Chocolate Lava Cake Irresistible Dessert Recipe

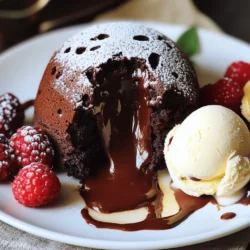
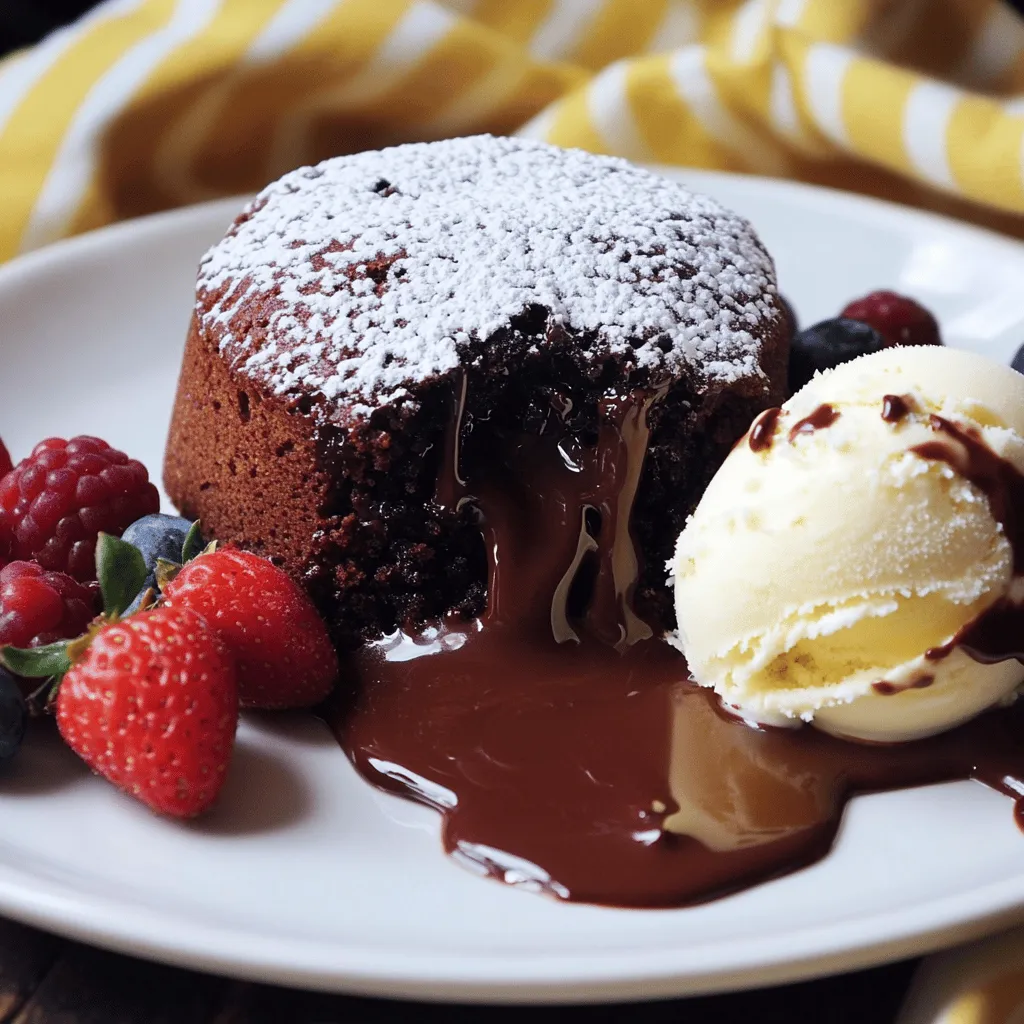
If you’re ready to impress your family and friends, this Chocolate Lava Cake recipe delivers. Imagine a warm, gooey center that flows like molten chocolate when you cut into it. With just a few simple ingredients and easy steps, you can create this irresistible dessert at home. Whether it’s a special occasion or a cozy night in, this treat is sure to satisfy your sweet tooth. Let’s get baking!

Ingredients

List of Ingredients

– 1/2 cup unsalted butter

– 1 cup semi-sweet chocolate chips

– 2 large eggs

– 2 large egg yolks

– 1/4 cup granulated sugar

– 2 tablespoons all-purpose flour

– 1 teaspoon vanilla extract

– Pinch of salt

– Powdered sugar (for dusting)

– Vanilla ice cream (for serving)

These ingredients create a rich and gooey dessert. The unsalted butter and chocolate chips are key to that melty center. The eggs and yolks help the cakes rise while keeping them soft. Granulated sugar adds sweetness, and a little flour gives the cake structure.

The vanilla extract adds flavor and warmth. A pinch of salt balances the sweetness. Dust the finished cakes with powdered sugar for a nice touch. Serve with vanilla ice cream to cool the warm cake.

Using high-quality chocolate chips makes a big difference in taste. Always use fresh eggs for the best texture. This recipe is simple yet rewarding. You can find the complete recipe above. Enjoy this dessert with friends and family!

Step-by-Step Instructions

Preparation Steps

1. Preheat the oven to 425°F (220°C).

2. Grease four ramekins with butter.

3. Place the ramekins on a baking sheet.

4. In a microwave-safe bowl, combine 1/2 cup unsalted butter and 1 cup semi-sweet chocolate chips.

5. Microwave in 30-second bursts, stirring in between.

6. Stir until the mixture is smooth and melted.

7. In a separate bowl, whisk together 2 large eggs, 2 large egg yolks, and 1/4 cup granulated sugar.

8. Whisk until the mix is pale and thick, about 2-3 minutes.

Baking Steps

1. Stir the melted chocolate mixture into the egg mixture.

2. Mix until both are fully combined.

3. Gently fold in 2 tablespoons of all-purpose flour, 1 teaspoon vanilla extract, and a pinch of salt.

4. Be careful not to over-mix the batter.

5. Evenly divide the batter among the prepared ramekins, filling each about 3/4 full.

6. Bake in the preheated oven for 12-14 minutes.

7. The edges should look firm, but the centers will jiggle slightly.

Serving Steps

1. Once baked, remove the ramekins from the oven.

2. Let them cool for 1 minute.

3. Carefully invert each ramekin onto a plate.

4. Dust the tops with powdered sugar.

5. Serve immediately with a scoop of vanilla ice cream on the side.

6. For that perfect molten experience, enjoy while it’s warm.

For a complete guide, refer to the Full Recipe.

Tips & Tricks

Baking Tips

How to know when the lava cake is done?

The perfect lava cake should have firm edges and a soft center. Bake your cakes for 12 to 14 minutes. The tops should look set, but the middle will still jiggle slightly. If you see cracks, don’t worry! They add to the charm of the dessert.

Tips for greasing ramekins effectively:

Greasing ramekins well is key to easy serving. Use soft, unsalted butter to coat the inside of each ramekin. Make sure to cover every bit of the sides and bottom. This helps the cake slide out smoothly after baking.

Avoiding common baking mistakes:

Overmixing your batter can lead to dense cakes. Mix just until combined. Also, remember to preheat your oven fully before baking. If the oven is not hot enough, the cakes won’t rise properly. Lastly, don’t open the oven door too soon; this can cause them to collapse.

Serving Tips

Suggestions for garnishing:

Garnishing can elevate your dessert. Try dusting with powdered sugar for a snowy look. Add fresh berries or mint leaves for color and freshness. A drizzle of chocolate sauce around the plate makes it feel extra special.

Ideal serving temperature for the best experience:

Serve the lava cake warm, right after baking. The center should be gooey and molten. If it cools too much, the lava effect won’t be as impressive. Pair it with a scoop of cold vanilla ice cream for a delightful contrast. Enjoy the warmth and richness together!

Variations

Flavor Variations

You can make your chocolate lava cake even more exciting with flavor twists. Adding espresso or coffee gives a rich, deep taste. Just mix in one tablespoon of brewed espresso into the melted chocolate. It enhances the chocolate’s flavor without overpowering it.

You can also try different types of chocolate. Dark chocolate creates a more intense taste. White chocolate, on the other hand, offers a creamy sweetness. Feel free to mix and match. Each choice will change the cake’s flavor, giving you endless options.

Dietary Modifications

If you need gluten-free options, swap regular flour for almond flour or gluten-free flour. This change keeps the cake soft and delicious. Just be sure to check your flour mix for results that match your taste.

For vegan adaptations, replace the eggs with flaxseed meal. Mix one tablespoon of flaxseed with two tablespoons of water. Let it sit for a few minutes until it becomes gel-like. Use dairy-free butter and vegan chocolate chips. This way, you can enjoy a rich lava cake without animal products.

Explore these variations and find your favorite twist on this classic dessert! For the complete recipe, check the Full Recipe section.

Storage Info

Storing Leftovers

To keep your chocolate lava cake fresh, store it in the fridge. Place the cooled cakes in an airtight container. This keeps them moist and tasty. You can enjoy them for up to three days. When you want to eat a piece, reheat it in the microwave. Heat it for about 20 seconds. This helps bring back the gooey center. If it needs more time, check every 10 seconds to avoid overcooking.

Freezing Tips

Yes, you can freeze chocolate lava cakes! Wrap each cooled cake tightly in plastic wrap. Then, place them in a freezer bag. This keeps them safe for up to three months. When you want to eat one, take it out and thaw in the fridge overnight. For the best texture, reheat it in the oven at 350°F (175°C) for about 10-15 minutes. This way, you’ll enjoy that perfect lava effect again!

FAQs

Common Questions

What causes the lava effect in chocolate lava cake?

The lava effect comes from the batter. When it bakes, the outer layer cooks fast. The inside stays soft and gooey. This difference in cooking creates that delicious molten center we love.

Can I make chocolate lava cake ahead of time?

Yes, you can prepare the batter in advance. Just fill the ramekins and cover them. Keep them in the fridge for up to 24 hours. When you’re ready to bake, just add a few extra minutes to the baking time.

How do I prevent lava cakes from overcooking?

To avoid overcooking, watch the timer closely. Bake them for 12-14 minutes. The edges should be set, but the center should jiggle slightly. If you bake them too long, they won’t have that gooey center.

This recipe for chocolate lava cake covers everything from ingredients to serving tips. You now know how to bake these rich cakes, how to avoid common mistakes, and even how to adapt them to fit diets. Don’t forget to experiment with flavors and variations. Whether serving fresh or reheated, these cakes deliver a delightful treat. Enjoy making and sharing this indulgent dessert that never fails to impress!

- 1/2 cup unsalted butter - 1 cup semi-sweet chocolate chips - 2 large eggs - 2 large egg yolks - 1/4 cup granulated sugar - 2 tablespoons all-purpose flour - 1 teaspoon vanilla extract - Pinch of salt - Powdered sugar (for dusting) - Vanilla ice cream (for serving) These ingredients create a rich and gooey dessert. The unsalted butter and chocolate chips are key to that melty center. The eggs and yolks help the cakes rise while keeping them soft. Granulated sugar adds sweetness, and a little flour gives the cake structure. The vanilla extract adds flavor and warmth. A pinch of salt balances the sweetness. Dust the finished cakes with powdered sugar for a nice touch. Serve with vanilla ice cream to cool the warm cake. Using high-quality chocolate chips makes a big difference in taste. Always use fresh eggs for the best texture. This recipe is simple yet rewarding. You can find the complete recipe above. Enjoy this dessert with friends and family! 1. Preheat the oven to 425°F (220°C). 2. Grease four ramekins with butter. 3. Place the ramekins on a baking sheet. 4. In a microwave-safe bowl, combine 1/2 cup unsalted butter and 1 cup semi-sweet chocolate chips. 5. Microwave in 30-second bursts, stirring in between. 6. Stir until the mixture is smooth and melted. 7. In a separate bowl, whisk together 2 large eggs, 2 large egg yolks, and 1/4 cup granulated sugar. 8. Whisk until the mix is pale and thick, about 2-3 minutes. 1. Stir the melted chocolate mixture into the egg mixture. 2. Mix until both are fully combined. 3. Gently fold in 2 tablespoons of all-purpose flour, 1 teaspoon vanilla extract, and a pinch of salt. 4. Be careful not to over-mix the batter. 5. Evenly divide the batter among the prepared ramekins, filling each about 3/4 full. 6. Bake in the preheated oven for 12-14 minutes. 7. The edges should look firm, but the centers will jiggle slightly. 1. Once baked, remove the ramekins from the oven. 2. Let them cool for 1 minute. 3. Carefully invert each ramekin onto a plate. 4. Dust the tops with powdered sugar. 5. Serve immediately with a scoop of vanilla ice cream on the side. 6. For that perfect molten experience, enjoy while it's warm. For a complete guide, refer to the Full Recipe. How to know when the lava cake is done? The perfect lava cake should have firm edges and a soft center. Bake your cakes for 12 to 14 minutes. The tops should look set, but the middle will still jiggle slightly. If you see cracks, don’t worry! They add to the charm of the dessert. Tips for greasing ramekins effectively: Greasing ramekins well is key to easy serving. Use soft, unsalted butter to coat the inside of each ramekin. Make sure to cover every bit of the sides and bottom. This helps the cake slide out smoothly after baking. Avoiding common baking mistakes: Overmixing your batter can lead to dense cakes. Mix just until combined. Also, remember to preheat your oven fully before baking. If the oven is not hot enough, the cakes won't rise properly. Lastly, don’t open the oven door too soon; this can cause them to collapse. Suggestions for garnishing: Garnishing can elevate your dessert. Try dusting with powdered sugar for a snowy look. Add fresh berries or mint leaves for color and freshness. A drizzle of chocolate sauce around the plate makes it feel extra special. Ideal serving temperature for the best experience: Serve the lava cake warm, right after baking. The center should be gooey and molten. If it cools too much, the lava effect won’t be as impressive. Pair it with a scoop of cold vanilla ice cream for a delightful contrast. Enjoy the warmth and richness together! {{image_2}} You can make your chocolate lava cake even more exciting with flavor twists. Adding espresso or coffee gives a rich, deep taste. Just mix in one tablespoon of brewed espresso into the melted chocolate. It enhances the chocolate's flavor without overpowering it. You can also try different types of chocolate. Dark chocolate creates a more intense taste. White chocolate, on the other hand, offers a creamy sweetness. Feel free to mix and match. Each choice will change the cake’s flavor, giving you endless options. If you need gluten-free options, swap regular flour for almond flour or gluten-free flour. This change keeps the cake soft and delicious. Just be sure to check your flour mix for results that match your taste. For vegan adaptations, replace the eggs with flaxseed meal. Mix one tablespoon of flaxseed with two tablespoons of water. Let it sit for a few minutes until it becomes gel-like. Use dairy-free butter and vegan chocolate chips. This way, you can enjoy a rich lava cake without animal products. Explore these variations and find your favorite twist on this classic dessert! For the complete recipe, check the Full Recipe section. To keep your chocolate lava cake fresh, store it in the fridge. Place the cooled cakes in an airtight container. This keeps them moist and tasty. You can enjoy them for up to three days. When you want to eat a piece, reheat it in the microwave. Heat it for about 20 seconds. This helps bring back the gooey center. If it needs more time, check every 10 seconds to avoid overcooking. Yes, you can freeze chocolate lava cakes! Wrap each cooled cake tightly in plastic wrap. Then, place them in a freezer bag. This keeps them safe for up to three months. When you want to eat one, take it out and thaw in the fridge overnight. For the best texture, reheat it in the oven at 350°F (175°C) for about 10-15 minutes. This way, you’ll enjoy that perfect lava effect again! What causes the lava effect in chocolate lava cake? The lava effect comes from the batter. When it bakes, the outer layer cooks fast. The inside stays soft and gooey. This difference in cooking creates that delicious molten center we love. Can I make chocolate lava cake ahead of time? Yes, you can prepare the batter in advance. Just fill the ramekins and cover them. Keep them in the fridge for up to 24 hours. When you’re ready to bake, just add a few extra minutes to the baking time. How do I prevent lava cakes from overcooking? To avoid overcooking, watch the timer closely. Bake them for 12-14 minutes. The edges should be set, but the center should jiggle slightly. If you bake them too long, they won't have that gooey center. This recipe for chocolate lava cake covers everything from ingredients to serving tips. You now know how to bake these rich cakes, how to avoid common mistakes, and even how to adapt them to fit diets. Don’t forget to experiment with flavors and variations. Whether serving fresh or reheated, these cakes deliver a delightful treat. Enjoy making and sharing this indulgent dessert that never fails to impress!

Chocolate Lava Cake

Indulge in the ultimate Chocolate Lava Cake with this easy recipe that guarantees a warm, gooey center that flows with chocolate bliss. Perfect for impressing guests or treating yourself, you only need simple ingredients and a few easy steps to create this irresistible dessert. Serve it warm with a dusting of powdered sugar and a scoop of vanilla ice cream for a delightful experience. Click through to discover the full recipe and start baking your sweet creation today!

Ingredients
  

1/2 cup unsalted butter (plus extra for greasing)

1 cup semi-sweet chocolate chips

2 large eggs

2 large egg yolks

1/4 cup granulated sugar

2 tablespoons all-purpose flour

1 teaspoon vanilla extract

Pinch of salt

Powdered sugar (for dusting)

Vanilla ice cream (for serving)

Instructions
 

Preheat your oven to 425°F (220°C). Grease four ramekins generously with butter and place them on a baking sheet for easy handling.

    In a microwave-safe bowl, combine the butter and semi-sweet chocolate chips. Microwave in 30-second intervals, stirring in between, until the mixture is completely melted and smooth.

      In another mixing bowl, whisk together the eggs, egg yolks, and granulated sugar until the mixture is pale and thickened, about 2-3 minutes.

        Stir the melted chocolate mixture into the egg mixture until fully combined.

          Gently fold in the flour, vanilla extract, and a pinch of salt until just combined, being careful not to over-mix.

            Divide the batter evenly among the prepared ramekins, filling each about 3/4 full.

              Bake in the preheated oven for 12-14 minutes. The edges should be firm, but the centers will be soft and slightly jiggly.

                Remove from the oven and let the cakes cool for 1 minute before carefully inverting each ramekin onto individual plates.

                  Dust the cakes with powdered sugar and serve immediately with a scoop of vanilla ice cream on the side for that perfect, molten experience.

                    Prep Time, Total Time, Servings: 15 mins | 20 mins | 4 servings

                      - Presentation Tips: For an elegant touch, garnish with fresh berries or mint leaves next to the lava cake and drizzle a little chocolate sauce around the plate. Enjoy!

                        Leave a Comment

                        Recipe Rating