
Craving something sweet and indulgent? Look no further than chocolate lava cake! This irresistible dessert delight features a warm, gooey center that oozes pure chocolate magic with every bite. I’ll walk you through the ingredients, steps, and tips to create this decadent treat that will impress anyone. Ready to dive into this chocolatey adventure? Let’s make your dessert dreams come true!
Ingredients
To make a perfect chocolate lava cake, you need simple ingredients. Here’s what you will need:
- 1/2 cup unsalted butter
- 1 cup dark chocolate chips (70% cocoa)
- 1 cup powdered sugar
- 2 large eggs
- 2 large egg yolks
- 1 teaspoon vanilla extract
- 1/2 cup all-purpose flour
- 1/4 teaspoon salt
- 1/2 teaspoon espresso powder (optional)
- Butter and cocoa powder for greasing ramekins
- Vanilla ice cream or whipped cream for serving
These ingredients create a delightful cake that has a rich, gooey center. The dark chocolate chips bring deep flavor, while the butter adds richness. The eggs and yolks make it light and fluffy. The espresso powder is optional but enhances the chocolate taste.Enjoy your baking!
Step-by-Step Instructions
Preparation Overview
First, preheat your oven to 425°F (220°C). This step is key for perfect baking. Grease four 6-ounce ramekins with butter. Then, dust them with cocoa powder to help release the cakes later. Next, in a medium microwave-safe bowl, melt 1/2 cup unsalted butter and 1 cup dark chocolate chips together. Use 30-second bursts in the microwave, stirring after each until smooth. Let this mixture cool slightly.
Detailed Instructions
In a new bowl, whisk together 1 cup powdered sugar, 2 large eggs, 2 large egg yolks, and 1 teaspoon vanilla extract. Mix until it looks well blended and frothy. Now, combine the melted chocolate mixture with the egg mixture. Stir gently until you blend them well. Sift in 1/2 cup all-purpose flour, 1/4 teaspoon salt, and 1/2 teaspoon espresso powder (if using). Fold these dry ingredients in gently—don’t overmix!
Pour the batter into your prepared ramekins, filling them about 3/4 full. Place these ramekins on a baking sheet for easy handling. Bake them in your preheated oven for 12-14 minutes. The edges should be firm, while the center stays soft and gooey.
Finishing Touches
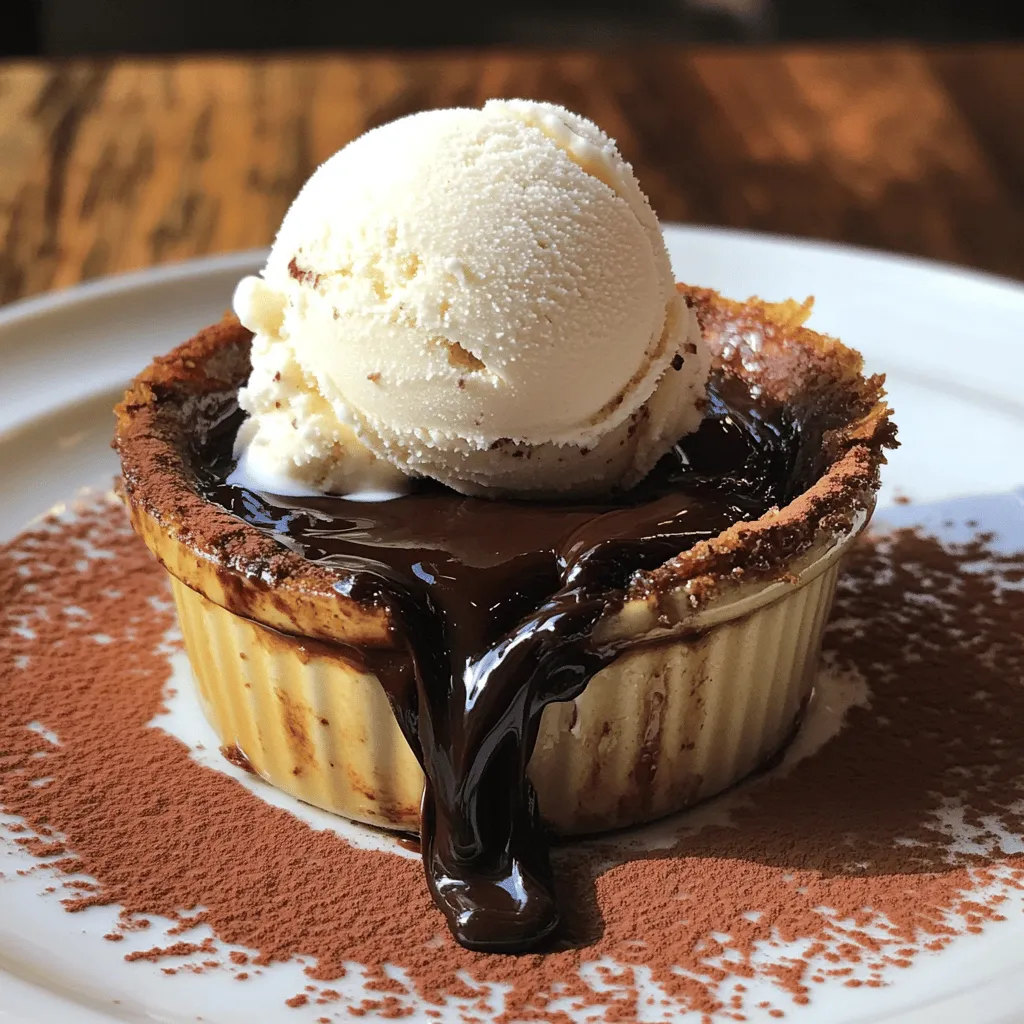
After baking, take them out and let them cool for 1 minute. Use a knife to run around the edges to loosen the cakes. Now, invert each ramekin onto a plate. Lift them gently to release the lava cake. Serve the cakes hot, topped with a scoop of vanilla ice cream or a dollop of whipped cream. This adds a nice balance to the rich chocolate flavor.
Tips & Tricks
Achieving the Perfect Lava Center
To get that gooey center, timing is key. Bake your cakes for 12 to 14 minutes. Keep an eye on them. The edges should be firm, while the middle stays soft. This is the sweet spot for lava flow.
Let the cakes cool for one minute after baking. This step keeps them from falling apart. Run a knife around the edge to help them release easily.
Common Troubleshooting
If your cakes turn out overcooked, don’t worry. You can still enjoy them. They will not have the classic lava center, but they will still taste great. Serve them warm with ice cream. It makes them better!
If your cakes stick to the ramekins, try these tips. Use butter and cocoa powder to grease them well before pouring in the batter. If they still stick, run a knife around the edges again.
Helpful Tools
For this recipe, I recommend 6-ounce ramekins. They are the right size for perfect lava cakes. Use a baking sheet to catch any drips while they bake.
Consider handy kitchen gadgets too. A silicone spatula can help mix your ingredients smoothly. A microwave-safe bowl makes melting chocolate easy.Enjoy making your chocolate lava cake!
Variations
Flavor Combinations
You can easily play with flavors in chocolate lava cake. Adding flavored extracts can make a big difference. Try a splash of orange extract for a citrus twist. Mint extract adds a fresh, cool taste. You can also switch up the chocolate. Use milk chocolate for a sweeter cake. White chocolate gives a creamy taste that pairs well with berries.
Dietary Adjustments
Want a gluten-free option? You can use almond flour instead of regular flour. This keeps the cake soft and delicious. For a vegan version, swap eggs with flaxseed meal or applesauce. These substitutes work well, making the cake just as tasty.
Presentation Ideas
How you serve your lava cake can impress your guests. Use different vessels like small mason jars or mini cast iron pans. This adds a fun touch. Toppings can elevate the dish too. Fresh berries add color and tartness. Chopped nuts provide crunch and flavor. For the ultimate treat, don’t forget a scoop of vanilla ice cream on top. It balances the rich chocolate perfectly.
Storage Info
Storing Unbaked Batter
You can store the unbaked batter in the fridge. Make sure to cover the bowl tightly with plastic wrap. The batter stays fresh for up to 24 hours. Just remember to let it sit at room temperature for about 30 minutes before baking. This helps the batter regain its texture.
Storing Baked Lava Cakes
If you have leftovers, store them in an airtight container. They keep well in the fridge for about 2 days. To reheat, place the cakes in the microwave for 15-20 seconds. Check every few seconds to avoid overcooking. This way, you maintain that gooey center.
Freezing Options
Yes, you can freeze cooked lava cakes! Wrap them well in plastic wrap, then place in a freezer bag. They stay good for up to 3 months. To thaw, move them to the fridge overnight. Reheat in the microwave as mentioned before for the best texture.
FAQs
What is a chocolate lava cake?
A chocolate lava cake is a warm dessert that has a gooey, melted chocolate center. It is also known as molten chocolate cake. The outside is baked until firm while the inside stays soft and liquid. When you cut into it, rich chocolate flows out, creating a delicious surprise. This cake is often served with ice cream or whipped cream for extra delight.
How do I know when my lava cake is done?
To check if your lava cake is done, look at the edges. They should be firm, but the center still needs to jiggle slightly. You can also insert a toothpick into the edge. If it comes out clean, the edges are done, but the center should still feel soft. Remember, the key is to avoid overbaking.
Can I make lava cakes ahead of time?
Yes, you can prepare lava cakes ahead of time. You can make the batter and pour it into ramekins. Cover them and store them in the fridge for up to 24 hours. When you are ready to bake, just take them out and bake them straight from the fridge. This makes it easy to serve a warm dessert anytime.
You now know how to make a rich chocolate lava cake. I covered the key ingredients and provided steps for preparation, baking, and serving. With the tips I shared, you can avoid common mistakes and achieve that perfect gooey center. Remember, variations can add fun twists to your recipe. Store your creations properly to enjoy them later. Baking should be enjoyable. With practice, you’ll impress everyone with this tasty dessert. Go ahead and create your sweet masterpiece!
- Chocolate Lava Cake
