Skip to content
DisclaimerTerms Of UseGDPR PolicyCookie Policy

Cooking Wells

  • Home
  • Drinks
  • Appetizers
  • Dinner
  • Dessert
  • About
  • Contact
  • Privacy Policy
DisclaimerTerms Of UseGDPR PolicyCookie Policy

Mia

To make a great minestrone soup, you need simple, fresh ingredients. Here’s what you will use: - 1 tablespoon olive oil - 1 onion, diced - 2 garlic cloves, minced - 2 carrots, diced - 2 celery stalks, diced - 1 zucchini, diced - 1 cup green beans, trimmed and cut into 1-inch pieces - 1 can (14 oz) diced tomatoes (with juice) - 4 cups vegetable broth - 1 can (15 oz) cannellini beans, drained and rinsed - 1 cup small pasta (such as ditalini or elbow pasta) - 1 teaspoon dried oregano - 1 teaspoon dried basil - Salt and pepper to taste - Fresh parsley, chopped (for garnish) Using fresh ingredients can elevate your soup's taste. Fresh veggies offer bright flavors and a good crunch. Canned ingredients save time and are convenient. For example, canned tomatoes bring rich flavor without the hassle. My tip is to use a mix. Fresh carrots and zucchini pair well with canned tomatoes and beans. When shopping for produce, look for vibrant colors and firm textures. Here are some tips: - Choose onions that feel heavy for their size. - Select carrots that are smooth and not soft. - Zucchini should be firm and shiny. - Green beans need to snap when bent. Buying seasonal produce often gives you the best flavor. This makes your minestrone soup even more delicious. For the full recipe, you can check the earlier sections for details. To start, gather all your ingredients. This step makes cooking easier. Chop the onion, garlic, carrots, celery, zucchini, and green beans. You want them all diced and ready to go. Heat one tablespoon of olive oil in a large pot over medium heat. Add the diced onion. Sauté for about 3-4 minutes until it turns soft and clear. Next, stir in the minced garlic, diced carrots, and celery. Cook them together for about 5 minutes. This helps the flavors blend well. Now, add the diced zucchini and green beans into the pot. Cook for another 3-4 minutes. Then, pour in one can of diced tomatoes, juice included, and four cups of vegetable broth. Stir everything together. Add the drained and rinsed cannellini beans, one teaspoon of dried oregano, and one teaspoon of dried basil. Sprinkle salt and pepper to taste. Bring your soup to a boil. Once it boils, lower the heat to a simmer. Now, add one cup of small pasta, like ditalini or elbow pasta. Cook for about 10-12 minutes. You want the pasta to be tender but not mushy. After cooking, taste your soup. Adjust the seasoning if needed. Remove the pot from heat. Spoon the soup into bowls. Finally, sprinkle some fresh parsley on top for a lovely touch. For the full recipe, check out the complete instructions. Enjoy your hearty bowl of minestrone soup! When making minestrone soup, avoid overcooking your veggies. You want them tender, not mushy. Use fresh ingredients for the best flavor. If you use canned beans, rinse them well to reduce sodium. Don't skip tasting the soup while cooking; this helps you adjust flavors early. Start with salt and pepper. Add them early for the best results. Use dried herbs like oregano and basil. Add them during cooking to release their flavors. Fresh herbs, like parsley, are great for garnishing. They add a pop of color and taste. Adjust your seasoning near the end. This way, you can control the flavor. A large pot is key for making minestrone soup. Choose one with a thick bottom to heat evenly. Use a good knife for chopping vegetables; it makes prep easier. A wooden spoon helps to stir without scratching your pot. A ladle is perfect for serving. Lastly, have measuring cups handy for accuracy. For the full recipe, refer to the section above. {{image_2}} You can easily make minestrone soup vegetarian or vegan. Start with the base recipe. Use vegetable broth instead of chicken broth. Swap out any cheese or meat for plant-based options. For a richer flavor, add more beans or lentils. You can toss in leafy greens like spinach or kale for extra nutrition. This keeps the soup vibrant and healthy. If you want a gluten-free version, it's simple. Look for gluten-free pasta made from rice or quinoa. You can use spiralized veggies like zucchini as a pasta substitute. Just cook them lightly before adding to the soup. This keeps the flavors fresh and the dish light. Make sure to check the labels on the broth and beans too, to ensure they are gluten-free. To make your minestrone soup heartier, add proteins. You can use diced chicken, turkey, or sausage. For a plant-based option, add chickpeas or lentils. These options boost both flavor and nutrition. Just add the proteins early on, so they cook through. Adjust the cooking time as needed. This way, you'll have a filling meal that's still packed with flavor. After enjoying your meal, let the soup cool first. Store it in an airtight container. This helps keep the soup fresh. You can keep it in the fridge for up to three days. If you want it to last longer, consider freezing it. Make sure to leave some space in the container for expansion. To freeze minestrone soup, pour it into freezer-safe containers. Label each container with the date. This way, you remember when you made it. The soup can be frozen for up to three months. When you’re ready to eat it, thaw it in the fridge overnight. Reheat it on the stove over low heat. Stir it often to avoid burning. Homemade minestrone soup lasts for about three days in the fridge. If frozen, it lasts up to three months. Be sure to check for any signs of spoilage before eating. Look for changes in color or smell. Enjoy your soup safely! For the full recipe, click here: [Full Recipe]. Minestrone soup comes from Italy. It has roots in rustic Italian cooking. People made it to use up leftover vegetables. Each region in Italy has its own twist. You may find different beans, pasta, or greens. This soup is not just one recipe but many. It reflects the seasons and what is fresh. Yes, you can make minestrone soup in a slow cooker. Just add all the ingredients to the pot. Set it on low for 6-8 hours. If you need it faster, set it on high for 3-4 hours. The soup will still taste great! Just add the pasta in the last 30 minutes. This keeps it from getting too soft. Minestrone soup lasts about 3-5 days in the fridge. Make sure to store it in an airtight container. If you want to keep it longer, freeze it. You can freeze it for up to 3 months. Just remember to let it cool before freezing. For the best flavor, eat it fresh! You can find the full recipe for a hearty vegetable minestrone soup above. Classic minestrone soup combines fresh ingredients and rich flavors. You learned how to prepare it step by step. We covered tips to avoid common mistakes and how to season it well. You can also explore tasty variations, whether vegetarian or gluten-free. Finally, we discussed great ways to store and reheat leftovers. Now, you have all the tools to make a delicious minestrone soup. Enjoy your cooking!

Classic Minestrone Soup Flavorful and Hearty Recipe

If you crave a warm, filling meal that bursts with flavor, Classic Minestrone Soup is for you! This hearty recipe

- 2 cups cooked chicken breast, shredded - 1/2 cup ranch dressing - 1 cup shredded lettuce - 1 cup diced tomatoes - 1/2 cup shredded cheese (cheddar or your choice) - 4 large tortillas (flour or whole grain) - 1/4 cup chopped green onions - Salt and pepper to taste To make Easy Chicken Ranch Wraps, you need simple and fresh ingredients. Start with cooked chicken breast. You can use leftovers or rotisserie chicken. Shred the chicken into small pieces. Next, grab some ranch dressing. This adds a rich and creamy flavor. You will also need some crunchy lettuce. Shredded lettuce adds a nice texture. Diced tomatoes give a juicy burst. Choose your favorite cheese, like cheddar. Cheese makes everything better! Tortillas are the base of your wrap. You can use flour or whole grain. Both work well. Green onions add a slight bite. Finally, don’t forget salt and pepper. They help to enhance all the flavors. - Each wrap contains around 400 calories. - Expect about 25 grams of protein. - Fats can be around 20 grams. - Carbohydrates are about 35 grams. Allergens may include dairy and gluten. If you are allergic, check labels on ranch dressing and tortillas. - Step 1: Prepare chicken and ranch mixture First, take your cooked chicken breast and shred it into small pieces. Place the shredded chicken in a mixing bowl. Then add the ranch dressing. Mix it well until each piece of chicken is coated. This step makes the chicken super tasty. - Step 2: Assemble the wraps Next, lay out your large tortillas on a clean flat surface. Spread the chicken mixture evenly on each tortilla. Leave about one inch of space from the edges. Now, top each wrap with shredded lettuce, diced tomatoes, shredded cheese, and chopped green onions. Add salt and pepper to taste for extra flavor. - Step 3: Rolling the wraps Now it’s time to roll! Start at one edge of the tortilla and tightly roll it up. As you roll, fold in the sides to keep the filling inside. This will help keep everything secure and neat. - Step 4: Optional grilling for crunch If you want your wraps crispy, heat a skillet over medium heat. Place the wraps in the skillet and grill for about 2-3 minutes on each side. Look for a golden brown color. This step adds a nice crunch to the wraps. Enjoy your Easy Chicken Ranch Wraps! For the full recipe, check out the details above. To make your chicken ranch wraps even better, follow these tips. First, ensure even distribution of filling. This means spreading the chicken mixture across the tortilla. Leave about an inch from the edges. This helps each bite taste great. Next, avoid soggy tortillas. To do this, don’t overfill your wraps. Use a light hand with ranch dressing. You can also use thicker tortillas. Flour tortillas work well, but whole grain offers a nice taste too. Also, consider grilling the wraps. This gives them a nice crunch and keeps the fillings in place. Pair your chicken ranch wraps with sides like chips or a fresh salad. The crunch from chips adds a fun texture. A simple green salad brightens the meal. You can also serve with extra ranch dressing for dipping. For a great presentation, lay the wraps on a large platter. Add a sprinkle of chopped green onions on top. This adds color and freshness. You can even place small bowls of ranch dressing on the side. This invites guests to dip as they please. {{image_2}} You can change the ranch dressing if you want a new taste. Try using Greek yogurt mixed with herbs for a creamy base. This gives a tangy flavor while cutting some calories. You can also use hummus for a fresh twist, adding a nice layer of taste. For protein, the options are endless. If you prefer turkey, it works great. You can use shredded beef for a heartier wrap. For a vegetarian option, swap the chicken for black beans or grilled veggies. Each option adds a unique flavor and texture. Adding spices can really boost your wraps. A sprinkle of garlic powder or paprika brings warmth. For fresh notes, try adding herbs like cilantro or parsley. They brighten up the dish and add color. You can also toss in extra vegetables. Feel free to add bell peppers, cucumbers, or spinach. These not only add crunch but also increase the nutrition of your wraps. The more colors on your plate, the better it looks and tastes. To keep your chicken ranch wraps fresh, use airtight containers. Glass or plastic containers work great. Make sure the wraps cool down first before sealing. Store them in the fridge for up to three days. If you want to keep them longer, consider freezing. To freeze your wraps, wrap each one in plastic wrap. Then place them in a freezer bag. This helps prevent freezer burn. You can freeze them for up to three months. When you want to eat them, take a wrap out and let it thaw in the fridge overnight. You can also reheat it straight from the freezer. Wrap it in a damp paper towel and microwave for one to two minutes. Enjoy your meal without losing any flavor! Easy Chicken Ranch Wraps stay fresh for about 3 to 4 days in the fridge. Store them in an airtight container to keep them moist. If the wraps sit too long, the tortillas may get soggy. Yes, you can make these wraps ahead of time! Just prepare the chicken mixture and fill the tortillas. Wrap them tightly in plastic wrap or foil. Keep them in the fridge until you are ready to eat. If you need a tortilla alternative, try lettuce leaves. They are a great low-carb option. You can also use pita bread or flatbreads for a different taste and texture. Ranch dressing adds flavor and creaminess. You can swap it for Greek yogurt or another dressing you like. Just make sure it complements the other ingredients. To make these wraps healthier, use whole grain tortillas. Add more veggies like cucumbers or bell peppers. You can also use lean chicken or turkey. This way, you boost the nutrients while keeping the taste. These Easy Chicken Ranch Wraps combine simple ingredients for a tasty meal. We covered everything from the ingredients list to cooking tips. You learned how to store leftovers and make healthy swaps too. Enjoy these wraps as a quick lunch or dinner. With so many options for variations, you can keep things fresh. Don’t hesitate to get creative and make them your own. Happy cooking!

Easy Chicken Ranch Wraps Quick and Tasty Meal Idea

Want a quick and tasty meal that everyone will love? Let’s dive into Easy Chicken Ranch Wraps! With just a

To make simple cheesy grits, gather these ingredients: - 1 cup stone-ground grits - 4 cups chicken or vegetable broth - 1 cup shredded sharp cheddar cheese - 1/2 cup heavy cream - 2 tablespoons unsalted butter These ingredients are key to a creamy and rich dish. Stone-ground grits provide texture and flavor. The broth adds depth, while both heavy cream and butter enhance creaminess. The sharp cheddar cheese gives that melty, cheesy goodness we love. For seasoning and garnish, you will need: - 1/2 teaspoon garlic powder - Salt and pepper to taste - 2 tablespoons chopped fresh chives Garlic powder boosts flavor without overpowering. Salt and pepper are essential for balance. Chives add a fresh touch and a pop of color to your dish. You might want to try these optional ingredients: - Additional cheese varieties - Spices for flavor enhancement Experimenting with different cheeses can bring new flavors. Consider adding spices like paprika or cayenne for a kick. Each variation can make your grits unique and exciting. For the full recipe, check out the details above. To start, bring your broth to a boil in a medium saucepan. You can use either chicken or vegetable broth. Chicken broth adds a rich taste, while vegetable broth offers a lighter flavor. I prefer chicken for its depth, but both work well. Once your broth boils, slowly whisk in the stone-ground grits. This helps prevent lumps. Reduce the heat to low and keep stirring. Cook the grits for about 20 to 25 minutes. Stir occasionally to ensure even cooking. You want them thick and creamy, so don’t rush this step. Now it’s time to make your grits truly delicious. Stir in the heavy cream and butter. This adds a lovely richness. Next, mix in half of the sharp cheddar cheese. Keep stirring until everything melts together. Season with salt and pepper to taste. If the grits are too thick, add a splash of broth or cream. Serve them in bowls, topped with more cheese and a sprinkle of fresh chives. For the full recipe, check the earlier section. To get the right thickness, you can adjust your grits with broth or cream. If your grits seem too thick, add a splash of broth or cream. Stir well to mix it in. This will help you reach a creamy texture. To avoid lumps while cooking, whisk the grits slowly as you pour them into the boiling broth. This will keep them smooth and creamy. Using the right cheese can boost the flavor of your grits. Sharp cheddar is a great choice for its bold taste. You can also try gouda or pepper jack for something different. Mixing different cheeses adds depth to your dish. A blend of cheddar and mozzarella can create a nice stretch and creaminess. Adding toppings can enhance the flavor of your cheesy grits. Consider crispy bacon or sautéed mushrooms for a savory touch. Fresh herbs like parsley or basil can add brightness. For a full meal, pair your grits with grilled chicken or vegetables. This makes for a hearty and delicious plate. For the full recipe, check out the complete guide on creamy cheesy grits delight! {{image_2}} You can change up your cheesy grits in fun ways. For a spicy kick, add chopped jalapeños. They bring heat and a nice crunch. If you want something fresh, try adding herbs like thyme or parsley. These herbs brighten up the dish and add a nice flavor. Need to make it gluten-free? Just check that your grits are labeled gluten-free. Most stone-ground grits are safe. For vegan options, swap the heavy cream and butter for plant-based versions. Use coconut cream and vegan butter for a rich taste. Want to make your grits in a slow cooker? Simply combine the grits and broth in the pot. Cook them on low for about 4 hours. This method gives the grits a nice creamy texture. If you’re short on time, use an Instant Pot. Cook them under pressure for about 10 minutes for quick and easy grits. For the full recipe, check out the [Full Recipe]. To store leftover grits, let them cool down first. Place them in an airtight container. This keeps out moisture and air. Store them in the fridge for up to three days. If you keep them longer, they may lose flavor and texture. If you want to keep cheesy grits longer, freezing is a great option. First, cool the grits completely. Spoon them into freezer-safe bags or containers. Make sure to remove any excess air. Label them with the date. You can freeze them for up to three months. To reheat frozen grits, move them to the fridge a day before. This helps them thaw slowly. If you’re in a rush, use the microwave on low power. Stir them often to ensure even heating. When reheating grits, you have a few good methods. The microwave is quick and easy. Heat them in short bursts, stirring in between. You can also reheat them on the stove. Add a little broth or cream to keep them creamy. Avoid the rubbery texture by stirring well. If they seem too thick, add more liquid. This keeps the grits smooth and delicious. Enjoy your creamy cheesy grits, even after storage! For the full recipe, check out the [Full Recipe]. For the best flavor and texture, I always choose stone-ground grits. They cook up creamy and have a great taste. Instant grits can work, but they lack the rich flavor of stone-ground. Always check the package to ensure freshness. Fresh grits yield the best results. Yes, you can make cheesy grits ahead of time. Just prepare them as directed and let them cool. Store them in an airtight container in the fridge for up to three days. When you’re ready to enjoy, reheat them slowly on the stove. Add a bit of broth or cream to bring back the creaminess. If your grits turn out too thick, don’t worry! Just add a little more broth or cream. Stir well to mix it in. If they feel gummy, ensure you whisk them well while cooking. This helps break up lumps. Cooking them on low heat also helps keep them smooth. Cheesy grits pair well with many dishes. Try serving them with shrimp for a classic combo. They also go great with fried chicken or sautéed greens. For a vegetarian option, serve them with roasted vegetables. You can even top them with a fried egg for a tasty brunch! Check out the Full Recipe for more ideas. Simple cheesy grits combine easy ingredients and clear steps to create a delicious dish. We covered key ingredients, cooking methods, and helpful tips to ensure great results. You can adapt the recipe for different diets and flavors too. In the end, you have the tools to make cheesy grits your own. Enjoy experimenting with variations and serving suggestions to delight your taste buds!

Simple Cheesy Grits Creamy Delight in No Time

Are you ready for a creamy, cheesy treat? Simple Cheesy Grits will become your go-to comfort food! This dish is

- 2 tablespoons olive oil - 1 medium onion, diced - 3 cloves garlic, minced - 2 carrots, sliced - 2 stalks celery, chopped - 1 zucchini, diced - 1 bell pepper (any color), diced - 1 cup green beans, trimmed and cut into 1-inch pieces - 1 can (14 oz) diced tomatoes (with juices) - 2 cups fresh spinach or kale, chopped - 6 cups vegetable broth - 1 teaspoon dried basil - 1 teaspoon dried thyme - Salt and pepper to taste - Juice of 1 lemon (optional) In this recipe for classic vegetable soup, I focus on fresh, simple ingredients. The olive oil gives a nice base. Diced onion and minced garlic bring great flavor. Sliced carrots and chopped celery add texture and sweetness. Next, I include diced zucchini and bell pepper. These vegetables add color and variety. Trimmed green beans and diced tomatoes bring a lovely depth. Finally, I add fresh spinach or kale for a healthy boost. For seasoning, I rely on vegetable broth, dried basil, and dried thyme. Salt and pepper are essential for taste. If you want extra brightness, a squeeze of lemon juice works wonders. This Full Recipe is perfect for anyone looking to create a hearty soup that warms the soul. 1. In a large pot, heat 2 tablespoons of olive oil over medium heat. 2. Add 1 medium diced onion and sauté for 4-5 minutes until soft. 3. Add 3 cloves of minced garlic and sauté for 1 minute until you smell it. 4. Now, stir in 2 sliced carrots and 2 chopped celery stalks. Cook these for 5 minutes. 1. Next, add 1 diced zucchini, 1 diced bell pepper, and 1 cup of trimmed green beans. Sauté for 3-4 minutes, stirring often. 2. Pour in 1 can of diced tomatoes with their juices and 6 cups of vegetable broth. 3. Add 1 teaspoon of dried basil, 1 teaspoon of dried thyme, and salt and pepper to taste. Bring this mix to a boil. 1. Once boiling, reduce the heat to a simmer. Cover the pot and cook for about 20-25 minutes until the vegetables are tender. 2. Stir in 2 cups of chopped fresh spinach or kale and cook for 3-5 minutes until wilted. 3. If you want, add juice from 1 lemon and adjust the seasoning with salt and pepper. You now have a warm and hearty soup ready to enjoy! For the full recipe, check the earlier section. To boost the taste of your vegetable soup, consider adding herbs and spices. Fresh herbs like parsley, dill, or cilantro can add a bright flavor. If you want a warm, earthy taste, try adding bay leaves or rosemary. When it comes to broth, homemade always wins. It packs more flavor than store-bought. However, if you use store-bought, choose low-sodium options. This helps control the salt level in your soup. Sautéing your vegetables right is key. Start with a hot pan to get a nice sear. Use olive oil for a rich flavor. Always stir often to prevent sticking. To avoid overcooking, keep an eye on your veggies. They should be tender but not mushy. This keeps their shape and nutrients. Taste as you go to get the perfect doneness. Garnishing can elevate your soup. Fresh herbs like basil or parsley add color and taste. A sprinkle of grated cheese, like Parmesan, can add creaminess. Pair your soup with crusty bread or crunchy crackers. This adds texture and makes for a filling meal. You can dip the bread or enjoy the crackers on the side. {{image_2}} You can mix and match vegetables in your soup. I love to use seasonal options. In spring, try fresh peas and asparagus. In fall, add butternut squash or sweet potatoes. Seasonal veggies give your soup unique flavors. You can also use frozen vegetables. They are handy and often just as tasty. Frozen veggies save time and last longer. This soup can fit many diets. It is vegan and gluten-free as it stands. You can make it hearty by adding protein. Beans or lentils work well. Just stir them in during the last few minutes of cooking. This change boosts protein and fiber, making it more filling. Want to spice things up? Add red pepper flakes for heat. You can also switch up the broth. Use a mushroom or tomato base for different flavors. Each choice can change the soup's taste. Experiment with your favorites to find the perfect mix. For the full recipe, check back to create your own delightful version! To keep your soup fresh, use airtight containers. Glass containers work best because they don’t stain or retain smells. You can also use plastic containers, but make sure they're BPA-free. Store your soup in the fridge for up to five days. Make sure to let it cool before sealing it up. This helps keep the flavors locked in. You can freeze this soup for later. Use freezer-safe bags or containers to save space. Leave some room in the container for expansion as the soup freezes. To reheat, thaw the soup overnight in the fridge. If you need it fast, run the bag under cold water. When reheating, do it on low heat. This helps keep the veggies from getting mushy. To save time, prepare the soup in advance. You can make a big batch on the weekend. This soup is great for busy weeks ahead. Just store it in the fridge or freezer. When ready to eat, reheat on the stove over low heat. Stir often to ensure it warms evenly. If it seems thick, add a splash of broth or water to bring back the flavor. For the full recipe, check the [Full Recipe]. Can I use fresh herbs instead of dried? Yes, you can use fresh herbs. They add a bright flavor. Use three times more fresh herbs than dried. For example, if a recipe calls for one teaspoon of dried basil, use three teaspoons of fresh basil. How do I make it thicker if desired? To thicken your soup, you have a few options. You can add more vegetables and cook them longer. Another way is to blend part of the soup. Use an immersion blender or regular blender. This will give you a creamy texture without adding cream. Health benefits of the ingredients This soup has many health benefits. The vegetables provide vitamins and minerals. Carrots are great for your eyes. Spinach offers iron, and tomatoes are full of antioxidants. This dish is low in calories and high in fiber. Caloric content per serving Each serving has about 150 calories. This can vary based on added ingredients. It is a filling option without adding too many calories. Great for a light lunch or dinner! How to adjust the recipe for fewer people You can easily cut the recipe in half. Use half the amount of each ingredient. This will help you make a smaller batch without wasting food. Scaling up for larger gatherings If you want to serve more people, double the recipe. Make sure to use a larger pot. It’s simple to make a big batch for parties or family meals. Just keep an eye on cooking time as it may need a bit longer. Classic vegetable soup brings together fresh ingredients and simple steps. We start with a base of olive oil, onion, and garlic. Then we add vibrant veggies and rich seasonings. Tips include enhancing flavor and perfect cooking techniques. Variations allow for creativity and dietary needs. Remember, this soup is not only tasty but also healthy. Enjoy it now or store it for later. Embrace the joy of cooking. Dive into this delicious recipe and make it your own.

Classic Vegetable Soup Flavorful and Wholesome Recipe

Are you ready to warm your heart and nourish your body with a bowl of Classic Vegetable Soup? This recipe

- 2 cups cooked jasmine rice (preferably cold) - 1 pound shrimp, peeled and deveined - 2 tablespoons vegetable oil - 1 cup mixed vegetables (carrots, peas, corn) - 2 eggs, lightly beaten - 3 green onions, chopped - 3 cloves garlic, minced - 2 tablespoons soy sauce - 1 teaspoon sesame oil - Salt and pepper to taste Using the right ingredients is key to great fried rice. Cold rice makes a big difference. Fresh shrimp adds a nice texture and flavor. Cold rice is a must. It helps keep the rice separate and not mushy. Fresh shrimp should be pink and firm. Rinse and peel them before cooking. You can mix up the veggies. Try bell peppers, broccoli, or snap peas. For those who avoid eggs, use tofu or skip them altogether. This way, you still enjoy a tasty meal. Start by gathering your ingredients. You’ll need shrimp, rice, and vegetables. - Shrimp: Peel and devein 1 pound of shrimp. Rinse them under cold water. Pat them dry with a paper towel. - Vegetables: Measure out 1 cup of mixed vegetables like carrots, peas, and corn. You can use fresh or frozen. For tools, have a large skillet or wok ready. You’ll also need a spatula for stirring. A bowl for the eggs and a knife for chopping green onions will help too. Heat 1 tablespoon of vegetable oil in your skillet over medium-high heat. Add 3 cloves of minced garlic. Sauté for about 30 seconds until it smells good. Next, toss in the shrimp. Cook for 2-3 minutes until they turn pink and opaque. Then, take the shrimp out and set them aside. In the same skillet, add another tablespoon of oil. Toss in your mixed vegetables and stir-fry for about 2-3 minutes. They should be tender. Push the veggies to one side. Pour 2 lightly beaten eggs into the other side. Scramble them until fully cooked. Now, add 2 cups of cold jasmine rice. Mix everything well. Make sure the rice heats through and combines with the veggies and eggs. Return the shrimp to the skillet. Pour in 2 tablespoons of soy sauce and 1 teaspoon of sesame oil. Season with salt and pepper. Stir until well coated. Finally, add 3 chopped green onions. Stir gently to combine. For serving, dish out the fried rice in bowls. You can garnish with more chopped green onions or sesame seeds for a nice crunch. If you want the full recipe, check out the complete details above. To make great shrimp fried rice, follow these steps: - Use cold rice. Cold rice keeps the grains separate and firm. - Heat your pan well. A hot pan helps fry the rice instead of steaming it. - Stir often. This keeps the rice from sticking and helps it cook evenly. - Add shrimp last. Cook shrimp just until pink, then remove them to avoid overcooking. For shrimp, look for ones that are bright and firm. They should smell fresh, not fishy. Garnishing makes your dish pop! Here are some simple ideas: - Top with fresh green onions for color. - Sprinkle sesame seeds for a crunchy finish. - Serve in a bowl for a cozy feel. For family dinners, consider serving the fried rice with a side salad. This adds freshness and balance to your meal. Prep is key for quick cooking. Here’s how to save time: - Chop your vegetables ahead of time. Store them in the fridge until you're ready to cook. - Use a one-pot method. This cuts down on dishes and makes cleanup easy. When you follow these tips, you’ll enjoy a fast, tasty meal. For the full recipe, check out the earlier section. {{image_2}} You can swap shrimp for chicken or tofu. Chicken gives a hearty bite. Simply dice it into small pieces and cook until golden. For a plant-based choice, tofu works well too. Use firm tofu and press it to remove excess water. This makes it crispier when cooked. You can also explore other seafood options. Try scallops or fish like salmon for a new twist. Adding spices can elevate your fried rice. A bit of fresh ginger adds warmth. You can also sprinkle chili flakes for heat. If you like sweet flavors, try teriyaki sauce. It adds a rich taste that pairs well with shrimp. Experiment with soy sauce variations too. Each sauce brings a different flavor profile. For a gluten-free version, use tamari instead of soy sauce. This keeps the dish safe for those with gluten allergies. If you want to make it vegetarian or vegan, skip the shrimp and eggs. You can add more veggies or chickpeas for protein. This way, everyone can enjoy a tasty meal! To keep your shrimp fried rice fresh, store it in an airtight container. Make sure it cools down before putting it in the fridge. This helps avoid bacteria growth. Set your fridge temperature to 40°F or lower for safety. The goal is to keep your food safe to eat. You can freeze shrimp fried rice for later use. Place it in a freezer-safe bag or container. Press out as much air as possible to prevent freezer burn. When you are ready to eat, let it thaw overnight in the fridge. Reheat it in a pan over medium heat, adding a splash of water to keep it moist. If stored correctly, shrimp fried rice lasts about 3-4 days in the fridge. For frozen rice, it can stay good for up to 3 months. Always check for signs of spoilage, like a sour smell or discoloration. If you notice these signs, it's best to throw it away. The best rice for fried rice is jasmine rice. This rice has a nice texture and flavor. It stays fluffy and separate when cooked. Other types, like long-grain rice, can work too, but they might not be as fragrant. Jasmine rice adds that special touch to your meal. Always use cold, cooked rice for the best results. Yes, you can make this recipe ahead of time. Cook the rice and shrimp the day before. Store them in the fridge until you’re ready to cook. When you’re ready, just reheat the rice and shrimp in a pan. This saves time and makes it easy to enjoy a quick meal. To avoid sticky fried rice, use cold rice that’s been cooked and cooled. Freshly cooked rice is too moist and can clump. Spread the rice on a tray to cool it down. This keeps the grains separate. Stir-frying over high heat also helps keep the rice fluffy. Yes, frozen shrimp and vegetables work great in this recipe. Just thaw the shrimp before cooking. You can add frozen vegetables straight from the bag. They’ll cook quickly in the hot pan. This makes meal prep easy and fast. You can substitute shrimp with chicken, pork, or tofu. Each option gives a different flavor. If you don’t have soy sauce, try tamari for a gluten-free version. For veggies, use whatever you have on hand, like bell peppers or broccoli. This recipe is flexible and fun! This blog post covered how to make shrimp fried rice. I explained the key ingredients and their importance. I provided step-by-step cooking instructions and shared tips for great texture and flavor. You learned about variations, storage, and common questions. Creating shrimp fried rice is fun and easy with the right tips. Enjoy making this dish for your family or friends. Try different ingredients to make it your own!

Easy Shrimp Fried Rice Flavorful Ready in Minutes

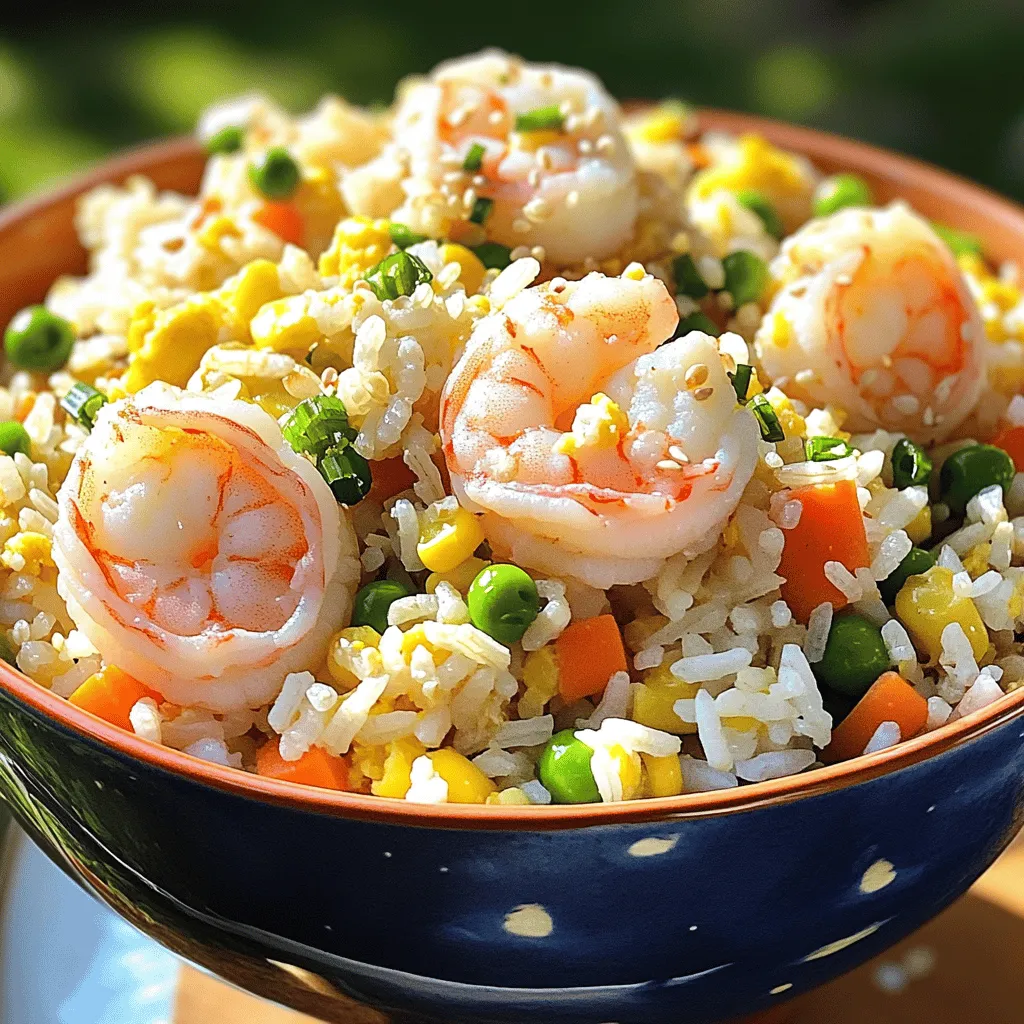
If you love quick and tasty meals, you’re in for a treat! My Easy Shrimp Fried Rice recipe packs a

This Greek Orzo Salad is bright and fresh. It combines pasta, veggies, and olives. You can make it in just 30 minutes. This dish serves four people. You can enjoy it as a side or a main course. Here’s what you need for the salad: - 1 cup orzo pasta - 1 cup cherry tomatoes, halved - 1 cucumber, diced - 1 bell pepper (red or yellow), diced - 1/4 red onion, finely chopped - 1/2 cup Kalamata olives, pitted and halved - 1/4 cup feta cheese, crumbled - 1/4 cup fresh parsley, chopped - 3 tablespoons olive oil - 2 tablespoons lemon juice - 1 teaspoon dried oregano - Salt and pepper to taste Using fresh ingredients makes a big difference. Fresh vegetables bring color and crunch. They also add great taste. Dried herbs, like oregano, pack flavor. They help balance the fresh notes. The mix of both gives your salad depth. You can use fresh lemon juice for the best taste. It brightens the whole dish. Always choose quality ingredients for the best results. For the full recipe, check the details above. First, we need to cook the orzo pasta. I fill a large pot with water and bring it to a boil. Once boiling, I add a pinch of salt to the water. Then, I add one cup of orzo pasta. I let it cook according to the package instructions until it's al dente. This usually takes about 8 to 10 minutes. After it's done, I drain the pasta in a colander. To stop the cooking, I rinse the orzo under cold water. This keeps it firm and prevents it from getting mushy. Next, I grab a large mixing bowl. In this bowl, I combine the cooked orzo, one cup of halved cherry tomatoes, one diced cucumber, and one diced bell pepper. I also add one finely chopped red onion and half a cup of Kalamata olives, pitted and halved. Finally, I sprinkle in a quarter cup of crumbled feta cheese. Gently, I mix all these ingredients together until they are evenly distributed. This mixture looks colorful and fresh. Now, it’s time to make the dressing. In a small bowl, I add three tablespoons of olive oil. Then, I squeeze in two tablespoons of fresh lemon juice. I also add one teaspoon of dried oregano, along with salt and pepper to taste. Using a whisk, I blend the dressing until it is smooth and well combined. Once ready, I pour the dressing over the orzo salad. I toss everything gently to coat all the ingredients evenly. Adding a quarter cup of chopped fresh parsley gives it a nice touch. I let the salad sit for about 10-15 minutes. This helps the flavors meld together nicely. For the full recipe, check out the details. To get the best orzo, cook it just right. Always follow the package instructions. I like to taste it a minute before the time is up. It should be firm but not hard. After cooking, drain the pasta. Rinse it under cold water. This stops cooking and keeps it from sticking. To make your Greek orzo salad pop, add fresh herbs. I love to use parsley and dill for a bright taste. You can also try mint for a refreshing twist. A splash of red wine vinegar gives a nice zing too. If you want more depth, add a pinch of smoked paprika or a dash of hot sauce for heat. Presentation can make your dish shine. Serve the salad in a big bowl with a sprinkle of feta on top. You can also layer the ingredients in a clear dish to show off the colors. Use fresh herbs as a garnish. A lemon wedge on the side adds a nice touch. This makes the salad look fresh and inviting. For the full recipe, check the Mediterranean Orzo Bliss Salad section above. {{image_2}} You can change the classic Greek orzo salad by using different ingredients. Try adding sun-dried tomatoes for a sweet flavor. You can also use arugula instead of parsley for a peppery kick. If you want more crunch, toss in some radishes or celery. For a sweeter taste, diced mango or apples work well, too. Experimenting with ingredients can make this salad fun and exciting. Adding protein makes Greek orzo salad more filling. Grilled chicken or shrimp pairs perfectly. You can also use chickpeas for a plant-based option. Cubed feta cheese adds a creamy texture, while diced ham or salami gives a savory touch. Choose your favorite protein to fit your taste or dietary needs. This salad is versatile for any meal. Serve it as a side dish at a barbecue or picnic. For a main dish, add grilled meat and serve it warm. You can also pack it for lunch in a jar. Greek orzo salad works well for potlucks or family gatherings. Just make sure to let it chill for a bit before serving. You can find the full recipe to guide you through making it just right. To keep Greek Orzo Salad fresh, store it in an airtight container. Make sure it is completely cool before sealing. This helps prevent moisture buildup, which can make the salad soggy. Place the container in the fridge right after serving. This keeps the flavors bright and crisp. Greek Orzo Salad will last for about 3 to 5 days in the fridge. Always check for signs of spoilage, like changes in smell or color. If the salad starts to look or smell off, it's best to throw it away. Trust your senses; they are your best guide. I do not recommend freezing Greek Orzo Salad. The texture of the vegetables and orzo changes when frozen. If you must freeze it, separate the salad from the dressing. Use a freezer-safe container and label it with the date. When you want to eat it, thaw it in the fridge overnight. Re-mix the dressing before serving to restore the flavors. For best taste, enjoy within a month. Check the Full Recipe for more details on making this dish! If you don’t have orzo pasta, you can use other small pasta types. Try ditalini, couscous, or even quinoa for a different texture. Each option adds a unique taste to the dish. Traditional orzo is not gluten-free, as it is made from wheat. However, you can find gluten-free orzo made from rice or corn. This makes it easy to enjoy the salad without gluten. Yes, you can make Greek Orzo Salad ahead of time. It tastes even better when the flavors blend. Just store it in the fridge, and enjoy it cold. For the best taste, eat it within two days. You can find the full recipe [here](#). This blog post covered everything you need to make a great Greek Orzo Salad. We explored the essential ingredients, learned step-by-step instructions, and shared tips for perfect texture and flavor. You can even try fun variations and know how to store your salad. In the end, Greek Orzo Salad is versatile and easy to make. Enjoy every bite, whether it’s for lunch or a party!

Greek Orzo Salad Fresh and Flavorful Dish Idea

Looking for a fresh and tasty dish? Greek Orzo Salad is the perfect choice! This simple recipe combines vibrant veggies

Let's dive into what you need to make these vegan chocolate chip cookies. Each ingredient plays a key role in making them tasty and fun. Here's the detailed list: - 1 cup almond flour - 1/2 cup all-purpose flour - 1/2 teaspoon baking soda - 1/4 teaspoon sea salt - 1/3 cup coconut oil, melted - 1/2 cup brown sugar - 1/4 cup maple syrup - 1 teaspoon vanilla extract - 1/2 cup vegan chocolate chips - 1/4 cup chopped walnuts (optional) Almond flour gives a nutty flavor and helps keep the cookies moist. It adds a nice texture, too. All-purpose flour provides structure. It balances the almond flour and helps the cookies hold their shape. Baking soda is your leavening agent. It helps the cookies rise and get that nice, soft bite. Sea salt enhances the flavors. It makes the sweetness of the cookies pop, creating a tasty contrast. Coconut oil acts as the fat here. It makes the cookies rich and gives them a slight coconut flavor. Brown sugar adds moisture and a deep, caramel-like sweetness. This helps create that chewy texture. Maple syrup brings in natural sweetness while keeping everything moist. It complements the brown sugar well. Vanilla extract adds warmth and depth. It rounds out the flavors beautifully, making the cookies taste homemade. Vegan chocolate chips are the stars of the show! They melt perfectly and provide that gooey goodness. Chopped walnuts are optional but offer a great crunch. They add a nice contrast to the soft cookies. This mix of ingredients makes for a simple yet delicious recipe. If you want to see how to put it all together, check the Full Recipe! First, I preheat my oven to 350°F (175°C). This helps the cookies bake evenly. Next, I line a baking sheet with parchment paper. This keeps the cookies from sticking. You can use any baking sheet you have. In a medium bowl, I whisk together the almond flour, all-purpose flour, baking soda, and sea salt. It’s important to mix well. This ensures the leavening agent works. I make sure there are no lumps in the flour mix. In another large bowl, I mix the melted coconut oil, brown sugar, maple syrup, and vanilla extract. I stir until the mixture is smooth and creamy. This step helps to blend all the flavors together. It also adds moisture to the cookies. Now, I gradually add the dry ingredients to the wet mixture. I stir gently until just combined. I avoid overmixing to keep the cookies soft. Next, I fold in the vegan chocolate chips and walnuts, if I’m using them. This makes the dough rich and tasty. Using a tablespoon or cookie scoop, I drop rounded balls of dough onto the prepared baking sheet. I leave about 2 inches of space between each ball. This helps the cookies spread while baking. I flatten each cookie slightly for an even bake. I bake them for 10-12 minutes. I look for lightly golden edges. The cookies will be soft but will harden as they cool. After baking, I let the cookies cool for 5 minutes before moving them to a wire rack. Try out this full recipe for my decadent vegan chocolate chip cookies! When you bake vegan, follow some simple rules. First, always measure your ingredients. Use a kitchen scale for the best results. This helps keep your cookies light and fluffy. Second, mix wet and dry ingredients separately. This step ensures even blending. Last, do not overmix your dough. Overmixing can make cookies tough. One common mistake is using cold coconut oil. Warm it until it melts before mixing. Another mistake is not preheating the oven. A hot oven helps cookies rise well. Keep an eye on your baking time, too. Every oven is different, so check your cookies a minute or two early. For the best flavor, use high-quality chocolate chips. They add richness to each bite. If you want a chewier cookie, add a bit more brown sugar. For a crispier cookie, flatten them a bit more before baking. These small changes can make a big difference in taste and texture. For more detailed instructions, check the Full Recipe. {{image_2}} You can easily change up your vegan chocolate chip cookies. Try adding different nuts or seeds. Chopped pecans or almonds give a nice crunch. You can also use dried fruit. Raisins or cranberries add a sweet twist. For a fun twist, mix in a tablespoon of nut butter. This will make your cookies even richer and creamier. If you want a hint of spice, add cinnamon or nutmeg. Just a pinch makes a big difference. If you need gluten-free cookies, you can still enjoy this recipe. Substitute the all-purpose flour with a gluten-free blend. Look for one that works cup-for-cup like regular flour. This way, your cookies will still taste great. Make sure to check the labels for gluten-free status. You can also add a bit of xanthan gum. This helps give your cookies the right texture. If you want to switch up the sweeteners, you have options. Instead of brown sugar, try coconut sugar. It has a nice caramel flavor. You can also use agave syrup instead of maple syrup. It will keep your cookies sweet and moist. Honey can work too, but it’s not vegan. Use any sweetener you like, but adjust the amount based on how sweet you want your cookies to be. For the full recipe, check out the detailed instructions earlier. Enjoy your cookie adventure! To keep your vegan chocolate chip cookies fresh, store them in an airtight container. This helps maintain their soft texture. If you stack them, add parchment paper between layers. This prevents sticking and keeps them nice. Cookies can stay fresh for about five days at room temperature. If you want them to last longer, consider freezing. Freezing is a great way to save cookies for later. First, let the cookies cool completely. Then, place them in a single layer on a baking sheet. Freeze for one to two hours until firm. After that, transfer them to a freezer-safe bag. Remove as much air as possible to prevent freezer burn. Your cookies can last for up to three months in the freezer! When you're ready to enjoy your frozen cookies, reheat them simply. Take out the desired number of cookies and let them thaw for about 10 minutes. Preheat your oven to 350°F (175°C) and bake for about five minutes. This will warm them up nicely. You can also microwave them for about 15 seconds for a quick treat. Enjoy them warm for a delightful experience! Yes, you can use regular flour. However, almond flour gives a nice flavor and texture. If you swap, use the same amount. The cookies will be less soft but still tasty. You can use vegetable oil or vegan butter. Both options work well. They will change the taste slightly, but the cookies will still be good. Make sure to melt the butter before mixing. Look for golden edges and a soft center. The cookies will firm up as they cool. You can also use a toothpick. If it comes out clean, they are ready. Absolutely! You can leave out the chocolate chips. Try adding dried fruit or nuts instead. The cookies will still be delicious and fun to eat. You now know how to make delicious vegan cookies using simple ingredients. We covered the key items like almond flour and vegan chocolate chips. I shared step-by-step instructions to ensure you can bake them perfectly. Plus, I provided tips to improve your vegan baking skills and offered fun variations to try. Remember to store your cookies properly for the best taste. Baking can be fun and easy, so go ahead and enjoy your cookie-making journey!

Vegan Chocolate Chip Cookies Easy and Tasty Treat

Looking for a sweet treat that’s both easy and vegan? You’ve found it! These Vegan Chocolate Chip Cookies are simple

- 4 salmon fillets (about 6 ounces each) - 1/4 cup soy sauce (low-sodium) - 1/4 cup honey - 2 tablespoons rice vinegar - 1 tablespoon grated fresh ginger - 2 cloves garlic, minced - 1 tablespoon sesame oil The main ingredient is salmon. You want fresh fillets for the best taste. Low-sodium soy sauce adds flavor without too much salt. Honey gives a sweet touch that balances the sauce. Rice vinegar adds a nice tang, while ginger and garlic bring warmth. Sesame oil adds richness and depth. - 2 tablespoons green onions, finely chopped (for garnish) - 1 tablespoon sesame seeds (for garnish) - Steamed rice, for serving - Steamed broccoli or asparagus, for serving Garnishes can make your dish pop. Green onions add a fresh bite. Sesame seeds add crunch and look nice. For sides, steamed rice is perfect. It soaks up the sauce well. Broccoli or asparagus adds color and nutrition. These sides complete the meal and make it more filling. For the full recipe, check out the provided details. To make the teriyaki flavor pop, you need to mix the ingredients well. In a medium bowl, whisk together: - 1/4 cup low-sodium soy sauce - 1/4 cup honey - 2 tablespoons rice vinegar - 1 tablespoon grated fresh ginger - 2 cloves garlic, minced - 1 tablespoon sesame oil Mix until you have a smooth sauce. Low-sodium soy sauce is key. It keeps the dish from being too salty and allows the other flavors to shine. For marinating, place the salmon fillets in a resealable bag or shallow dish. Pour half of the marinade over them. Seal the bag or cover the dish. Let the salmon sit in the fridge for 30 minutes to 1 hour. This time helps the fish absorb the flavors. First, preheat your oven to 400°F (200°C). Once hot, remove the salmon from the marinade. Place it on a baking sheet lined with parchment paper. Brush the fillets with some of the remaining marinade. Bake the salmon for 12-15 minutes. You want it to be cooked through and flaky. In the last 2-3 minutes, turn on the broiler. Baste the salmon with more marinade. Broil until the top is caramelized and slightly crispy. Watch it closely to avoid burning. With these steps, you will have a simple and tasty teriyaki salmon that’s sure to impress! For the full recipe, check the section above. Understanding Cooking Times Cooking salmon can be simple when you know the times. For fillets, bake for 12 to 15 minutes at 400°F (200°C). Thicker pieces may need a bit longer. Always check the salmon's thickness. A good rule is to cook for about 4 to 6 minutes per half-inch of thickness. Checking for Doneness To check if your salmon is done, use a fork. Gently flake the thickest part. If it flakes easily and is opaque, it’s ready. You can also use a meat thermometer. Aim for an internal temp of 145°F (63°C). If you prefer it a bit less cooked, go for 125°F (52°C). Additional Marinade Ideas While the teriyaki marinade is great, you can mix it up. Try adding orange juice for sweetness or chili paste for heat. A splash of lime juice can brighten the flavor. You can also swap honey for maple syrup for a different sweetness. Alternative Ingredients for Varied Flavor Change up the salmon with different fish like trout or tuna. You can use coconut aminos instead of soy sauce for a soy-free option. Add fresh herbs like cilantro or basil for a pop of freshness. If you want a nutty flavor, toss in some crushed peanuts or walnuts. For the full recipe, check out the [Full Recipe]. {{image_2}} You can enjoy teriyaki salmon in many ways. The two most popular styles are grilled and baked. - Grilled Salmon: Grilling gives the salmon a smoky flavor. The high heat creates a nice char. Just brush the marinade on before grilling. Cook for about 4-6 minutes per side. Make sure to watch it closely! - Baked Salmon: Baking is easy and keeps your salmon moist. To bake, follow the full recipe. The oven cooks the salmon evenly. You end up with a tender, flavorful dish in about 15 minutes. Another fun way to enjoy teriyaki salmon is in a bowl. - Teriyaki Salmon Bowls: These bowls are great for a quick meal. Start with a base of rice or quinoa. Add your baked or grilled salmon on top. Then, load it up with your favorite veggies like broccoli, carrots, or bell peppers. Drizzle some extra teriyaki sauce for an added kick! If you have dietary needs, you can easily adjust this recipe. - Gluten-Free Options: To make this dish gluten-free, use tamari instead of soy sauce. Tamari has a similar taste but is gluten-free. This small swap allows everyone to enjoy the meal. - Low-Carb Variants: For a lower-carb meal, skip the rice. Instead, serve your salmon with steamed veggies. Zoodles (zucchini noodles) or cauliflower rice work great, too. They keep the meal light and healthy without losing the delicious flavors of teriyaki. These variations make teriyaki salmon a versatile meal that fits many diets. You can enjoy it your way! Refrigerating Cooked Salmon After cooking your teriyaki salmon, let it cool down. Place it in an airtight container. It will stay fresh in the fridge for up to three days. Make sure to store it in the main part of the fridge, not in the door. Freezing Recommendations If you want to keep it longer, freeze the salmon. Wrap it tightly in plastic wrap, then place it in a freezer bag. It can last for about three months in the freezer. Remember to label the bag with the date. Best Methods for Reheating Salmon When you are ready to eat, there are a few good ways to reheat your salmon. The oven is best for keeping it moist. Preheat your oven to 275°F (135°C) and place the salmon on a baking sheet. Heat it for about 15 minutes. You can also use a microwave. Just cover the salmon with a damp paper towel and heat in short bursts, checking often. Avoiding Dryness To prevent dryness, add a splash of water or broth when reheating. This will help keep it juicy. If using the microwave, heat it on low power. This gives it time to warm through without losing moisture. Can I use other types of fish? Yes, you can use other fish like tilapia or mahi-mahi. These fish work well with the teriyaki sauce. They will give a nice flavor and cook similarly to salmon. How do I know when the salmon is cooked? You can check if the salmon is cooked well by using a fork. Gently flake the salmon with the fork. If it flakes easily, it's ready. The inside should be light pink and not raw. What are the health benefits of salmon? Salmon is rich in healthy fats. It has omega-3 fatty acids that are good for your heart. Salmon also has high protein levels and essential vitamins. These nutrients help keep your body strong and healthy. Calorie count and macros for teriyaki salmon dish A serving of teriyaki salmon has about 350 calories. It includes around 30 grams of protein. You’ll also get about 15 grams of fat and 25 grams of carbs from the rice. This dish is a balanced meal. What goes well with teriyaki salmon? Teriyaki salmon pairs nicely with steamed rice. You can also serve it with vegetables. Broccoli or asparagus are great choices. They add color and nutrition to your meal. Side dishes and wine pairings For a side, try a simple salad with fresh greens. You can also serve it with a light miso soup. If you want a drink, a chilled white wine like Sauvignon Blanc is perfect. It complements the flavors of the dish well. For the full recipe, check out the full recipe. This post covered how to make easy teriyaki salmon. You learned about key ingredients, including salmon and marinade components. We discussed steps for preparing, marinating, and cooking to get perfect salmon. You also found useful tips for flavor enhancements and storage methods. In conclusion, teriyaki salmon is simple and tasty. You can customize it with various sides and garnishes. Enjoying this dish can fit many diets too. So, gather your ingredients, follow the steps, and savor a delightful meal!

Easy Teriyaki Salmon Simple and Tasty Meal Solution

Are you ready for a quick meal that packs flavor and health? Easy Teriyaki Salmon is your answer! With just

- 1 ½ cups rolled oats - 1 cup whole wheat flour - 1 cup fresh or frozen blueberries - ½ cup almond butter - ⅓ cup honey or maple syrup - ½ cup brown sugar - 1 teaspoon vanilla extract - 1 teaspoon baking powder - ½ teaspoon cinnamon - Pinch of salt - ¼ cup chopped nuts (optional) Blueberry oatmeal bars are a great snack. They are tasty and healthy. Let's break down the ingredients you will need. First, rolled oats provide fiber. They help keep you full and satisfied. Whole wheat flour adds extra nutrients. It also gives the bars a hearty texture. You can use fresh or frozen blueberries. They add natural sweetness and flavor. Almond butter is creamy and rich. This ingredient offers healthy fats and protein. For sweetness, you can choose honey or maple syrup. Both options will work well. Brown sugar adds moisture and depth to the flavor. A little bit of vanilla extract enhances everything. Baking powder helps the bars rise. Cinnamon adds warmth and a nice aroma. A pinch of salt balances the sweetness. Lastly, chopped nuts are optional. They add crunch and healthy fats. This combination makes the perfect base for blueberry oatmeal bars. These bars are not only simple to make but also pack a nutritious punch. Check out the Full Recipe for detailed steps on creating these delightful snacks. 1. Preheat your oven to 350°F (175°C). Grease a 9x9 inch baking dish or line it with parchment paper. This helps with easy removal later. 2. In a large bowl, combine 1 ½ cups rolled oats, 1 cup whole wheat flour, 1 teaspoon baking powder, ½ teaspoon cinnamon, and a pinch of salt. Mix well to blend all dry ingredients. 3. In another bowl, whisk together ½ cup almond butter, ⅓ cup honey or maple syrup, ½ cup brown sugar, and 1 teaspoon vanilla extract until smooth. 4. Pour the wet mixture into the dry mixture. Stir until just combined. Be careful not to overmix. 5. Gently fold in 1 cup of blueberries and ¼ cup of chopped nuts if you choose to add them. 6. Spread the mixture evenly in your prepared baking dish. Press down firmly to create a solid layer. 7. Bake in the preheated oven for 25 to 30 minutes. Check doneness by inserting a toothpick. It should come out clean. 8. Once baked, let it cool in the pan for 10 minutes. Then transfer to a wire rack to cool completely. After cooling, cut into bars and enjoy your delicious blueberry oatmeal bars. For the full recipe, check out the details above. How to avoid overmixing To keep your blueberry oatmeal bars soft, mix gently. Overmixing can lead to tough bars. When you combine the wet and dry ingredients, stir just enough to blend. Then fold in the blueberries carefully. Ensuring even baking For even baking, spread your mixture flat in the pan. Use a spatula to press it down firmly. This helps the bars bake evenly. Check for doneness by inserting a toothpick. It should come out clean when done. Substituting different fruits You can switch blueberries for other fruits. Try raspberries, strawberries, or even diced apples. Each fruit gives a new taste and texture. Just keep the same amount in the recipe. Using alternative sweeteners If you want less sugar, use ripe bananas or applesauce. These options add sweetness and moisture. Honey or maple syrup can also be reduced. Play around to find what you enjoy best. Adding spices Spices can make your bars extra tasty. Try adding a pinch of nutmeg or ginger. These spices bring warmth and depth. You could also mix in a bit of cocoa powder for a chocolatey twist. Incorporating chocolate chips For chocolate lovers, adding chocolate chips is a great idea. Mix in semi-sweet or dark chocolate chips. They melt during baking and add richness to your bars. This change makes for a delightful treat! For the full recipe, check the section titled Full Recipe. {{image_2}} You can switch up the blueberries for other fruits. Raspberries and strawberries both work great. They add different flavors and colors. Mixed berry oatmeal bars are also fun! Use a blend of your favorite fruits for a tasty twist. If you want a gluten-free option, use almond or coconut flour instead of whole wheat flour. You can also lower the sugar by using ripe bananas or applesauce. These swaps keep the bars healthy and still delicious. These bars taste amazing with yogurt or whipped cream. A dollop on top adds creaminess. You can also enjoy them with a cup of tea or coffee. Both drinks pair well and make for a comforting snack. Want to know more? Try the Full Recipe for the best results! To keep your blueberry oatmeal bars fresh, store them at room temperature. Place them in an airtight container. This will help maintain their soft and chewy texture. I like to use a glass container, which keeps them fresh longer. For longer storage, you can freeze the bars. Cut them into squares before freezing. Wrap each square in plastic wrap and place them in a freezer bag. When you want to enjoy them, thaw them in the fridge overnight. You can also reheat them in the microwave for about 15 to 20 seconds. This will make them warm and tasty again. These bars can last up to a week at room temperature. If stored in the freezer, they can stay good for up to three months. Keep an eye out for any signs of spoilage. If you see mold or notice an off smell, it’s best to throw them away. For best quality, enjoy them fresh! Can I use old-fashioned oats instead of rolled oats? Yes, you can use old-fashioned oats. They will give your bars a great texture. Just remember, they may be a bit chewier than rolled oats. How do I know when the bars are done baking? The bars are done when the edges turn golden brown. A toothpick should come out clean when you test the center. Are blueberry oatmeal bars healthy? Yes, these bars are healthy. They contain whole grains, fruits, and healthy fats. These ingredients provide fiber and nutrients, making them a good snack choice. Can this recipe be made vegan? Absolutely! You can swap honey for maple syrup. Use a nut butter that fits your diet, and you have a tasty vegan treat. Can I add protein powder to the recipe? Yes, you can add protein powder. Just replace some of the flour with it. This change boosts the protein, making it even better for snacking. What is the best way to make these bars chewy? To make these bars chewy, do not overmix the batter. Also, slightly underbake them. This will keep the center softer and chewier. For the Full Recipe, check out the detailed instructions above. This blog post covered how to make delicious blueberry oatmeal bars. We talked about the key ingredients and their nutritional value. You learned step-by-step instructions for preparing and baking. I also shared helpful tips and variations to suit your taste and needs. Finally, we discussed storage and answered common questions. Now you have all you need to enjoy these tasty, healthy snacks. Get baking and enjoy the fruits of your labor!

Blueberry Oatmeal Bars Perfect for Healthy Snacking

Looking for a tasty and healthy snack? Blueberry oatmeal bars are your answer! Packed with wholesome ingredients, these bars satisfy

- 2 cups cooked chicken, shredded or diced - 3 cups fresh broccoli florets - 1 cup uncooked brown rice - 3 cups chicken broth - 1 cup shredded cheddar cheese - 1/2 cup cream cheese, softened - 1 cup Greek yogurt or sour cream - 1 teaspoon garlic powder - 1 teaspoon onion powder - Salt and pepper to taste - 1/2 cup breadcrumbs (for topping) - 2 tablespoons olive oil - Fresh parsley, chopped (for garnish) Gather these ingredients when you make Cheesy Chicken Broccoli Casserole. Each one plays a key role in creating a rich and creamy dish. The cooked chicken gives protein and flavor. The fresh broccoli adds crunch and color. Brown rice is a hearty base that fills you up. Chicken broth adds depth to the flavor. Cheddar cheese and cream cheese create a creamy texture and cheesy goodness. Greek yogurt or sour cream adds tanginess and richness. Garlic powder and onion powder provide savory notes. Salt and pepper help balance the flavors. Breadcrumbs give a crispy topping, while olive oil adds a bit of richness. Fresh parsley is not just for looks; it adds a bright, fresh taste. Use this complete list of ingredients to create a dish that brings comfort and joy. Check the Full Recipe for the detailed steps to follow. To start, you need to cook the brown rice. In a large pot, mix the uncooked brown rice with chicken broth. Bring it to a boil, then cover. Let it simmer on low heat for about 25-30 minutes. The rice will absorb all the broth and become fluffy. While the rice cooks, it’s time to steam the broccoli. Place the broccoli florets in a steamer basket over boiling water. Steam them for about 4-5 minutes. You want them tender but still bright green. Drain and set them aside. Now, let’s mix the main ingredients. In a large bowl, combine your cooked chicken with softened cream cheese, Greek yogurt, garlic powder, onion powder, salt, and pepper. Mix everything until it is smooth and well combined. Once your rice is done, add it to the chicken and cream cheese mix. Then, fold in the steamed broccoli. Stir gently until all the ingredients are mixed well. Next, transfer the mixture to a greased 9x13 inch baking dish. Spread it evenly. Now, sprinkle shredded cheddar cheese on top. For the topping, take a small bowl and mix the breadcrumbs with olive oil until the breadcrumbs are coated. Sprinkle this mixture over the cheese layer. Bake your casserole in the preheated oven at 350°F (175°C) for 25-30 minutes. You want it to be bubbly and the breadcrumbs to be golden brown. When done, let it cool for about 5 minutes before serving. For a fresh touch, add some chopped parsley on top. For the full recipe, refer back to the ingredients list and instructions provided. To get the best texture, aim for a creamy mix. The key lies in balancing the chicken, cheese, and rice. If your mix feels too thick, add a splash of chicken broth. If it seems too thin, let it cook a bit longer. To avoid overcooking, keep an eye on your baking time. Check it around the 25-minute mark. You want the cheese bubbly and gold, but not brown. If you notice the top browning too fast, cover it loosely with foil. A good 9x13 inch baking dish works wonders for this recipe. I love using glass or ceramic for even cooking. A large mixing bowl is also essential. It helps combine the creamy ingredients without spills. For best results, use a sharp knife for cutting chicken and broccoli. A sturdy wooden spoon is perfect for mixing. Having a steamer basket makes broccoli easy to cook. It keeps the color bright and the crunch intact. Pair your casserole with a fresh side salad. A crisp green salad brightens the meal. Garlic bread also makes a great side. It soaks up the cheesy goodness. Serve the casserole warm. It tastes best right out of the oven. If you have leftovers, heat them gently in the oven. This keeps the flavors fresh and delicious. For the full recipe, click [here](#). {{image_2}} You can easily change some ingredients for your casserole. If you want to skip cream cheese, try sour cream or Greek yogurt. They add a nice creaminess without losing taste. For cheese, cheddar is great, but mozzarella or Monterey Jack work too. They can give a different flavor and melt nicely. If you need gluten-free options, use brown rice or quinoa. Both are tasty and safe for gluten-free diets. For low-carb choices, swap rice with cauliflower rice. It keeps the dish light while still filling. Adding spices can elevate your casserole. Try paprika or cayenne for a little kick. Fresh herbs like thyme or parsley also add great flavor. You can mix in other veggies too. Bell peppers, carrots, or even spinach can make it colorful and healthy. Check out the Full Recipe for a delicious way to enjoy this meal! To store leftovers, wait until the casserole cools. Place it in a container with a tight lid. You can keep it in the fridge for up to three days. If you want to enjoy it later, freezing is a great option. I recommend using glass or BPA-free plastic containers. These help keep your food fresh and safe. To freeze the casserole, let it cool completely. Cover it with plastic wrap, then foil. This prevents freezer burn and keeps all the yummy flavors. You can freeze it for up to three months. When you are ready to enjoy it, remove it from the freezer. Thaw it in the fridge overnight. To reheat, place it in the oven at 350°F (175°C) for about 30 minutes. Make sure it's hot all the way through before serving. Enjoy the comfort of Cheesy Chicken Broccoli Casserole again with a simple reheat! For the full recipe, check out the earlier section. How long can I store the casserole? You can store Cheesy Chicken Broccoli Casserole in the fridge for about three to four days. Make sure to place it in an airtight container. If you want to keep it longer, you can freeze it. Frozen casserole lasts for about two to three months. Just remember to thaw it in the fridge before reheating. Can I use frozen broccoli? Yes, you can use frozen broccoli in this recipe. Just make sure to thaw it and drain any extra water before adding it to the mix. Frozen broccoli cooks faster than fresh, so keep an eye on it to avoid mushiness. What can I serve with Cheesy Chicken Broccoli Casserole? This casserole pairs well with a simple side salad or some crusty bread. You can also serve it with rice or mashed potatoes for a heartier meal. If you want to keep it light, a fresh fruit salad works great too. For the full recipe, check here: [Full Recipe]. This blog post covered everything you need for a tasty Cheesy Chicken Broccoli Casserole. You learned about the key ingredients, simple steps to make it, and tips for perfecting the dish. We explored variations and storage options that fit different diets. With these insights, you can create a flavorful meal that all family members will enjoy. By following these steps, you’ll serve a warm dish that keeps everyone coming back for more. Enjoy your cooking adventure!

Cheesy Chicken Broccoli Casserole Comfort Food Recipe

Are you ready for a meal that warms your heart and fills your belly? My Cheesy Chicken Broccoli Casserole is

Older posts
Newer posts
← Previous Page1 … Page16 Page17 Page18 … Page65 Next →

dsad

© 2025 Cooking Wells • Built with GeneratePress

Our Policies

  • Copyright Policy
  • Cookie Policy
  • GDPR Policy
  • Privacy Policy
  • Disclaimer
  • Terms Of Use

More Information

  • Home
  • About
  • Contact
  • Appetizers
  • Dessert
  • Dinner
  • Drinks
©2025, Cooking Wells About Back To Top