Skip to content
DisclaimerTerms Of UseGDPR PolicyCookie Policy

Cooking Wells

  • Home
  • Drinks
  • Appetizers
  • Dinner
  • Dessert
  • About
  • Contact
  • Privacy Policy
DisclaimerTerms Of UseGDPR PolicyCookie Policy

Mia

To make a tasty sweet potato breakfast hash, gather these simple ingredients: - 2 medium sweet potatoes, peeled and diced - 1 red bell pepper, diced - 1 green bell pepper, diced - 1 small red onion, chopped - 2 cloves garlic, minced - 4 large eggs - 2 tablespoons olive oil - 1 teaspoon smoked paprika - 1 teaspoon ground cumin - Salt and pepper to taste These ingredients work together to create a warm, hearty dish. Sweet potatoes give a nice sweetness, while the peppers add crunch. The spices bring depth to the flavor. You can add these optional garnishes to enhance your dish: - Fresh cilantro, chopped - Avocado slices - Crumbled feta cheese These garnishes add fresh flavors and make the dish look great. You can mix and match based on what you like. This dish is not just delicious; it is also nutritious. Here’s a quick overview of what you get in one serving: - Calories: Approximately 300 - Protein: 12 grams - Carbohydrates: 40 grams - Fiber: 6 grams - Fat: 10 grams Sweet potatoes are high in fiber and vitamins. Eggs provide protein and healthy fats. This meal is perfect for starting your day right. For the full recipe, check out the Sweet Potato Breakfast Hash. To make Sweet Potato Breakfast Hash, start with your ingredients ready. You need two medium sweet potatoes, a red bell pepper, a green bell pepper, a small red onion, garlic, eggs, olive oil, smoked paprika, and cumin. First, heat two tablespoons of olive oil in a large skillet over medium heat. Add the diced sweet potatoes to the skillet. Season with salt, pepper, smoked paprika, and cumin. Sauté for about 10-12 minutes. Stir occasionally until the sweet potatoes are tender and lightly browned. Next, add the chopped red onion, red bell pepper, and green bell pepper to the skillet. Cook for another 5-7 minutes until the vegetables are soft. Then, stir in the minced garlic and cook for an additional 1-2 minutes until fragrant. Create small wells in the hash and crack an egg into each well. Cover the skillet with a lid. Cook for about 5-8 minutes or until the eggs are cooked to your liking. Remove from heat, top with fresh cilantro, and serve warm. For the complete recipe, check out the Full Recipe. When cooking sweet potatoes, choose firm ones without spots. Peel them, then cut them into even dice. This helps them cook evenly. Soak the diced sweet potatoes in cold water for 30 minutes. This step reduces starch and makes them crispier. You can also steam them for a few minutes before sautéing. This will help them cook faster and become tender. To get perfectly cooked eggs in your hash, crack them gently into the wells. Make sure the heat is not too high. This prevents the eggs from cooking too fast. Cover the skillet to trap heat and steam. This cooks the eggs evenly. For runny yolks, check them after 5 minutes. If you prefer firmer yolks, leave them for a bit longer. Adjust the cooking time based on your taste. To make a great sweet potato breakfast hash, you need the right skills. Start with a hot skillet. Heat olive oil before adding the sweet potatoes. This helps them cook evenly. Stir often for a nice brown color. When they’re tender, add the peppers and onion. Keep stirring to mix flavors. Cooking on medium heat gives the best results. One big mistake is not cutting the sweet potatoes evenly. If pieces are too big, they won’t cook right. Try to keep them about the same size for even cooking. Another error is overcrowding the pan. If the skillet is too full, the hash will steam instead of brown. Give the potatoes space to get crispy. Lastly, don’t skip seasoning. Salt, pepper, and spices bring the dish to life. Sweet potato breakfast hash is tasty on its own, but it pairs well with many sides. Try serving it with crispy bacon or spicy sausage for extra protein. A fresh fruit salad adds a nice, sweet touch. If you want something creamy, top it with avocado slices or a dollop of sour cream. Don’t forget a side of toast to scoop up all the goodness! For the full recipe, check out the Sweet Potato Breakfast Hash. {{image_2}} You can make your sweet potato breakfast hash heartier by adding proteins. Bacon or sausage adds rich flavors. Just cook the bacon in the skillet first. Let it get crispy, then remove it. Use the fat left to cook the sweet potatoes. For sausage, slice it and cook it until browned. Mix it into the hash before adding eggs. This gives you a tasty twist. If you want a vegetarian version, simply skip the meat. You can add more veggies instead. Consider adding spinach, mushrooms, or zucchini. For a vegan option, replace eggs with tofu. Scramble firm tofu in the skillet. It absorbs flavors well and brings protein to the dish. Don’t forget to season well with salt and pepper. Spices and herbs can really boost flavor. Besides smoked paprika and cumin, try adding chili powder for heat. You can also mix in fresh herbs like thyme or oregano. Add these when you cook the vegetables. They bring freshness and depth to the dish. A squeeze of lime juice at the end can brighten everything up. Each variation adds its own flair to this dish. Explore these ideas to create your perfect sweet potato breakfast hash. For the full recipe, check out how to make this delicious meal! To keep your sweet potato breakfast hash fresh, store it in an airtight container. Let it cool first, then place it in the fridge. It will stay good for about 3 to 5 days. Always label your container with the date to track freshness. When you want to enjoy your leftovers, reheat them on the stove. Use a nonstick skillet over medium heat. Add a splash of olive oil to keep it moist. Stir occasionally until heated through. You can also use the microwave for quick reheating. Place it in a microwave-safe bowl and cover it with a damp paper towel. Heat for about 1 to 2 minutes. If you want to save your hash for later, freezing works well. Place it in a freezer-safe container. Make sure to leave some space for expansion. It can stay in the freezer for up to 3 months. When you’re ready to eat, let it thaw in the fridge overnight before reheating. Enjoy your sweet potato breakfast hash anytime! For the full recipe, check out the earlier sections. If you can't find sweet potatoes, try using regular potatoes. Yukon gold or red potatoes work well. Butternut squash is a great choice too. It adds a nice sweetness similar to sweet potatoes. You can also use carrots for a different flavor. Each option changes the dish a bit but keeps it tasty. Yes, you can prep this dish ahead. Cook the sweet potatoes and veggies, then store them in the fridge. When you are ready to eat, just reheat them and add the eggs. This way, you save time in the morning. You will still have a hearty and warm meal. Absolutely! Sweet Potato Breakfast Hash is perfect for meal prep. You can make a big batch and divide it into containers. This makes it easy to grab and go during busy mornings. Just reheat it in the microwave and enjoy a healthy breakfast. In this blog post, we explored the sweet potato breakfast hash, its ingredients, and how to make it. I shared tips for cooking sweet potatoes and perfecting eggs. We also covered common mistakes and suggested ways to enhance flavor. Remember, you can customize this dish with proteins or herbs. With proper storage, you can enjoy leftovers later. Experiment with variations and enjoy a great meal. This hash is not just tasty; it’s also good for you!

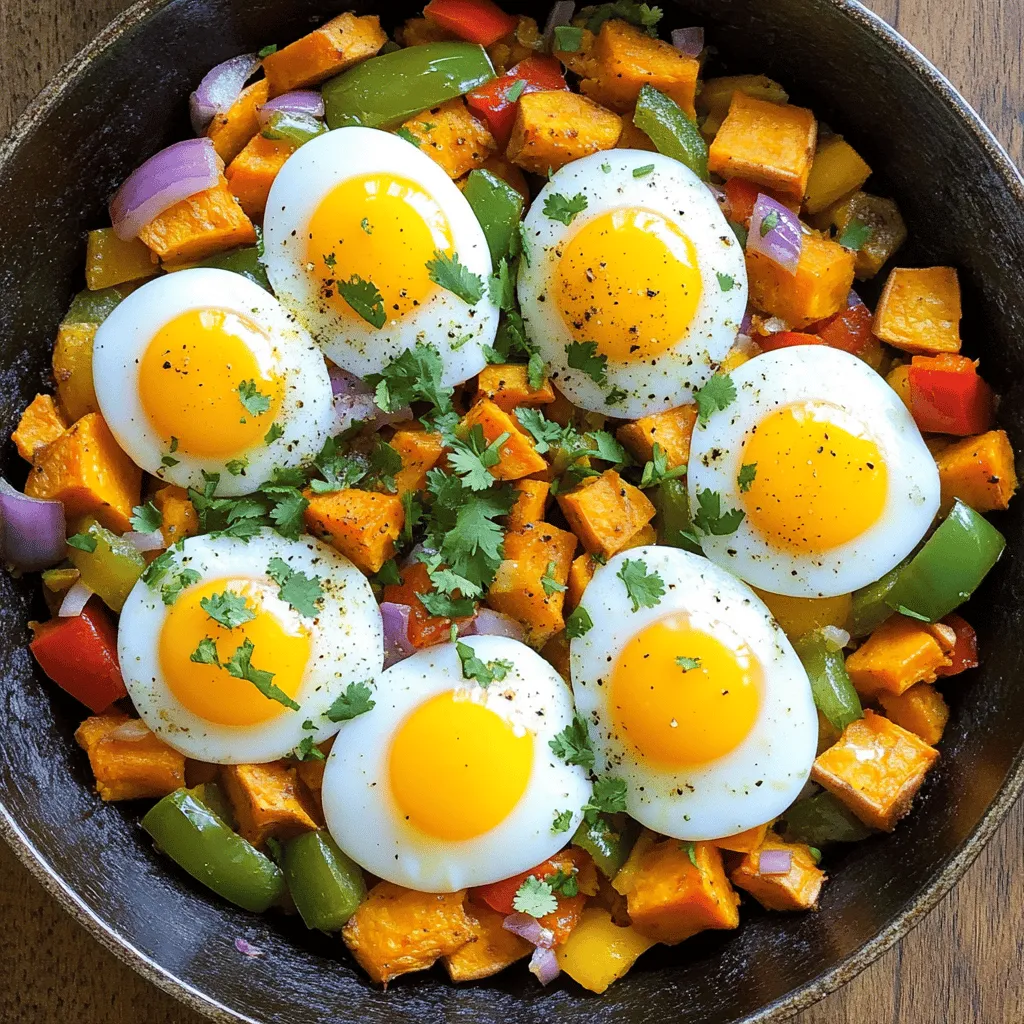
Sweet Potato Breakfast Hash Flavorful and Hearty Dish

Are you ready to elevate your breakfast game? My Sweet Potato Breakfast Hash is the perfect blend of flavors and

To make Lemon Herb Roasted Veggies, you need a few key ingredients. Start with assorted vegetables for roasting. I love using bell peppers, zucchini, carrots, and red onions. You can pick any veggies you enjoy! Next, grab some olive oil and herbs. This will add nice flavor to your dish. Lastly, include citrus components for flavor enhancement. A fresh lemon is perfect for this. Now let’s talk about seasoning. You will need dried herbs and garlic. I suggest using a mix of Italian herbs, like thyme, oregano, and basil. Add lemon zest and juice to give your veggies a bright taste. The zest adds a nice punch! Finally, use fresh parsley for garnish. It gives a lovely pop of color and freshness to the dish. For the complete recipe, check out the [Full Recipe]. Chop your veggies into even sizes. This helps them cook evenly. I love using bell peppers, zucchini, carrots, and red onions. You can also try broccoli or cauliflower. Just pick what you like best! 1. Wash the vegetables well. 2. Slice them into bite-sized pieces. 3. Keep them in a bowl. Next, we will make the tasty olive oil mix. This will add flavor to your veggies. 1. In a small bowl, whisk together: - 3 tablespoons of olive oil - 1 teaspoon of dried Italian herbs - Zest of 1 lemon - Juice of 1 lemon - 2 minced garlic cloves - Salt and pepper to taste 2. Pour this mix over your chopped veggies. 3. Toss everything well. Make sure all pieces get coated. This ensures every bite is full of flavor. Now we are ready to roast! Preheat your oven to 400°F. 1. Spread the coated veggies on a baking sheet. Use parchment paper for easy cleanup. 2. Roast for 20-25 minutes. Halfway through, stir the veggies. This helps them cook evenly and get that nice caramelized look. When the veggies are tender, they are ready. Enjoy them hot or warm! For the full recipe, check the guide above. To roast veggies just right, set your oven to 400°F (200°C). This heat helps the veggies caramelize and become tender. Roast them for 20-25 minutes. Keep an eye on them. Stir halfway through to cook evenly. To check if the veggies are done, use a fork. They should be soft and slightly brown. If they are still hard, give them a few more minutes. You can switch up the herbs for new tastes. Try rosemary or dill instead of Italian herbs. Fresh herbs also work great. Just chop them up and add them before roasting. Adding nuts or cheese can boost the flavor too. Toss in some pine nuts or feta cheese for a tasty twist. These additions make the dish richer and more filling. Explore different options to find what you like best! For the complete dish, refer to the Full Recipe. {{image_2}} Using seasonal vegetables makes this dish even better. In summer, choose bright bell peppers, zucchini, and tomatoes. Their colors pop and taste fresh. For winter, root veggies like carrots, sweet potatoes, and Brussels sprouts work great. They offer warmth and earthiness. Mix and match colors for a stunning look. Pair bright yellow squash with deep purple eggplant. Add green broccoli for contrast. This not only looks good but also makes your meal more fun. You can grill or roast your veggies. Grilling gives them a smoky flavor. Simply toss your veggies in the seasoning and put them on a hot grill. Cook them for about 10-15 minutes, turning them often. If you want a quick option, try an air fryer. Set it to 400°F (200°C) and cook for 15 minutes. Shake the basket halfway through for even cooking. You’ll get crispy veggies in no time! For the full recipe, check out the [Full Recipe]. After enjoying your lemon herb roasted veggies, store any leftovers right. Let them cool first. This step helps keep their texture. Use an airtight container to keep them fresh. Glass containers work well, as they do not hold odors. You can also use plastic containers if you prefer. Just make sure they seal tightly. Label your container with the date. This way, you know when to use them. Reheating roasted veggies can be tricky. You want to keep their great texture. The best way is to use the oven. Preheat it to 350°F (175°C). Spread the veggies on a baking sheet. Heat them for 10-15 minutes. Stir them halfway through for even warmth. If you're short on time, you can use a microwave. Place them in a microwave-safe bowl. Cover it with a damp paper towel to keep them moist. Heat in short bursts of 30 seconds. Check often to avoid overcooking. Quick reheating tips like these can save you time during busy weekdays. For the full recipe, check out the Lemon Herb Roasted Veggies section. Can I use frozen vegetables for this recipe? Yes, you can use frozen vegetables. Just make sure to thaw them first. Drain any extra water before mixing with the olive oil and herbs. This helps them roast better. Frozen veggies may not get as crispy, but they still taste great. How can I make this dish vegan-friendly? This recipe is already vegan! It uses no animal products. The olive oil and veggies provide all the flavor. Just follow the steps and enjoy a tasty dish that fits your diet. What are the health benefits of roasted vegetables? Roasted vegetables are packed with vitamins and minerals. They contain fiber, which helps digestion. Roasting brings out natural sugars, making them sweet and tasty. This dish is low in calories but high in nutrients, making it a healthy choice. How to pair this dish with proteins for a complete meal? You can pair Lemon Herb Roasted Veggies with proteins like chicken, fish, or tofu. These add flavor and make the meal filling. For a quick option, serve with grilled chicken or chickpeas. For a fun twist, add roasted veggies to a grain bowl with quinoa or rice. For the full recipe, check out the complete details and enjoy cooking! Roasting vegetables is simple and fun. We covered key ingredients, like assorted veggies, olive oil, and herbs. You learned the steps to prep, mix, and roast for the best flavor. We shared tips to perfect your roasting skills and enhance taste with zest and garnishes. Try variations to suit the season or switch up cooking methods. Store leftovers wisely and reheating keeps them tasty. Enjoy these recipes and celebrate the benefits of roasted veggies in your meals.

Lemon Herb Roasted Veggies Simple and Flavorful Dish

Are you ready to elevate your dinner game? Lemon Herb Roasted Veggies are simple, full of flavor, and packed with

To make a tasty pesto chicken flatbread, you need a few key ingredients: - 2 flatbreads (store-bought or homemade) - 1 cup cooked chicken breast, shredded - 1/2 cup pesto sauce (store-bought or homemade) - 1 cup fresh mozzarella cheese, shredded - 1/2 cup cherry tomatoes, halved - 1/4 cup Kalamata olives, sliced - 1/4 teaspoon crushed red pepper flakes (optional) - Fresh basil leaves, for garnish - Olive oil, for drizzling - Salt and pepper to taste These ingredients create a great balance of flavors. The flatbread serves as a crispy base, while the pesto adds a bright green pop. The chicken provides protein, and the cheese melts to perfection. You can get creative with optional toppings. Here are some ideas: - Sliced bell peppers - Red onion rings - Spinach leaves - Feta cheese - Balsamic glaze Adding these can give your flatbread a unique twist. For a little extra heat, consider adding some crushed red pepper flakes. You might wonder if you should make your pesto and flatbreads or buy them. Here’s my take: - Homemade pesto: It’s fresher and more flavorful. You can control the ingredients. Plus, it’s easy to make. Just blend fresh basil, garlic, nuts, cheese, and olive oil. - Store-bought pesto: It saves time. Look for quality brands with minimal additives. For the flatbreads, store-bought options are fine. However, making your own can be fun and gives you more control over the texture. This recipe is all about flexibility. Whether you choose to make everything from scratch or not, you’ll end up with a delicious dish. For the complete list of steps, check out the Full Recipe. Start by getting all your ingredients ready. Gather your flatbreads, cooked chicken, and pesto. Make sure your oven is clean and ready. Preheat your oven to 400°F (200°C). This step is key for a great bake. Line a baking sheet with parchment paper. This helps with easy clean-up later. Now it’s time to assemble! Place the flatbreads on your baking sheet. Use a spoon to spread the pesto sauce evenly on each flatbread. Leave a small border around the edges. Next, add the shredded chicken on top of the pesto. Make sure to spread it evenly. Then, sprinkle the fresh mozzarella cheese over the chicken. Add the cherry tomatoes and Kalamata olives on top. You can sprinkle salt and pepper to taste. If you like it spicy, add crushed red pepper flakes. Once everything is loaded, carefully place the baking sheet in the oven. Bake for 12 to 15 minutes. Watch for the cheese to melt and the edges to turn golden brown. After baking, take the flatbreads out of the oven. Let them cool for a few minutes. Drizzle a little olive oil on top for flavor. Garnish with fresh basil leaves for a pop of color. Finally, slice the flatbreads into wedges. Serve them warm and enjoy your delicious creation! For the full recipe, check out the details above. To make your flatbread shine, focus on the details. Choose high-quality pesto for the best flavor. I like to use homemade pesto when time allows. It adds a fresh taste that store-bought can't match. Spread it evenly on the flatbread. This step ensures every bite is flavorful. Use fresh mozzarella cheese for a creamy texture. When it melts, it creates a gooey delight. Don't skimp on toppings. More chicken and veggies mean more flavor. Bake until the edges are golden brown. This crispiness adds texture to your meal. Avoid soggy flatbreads by not overloading them with sauce. A thin layer of pesto goes a long way. Keep an eye on your oven. Each oven is different; baking times may vary. If your cheese is browning too fast, lower the oven temperature slightly. Make sure to use cooked chicken. Raw chicken will not cook through in the short baking time. Lastly, remember to let the flatbreads cool a bit before slicing. This step helps keep the toppings in place. Always use fresh ingredients when possible. Fresh basil gives a burst of flavor and color. Look for ripe cherry tomatoes; they add sweetness. Kalamata olives bring a briny taste that pairs well with the pesto. If you want, drizzle olive oil on top before serving. It enhances the flavors and adds a beautiful shine. Remember, fresh ingredients elevate your dish. You can find the full recipe above to guide you through the process! {{image_2}} You can use many types of flatbreads for this recipe. Pita bread works well. Naan adds a nice flavor too. You can even try whole wheat or gluten-free flatbreads. Each type gives a unique taste and texture. Choose what you like best! Change up the protein for fun. Grilled shrimp or sliced steak works great. You can also try cooked sausage or even tofu for a twist. For toppings, add bell peppers, spinach, or artichokes. Experiment with flavors you enjoy. The options are endless! To make a vegan flatbread, skip the chicken and cheese. Use extra veggies like mushrooms and zucchini. You can add a plant-based cheese for creaminess. Use a nut-based pesto to keep it vegan. This way, everyone can enjoy a tasty flatbread! For the full recipe, check out the instructions above. To keep your pesto chicken flatbread fresh, place it in an airtight container. Let it cool first. This prevents moisture from making the flatbread soggy. You can store it in the fridge for up to three days. If you want to enjoy it later, I recommend wrapping each piece in plastic wrap. This extra layer helps keep it tasty! When you're ready to eat your leftovers, preheat your oven to 350°F (175°C). Place the flatbread on a baking sheet. Heat it for about 10 minutes. This will help the cheese melt again and the flatbread crisp up. If you're in a hurry, you can use a microwave too. Just heat for 30 seconds, but the texture won't be the same. To freeze your pesto chicken flatbread, allow it to cool completely. Wrap each piece tightly in plastic wrap, then place them in a freezer bag. This helps prevent freezer burn. You can keep it frozen for up to two months. When you're ready to eat, thaw it in the fridge overnight before reheating. Enjoy your pesto chicken flatbread even after a busy day! For the full recipe, check out the details. To make homemade pesto, you need fresh basil, garlic, pine nuts, Parmesan cheese, and olive oil. Start with a cup of fresh basil leaves. Add two cloves of garlic, a quarter cup of pine nuts, and a half cup of grated Parmesan cheese. Blend these ingredients in a food processor. Slowly drizzle in half a cup of olive oil while blending until smooth. Taste it and add salt as needed. This fresh pesto will make your flatbread shine. Yes, you can use different types of cheese for your flatbread. While fresh mozzarella is classic, you can try goat cheese, feta, or even cheddar. Each cheese adds a unique flavor and texture. Mixing cheeses can also enhance taste. Just remember, the cheese should melt well and blend with the pesto and chicken. You can serve Pesto Chicken Flatbread with a fresh salad or some roasted veggies. A simple arugula salad with lemon dressing pairs well. You could also serve it with a side of garlic bread for extra flavor. For a fun twist, try a fruit salad or a light soup. These sides will balance the rich flavors of the flatbread, making your meal complete. Pesto Chicken Flatbread is simple and fun to make. We explored key ingredients, from essential pesto to tasty toppings. I shared step-by-step cooking instructions to ensure great results. Tips and tricks help you avoid mistakes and choose fresh ingredients. We discussed variations, including vegan options and different flatbread styles. Lastly, I provided storage methods to keep your leftovers tasty. Enjoying this dish can ignite your kitchen creativity. Now, go create your delicious masterpiece!

Pesto Chicken Flatbread Easy and Tasty Recipe

Looking for an easy and tasty meal that’s sure to impress? You’ll love this Pesto Chicken Flatbread recipe! It’s quick

- 2 ripe bananas, mashed - 1 cup fresh strawberries, hulled and chopped - 1/2 cup granulated sugar - 1/4 cup brown sugar, packed - 1/3 cup melted coconut oil - 2 large eggs, beaten - 1 teaspoon vanilla extract - 1 teaspoon baking soda - 1/2 teaspoon salt - 1 1/2 cups all-purpose flour - 1/2 teaspoon ground cinnamon (optional) - 1/4 cup chopped walnuts or pecans (optional) When making strawberry banana bread, the ingredients are key. The bananas need to be ripe. This means they should have brown spots. Ripe bananas add sweetness and moisture. Fresh strawberries give a burst of flavor. You can use frozen strawberries, but fresh is best. I love using coconut oil in this recipe. It adds a subtle taste and keeps the bread moist. The sugars create a nice balance of sweetness. Brown sugar adds a hint of caramel flavor. Eggs bind the ingredients together. They help the bread rise and stay fluffy. Vanilla extract enhances the overall taste. It brings out the fruit flavors. Baking soda is essential for leavening. It makes the bread rise as it bakes. Salt enhances the flavors and balances the sweetness. Flour forms the base of the bread. All-purpose flour works well, but you can substitute it for gluten-free flour. If you like, add cinnamon for warmth. Nuts add crunch and flavor, but they are optional. Each ingredient plays a role in this delightful recipe. For the full recipe, check the details above. 1. Preheat oven and prepare the loaf pan First, preheat your oven to 350°F (175°C). While it heats, grease a 9x5-inch loaf pan. You can also line it with parchment paper for easy removal. 2. Combine ingredients in the mixing bowl In a large mixing bowl, mash 2 ripe bananas. Add 1/2 cup granulated sugar, 1/4 cup brown sugar, and 1/3 cup melted coconut oil. Mix until smooth and creamy. 3. Add dry ingredients and mix In a separate bowl, whisk together 1 teaspoon baking soda, 1/2 teaspoon salt, and 1 1/2 cups all-purpose flour. If you like, add 1/2 teaspoon ground cinnamon for extra flavor. Gradually mix the dry ingredients into the banana mixture. Stir until just combined. Be careful not to overmix. 4. Fold in strawberries and nuts Gently fold in 1 cup of chopped strawberries and, if you want, 1/4 cup of chopped walnuts or pecans. This adds a nice crunch and extra flavor to your bread. - Bake time and testing for doneness Pour the batter into your prepared loaf pan. Bake in the oven for 55-60 minutes. Check for doneness by inserting a toothpick into the center. If it comes out clean, your bread is ready! Once baked, remove the bread from the oven. Let it cool in the pan for about 10 minutes. Then, transfer it to a wire rack to cool completely. Serve slices warm with a pat of butter or a dollop of whipped cream. You can also sprinkle fresh strawberries on top for a lovely touch. Enjoy this Strawberry Banana Bliss Bread with family and friends! For the full recipe, check out the earlier section. - Avoiding overmixing: Mix the batter just until you see no dry flour. Overmixing makes the bread tough. It’s okay if the batter is a bit lumpy. This keeps your bread soft and light. - Ensuring optimal ripeness of bananas: Use ripe bananas for the best flavor. Look for bananas with brown spots. These bananas are sweeter and will add moisture to your bread. - Using spices like nutmeg or allspice: A pinch of nutmeg or allspice can add warmth and depth to your bread. Just a little goes a long way. These spices complement the sweetness of the strawberries and bananas nicely. You may also try adding ground cinnamon for an extra kick. For the full recipe, follow the steps closely to ensure a delicious outcome. {{image_2}} You can change fruits in this recipe. Try using blueberries or raspberries instead of strawberries. Each fruit will give a unique taste and color. You can also mix fruits. For example, add half strawberries and half blueberries for a fun twist. Sweeteners are another easy swap. Instead of granulated sugar, try honey or maple syrup. Both give a nice flavor and can make your bread moister. Just use a little less if you choose these options, as they are sweeter than regular sugar. To make this recipe vegan, you can replace eggs with flaxseed meal. Mix one tablespoon of flaxseed meal with three tablespoons of water. Let it sit for a few minutes until it thickens. This mix works well in baking and keeps your bread fluffy. For a gluten-free version, simply use gluten-free flour. Many brands offer a one-to-one substitute. Just be sure to check the label. You can also add a bit of xanthan gum if your flour does not already include it. This helps bind the ingredients together. With these easy changes, you can enjoy delicious strawberry banana bread that fits your needs! For the full recipe, check the details above. Store your strawberry banana bread in an airtight container. Keeping it at room temperature is best for short-term storage. It stays fresh for about 3 to 4 days this way. If you live in a humid area, the fridge is a safe option. The cold can help prevent mold, but it may make the bread a bit dry. To keep it moist, wrap it tightly with plastic wrap before placing it in the fridge. Freezing is a great way to save your strawberry banana bread for later. First, ensure the bread is completely cool. Then, slice it into pieces for easy thawing. Wrap each slice in plastic wrap. After that, place the wrapped slices in a freezer bag. This way, you can grab just what you need. When you're ready to enjoy it, take out a slice and let it thaw at room temperature. You can also warm it in the microwave for a few seconds. Enjoy your treat anytime! You can tell when your bread is done by using a toothpick. Insert it into the center of the loaf. If it comes out clean, the bread is ready. If it has wet batter on it, bake for a few more minutes. Keep an eye on it to avoid overbaking. Yes, you can use frozen strawberries! Just thaw them and drain excess liquid. This helps keep your batter from becoming too wet. Frozen strawberries may change the texture slightly but will still taste great in your bread. If your bread is too dense, it might be due to overmixing. Try mixing the batter gently next time. You can also ensure your bananas are ripe enough. Ripe bananas add moisture and sweetness, which help make the bread lighter. Absolutely! You can double the recipe to make more bread. Just make sure to use a larger mixing bowl. You may need to bake it longer if you use a bigger pan. Check for doneness with a toothpick as usual. Strawberry banana bread lasts about three to four days at room temperature. Store it in an airtight container to keep it fresh. If you want it to last longer, consider freezing some slices. They freeze well and taste good later. This blog post covered the key ingredients and steps for making delicious strawberry banana bread. You learned how to combine ripe bananas and strawberries for a delightful treat. I shared essential tips for the best results and ways to customize the recipe to suit your taste. In the end, baking this bread is simple and fun. Enjoy experimenting with flavors and variations. Your homemade strawberry banana bread will impress your friends and family!

Strawberry Banana Bread Simple and Tasty Delight

Welcome to the world of Strawberry Banana Bread! This simple and tasty delight combines sweet bananas and fresh strawberries into

- 2 cups rolled oats - 1 cup natural peanut butter - 1/2 cup honey or maple syrup - 1/2 cup brown sugar - 1/2 teaspoon salt - 1 teaspoon vanilla extract The main ingredients for Peanut Butter Oatmeal Bars are simple yet powerful. The rolled oats provide a hearty base. They give you fiber and energy. Natural peanut butter adds creaminess and protein. Honey or maple syrup brings sweetness and moisture. Brown sugar enhances the flavor with a touch of caramel. Salt balances the sweetness, while vanilla extract adds depth. - 1/4 cup mini chocolate chips - 1/4 cup chopped nuts (walnuts or almonds) For those who love a twist, optional add-ins make these bars even better. Mini chocolate chips add a sweet surprise in each bite. Chopped nuts provide crunch and healthy fats. You can mix and match add-ins based on your taste. - Calories per serving: About 150 calories - Protein content: Approximately 5 grams - Fiber content: Roughly 3 grams Each serving of these bars packs around 150 calories. They offer about 5 grams of protein, which helps keep you full. With roughly 3 grams of fiber, they support healthy digestion. These bars are great for a snack or quick breakfast. They are healthy and satisfying, making them a smart choice. If you want to try this delicious recipe, check out the Full Recipe for all the steps! - Preheat the oven to 350°F (175°C). - Line an 8x8-inch baking dish with parchment paper. - In a large mixing bowl, combine 2 cups of rolled oats, 1/2 cup of brown sugar, and 1/2 teaspoon of salt. Mix well. - In another bowl, heat 1 cup of natural peanut butter and 1/2 cup of honey (or maple syrup) in the microwave for about 30 seconds. Stir until warm and smooth. - Add 1 teaspoon of vanilla extract to the peanut butter mixture and mix until smooth. - Pour the peanut butter mixture into the dry ingredients and combine until everything is mixed well. If you want, fold in 1/4 cup of mini chocolate chips and 1/4 cup of chopped nuts for added flavor and texture. - Transfer the mixture to the lined baking dish. Press it down evenly with a spatula or your hands. - Bake in the preheated oven for 20-25 minutes. Look for the edges to turn golden brown. - Let the bars cool completely in the baking dish on a wire rack before you cut them into squares or rectangles. Try this Full Recipe and enjoy your tasty and healthy peanut butter oatmeal bars! - Overmixing the ingredients: Mixing too much can make the bars tough. Stir just until mixed. - Not packing the mixture firmly: If you don’t press it down well, the bars can crumble. Use your hands or a spatula to compact the mixture tightly. - Adding spices like cinnamon: A sprinkle of cinnamon can add warmth and depth. Try about half a teaspoon for a subtle flavor boost. - Using different nut butters: You can swap peanut butter for almond or cashew butter. Each nut butter brings a unique taste and texture. - Garnishing with melted chocolate: Drizzle some melted chocolate on top for a sweet touch. This makes the bars look fancy and taste even better. - Using decorative serving plates: Arrange the bars on a pretty plate. A colorful plate can make your snack more inviting and fun to eat. For the full recipe, you can refer back to the detailed instructions provided earlier. {{image_2}} To add more chocolate flavor, try using cocoa powder. Start with 1/4 cup of unsweetened cocoa powder. Mix it in with the dry ingredients. You can also add more chocolate chips. Use up to 1/2 cup of mini chocolate chips for a richer taste. This will give your bars a fudgier texture and a delightful sweetness. For a nutty twist, swap in different nuts. Chopped pecans, hazelnuts, or pistachios work great. Each nut brings its own flavor. You can mix nuts for a unique crunch. Use 1/4 cup of your favorite nuts, or go wild and combine two types. This adds healthy fats and extra texture to your bars. If you want a no-bake option, it's simple! Just use rolled oats, peanut butter, honey, and nuts. Mix them well in a bowl. Press the mixture into a lined dish. Chill it in the fridge for at least an hour. Once set, cut them into bars. This version is quick and easy, perfect for hot days. Check out the Full Recipe for more details! To keep your peanut butter oatmeal bars fresh, use airtight containers. This prevents air from getting in and keeps the bars moist. Choose a container that fits the bars snugly. Avoid using plastic wrap alone, as it won’t keep them fresh for long. Freezing is a great way to store these bars for longer. Cut the bars into squares before freezing. Wrap each square in plastic wrap. Then, place them in a freezer bag or container. This keeps them safe from freezer burn. They can last up to three months in the freezer. Just thaw them in the fridge when you want to enjoy one. In the refrigerator, the bars last about one week. Store them in an airtight container to keep them fresh. If you notice any changes in smell or texture, it’s best to toss them. Keeping them in the fridge helps maintain that soft and chewy texture you love. Yes, you can substitute peanut butter with other nut butters. Here are some great options: - Almond butter - Cashew butter - Sunflower seed butter (for nut-free) These alternatives can give you a new taste while keeping the texture similar. To cut the bars cleanly, follow these tips: - Let the bars cool completely before cutting. - Use a sharp knife to make straight cuts. - Wipe the knife with a damp cloth after each cut. This will help keep the bars intact and looking nice. Yes, these bars are perfect for meal prep! Here’s how to make them part of your plan: - Make a batch on the weekend. - Store them in an airtight container. - Grab one for a quick snack or breakfast during the week. This way, you have a healthy treat ready when you need it. In this blog post, we explored how to make delicious peanut butter oatmeal bars. We covered the key ingredients, step-by-step instructions, and tips to avoid common mistakes. You saw variations to enhance flavor and texture, plus how to store these bars for freshness. Making these bars is simple and fun. They provide great energy for snacks or meal prep. Enjoy creating your own twists!

Peanut Butter Oatmeal Bars Tasty and Healthy Snack

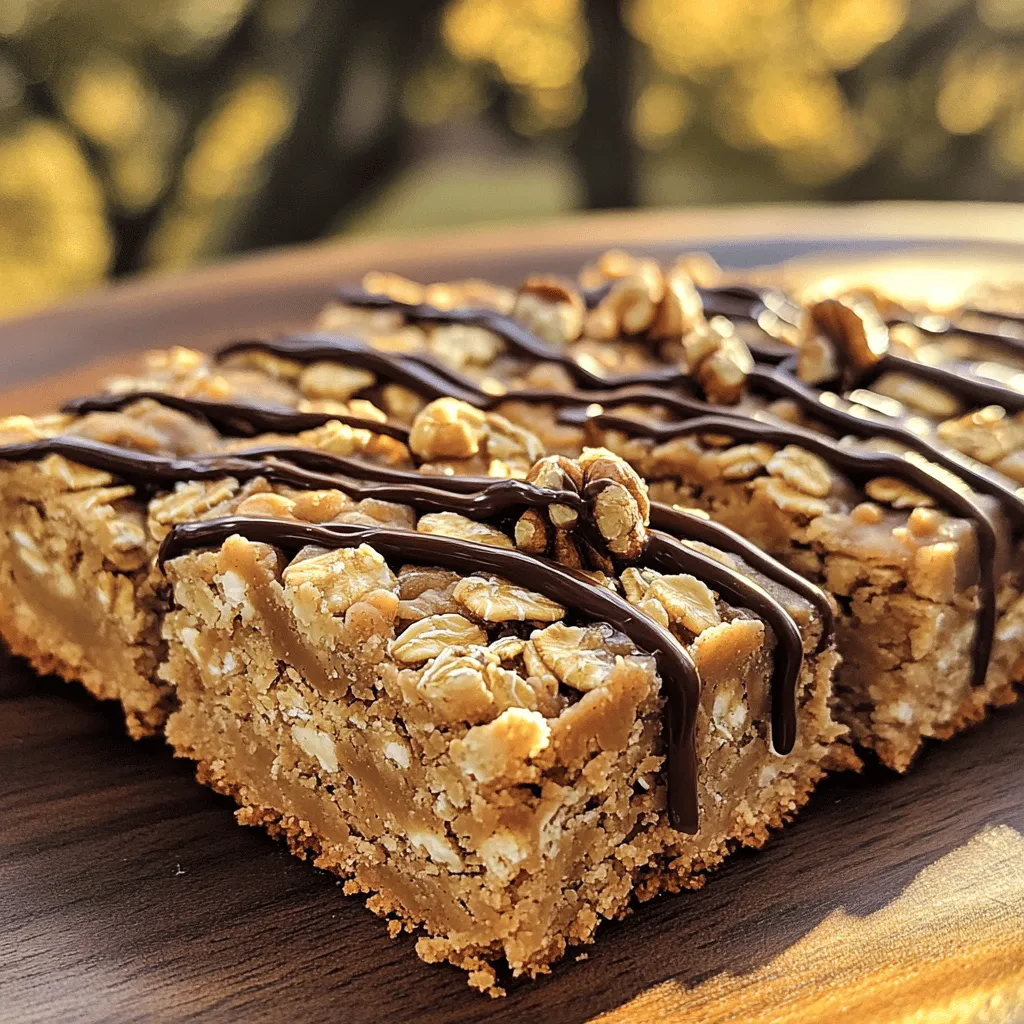
Craving a healthy snack that satisfies your sweet tooth? Look no further! Peanut Butter Oatmeal Bars are not only delicious

To make chocolate dipped pretzels, you need a few simple items. Here’s the list of ingredients: - 1 cup pretzel rods or twists - 1 cup semi-sweet chocolate chips - 1 tablespoon coconut oil (or shortening) - 1/2 cup crushed nuts (almonds, peanuts, or hazelnuts) - 1/4 cup colorful sprinkles (optional) - Sea salt (for sprinkling) Each ingredient plays a key role. The pretzels give that crunchy bite. The semi-sweet chocolate adds sweetness and richness. Coconut oil helps the chocolate melt smoothly, making it easy to dip. Crushed nuts add texture and flavor. Colorful sprinkles make the pretzels look fun and festive. A sprinkle of sea salt balances the sweet and salty taste. I love using different types of nuts based on mood. Almonds give a nice crunch. Peanuts add a classic touch. Hazelnuts bring a unique flavor. You can even skip the nuts if you prefer a simple treat. The possibilities are endless! For the best results, use high-quality chocolate chips. They melt better and taste richer. This recipe is easy to customize. You can mix and match toppings to fit any occasion. For the full recipe, check out the detailed instructions on creating these treats. To start, you need a clean baking sheet. Line it with parchment paper. This will stop the pretzels from sticking. It makes clean-up easy too. Make sure the paper covers the whole sheet. You want a smooth surface for your pretzels. Next, grab a microwave-safe bowl. Add 1 cup of semi-sweet chocolate chips and 1 tablespoon of coconut oil. The oil helps the chocolate melt smoothly. Microwave the bowl for 30 seconds. After that, take it out and stir. Repeat this until the chocolate is fully melted and shiny. Be careful not to overheat it. You want a nice, creamy texture. Now it’s time to dip! Hold a pretzel by one end and dip it into the melted chocolate. Let the extra chocolate drip back into the bowl. For a thicker layer, dip it a second time. While the chocolate is still wet, sprinkle on crushed nuts or colorful sprinkles. A little sea salt adds a nice touch too. Place each dipped pretzel on the lined baking sheet. Once all pretzels are done, put the sheet in the fridge for 30 minutes. This helps the chocolate harden. After they cool, you can enjoy your tasty creations or store them for later! For the complete recipe, check the Full Recipe section. To get smooth chocolate, use semi-sweet chocolate chips. Mix in one tablespoon of coconut oil. The oil helps the chocolate melt evenly. Melt the chocolate in a microwave-safe bowl. Heat it in 30-second bursts. Stir it well between each burst. This method prevents the chocolate from burning. Aim for a silky, glossy finish. When dipping pretzels, hold them by one end. Dip them straight into the chocolate. Let the excess chocolate drip off. You can dip again for a thicker layer. Place them on parchment paper right away. This helps them cool without sticking. Working in small batches is best. It keeps your chocolate warm and smooth. Get creative with your toppings! Crushed nuts, like almonds or peanuts, add crunch. Colorful sprinkles make them fun and festive. You can also use sea salt for a sweet-salty mix. Try crushed candies for a sweet twist. For a festive touch, use holiday-themed sprinkles and toppings. Each bite becomes a special treat! For more details, check out the Full Recipe. {{image_2}} You can use many types of chocolate for your pretzels. Semi-sweet chocolate is classic and rich. Dark chocolate gives a bold flavor, while milk chocolate adds sweetness. For a fun twist, try white chocolate. You can even combine chocolates for a layered effect. Just melt them as you do in the Full Recipe. The toppings are where you can get really creative. Crushed nuts add a nice crunch. You can choose almonds, peanuts, or hazelnuts. For a colorful touch, use sprinkles. Sea salt enhances the sweet and salty mix. Try adding coconut flakes for a tropical vibe. You can also use crushed candies for extra sweetness! You can change your pretzels with the seasons. For Halloween, use orange and black sprinkles. In winter, add peppermint bits or edible glitter for a festive look. For Valentine’s Day, pink and red sprinkles work wonders. These seasonal touches make your treats special and fun for any occasion! To keep your chocolate dipped pretzels fresh, use an airtight container. Place a piece of parchment paper between layers to avoid sticking. Store them at room temperature away from heat and light. This helps maintain their crunch and chocolate flavor. Chocolate dipped pretzels last about two weeks when stored properly. To check freshness, look for any signs of moisture or a change in texture. If they feel soft or chewy, it's time to enjoy them quickly. For best taste, eat them within the first week. If your pretzels lose some crunch, you can refresh them. Preheat your oven to 200°F (93°C). Spread the pretzels on a baking sheet and heat for about 10 minutes. This helps to restore their crispiness without melting the chocolate. Just let them cool before serving again. Follow the [Full Recipe] to make these tasty treats! It usually takes about 30 minutes for chocolate to harden on pretzels in the fridge. If you let them sit at room temperature, it may take longer. The chocolate will feel firm to the touch when it's ready. Keeping your kitchen cool can also help speed up the process. Yes, you can use white chocolate for dipping your pretzels. White chocolate adds a sweet and creamy taste. Just melt it in the same way as semi-sweet chocolate. You can also mix in some food coloring for fun colors! You can find chocolate-dipped pretzels at many stores. Check the candy aisle or bakery section. Online shops also sell them, often in various flavors. If you want a special treat, try local bakeries or specialty candy shops. You learned how to make tasty chocolate-dipped pretzels today. We covered the key ingredients, step-by-step instructions, and helpful tips. You can add your favorite toppings and try different chocolates. Remember to store them properly to keep them fresh. Enjoy creating these snacks for yourself or as gifts. Your creativity can make each batch unique. Now, go ahead and make these fun treats!

Chocolate Dipped Pretzels Irresistible Sweet Treat

If you’re looking for a sweet and salty treat that’s easy to make, you’ve found it! Chocolate dipped pretzels combine

To make tasty Buffalo Chicken Sliders, you need these key ingredients: - 1 lb (450g) shredded rotisserie chicken - 1/2 cup buffalo sauce (adjust based on heat preference) - 1/4 cup ranch dressing - 8 slider rolls (mini burger buns) - 1/2 cup blue cheese crumbles (or feta for a milder taste) - 1 cup coleslaw (store-bought or homemade) - 1 tablespoon olive oil - Fresh celery sticks for garnish - Salt and pepper to taste You can swap out some ingredients for your taste or diet. - Use shredded chicken breast instead of rotisserie for a leaner option. - Choose a spicy or mild buffalo sauce based on your heat level. - You can replace ranch dressing with Greek yogurt for a healthier twist. - If you dislike blue cheese, try feta or omit it altogether. - For a gluten-free option, use gluten-free slider rolls. When picking ingredients, freshness matters. - Look for rotisserie chicken that is moist and flavorful. - Choose buffalo sauce that has a good balance of heat and flavor. - Select fresh herbs and vegetables to add brightness to your dish. - If making coleslaw, use crisp cabbage and fresh dressing for crunch. - Always taste as you go; adjust flavors to fit your palate. These tips ensure your Buffalo Chicken Sliders shine with flavor and freshness. For the full recipe, check out the instructions above. First, gather all your ingredients. You will need shredded chicken, buffalo sauce, ranch dressing, and slider rolls. In a medium bowl, mix the chicken with the buffalo sauce. Add salt and pepper to taste. Stir until the chicken is coated well. Next, make the creamy sauce. In a small bowl, mix the ranch dressing with blue cheese crumbles. Ensure it's well combined. This sauce adds a nice twist to your sliders. Heat a skillet over medium heat. Add olive oil and let it warm up. Once hot, add the buffalo chicken mixture. Cook for 4-5 minutes. Stir occasionally until the chicken is warmed. While the chicken heats, prepare your slider rolls. Cut them in half. Toast them until golden brown. You can use a grill pan or toaster oven for this. Now, assemble the sliders. On the bottom half of each roll, add the buffalo chicken. Top it with the creamy sauce and a small scoop of coleslaw. Finally, place the top half of the roll on each slider. If you like, cut each slider in half for easier handling. Serve with fresh celery sticks for added crunch. - Prepare the chicken: 5 minutes - Make the creamy sauce: 2 minutes - Heat the chicken: 4-5 minutes - Toast the rolls: 3-4 minutes - Assemble the sliders: 3 minutes Total cooking time is about 25 minutes. - Medium bowl for mixing - Small bowl for the sauce - Skillet for heating the chicken - Grill pan or toaster oven for toasting - Knife for cutting the rolls - Cutting board for easy prep Using these tools makes the process smooth and fun! Enjoy making these tasty buffalo chicken sliders. For the full details on this recipe, check the Full Recipe section. To make the best buffalo chicken sliders, use shredded rotisserie chicken. It saves time and adds flavor. Mix the chicken with buffalo sauce in a bowl. Adjust the sauce based on your spice level. I like a little heat, but you can tone it down. The creamy sauce is key. Mix ranch dressing with blue cheese in a separate bowl. This adds richness that balances the heat. Always toast the slider rolls; it makes a big difference. Toasting adds a nice crunch that everyone loves. One common mistake is not warming the chicken enough. Make sure to heat it until it’s hot all the way through. Another mistake is using too much sauce. It can make the sliders soggy. Stick to the recipe for the right balance. Also, don't skip the coleslaw. It gives the sliders freshness and a nice crunch. Lastly, avoid overloading the sliders. A little bit of filling goes a long way. Buffalo chicken sliders pair well with fresh celery sticks. They add a nice crunch and help cool your mouth. Serve them with chips for a fun crunch. If you want something healthier, try veggie sticks. You can also offer a side of extra ranch or blue cheese for dipping. Lastly, don’t forget drinks! A cold drink helps balance the heat from the sliders. {{image_2}} You can switch to a vegetarian option easily. Use shredded jackfruit or tempeh to mimic the chicken texture. Toss it in buffalo sauce just like you would the chicken. For a vegan choice, pick a dairy-free ranch dressing. This way, you get the same great taste without meat or dairy. Buffalo chicken sliders can be fun to change up. Try different sauces like barbecue or honey mustard for a twist. You can also add spices. A bit of garlic powder or paprika can boost the flavor. Mix in some hot sauce if you want extra heat. Experiment to find your favorite combo! You can make sliders any size you like. Smaller sliders are perfect for parties. Larger ones work well for a main meal. Stack them high for a fun presentation. Serve them on a big platter with celery sticks on the side. This adds crunch and freshness to your meal. For a full recipe, check out the detailed instructions I provided earlier. To keep your Buffalo Chicken Sliders fresh, store them in an airtight container. Place the sliders in the fridge for up to three days. If you separate the chicken from the buns, it will stay fresh longer. Always let the sliders cool before putting them in the fridge. This helps prevent sogginess. You can freeze leftover buffalo chicken to enjoy later. Place the chicken in a freezer-safe bag or container. It can last up to three months in the freezer. Avoid freezing the buns, as they can get mushy. When ready to eat, thaw the chicken overnight in the fridge. To reheat the chicken, use a skillet or microwave. If using a skillet, heat it on medium and stir the chicken until warm. This takes about 5 minutes. In the microwave, place the chicken in a bowl and cover it. Heat for one minute, then check and heat more if needed. For the buns, toast them lightly in a toaster or skillet before serving. Enjoy your sliders just like new! Serve Buffalo Chicken Sliders warm. Stack the sliders on a platter. This makes it easy for guests to grab one. You can add a side of celery sticks for crunch. A small bowl of extra ranch dressing also works great for dipping. Yes, you can use different types of chicken. Shredded rotisserie chicken works well, but you can also use cooked chicken breast or thighs. Both options give good flavor. Just make sure to shred or chop the chicken into small pieces for the best texture in your sliders. Great sides include coleslaw, potato chips, or a fresh salad. These sides balance the heat of the sliders. You might also serve carrot sticks and celery for a crunchy option. For drinks, try soda or iced tea to cool the spice. For the full recipe, check out the detailed steps to make Buffalo Chicken Sliders with a Creamy Twist. In this blog post, we explored the key ingredients and cooking steps for Buffalo Chicken Sliders. We talked about ingredient substitutions and tips for choosing the best options. You learned about the cooking process, timing, and tools needed. We covered common mistakes and serving ideas, plus variations for different diets. Lastly, we discussed how to store and reheat leftovers. Now, you're ready to make these sliders a hit at your next meal. Enjoy cooking!

Buffalo Chicken Sliders Tasty and Easy to Make

If you’re craving a quick and tasty meal, Buffalo Chicken Sliders are the answer. These mini sandwiches pack bold flavor

To make Lemon Herb Quinoa Salad, gather these fresh ingredients: - 1 cup quinoa - 2 cups vegetable broth (or water) - 1 large cucumber, diced - 1 cup cherry tomatoes, halved - 1/2 red onion, finely chopped - 1 cup fresh parsley, chopped - 1/2 cup fresh mint, chopped - 1/4 cup olive oil - Juice of 2 lemons - Salt and pepper to taste - 1/4 cup feta cheese, crumbled (optional) Quinoa is a great base for this salad. It is high in protein and fiber. This makes it filling and good for your health. The cucumber adds crunch and hydration. It is low in calories and high in water. Cherry tomatoes are sweet and rich in vitamins. They provide antioxidants. Fresh parsley and mint boost flavor and freshness. They also offer vitamins and minerals. Olive oil is a healthy fat. It helps keep your heart healthy. Lastly, feta cheese adds a creamy touch. It gives protein and calcium but can be skipped if you want a lighter dish. You can make this salad even more exciting with some add-ins. Consider diced bell peppers for extra crunch and color. You can add chickpeas for more protein. Avocado brings creaminess and healthy fats. If you like heat, try adding jalapeños. Nuts, like almonds or walnuts, give a nice crunch. Dried fruits, such as cranberries or raisins, add sweetness. Feel free to mix and match these options to suit your taste. For the full recipe, check out the detailed preparation steps! Start by rinsing the quinoa. Use a fine-mesh sieve. This helps remove any bitterness. Next, chop the cucumber, cherry tomatoes, red onion, parsley, and mint. Aim for even sizes to make the salad look nice. In a medium saucepan, combine the rinsed quinoa and vegetable broth. Bring it to a boil. Once boiling, reduce the heat to low. Cover and let it simmer for about 15 minutes. Check that all the liquid is absorbed. Remove it from heat and let it sit covered for another 5 minutes. Fluff the quinoa with a fork. Allow it to cool before mixing it with the vegetables. In a large bowl, mix the diced cucumber, halved tomatoes, chopped onion, parsley, and mint. Pour the olive oil and lemon juice over the vegetables. Add salt and pepper to taste. Once the quinoa is cool, add it to the bowl. Toss everything together gently. If you like feta cheese, sprinkle it on top. Serve the salad in a large bowl or on individual plates. For a fun twist, use mason jars for a portable option. Check the [Full Recipe] for more details! You can easily adapt this salad to fit many diets. For a gluten-free meal, ensure your quinoa is certified gluten-free. To make it vegan, simply skip the feta cheese or use a plant-based alternative. If you want more protein, add chickpeas or black beans. For those who avoid oil, replace olive oil with an avocado or a nut butter dressing. This salad is flexible to meet everyone’s needs. Many people forget to rinse quinoa before cooking. Rinsing removes a bitter coating called saponin. Another mistake is overcooking the quinoa. Cook it just until it absorbs all the liquid. Letting it sit too long after cooking can make it mushy. Also, don’t skip the seasoning. Salt and lemon juice are key for flavor. Always taste before serving and adjust as needed. To make your salad shine, focus on fresh herbs. Fresh parsley and mint add bright notes. The lemon juice gives it a zesty kick, so don’t hold back. A good balance of oil and acid is important too. Use a 3:1 ratio of oil to lemon juice for a rich dressing. Lastly, let the salad sit for a bit before serving. This helps all the flavors blend nicely. For the full recipe, check out the detailed instructions above. {{image_2}} You can make this Lemon Herb Quinoa Salad your own. Try adding different veggies, nuts, or seeds. For a nutty taste, toss in some chopped almonds or walnuts. Want a spicy kick? Add diced jalapeños or a sprinkle of red pepper flakes. Swap the cucumbers for bell peppers or zucchini for a refreshing twist. If you enjoy a sweet touch, add diced apples or grapes. The options are endless! This salad shines in every season. In spring, add fresh asparagus or peas for a vibrant touch. Summer calls for juicy peaches or corn to enhance its freshness. In fall, consider roasted butternut squash or cranberries for warmth and color. Winter can bring in roasted root veggies like sweet potatoes or carrots. Each season offers unique flavors that keep this salad exciting. Pairing the salad with protein boosts its nutrition. Grilled chicken or shrimp works well on warm days. For a vegetarian option, try chickpeas or black beans. You can also add grilled tofu for a plant-based protein source. If you enjoy seafood, consider smoked salmon or canned tuna. Each choice adds flavor and makes this dish a complete meal. For the full recipe, check out [Full Recipe]. After enjoying your Lemon Herb Quinoa Salad, store any leftovers in an airtight container. This keeps the salad fresh and tasty. Make sure the salad cools down to room temperature first. If you have extra dressing, store it separately. This way, it won’t make the salad soggy. The salad stays fresh in the fridge for about 3 to 5 days. Keep it in the airtight container. Check for any signs of spoilage before eating. If the salad looks or smells off, it’s time to toss it. Always trust your senses when it comes to food safety. You can freeze the salad for longer storage, but it may change the texture. To freeze, pack the salad in a freezer-safe container. Leave some space at the top for expansion. It’s best to eat the frozen salad within 1 to 2 months. To enjoy, thaw it in the fridge overnight or at room temperature. Keep in mind that fresh herbs may lose flavor, but the taste will still be good. For more tips, check the Full Recipe. To cook quinoa properly, start by rinsing it in cold water. This step removes any bitter taste. Next, combine one cup of rinsed quinoa with two cups of vegetable broth or water in a pot. Bring it to a boil. Then turn down the heat, cover it, and let it simmer for about 15 minutes. Once the liquid is gone, remove it from heat. Let it sit covered for another five minutes. Finally, fluff it with a fork. This method gives you light and fluffy quinoa. Yes, you can make Lemon Herb Quinoa Salad ahead of time. In fact, it tastes even better after chilling in the fridge for a few hours. Just follow the recipe as directed and let the salad cool completely. Then, store it in an airtight container. This way, the flavors blend well. You can prepare it a day in advance. Just give it a good toss before serving. If you want to replace feta cheese, try these options. Crumbled goat cheese works well with a similar tang. For a dairy-free option, use almond feta or tofu feta. You can also try nutritional yeast for a cheesy flavor without dairy. Each substitute gives a unique twist to the salad. Choose one that fits your taste or diet. This blog post covers all you need to know about quinoa salad. We explored key ingredients, their health benefits, and ways to customize the dish. You learned the step-by-step process for cooking and assembling it. Tips help you avoid common mistakes and enhance the flavor. We discussed variations to keep it fresh and exciting all year. Lastly, proper storage ensures your salad stays tasty for longer. Enjoy creating your perfect quinoa salad!

Lemon Herb Quinoa Salad Fresh and Flavorful Dish

If you’re looking for a fresh and tasty dish, you’ve found it! My Lemon Herb Quinoa Salad is packed with

- 2 pounds Yukon Gold potatoes - 4 cloves garlic - 1 cup sharp cheddar cheese - ½ cup cream cheese - ½ cup unsalted butter - ½ cup whole milk - Salt and pepper - ¼ cup fresh chives - Large pot - Potato masher or ricer - Small saucepan Gather these ingredients to create rich and flavorful cheesy garlic mashed potatoes. Yukon Gold potatoes give a creamy texture. Garlic adds a strong aroma and taste. Sharp cheddar cheese brings a nice bite, while cream cheese adds extra richness. Unsalted butter and whole milk make the potatoes smooth and creamy. Don't forget the salt and pepper for seasoning! Fresh chives add a pop of color and a mild onion flavor. You will also need a large pot to boil the potatoes. A potato masher or ricer helps achieve that creamy texture. A small saucepan is perfect for making the garlic butter. With these items ready, you are set to make a delightful side dish. Check out the Full Recipe for all the steps to create this dish! Start by peeling and cubing the 2 pounds of Yukon Gold potatoes. Cut them into even chunks. This helps them cook evenly. Place the cubed potatoes in a large pot and cover them with cold water. Add a pinch of salt to the water. Bring the pot to a boil over medium-high heat. Once boiling, turn down the heat to a simmer. Cook the potatoes for about 15 to 20 minutes. To check for tenderness, poke a potato chunk with a fork. If it goes in easily, the potatoes are done. Drain the potatoes well and return them to the pot. This step is key for fluffy mashed potatoes. While the potatoes are cooking, melt ½ cup of unsalted butter in a small saucepan over low heat. Add 4 cloves of minced garlic to the melted butter. Sauté the garlic for 1 to 2 minutes until it smells amazing. Be careful not to burn it. Once the garlic is fragrant, remove it from the heat. This will give your mashed potatoes a rich garlic flavor. Now it's time to mash! Use a potato masher or a ricer to mash the potatoes until they are smooth and creamy. This is where you can get creative. Stir in the melted garlic butter, ½ cup of cream cheese, and 1 cup of sharp cheddar cheese. Mix everything until the cheese melts and is fully combined. If the mashed potatoes seem too thick, add ½ cup of whole milk to reach your desired consistency. Season with salt and pepper to taste. Adjust the flavors as needed. Your cheesy garlic mashed potatoes are ready to shine! For the full recipe, refer to the earlier section. To make cheesy garlic mashed potatoes shine, choose sharp cheddar cheese. This cheese adds a strong, tangy taste. You can also mix in some cream cheese for creaminess. Season your potatoes well with salt and pepper. This step brings out all the flavors. Taste as you go to get it just right. Use a potato masher for a rustic texture. If you want it super smooth, a ricer works best. Avoid lumps by mashing while the potatoes are warm. This step helps them blend better. If you find any lumps, just keep mashing until smooth. These mashed potatoes pair great with meats like roast chicken or steak. For a vegetarian option, serve with grilled veggies. To make it pretty, sprinkle fresh chives on top. They add a pop of color and a fresh taste. For more ideas, check out the Full Recipe for serving tips! {{image_2}} You can switch up the type of potatoes you use. Yukon Gold potatoes are creamy, but you can also try Russets or red potatoes for a different taste. Each type adds its own flavor and texture. If you don’t have fresh garlic, garlic powder works well too. Use about 1 teaspoon for every clove you would normally use. It’s a simple swap that can save time. Get creative by adding herbs or spices. Fresh herbs like rosemary or thyme can give your mashed potatoes a bright touch. A sprinkle of paprika adds a nice kick, too. For a deeper flavor, try adding roasted garlic. Roast whole cloves until soft, then mash them in. The sweet, caramelized taste will take your dish to the next level. If you need to make it dairy-free or vegan, swap cream cheese and butter with plant-based versions. Use non-dairy milk like almond or oat milk to keep it creamy. For a low-carb option, you can replace potatoes with cauliflower. Steam the cauliflower until soft, then mash as you would with potatoes. It’s a great way to enjoy creamy mashed goodness without the carbs. For the full recipe, check the *Full Recipe*. After you enjoy your cheesy garlic mashed potatoes, let them cool first. Place leftovers in an airtight container. This keeps them fresh. Store them in the fridge. They will last for about 3 to 5 days. Always check for any off smells before eating. You can freeze mashed potatoes for later use. Start by letting them cool completely. Then, spoon the mashed potatoes into freezer-safe bags. Squeeze out as much air as you can. Label and date the bags. They will keep for up to 2 months in the freezer. To reheat, let them thaw overnight in the fridge. For best flavor and texture, add a little milk when reheating. You can reheat mashed potatoes in two main ways. For stovetop reheating, place them in a pot over low heat. Stir often and add a splash of milk to keep them creamy. For microwaving, place them in a bowl with a lid. Heat on medium power in short bursts, stirring in between. This keeps them from drying out. Enjoy those cheesy garlic mashed potatoes again! To make Cheesy Garlic Mashed Potatoes ahead, prepare them as usual. After mashing, let them cool. Store them in an airtight container in the fridge for up to two days. When you are ready to serve, reheat them on the stove or in the microwave. Add a splash of milk to keep them creamy. Stir often to heat evenly. Yes, you can use different cheeses! Try gouda for a smoky flavor or mozzarella for extra stretch. Parmesan gives a nice salty touch. If you want something unique, use blue cheese for a bold taste. Mix and match to find your favorite blend! These mashed potatoes pair well with many dishes. Serve them with roasted chicken or grilled steak for a hearty meal. They also go great with meatloaf or pork chops. For a vegetarian option, try them with sautéed greens or a rich mushroom sauce. Enjoy your meal! In this blog post, we explored the key ingredients and steps to make cheesy garlic mashed potatoes. We covered how to prepare, mash, and mix for the best flavor and texture. Plus, we shared tips for variations and storage. These mashed potatoes can elevate any meal. Experiment with flavors and enjoy the creamy goodness! Trust me, once you try these, you’ll want them at every dinner.

Cheesy Garlic Mashed Potatoes Rich and Flavorful Side

If you’re ready to elevate your side dishes, this recipe for Cheesy Garlic Mashed Potatoes is a game-changer. Loaded with

This creamy spinach artichoke pasta blends rich flavors and textures. It uses simple ingredients you can find easily. The dish is perfect for a weeknight meal or a cozy gathering. You will love how fast it comes together. - 12 oz pasta (penne or fettuccine) - 1 cup fresh spinach, chopped - 1 cup canned artichoke hearts, drained and chopped - 1 cup heavy cream - 1 cup mozzarella cheese, shredded - 1/2 cup Parmesan cheese, grated - 2 cloves garlic, minced - 2 tablespoons olive oil - 1 teaspoon Italian seasoning - Salt and pepper to taste - Fresh basil for garnish - A splash of lemon juice to add brightness - Red pepper flakes for a little heat - Sun-dried tomatoes for a sweet touch - Grilled chicken for extra protein - Crumbled feta cheese for a tangy bite Using these optional ingredients can take your dish to the next level. Feel free to mix and match to find your favorite combination. Start by bringing a large pot of salted water to a boil. Use about 4 quarts of water for every 12 ounces of pasta. Add the pasta to the pot and cook it according to the package instructions. You want it to be al dente, which means it should be firm but not hard. This usually takes about 8 to 10 minutes. Once done, drain the pasta in a colander and set it aside. In a large skillet, heat 2 tablespoons of olive oil over medium heat. Add 2 cloves of minced garlic and sauté for about 1 minute. You want the garlic to be fragrant but not burnt. Next, add 1 cup of chopped artichoke hearts. Sauté these for 2 to 3 minutes until they are warm. Now, pour in 1 cup of heavy cream and stir it well. Let it simmer for 3 to 4 minutes until it thickens. Lower the heat and add 1 cup of shredded mozzarella cheese. Stir until it melts into the cream. Finally, add 1 cup of chopped spinach and 1 teaspoon of Italian seasoning. Cook for another 2 to 3 minutes until the spinach wilts. Now it’s time to bring it all together! Toss the cooked pasta into the creamy sauce. Mix it well so every piece of pasta gets coated. Season it with salt and pepper to taste. Remove the skillet from the heat and stir in 1/2 cup of grated Parmesan cheese. Let it sit for a couple of minutes to thicken further. Serve your dish hot, garnished with fresh basil leaves and extra Parmesan if you like. For the full recipe, check out the detailed steps above. To make your sauce creamy, use heavy cream. It gives the best texture. Heat the cream slowly. Stir it gently. This helps it thicken well. You can also blend in some mozzarella cheese. It melts nicely and adds richness. For an even creamier sauce, add a splash of pasta water. This will help bind everything together. If you want a dairy-free version, swap heavy cream for coconut milk. It gives a nice flavor without dairy. Use vegan cheese instead of mozzarella and Parmesan. Nutritional yeast can add a cheesy taste too. You can also try cashew cream for creaminess. Just soak cashews in water, blend until smooth, and add it to your sauce. Season your dish well for the best taste. Besides salt and pepper, try adding garlic powder or onion powder. A squeeze of lemon juice can brighten the flavors. Fresh herbs like basil or parsley are great too. You can even add a pinch of red pepper flakes for a little heat. Remember, taste as you go! Adjust the seasonings to your liking for the perfect dish. For even more tips, check out the Full Recipe for Spinach Artichoke Pasta. {{image_2}} You can easily add chicken to your spinach artichoke pasta. Grilled or sautéed chicken works well. Start by cooking the chicken separately. Once it’s done, slice it into strips. Toss it in with the creamy sauce before mixing in the pasta. The chicken adds protein and makes the meal more filling. This variation is great for a hearty dinner. You can also mix in other veggies. Frozen peas are a quick and tasty option. Simply add them during the last few minutes of cooking. Sun-dried tomatoes provide a burst of flavor. Chop them up and stir them into the sauce. Both options add color and nutrition to the dish. Feel free to experiment with your favorite veggies. Cheese is a key part of this dish. If you want a twist, try feta or goat cheese. Both bring a tangy flavor that pairs well with spinach and artichokes. Simply crumble them into the sauce before adding the pasta. For a dairy-free option, use vegan cheese. Look for brands that melt well. This way, everyone can enjoy this creamy pasta. For the full recipe, check out the details above. Store any leftover spinach artichoke pasta in an airtight container. This keeps it fresh. Place it in the fridge. It will last for about three days. Make sure to cool it down first before sealing. This helps prevent condensation inside the container. When you're ready to eat the leftovers, reheat them on the stove for best flavor. Add a splash of water or cream to keep the pasta moist. Heat it gently over medium-low heat. Stir often to prevent sticking. You can also use a microwave. Just cover the bowl with a lid or wrap. Heat in short bursts of 30 seconds. Stir between each burst until it's warm. You can freeze this pasta for later. Let it cool completely first. Then, place it in a freezer-safe container or bag. Try to remove as much air as possible. Label it with the date. It can stay good for up to three months. When you're ready to eat it, thaw it in the fridge overnight. Reheat it as described above. Enjoy a quick meal anytime! For the full recipe, check out the details above. You can serve this pasta with many sides. A simple green salad works well. Garlic bread is also a great choice. You can even pair it with grilled chicken for extra protein. Yes, you can prepare this dish ahead of time. Cook the pasta and sauce separately. Store them in the fridge. When ready to eat, reheat and combine. This way, you save time on busy days. To make this dish gluten-free, use gluten-free pasta. Many brands offer great options that taste good. Check the label to ensure the pasta is certified gluten-free. To boost the flavor, add more garlic or herbs. Fresh basil and parsley add brightness. A dash of lemon juice can also lift the dish. For a kick, sprinkle some red pepper flakes on top. These simple tweaks make a big difference. For the complete cooking process, check out the Full Recipe for details. In this post, we explored how to create the best Spinach Artichoke Pasta. I covered the main ingredients and optional extras that can boost flavor. You learned step-by-step instructions for cooking the pasta and sauce. I shared tips for a creamy sauce and dairy-free options. We looked at tasty variations and how to store leftovers. Now, you can enjoy a delicious meal while customizing it your way. Let's bring flavor and comfort to your table!

Savory Spinach Artichoke Pasta Easy and Flavorful Dish

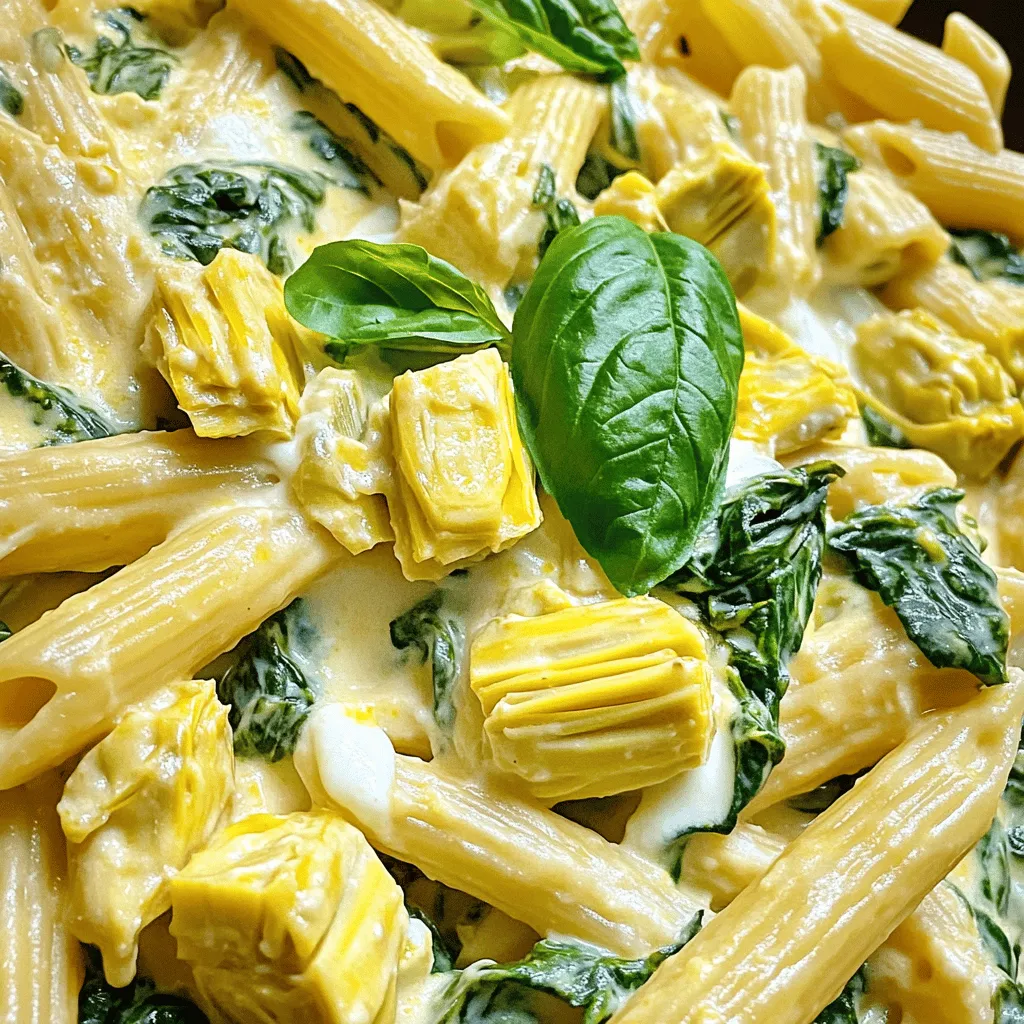
Are you craving a quick and tasty meal? Let me introduce you to my Savory Spinach Artichoke Pasta. This dish

Older posts
Newer posts
← Previous Page1 … Page17 Page18 Page19 … Page65 Next →

dsad

© 2025 Cooking Wells • Built with GeneratePress

Our Policies

  • Copyright Policy
  • Cookie Policy
  • GDPR Policy
  • Privacy Policy
  • Disclaimer
  • Terms Of Use

More Information

  • Home
  • About
  • Contact
  • Appetizers
  • Dessert
  • Dinner
  • Drinks
©2025, Cooking Wells About Back To Top