![To make a tasty spinach and mushroom frittata, you need a few key items: - 6 large eggs - 1 cup fresh spinach, chopped - 1 cup mushrooms, sliced (cremini or button work well) - 1 small onion, finely diced - 1 clove garlic, minced - ½ cup grated mozzarella cheese - ¼ cup milk - 2 tablespoons olive oil - Salt and pepper to taste These ingredients bring flavor and nutrition together in this dish. You can enhance your frittata with extra ingredients. Here are some ideas: - Diced bell peppers for sweetness - Fresh herbs like basil or chives for freshness - Crumbled feta cheese for a tangy kick - Cooked bacon or sausage for a meaty option Feel free to mix and match based on what you enjoy! Don’t worry if you can’t find an ingredient. Here are some easy swaps: - Use kale or Swiss chard instead of spinach - Swap mushrooms for zucchini or bell peppers - Substitute any cheese you like, such as cheddar or goat cheese - Use almond milk or oat milk for a dairy-free version These substitutions can keep your frittata fresh and exciting. For the complete recipe, check out the Full Recipe section. Start by preheating your oven to 375°F (190°C). This step is key for a perfect frittata. While the oven warms up, gather your ingredients. You’ll need eggs, spinach, mushrooms, onion, garlic, cheese, milk, olive oil, salt, and pepper. Having everything ready makes the cooking process smoother. In a large oven-safe skillet, heat two tablespoons of olive oil over medium heat. Add the diced onion first. Cook it for about 3-4 minutes until it turns translucent. Then, add the sliced mushrooms. Stir them for about 5 minutes until they become golden brown. This caramelization adds great flavor. Next, toss in the minced garlic and chopped spinach. Cook this mixture for 1-2 minutes until the spinach wilts. This adds a fresh taste to your dish. While the veggies cook, crack 6 large eggs into a bowl. Add ¼ cup of milk, salt, and pepper. Whisk these ingredients together until mixed well. Once the vegetables are ready, pour the egg mixture over them. Make sure it covers them evenly. Sprinkle ½ cup of grated mozzarella cheese on top. This cheese melts beautifully and adds richness. Now, let’s move to the stovetop. Cook the skillet on medium for about 3-4 minutes. You’ll see the edges start to set. Once this happens, carefully transfer the skillet to your preheated oven. Bake for 15-20 minutes. You’ll know it’s done when the frittata is puffed and golden brown in the center. After baking, let it cool for a few minutes. Slice it into wedges and serve warm. For a pretty touch, garnish with fresh parsley. This frittata is a simple and delicious meal, perfect for any time of day. For the full recipe, check out [Full Recipe]. To get a great texture in your frittata, focus on cooking time. Cook the vegetables until they are soft but not mushy. When you mix in the egg, don’t over-stir. This keeps the frittata fluffy. Bake it just until it is puffed and golden. A slight jiggle in the center is fine; it will set as it cools. One mistake is cooking the frittata too long. This makes it dry. Another is not seasoning the egg mixture. Always add salt and pepper to enhance flavor. Avoid using too many watery veggies, as they can make the frittata soggy. Lastly, don’t skip the oven step; it helps achieve that nice, fluffy texture. Serve the frittata warm, garnished with fresh parsley for color. It pairs well with a simple side salad. A light vinaigrette can add a nice zing. For drinks, try pairing it with fresh juice or coffee. To level up your meal, add some crusty bread on the side. For more details, check the Full Recipe. {{image_2}} You can change the frittata by adding other veggies. Try bell peppers, zucchini, or tomatoes. Each vegetable brings its own taste. For a spicy kick, add jalapeños or red pepper flakes. You can also include cooked bacon or sausage for extra flavor. Just remember to adjust cooking time for denser ingredients. Cheese makes it creamy and rich. Besides mozzarella, you can use cheddar or feta. Goat cheese adds a tangy twist. For a milder taste, try Swiss cheese. Mix different cheeses for a unique flavor. Just keep in mind that some cheeses melt better than others. You can easily make this frittata gluten-free. All the main ingredients are already gluten-free. For dairy-free options, use almond milk or oat milk. Substitute cheese with vegan cheese or nutritional yeast for a cheesy flavor without dairy. These swaps keep your frittata tasty and inclusive for all diets. For the full recipe, check the section above. After making the spinach and mushroom frittata, let it cool completely. Slice it into wedges. Store leftovers in an airtight container. This helps keep it fresh. Place the container in the fridge. It will last for about 3 to 4 days. Avoid stacking the slices on top of each other. This keeps them from sticking. When you want to enjoy the frittata again, use the oven or microwave. For the oven, preheat it to 350°F (175°C). Place the slices on a baking sheet. Heat for about 10-15 minutes. This method keeps the texture nice. If you use a microwave, heat for 30 seconds to 1 minute. Check often to avoid overcooking. You can freeze the frittata for later. Wrap individual slices tightly in plastic wrap. Then, place them in a freezer-safe bag. Be sure to remove as much air as possible. Label the bag with the date. The frittata can last up to 3 months in the freezer. To thaw, place it in the fridge overnight. Then reheat as needed. This way, you always have a quick meal ready! A frittata lasts about 3 to 4 days in the fridge. Make sure to store it in an airtight container. This keeps the frittata fresh. If you notice any change in smell or texture, it’s best to throw it out. Yes, you can make a frittata ahead of time. It’s perfect for meal prep. Just cook it, let it cool, and store it in the fridge. You can reheat it before serving. This makes busy mornings much easier. Cut a frittata into wedges for easy serving. Use a sharp knife for clean cuts. You can serve it warm or at room temperature. Garnish with fresh parsley for a nice look. Pair it with a simple salad or toast for a full meal. Yes, you can make a frittata without eggs. Use chickpea flour instead. Mix it with water to form a batter. This creates a similar texture. Add your favorite veggies and bake. It’s a great option for those avoiding eggs. For the full recipe, check the Spinach & Mushroom Frittata section above. You now have the tools to make a delicious spinach and mushroom frittata. We covered key ingredients, cooking steps, and tips for the best texture. You learned how to add flavors with optional ingredients and substitutions. Plus, we explored ways to store and reheat leftovers safely. Cooking should be fun and creative, so feel free to try different vegetables and cheeses. With these insights, your frittata will shine at any meal. Enjoy your cooking adventure!](https://cookingwells.com/wp-content/uploads/2025/06/76ac4d66-97ff-48b8-849c-347fcb615809.webp)
Spinach and Mushroom Frittata Simple Delicious Meal
Looking for a tasty, simple meal? This Spinach and Mushroom Frittata is perfect for you! Packed with healthy greens and
Looking for a tasty, simple meal? This Spinach and Mushroom Frittata is perfect for you! Packed with healthy greens and
![To make this tasty coconut lime rice, gather these simple ingredients: - 1 cup jasmine rice - 1 cup coconut milk - 1 cup water - 1 tablespoon lime juice - Zest of 1 lime - 1 tablespoon sugar - 1/2 teaspoon salt - Fresh cilantro, chopped (for garnish) - Toasted coconut flakes (for garnish) When measuring ingredients, be precise. Use a dry measuring cup for rice and a liquid measuring cup for coconut milk and water. Rinse the jasmine rice until the water runs clear. This step helps remove extra starch. It makes the rice less sticky and more fluffy. The lime juice and zest add a bright flavor. I recommend using fresh limes for the best taste. The sugar balances the tangy lime. Use granulated sugar for this recipe. If you can’t find jasmine rice, you can use basmati rice instead. It has a similar texture and flavor. For a lighter option, you can replace coconut milk with low-fat coconut milk. Just keep in mind that the taste may change slightly. If you want a dairy-free version, you can swap sugar with maple syrup or honey. For a nutty flavor, try adding slivered almonds as a garnish instead of coconut flakes. These changes can help you make this dish fit your needs. For the full recipe, check out the complete directions to make this flavorful side dish. To start, you need to rinse the jasmine rice. Rinse it under cold water. Keep going until the water runs clear. This step removes extra starch. Removing starch keeps the rice from getting too sticky. Next, gather your ingredients. You will need: - 1 cup jasmine rice - 1 cup coconut milk - 1 cup water - 1 tablespoon lime juice - Zest of 1 lime - 1 tablespoon sugar - 1/2 teaspoon salt - Fresh cilantro, chopped (for garnish) - Toasted coconut flakes (for garnish) Now, you are ready to cook! In a medium saucepan, combine the rinsed rice, coconut milk, water, lime juice, lime zest, sugar, and salt. Stir everything well. Heat the mixture over medium-high heat. Wait for it to boil. Once it boils, reduce the heat to low. Cover the pan tightly. Let it simmer for about 15-20 minutes. You want the rice to absorb all the liquid and become tender. After cooking, turn off the heat. Keep the lid on and let it sit for 5 minutes. This allows the rice to steam. After 5 minutes, remove the lid. Use a fork to fluff the rice gently. This step helps separate the grains. If you want extra flavor, mix in a bit of lime zest when fluffing. Transfer the rice to a serving bowl. Garnish it with fresh cilantro and toasted coconut flakes. For the full recipe, check [Full Recipe]. Enjoy your tasty and flavorful coconut lime rice! When making coconut lime rice, avoid these common errors: - Not rinsing the rice: Rinsing removes extra starch. This step stops your rice from being too sticky. - Skipping the lime zest: The zest adds a strong, fresh flavor. Don’t leave it out! - Overcooking the rice: Keep an eye on the cooking time. Too long makes it mushy. - Not letting it steam: After cooking, let the rice sit covered. This helps it fluff up nicely. To make your coconut lime rice even tastier, try these ideas: - Add fresh herbs: Chopped cilantro or mint gives a bright touch. - Use broth instead of water: This adds depth. Chicken or vegetable broth works well. - Mix in spices: Try adding a pinch of cumin or turmeric for warmth. - Include toasted nuts: Chopped cashews or almonds add a nice crunch. For this recipe, you’ll need a few basic tools: - Medium saucepan: This is where you’ll combine all the ingredients. - Measuring cups and spoons: Accurate measurements are key for great flavor. - Colander: Use this to rinse the rice thoroughly. - Fork: A fork is perfect for fluffing your rice after cooking. With the right tools and knowledge, you can create a flavorful dish. For the full recipe, check out the Tropical Coconut Lime Rice recipe. {{image_2}} You can make coconut lime rice with other grains. Try using quinoa for a nutty taste. Brown rice adds a heartier texture. The cooking time may change, so check often. For quinoa, use about 15 minutes; for brown rice, it takes around 30-40 minutes. Adjust the liquid as needed. This way, you can enjoy varied flavors while keeping the coconut lime essence. Want to make your meal heartier? Add proteins like shrimp, chicken, or tofu. Cook the proteins separately, then mix them into the rice before serving. For shrimp, sauté them until pink. For chicken, grill or bake it, then chop it up. Tofu can be cubed and pan-fried for a crispy bite. This addition makes the dish filling and delicious, perfect for a main course. Tropical fruits can brighten your coconut lime rice. Consider adding pineapple or mango for a sweet contrast. Dice the fruit and fold it in right before serving. You can also top the dish with slices of avocado for creaminess. This makes the meal colorful and fresh. Each bite becomes a burst of flavor, taking you straight to the tropics. For detailed instructions on making coconut lime rice, check the Full Recipe. After you make coconut lime rice, let it cool. Store it in a container with a tight lid. Keep it in the fridge for up to four days. If you want to keep it longer, freezing is a great option. Make sure it cools completely before you freeze it. To reheat your coconut lime rice, use the microwave or a stovetop. If using the microwave, place the rice in a bowl. Add a splash of water to keep it moist. Cover it with a damp paper towel. Heat it for about one to two minutes. Stir halfway through to ensure even heating. On the stovetop, add a bit of coconut milk to a pan. Heat over low heat, stirring often until warm. If you want to freeze coconut lime rice, portion it into freezer bags. Remove as much air as you can before sealing. Label the bags with the date. You can freeze it for up to three months. When ready to eat, thaw it in the fridge overnight. Then, reheat it as mentioned above. This keeps the flavors fresh and delicious. Coconut Lime Rice can last for about four to five days in the fridge. Make sure to store it in an airtight container. This helps keep it fresh and prevents odors from mixing in. Before serving, check for any signs of spoilage, like a bad smell or unusual texture. Yes, you can use brown rice instead of jasmine rice. However, brown rice takes longer to cook. You will need to adjust the water and cooking time. Brown rice has a nuttier flavor and chewier texture, which adds a nice twist to the dish. Just be sure to follow the cooking instructions for brown rice for the best results. Coconut Lime Rice pairs well with many dishes. It complements grilled shrimp, chicken, or fish. You can also serve it alongside spicy curries or stir-fried vegetables. The fresh lime and coconut flavors enhance these dishes, creating a delightful meal. For the full recipe, check out the Tropical Coconut Lime Rice recipe. Coconut lime rice is easy to make and tasty. We covered the key ingredients, steps, and helpful tips. You learned about good substitutes and common mistakes to avoid. We also explored fun variations and smart storage tips. With these insights, you can create a delicious dish every time. Enjoy crafting your coconut lime rice and impress your family with your cooking skills!](https://cookingwells.com/wp-content/uploads/2025/06/28645123-1de0-458b-8831-ecf8a389f446.webp)
Looking for a side dish that pops with flavor? My Coconut Lime Rice is the answer! This dish combines creamy
![This wild rice and cranberry salad is fresh, tasty, and easy to make. It combines nutty wild rice with sweet cranberries and crunchy veggies. You can find the full recipe above. - Wild Rice: This grain is higher in protein than regular rice. It also has fiber, which helps digestion. - Cranberries: These berries add a sweet-tart flavor and are rich in antioxidants. They help support your immune system. - Cucumbers: They bring crunch and hydration, making the salad refreshing. - Red Bell Pepper: This adds color and vitamin C, boosting your health. - Red Onion: Adds a sharp flavor and has anti-inflammatory properties. - Walnuts or Pecans: These nuts add healthy fats and protein, making the salad filling. - Parsley: This herb adds a fresh taste and is packed with vitamins. - Olive Oil: A great source of healthy fats, it also enhances flavor. - Apple Cider Vinegar: This gives a zesty kick and may help with digestion. - Maple Syrup: A natural sweetener that balances the salad’s flavors. You can mix in other ingredients for extra flavor and nutrition, such as: - Feta Cheese: For a creamy touch. - Apple Slices: For added sweetness and crunch. - Chickpeas: For extra protein and fiber. - Spinach or Kale: For more greens and nutrients. - Sunflower Seeds: For crunch and healthy fats. Feel free to customize this salad to fit your taste! To start, rinse the wild rice under cold water. This step helps remove dirt and impurities. Next, grab a medium saucepan and add the rinsed wild rice along with 3 cups of vegetable broth. Bring the mixture to a boil. Once it boils, reduce the heat to low. Cover the pot and let it simmer for about 45 to 50 minutes. You want the rice to be tender and burst open. After cooking, drain any excess liquid if needed. This wild rice forms the hearty base of your salad. If you choose fresh cranberries, boil them in a small pot of water for about 5 to 10 minutes. You will see them start to burst. This step helps soften their tartness. Once they burst, drain the cranberries and set them aside. If you decide to use dried cranberries, you can skip this step. They add sweetness and chewiness right away. Both options will work, but fresh cranberries give a lovely pop of flavor. In a large mixing bowl, combine the cooked wild rice and your cranberries. Next, add diced cucumbers, diced red bell pepper, and chopped red onion. Toss in walnuts or pecans for crunch. Finally, fold in the chopped parsley for a fresh touch. In a separate bowl, whisk together olive oil, apple cider vinegar, maple syrup, salt, and pepper. Pour this dressing over your salad mixture. Toss everything gently to combine. For the best taste, let the salad chill in the fridge for about 30 minutes. This resting time allows all the flavors to mingle. Check the seasoning and adjust if needed. Enjoy your fresh and vibrant wild rice and cranberry salad! For the full recipe, refer to the earlier section. To boost the flavors in your wild rice and cranberry salad, use fresh herbs. Adding basil or mint can make a big difference. You can also try different dressings. A citrus vinaigrette or a yogurt-based dressing will add a new twist. For a bit of heat, toss in some diced jalapeños or a dash of hot sauce. They bring a nice kick to the salad. Texture is key in this salad. The wild rice gives a chewy bite, while the nuts add crunch. For extra texture, try adding roasted chickpeas or sunflower seeds. They will give you a nice contrast. Also, consider including some diced avocado for creaminess. Just add it right before serving to keep it fresh. A beautiful salad looks more appetizing. Serve the wild rice salad in a large bowl with a colorful garnish. Use whole cranberries and a sprinkle of parsley. This adds a pop of color and makes it inviting. You can also plate individual servings for a more elegant touch. Consider using a ring mold to shape the salad neatly on each plate. For a final touch, drizzle some extra dressing on top for a gorgeous finish. Check out the Full Recipe for more details on making this delicious dish! {{image_2}} You can easily swap ingredients to meet your needs. If you have nut allergies, skip the walnuts or pecans. Try sunflower seeds for a crunchy twist. If you want a sweeter taste, use honey instead of maple syrup. You can also replace the olive oil with avocado oil for a different flavor. If you prefer a gluten-free option, this salad is already gluten-free with wild rice. This salad shines with seasonal ingredients. In spring, add fresh peas or asparagus. In summer, include diced tomatoes or corn for a sweet crunch. In the fall, consider adding diced apples for a crisp texture. Winter brings roasted veggies like squash or Brussels sprouts, adding warmth and flavor. Each season offers a chance to change the salad and keep it fresh. This wild rice and cranberry salad fits many diets. It’s vegan and gluten-free, making it a great choice for most eaters. To make it lower in carbs, reduce the wild rice and add more veggies. If you seek protein, consider adding chickpeas or grilled chicken. This salad can adapt to many diets while still tasting amazing. Check the [Full Recipe] for more ideas! To keep your wild rice and cranberry salad fresh, store it in an airtight container. Make sure it cools down before sealing. This helps keep moisture out and preserves flavor. If you plan to eat it later, store the dressing separately. This keeps the salad crisp and prevents sogginess. When stored properly, this salad lasts about 3 to 5 days in the fridge. The wild rice holds up well, but the fresh vegetables may wilt over time. If you notice any off-smells or changes in color, it’s best to toss it out. Always trust your senses to judge freshness. This salad tastes best cold, so I do not recommend reheating. If you prefer it warm, gently heat it on the stove. Use low heat and stir often to avoid burning. Add a splash of vegetable broth if it seems dry. Enjoy the fresh flavors as they were meant to be! For the full recipe, check out the detailed steps above. Yes, you can use regular rice. However, wild rice gives a unique taste and texture. It has a nutty flavor and a chewy bite. Regular rice will not provide the same experience. If you decide to substitute, use a long-grain rice for the best results. Absolutely! This salad is a great choice for meal prep. It tastes even better after it sits in the fridge. You can easily store it in airtight containers. Just remember to keep the dressing separate until you are ready to eat. This keeps everything fresh and crunchy. To make this salad vegan, simply check your ingredients. The recipe is already vegan. Use maple syrup as the sweetener. Ensure your vegetable broth is plant-based. This way, you can enjoy a tasty and healthy salad. You can also add more veggies or nuts for extra flavor. For more details, check the Full Recipe. This blog post covered a delicious wild rice salad. We explored key ingredients and their benefits, plus preparation steps for fresh and dried cranberries. I shared tips on flavor, texture, and how to present your dish nicely. We also talked about substitutions for allergies and storage practices to keep your salad fresh. With this recipe, you can make a tasty meal that suits many diets. Enjoy making this salad your own and share it with friends!](https://cookingwells.com/wp-content/uploads/2025/06/64044f61-ae4d-44cc-a2a0-8f37c24a6205.webp)
Looking for a fresh and tasty dish? My Wild Rice and Cranberry Salad is just what you need! Packed with
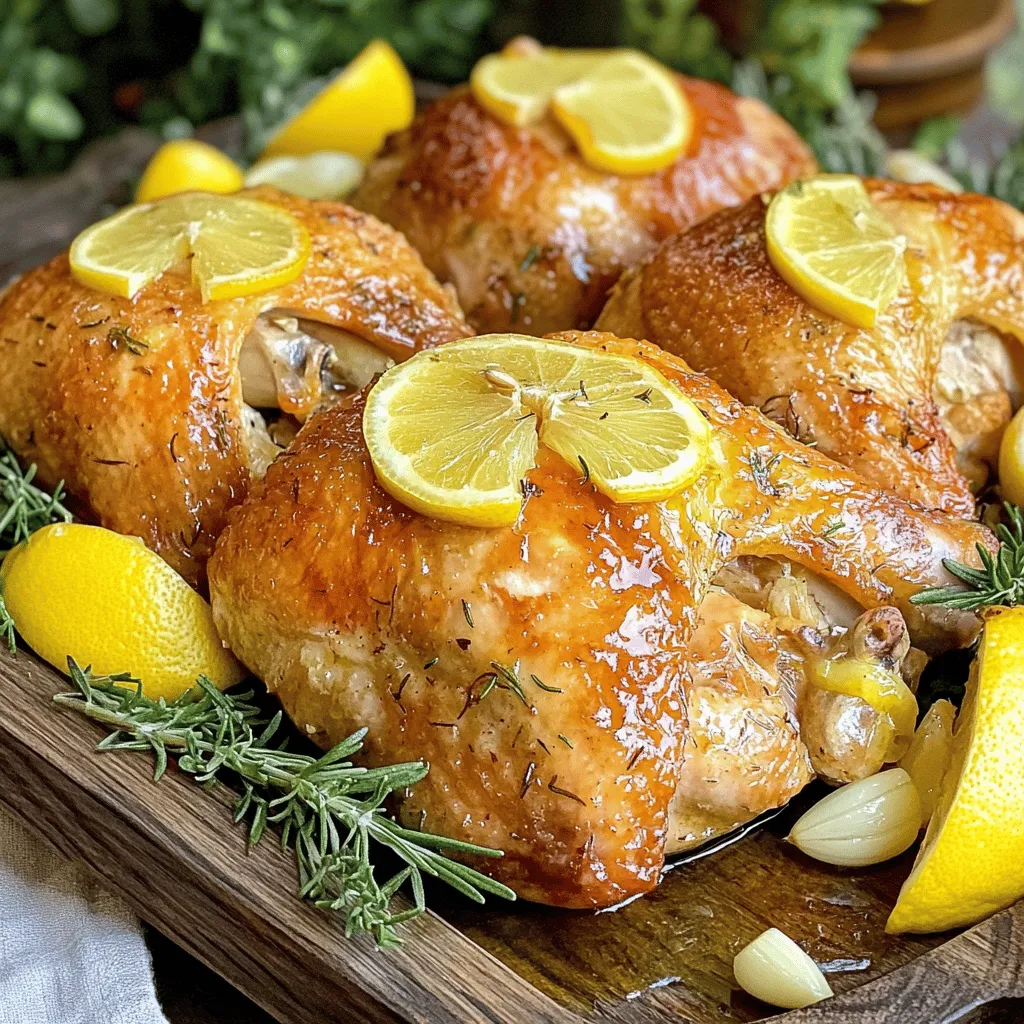
Looking for a delicious family meal? Lemon Garlic Roasted Chicken is your answer. This dish pairs juicy chicken with bright
![- 2 cups Bomba rice or any short-grain rice - 4 cups seafood stock (homemade or store-bought) - 1 small onion, finely chopped - 3 cloves garlic, minced - 1 red bell pepper, diced - 1 cup green peas (fresh or frozen) - 1 teaspoon smoked paprika - 1 pinch of saffron threads - 200g squid, cleaned and sliced into rings - 200g shrimp, peeled and deveined - 200g mussels, cleaned - 1 tablespoon olive oil - Salt and pepper to taste - Fresh parsley, chopped, for garnish - Lemon wedges, for serving Saffron is key to this dish. It gives a rich color and unique flavor. Use high-quality saffron for the best taste. The seafood stock adds depth. You can make your own or buy it. Bomba rice is ideal for paella. It absorbs liquid well and stays firm. The vegetables bring freshness. Onions and garlic add a savory base. Red bell peppers add sweetness and color. Green peas provide a nice pop. Smoked paprika gives a hint of smokiness that pairs well with seafood. When choosing seafood, look for fresh options. Squid, shrimp, and mussels are classic picks. You can mix in other seafood if you like. Just ensure everything is cleaned and prepped before cooking. This list covers everything you need for a delicious saffron infused seafood paella. For the complete recipe, check the Full Recipe section. Enjoy cooking! - Soak saffron threads in seafood stock. This helps release their rich flavor. - Sauté vegetables in olive oil. Start with onion and bell pepper for sweetness. - Toast the rice and add liquid. This gives the rice a nice nutty taste. - Arrange seafood on top. Place shrimp, mussels, and squid evenly across the rice. - Rest the paella for 5 minutes. This allows the flavors to meld together. - Garnish with parsley and serve with lemon wedges. The lemon adds a refreshing zing. For detailed steps, check the Full Recipe. - Importance of quality saffron: Use high-quality saffron for the best flavor. Look for deep red threads, as they offer rich taste and color. Cheap saffron may lack flavor and turn your dish dull. - How to avoid mushy rice: To keep rice firm, use the right amount of stock. Always measure your liquid carefully. Once the rice begins to cook, do not stir it. This helps create a nice crust at the bottom called "socarrat." - Best sides to pair with paella: Serve your paella with a fresh green salad. A simple arugula salad with a lemon vinaigrette works well. You can also add crusty bread to soak up the delicious juices. - Ideal drinks for pairing: Enjoy your paella with a chilled white wine, like Albariño. If you prefer non-alcoholic options, try sparkling water with lemon. Both choices enhance the seafood flavors. - Garnishing techniques: Sprinkle fresh parsley over the paella for color. Add lemon wedges for a zesty touch. You can also use edible flowers for a lovely pop of color. - Serving style for gatherings: Serve paella directly from the pan for a rustic feel. This invites guests to help themselves. Provide large spoons for easy serving and let everyone enjoy this flavorful dish together. For the complete recipe, check out the [Full Recipe]. {{image_2}} You can switch up the seafood for your paella. Try using: - Scallops for a sweet, tender bite. - Clams for a salty, briny flavor. - Crab for a rich taste. For a vegetarian option, use: - Artichokes for a meaty texture. - Bell peppers and zucchini for sweetness. - Chickpeas for added protein and fiber. Add more taste to your paella with these extras: - Chorizo for a spicy kick and smoky flavor. - Fresh herbs like thyme or rosemary for depth. - A splash of white wine for acidity. You can also play with spices: - Use saffron and smoked paprika for warmth. - Add chili flakes for heat. - Incorporate lemon zest for brightness. If you need gluten-free options, use: - Gluten-free rice, like Arborio or any short-grain variety. - Ensure your seafood stock is gluten-free. For allergies, adjust as follows: - Substitute seafood with vegetables or tofu for a vegan dish. - Check all labels for allergens in spices or broth. These variations let you customize your saffron infused seafood paella to fit any taste or diet. Enjoy making it your own! For the full recipe, check out [Full Recipe]. To store leftovers, let your paella cool first. Place it in an airtight container. This keeps the flavors fresh. Store it in the fridge for up to three days. To reheat, add a splash of seafood stock to keep it moist. Heat it on the stove over low heat. Stir gently until warmed through. You can also use the microwave, but cover it to avoid drying out. For freezing paella safely, let it cool completely. Portion it into freezer-safe bags or containers. Remove as much air as possible to avoid freezer burn. Paella can be frozen for up to three months. When you're ready to eat, thaw it overnight in the fridge. Reheat on the stove with a little seafood stock. This helps bring back the flavors and texture. In the fridge, your saffron infused seafood paella lasts about three days. If you see any mold or off smells, it’s best to toss it. Signs your paella has gone bad include a sour smell or slimy texture. Always trust your senses. When in doubt, throw it out to stay safe. Can I use different types of rice? Yes, you can use other short-grain rice. Bomba rice is best, but Valencia rice works too. Just remember that different rice absorbs liquid differently. Adjust your stock as needed. How can I make it spicier? To make your paella spicier, add some diced jalapeños or crushed red pepper flakes. You can also use spicy paprika instead of smoked paprika. Start small and taste as you go. What are the best seafood combinations? Great seafood options include shrimp, mussels, and squid. You can also try clams, scallops, or even fish. Choose what you like best for a mix that excites your palate. Do I need a special pan for paella? A paella pan is ideal. It’s wide and shallow, helping the rice cook evenly. If you don’t have one, a large skillet can work too. Just spread the rice out as much as possible. How do I know when the rice is done? The rice should be tender but not mushy. When it absorbs the stock, it’s almost done. You can taste it to check. A slight bite is perfect, known as "al dente." Can I substitute saffron with anything? Saffron adds unique flavor and color, but you can use turmeric for color. It won’t taste the same, but it can work in a pinch. Use a smaller amount since turmeric is stronger. What variations are recommended for dietary restrictions? For vegetarian options, skip the seafood and add more veggies. Use vegetable stock instead of seafood stock. You can also use tofu or chickpeas for protein. Always adjust seasonings for taste. This blog post covered everything you need to make saffron-infused seafood paella. We discussed the key ingredients, step-by-step cooking instructions, and serving tips. I also shared ways to store leftovers and answer common questions. Whether you’re an expert cook or just starting, you can enjoy this dish. With slight tweaks, you can customize it for any taste. Get ready to delight your guests with this vibrant and flavorful meal!](https://cookingwells.com/wp-content/uploads/2025/06/d1161265-66c9-4573-8abf-4e8cf400ecad.webp)
Ready to treat your taste buds? My Saffron Infused Seafood Paella will take you straight to Spain with every bite!
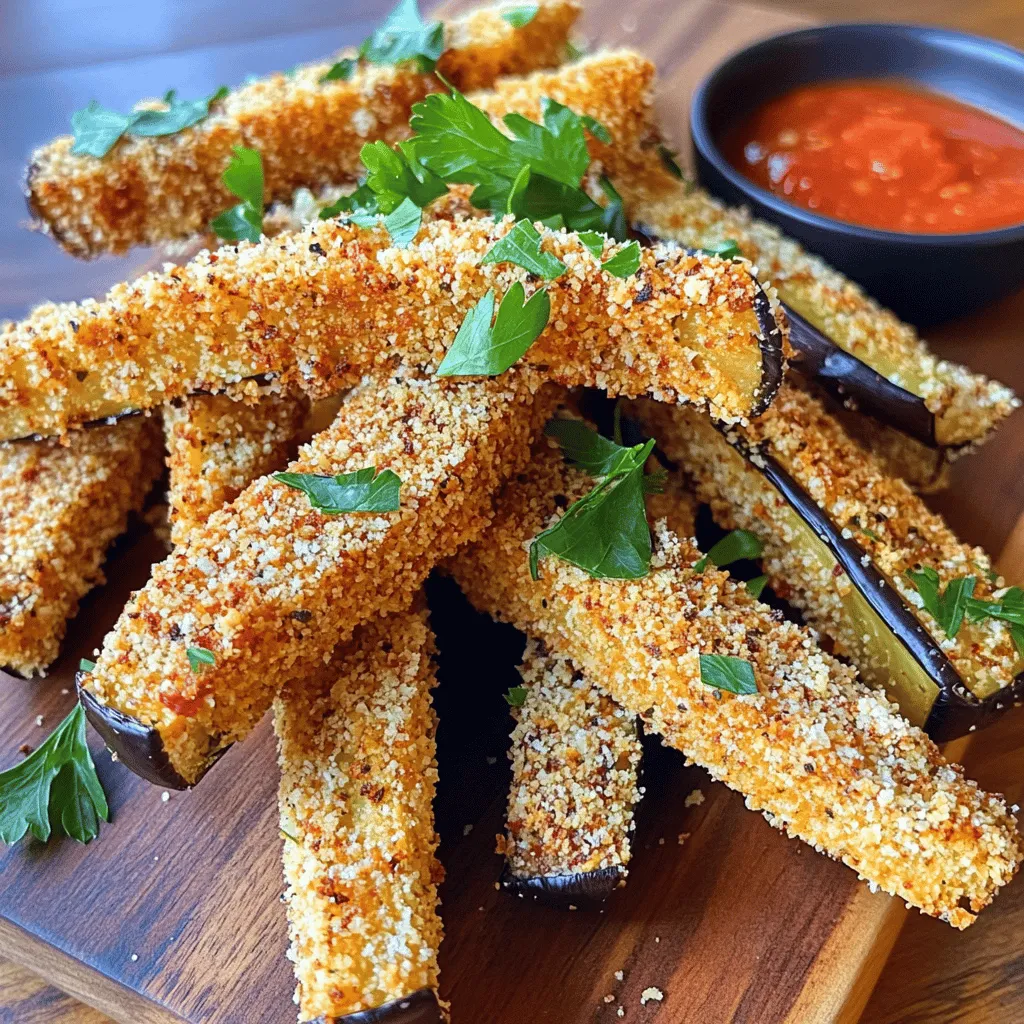
If you crave a snack that’s both crispy and nutritious, you’re in for a treat! Baked eggplant fries offer a
![To make a delicious pumpkin risotto with sage, you need the right ingredients. Here’s what you will gather: - 1 cup Arborio rice - 2 cups pumpkin puree (canned or homemade) - 4 cups vegetable broth - 1 medium onion, finely chopped - 2 tablespoons olive oil - 1 tablespoon fresh sage, chopped (plus extra for garnish) - 1/2 cup grated Parmesan cheese (optional) - Salt and pepper to taste - 1 tablespoon unsalted butter Each ingredient plays a key role. Arborio rice is perfect because it is starchy, making the risotto creamy. The pumpkin puree adds a sweet flavor and bright color. Using vegetable broth gives depth to the dish. Onion adds sweetness when sautéed in olive oil. Fresh sage gives a lovely aroma, enhancing the taste. Parmesan cheese, if added, creates a richer flavor. Salt and pepper balance everything, while butter adds extra creaminess. This list sets the stage for a hearty meal. You will enjoy the process of making this dish as much as eating it. If you want the full details, check out the Full Recipe for step-by-step guidance. 1. Heat vegetable broth: Start by warming the vegetable broth in a saucepan over low heat. This keeps it warm for the risotto. 2. Sauté onions: In a heavy pot, heat the olive oil over medium heat. Add the finely chopped onion. Cook it for about 5 minutes until it turns soft and clear. 3. Toast Arborio rice: Next, stir in the Arborio rice. Toast it for 1-2 minutes. This helps the rice absorb more flavor. 1. Add vegetable broth gradually: Pour in one ladle of warm broth. Stir continuously until the rice absorbs the broth. This step adds creaminess. 2. Incorporate pumpkin puree: After the first ladle is absorbed, mix in the pumpkin puree. Add another ladle of broth and keep stirring. The risotto should start to look creamy. 3. Stir until creamy and al dente: Continue adding broth and stirring for about 18-20 minutes. The rice should be soft yet firm in the middle. You might not need all the broth. 1. Add sage and butter: Once the risotto reaches your desired texture, take it off the heat. Stir in the chopped sage and unsalted butter. This adds richness and flavor. 2. Season to taste: Use salt and pepper to enhance the taste. Remember, taste as you go to get the flavor just right. 3. Let risotto sit before serving: Allow the risotto to sit for one minute. This helps it thicken slightly and makes it even more delightful. For a full recipe, check out the detailed instructions above. Enjoy your cooking! - Use fresh sage for a better flavor. Fresh herbs add depth to your dish. - Keep broth warm for smoother cooking. Warm broth helps the rice cook evenly. - Stirring technique for creaminess. Stirring often releases starch, creating a creamy texture. - Serve in shallow bowls. This allows the risotto to cool slightly and be more inviting. - Garnish with chopped sage. A sprinkle of fresh sage enhances the dish's look and taste. - Use a sprinkle of black pepper. It adds a nice contrast and extra flavor. - Overcooking the rice. This can make your risotto mushy instead of creamy. - Not adding enough broth. Rice needs liquid to cook properly and absorb flavor. - Skipping the resting time. Letting risotto sit for a minute makes it thicker and richer. For the full recipe, check out the details above. {{image_2}} You can make this dish fully vegetarian by using vegetable broth instead of chicken broth. This simple swap keeps the flavor rich while staying plant-based. You can also add more veggies like fresh spinach. Just stir it in near the end. The spinach wilts quickly and adds a nice color. For added depth, try adding minced garlic. It brings a warm, savory note to the risotto. You can also play with different types of cheese. Goat cheese offers a tangy twist, while feta gives a fresh taste. Each cheese adds a unique flavor profile to the dish. During fall, roasted squash can be a great addition. It enhances the pumpkin flavor and adds sweetness. You might also consider adding nuts like walnuts or pine nuts. They bring crunch and a nice contrast to the creamy risotto. These add-ins make the dish feel even more special. Explore these variations to make this pumpkin risotto your own. Check the Full Recipe for all the details you need! To keep your pumpkin risotto fresh, store leftovers in an airtight container. The risotto will stay good in the fridge for about three days. Before storing, let it cool to room temperature. This helps prevent moisture buildup. When you store risotto, avoid adding too much liquid. If it seems too wet, it can get mushy. Make sure to label your container with the date. This way, you know when to eat it. The best way to reheat risotto is on the stove. Add a splash of broth or water to help it warm up. Stir it over low heat for even heating. You can also use a microwave, but be cautious. Heat it in short bursts and stir in between. After reheating, check the texture. If it's too thick, add a little more liquid. This keeps it creamy and smooth. Yes, you can freeze risotto! However, it may lose some creaminess. To freeze, cool the risotto completely. Then, place it in a freezer-safe container. Make sure to leave some space for expansion. When you want to eat it, thaw it in the fridge overnight. Reheat it as mentioned above. You can also add a little broth to restore its creamy texture. For the best taste, try to eat it within a month. For the full recipe of pumpkin risotto, check out the delicious details above! Pumpkin risotto can last in the fridge for about 3 to 5 days. Store it in an airtight container to keep it fresh. The creamy texture may change over time, but it will still be safe to eat. Yes, you can make pumpkin risotto ahead of time. Cook it fully, then cool it quickly. Once cool, store it in the fridge. When ready to eat, reheat it on the stove with a splash of broth to restore creaminess. Pumpkin risotto pairs well with several dishes. Here are a few ideas: - Grilled chicken or turkey - Roasted vegetables - A simple green salad - Sautéed greens like spinach or kale These sides add texture and balance to the creamy risotto. You can use brown rice, but the risotto will not be the same. Arborio rice is starchy and creates a creamy texture. Brown rice takes longer to cook and will be chewier. If you prefer brown rice, be ready for a different result. For the best outcome, follow the [Full Recipe] using Arborio rice. In this post, we explored how to make a creamy pumpkin risotto. We covered the key ingredients, including Arborio rice and fresh sage. I shared step-by-step instructions to help you achieve the best texture. Tips on flavor and presentation made it even better. Remember to avoid common mistakes and consider fun variations. Store and reheat leftovers wisely for future meals. With these insights, you can enjoy delicious risotto any time. Happy cooking!](https://cookingwells.com/wp-content/uploads/2025/06/6b585e63-1531-41bc-bbb5-6955e0b40b18.webp)
If you’re searching for a warm, comforting dish that combines rich pumpkin flavor with the earthiness of sage, you’ve found
![- 1 lb shrimp, peeled and deveined - 2 tablespoons olive oil - 3 tablespoons fresh lime juice - Zest of 1 lime - 1/4 cup fresh cilantro, chopped When making cilantro lime shrimp tacos, fresh shrimp is key. I always choose shrimp that is peeled and deveined. This makes cooking easy and quick. The olive oil adds richness and helps the flavors blend. Fresh lime juice and zest give a bright kick. Cilantro brings in that fresh, herbal note. - 1 teaspoon ground cumin - 1 teaspoon chili powder - Salt and pepper to taste - 1 cup cabbage, shredded - 1 avocado, sliced - 1/2 cup sour cream or Greek yogurt Seasoning is where you can get creative. Ground cumin and chili powder add warmth and depth. Salt and pepper enhance all the flavors. Shredded cabbage adds a nice crunch. Sliced avocado brings creaminess to the dish. Finally, sour cream or Greek yogurt adds a tangy finish. - 8 corn tortillas - Alternative options: flour tortillas or lettuce wraps I prefer corn tortillas for their flavor and texture. They hold up well with the shrimp and toppings. If you want, you can use flour tortillas for a softer bite. For a low-carb option, lettuce wraps work great too. Each choice gives you a different taste and feel. To start, gather your shrimp and other ingredients. In a bowl, mix the shrimp, olive oil, lime juice, lime zest, cilantro, cumin, chili powder, salt, and pepper. Make sure the shrimp get a good coat from all the flavors. This step is key for tasty shrimp. Cover the bowl with plastic wrap and let it marinate in the fridge for 15 to 20 minutes. This short wait allows the flavors to soak into the shrimp. Next, heat a skillet over medium-high heat. When the pan is hot, carefully add the marinated shrimp. Cook the shrimp for 2 to 3 minutes on each side. You know they are done when they turn pink and look firm. Avoid overcooking, as that can make them rubbery. Perfectly cooked shrimp should be tender and juicy. Now, it’s time to build your tacos! First, warm the corn tortillas in a separate pan for about 30 seconds on each side. This makes them soft and easy to fold. Once warm, take a tortilla and place a few shrimp in the center. Next, add some shredded cabbage and a slice of avocado on top. Finally, drizzle a bit of sour cream or Greek yogurt over everything. Serve with lime wedges on the side for that extra zing. For the full recipe, be sure to check out the complete instructions. To make your shrimp burst with flavor, start with the marinade. Use olive oil, lime juice, and lime zest. Add chopped cilantro, ground cumin, chili powder, salt, and pepper. Mix well to coat the shrimp evenly. Marinate for 15-20 minutes in the fridge. This helps the shrimp soak up all the flavors. Don't skip this step; it makes a huge difference. When you prepare your tacos, think about layers. Start with a warm corn tortilla. Add a few shrimp from the marinated mix. Next, pile on some shredded cabbage for crunch. Then, add a slice of creamy avocado. Finish with a drizzle of sour cream or Greek yogurt. Each layer should be visible for a beautiful presentation. This makes each bite a delight. To cook shrimp perfectly, use a non-stick skillet. Heat it over medium-high heat. This helps the shrimp cook evenly. For warming tortillas, a cast-iron skillet works great. It gives tortillas a nice char. Keep all your tools ready. A spatula and tongs will help you flip shrimp and serve tacos easily. For the full recipe, check out the details above. {{image_2}} You can swap shrimp for chicken if you prefer. Just cut chicken into small pieces. Marinate it just like the shrimp. Cook it until it is fully done. Tofu is a great choice for a plant-based meal. Use firm tofu and press it to remove water. Cut it into cubes and marinate. Beef is another option. Use flank steak or sirloin. Slice it thin and cook quickly for great flavor. Add your twist by changing the spices. Try smoked paprika for a deeper taste. Or, add fresh herbs like basil or mint for a fresh kick. A pinch of cayenne pepper can bring heat. You could also mix in some lime zest into your marinade for more citrus flavor. Explore different peppers, like jalapeños or serranos, for added spice. Pair your tacos with fresh salsa. A mango salsa adds sweetness and zest. A corn salsa brings crunch and color. You could also serve a simple salad on the side. A mix of greens works great. For a creamy touch, add a drizzle of chipotle sauce. This will give a smoky depth to your meal. For the full recipe, check out the details above. To keep your cilantro lime shrimp tacos fresh, store leftovers properly. First, separate the shrimp from the tortillas and toppings. Place the shrimp in an airtight container. Add some lime juice on top to maintain flavor. For the tortillas, wrap them in foil or plastic wrap. This helps prevent them from drying out. Store cabbage, avocado, and sour cream in separate containers. Use them within two days for best taste. When you're ready to enjoy leftovers, reheat the shrimp gently. Place them in a skillet over medium heat. Cook until they're warmed through, about 3-4 minutes. Avoid high heat, as it can make the shrimp tough. For tortillas, warm them in a dry pan for about 30 seconds on each side. This keeps them soft and pliable. If you have any toppings left, add them fresh for the best flavor. You can freeze shrimp or taco components for later use. To freeze shrimp, place them in a freezer-safe bag. Be sure to remove as much air as possible. You can freeze the shrimp for up to three months. For tortillas, stack them with parchment paper between each one. Wrap the stack in plastic wrap and foil. When you're ready to use them, thaw in the fridge overnight. This way, you can enjoy a quick meal anytime! For the full recipe, check out the details above. Yes, you can use frozen shrimp. Just be sure to thaw them first. Run them under cold water for a few minutes. Fresh shrimp taste great, but frozen works well too. They are often just as good if cooked right. Just remember to drain and dry them before marinating. This helps the shrimp soak up the flavors better. If you want heat, try adding diced jalapeños to the shrimp. You can also sprinkle in some cayenne pepper or hot sauce. For more depth, use chipotle in adobo sauce in the marinade. Each of these options gives the tacos a nice kick. Adjust the amount based on your taste. Start with a little, then add more if you want it spicier! If you want a dairy-free option, use coconut yogurt. It adds creaminess with a hint of sweetness. You could also use cashew cream for a rich texture. Greek yogurt works as a healthy swap if you want dairy. It still gives that tangy flavor. Choose what fits your diet best! Check the [Full Recipe] for more details. These shrimp tacos are packed with flavor and easy to make. We covered key ingredients like shrimp, spices, and tortillas. You learned how to marinate and cook the shrimp perfectly. We also shared tips for assembling your tacos for a great look and taste. Don't forget the variations, and check how to store leftovers. Enjoy experimenting with flavors, whether you stick with shrimp or try something new. Enjoy your taco journey!](https://cookingwells.com/wp-content/uploads/2025/06/72b483a2-91b3-40ee-9b78-5d9d94cd6765.webp)
If you crave a tasty, easy meal, you’ll love these Cilantro Lime Shrimp Tacos! With just a few simple ingredients
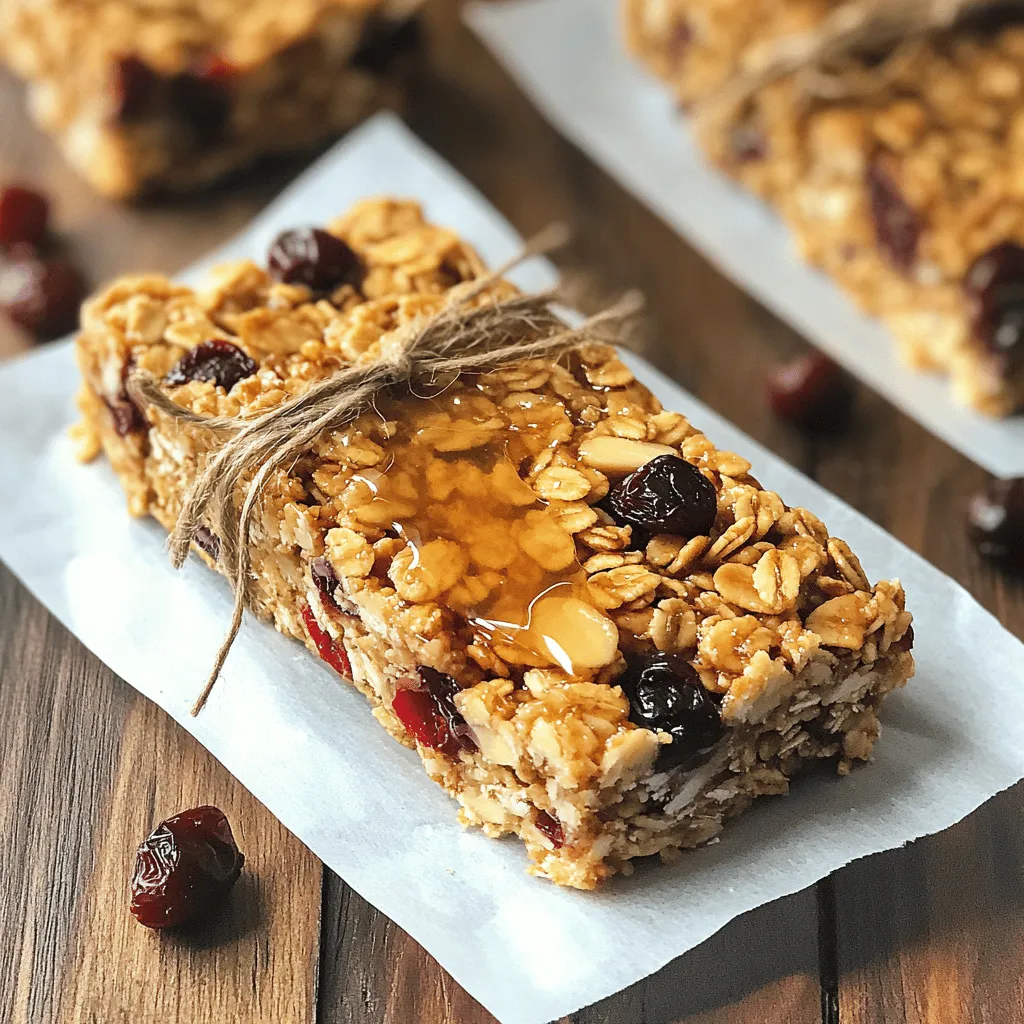
Are you ready for a tasty and healthy snack? My Cherry Almond Granola Bars are the perfect blend of crunch
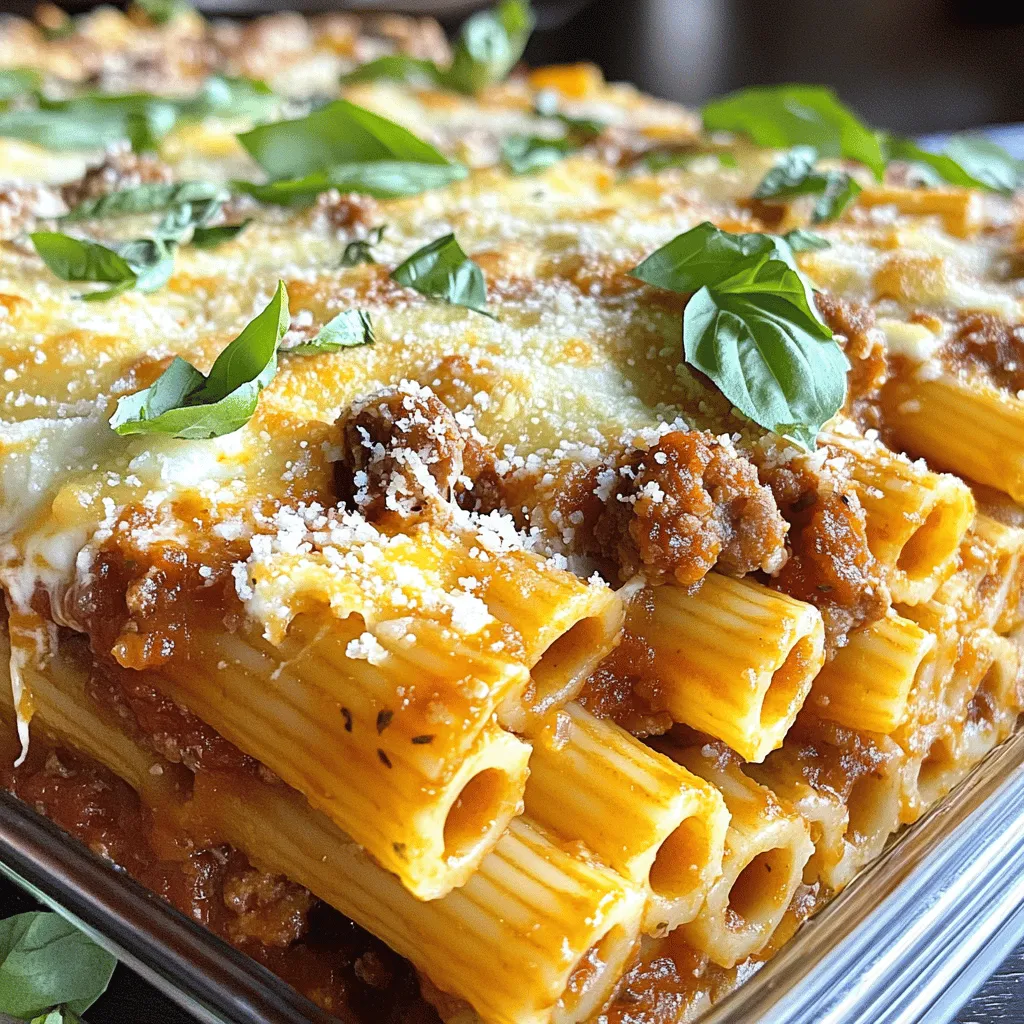
Craving a dish that warms the soul and delights the taste buds? Look no further than my Baked Ziti with
