Skip to content
DisclaimerTerms Of UseGDPR PolicyCookie Policy

Cooking Wells

  • Home
  • Drinks
  • Appetizers
  • Dinner
  • Dessert
  • About
  • Contact
  • Privacy Policy
DisclaimerTerms Of UseGDPR PolicyCookie Policy

Mia

To make a great chocolate chip banana bread, you need a few key items. These ingredients create the perfect balance of flavor and texture. Here’s what you will need: - 3 ripe bananas, mashed - 1/3 cup melted coconut oil or unsalted butter - 1/2 cup brown sugar - 1/4 cup honey or maple syrup - 1 large egg - 1 teaspoon vanilla extract - 1 teaspoon baking soda - A pinch of salt - 1 1/2 cups all-purpose flour - 1/2 cup chocolate chips, either dark or semi-sweet - Optional: 1/4 cup chopped walnuts or pecans - Optional: 1 teaspoon ground cinnamon You can customize your banana bread in fun ways. Here are some ideas: - Swap chocolate chips for white chocolate or butterscotch chips. - Use almond or peanut butter instead of coconut oil for a nutty flavor. - Add dried fruit like raisins or cranberries for extra sweetness. - Replace the egg with a flax egg for a vegan option. - Try adding spices like nutmeg or ginger for a warm twist. These options give you room to play and create a banana bread that suits your taste. Check out the Full Recipe for more details! Start by preheating your oven to 350°F (175°C). This helps your bread bake evenly. Next, take a 9x5-inch loaf pan. You can grease it with oil or butter. Alternatively, line it with parchment paper. This makes it easy to take the bread out later. In a large mixing bowl, mash three ripe bananas. Use a fork for this task. Then, add 1/3 cup of melted coconut oil or unsalted butter. Mix these two until they blend well. Next, pour in 1/2 cup of brown sugar and 1/4 cup of honey or maple syrup. Add one large egg and 1 teaspoon of vanilla extract. Whisk this mixture until it’s smooth and creamy. Now, sprinkle 1 teaspoon of baking soda and a pinch of salt over your wet mix. Stir it gently to combine. Gradually add 1 1/2 cups of all-purpose flour. Be careful not to overmix the batter. Finally, fold in 1/2 cup of chocolate chips and, if you like, 1/4 cup of chopped walnuts or pecans. You can even add 1 teaspoon of ground cinnamon for a fun twist! Pour the batter into your prepared loaf pan. Spread it evenly across the pan. Place it in your preheated oven and bake for 60-65 minutes. Check if it’s done by inserting a tester in the center. If it comes out clean, your bread is ready! Let it cool in the pan for about 10 minutes. After that, move it to a wire rack to cool completely. Use ripe bananas for the best flavor. Look for bananas with brown spots. The more spots, the sweeter they are. They should feel soft when you squeeze them gently. Avoid green bananas. They won't mash well and lack sweetness. If you want to ripen bananas quickly, place them in a paper bag. This traps the ethylene gas and speeds up ripening. Temperature matters. Preheat your oven to 350°F (175°C) before you start. Grease your pan well to prevent sticking. You can also use parchment paper for easy removal. Mix your wet ingredients first, then add the dry ones. This keeps your batter smooth. Don’t overmix when adding flour. This makes your bread dense. Fold in the chocolate chips gently. This keeps them from sinking to the bottom. One big mistake is using unripe bananas. They make the bread taste bland. Another mistake is overbaking. Keep an eye on the bread. Check it around 60 minutes. If a toothpick comes out clean, it’s done. Avoid opening the oven too often. This lets out heat and can affect baking. Lastly, don’t skip the cooling time. Letting it cool in the pan helps it set. For the full recipe, refer to the details provided earlier. {{image_2}} You can switch up the flavor by using different types of chocolate. Dark, semi-sweet, or even white chocolate all work well. I love using dark chocolate chips for a richer taste. You can also chop up your favorite chocolate bar and fold it in. This adds a fun texture and flavor. You can even mix and match. Try a blend of dark and milk chocolate for a sweet twist. Want to make your banana bread even more special? Add spices like cinnamon or nutmeg. I often use a teaspoon of ground cinnamon for warmth. You can also try a splash of almond or coconut extract for extra flavor. These small changes can make a big difference. Each bite will feel like a new experience. Need to make changes for dietary needs? You can easily swap ingredients. Use applesauce instead of oil for a lighter version. If you're dairy-free, plant-based butter works great. For a gluten-free option, use almond or oat flour. You can also replace the egg with a flax egg. Just mix one tablespoon of ground flaxseed with three tablespoons of water. Let it sit for a few minutes before adding. These swaps help everyone enjoy this tasty treat. For a full recipe, check out the delightful Chocolate Chip Banana Bread! To keep your chocolate chip banana bread fresh, wrap it tightly. Use plastic wrap or aluminum foil. Store it at room temperature if you plan to eat it within a few days. For longer storage, move it to the fridge. This helps prevent spoilage. Always let the bread cool completely before wrapping. This keeps moisture inside and keeps your bread soft. Freezing is a great option if you have extra banana bread. Slice the bread first for easy servings. Wrap each slice in plastic wrap. Then, place the wrapped slices in a freezer bag. Press out as much air as you can. Label the bag with the date and type of bread. This way, you can enjoy your delightful treat for up to three months. When you want to enjoy your banana bread again, reheating is simple. For individual slices, use a microwave. Heat for about 10-15 seconds. Check to make sure it’s warm but not too hot. If you prefer, you can use an oven. Preheat it to 350°F (175°C). Place the slices on a baking sheet and warm them for about 5-10 minutes. This keeps the bread moist and brings back its fresh flavor from the oven. The key to moist banana bread is ripe bananas. They add natural sweetness and moisture. Using coconut oil also helps keep the bread soft. Plus, don’t overmix the batter. This keeps the bread light and fluffy. Yes, you can use frozen bananas! Just thaw them first and drain any extra liquid. Frozen bananas often taste sweeter, which can enhance your bread. They will mash easily, so it’s a great option. You can store this banana bread at room temperature for about 2-3 days. Wrap it in plastic wrap to keep it fresh. If you want it to last longer, store it in the fridge for up to a week. Yes, you can make this recipe without eggs. Use a flax egg or applesauce instead. For a flax egg, mix 1 tablespoon of ground flaxseed with 2.5 tablespoons of water. Let it sit for a few minutes until it thickens. Applesauce works well too, using 1/4 cup as a substitute. Try these options for a delicious result! For the full recipe, check out the delightful Chocolate Chip Banana Bread. In this post, we covered how to make delicious chocolate chip banana bread. We discussed essential ingredients, measurements, and possible add-ins. You learned step-by-step instructions for baking, along with tips for choosing bananas and avoiding common mistakes. We explored variations for adding flavor and storage methods for leftovers. Remember, each ingredient plays a key role, and small changes can make a big difference. Now, you're ready to bake banana bread that tastes great and fits your needs. Enjoy your tasty creation!

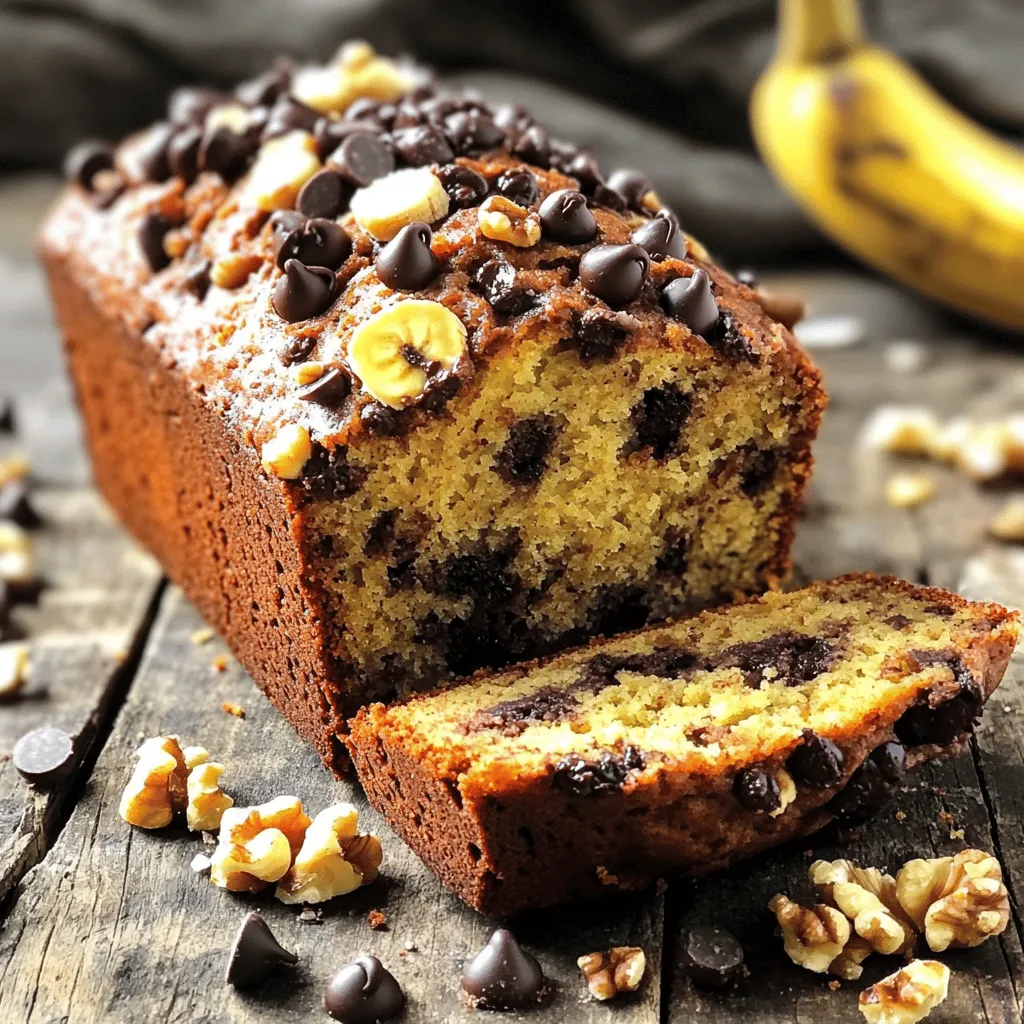
Chocolate Chip Banana Bread Delightful and Easy Recipe

Welcome to the delightful world of Chocolate Chip Banana Bread! This easy recipe will satisfy your sweet tooth and use

- 1 ½ cups all-purpose flour - 1 cup granulated sugar - ½ teaspoon baking powder - ½ teaspoon baking soda - ½ teaspoon salt - 1 teaspoon ground cinnamon - ½ cup unsalted butter, melted - 1 large egg - 1 teaspoon vanilla extract - ½ cup buttermilk - ½ cup granulated sugar (for coating) - 1 tablespoon ground cinnamon (for coating) I love using simple ingredients to create these muffins. They are easy to find and work well together. The all-purpose flour gives the muffins their structure. I use granulated sugar for sweetness. Baking powder and baking soda help the muffins rise. Salt is key to balance the sugar and cinnamon. Ground cinnamon adds that warm flavor we all love. The unsalted butter gives richness. The egg binds everything together, while the vanilla adds a lovely aroma. Buttermilk keeps the muffins moist and tender. For the coating, I combine more granulated sugar with ground cinnamon. This step is what makes each muffin taste like a donut. You roll them in this mix when they are warm, and it sticks perfectly. These ingredients come together to create a treat that tastes amazing. You can find the full recipe for these delicious cinnamon sugar donut muffins to make them at home! First, preheat your oven to 350°F (175°C). This step is key for even baking. Next, grease your muffin tin or line it with muffin liners. This helps the muffins pop out easily after baking. In a large bowl, combine all your dry ingredients. This includes 1 ½ cups of all-purpose flour, 1 cup of granulated sugar, ½ teaspoon of baking powder, ½ teaspoon of baking soda, ½ teaspoon of salt, and 1 teaspoon of ground cinnamon. Whisk these together until they are well mixed. Now, let’s prepare the wet mixture. In another bowl, whisk together ½ cup of melted unsalted butter, 1 large egg, 1 teaspoon of vanilla extract, and ½ cup of buttermilk. Mix these until the mixture is smooth and well combined. Next, pour the wet ingredients into the dry ingredients. Gently fold them together until just combined. Be careful not to overmix; it’s okay if some lumps remain. Overmixing can make the muffins tough. Fill each muffin cup about ¾ full with the batter. This allows room for the muffins to rise. Bake for 15-18 minutes. To check if they are done, insert a toothpick in the center. If it comes out clean, they are ready! While the muffins bake, prepare the cinnamon sugar coating. In a small bowl, mix ½ cup of granulated sugar with 1 tablespoon of ground cinnamon. Once the muffins cool for about 5 minutes, roll each one in the cinnamon sugar mixture until fully coated. This gives them that sweet, crunchy finish. Enjoy your Cinnamon Sugar Donut Muffins warm or at room temperature for a perfect treat! For the complete details, check the Full Recipe. To make great muffins, avoid overmixing the batter. Mix until just combined. A few lumps are fine. Overmixing makes muffins tough. The baking time is key too. Bake at 350°F (175°C) for 15-18 minutes. Check for doneness with a toothpick. If it comes out clean, they are ready! Want to boost the flavor? Add vanilla extract! It makes the muffins taste rich and warm. You can also try other flavorings. Nutmeg or cardamom adds a nice twist. Just a pinch can change the whole taste. Get creative and enjoy! Serving matters too. Place the muffins on a pretty plate. Dust with extra cinnamon sugar for a nice touch. Serve them warm for the best experience. You can also pair them with coffee or tea. They make a perfect snack or breakfast treat. For the full recipe, check the link above. {{image_2}} You can make your Cinnamon Sugar Donut Muffins lighter with simple swaps. Use whole wheat flour instead of all-purpose flour. This adds fiber and nutrients. For sugar, try using coconut sugar or a sugar substitute. Greek yogurt can replace buttermilk for a protein boost. These changes keep the muffins tasty but cut some calories. Feel free to play with flavors! Add nutmeg for a warm spice twist. You can mix in chocolate chips for a sweet surprise. Diced apples or chopped nuts add texture and flavor. Even a splash of almond extract can bring a nice touch. These small changes make each batch unique and fun. For gluten-free muffins, use a gluten-free flour blend. This keeps the texture light and fluffy. To make these muffins dairy-free, simply replace butter with coconut oil. Use almond milk in place of buttermilk. These swaps let everyone enjoy a delicious treat without worry. Explore the Full Recipe for all the details! To keep your muffins fresh, store them at room temperature. Place them in an airtight container. This will keep them soft for about two days. You can also use a resealable bag. Just make sure to remove as much air as possible. Keep them away from direct sunlight and heat. If you want them to last longer, you can refrigerate them. However, this may change their texture a bit. If you want to save muffins for a longer time, freezing is a great option. First, let the muffins cool completely. Then, wrap each muffin tightly in plastic wrap. Place the wrapped muffins in a freezer-safe bag. Label the bag with the date. You can freeze them for up to three months. When you're ready to eat them, you can take them out and let them thaw at room temperature. To regain freshness, you can reheat your muffins easily. If you use a microwave, wrap a muffin in a damp paper towel. Heat it for about 15-20 seconds. This will make it warm and soft. If you prefer the oven, preheat it to 350°F (175°C). Place the muffins on a baking sheet and heat for 5-10 minutes. This way, they will taste almost like fresh-baked muffins. Enjoy your delicious Cinnamon Sugar Donut Muffins! You can check if the muffins are done by using a toothpick. Insert it into the center of a muffin. If it comes out clean, your muffins are ready. They should also look lightly golden on top. The edges might pull away from the pan slightly. Yes, you can replace buttermilk easily. Use regular milk with a bit of vinegar or lemon juice. Just add 1 tablespoon of vinegar to ½ cup of milk. Let it sit for a few minutes. You can also use plain yogurt or sour cream mixed with water. These muffins taste great warm or at room temperature. Try serving them with coffee or tea for a cozy treat. Pair them with fresh fruit or a dollop of whipped cream for extra flavor. You can also serve them at brunch or as a snack. For a fun twist, drizzle some icing on top! In this post, I shared the key ingredients and steps to make delicious Cinnamon Sugar Donut Muffins. You learned how to mix and bake them perfectly. I offered tips for flavor and presentation. You also found variations and storage advice to keep your muffins fresh. These muffins are simple to make and fun to enjoy. Play with flavors and adapt to your needs. Happy baking!

Cinnamon Sugar Donut Muffins Perfectly Delicious Treat

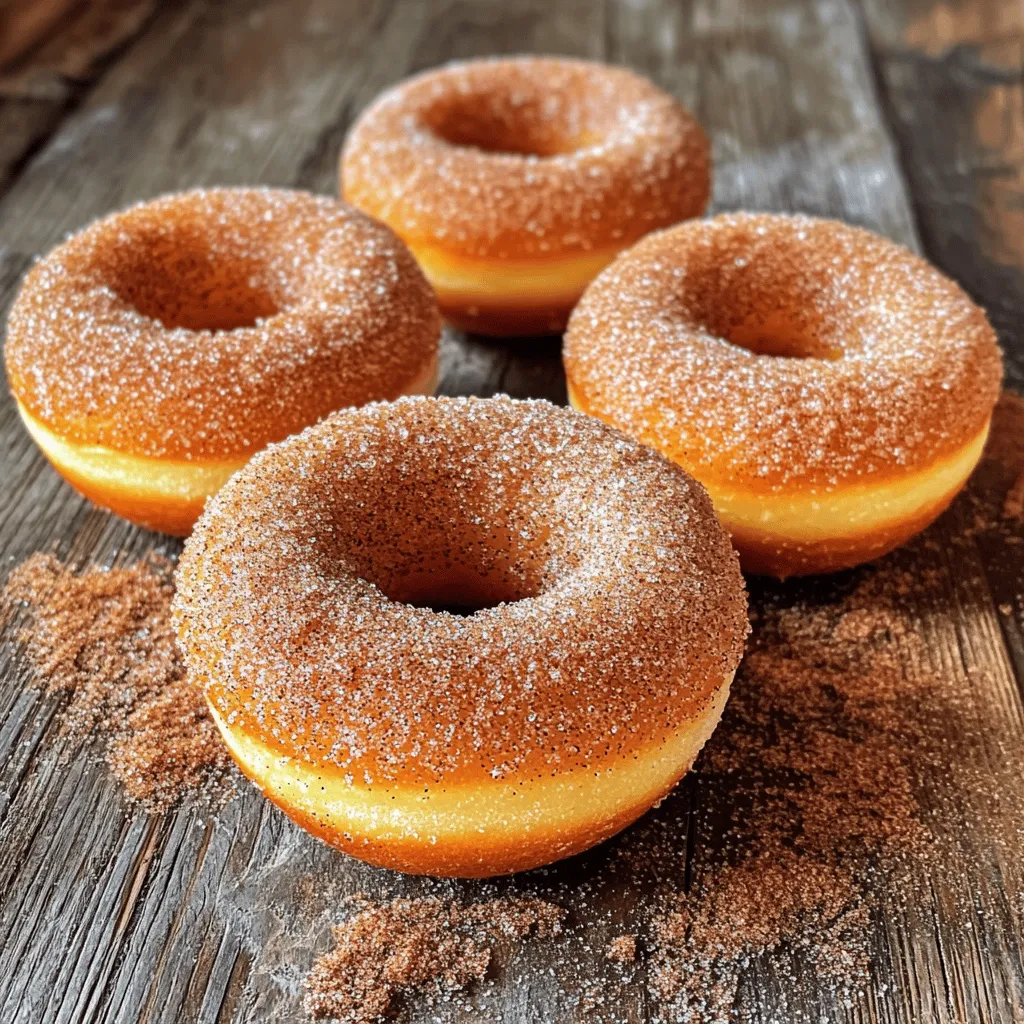
Are you ready to whip up a treat that’s as delightful as it sounds? Cinnamon Sugar Donut Muffins combine the

- 1 cup unsalted butter, melted - 1 cup granulated sugar - 1 cup brown sugar, packed - 4 large eggs - 1 teaspoon vanilla extract - 1 cup all-purpose flour - 1/2 cup unsweetened cocoa powder - 1/2 teaspoon salt - 1 cup semi-sweet chocolate chips - 1/2 cup unsalted butter, softened - 1/2 cup granulated sugar - 1 cup brown sugar, packed - 2 tablespoons milk - 1 teaspoon vanilla extract - 1 1/2 cups all-purpose flour - 1/2 teaspoon salt - 1/2 cup mini chocolate chips - Melted chocolate for drizzling - Sea salt for sprinkling Making Chocolate Chip Cookie Dough Brownies is a fun journey! You start with the brownie layer, which is rich and fudgy. The secret is in the butter and sugars. They give the brownies a nice, moist texture. Then, we move on to the cookie dough layer. It’s soft and sweet, just like you want it. The mini chocolate chips add that extra pop of flavor. Feel free to get creative with toppings. Drizzling melted chocolate on top makes the brownies even more tempting. A sprinkle of sea salt can enhance the sweet flavor too. You can find the full recipe to guide you through each step with ease. Enjoy making and eating this treat! Start by preheating your oven to 350°F (175°C). Grease a 9x13 inch baking dish or use parchment paper. This will help with easy removal later. In a large bowl, mix together 1 cup of melted unsalted butter, 1 cup of granulated sugar, and 1 cup of brown sugar. Blend until smooth. Next, add 4 large eggs, one at a time. Mix well after each addition. Stir in 1 teaspoon of vanilla extract. In another bowl, whisk together 1 cup of all-purpose flour, 1/2 cup of unsweetened cocoa powder, and 1/2 teaspoon of salt. Gradually combine the dry mix with the wet ingredients. Stir until just combined, then fold in 1 cup of semi-sweet chocolate chips. This brownie batter will be thick and rich. Now, pour the brownie batter into your prepared baking dish. Spread it evenly with a spatula. Bake in the preheated oven for 25-30 minutes. To check if they’re done, insert a toothpick into the center. It should come out with moist crumbs, not wet batter. Once baked, remove them from the oven and let them cool completely in the dish. This cooling step is key for a nice texture. While the brownies cool, make the cookie dough layer. In a separate bowl, cream together 1/2 cup of softened unsalted butter, 1/2 cup of granulated sugar, and 1 cup of brown sugar. Mix until fluffy. Add in 2 tablespoons of milk and 1 teaspoon of vanilla extract, blending until smooth. Gradually stir in 1 1/2 cups of all-purpose flour and 1/2 teaspoon of salt. Mix until just combined. Finally, fold in 1/2 cup of mini chocolate chips. This cookie dough will be soft and delicious. Once the brownie layer is completely cool, spread the cookie dough over the brownies. Use a spatula to smooth it out, pressing gently to make sure it sticks well. Now your layers are ready for chilling! To get the best brownies, I recommend using room temperature eggs. This helps them mix better. Make sure to blend the butter and sugars until smooth. This step adds air, making your brownies light. When you mix in the flour, do not over-mix. Just stir until you see no dry flour. This keeps the brownies soft. Bake them until a toothpick shows moist crumbs, not wet batter. That perfect bake gives you the right texture. The cookie dough layer should be soft yet firm enough to spread. Start by creaming the softened butter and sugars until fluffy. Mix in the milk and vanilla next. When adding flour, be gentle. You want to mix just until combined. If it feels too crumbly, add a splash more milk. The mini chocolate chips make every bite special. They melt slightly, adding to the deliciousness. After chilling the brownies, cut them into squares. Store leftovers in an airtight container. They keep well in the fridge for about a week. For a tasty twist, drizzle melted chocolate on top before serving. A sprinkle of sea salt can enhance their flavor, making them even more tempting. If you want to wow guests, stack them on a nice plate. These treats are sure to impress! For the full recipe, be sure to check the instructions. {{image_2}} You can make your Chocolate Chip Cookie Dough Brownies even better! One great idea is to add nuts. Walnuts or pecans give a nice crunch. Just chop them up and mix them into the brownie layer. You can also try using different types of chocolate. Dark chocolate or white chocolate chips can add a fun twist. Mixing in some caramel bits adds a sweet surprise. The options are endless! If you need a gluten-free version, it’s easy to adapt this recipe. Replace all-purpose flour with a gluten-free flour blend. Make sure it has xanthan gum to help with texture. Check that your chocolate chips are also gluten-free. This way, you can enjoy the same rich taste without any worries. For a vegan version, the changes are simple. Use a plant-based butter instead of regular butter. Replace the eggs with flaxseed meal or applesauce. For each egg, mix one tablespoon of flaxseed meal with three tablespoons of water. Let it sit for a few minutes until it thickens. Use almond milk or another plant milk in place of regular milk. These swaps keep the taste rich and delicious while being friendly for a vegan diet. You can find the Full Recipe to guide you through these variations! After you enjoy your chocolate chip cookie dough brownies, you want to keep them fresh. Place any leftovers in an airtight container. Store them at room temperature for up to three days. If you want them to last longer, put them in the fridge. They will stay good for about a week. Just make sure to cover them well to prevent drying out. Freezing these brownies is a great option for later treats. Start by cutting them into squares. Wrap each square tightly in plastic wrap. Then, place the wrapped brownies in a freezer-safe bag. They can last up to three months in the freezer. When you’re ready to enjoy, just take them out and let them thaw in the fridge overnight. If you want to warm up your brownies, it’s simple! Preheat your oven to 350°F (175°C). Place the brownies on a baking sheet and cover them with foil. Heat for about 10 minutes. This keeps them soft and gooey. You can also microwave them for about 15-20 seconds. Just watch closely to avoid overheating. For an extra treat, top with a scoop of ice cream before serving! You can find the full recipe for these delicious brownies above. Yes, you can! Feel free to swap semi-sweet chocolate chips for dark or milk chocolate. Each type gives its own twist. Dark chocolate brings a rich taste, while milk chocolate adds a sweeter touch. You can even mix different types for a fun blend. Just remember, the flavor balance changes with each choice. To make brownies more fudgy, use less flour. Try adding an extra egg or two. Melt the butter, but don’t overbeat the batter. This keeps the brownies soft and moist. Also, baking them for a shorter time can help. Check them a few minutes early. If a toothpick comes out with some moist crumbs, they’re perfect! To cut brownies neatly, let them cool completely. Use a sharp knife for clean edges. You can dip the knife in warm water, then dry it before cutting. This helps the knife glide through the brownies easily. For fun shapes, try using cookie cutters. This makes serving even more special! For the full recipe, check out the earlier sections. Enjoy creating these delicious treats! In this post, we covered how to make delicious chocolate chip cookie dough brownies. We talked about the right ingredients, how to layer brownies and cookie dough, and key tips for success. I shared ideas for variations, storing leftovers, and answers to common questions. These brownies are easy to adapt and fun to bake. Enjoy your sweet treats and share them with friends!

Chocolate Chip Cookie Dough Brownies Irresistible Treat

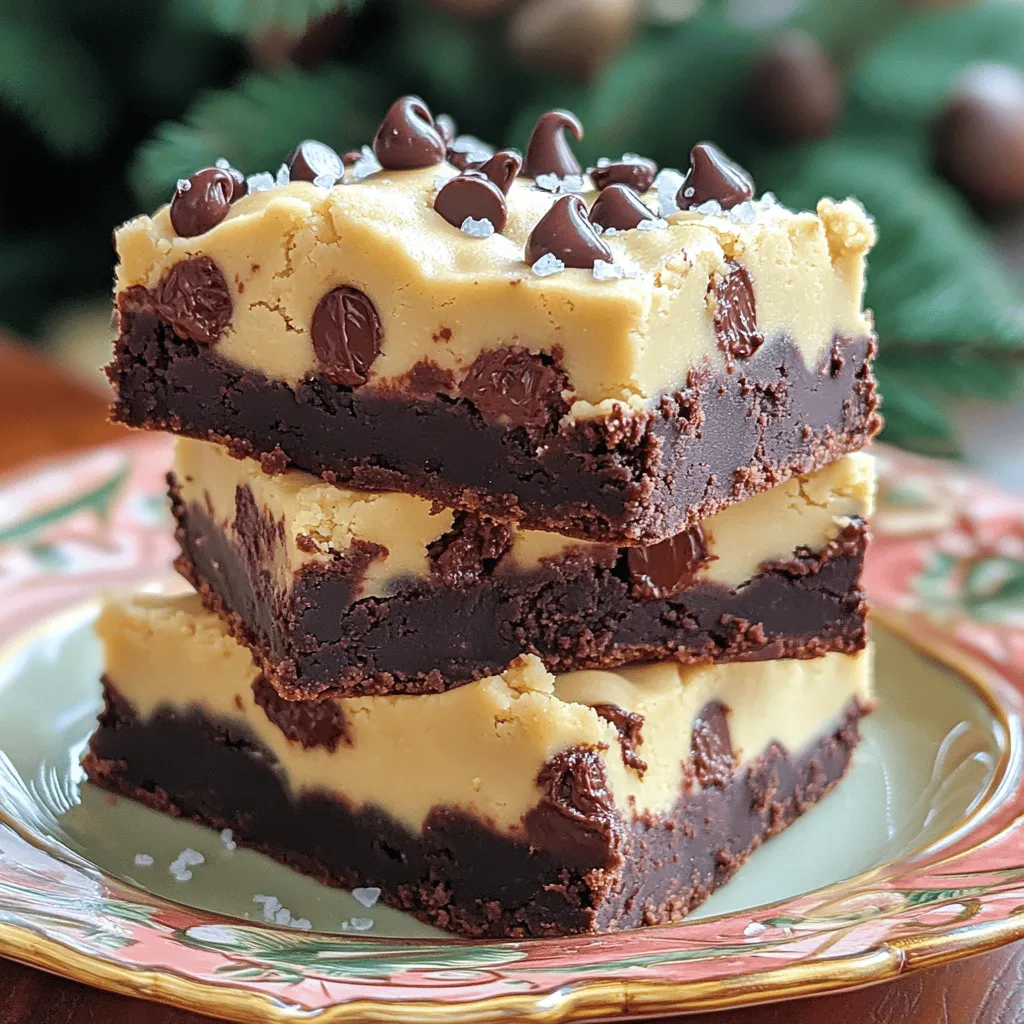
Who can resist the sweet blend of chocolate chip cookies and rich brownies? In this blog, I’ll guide you through

To create the perfect Lemon Garlic Herb Grilled Shrimp, gather the following ingredients: - 1 pound large shrimp, peeled and deveined - 4 cloves garlic, minced - Zest and juice of 1 large lemon - 1/4 cup olive oil - 1 tablespoon fresh parsley, chopped - 1 tablespoon fresh cilantro, chopped - 1 teaspoon dried oregano - 1/2 teaspoon red pepper flakes (optional) - Salt and pepper to taste - Lemon wedges for serving Each ingredient plays a key role in building flavor. The shrimp brings a sweet and juicy base. Garlic adds a rich, savory punch. Lemon zest and juice give brightness and balance. Olive oil adds smoothness and helps the shrimp cook evenly. The herbs, like parsley and cilantro, offer freshness. Dried oregano rounds out the flavor with a hint of earthiness. If you want a kick, add red pepper flakes. Finally, seasoning with salt and pepper enhances all the flavors. Using fresh ingredients makes a big difference. Fresh shrimp has better texture and taste. Fresh herbs provide vibrant notes that dried herbs can’t match. When you combine these ingredients, you create a marinade that turns ordinary shrimp into a flavorful delight. For the full recipe, check the details above. First, gather your ingredients. In a medium bowl, combine the minced garlic, lemon zest, lemon juice, and olive oil. Add chopped parsley and cilantro, followed by the dried oregano. If you like some heat, toss in red pepper flakes. Season with salt and pepper to taste. Mix everything well until combined. This mixture will be your flavorful marinade. Next, add the peeled and deveined shrimp to the marinade. Ensure each shrimp is well coated in the mixture. Once coated, cover the bowl with plastic wrap. Place it in the fridge for at least 30 minutes. For a deeper flavor, marinate for up to 2 hours. The shrimp will soak up all that lemony goodness. Now, it’s time to grill! Preheat your grill to medium-high heat. While the grill heats, remove the shrimp from the marinade. Let any excess marinade drip off. Discard the leftover marinade. If you’re using skewers, thread the shrimp onto them. If your skewers are wooden, soak them in water for 30 minutes first. This helps prevent burning. Place the shrimp skewers on the grill. Cook each side for about 2-3 minutes. The shrimp will turn opaque and develop nice grill marks. Once done, remove them from the grill. Serve immediately with fresh lemon wedges on the side. Enjoy this tasty dish with your loved ones. For a detailed recipe, check the Full Recipe. To get the best flavor, marinate your shrimp for at least 30 minutes. This gives the garlic, lemon, and herbs time to soak in. If you have time, let them marinate for up to 2 hours. This deeper flavor makes your shrimp shine! For perfect grill marks, make sure your grill is hot. Preheat it to medium-high heat, about 375°F (190°C). Place the shrimp on the grill and cook for 2-3 minutes per side. Look for that nice opaque color and grill marks. Don’t overcrowd the grill. Give each shrimp space to cook evenly. Pair your shrimp with fresh sides. A light salad or grilled veggies work great. You can also serve them with rice or quinoa for a hearty meal. Add lemon wedges on the plate for a fresh touch. This makes for a beautiful and tasty presentation. Check out the Full Recipe for more tips! {{image_2}} You can add different herbs or spices to change the taste. Try fresh basil or dill for a twist. You can also use smoked paprika for a deeper flavor. If you want some heat, add more red pepper flakes. This can give the dish a nice kick. Not everyone has a grill, and that is okay! You can broil the shrimp in your oven. Just place them on a baking sheet and set your oven to broil. Cook for about 2-3 minutes per side. Alternatively, you can sauté the shrimp in a pan on the stove. Use olive oil and cook on medium heat until they are opaque. Both methods work great for this recipe. You can easily make this dish gluten-free. Just check your olive oil and seasonings to ensure they are safe. To make it low-carb, skip the bread or pasta sides. Instead, serve with a fresh salad or grilled veggies. These options keep the meal light and healthy. For the full recipe, refer to the main article. To keep your Lemon Garlic Herb Grilled Shrimp fresh, store it in the fridge. Place the shrimp in an airtight container. This helps prevent any smells from other foods. It’s best to eat the leftovers within 2 days. If you follow this, your shrimp will stay tasty and safe. To reheat, avoid using the microwave if you can. Instead, warm the shrimp in a skillet. Heat it on low and stir gently. This method helps keep the shrimp juicy and avoids rubbery texture. You can add a splash of lemon juice to boost flavor as you warm it up. If you want to freeze grilled shrimp, first let it cool completely. Wrap the shrimp tightly in plastic wrap and then in foil. This keeps out air and prevents freezer burn. Label the package with the date. You can freeze it for up to 3 months. When you’re ready to eat, thaw it in the fridge overnight before reheating. This way, the shrimp stays delicious! To make this dish, start by mixing the marinade. In a medium bowl, add minced garlic, lemon zest, lemon juice, olive oil, chopped parsley, chopped cilantro, oregano, and red pepper flakes. Stir it well to combine. Then, add the shrimp. Coat them well in the marinade. Cover the bowl with plastic wrap and put it in the fridge for at least 30 minutes. For deeper flavor, you can marinate for up to 2 hours. Next, preheat your grill to medium-high heat, around 375°F. Take the shrimp out and let the excess marinade drip off. Discard the remaining marinade. If you have wooden skewers, soak them in water for 30 minutes to prevent burning. Thread the shrimp onto the skewers and grill them for about 2-3 minutes on each side. The shrimp are done when they turn opaque and have nice grill marks. Serve them hot with lemon wedges on the side. You can use frozen shrimp for this recipe. Just ensure they are fully thawed before marinating. To thaw shrimp, place them in a bowl of cold water for about 20-30 minutes. Avoid using hot water as it can cook the shrimp. Fresh shrimp do taste better, but frozen shrimp works well too. Just remember to pat them dry before adding to the marinade for the best results. Grilled shrimp pairs nicely with many side dishes. Here are some great options: - Rice: A light lemon or herb rice complements the shrimp well. - Salad: A fresh garden salad or a simple mixed greens salad adds crunch. - Grilled Veggies: Try zucchini, bell peppers, or asparagus for a colorful side. - Pasta: A light lemon garlic pasta is a perfect match. - Bread: Serve with crusty bread to soak up the shrimp’s flavors. Feel free to mix and match these sides to create a delightful meal. For the full recipe, check out the Lemon Garlic Herb Grilled Shrimp recipe. This blog post covered how to make Lemon Garlic Herb Grilled Shrimp. We listed key ingredients and provided easy steps to prepare and grill shrimp. You learned tips for perfecting flavor and variations for different diets. Remember to store or reheat leftovers to keep them fresh. Grilled shrimp is versatile and pairs well with many sides. Enjoy your cooking journey and try out new flavors! Your taste buds will thank you.

Lemon Garlic Herb Grilled Shrimp Flavorful Delight

Are you ready to impress your guests with a mouthwatering dish? Lemon Garlic Herb Grilled Shrimp is that perfect blend

- 2 ripe bananas, mashed - 1 cup rolled oats - 1/2 cup almond flour - 1/4 cup honey or maple syrup - 1/4 cup unsweetened peanut butter or almond butter - 1 teaspoon vanilla extract - 1/2 teaspoon baking powder - 1/2 teaspoon cinnamon - 1/4 cup dark chocolate chips (optional) - Pinch of salt The ingredients for these banana oatmeal cookies are simple and healthy. The ripe bananas provide natural sweetness. You can choose honey or maple syrup, depending on your taste. The almond flour adds rich flavor while keeping the cookies light. Rolled oats give the cookies their chewy texture and boost fiber. Many people wonder about the nutritional information. Each cookie has about 100 calories. They contain healthy fats from nut butter. You'll also get protein from almond flour and oats. These cookies pack a punch with health benefits too. Oats are great for heart health. They can help lower cholesterol. Bananas provide potassium, which is good for your heart and muscles. For the full recipe, check out the detailed steps to make these delicious treats! First, you need to preheat your oven to 350°F (175°C). This step warms the oven to cook the cookies evenly. Next, line a baking sheet with parchment paper. This keeps the cookies from sticking and makes cleanup easy. In a large mixing bowl, combine the two ripe bananas and almond butter. Mash the bananas well until the mixture is smooth. Then, stir in the honey or maple syrup, vanilla extract, and a pinch of salt. Mix all these wet ingredients well. In another bowl, mix the rolled oats, almond flour, baking powder, and cinnamon. Make sure the dry ingredients are combined evenly. Now, slowly add the dry mix to the wet mix. Stir until everything is fully blended. If you want, fold in the dark chocolate chips for a yummy treat. Using a spoon or cookie scoop, drop mounds of dough onto the prepared baking sheet. Leave about 2 inches of space between each mound. This allows them to spread while baking. Flatten each mound slightly with the back of a spoon for a nice shape. Bake your cookies in the preheated oven for 12 to 15 minutes. Keep an eye on them until the edges turn golden brown. Once baked, let the cookies cool on the baking sheet for about 5 minutes. After that, move them to a wire rack to cool completely. Enjoy your tasty and healthy Banana Oatmeal Bliss Cookies! To achieve the perfect texture in your Banana Oatmeal Cookies, you can choose between chewy and crunchy. For chewy cookies, use less baking time. Bake them for 12 minutes until the edges are golden but the center stays soft. If you prefer crunchy cookies, bake them for 15 minutes. Let them cool longer on the baking sheet. This allows them to crisp up as they cool. Adding spices can elevate your cookie experience. A dash of nutmeg or an extra sprinkle of cinnamon gives warmth and depth. You can also try vanilla or almond extracts for a twist. Optional add-ins like nuts or seeds enhance crunch and flavor. Chopped walnuts or sunflower seeds work great here. Feel free to mix in dark chocolate chips for a sweet surprise. Serve your cookies warm with a glass of milk or a cup of tea. They make a lovely breakfast treat too! Try pairing them with yogurt for a delightful snack. For a fun twist, top them with a bit of peanut butter or an extra drizzle of honey. Dust with cinnamon for a festive touch before serving. Your friends will love these tasty treats! {{image_2}} You can easily adjust this recipe for special diets. If you need gluten-free cookies, swap regular flour for almond flour or oat flour. These flours work well and keep the cookies soft. For a vegan option, replace honey with maple syrup. You can also use nut butter made from sunflower seeds to avoid nuts. Add some fun flavors to your cookies! Try mixing in different fruits like diced apples, blueberries, or diced peaches. You can also add nuts or seeds for crunch. If you love chocolate, toss in mini chocolate chips or chunks. Seasonal flavors can be exciting too! In fall, add pumpkin spice. In summer, mix in fresh berries for a bright taste. To make these cookies even healthier, you can reduce the sugar. Use half the amount of honey or maple syrup. You can also use ripe bananas for natural sweetness. If you want to lower the carbs, swap almond flour for coconut flour. This change keeps them tasty while cutting carbs. To keep your Banana Oatmeal Cookies fresh, store them in an airtight container. This keeps moisture out and helps maintain their soft texture. You can also add a slice of bread to the container. The bread helps keep cookies moist. For longer storage, you can freeze the cookie dough or baked cookies. To freeze the dough, scoop mounds onto a baking sheet and freeze them until solid. Then, transfer them to a zip-top bag. For baked cookies, let them cool completely, then wrap them in plastic wrap and place them in a freezer bag. When stored properly, these cookies last about a week at room temperature. In the fridge, they can stay fresh for up to 10 days. If you freeze the dough, it can last for about three months. Baked cookies can remain in the freezer for up to two months. To reheat your Banana Oatmeal Cookies, use the oven. Preheat it to 350°F (175°C). Place cookies on a baking sheet and heat for about 5 minutes. This method keeps them soft and warm. You can also use the microwave. Heat each cookie for about 10-15 seconds. However, be careful not to overheat, as this can make them tough. Yes, you can use quick oats in banana oatmeal cookies. Quick oats are thinner than rolled oats. This change affects the cookie's texture. Your cookies may turn out softer and less chewy. If you prefer a heartier bite, stick with rolled oats. You can replace eggs with applesauce or mashed bananas. Use about 1/4 cup of either for each egg. This will keep your cookies moist and tasty. Another option is to use flaxseed meal mixed with water. Mix 1 tablespoon of flaxseed meal with 2.5 tablespoons of water. Let it sit for a few minutes to thicken before adding. To boost flavor, try adding spices like nutmeg or ginger. Chopped nuts or seeds also work great for added crunch. Dried fruits like cranberries or raisins bring natural sweetness. If you like chocolate, dark chocolate chips are a perfect choice. You can mix and match these options to find your favorite combo. For the full recipe, check out the Banana Oatmeal Bliss Cookies. This blog post shared a simple and tasty banana oatmeal cookie recipe. We explored the ingredients, vital health benefits, and step-by-step instructions. I provided tips for texture and flavor, plus variations to fit your diet. Remember, these cookies are not only easy to make but also healthy. Enjoy them fresh or store them for later. With creativity, you can enhance their taste and make them your own. Bake and enjoy a nutritious treat that fits any lifestyle!

Banana Oatmeal Cookies Tasty and Healthy Treat

Looking for a tasty snack that’s healthy too? You’ve found it with these Banana Oatmeal Cookies! Made with ripe bananas

For a tasty crispy chickpea salad, you need these main ingredients: - 1 can (15 oz) chickpeas, drained and rinsed - 2 tablespoons olive oil - 1 teaspoon smoked paprika - 1 teaspoon garlic powder - 1/2 teaspoon cumin - Salt and pepper to taste - 4 cups mixed greens (spinach, arugula, kale) - 1 cup cherry tomatoes, halved - 1 cucumber, diced - 1/4 red onion, thinly sliced - 1/4 cup feta cheese, crumbled (optional) - Juice of 1 lemon - 1 tablespoon balsamic vinegar - Fresh herbs (parsley or cilantro) for garnish These ingredients create a salad that is both crispy and fresh. The chickpeas give protein, while the greens add vitamins. The spices bring great flavor. You can add fun toppings to make your salad even better. Try these options: - Sliced avocado for creaminess - Roasted nuts for crunch - Sliced olives for brininess - Grated carrots for sweetness These toppings let you customize your salad. Mix and match to find your favorite combination. Chickpeas are packed with protein and fiber. They help keep you full and support digestion. The greens add iron and vitamins A, C, and K. Tomatoes are rich in antioxidants, which are good for your heart. Feta cheese adds calcium and flavor. Olive oil provides healthy fats that support heart health. Each ingredient plays a role in making this salad both tasty and nutritious. This recipe is not just a meal; it's a way to nourish your body. You can find the full recipe to enjoy this salad at home! Start with one can of chickpeas. Drain and rinse them well. This step removes extra salt. Next, lay the chickpeas on a paper towel. Pat them dry to get rid of moisture. Dry chickpeas turn crispier when roasted. This is a key step for our dish. Preheat your oven to 400°F (200°C). This heat helps to create that perfect crunch. In a bowl, mix the dried chickpeas with two tablespoons of olive oil. Add one teaspoon of smoked paprika, one teaspoon of garlic powder, and half a teaspoon of cumin. Sprinkle in salt and pepper to taste. Toss everything well to coat the chickpeas. Spread them on a baking sheet. Make sure they are in a single layer for even cooking. Roast them for 25 to 30 minutes. Halfway through, stir them so they cook evenly. They should be golden brown and crispy when done. While the chickpeas roast, prepare the salad. In a large bowl, combine four cups of mixed greens. You can use spinach, arugula, or kale. Next, add one cup of halved cherry tomatoes and one diced cucumber. Thinly slice a quarter of a red onion and toss it in. If you like, sprinkle a quarter cup of crumbled feta cheese on top. In a small bowl, mix the juice of one lemon with one tablespoon of balsamic vinegar. Whisk it together, then pour it over the salad. Toss the salad well to coat it in the dressing. Once the chickpeas are ready and cooled, add them to the salad. Gently mix everything together. Garnish with fresh herbs like parsley or cilantro. Serve your Crispy Chickpea Salad right away for the best crunch. For the full recipe, check the section above. To make the best crispy chickpeas, start with dry chickpeas. After rinsing, pat them dry. This step removes extra moisture, which helps them get crispy. Spread the chickpeas on a baking sheet in a single layer. Avoid crowding them, or they won’t crisp up well. Also, add enough olive oil and seasoning. This ensures every chickpea gets flavor and crunch. While lemon juice and balsamic vinegar are great, you can try other dressings too. A tahini dressing adds a creamy touch. Mix tahini with lemon juice and water for a smooth blend. You could also try a yogurt-based dressing for a tangy flavor. Adding herbs like dill or basil can give your salad a fresh twist. Don’t be afraid to experiment with flavors you enjoy. You can easily make this salad fit your diet. If you’re vegan, skip the feta cheese. You could use avocado instead for creaminess. For gluten-free options, just ensure your dressing is free from gluten ingredients. Add proteins like grilled chicken or tofu for extra energy. If you're low-carb, use leafy greens and skip the grains. This salad can change to match your needs. For the full recipe, check out Crispy Chickpea Salad. {{image_2}} You can switch up your greens. Try using romaine, butter lettuce, or even Swiss chard. Each of these options adds a unique taste and texture. You can also mix in some carrots, bell peppers, or radishes for extra crunch and color. This keeps your salad fresh and fun! Add protein to make your salad more filling. Grilled chicken or tofu works great. These options boost the flavor and keep you satisfied. You could also try chickpea salad with hard-boiled eggs, shrimp, or even quinoa. Each choice makes the dish more balanced. Dressings can change the whole vibe of your salad. For a tangy kick, use a lemon-tahini dressing. If you like something creamy, try a yogurt-based dressing. A spicy ranch or a sweet vinaigrette can also add fun. Feel free to mix and match until you find your favorite flavor. Check out the Full Recipe for more ideas! Store leftover salad in an airtight container. Keep it in the fridge. This keeps it fresh for about two days. If you add the chickpeas, they may lose some crispiness. To keep chickpeas crispy, store them separately from the salad. Place them in a sealed container at room temperature. Avoid putting them in the fridge. If you notice they lose their crunch, re-roast them in the oven for a few minutes. For meal prep, make the chickpeas and salad separately. Roast the chickpeas ahead of time. You can wash and chop the vegetables in advance. Keep everything stored in separate containers. This way, you can mix them fresh before serving. For the best flavor, add the dressing just before eating. Check out the Full Recipe for details on preparation. To make chickpeas crispy, start by drying them well. Use a paper towel after draining. This step removes excess moisture. Then, toss them in olive oil and spices. The oil helps them crisp up in the oven. Roast them at 400°F for about 25-30 minutes. Stir them halfway to ensure even cooking. This method gives you crunchy, tasty chickpeas. Yes, you can prepare parts of the salad ahead of time. You can roast the chickpeas a day before. Just store them in a sealed container. The greens and veggies can be prepped too. Keep them in the fridge in separate bags. Mix everything just before serving. This keeps the salad fresh and crunchy. Chickpeas are very healthy. They are high in protein and fiber. This helps you feel full longer. They also have vitamins and minerals like iron and folate. Eating chickpeas can support heart health. They may help with weight management too. Adding them to your diet is a smart choice. Yes, this salad is vegan-friendly! It mainly uses vegetables and chickpeas. If you skip the feta cheese, it stays vegan. The dressing is made from lemon juice and balsamic vinegar, which are both plant-based. Enjoy this salad without any animal products. It’s a great choice for everyone! Crispy Chickpea Salad offers simple steps to a tasty dish. Start with chickpeas, roast them, and mix in your favorites. You can swap greens, add proteins, and choose dressings to fit your taste. Storing extras correctly keeps your salad fresh for later. This recipe is a fun way to boost health with chickpeas. Enjoy making this versatile salad that is both easy and good for you!

Crispy Chickpea Salad Flavorful and Nutritious Meal

If you’re searching for a tasty and healthy meal, look no further! My Crispy Chickpea Salad packs a punch of

To make these tasty Pumpkin Spice Energy Balls, gather the following ingredients: - 1 cup rolled oats - 1/2 cup almond butter (or peanut butter) - 1/2 cup canned pumpkin puree - 1/4 cup honey or maple syrup - 1/2 teaspoon vanilla extract - 1 teaspoon pumpkin spice blend (or a mix of cinnamon, nutmeg, and ginger) - 1/4 cup chia seeds - 1/4 cup mini chocolate chips (optional) - A pinch of salt You can swap some ingredients based on your taste or needs. For example: - Use sunflower seed butter instead of almond butter for a nut-free option. - Replace honey with agave syrup for a vegan choice. - If you want a lower sugar option, use mashed banana instead of honey or maple syrup. - You can use rolled oats or quick oats; both work well. - Add nuts or seeds for extra crunch and health benefits. Each energy ball has about: - Calories: 100 - Protein: 3g - Carbohydrates: 12g - Fat: 5g - Fiber: 2g - Sugar: 3g These energy balls are a healthy snack that gives you energy without the crash. You can feel good about enjoying them. For the full recipe, check the detailed instructions. To make Pumpkin Spice Energy Balls, start with a big mixing bowl. Add 1 cup of rolled oats, 1/2 cup of almond butter, and 1/2 cup of canned pumpkin puree. Pour in 1/4 cup of honey or maple syrup. Mix these ingredients well until you have a thick and sticky dough. Next, add 1/2 teaspoon of vanilla extract, 1 teaspoon of pumpkin spice blend, 1/4 cup of chia seeds, and a pinch of salt. Stir again until everything blends smoothly. If you like, fold in 1/4 cup of mini chocolate chips for a sweet touch. Now, scoop out a tablespoon of the mixture and roll it into a ball. Keep rolling until you finish all the dough. Place the balls on a baking sheet lined with parchment paper. Chill them in the fridge for about 30 minutes. This helps them firm up nicely. For the best consistency, make sure your almond butter is smooth. If it’s too thick, add a tiny bit of water or more pumpkin puree. You want it sticky but not too wet. If the mixture feels too dry, mix in a little extra honey or maple syrup. This balance helps the energy balls hold together well. Try to keep your hands slightly damp while rolling the balls. This trick helps prevent the mixture from sticking to your hands. If you find the mixture too sticky, dust your hands with a little bit of oats. After rolling the energy balls, it’s time to chill them. Place the baking sheet in the fridge for about 30 minutes. This makes them easier to handle and gives them a nice shape. Once they are firm, transfer the energy balls into an airtight container. You can store them in the fridge for up to one week. For longer storage, freeze them individually. Just wrap each ball in plastic wrap and place them in a freezer-safe bag. This way, you can enjoy your Pumpkin Spice Energy Balls anytime! For the full recipe, check the section above. To boost flavor, use fresh spices. Ground spices lose taste over time. You can also toast your oats for a richer taste. This adds a nutty flavor that enhances the energy balls. If you want a creamier texture, try adding a bit more almond butter. It makes the balls smooth and easy to eat. One common mistake is not chilling the mixture. Chilling helps the balls hold their shape. Another mistake is using too much wet ingredient. This can make the mixture too sticky. If this happens, add more oats to balance it out. Avoid overmixing, as it can make the texture dense. These energy balls pair well with warm drinks. Try them with chai tea or hot cocoa. For a refreshing option, serve with iced coffee or herbal tea. You can also enjoy them as a quick snack on their own. They make a great treat for kids and adults alike. For a fun twist, roll them in shredded coconut or crushed nuts before serving. This adds extra texture and flavor. For the full recipe, check the earlier section! {{image_2}} You can change the flavor of your energy balls to match your taste. Try adding a bit of cocoa powder for a chocolate twist. Swap pumpkin spice for chai spice if you want something different. You can even mix in some orange zest for a fresh flavor. Each change makes these treats exciting and unique! These energy balls fit many diets with a few tweaks. To make them gluten-free, use certified gluten-free oats. For a vegan option, replace honey with maple syrup. You can also use almond butter or sunflower seed butter for nut-free diets. These simple swaps keep the taste while meeting different needs. Get creative with your add-ins! You can use different nuts like walnuts or pecans for crunch. Add seeds such as flaxseeds or pumpkin seeds for extra nutrition. Dried fruits like cranberries or raisins give a sweet touch. Mix and match to find your favorite combination and make these energy balls your own! For the complete recipe, check out the Full Recipe section. To keep your Pumpkin Spice Energy Balls fresh, store them in an airtight container. This helps prevent them from drying out. Place them in the fridge right after making them. You can stack them in a single layer or separate layers with parchment paper. This method keeps them from sticking together. If you want to save some energy balls for later, freezing is a great option. Start by placing each ball on a baking sheet. Freeze them for about an hour until they are firm. After they are frozen, transfer them to a freezer-safe bag or container. Label it with the date so you know when you made them. They can last up to three months in the freezer. In the fridge, your energy balls will stay fresh for about one week. If you keep them frozen, they can last for three months. Always check for any off smells or changes in texture before eating. Freshness is key to keeping these snacks tasty and safe. Enjoy your delicious Pumpkin Spice Energy Balls at their best! For the complete recipe, refer to the full recipe. Pumpkin spice energy balls are small snacks that pack a flavor punch. They mix oats, nut butter, pumpkin puree, and spices. These balls are sweet and healthy. They give you energy and taste great. You can make them in just 15 minutes! In the fridge, these energy balls last about a week. Store them in an airtight container to keep them fresh. If you want to save them longer, try freezing them! They freeze well and can last for months. Yes, you can use any nut butter you like! Almond butter and peanut butter work best, but cashew and sunflower butter are great too. Just keep the same amount to keep the texture right. This flexibility lets you customize the flavor to your taste! For the full recipe, check it out. You learned how to make Pumpkin Spice Energy Balls and why they are great snacks. I shared tips on ingredients, cooking steps, and storing your treats. You can even adapt them to fit different diets. These energy balls offer both flavor and nutrition. They are easy to customize and store well. Enjoy making them and experimenting with new flavors! Happy snacking!

Pumpkin Spice Energy Balls Tasty and Healthy Snack

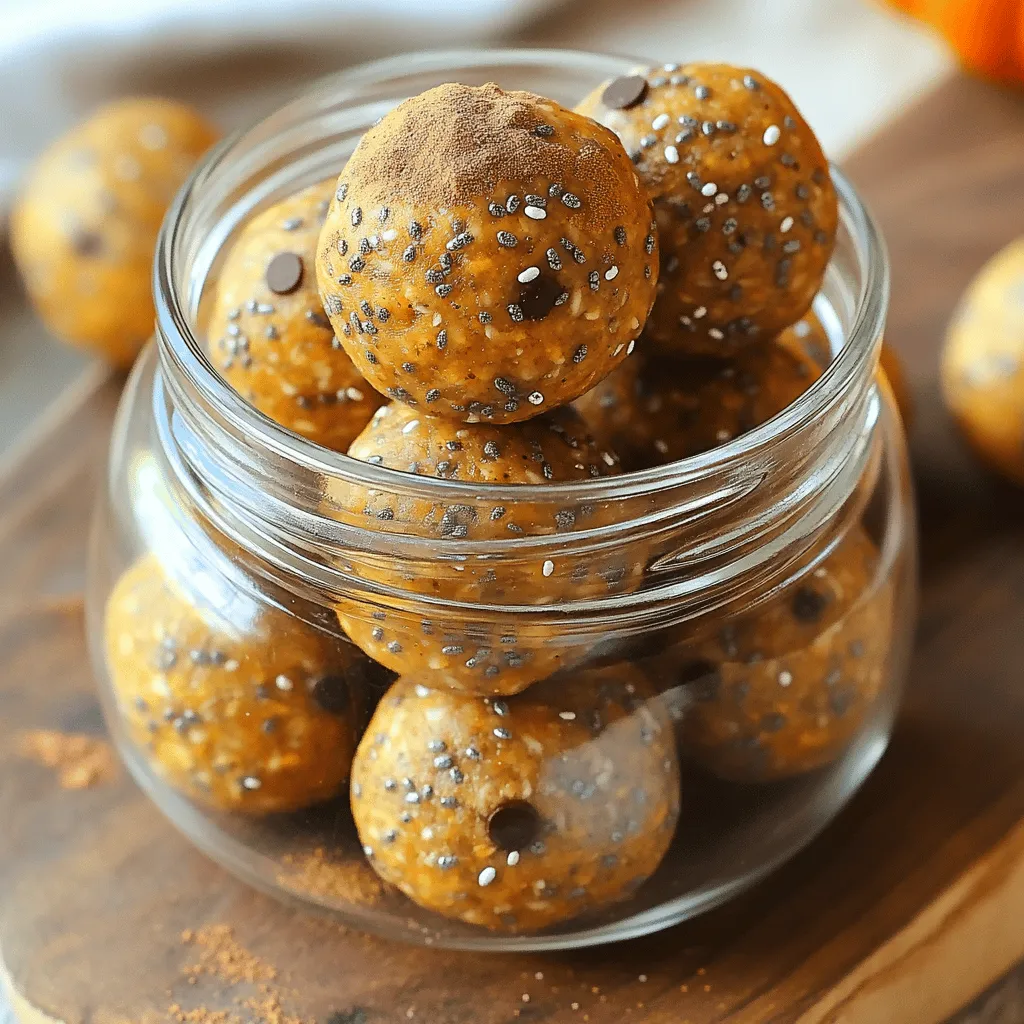
Are you ready to enjoy a tasty and healthy snack that’s perfect for fall? Pumpkin Spice Energy Balls are not

To make Buffalo Cauliflower Bites, you need a few key items. Here’s a list of essential ingredients: - 1 large head of cauliflower, cut into bite-sized florets - 1 cup all-purpose flour - 1 cup non-dairy milk (almond or soy milk work well) - 1 teaspoon garlic powder - 1 teaspoon onion powder - 1 teaspoon paprika - 1/2 teaspoon salt - 1/2 teaspoon black pepper - 1 cup buffalo sauce (store-bought or homemade) - 2 tablespoons melted vegan butter (optional) - Fresh celery sticks and carrot sticks for serving - Blue cheese or ranch dressing for dipping (optional) These ingredients come together to create a crunchy, spicy snack that packs a punch. If you want to enhance the taste, consider adding some optional ingredients. Here are a few ideas: - Cayenne pepper for extra heat - Fresh herbs like parsley or cilantro for garnish - Nutritional yeast for a cheesy flavor - A squeeze of lime juice for a zesty kick These additions can make your bites even more exciting. Not every ingredient has to be set in stone. Here are some easy swaps you can make: - Use chickpea flour instead of all-purpose flour for a gluten-free option. - Swap non-dairy milk for regular milk if you don’t need it to be vegan. - Substitute the buffalo sauce with barbecue sauce for a milder flavor. - Use any plant-based butter if you don’t have vegan butter. These substitutions allow you to customize the recipe to fit your taste and dietary needs. For the full recipe, check the instructions later in this article. First, you need to get your oven ready. Preheat it to 450°F (232°C). Line a baking sheet with parchment paper for easy cleanup. Next, take a large mixing bowl. Combine one cup of flour with one teaspoon of garlic powder, one teaspoon of onion powder, one teaspoon of paprika, half a teaspoon of salt, and half a teaspoon of black pepper. Whisk this mixture until it is well combined. Now, slowly add one cup of non-dairy milk to the flour mix. Stir gently until you get a smooth batter. This batter will help the cauliflower stick and get crunchy. Cut a large head of cauliflower into bite-sized florets. Dip each floret into the batter. Make sure to let any extra batter drip off. Place the coated florets on the prepared baking sheet. Place the baking sheet in your preheated oven. Bake the cauliflower bites for 25 to 30 minutes. They should turn golden brown and crispy. Halfway through, remember to turn them for even cooking. When the timer goes off, check that they are crispy. If they need more time, leave them in for a few more minutes. While your bites bake, prepare the buffalo sauce. In a separate bowl, mix one cup of buffalo sauce with two tablespoons of melted vegan butter. This step is optional but adds extra flavor. Once the cauliflower is out of the oven, transfer it to a large mixing bowl. Pour the buffalo sauce mixture over the hot cauliflower. Toss gently to coat each piece well. Now, return the coated bites to the baking sheet. Bake them for another 5 to 7 minutes. This step helps the sauce caramelize and stick better. Serve your buffalo cauliflower bites hot, paired with fresh celery sticks, carrot sticks, and your favorite dipping sauce. Enjoy this tasty snack! For the full recipe, check out the details above. To get those bites nice and crispy, start by preheating your oven to 450°F (232°C). This high heat helps them crisp up. Use a good amount of flour in your batter. A thick coating adds crunch. Don't forget to turn the cauliflower halfway through baking. This step makes sure all sides cook evenly. Adding spices to your batter is key. I recommend garlic powder, onion powder, and paprika. These spices bring out rich flavors. If you want more heat, try adding cayenne pepper. Toss the hot bites in buffalo sauce right after baking. This method ensures they soak up all the flavors. For a richer taste, mix in melted vegan butter with the sauce. Serve your buffalo cauliflower bites hot with fresh celery and carrot sticks. They are perfect for dipping! You can use ranch or blue cheese dressing. For a vegan option, look for a plant-based dressing. These bites make a great snack for parties or game days. They are fun and delicious! Enjoy every crispy bite! {{image_2}} You can spice up your Buffalo cauliflower bites easily. Try adding cayenne pepper to the flour mix. A pinch gives a nice kick. For even more heat, toss in some diced jalapeños. This adds a fresh, spicy punch. If you love heat, use extra buffalo sauce before serving. You can also mix in chili powder for a smoky flavor. You don’t have to stick to baking for these bites. Air frying is a great option. It cooks them quickly and makes them super crispy. Set your air fryer to 400°F (200°C) for about 15-20 minutes. Shake the basket halfway through to ensure even cooking. You can also grill the bites for a smoky taste. Just place them in a grill basket and cook over medium heat. This method gives you a nice char. Dipping sauces can take your bites to the next level. Traditional ranch or blue cheese work well. To make it fun, try a spicy avocado dip. Just mash avocado with lime juice and hot sauce. You could also mix yogurt with herbs for a fresh taste. For a sweet twist, combine honey with mustard. This balance of flavors enhances the dish. Feel free to experiment and find your perfect match! For the complete recipe, check [Full Recipe]. To keep your Buffalo Cauliflower Bites fresh, let them cool completely. Place them in an airtight container. This will prevent moisture and keep them crispy. You can store them in the fridge for up to three days. If you want them to last longer, consider freezing them. When you want to enjoy your leftover bites, preheat your oven to 350°F (175°C). Spread the cauliflower bites on a baking sheet. Bake them for about 10-15 minutes until they are warm and crispy again. Avoid using the microwave, as it can make them soggy. Buffalo Cauliflower Bites can last in the fridge for three days. If you freeze them, they can last for up to three months. To freeze, place the cooled bites in a single layer on a baking sheet. Once frozen, transfer them to a freezer-safe bag. This way, you can enjoy this tasty snack whenever you want! For detailed cooking steps, refer to the Full Recipe. Buffalo cauliflower bites are a tasty snack. They use cauliflower florets, coated in batter, and baked until crispy. The bites are tossed in spicy buffalo sauce. This dish brings the bold flavor of buffalo wings but is plant-based. Yes, you can easily make buffalo cauliflower bites gluten-free. Just swap all-purpose flour for a gluten-free flour blend. Many blends work well here. You can also use almond flour or chickpea flour. Both options keep the bites crispy and delicious. To make them spicier, add cayenne pepper or hot sauce to the batter. You can also increase the amount of buffalo sauce. If you prefer milder bites, reduce the amount of buffalo sauce. Mixing in some honey or maple syrup can also tone down the heat. Yes, buffalo cauliflower bites can be a healthy snack. They have fewer calories than traditional wings. Cauliflower is rich in vitamins and fiber. Baked bites have less oil than fried options. Just watch how much sauce you add for a healthier choice. For the full recipe, check the section above. Buffalo cauliflower bites are a tasty and easy snack. We explored key ingredients and steps to make them. You learned tips for great flavor and texture. We also shared fun variations and how to store leftovers. These bites fit many diets and make perfect party food. Enjoy experimenting with flavors and dips. You can make this snack your own, and it’s sure to please everyone! Stick to the steps and tips for a delicious outcome. Happy cooking!

Buffalo Cauliflower Bites Flavorful and Easy Snack

Get ready to enjoy a tasty treat that’s easy to make! Buffalo cauliflower bites are perfect for snack time or

- 1 cup red lentils, rinsed - 1 can (13.5 oz) coconut milk - 1 medium onion, diced - 2 cloves garlic, minced - 1 tablespoon fresh ginger, grated - 2 tablespoons curry powder - 1 teaspoon turmeric powder - Salt and pepper to taste - 4 cups vegetable broth - 1 cup diced tomatoes (fresh or canned) - 1 carrot, diced - 1 bell pepper, diced - 2 cups spinach or kale, roughly chopped - Fresh cilantro, for garnish (optional) Using these ingredients, you create a warm and tasty Coconut Curry Lentil Soup. Each one plays a key role in building flavor and nutrition. The red lentils cook down nicely and add protein. Coconut milk brings creaminess and a subtle sweetness. Onions, garlic, and ginger form a strong base, giving depth to the soup. The spices, curry powder and turmeric, add warmth and a vibrant color. Adjust salt and pepper to enhance the flavors to your liking. Feel free to mix in your favorite vegetables. Carrots and bell peppers add a nice crunch. Spinach or kale gives extra nutrients. Don't forget the fresh cilantro for a bright finish. For the complete list of ingredients and instructions, check the Full Recipe. Enjoy the process of making this hearty soup! - Heat olive oil in a large pot over medium heat. - Sauté diced onion until translucent. Start by warming the olive oil. This helps the onion cook evenly. I love using medium heat to avoid burning. Once the onion turns soft and clear, it's time to add more flavor. - Add minced garlic and grated ginger, cooking until fragrant. - Stir in curry powder and turmeric, cooking to bloom the spices. Next, toss in the minced garlic and ginger. They add a fresh kick to the soup. Cook them until you can smell their aroma. Then, add the curry powder and turmeric. This step brings out the spice flavors. Cook this mix for a minute to bloom the spices. - Add diced carrots and bell pepper, then cook slightly. - Introduce rinsed lentils, diced tomatoes, coconut milk, and vegetable broth. - Bring to a boil, then simmer uncovered until lentils are tender. - Stir in chopped spinach or kale, and season with salt and pepper. Now, it's time to add the veggies. Toss in the diced carrots and bell pepper. Cook them for a few minutes until they soften a bit. Then, add the rinsed lentils, diced tomatoes, coconut milk, and vegetable broth. Stir everything nicely. Bring this mix to a boil. Once boiling, lower the heat and let it simmer uncovered. This will take about 20 to 25 minutes until the lentils get tender. Finally, stir in the chopped spinach or kale. Let it simmer for another five minutes. Season your soup with salt and pepper to taste. For the full recipe, check out the ingredients and precise steps. Enjoy creating a warm bowl of coconut curry lentil soup! - Rinse lentils thoroughly for best results. This helps remove dirt and impurities. - Adjust cooking times based on desired lentil texture. For softer lentils, cook longer. - Garnish with fresh cilantro for an added touch. It brightens up the soup. - Serve with crusty bread or rice to enhance the meal. Both options soak up the flavors. - Overcooking vegetables before adding broth. This can make them mushy and bland. - Skipping the spice blooming step, which enhances flavors. Blooming spices brings out their true taste. Coconut Curry Lentil Soup is a simple yet delicious dish. For the full recipe, check out the details above. {{image_2}} You can easily make this soup fit your diet. For a vegan option, ensure your vegetable broth is plant-based. This simple step keeps the soup fully vegan. If you need it gluten-free, check that all ingredients, especially the broth, are gluten-free. Many brands offer great gluten-free options. Want to spice things up? Add lime juice for a fresh citrus kick. It brightens the soup! You can also try different greens. Swiss chard or arugula adds a unique twist. These greens not only change the flavor but also boost nutrition. Looking to add protein? You can include tofu or chickpeas. Both options make the soup more filling. If lentils aren't your favorite, swap them with other legumes like black beans. This keeps the texture nice and gives a different flavor profile. These variations keep Coconut Curry Lentil Soup exciting and tasty. Don't forget to check the Full Recipe for more ideas! You can store your Coconut Curry Lentil Soup in an airtight container. It will last up to 5 days in the fridge. This makes it easy to grab for a quick meal. Just make sure to let it cool before sealing. For longer storage, freeze the soup in portions. Use freezer-safe containers or bags. It will stay good for up to 3 months. This way, you’ll have healthy meals ready when you need them. When you want to enjoy the soup again, reheat it on the stovetop or microwave. If it seems thick, add a little water for the right consistency. Stir well as it warms up to keep it smooth and tasty. The soup can be refrigerated for up to 5 days or frozen for 3 months. This makes it a great meal prep option. I often make a big batch and enjoy it throughout the week. Yes, combine all ingredients and cook on low for 6-8 hours or high for 3-4 hours. A slow cooker gives the flavors time to blend, making it even tastier. You'll love the ease of using one pot! Lentils are high in protein, fiber, and essential minerals, making them nutritious. They help keep you full and support digestion. Plus, they are a great source of iron, which is vital for energy. Red lentils are preferred, but green or brown lentils can also work, with slight adjustments in cooking time. Just remember that red lentils cook faster, while green and brown lentils hold their shape better. You might need to add more liquid if you use the latter. For the full recipe, check out the details above! This essay shared how to make Coconut Curry Lentil Soup using simple ingredients. We discussed the main components like lentils, coconut milk, and spices. You learned step-by-step instructions and common mistakes to avoid. Don't forget to try variations, such as adding lime juice or different greens. Storing leftovers is easy. You can keep it fresh for days or freeze it for later. Cooking can be fun and simple with this recipe. Enjoy your healthy, tasty meal and get creative!

Coconut Curry Lentil Soup Flavorful and Nourishing Dish

Are you craving a warm, hearty dish that’s both tasty and healthy? Look no further than Coconut Curry Lentil Soup.

Here are the ingredients you need to make lemon blueberry muffins. Each one plays a key role in creating a fluffy and flavorful treat. - 1 ½ cups all-purpose flour - ½ cup granulated sugar - 2 teaspoons baking powder - ½ teaspoon baking soda - ½ teaspoon salt - 1 large lemon, zested and juiced - 1/3 cup vegetable oil - 1 large egg - ½ cup buttermilk (or substitute with milk and a splash of lemon juice) - 1 cup fresh blueberries (or frozen, if unavailable) - 1 teaspoon vanilla extract - Optional: Powdered sugar for dusting The flour forms the base, giving structure to the muffins. Sugar adds sweetness and helps with browning. Baking powder and baking soda create lift, making the muffins rise. Salt balances the flavors and enhances the sweetness. Lemon zest and juice add a bright, tangy flavor that pairs well with blueberries. Vegetable oil keeps the muffins moist and tender. The egg binds the ingredients together. Buttermilk adds richness and acidity, making them fluffy. Fresh blueberries burst with juice in every bite. If fresh ones are hard to find, frozen will work just fine. Lastly, a dusting of powdered sugar gives a nice finish, but it’s entirely optional. These simple ingredients come together to create a delightful treat. For the full recipe, check the section above! First, set your oven to 375°F (190°C). This is the perfect temperature for baking. Next, prepare your muffin tin. You can use paper liners or lightly grease it with cooking spray. This step helps your muffins release easily after baking. In a large bowl, whisk together the dry ingredients. Combine 1 ½ cups of flour, ½ cup of sugar, 2 teaspoons of baking powder, ½ teaspoon of baking soda, and ½ teaspoon of salt. Make sure these ingredients mix well. This blend will help your muffins rise and create a nice texture. In another bowl, mix the wet ingredients. Whisk together the zest and juice of one large lemon, ⅓ cup of vegetable oil, one large egg, and ½ cup of buttermilk. If you don’t have buttermilk, you can use regular milk with a splash of lemon juice. Keep whisking until the mix is smooth. Pour the wet ingredients into the dry ingredients. Gently fold them together. It is key to not overmix the batter; it should stay slightly lumpy. Overmixing can make your muffins tough. After that, fold in 1 cup of fresh blueberries. This step adds delicious bursts of flavor. Now, divide the batter among the muffin cups. Fill each cup about ⅔ full. This gives them room to rise. Bake in your preheated oven for 18-20 minutes. To check for doneness, insert a toothpick into the center. If it comes out clean, your muffins are ready. Once baked, let the muffins cool in the tin for about 5 minutes. This makes them easier to handle. Then, transfer them to a wire rack to cool completely. If you want, dust the tops with powdered sugar for a sweet finish. Enjoy your lemon blueberry muffins fresh from the oven! For the full recipe, check the section above. To make your lemon blueberry muffins fluffy, start with room temperature ingredients. Room temperature eggs and buttermilk mix better and trap air. This helps the muffins rise. Make sure to not overmix the batter. Mix until just combined. Lumps are okay. Overmixing makes the muffins tough. Use a gentle hand when folding in the blueberries. This way, they stay whole and juicy. For even baking, place the muffin tin in the center of the oven. This lets hot air circulate around the muffins. Rotate the tin halfway through baking to ensure even heat. When choosing blueberries, fresh is best. Look for plump, firm berries with a deep blue color. Avoid mushy or shriveled ones. If fresh blueberries are not available, frozen works too. Just add them still frozen to avoid them bleeding into the batter. For lemons, choose ones that feel heavy for their size. This means they have more juice. Look for bright yellow skin with no blemishes. Zest the lemon before juicing for maximum flavor. You can prepare the muffin batter in advance. Mix it the night before and store it in the fridge. This saves time in the morning. Just remember, let the batter sit at room temperature for a few minutes before baking. If you want to store uncooked muffins, fill the muffin cups with batter. Cover them tightly with plastic wrap. Place them in the fridge for up to 24 hours. Bake them when you're ready for fresh muffins. For the full recipe, check out the detailed instructions provided. {{image_2}} You can switch blueberries for other fruits. Raspberries and strawberries work great. Both add their unique taste. You can also mix fruits. For example, use half blueberries and half strawberries. This combo gives a new twist to the flavor. To make these muffins vegan, replace the egg. Use a flaxseed meal instead. Mix one tablespoon of flaxseed with three tablespoons of water. Let it sit for five minutes until it thickens. For buttermilk, use plant-based milk mixed with lemon juice. Almond or soy milk is a good choice. This keeps the muffins moist while being dairy-free. Want more flavor? Add lemon extract or lemon zest. This boosts the lemon taste and makes the muffins pop. You can also use spices like cinnamon. A pinch can add warmth and depth to your muffins, making them even tastier. For the full recipe, check out the [Full Recipe]. To keep your leftover lemon blueberry muffins fresh, store them in an airtight container. Place a paper towel at the bottom of the container. This helps absorb moisture and keeps muffins from getting soggy. You can store them at room temperature for up to three days. If you want to keep them longer, refrigerate them. However, refrigeration can dry out the muffins. Freezing muffins is simple and effective. First, let the muffins cool completely. Wrap each muffin in plastic wrap. Then, place them in a freezer bag. Make sure to remove as much air as possible. This helps prevent freezer burn. You can freeze muffins for up to three months. When you're ready to eat, take out a muffin and let it thaw at room temperature. For a quick warm-up, you can microwave it for about 20-30 seconds. This makes the muffin soft and tasty again. Lemon blueberry muffins last about three days at room temperature. After that, they may start to lose flavor and texture. If you notice a change in smell or appearance, it’s best to throw them away. Signs of spoilage include a dry texture, mold, or an off smell. Enjoy your muffins while they’re fresh! For the full recipe, check out the earlier section in this article. Yes, you can use regular milk. To make a buttermilk substitute, add one tablespoon of lemon juice to a cup of milk. Stir and let it sit for five minutes. This will give your muffins a nice tang and keep them moist. Absolutely! You can use gluten-free flour blends. Look for one that has xanthan gum, which helps improve the texture. Almond flour or oat flour can also work but may change the taste and texture slightly. You can reduce the sugar by a third for a less sweet muffin. Consider using natural sweeteners like honey or maple syrup. These options can add flavor while lowering the sugar content. Just remember to adjust the liquid in your batter if you use these sweeteners. In this blog post, we explored how to make delicious lemon blueberry muffins. We covered every step, from mixing dry and wet ingredients to baking and cooling. You learned common tips and variations to customize your muffins. Whether you choose fresh or frozen blueberries, these muffins will be a hit. Now, you can confidently try this easy recipe at home. Enjoy your baking and the tasty results!

Lemon Blueberry Muffins Simple and Tasty Delight

Are you ready to bake a treat that brightens your day? Lemon blueberry muffins are simple, tasty, and perfect for

Older posts
Newer posts
← Previous Page1 … Page33 Page34 Page35 … Page61 Next →

dsad

© 2025 Cooking Wells • Built with GeneratePress

Our Policies

  • Copyright Policy
  • Cookie Policy
  • GDPR Policy
  • Privacy Policy
  • Disclaimer
  • Terms Of Use

More Information

  • Home
  • About
  • Contact
  • Appetizers
  • Dessert
  • Dinner
  • Drinks
©2025, Cooking Wells About Back To Top