Skip to content
DisclaimerTerms Of UseGDPR PolicyCookie Policy

Cooking Wells

  • Home
  • Drinks
  • Appetizers
  • Dinner
  • Dessert
  • About
  • Contact
  • Privacy Policy
DisclaimerTerms Of UseGDPR PolicyCookie Policy

Mia

To make the Peach Galette with Almond Crust, gather these key ingredients: - 1 ½ cups almond flour - ½ cup all-purpose flour - ¼ cup cold unsalted butter, cubed - 1 tablespoon sugar - 1/4 teaspoon salt - 1/4 cup ice water - 4 ripe peaches, sliced - 2 tablespoons honey or maple syrup - 1 tablespoon lemon juice - 1 teaspoon vanilla extract - 1 tablespoon cornstarch - 1 egg (for egg wash) - Turbinado sugar (for sprinkling on crust) You can adjust the measurements based on your taste or dietary needs. For example: - Almond flour gives a nutty flavor but can be swapped with oat flour for a different taste. - If you want a dairy-free option, use coconut oil instead of butter. - Maple syrup can replace honey for a vegan version. - Feel free to use more or less sugar based on your peach's sweetness. The essential ingredients are the almond flour, peaches, and butter. These create the main structure and flavor. The optional items include: - Honey or maple syrup for sweetness - Lemon juice for brightening the flavor - Vanilla extract for added depth - Cornstarch to thicken the peach filling Using all the optional ingredients can enhance the dish, but the galette will still shine with just the essentials. For the full recipe, check out the complete instructions for making this delightful dessert. To make the almond crust, start by mixing the dry ingredients. In a large bowl, combine 1 ½ cups of almond flour, ½ cup of all-purpose flour, 1 tablespoon of sugar, and ¼ teaspoon of salt. This blend gives the crust a lovely nutty flavor. Next, add in ¼ cup of cubed cold unsalted butter. Use your fingers or a pastry cutter to mix until it looks like coarse crumbs. This step is key for a flaky crust. Now, it's time to add the ice water. Gradually mix in ¼ cup, adding one tablespoon at a time. Stop when the dough starts to come together. Wrap the dough in plastic wrap and chill it in the fridge for at least 30 minutes. This rest time helps the crust hold its shape while baking. While the crust chills, let’s make the peach filling. Take 4 ripe peaches and slice them. In a medium bowl, combine the sliced peaches with 2 tablespoons of honey or maple syrup, 1 tablespoon of lemon juice, 1 teaspoon of vanilla extract, and 1 tablespoon of cornstarch. Toss everything gently. The cornstarch helps thicken the filling, so it won’t make the crust soggy. Let the mixture sit for a bit to allow the flavors to blend. After the dough has chilled, preheat your oven to 375°F (190°C). On a lightly floured surface, roll out your dough into a rough circle about 12 inches in diameter. Don’t worry about making it perfect; a rustic look is charming. Carefully transfer the dough to a lined baking sheet. Spoon the peach mixture into the center, leaving a 2-inch border. Gently fold the edges of the dough over the peach filling, making little pleats as you go. This creates a beautiful edge. For a nice golden color, beat 1 egg and brush it over the crust. Then, sprinkle some turbinado sugar on top for a delightful crunch. Now, bake your galette for 30-35 minutes. You want the crust to be golden brown, and the peaches should be bubbly. Let it cool for a few minutes before serving. This galette is perfect warm or at room temperature. Enjoy it with a scoop of vanilla ice cream for a special treat. For the complete process, refer to the Full Recipe. To get that perfect crust, use cold butter. It helps keep the crust flaky. You can also chill your mixing bowl. This keeps everything cool. When mixing, aim for a crumbly texture. Don't overmix! A little warmth from your hands can melt the butter. This can make the crust tough. You can add spices to boost flavor. A pinch of cinnamon or nutmeg works well. Try adding fresh herbs like thyme or basil for a twist. You can also swap peaches for other fruits. Berries or apples can make great substitutes. Drizzling a little honey or maple syrup enhances sweetness too. One mistake is not chilling the dough. If the dough is warm, it won’t hold its shape. Another issue is overfilling the galette. Too much filling can make it hard to fold. Watch the baking time; every oven is different. Pull it out when the crust is golden brown. For the best taste, serve it warm. Check out the Full Recipe for all the steps! {{image_2}} You can swap peaches for other fruits. Try nectarines, plums, or berries. Each fruit brings its unique flavor. For example, berries add a nice tartness. Adjust the sugar based on the fruit's sweetness. Keep the same filling steps, and enjoy a new twist each time. If you need a gluten-free option, use only almond flour. You can mix in a bit of coconut flour for texture. This keeps the crust light and tasty. Make sure your other ingredients, like sugar and butter, are gluten-free too. Your galette will still taste amazing! To make this galette vegan, replace butter with coconut oil. Use a flax egg instead of a regular egg. Mix one tablespoon of flaxseed meal with three tablespoons of water. Let it sit for a few minutes to thicken. This will help bind your crust. Use maple syrup in place of honey for sweetness. These simple changes keep your galette delicious and plant-based. For the full recipe, follow the instructions provided, and enjoy your cooking! You can keep your peach galette in the fridge. Wrap it in plastic wrap or foil. It will stay fresh for up to three days. The crust may lose some crunch, but the flavor stays great. To serve, let it sit at room temperature for a bit. If you want to store it for longer, freezing is the way to go. First, let the galette cool completely. Wrap it tightly in plastic wrap, then place it in an airtight container. It will last up to three months in the freezer. When you’re ready to eat, thaw it in the fridge overnight. To reheat your galette, preheat your oven to 350°F (175°C). Place the galette on a baking sheet. Heat it for about 10-15 minutes. This way, the crust gets crispy again, and the peaches warm up nicely. Enjoy it warm, maybe with a scoop of ice cream! A galette is a free-form pie. It has a rustic look and is easy to make. You can fill it with fruits, veggies, or even meats. The crust is often flaky and buttery. It does not need a pie dish, which makes it fun to prepare. You simply roll out the dough and fold the edges over the filling. This creates a lovely, casual presentation. Galettes are great for any occasion, from family dinners to gatherings with friends. Yes, you can use frozen peaches. They are a good option when fresh peaches are out of season. Thaw the peaches first and drain any excess liquid. This helps keep the filling from being too watery. The flavor will still be sweet and delicious. Just slice them and mix them with your other filling ingredients as you would with fresh peaches. To keep the crust crisp, follow these tips: - Use cold ingredients: Start with cold butter and ice water for the dough. - Pre-bake the crust: If you want, you can pre-bake the crust for a few minutes before adding the filling. - Add a layer: Sprinkle almond flour or cornstarch on the crust before adding the peaches. This absorbs excess moisture. - Don’t overfill: Avoid adding too much filling. Leave enough space for the juices to bubble without spilling over. These steps will help create a crust that is golden and flaky. Enjoy your Peach Galette with Almond Crust! For the full recipe, refer to the section above. We covered everything you need to know to make a delicious peach galette. You learned about the right ingredients, how to prepare the crust, and how to bake the filling. I shared tips to enhance flavor and avoid common mistakes. You also discovered variations and storage tips for your galette. Now, you can enjoy making this tasty treat at home. Embrace creativity and have fun in the kitchen!

Peach Galette with Almond Crust Delightful Recipe

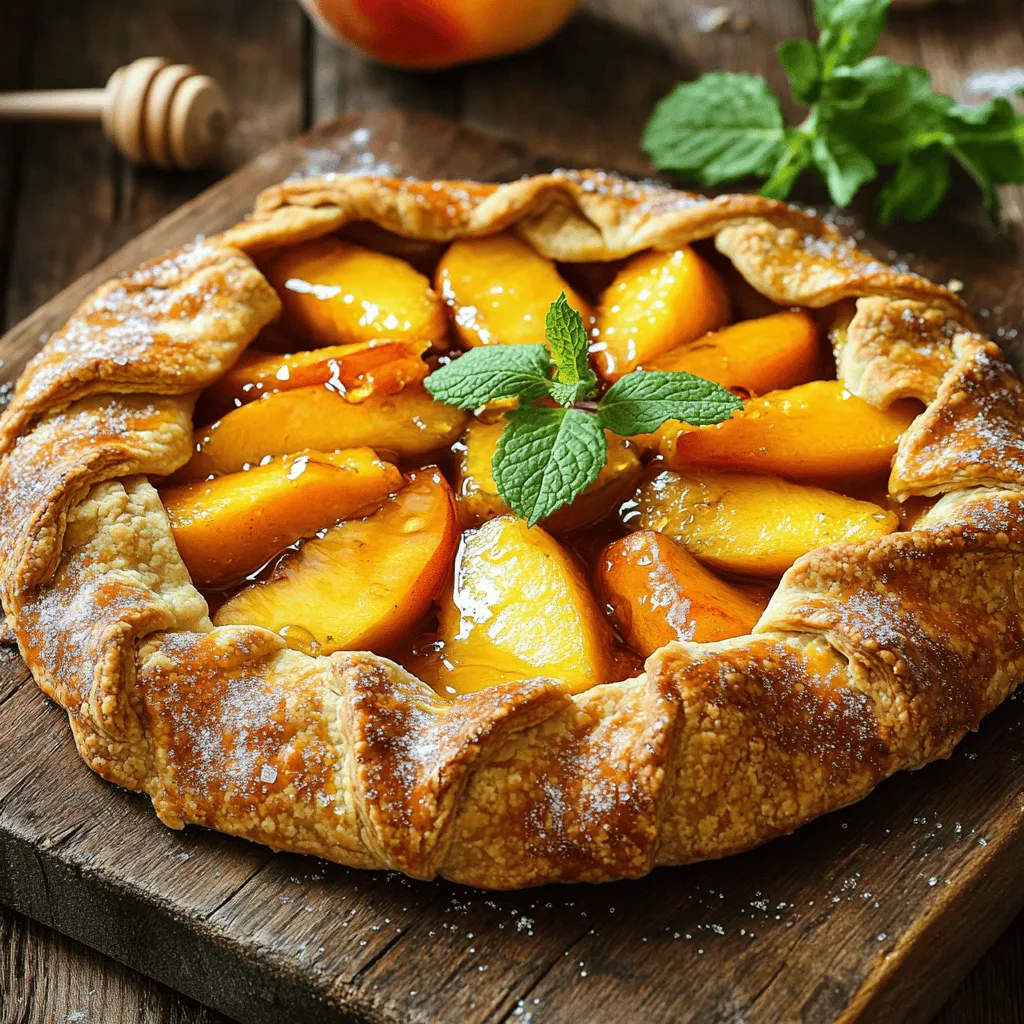
Are you ready to tantalize your taste buds? This Peach Galette with Almond Crust is a must-make! It combines juicy

- 2 medium eggplants, sliced into ½-inch rounds - 1 teaspoon salt - 2 cups marinara sauce (homemade or store-bought) - 2 cups ricotta cheese - 1 cup grated Parmesan cheese - 3 cups shredded mozzarella cheese - 1 teaspoon dried basil - 1 teaspoon dried oregano - Fresh basil leaves for garnish (optional) - Olive oil for drizzling Eggplant Parmesan Bake is a great dish that brings comfort and flavor. Each ingredient plays a key role in making this dish stand out. Eggplants are the star here. They soak up flavors and add a rich texture. Salting the eggplants helps remove bitterness. It also gets rid of excess moisture, which is important to avoid a soggy dish. Marinara sauce adds a nice tang. You can use store-bought or make your own. Homemade sauce is fresh and full of flavor, but store-bought saves time. Ricotta cheese is creamy and rich. It adds a soft layer that balances the eggplant. Parmesan cheese brings a nutty, salty kick. It melts well and complements the other cheeses. Mozzarella is the cheese for gooeyness. It stretches and creates that delightful pull when served. Dried basil and oregano add warmth and depth to the dish. Fresh basil on top adds a pop of color and a fresh taste. Drizzling olive oil gives a nice finish and helps everything brown nicely. This dish is not just tasty; it’s also packed with nutrients. The eggplants provide fiber, vitamins, and minerals. The cheeses offer protein and calcium. You can enjoy a hearty meal that nourishes both body and soul. Eggplant Parmesan Bake can be a balanced meal. Each serving has a good mix of protein, healthy fats, and carbs. You can enjoy it without guilt. You can switch ingredients if needed. Use zucchini instead of eggplant for a lighter dish. Vegan cheese works well for a dairy-free option. If you want whole grain, use whole wheat pasta instead of bread. Using your favorite herbs can also change the flavor. Try adding thyme or rosemary for a new twist. Don't hesitate to explore options that fit your taste! For the full recipe, check the detailed instructions. 1. Preheat the oven to 375°F (190°C). This helps the bake cook evenly. 2. Prepare and salt the eggplant slices. This step draws out moisture and bitterness. - Slice 2 medium eggplants into ½-inch rounds. - Sprinkle 1 teaspoon salt over the slices. - Let them sit for about 30 minutes. Rinse them under cold water and pat dry with a paper towel. - In a large skillet, add a drizzle of olive oil and heat over medium. - Sauté the eggplant slices until golden brown and tender. This should take about 3-4 minutes per side. - Transfer the cooked slices to a paper towel-lined plate to absorb excess oil. - In a mixing bowl, combine 2 cups of ricotta cheese, half of the grated Parmesan cheese (1 cup), 1 teaspoon dried basil, 1 teaspoon dried oregano, and a pinch of salt and pepper. Mix well. - In a baking dish, spread a thin layer of 2 cups marinara sauce on the bottom. - Layer half of the sautéed eggplant over the sauce. - Spoon half of the ricotta mixture over the eggplant. Add another layer of marinara sauce and then a layer of 3 cups shredded mozzarella cheese. - Repeat the layers once more. Finish with marinara sauce and top with the remaining mozzarella and Parmesan cheese. - Drizzle a little olive oil over the top for a golden finish. - Cover the baking dish with aluminum foil. Bake for 30 minutes. - After that, remove the foil and bake for an additional 15 minutes. This allows the cheese to get bubbly and golden brown. - Let the bake cool for a few minutes before serving. You can garnish with fresh basil leaves if you like. These steps make it easy to enjoy a delightful Eggplant Parmesan Bake. For the full recipe, be sure to check the details above! To make eggplant perfect, start with salting. Salting draws out moisture. This helps reduce bitterness. Slice your eggplants into ½-inch rounds. Sprinkle them with salt and let them sit for about 30 minutes. Rinse off the salt and pat them dry. This step helps the eggplant fry better. When you sauté them, aim for a golden brown color. This gives a nice flavor and a great texture. Choosing the right cheese is key to a great bake. Ricotta cheese gives creaminess. It helps bind the layers well. I also love using a mix of mozzarella and Parmesan. Mozzarella melts beautifully, while Parmesan adds a salty kick. You can also try provolone or fontina cheese for a twist. Mixing cheeses creates depth in flavor. Feel free to adjust the amounts based on your taste. Sogginess can ruin your eggplant bake. To prevent this, ensure your eggplant is dry before cooking. Avoid using too much marinara sauce. A little goes a long way. Layering also matters. Start with a thin layer of sauce at the bottom. This keeps the eggplant from sitting in moisture. Cover the baking dish with foil during baking, then uncover it later. This helps the cheese brown nicely without making your dish wet. You can find the Full Recipe for this delightful dish to perfect your own Eggplant Parmesan Bake! {{image_2}} For a vegan twist, swap the dairy cheese with plant-based options. Use cashew cream or tofu for the ricotta. Nutritional yeast adds a cheesy flavor. For Parmesan, try store-bought vegan cheese or make your own by blending nuts and nutritional yeast. This way, you keep the rich taste while making it plant-friendly. You can make this dish gluten-free easily. Use gluten-free breadcrumbs instead of regular ones for a crispy top layer. Ensure your marinara sauce is gluten-free as well. Many brands offer gluten-free options, so check the labels. This way, everyone can enjoy the dish without worry. Boost the nutrition by adding more veggies. Spinach, zucchini, or bell peppers work great. Slice them thin and layer them with the eggplant. This adds color and flavor to the dish. You can also toss in some mushrooms for an earthy taste. The more veggies, the better! For the full recipe, check the details above. After you finish your Eggplant Parmesan Bake, let it cool down. Cover the dish tightly with plastic wrap or aluminum foil. You can also transfer the leftovers to an airtight container. Store it in the fridge. It will stay fresh for about 3 to 5 days. If you want to save some for later, freezing is a great option! First, let the dish cool completely. Cut it into portions for easy reheating. Wrap each portion tightly in plastic wrap. Then, place them in a freezer bag or container. This way, it will last for up to 3 months. Just remember to label the bag with the date. When you’re ready to enjoy your Eggplant Parmesan Bake again, it’s easy to reheat. For the best results, use the oven. Preheat it to 350°F (175°C). Remove any plastic wrap and cover the dish with foil. Bake for about 20-30 minutes, or until it’s heated through. If you prefer a crispy top, remove the foil for the last 5 minutes. You can also use a microwave if you’re short on time. Just heat each portion for 1-2 minutes, checking often. Enjoy your tasty meal! For the full recipe, check the earlier section. Yes, you can make Eggplant Parmesan Bake ahead. Prepare it fully, then cover it tightly. Store it in the fridge for up to two days. When you're ready to eat, just bake it straight from the fridge. This makes dinner easy after a busy day. Eggplant Parmesan Bake pairs well with many sides. Here are some tasty ideas: - A simple green salad with vinaigrette. - Garlic bread for a crunchy side. - Steamed vegetables like broccoli or green beans. - A light pasta dish to complement the bake. These options balance the rich flavors of the dish. You can store Eggplant Parmesan Bake in the fridge for about 3 to 4 days. Keep it in an airtight container to maintain freshness. If you want to save it longer, consider freezing portions. Just remember to thaw it before reheating for the best taste. For the full recipe, check the detailed instructions above. This article covered how to make a delicious Eggplant Parmesan. We discussed ingredients, preparation steps, and baking tricks. I shared tips for perfect eggplant texture and suggested helpful variations, too. Remember, you can customize this dish to fit different diets. Whether vegan or gluten-free, there's an option for everyone. Store leftovers well and enjoy them later. I hope you feel ready to make this dish. Happy cooking!

Eggplant Parmesan Bake Flavorful and Easy Delight

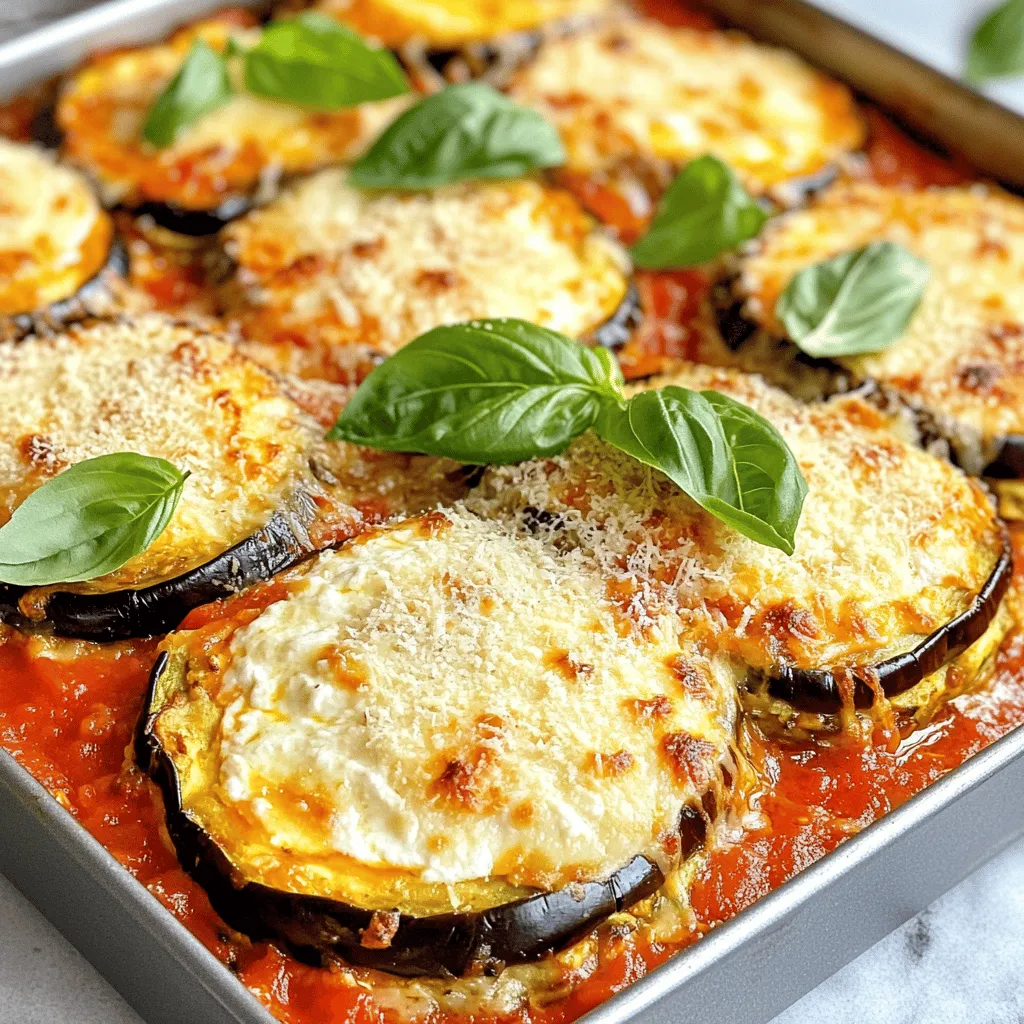
Craving a comforting dish that’s bursting with flavor? Look no further than Eggplant Parmesan Bake! This easy recipe layers tender

To make Coconut Curry Lentil Soup, you will need: - 1 tablespoon coconut oil - 1 medium onion, diced - 3 cloves garlic, minced - 1 tablespoon fresh ginger, grated - 1 tablespoon red curry paste - 1 teaspoon ground cumin - 1 teaspoon ground coriander - 1 can (14 oz) coconut milk - 4 cups vegetable broth - 1 cup red lentils, rinsed - 1 medium carrot, diced - 1 bell pepper, diced (any color) - 2 cups fresh spinach (or kale) - 2 tablespoons lime juice - Salt and pepper, to taste - Fresh cilantro, for garnish (optional) These ingredients create a rich and creamy soup that bursts with flavor. You can boost the soup's taste with some optional ingredients. Consider adding: - 1 tablespoon soy sauce or tamari for extra umami - 1 teaspoon turmeric for a vibrant color and health benefits - A pinch of red pepper flakes for some heat - Chopped green onions for a fresh crunch These additions can make the soup even more delightful. If you have allergies or dietary preferences, you can easily adjust the recipe. Here are some ideas: - Use olive oil instead of coconut oil for a different base flavor. - Substitute the vegetable broth with chicken broth for a non-vegetarian option. - If you are sensitive to spices, use less red curry paste or skip it altogether. - Replace red lentils with green or brown lentils, but note that cooking times may vary. These swaps ensure that everyone can enjoy this tasty soup. For the full recipe, check out the detailed instructions! First, gather all your ingredients. This makes the cooking process easy and fun. You will need: - 1 tablespoon coconut oil - 1 medium onion, diced - 3 cloves garlic, minced - 1 tablespoon fresh ginger, grated - 1 tablespoon red curry paste - 1 teaspoon ground cumin - 1 teaspoon ground coriander - 1 can (14 oz) coconut milk - 4 cups vegetable broth - 1 cup red lentils, rinsed - 1 medium carrot, diced - 1 bell pepper, diced (any color) - 2 cups fresh spinach (or kale) - 2 tablespoons lime juice - Salt and pepper, to taste - Fresh cilantro, for garnish (optional) Chop the onion, garlic, ginger, carrot, and bell pepper. Rinse the lentils well under cold water. This step removes dirt and prevents a mushy texture. In a large pot, heat the coconut oil over medium heat. Add the diced onion and sauté for about 5 minutes until it looks clear. Stir in the minced garlic and grated ginger. Cook for 1-2 minutes until you smell their aroma. Now, add the red curry paste, ground cumin, and ground coriander. Mix it all well and let the spices cook for another minute. This helps bring out their flavors. Next, pour in the coconut milk and vegetable broth. Stir it well to combine. Add in the rinsed red lentils, diced carrot, and diced bell pepper. Bring the soup to a gentle boil, then lower the heat to a simmer. Cover the pot and let it simmer for about 25-30 minutes. The lentils should become soft and soak up most of the liquid. Remember to stir occasionally to prevent sticking. Once the lentils are cooked, add the fresh spinach or kale. Stir until it wilts down. Remove the pot from heat and mix in the lime juice. Season with salt and pepper to taste. Serve the soup hot. I love using vibrant bowls for a nice look. Drizzle a bit of coconut milk on top for contrast. A sprinkle of fresh cilantro adds a pop of color and flavor. You can also add lime wedges on the side for that extra zing. Enjoy your Coconut Curry Lentil Soup! For the full recipe, check the details above. To make your soup rich and creamy, use full-fat coconut milk. The fat adds depth. For a thicker texture, mash some of the lentils. This step gives a nice body to the soup. Always taste and adjust seasoning. A squeeze of lime brightens the flavors. Fresh herbs also add a burst of taste. Experiment with toppings like avocado or roasted nuts for crunch. Rinse your lentils before cooking. This step removes dirt and debris. Red lentils cook faster than others. Keep an eye on them, as they can turn mushy if overcooked. Always check the package for cooking times. Soaking lentils is not necessary but can reduce cooking time. If you want them firmer, cook them for a shorter time. A large pot is essential for this recipe. Use a sturdy spatula for stirring. A sharp knife makes chopping easier. A cutting board is a must-have for prep work. I also recommend a measuring cup for accuracy. Having these tools makes the cooking process smoother. If you want to blend your soup, an immersion blender is perfect. It saves time and reduces mess. For the full recipe, check the section above. {{image_2}} You can easily add protein to your Coconut Curry Lentil Soup. For a simple boost, try adding cooked chicken, shrimp, or tofu. If you choose chicken, shred it and stir it in before serving. For shrimp, add them when the soup is almost done. Tofu can be cubed and added during cooking. Each option adds flavor and makes the soup more filling. This recipe is naturally vegetarian. To make it vegan, ensure you use plant-based broth. You can also swap honey for maple syrup if you want a touch of sweetness. Using coconut milk keeps it creamy and rich. Always check labels to confirm there are no animal products. If you love heat, add more red curry paste or fresh chili peppers. For a milder soup, reduce the amount of red curry paste. You can also serve hot sauce on the side for those who prefer extra spice. Balancing the heat with lime juice helps create a tasty flavor profile. After enjoying your Coconut Curry Lentil Soup, let it cool before storing. Transfer it to an airtight container. This keeps the soup fresh and tasty. I recommend using glass containers. They help prevent any strange flavors from plastic. The soup can stay in the fridge for about 3 to 5 days. When you're ready to enjoy leftovers, take the soup from the fridge. Pour it into a pot to reheat. Use low to medium heat on the stove. Stir often to avoid sticking. If the soup looks too thick, add a splash of water or broth. Heat until it is warm all the way through. You can also use a microwave. Just heat in short bursts, stirring in between. If you want to save some for later, freezing is a great option. Use freezer-safe containers or bags. Make sure to leave some space at the top. The soup will expand as it freezes. It can last up to 3 months in the freezer. When ready to eat, thaw it overnight in the fridge. Then, reheat as described above. Enjoy your delicious soup anytime! For the complete recipe, check out the Full Recipe. To store Coconut Curry Lentil Soup, let it cool first. Then, transfer it to an airtight container. This keeps the soup fresh and safe. You can store it in the fridge for easy access. If you want to keep it longer, freeze it in a freezer-safe container. Yes, you can make Coconut Curry Lentil Soup in advance. This soup tastes even better the next day. The flavors blend well as it sits. Just follow the recipe and let it cool before storing. I often make a big batch for quick meals during the week. Coconut Curry Lentil Soup lasts about 4 to 5 days in the fridge. Ensure it stays in an airtight container. Always check for any signs of spoilage before eating. If you want to keep it longer, consider freezing it. You can enjoy this tasty soup for weeks! For the full recipe, check here. In this blog post, I covered how to make Coconut Curry Lentil Soup. We discussed the key ingredients, exact measurements, and optional flavor enhancers. I shared step-by-step instructions for cooking and serving. You learned tips for perfect texture and flavor, along with variations to suit your taste. Finally, we went over proper storage and reheating methods. This soup is versatile and fun to make. Enjoy experimenting with flavors and enjoy your meals. Happy cooking!

Coconut Curry Lentil Soup Flavorful and Simple Recipe

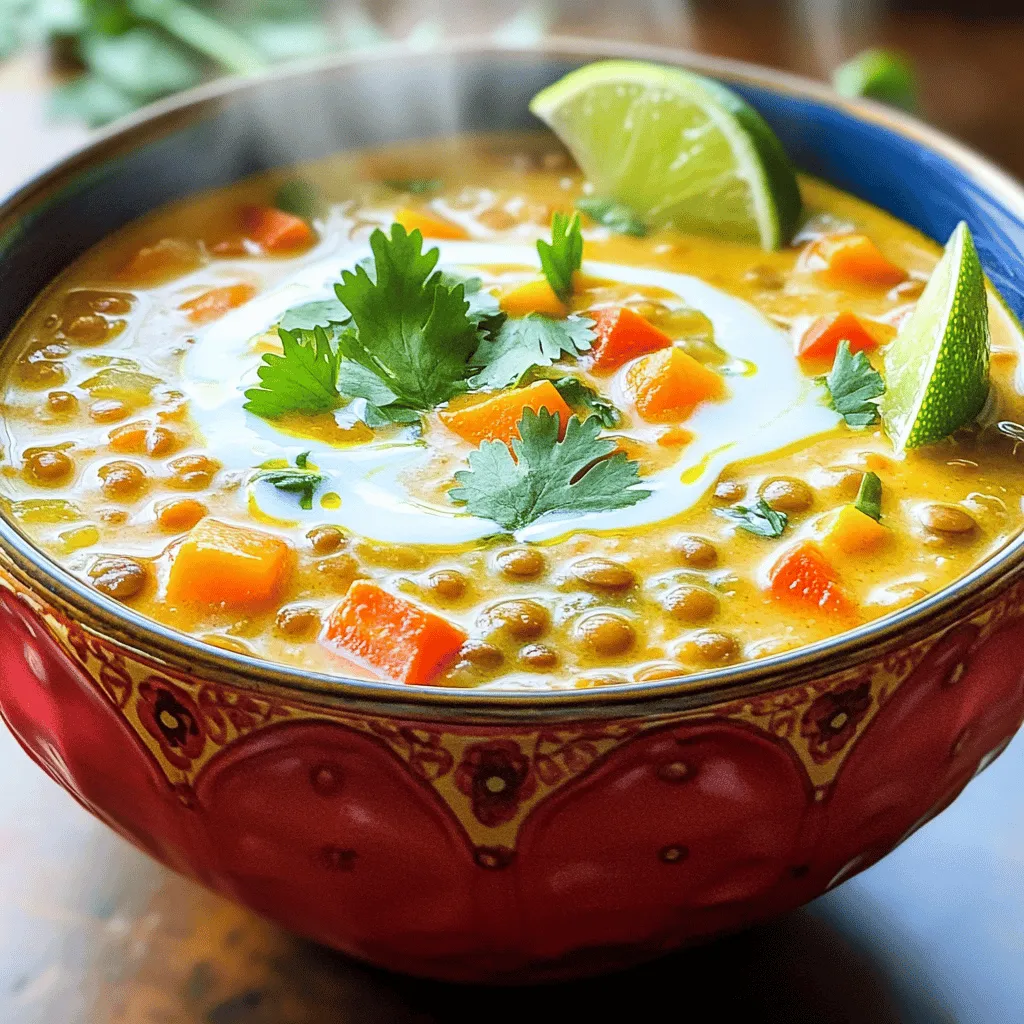
Looking for a warm, tasty dish that’s easy to make? You’re in the right place! This Coconut Curry Lentil Soup

The key to making Chili Lime Grilled Corn is using fresh and vibrant ingredients. Here’s what you need: - Fresh corn (4 ears, husked) - Olive oil (2 tablespoons) - Spices and seasonings: - Chili powder (1 teaspoon) - Smoked paprika (1/2 teaspoon) - Salt and pepper to taste - Cheese options: - Crumbled feta cheese (1/4 cup) - Cotija cheese (for a different flavor) - Garnish ingredients: - Fresh cilantro (chopped) - Juice of 2 limes Using fresh corn makes a big difference. It adds sweetness and crunch. The olive oil helps the spices stick and adds richness. The chili powder and smoked paprika give it a nice kick and depth of flavor. You can choose between feta or cotija cheese for a creamy finish. I love the tang of feta, but cotija works great too. Finally, cilantro adds a fresh touch, and lime juice brightens everything up. For the full recipe, check out the complete instructions and get ready to enjoy this zesty summer side dish! Start by husking the corn. Pull down the green leaves and remove all the silk. Rinse the corn under cold water to ensure it is clean. This step is key for great flavor. Next, make the marinade. In a small bowl, mix the olive oil, chili powder, smoked paprika, lime juice, salt, and pepper. Stir well until it blends together. This marinade gives the corn its zesty kick. Now it’s time to grill. Preheat your grill to medium-high heat. This helps the corn cook evenly and get those nice grill marks. Once heated, brush the marinade onto each ear of corn. Make sure to coat all sides evenly. Place the corn directly on the grill. Cook it for about 10 to 12 minutes. Turn the corn every few minutes to avoid burning and to get that perfect char. To check if the corn is done, look for a tender texture and a nice golden-brown color. You want to see some charred spots but not too much blackening. After grilling, take the corn off the grill. Sprinkle crumbled feta cheese or cotija cheese on top. This adds a salty flavor that pairs well with the lime. For a final touch, drizzle any leftover marinade over the corn. Garnish with fresh cilantro for color and flavor. Serve the corn warm, with lime wedges on the side. This adds an extra zesty touch to each bite. You can serve this corn with other summer dishes like grilled chicken or a fresh salad. Its bright flavors make it a great side for any meal. For the full recipe, check out the details above. To make great chili lime grilled corn, managing your grill's heat is key. Preheat your grill to medium-high heat, around 400°F. This ensures even cooking. If your grill is too hot, you risk burning the corn. Keep an eye on it. Turn the corn every few minutes. You want a nice char but not blackened kernels. Adjusting spice levels can make your corn just right for you. If you like more heat, add extra chili powder. For a milder taste, use less. Fresh herbs can boost flavor too. Chopped cilantro adds a fresh touch. You can also try using fresh parsley or basil for a unique twist. One common mistake is underseasoning the corn. The marinade should have enough salt and lime juice for flavor. Don't skimp on these! Another pitfall is overcooking. Corn should grill for about 10-12 minutes. If you cook it too long, it can become tough. Follow the timing closely for the best results. For the full recipe, check the details above. {{image_2}} You can switch up the cheese for more flavor. Feta cheese works well, but cotija cheese is a great choice too. Cotija adds a salty bite that pairs nicely with lime. For a vegan option, skip the cheese or use a plant-based version. Nutritional yeast can add a cheesy taste without dairy. Herbs can change the taste of your corn. Fresh cilantro is a classic choice, but try adding basil or parsley for a twist. You can also boost the heat. Add more chili powder or toss in some cayenne pepper. If you like it spicy, jalapeños can bring the heat. Just chop them finely and mix them into the marinade. Grilling is the best way to cook corn, but you can bake it too. For oven-baked corn, wrap the ears in foil with the marinade. Bake at 400°F for about 20 minutes. You can also cook corn on the stovetop. Use a grill pan on medium-high heat. This method gives you those nice grill marks without a grill. Explore these variations to make your chili lime grilled corn uniquely yours. For the full recipe, check out the [Full Recipe] section above. To keep chili lime grilled corn fresh, store it in an airtight container. Place it in the fridge right after it cools down. Use it within three days for the best taste. If you have more corn than you can eat, freezing is a great option. Wrap each ear tightly in plastic wrap. Then, place them in a freezer bag. Make sure to remove as much air as possible before sealing. This way, your corn will stay tasty for up to three months. For reheating, the best method is to use the grill or oven. Preheat your grill or oven to 350°F (175°C). Place the corn on the grill or a baking sheet. Heat for about 5-10 minutes, turning occasionally until warm. You can also use the microwave if you’re in a hurry. Just wrap the corn in a damp paper towel and heat for 1-2 minutes. To boost the flavors after storage, squeeze fresh lime juice or add a pinch of salt before serving. Chili lime grilled corn lasts about three days in the fridge. After that, it may lose its taste and texture. Look for signs of spoilage: a sour smell, slimy texture, or discoloration. If you see any of these signs, it's best to throw it away. Fresh corn has a sweet smell and bright color, so trust your senses! To add heat to your grilled corn, you have a few options. You can mix in cayenne pepper or crushed red pepper flakes into the marinade. Another method is to brush the corn with a spicy hot sauce before grilling. I love using sriracha or a smoky chipotle sauce for extra flavor. These sauces not only add heat but also enhance the corn’s taste. Yes, you can use frozen corn, but there are a few steps. First, thaw the corn completely before using it. You can do this by leaving it in the fridge overnight or placing it in warm water for about 10 minutes. Frozen corn may not have the same crunch as fresh corn, but it still tastes good. Fresh corn has a sweeter flavor, while frozen corn is quick and easy. If you need a substitute for feta cheese, try crumbled goat cheese. It has a similar tangy taste and creamy texture. Another great option is cotija cheese, which is often used in Mexican dishes. For a dairy-free choice, use a vegan feta or nutritional yeast. Both options give a nice flavor without dairy. Grilling corn can be simple and fun. We covered key ingredients, from spices to cheeses. You learned to prepare, grill, and present your corn for the best taste. I shared tips to avoid mistakes and variations to keep things fresh. Now, you can store leftovers and reheat them easily. Enjoy these techniques to impress your family. Grilling corn becomes a tasty experience that you can make your own. With practice, you will master the art of grilling corn!

Chili Lime Grilled Corn Zesty Summer Side Dish

Summer is the perfect time to enjoy fresh flavors, and my Chili Lime Grilled Corn will elevate your BBQ game.

For this tasty dish, you need: - 1 pound Brussels sprouts, trimmed and halved - 3 tablespoons pure maple syrup - 2 tablespoons olive oil - 1 tablespoon balsamic vinegar - 1 teaspoon garlic powder - Salt and pepper to taste These main ingredients work together to create a sweet and savory flavor. The maple syrup adds sweetness, while the balsamic vinegar gives it a nice tang. The garlic powder enhances the taste, making each bite delicious. To boost the flavor even more, consider adding: - 1/2 cup pecans, roughly chopped - 1/4 teaspoon cayenne pepper (optional for a spicy kick) Pecans add a nice crunch, and cayenne pepper can bring some heat if you like it spicy. You can adjust these to fit your taste. This dish is not only tasty but also packs some nutrition. Each serving has: - Calories: Around 180 - Protein: 3 grams - Fat: 12 grams - Carbohydrates: 18 grams - Fiber: 4 grams Brussels sprouts are high in vitamins and low in calories, making them a smart choice. For the full recipe, check out the [Full Recipe]. Start by rinsing the Brussels sprouts under cold water. This step removes dirt and any residue. Trim the ends and slice them in half. This helps them cook evenly. Make sure they are about the same size for even roasting. Place your halved sprouts in a large bowl. In the same bowl, add the following ingredients: - 3 tablespoons pure maple syrup - 2 tablespoons olive oil - 1 tablespoon balsamic vinegar - 1 teaspoon garlic powder - Salt and pepper to taste - 1/4 teaspoon cayenne pepper (optional) Mix these well until the Brussels sprouts are coated. It's important to ensure every sprout gets that sweet glaze. If you like heat, add cayenne, but it’s not required. Preheat your oven to 400°F (200°C). Line a baking sheet with parchment paper. Spread the glazed Brussels sprouts evenly on the sheet. Make sure they are not crowded. Roast them for 20 minutes. After that, stir in the roughly chopped pecans. Return the baking sheet to the oven. Roast for another 10-15 minutes. Look for a nice caramelized color. When they are tender, remove them from the oven. Let them cool for a moment before serving. For the perfect touch, drizzle any leftover glaze from the baking sheet on top. Enjoy your meal! For the full recipe, check out the complete guide. To roast Brussels sprouts well, follow a few simple steps. First, cut them in half. This helps them cook evenly. Next, make sure to coat them well with oil and glaze. This keeps them moist and adds flavor. Use a large bowl for mixing. This gives you space to toss them without mess. Finally, spread the sprouts out on the baking sheet without crowding. This ensures they roast instead of steam. You can tweak the maple glaze to fit your taste. Want a touch of spice? Add a little cayenne pepper, just like in the recipe. For a tangy twist, mix in more balsamic vinegar. You can even swap maple syrup for honey or agave syrup if you prefer. Experiment with different spices, too. Try adding cinnamon or nutmeg for a warm flavor. Maple glazed Brussels sprouts make a great side dish. They pair well with roasted meats like chicken or pork. You could also serve them with grains like quinoa or rice. For a colorful plate, add some roasted carrots or sweet potatoes. This adds more flavor and nutrients. If you want a crunch, sprinkle some extra pecans on top before serving. For the full recipe, check out the details above. {{image_2}} You can easily turn your maple glazed Brussels sprouts into a full meal. Add cooked chicken, bacon, or tofu for protein. Just toss these in with the sprouts before roasting. This adds flavor and makes your dish more filling. Maple syrup is sweet and rich, but you can try other sweeteners too. Honey or agave syrup can work well. They will change the flavor slightly. You might find you like one better than the other. Just keep the same amount when you swap them out. Change up your Brussels sprouts for different holidays. For Thanksgiving, add cranberries for a festive touch. In winter, try adding roasted chestnuts for warmth. Each season brings unique flavors, so have fun experimenting! To keep your leftover Brussels sprouts fresh, place them in an airtight container. Make sure the container is sealed well. Store them in the fridge. They will stay good for about 3 to 4 days. If you notice any moisture inside the container, use a paper towel to absorb it. This helps prevent sogginess. When you're ready to eat your leftovers, reheat them gently. I recommend using the oven for the best taste. Preheat your oven to 350°F (175°C). Spread the Brussels sprouts on a baking sheet in a single layer. Heat them for about 10 minutes or until they are warm. This method keeps them crispy and tasty. You can also use a microwave if you're short on time, but the texture may not be as good. If you want to save your Brussels sprouts for later, freezing is a great option. First, cool them completely after cooking. Then, spread them out on a baking sheet and freeze them for about 2 hours. This prevents them from sticking together. Once frozen, transfer the sprouts to a freezer-safe bag or container. They can last for up to 3 months in the freezer. When you are ready to eat them, thaw them in the fridge overnight before reheating. Enjoy your maple glazed Brussels sprouts anytime! Yes, you can use frozen Brussels sprouts. Just thaw them and pat them dry. This helps to keep them from getting mushy. The flavor will still be good, but fresh sprouts offer a better texture. If you use frozen ones, adjust the cooking time. Cook them a bit longer to ensure they are tender and caramelized. You can swap out ingredients easily. Here are some ideas: - Use honey instead of maple syrup for sweetness. - Swap olive oil with avocado oil for a higher smoke point. - Use apple cider vinegar instead of balsamic vinegar for a different taste. - If you don’t have garlic powder, fresh minced garlic works great too. - Pecans can be changed to walnuts or almonds if desired. This recipe is mostly vegan already. Just ensure that the maple syrup is pure and not mixed with any other ingredients. All other ingredients are plant-based. You can also add a bit of nutritional yeast for a cheesy flavor. This will enhance the dish without using any animal products. Follow the [Full Recipe] for detailed steps to make this vegan dish. You now know how to make delicious maple glazed Brussels sprouts. We covered the key ingredients, step-by-step prep, and roasting tips. You can add your own twists with optional ingredients and variations. Remember, it's all about customizing the flavors to fit your taste. Whether you're storing leftovers or diving into FAQs, you have all the info you need. Enjoy making this tasty dish, and share it with others who will love it too!

Maple Glazed Brussels Sprouts Tasty Side Dish Recipe

Looking to elevate your side dish game? Maple Glazed Brussels Sprouts are the answer! This tasty recipe combines the sweet

- 1 pound shrimp, peeled and deveined - 1 cup grits (stone-ground preferred) - 4 cups water or low-sodium chicken broth - 1 cup shredded sharp cheddar cheese - 1/4 cup cream (heavy or half-and-half) - 2 tablespoons olive oil - 2 tablespoons butter - 1 clove garlic, minced - 1/2 teaspoon smoked paprika - 1/2 teaspoon cayenne pepper (adjust to spice preference) - Salt and pepper to taste - 2 green onions, sliced (for garnish) - Fresh parsley, chopped (for garnish) The main ingredients for my zesty shrimp and grits include fresh shrimp and stone-ground grits. The shrimp bring a sweet and juicy flavor, while the grits offer a creamy base. I prefer using low-sodium chicken broth to give the dish extra flavor without too much salt. For additional taste, I add sharp cheddar cheese and cream. This makes the grits rich and adds depth. Olive oil helps cook the shrimp and keeps them moist. I also use simple seasonings like garlic, smoked paprika, and cayenne pepper. The spices give the shrimp a nice kick. I finish the dish with sliced green onions and fresh parsley for color and a fresh taste. You can find the full recipe for zesty shrimp and grits to explore all the steps, tips, and cooking secrets that make this dish a true southern delight. 1. Bring 4 cups of water or chicken broth to a boil. 2. Slowly whisk in 1 cup of grits. 3. Reduce the heat to low and stir often. 4. Let them simmer for 20-25 minutes until creamy. 5. Stir in 1 cup of shredded cheddar cheese, 1/4 cup of cream, salt, and pepper. Keep warm while you cook the shrimp. 1. In a large skillet, heat 2 tablespoons of olive oil and 2 tablespoons of butter over medium-high heat. 2. Once hot, add 1 clove of minced garlic and sauté for 30 seconds. 3. Add 1 pound of shrimp to the skillet. 4. Sprinkle with 1/2 teaspoon of smoked paprika, 1/2 teaspoon of cayenne pepper, salt, and pepper. 5. Cook for 2-3 minutes until shrimp turn pink. Flip and cook for 1-2 more minutes until cooked through. 1. Spoon the creamy grits onto a plate or bowl. 2. Top with the zesty shrimp mixture. 3. Garnish with sliced green onions and chopped parsley for a fresh touch. For the full recipe and more details, check out the link provided. For the best flavor, use stone-ground grits. They have a richer taste and texture. Instant grits cook fast, but they lack depth. Stone-ground grits need about 20-25 minutes to cook. This slow cooking gives them a creamy texture. Stir them often to prevent lumps. To amp up the flavor, add spices like thyme or oregano. Fresh herbs truly shine in this dish. They add brightness and depth. Using fresh garlic also makes a big difference. It adds a punch that dried garlic can't match. When possible, choose fresh ingredients for the best taste. Avoid overcooking shrimp; they become rubbery. Cook shrimp until they turn pink and opaque. This usually takes about 2-3 minutes per side. Look for a slight curl in the shrimp's shape. That means they are done. Don’t walk away while they cook; stay focused for best results. For the complete recipe, check out the [Full Recipe]. {{image_2}} You can easily make a vegetarian version of shrimp and grits. Swap shrimp for hearty mushrooms, like portobello or shiitake. Tofu is also a great choice. It absorbs flavors well and adds protein. Add vibrant vegetables like spinach or bell peppers for extra texture and taste. These can be sautéed with garlic to give them a rich flavor. If you love heat, try adding more spices. Increase the cayenne pepper to your taste. You can also use hot sauce for more zing. Try adding a few dashes of your favorite hot sauce right before serving. For extra flavor, consider using chili powder or crushed red pepper flakes. These will bring a nice kick to your dish. For a true Southern comfort dish, add sausage or bacon. Cook these in the skillet before the shrimp for a smoky flavor. You might also try andouille sausage for a spicy touch. When it comes to cheese, feel free to switch it up. Gruyère or pepper jack cheese can bring a unique taste. Don’t be afraid to experiment with flavors in this classic dish! To keep your shrimp and grits fresh, store them in separate containers. Use airtight containers to prevent moisture loss. Make sure to cool both the shrimp and grits to room temperature before sealing. Store them in the fridge for up to three days. Reheat shrimp and grits gently to keep them tasty. For grits, add a splash of water or cream in a pot. Heat over low flame while stirring until warm. For shrimp, use a skillet over medium heat. This method keeps the shrimp juicy and the grits creamy. If your grits seem dry, add a bit more liquid to refresh them. You can freeze shrimp and grits, but it’s best to freeze them separately. Place shrimp in a freezer-safe bag and remove air before sealing. Freeze grits in a different container. Thaw overnight in the fridge before reheating. This keeps the texture nice when you are ready to enjoy them again. Yes, you can use frozen shrimp. Just remember to thaw them first. Place them in cold water for about 15-20 minutes. This method helps keep the shrimp firm. Fresh shrimp has a nice texture, but frozen works well too. You may want to reduce cooking time by one minute if using thawed shrimp. This way, they cook evenly and stay juicy. Cooked grits last about three to five days in the fridge. Store them in an airtight container. Make sure they cool down before sealing. If they dry out, add a little water when reheating. This helps restore the creamy texture. A crisp white wine works best with shrimp and grits. Look for Sauvignon Blanc or Chardonnay. These wines enhance the dish's flavors without overpowering them. If you prefer red, choose a light Pinot Noir. Both options will complement the zesty shrimp. For the complete Zesty Shrimp and Grits recipe, check out the [Full Recipe]. Shrimp and grits blend creamy comfort with zesty flavors. We've covered the main ingredients, cooking steps, and tips for perfect texture. You now know how to make this dish shine. Adaptations and variations can keep it fresh and exciting every time. Don't forget about storage and reheating to enjoy leftovers later. With a few simple tweaks, you'll elevate your cooking game. Now, get ready to impress your family and friends with this delicious Southern classic!

Zesty Shrimp and Grits Flavorful Southern Delight

If you crave a dish that packs a punch of flavor, look no further than Zesty Shrimp and Grits. This

- Firm tofu - Cornstarch - Soy sauce - Sesame oil The main stars of this dish are firm tofu, cornstarch, soy sauce, and sesame oil. Firm tofu holds its shape well, making it perfect for crispy bites. Cornstarch gives the tofu a crunchy texture when baked. Soy sauce adds a savory kick, and sesame oil brings a nutty flavor that enhances every bite. - Kale - Cherry tomatoes - Cucumber - Avocado - Shredded carrots Fresh veggies are key to a colorful and nutritious Buddha bowl. Kale is packed with vitamins and adds a nice crunch. Cherry tomatoes bring sweetness and juiciness. Cucumber adds a refreshing crispness. Sliced avocado provides creaminess, while shredded carrots add color and nutrients. - Sriracha or hot sauce - Additional seasonings For a kick, you can add sriracha or your favorite hot sauce. This spice elevates the dish and adds depth. Feel free to mix in additional seasonings to customize the flavor. This way, you can make the bowl uniquely yours. For the full recipe, check out the detailed instructions on how to bring all these ingredients together for a delightful meal! To start, you need to press and cube the firm tofu. Wrap the tofu in a clean towel and place a heavy object on top. This will help remove excess water. Let it sit for about 15 minutes. After pressing, cut the tofu into bite-sized cubes. Next, marinate the tofu to add flavor. In a bowl, mix the cubed tofu with soy sauce, sesame oil, salt, and pepper. Let it marinate for 10 minutes. This step adds a nice depth to your dish. Now, it's time to coat the tofu with cornstarch. Sprinkle 2 tablespoons of cornstarch over the marinated tofu. Toss the tofu gently to coat each piece evenly. This will help it become crispy when baked. Preheat your oven to 400°F (200°C). Line a baking sheet with parchment paper. Spread the coated tofu evenly on the baking sheet. Bake for 25-30 minutes. Be sure to turn the tofu halfway through. You want it golden brown and crispy. While the tofu bakes, prepare your bowl. Start with a base of cooked quinoa. It adds protein and fiber. Next, layer chopped kale, sliced cucumber, cherry tomatoes, and shredded carrots. Finally, add sliced avocado for creaminess. Once the tofu is done baking, add it to the bowl alongside your fresh veggies. Drizzle with sriracha or your favorite hot sauce. Finish with a sprinkle of sesame seeds for crunch. Now, you can enjoy a healthy and flavorful meal! To make crispy tofu, start by pressing it well. Use a clean towel to absorb excess moisture. This step helps the tofu get crispy when baked. Next, cut the tofu into cubes. The smaller the pieces, the crispier they become. After cutting, marinate the tofu for about 10 minutes. This adds flavor and moisture. For baking, use cornstarch. Coat the marinated tofu cubes evenly with cornstarch. This gives them a crunchy outer layer. Place the tofu on a baking sheet lined with parchment paper. Bake at 400°F for 25-30 minutes. Turn them halfway through for even crispiness. Enhancing the flavor of your crispy tofu is easy. Use soy sauce and sesame oil for a rich taste. You can also add garlic powder or onion powder for more depth. For added zing, try marinades. A mix of soy sauce, lime juice, and a hint of maple syrup works wonders. Let the tofu soak up the flavors for at least 10 minutes. Don’t forget about sauces! Drizzle sriracha or tahini sauce over the bowl. These add a kick and complement the crispy tofu well. When serving your Buddha bowl, think of colorful pairings. Use a base of quinoa topped with fresh kale. Add vibrant cherry tomatoes and cool cucumber slices. For a beautiful presentation, arrange the ingredients in sections. A slice of avocado on top adds creaminess. Finish with a sprinkle of sesame seeds for a nice touch. You can also pair this bowl with a side of miso soup. It warms the meal and adds extra flavor. Enjoy your healthy and flavorful dish! {{image_2}} You can switch up the protein in your Buddha bowl. Chickpeas offer a great plant-based option. They add a nice texture and flavor. If you prefer meat, grilled chicken works well too. Both choices keep the meal satisfying and nutritious. For a vegan twist, try adding lentils or black beans. These options are rich in protein and fiber, making your bowl hearty. Quinoa is a popular base, but you can get creative. Brown rice is a great alternative. It has a chewy texture and nutty flavor. Farro also works well and gives a nice bite. If you need gluten-free options, try rice or millet. They will still give you that filling base while keeping your bowl healthy. Using seasonal vegetables makes your Buddha bowl fresh and vibrant. In spring, add asparagus or snap peas for crunch. In summer, incorporate zucchini or bell peppers for a pop of color. Autumn brings squash or beets, which add earthiness. Winter calls for hearty greens like collards or Brussels sprouts. Customize your bowl based on what’s available. This keeps your meals exciting and full of flavor! To store leftovers, let the Buddha bowl cool down first. Place the components in separate containers. This helps keep everything fresh. Use airtight containers to avoid moisture and air. Glass or BPA-free plastic containers work best. These keep your meal tasty for the next day. You can freeze the cooked tofu and veggies if you have extra. Place them in a freezer-safe bag. Remove as much air as you can before sealing. This helps prevent freezer burn. When you're ready to eat, thaw in the fridge overnight. Reheat in a pan or microwave. Add a splash of water to keep it moist. The Buddha bowl stays fresh in the fridge for up to three days. Check for any signs of spoilage. If the tofu smells sour or the veggies look wilted, toss it. Keeping track of freshness helps you enjoy this healthy meal at its best. To make crispy tofu, start with firm tofu. Press it well to remove extra water. This helps it fry better. You can use a heavy pan or a tofu press. Next, cut the tofu into cubes. Marinate it in soy sauce and sesame oil for a strong flavor. After marinating, coat the tofu with cornstarch. This helps create a nice crust. For frying, heat oil in a pan. Fry the tofu cubes until golden brown on all sides. If baking, set your oven to 400°F (200°C). Spread the cubes on a baking sheet. Bake them for 25-30 minutes, flipping halfway through. Avoid overcrowding the pan or baking sheet. This keeps the tofu from getting crispy. Also, do not skip the cornstarch; it makes a big difference! Yes, you can easily make this Buddha bowl vegan! Always check the ingredient labels. Look for vegan soy sauce and ensure your hot sauce is plant-based. For vegan protein, try chickpeas or lentils. Both options boost protein and add texture. You can also add nuts or seeds for added crunch and nutrition. Tofu is a great vegan choice too. Just like in this recipe, it provides protein and absorbs flavors well. You can swap quinoa with other grains. Brown rice, farro, or barley work well. Each adds a different taste and texture to the bowl. To cook brown rice, use a ratio of 2 parts water to 1 part rice. Bring it to a boil, then simmer for about 45 minutes. For farro, use a 2:1 water to grain ratio, cooking it for about 30 minutes. Barley needs about 50 minutes to cook, with a similar water ratio. These swaps keep your Buddha bowl delicious while adding variety. Don't hesitate to experiment! You now have all the steps to create a tasty Crispy Tofu Buddha Bowl. Start with fresh ingredients like firm tofu and colorful veggies. Follow the easy instructions to prepare, bake, and assemble your dish. Use the tips to get that perfect crispiness and explore different variations to suit your taste. Remember to store leftovers properly to keep them fresh. With this guide, you can enjoy a healthy meal that's both satisfying and fun to make. Try it out, and get creative!

Crispy Tofu Buddha Bowl Healthy and Flavorful Meal

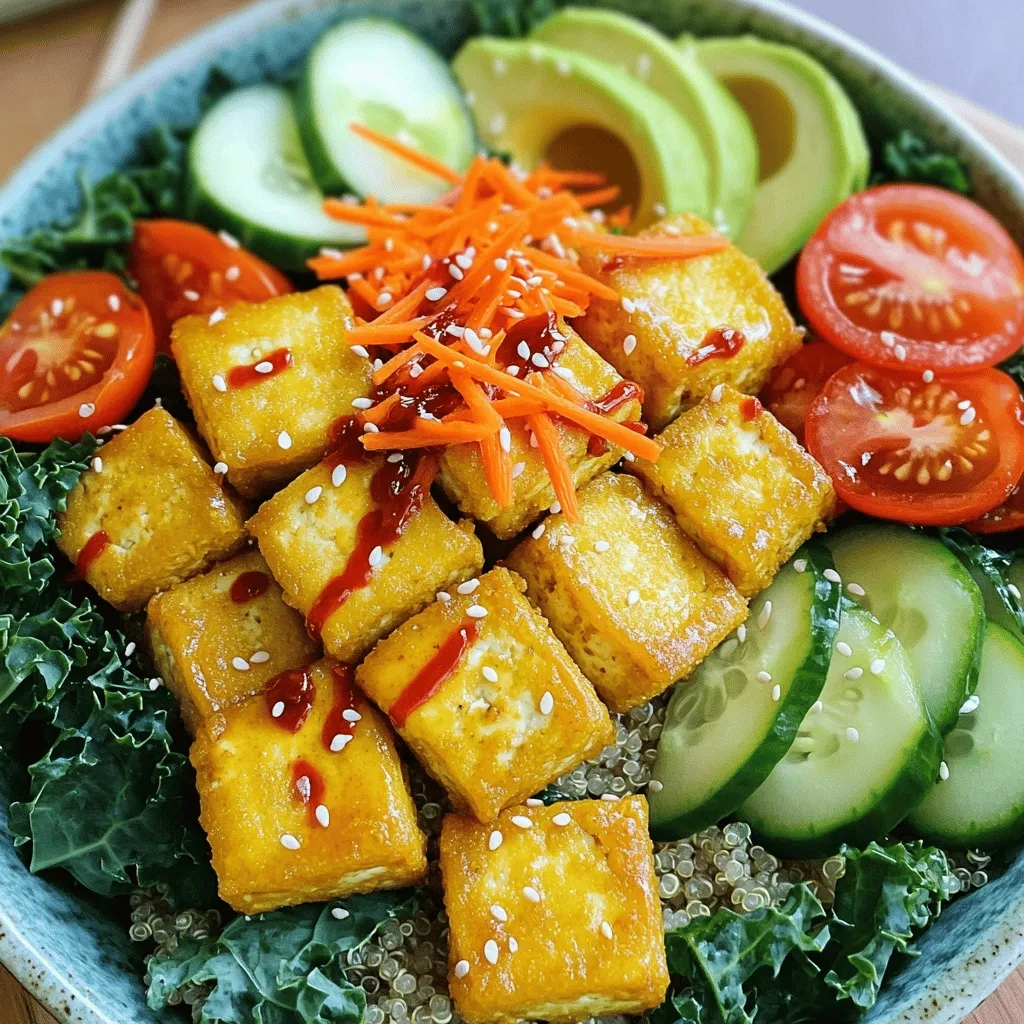
Looking for a healthy and tasty meal? Let me introduce you to the Crispy Tofu Buddha Bowl! This dish is

- 1 lb (450 g) chicken breast, thinly sliced - 2 tablespoons honey - 3 tablespoons soy sauce - 1 tablespoon rice vinegar - 1 bell pepper (red or yellow), sliced - 1 cup broccoli florets - 1 medium carrot, julienned - 2 cloves garlic, minced - 1 inch ginger, grated - Salt and pepper to taste - 2 green onions, sliced (for garnish) - Sesame seeds (for garnish) This dish shines from its simple yet flavorful ingredients. The chicken breast gives you lean protein, while honey adds a sweet touch. Soy sauce brings depth, and rice vinegar adds a hint of tang. For the veggies, I love using bell pepper and broccoli. They add color and crunch. Carrots bring a nice sweetness, and garlic and ginger deliver aromatic flavors. You can mix and match vegetables based on what you have on hand. Feel free to add snap peas or even mushrooms for extra texture. The key is to keep it fresh and vibrant. You can find the full recipe for this stir-fry below and get cooking! To start, you need to make the honey garlic sauce. In a bowl, combine these ingredients: - 2 tablespoons honey - 3 tablespoons soy sauce - 1 tablespoon rice vinegar - 2 cloves garlic, minced - 1 inch ginger, grated Stir until the honey mixes well with the other liquids. If you want a thicker sauce, mix 1 tablespoon of cornstarch with 2 tablespoons of water in a small bowl and set it aside. Next, heat 1 tablespoon of vegetable oil in a large skillet over medium-high heat. Add 1 pound of thinly sliced chicken breast. Season it with salt and pepper. Stir-fry the chicken until it turns white, about 5 to 7 minutes. Once it is cooked, remove the chicken from the skillet and set it aside on a plate. In the same skillet, add another tablespoon of vegetable oil. Add sliced bell pepper, broccoli florets, and julienned carrot. Stir-fry these veggies for about 3 to 4 minutes. You want them to be bright and slightly tender but still crisp. Now, return the cooked chicken to the skillet. Pour your honey garlic sauce over the chicken and veggies. Stir well to coat everything in the sauce. If you used cornstarch, add it now to thicken the sauce. Cook for another 2 to 3 minutes until everything is heated through. Taste it and adjust the seasoning if needed. Once done, you can enjoy this tasty weeknight meal. For the full recipe, check back to the beginning of this article! To make a great stir-fry, you need high heat. This helps cook your food fast. Keep all your ingredients ready before you start. This makes cooking smooth and easy. You can add cornstarch to thicken the sauce. Mix it with water first. If you like your dish sweeter, add more honey. This lets you control the taste just how you like it. Serve your stir-fry over fluffy rice or noodles. This adds a nice base. For a finishing touch, sprinkle extra green onions and sesame seeds on top. This makes your dish look appealing and fresh. If you want a pop of color, add a lime wedge on the side. For the complete recipe, check out the [Full Recipe]. {{image_2}} You can easily swap chicken for other proteins. Try beef for a heartier meal. Shrimp adds a nice seafood twist. For a plant-based option, use tofu. Each choice gives a unique flavor and texture. Adjust cooking times based on what you choose. Beef may take longer, while shrimp cooks quickly. Feel free to mix up the vegetables. Snap peas add a sweet crunch. Asparagus brings a fresh taste to the dish. Mushrooms add umami and richness. Just remember to cut them into bite-sized pieces. This keeps everything cooking evenly and looking great. You can use any veggie you like. If you love heat, spice things up! Add red pepper flakes for a mild kick. Sriracha gives a bold flavor with more heat. Start with a small amount, then taste as you go. Adjust to find your perfect spice level. This twist makes the dish exciting and unique. For more details on making this delicious meal, check out the Full Recipe. Refrigerate your honey garlic chicken stir-fry in an airtight container. It stays fresh for up to 3 days. Keeping it sealed helps prevent moisture loss and keeps flavors intact. To reheat, I suggest using the stovetop. This method brings back the stir-fry's fresh texture. Heat it gently over low to medium heat. Stir occasionally until everything is warm. Avoid microwaving, as it can make the chicken tough. You can freeze the stir-fry in portions for quick meals. Use freezer-safe containers or bags. It’s best to consume within 1 month for optimal taste. When ready to eat, thaw it in the fridge overnight before reheating. Yes, just ensure it's fully thawed before cooking. Frozen chicken can work well. Replace chicken with tofu and use vegetable broth in the sauce. Tofu absorbs flavors well. It's great with rice, noodles, or steamed vegetables. Each option adds a nice touch. Total time is approximately 30 minutes (prep + cook). It’s a quick meal option. Yes, it's loaded with protein and vegetables, making it a nutritious meal choice. Enjoy the flavors! For the complete recipe, check the Full Recipe section. Honey Garlic Chicken Stir-Fry brings together simple ingredients and great flavors. You start by making the sauce, then cook the chicken, and finally stir-fry your veggies. Don't forget tips for perfecting your stir-fry technique and exploring fun variations! This dish is quick, nutritious, and delicious. Enjoy all the options for protein and veggies to fit your taste. With easy storage and reheating, it’s perfect for busy days. Now, you can impress your friends or family with this tasty meal!

Honey Garlic Chicken Stir-Fry Tasty Weeknight Meal

Looking for a quick and tasty weeknight meal? Honey Garlic Chicken Stir-Fry fits the bill! With mouthwatering chicken, colorful veggies,

To make Caramel Apple Monkey Bread, gather these simple ingredients: - 2 cans (16 oz each) refrigerated biscuit dough - 1 cup granulated sugar - 1 tablespoon ground cinnamon - 1/2 cup unsalted butter, melted - 2 apples (Granny Smith or Honeycrisp), peeled, cored, and diced - 1 cup caramel sauce (store-bought or homemade) - 1/2 cup chopped pecans or walnuts (optional) - Powdered sugar, for dusting These ingredients make this treat sweet and fun to eat. The biscuit dough serves as the base. The sugar and cinnamon create a tasty coating. The apples add a fresh crunch, while the caramel sauce brings a rich flavor. If you like nuts, toss in some pecans or walnuts for extra texture. Don’t forget the powdered sugar for a lovely finish! You can find the full recipe in the section above. This recipe is perfect for gatherings or cozy nights in. Enjoy the process of making this delightful dessert! - Preheat the oven to 350°F (175°C). - Grease a bundt pan with non-stick cooking spray. - In a large bowl, combine 1 cup of granulated sugar and 1 tablespoon of ground cinnamon. - Open the two cans of refrigerated biscuit dough. Cut each biscuit into quarters. Toss the pieces in the sugar mixture until they are well coated. - In the greased bundt pan, layer half of the coated biscuit pieces at the bottom. - Next, sprinkle half of the diced apples over the biscuit pieces. If you like, add half of the chopped nuts. - Drizzle about 1/4 cup of caramel sauce on this layer. - Repeat these layers with the remaining biscuit pieces, apples, and nuts. Drizzle more caramel sauce on top. - Finally, pour the melted butter evenly over everything before baking. - Bake in the preheated oven for 30-35 minutes. - To check doneness, insert a toothpick into the center. It should come out clean when the monkey bread is ready. This recipe is sure to bring joy and sweetness to your table. For the full details, check the Full Recipe. To get that golden color, bake your monkey bread until it is brown on top. This usually takes about 30-35 minutes. Check the middle with a toothpick. If it comes out clean, your monkey bread is ready! When cutting the biscuit dough, use a sharp knife or scissors. Cut each biscuit into four equal pieces. This helps them cook evenly. Toss the pieces gently in cinnamon sugar. This adds flavor to every bite. For a lovely touch, serve your monkey bread warm. Guests can pull apart pieces easily. Add extra diced apples on top for color. A dollop of whipped cream makes it even better! For added sweetness, drizzle more caramel sauce over the top. If you want crunch, sprinkle some chopped nuts. This makes each piece exciting. Remember, the more fun toppings, the better the treat! You can find more ideas in the Full Recipe to help you enjoy this sweet and easy treat. {{image_2}} You can make your Caramel Apple Monkey Bread even more fun with flavor twists. Adding spices like nutmeg or cloves gives it a warm depth. A pinch of these spices enhances the apple flavor. Try using pears or peaches instead of apples for a fruity change. Each fruit brings its own unique taste, making your dish special every time. If you need gluten-free options, look for gluten-free biscuit dough. Many brands offer this now, so it’s easy to find. For vegan needs, you can swap butter with coconut oil or a vegan butter. You can also use a vegan caramel sauce. These simple swaps make the monkey bread fit different diets while still tasting great. To keep your Caramel Apple Monkey Bread fresh, store leftovers in the fridge. Place the bread in an airtight container. This helps prevent it from drying out. You can enjoy it for up to three days this way. When you're ready to eat, reheating is simple. Preheat your oven to 350°F (175°C). Place the monkey bread on a baking sheet. Cover it with foil to keep it moist. Heat for about 10-15 minutes. This keeps it warm and soft for you. If you want to save some for later, freezing is a great option. First, let the monkey bread cool completely. Then you can wrap it tightly in plastic wrap. After that, place it in a freezer-safe bag or container. This helps keep it fresh for about three months. When you're ready to enjoy it again, take it out of the freezer. Let it thaw in the fridge overnight. For reheating, follow the same steps as before. Preheat your oven to 350°F (175°C) and cover with foil. Heat until warmed through. Enjoy your sweet treat anytime! Yes, you can prep this recipe in advance. Start by cutting the biscuit dough and tossing it in the sugar mixture. Then, layer the biscuit pieces, apples, and nuts in the bundt pan. Drizzle the caramel sauce on top. Cover the pan with plastic wrap and refrigerate it for up to 24 hours. When ready, pour the melted butter over the top and bake as directed. I recommend using Granny Smith or Honeycrisp apples. Both types add a nice balance of sweet and tart flavors. Granny Smith apples are crisp and firm, while Honeycrisp apples are sweeter and juicy. You can also try Fuji or Braeburn for a twist. You can easily make your caramel sauce. Cook sugar and butter over low heat until melted. Stir until smooth. If you like it sweeter, add more sugar. For a richer flavor, add a pinch of sea salt. You can also use store-bought caramel sauce for convenience. Look for a golden brown color on top. A toothpick inserted should come out clean. If it’s still sticky, bake for a few more minutes. The center must be cooked through, so keep an eye on it during baking. This recipe for Caramel Apple Monkey Bread is easy and fun. You learned the basic ingredients and steps to make it delicious. The tips and variations help you customize it to fit your taste. By storing leftovers correctly, you keep it fresh for later. Whether you bake it today or prep ahead, this treat brings joy. Enjoy this sweet delight with friends and family. Now, get ready to make a warm and gooey dessert everyone will love!

Caramel Apple Monkey Bread Sweet and Easy Treat

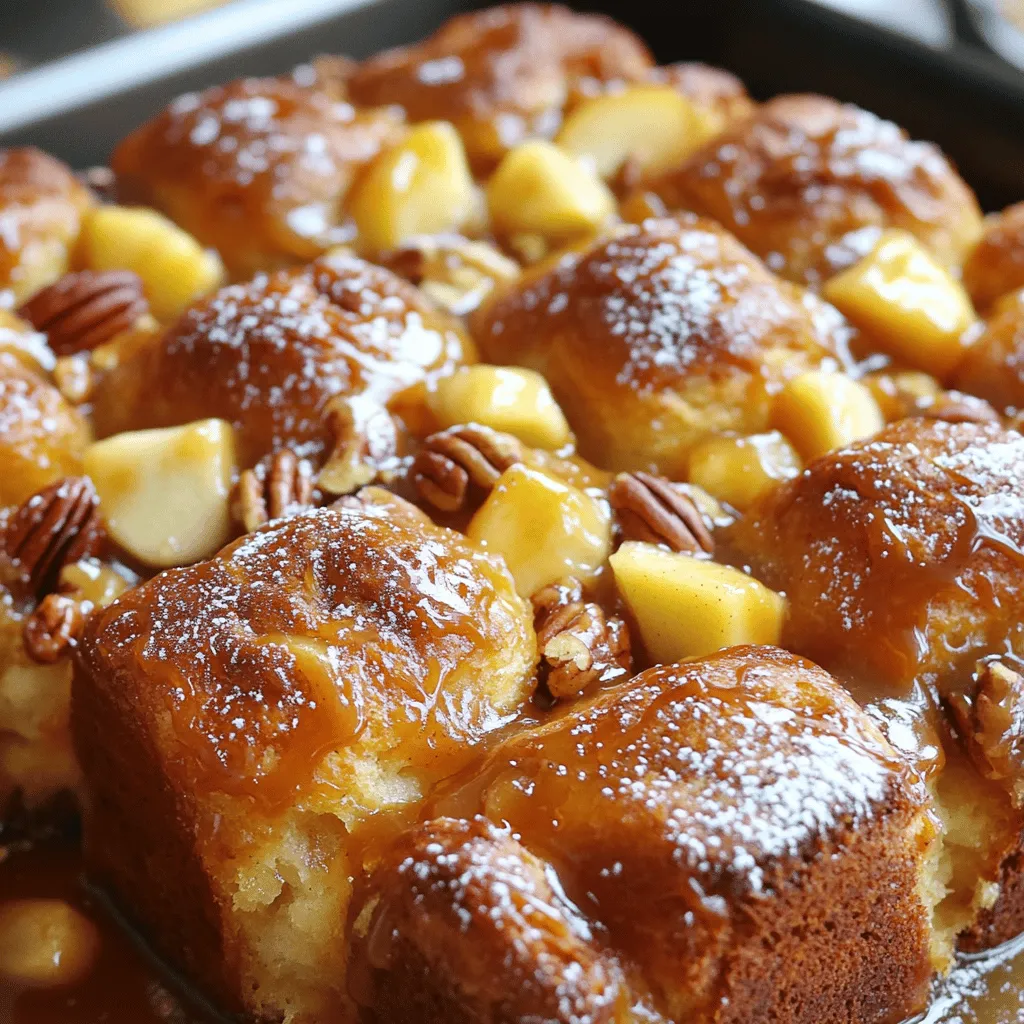
If you’re craving a warm, gooey treat, you’ll love this Caramel Apple Monkey Bread! This delightful dish is a simple

To make a tasty cauliflower rice stir-fry, gather these items: - 1 medium head of cauliflower (about 4 cups riced) - 1 tablespoon sesame oil - 1 cup carrots, julienned - 1 cup bell peppers (red, yellow, or green), thinly sliced - 1 cup snap peas, trimmed - 3 green onions, chopped - 2 cloves garlic, minced - 1-inch piece of ginger, grated - 2 tablespoons soy sauce or tamari - 1 tablespoon rice vinegar - 1 teaspoon sriracha (optional for heat) - Sesame seeds for garnish - Fresh cilantro for garnish Cauliflower rice is low in carbs and high in fiber. One serving of this dish provides: - Calories: 150 - Protein: 4g - Carbohydrates: 10g - Fiber: 5g - Fat: 9g Cauliflower rice offers many health benefits. First, it is low in calories. This helps with weight loss. Second, it is rich in vitamins C and K. These vitamins support your immune system and bone health. Third, it is high in fiber. Fiber aids digestion and keeps you full longer. Plus, it is gluten-free! This makes it great for those with gluten allergies. Overall, cauliflower rice is a smart choice for a healthy meal. For the full recipe, check out the details above. To start, you need to prepare the cauliflower. First, remove the leaves and stem. Then, cut it into small florets. Next, use a food processor to pulse the florets. Aim for about 10 pulses until it looks like rice. If you don’t have a food processor, a box grater works well too. Just grate the cauliflower until it resembles rice grains. This will give your stir-fry a light and fluffy base. Now it's time to cook the vegetables. Grab a large non-stick skillet or wok. Heat 1 tablespoon of sesame oil over medium-high heat. Once hot, add 2 cloves of minced garlic and 1-inch grated ginger. Sauté these for about 30 seconds; the smell will be amazing! Next, toss in 1 cup of julienned carrots, 1 cup of sliced bell peppers, and 1 cup of snap peas. Stir-fry everything for about 3-4 minutes. You want the veggies to be tender yet still crisp. Add the riced cauliflower into your skillet and mix well. Keep sautéing for another 5-6 minutes until the cauliflower is warm and tender. Now, pour in 2 tablespoons of soy sauce, 1 tablespoon of rice vinegar, and sriracha if you like heat. Stir everything to coat well and let it cook for 2 more minutes. Finally, remove the skillet from heat and fold in 3 chopped green onions. Serve hot, garnished with sesame seeds and fresh cilantro. For the full recipe, check the details above and enjoy your healthy meal! To make great cauliflower rice, use a fresh head of cauliflower. Cut it into small florets. Pulse them in a food processor until rice-like. Be careful not to over-process; it can become mushy. If you don’t have a food processor, a box grater works too. Just grate until you have small pieces. The size of the rice matters for even cooking. Soggy stir-fry ruins the dish. To keep your stir-fry crisp, dry the cauliflower rice well before cooking. You can use a clean kitchen towel to squeeze out extra moisture. Always cook over medium-high heat. This helps the water evaporate quickly. Cook the vegetables briefly to keep them crunchy. Stir them often for even cooking. Having the right tools makes cooking easier. Here are my top picks for this dish: - A large non-stick skillet or wok for even heat. - A food processor or box grater to rice the cauliflower. - A sharp knife and cutting board for chopping veggies. - Measuring spoons and cups for precise ingredient amounts. These tools help you create a tasty meal without stress. For the full recipe, check the details above. {{image_2}} You can easily boost your stir-fry with protein. Tofu, chicken, or shrimp add taste and fill you up. For tofu, use firm or extra-firm. Cut it into cubes and fry it until golden. Add it to the pan after the veggies. For chicken, use diced breast or thigh. Cook it until no longer pink, then mix it in. Shrimp cooks fast, so add it just before the cauliflower. It takes only a few minutes to turn pink. Each of these proteins pairs well with the dish and makes it heartier. If you want a vegetarian or vegan option, tofu is a great choice. But you can also use chickpeas or edamame. These options pack a protein punch without meat. Just rinse canned chickpeas and toss them in. Edamame can be added shelled and cooked. Both options make your dish filling and tasty while keeping it plant-based. To kick up the flavor, try adding spices or sauces. Garlic and ginger give a great base. You can also use pepper flakes or curry powder for a spicy twist. For sauces, soy sauce is classic, but try teriyaki or hoisin for a sweeter taste. You can even mix in peanut sauce for a creamy touch. Experiment with flavors to find your favorite blend. Each change can make your cauliflower rice stir-fry new and exciting. For the full recipe, check out the complete details above. Leftovers from your cauliflower rice stir-fry can stay fresh if stored properly. First, let the stir-fry cool to room temperature. Then, place it in an airtight container. Make sure to seal it well to keep out air. Store the container in the fridge. Your stir-fry will last for about three to four days. If you want to keep your stir-fry for longer, freezing is a great option. After cooling, scoop the stir-fry into freezer-safe bags or containers. Try to remove as much air as possible. This helps avoid freezer burn. Label the bags with the date. You can freeze the stir-fry for up to three months. To reheat your stir-fry, you can use the microwave or the stove. For the microwave, place the stir-fry in a bowl. Cover it with a microwave-safe lid and heat for 1-2 minutes, stirring halfway through. For the stove, add a splash of water to a skillet. Heat on medium until warm, stirring often. This keeps the rice from drying out. Enjoy your meal again just like the first time! If you want the full recipe, check out the detailed steps above. Yes, you can use frozen cauliflower rice. It saves time and is easy to use. Just add it to the skillet straight from the freezer. You may need to cook it a bit longer to heat through. It still tastes great and keeps the meal healthy. I often keep a bag on hand for quick meals. To add some heat, try using extra sriracha in your stir-fry. You can also add red pepper flakes or diced fresh chili peppers. Start small and taste as you go. This way, you can control the spice level. A dash of hot sauce at the end also works well. Cauliflower rice stir-fry pairs well with many side dishes. Consider these options: - Grilled chicken or tofu for protein. - A fresh salad with crunchy veggies. - Steamed broccoli or green beans for extra greens. - Edamame for a fun snack. These sides can complement your meal nicely and make it more filling. For the full recipe, check out the previous section. Cauliflower rice stir-fry is easy and tasty. We covered its ingredients, health benefits, and how to cook it. You can add protein, spices, and sauces for variety. Store leftovers well and reheat them easily. Experiment with flavors to make it yours. Enjoy this healthy dish that fits into many diets. Eating fresh and healthy is fun and satisfying. Let's make cauliflower rice a regular part of your meals!

Cauliflower Rice Stir-Fry Flavorful and Healthy Meal

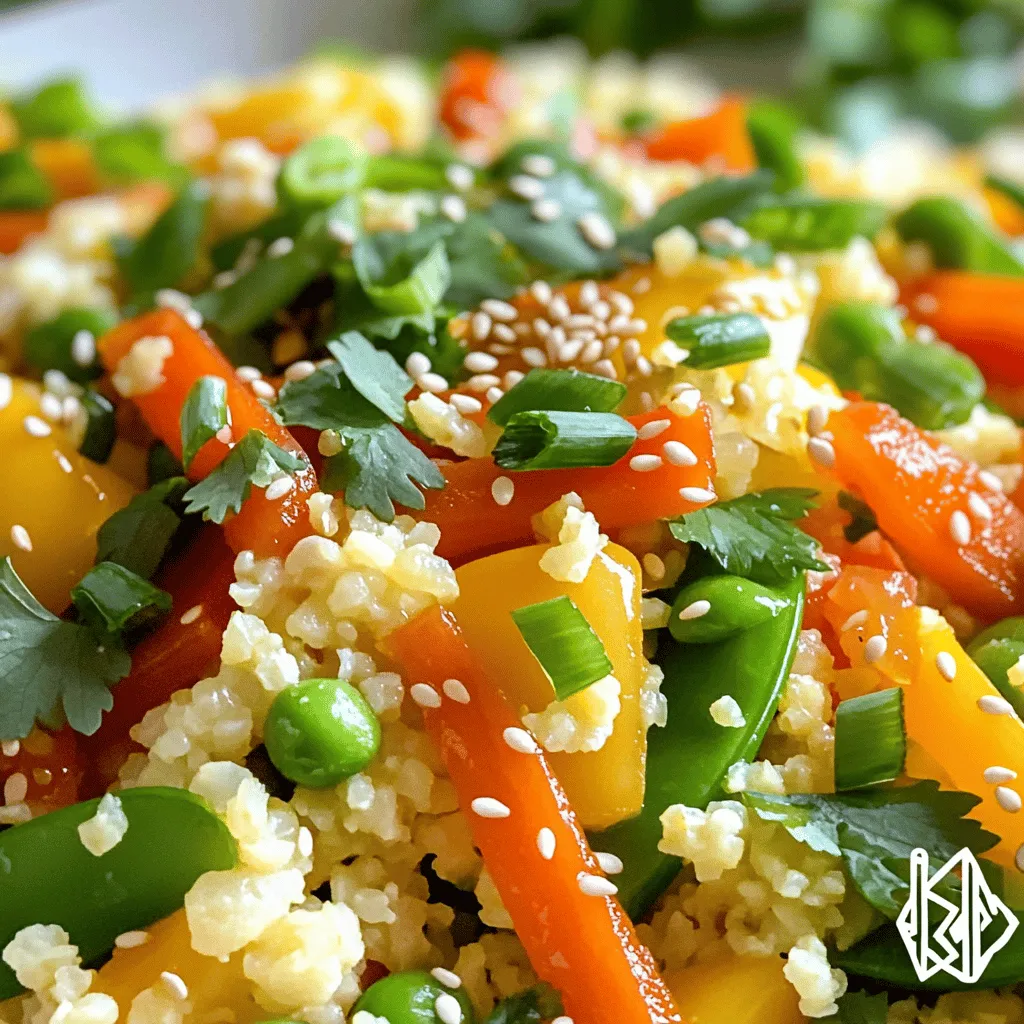
Looking for a quick, nutritious meal? Cauliflower Rice Stir-Fry is your answer. It’s packed with flavor and easy to make.

Older posts
Newer posts
← Previous Page1 … Page34 Page35 Page36 … Page60 Next →

dsad

© 2025 Cooking Wells • Built with GeneratePress

Our Policies

  • Copyright Policy
  • Cookie Policy
  • GDPR Policy
  • Privacy Policy
  • Disclaimer
  • Terms Of Use

More Information

  • Home
  • About
  • Contact
  • Appetizers
  • Dessert
  • Dinner
  • Drinks
©2025, Cooking Wells About Back To Top