Skip to content
DisclaimerTerms Of UseGDPR PolicyCookie Policy

Cooking Wells

  • Home
  • Drinks
  • Appetizers
  • Dinner
  • Dessert
  • About
  • Contact
  • Privacy Policy
DisclaimerTerms Of UseGDPR PolicyCookie Policy

Mia

- 2 ripe avocados - 1/2 cup unsweetened cocoa powder - 1/3 cup maple syrup (or honey) - 1/4 cup almond milk (or any milk of choice) - 1 teaspoon vanilla extract - Pinch of sea salt - 1/4 cup dark chocolate chips (dairy-free if vegan) for garnish - Fresh berries for garnish (optional) When you gather your ingredients, use the right amounts. Each item plays a key role. The avocados give creaminess, while cocoa adds rich chocolate flavor. Maple syrup sweetens the mousse, and almond milk helps blend it all. Vanilla extract adds warmth, and sea salt enhances the taste. You can switch some ingredients if needed. Instead of maple syrup, you can use honey for sweetness. If you want a different milk, try coconut or oat milk. For a nut-free option, use soy milk. You can also skip the dark chocolate chips if you prefer. Instead, top with nuts or seeds for crunch. To start, gather your ingredients. You need two ripe avocados, cocoa powder, maple syrup, almond milk, vanilla extract, sea salt, dark chocolate chips, and optional berries for garnish. Next, cut the avocados in half. Remove the pits carefully. Use a spoon to scoop out the green flesh and put it in your food processor. Now, add the cocoa powder, maple syrup, almond milk, vanilla extract, and a pinch of sea salt to the food processor. Blend everything on high speed. Stop and scrape the sides as needed. Keep blending until the mixture is smooth and creamy. Taste the mousse. If you want it sweeter, add a little more maple syrup and blend again. Once it's perfect, transfer the mousse into serving bowls or glasses. Put the bowls in the fridge for at least 30 minutes. This chilling time helps it set and taste better. While you wait, melt your dark chocolate chips. Use a microwave-safe bowl. Heat them in 20-second intervals, stirring until smooth. When ready to serve, drizzle the melted chocolate over each bowl. You can also add fresh berries on top for extra flavor and color. Enjoy your rich and creamy chocolate avocado mousse! For the complete recipe, check the Full Recipe section. To get that rich and creamy mousse, use ripe avocados. They should feel soft but not mushy. When blending, start at a low speed. Gradually increase to high until the mixture is smooth. Scrape down the sides of the bowl to mix evenly. If the mousse is too thick, add a splash of almond milk. This helps reach the desired texture. Taste your mousse before serving. If it’s not sweet enough, add more maple syrup. Start with a teaspoon at a time. Blend well after each addition. Remember, the cocoa powder adds some bitterness, so adjust as needed. Everyone's preference varies, so make it to your taste! Serve this mousse chilled for the best experience. Use small bowls or glasses for a fancy touch. Drizzle melted dark chocolate on top for extra decadence. You can also add fresh berries for color and flavor. For a fun twist, serve it with crushed nuts or coconut flakes. Explore your creativity with each serving! For the full recipe, check the earlier section. {{image_2}} You can easily make this mousse vegan. Just use maple syrup instead of honey. The rest of the recipe stays the same. This keeps the mousse rich and creamy without dairy. You’ll love the taste just as much! Want to change it up? You can add flavors! Try adding a bit of espresso powder for a coffee kick. A dash of peppermint extract works well too. For a fruity twist, mix in some orange zest. Each flavor will give you a new treat! Great news! This recipe is already gluten-free. All the ingredients are safe for those who avoid gluten. You can enjoy this dessert without worry. Just make sure your chocolate chips are gluten-free as well. It’s a sweet treat for everyone! For the full recipe, check out the detailed steps and tips. To keep your chocolate avocado mousse fresh, always store it in the fridge. Use an airtight container for the best results. This mousse can stay good for up to three days when refrigerated. I recommend covering the top with plastic wrap to avoid browning. If you see any browning, just mix it back in before serving. You can freeze chocolate avocado mousse, but it may change in texture. To freeze, place it in a freezer-safe container. Leave some space at the top, as it may expand. When you're ready to eat, thaw it overnight in the fridge. Blend it again if it seems a bit grainy after thawing. The mousse is best enjoyed fresh, but it can last up to three days in the fridge. If you freeze it, consume it within a month for the best taste. Always check for any off smells or colors before eating. Following these tips will help you enjoy this rich dessert longer. For the full recipe, refer back to the earlier section. You can make Chocolate Avocado Mousse in just a few steps. First, cut two ripe avocados in half. Remove the pits and scoop out the flesh into a food processor. Next, add 1/2 cup of unsweetened cocoa powder, 1/3 cup of maple syrup, 1/4 cup of almond milk, 1 teaspoon of vanilla extract, and a pinch of sea salt. Blend everything on high until smooth. Adjust the sweetness if needed. Once mixed, transfer the mousse to bowls and chill for 30 minutes. Chocolate Avocado Mousse tastes rich and creamy. The cocoa gives it a deep chocolate flavor, while the avocado adds a silky texture. You will find it sweet but not too sweet, thanks to the maple syrup. It feels indulgent yet healthy, making it a perfect dessert choice. The flavors blend well, and you won’t even taste the avocado! Yes, you can use a different sweetener if you prefer. Honey works well in place of maple syrup. You can also try agave syrup or coconut sugar. Just remember to adjust the amount based on how sweet you want it. Each sweetener can change the taste a bit, but they all work nicely in this mousse. For the full recipe, check the details above. You learned about making chocolate avocado mousse, from ingredients to serving tips. We explored measurements, possible substitutions, and how to blend everything. I shared tricks for the perfect texture and sweetness adjustments. You can try different flavors and storage tips to keep it fresh. Remember, you can customize it easily. Enjoy making your mousse and share it with others!

Chocolate Avocado Mousse Rich and Creamy Delight

Are you ready to indulge in a rich and creamy treat? Chocolate avocado mousse is the dessert everyone will love.

- 1 zucchini, sliced into thick rounds - 1 yellow bell pepper, cut into 1-inch pieces - 1 red onion, cut into wedges - 1 cup cherry tomatoes - 1 small eggplant, cubed - 1 cup button mushrooms, whole When I make grilled vegetable skewers, I love choosing fresh veggies. Each one brings its own taste and color. For the best results, slice the zucchini thick and cube the eggplant. This helps all the flavors blend well. - 1/4 cup olive oil - 2 tablespoons balsamic vinegar - 2 teaspoons garlic powder - 1 teaspoon smoked paprika - Salt and pepper to taste The marinade is key for great flavor. I mix olive oil and balsamic vinegar for a tangy base. Garlic powder and smoked paprika add depth. Don’t forget to sprinkle salt and pepper for balance. This mix makes the veggies shine. - Fresh basil leaves - Additional herbs Garnishes can elevate your dish. I like to add fresh basil leaves for a pop of color. You can also use other herbs that you enjoy. Herbs make each bite fresh and fragrant. They complete your grilled vegetable skewers beautifully. For the full recipe, check out the [Full Recipe]. To make great grilled vegetable skewers, start by slicing your vegetables. Cut the zucchini into thick rounds. This helps it stay firm on the grill. Chop the yellow bell pepper into 1-inch pieces. The red onion should be cut into wedges. For cherry tomatoes, leave them whole. Cube the eggplant into bite-sized pieces. Finally, keep the button mushrooms whole. This mix creates a colorful and tasty skewer. Now, let’s make the marinade. In a small bowl, mix together 1/4 cup of olive oil and 2 tablespoons of balsamic vinegar. Add 2 teaspoons of garlic powder and 1 teaspoon of smoked paprika. Don’t forget to add salt and pepper to taste. Whisk this together well. This marinade adds great flavor to your veggies. Once your vegetables are cut, place them in a large bowl. Pour the marinade over them and toss well. Make sure every piece is coated. Let them marinate for at least 15 minutes. While they soak, soak wooden skewers in water. This step stops them from burning on the grill. After marinating, thread the veggies onto the skewers. Alternate the types for a bright look. Your skewers are now ready for grilling! For great grilled vegetable skewers, your grill needs to be hot. Aim for medium-high heat, around 400°F. Cook them for about 8-10 minutes. Turn the skewers often. This helps the veggies cook evenly and get those lovely grill marks. If you use wooden skewers, soak them in water for 30 minutes before grilling. This step helps stop them from burning. If they burn, they can ruin the taste and look of your skewers. Soaking gives you better results and keeps your skewers intact. To make your skewers pop, use spices and herbs. I love garlic powder and smoked paprika for a tasty kick. Fresh herbs like basil brighten the dish. If you want to serve them, drizzle with olive oil and add a sprinkle of salt. You can even pair them with a zesty dip like tzatziki. For more ideas, check out the Full Recipe. {{image_2}} You can mix up the veggies in your skewers. If you want, try using broccoli, asparagus, or even carrots. Each vegetable brings its own taste and texture. For instance, mushrooms add a nice umami flavor. Try using eggplant instead of zucchini for a richer taste. You can also swap bell peppers with cherry tomatoes for a sweeter bite. This recipe is flexible, so have fun with it! Grilled vegetable skewers are great, but adding protein makes them even better. You can use cubed tofu or chicken to enhance the meal. Tofu absorbs flavors well, making it a tasty option. If you choose chicken, cut it into small, even pieces for even cooking. Marinate the protein with the vegetables for a unified flavor. This way, you create a satisfying dish that packs a punch. If you want a vegan twist, try different marinades. Use lemon juice, soy sauce, and maple syrup for a sweet and tangy flavor. You can also mix olive oil with herbs like rosemary and thyme. Coconut aminos work well for a soy-free option. These marinades add depth to your grilled veggies without dairy. Remember, the right marinade can make your skewers shine! For the full recipe, check out the details above. To keep your leftover skewers fresh, place them in an airtight container. This protects them from drying out. If you want to freeze them, wrap each skewer in plastic wrap. Then, put them in a freezer bag. This way, they stay tasty for later use. For reheating, the best method is to use the grill. Heat it to medium. Place the skewers on the grill for about 5 minutes. Turn them halfway to warm evenly. You can also use a microwave, but it may not keep the flavor as well. If you use a microwave, heat them in short bursts of 30 seconds. Grilled vegetable skewers last about 3 to 4 days in the fridge. If you freeze them, they can last for up to 3 months. Just remember, the sooner you eat them, the better the taste! Enjoy them chilled or warm for the best experience. Yes, you can use frozen vegetables. However, fresh veggies taste better. Frozen vegetables may lose some crunch. If you use them, thaw before skewering. Pat them dry to avoid excess moisture. This helps them grill better. You might need to adjust cooking time. Cook frozen veggies a bit longer. They may not get grill marks like fresh ones. Grilled vegetable skewers pair well with many dips. Tzatziki is a favorite. Its coolness balances the warm, grilled taste. Hummus also works nicely. It adds creaminess and flavor. You can try balsamic glaze for a sweet touch. Pesto is another great choice. It brings a fresh herb taste. Serve your skewers with any of these dips for extra flavor. You can grill vegetables in the oven too. Start by preheating your oven to 400°F (200°C). Arrange skewers on a baking sheet. Place them on the middle rack. Bake for about 15-20 minutes. Turn the skewers halfway through baking. This ensures even cooking. Keep an eye on them to avoid burning. Enjoy the same delicious flavors without a grill! Check the Full Recipe for more details. Grilled vegetable skewers are easy and fun to make. We covered the essential ingredients like zucchini, bell peppers, and mushrooms, along with a flavorful marinade. I shared tips for grilling and storing leftovers, so you can enjoy them longer. Feel free to get creative with your ingredients and spices! These skewers are a tasty way to enjoy veggies. So fire up your grill and give these recipes a try! You'll love the fresh flavors and ease of preparation. Enjoy your cooking adventure!

Grilled Vegetable Skewers Flavorful and Easy Recipe

Get ready to fire up your grill! In this article, I will share my easy and flavorful recipe for grilled

- 2 cups edamame in pods (fresh or frozen) - 3 tablespoons olive oil - 4 cloves garlic, minced - 1 teaspoon red pepper flakes (adjust to taste) - 1 tablespoon soy sauce - 1 tablespoon sesame oil - 1 teaspoon fresh lime juice - Salt, to taste - Sesame seeds and chopped green onions for garnish Gather these ingredients to make your spicy garlic edamame. Edamame is a tasty snack that is packed with protein. You can use fresh or frozen edamame, depending on what you have. Olive oil adds richness and helps cook the garlic. Use fresh garlic for the best flavor. It gives the dish a nice aroma and taste. Red pepper flakes bring the heat, and you can adjust how much you add. If you like it spicy, feel free to add more. Soy sauce adds depth, while sesame oil gives a nutty flavor. The lime juice at the end will brighten the dish. Don’t forget to add salt to taste. For toppings, sesame seeds and chopped green onions add a nice touch. They make your edamame look beautiful and add extra flavor. This simple list of ingredients makes it easy to whip up a batch of spicy garlic edamame. For the full recipe, check out the cooking instructions section. To start, you need to prepare the edamame. If you have frozen edamame, cook it according to the package instructions. This usually takes about 5 minutes. If you choose fresh edamame, rinse the pods under cold water. This helps remove dirt and keeps them fresh. Next, heat 3 tablespoons of olive oil in a large skillet over medium heat. The oil should shimmer but not smoke. Add 4 minced garlic cloves to the skillet. Sauté the garlic for 1-2 minutes until it smells great. Be careful not to let it turn brown, as that can make it bitter. Now, add 1 teaspoon of red pepper flakes to the garlic. This step gives the dish its spicy kick. Cook this for another 30 seconds to release the flavors. After that, toss in the cooked edamame. Stir well to coat the beans in the spicy garlic oil. This makes sure each pod gets that tasty flavor. Now, it’s time for the final touches. Drizzle 1 tablespoon of soy sauce and 1 tablespoon of sesame oil over the edamame. Toss everything together again until you see the sauce mix in well. Squeeze in 1 teaspoon of fresh lime juice and add salt to taste. This adds a bright flavor that balances the spice. Once done, remove the skillet from heat. Transfer your spicy edamame to a nice serving bowl. For the final touch, garnish with sesame seeds and chopped green onions. This adds color and a little crunch. You can find the full recipe [here](#). To get the best flavor from your spicy garlic edamame, use fresh garlic. Fresh garlic adds a strong, vibrant taste. Sauté it just until fragrant. If you cook it too long, it may turn bitter. Adjusting the spice level is simple. If you want more heat, add extra red pepper flakes. Start with a small amount and taste as you go. Remember, you can always add more, but you can't take it out! If you don't have olive oil, try sesame oil or avocado oil. Both oils bring unique flavors and can enhance your dish. You can even mix them for a richer taste. For gluten-free soy sauce, look for tamari. It works just as well and keeps the flavor intact. You can also use coconut aminos for a different twist. Spicy garlic edamame pairs well with rice dishes or salads. You can serve it alongside sushi or grilled meats for a lovely contrast. This dish makes a great appetizer or snack. It’s easy to share at parties. You can also pack it for lunch or enjoy it while watching a movie. Check out the Full Recipe for a detailed guide on making this delicious snack! {{image_2}} You can make spicy garlic edamame even more exciting. Adding citrus zest brings a bright twist. Try using lime or lemon zest for a fresh flavor. It enhances the dish and adds a fun aroma. Incorporating other spices can change the taste too. For example, smoked paprika or cumin can add depth. Experiment with different spices to find your favorite mix. If you follow a vegan diet, this recipe is perfect for you. All ingredients are plant-based. You can enjoy spicy garlic edamame without any changes. For a low-sodium version, use low-sodium soy sauce. This change keeps the flavor but reduces salt. It’s a great option for those watching their sodium intake. You can include other vegetables to make this dish even better. Bell peppers add color and crunch. Just chop them up and toss them in with the edamame. If you want more protein, consider adding tofu or chicken. Cook the protein separately, then mix it in. This addition makes the dish heartier and even more satisfying. For the full recipe, check out the main section above. To keep your spicy garlic edamame fresh, store any leftovers in an airtight container. This helps seal in the flavor and moisture. You can use glass or plastic containers with tight lids. Be sure to let the edamame cool down before you store it. This prevents condensation, which can make them soggy. When you are ready to enjoy your leftovers, reheating is key. The best way to do this is in a skillet. Heat it on medium for about 3 to 5 minutes. Stir often to keep the edamame from sticking. If you want to use a microwave, place the edamame in a bowl with a splash of water. Cover it and heat for about 1-2 minutes. Yes, you can freeze spicy garlic edamame! First, let them cool completely. Then, place them in a freezer-safe bag or container. Push out as much air as you can before sealing. To thaw, just put them in the fridge overnight. If you're in a hurry, you can also run them under cold water. This way, you can enjoy your snack later without losing that great flavor from the Full Recipe. Edamame are young soybeans. They grow in pods and are often green. These beans are packed with protein and fiber. A one-cup serving has about 17 grams of protein. They also have vitamins like K and folate. Eating edamame can help keep your heart healthy. They are low in calories, making them a great snack. You can enjoy them hot or cold, and they taste great with salt. Spicy garlic edamame has a kick. The heat comes from red pepper flakes. You can make it as spicy as you want. If you like mild flavors, use less red pepper. If you want more heat, add more flakes. It’s all about your taste. A good tip is to start small and adjust. This way, you find the perfect level for you. Yes, you can use frozen edamame! Frozen edamame is convenient and easy. Just cook it according to the package instructions. This usually takes only a few minutes. If you use fresh edamame, rinse the pods under cold water. Both options taste great, but fresh may have a bit more flavor. Choose what works best for you. Enjoy your spicy garlic edamame with your favorite drink. Check out the Full Recipe for step-by-step cooking instructions! In this blog, we explored making spicy garlic edamame. We discussed ingredients like edamame, garlic, and spices. You learned step-by-step instructions for cooking and seasoning. I provided tips for the best flavor and storage methods. Whether you customize it or serve it as a snack, this dish shines. It's easy to make and delicious to eat. Enjoy your cooking journey with spicy garlic edamame!

Spicy Garlic Edamame Flavorful and Easy Snack

Looking for a snack that’s both tasty and easy to make? You’re in for a treat with Spicy Garlic Edamame.

- 1 cup all-purpose flour - 2 tablespoons sugar - 1 tablespoon baking powder - 1/2 teaspoon salt - 1 cup milk (or plant-based alternative) - 1 large egg - 2 tablespoons melted butter (or coconut oil) - 1 teaspoon vanilla extract - 1/2 cup Nutella - Butter or oil for cooking - Optional toppings: sliced bananas, fresh strawberries, whipped cream, powdered sugar To make Nutella stuffed pancakes, you need simple ingredients. First, gather all-purpose flour, sugar, baking powder, and salt. These dry ingredients will create the pancake base. Next, for the wet ingredients, grab milk, a large egg, melted butter, and vanilla extract. These will help bind everything together. The star of the show is Nutella. You will need about half a cup. This sweet, chocolatey hazelnut spread makes every bite special. For cooking, use butter or oil to prevent sticking. Finally, you can add toppings like sliced bananas, fresh strawberries, whipped cream, or powdered sugar to make your pancakes even better. For the detailed steps to create this tasty dish, check out the Full Recipe. Enjoy the process and have fun experimenting with flavors and toppings! - In a bowl, whisk together: - 1 cup all-purpose flour - 2 tablespoons sugar - 1 tablespoon baking powder - 1/2 teaspoon salt This mix is the base for your pancakes. Make sure the dry ingredients blend well. This step is key for fluffy pancakes. - In a separate bowl, combine: - 1 cup milk (or plant-based alternative) - 1 large egg - 2 tablespoons melted butter (or coconut oil) - 1 teaspoon vanilla extract Mix these well. This will add moisture and flavor to your pancakes. Stir gently to avoid lumps. A few lumps are okay. - Heat a non-stick skillet over medium heat. Lightly grease it with butter or oil. - Pour 1/4 cup of the batter onto the skillet. Cook until bubbles form on the surface, about 2-3 minutes. - Spoon 1 tablespoon of Nutella onto the pancake. Then, pour another 1/4 cup of batter over Nutella. - Carefully flip the pancake. Cook for another 2-3 minutes until golden brown. Repeat this with the rest of the batter and Nutella. Serve warm. Use the Full Recipe for more details! To make the best pancakes, start by frying at the right temperature. Heat your skillet over medium heat. Test it by splashing a drop of water; if it sizzles, you’re ready. This will help your pancakes cook evenly. To prevent sticking, use a non-stick skillet or a well-seasoned pan. Lightly grease it with butter or oil. This small step makes a big difference in getting those perfect pancakes. One mistake to watch out for is overmixing the batter. Stir just until the dry and wet ingredients combine. A few lumps are okay. Overmixing makes the pancakes tough, not fluffy. Another common error is not letting the pancake cook long enough before flipping. Wait until bubbles form on the surface. This shows that the pancake is ready to turn. Flip it carefully to keep the Nutella inside. For a beautiful presentation, stack the pancakes high on a plate. Drizzle with chocolate sauce for extra sweetness. Add fresh fruit like sliced bananas or strawberries for color and taste. A sprinkle of powdered sugar can give it an elegant touch. Enjoy your Nutella stuffed pancakes! {{image_2}} You can make Nutella stuffed pancakes even better with add-ins. Think about adding seasonal fruits like berries or bananas. They bring a fresh taste and bright color. You can also mix in nuts for crunch. Almonds or walnuts work great. Want more chocolate? Toss in some chocolate chips. These options make your pancakes unique and delicious. If you need gluten-free pancakes, you can use almond flour or a gluten-free blend. This ensures everyone can enjoy them. For those avoiding dairy, try plant-based milk like almond or oat. You can also swap melted butter for coconut oil. These swaps keep your pancakes tasty while meeting dietary needs. These pancakes shine at breakfast or brunch. Stack them high and drizzle with syrup. For a sweet touch, add whipped cream or powdered sugar. They also make a great dessert. Serve with a scoop of ice cream and fresh fruit. Your family and friends will love this treat! You can find the Full Recipe in this article for more details. To store leftover pancakes, first let them cool. Place them in an airtight container. You can also stack them with a piece of parchment paper in between each pancake. This helps keep them from sticking together. Store them in the fridge for up to three days. When you're ready to eat, just take them out and reheat. To freeze pancakes, first cool them completely. Then, place a sheet of parchment paper between each pancake. This prevents them from freezing together. Put the stacked pancakes in a freezer-safe bag. Squeeze out as much air as you can. You can store them in the freezer for up to two months. When you want to enjoy them, just take what you need. To reheat pancakes, you have a few options. You can use a microwave, oven, or skillet. For the microwave, place the pancake on a plate. Heat for about 20-30 seconds. If you want to use the oven, preheat it to 350°F (175°C). Place pancakes on a baking sheet and heat for about 10 minutes. For a skillet, warm it over low heat and cook each pancake for about 1-2 minutes on each side. This keeps them soft and tasty. You can replace eggs with a few options. Use 1/4 cup of unsweetened applesauce. This adds moisture and sweetness. Another choice is a flax egg. Mix 1 tablespoon of ground flaxseed with 2.5 tablespoons of water. Let it sit for a few minutes until it thickens. You can also try 1/4 cup of yogurt or silken tofu. These options help make your pancakes fluffy and tasty. Yes, you have many choices! You can use chocolate chips for a gooey center. Peanut butter adds a rich and nutty flavor. If you like fruit, try sliced strawberries or bananas. You can even mix Nutella with almond butter for a twist. Each filling gives a unique taste, so feel free to get creative! To keep pancakes warm, use your oven. Preheat it to 200°F (93°C). While you cook each pancake, place them on a baking sheet in the oven. This keeps them warm without overcooking. You can also cover them loosely with foil. This way, they stay soft and delicious until you serve them. Making Nutella stuffed pancakes is easy! Start with the Full Recipe. Here is a quick overview: - Ingredients: - 1 cup all-purpose flour - 2 tablespoons sugar - 1 tablespoon baking powder - 1/2 teaspoon salt - 1 cup milk (or plant-based alternative) - 1 large egg - 2 tablespoons melted butter (or coconut oil) - 1 teaspoon vanilla extract - 1/2 cup Nutella - Butter or oil for cooking - Optional toppings: sliced bananas, fresh strawberries, whipped cream, powdered sugar - Steps: 1. Mix the dry ingredients in one bowl. 2. In another bowl, combine the wet ingredients. 3. Pour the wet mix into the dry mix until just combined. 4. Cook the pancakes in a skillet, adding Nutella in the middle. 5. Flip and finish cooking until golden brown. Serve these pancakes warm and enjoy every bite! You can now create delicious Nutella stuffed pancakes easily. We covered key ingredients, step-by-step cooking, and tips to avoid common mistakes. Don't forget the many ways to customize and serve these pancakes. Whether for breakfast, brunch, or dessert, you can impress anyone. Store and reheat leftovers to enjoy them again. With this knowledge, you can make pancakes that please everyone. Enjoy your cooking and have fun experimenting with flavors!

Nutella Stuffed Pancakes Irresistible Breakfast Treat

If you want to impress your family or friends, try Nutella stuffed pancakes! These warm, gooey treats are a game-changer

To make carrot cake overnight oats, you need a few key items. Here is what you will need: - 1 cup rolled oats - 1 ½ cups almond milk (or any milk of your choice) - 1 large carrot, finely grated - 1 tablespoon maple syrup (or honey) - 1 teaspoon vanilla extract - ½ teaspoon ground cinnamon - ¼ teaspoon nutmeg - Pinch of salt These ingredients create a creamy and flavorful base for your oats. The rolled oats soak up the milk, making them soft and delicious. The grated carrot gives a nice texture and natural sweetness. You can personalize your oats with some fun extras. Here are a few ideas: - 2 tablespoons chopped walnuts (optional) - 2 tablespoons raisins (optional) - Greek yogurt (for topping) - Extra walnuts and carrot shavings (for garnish) Adding walnuts gives a nice crunch. Raisins add a sweet burst. Top your oats with Greek yogurt for creaminess and more nutrients. If you have dietary needs, there are easy swaps you can make. Try these substitutes: - Use any plant-based milk for almond milk if you want a nut-free option. - Maple syrup can be swapped for agave or stevia for lower sugar. - If you’re gluten-free, choose certified gluten-free oats. These swaps keep the recipe delicious while meeting your needs. You can enjoy this treat no matter your diet! For the complete recipe, check out the Full Recipe. Start by gathering your ingredients. You will need rolled oats, grated carrot, almond milk, maple syrup, vanilla extract, ground cinnamon, nutmeg, and a pinch of salt. In a medium bowl, mix the rolled oats with the grated carrot. Then, pour in the almond milk. Add the maple syrup and vanilla extract next. Sprinkle in the ground cinnamon and nutmeg. Finally, add a pinch of salt to enhance the flavor. Stir all the ingredients until they blend well. Next, if you like, fold in the chopped walnuts and raisins. This step adds a nice crunch and sweetness. Once mixed, divide the oat mixture into two jars. Make sure to use jars with lids for easy storage. Seal the jars tightly and place them in the fridge. Let them chill overnight or for at least four hours. This waiting time allows the oats to soak up the milk and soften. In the morning, take the jars out of the fridge. Give the oats a good stir before serving. If you want a creamier texture, add a splash of milk. For a tasty finish, top each serving with a dollop of Greek yogurt. You can also sprinkle extra chopped walnuts and some carrot shavings on top. This adds a lovely look and extra flavor. For the full recipe, check the details above. Enjoy your delightful carrot cake overnight oats! To get the best texture, use rolled oats. They soak up the milk well. You want the oats soft but not mushy. Grating the carrot finely helps it mix in better. Don't skip the spices! Cinnamon and nutmeg add warmth to each bite. If you like a bit of crunch, add walnuts or raisins. They bring texture and taste. A common mistake is not letting the oats soak long enough. They need time to absorb the liquid. If you use quick oats, they might turn too mushy. Also, using too much milk can make your oats runny. Stick to the recipe for a creamy, thick mix. Lastly, don't forget the salt! It enhances the sweet flavor of the oats. You can easily change this recipe to fit your taste. Want it sweeter? Add more maple syrup or honey. For a tropical twist, include some coconut flakes. Try swapping walnuts for pecans or almonds. You can also add fresh fruit, like pineapple or banana, for a new flavor. Experiment to find your perfect mix! For the complete recipe, check the Full Recipe section. {{image_2}} You can easily make this recipe vegan. Just swap almond milk for coconut milk or oat milk. Use maple syrup instead of honey. This keeps the taste rich and sweet. You still get all the yummy flavors of carrot cake. To boost protein, add a scoop of your favorite protein powder. You can mix it right in with the oats. Greek yogurt on top also adds protein. Or, try adding nut butter for creaminess and extra protein. Peanut or almond butter works well. Feel free to change up the spices. Try adding cardamom for a unique taste. You can also leave out the nutmeg if you prefer. If you're in the mood for something fruity, add pineapple instead of carrots. This gives a fun twist to the classic flavor. I recommend storing your carrot cake overnight oats in a sealed jar. Glass jars work great for this. They keep your oats fresh and tasty. Make sure to fill the jar to the top. This reduces air exposure. You can prepare these oats in advance. Just keep them in the fridge until you're ready to eat! Carrot cake overnight oats will last for about 3 to 5 days in the fridge. This makes them perfect for meal prep. Just check for any changes in smell or texture before eating. If they look or smell off, it's best to toss them. You can enjoy your oats cold or warm. If you prefer warm oats, just microwave them. Heat in 30-second bursts, stirring in between. This helps evenly warm the oats without drying them out. If the oats seem too thick, add a splash of milk or water to loosen them. Enjoy your delicious breakfast! Yes, you can make carrot cake overnight oats ahead of time. It’s best to prepare them the night before. This way, they soak up the flavors overnight. The oats will be soft and creamy in the morning. You can store them in the fridge for up to three days. Just remember to keep the oats in a sealed container. This keeps them fresh and tasty. You can add many fruits and nuts to this recipe. Some great options include: - Apples - Pineapple - Bananas - Pecans - Almonds These fruits add sweetness and texture. Nuts give a nice crunch. You can mix and match to find your favorite combo. To make carrot cake overnight oats gluten-free, simply swap regular oats for gluten-free oats. Look for oats labeled gluten-free in stores. This ensures they do not come into contact with gluten. The rest of the recipe stays the same. You can still enjoy the same great taste without gluten. Carrot cake overnight oats offer a fun twist on breakfast. We explored essential ingredients and shared tasty add-ins. I provided step-by-step instructions to help you create this dish. You learned tips for great texture and flavor. We also looked at easy swaps to fit your needs. Now, you can enjoy a healthy breakfast that tastes like dessert. Have fun making it your own!

Carrot Cake Overnight Oats Delightful Easy Recipe

Are you ready to enjoy a delicious breakfast that tastes like dessert? Carrot Cake Overnight Oats are a tasty, easy

To make avocado toast with radish, we need just a few simple ingredients. Here’s what you’ll need: - 2 slices of whole grain bread - 1 ripe avocado - 1 cup radishes, thinly sliced These three main ingredients create a tasty base. But you can add some optional ingredients to enhance the flavor: - 1 tablespoon lemon juice - 1 teaspoon olive oil - Salt and pepper to taste - 1 tablespoon sesame seeds (optional) - Fresh microgreens or arugula for garnish The bread you choose can change the whole taste. I recommend whole grain for its nutty flavor. You can also try sourdough for a tangy twist, or even gluten-free bread if you prefer. Each type brings something unique, so feel free to explore! For the full recipe, check out the detailed steps to make this delicious dish. To start, I recommend choosing two slices of whole grain bread. Place the bread in a toaster or on a grill. Toast it until it reaches your desired crispness. I like mine golden brown. For a crunchy texture, you can use a broiler. Just watch it closely to prevent burning. A good tip is to toast the bread just before you assemble the dish. This keeps it warm and fresh. Next, let's prepare the avocado. Take your ripe avocado and cut it in half. Remove the pit carefully. Scoop the soft flesh into a bowl. Use a fork to mash it gently. You want it creamy but still a bit chunky. Add one tablespoon of lemon juice and one teaspoon of olive oil. Season it with salt and pepper to taste. This mix brightens the flavor and keeps the avocado from browning. Now it’s time to assemble your toast. Spread a thick layer of the avocado mixture on each slice of toasted bread. Make it generous! Then, take your thinly sliced radishes and arrange them on top. You can lay them in a fan shape or in a circle for a pretty look. If you want extra crunch, sprinkle sesame seeds on top. Finally, add fresh microgreens or arugula for a pop of color. This dish not only tastes great but looks amazing too! Check the [Full Recipe] for all the details. Pick an avocado that feels slightly soft when you squeeze it. This means it is ripe. A ripe avocado has a dark green to black skin. If it's too hard, leave it out for a day or two. Once ripe, store it in the fridge to slow down the ripening process. This helps keep it fresh longer. Add a pinch of salt and pepper to your avocado mix. This helps bring out its natural taste. For more kick, try adding red pepper flakes or garlic powder. You can also mix in some fresh herbs like cilantro or basil for extra flavor. Topping your avocado toast with extras can make it even better. Consider adding sliced tomatoes, cucumbers, or even a poached egg. Another fun idea is to sprinkle on some crumbled feta cheese or nuts for crunch. These additions make the dish both tasty and colorful. {{image_2}} You can use many types of bread for avocado toast. Each type brings its own flavor. Try sourdough for a tangy bite. Rye bread adds a nutty taste. Whole grain bread is hearty and rich in fiber. For a lighter option, try pita bread or bagels. If you need gluten-free choices, look for bread made from almond or coconut flour. These options work well and taste great. To make your avocado toast more filling, add protein. A poached egg on top is creamy and rich. Smoked salmon brings a nice savory depth. You can even add cooked bacon for a crispy texture. For extra flavor, experiment with herbs. Chopped cilantro or dill can brighten the dish. A sprinkle of red pepper flakes adds some heat. You can also mix in spices like cumin or paprika. Mixing in some lemon zest can give a fresh twist. Adding a drizzle of balsamic glaze can enhance the taste too. These creative combinations make each bite exciting. For the full recipe, check out Avocado Toast Delight with Radish. To keep your avocado fresh, use an airtight container. This helps to slow down browning. Add lemon juice to your mixture. The acidity helps preserve the green color. Store it in the fridge and use within one day for best taste. If you notice browning, just scrape off the top layer. The flavor will remain good underneath. For storing assembled toast, it’s best to eat it right away. If you must store it, wrap it tightly in plastic wrap to keep it from getting soggy. Place it in the fridge but try to eat it within a few hours. The bread will lose its crispness over time. To reheat your toast, use a toaster or oven. Avoid the microwave, as it makes bread chewy. Toast it at a low setting until warm. This helps keep that nice crunch. If you have leftover toppings, store them separately. You can add them again after reheating. If your radishes get soft, try slicing fresh ones to add on top. This keeps your dish looking vibrant and fresh. Enjoy your avocado toast warm for the best flavor and texture. For more delicious ideas and tips, check out the Full Recipe. To make your avocado toast more filling, add hearty toppings. Here are some ideas: - Sliced hard-boiled eggs for protein - Crumbled feta cheese for a salty kick - Smoked salmon for healthy fats - Chickpeas for extra fiber - Roasted nuts for crunch and flavor These toppings not only add taste but also boost the meal's nutrition. You can mix and match to find your favorite combo! You can prepare some parts in advance to save time. Here are some tips: - Toast the bread in advance and store it in an airtight container. - Make the avocado mixture and keep it in a sealed bowl. - Add a little lemon juice to the avocado to keep it fresh. - Slice the radishes right before serving to keep them crisp. By prepping these items, you can enjoy your toast quickly on busy mornings! Both avocado and radish offer great health benefits. Here is a quick overview: - Avocado: Full of healthy fats and fiber. It helps heart health and keeps you full. - Radish: Low in calories and high in vitamin C. It can aid digestion and boost your immune system. Together, they create a tasty dish full of nutrients. Enjoy these benefits while savoring your avocado toast! You learned how to make delicious avocado toast. We covered key ingredients, preparation steps, and presentation tips. I shared ideas for variations and how to store leftovers. Remember to choose ripe avocados for the best flavor. Enjoy experimenting with toppings and flavor combinations. Avocado toast is healthy and versatile. It’s not just a meal; it’s a chance to be creative in the kitchen. I hope you try out these tips and make your own unique toast creations. Happy toasting!

Avocado Toast with Radish Easy and Delicious Recipe

Looking for a quick, tasty meal? Avocado toast with radish is your answer! This easy recipe combines creamy avocado with

- 4 ripe peaches, sliced - 8 ounces fresh mozzarella cheese, sliced - 1 cup fresh basil leaves - 2 tablespoons balsamic glaze - 1 tablespoon extra virgin olive oil - Salt and freshly ground black pepper to taste Selecting the best peaches Choose peaches that feel firm but yield slightly when pressed. Look for a sweet scent. Color should be bright and even, with no bruises. Choosing fresh mozzarella Fresh mozzarella should be soft and moist. Check the packaging date to ensure freshness. Look for a creamy texture that will complement the peaches. Importance of fresh basil Fresh basil adds a fragrant touch. Look for vibrant, green leaves without browning. The aroma should be strong, indicating freshness. Use whole leaves for the best flavor. For the complete process, check the Full Recipe. 1. Washing and slicing peaches: Start by washing the peaches under cool water. This removes dirt and chemicals. Cut each peach in half and remove the pit. Slice each half into wedges or rounds. Aim for even thickness to ensure balance in flavor and texture. 2. Slicing mozzarella cheese: Next, take the fresh mozzarella cheese. Slice it into pieces that match the thickness of your peach slices. This helps create a harmonious look and taste when you layer them together. 1. Layering peaches and mozzarella: On a large serving plate, arrange the peach slices in a circular pattern. Alternate each slice with mozzarella. This colorful display will make the salad visually appealing and delightful to eat. 2. Adding basil leaves: Tuck fresh basil leaves in between the peach and mozzarella layers. The basil adds a nice herbal note. Its aroma will enhance the overall flavor of the salad. 1. Drizzling balsamic glaze and olive oil: Drizzle balsamic glaze over the salad. This adds a sweet and tangy finish. Then, add a light drizzle of extra virgin olive oil for richness. 2. Seasoning with salt and pepper: Finally, sprinkle a pinch of salt and freshly ground black pepper on top. This simple seasoning brings out the flavors of the peaches and cheese. Enjoy your Peach Caprese Salad right away, or let it chill for ten minutes. It’s a refreshing summer delight! For the complete recipe, check out the [Full Recipe]. To boost the taste of your Peach Caprese Salad, consider adding a pinch of sea salt. This simple step brings out the sweet and savory notes in both the peaches and mozzarella. You can also try a sprinkle of red pepper flakes. This will add a subtle heat that contrasts well with the sweetness of the peaches. When it comes to balsamic vinegar, using aged balsamic can elevate your dish. Aged balsamic is thicker and sweeter than regular balsamic. It adds depth and richness that enhances the flavors in your salad. For serving, I recommend using a large white platter. This color makes the vibrant peaches and green basil pop! Arrange the salad in a circular pattern to draw the eye. Finish with some extra basil leaves on top for a fresh look. For added flair, drizzle some balsamic glaze in a swirl around the edge of the platter. This not only looks good but also makes it easy for guests to grab extra glaze. Serve your Peach Caprese Salad right after you make it. This way, you enjoy the fresh flavors of the ingredients. If you want a cool touch, chill it for about 10 minutes before serving. Just don’t let it sit too long, or the peaches may become soggy. Keep in mind that the salad tastes best within a few hours of preparation. If you want to make it ahead, prepare the ingredients separately. Assemble everything just before serving for the best taste and texture. For the full recipe, check out the complete details in the previous sections. {{image_2}} You can make your Peach Caprese Salad heartier by adding protein. Grilled chicken or shrimp works well. Simply grill your choice of protein and slice it thinly. Place it on top of the salad for a tasty twist. For a salty kick, try adding prosciutto or crispy bacon. These additions bring a savory flavor that balances the sweetness of the peaches. If you want a vegetarian option, consider plant-based mozzarella. Many brands offer great alternatives that melt and taste like cheese. You can also add nuts for extra crunch. Toasted pine nuts or almonds add texture and flavor. They pair well with the sweet peaches and creamy mozzarella. Feel free to swap peaches for other seasonal fruits. Nectarines or plums can work just as well. Each fruit brings its own unique taste. You can also change the herbs. Instead of basil, try using mint or arugula. These herbs add a fresh note that brightens the dish. For the full recipe, check out the Peach Caprese Salad section. Store Peach Caprese Salad in a sealed container. This keeps the flavors fresh. It lasts about two days in the fridge. If the salad mixes, the peaches may get mushy. To prevent this, store peaches, mozzarella, and basil separately. - Shelf Life of Ingredients: - Peaches: Best eaten within 2 days for sweetness. - Mozzarella: Store in brine; lasts up to a week. - Basil: Use within 3 days for optimal flavor. You cannot freeze Peach Caprese Salad as a whole. Freezing changes the texture. However, you can freeze the individual components. - Freezing Peaches: Slice and place in a single layer on a tray. Once frozen, transfer to a bag. They last for up to 6 months. - Freezing Mozzarella: Drain and wrap in plastic wrap. It can freeze for 2-3 months. Leftover Peach Caprese Salad can shine in many ways. - Creative Ways: - Toss it into pasta for a fresh twist. - Blend into a smoothie for a sweet treat. - Recipes Incorporating Leftover Ingredients: - Make a peach salsa with diced leftover peaches, onions, and lime. - Use basil in a pesto or as a topping on pizza. Enjoy every bite, and don’t waste a thing! For the full recipe, check out the details above. A Peach Caprese Salad is a fresh, colorful dish. It combines ripe peaches, creamy mozzarella, and fragrant basil. The key ingredients are: - 4 ripe peaches, sliced - 8 ounces fresh mozzarella cheese, sliced - 1 cup fresh basil leaves - 2 tablespoons balsamic glaze - 1 tablespoon extra virgin olive oil - Salt and freshly ground black pepper to taste This salad has a sweet and savory taste. The peaches add juiciness, while the mozzarella provides creaminess. Fresh basil gives it a lovely aroma. The balsamic glaze ties it all together with a sweet-tangy finish. To make this salad vegan, swap the mozzarella for plant-based cheese. You can use nut-based mozzarella or tofu. These alternatives mimic the texture of cheese well. For the balsamic glaze, check that it contains no animal products. This way, you keep the flavor while making it suitable for a vegan diet. Yes, you can prepare the salad ahead of time. However, I recommend waiting to add the balsamic glaze until just before serving. This keeps the salad fresh and prevents sogginess. You can slice the peaches and mozzarella earlier in the day. Keep them in the fridge until you are ready to serve. Peach Caprese Salad pairs well with many dishes and drinks. Here are some great options: - Grilled chicken or shrimp for protein - A light white wine like Sauvignon Blanc - Crusty bread to soak up the flavors - A fresh arugula salad for added greens These pairings enhance the salad's sweetness and freshness, making your meal complete. If fresh peaches are not available, use other fruits. Nectarines or plums work beautifully in this salad. You can also use canned peaches or frozen ones. Just make sure they are well-drained and not overly sweet. This way, you can enjoy a delicious Peach Caprese Salad no matter the season. For the full recipe, check out the [Full Recipe]. This blog post detailed how to create a delicious Peach Caprese Salad. We covered key ingredients like ripe peaches, fresh mozzarella, and basil, then explored step-by-step instructions for preparation and assembly. I shared tips for enhancing flavors and suggested variations, including protein options and vegetarian substitutes. In conclusion, enjoy this salad fresh or creatively use leftovers. Making small changes can customize it to your taste. Get ready to impress your guests with this vibrant dish!

Peach Caprese Salad Refreshing Summer Delight

Looking for a light and tasty dish to impress your friends this summer? A Peach Caprese Salad is your answer!

- 3 medium-sized apples (preferably honeycrisp or Fuji) - 2 tablespoons granulated sugar - 1 teaspoon ground cinnamon - 1 tablespoon lemon juice - Optional: pinch of salt You can use different apple types for your chips. For sweeter chips, try Gala or Golden Delicious. If you want tartness, use Granny Smith apples. For sugar, honey or maple syrup works as a healthier choice. You can also use coconut sugar for a unique twist. For slicing apples, you can use a mandoline slicer or a sharp knife. A mandoline gives you even slices quickly. If you choose a knife, take your time to slice apples thinly and evenly. You will also need a baking sheet lined with parchment paper. This helps prevent sticking and makes cleanup easy. To make great apple chips, start with clean apples. Wash them under cool water. Use a soft cloth to dry them well. This step is key to getting rid of dirt and wax. Next, slice the apples into thin rounds. A mandoline slicer works best, but a sharp knife will do. Aim for about 1/8-inch thickness. Keeping the slices even helps them bake evenly. The next step is to mix the cinnamon sugar coating. In a medium bowl, combine 2 tablespoons of granulated sugar and 1 teaspoon of ground cinnamon. If you want, add a pinch of salt for extra flavor. Even coating is very important. It ensures each apple slice gets the same sweet flavor. Toss all the apple slices in the mix until they are well-coated. Now it’s time to bake the apple chips. Preheat your oven to 225°F (110°C) and line a baking sheet with parchment paper. Arrange the apple slices in a single layer on the sheet. Make sure they don’t touch; this helps them crisp up. Bake for 1.5 to 2 hours. Flip the apple slices halfway through for even cooking. Keep an eye on them as they bake. They should look crisp and slightly golden when done. After baking, let the chips cool on the sheet. They will get even crisper as they cool. Store them in an airtight container to keep them fresh. For the full recipe, check above. To get your apple chips just right, the oven temperature matters. Set your oven to 225°F (110°C) for the best results. This low heat helps the apples dry out slowly, making them crispier. Bake for about 1.5 to 2 hours. Flip the slices halfway through to ensure even baking. Keep an eye on them; you want a light golden color. One common mistake is slicing apples unevenly. Aim for slices about 1/8-inch thick. Too thick, and they won’t crisp well. Too thin, and they might burn. Another mistake is not spacing the apple slices correctly. If they touch, they will steam instead of crisp. Leave room between each slice on the baking sheet. Want to jazz up your apple chips? Try adding a pinch of nutmeg or ginger to the cinnamon sugar mix. You can also drizzle a bit of caramel over the chips after baking for a sweet twist. These little changes can take your cinnamon sugar apple chips to the next level, making them even more delicious. {{image_2}} You can add other spices to your cinnamon sugar apple chips. A pinch of nutmeg brings warmth and depth. Ginger adds a nice kick. Mix them in with your sugar and cinnamon for fun new flavors. If you want a treat that's extra sweet, drizzle them with caramel. This makes them more like candy. Kids love this twist! Apple chips are just the start. You can use pears or bananas for a change. Slice these fruits just like you do with apples. Each fruit gives a new taste. Pear chips are juicy and soft while banana chips are sweet and chewy. Try mixing different fruits for a colorful snack! Fall is the perfect time for cinnamon sugar apple chips. You can add pumpkin spice to the mix for a seasonal touch. Or, try to sprinkle some crushed pecans on top. This gives a nice crunch and complements the fall flavors. You can even shape the apples into fun autumn designs for kids. Enjoying these chips while watching the leaves fall makes the season special. For the full recipe, see the section above. To keep your apple chips crispy, store them in an airtight container. Make sure they are completely cool before sealing. If you live in a humid area, add a small packet of silica gel. This helps absorb moisture and keeps the chips crunchy. Homemade apple chips last about one week at room temperature. If you store them in the fridge, they can last up to two weeks. For longer storage, try freezing them. Frozen apple chips can last several months, but the texture may change after thawing. Check your apple chips for obvious signs of spoilage. If they feel soft or chewy, they have lost their crunch. Look for any dark spots or mold; these mean they are no longer safe to eat. If they smell off or stale, it's best to discard them. Enjoy your crispy cinnamon sugar apple chips while they are fresh! Yes, you can use a dehydrator! It’s a great tool for making apple chips. First, slice your apples as you would for baking. Lay the slices flat on the dehydrator trays. Set the dehydrator to 135°F (57°C). Dehydrate the apple slices for 6 to 8 hours. Check them every few hours. You want them dry and crispy, not chewy. If your apple chips are not crispy, check a few things. Slices may be too thick. Aim for 1/8-inch thickness for best results. Moisture can also be a problem. Make sure to dry apples well before baking. If you used too much lemon juice, it might add extra moisture. Lastly, make sure to space the slices on the baking sheet. They should not touch each other. Yes, you can make these chips ahead of time! Store them in an airtight container to keep them fresh. If they lose some crispness, you can reheat them. Just pop them back in the oven at 225°F (110°C) for about 10 minutes. This will help restore their crunch. Enjoy your tasty snack anytime! Check out the Full Recipe for more details. You learned how to create tasty apple chips using just a few simple steps. We explored the best ingredients, equipment, and tips to help you succeed. With this knowledge, you can make delicious snacks with various flavors and textures. Remember to store them right to keep them crispy. Now, get the whole family involved and enjoy making your own apple chips at home. It's a fun way to snack smart!

Cinnamon Sugar Apple Chips Crunchy and Delicious Snack

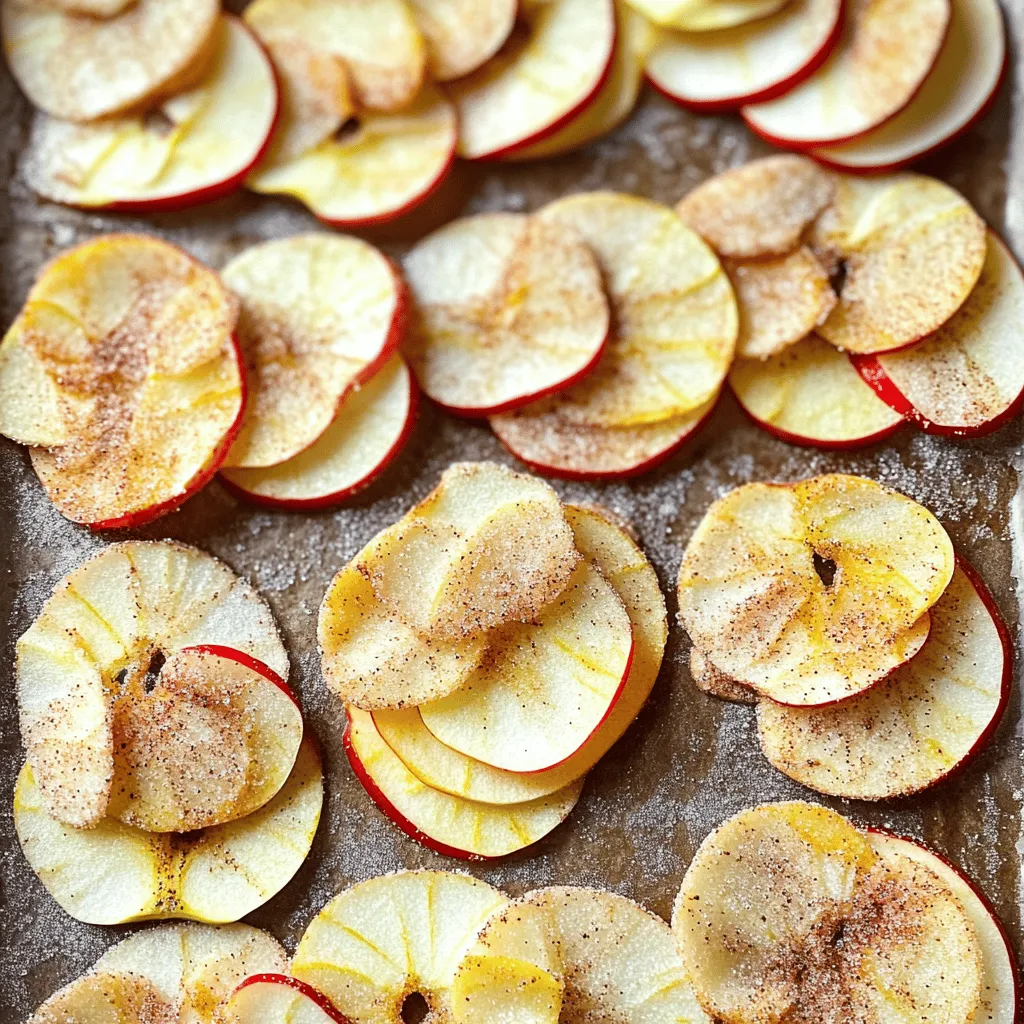
Craving a tasty, crunchy snack? Say hello to Cinnamon Sugar Apple Chips! These simple treats are packed with flavor and

To make a tasty Sweet Potato Black Bean Chili, you need: - 2 medium sweet potatoes, peeled and diced - 1 can (15 oz) black beans, drained and rinsed - 1 can (14 oz) diced tomatoes with green chilies - 1 yellow onion, chopped - 2 cloves garlic, minced - 1 bell pepper (any color), chopped - 2 cups vegetable broth - 1 tablespoon olive oil - 2 teaspoons ground cumin - 1 teaspoon smoked paprika - 1 teaspoon chili powder - Salt and pepper to taste For optional garnishes and toppings, consider: - 1 avocado, diced - Fresh cilantro, chopped - Lime wedges for serving This recipe is perfect for a cozy night in or a gathering with friends. The sweet potatoes add a nice touch of sweetness that pairs well with the rich flavors of the black beans and spices. You can find the full recipe and instructions to get started on this delightful dish. To make Sweet Potato Black Bean Chili, follow these easy steps. This chili is hearty and full of flavor. 1. Heat the Oil: In a large pot, heat the olive oil over medium heat. 2. Sauté Onion and Garlic: Add the chopped onion and minced garlic. Cook until the onion turns soft, about 5 minutes. 3. Add Bell Pepper: Stir in the diced bell pepper. Cook for 2-3 minutes until it softens a bit. 4. Mix in Sweet Potatoes: Add the diced sweet potatoes to the pot and stir. Let them cook for another 5 minutes to start softening. 5. Season the Mixture: Add ground cumin, smoked paprika, chili powder, salt, and pepper. Stir well to coat the vegetables. 6. Add Tomatoes and Broth: Pour in the diced tomatoes with their juices and the vegetable broth. Bring it to a boil. 7. Simmer: Reduce the heat to low and cover the pot. Let the chili simmer for 20-25 minutes until the sweet potatoes are tender. Stir occasionally to prevent sticking. 8. Add Black Beans: Once the sweet potatoes are soft, mix in the black beans. Heat for another 5 minutes to warm the beans. 9. Taste and Adjust: Taste your chili and add more seasoning if needed. 10. Serve: Serve hot, garnished with diced avocado, fresh cilantro, and lime wedges for squeezing. For the full recipe, check the details above. Enjoy crafting this delightful chili! To get the best texture and flavor in your chili, focus on the sweet potatoes. Cut them into small, even pieces. This helps them cook faster and blend well with the other ingredients. For added depth, sauté the onion and garlic until they are soft and fragrant. This step adds a rich base flavor to your dish. If you want to adjust the spiciness, start with mild spices. You can always add more chili powder later. For a smoother heat, consider using fresh jalapeños or crushed red pepper flakes. Taste as you go, and find the heat level that feels right for you. Sweet Potato Black Bean Chili pairs well with a variety of sides. Serve it with warm cornbread or tortilla chips for a nice crunch. You can also enjoy it over rice or quinoa for a heartier meal. When garnishing, top each bowl with diced avocado and fresh cilantro. These add creaminess and brightness. Lime wedges on the side offer a zesty kick when squeezed over the chili. This balance of flavors will make every bite a delight! For the full recipe, check out the Sweet Potato Black Bean Chili details. {{image_2}} You can easily add protein to your chili. Try adding cooked chicken or ground turkey. If you're vegan, use lentils or chickpeas. These options boost flavor and nutrition. For dietary needs, make this chili gluten-free by checking your vegetable broth. Most brands are safe, but double-check. You can also swap black beans for pinto or kidney beans. To change the flavor, play with spices. Add cayenne for heat or oregano for a fresh kick. You can also try fresh herbs like basil or parsley. They can bring new life to every bowl. Seasonal veggies are a great addition. In fall, add butternut squash. In summer, toss in corn or zucchini. This keeps your chili exciting and fresh! To keep your Sweet Potato Black Bean Chili fresh, store it in airtight containers. Let the chili cool down before placing it in the fridge. This helps avoid moisture build-up. In the fridge, the chili lasts for about 3 to 5 days. If you want to save it longer, freeze it in portion-sized containers. It will keep well for up to 3 months in the freezer. When you're ready to enjoy the chili again, reheat it gently. You can use the stove or microwave. If using the stove, warm it over low heat. Stir often to keep it from sticking. If using the microwave, heat it in short bursts, stirring in between. This keeps the flavors intact and makes sure it heats evenly. Enjoy your comforting bowl of Sweet Potato Black Bean Chili! For the full recipe, check out the earlier section. How to make Sweet Potato Black Bean Chili spicier? To spice up your chili, add more chili powder or diced jalapeños. You can also mix in hot sauce for an extra kick. Start with a little, then taste and adjust. This way, you control the heat level. Can I use other beans in this recipe? Yes, you can swap black beans for kidney beans or pinto beans. Both options work well and add a nice texture. Just remember to rinse and drain them before adding them to the pot. What is the nutritional value of Sweet Potato Black Bean Chili? This chili is packed with nutrients. Each serving has about 250 calories, 10 grams of protein, and 8 grams of fiber. Sweet potatoes add vitamins A and C while beans offer protein and iron. It’s a healthy choice for any meal. How can I make this recipe ahead of time? You can prepare the chili a day in advance. Just follow the recipe, let it cool, and store it in the fridge. The flavors will deepen overnight. Reheat it on the stove before serving. This makes dinner easy and quick! For the complete recipe, check out the [Full Recipe]. Sweet Potato Black Bean Chili is a simple and tasty dish. We covered ingredients, step-by-step cooking, and tips to make it perfect. You can adapt the recipe to suit your taste or dietary needs. Storing and reheating tips help keep your chili fresh. This meal is easy to prepare and customize, making it a great choice for any occasion. Embrace the flavors and enjoy this warm dish with friends and family. You’ll find that cooking can be fun and rewarding when you try new recipes.

Savory Sweet Potato Black Bean Chili Recipe Today

Looking for a warm, comforting dish? Try this Savory Sweet Potato Black Bean Chili! Packed with flavor and nutrients, it’s

To make Carrot Cake Energy Bites, you will need a few simple ingredients. Here’s the list: - 1 cup rolled oats - 1 cup grated carrots (about 2 medium carrots) - 1/2 cup almond butter (or peanut butter) - 1/4 cup honey or maple syrup - 1/2 teaspoon vanilla extract - 1/2 teaspoon ground cinnamon - 1/4 teaspoon nutmeg - 1/4 cup raisins or chopped walnuts (optional) - Pinch of salt These ingredients not only taste good but also provide healthy benefits. The oats give you energy and fiber. Carrots add vitamins and sweetness. Almond butter or peanut butter adds healthy fats and protein. Honey or maple syrup gives a touch of natural sweetness. Spices like cinnamon and nutmeg enhance flavor while adding warmth. You can also mix in raisins or walnuts for extra texture and taste. This recipe is easy to follow, and you can find the full recipe online. Preparing these energy bites is a fun way to enjoy a snack that feels like dessert! 1. In a large mixing bowl, combine 1 cup of rolled oats and 1 cup of grated carrots. These two ingredients form the base of our tasty bites. 2. Next, add 1/2 cup of almond butter and 1/4 cup of honey (or maple syrup) along with 1/2 teaspoon of vanilla extract. Stir until everything blends well. 3. Now, mix in 1/2 teaspoon of ground cinnamon, 1/4 teaspoon of nutmeg, and a pinch of salt. These spices give our bites that classic carrot cake flavor. 4. If you like, fold in 1/4 cup of raisins or chopped walnuts for extra texture and sweetness. 5. Cover the bowl and chill the mixture in the refrigerator for 30 minutes. Chilling helps the mixture firm up so it's easier to roll. 6. After chilling, use your hands to roll the mixture into bite-sized balls, about 1 inch in diameter. This size is perfect for snacking! 7. Place the energy bites on a parchment-lined tray. This ensures they won’t stick and makes cleanup easy. 8. Finally, refrigerate the bites for at least 10 minutes. This step helps them hold their shape. You can enjoy them right away or store in an airtight container for up to one week. To make the best carrot cake energy bites, accurate measurements matter. Use a dry measuring cup for the oats and a liquid measuring cup for the honey or maple syrup. This ensures each bite has the same taste and texture. Mix your ingredients thoroughly. I find that using a sturdy spatula helps blend everything evenly. If you notice clumps, a quick stir will fix that. Feel free to swap nuts or nut butters. Almond butter gives a nice flavor, but peanut butter works too. You could also try sunflower seed butter for a nut-free option. Adjust your spices based on the season. In the fall, add a pinch of pumpkin spice. In spring, consider a bit of fresh ginger for a zesty touch. Pair these bites with a warm cup of tea or coffee. They also work well as a quick snack before or after a workout. If you're meal prepping, toss a few in lunchboxes for a healthy treat. They stay fresh in the fridge for about a week, so you can enjoy them anytime. For the full recipe, check out the earlier section. {{image_2}} Carrot Cake Energy Bites are packed with nutrients. The main ingredients offer a range of health benefits. - Rolled oats provide fiber and energy. - Carrots are rich in vitamins A and K. They help with vision and skin health. - Almond butter (or peanut butter) gives you healthy fats and protein. - Honey or maple syrup add natural sweetness with some antioxidants. - Cinnamon and nutmeg bring flavor and may help with digestion. Each serving has about 150 calories. This includes healthy fats and carbs, making it a great snack. These energy bites can fit many diets. They can be gluten-free if you use certified oats. You can also make them nut-free by swapping almond butter for sunflower seed butter. For a vegan option, use maple syrup instead of honey. You can also replace almond butter with a nut-free butter, like soy nut butter. For portion control, stick to one to two bites as a snack. They are great before or after a workout. Enjoy them as a quick pick-me-up during the day. You can also pack them for lunch or a road trip. These bites are easy to make and store. Keep them in the fridge for up to a week. They are ready to grab when you need a tasty, healthy snack! You can make your carrot cake energy bites even more fun with different flavors. Here are two great options: - Tropical Coconut Carrot Bites: Add 1/4 cup of shredded coconut to the mix. This gives a sweet, tropical twist. It pairs well with the carrots and spices. - Chocolate Chip Carrot Energy Bites: Mix in 1/4 cup of mini chocolate chips. This adds a rich, sweet touch. Who doesn't love chocolate with their snacks? Changing ingredients can make these bites unique. Here are some substitutions to consider: - Alternative Sweeteners or Binders: Try using agave syrup instead of honey. It adds a different sweetness while keeping the bites sticky. - Whole Grain Oats vs. Rolled Oats: You can use whole grain oats for a heartier texture. They are more nutritious and add fiber to your bites. Seasoning your bites can reflect the time of year. Here are two ideas: - Suggestions for Adding Pumpkin Spice in Fall: Add 1 teaspoon of pumpkin spice to the mix. It brings warm flavors like cinnamon and nutmeg. - Using Zucchini for a Summer Twist: Grate 1 cup of zucchini and mix it in. This keeps your bites moist and light, perfect for summer snacking. Explore these variations to keep your carrot cake energy bites exciting! For the full recipe, check out the earlier section. How long do carrot cake energy bites last? These energy bites stay fresh for up to one week in the fridge. Store them in an airtight container. Can I freeze these energy bites? Yes, you can freeze them! They last up to three months. Just thaw them in the fridge before eating. What other ingredients can I add? You can add seeds like chia or flaxseed. Dried cranberries and coconut flakes work well too. What to do if the mixture is too dry or wet? If it's dry, add a touch of almond butter or honey. If it's wet, add more oats. Tips for rolling energy bites easily Wet your hands slightly before rolling. This helps to prevent the mixture from sticking to your hands. Are carrot cake energy bites healthy? Yes, they are healthy! They contain fiber, healthy fats, and natural sugars. Enjoy them guilt-free! What makes a good energy snack? A good energy snack has fiber, protein, and healthy fats. Carrot cake energy bites hit all these marks. They keep you full and energized. For the full recipe, check the section above. In this post, we covered a simple, tasty recipe for carrot cake energy bites. You learned about the ingredients, step-by-step instructions, and helpful tips. These bites are healthy, easy to make, and fun to customize. Enjoy making them your own, whether you add nuts, spices, or even different sweeteners. These energy bites fit into many diets and fit perfectly into lunchboxes or snack time. Try them out and make snack time healthier and more enjoyable.

Carrot Cake Energy Bites Healthy and Tasty Snack

Looking for a snack that’s both healthy and delicious? Carrot Cake Energy Bites pack all the flavors you love while

Older posts
Newer posts
← Previous Page1 … Page39 Page40 Page41 … Page60 Next →

dsad

© 2025 Cooking Wells • Built with GeneratePress

Our Policies

  • Copyright Policy
  • Cookie Policy
  • GDPR Policy
  • Privacy Policy
  • Disclaimer
  • Terms Of Use

More Information

  • Home
  • About
  • Contact
  • Appetizers
  • Dessert
  • Dinner
  • Drinks
©2025, Cooking Wells About Back To Top