Skip to content
DisclaimerTerms Of UseGDPR PolicyCookie Policy

Cooking Wells

  • Home
  • Drinks
  • Appetizers
  • Dinner
  • Dessert
  • About
  • Contact
  • Privacy Policy
DisclaimerTerms Of UseGDPR PolicyCookie Policy

Mia

- 1 ripe banana - 1 cup fresh strawberries, hulled - 1/2 cup Greek yogurt (or dairy-free alternative) - 1/2 cup almond milk (or other plant-based milk) - 1 tablespoon honey or maple syrup - 1 tablespoon chia seeds - 1/4 teaspoon vanilla extract - Sliced banana - Fresh strawberries - Granola - Shredded coconut - Chopped nuts The base of a great strawberry banana smoothie bowl comes from its essential ingredients. Start with a ripe banana for creaminess and sweetness. Fresh strawberries add a tart burst of flavor. Greek yogurt gives a nice thickness and protein boost, while almond milk or plant-based milk ensures a smooth blend. You can customize your bowl by adding optional ingredients. Honey or maple syrup can sweeten it more. Chia seeds offer fiber and omega-3s, and vanilla extract enhances the taste. Don’t forget about toppings! They add fun textures and colors. Sliced bananas and strawberries look great on top. Granola adds crunch, while shredded coconut and chopped nuts give extra flavor. This recipe is easy to follow and fun to make. For the full recipe, check [Full Recipe]. To start, gather your ingredients. Place the ripe banana, fresh strawberries, Greek yogurt, almond milk, honey, chia seeds, and vanilla extract in a blender. Blend everything until it is smooth and creamy. If the mixture is too thick, add a little more almond milk to help. Make sure to scrape down the sides of the blender so all ingredients mix well. A smooth consistency is key to a perfect smoothie bowl. Once blended, pour the smoothie into a bowl. Use a spoon to create a swirl in the center. This makes it look nice. Now, it's time to add your toppings. Arrange sliced bananas, halved strawberries, granola, shredded coconut, and chopped nuts on top. Use different colors and textures to make it pop. This adds both beauty and crunch to your bowl. After blending, taste your smoothie mixture. If you want it sweeter, you can add more honey or maple syrup. Mix again to combine. You can also adjust the thickness. If you want a thicker bowl, add more yogurt or reduce the almond milk. For a thinner consistency, add a bit more almond milk. This way, you can create the perfect smoothie bowl just for you. For the full recipe, check out the complete instructions above. For a smooth and creamy texture, I recommend using a high-power blender. Brands like Vitamix or NutriBullet work great. These blenders blend the ingredients easily and provide a silky finish. To prevent clumping, add the liquid first. Then, layer in the fruits and yogurt. This order helps blend everything well without lumps. Feel free to get creative! You can add other fruits like mango, blueberries, or pineapple. Each fruit gives a unique twist to your bowl. To add superfoods, try tossing in a scoop of protein powder or some spinach. These ingredients boost the nutrition without changing the taste much. Garnishing is key to a beautiful smoothie bowl. Use sliced bananas, fresh strawberries, and a sprinkle of granola on top. For added crunch, throw in coconut or nuts. Make sure to use contrasting colors for visual appeal. Bright reds and yellows stand out well against the green spinach. A well-presented bowl makes it more enjoyable! {{image_2}} You can change your smoothie bowl with the fruits you have. During summer, use peaches or berries. In winter, try bananas or apples. Seasonal toppings can make it fun! Use nuts in the fall or fresh mint in spring. You can also sprinkle some seeds or add a drizzle of honey. Want to spice things up? Try adding cinnamon or nutmeg. These spices add warmth and depth. You can also use flavored yogurts or milks. Almond milk with vanilla tastes great! Coconut milk can add a creamy twist. Just blend these into your smoothie for extra flavor. If you need gluten-free options, this recipe is already safe. You can swap Greek yogurt for dairy-free yogurt to make it vegan. Use plant-based milk like oat or soy. For sweetness, maple syrup works well. Each choice keeps it tasty and friendly for different diets. For the complete Strawberry Banana Bliss Smoothie Bowl recipe, check the [Full Recipe]. You can keep your smoothie bowl in the fridge. Use an airtight container for best results. This method preserves flavor and freshness. Aim to eat your leftovers within 24 hours. The longer it sits, the less tasty it becomes. You can freeze smoothie portions for later. Pour the smoothie into ice cube trays or small containers. This method allows for easy portion control. When you want to enjoy a smoothie bowl, take out a few cubes. Let them sit in the fridge overnight to thaw. You can also blend them directly with fresh ingredients. To reheat, avoid using the microwave. Instead, let the smoothie sit at room temperature. This method helps maintain texture and flavor. If you must use heat, do so gently. Blend in a little almond milk to restore creaminess. Enjoy your Strawberry Banana Smoothie Bowl from the [Full Recipe] with a fresh taste every time! If you don’t have ripe bananas, you can use other fruits. Frozen bananas work well too. They add sweetness and creaminess. You can also try applesauce for a smoother texture. If you need a sweet kick, add a touch of honey or maple syrup. These options keep your smoothie bowl tasty and enjoyable. Yes, you can prep the ingredients ahead. Cut the strawberries and store them in the fridge. You can also measure out the yogurt and milk in a container. Just blend everything together when you are ready to eat. To save time, blend the smoothie the night before. Just remember to store it in the fridge. Give it a quick stir before serving. To make your smoothie bowl thicker, use less liquid. You can also add more banana or use frozen fruit. Chia seeds help too; they absorb liquid and thicken the mix. Another trick is to blend less, so it stays chunky. Enjoy experimenting with these tips to find your perfect thickness! You can create a delicious smoothie bowl using simple ingredients like ripe bananas and strawberries. Blend these with Greek yogurt and almond milk for a tasty treat. Customize it with optional ingredients like honey or chia seeds. Remember to be creative with toppings to make it look appealing. In the end, you can enjoy various flavors and textures. Don't hesitate to experiment with seasonal fruits or dietary options. With the tips provided, you’ll master the art of making smoothie bowls. Enjoy your healthy creation!

Strawberry Banana Smoothie Bowl Delightful Recipe

Are you ready to make a refreshing Strawberry Banana Smoothie Bowl? This easy recipe is packed with flavor and nutrients.

- 4 bone-in, skin-on chicken thighs - 1/4 cup honey - 4 cloves garlic, minced - 2 tablespoons soy sauce (low-sodium preferred) - 1 tablespoon apple cider vinegar - 1 teaspoon fresh ginger, grated - 1 tablespoon olive oil - Salt and pepper to taste - Chopped green onions and sesame seeds for garnish The first star of this dish is the bone-in, skin-on chicken thighs. They stay juicy and tender as they cook. Next, we have honey, which adds a sweet touch and helps create a lovely glaze. Garlic is a must in this recipe; it brings a rich and savory flavor that pairs well with the honey. Soy sauce adds a touch of saltiness and umami, enhancing the dish's depth. The apple cider vinegar provides a bright note, balancing the sweetness of honey. Fresh ginger adds a bit of warmth and a slight bite, making the flavors pop. Olive oil ensures the chicken cooks evenly and adds extra richness. The seasoning of salt and pepper is simple but essential. Finally, green onions and sesame seeds are perfect as a garnish, giving the dish a fresh look and crunch. For a complete guide to making this dish, check out the Full Recipe! Marinating chicken is key to great flavor. The longer you marinate, the better it tastes. Aim for at least 30 minutes. If you can, try for 2 hours. This allows the flavors to soak into the meat. To coat the chicken evenly, use a resealable plastic bag or a shallow dish. Pour your marinade over the chicken thighs, then seal the bag or cover the dish. Turn the chicken a few times to make sure every part gets coated. This step helps the chicken absorb all that sweet and savory goodness. Start by preheating your oven to 400°F (200°C). This makes sure the chicken cooks evenly. While the oven heats, prepare your skillet. Use a large oven-safe skillet and heat it over medium-high heat. When the skillet is hot, take the chicken out of the marinade. Reserve that marinade for later. Place the chicken skin-side down in the skillet. Sear it for about 5-6 minutes until the skin is golden and crispy. Then, flip the chicken and sear the other side for an additional 3-4 minutes. This step gives your chicken a nice crust and locks in moisture. After searing, pour the reserved marinade over the chicken. This adds even more flavor. Next, transfer the skillet to your preheated oven. Bake for 25-30 minutes. The chicken is done when it reaches an internal temperature of 165°F (75°C). The skin should look caramelized and sticky. For an extra touch, you can glaze the sauce. After baking, return the skillet to the stovetop. Simmer the sauce for about 5-6 minutes until it thickens. This step really enhances the flavors and makes for a delicious finish. You can find the full recipe at the top of this article. Enjoy your flavorful dinner delight! To make your honey garlic chicken thighs truly shine, choose quality ingredients. For soy sauce, I recommend using Kikkoman or La Choy. They add a rich umami flavor that enhances the dish. For honey, look for raw or local honey. This type has a deeper taste and better texture. Consider adding a secret ingredient: fresh ginger. Its warm spice will boost the flavor. Just a teaspoon of grated ginger can transform the dish. You may also try a splash of sesame oil for a nutty twist. Lastly, don't forget to use fresh garlic. It makes a big difference in flavor. One common mistake is overcooking the chicken. This can make it dry and tough. Always aim for an internal temperature of 165°F (75°C). Use a meat thermometer for accuracy. Another mistake is not using enough marinade. A good marinade helps keep the chicken moist and adds flavor. Ensure each piece is well-coated. Marinate for at least 30 minutes, but longer is better, even up to two hours. This time allows the flavors to soak in deeply. If you follow these tips, your honey garlic chicken thighs will be a flavorful dinner delight! For the complete process, check out the Full Recipe. {{image_2}} You can make honey garlic chicken with different cuts. Boneless chicken thighs or breasts work well. They cook faster and are easier to eat. If you choose skinless chicken, the dish will be lighter but lose some crispiness. Skin-on chicken gives a nice texture and rich flavor. The skin helps lock in moisture too. You can add a twist to the flavors. Try adding chili flakes for some heat. This simple spice gives a nice kick without overpowering the dish. If you want a different sweetness, you can swap honey for maple syrup or agave nectar. Each sweetener adds its unique flavor, making the dish even more special. Explore these variations to find your favorite way to enjoy honey garlic chicken thighs. For the complete recipe, check out the Full Recipe. To keep your honey garlic chicken thighs fresh, store them in an airtight container. You want to seal out air to prevent drying. Place the chicken in the fridge within two hours of cooking. This keeps it safe from bacteria. You can keep these chicken thighs for up to four days in the fridge. If you want to enjoy them later, consider freezing instead. If you want to save your chicken for a longer time, freezing works great. First, let the chicken cool completely. Then, wrap each piece tightly in plastic wrap. Place the wrapped thighs in a freezer-safe bag. This helps keep the flavor intact. You can freeze them for up to three months. When you’re ready to eat, thaw the chicken overnight in the fridge. To reheat, bake it in the oven at 350°F (175°C) until hot. This will help keep the skin crispy and the meat juicy. Enjoy your flavorful dinner delight any time! Check out the Full Recipe for more details. Yes, you can use chicken breasts. They cook faster but have less fat. Chicken thighs have more flavor due to their higher fat content. The texture of thighs is juicier and tender. If you choose breasts, reduce cooking time. They may dry out if overcooked. Pair honey garlic chicken thighs with many sides. Some great options include: - Steamed rice - Mashed potatoes - Roasted vegetables - Green salad - Garlic bread These sides complement the sweet and savory flavors. Check the internal temperature of the chicken. It should reach 165°F (75°C). Use a meat thermometer for accuracy. Look for clear juices when you cut into it. No pink should remain. The skin should be golden and crispy. These signs show your chicken is cooked well. In this article, we explored how to make delicious honey garlic chicken thighs. We covered important ingredients, like chicken, honey, garlic, and soy sauce. You learned how to marinate and cook the chicken for the best flavor. We shared tips to avoid common mistakes and offered tasty variations. Remember, cooking is fun! With these steps, you can impress anyone at your next meal. Enjoy your cooking adventure!

Honey Garlic Chicken Thighs Flavorful Dinner Delight

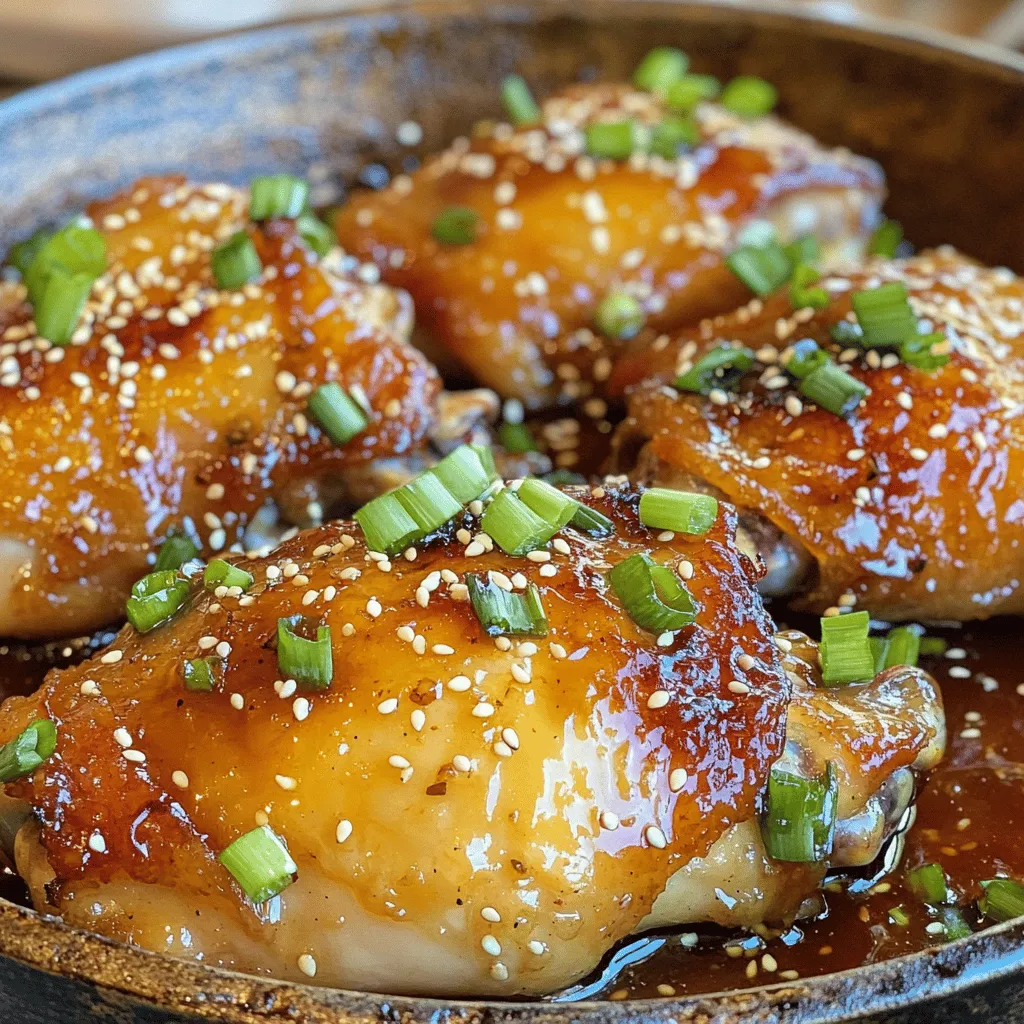
Looking for a dinner that is both tasty and easy to make? Honey Garlic Chicken Thighs are your answer! This

- 1 medium head of cauliflower, grated or processed into rice-size pieces - 2 tablespoons sesame oil - 2 cloves garlic, minced - 1 small onion, finely chopped - 1 carrot, diced - 1 cup frozen peas - 2 eggs, beaten - 3 tablespoons soy sauce (or tamari for gluten-free) - 2 green onions, sliced - Salt and pepper to taste To make cauliflower fried rice, you start with a medium head of cauliflower. Grating or processing it creates rice-like pieces. This is the base of the dish. The sesame oil adds a rich flavor. Garlic and onion bring depth and aroma that fills the kitchen. Diced carrots and frozen peas add color and sweetness. For protein, I often use eggs, which give the dish heartiness. - 1 teaspoon sriracha or chili sauce for heat - Different protein choices: chicken, shrimp, or tofu For an extra kick, I like to add sriracha or chili sauce. It brings a nice heat that pairs well with the flavors. You can also swap in different proteins. Chicken, shrimp, or tofu work great here. This makes the dish more versatile and fun. - Calories: 200 - Carbs: 15g - Protein: 10g - Fat: 10g Cauliflower fried rice is not just tasty; it's also healthy. Each serving has around 200 calories. With 15 grams of carbs, it fits well in many diets. You also get about 10 grams of protein, thanks to the eggs. The healthy fats come from the sesame oil, which helps keep the dish balanced. To start, take a medium head of cauliflower. Remove the leaves and stem. You can grate it using a box grater or pulse it in a food processor. Aim for rice-sized pieces. This step is key. It gives the dish its name and texture. Set the grated cauliflower aside for later use. Next, heat two tablespoons of sesame oil in a large skillet over medium heat. Add two cloves of minced garlic and one small finely chopped onion. Sauté these until you smell the garlic, about two to three minutes. You want the onion to look clear. After that, add one diced carrot. Stir it for three to four minutes until it softens a bit. Then, toss in one cup of frozen peas. This mix adds color and sweetness to your fried rice. Now, push the veggies to one side of the skillet. Pour in two beaten eggs on the other side. Scramble the eggs until they are fully cooked. Once done, mix them into the vegetables. Next, add the grated cauliflower and the frozen peas. Stir everything together well. Cook for about five to seven minutes until the cauliflower is tender but still has a little crunch. Finally, pour in three tablespoons of soy sauce and season with salt and pepper. If you like heat, add one teaspoon of sriracha. Mix everything well until heated through. Remove from heat and stir in two sliced green onions. This adds freshness to your dish. For the full recipe, refer to the detailed instructions above. To avoid soggy cauliflower fried rice, focus on cooking techniques. Always start with dry cauliflower. If you use frozen cauliflower, thaw it first and drain any water. Grate or process the cauliflower into rice-sized pieces. Sauté on medium-high heat to help it brown. This quick cook time keeps it from getting mushy. Stir often, but don’t overdo it. You can customize flavor profiles easily. Use different sauces or spices to change the taste. Try adding teriyaki sauce for a sweet twist. If you like heat, mix in chili garlic sauce. You can also swap soy sauce for coconut aminos. Fresh herbs like cilantro or basil add brightness. Experiment until you find your favorite blend. To ensure your cauliflower retains its crunch, keep an eye on cooking time. Cook the cauliflower for just 5-7 minutes. This gives it enough time to soften without turning mushy. Stir in the soy sauce near the end of cooking. This helps keep the cauliflower firm. Lastly, add green onions right before serving for extra crunch and flavor. Enjoy your vibrant, tasty dish! For the full recipe, check out the detailed steps above. {{image_2}} You can add many proteins to your cauliflower fried rice. Chicken is a great option. Simply chop cooked chicken into small bits and mix it in. Shrimp is another tasty choice. Cook them until pink and tender, then stir them through. For a plant-based option, tofu works well. Cube firm tofu, sauté it until golden, and then add it to your dish. Each protein brings its own flavor, making your meal more exciting. If you want a vegan version, you need to swap eggs. A good egg replacement is silken tofu. Just blend it until smooth, then mix it in during the cooking process. Another option is to use a flaxseed meal. Combine one tablespoon of flaxseed meal with two and a half tablespoons of water. Let it sit for a few minutes to thicken, then add it to your mix. Both options keep your dish rich and tasty. For those watching their sodium, you can use low-sodium soy sauce. It has less salt but still adds great flavor. You might also try coconut aminos. This sauce is sweeter and lower in sodium, making it a fantastic choice. Use it in place of regular soy sauce. You can enjoy your meal without the extra salt while still keeping it delicious. For the full recipe, check out the details shared above. To keep your leftover cauliflower fried rice fresh, place it in an airtight container. Make sure to cool it down to room temperature before sealing. Store it in the fridge for up to 3 days. If you notice any moisture, use a paper towel to absorb it. This helps prevent sogginess. When it’s time to enjoy your leftover rice, the best method is using a skillet. Heat a little sesame oil over medium heat. Add the rice and stir it often. This keeps the texture nice and prevents it from becoming mushy. You can also microwave it, but cover it with a damp paper towel to keep moisture in. To freeze cauliflower fried rice, first let it cool completely. Then, portion it into freezer-safe bags. Squeeze out as much air as possible before sealing. You can freeze it for up to 2 months. When you're ready to eat, thaw it in the fridge overnight. Then, reheat it in a skillet or microwave as mentioned earlier. This keeps the flavors fresh and vibrant. Yes, cauliflower fried rice is very healthy. Cauliflower is low in calories and high in nutrients. It is rich in vitamins C and K. It also has fiber, which helps digestion. Using cauliflower instead of rice lowers carbs. This makes it perfect for low-carb diets. Plus, it adds great flavor and texture. You can feel good about eating this dish! Yes, you can make cauliflower fried rice in advance. It works great for meal prep. Just cook the dish and let it cool. Store it in airtight containers in the fridge. It stays fresh for up to four days. When you are ready to eat, just reheat it on the stove or microwave. This saves time on busy days! Cauliflower fried rice pairs well with many dishes. You can serve it with grilled chicken or shrimp. Tofu is a great vegetarian option. For sides, try a simple salad or steamed vegetables. You can also add some sweet and sour sauce for extra flavor. This makes your meal even more tasty and fun! Cauliflower fried rice offers a healthy twist on a classic dish. We discussed key ingredients like grated cauliflower, vegetables, and protein options. Cooking techniques help keep your dish crunchy. Customizing flavors with sauces can add excitement for your taste buds. Proper storage extends its freshness, and meal prep makes it easy to enjoy. Embrace this versatile recipe. You can enjoy a tasty meal while staying healthy!

Cauliflower Fried Rice Easy and Flavorful Recipe

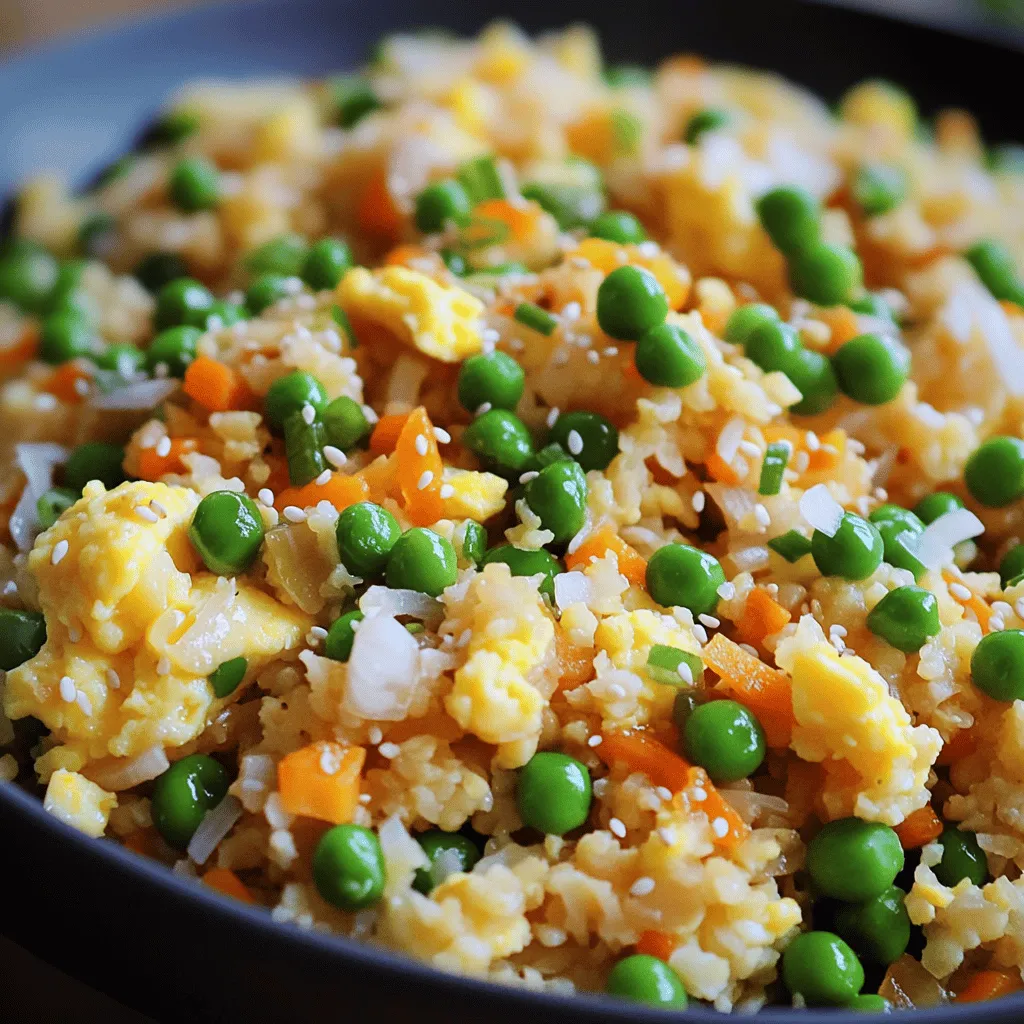
Want a healthy twist on a classic dish? Cauliflower Fried Rice is the answer! This easy and flavorful recipe lets

To make this tasty Mediterranean quinoa salad, gather these ingredients: - 1 cup quinoa, rinsed - 2 cups vegetable broth or water - 1 cucumber, diced - 1 cup cherry tomatoes, halved - 1 bell pepper (red or yellow), diced - 1/2 red onion, finely chopped - 1 cup Kalamata olives, pitted and sliced - 1/2 cup feta cheese, crumbled - 1/4 cup fresh parsley, chopped - 1/4 cup fresh mint, chopped - 3 tablespoons olive oil - 2 tablespoons lemon juice - Salt and pepper to taste You can change this salad to fit your tastes. Here are some fun ideas: - Add chickpeas for more protein - Use sun-dried tomatoes for extra flavor - Swap feta for goat cheese for a tangy twist - Mix in avocado for creaminess - Add nuts or seeds for crunch Each ingredient brings health benefits to the table: - Quinoa: High in protein and fiber, quinoa is a great grain choice. - Cucumbers: They add hydration and are low in calories. - Tomatoes: Rich in antioxidants, tomatoes support heart health. - Bell Peppers: Full of vitamins A and C, these add color and nutrition. - Olives: Packed with healthy fats, olives promote good cholesterol. - Feta Cheese: This adds calcium and protein, plus a rich flavor. - Parsley and Mint: Both herbs aid digestion and add freshness. This Mediterranean quinoa salad is not just bright and tasty; it's also a healthy option. Try this [Full Recipe] to enjoy a flavorful dish that nourishes your body! To make the quinoa, start with 1 cup of rinsed quinoa. Place it in a medium saucepan. Next, add 2 cups of vegetable broth or water. Bring this mixture to a boil over medium-high heat. Once it boils, reduce the heat to low. Cover the saucepan and let it simmer for 15 minutes. This cooks the quinoa fully. After 15 minutes, check to see if all the liquid is absorbed. If so, remove it from the heat. Let it sit, covered, for 5 more minutes. This step helps fluff the quinoa. Use a fork to fluff it gently after. The quinoa should be light and airy. While the quinoa cooks, you can prep the veggies. Take 1 cucumber and dice it into small pieces. Wash and halve 1 cup of cherry tomatoes. Chop 1 bell pepper, either red or yellow, into small bits. Finely chop 1/2 of a red onion. Slice 1 cup of Kalamata olives, making sure they are pitted. Finally, chop 1/4 cup each of fresh parsley and mint. These herbs add bright flavors to the salad. In a large bowl, combine all the chopped vegetables. Add the cooked quinoa to this bowl. Next, prepare the dressing. In a small bowl, whisk together 3 tablespoons of olive oil and 2 tablespoons of lemon juice. Add salt and pepper to taste. Pour this dressing over the salad mix. Gently toss everything together. Make sure all the ingredients blend well. Taste the salad and adjust the seasoning if needed. You can add more lemon juice or salt for extra flavor. Serve the salad chilled or at room temperature for the best taste. For a lovely touch, garnish with extra parsley and lemon wedges. For the Full Recipe, check the ingredients list above. To make your Mediterranean quinoa salad pop, use fresh herbs. Fresh parsley and mint add bright notes. A squeeze of lemon juice wakes up the flavors. Use high-quality olive oil for richness. You can also add spices. Try cumin or smoked paprika for depth. Serve this salad in a large shallow bowl. This allows guests to see the colorful layers. Garnish with extra parsley and lemon wedges for a fresh look. Chill the salad for at least 30 minutes before serving. This lets the flavors blend nicely. If you want, serve it with pita bread or hummus. They complement the salad well. Do not skip rinsing the quinoa. This step removes bitter saponins. Avoid overcooking the quinoa. It should be fluffy, not mushy. When adding salt, start small. You can always add more later. Lastly, do not forget to adjust the dressing. Taste it before serving. You may want more lemon juice or salt. For a complete guide, check the Full Recipe. {{image_2}} You can easily boost this salad's protein. Try adding grilled chicken or shrimp. Tofu is a great choice for vegans. Chickpeas also work well for a hearty touch. Aim for about one cup of protein per salad. This will make your meal more filling and balanced. If you have dietary needs, you can swap ingredients. For a gluten-free option, quinoa is perfect. Replace feta with a dairy-free cheese for lactose-free diets. You can skip olives if you dislike them. Consider adding artichoke hearts as a tasty alternative. Always adjust according to your needs and preferences. The dressing is where you can get creative. Try adding garlic for a punch of flavor. Swap lemon juice for lime juice for a twist. Add a splash of balsamic vinegar for depth. You can even mix in some avocado for creaminess. Play with flavors until you find your favorite. For the full recipe, check out the Mediterranean Quinoa Salad. Store your Mediterranean quinoa salad in an airtight container. It stays fresh in the fridge for about three days. Make sure the container is sealed well to keep out air. This keeps the salad crispy and tasty. If you notice any signs of spoilage, like bad smells or mold, throw it away. You can freeze this salad, but some ingredients may change in texture. To freeze, put the salad in a freezer-safe container. Leave some space at the top for expansion. Use the salad within three months for the best taste. When you're ready to eat, thaw it in the fridge overnight. To refresh your salad after thawing, add fresh herbs and a squeeze of lemon juice. This brightens the flavors. If the salad feels dry, drizzle a bit of olive oil. You can also mix in more diced veggies for extra crunch. Enjoy your flavorful and fresh dish any time! For the full recipe, refer to the section above. Mediterranean Quinoa Salad can last for about 3 to 5 days in the fridge. Store it in an airtight container. The flavors will blend, making it taste even better. However, if you add fresh herbs or avocado, eat it sooner. They don’t stay fresh for long. Yes, you can make Mediterranean Quinoa Salad in advance. In fact, it tastes great when made ahead. Prepare it a day or two before you plan to serve. Just remember to add fresh herbs right before eating. This keeps them bright and tasty! Quinoa is a superfood packed with nutrients. It is high in protein and has all nine essential amino acids. This makes it great for muscle repair. Quinoa is also rich in fiber, which is good for digestion. Plus, it contains vitamins and minerals like magnesium and iron. Eating quinoa can help you feel full and satisfied. In this post, we explored how to make a delicious Mediterranean Quinoa Salad. We listed key ingredients and optional ones for your own twist. You learned about the health benefits of quinoa and how to cook it just right. I shared tips to enhance flavor and avoid common mistakes. We discussed protein options and alternative ingredients to fit your diet. Finally, I offered smart storage tips to keep your salad fresh. Enjoy making this dish to boost your meals!

Mediterranean Quinoa Salad Flavorful and Fresh Dish

Looking for a fresh, flavorful dish that’s good for you? The Mediterranean Quinoa Salad is just what you need! Packed

To make coconut macaroons, gather these simple ingredients: - 3 cups unsweetened shredded coconut - 1 cup sweetened condensed milk - 1 teaspoon pure vanilla extract - 1/4 teaspoon almond extract - 2 large egg whites - 1/4 teaspoon sea salt - 1/2 cup dark chocolate chips (optional for drizzling) These ingredients create a lovely balance of sweet and chewy. You can play with flavors and textures. Here are some ideas: - Add 1/2 cup chopped nuts, like almonds or walnuts. - Mix in 1/2 teaspoon of orange or lemon zest for a citrus twist. - Use milk chocolate chips instead of dark chocolate for a sweeter taste. These options give your cookies a fun twist. If you need to swap out any ingredients, consider these options: - Use 1/2 cup of coconut cream instead of sweetened condensed milk for a dairy-free version. - Replace egg whites with aquafaba (the liquid from canned chickpeas) for an egg-free option. - If you don't have almond extract, just use more vanilla extract. These substitutions can still yield delicious results. For the full recipe, you can refer to the Full Recipe section. Enjoy your baking! Start by gathering all your ingredients. You need: - 3 cups unsweetened shredded coconut - 1 cup sweetened condensed milk - 1 teaspoon pure vanilla extract - 1/4 teaspoon almond extract - 2 large egg whites - 1/4 teaspoon sea salt - 1/2 cup dark chocolate chips (optional for drizzling) Now, preheat your oven to 325°F (160°C). This step is key for even baking. Line a baking sheet with parchment paper to prevent sticking. In a large mixing bowl, combine the shredded coconut, sweetened condensed milk, vanilla extract, almond extract, and sea salt. Mix until it’s well blended. In another bowl, beat the egg whites with an electric mixer. You want them to form stiff peaks. This creates a light and airy texture in your macaroons. Gently fold the whipped egg whites into the coconut mixture. Be careful not to deflate the egg whites. Using a small cookie scoop or your hands, shape the mixture into small mounds. Place them about an inch apart on the baking sheet. This gives them room to spread. Bake the macaroons in your preheated oven for 20 to 25 minutes. Keep an eye on them; you want the tops golden brown. Once baked, remove the cookies from the oven and let them cool on the baking sheet for about 10 minutes. This helps them firm up. After that, transfer them to a wire rack to cool completely. For a fun touch, you can melt the dark chocolate chips in a microwave-safe bowl. Do this in 30-second intervals, stirring until smooth. Drizzle the melted chocolate over the cooled macaroons. This adds a delicious twist! For the full recipe, check out the earlier section. Enjoy your delightful coconut macaroons! When making coconut macaroons, avoid using sweetened coconut. It can make the cookies too sweet. Also, don’t skip the egg whites. They give the cookies a nice lift. Mixing too fast can break the air bubbles. Gently fold the egg whites to keep that light texture. To get the best texture, whip the egg whites until they form stiff peaks. This is key! The peaks should stand tall and not droop. When folding, be careful. You want to keep as much air in as possible. This helps your macaroons rise well in the oven. Want to jazz up your macaroons? Try adding a splash of almond extract. It adds a nice touch! You can also mix in some lemon zest for a fresh twist. If you love chocolate, drizzle melted dark chocolate on top after baking. It makes the cookies even more special. For the full recipe, check the earlier section. {{image_2}} You can easily make these cookies dairy-free. Just skip the sweetened condensed milk. Instead, use coconut cream. This will keep the rich taste and moist texture. You can find coconut cream in most stores. It works great in this recipe. Simply swap it in for the milk, and you are all set! For a nut-free option, omit the almond extract. Many people have nut allergies, so this is key. You can still enjoy full flavor with just vanilla extract. This keeps the cookies safe for everyone. Always check the labels on your ingredients to be sure they are nut-free. Chocolate makes everything better! To create chocolate-dipped macaroons, follow the full recipe. After cooling, melt some dark chocolate. Drizzle or dip each macaroon in the melted chocolate. You can also add toppings like crushed nuts or sea salt for extra flair. These variations add excitement to your delicious treats! To keep your coconut macaroons fresh, store them in an airtight container. Line the container with parchment paper to absorb moisture. Place layers of cookies separated by parchment paper. This method helps keep them from sticking together. Store them at room temperature for the best taste and texture. You can freeze coconut macaroons for later enjoyment. First, let them cool completely. Then, place them in a single layer on a baking sheet. Freeze for about an hour until firm. After that, transfer them to a freezer bag. Squeeze out as much air as you can. Label the bag with the date. Frozen macaroons can last up to three months. Homemade coconut macaroons stay fresh for about one week at room temperature. If stored properly in an airtight container, they can last up to two weeks. However, if you freeze them, you can enjoy the cookies for much longer. Just remember to thaw them in the fridge overnight before eating. For the full recipe, check out the Coconut Joyous Macaroons. You can replace eggs by using aquafaba, which is the liquid from canned chickpeas. Use about 3 tablespoons of aquafaba to replace each egg white. Whip it until it forms stiff peaks, just like egg whites. This will give your macaroons a light and fluffy texture. You can also try using silken tofu blended until smooth as a substitute. Yes, you can use sweetened coconut if you want a sweeter treat. Just remember that it will add extra sugar to your macaroons. This might change the texture slightly, but the end result will still be delicious. Adjust the amount of sweetened condensed milk if you feel it is too sweet for your taste. If you don't have condensed milk, you can make a simple substitute. Mix one cup of milk with 1/4 cup of sugar and heat it until the sugar dissolves. Let it cool and thicken. You can also use coconut cream, which will add more coconut flavor. This will change the texture, but it will still work well in the recipe. You will know the macaroons are done when they turn a lovely golden brown on top. The edges should look slightly crispy, while the inside remains soft. You can also gently touch the tops; they should feel firm but not hard. Remember to cool them before you taste to let the flavors settle. Coconut macaroon cookies are fun and easy to make. We explored key ingredients, steps for baking, and tips for great results. You can even customize them to fit your tastes with variations and substitutions. Remember, storage matters too, as keeping them fresh allows you to enjoy these treats longer. Use what you’ve learned to create your perfect batch. With a bit of practice, you’ll master coconut macaroons that everyone loves. Happy baking!

Coconut Macaroon Cookies Simple and Tasty Delight

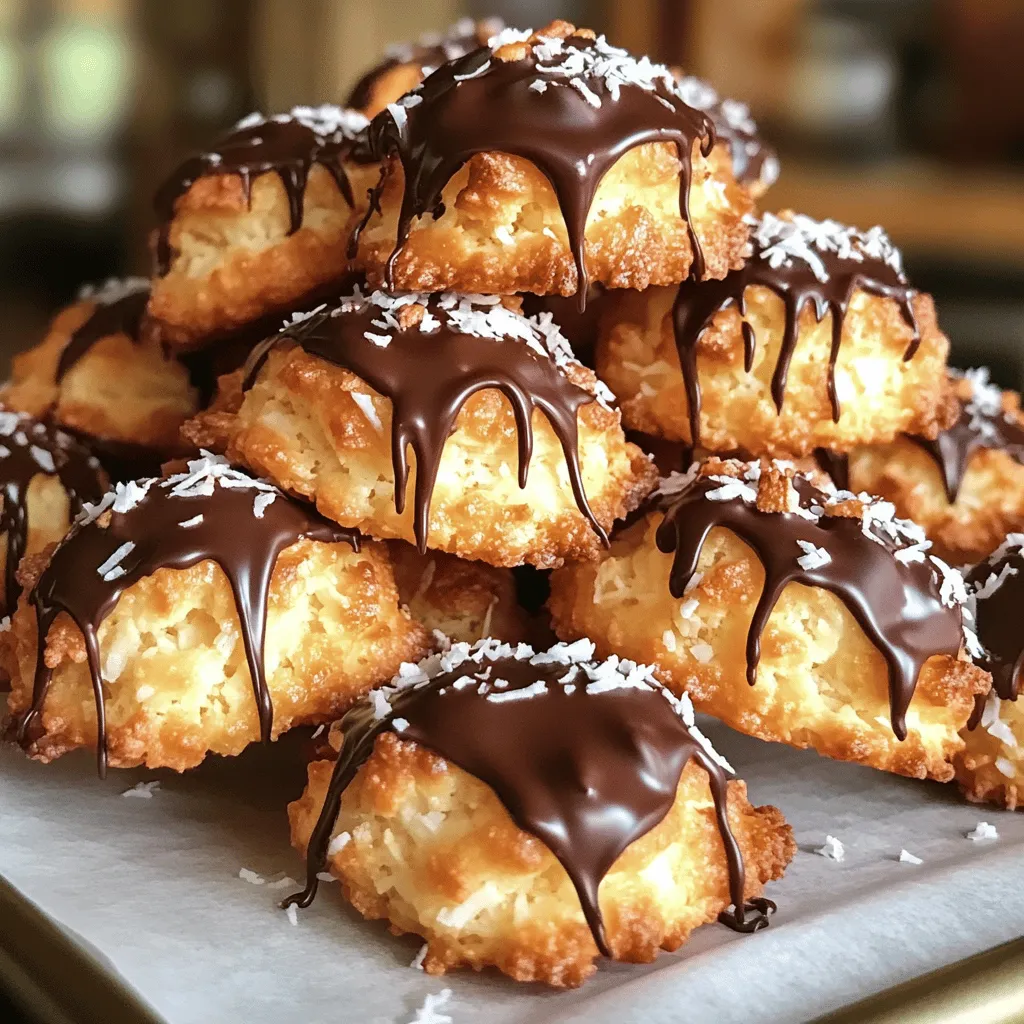
If you crave a sweet treat, you’ll love these Coconut Macaroon Cookies! They’re simple to make and bursting with flavor.

To make pumpkin spice latte cupcakes, gather these simple ingredients: - 1 ½ cups all-purpose flour - 1 teaspoon baking powder - ½ teaspoon baking soda - ½ teaspoon salt - 2 teaspoons pumpkin pie spice - ½ cup unsalted butter, softened - 1 cup granulated sugar - 2 large eggs - 1 cup canned pumpkin puree - 1 teaspoon vanilla extract - ½ cup brewed coffee, cooled - ½ cup buttermilk These ingredients create a rich flavor that captures fall's essence. The pumpkin puree adds moisture, while the spices provide warmth. Measuring ingredients correctly is key. Here are some tips to help you: - Flour: Spoon flour into your measuring cup and level it off with a knife. Do not scoop directly from the bag, as it packs down. - Baking Powder and Baking Soda: Use a measuring spoon to scoop, then level off. Too much can make cupcakes rise quickly and fall flat. - Butter: If using sticks, cut them based on the markings. If using a cup, soften it first for easy measuring. Accurate measuring ensures your cupcakes rise and have the right texture. You can enhance your cupcakes with tasty toppings. Here are some ideas: - Cream Cheese Frosting: This adds a rich, tangy flavor. It pairs well with the sweet cake. - Pumpkin Pie Spice: A light sprinkle on top gives extra flavor and looks festive. - Cinnamon Sticks: Use as a garnish for a fun touch. - Chocolate-covered Coffee Beans: These add crunch and a caffeine kick. Feel free to get creative with your toppings. They make your cupcakes look beautiful and add more flavor! For the full recipe, check [Full Recipe]. Start by preheating your oven to 350°F (175°C). This step is very important. While the oven heats, line a cupcake tin with paper liners. This keeps the cupcakes from sticking and makes for easy serving. Make sure to have all your tools ready, like mixing bowls, a whisk, and an electric mixer. This helps you stay organized. In a medium bowl, whisk together the dry ingredients: flour, baking powder, baking soda, salt, and pumpkin pie spice. This helps blend the flavors. Set this bowl aside. In a large bowl, cream the softened butter and sugar with an electric mixer. Mix for about 3-4 minutes until it's light and fluffy. Next, add the eggs one at a time, mixing well after each one. Now, stir in the pumpkin puree and vanilla extract. In another bowl, combine the cooled brewed coffee and buttermilk. Gradually add the flour mixture to the pumpkin mixture. Alternate this with the buttermilk-coffee mix. Start and end with the flour. Stir gently until just combined. Do not overmix. This keeps your cupcakes fluffy. Now it’s time to bake! Divide the batter evenly among the cupcake liners. Fill each one about two-thirds full. Bake for 18-20 minutes. Check for doneness by inserting a toothpick in the center. If it comes out clean, they are ready. Let the cupcakes cool in the tin for 5 minutes. After that, transfer them to a wire rack to cool completely. This cooling step is key to getting the right texture. Enjoy this delightful fall treat! For the complete recipe, check the Full Recipe. To make your cupcakes moist and fluffy, start with room temperature ingredients. This includes your butter, eggs, and buttermilk. Using these at room temperature helps them mix better. Another tip is not to overmix the batter. Mix until just combined. This keeps your cupcakes light. Adding the pumpkin puree also helps keep them moist. Finally, using a good quality coffee makes a big difference. The flavor of the coffee shines through. One common mistake is not measuring the flour correctly. Too much flour can make your cupcakes dry. Use the spoon and leveled method to measure. Another mistake is opening the oven too soon. This can cause your cupcakes to sink. Wait until they are close to baking time before checking them. Also, don’t skip the cooling step. If you frost them warm, the frosting will melt. For a great frosting, use cream cheese frosting. Start by letting it soften at room temperature. This makes it easier to spread. Use a piping bag for a neat look. If you don’t have one, a zip-top bag works too. Just cut a small hole in one corner. Frost the cooled cupcakes with a swirl motion. This gives them a nice, professional finish. For extra flair, sprinkle some pumpkin pie spice on top. For more details, check the Full Recipe for perfect results! {{image_2}} You can change up the flavors in your pumpkin spice latte cupcakes. Try adding chocolate chips for a sweet twist. You can also use espresso powder for a stronger coffee flavor. If you want a nutty taste, mix in chopped walnuts or pecans. For a fun change, add a layer of cream cheese in the middle of the batter. You can also swap the pumpkin puree with mashed sweet potatoes for a different taste. If you need a gluten-free option, it's easy to adapt this recipe. You can use a gluten-free all-purpose flour mix instead of regular flour. Ensure the mix has xanthan gum to help with the texture. Be careful to check your other ingredients, too, like baking powder and coffee, to ensure they are gluten-free. With these swaps, you can still enjoy tasty cupcakes without gluten. Making vegan pumpkin spice latte cupcakes is simple and fun! Replace the eggs with flax eggs. To make a flax egg, mix one tablespoon of ground flaxseed with three tablespoons of water. Let it sit for a few minutes. You can also use almond milk or soy milk in place of buttermilk. For the butter, try coconut oil or vegan butter. These changes keep the cupcakes moist and delicious while following a vegan diet. For the full recipe, you can refer to the earlier section. After making pumpkin spice latte cupcakes, you may have some left. To keep them fresh, store them in an airtight container. This will help them stay moist. You can leave them at room temperature for up to two days. If you want to keep them longer, the fridge is a good choice. Just make sure they are covered. This helps prevent them from drying out. Freezing cupcakes is easy! First, let them cool completely. Place each cupcake in a cupcake liner or wrap them in plastic wrap. Then, put them in a freezer-safe bag or container. Label the bag with the date. You can freeze them for up to three months. When you're ready to enjoy them, just take them out and let them thaw at room temperature. To enjoy your cupcakes warm, you can reheat them. Preheat your oven to 350°F (175°C). Place the cupcakes on a baking sheet. Heat them for about 5-10 minutes. This will make them warm and soft again. If you prefer, you can also use a microwave. Heat them for 10-15 seconds. Just be careful not to overheat, or they may become dry. Pumpkin pie spice is a mix of warm spices. It usually has cinnamon, nutmeg, ginger, and allspice. This blend gives your treats a cozy flavor. You can make your own by mixing these spices in equal parts. Just use: - 2 teaspoons ground cinnamon - 1 teaspoon ground nutmeg - 1 teaspoon ground ginger - 1 teaspoon ground allspice Mix them well, and you have your spice ready! Yes, you can use fresh pumpkin. It adds a nice taste and texture. To use fresh pumpkin, start by roasting it. Cut the pumpkin in half and scoop out the seeds. Bake the halves at 350°F (175°C) for about 45 minutes. Once soft, scoop out the flesh and puree it. You need about 1 cup of fresh pumpkin puree for the recipe. These cupcakes stay fresh for about 3 days at room temperature. Keep them in an airtight container to keep them moist. If you want them to last longer, you can freeze them. Wrap each cupcake tightly in plastic wrap and place them in a freezer bag. They will stay good for up to 3 months. Just thaw them in the fridge before serving. For the complete recipe, check out the Full Recipe! You now know how to make delicious pumpkin spice latte cupcakes. We covered essential ingredients, baking steps, and expert tips for great results. Don’t forget to try the variations for extra fun. Proper storage keeps your cupcakes fresh, so remember those best practices. These treats are perfect for any fall gathering or cozy night in. Enjoy your baking journey and impress your friends and family with these tasty delights! Your kitchen will smell amazing, and you might just become the go-to baker.

Pumpkin Spice Latte Cupcakes Delightful Fall Treat

Get ready to fall in love with Pumpkin Spice Latte Cupcakes! These tasty treats blend the rich flavors of coffee

- 2 medium eggplants, sliced into 1/4-inch rounds - 1 teaspoon salt - 2 cups marinara sauce - 2 cups shredded mozzarella cheese - 1 cup grated Parmesan cheese Baked Eggplant Parmesan starts with fresh eggplants. Choose firm ones for the best flavor. The marinara sauce adds a rich taste, while mozzarella and Parmesan give you that cheesy, gooey goodness we all love. - 1 cup all-purpose flour - 2 large eggs, beaten - 1 cup breadcrumbs (preferably Italian seasoned) - 1 teaspoon dried oregano - 1 teaspoon dried basil - 1/2 teaspoon black pepper The breading mixture gives the eggplant a crunchy texture. The flour helps the egg and breadcrumbs stick. Mixing in oregano, basil, and black pepper adds a nice touch of flavor. - Olive oil spray for cooking - Fresh basil for garnish Olive oil spray makes the dish crispier. Fresh basil adds a pop of color and freshness on top. If you want to impress, use these optional ingredients. For the full recipe, check out the detailed steps provided. First, slice the eggplants into 1/4-inch rounds. Sprinkle them with salt. This step helps draw out moisture. Let them sit for about 30 minutes. The salt will make the eggplants less bitter. After 30 minutes, pat them dry with paper towels. This helps to remove excess salt and moisture. Now it's time to set up your breading station. In one dish, place the all-purpose flour. In a second dish, beat the two large eggs. In another dish, mix the breadcrumbs with dried oregano, dried basil, and black pepper. This mix adds great flavor to the eggplant. When ready, dip each eggplant slice into the flour first. Shake off any excess flour before moving to the eggs. Then, coat each slice evenly in the breadcrumb mixture. Next, arrange the breaded eggplant on a baking sheet lined with parchment paper. Spray lightly with olive oil to help them crisp up. Bake in the preheated oven at 375°F (190°C) for 25-30 minutes. Flip them halfway through for even cooking. Once golden brown and crispy, take them out. In a 9x13 inch baking dish, spread a thin layer of marinara sauce. Layer half of the baked eggplant slices over the sauce. Sprinkle 1 cup of mozzarella cheese and 1/2 cup of grated Parmesan cheese over the eggplant. Repeat this with another layer of marinara sauce, the rest of the eggplant, and the remaining cheese. Bake this layer for another 25-30 minutes or until the cheese is bubbly and golden brown. Once done, let it cool for a few minutes before slicing. This dish is best served hot. Enjoy this tasty Baked Eggplant Parmesan! For the full recipe, check out the details above. To keep your eggplant from getting soggy, start by salting it. Slice the eggplant and sprinkle it with salt. Let it sit for about 30 minutes. This step helps draw out moisture. After that, pat the slices dry with paper towels. This keeps your dish nice and firm. For the best baking, use a baking sheet lined with parchment paper. This helps the eggplant brown evenly without sticking. Spray the breaded slices lightly with olive oil. This adds a crispy layer without excess oil. Flip the slices halfway through baking. This ensures both sides get that golden color. To boost the flavor, consider adding herbs like oregano and basil. These herbs pair well with eggplant. You can mix them into the breadcrumbs for extra taste. A pinch of black pepper adds a nice kick too. If you're looking for cheese alternatives, try using goat cheese or ricotta. These cheeses give a different taste and texture. Mix them in with the mozzarella for a creamy twist. Experiment with different combinations to find your favorite flavor. Baked Eggplant Parmesan goes well with a side salad. A simple green salad with vinaigrette balances the dish. You can also serve it with garlic bread for a comforting meal. For garnishing, fresh basil leaves bring a pop of color. A sprinkle of extra Parmesan on top makes it look lovely and inviting. Consider adding a drizzle of olive oil for a shiny finish. These small touches make your dish stand out. For the full recipe, check out the details above. {{image_2}} You can switch up the veggies in Baked Eggplant Parmesan. Try zucchini or bell peppers for a new twist. Layering in mushrooms adds a nice earthy flavor. You can also use thin slices of squash for variety. For gluten-free options, swap the breadcrumbs with crushed gluten-free crackers. Almond flour works well too. This keeps the dish tasty and safe for those with gluten sensitivities. Baked Eggplant Parmesan is great for meal prep. Make it ahead and store it in the fridge. It stays fresh for about three days. You can also freeze it for later. Just assemble and freeze before baking. To reheat, thaw it overnight in the fridge, then bake until warm. This keeps the flavors fresh and delicious. For a fun Italian-style twist, use pesto instead of marinara sauce. This adds a rich, herby taste. You can also try different sauces, like a spicy arrabbiata or a creamy Alfredo. Each sauce gives the dish a fresh flavor, making it unique. Adding fresh herbs like basil or parsley on top brightens the dish. Experimenting with sauces can turn this classic into a new favorite. To keep your Baked Eggplant Parmesan fresh, use airtight containers. Glass or plastic containers work well. Store leftovers in the fridge for up to three days. This keeps the flavors intact. Reheat your eggplant parmesan in the oven for the best results. Preheat your oven to 350°F (175°C). Place the dish in the oven for about 15-20 minutes. This method helps to keep the texture crispy. If you use a microwave, it may get soggy. Microwaving is faster but not the best choice for texture. To freeze baked eggplant parmesan, let it cool completely first. Then, wrap it tightly in plastic wrap and foil. This prevents freezer burn. You can freeze it for up to three months. When you’re ready to eat, thaw it in the fridge overnight. Reheat it in the oven at 350°F (175°C) until hot and bubbly. Enjoy that homemade taste again! For the full recipe, check out the earlier section. To make Baked Eggplant Parmesan, follow these steps: 1. Prepare the eggplants: Slice them and sprinkle with salt. Let them sit for 30 minutes. 2. Set up a breading station: Use flour, beaten eggs, and breadcrumbs mixed with herbs. 3. Bread the eggplant: Dip each slice in flour, then eggs, and finally breadcrumbs. 4. Bake the eggplant: Place on a baking sheet and bake at 375°F for 25-30 minutes. 5. Layer the dish: In a baking dish, add marinara sauce, eggplant, and cheeses in layers. 6. Final bake: Bake again until the cheese is bubbly and golden. For more details, check the Full Recipe. Yes, you can prepare Baked Eggplant Parmesan ahead. After cooking, let it cool. Store it in an airtight container in the fridge for up to three days. When ready to eat, reheat it in the oven for the best texture. If you do not have eggplant, try zucchini or portobello mushrooms. Slice them similarly and follow the same breading steps. Adjust cooking time as needed. Baked Eggplant Parmesan can be healthy. It is rich in vitamins and fiber. To make it lighter, use less cheese or opt for low-fat versions. You can also add more vegetables for added nutrients. The total time for Baked Eggplant Parmesan is about one hour. Preparation takes around 20 minutes, while baking takes about 40 minutes. This makes it a great dish for a weekend meal or family dinner. This blog post detailed how to make tasty Baked Eggplant Parmesan. You learned about key ingredients, preparation steps, and cooking techniques. The tips and tricks helped you avoid sogginess and enhance flavors. You also discovered variations to fit your taste and meal prep ideas for convenience. Lastly, the storage info showed how to keep leftovers fresh. Now, go and enjoy this delicious dish with your loved ones. Happy cooking!

Baked Eggplant Parmesan Savory and Simple Recipe

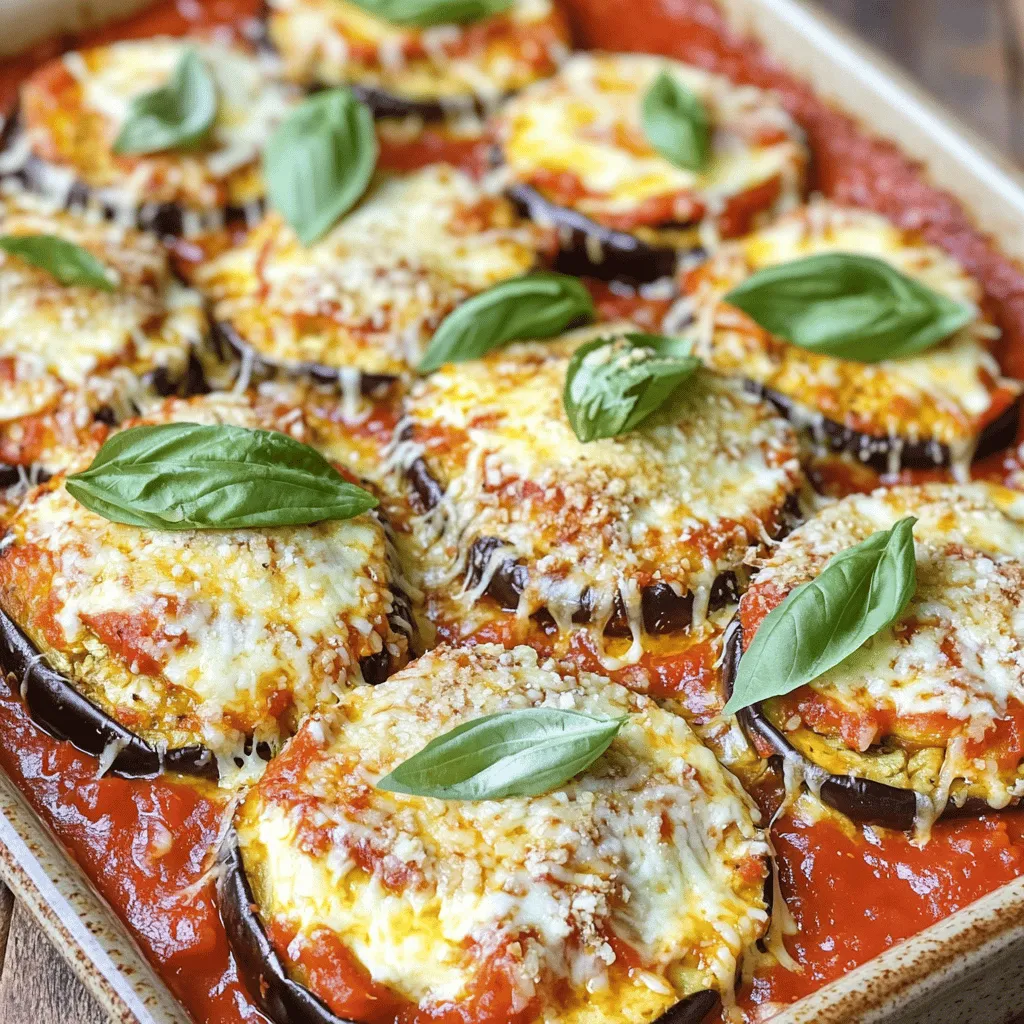
Are you ready to enjoy a delicious, healthy meal that’s easy to make? My Baked Eggplant Parmesan recipe is the

- Tomato Sauce: Using high-quality tomatoes makes a big difference. I recommend San Marzano tomatoes. They are sweet and rich in flavor. This adds a nice base to your pizza. - Cheese: Fresh mozzarella is key. Look for buffalo mozzarella or cow's milk mozzarella. Both melt beautifully and give a creamy texture. Slice it thick for a great bite. - Dough: The dough is the heart of the pizza. Use all-purpose flour for the best results. Combine flour, yeast, water, salt, and olive oil. Knead it well for a smooth, elastic dough. Let it rise in a warm spot for great texture. - Additional Toppings: You can add toppings like sliced tomatoes, olives, or artichokes. Fresh arugula also adds a nice peppery flavor. - Seasonings and Spices: Sprinkle sea salt and freshly cracked black pepper over your pizza. You can also add red pepper flakes for a spicy kick. Fresh basil enhances the flavor too. For the full recipe, check out Margherita Pizza Delight . 1. In a bowl, mix warm water, yeast, and sugar. Let it sit for 5 minutes. 2. In a larger bowl, whisk flour and salt. Create a well in the center. 3. Pour the yeast mixture and olive oil into the well. Mix until a dough forms. 4. Knead the dough on a floured surface for 5-7 minutes until it feels smooth. 5. Place the dough in an oiled bowl. Cover with a damp cloth and let it rise. 6. Set it in a warm spot for 1 hour or until it doubles in size. 1. For the sauce, combine crushed San Marzano tomatoes with olive oil and sea salt. 2. Mix well and let the sauce sit for at least 30 minutes. This helps the flavors grow. 1. Once the dough rises, punch it down and divide it into two pieces. 2. Roll out one piece on a floured surface into a 12-inch circle. 3. Transfer the dough to a parchment-lined baking sheet or pizza peel. 4. Spread half the sauce evenly on the dough, leaving a small edge. 5. Place fresh mozzarella slices on top of the sauce. 6. Preheat your oven to its highest setting, around 475°F (250°C). 7. Bake the pizza for 10-12 minutes until the crust turns golden. 8. After baking, add fresh basil leaves, drizzle olive oil, and sprinkle black pepper. 9. Slice and serve warm! For the full recipe, check out Margherita Pizza Delight . To get great pizza dough, focus on rising time and warmth. Let the dough rise in a warm spot for one hour. It should double in size. A warm kitchen helps yeast work better. For a crispy crust, use high-gluten flour. Knead the dough well to build strength. This makes it rise better. When choosing mozzarella, go for fresh, high-quality cheese. Look for mozzarella packed in water. It tastes richer and melts well. For toppings, fresh basil is a must. You can also add thin slices of tomatoes or a sprinkle of sea salt. Keep it simple to let the flavors shine. Using a pizza stone gives you the best results. It holds heat and helps the crust cook evenly. If you don’t have one, a baking sheet works too. Preheat your oven to its highest setting, around 475°F (250°C). This helps achieve that golden crust and bubbly cheese. Aim for 10-12 minutes of baking time for the perfect pizza. {{image_2}} You can have fun with Margherita pizza by adding your own twist. Here are some ideas: - Different Herbs or Spices: Instead of just basil, try adding oregano or thyme. These herbs give your pizza new flavors. A sprinkle of red pepper flakes can add heat, too! - Gourmet Cheeses: While fresh mozzarella is a must, think about mixing in other cheeses. Try goat cheese for tang or fontina for a creamy bite. These changes make your pizza unique and delicious. Margherita pizza varies by region. Each style has its own charm. - Neapolitan vs. Other Styles: The Neapolitan version has a soft, chewy crust. It is cooked quickly at high heat. Other styles, like Roman, have a thin and crispy crust. Both are tasty but offer different eating experiences. - Traditional vs. Modern Interpretations: Some cooks stick to classic toppings. Others add modern flavors, like truffle oil or prosciutto. These modern twists can make the pizza exciting and new. Experimenting with these variations can lead you to a pizza that feels personal and full of flavor. To keep your pizza fresh, store it in the refrigerator. Place the slices in an airtight container. This method keeps the pizza from drying out. You can also wrap it in plastic wrap or aluminum foil. For best taste, eat the leftovers within three days. If you want to save pizza for longer, freezing is a great option. First, slice the pizza and let it cool. Then, wrap each slice in plastic wrap. After that, place the wrapped slices in a freezer bag. Label the bag with the date. You can freeze pizza for up to two months. Reheating pizza can be tricky. You want to keep the crust crispy. The oven is best for this. Preheat your oven to 375°F (190°C). Place the pizza directly on the oven rack or on a baking sheet. Heat for about 10 minutes. This method warms the pizza without making it soggy. You can also use a microwave, but it may not keep the crust crisp. If you must use the microwave, place a cup of water inside. This helps create steam. Heat the pizza for about 30 seconds to 1 minute. Check to make sure it is warm all the way through. Margherita pizza comes from Naples, Italy. It has a rich history tied to Queen Margherita of Savoy. In 1889, a chef created this dish to honor her. He used the colors of the Italian flag: red tomatoes, white mozzarella, and green basil. This pizza is simple but full of flavor, making it a classic choice. Yes, you can prep some items in advance. Make the dough a day before and store it in the fridge. Just let it warm up before rolling it out. You can also prepare the sauce ahead of time. Store it in an airtight container in the fridge for up to three days. This saves time on pizza night! Serve your Margherita pizza hot, straight from the oven. It pairs well with light drinks like sparkling water or a crisp white wine. Fresh salads with arugula and cherry tomatoes complement it nicely. In Italy, sharing pizza is a fun tradition. So, gather your friends and enjoy! For the complete instructions and additional tips, check out the Margherita Pizza Delight . In this post, we explored the art of making Classic Margherita Pizza. We discussed key ingredients like quality tomatoes, fresh mozzarella, and perfect dough. I shared step-by-step instructions for making the dough, sauce, and assembling your pizza. You learned tips to enhance flavor and various storage methods. Remember, quality ingredients and techniques make a huge difference. Enjoy creating your pizza, whether classic or with your favorite twists. You have all the tools you need for great pizza nights at home!

Classic Margherita Pizza Simple and Flavorful Guide

If you crave a slice of Classic Margherita Pizza, you’re in for a treat! This guide shows you how to

Let’s dive into the sweet world of meringue cookies with fruit! Here’s what you need: - 3 large egg whites - 1/4 teaspoon cream of tartar - 3/4 cup granulated sugar - 1 teaspoon vanilla extract - 1/2 teaspoon cornstarch - Pinch of salt - 1 cup mixed fresh fruit (like strawberries, kiwi, blueberries, raspberries) - Fresh mint leaves for garnish (optional) Each ingredient plays a vital role. The egg whites create that light, airy texture. Cream of tartar stabilizes the egg whites, ensuring they whip up nicely. Sugar adds sweetness and helps the meringue hold its shape. Vanilla extract gives a lovely flavor, while cornstarch helps the meringue stay crisp on the outside. Finally, a pinch of salt balances the sweetness. When it comes to fruit, choose fresh, vibrant options. Strawberries add a pop of color, while blueberries bring a burst of flavor. Kiwi adds a tangy twist, and raspberries provide a delightful tartness. You can mix and match your favorites! This recipe is perfect for special occasions or just a sweet treat at home. Get ready to impress with these delightful meringue cookies! For the full recipe, check out the instructions that follow. - Preheat your oven to 225°F (110°C). - Line two baking sheets with parchment paper. This helps the meringues not stick. - In a clean bowl, beat the egg whites and cream of tartar on medium speed. - Once foamy, add sugar slowly, one tablespoon at a time. Beat until stiff peaks form, about 5-7 minutes. - Add the vanilla extract, cornstarch, and a pinch of salt to the mixture. - Mix until just combined. Your meringue is now ready for piping. - Use a piping bag or spoon to dollop meringue onto your baking sheets. - Bake for 1.5 to 2 hours until dry and easily lifted from parchment. - Turn off the oven and let the meringues cool inside for one hour. After cooling, gently remove them and transfer to a platter. To make meringue cookies, you need glossy, stiff peaks. Start with clean, dry bowls and tools. This helps the egg whites whip well. Beat the egg whites with cream of tartar until foamy. Then, add sugar slowly. This step is key. If you add too fast, the meringue may not set right. Aim for peaks that stand tall and firm. If it looks shiny and holds its shape, you did it! Common pitfalls include greasy bowls or under-whipping the egg whites. Even a tiny bit of yolk can ruin your meringue. If your meringue is runny, it means you need to whip more. Remember, patience is vital in this process. The best fruits for meringue cookies are light and fresh. I love using strawberries, blueberries, and kiwi. These add color and flavor. Raspberries also work well, adding a tart touch. Choose fruits that are ripe but firm. Overripe fruit can make the meringue soggy. To prep fruit, wash it well. Slice larger fruits into bite-sized pieces. Keep the pieces small for easy serving. You want each bite to have a mix of sweet meringue and juicy fruit. Arranging fruit with meringue can be fun! Start by placing the meringue on a large platter. Scatter the fruit around or on top. This creates a colorful display. For added flair, consider drizzling honey or dusting powdered sugar on top. Garnishes like fresh mint leaves can enhance the look. They add a pop of green and a fresh taste. Keep it simple but elegant. The beauty of the meringue and fruit will shine through. Use these tips to make your meringue cookies with fruit truly delightful. For the complete recipe, check the Full Recipe section. {{image_2}} You can make fun meringue flavors. Adding citrus can give a fresh taste. Try lemon or orange zest. Just mix some zest into the egg whites while whipping. You can also add herbs. Basil or mint can bring a unique twist. Just chop them finely and fold them in before baking. Think about fun fruit pairings for your meringues. Strawberries and kiwi work well together. You can also mix blueberries and raspberries for a colorful treat. Seasonal fruits are great too. In summer, use peaches or cherries. In fall, try apples or pears. They all add different flavors and colors. If you need an egg-free option, aquafaba is your friend. This is the liquid from canned chickpeas. It whips up just like egg whites. For gluten-free meringues, the recipe is already safe. Just ensure your sugar and cornstarch are gluten-free. This way, everyone can enjoy these sweet treats. You can find the Full Recipe to try out these variations! To keep your meringue cookies fresh, follow these tips: - Store them in an airtight container. This helps keep out moisture. - Place parchment paper between layers. This prevents sticking. - Keep them in a cool, dry place. Avoid heat and humidity. Meringue cookies last about 1 to 2 weeks at room temperature. If you want to store them longer, try freezing. To freeze, layer them in an airtight container with parchment paper. They can last up to 2 months in the freezer. Fresh fruit adds a vibrant touch to your meringue cookies. To keep it fresh, store it properly: - Keep fruit in the fridge until you are ready to serve. This helps maintain flavor and texture. - Wash fruit just before use to reduce spoilage. Excess moisture can lead to quicker spoilage. Avoid placing fresh fruit on meringues too early. The moisture from the fruit can soften the meringue. Serve the fruit on top right before you enjoy the cookies for the best taste and look. Yes, you can use pasteurized egg whites. They are safe and easy to use. The main benefit is they reduce the risk of foodborne illness. Pasteurized egg whites also whip just as well as fresh ones. If you choose to use fresh egg whites, ensure they are at room temperature. This helps create stable meringue. If your meringue is runny, do not worry. First, check the egg whites. They must be clean and free of yolk. Then, make sure to beat them long enough. Use high speed and keep beating until you see stiff peaks. If it's still runny, add a little more sugar. This can help stabilize your meringue. To make chewy meringue cookies, you can adjust the baking time. Shorten the baking time to 1 hour. This keeps them soft inside. You can also lower the oven temperature to 200°F (93°C). This allows for a gentler bake. Adding a touch more cornstarch can help too. This gives a slight chewiness while still keeping that light texture. In this post, we explored how to make delicious meringue cookies topped with fresh fruit. We covered the ingredients, baking steps, and tips for achieving the perfect texture. You learned about flavor variations and how to store both meringue and fruit properly. Meringues are versatile treats that charm anyone with their lightness and sweetness. With practice, you can master this fun dessert, impressing family and friends. Enjoy your meringue-making journey!

Meringue Cookies with Fruit Delightful Sweet Treat

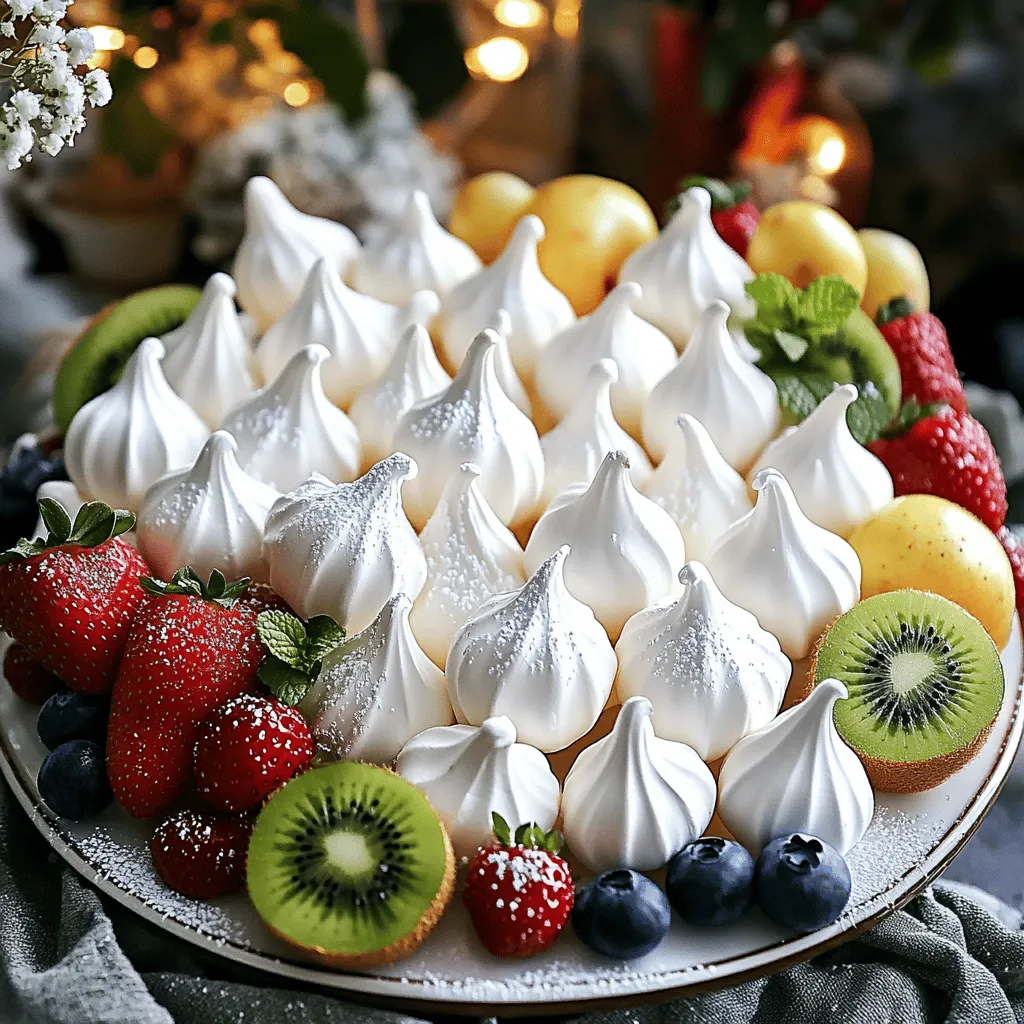
If you’re craving a light, sweet treat, meringue cookies with fruit are a must-try! These airy delights are perfect for

To make a tasty berry smoothie bowl, you need fresh and simple ingredients. Here’s what you will need: - 1 frozen banana - 1 cup mixed berries (blueberries, strawberries, raspberries) - 1/2 cup Greek yogurt (or dairy-free alternative) - 1/2 cup almond milk (or preferred milk) - 1 tablespoon chia seeds - 1 tablespoon honey or maple syrup (optional) - Toppings: sliced fresh fruits, granola, shredded coconut, hemp seeds Using these ingredients, you can create a fun and colorful smoothie bowl. The frozen banana gives it a creamy texture, while the berries add flavor and color. Greek yogurt packs in protein, making this bowl filling and nutritious. You can switch the berries based on what you like. For example, you can use blackberries or cherries instead. The yogurt can also be swapped for a plant-based version if you prefer. Enjoy mixing and matching until you find your favorite combo! If you want to know how to prepare this bowl, check the Full Recipe for steps. This recipe is quick and perfect for breakfast or a snack. Plus, it looks great! - Step 1: Combine ingredients in a blender Start by adding the frozen banana, mixed berries, Greek yogurt, almond milk, and chia seeds into your blender. Make sure to measure each item carefully for the best taste. - Step 2: Blend until smooth and creamy Blend the mixture on high speed. Stop to scrape down the sides if needed. You want a smooth and creamy texture, so blend until it’s just right. - Step 3: Adjust sweetness as necessary After blending, taste your smoothie. If you want it sweeter, add honey or maple syrup. Blend briefly to mix in the sweetness. - Step 4: Pour smoothie into a bowl Once your smoothie is ready, pour it into a shallow bowl. This helps with presentation and makes it easy to add toppings. - Step 5: Add toppings creatively Get creative with your toppings! Start with sliced fresh fruits. Then, add a handful of granola, a sprinkle of shredded coconut, and some hemp seeds for good nutrition. - Step 6: Drizzle with honey and garnish For extra flavor, drizzle some honey on top. You can also add whole berries or a mint leaf as a garnish. This makes your bowl look inviting and delicious. For the full recipe, you can refer back to the main list of ingredients and instructions! To get the right texture for your berry smoothie bowl, blend it just enough. Start with 30 to 45 seconds on high speed. If it seems too thick, add a bit more almond milk. If it's too thin, add a bit more frozen fruit or yogurt. - Optimal blending times: Blend until smooth, but do not overdo it. - Avoiding a too-thick or too-thin smoothie: Adjust your liquid and frozen ingredients. A beautiful bowl makes your smoothie even better! Use a shallow bowl for serving. It allows for easy topping arrangements. - Arranging toppings for visual appeal: Group fruits, granola, and coconut in sections. This creates a colorful and fun look. - Best bowls for serving: Use bowls that are wide and shallow. They show off your toppings nicely. Once you have your smoothie bowl ready, don’t forget to check the Full Recipe for more details! {{image_2}} You can change the berries in your smoothie bowl based on what is fresh or in season. Here are some great options: - Strawberries: Sweet and juicy, they add a lovely flavor. - Blueberries: These tiny gems are packed with antioxidants. - Blackberries: They give a nice tartness to the bowl. - Raspberries: Their bright color and tangy taste pop out. If you want to mix it up, try using other fruits. Here are some ideas: - Mango: This tropical fruit can add a creamy texture. - Peaches: They bring a sweet and fragrant flavor. - Pineapple: For a zesty twist, pineapples work well too. Choosing the right milk can change the taste of your smoothie bowl. Here are some great non-dairy options: - Almond Milk: This is light and adds a subtle nutty flavor. - Coconut Milk: Rich and creamy, it gives a tropical vibe. - Oat Milk: This option is thick and hearty. - Soy Milk: It has a mild taste and adds protein. Each type of milk can change the flavor and texture. For example, coconut milk makes it rich and creamy, while almond milk keeps it light. Choose what you like best! How do you store leftover smoothie? Pour the leftover smoothie in an airtight container. Seal it well to keep out air. Store it in the fridge for up to 24 hours. When you are ready to drink it, just shake or stir well. What are freezing tips for fruit and pre-made smoothies? To freeze fruit, wash and chop it first. Spread the pieces on a tray and freeze until solid. Then, place the fruit in a bag. For pre-made smoothies, pour them into ice cube trays. Once frozen, transfer the cubes to a bag. This way, you can blend small amounts later. What is the difference between fresh and frozen berries? Fresh berries last about three to seven days in the fridge. Frozen berries can last six to twelve months in the freezer. Frozen berries keep their nutrients well and are great for smoothies. What should I know about Greek yogurt shelf life? Unopened Greek yogurt can last two to three weeks past the date on the container. Once opened, try to eat it within a week. Always check for any off smell or mold before using it. How can I make my smoothie bowl healthier? To boost the health of your smoothie bowl, use these tips: - Add more leafy greens like spinach or kale. - Swap out yogurt for a low-fat or plant-based option. - Use less sweetener or skip it altogether. - Top with nuts or seeds for healthy fats. These changes keep flavors rich while adding nutrients. Can I make a smoothie bowl ahead of time? Yes, you can prepare your smoothie bowl in advance! - Blend the ingredients and store in an airtight container. - Keep it in the fridge for up to 24 hours. - When ready to eat, just stir, add toppings, and enjoy. This way, you save time during busy mornings. What are the health benefits of berries in smoothies? Berries pack a big health punch! They are: - High in fiber, which aids digestion. - Loaded with antioxidants, helping fight free radicals. - Rich in vitamins, like vitamin C, for immune support. - Low in calories, making them perfect for weight management. Including berries in your smoothie bowl is a smart choice! Why did my smoothie bowl turn out runny? A runny smoothie bowl can happen for a few reasons: - Too much liquid was added during blending. - Not enough frozen fruit was used. To fix this, try adding more frozen fruit or reducing liquid. Blend until you reach your desired thickness. How can I make a smoothie bowl thicker? To thicken your smoothie bowl, consider these options: - Use more frozen fruits, like bananas or berries. - Add ice cubes for a chilly texture. - Blend in some oats or chia seeds. These tips help create a creamy, satisfying bowl. You now have all the tools to create a delicious berry smoothie bowl. We covered key ingredients, step-by-step instructions, and tips for perfecting your bowl. Remember to get creative with your toppings and flavors. Whether you prefer fresh berries or other fruits, the options are endless. Proper storage extends your smoothie’s life and keeps it tasty. I hope you’ll enjoy making and sharing your smoothie bowls. They are both fun to make and healthy to eat!

Berry Smoothie Bowl Nourishing and Simple Recipe

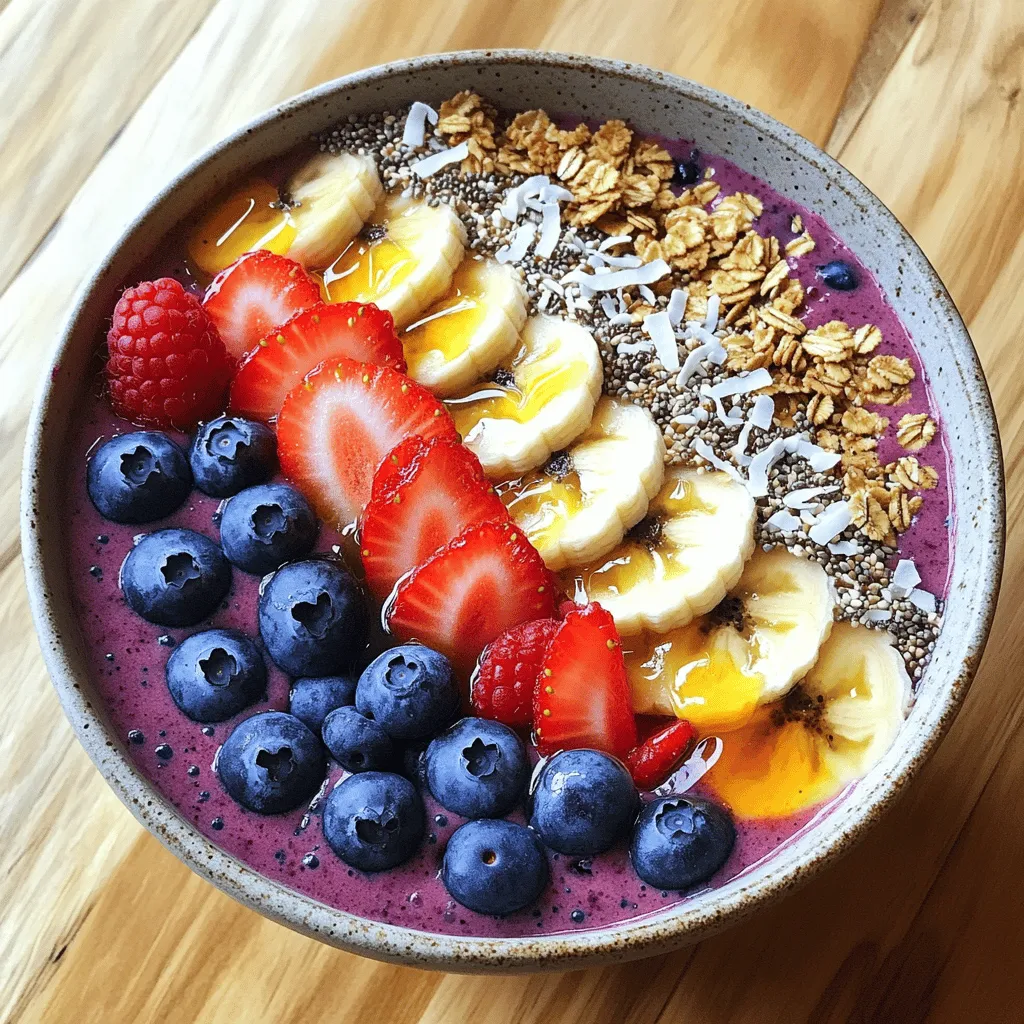
Are you ready to whip up a delicious Berry Smoothie Bowl? This recipe is not only simple but also packed

Older posts
Newer posts
← Previous Page1 … Page40 Page41 Page42 … Page60 Next →

dsad

© 2025 Cooking Wells • Built with GeneratePress

Our Policies

  • Copyright Policy
  • Cookie Policy
  • GDPR Policy
  • Privacy Policy
  • Disclaimer
  • Terms Of Use

More Information

  • Home
  • About
  • Contact
  • Appetizers
  • Dessert
  • Dinner
  • Drinks
©2025, Cooking Wells About Back To Top