Skip to content
DisclaimerTerms Of UseGDPR PolicyCookie Policy

Cooking Wells

  • Home
  • Drinks
  • Appetizers
  • Dinner
  • Dessert
  • About
  • Contact
  • Privacy Policy
DisclaimerTerms Of UseGDPR PolicyCookie Policy

Mia

To make a perfect eggnog cake, gather these simple ingredients: - 2 cups all-purpose flour - 1 ½ teaspoons baking powder - ½ teaspoon baking soda - ½ teaspoon salt - 1 teaspoon ground nutmeg - 1 teaspoon ground cinnamon - 1 cup unsalted butter, softened - 1 cup granulated sugar - 1 cup packed brown sugar - 4 large eggs - 1 ½ cups eggnog - 1 teaspoon vanilla extract - ½ teaspoon almond extract - 1 cup chopped walnuts (optional) Each ingredient plays a key role in creating the cake's rich flavor and moist texture. The flour, baking powder, baking soda, and salt form the cake's base. Nutmeg and cinnamon add warmth and holiday cheer. Butter and sugars give the cake its sweetness and softness. Eggs help bind everything together, while eggnog adds moisture and a festive twist. Vanilla and almond extracts enhance the flavors even more. If you want a bit of crunch, add chopped walnuts for texture. For the full recipe, which includes preparation steps and baking instructions, check the detailed sections ahead! 1. First, preheat your oven to 350°F (175°C). This step is key for the cake. 2. Next, grease and flour a 9x13 inch baking pan. You can also line it with parchment paper for easy removal. 3. In a medium bowl, mix together the dry ingredients. Combine 2 cups of flour, 1 ½ teaspoons of baking powder, ½ teaspoon of baking soda, ½ teaspoon of salt, 1 teaspoon of nutmeg, and 1 teaspoon of cinnamon. Set this bowl aside. 4. Now, in a large mixing bowl, cream 1 cup of softened butter, 1 cup of granulated sugar, and 1 cup of brown sugar. Mix until it looks pale and fluffy, about 3-4 minutes. 1. It’s time to add the eggs! Drop in 4 large eggs, one at a time. Mix well after each egg. 2. Next, you will gradually stir in the dry mix. Alternate this with 1 ½ cups of eggnog. Start and end with the dry ingredients. Mix until just combined. 1. Pour the batter into your prepared baking pan. Spread it evenly across the pan. 2. Bake your cake for 30-35 minutes. To check if it’s done, stick a toothpick in the center. If it comes out clean, the cake is ready! 3. Allow your cake to cool in the pan for about 10 minutes. Then, transfer it to a wire rack to cool completely. For the full recipe, you can check out the detailed instructions. Enjoy baking this festive treat! - Avoid overmixing the batter: Mix just until everything blends. Too much mixing can make your cake tough. - How to check for doneness: Insert a toothpick in the center. If it comes out clean, the cake is ready. - Ways to decorate the cake: Dust the top with powdered sugar. Add whipped cream and a sprinkle of nutmeg for a festive look. - Serving suggestions: Slice the cake and serve on colorful plates. This adds to the holiday cheer. - Issues that can affect the texture: Using cold eggs or butter can lead to a dense cake. Always use room temperature ingredients. - Tips for ingredient substitutions: If you need to swap eggs, use 1/4 cup of unsweetened applesauce per egg. This keeps the cake moist. For the complete recipe, check out the Full Recipe. {{image_2}} You can easily switch up the taste of your eggnog cake. Adding different spices can bring new flavors. Try a pinch of ginger or allspice for extra warmth. If you like, you can also mix in flavored extracts. Swap out vanilla for peppermint or rum extract for a festive twist. These small changes can make a big difference in your cake. If you need a gluten-free cake, use a gluten-free flour blend. This works well in the recipe. You can also make a vegan version. Replace butter with coconut oil and eggs with flax eggs. Use unsweetened almond milk instead of eggnog. These options keep the cake tasty and fun for everyone. How you serve your cake can change the experience. You can layer it with frosting for a fancy touch. Cream cheese frosting pairs well with the eggnog flavor. Alternatively, serve it plain for breakfast with a sprinkle of powdered sugar. It’s great any time of day. Enjoy your delicious cake! You can find the full recipe above. You can store your eggnog cake at room temperature for up to two days. If you want it to last longer, keep it in the fridge. Wrap the cake in plastic wrap or place it in an airtight container. This helps keep it moist and fresh. If you choose the fridge, it can last up to a week. If you want to save some for later, freezing is a great option. First, let the cake cool completely. Then, wrap it tightly in plastic wrap. You can also use aluminum foil for extra protection. Place it in a freezer-safe bag or container. Your eggnog cake can freeze well for up to three months. When you're ready to eat it, move it to the fridge to thaw overnight. You can also let it sit at room temperature for a few hours. Use thawed cake for special occasions or family gatherings. After baking, your eggnog cake can last about five days at room temperature. In the fridge, it can stay fresh for around one week. Watch for signs of spoilage. If you see mold or a change in smell, it's best to throw it away. Enjoy your eggnog cake while it's fresh and delicious! For the full recipe, check out the details above. You can use milk or cream mixed with spices. Add a bit of vanilla for flavor. This keeps the cake moist but changes the taste slightly. You may also try almond milk or coconut milk for a dairy-free option. Each choice adds a unique twist to your cake. Yes, you can use cake flour for a lighter texture. Whole wheat flour adds a hearty flavor but may make it denser. Gluten-free flour blends are also available. Just remember, different flours may change how the cake rises and its overall texture. If you use a smaller pan, bake for a shorter time. Start checking the cake ten minutes early. For a larger pan, it may need longer. Always check with a toothpick to see if it’s done. Adjusting the time helps ensure a perfectly baked cake. This post covers making a delicious eggnog cake, focusing on key ingredients and preparation steps. We explored important tips for baking and presentation. Variations for flavor and dietary needs add excitement to the recipe. Finally, we discussed storage methods to keep your cake fresh longer. With simple steps and handy tricks, you can create a delightful cake for any occasion. Enjoy your baking journey and the tasty results!

Eggnog Cake Delightful Holiday Dessert Recipe

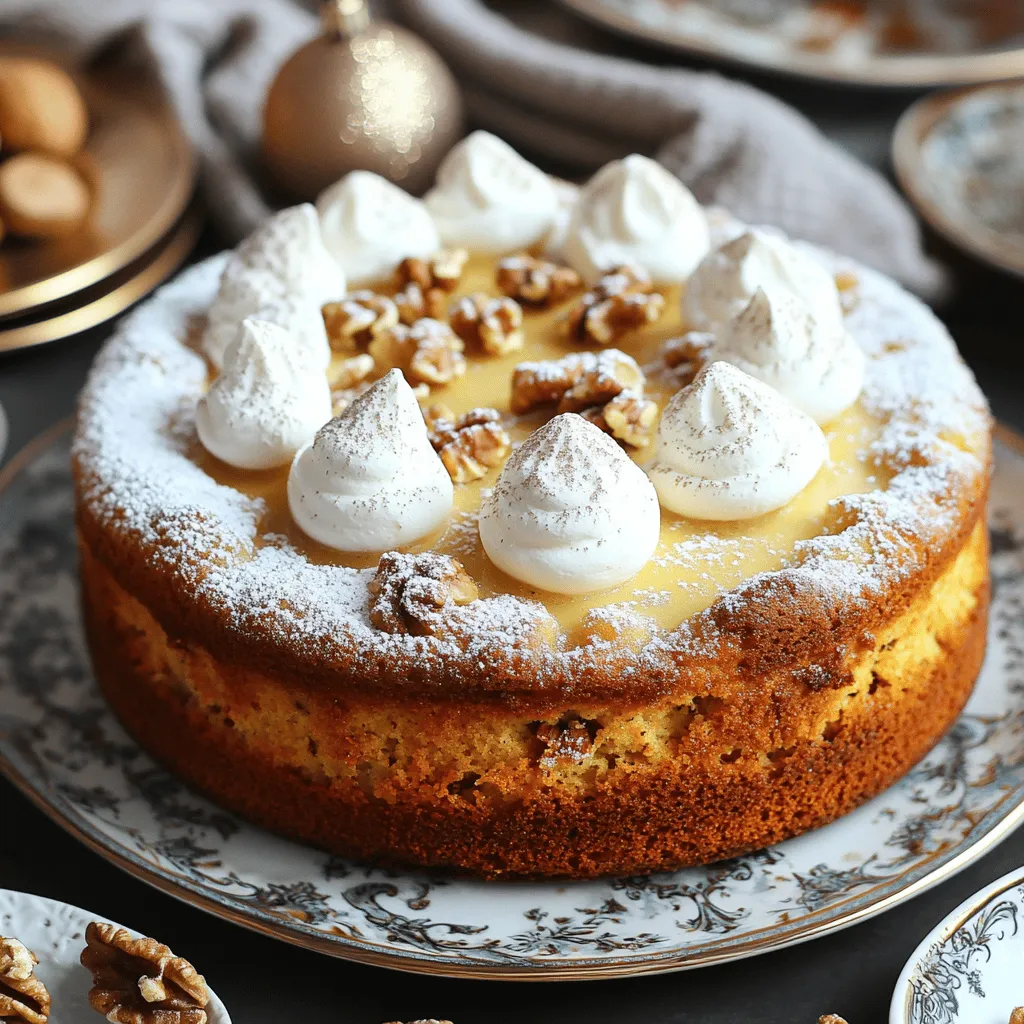
Looking for a festive treat that warms your heart during the holiday season? This Eggnog Cake recipe is the perfect

- 1.5 pounds baby potatoes, halved - 4 tablespoons olive oil - 4 cloves garlic, minced - 1 teaspoon dried rosemary - 1 teaspoon dried thyme - 1/2 cup grated Parmesan cheese - Salt and pepper to taste - Fresh parsley, chopped (for garnish) When making Crispy Garlic Parmesan Potatoes, you want to start with the right items. The baby potatoes give a nice texture. Olive oil helps them crisp up. Garlic adds a rich flavor, while rosemary and thyme bring a nice herbal touch. Parmesan cheese gives a salty kick that makes the dish special. Don't forget salt and pepper for taste. Finally, fresh parsley brightens the dish and adds color. - Baking sheet - Parchment paper - Large mixing bowl - Knife and cutting board Having the right tools is just as important as the ingredients. A baking sheet will hold the potatoes while they roast. Parchment paper will keep them from sticking and help with cleanup. A large mixing bowl is perfect for tossing all the flavors together. Lastly, a knife and cutting board will help you prepare the potatoes with ease. For the complete recipe, check out the Full Recipe section. - Preheat the oven to 425°F (220°C). - Line a baking sheet with parchment paper. This step is key for a great bake. Preheating the oven helps the potatoes cook evenly. The parchment paper keeps them from sticking. - Combine halved potatoes, olive oil, minced garlic, herbs, salt, and pepper in a bowl. In a large mixing bowl, add the halved baby potatoes. Pour in the olive oil and add minced garlic. I love using fresh garlic for the best taste. Next, sprinkle in dried rosemary and thyme. Don’t forget the salt and pepper! Toss everything well to coat the potatoes. - Spread potatoes on the baking sheet and roast for 25-30 minutes, stirring halfway. Now, spread your seasoned potatoes in a single layer on the prepared baking sheet. This gives them space to crisp up. Roast them for 25 to 30 minutes. Remember to stir them halfway for even browning. The smell will be amazing! - Sprinkle Parmesan cheese and return to oven for 5 minutes until melted and crispy. After roasting, take the potatoes out and sprinkle them with grated Parmesan cheese. This adds a lovely, cheesy flavor. Pop them back in the oven for just 5 more minutes. This makes the cheese melt and become crispy. Trust me, you’ll want to try this! For the full recipe, check out the complete instructions to make Crispy Garlic Parmesan Potatoes. To get the best crispiness, always preheat your oven to 425°F (220°C). A hot oven helps the potatoes cook evenly and turn golden. Spacing matters too. Place the potatoes in a single layer on your baking sheet. If they are too close, they will steam instead of crisp. Use parchment paper to prevent sticking and make cleanup easy. You can change the flavor of your Crispy Garlic Parmesan Potatoes by adding spices or herbs. Try paprika or cayenne for some heat. Fresh herbs like basil or chives can also add a nice twist. If you want to switch things up, consider using sweet potatoes instead of baby potatoes. For a vegan option, you can replace Parmesan cheese with nutritional yeast or skip it altogether. The potatoes will still taste great! For the full recipe, check out the link provided. {{image_2}} You can use different types of potatoes for this dish. Yukon Gold potatoes are creamy and buttery. They give a nice texture. Red potatoes have a thin skin and hold their shape well. They may be a bit waxy but are very tasty. Experiment with both to find your favorite! Parmesan works great, but you can try other cheeses too. Asiago has a sharp flavor that adds depth. Cheddar brings a nice richness, especially if you love bold flavors. You can also mix cheeses for a unique blend. Just remember, the more cheese, the more flavor! Don't be afraid to get creative with your herbs and spices. Rosemary and thyme are classic, but you can try oregano or basil. For a kick, add a pinch of red pepper flakes. Experiment with garlic powder or onion powder for extra taste. These small changes can make a big difference in flavor! To store leftover crispy garlic Parmesan potatoes, place them in an airtight container. This helps keep them fresh and tasty. Make sure the potatoes cool to room temperature before sealing the container. Stored properly, they last about 3 to 4 days in the fridge. You might notice some softening, but they still hold great flavor. To reheat your potatoes and keep them crispy, use the oven. Preheat your oven to 400°F (200°C). Spread the potatoes on a baking sheet in a single layer. Heat them for about 10 to 15 minutes. This method revives the crispiness and flavor. You can also use an air fryer for about 5 to 7 minutes at 350°F (175°C) for even better results. Enjoy those delicious flavors again! Yes, you can prepare these potatoes ahead of time. Cook them as per the recipe. Once done, let them cool. Store in an airtight container in the fridge. When you are ready to eat, reheat them in the oven at 350°F (175°C) for about 10-15 minutes. This helps keep them crispy. These potatoes pair well with many main dishes. Try serving them with grilled chicken or fish. They also go great with steak or a hearty salad. You can even enjoy them with a dip like ranch or aioli. Absolutely! You can switch out the Parmesan for other cheeses. Asiago or Pecorino Romano work well too. For a milder taste, try using Cheddar. Each cheese gives a unique flavor. To make these potatoes dairy-free, skip the Parmesan cheese. Instead, use a dairy-free cheese. Nutritional yeast is also a great option to add a cheesy flavor. You can even try using vegan butter for richness. If you love garlic, you can add more! Increase the minced garlic to six cloves. You can also roast some whole garlic cloves with the potatoes. This adds a lovely, sweet garlic taste. For the complete recipe for Crispy Garlic Parmesan Potatoes, click [here](#). You can make Crispy Garlic Parmesan Potatoes easily with the right ingredients and tools. We covered the essentials, step-by-step instructions, and tips to ensure great results. Remember, you can also mix things up with different potatoes and cheeses. Proper storage helps keep leftovers tasty. With these tips, you’ll enjoy a delicious side dish anytime. Try out the full recipe, and savor each bite!

Crispy Garlic Parmesan Potatoes Easy Flavorful Side

Looking for a side dish that’s both crispy and full of flavor? You’ve found it! My Crispy Garlic Parmesan Potatoes

- 2 cans of refrigerated biscuit dough - 2 cups shredded mozzarella cheese - 1 cup diced pepperoni - 1 teaspoon Italian seasoning - 1 cup pizza sauce (for dipping) - 1/4 cup grated Parmesan cheese - 1/4 cup olive oil - 1 teaspoon garlic powder - 1/2 teaspoon crushed red pepper flakes (optional) Gather these ingredients for your Cheese Pizza Monkey Bread. First, the biscuit dough forms the base. I love using refrigerated dough. It’s easy and fast. Next, mozzarella cheese adds that melty goodness. You can never go wrong with cheese! Diced pepperoni brings in a savory punch. For seasoning, Italian seasoning adds a classic pizza flavor. Don't forget the pizza sauce for dipping. It makes every bite even tastier! Grated Parmesan cheese adds a nice finish on top. The olive oil helps everything come together. Garlic powder gives a subtle, rich taste. If you like a kick, add crushed red pepper flakes. These ingredients combine to make a fun, shareable dish. You can find the Full Recipe in the instructions section. Enjoy cooking! - Preheat oven to 350°F (175°C). - Grease bundt pan with cooking spray or olive oil. Before you start, set your oven. Preheating is key to a good bake. Greasing your bundt pan stops the monkey bread from sticking. Use either cooking spray or olive oil for this step. - Cut biscuit dough into quarters. - Mix biscuit pieces with cheese and toppings. Open your biscuit dough cans. Cut each biscuit into four small pieces. This makes it easy for the dough to cook through. In a big bowl, mix the quartered biscuit pieces with shredded mozzarella, diced pepperoni, Italian seasoning, and garlic powder. If you like heat, toss in crushed red pepper flakes. Drizzle olive oil over the mix and toss gently. You want every piece coated with oil. - Layer ingredients in the bundt pan. - Bake and cool before serving. Start layering in your bundt pan. First, sprinkle half of the grated Parmesan cheese on the bottom. Then, add half of your biscuit mixture. Spread it out evenly. Next, add the rest of the Parmesan cheese. Finally, add the remaining biscuit mixture, pressing down gently to pack it in. Bake for 30-35 minutes. Look for a golden brown top to know it’s done. Let it cool for about 10 minutes. Invert it onto a plate, and it’s ready to serve! Enjoy with pizza sauce on the side. For the full recipe, check out [Full Recipe]. - Make sure to coat your dough in olive oil. This helps it bake evenly. - When you layer the dough in the pan, press it down lightly. This packs it in well. - Try using different cheeses like cheddar or gouda. Each cheese adds its own twist. - Fresh herbs like basil or oregano can boost the taste. Just chop them up and mix them in. - Serve the monkey bread warm with pizza sauce for dipping. The sauce adds great flavor. - You can also pair it with a fresh salad or some garlic bread. This adds a nice balance to your meal. {{image_2}} If you want a meat-free version, swap the pepperoni for your favorite vegetables. Think bell peppers, mushrooms, or spinach. These veggies add color and flavor. You can even use artichokes or olives for a unique twist. Just chop them small so they mix well with the dough. Cheese is key to making this dish tasty. While mozzarella is classic, why not try cheddar or feta? Cheddar gives a sharp bite. Feta adds a rich creaminess and tang. You can mix different cheeses for a fun flavor. Experiment to find your favorite blend. For those who love heat, add spicy sausage or jalapeños. This twist kicks up the flavor. You can use fresh or pickled jalapeños, depending on how spicy you want it. If you’re feeling bold, mix in some crushed red pepper flakes. It’s a great way to make your Cheese Pizza Monkey Bread stand out. Check out the Full Recipe for more ideas! To keep your Cheese Pizza Monkey Bread fresh, store it in an airtight container. This method helps prevent it from drying out. You can keep it in the fridge for up to three days. When you're ready to enjoy it again, you'll have tasty leftovers waiting for you. The best way to reheat your Cheese Pizza Monkey Bread is in the oven. Preheat your oven to 350°F (175°C). Place the monkey bread on a baking sheet. Heat it for about 10-15 minutes. This way, it stays crispy on the outside and warm inside. You can also use the microwave for a quick option, but it may not be as crispy. If you want to save some for later, you can freeze it. Cut the monkey bread into slices. Wrap each slice in plastic wrap and then place them in a freezer bag. Make sure to remove as much air as possible. To thaw, leave it in the fridge overnight. Reheat in the oven for the best results. Enjoy your Cheese Pizza Monkey Bread any time with these simple storage tips! You can tell when it's done by looking at its color. The top should be golden brown. You can also check the biscuits inside. They should feel firm and not doughy. A quick way to check is to use a food thermometer. The inside should reach 190°F (88°C) to be safe to eat. Let it cool for ten minutes before serving. This helps the bread firm up. Yes, you can prepare it ahead of time! You can cut the biscuit dough and mix it with cheese and toppings. Place this mixture in the bundt pan but don’t bake it yet. Cover it and store it in the fridge for up to 24 hours. When you are ready to bake, just pop it in the oven. This saves time and makes it easy for parties or family dinners. If you don't have biscuit dough, don't worry! You can use pizza dough or bread dough instead. Just roll it out and cut it into small pieces. You can also try using crescent roll dough for a flakier texture. If you want a gluten-free option, look for gluten-free biscuit dough at your local store. This recipe is flexible and allows for many tasty options. For the full recipe, check out the earlier section! This blog post covered all you need to make Cheese Pizza Monkey Bread. You learned about the key ingredients, how to prepare, and bake it step by step. I included tips to perfect your dish, variations to try, and how to store leftovers. Each method adds unique flavor and charm. You can create a special treat that everyone will enjoy. So grab your ingredients and start baking this fun, cheesy dish today!

Cheese Pizza Monkey Bread Simple and Tasty Recipe

If you love pizza night, you’ll adore this Cheese Pizza Monkey Bread recipe! It combines gooey mozzarella, savory pepperoni, and

- 2 cups all-purpose flour - 1/2 cup granulated sugar - 1 tablespoon baking powder - 1/2 teaspoon salt - 1/2 cup unsalted butter, cold and cubed - 1/2 cup buttermilk - 1 large egg - 1 teaspoon vanilla extract - 1 cup wild blueberries (fresh or frozen) - 1 teaspoon lemon zest - 1 egg wash (1 egg beaten with 1 tablespoon water) - Confectioners' sugar for dusting - Mixing bowls - Whisk - Pastry cutter - Baking sheet - Parchment paper I love making Wild Blueberry Coffee Cake Danishes. The ingredients are simple yet they create a perfect treat. You start with the base of all-purpose flour, sugar, and baking powder. These are the building blocks. Next, you add cold, cubed butter. This makes the pastry flaky. The buttermilk gives it a tender crumb. An egg and vanilla extract add richness and flavor. You can’t forget the wild blueberries; they burst with flavor in every bite. Lemon zest adds a bright touch to the filling. For the best results, gather your kitchen tools. A mixing bowl, whisk, and pastry cutter are key. You’ll need a baking sheet lined with parchment paper for easy cleanup. This list helps you create a delightful treat that everyone will love. For the complete recipe, check out the Full Recipe section. 1. Preheat the oven to 375°F (190°C). 2. Line the baking sheet with parchment paper. 3. In a large bowl, mix the dry ingredients: flour, sugar, baking powder, and salt. 4. Cut in the cold butter until it looks like coarse crumbs. 5. In a separate bowl, whisk together the buttermilk, egg, and vanilla. Then, combine this with the dry mix. 6. Gently fold in the wild blueberries and lemon zest. 7. Turn out the dough onto a floured surface. Shape it, and create wells for filling. 8. Brush the edges with the egg wash and bake for 15-20 minutes. This simple method makes delightful Wild Blueberry Coffee Cake Danishes. For the full recipe, check out the details above. Enjoy every bite! - Use cold butter for a flakier pastry. Cold butter helps create layers. - Avoid over-mixing to keep the pastry tender. Gentle mixing leads to soft dough. - Add lemon juice for a tangy twist. This brightens the taste of blueberries. - Substitute different berries as desired. Try raspberries or blackberries for variety. - Dust with confectioners' sugar before serving. This adds a lovely touch to your danishes. - Serve warm for the best experience. Warm pastries taste better and feel fresh. These tips will help you make the best Wild Blueberry Coffee Cake Danishes. For a full recipe, check out the [Full Recipe]. Enjoy your baking! {{image_2}} You can switch up the blueberries with other fruits. Raspberries and strawberries work great. They add a sweet and tart flavor. Mixed berry danishes are also fun. Just combine your favorite berries for a colorful twist. Need a gluten-free option? Use a 1:1 gluten-free flour blend. Make sure to check for the right mix. You may need to adjust the wet ingredients a bit. Start with less buttermilk and add more as needed. This keeps your dough moist and tasty. Want to make your danishes extra special? Try a cream cheese filling. Just blend cream cheese, sugar, and vanilla. Spread it in the middle before baking. For a crunchy texture, add a crumble topping. Mix oats, flour, and butter for a delightful crunch. You can find the full recipe for these tasty treats to explore these ideas. To keep your Wild Blueberry Coffee Cake Danishes fresh, store them in an airtight container at room temperature. This will help keep them soft and tasty. If you want them to last longer, refrigerate them. This will help avoid spoilage and keep the flavors intact. For the best texture, reheat your danishes in the oven. Set it to 350°F (175°C) and warm them for about 5-10 minutes. This method keeps them flaky. If you need a quick fix, you can use the microwave. Heat one danish for about 15-20 seconds. Remember, it may get a bit soft. You can freeze these danishes before or after baking. If you freeze before baking, wrap them tightly in plastic wrap and then in foil. When you are ready to bake, no need to thaw, just bake them a few minutes longer. If you freeze after baking, let them cool first. Wrap them well and store in a freezer bag. For thawing, take them out and let them sit at room temperature for a few hours. This keeps them fresh and ready to eat. Enjoy making these danishes, and remember to check the Full Recipe for more details! Yes, you can use any type of berry. Just adjust the amount as needed. Raspberries, strawberries, or blackberries all work well in this recipe. Each berry will add its unique flavor to your danishes. Leftovers usually last about 2-3 days at room temperature. To keep them fresh, store them in an airtight container. If you want them to last longer, consider refrigerating them. Yes, you can prepare the dough ahead of time and freeze it. Just wrap the dough tightly in plastic wrap and place it in a freezer bag. When you are ready, thaw it in the fridge overnight before baking. If you don’t have buttermilk, you can substitute it easily. Just mix regular milk with a bit of vinegar or lemon juice. This creates a similar tangy flavor that buttermilk adds to the recipe. This blog post provided a clear path to making delicious blueberry pastries. You learned about the key ingredients, step-by-step instructions, and helpful tips. Remember, using cold butter and avoiding over-mixing will give you the best texture. Feel free to experiment with different fruits and toppings to make it your own. With proper storage and reheating, these pastries can bring joy even days later. Enjoy the process and happy baking!

Wild Blueberry Coffee Cake Danishes Delightful Treat

If you’re looking for a delectable way to start your day, these Wild Blueberry Coffee Cake Danishes are a must-try!

- 1 package of puff pastry (2 sheets, thawed) - 1 cup shelled pistachios, finely chopped - 1/4 cup granulated sugar - 1/4 cup unsalted butter, softened - 1/2 teaspoon almond extract - 1 egg (for egg wash) - Powdered sugar (for dusting) To make pistachio filled croissants, you need simple yet quality ingredients. The puff pastry provides the flaky texture. I love using fresh, shelled pistachios for the filling. They have a rich taste that pairs well with the sweetness from the sugar. Softened butter helps the filling stick together. Almond extract adds a lovely hint of flavor, enhancing the nutty notes. - Calories per serving: Each croissant has about 180 calories. - Fats, proteins, and carbohydrates breakdown: - Total fats: 10g - Proteins: 3g - Carbohydrates: 20g - Dietary considerations: This recipe contains nuts, so it is not suitable for nut allergies. It is not gluten-free due to the puff pastry. Knowing the nutritional info can help you enjoy these treats mindfully. Each croissant is a delightful balance of flavor and texture. 1. Preheat your oven to 400°F (200°C). Line a baking sheet with parchment paper. 2. In a mixing bowl, combine the finely chopped pistachios, granulated sugar, softened butter, and almond extract. Mix until you form a smooth paste. 1. Roll out each sheet of puff pastry on a lightly floured surface. Cut each sheet into triangles about 4 inches wide at the base. 2. Place a heaping tablespoon of the pistachio filling at the base of each triangle. 3. Starting from the base, roll each triangle tightly towards the tip. This forms the crescent shape. 1. Beat the egg in a small bowl. Brush the egg wash over the tops of each croissant. This gives them a golden finish. 2. Bake in the preheated oven for 15 to 18 minutes. Watch for the croissants to puff and turn golden brown. 3. Let them cool slightly before dusting with powdered sugar. Enjoy the sweet finish! This recipe makes 12 croissants and takes about 40 minutes from start to finish. For the full recipe, check out the details above. To make the best croissants, focus on flakiness. Use chilled puff pastry. Cold dough helps create layers that puff up beautifully. Roll it out gently without squishing. This keeps air pockets intact. For the filling, ensure it is smooth. A thick paste works better than a runny mix. It stays inside the croissant while baking. One big mistake is overfilling the croissants. If you add too much filling, it spills out. This makes a mess and can ruin the look. Another mistake is not preheating the oven. An oven that is not hot enough will not bake the croissants right. They will be soggy instead of crispy. Pair your pistachio croissants with coffee or tea. The nutty flavor matches well with both drinks. You can also get creative with how you serve them. Try dusting with powdered sugar for a nice touch. Arrange them on a pretty plate for a special look. This makes your dish more appealing and fun to eat. For the full recipe, check out the complete instructions. {{image_2}} You can get creative with your pistachio filled croissants. Try adding chocolate for a rich twist. Dark or milk chocolate both work well. You can also add fruit fillings like berries or cherries. These will give a nice contrast to the creamy pistachios. Additionally, feel free to substitute different nuts. Almonds, hazelnuts, or walnuts can add unique flavors and textures. Just chop them finely, like the pistachios, and mix them into your filling. If you want a vegan version, it's simple to make swaps. Use plant-based butter instead of regular butter. For the egg wash, use almond milk or soy milk mixed with a bit of syrup for shine. If you need a gluten-free option, look for gluten-free puff pastry. Many brands offer this now. Just ensure the filling is also gluten-free by checking the labels. You can also bring in local flavors to your croissants. For example, Turkish cuisine often uses rose water and orange blossom. Try adding a splash of these to your filling for a fragrant twist. Italian recipes might include ingredients like ricotta or citrus zest. These flavors can elevate your croissants and make them special. Experiment with what you love to create your perfect pistachio delight. You can often find great pistachio croissants at local bakeries. Check out shops known for fresh pastries. Look for places with a good reputation in your area. Ask friends for their favorites. When you visit, pay attention to the display. Freshly baked goods usually look golden and flaky. If you smell something nutty and sweet, you’re in the right place! If you prefer shopping online, many stores sell pre-made pistachio croissants. Websites like Goldbelly or local delivery services have tasty options. Brands like La Boulangerie offer high-quality pastries shipped to your door. Always check reviews before ordering. This helps you choose the best brand for your taste. Delivery times can vary, so plan ahead for special occasions. Prices for pistachio croissants can differ based on where you buy them. At local bakeries, expect to pay about $3 to $5 each. Online shops may charge more due to shipping, ranging from $5 to $10 per croissant. Making them at home is cheaper. You can make a dozen for around $15 using the Full Recipe. This gives you delicious croissants and saves money! Store pistachio filled croissants at room temperature for the best taste. Keep them in an airtight container. This helps maintain their crispiness. If you must refrigerate, they may lose some texture. Wrap them tightly in plastic wrap before placing them in the fridge. Yes, you can freeze pistachio croissants! Freeze them after baking for the best results. Let them cool completely before wrapping. Use plastic wrap and then place them in a freezer bag. They can last up to three months. To enjoy, thaw them in the fridge overnight and reheat in the oven. If you want to try something different, use other nuts like almonds or walnuts. Each nut gives a new flavor. Sunflower seeds or pumpkin seeds are great for a nut-free option. You can also add chocolate chips or dried fruit for a unique twist. In this post, I covered how to make delicious pistachio-filled croissants. We discussed ingredients, step-by-step instructions, and tips for success. I also shared ideas for variations and serving suggestions. Remember, practice makes perfect. Avoid common mistakes like overfilling and not preheating the oven. Explore different flavors, and don’t hesitate to get creative. Whether you buy them or make them, enjoy these tasty treats with coffee or tea. Happy baking!

Pistachio Filled Croissants Delightful and Simple Recipe

If you love the rich, nutty flavor of pistachios, you’re in for a treat! In this easy and fun recipe,

To make a tasty Crispy Chickpea Salad, gather these main items: - 1 can (15 oz) chickpeas, drained and rinsed - 2 tablespoons olive oil - 1 teaspoon smoked paprika - 1 teaspoon garlic powder - Salt and pepper to taste - 4 cups mixed salad greens (like spinach, arugula, romaine) - 1 cup cherry tomatoes, halved - 1 cucumber, diced - 1 bell pepper (any color), diced - 1 avocado, sliced - 2 tablespoons lemon juice - 1 tablespoon balsamic vinegar These ingredients work well together, giving flavor and texture. You can add optional items for extra taste and richness: - ¼ cup feta cheese, crumbled - Fresh herbs (like parsley or cilantro), chopped for garnish These optional ingredients add creaminess and a fresh touch. Each ingredient in this salad brings health benefits: - Chickpeas: Packed with protein and fiber, they keep you full. - Olive oil: A healthy fat that supports heart health. - Smoked paprika: Offers antioxidants and adds a smoky taste. - Garlic powder: May boost your immune system and flavor. - Salad greens: Low in calories, high in vitamins A and C. - Cherry tomatoes: Rich in vitamins and antioxidants, good for your skin. - Cucumber: Hydrating and low-calorie, perfect for freshness. - Bell peppers: High in vitamin C, aiding your immune system. - Avocado: Provides healthy fats and fiber, promoting satiety. - Feta cheese: Adds calcium and flavor, though it is optional. - Lemon juice: Adds vitamin C and brightens the dish. - Balsamic vinegar: May help with digestion and adds a sweet touch. These ingredients not only taste great but also nourish your body. For the full recipe, check out the detailed cooking steps. First, gather your ingredients. You will need one can of chickpeas, olive oil, smoked paprika, garlic powder, salt, and pepper. Also, get your salad greens, cherry tomatoes, cucumber, bell pepper, avocado, feta cheese, lemon juice, balsamic vinegar, and fresh herbs. Drain and rinse the chickpeas well. That helps them crisp up nicely. Next, chop the veggies. Halve the cherry tomatoes, dice the cucumber and bell pepper, and slice the avocado. Set everything aside as we move on. Preheat your oven to 400°F (200°C). Spread the chickpeas on a baking sheet in a single layer. Drizzle them with olive oil. Then, sprinkle the smoked paprika, garlic powder, salt, and pepper over them. Toss the chickpeas gently to coat them evenly. Bake in the oven for 20 to 25 minutes. Shake the pan halfway through. This step helps the chickpeas cook evenly and become golden and crispy. Keep an eye on them as they bake. You want them crunchy, not burnt! While the chickpeas bake, prepare your salad. In a large bowl, combine the mixed salad greens, cherry tomatoes, cucumber, bell pepper, and avocado. In a small bowl, whisk together the lemon juice, balsamic vinegar, salt, and pepper. This will be your dressing. Once the chickpeas are done, let them cool for a few minutes. Then, add them to your salad. Drizzle the dressing over the top. Toss gently to mix everything well. If you like, sprinkle crumbled feta cheese and fresh herbs on top. Now, your crispy chickpea salad is ready to enjoy! For a detailed recipe, check the Full Recipe. To keep your chickpeas crispy, start with dry chickpeas. If using canned, drain and rinse them well. Pat them dry with a towel. This step removes excess moisture, which can make them soggy. Coat them lightly with olive oil and spices. Bake them at 400°F for 20-25 minutes. Shake the pan halfway through to crisp all sides. Let them cool for a few minutes after baking. This cooling time helps them stay crunchy when added to the salad. You can easily boost the salad’s nutrition. Add more veggies like carrots, radishes, or kale. These add color and vitamins. You can also throw in some nuts or seeds for healthy fats. Walnuts or sunflower seeds work well. If you want extra protein, toss in some cooked quinoa or beans. This makes the salad more filling and satisfying. Feel free to mix and match based on what you have at home. The dressing can change the whole taste of your salad. A simple lemon juice and balsamic vinegar mix is great. But you can add other flavors too. Try a yogurt dressing for creaminess. Or mix in tahini for a nutty flavor. You can also use honey or maple syrup for sweetness. Just remember to keep the balance of flavors. A tangy dressing pairs well with crispy chickpeas. Experiment with different herbs and spices for unique tastes. {{image_2}} This salad is already a great choice for vegetarians and vegans. The chickpeas offer protein and fiber. If you skip the feta cheese, the salad stays fully vegan. You can also add more veggies. Try shredded carrots or roasted zucchini for extra flavor and crunch. You can swap out ingredients based on what you like. If you avoid olive oil, use avocado oil instead. For a nut-free option, skip the feta cheese. If you need a lower-carb choice, replace chickpeas with roasted cauliflower. This keeps the dish tasty and suitable for your diet. Change the salad based on the season. In spring, add fresh peas or asparagus for a pop of color. Summer is perfect for juicy peaches or strawberries. In fall, roasted sweet potatoes work well. Winter calls for hearty greens like kale or Brussels sprouts. Each season brings new flavors to enjoy in your crispy chickpea salad. To store leftover crispy chickpea salad, keep the chickpeas and greens separate. Use an airtight container for both. This helps prevent sogginess. Store in the fridge for up to three days. If you mix them together, the salad will lose its crispiness. When reheating leftover chickpeas, avoid the microwave. Instead, use an oven or air fryer. Preheat your oven to 375°F (190°C). Spread the chickpeas in a single layer on a baking sheet. Heat them for about 10-15 minutes until warm and crispy again. This method keeps them crunchy. Leftover salad lasts three days in the fridge. Check for changes in smell or color. If the salad looks dull or has a strange odor, it’s best to toss it. Always trust your senses. Fresh ingredients make a big difference in taste and safety. It takes about 35 minutes to make this salad. You need 10 minutes to prep the ingredients. The chickpeas bake for around 20-25 minutes, giving them a nice crunch. Yes, you can prepare this salad ahead of time. Make the chickpeas and store them in an airtight container. Keep the salad greens and other veggies separate until you’re ready to eat. This keeps everything fresh and crisp. You can add several proteins to this salad. Here are some tasty options: - Grilled chicken - Cooked quinoa - Chickpeas (double the amount for more crunch) - Hard-boiled eggs - Tofu or tempeh for a plant-based option These proteins will boost the nutrition and keep you full longer. Yes, this salad is gluten-free. All the ingredients, including chickpeas and veggies, are naturally gluten-free. Just ensure any added dressing or toppings do not contain gluten. For instance, check that the balsamic vinegar is pure and gluten-free for safety. For the full recipe, check out the Crispy Chickpea Salad section. This blog post covered how to make a Crispy Chickpea Salad. We explored key ingredients, from the main elements to optional flavor boosters. I shared step-by-step instructions, including how to keep those chickpeas crispy. We discussed helpful tips and variations to suit different diets and seasons. In the end, this salad is not only tasty but also packed with nutrition. You can enjoy it any time and make it your own. Try it out, and let your taste buds lead the way!

Crispy Chickpea Salad: Healthy and Tasty Delight

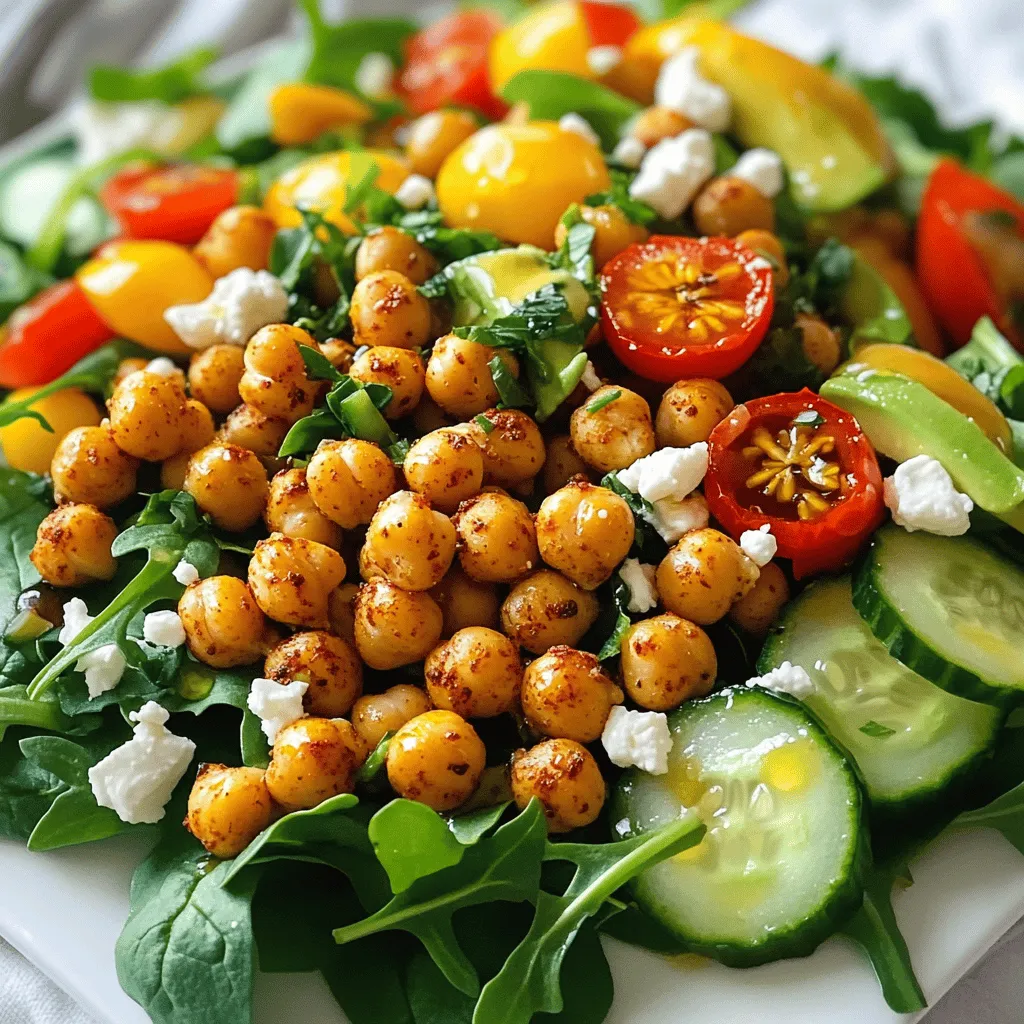
Looking for a healthy yet tasty meal? Try my Crispy Chickpea Salad! It’s easy to make and full of flavor.

- 2 cups rolled oats - 1 cup mixed nuts (almonds, pecans, walnuts), chopped - 1/2 cup sunflower seeds - 1/2 cup honey or maple syrup - 1/4 cup almond butter or peanut butter - 1/2 teaspoon vanilla extract - 1/2 teaspoon cinnamon - 1/4 teaspoon sea salt - 1/2 cup dried fruits (cranberries, apricots, or raisins), chopped if large I love making homemade granola bars because they are tasty and easy. You start with rolled oats, which give them a nice chewy texture. I usually mix in nuts like almonds, pecans, and walnuts for a crunch. Sunflower seeds add a delightful pop, too. For sweetness, I choose either honey or maple syrup. Both work great. Almond butter or peanut butter helps bind everything together. It also gives a rich flavor. Now, let’s talk about flavor. Adding vanilla extract brings warmth, while cinnamon gives a cozy touch. A little sea salt helps balance the sweetness perfectly. Dried fruits add a fruity burst and chewiness. My favorites are cranberries, apricots, or raisins. You can chop them if they are too big. For the full recipe, check out the [Full Recipe]. You can mix and match these ingredients based on what you like. That’s the fun part! - Preheat the oven to 350°F (175°C). - Line an 8x8 inch baking dish with parchment paper. Leave some overhang for easy removal. - In a large bowl, combine 2 cups of rolled oats, 1 cup of chopped mixed nuts, and 1/2 cup of sunflower seeds. Mix well. - In a small saucepan over low heat, melt 1/2 cup of honey or maple syrup with 1/4 cup of almond butter. Stir continuously. - Once melted, remove from heat and mix in 1/2 teaspoon of vanilla extract, 1/2 teaspoon of cinnamon, and 1/4 teaspoon of sea salt. - Pour the warm mixture over the dry ingredients. Stir until all the oats and nuts are coated. - Fold in 1/2 cup of chopped dried fruits, mixing until well distributed. - Transfer the mixture to the prepared baking dish. Press down firmly with a spatula or your hands. - Bake in the preheated oven for 20-25 minutes or until golden brown. - Remove from the oven and let it cool completely in the pan on a wire rack. - Once cool, use the parchment paper to lift the granola out and cut into bars or squares. This simple method makes delicious granola bars that are easy to customize. You can find the full recipe earlier in this article. Enjoy your tasty and nutritious homemade snack! To get that perfect crunch, I suggest using a mix of nuts. Almonds, pecans, and walnuts all add great flavor and texture. You can also play with the baking time. Bake for 20 minutes for softer bars or 25 minutes for a crunchier finish. You can make your granola bars special by adding spices. Try nutmeg or ginger for a warm taste. If you want a sweet touch, mix in some chocolate chips. They melt slightly and add a nice richness. For a beautiful look, stack your bars neatly on a wooden board. You can also wrap them in parchment paper. This makes them easy to grab on the go. If you want to impress, store them in a mason jar. It looks nice and keeps them fresh. If you want the full recipe, check out the Crunchy Nutty Granola Bars section. {{image_2}} If you want a nut-free granola bar, it's easy to make. You can swap out the nuts for seeds. Try using extra sunflower seeds or pumpkin seeds. Puffed rice also works well. This keeps the crunch while making it safe for those with nut allergies. To make your bars vegan, use maple syrup instead of honey. This adds a nice sweetness. You can also change almond butter for another plant-based spread, like sunflower seed butter or tahini. These swaps keep your bars creamy and delicious without animal products. Want to boost the protein? You can add protein powder right into the mix. This works great if you are active or need extra energy. Another option is to use cooked quinoa instead of some oats. Quinoa adds protein and a nice texture to your bars. You can find the full recipe and start making your own tasty granola bars today! To keep your homemade granola bars fresh, store them in an airtight container. This keeps moisture away and helps maintain their crunchy texture. You can keep them at room temperature for easy access. If you want them to last longer, refrigerate them. This also adds a nice chill to the bars. If you want to save some for later, wrap each bar individually. Use plastic wrap or foil to keep them fresh. You can freeze them for up to three months. When you're ready to eat, just thaw them at room temperature or in the fridge. This way, you’ll always have a tasty snack handy. Homemade granola bars are best enjoyed fresh. They can last 1-2 weeks at room temperature. After that, they may lose their crunchiness and flavor. If you notice any changes in smell or texture, it’s best to toss them out. Enjoy them while they are fresh and tasty! Yes, but the texture will be softer. Maple syrup or agave nectar work well. Use certified gluten-free oats and ensure other ingredients are gluten-free. Make sure to press the mixture firmly into the baking dish before baking. Absolutely! You can mix and match nuts, seeds, and dried fruits to your liking. These homemade granola bars are simple and fun to make. You learned about the key ingredients, mixing steps, and baking process. I shared tips to enhance flavor and texture. You can adapt the recipe to fit your needs, whether nut-free or vegan. Remember to store them well for freshness. Enjoy your delicious, customized snacks!

Homemade Granola Bars Easy Recipe Tasty and Nutritious

Are you ready to whip up a tasty treat that’s both healthy and easy? This homemade granola bar recipe packs

To make sweet potato and black bean chili, you need a few key items: - 2 medium sweet potatoes, peeled and diced - 1 can (15 oz) black beans, rinsed and drained - 1 can (14 oz) diced tomatoes with green chilies - 1 onion, chopped - 3 cloves garlic, minced - 1 red bell pepper, chopped - 1 tablespoon olive oil - 2 teaspoons ground cumin - 2 teaspoons chili powder - 1 teaspoon smoked paprika - 1 cup vegetable broth - Salt and pepper to taste - Fresh cilantro for garnish - Avocado slices for serving (optional) - Lime wedges for serving (optional) These ingredients create a rich, hearty flavor. The sweet potatoes add natural sweetness, while the black beans provide protein and texture. The spices bring warmth and depth to the dish. If you can't find some ingredients, don't worry! Here are some easy swaps: - Use butternut squash instead of sweet potatoes. - Canned kidney beans or pinto beans can replace black beans. - Fresh tomatoes work well if you don't have canned ones. - Any color bell pepper can work if red isn’t available. - You can use vegetable oil instead of olive oil for frying. These substitutes still give you a tasty chili. Feel free to mix and match based on what you have. Choosing fresh ingredients is key for great chili. Here’s how to pick the best: - Sweet Potatoes: Look for firm, smooth skin. Avoid any with spots or soft areas. - Onions: Choose onions that feel heavy for their size and have dry skin. - Bell Peppers: Pick peppers that are shiny and firm. They should feel heavy too. - Garlic: Choose bulbs that are firm and plump. Avoid any that feel soft or sprouted. Fresh ingredients lead to a more vibrant flavor. Trust your senses when selecting! For the full recipe, check out the complete guide to making sweet potato and black bean chili. To start, gather all your ingredients. You will need sweet potatoes, black beans, diced tomatoes, onion, garlic, and red bell pepper. Measure out your spices, olive oil, and vegetable broth. - 2 medium sweet potatoes, peeled and diced - 1 can (15 oz) black beans, rinsed and drained - 1 can (14 oz) diced tomatoes with green chilies - 1 onion, chopped - 3 cloves garlic, minced - 1 red bell pepper, chopped - 1 tablespoon olive oil - 2 teaspoons ground cumin - 2 teaspoons chili powder - 1 teaspoon smoked paprika - 1 cup vegetable broth - Salt and pepper to taste - Fresh cilantro for garnish - Avocado slices for serving (optional) - Lime wedges for serving (optional) Now, prepare your workspace. Chop the onion, garlic, and red bell pepper. Dice the sweet potatoes into small cubes. This helps them cook evenly. Heat the olive oil in a large pot over medium heat. Add the chopped onion first. Cook it for about five minutes. You want it soft and clear. Next, add the minced garlic and chopped bell pepper. Cook these for 2-3 minutes. You should smell the garlic. Now, stir in the diced sweet potatoes. Add the cumin, chili powder, and smoked paprika. Cook for another 2-3 minutes. This step coats the potatoes with the spices. Pour in the diced tomatoes and their juices, black beans, and vegetable broth. Stir everything well. Bring this mixture to a boil. Once boiling, lower the heat to let it simmer. Let it cook for 25-30 minutes. Stir occasionally. Check if the sweet potatoes are tender. They should be soft enough to mash with a fork. After cooking, season the chili with salt and pepper to taste. If you want it spicier, add chili flakes or chopped jalapeños. Once done, remove the pot from the heat. Let it rest for a few minutes before serving. This helps the flavors meld well. For the best presentation, serve the chili in bowls. Garnish with fresh cilantro and avocado slices. Add lime wedges on the side for a zesty touch. Enjoy your flavorful delight! For the full recipe, check out the recipe section above. To make the best sweet potato and black bean chili, follow these tips: - Cut sweet potatoes evenly: This ensures they cook at the same rate. - Sauté onions well: Cook them until they are soft and sweet. This adds depth. - Use fresh spices: Fresh spices give your chili a bolder flavor. Check dates on spice jars. - Simmer gently: Let the chili simmer slowly. This helps all flavors blend well. Want your chili spicier? Here’s how: - Add chili flakes: Start with a small pinch and taste as you go. - Use fresh jalapeños: Dice them in for a fresh spicy kick. - Try hot sauce: A few drops can enhance the heat. Always taste first! If you prefer mild flavors, skip the chili flakes and jalapeños. You can also add more sweet potatoes to balance the heat. Serve your chili in a fun way: - Garnish with cilantro: This adds color and freshness. - Top with avocado slices: Creamy avocado pairs perfectly with chili. - Serve lime wedges: A squeeze of lime brightens the flavors. For a complete meal, serve your chili with warm cornbread or over rice. You can find the full recipe for my sweet potato and black bean chili in the earlier sections. Enjoy every bite! {{image_2}} Want to add protein to your sweet potato and black bean chili? You have many options! You can use ground turkey or beef for a heartier dish. For a lighter choice, try chicken breast. Cook the meat first in the pot before adding the other ingredients. If you prefer plant-based options, diced tofu or tempeh work well. Both soak up the chili's flavors nicely. This chili is naturally vegetarian and can easily be vegan. Just check your broth to ensure it has no animal products. You can also add more beans or lentils for extra nutrition. If you like a creamy texture, stir in some coconut milk. It adds richness without dairy. You can experiment with different beans too. Pinto or kidney beans can be great in this dish. To elevate your chili's taste, think about adding herbs and spices. Fresh cilantro adds a bright flavor. If you enjoy heat, toss in some diced jalapeños or chili flakes. For a touch of sweetness, try adding a dash of cinnamon. It might sound odd, but it works! You can also experiment with smoked paprika for an even deeper flavor. Don't be afraid to play with the spices; they can change your dish entirely. For the full recipe, visit the [Full Recipe]. After enjoying your sweet potato and black bean chili, store leftovers in an airtight container. Let it cool first before sealing. This helps keep the chili fresh. You can keep it in the fridge for up to four days. If you want to enjoy it later, freezing is a great option. To reheat, you can use the stove or microwave. For the stove, place the chili in a pot over medium heat. Stir it often until it warms up. This usually takes about 5 to 10 minutes. If you use a microwave, pour the chili into a microwave-safe bowl. Heat it for about 2 to 3 minutes, stirring halfway through. Make sure it’s hot all the way through. Freezing is best if you want to save your chili for later. Pour the cooled chili into freezer bags or containers. Leave some space at the top to allow for expansion. Label the bags with the date and freeze. Your chili can last up to three months in the freezer. When you're ready to eat it, thaw it overnight in the fridge. Then, reheat as mentioned above. This makes meal prep easy and delicious! For the complete recipe, check out the Full Recipe link above. To add heat to your chili, try these simple tips. You can add chili flakes or diced jalapeños. Both options can spice up your dish without much effort. If you like it extra hot, add some diced fresh peppers during cooking. You can also mix in a splash of hot sauce at the end. Just remember to taste as you go. You want a nice balance of heat and flavor. Yes, you can prepare this chili in advance. It stores well in the fridge for up to four days. Simply cool it down and place it in an airtight container. You can also freeze it for up to three months. To reheat, just thaw it overnight in the fridge and warm it on the stove. This makes it a great meal prep option for busy days. Toppings can enhance your chili's flavor and texture. Fresh cilantro adds a nice pop of color and taste. Slices of avocado bring creaminess. You can also use shredded cheese or a dollop of sour cream. Lime wedges give a zesty finish. Try different combinations to find your favorite way to enjoy your chili. For more ideas, check the Full Recipe. You now have a complete guide to making sweet potato and black bean chili. We covered key ingredients, cooking steps, and helpful tips. You learned how to add your own twist with protein and spices. Storing and reheating tips will keep your chili fresh for later. I hope you feel ready to make this dish customized to your taste. Enjoy making a warm bowl that everyone will love. Your journey to delicious chili starts now!

Sweet Potato and Black Bean Chili Flavorful Delight

Are you ready to dive into a bowl of warmth and flavor? This Sweet Potato and Black Bean Chili is

- Ground turkey - Breadcrumbs - Parmesan cheese - Fresh parsley - Egg - Garlic - Onion powder - Italian seasoning - Marinara sauce - Olive oil for frying The main ingredient, ground turkey, is lean and tasty. It gives the meatballs a nice texture. I love using whole wheat breadcrumbs. They add flavor and help bind the meatballs. Parmesan cheese adds a salty kick. Fresh parsley gives a pop of color and freshness. You need one egg to hold everything together. Minced garlic brings a lovely aroma. Onion powder adds a sweet depth. Italian seasoning rounds out the flavor. Marinara sauce is key for serving; it keeps things saucy and delicious. A splash of olive oil helps brown the meatballs nicely. - Additional spices (e.g., red pepper flakes) - Substitute breadcrumbs with oats - Different types of cheese For a little heat, I like to add red pepper flakes. Oats can replace breadcrumbs for a gluten-free option. You can mix in different cheeses, like mozzarella or feta, for fun twists. These options let you play with flavors and textures. Just try what sounds good to you! - Mixing the ingredients Start by taking a large mixing bowl. Add 1 pound of ground turkey. Next, sprinkle in 1/2 cup of breadcrumbs and 1/4 cup of grated Parmesan cheese. Toss in 1/4 cup of fresh parsley, chopped, and 2 minced garlic cloves. Crack in 1 large egg. Add 1 teaspoon of onion powder and 1 teaspoon of Italian seasoning. Season with salt and pepper. Mix everything well until it forms a uniform mixture. - Forming the meatballs Once mixed, take a small portion of the mixture. Roll it between your hands to form a ball about 1 inch in diameter. Repeat this until you shape around 16 to 20 meatballs. This step is fun and makes cooking feel more personal. - Heating the skillet Grab a large skillet and place it on medium heat. Drizzle a bit of olive oil in the pan. Allow the oil to heat up until it shimmers. This ensures that the meatballs won’t stick. - Browning the meatballs Carefully place the meatballs in the hot skillet. Make sure not to overcrowd them; this helps them brown evenly. Cook for about 3 to 4 minutes on each side. You want them to turn a lovely golden brown. This browning adds flavor. - Simmering with marinara sauce After browning, pour a jar of marinara sauce over the meatballs. Turn the heat down to low. Cover the skillet and let them simmer for 15 to 20 minutes. This allows the meatballs to soak up the sauce's rich flavors. - Garnish ideas For a fresh look, sprinkle extra chopped parsley over the meatballs before serving. This adds color and a bit of freshness. - Pairing with pasta or salad These turkey meatballs are great on their own, but I love serving them with pasta or a crisp salad. The balance of flavors makes each bite enjoyable. For the full recipe, check out the earlier section! To make juicy turkey meatballs, keep these tips in mind: - Use fresh ingredients. Fresh parsley and garlic enhance flavor. - Add moisture. Ingredients like breadcrumbs and the egg help keep meatballs moist. To stop meatballs from falling apart, you can: - Mix gently. Overmixing can make them tough. - Chill the mixture. Let it sit in the fridge for 30 minutes before forming meatballs. You can cook meatballs in different ways. Skillet-cooking gives a nice brown crust. Here's how: - Heat oil in a skillet over medium heat. - Brown them for 3-4 minutes on each side. Baking in the oven is also a good choice. Preheat the oven to 400°F. Place meatballs on a baking sheet and cook for about 20 minutes. If you want to try slow cooking: - Set your slow cooker on low. - Add meatballs and sauce, and cook for 4 hours. These methods all yield tender, tasty turkey meatballs. For the complete recipe, check the Full Recipe section. {{image_2}} Making it gluten-free To make these turkey meatballs gluten-free, swap the breadcrumbs for gluten-free options. You can use ground oats or almond flour as great substitutes. Just mix them in like you would with regular breadcrumbs. This keeps the meatballs moist and tasty. Vegetarian options For a vegetarian version, use lentils or chickpeas instead of ground turkey. Mash them well and add your favorite spices. You can also add chopped mushrooms for extra flavor and texture. This variation keeps the dish hearty and satisfying. Adding different herbs and spices You can change the flavor by adding herbs and spices. Try fresh basil or thyme for a twist. A pinch of red pepper flakes adds a nice kick. Mix in some paprika for a smoky taste. These tweaks make your meatballs unique and fun. Incorporating vegetables into the meatball mix You can sneak in some veggies for added nutrition. Grated zucchini or finely chopped spinach works well. Carrots also add sweetness. Just be sure to squeeze out excess moisture. This keeps your meatballs from getting soggy. You’ll enjoy the extra flavor and health benefits. For the full recipe, check out the complete guide! To keep your meatballs fresh, store them in the fridge. Place them in an airtight container. They can stay good for up to three days. If you want to keep them longer, freezing is a great option. Just make sure they cool down first. Use a freezer-safe bag or container. They can last for up to three months in the freezer. When you are ready to eat your meatballs, reheating is easy. The best way is to use the oven. Preheat it to 350°F (175°C). Place the meatballs in a dish and cover them with foil. Heat for about 20 minutes. You can also use a microwave. Just place them on a microwave-safe plate. Heat for one to two minutes. To avoid dryness, add a little marinara sauce before reheating. This keeps them moist and tasty. How long can I store meatballs in the fridge? You can store meatballs in the fridge for up to four days. Make sure they cool down first. Place them in an airtight container to keep them fresh. Can I use ground chicken instead of turkey? Yes, ground chicken works well in this recipe. It has a milder flavor but holds up nicely. The cooking time may be similar, so keep an eye on them. What can I serve with Easy Turkey Meatballs with Marinara? You can serve these meatballs with pasta, rice, or a fresh salad. They also go great in a sub sandwich. You can even pair them with garlic bread for a complete meal. Can I make meatballs ahead of time? Absolutely! You can prepare the meatballs a day in advance. Just store them in the fridge. You can also freeze them for up to three months. Thaw them in the fridge before cooking. How do I know when meatballs are fully cooked? Check the center of the meatballs. They should reach an internal temperature of 165°F. You can also cut one open. It should be firm and no longer pink inside. In this post, we covered how to make easy turkey meatballs, starting with the right ingredients like ground turkey, breadcrumbs, and spices. You learned the step-by-step process from mixing to cooking in marinara sauce. I also shared tips for great texture and storage. Now it's your turn to try this simple recipe. Experiment with flavors and enjoy delicious meals. With a few tweaks, these meatballs can fit any diet. Happy cooking!

Easy Turkey Meatballs with Marinara Simple Recipe

Looking for a quick and tasty dinner idea? My Easy Turkey Meatballs with Marinara recipe is the answer! With just

To make these tasty fritters, you need some fresh ingredients. Here’s what you’ll need: - 2 medium zucchinis, grated - 1 teaspoon salt - 1 cup all-purpose flour - 1/2 cup grated Parmesan cheese - 1/2 cup shredded mozzarella cheese - 2 large eggs - 3 green onions, finely chopped - 1 garlic clove, minced - 1 teaspoon dried oregano - 1/2 teaspoon black pepper - Olive oil, for frying These ingredients create a great mix of flavors. The cheeses add creaminess, while the zucchini brings moisture. Having a few pantry staples can make cooking easier. Consider keeping these on hand: - All-purpose flour - Olive oil - Dried oregano - Black pepper These basics help build many dishes. They are easy to use and store well. Want to spice things up? You can add different ingredients to your fritters. Here are some ideas: - Chopped bell peppers for crunch - Fresh herbs like basil or parsley - A pinch of red pepper flakes for heat These add-ins make your fritters unique. Feel free to experiment with your favorites! For the complete process, check out the Full Recipe. Start by grating the zucchinis into a large bowl. Use the large holes on your grater to make thin shreds. Once grated, sprinkle 1 teaspoon of salt over the zucchini. This step is key. Let it sit for about 10 minutes. The salt pulls out excess moisture, which helps make the fritters crispier. After 10 minutes, take a clean dish towel and place the zucchini in it. Squeeze it tightly to remove as much water as you can. This makes a big difference in texture. Now, take the drained zucchini and put it back in the bowl. Add the following ingredients: - 1 cup all-purpose flour - 1/2 cup grated Parmesan cheese - 1/2 cup shredded mozzarella cheese - 2 large eggs - 3 green onions, finely chopped - 1 garlic clove, minced - 1 teaspoon dried oregano - 1/2 teaspoon black pepper Mix everything together well. Use a fork or your hands to combine all the ingredients. The mixture should be thick but not dry. If it feels too wet, you can add a little more flour. Heat a generous amount of olive oil in a non-stick skillet over medium heat. You want enough oil to cover the bottom of the skillet but not too much. For each fritter, scoop about 2 tablespoons of the mixture. Flatten it slightly in the skillet. Cook the fritters for about 3-4 minutes on each side. Look for a golden brown color. Adjust the heat if they start to burn. Once cooked, place the fritters on a plate lined with paper towels. This helps soak up any extra oil. Repeat with the remaining mixture, adding more olive oil as needed. For the full recipe, check the earlier section on ingredients and instructions. Enjoy your savory cheesy zucchini fritters warm! To make your fritters crispy, follow a few steps. First, remove excess moisture from the zucchini. After grating, sprinkle salt and let it sit. This pulls out water. Next, use a clean towel to squeeze out even more liquid. The drier the zucchini, the crispier the fritters. Use enough olive oil in your skillet. It helps create a nice golden crust. Finally, cook them at medium heat for even browning. Avoid these common mistakes for the best fritters. First, do not skip squeezing out the moisture. Wet zucchini makes soggy fritters. Next, don’t overcrowd the pan. Give each fritter space to cook well. If you add too many at once, they will steam instead of fry. Lastly, watch the frying time. Overcooked fritters can burn quickly. For the best results, a non-stick skillet works great. It prevents sticking and makes flipping easy. Use a spatula to help lift the fritters without breaking them. A mixing bowl is also important for combining the ingredients. A grater helps to shred the zucchini finely. If you want to keep things tidy, a clean dish towel or cheesecloth is key for squeezing moisture. For the full recipe, be sure to check the instructions provided. {{image_2}} You can make your zucchini fritters even more delicious by adding different cheeses. For a rich flavor, try using aged cheddar. Goat cheese can add a tangy twist. You might also mix in some feta for a creamy texture. Just remember to keep the total amount of cheese about one cup. This way, your fritters will stay light and fluffy. If you like some heat, you can spice up your fritters. Add a diced jalapeño or a pinch of red pepper flakes to the mix. You can also include hot sauce in the batter for a kick. These spicy zucchini fritters will surely please those who enjoy bold flavors. Just adjust the spice level to your taste. To make these fritters gluten-free, switch the all-purpose flour with a gluten-free blend. Many blends work well in recipes like this. You can also use ground oats or almond flour for a nutty flavor. This way, everyone can enjoy these tasty zucchini fritters, no matter their dietary needs. For the full recipe, check the link. To keep your fritters fresh, store them in an airtight container. Let them cool down first. Place a paper towel at the bottom to absorb moisture. This keeps them crispy. Store them in the fridge for up to three days. When you want to enjoy your leftovers, the skillet works best. Heat a little olive oil in a pan on medium heat. Add the fritters and cook for about 2-3 minutes on each side. This brings back their crispiness. You can also use an oven. Preheat it to 350°F (175°C). Place the fritters on a baking sheet and heat for 10-15 minutes. If you want to save some for later, freezing is a great option. First, let the fritters cool completely. Then, place them in a single layer on a baking sheet. Freeze for about an hour. After that, transfer them to a freezer-safe bag. You can store them for up to three months. When ready to eat, just reheat from frozen using the oven or skillet. For the full recipe, check out the steps above! To make zucchini fritters less watery, start by salting the grated zucchini. This step pulls out moisture. Let it sit for about ten minutes. Then, use a clean dish towel to squeeze out the liquid. The drier the zucchini, the better the fritters. If you find them too wet, you can add a bit more flour to the mix. This will help bind everything together. Yes, you can bake zucchini fritters. Preheat your oven to 400°F (200°C). Place the fritters on a baking sheet lined with parchment paper. Brush or spray them lightly with olive oil. Bake for about 20 minutes, flipping halfway. They may not be as crispy as fried fritters, but they will still taste great. Savory cheesy zucchini fritters pair well with many sides. I love serving them with a dollop of sour cream or Greek yogurt. A side of fresh salad adds a nice crunch. You can also try them with a zesty dipping sauce, like tzatziki or a spicy aioli. For a bright touch, add lemon wedges on the side. Enjoy experimenting with different flavors! For the full recipe of these fritters, check out the section above. In this post, we explored the key ingredients for tasty zucchini fritters, from the main ones to optional add-ins. I shared step-by-step instructions and helpful tips for perfecting your fritters. We also discussed fun variations and storage methods. Remember, making mistakes is part of learning. Don’t let them stop you. Enjoy experimenting with flavors, and keep these fritters crispy and delicious!

Savory Cheesy Zucchini Fritters Simple and Tasty Meal

If you’re looking for a quick, tasty meal, you’ve come to the right place! Savory cheesy zucchini fritters are packed

Older posts
Newer posts
← Previous Page1 … Page42 Page43 Page44 … Page60 Next →

dsad

© 2025 Cooking Wells • Built with GeneratePress

Our Policies

  • Copyright Policy
  • Cookie Policy
  • GDPR Policy
  • Privacy Policy
  • Disclaimer
  • Terms Of Use

More Information

  • Home
  • About
  • Contact
  • Appetizers
  • Dessert
  • Dinner
  • Drinks
©2025, Cooking Wells About Back To Top