Skip to content
DisclaimerTerms Of UseGDPR PolicyCookie Policy

Cooking Wells

  • Home
  • Drinks
  • Appetizers
  • Dinner
  • Dessert
  • About
  • Contact
  • Privacy Policy
DisclaimerTerms Of UseGDPR PolicyCookie Policy

Mia

To make a tasty Creamy Spinach and Artichoke Dip, you need simple ingredients. Here’s the list of what you’ll need: - Creamy ingredients: - 1 cup cream cheese, softened - 1/2 cup sour cream - 1/2 cup mayonnaise - Flavor boosters: - 2 cloves garlic, minced - 1 teaspoon onion powder - 1/2 teaspoon red pepper flakes (optional) - Main components: - 1 cup frozen spinach, thawed and drained - 1 cup canned artichoke hearts, drained and chopped - 1 cup shredded mozzarella cheese - 1/2 cup grated Parmesan cheese - Seasoning essentials: - Salt and pepper to taste This list ensures your dip is creamy and full of flavor. Each part plays a key role in making the dip delicious. You can find the full recipe in the recipe section. Remember, using fresh ingredients can enhance the taste. Enjoy the process of gathering these items, as they set the stage for a great snack! 1. Preheat your oven to 350°F (175°C). This step is key for even cooking. 2. Grease your baking dish. Use a light layer of oil or butter to prevent sticking. 3. In a large mixing bowl, combine the creamy ingredients. Mix 1 cup of softened cream cheese, 1/2 cup of sour cream, and 1/2 cup of mayonnaise until smooth. 4. Incorporate the spinach and artichokes into the mixture. Add 1 cup of drained and chopped artichoke hearts and 1 cup of thawed and drained frozen spinach. Stir well to combine. 1. Transfer the mixture to the greased baking dish. Spread it evenly to ensure even cooking. 2. Bake in the preheated oven for 25-30 minutes. Look for a bubbly dip with a golden top. This means it’s ready! 1. Let the dip cool for about 5 minutes. This helps avoid burns and allows the flavors to meld. 2. Serve warm with your favorite dippers. I love tortilla chips, toasted baguette slices, or fresh vegetable sticks. For a fun touch, sprinkle extra Parmesan and add some spinach leaves on top. You will find the full recipe helpful as you prepare this delightful snack! Draining the ingredients is key. If you skip this step, your dip can turn out watery. You want that thick and creamy texture. I always press the spinach and artichokes in a clean cloth or paper towel. This helps remove extra moisture. For the right creaminess, blend your cream cheese, sour cream, and mayonnaise well. Mix until smooth. The more you mix, the creamier it gets. Aim for a silky texture that is easy to dip into. What should you serve with this dip? Tortilla chips are a classic choice. They add a nice crunch. You can also use toasted baguette slices. They soak up the dip’s flavors. Fresh vegetable sticks work great too. Carrots and celery add a nice crunch. For presentation, consider garnishing your dip. A sprinkle of Parmesan cheese looks nice. You can also add fresh spinach leaves on top. This adds color and makes it look appetizing. You will need mixing bowls and a baking dish. A large bowl works well for mixing ingredients. A glass or ceramic baking dish is perfect for the oven. Also, use a quality oven thermometer. This helps ensure your oven is at the right temperature. An accurate oven means your dip bakes evenly. Always check the temperature before you bake. For the full recipe, check out the details above. Enjoy making your dip! {{image_2}} You can switch up the cream cheese and sour cream for a lighter dip. Try using Greek yogurt instead. It adds creaminess while cutting down on fat. For a nutty flavor, you could also use cashew cream. If you want to experiment with cheese, mozzarella works great. However, you can also use cheddar or gouda. Each cheese brings a unique taste. Mixing cheeses can create a creamy dip with interesting flavors. Want to jazz up your dip? Herbs can add a fresh taste. Try adding basil or oregano for extra flavor. Fresh herbs work best, but dried ones are fine too. You can also sneak in more veggies. Chopped bell peppers add crunch and color. Sautéed mushrooms lend a nice earthiness. Both options make your dip tastier and healthier. If you're looking to make a gluten-free version, you're in luck! This dip is naturally gluten-free. Just check the labels on your ingredients to be sure. For a vegan option, replace cream cheese and sour cream with nut-based products. Use vegan mayonnaise as well. This makes a rich and creamy dip without animal products. If you want a lighter version, reduce the amount of cheese or use low-fat options. You can also add more spinach to bulk it up without extra calories. These variations make Creamy Spinach and Artichoke Dip a flexible and fun snack. You can customize it to fit your taste and dietary needs. Check out the Full Recipe for more details. To keep your creamy spinach and artichoke dip fresh, store it properly in the fridge. Here are the best practices: - Use an airtight container: This helps prevent the dip from drying out. - Cool first: Let the dip cool to room temperature before sealing it. - Refrigerate promptly: Aim to store leftovers within two hours of baking. If you want to save it for later, freezing is also an option: - Freeze in portions: Use small containers or freezer bags for easy thawing. - Label and date: Write the date on the container for reference. - Use within three months: For the best taste, consume it sooner. When you're ready to enjoy leftovers, reheating is key to keeping the dip tasty. Here are my recommended methods: - Oven method: Preheat your oven to 350°F (175°C). Place the dip in an oven-safe dish and heat for 15-20 minutes until warm and bubbly. - Microwave method: Heat in short bursts, about 30 seconds at a time. Stir in between to ensure even warming. Be cautious when reheating: - Watch for hot spots: Stir well to avoid burning. - Don’t overheat: This can change the dip's texture and taste. Enjoy your creamy spinach and artichoke dip fresh and warm! For the full recipe, check the earlier section. To make your dip even creamier, you can try a few simple tips. First, use full-fat cream cheese. It blends better and gives a rich texture. You can also add more sour cream or mayonnaise. Both help to enhance the creaminess. Another trick is to blend the dip until smooth. This breaks down lumps and creates a velvety finish. Lastly, consider adding a splash of heavy cream. This will make your dip extra luscious. Yes, you can make this dip ahead of time! Prepare it as usual, but don’t bake it yet. Cover the dish with plastic wrap and store it in the fridge for up to two days. When you're ready to serve, just preheat your oven and bake it as directed. This way, you save time on the day of your event. There are many tasty options to serve with your dip. Here are some popular choices: - Tortilla chips - Toasted baguette slices - Fresh vegetable sticks (like carrots and celery) - Pita chips - Crackers Each option adds a different crunch and flavor, making your snack time more fun! You've learned how to make a delicious Creamy Spinach and Artichoke Dip. We covered the right ingredients, from creamy bases to flavor boosters. I shared simple steps for preparation and baking. Tips on perfecting the dip help ensure success every time. Remember, this dip is versatile. You can try different ingredients or dietary adjustments. With proper storage and reheating, you can enjoy leftovers too. Follow these tips, and your dip will impress everyone. Enjoy making this tasty treat at your next gathering.

Creamy Spinach and Artichoke Dip Simple and Tasty Snack

Are you ready to impress your friends with a simple yet tasty snack? My creamy spinach and artichoke dip is

To make Nutella-Stuffed Banana Bread, gather these simple ingredients: - 3 overripe bananas, mashed - 1/3 cup melted butter - 1 teaspoon baking soda - Pinch of salt - 3/4 cup sugar - 1 large egg, beaten - 1 teaspoon vanilla extract - 1 1/2 cups all-purpose flour - 1/2 cup Nutella - Optional: chocolate chips or chopped hazelnuts These ingredients work together to create a moist and sweet banana bread. The overripe bananas give it a rich flavor. The melted butter adds a nice texture. Baking soda helps it rise, while the egg binds everything together. You can even add chocolate chips or nuts for extra crunch. When you mix these ingredients, remember to mash the bananas well. This ensures that they blend nicely into the batter. And don’t forget the Nutella! It adds a delightful surprise in the middle of the bread. For more detailed steps, check out the Full Recipe. You’ll find everything you need to create this tasty treat! - Preheat the oven to 350°F (175°C). - Grease the loaf pan with butter or non-stick spray. - In a bowl, combine the mashed bananas and melted butter. Mix until smooth. - Next, add the baking soda, salt, sugar, beaten egg, and vanilla. Stir well. - Gradually incorporate the flour into the banana mixture. Mix just until no dry flour remains. - Pour half of the batter into the prepared loaf pan. Spread it evenly. - Add dollops of Nutella across the batter. Use a knife to swirl it slightly. - Pour the remaining batter over the top, covering the Nutella. Smooth it out. - Bake in the preheated oven for 60 to 70 minutes. - Check doneness by inserting a toothpick into the center. Avoid the Nutella. - Once baked, let the banana bread cool in the pan for 10 minutes. Then, transfer it to a wire rack to cool completely. For the full recipe, refer to the ingredients and steps above. Enjoy the process! To make the best Nutella-stuffed banana bread, use overripe bananas. They are sweeter and softer. This adds moisture and flavor to your bread. If your bananas are not overripe, your bread may be dry. Avoid over-mixing the batter. Mix just until the flour disappears. A few lumps are okay. Over-mixing makes the bread dense, not light and fluffy. Serve your banana bread warm for the best taste. You can slice it and add extra Nutella on top. It also tastes great with a scoop of vanilla ice cream. Try pairing it with fresh fruit or a dollop of whipped cream for added flavor. If your bread does not rise, check your baking soda. It must be fresh. Old baking soda can cause the bread to fall flat. Make sure your oven is at the right temperature too. If your banana bread is dense, you may have over-mixed it. This can cause the bread to be tough. Next time, remember to mix gently. A light hand makes a big difference. For the full recipe, check the earlier sections. Enjoy your baking! {{image_2}} You can make your Nutella-stuffed banana bread even better by adding ingredients. Try chocolate chips for a rich taste. Chopped hazelnuts give a nice crunch. You can also play with spices. A dash of cinnamon adds warmth. Vanilla extract can brighten the flavor. Experimenting with these add-ins makes baking fun! You might want a healthier banana bread. You can use honey instead of sugar. This gives a sweet taste with less refined sugar. Swap all-purpose flour for whole wheat flour. This adds fiber to your bread. If you want to switch from Nutella, try almond or peanut butter. Both offer a nutty flavor and creamy texture. Change the recipe with the seasons. In fall, add pumpkin puree and warming spices. This makes a cozy treat. During summer, toss in fresh berries. Raspberries or blueberries add a fruity burst. For a tropical twist, use diced pineapple or coconut. These twists keep your banana bread exciting all year round. To keep your Nutella-stuffed banana bread fresh, you have two main options: room temperature and refrigeration. - Room Temperature: If you plan to eat the bread within a few days, store it at room temperature. Wrap it in plastic wrap or foil to keep it moist. - Refrigeration: If you want to keep it longer, place it in the fridge. This slows down spoilage but may dry it out slightly. Wrap it well to maintain moisture. For later use, you can freeze the banana bread. Slice it first for easy access. Wrap each slice in plastic wrap, then place them in a freezer bag. This way, you can enjoy a slice whenever you crave it! Banana bread lasts about 3 to 4 days at room temperature when stored properly. - Signs that it has gone bad: Look for mold or an off smell. If it feels dry or hard, it's time to toss it. Always check before eating! Enjoy your Nutella-stuffed banana bread while it’s fresh for the best taste. For the full recipe, you can refer to the earlier sections. Yes, you can. Frozen bananas work great in banana bread. To use them, take the bananas out of the freezer and let them thaw. This usually takes a few hours. You can also speed it up by placing them in warm water. Once thawed, peel and mash them. They should be very soft and easy to mix into your batter. This recipe is not gluten-free as it uses all-purpose flour. To make it gluten-free, you can use a gluten-free flour blend. Just make sure it contains xanthan gum, which helps give the bread structure. You might need to adjust the liquid amounts as gluten-free flours can absorb more moisture. Leftover Nutella is a treat! You can use it in many ways. Try spreading it on toast or pancakes. You can also swirl it into yogurt or oatmeal for extra flavor. Another fun idea is to make Nutella hot chocolate. Just mix it with warm milk, and enjoy! Reheating banana bread is easy! The best way is to use an oven. Preheat your oven to 350°F (175°C). Wrap the bread in foil to keep it moist. Heat it for about 10-15 minutes. You can also use a microwave, but be careful. Heat it in short bursts to avoid drying it out. Enjoy your warm banana bread! Banana bread is simple and fun to make. We covered all the essential steps and tips. Start with ripe bananas for great flavor. Layer Nutella for a tasty twist. You learned how to store it for longer freshness. Experiment with variations to keep it exciting. This recipe is great for sharing or enjoying alone. Now, gather your ingredients and bake your perfect loaf!

Nutella-Stuffed Banana Bread Delightful and Easy Recipe

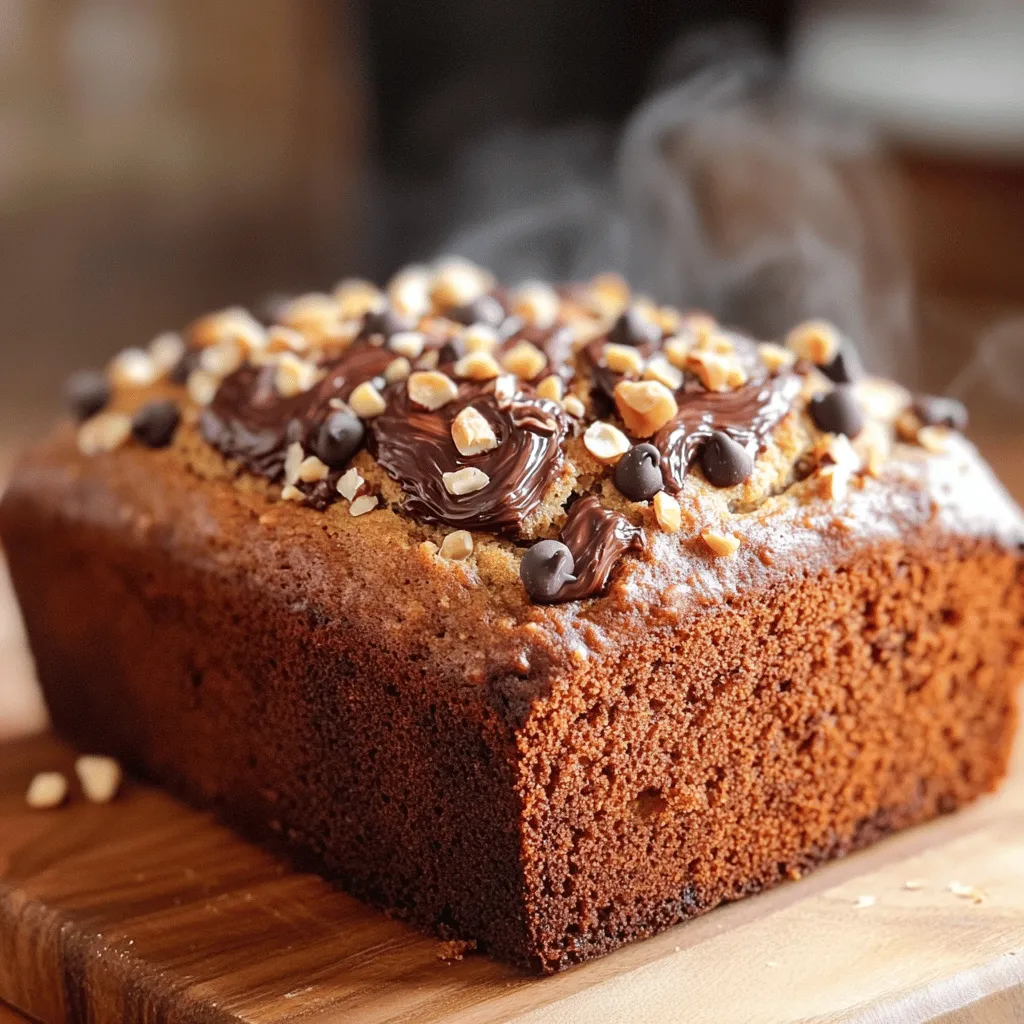
If you love the sweet taste of banana bread and the rich flavor of Nutella, you’re in for a treat!

To make Zesty Lemon Garlic Shrimp, you need a few key ingredients. - 1 pound large shrimp, peeled and deveined - 2 tablespoons olive oil - 1 tablespoon unsalted butter - 4 cloves garlic, minced - Zest of 1 lemon - Juice of 2 lemons - Fresh parsley, chopped for garnish - 1 teaspoon red pepper flakes (adjust for spice preference) - 1 teaspoon dried oregano - Salt and pepper to taste These ingredients come together to create a fresh, bright, and delicious dish. The shrimp serve as the main star, while the garlic and lemon add layers of flavor. I love how simple it is to find these ingredients in any grocery store. You can use the Full Recipe to guide you through making this dish. Each ingredient plays a role in making your meal tasty and memorable. Cooking the Garlic Start by heating the olive oil and butter in your skillet. Use medium heat until the butter melts. Next, add the minced garlic. Sauté it for about one minute. You want it to smell great but not burn. Keep an eye on it; burnt garlic tastes bitter. Combining Flavors in the Skillet Once the garlic is fragrant, stir in the red pepper flakes and dried oregano. Let these spices bloom for about 30 seconds. This step unlocks their full flavor. The oil gets infused with a zesty kick, preparing for the shrimp. Cooking the Shrimp to Perfection Now it’s time for the shrimp. Add them in a single layer to the skillet. Cook them for 2-3 minutes on one side. Don’t touch them; let them turn pink. After that, flip the shrimp over. Add lemon zest and juice at this point. Cook for another 2-3 minutes until they are fully opaque. This means they are done! Season with salt and pepper to taste. Toss everything to coat the shrimp in that zesty sauce. For the finishing touch, remove from heat and sprinkle fresh chopped parsley on top. Follow these steps for a fresh and tasty dish. For a complete guide, check out the Full Recipe. Garlic Cooking Tips Garlic adds a great flavor. Mince it finely for the best taste. Cook garlic over medium heat. This helps it release its aroma. Watch it closely. You do not want it to burn. Burned garlic tastes bitter. Balancing Brightness and Spice Lemon juice adds brightness to the dish. Use fresh lemons for the best flavor. Adjust the red pepper flakes for spice. Start with a little, then taste. You can always add more heat. This balance makes the dish exciting. Ensuring Tender Shrimp Cook shrimp quickly to keep them tender. They only need 2-3 minutes per side. When they turn pink, they’re ready. Overcooking makes them rubbery and tough. Remove them from heat as soon as they are opaque. This keeps them juicy and delicious. For the full recipe, check the earlier section. {{image_2}} If you want to mix it up, try using other proteins. You can use chicken, scallops, or even tofu. Each option brings a unique taste. Chicken works great with the same zesty sauce. Scallops give a sweet flavor, while tofu adds a nice texture. Herbs can change your dish. If you don’t have oregano, use thyme or basil. Both add a fresh twist. You can also use fresh herbs instead of dried. Fresh herbs bring a bright flavor. Just add them at the end for the best taste. You control the heat! If you like it spicy, add more red pepper flakes. For a milder dish, reduce the amount or leave it out. You can also include other spices like paprika or cayenne. Each choice lets you create a dish that fits your taste. Explore these swaps to make your Zesty Lemon Garlic Shrimp even more exciting! For the complete recipe, check the Full Recipe section. Refrigeration Guidelines After cooking Zesty Lemon Garlic Shrimp, let it cool slightly. Place the shrimp in an airtight container. Store it in the fridge. It stays fresh for up to three days. Always check for any smell or change in color before eating. Freezing Instructions If you want to save leftovers, freezing is a good option. First, let the shrimp cool completely. Then, use a freezer-safe bag. Remove as much air as possible before sealing. You can freeze it for up to three months. When ready to eat, thaw in the fridge overnight. Reheating Best Practices To reheat, you can use a skillet or microwave. If using a skillet, add a splash of water or oil. Heat on low until warm. In the microwave, heat in short bursts of 30 seconds. Stir in between to avoid overcooking. Enjoy your meal just like the first time! How do I make Zesty Lemon Garlic Shrimp the best way? To make Zesty Lemon Garlic Shrimp taste amazing, follow these tips: - Use fresh shrimp for the best flavor. - Don't rush cooking the garlic; it needs just a minute. - Add lemon juice and zest at the right time to keep the flavors bright. - Cook the shrimp until they are pink and opaque. For a full guide, check the Full Recipe. Can I use frozen shrimp for this recipe? Yes, you can use frozen shrimp. Just make sure to thaw them first. Place the shrimp in cold water for about 15 minutes. This method helps keep the shrimp tender. Frozen shrimp may have a bit less flavor, but they will still work. What goes well as a side dish? Zesty Lemon Garlic Shrimp pairs well with many sides. Here are some great options: - Simple rice, like jasmine or basmati. - A fresh green salad with a light dressing. - Roasted vegetables for a tasty contrast. These sides will balance the shrimp's bright flavors. This article shared everything you need for perfect Zesty Lemon Garlic Shrimp. You learned about essential ingredients, simple cooking steps, and tips for the best flavor. We covered variations to suit your taste and how to store leftovers. Cooking shrimp can be easy and fun. With fresh ingredients and clear steps, you can create a dish everyone will love. Enjoy crafting your own version of this recipe!

Zesty Lemon Garlic Shrimp Fresh and Tasty Dish

Ready for a fresh dish that bursts with flavor? My Zesty Lemon Garlic Shrimp is quick, easy, and oh-so-tasty! Perfect

- 2 cups all-purpose flour - 2 tablespoons granulated sugar - 1 teaspoon instant yeast - 1/2 teaspoon salt - 3/4 cup warm milk - 3 tablespoons unsalted butter, melted - 1/2 cup Biscoff cookie butter - 2 tablespoons brown sugar - 1 teaspoon ground cinnamon - 1/2 cup powdered sugar (for frosting) - 2 tablespoons milk (for frosting) - 1/4 teaspoon vanilla extract (for frosting) - Mixing bowls - Measuring cups and spoons - Rolling pin - Sharp knife or dough cutter - Baking dish Gathering the right ingredients and tools is key to making Biscoff cookie butter cinnamon rolls. For the dough, you'll need the flour, sugar, yeast, salt, warm milk, and melted butter. The warm milk helps the yeast bloom, making your rolls fluffy. The Biscoff cookie butter is the star here. It adds a rich flavor that no one can resist. You also need brown sugar and cinnamon for the filling—it brings warmth and sweetness to each bite. For the frosting, powdered sugar, milk, and vanilla extract will make a sweet glaze that ties everything together. Make sure to have all your tools ready: mixing bowls for combining, measuring cups for accuracy, a rolling pin for shaping, and a baking dish for the final rise and bake. This setup will help you create a delightful treat that’s perfect for any occasion! You can find the full recipe for these delicious rolls to guide you through the process. First, grab a large bowl. Combine warm milk, granulated sugar, and instant yeast in it. Let this mixture sit for about 5 minutes until it gets foamy. This shows the yeast is active. In a separate bowl, whisk together 2 cups of flour and 1/2 teaspoon of salt. Slowly add this flour mix into the yeast mixture. Add 3 tablespoons of melted butter too. Stir until a dough forms. Now, take the dough and place it on a floured surface. Knead it for about 5 to 7 minutes. You want the dough to feel smooth and elastic. After kneading, place the dough in a lightly greased bowl. Cover it with a kitchen towel and let it rise in a warm spot for about 1 hour. The dough should double in size. While the dough is rising, prepare the Biscoff filling. In a small bowl, mix together 1/2 cup of Biscoff cookie butter, 2 tablespoons of brown sugar, and 1 teaspoon of ground cinnamon. Once the dough has risen, punch it down to remove air. Roll it out into a rectangle about 1/4 inch thick on a floured surface. Spread the Biscoff filling over the rolled-out dough, leaving a small border around the edges. Starting from the long side, tightly roll the dough into a log. Pinch the seam to seal it. Cut the log into 12 equal pieces. Place the rolls in a greased baking dish. Cover them and let them rise again for 30 to 45 minutes until they puff up. Preheat your oven to 350°F (175°C) while the rolls rise. Once ready, bake the rolls for 20 to 25 minutes. They should be golden brown when done. To make the frosting, whisk together 1/2 cup of powdered sugar, 2 tablespoons of milk, and 1/4 teaspoon of vanilla extract in a bowl. Adjust the frosting's thickness with more milk or powdered sugar if needed. Once the rolls are out of the oven, let them cool slightly. Drizzle the frosting over the warm rolls, and enjoy this sweet treat! You can find the full recipe above. - Ensuring the right dough consistency: Start with warm milk at 110°F. This helps the yeast activate. Mix until the dough is smooth. It should feel soft but not sticky. If too sticky, add a little flour. - Tips for achieving fluffy rolls: Knead the dough well for 5-7 minutes. This builds gluten, giving your rolls a nice rise. Let the dough rise in a warm spot until it doubles. A warm oven turned off works great! - Adding spices or extras to the filling: You can mix in nutmeg or ginger for a spicy twist. Try adding chopped nuts or chocolate chips to the filling for extra crunch and flavor. - Ideas for alternative frostings: Cream cheese frosting pairs well with Biscoff flavors. A simple vanilla glaze or a chocolate drizzle can also lift your rolls. Get creative with what you have at home! For an easy guide, check out the Full Recipe to make your own Biscoff Cookie Butter Cinnamon Rolls. {{image_2}} You can change the filling to mix things up. Try using Nutella or peanut butter instead of Biscoff cookie butter. You will still get a sweet and rich flavor. You can also add fruits like bananas or apples for a fresh twist. Nuts, such as walnuts or pecans, add a nice crunch and flavor. If you need a gluten-free version, swap traditional flour with gluten-free flour. Be careful to choose a blend that works well for baking. You may need to adjust the amount of liquid to make the dough right. This helps those with gluten sensitivity enjoy the rolls too. To make this recipe vegan, replace dairy ingredients with plant-based ones. Use almond milk or oat milk in place of regular milk. For the frosting, mix powdered sugar with a plant-based milk and a bit of vanilla extract. This way, everyone can enjoy these tasty rolls, no matter their diet. For the full recipe, check the details provided. To keep leftover cinnamon rolls fresh, wrap them in plastic wrap. This helps retain moisture. Store them in an airtight container at room temperature. They stay good for 2-3 days. If you want a warm treat, just pop them in the microwave for 10-15 seconds. For long-term storage, you can freeze your rolls. You have two options: freeze unbaked or baked rolls. If you freeze unbaked rolls, cover them tightly. Place them in a freezer bag. They can last for up to three months. When you're ready to bake, let them thaw in the fridge overnight. Then, let them rise before baking. If you prefer freezing baked rolls, allow them to cool completely. Wrap them in plastic wrap and then foil. They will also last for about three months. To reheat, take them out of the freezer and let them thaw at room temperature. Then, warm them in the oven at 350°F for about 10-15 minutes. Enjoy your Biscoff cookie butter cinnamon rolls anytime! To help your cinnamon rolls rise, you need warm conditions. Here are some tips: - Use warm milk, not hot, for the dough. - Let the dough rise in a warm spot, like near the oven. - Cover the dough with a towel to keep it warm and moist. - Be patient; let it rise until doubled in size. These steps help create a light and fluffy roll. The yeast needs warmth and time to work its magic. Yes, you can use homemade Biscoff cookie butter. However, store-bought options are more consistent. Homemade versions might differ in texture or flavor. Ensure your homemade butter is smooth and spreadable. This can affect how well it spreads on the dough. If your cookie butter is too thick, warm it slightly to make it easier to work with. These cinnamon rolls pair well with many drinks and snacks. Here are some ideas: - Coffee or chai tea enhances the cinnamon flavor. - Milk or almond milk offers a nice balance of creaminess. - Fresh fruit, like berries or banana slices, adds a refreshing touch. - Whipped cream can be a tasty topping for extra sweetness. You can explore these options to make your treat even better. Enjoy your cinnamon roll experience! You now have a solid recipe for Biscoff cookie butter cinnamon rolls. We covered the list of ingredients, tools, and each step to make them. I shared tips to improve your rolls and variations to try. Store your rolls properly to keep them fresh. With practice, you'll impress everyone with your baking. Enjoy every delicious bite!

Biscoff Cookie Butter Cinnamon Rolls Delightful Treat

Are you ready to elevate your breakfast game? These Biscoff Cookie Butter Cinnamon Rolls are the ultimate treat for cookie

To make your buffalo cauliflower bites, gather these key ingredients: - 1 medium head cauliflower, cut into bite-sized florets - 1 cup all-purpose flour - 1 cup almond milk (or any non-dairy milk) The right seasonings make these bites pop. You will need: - 1 teaspoon garlic powder - 1 teaspoon onion powder - 1 teaspoon smoked paprika - ½ teaspoon salt - ½ teaspoon black pepper These spices add depth and flavor to your dish. The flour and almond milk create a tasty batter that coats the cauliflower. When it's time to serve, I recommend garnishing with fresh parsley. Place the bites on a platter alongside celery sticks and carrot sticks. This adds a fresh crunch. You can also serve them with ranch or blue cheese dressing for dipping. These bites are great for parties or a fun snack at home. Check out the Full Recipe for more details! Start by preheating your oven to 450°F (230°C). While the oven heats, line a baking sheet with parchment paper. This helps keep the bites from sticking. Next, cut one medium head of cauliflower into bite-sized florets. Make sure they are all about the same size for even cooking. In a mixing bowl, whisk together one cup of all-purpose flour, one teaspoon of garlic powder, one teaspoon of onion powder, one teaspoon of smoked paprika, half a teaspoon of salt, and half a teaspoon of black pepper. This blend adds great flavor to your bites. Gradually add one cup of almond milk, or any non-dairy milk, to the dry mix. Whisk until you have a smooth batter. Dip each cauliflower floret into the batter. Make sure each piece is fully coated. Place them on the lined baking sheet in a single layer. This helps them bake evenly. Drizzle two tablespoons of olive oil on top. Toss the florets gently to coat them well with the oil. Spread them out evenly on the sheet. Bake the cauliflower in the preheated oven for 20-25 minutes. Look for a golden and crispy texture. This step is key to getting that perfect bite. While the cauliflower bakes, prepare the buffalo sauce. In a large bowl, combine one cup of your favorite buffalo sauce with any leftover batter. This adds thickness and flavor. Once the cauliflower bites are crispy, take them out of the oven. Toss them in the buffalo sauce mixture until they are fully coated. Return the coated bites to the baking sheet. Bake for an additional 10 minutes. This deepens the flavor and adds an extra crunch. Before serving, garnish with chopped fresh parsley. Serve the buffalo cauliflower bites with celery and carrot sticks for a fresh touch. Enjoy your savory snack! For the full recipe, check out the recipe section. To make your Buffalo Cauliflower Bites extra crispy, use a high oven temperature. I recommend setting your oven to 450°F (230°C). This heat helps the cauliflower roast well. Make sure to space the florets apart on the baking sheet. If they touch, they will steam, not crisp. Drizzle olive oil over them for added crunch. Toss them gently so the oil coats each piece. For a flavor boost, try adding different spices. Consider cayenne pepper for heat or smoked paprika for a rich taste. You can mix in some nutritional yeast for a cheesy flavor too. Marinating the cauliflower in buffalo sauce before baking can deepen the taste. You can also switch up the batter. Use oat flour or chickpea flour for a different texture and taste. Pair your Buffalo Cauliflower Bites with tasty dipping sauces. Ranch dressing is a classic choice, but blue cheese adds a nice zing. For a healthier option, serve with a yogurt-based dip. You can even make a spicy avocado sauce by blending ripe avocado, lime juice, and a pinch of salt. These dips enhance the overall eating experience and balance the bold flavors of the bites. For the full recipe, check out the detailed steps above. {{image_2}} If you need a gluten-free option, switch the all-purpose flour for a gluten-free flour blend. This change keeps the batter light and crisp. You can use almond flour or chickpea flour as tasty alternatives. Both options work well with the spices in the recipe. Buffalo sauce can be spicy or mild based on your taste. For a spicy kick, use a traditional hot sauce like Frank’s RedHot. If you prefer mild flavors, choose a sauce that has a lower heat level. You can also mix hot sauce with butter or a little honey to balance the heat. Cauliflower is great, but you can experiment with other veggies too! Try using broccoli florets or even sliced bell peppers. These veggies hold up well in the oven and soak up the buffalo sauce nicely. For a fun twist, use zucchini or mushrooms for a different texture and taste. For the complete recipe, check the Full Recipe section. To store your buffalo cauliflower bites, let them cool first. Place them in an airtight container. Keep them in the fridge for up to three days. Make sure they are in a single layer if possible. This helps keep them crispier. When you're ready to eat the leftovers, preheat your oven to 350°F (175°C). Spread the cauliflower bites on a baking sheet. Heat them for about 10-15 minutes or until hot. You can also use an air fryer for quick reheating. Just cook them at 350°F (175°C) for about five minutes. You can freeze buffalo cauliflower bites for longer storage. Place them in a freezer-safe bag or container. Try to remove as much air as possible. They will stay fresh for about two months. To cook from frozen, bake them straight from the freezer. Just add a few extra minutes to the cooking time. Enjoy these tasty bites later with the Full Recipe! Yes, you can make Buffalo Cauliflower Bites in an air fryer. Air fryers cook food quickly and give it a nice crisp. To do this, set your air fryer to 400°F (200°C). Place the batter-coated cauliflower in a single layer. Cook for about 12-15 minutes. Shake the basket halfway through for even cooking. This method saves time and oil, making it a great option. If you want to skip the flour, try using chickpea flour or almond flour. Both options work well and add unique flavors. You can also use cornstarch for a gluten-free batter. Mix the alternative flour with the same seasonings, and add your non-dairy milk. This keeps the texture and taste similar to the original recipe. Making homemade buffalo sauce is easy and fun! Start with these simple steps: - Melt ½ cup of butter in a saucepan. - Stir in 1 cup of hot sauce (like Frank's RedHot). - Add 1 tablespoon of vinegar for tang. - Mix in 1 teaspoon of garlic powder for flavor. - Whisk everything together until smooth. You can adjust the heat by adding more hot sauce or a pinch of sugar for sweetness. This sauce is perfect for dipping or tossing your cauliflower bites. For the full recipe, check the earlier section. Buffalo cauliflower bites are fun and tasty. We covered key ingredients, from primary components to seasonings. I shared step-by-step instructions for baking and coating. With tips for crispiness and flavor, you can make them great every time. Variations let you customize for dietary needs. Don’t forget how to store leftovers, too. Now, you can enjoy this dish freshly made or reheated later. Try different sauces and veggies to find your favorite mix. Enjoy your cooking adventure with buffalo cauliflower!

Savory Buffalo Cauliflower Bites Easy Recipe Guide

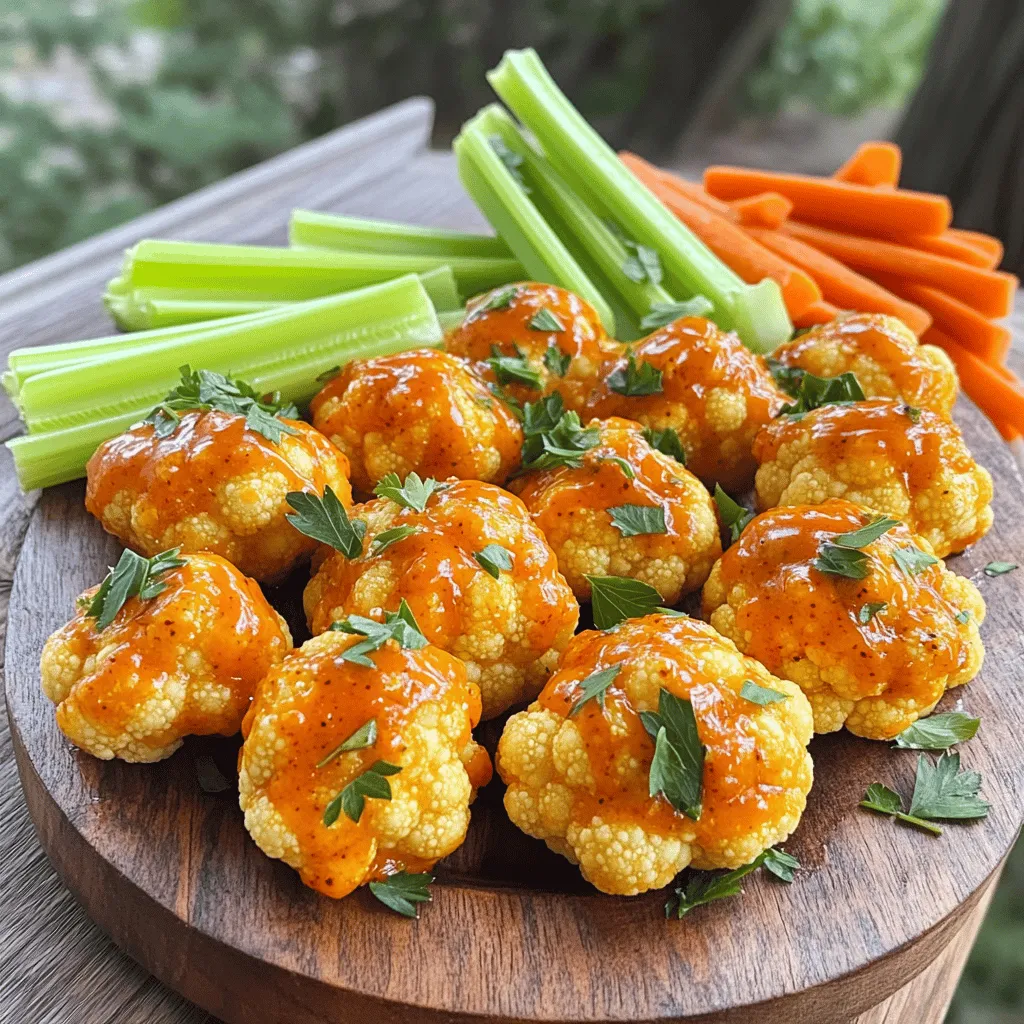
Are you craving a tasty snack that’s both healthy and satisfying? Buffalo cauliflower bites are your answer! These bites pack

- Whole chicken (4-5 lbs) - Fresh herbs: rosemary, thyme, parsley - Olive oil and garlic - Vegetables: onion, carrots, potatoes - Seasoning essentials: lemon, salt, and pepper To make savory herb roasted chicken, you need simple, fresh ingredients. Start with a whole chicken. A bird weighing 4-5 pounds works best. Next, gather fresh herbs. I love using rosemary, thyme, and parsley. They add great flavor and aroma. Olive oil and garlic also play key roles. They help create a rich, tasty crust. For vegetables, use onion, carrots, and potatoes. They roast well and soak up the chicken's juices. Add seasoning essentials like lemon, salt, and pepper. Lemon brightens the dish and makes it zesty. This recipe uses fresh ingredients to ensure a juicy and flavorful chicken. You can find the full recipe above, which guides you through each step. Enjoy your cooking! Start by cleaning the chicken. Rinse it under cold water and pat it dry with paper towels. This step is key for a crispy skin. Next, make your herb paste. In a small bowl, mix olive oil, chopped rosemary, thyme, parsley, minced garlic, lemon zest, salt, and pepper. This paste will bring great flavor. Now, loosen the skin on the chicken breast and thighs. You can do this by gently sliding your fingers under the skin. Be careful not to tear it. Once you loosen the skin, rub the herb paste under the skin and over the chicken. Make sure every part gets some love. Then, stuff the cavity with the quartered lemon. This adds moisture and flavor. In a roasting pan, arrange the onion, carrots, and potatoes in a single layer. Place the chicken on top, breast side up. Now, roast the chicken in your preheated oven at 425°F (220°C) for about 1 hour and 15 minutes. It's done when the internal temperature hits 165°F (75°C) in the thickest part of the thigh. The skin should be golden and crispy. Halfway through cooking, baste the chicken with the pan juices. This keeps it juicy. After cooking, let the chicken rest for 10 to 15 minutes before carving. This helps the juices settle. Enjoy your savory herb roasted chicken! For more details, check out the Full Recipe. Basting is key to keeping your chicken juicy. Baste the chicken halfway through cooking. This adds flavor and moisture. Use the pan juices to soak the skin. Doing this step helps the chicken stay tender and gives it a nice color. Letting the chicken rest is very important. After you take it out of the oven, let it sit for 10-15 minutes. This allows the juices to settle. If you cut it right away, those juices run out. You want every bite to be juicy and full of flavor. To boost the taste, try adding different spices. You can use smoked paprika for a hint of smoke. A bit of lemon juice can add brightness. Feel free to experiment with marinades too. Soy sauce or honey can make nice glazes. These ideas give your chicken a unique twist. For more details, check the Full Recipe. {{image_2}} You can mix and match herbs to create your own flavor. Rosemary, thyme, and parsley work well together. If you want a twist, try oregano or sage. Each herb adds its own taste. Oregano gives a warm, earthy flavor. Sage adds a hint of woodiness. This keeps your dish exciting and unique. Roasting is classic, but other methods work, too. You can use a slow cooker for a tender chicken. Just put everything in, set it, and walk away. An air fryer is another great option. It cooks fast and gives crispy skin without tons of oil. Each method offers its own benefits, so try what you like best. Feel free to swap out sides or add flavors. Instead of carrots and potatoes, try sweet potatoes or Brussels sprouts. You can even add a splash of balsamic vinegar for a tangy bite. This recipe is flexible, so get creative! Mix in your favorite flavors for a dish that feels personal. For the full recipe, check the earlier section. Store leftover chicken in an airtight container. This keeps it fresh and safe to eat. Make sure to refrigerate your chicken within two hours of cooking. It helps prevent harmful bacteria growth. If you have any herbs left, store those separately to maintain their flavor. To freeze your chicken, first let it cool completely. Wrap it tightly in plastic wrap, then place it in a freezer-safe bag. This extra layer helps prevent freezer burn. When you are ready to eat it again, thaw it in the fridge overnight. Reheat it in the oven at 350°F (175°C) until it's hot all the way through. For best quality, eat refrigerated chicken within three to four days. If frozen, it’s best to use it within four months. After that, it may still be safe to eat, but the quality may drop. Always check for any off smells or changes in texture before eating. Following these steps ensures you enjoy every bite of your savory herb roasted chicken from the [Full Recipe]. Roasting a chicken takes about 20 minutes per pound. For a 4-5 pound chicken, that means roughly 1 hour and 15 minutes. Always check the size of your chicken. Some ovens may cook faster or slower. Use a meat thermometer to ensure accuracy. The chicken is ready when it reaches an internal temperature of 165°F (75°C) in the thickest part of the thigh. Yes, you can use dried herbs, but the flavor will change. Dried herbs are more potent than fresh ones. Use about one-third the amount when switching. For example, if the recipe calls for 2 tablespoons of fresh herbs, use about 1 tablespoon of dried herbs. This change will still give you a nice flavor, but fresh herbs bring a brighter taste. The best way to know if your chicken is done is to check its internal temperature. Use a meat thermometer to measure the temperature in the thigh, not touching the bone. It should read 165°F (75°C). This ensures the chicken is safe to eat. Also, the juices should run clear when you cut into it. Enjoy your perfectly juicy chicken! This post covered how to roast a whole chicken perfectly. We discussed the ingredients, from fresh herbs to essential vegetables. I provided step-by-step instructions to prep, season, and roast the chicken safely. Tips on basting and resting helped ensure moisture and flavor. I also shared variations for herbs, cooking methods, and storage tips to keep leftovers fresh. With these guidelines, you can elevate your cooking skills and impress others with a delicious meal.

Savory Herb Roasted Chicken Perfectly Juicy Recipe

If you crave a flavorful and tender meal, look no further than this Savory Herb Roasted Chicken. I’ll share my

To make the best chocolate chip cookie dough dip, you'll need some simple but key ingredients: - 1 cup all-purpose flour (heat-treated for safety) - 1/2 cup brown sugar, packed - 1/2 cup granulated sugar - 1/2 cup unsalted butter, softened - 2 teaspoons vanilla extract - 1/4 teaspoon salt - 1/2 cup mini chocolate chips - 1/2 cup cream cheese, softened - 1/2 cup powdered sugar Each of these ingredients plays a big role. The flour gives it a doughy feel, while the sugars add sweetness. The butter and cream cheese create a rich, smooth texture. The vanilla brings warmth, and the mini chocolate chips add delightful bursts of chocolate with every bite. You can make this dip your own with some fun add-ins. Consider: - 1 cup whipped topping (for a lighter texture) - Chopped nuts (like walnuts or pecans) - A sprinkle of sea salt on top - Different flavored extracts (like almond or hazelnut) These options allow you to switch up the taste and texture. Whipped topping makes it fluffier, while nuts add a crunchy bite. A sprinkle of sea salt can enhance the sweetness nicely. If you need to swap an ingredient, here are some easy choices: - Use coconut flour for a gluten-free option. - Replace cream cheese with Greek yogurt for a tangy twist. - Use dairy-free butter and cream cheese for a vegan option. These substitutions help you cater to different diets or preferences. Just remember, the taste and texture might change slightly, but the dip will still be delicious! For the full recipe, check out the detailed instructions above. To start, gather your ingredients. In a large bowl, cream together the softened butter, brown sugar, granulated sugar, and cream cheese. Mix until it is smooth. Adding the vanilla extract and salt comes next. Stir well to blend all the flavors. Now, it's time to add the flour. Make sure it’s heat-treated for safety. Gradually mix it in. This will help avoid lumps. Keep stirring until everything is combined. The dough should be thick and creamy. Once your base is ready, it's time for the fun part! Gently fold in the mini chocolate chips. Use a spatula to make sure they are evenly spread throughout the dough. This step adds that delightful chocolate flavor in every bite. If you want a lighter dip, consider adding whipped topping. Just fold it in gently. This will make the dip fluffier and even more enjoyable! Now, transfer your cookie dough dip to a serving bowl. Smooth the top with your spatula for a nice finish. Cover the bowl with plastic wrap. Place it in the fridge for at least 30 minutes. Chilling helps the flavors mix well together. When you are ready to serve, take it out of the fridge. For a nice touch, sprinkle some extra mini chocolate chips on top. Serve it with graham crackers, pretzels, or apple slices. You can find the Full Recipe for more details! To get the perfect creamy texture, start with softened butter and cream cheese. Mix them well with the sugars until smooth. This step is key. If you want a lighter dip, add whipped topping. Fold it in gently to keep the air in. You can boost the flavor by adding a pinch of cinnamon or a splash of almond extract. This gives the dip a warm, cozy taste. You might even want to mix in some chopped nuts or peanut butter for a twist. The mini chocolate chips bring sweetness, but feel free to experiment with dark chocolate or white chocolate chips too. When it's time to serve, think about what you can dip into this treat. Graham crackers are classic and crunchy. Pretzels bring a salty kick, which pairs well. Apple slices add freshness, and mini cookies make it a sweet delight. Arrange these dippers in a fun way to make your spread even more inviting. For an eye-catching finish, sprinkle extra mini chocolate chips on top. {{image_2}} To make a gluten-free version, simply swap the all-purpose flour for gluten-free flour. Make sure to use a blend that works well in desserts. Heat-treat the gluten-free flour the same way to keep it safe. This dip tastes just as good, and everyone can enjoy it! Want to add some crunch? Stir in chopped nuts, like walnuts or pecans. You can add about 1/2 cup of nuts to the base mix. This twist brings great flavor and texture. It pairs perfectly with the sweet chocolate chips! For a vegan version, replace the butter and cream cheese with plant-based options. Use vegan butter and a dairy-free cream cheese. You can also swap honey or regular sugar for maple syrup or coconut sugar. This way, everyone can enjoy the dip, and it still tastes amazing! You can find the Full Recipe to make the base dip, then try out these fun variations. To store your chocolate chip cookie dough dip, place it in an airtight container. This keeps it fresh and safe from air. Make sure to seal it tightly. You can store it in the fridge for easy access. The dip stays fresh in the fridge for about five days. After that, it may lose its taste and texture. Always check for any signs of spoilage, like off smells or changes in color. If it looks or smells funny, it’s best to toss it. If you want to keep some dip for later, freezing works well. Scoop the dip into a freezer-safe container. Leave some space at the top, as the dip may expand. You can freeze it for up to three months. When you're ready to enjoy it, thaw it in the fridge overnight. This keeps it safe and tasty. For the best flavor, use the dip within a month after thawing. Yes, you can eat the cookie dough dip raw. It tastes great and is safe to eat. We heat-treat the flour to kill any germs. Just make sure all your ingredients are fresh. This dip is rich and creamy, perfect for indulging. The dip lasts about five days in the fridge. Store it in an airtight container. Keep it tightly sealed to maintain its flavor. If you notice any changes in taste or texture, it’s best to toss it. You can serve the dip with many fun dippers. Try graham crackers, pretzels, or apple slices. Mini cookies also work well for a sweet treat. For a twist, use fruit like strawberries or bananas. Get creative and have fun with it! For more details, check the Full Recipe. You learned how to make a tasty chocolate chip cookie dough dip. We covered key ingredients and fun add-ins. You now know how to prepare the dip, ensuring a creamy texture, and serve it with the best dippers. Variations like gluten-free and vegan options make it easy for everyone. Finally, I shared storage tips so you can enjoy leftovers. Experiment with flavors and make it your own. Enjoy your yummy treat!

Chocolate Chip Cookie Dough Dip Irresistible Treat

If you love the taste of cookie dough, you’ll adore my Chocolate Chip Cookie Dough Dip! This creamy, sweet treat

To make Zesty Lemon Garlic Shrimp Tacos, you need some fresh and simple ingredients. Here’s what you’ll need: - 1 lb large shrimp, peeled and deveined - 3 tablespoons olive oil - 4 cloves garlic, minced - Juice and zest of 2 lemons - 1 teaspoon paprika - 1 teaspoon ground cumin - Salt and pepper to taste - 8 small corn tortillas - 1 cup shredded red cabbage - 1 avocado, sliced - Fresh cilantro for garnish - Lime wedges for serving These ingredients come together to create a vibrant dish bursting with flavor. The shrimp pairs perfectly with the zesty lemon and garlic, while the fresh toppings add a nice crunch. Each bite takes you to a sunny beach, even if you're at home. For the full recipe, check out the details that will guide you through every step. To start, you will need to prepare the marinade. In a medium bowl, combine the following: - 3 tablespoons olive oil - 4 cloves garlic, minced - Juice and zest of 2 lemons - 1 teaspoon paprika - 1 teaspoon ground cumin - Salt and pepper to taste Mix these ingredients well. Add 1 pound of large shrimp that are peeled and deveined. Toss the shrimp to coat them in the marinade. I recommend letting it sit for about 15 minutes. This time allows the shrimp to absorb all those zesty flavors. For the best shrimp, heat a large skillet over medium-high heat. Once it's hot, add the marinated shrimp in a single layer. Cook the shrimp for 2-3 minutes on each side. You want them to turn pink and be fully cooked. Keep an eye on the time so they do not overcook. Overcooked shrimp can become tough and rubbery. While the shrimp cooks, it's time to warm the corn tortillas. Use a separate dry skillet and set it over low heat. Warm each tortilla for about 30 seconds on each side. This makes them pliable and improves the texture. You want them soft and ready to hold all the tasty fillings. Now it’s time for the fun part: assembling the tacos! Take a warm tortilla and place a portion of the shrimp on it. Next, add some shredded red cabbage for crunch and then top with sliced avocado. I love to garnish my tacos with fresh cilantro. Serve them with lime wedges on the side for an extra zesty kick. For the full recipe, check out the complete instructions above. To avoid overcooking shrimp, watch the color closely. Cook them until they turn pink. This usually takes 2-3 minutes per side. If they curl tightly, they are overdone. For a perfect sear, use a hot skillet. Add the shrimp in a single layer. This helps them cook evenly. Don’t overcrowd the pan; cook in batches if needed. You can use other spices to boost flavor. Try adding chili powder or cayenne for heat. Marinades with lime juice or soy sauce can add depth. For garnishes, fresh herbs like parsley or dill work great. Thinly sliced radishes and jalapeños add a nice crunch. These extras can brighten up your tacos. For sides, consider black beans or a fresh corn salad. They add a nice contrast to the tacos. You can also serve with tortilla chips and salsa for a fun touch. For gatherings, set up a taco bar. Let guests build their own tacos with various toppings. This makes serving easy and fun! For the full recipe, check out the details above. {{image_2}} For those who need gluten-free options, corn tortillas work great. They add a nice crunch and keep the taco authentic. If you want to try something different, you can use lettuce wraps instead. They are fresh and light. If you prefer vegan options, swap the shrimp for jackfruit or tofu. Both of these ingredients soak up flavor well. You can use the same marinade from the original recipe. Just make sure to cook them until tender. Want to spice things up? Add jalapeños or chili flakes for heat. You can also use hot sauce on top for an extra kick. If you love smoky flavors, try adding smoked paprika instead of regular. For herbs, cilantro is a classic choice, but don’t stop there. Fresh basil or dill can add a unique twist. Experiment with different herbs to find your favorite mix. Using fresh produce can really elevate your tacos. In summer, fresh corn kernels can add sweetness. In fall, diced apples or pears can provide a nice crunch. Check your local market for seasonal fruits and veggies. This can help you adapt your tacos based on what’s available. Fresh ingredients always make meals taste better. For the full recipe, refer to the earlier sections. To store shrimp tacos, place them in an airtight container. Make sure to separate the shrimp from the tortillas and toppings. This keeps the tortillas from getting soggy. You can store them in the fridge for up to two days. I recommend using glass containers for easy viewing. They also help keep the shrimp fresh. Avoid using plastic wrap as it can trap moisture. When reheating shrimp, do it gently to keep the texture. Place the shrimp in a skillet over low heat. Stir often until they are warm. Avoid high heat, as it can toughen them. For tortillas, wrap them in damp paper towels and microwave for about 15 seconds. This method makes them soft and warm. Add your toppings after reheating to keep them fresh. Can you freeze shrimp tacos? Yes, but do it right. Store the shrimp in freezer-safe bags. Squeeze out the air to prevent freezer burn. You can freeze them for up to three months. When ready to eat, thaw the shrimp in the fridge overnight. Reheat them using the tips above. Remember, it’s best to freeze shrimp without the tortillas and toppings. Enjoy the full recipe to make fresh tacos! To tell if shrimp is cooked, look for a few signs. Cooked shrimp turns pink and opaque. It also curls up into a C shape. If you see these signs, your shrimp is ready. Overcooked shrimp becomes tough and rubbery, so watch closely. Yes, you can use frozen shrimp. To thaw, place them in the fridge overnight. If you're in a hurry, put them in a bowl of cold water for about 15 minutes. After thawing, pat them dry before cooking. This helps them get a nice sear. If you need a different option, try lettuce wraps. They are fresh and crunchy. You can also use corn tortillas for gluten-free needs. For a low-carb choice, try cauliflower tortillas. These options still taste great with the shrimp. For toppings, I recommend shredded red cabbage for crunch. Sliced avocado adds a creamy texture. Fresh cilantro brings a burst of flavor. You can also squeeze lime juice on top for extra zest. These toppings really enhance the dish. Absolutely! You can marinate the shrimp ahead of time. Just store them in the fridge for up to 24 hours. Warm your tortillas and cook the shrimp when you're ready to eat. This makes for quick assembly and a tasty meal. Check out the Full Recipe for more details on preparation. We explored how to make Zesty Lemon Garlic Shrimp Tacos. I shared essential ingredients, step-by-step instructions, and tips for perfect shrimp. We discussed variations for dietary needs and seasonal items, plus storage and reheating advice. Enjoy experimenting with flavors and customizing this dish. Perfect shrimp tacos can elevate any meal or gathering. Let your creativity shine as you try new toppings and techniques. You'll impress everyone with these tasty tacos!

Zesty Lemon Garlic Shrimp Tacos Tasty and Simple Meal

Are you ready for a flavor explosion? These Zesty Lemon Garlic Shrimp Tacos are quick to make and will wow

To make a tasty spinach artichoke dip, gather these simple ingredients: - 1 cup fresh spinach, chopped - 1 cup canned artichoke hearts, drained and chopped - 1 cup cream cheese, softened - 1/2 cup sour cream - 1/2 cup mayonnaise - 1 cup shredded mozzarella cheese - 1/4 cup grated Parmesan cheese - 2 cloves garlic, minced - 1 teaspoon onion powder - 1/2 teaspoon salt - 1/4 teaspoon black pepper - 1/4 teaspoon crushed red pepper flakes (optional, for a kick) Each serving of this dip has about: - Calories: 250 - Protein: 8g - Total Fat: 20g - Saturated Fat: 10g - Carbohydrates: 10g - Fiber: 1g - Sugars: 1g This dip packs flavor but also provides some nutrients. Spinach adds vitamins, and artichokes bring fiber. You can swap some ingredients if needed: - Use Greek yogurt instead of sour cream for a tangy taste. - Replace cream cheese with cottage cheese for a lighter option. - Try different cheeses, like cheddar or gouda, for a unique flavor. - If you don't have fresh spinach, frozen spinach works well too. Just make sure to drain it first. For the full recipe, check out the Charming Spinach Artichoke Dip section. First, gather all your ingredients. You will need fresh spinach, artichoke hearts, cream cheese, sour cream, mayonnaise, mozzarella, Parmesan, garlic, onion powder, salt, black pepper, and red pepper flakes. Chop the spinach and artichokes finely. This helps blend the flavors well. Make sure your cream cheese is soft. It mixes easier when it’s at room temperature. 1. Preheat your oven to 350°F (175°C). This step is key for even cooking. 2. In a mixing bowl, combine the softened cream cheese, sour cream, and mayonnaise. Stir until smooth and creamy. 3. Add the chopped spinach, artichokes, mozzarella, Parmesan, garlic, onion powder, salt, black pepper, and red pepper flakes if you like heat. Mix until everything is well combined. 4. Transfer the mixture into a baking dish. Spread it out evenly. 5. Bake in the preheated oven for 25-30 minutes. Look for the dip to be bubbly and lightly golden on top. 6. Remove the dip from the oven. Let it cool slightly before serving. You want the dip to bubble around the edges. The top should have a nice golden color. If it's not golden yet, let it bake a few more minutes. Keep an eye on it to avoid burning. Once it looks good, take it out. Serve it warm for the best taste. Check out the Full Recipe for more details! To make the best spinach artichoke dip, use fresh ingredients. Fresh spinach gives a nice taste. Always use room temperature cream cheese. This helps it blend smoothly. Mix the cream cheese, sour cream, and mayonnaise well. This creates a creamy base. Be sure to chop the artichoke hearts and spinach finely. Chunky pieces can affect the dip's texture. If you want a spicy kick, add more crushed red pepper flakes. Bake until it bubbles and turns golden. This gives the dip a nice crust. One common mistake is overcooking the dip. Keep an eye on it in the oven. Remove it as soon as it is bubbly. Another mistake is not seasoning enough. Taste the mix before baking. Adjust salt and pepper if needed. Using low-fat cream cheese can change the flavor. Stick to regular cream cheese for the best taste. Lastly, don’t forget to let it cool a bit before serving. It’s easier to eat when it’s not too hot. Serve the dip warm for the best flavor. I love pairing it with tortilla chips. They add a nice crunch. You can also use toasted baguette slices. Fresh vegetable sticks work great too. Carrots and celery add a fresh twist. For a touch of color, sprinkle extra Parmesan on top. A bit of chopped parsley makes it look pretty. This dip is perfect for parties, game nights, or family gatherings. Check the full recipe for more details! {{image_2}} You can make your spinach artichoke dip even better with fun add-ins. Try adding cooked bacon for a smoky flavor. If you love heat, mix in jalapeños or diced green chilies. Want to switch up the cheese? Use a blend of cheddar and pepper jack for a tasty twist. You can also add chopped sun-dried tomatoes for a touch of sweetness. These changes can make your dip unique and exciting. This dip fits any event! For a game day snack, serve it with crispy tortilla chips. If it’s a fancy party, use toasted baguette slices. For a fresh option, pair it with crisp vegetable sticks. You can also put the dip in small ramekins for individual servings. This makes it easy for guests to grab their own. Dress it up with fresh herbs or a drizzle of olive oil to impress everyone. To lighten up this dish, you can swap some ingredients. Use Greek yogurt instead of sour cream and mayonnaise. This change cuts calories while adding protein. You can also use low-fat cream cheese for a healthier base. If you want, add more spinach to boost the nutrients. This way, you enjoy a tasty dip that feels good to eat. Check out the Full Recipe for more ideas on making it your own. After enjoying your dip, let it cool. Place the leftovers in an airtight container. Make sure to seal it well to keep out air. Store it in your fridge for up to three days. This helps keep the dip fresh and tasty. When you're ready to enjoy the dip again, it's time to reheat it. Preheat your oven to 350°F (175°C). Scoop the dip into an oven-safe dish. Heat it for 15-20 minutes, or until it's warm and bubbly. You can also use a microwave. Heat in short bursts, about 30 seconds at a time, stirring in between. This keeps it nice and creamy. You can freeze this dip for later. First, let it cool completely. Then, place it in a freezer-safe container. Make sure to leave some space at the top, as it will expand. It can stay frozen for up to three months. To thaw, move it to the fridge overnight. Then, reheat it as mentioned above. This way, you can enjoy your spinach artichoke dip anytime! For the full recipe, check out the Charming Spinach Artichoke Dip section. Yes, you can make spinach artichoke dip ahead of time. Prepare the dip and place it in a baking dish. Cover it with plastic wrap or foil. Store it in the fridge for up to two days. When ready to eat, just bake it as per the instructions. This helps the flavors blend well. You can enjoy a tasty dip without the rush. Spinach artichoke dip pairs well with many items. Here are some great options: - Tortilla chips - Sliced baguette - Fresh vegetable sticks (carrots, celery, bell peppers) - Pita chips - Crackers Each option adds a nice crunch. You can even mix and match for fun. This makes your snack time more exciting! Homemade spinach artichoke dip lasts about three to four days in the fridge. Keep it in an airtight container. If you want to keep it longer, freezing is a good option. Just thaw it in the fridge before reheating. Enjoy your dip at your own pace! For the full recipe, check out the details above. In this post, we covered how to make a delicious spinach artichoke dip. We examined ingredients, cooking steps, and tips for success. You learned about substitutions, serving ideas, and variations to impress your guests. Proper storage and reheating tips help keep leftovers fresh. Remember, the key to great dip is using fresh ingredients and avoiding common mistakes. Enjoy your cooking journey, and your dip will always be a hit!

Easy Spinach Artichoke Dip Flavorful and Simple Recipe

Looking for a creamy, delicious dip that’s quick to whip up? This Easy Spinach Artichoke Dip recipe is just what

To make a great Loaded Potato Meatloaf, you need these main ingredients: - 1 lb (450g) ground beef - 1 lb (450g) russet potatoes, peeled and cubed - 1 cup shredded cheddar cheese - 1/2 cup sour cream - 1/2 cup breadcrumbs - 1/4 cup green onions, chopped - 2 cloves garlic, minced - 1 large egg - 1 teaspoon Worcestershire sauce - 1 teaspoon salt - 1/2 teaspoon black pepper - 1/2 teaspoon smoked paprika - 1/2 cup ketchup (for topping) These ingredients create a hearty dish. The beef gives it protein, while the potatoes add a creamy texture. Cheese and sour cream make it rich and tasty. Using fresh ingredients makes a big difference. Choose the best potatoes you can find. Look for firm russets without dark spots. Fresh green onions add a nice crunch. Garlic should smell strong and fragrant. These fresh items enhance the flavors and make your dish pop. You can get creative with your Loaded Potato Meatloaf. Add-ins can include: - Cooked bacon bits for a smoky flavor - Diced bell peppers for a crunchy bite - Different cheeses like pepper jack or mozzarella Feel free to mix and match based on what you like. This adds a personal touch and keeps the recipe exciting. You can find the Full Recipe to guide you through creating this delicious dish. Start by peeling and cubing the russet potatoes. Place the cubes in a large pot and cover them with water. Bring the water to a boil. Cook the potatoes until tender, which takes about 15 minutes. Drain the potatoes and mash them in a bowl. Mix in sour cream, cheddar cheese, and half of the chopped green onions. Set this aside for later. In a separate large bowl, combine the ground beef, breadcrumbs, minced garlic, egg, Worcestershire sauce, salt, black pepper, and smoked paprika. Use your hands to mix the ingredients until they blend well. This step is key for the best flavor and texture. Now, divide the meat mixture in half. Take one half and press it into a loaf shape in the bottom of a loaf pan. Spread the loaded mashed potatoes evenly over this layer. Then, take the remaining meat mixture and place it on top, sealing the edges well. Finally, spread ketchup over the meatloaf for a tasty glaze. For the full recipe, check the details above. To get the best texture in your Loaded Potato Meatloaf, use fresh potatoes. They add creaminess and flavor. When mashing, ensure they are smooth but not too watery. Mix in cheddar cheese and sour cream for rich taste. The cheese melts well, making each bite gooey and delicious. One big mistake is overmixing the meat. This can make your meatloaf tough. Just mix until everything is combined. Another mistake is not sealing the edges when layering. This keeps the potatoes from leaking out during baking. Be sure to press down firmly around the edges. For a great glaze, use ketchup mixed with a bit of Worcestershire sauce. This adds depth to the flavor. Spread the glaze evenly over the top before baking. It caramelizes nicely, giving your meatloaf a beautiful finish. You can also sprinkle a little smoked paprika on top for extra color and taste. Get the full recipe to create your own Loaded Potato Meatloaf! {{image_2}} If you want a twist, try using ground turkey or chicken instead of beef. These meats are leaner and still tasty. For a vegan option, use lentils or black beans. Just mash them well and mix with your favorite spices. You can also use a mix of ground meats for extra flavor. Each choice gives a unique taste to your loaded potato meatloaf. Cheese adds richness to your meatloaf. Instead of cheddar, try mozzarella for a milder taste. You can even use pepper jack for a spicy kick. Adding cream cheese can make it extra creamy. Don’t forget to sprinkle in some crumbled feta or goat cheese for a gourmet touch. Each cheese option brings a new layer of flavor. Spices can transform your meatloaf. Try adding diced jalapeños for heat. A bit of cumin or chili powder can add depth. Fresh herbs like parsley or thyme can brighten the dish. You can also mix in some barbecue sauce for a smoky flavor. These small changes make your loaded potato meatloaf unique every time. For more ideas, check out the Full Recipe and explore different combinations! To store your leftover Loaded Potato Meatloaf, let it cool first. Wrap it tightly in plastic wrap or aluminum foil. You can also place it in an airtight container. This keeps it fresh and tasty. Store it in the fridge for up to four days. When you want to enjoy your leftovers, preheat your oven to 350°F (175°C). Place the meatloaf slices in a baking dish. Cover them with foil to keep them moist. Bake for about 20 minutes or until heated through. You can also use the microwave. Heat on medium for 1-2 minutes or until hot. If you want to save some for later, freezing is a great option. Wrap the meatloaf tightly in plastic wrap. Then, place it in a freezer-safe bag or container. You can freeze it for up to three months. To thaw, move it to the fridge overnight. Reheat it as mentioned above, and enjoy! For the full recipe, check out the details above. Loaded Potato Meatloaf lasts about 3 to 4 days in the fridge. Keep it in an airtight container. This helps it stay fresh and tasty. The flavors actually get better as it sits! Yes, you can make Loaded Potato Meatloaf ahead of time. Prepare it a day before, then store it in the fridge. Just pop it in the oven when you're ready to bake. This makes dinner easy and quick! Many sides go great with Loaded Potato Meatloaf. Here are some tasty options: - Roasted vegetables - Green salad - Creamy coleslaw - Mashed cauliflower - Garlic bread These sides add color and flavor to your meal! Absolutely, you can make Loaded Potato Meatloaf without breadcrumbs. Use oats or crushed crackers instead. If you want it gluten-free, try ground almonds or almond flour. These options keep the meatloaf moist and tasty. You can find the full recipe above. In this blog post, we explored the tasty world of Loaded Potato Meatloaf. We discussed the best ingredients to use and how to prepare each step. I shared tips to perfect the texture and flavor while avoiding common mistakes. You can customize this dish with meat alternatives, cheeses, and spices for unique flavors. Lastly, I provided storage tips to keep leftovers fresh. This recipe is fun and flexible, making it a delightful meal for anyone. Enjoy crafting your delicious Loaded Potato Meatloaf!

Loaded Potato Meatloaf Irresistible Comfort Food

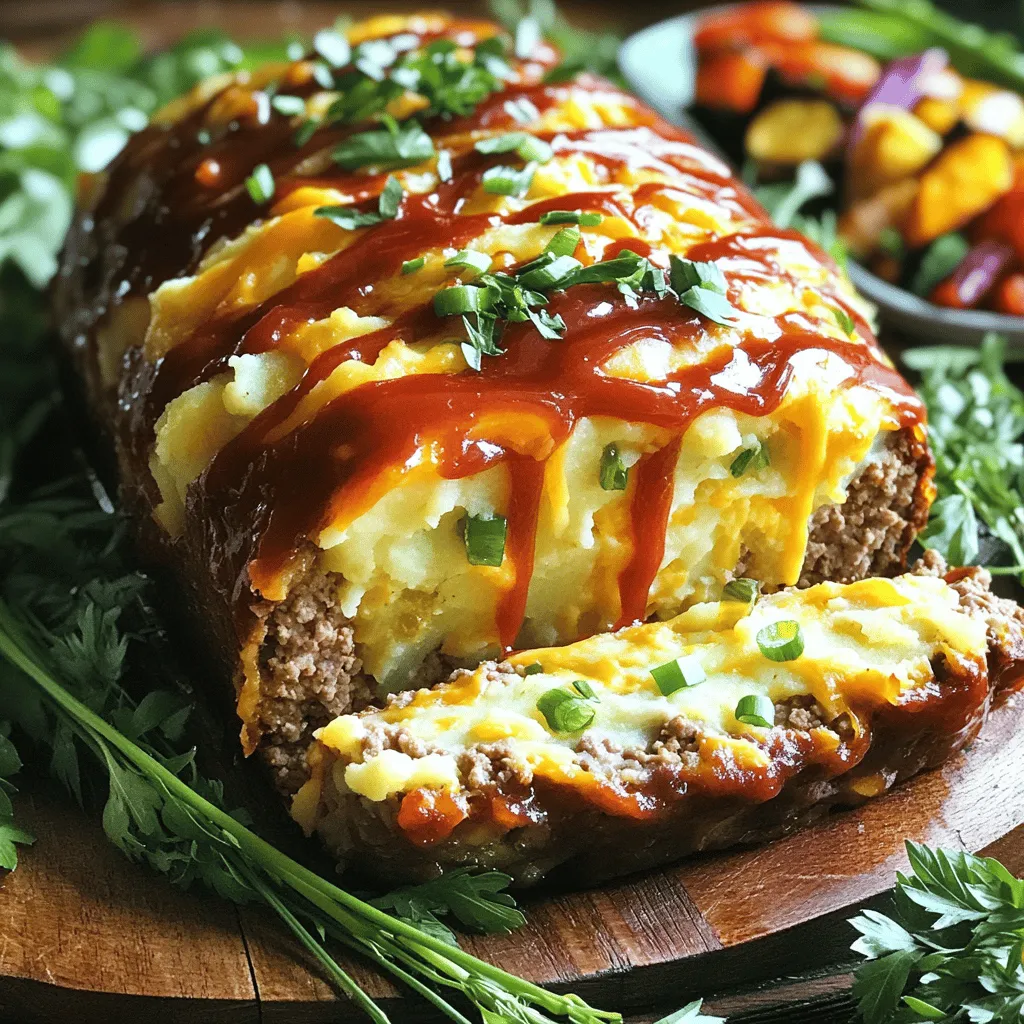
Craving comfort food that hits the spot? Loaded Potato Meatloaf is your answer! This dish combines tender meat with creamy

Older posts
Newer posts
← Previous Page1 … Page43 Page44 Page45 … Page60 Next →

dsad

© 2025 Cooking Wells • Built with GeneratePress

Our Policies

  • Copyright Policy
  • Cookie Policy
  • GDPR Policy
  • Privacy Policy
  • Disclaimer
  • Terms Of Use

More Information

  • Home
  • About
  • Contact
  • Appetizers
  • Dessert
  • Dinner
  • Drinks
©2025, Cooking Wells About Back To Top