Skip to content
DisclaimerTerms Of UseGDPR PolicyCookie Policy

Cooking Wells

  • Home
  • Drinks
  • Appetizers
  • Dinner
  • Dessert
  • About
  • Contact
  • Privacy Policy
DisclaimerTerms Of UseGDPR PolicyCookie Policy

Mia

- 2 cups plain Greek yogurt - 2 tablespoons honey or maple syrup - 1 teaspoon vanilla extract - 1 cup mixed berries (strawberries, blueberries, raspberries) - 1/2 banana, sliced - 1/4 cup chopped nuts (almonds, walnuts, or pistachios) - 2 tablespoons shredded coconut (optional) - A pinch of sea salt To make frozen yogurt bark, you need some key items. First, grab 2 cups of plain Greek yogurt. This yogurt gives your bark a creamy base. Next, add 2 tablespoons of honey or maple syrup. This sweetens it up just right. Don’t forget 1 teaspoon of vanilla extract for that yummy flavor. You can also add fun toppings. I love using 1 cup of mixed berries like strawberries, blueberries, and raspberries. They add color and taste. A 1/2 banana, sliced, works well too. For some crunch, add 1/4 cup of chopped nuts like almonds or walnuts. If you want a little extra, sprinkle on 2 tablespoons of shredded coconut. Finally, a pinch of sea salt brings out all the flavors. These ingredients make a tasty treat that’s also healthy. You can find the full recipe online for more details. Enjoy making this fun and easy snack! - Line a baking sheet with parchment paper or a silicone mat. This helps with easy removal later. - In a mixing bowl, combine the Greek yogurt, honey (or maple syrup), vanilla extract, and a pinch of sea salt. Stir until smooth. This yogurt mixture should be creamy and easy to spread. - Pour the yogurt mixture onto the baking sheet. Spread it out evenly to make a rectangular layer about 1/4 inch thick. - Scatter mixed berries, banana slices, chopped nuts, and shredded coconut (if using) over the yogurt. Press them lightly into the mixture. This step adds flavor and crunch to your bark. - Transfer the baking sheet to the freezer. Freeze for 3-4 hours until firm. Make sure it is completely frozen to ensure crisp bites. - Once frozen, remove the bark from the freezer. Let it sit for a few minutes. This helps soften it slightly for easier cutting. - Using a sharp knife, cut the yogurt bark into pieces of your desired size. You can make squares or rectangles. For cutting tips, try to use a warm knife. It makes slicing easier. You can store the pieces in an airtight container in the freezer. Enjoy this fun treat whenever you like! For the full recipe, check out the details provided earlier. To make great frozen yogurt bark, start with the right Greek yogurt. Look for full-fat plain Greek yogurt. It gives a creamy texture and rich taste. Brands like Fage or Chobani are good choices. They have the right balance of tartness and creaminess. Next, focus on sweeteners. Honey and maple syrup both work well. Honey gives a floral note, while maple syrup adds a warm flavor. You can also adjust the sweetness to your taste. Start with two tablespoons and taste before adding more. Presentation matters when serving frozen yogurt bark. Use a colorful platter to catch the eye. Drizzle extra honey on top for a shiny finish. This adds a sweet touch and looks great. Add fresh berries on top right before serving. They bring color and brightness to your dish. Use strawberries, blueberries, or raspberries for a fun mix. You can even add mint leaves for a fresh look. To freeze yogurt bark evenly, spread the yogurt mixture about 1/4 inch thick on the baking sheet. Make it as smooth as possible. This helps it freeze uniformly. Avoid freezer burn by covering your yogurt bark well. Use parchment paper to line your baking sheet. After freezing, wrap pieces in plastic wrap. Store them in an airtight container. This keeps them fresh and tasty for longer. For the full recipe, you can check the other section above. {{image_2}} You can mix things up with different flavors. For a chocolate yogurt bark, use chocolate Greek yogurt instead of plain. It adds a rich taste that kids love. You can also sprinkle mini chocolate chips on top for extra sweetness. For a tropical yogurt bark, try using pineapple and coconut. Use plain Greek yogurt and mix in some shredded coconut. Then, top it with diced pineapple. This combo gives a bright and sweet taste that feels like a vacation. If you need vegan options, use coconut yogurt instead of Greek yogurt. Maple syrup works great as a sweetener. This keeps it plant-based and delicious. For nut-free versions, skip the nuts and add seeds instead. Pumpkin seeds or sunflower seeds add crunch without the allergy risk. This way, everyone can enjoy a tasty treat. Using seasonal fruits can change the taste of your yogurt bark. In spring, fresh strawberries and cherries are perfect. In fall, try using apples and cinnamon for a cozy flavor. You can also customize your bark for holidays. For example, use red and green fruits for Christmas. Or, use orange and black fruits for Halloween. These colors make your bark fun and festive. Check out the Full Recipe for all the details on how to make frozen yogurt bark! To keep your frozen yogurt bark fresh, store it in an airtight container. This step helps keep moisture out. You can also use a freezer bag for easy access. To avoid freezer burn, press out as much air as possible before sealing. This will keep your bark tasty and looking great. Frozen yogurt bark lasts about one month in the freezer. To ensure freshness, always check your container's seal. If you see ice crystals on the bark, it may have freezer burn. Look for changes in color or texture, which are signs of spoilage. When in doubt, throw it out! If you have leftovers, get creative! You can chop the bark and mix it into yogurt parfaits. Just layer it with more yogurt and fresh fruit. Another fun idea is to blend pieces into smoothies. This adds a creamy texture and fruity flavor. Enjoy experimenting with your frozen yogurt bark! Frozen yogurt bark can last about 2 to 3 months in the freezer. To keep it fresh, store it in an airtight container. This will help prevent freezer burn and keep the taste great. Just be sure to label it with the date you made it. This way, you’ll know how long it has been in there. Yes, you can customize toppings to fit your needs. Some common allergens include nuts, dairy, and certain fruits. If someone has a nut allergy, try using seeds like sunflower or pumpkin instead. For a dairy-free option, look for coconut yogurt or almond yogurt. You can also switch up the fruits based on personal taste or what you have at home. Frozen yogurt bark can be a healthy snack. Each serving provides protein from the Greek yogurt, which helps keep you full. The mixed berries add fiber and vitamins. Bananas provide potassium, while nuts add healthy fats. Overall, it is a tasty treat that can fit into a balanced diet. Absolutely! You can make frozen yogurt bark in advance. It’s perfect for meal prepping. Just follow the Full Recipe and freeze it. When you want a snack, simply take out a piece. This makes it a great option for busy days when you need something quick and healthy. Frozen yogurt bark is a fun, easy treat you can make at home. We discussed simple ingredients, like Greek yogurt and honey, and ways to boost flavor and looks with toppings. You learned easy steps to prepare, freeze, and serve this snack. Remember to store it well to keep it fresh. Whether you want fruity or chocolatey, frozen yogurt bark is a treat for everyone. Enjoy creating your own versions while keeping health in mind.

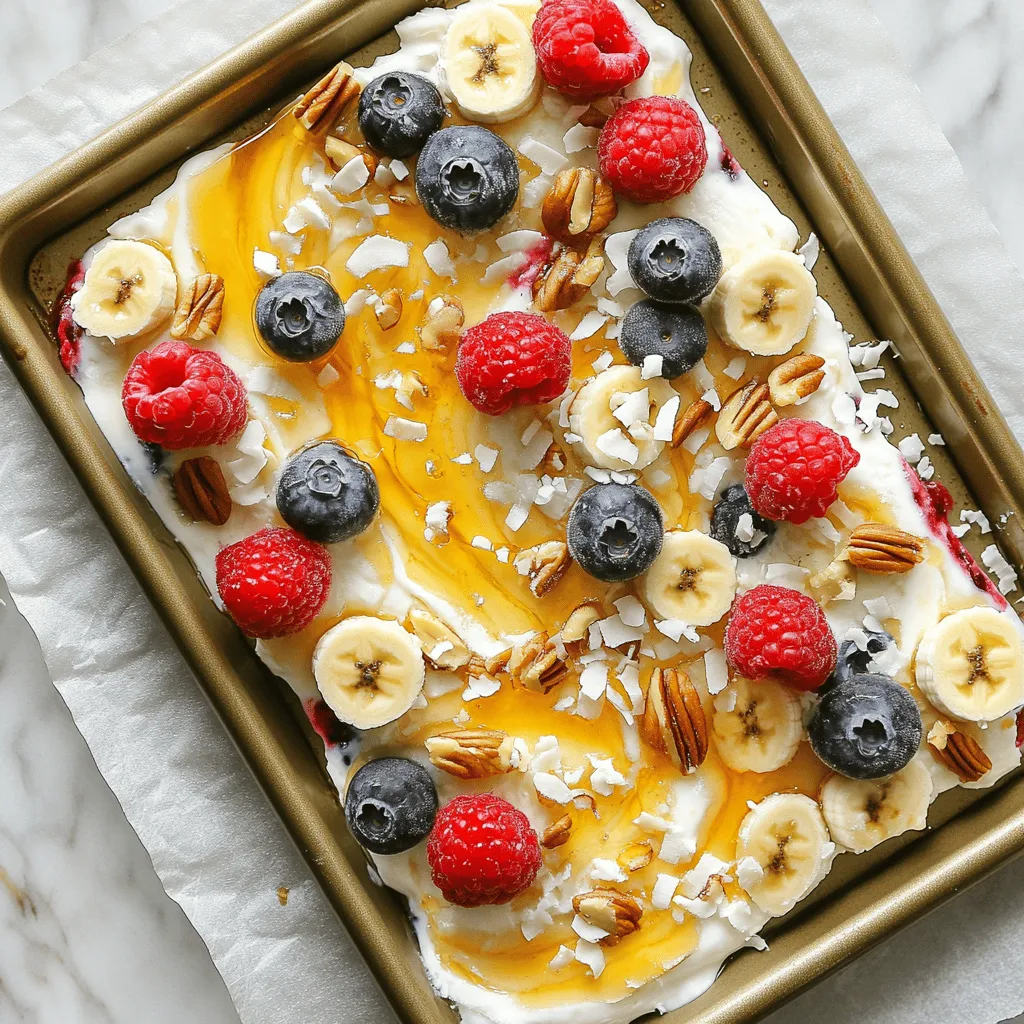
Frozen Yogurt Bark Easy and Delicious Treat Idea

Looking for a fun and healthy treat? Frozen Yogurt Bark is easy to make and oh-so-delicious! With creamy Greek yogurt

- 1/2 cup unsalted butter - 1 cup dark chocolate (60-70% cocoa), chopped - 2 large eggs - 2 large egg yolks The main ingredients give the lava cake its rich flavor and texture. Unsalted butter adds creaminess, while dark chocolate creates that molten center. Eggs and egg yolks help the cake rise and stay soft inside. - 1/2 cup granulated sugar - 1/4 cup all-purpose flour - 1/2 teaspoon vanilla extract - 1/4 teaspoon salt Granulated sugar sweetens the cake. All-purpose flour helps bind the ingredients. Vanilla extract adds a lovely aroma, and salt balances the sweetness. Together, they create the perfect cake base. - Powdered sugar - Fresh berries - Mint leaves Garnishes make your dessert look beautiful. Dusting with powdered sugar gives a snowy effect. Fresh berries add a pop of color and tartness. Mint leaves bring a fresh touch. These details elevate your lava cake presentation. For the complete recipe, check out the Full Recipe. 1. Preheat your oven to 425°F (220°C). This temperature helps create the perfect lava center. 2. Grease four ramekins with unsalted butter. Make sure to cover every inch. 3. Dust the greased ramekins lightly with flour. Tap out any extra flour for an even bake. 1. In a microwave-safe bowl, combine chopped dark chocolate and butter. Heat in 30-second bursts until melted. Stir after each interval until smooth. 2. In a large mixing bowl, whisk together the eggs, egg yolks, and granulated sugar. Whisk until the mix is pale and thick, about 3-4 minutes. 1. Pour the melted chocolate mixture into the egg mixture. Stir until fully combined, adding vanilla extract and salt. 2. Gently fold in the all-purpose flour. Mix just until combined; do not overmix. 3. Divide the batter evenly among the prepared ramekins. Fill each about 3/4 full for the best results. 4. Place the ramekins on a baking sheet. Bake for 12-14 minutes. Check for firm edges and a soft center. 5. Remove from the oven and let them sit for 1 minute. Run a knife around the edges to loosen the cakes. 6. Invert each ramekin onto a plate. Tap gently to release the cakes. Dust with powdered sugar before serving. This method creates a rich, gooey center that will impress anyone. Enjoy the magic of chocolate lava cake with the full recipe in hand! To get that gooey center, you need to watch the baking time closely. Start with 12 minutes. If you see the edges set but the center still jiggles, you’re on the right track. The key is to pull them out before the center cooks fully. If you bake too long, the center will firm up. Aim for a soft, flowing center when you cut into it. Greasing the ramekins is very important. Use unsalted butter and coat them well. After greasing, dust them with flour. This helps the cakes release easily. If you don’t have ramekins, you can use muffin tins. Just make sure to adjust the baking time. The cakes may need less time in a larger pan. Pairing your lava cake with ice cream is a must. The cold ice cream makes a great contrast to the warm cake. Vanilla is classic, but chocolate or raspberry sorbet can also work well. For added flair, top with fresh berries or a sprinkle of sea salt. A drizzle of caramel or chocolate sauce can elevate your dessert to gourmet status. Enjoy the mix of textures and flavors! {{image_2}} For a vegan twist, you can swap out the butter and eggs. Use coconut oil instead of butter. For the eggs, mix 1 tablespoon of ground flaxseed with 2.5 tablespoons of water. Let it sit for a few minutes to thicken. This mix works well for binding. You may need to bake these cakes a little longer, about 15-18 minutes, to ensure they set properly. If you need a gluten-free version, use almond flour or coconut flour. Almond flour gives a rich, nutty flavor. Coconut flour absorbs more moisture, so use less, about 1/8 cup. The texture may change slightly, so keep an eye on the baking time. Start checking for doneness at 10 minutes. The cakes should be firm at the edges but soft in the middle. You can make your lava cake even more exciting! Add a hint of espresso for a coffee flavor. Just mix in 1 teaspoon of espresso powder when you combine the chocolate and butter. For a fruity twist, infuse the batter with orange zest or a sprinkle of cinnamon. These flavors brighten up the rich chocolate. Feel free to explore these variations, which add unique touches to your chocolate lava cake. You can find the full recipe to get started! Chocolate lava cakes taste best fresh, but you can store them at room temperature. They last for about one day. To store them, keep them in a cool, dry place. Cover them lightly with plastic wrap or place them in an airtight container. This helps to keep them moist and tasty. You can freeze chocolate lava cakes to enjoy later. First, let them cool completely. Then, wrap each cake tightly in plastic wrap to avoid freezer burn. Place them in a freezer-safe bag or container. They can last for up to three months in the freezer. To thaw, take them out and leave them in the fridge overnight. For reheating, preheat your oven to 350°F (175°C). Place the cakes on a baking sheet and heat for about 10-15 minutes. This restores their rich, gooey center. To keep the lava cakes soft, the oven is your best friend. After reheating, serve them warm. You can dust them with powdered sugar for a sweet touch. Fresh berries and mint leaves make lovely garnishes, too. If you want a special treat, add a scoop of vanilla ice cream on the side. This way, you can enjoy your delicious chocolate lava cake even after storage. For the full recipe, check out the [Full Recipe]. You can use semi-sweet chocolate or milk chocolate as substitutes. Semi-sweet chocolate gives a rich flavor, while milk chocolate adds sweetness. Keep in mind, these choices will change the taste. For a deeper flavor, you might add cocoa powder. This will give your cake a strong chocolate taste. Yes, you can prepare the batter ahead of time. Mix all ingredients and fill the ramekins. Cover them and store in the fridge for up to 24 hours. When ready, bake them straight from the fridge. Just add a couple more minutes to the baking time. You can tell they are done by checking the edges. The edges should be firm, while the center looks soft. A toothpick inserted in the center should come out with some moist batter. This means your lava cake is ready to ooze chocolate. Yes, you can use various sizes of ramekins. Just remember to adjust the baking time. Smaller ramekins may need less time, while larger ones will need more. Keep an eye on them as they bake. Check for doneness by looking at the edges and the center. You now know how to make a delicious chocolate lava cake. We reviewed key ingredients, preparation steps, and baking tips. Don't forget about storage and reheating for later enjoyment. Remember, you can make variations, like vegan or gluten-free options. With practice, you can achieve the perfect lava center. Enjoy your baking journey and impress your friends with this delightful treat!

Chocolate Lava Cake Irresistible Dessert Delight

Indulge in the rich world of Chocolate Lava Cake, the dessert that makes every occasion special. With its warm, gooey

- 1 can (15 oz) chickpeas, drained and rinsed - 4 cups mixed greens (spinach, arugula, romaine) - 1 cup cherry tomatoes, halved - 1 cucumber, diced - 1/2 red onion, thinly sliced - 1/4 cup feta cheese, crumbled (optional for vegan) I love using chickpeas in salads. They add crunch and protein. Start with one can of chickpeas. Drain and rinse them well. This step helps remove extra salt and makes them cleaner. Next, grab your greens. I usually mix spinach, arugula, and romaine. This blend gives great flavor and texture. For color and taste, add one cup of cherry tomatoes. Halve them to make it easy to eat. Then, chop one cucumber into bite-sized pieces. It adds a nice crunch. To finish the base, slice half a red onion thinly. The onion gives a bit of sharpness. If you want, sprinkle some feta cheese on top. It's optional for vegan diets, but I think it adds a great salty touch. - 1 tablespoon olive oil - 1 teaspoon smoked paprika - 1/2 teaspoon garlic powder - 1/2 teaspoon cumin - Salt and pepper to taste - 2 tablespoons tahini - 1 tablespoon lemon juice - Fresh parsley for garnish Now, let's talk about seasoning. Combine one tablespoon of olive oil with your chickpeas. This will help them crisp up in the oven. Next, add one teaspoon of smoked paprika for a warm flavor. Sprinkle in half a teaspoon of garlic powder and half a teaspoon of cumin. These spices bring depth to the dish. Don't forget salt and pepper. Add them to taste. They enhance all the flavors. For the dressing, mix two tablespoons of tahini with one tablespoon of lemon juice. This gives a creamy texture and a zesty kick. Finally, chop some fresh parsley for garnish. It adds color and freshness. You can find the full recipe [here](#). - Preheat the oven to 400°F (200°C). - In a bowl, mix the chickpeas with olive oil and spices. Make sure each chickpea gets coated well. I love using smoked paprika for its rich flavor, but feel free to add garlic powder and cumin too. - Spread the seasoned chickpeas on a baking sheet. Make sure they are in a single layer. This helps them roast evenly and get crispy. - Roast for 25-30 minutes. Shake the pan halfway through to ensure they cook evenly. You want them golden brown and crunchy. - In a large bowl, combine the mixed greens, cherry tomatoes, cucumber, and red onion. This mix adds color and crunch. - Prepare the tahini dressing by whisking together tahini and lemon juice. Add a bit of water for a pourable texture. Adjust with salt for flavor. - Once the chickpeas are crispy, let them cool a little. Then, toss them into the salad mix along with the dressing. - Finish by sprinkling feta cheese and fresh parsley on top for added flavor. Serve this salad right away for the best taste. For the full recipe, check the earlier section. To make your chickpeas super crispy, start by draining them well. Any extra moisture will keep them from getting that perfect crunch. Spread the chickpeas in a single layer on a lined baking sheet. This way, heat circulates evenly around them. Bake at 400°F (200°C) for about 25 to 30 minutes. Shake the pan halfway for even roasting. If you want a creamier texture, add yogurt to your dressing. It gives a rich taste that pairs well with the chickpeas. For a tangy kick, use vinegar instead. Balsamic or apple cider vinegar works great. You can mix and match these options for a flavor that suits you. You can swap chickpeas for black beans or lentils if you prefer. Both options add protein and work well in this salad. Feel free to customize your vegetables too. Try bell peppers, radishes, or even shredded carrots for a fun twist. Each change can bring new flavors and colors to your dish. For the full recipe, check out the Crispy Chickpea Salad instructions above. {{image_2}} Crispy chickpea salad is fun to make and easy to change! Here are some tasty ideas. For a Mediterranean twist, add olives and bell peppers. They bring salty and sweet flavors. Use hummus as a dressing for creaminess. It pairs well with the crispy chickpeas and fresh greens. To create an Asian-inspired salad, add sesame oil and ginger to the dressing. This will give it a warm, nutty taste. You can include edamame and cabbage for texture and crunch. This version is colorful and packed with nutrients. You can change this salad based on the season. In summer, add zucchini for a fresh taste. In spring, use peas or radishes. Fresh herbs like basil or mint add a bright flavor that lifts the dish. These variations keep your salad exciting and flavorful. Check the Full Recipe for the basics, then explore these ideas! To keep your crispy chickpea salad fresh, store any leftovers in an airtight container. This helps avoid moisture, which can make the salad soggy. Enjoy it within 2-3 days for the best flavor and texture. If you want to enjoy the chickpeas warm again, reheat them in the oven. Set it to 350°F (175°C) and spread the chickpeas on a baking sheet. This keeps them crispy. You can also add a little extra dressing to freshen up the salad before serving. For meal prep, I suggest preparing your ingredients separately. This keeps everything fresh and crunchy. Combine the salad just before serving for the best taste. Enjoy the process of making this vibrant dish! To make chickpeas crispy, start by soaking them. If you use dried chickpeas, soak them overnight. This step helps them cook better. After soaking, drain and rinse them well. Then, toss the chickpeas with olive oil and spices like smoked paprika and cumin. Spread them on a baking sheet in one layer. Roast them at 400°F (200°C) for about 25 to 30 minutes. Shake the pan halfway through to ensure even cooking. This method gives you the perfect crunch. Yes, you can easily make this salad vegan! Just skip the feta cheese or use a vegan version. For the dressing, tahini is a great base. You can mix it with lemon juice, water, and a pinch of salt. This creamy dressing adds flavor without dairy. Also, make sure your chickpeas and any added ingredients are plant-based. Crispy Chickpea Salad pairs well with many dishes. Serve it with quinoa for extra protein. You can also add grilled vegetables for a hearty meal. If you want a lighter option, a bowl of soup works great. This salad also goes well with whole-grain pita or rice. Feel free to get creative with sides! To adjust the spice level, simply add or reduce spices. If you like heat, add cayenne pepper or chili powder. For a milder taste, cut back on the cumin and paprika. You can also try adding fresh herbs like cilantro or parsley. They add flavor without the spice. Taste as you go to find your perfect balance. Yes, you can prepare this salad in advance! To keep it fresh, store the ingredients separately. Keep the crispy chickpeas in an airtight container. The salad mix should also stay separate until you’re ready to eat. Dress the salad just before serving to keep everything crunchy. This way, you enjoy a fresh meal even after some time! This blog post offers a simple recipe for a delicious crispy chickpea salad. We covered the main ingredients, step-by-step instructions, and helpful tips. You can customize this salad easily to fit your taste and dietary needs. Remember, the key to crunchiness is proper drying and roasting of the chickpeas. Enjoy making this healthy meal and experimenting with seasonal ingredients. Try it out, and you might find a new favorite dish!

Crispy Chickpea Salad Fresh and Flavorful Dish

Looking for a fresh and tasty dish? This Crispy Chickpea Salad is just what you need! Packed with vibrant veggies

To make a hearty and flavorful breakfast hash, gather these essential ingredients: - 2 medium russet potatoes, diced - 1 small sweet potato, diced - 1 bell pepper (any color), chopped - 1 small red onion, finely chopped - 2 cloves garlic, minced - 3 slices of bacon, chopped (or use turkey bacon for a healthier option) - 4 large eggs - 1 teaspoon smoked paprika - Salt and pepper to taste - Fresh parsley, chopped (for garnish) - Olive oil, for cooking These ingredients work together to create a warm and filling dish. The diced potatoes form the base, while fresh veggies add color and crunch. You can choose bacon for a savory kick or turkey bacon for a lighter take. Topping it all off with eggs boosts the meal's protein. Seasoning your hash is key to enhancing its flavor. Use: - Smoked paprika, salt, and pepper - Fresh parsley for garnish - Olive oil for cooking The smoked paprika gives the hash a subtle depth. Salt and pepper bring out the natural flavors of the ingredients. Lastly, a sprinkle of fresh parsley adds a pop of color and freshness. This combination makes each bite a delight. For the full recipe, check out the cooking instructions to bring your breakfast hash to life! To start, grab a large skillet and heat a tablespoon of olive oil over medium heat. Add the chopped bacon and cook it until it turns crispy and brown. This should take about 5-7 minutes. The key to crispy bacon is to not overcrowd the pan. If you need to, cook it in batches. Once it's crispy, remove the bacon and set it aside. Keep the rendered fat in the pan. This fat adds flavor to the hash. Next, add your diced russet and sweet potatoes to the skillet. Season them with salt, pepper, and a teaspoon of smoked paprika. Stir them well. Cook the potatoes for about 8-10 minutes, stirring occasionally. You want them to turn golden brown and start softening. Seasoning is crucial here. It enhances the natural flavors and makes the dish more enjoyable. Now it’s time to add the chopped red onion, bell pepper, and minced garlic to the skillet. Cook these veggies for another 5-7 minutes. You want them to be tender but not mushy. After that, push the hash mixture to the side of the skillet. Crack your eggs directly into the pan. Cook them sunny-side up or over-easy, based on your taste. Let the eggs cook until the whites are set and the yolks are still runny, which takes about 2-4 minutes. Once the eggs are done, sprinkle the crispy bacon back into the skillet. Gently mix everything together. If needed, adjust the seasoning. Finally, remove the skillet from heat and garnish with freshly chopped parsley. This adds a nice touch and makes your hash look beautiful. For the full recipe, check out the details above! For golden brown potatoes, start with dry diced potatoes. Rinse them and pat them dry with a towel. This helps remove excess starch. Heat the skillet well before adding oil. A hot pan helps create that perfect crust. Cook the potatoes without stirring too often. Let them sit for a few minutes to allow browning. To avoid mushiness in the hash, don't overcrowd the skillet. If you add too many potatoes at once, they will steam instead of fry. Use medium heat to cook them evenly. Keep an eye on the time; potatoes should cook for about 10 minutes until they are tender. To elevate flavor, add spices like smoked paprika, garlic powder, or cumin. Fresh herbs like parsley or chives also brighten up the dish. Always taste your hash as you cook. Adjust seasoning to your liking. A little salt and pepper go a long way to bring out the flavors. For presentation, serve the hash on individual plates. Place each egg on top for a stunning look. Add extra parsley to give it a fresh pop of color. You can also serve avocado slices on the side. The creamy texture of avocado pairs well with the crispy hash. Try out these tips to make your savory breakfast hash truly special. For the complete guide, check out the Full Recipe. {{image_2}} You can easily make a vegetarian breakfast hash. Swap bacon for hearty vegetables. Try using mushrooms for a savory flavor. You can add chickpeas or black beans for protein. These ingredients give you a filling meal without meat. If you need a gluten-free hash, avoid regular potatoes. Use sweet potatoes or quinoa instead. These grains add texture and flavor. Be careful not to mix gluten items. Always use clean tools and surfaces. This way, you avoid cross-contamination. You can make your hash unique by using local ingredients. For example, in the Southwest, add jalapeños and chorizo. In the Northeast, try using kielbasa or sauerkraut. Each region has a flavor that can enhance your dish. Explore what your area offers and have fun with it. For the full recipe, check out the detailed instructions above. To store your leftover Savory Breakfast Hash, first let it cool down. Placing hot food in the fridge can cause condensation and spoilage. Once cool, transfer the hash to an airtight container. This helps keep it fresh. It can last in the fridge for up to four days. When placing it in the fridge, keep it on a middle shelf. This helps maintain a stable temperature. Avoid putting it in the door, as it gets warmer there. When it's time to enjoy your hash again, reheating correctly is key. Use a skillet over medium heat for the best results. Add a splash of olive oil to help restore moisture. Stir the hash often to heat it evenly. If you prefer a microwave, place your hash in a microwave-safe bowl. Cover it with a wet paper towel to keep it moist. Heat in short bursts, stirring in between. This helps to keep the texture intact. For added flavor, consider mixing in a bit more smoked paprika or fresh parsley while reheating. This will brighten up your dish and make it taste fresh again. Savory Breakfast Hash can last about three to four days in the fridge. Store it in an airtight container. Always check for signs of spoilage before eating. If you see mold or an off smell, throw it away. Yes, you can make Savory Breakfast Hash ahead of time. Cook it fully, then cool it before storing. This meal is perfect for meal prepping. You can reheat it for quick breakfasts during the week, saving you time. Pair Savory Breakfast Hash with fresh fruit, toast, or a simple salad. You can also add avocado slices for creaminess. Some people enjoy it with salsa or hot sauce for an extra kick. You can use other types of potatoes in Savory Breakfast Hash. Sweet potatoes add a nice flavor. Yukon gold potatoes give a buttery taste. Even cauliflower works if you want a low-carb option. Each type brings its own taste and texture, so feel free to experiment. In this blog post, we explored how to make a delicious savory breakfast hash. We covered essential ingredients like potatoes, vegetables, and protein. You learned step-by-step cooking tips and seasoning ideas for the best flavors. We also touched on variations for dietary needs and how to store leftovers. In closing, a well-made breakfast hash is a tasty start to your day. Enjoy experimenting with flavors and ingredients. You’ll find endless ways to make it your own.

Savory Breakfast Hash Hearty and Flavorful Meal

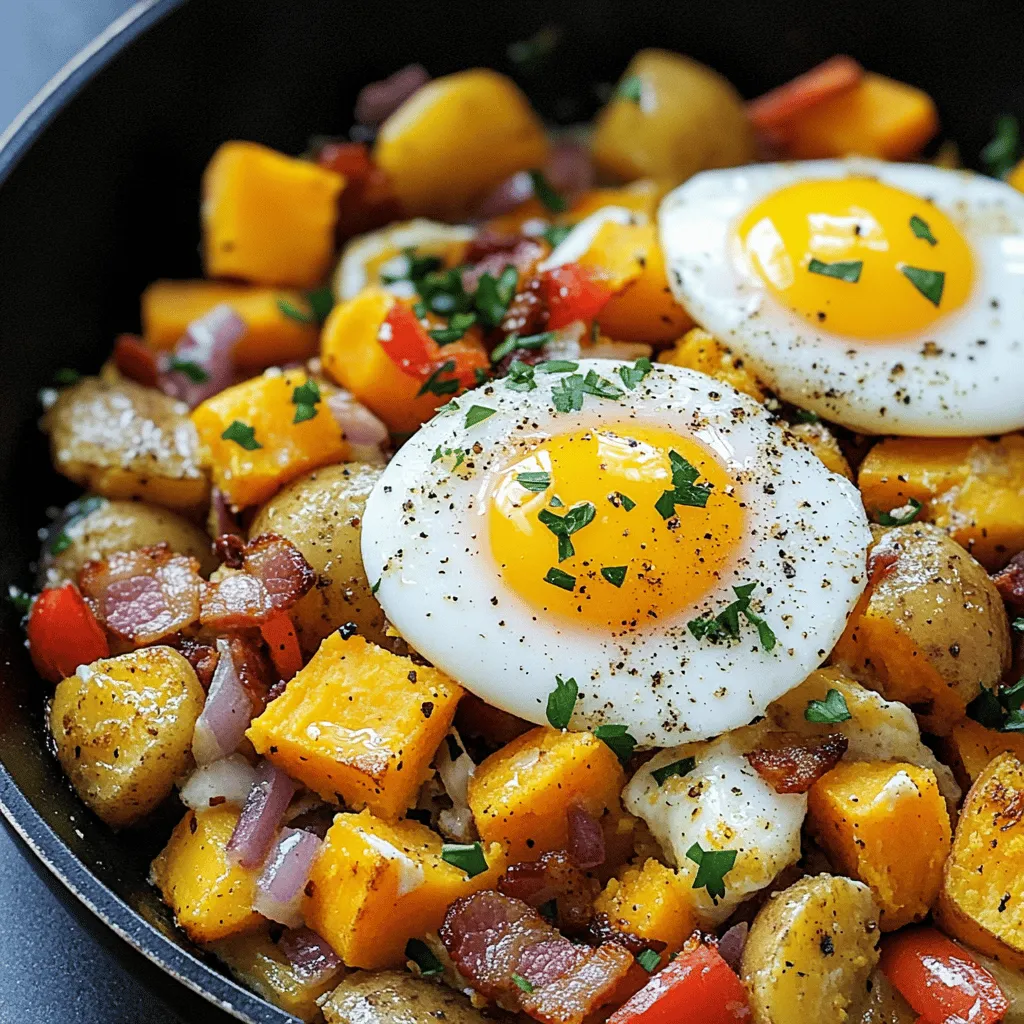
If you’re looking for a warm and filling way to start your day, savory breakfast hash is the answer. It

To make this soup, you need simple ingredients that pack a lot of flavor. Here’s what you’ll need: - 2 tablespoons olive oil - 1 medium onion, chopped - 3 cloves garlic, minced - 2 cans (14.5 ounces each) diced tomatoes (with juices) - 2 cups vegetable broth - 1 teaspoon sugar (optional, to balance acidity) - 1 cup heavy cream or coconut cream for a dairy-free option - 1 cup fresh basil leaves, packed - Salt and pepper to taste Each ingredient plays a key role. Olive oil adds richness, while onion and garlic create a solid base. The diced tomatoes give that bright red color and tangy taste. Vegetable broth adds depth, and sugar balances the acidity from the tomatoes. Cream brings a luscious texture, and basil gives it that fresh aroma. While the soup is tasty on its own, garnishes can elevate it even more. Here are some options you can try: - Croutons - Additional basil or cheese for topping Croutons add a nice crunch, while extra basil or cheese can make the soup even more delightful. You can mix and match these garnishes based on your taste. For the full recipe, check out the details provided earlier. To start, heat 2 tablespoons of olive oil in a large pot over medium heat. Once hot, add 1 chopped onion. Cook it for about 5 minutes until it turns translucent. This step builds a strong base for your soup. Next, toss in 3 minced garlic cloves. Sauté for just 1 more minute. The smell will be amazing! Now, pour in 2 cans of diced tomatoes with their juices. Add 2 cups of vegetable broth to the pot. Stir everything together. Bring the mixture to a gentle simmer. This step is crucial. Let it simmer for about 15 minutes. This waiting time helps the flavors blend well. Once the soup has simmered, it's time to blend. If you have an immersion blender, use it right in the pot. This makes blending easy! If not, you can use a regular blender. Just let the soup cool a bit before transferring it in batches. Blend until it is smooth and creamy. Now, stir in 1 cup of heavy cream or coconut cream for a dairy-free option. Then, fold in 1 cup of fresh basil leaves. Let the basil wilt in the warm soup. Finally, taste your soup. Adjust the salt and pepper to your liking. This is where you can make it perfect for you. To serve, ladle the soup into bowls. Add croutons on top if you like. They add a nice crunch! This soup pairs well with a slice of crusty bread. Enjoy your creamy tomato basil soup! For the full recipe, check out the section above. To boost flavor in your creamy tomato basil soup, consider adding herbs like oregano or thyme. These herbs blend well and add depth. You can also sprinkle in a pinch of red pepper flakes for a little heat. If your soup tastes too acidic, adding a teaspoon of sugar helps balance it. This tiny trick makes a big difference in taste. Prepping your ingredients ahead of time saves you effort. Chop your onion and garlic the night before. You can also measure your broth and tomatoes in advance. For quick blending, an immersion blender is a great tool. It makes puréeing the soup easy and mess-free. If you don’t have one, a regular blender works too, but be careful with hot liquids. Be careful not to overcook the basil. Adding it too early can make it taste bitter. For best results, fold it in at the end, just before serving. Also, find the right balance between creaminess and acidity. If the soup is too creamy, add a splash of broth or water to lighten it. This helps keep the flavors bright and fresh. For the full recipe, check out the Creamy Tomato Basil Bliss section. {{image_2}} You can easily make this creamy tomato basil soup vegan. Just swap heavy cream for coconut cream. It gives a nice richness without dairy. Use vegetable broth instead of chicken broth to keep it plant-based. Feel free to play with herbs too. If you want a twist, try adding oregano or thyme. These herbs add a different layer of flavor while keeping the soup fresh and tasty. To make this soup gluten-free, check all your ingredients. Many canned tomatoes and broths are gluten-free, but it’s good to confirm. If you want a thicker soup, use cornstarch or a gluten-free flour blend. Mix it with a little water first and stir it in while the soup simmers. This helps achieve a smooth texture without any gluten. If you like a kick, make your tomato basil soup spicy. Adding red pepper flakes or fresh chili peppers can do the trick. Start with a small amount and taste as you go. This way, you control the heat level. You may need to adjust the cooking time slightly. Let it simmer a bit longer to help the spice blend into the soup. This will enhance the overall flavor and make it more enjoyable. To store your creamy tomato basil soup, first let it cool completely. Transfer it to an airtight container. This will keep the soup fresh. The soup lasts about 3 to 4 days in the fridge. Always check for any off smells or changes in texture before eating. You can freeze creamy tomato basil soup with great success. To avoid separation, cool it completely before freezing. Use a freezer-safe container and leave some space for expansion. When you want to enjoy it again, thaw it overnight in the fridge. To reheat, warm it gently on the stove. Stir well to combine, and add a splash of cream if needed for creaminess. Yes, you can use fresh tomatoes! They add a bright, fresh taste. Start with about 2 pounds of ripe tomatoes. First, blanch them in boiling water for 30 seconds. Then, cool them in ice water. Peel off the skins and chop them. This method keeps the flavor vibrant and fresh. To thicken the soup, add more heavy cream or blend in some cooked rice. You can also use a bit of cornstarch mixed with water. If the soup is too thick, add more vegetable broth or water. Adjust gradually until you reach your desired consistency. If you want a dairy-free option, use coconut cream. It gives a rich taste and creamy texture. Nut milk, like cashew or almond, works too but will be less creamy. You can also use soy cream or oat cream for a lighter option. Absolutely! You can make this soup up to three days in advance. Just store it in an airtight container in the fridge. When ready to eat, reheat on the stove over low heat. Stir gently to keep it smooth and creamy. Yes, this soup is very kid-friendly! Its smooth texture and sweet taste appeal to children. To make it even more fun, serve it with croutons or a grilled cheese sandwich. You can also let kids help blend the soup for a hands-on cooking experience. In this blog post, I covered how to make creamy tomato basil soup from scratch. We began with the essential ingredients and then explored the preparation steps, including tips for flavor and common mistakes. I shared variations, storage info, and answered frequently asked questions. Enjoy making this soup with your own twist. It’s simple, tasty, and perfect for sharing. You can create a meal that warms both hearts and bellies. Dive in and savor every spoonful!

Creamy Tomato Basil Soup Flavorful & Easy Recipe

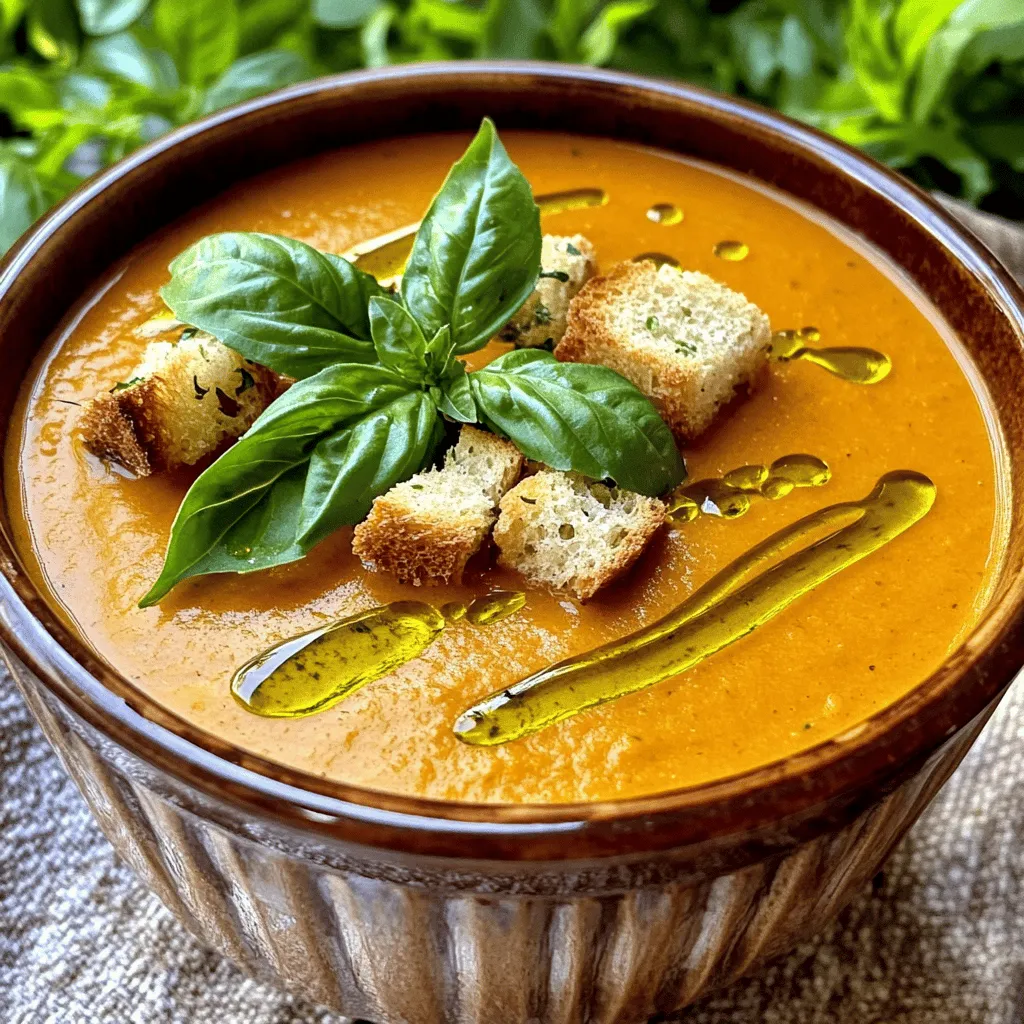
Looking for a cozy and delicious meal? Try my Creamy Tomato Basil Soup! This easy recipe is packed with flavor

- 1 cup quinoa (uncooked) - 2 cups vegetable broth (or water) - 1 cup cherry tomatoes, halved - 1 cucumber, diced - 1 bell pepper (red or yellow), diced - 1/2 red onion, finely chopped - 1 cup kalamata olives, pitted and halved - 1/2 cup feta cheese, crumbled (optional) - 1/4 cup fresh parsley, chopped - 1/4 cup fresh mint, chopped - 3 tablespoons lemon juice - 3 tablespoons olive oil - Salt and pepper to taste When making Mediterranean quinoa salad, start with the main ingredients. Quinoa is your base. It’s light and healthy. Using vegetable broth gives it a nice flavor. You’ll also need fresh vegetables like cherry tomatoes and cucumbers. These add crunch and color. Bell peppers and red onions boost flavor and nutrients. Next, consider the additional ingredients. Kalamata olives add a salty bite. If you like cheese, feta adds creaminess. Fresh herbs like parsley and mint brighten the dish. Now, let’s talk about the dressing components. Lemon juice gives a fresh zing. Olive oil brings richness. Salt and pepper finish the mix. You can find the full recipe above for precise measurements and steps. Enjoy making this dish! 1. Rinse quinoa under cold water in a fine mesh strainer. This removes any bitterness. 2. In a medium pot, combine the rinsed quinoa and vegetable broth. Bring it to a boil. 3. Once boiling, reduce heat to low. Cover the pot and simmer for 15-20 minutes. The quinoa will absorb all the liquid. Fluff it with a fork and let it cool. 1. While the quinoa cools, chop the vegetables. Cut the cherry tomatoes in half. Dice the cucumber and bell pepper. Finely chop the red onion. 2. Add all the prepared vegetables to a large mixing bowl. This makes mixing easy later. 1. Now, it’s time to add more flavor. Toss in the kalamata olives, crumbled feta cheese (if you want), fresh parsley, and mint to the bowl with the vegetables. 2. In a small bowl, whisk together the lemon juice, olive oil, salt, and pepper. This dressing brings everything together. 3. Once the quinoa has cooled, add it to the large bowl. Drizzle the dressing over the top. 4. Gently toss the salad to mix all the ingredients. Ensure the dressing coats everything evenly. 5. Taste the salad and adjust the seasoning. Add more salt, pepper, or lemon juice if needed. 6. For the best flavor, let the salad sit for at least 15 minutes before serving. This method ensures a fresh and flavorful Mediterranean quinoa salad. For the complete details on the ingredients, check the Full Recipe. To make your quinoa just right, rinse it well. This step helps remove any bitter flavor. After rinsing, cook the quinoa in vegetable broth. This adds a nice taste. Once it’s cooked, let it cool before mixing. Cooling helps keep the grains fluffy. When your salad is ready, taste it! Adjust the seasoning if needed. You can add more salt, pepper, or lemon juice. Let the salad sit for 15 minutes before serving. This time lets the flavors blend and become yummy. For a great look, serve the salad in a big bowl or on individual plates. This makes it fun to share. Top it with extra herbs and lemon wedges. These little touches make the dish pop. For the full recipe, check out the details above. {{image_2}} You can make your Mediterranean quinoa salad even better by adding protein. Grilled chicken works well and adds great flavor. You can also use chickpeas for a plant-based option. They add a nice texture and are full of nutrients. For creaminess, try incorporating diced avocado. It brings a rich taste and pairs well with the other ingredients. The dressing can change the flavor of your salad. You can experiment with balsamic vinaigrette for a sweet and tangy taste. This adds a nice kick to the dish. If you want something unique, try tahini. This sesame paste gives the salad a rich and nutty flavor that you won’t forget. Using seasonal ingredients can make your salad more exciting. In summer, add fresh bell peppers or zucchini for crunch. In winter, try using pomegranate seeds for a burst of sweetness. They also add a lovely color that brightens the dish. This way, your salad stays fresh and fun all year round. For the complete recipe, check out the Full Recipe section. Store your Mediterranean quinoa salad in an airtight container in the fridge. This keeps it fresh and tasty. You should eat it within 3-5 days for the best flavor. Freezing this salad is not a good idea. The texture will change, and it won't taste as good. It’s best to prepare the salad fresh for great taste and quality. You can serve the salad cold or at room temperature. If you prefer it warm, you can lightly heat it in the microwave. Just be careful not to overheat it, as that can ruin the flavors and texture. Enjoy your meal! Yes, it's great for meal prep and can be made a day ahead. When you prepare it in advance, the flavors have time to blend. Just store it in the fridge in an airtight container. This makes it easy to grab for lunches or quick dinners. Yes, quinoa is naturally gluten-free. It is a perfect grain for those who avoid gluten. Quinoa is also high in protein, which makes it a healthy choice as well. Absolutely! Feel free to add or substitute your favorite vegetables or herbs. You might like to try adding avocado, chickpeas, or even different types of olives. Customize it to match your taste or what's in season. It's best to consume within 2 hours if not refrigerated. After that, bacteria can grow. To keep it safe, always store leftovers in the fridge. It provides healthy fats, fiber, and vitamins from fresh ingredients. You'll find a good mix of nutrients that support your health. The olives add healthy fats, while veggies give you vitamins and minerals. This Mediterranean quinoa salad is simple and packed with flavor. You learned how to cook quinoa, prepare fresh veggies, and mix everything together with a tasty dressing. I shared tips to enhance taste and present the dish beautifully. Feel free to change up the ingredients or dressing to suit your likes. Remember, this salad is great for meal prep and stays fresh in the fridge. Enjoy your fresh and healthy creation that’s full of nutrition and flavor!

Mediterranean Quinoa Salad Fresh and Flavorful Dish

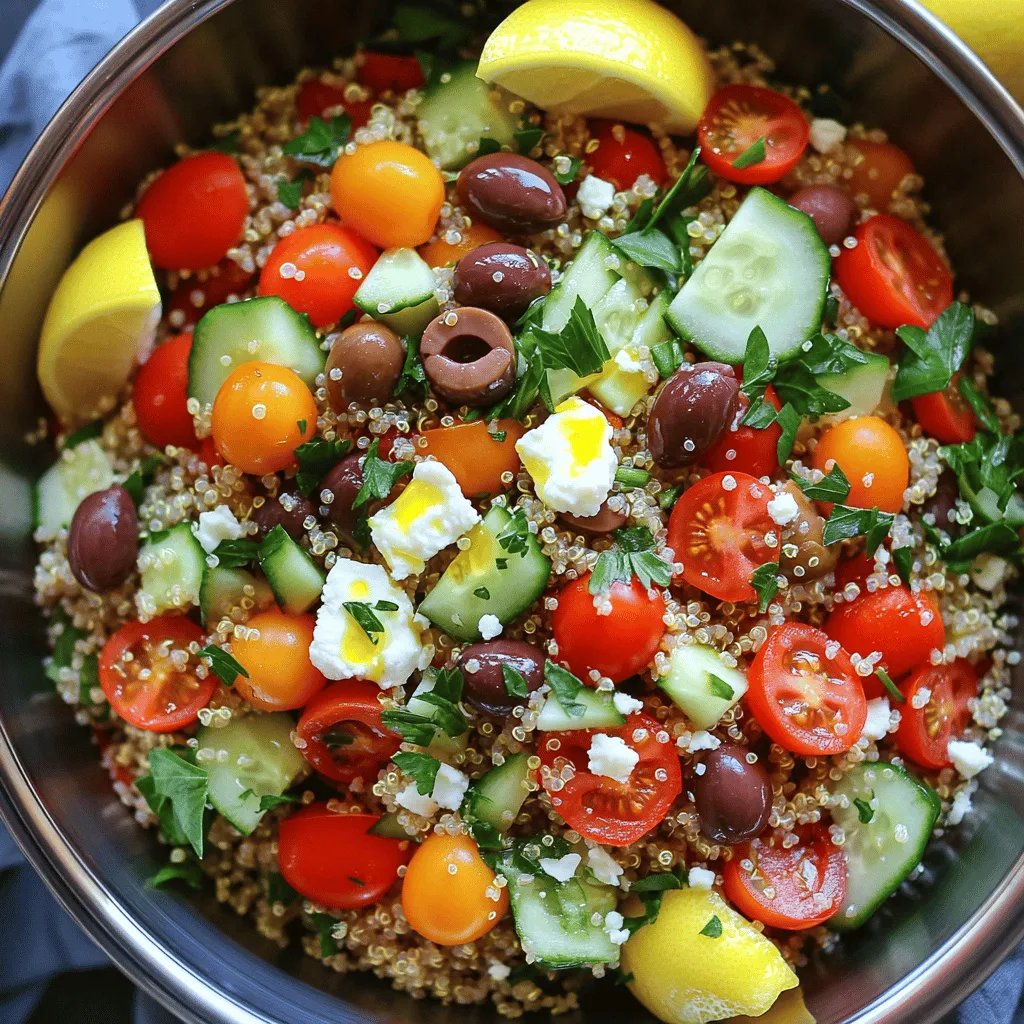
Looking for a fresh and flavorful dish that’s easy to make? You’re in luck! This Mediterranean Quinoa Salad is packed

To make my Nutty Choco-Coconut Granola Bars, you need: - 2 cups rolled oats - 1 cup mixed nuts (almonds, walnuts, pecans, roughly chopped) - ½ cup shredded coconut (unsweetened) - ½ cup honey or maple syrup - ¼ cup almond butter (or any nut butter of your choice) - 1 teaspoon vanilla extract - ½ teaspoon sea salt - ½ cup dark chocolate chips (or chunks) - ¼ cup dried fruits (cranberries, apricots, or raisins) You can change some ingredients if you want. For the nuts, try using sunflower seeds or pumpkin seeds for a nut-free option. If you like more sweetness, use more honey or maple syrup. You can also swap almond butter for peanut butter or cashew butter. For a tropical twist, add more coconut or even some dried mango pieces. These bars are packed with good stuff! - Rolled oats provide fiber. They help keep you full longer. - Mixed nuts offer healthy fats and protein. They support heart health. - Shredded coconut adds flavor and fiber. It also gives you energy. - Honey or maple syrup is natural sugar. It gives a quick energy boost. - Almond butter serves as a great protein source. It’s good for muscle health. - Dark chocolate chips give a sweet taste and antioxidants. They can improve mood. - Dried fruits add vitamins and minerals. They sweeten the bars naturally. Feel free to explore the Full Recipe to see how these ingredients come together for a delicious snack! Start by getting all your ingredients ready. You need: - 2 cups rolled oats - 1 cup mixed nuts (almonds, walnuts, pecans, roughly chopped) - ½ cup shredded coconut (unsweetened) - ½ cup honey or maple syrup - ¼ cup almond butter (or any nut butter of your choice) - 1 teaspoon vanilla extract - ½ teaspoon sea salt - ½ cup dark chocolate chips (or chunks) - ¼ cup dried fruits (cranberries, apricots, or raisins) First, preheat your oven to 350°F (175°C). Line an 8x8 inch baking pan with parchment paper. Leave some paper hanging over the sides to help you lift the bars out later. Next, in a large bowl, mix the rolled oats, mixed nuts, shredded coconut, and sea salt. Stir well to blend all the dry ingredients together. In a small saucepan, heat the honey (or maple syrup) and almond butter over medium heat. Stir until it's smooth. This should take about 2-3 minutes. Remove it from the heat and add the vanilla extract. Pour this wet mixture over the dry ingredients in the bowl. Use a spatula to mix it well until the oats and nuts are fully coated. Now, fold in the dark chocolate chips and dried fruits. Be gentle to prevent the chocolate from melting. Transfer this mixture into your prepared baking pan. Spread it out evenly, then press down firmly with the back of a spatula. This step helps the bars stick together. Bake your granola bars in the preheated oven for about 20-25 minutes. Keep an eye on them. You want the edges to turn golden brown. Once baked, remove the pan from the oven. Let the granola bars cool in the pan for about 10 minutes. After that, use the parchment paper to lift them out of the pan. Place the bars on a wire rack to cool completely. Once they're cool, cut them into your desired sizes with a sharp knife. You can find the full recipe details above to ensure you don’t miss any steps. Enjoy your homemade granola bars! To get the right texture in your granola bars, press the mixture firmly into the pan. This helps the bars hold together. Use a spatula to flatten the top. Bake until the edges turn golden brown. This gives a nice crunch. Don't skip the cooling step. Let them cool fully before cutting. This helps maintain their shape. Store your homemade granola bars in an airtight container. This keeps them fresh for a week. If you want them to last longer, wrap each bar in parchment paper. You can place them in a zip-top bag for extra protection. For longer storage, you can freeze them. Just thaw them at room temperature when you're ready to eat. One common mistake is not measuring ingredients correctly. This can affect the taste and texture. Avoid using too much liquid, or your bars may be too soft. Another mistake is not pressing the mixture down firmly. This can lead to crumbly bars. Lastly, remember to let them cool completely before cutting. This keeps them from falling apart. {{image_2}} You can mix different flavors in your granola bars. Try adding berries for a fruity taste. Use dried blueberries or strawberries for a sweet kick. If you love nuts, go for a nutty mix. Add pecans, cashews, or hazelnuts for crunch. For chocolate lovers, toss in chocolate chips or cocoa powder. You can even blend flavors. How about a berry-chocolate bar? The choices are endless! Making your granola bars allergy-friendly is easy. For gluten-free bars, use certified gluten-free oats. This keeps everyone happy and safe. You can also make nut-free bars. Just swap out the mixed nuts for seeds. Pumpkin seeds or sunflower seeds work great. This way, kids with nut allergies can enjoy them too! You can adjust the sweetness of your bars to fit your taste. If you want less sugar, use less honey or maple syrup. You can also add ripe mashed bananas for natural sweetness. This adds flavor and moisture. Want it sweeter? Just add a bit more sweetener. Taste the mixture before you bake. This way, you know you’ll love the final product! For full instructions, check out the Full Recipe. To keep your granola bars fresh, store them in an airtight container. I recommend placing parchment paper between layers. This prevents them from sticking together. Keep the container in a cool, dry place. Avoid direct sunlight or heat, as this can affect their taste and texture. If you follow these steps, your bars can last about one week. For longer storage, freezing is a great option. Wrap each granola bar in plastic wrap. Then, place them in a freezer bag or container. Be sure to label the bag with the date. You can freeze them for up to three months. When you want to enjoy them, just take them out and let them thaw at room temperature. To check if your granola bars are still fresh, look for a few signs. First, check for any off smells. If they smell stale, it’s best to toss them. Next, feel the texture. If they are too hard or crumbly, they may not taste good anymore. Lastly, take a small bite. If the flavor seems off, it’s time to say goodbye. Enjoy your homemade granola bars while they are still fresh and tasty! You can replace honey with maple syrup or agave nectar. Both options work well. They add sweetness and moisture. You can also use mashed bananas or applesauce for a fruity twist. These alternatives keep the bars tasty and chewy. Yes, you can use quick oats. However, the texture will change. Quick oats make the bars softer and less chewy. Rolled oats give more structure and a heartier bite. If you prefer a chewier bar, stick with rolled oats. To keep bars intact, press the mixture firmly into the pan. Using a spatula helps. Make sure the mixture is evenly coated with the wet ingredients. Let the bars cool completely before cutting them. This helps them set properly. You can add various healthy mix-ins like: - Chia seeds - Flaxseeds - Pumpkin seeds - Sunflower seeds - Dark chocolate chunks - Nut butter swirls - Dried fruits like raisins or apricots Mixing these in adds flavor and boosts nutrition. Experiment to find your favorite combinations! Making homemade granola bars is simple and fun. You learned about key ingredients and their benefits. We explored step-by-step instructions and tips for perfect texture. You can customize with different flavors and store them well for freshness. Remember to avoid common mistakes to achieve the best results. Dive in, experiment, and enjoy your tasty creation! Healthy snacks can be easy and delicious. Get started on your granola journey today.

Homemade Granola Bars Simple and Healthy Recipe

Are you ready to whip up a tasty treat that’s both easy and healthy? This homemade granola bar recipe will

To make Coconut Curry Chicken, you need these key items: - 1 lb (450g) chicken breast, cubed - 1 can (14 oz) coconut milk - 2 tablespoons coconut oil - 1 onion, finely chopped - 2 cloves garlic, minced - 1 tablespoon fresh ginger, minced - 2 tablespoons red curry paste - 1 tablespoon fish sauce - 1 tablespoon brown sugar - 1 red bell pepper, chopped - 1 cup broccoli florets - 1 cup snap peas - Fresh cilantro, for garnish - Lime wedges, for serving - Salt and pepper to taste When cooking, measuring your ingredients helps. Here’s a quick guide: - Use a kitchen scale for chicken to ensure accuracy. - A standard can of coconut milk is 14 ounces. - For oil, use a tablespoon measuring spoon. - Fresh herbs like cilantro should be chopped roughly. - Vegetables can be chopped into bite-sized pieces for even cooking. You can also add some optional items to enhance the taste: - Extra vegetables like carrots or zucchini. - A splash of lime juice for brightness. - Chopped peanuts for crunch. - Sliced green onions for a fresh touch. - Additional spices like turmeric for warmth. These ingredients make your Coconut Curry Chicken rich and full of flavor. Check out the Full Recipe for more details! - Cubing the Chicken: Start by cutting the chicken breast into bite-sized cubes. Aim for pieces that are about one inch thick. This size ensures even cooking. - Measuring Ingredients: Gather all your ingredients first. Measure out the coconut milk, curry paste, and fish sauce. This step makes cooking smooth and easy. - Chopping Vegetables: Dice the onion and chop the red bell pepper. Also, mince the garlic and ginger. Keep the broccoli florets and snap peas ready. - Sautéing Aromatics: Heat coconut oil in a large skillet over medium heat. Add the chopped onion and stir. Cook until the onion softens, about three to four minutes. Then, add minced garlic and ginger. Stir for one minute until fragrant. - Browning the Chicken: Add the cubed chicken to the skillet. Season with salt and pepper. Cook until the chicken turns lightly brown, about five to seven minutes. This step builds great flavor. - Combining Flavors: Mix in the red curry paste. Stir well to coat the chicken. Now, pour in the coconut milk, fish sauce, and brown sugar. Stir everything together. Bring the mixture to a gentle simmer. - Adding Vegetables: Toss in the chopped red bell pepper, broccoli florets, and snap peas. Cook for an extra five to seven minutes. The veggies should be tender yet colorful. - Adjusting Seasoning: Taste your dish and adjust the seasoning. Add more salt, pepper, or sugar if needed. This step ensures a balanced flavor. - Serving Suggestions: Serve the Coconut Curry Chicken hot. Garnish with fresh cilantro and lime wedges for a zesty touch. You can find the full recipe [here](#). When cooking chicken for coconut curry, choose fresh chicken breast. Cut it into even cubes. This helps it cook evenly. Always season your chicken with salt and pepper. This adds flavor from the start. Sauté the chicken until it gets a nice golden color. This will lock in flavors. Cook it in batches if your pan is small. Overcrowding can make it steam instead of brown. For the best coconut milk, shake the can well before opening. This mixes the cream and liquid. When you add it to the pan, stir it gently. You want a smooth, creamy sauce. If your curry is too thick, add a splash of water. If it’s too thin, let it simmer longer. This will help it thicken. The right consistency is key for a great curry. To boost flavor, try adding a squeeze of lime juice. It brightens the dish and adds freshness. Fresh herbs like cilantro can also enhance taste. If you like it spicy, add more red curry paste or fresh chili. For a touch of sweetness, increase the brown sugar slightly. Always taste your curry as you cook. This helps you find the perfect balance of flavors. Check the Full Recipe for specific amounts and details. {{image_2}} You can turn your Coconut Curry Chicken into a warm soup. Just add more coconut milk and broth. This makes a creamy, rich soup. To make it, follow the same steps as the main recipe. After you add the coconut milk, add 2 cups of chicken broth. Let it simmer for about 10 minutes. Pour it into bowls, and top with fresh cilantro. This soup is tasty and comforting. Want to add more veggies? This version is perfect for you. Simply mix in your favorite vegetables. I like using carrots, bell peppers, and zucchini. Add these when you add the chicken. Cook them until they are tender. This not only adds color but also boosts nutrition. You can even change the veggies based on what you have at home. Do you prefer spicy food? You can easily adjust the heat level. To make it spicy, add more red curry paste. Start with 2 tablespoons and adjust to taste. You can also add chopped fresh chili peppers. If you want a milder dish, use less curry paste. You can even skip it entirely and use just coconut milk. This way, you still get a creamy dish without too much heat. Feel free to explore these variations for a fun twist on the classic Coconut Curry Chicken. For the full recipe, check the details above! To keep your Coconut Curry Chicken fresh, let it cool first. Then, transfer it to an airtight container. You can store it in the fridge for up to four days. Make sure to label the container with the date. This way, you know when to eat it. If you want to save some for later, freezing is a great option. Place the cooled chicken in a freezer-safe container. Leave some space at the top, as it will expand when frozen. Your Coconut Curry Chicken will stay good for about three months in the freezer. When you’re ready to eat, just thaw it in the fridge overnight. Reheating is simple. You can warm it in a skillet over low heat. Stir it often to heat evenly. If it seems thick, add a splash of coconut milk or water. You can also use a microwave. Place it in a microwave-safe bowl, cover it, and heat in short bursts. Stir between intervals for even warmth. Enjoy your meal like it's fresh! For the full recipe, check out the Tropical Coconut Curry Chicken. You can serve Coconut Curry Chicken with rice or noodles. White rice soaks up the curry sauce well. You can also try brown rice for a healthier option. Quinoa is nice too. For a fun twist, serve it with naan bread. This adds a unique touch and helps scoop up the curry. Green salad or steamed vegetables make great sides as well. They add freshness and balance to the meal. Yes, you can use canned chicken. Canned chicken is already cooked, so it saves time. Just drain and rinse it before adding it to the pan. Use it when you need a quick meal. The flavor may not be as rich, but it will still taste good. Fresh chicken gives a better texture, but canned works in a pinch. To make your Coconut Curry Chicken spicier, add more red curry paste. Start with one extra teaspoon and taste. You can also add chili flakes or fresh chopped chilies. For a different heat, try adding a splash of hot sauce. Remember to adjust slowly. You can always add more, but you can't take it out once it's in! Yes, you can make Coconut Curry Chicken ahead of time. Cook it and let it cool. Store it in an airtight container in the fridge. It stays good for about three days. Reheat it on the stove or in the microwave. The flavors will deepen as it sits, making it even tastier. Just remember to stir well before serving. You can also freeze it for up to three months. In this blog post, we explored how to make Coconut Curry Chicken. We covered essential ingredients, cooking steps, and tips for best results. You learned how to adjust flavors and create variations, like soup or spicy options. Proper storage and reheating tips help keep your dish fresh. Cooking should be fun, and this dish can fit any meal. Enjoy creating your Coconut Curry Chicken, and don't shy away from experimenting!

Coconut Curry Chicken Savory and Easy Weeknight Meal

Looking for an easy and tasty weeknight meal? Coconut Curry Chicken is your answer! This dish bursts with rich flavors

- 2 medium sweet potatoes, peeled and diced - 1 can (15 oz) black beans, rinsed and drained - 1 can (14 oz) diced tomatoes with green chilies - 1 medium onion, diced - 3 cloves garlic, minced - 1 bell pepper (any color), diced - 1 cup corn (frozen or fresh) - 2 cups vegetable broth - 1 tablespoon chili powder - 1 tablespoon cumin - 1 teaspoon smoked paprika - 1 teaspoon oregano - Salt and pepper to taste - 2 tablespoons olive oil - Fresh cilantro, for garnish - Avocado slices, for topping (optional) Each serving offers a healthy balance of nutrients. You get around 250 calories, 10 grams of protein, and 8 grams of fiber. This chili is low in fat and rich in vitamins. It provides a good source of Vitamin A from sweet potatoes and antioxidants from black beans. Sweet potatoes are not just tasty; they are packed with beta-carotene. This helps keep your eyes and skin healthy. Black beans add protein and fiber, which aid digestion and keep you full. Tomatoes are rich in lycopene, known for heart health. Corn adds natural sweetness and vitamin C. Garlic and onion boost your immune system and flavor, making this dish both hearty and healthy. Check out the Full Recipe for all the details! To make Sweet Potato Black Bean Chili, gather all your ingredients first. This keeps your cooking smooth and easy. Here’s what you need: - 2 medium sweet potatoes, peeled and diced - 1 can (15 oz) black beans, rinsed and drained - 1 can (14 oz) diced tomatoes with green chilies - 1 medium onion, diced - 3 cloves garlic, minced - 1 bell pepper (any color), diced - 1 cup corn (frozen or fresh) - 2 cups vegetable broth - 1 tablespoon chili powder - 1 tablespoon cumin - 1 teaspoon smoked paprika - 1 teaspoon oregano - Salt and pepper to taste - 2 tablespoons olive oil - Fresh cilantro, for garnish - Avocado slices, for topping (optional) Make sure to have a large pot ready. It will hold all your ingredients. 1. Start by heating the olive oil in the large pot over medium heat. 2. Add the diced onion and bell pepper. Cook them until the onion turns clear, about 5 minutes. 3. Stir in the minced garlic. Cook for 1-2 minutes until you can smell it. 4. Next, add the diced sweet potatoes, corn, black beans, diced tomatoes, and vegetable broth to the pot. 5. Sprinkle the chili powder, cumin, smoked paprika, oregano, salt, and pepper. Mix everything well. 6. Bring the chili to a boil. Then lower the heat and let it simmer for 25-30 minutes. Stir it a bit to stop it from sticking. 7. Check the taste. Add more salt, pepper, or spices if you want. 8. Once the sweet potatoes are soft, serve the chili hot. You can garnish with fresh cilantro and avocado slices if you like. To get the best texture in your chili, cut the sweet potatoes into even pieces. This helps them cook at the same rate. Stir often to keep everything mixed up. If the chili is too thick, add a splash of broth or water. If it’s too thin, let it simmer longer without a lid. This will help it thicken up. Enjoy your hearty bowl of Sweet Potato Black Bean Chili! For the full recipe, refer to the earlier section. When making Sweet Potato Black Bean Chili, avoid these common pitfalls: - Not rinsing black beans: Rinse canned black beans to remove excess salt. - Overcooking vegetables: Cook sweet potatoes until soft but not mushy. - Skipping the spices: Spices add depth. Don’t skip chili powder and cumin. - Not tasting as you go: Always taste and adjust seasonings before serving. - Ignoring texture: Stir occasionally to prevent sticking and ensure even cooking. You can make this chili your own in many ways: - Add protein: Mix in cooked chicken or turkey for extra heartiness. - Change the beans: Use pinto or kidney beans for a different flavor. - Mix in greens: Spinach or kale can add color and nutrients. - Adjust the heat: Add diced jalapeños or hot sauce for spice lovers. - Experiment with toppings: Try sour cream, cheese, or lime wedges for extra zing. Serve your chili in a fun and inviting way: - Use deep bowls: This helps keep the chili warm and looks great. - Garnish with fresh cilantro: A sprinkle adds a fresh taste and color. - Offer lime wedges: They add a bright flavor twist when squeezed on top. - Pair it with tortilla chips: Chips add a crunchy contrast to the chili. - Serve with cornbread: This classic side complements the chili perfectly. For the full recipe, check the Sweet Potato Black Bean Chili section. {{image_2}} Sweet Potato Black Bean Chili is already vegetarian and vegan-friendly. You can enjoy it without any animal products. The black beans and sweet potatoes give it a great taste and texture. If you want to add more protein, toss in some quinoa or lentils. These options keep the chili healthy and filling while sticking to plant-based ingredients. If you like heat, you can add more spice easily. Try adding diced jalapeños or a pinch of cayenne pepper. You can also use a spicier chili powder for a real kick. For a milder version, skip the chili powder or use sweet paprika. Make sure to taste as you go to find your perfect balance. You can switch out ingredients to create new flavors. Instead of sweet potatoes, try butternut squash for a different twist. If you want more texture, add zucchini or bell peppers. You can also swap black beans for kidney beans or pinto beans. Each change gives the chili its own unique taste. For a richer flavor, add some cocoa powder or a splash of beer. For the full recipe, check out the cooking instructions. Enjoy experimenting with these variations! To keep your chili fresh, let it cool first. Then, pour it into a clean, airtight container. Seal tightly and store it in the fridge. Leftover chili can stay good for about three to four days. Make sure you label the container with the date. This way, you won't forget when you made it. If you want to save the chili for later, freezing is a great option. Use freezer-safe containers or heavy-duty bags. Divide the chili into portions for easy meals. Leave some space at the top of the container as the chili will expand when frozen. You can freeze it for up to three months. When you are ready to eat, just thaw it in the fridge overnight. For the best taste, reheat the chili on the stove. Pour it into a pot and warm it over medium heat, stirring often. If the chili seems thick, add a splash of vegetable broth or water. You can also reheat it in the microwave. Use a microwave-safe bowl and cover it loosely. Heat in short bursts, stirring in between. Enjoy your chili just like it was freshly made! Yes, you can make Sweet Potato Black Bean Chili in a slow cooker. Just add all the ingredients to the pot. Set it on low for 6 to 8 hours. If you use high heat, cook for 3 to 4 hours. This method makes everything tender and tasty. The slow cooker brings out the rich flavors of each ingredient. It also makes your kitchen smell amazing while it cooks! Sweet Potato Black Bean Chili lasts about 4 to 5 days in the fridge. Store it in an airtight container. Make sure it cools down before you put it away. This helps keep the flavors fresh and vibrant. If you want to enjoy it later, you can freeze it too. Just follow the freezing tips I share in the Storage Info section. You can serve Sweet Potato Black Bean Chili with many tasty sides. Here are a few ideas: - Cornbread for a sweet touch. - Rice or quinoa for added heartiness. - Tortilla chips for a crunchy bite. - A fresh salad to balance the warmth. - Slices of avocado on top for creaminess. These sides make your meal more fun and filling. Try different combinations to find your favorite! For the full recipe, check out the earlier section. In this post, we explored the delicious Sweet Potato Black Bean Chili. You learned about its key ingredients, health benefits, and cooking steps. We covered tips to avoid common mistakes and how to customize your chili to fit your taste. We also discussed storage methods and answered frequent questions. Now you have all the tools to make great chili. Enjoy cooking and sharing this dish with others. Happy eating!

Sweet Potato Black Bean Chili Hearty and Flavorful Dish

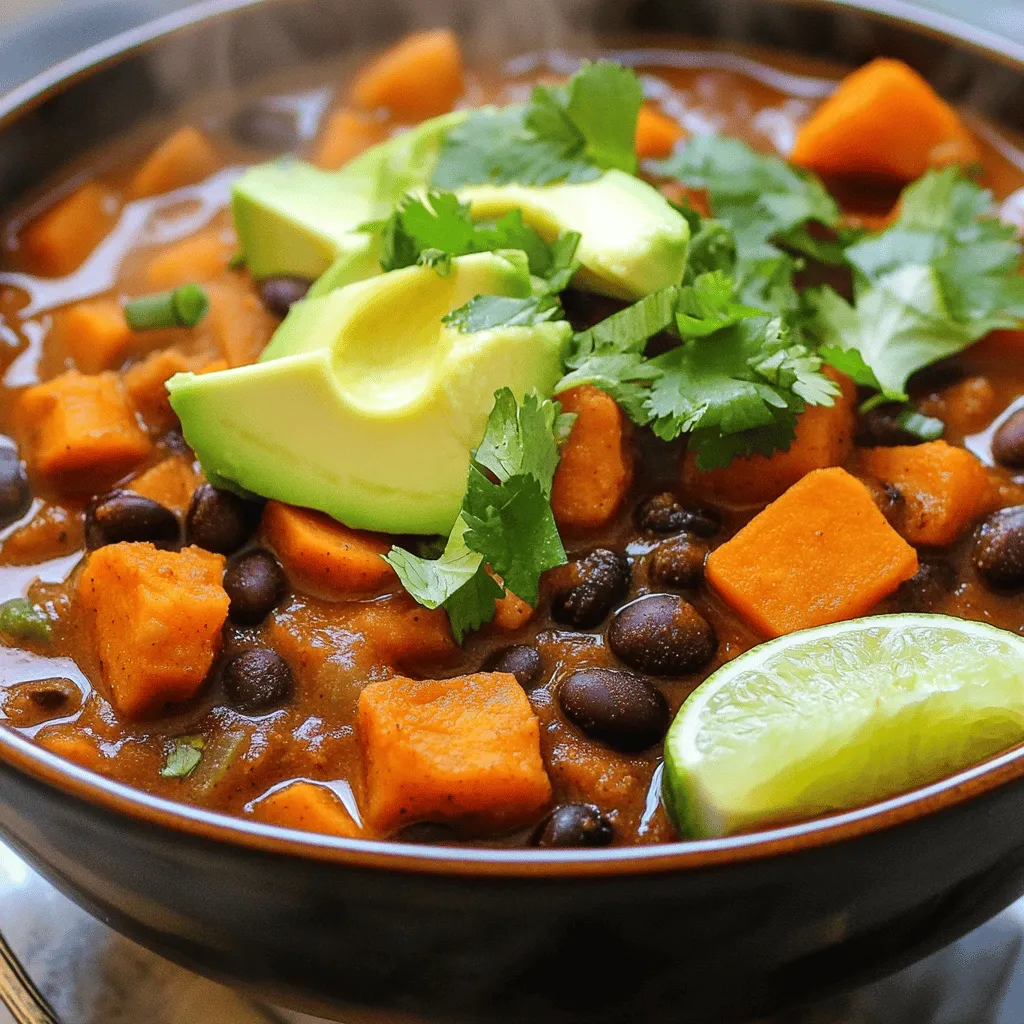
If you’re craving a warm, hearty meal that’s both filling and flavorful, you’re in the right place! This Sweet Potato

- Cauliflower florets - Garlic - Olive oil The star of this dish is the cauliflower. You need one large head of cauliflower, cut into bite-sized florets. The garlic brings bold flavor. I use four cloves, minced finely. Olive oil is essential for roasting. It helps the cauliflower become golden and crispy. - Parmesan cheese - Italian seasoning - Red pepper flakes Now for the seasoning! I like to add a 1/4 cup of grated Parmesan cheese. It adds a rich, salty taste. For herbs, I use 1 teaspoon of Italian seasoning. It blends well with the garlic. If you want a little heat, sprinkle in 1/2 teaspoon of red pepper flakes. This is optional but makes it fun! - Fresh parsley - Lemon wedges To finish, I garnish with fresh parsley. It adds a nice green color. I also serve lemon wedges on the side. Squeezing lemon over the cauliflower brightens the flavor. For the full recipe, check out Garlic Parmesan Roasted Cauliflower! 1. Preheat the oven: Start by setting your oven to 425°F (220°C). This high heat helps the cauliflower get nice and crispy. 2. Prepare the cauliflower: Take one large head of cauliflower and cut it into florets. Make sure they are all about the same size. This helps them cook evenly. 1. Combine cauliflower and garlic: In a large mixing bowl, add the cauliflower florets and four cloves of minced garlic. This mix gives the dish a strong flavor. 2. Prepare the olive oil mixture: In a small bowl, whisk together 1/4 cup of olive oil, 1 teaspoon of Italian seasoning, and 1/2 teaspoon of red pepper flakes if you want some heat. Add salt and pepper to taste. This mix adds depth to your cauliflower. 1. Roast the cauliflower: Pour the olive oil mixture over the cauliflower and garlic. Toss until the florets are well coated. Spread them out on a baking sheet lined with parchment paper. Roast in the oven for 25-30 minutes. Stir them halfway through for even cooking. 2. Add Parmesan cheese: When the cauliflower is tender and golden, take it out. Sprinkle 1/4 cup of grated Parmesan cheese on top. Return it to the oven for an extra 5 minutes. The cheese will melt and bubble, creating a yummy topping. This simple process brings out the best flavors in your Garlic Parmesan Roasted Cauliflower. Trust me, it’s a flavorful delight! You can find the full recipe to follow along easily. To get the best flavor and texture from your Garlic Parmesan Roasted Cauliflower, start by setting your oven to 425°F (220°C). This temperature helps the cauliflower get crispy and brown. Roast it for about 25 to 30 minutes. Halfway through, stir the florets to ensure even cooking. Even coating is key to great taste. When you mix the olive oil and spices with the cauliflower, make sure every piece gets some love. Use your hands to toss it all together. This way, every bite will have flavor. Spices and herbs can truly elevate your dish. I like to add a bit of Italian seasoning to complement the garlic. Feel free to experiment! You can add paprika for a smoky flavor or a pinch of cumin for warmth. If you want to switch things up, try adding lemon zest or fresh herbs like thyme or rosemary. You can also add a splash of balsamic vinegar for tanginess. Serving is just as important as cooking. I love to place the roasted cauliflower in a rustic bowl. Drizzle some extra olive oil on top for shine. A sprinkle of Parmesan cheese makes it look extra tasty. For garnish, chopped fresh parsley adds color and freshness. Place lemon wedges around the dish for a nice pop. It not only looks great but also adds a zesty kick when served. For the full recipe, check out the complete guide above! {{image_2}} You can mix things up by swapping out the Parmesan cheese. For a creamier taste, try mozzarella. This cheese melts well and adds a lovely stringy texture. Another great option is aged cheddar, which offers a sharp and tangy flavor. If you want a dairy-free option, use vegan cheese. Look for brands that melt well. Nutritional yeast is also a good choice. It adds a cheesy flavor without dairy. Don’t be afraid to experiment with different herbs. Fresh thyme or rosemary pairs nicely with the garlic. You can also add some paprika for a smoky flavor. Mix in some chopped spinach or bell peppers for added color and nutrition. Consider adding other vegetables too. Broccoli or Brussels sprouts roast well alongside cauliflower. Just chop them into similar sizes for even cooking. For an Italian twist, add some sun-dried tomatoes and basil. This gives the dish a fresh and vibrant taste. You can even drizzle balsamic glaze on top after roasting for extra flavor. If you crave spice, try an Asian-inspired variation. Toss in soy sauce and sesame oil. Add some sliced green onions and sesame seeds for crunch. This creates a unique and tasty side dish. You can find the full recipe [here](#). After you enjoy Garlic Parmesan Roasted Cauliflower, store leftovers in the fridge. Place the cooled cauliflower in an airtight container. This helps keep the flavors fresh. You can also use a glass jar with a tight lid. Make sure to eat it within 3-4 days for the best taste. To reheat the cauliflower, use an oven or a skillet. If using an oven, set it to 350°F (175°C). Place the cauliflower on a baking sheet and heat for about 10 minutes. If you prefer a skillet, add a little olive oil and heat over low. Stir gently to keep the texture nice. Use these methods to keep the flavors and crunch intact. Yes, you can freeze roasted cauliflower! To do this, first let the cauliflower cool completely. Then, place it in a freezer-safe bag or container. Squeeze out as much air as you can. For the best taste, use it within 2-3 months. When you're ready to enjoy it, thaw it in the fridge overnight before reheating. This will help maintain its great flavor and texture. For the full recipe, check out the Garlic Parmesan Roasted Cauliflower recipe. How to make Garlic Parmesan Roasted Cauliflower crispy? To make your cauliflower crispy, follow these tips: - Use high heat. Roasting at 425°F (220°C) helps. - Spread the florets in a single layer. This helps them cook evenly. - Toss them halfway through cooking. This keeps them from steaming. - Use enough olive oil. A good coating helps create crispiness. Can I use frozen cauliflower? Yes, you can use frozen cauliflower. However, it may not get as crispy. Thaw it first, then pat it dry. This removes excess moisture. Follow the same steps in the full recipe for flavor. Nutritional information of cauliflower Cauliflower is low in calories and high in fiber. One cup has about 25 calories. It is rich in vitamins C and K. These vitamins support your immune system and help bones. Health benefits of garlic and Parmesan cheese Garlic has many health perks. It may boost your immune system and lower blood pressure. It also adds flavor without extra calories. Parmesan cheese is high in protein and calcium. It helps build strong bones and muscles. What to serve with Garlic Parmesan Roasted Cauliflower? This dish pairs well with many meals. Try serving it with grilled chicken or fish. It also works great with pasta or as part of a veggie platter. Is it a good side dish for specific meals? Absolutely! Garlic Parmesan Roasted Cauliflower is perfect for holiday dinners. It adds a tasty twist to weeknight meals too. Serve it as a side for steak or as a light snack. In this post, we explored Garlic Parmesan Roasted Cauliflower, from its key ingredients to cooking tips. You learned how to prepare, season, and serve this dish. We covered various flavors and storage methods. Experiment with ingredients and make it your own. Remember, cooking should be fun and creative! Enjoy trying out these tips, and share your delicious results with others. Your kitchen can be a place of tasty discoveries.

Garlic Parmesan Roasted Cauliflower Flavorful Delight

If you’re looking for a new side dish that bursts with flavor, you’ve found it! Garlic Parmesan Roasted Cauliflower is

Older posts
Newer posts
← Previous Page1 … Page46 Page47 Page48 … Page59 Next →

dsad

© 2025 Cooking Wells • Built with GeneratePress

Our Policies

  • Copyright Policy
  • Cookie Policy
  • GDPR Policy
  • Privacy Policy
  • Disclaimer
  • Terms Of Use

More Information

  • Home
  • About
  • Contact
  • Appetizers
  • Dessert
  • Dinner
  • Drinks
©2025, Cooking Wells About Back To Top