Skip to content
DisclaimerTerms Of UseGDPR PolicyCookie Policy

Cooking Wells

  • Home
  • Drinks
  • Appetizers
  • Dinner
  • Dessert
  • About
  • Contact
  • Privacy Policy
DisclaimerTerms Of UseGDPR PolicyCookie Policy

Mia

To make banana oatmeal pancakes, you need simple and wholesome ingredients. Here’s what you will need: - 1 cup rolled oats - 1 ripe banana, mashed - 1 cup milk (dairy or plant-based) - 1 teaspoon baking powder - 1/2 teaspoon cinnamon - 1/4 teaspoon salt - 1 tablespoon honey or maple syrup (optional) - 1 large egg - Coconut oil or butter for cooking - Optional toppings: fresh fruits, nuts, honey, or maple syrup Each ingredient plays an important role. The oats provide a hearty base and fiber. The banana adds natural sweetness and moisture. The milk helps bind everything together. Baking powder gives the pancakes lift. Cinnamon adds warmth and flavor. Salt enhances all the tastes. Honey or maple syrup is optional but adds a nice touch. The egg helps with texture. Use coconut oil or butter for a rich, delicious finish. Feel free to experiment with toppings! Fresh fruits like berries or sliced bananas brighten the dish. Nuts can add crunch and protein. Drizzle with honey or syrup for extra sweetness. For the full recipe, check out the details above. - Step 1: Blend rolled oats into flour consistency. Use a blender or food processor. This helps make the pancakes fluffy. - Step 2: Combine all ingredients in a mixing bowl. Add the mashed banana, milk, baking powder, cinnamon, salt, honey, and egg. Mix well until smooth. The batter should feel a bit thick but pourable. - Step 3: Heat skillet and cook pancakes. Use medium heat. Add a bit of coconut oil or butter to prevent sticking. - Cooking time per pancake: Cook each pancake for about 2-3 minutes. Look for bubbles forming on the surface. - How to know when to flip the pancakes: Flip when bubbles burst and the edges look set. Cook the other side for another 2-3 minutes until golden brown. - Recommended toppings: Try fresh fruits like sliced bananas and berries. Nuts add crunch. A drizzle of honey or maple syrup makes it sweet. - Suggested pairings with drinks or sides: Serve with a glass of milk or fresh fruit juice. You can also enjoy them with yogurt on the side. For the complete recipe, check the Full Recipe section. To make great pancakes, focus on your batter's consistency. You want it thick but pourable. If it’s too runny, add a little more oat flour. If it’s too thick, add a splash of milk. Mixing well helps all the ingredients blend together. To prevent sticking, heat your skillet over medium heat. Use a bit of coconut oil or butter before each pancake. Wait until it’s hot, then pour your batter. The pancakes should flip easily if the skillet is at the right temperature. Bananas and oats pack many health benefits. Bananas give energy and potassium, while oats provide fiber and protein. Together, they make a filling breakfast. Be mindful of allergens. If you’re allergic to eggs, you can use flaxseed meal mixed with water as a substitute. For dairy-free options, choose plant-based milk. Both swaps keep the recipe tasty. You will need a blender to make oat flour. A mixing bowl for combining ingredients is essential. A good non-stick skillet is best for cooking. For easy cleanup, use parchment paper to line your workspace. Clean your tools right after cooking; it makes washing easier. Enjoy your cooking time! {{image_2}} You can add different fruits to your banana oatmeal pancakes for fun flavors. Try adding blueberries or strawberries for a burst of sweetness. Chocolate chips also work well if you crave something sweeter. These additions make your pancakes colorful and tasty. Just fold them in gently before cooking. If you need gluten-free pancakes, use almond flour or oat flour instead of rolled oats. These options taste great and keep the pancakes light. For a vegan version, replace the egg with flaxseed meal or applesauce. Use almond milk or coconut milk in place of regular milk. These swaps keep your pancakes delicious and suitable for everyone. To enhance the flavor, add a splash of vanilla extract or a pinch of nutmeg. These small changes create a wonderful aroma and taste. For toppings, try fresh fruits, yogurt, or a drizzle of honey. You can also sprinkle nuts on top for added crunch. Each variation makes breakfast exciting and unique. To keep your leftover pancakes fresh, store them in the fridge. Place them in an airtight container. They will stay good for about 3 days. You can also freeze pancakes for later use. Stack them with parchment paper in between each pancake. Then, place the stack in a freezer bag. This way, they won’t stick together. Frozen pancakes can last for about 2 months. The best way to reheat pancakes is in the microwave or on a skillet. For the microwave, place pancakes on a plate and cover them with a damp paper towel. Heat for about 20-30 seconds. This keeps them soft. If you prefer a skillet, heat it over medium-low heat. Add a little butter or oil, then warm the pancakes for about 1-2 minutes on each side. For serving, you can add fresh fruits and a drizzle of syrup. This makes them taste just like fresh pancakes! Enjoy your breakfast! Can I make these pancakes vegan? Yes, you can make these pancakes vegan. Use plant-based milk and replace the egg with one tablespoon of ground flaxseed mixed with three tablespoons of water. Let it sit for five minutes to thicken. How can I make the pancakes fluffier? To make the pancakes fluffier, add an extra half teaspoon of baking powder. Whisk the egg whites separately until they are fluffy, then fold them into the batter gently. This will add air and lightness. What can I use instead of bananas? You can use applesauce, mashed sweet potatoes, or pureed pumpkin instead of bananas. Each will give a different flavor but still keep the pancakes moist and tasty. How do I get my pancakes golden brown without burning? Cook the pancakes over medium heat. If the skillet is too hot, the pancakes will burn. You can test the heat by sprinkling a few drops of water on the skillet. If they sizzle, it’s ready. Adjust the heat as needed. Caloric content per serving Each serving of banana oatmeal pancakes has about 220 calories. This can vary based on added toppings. Key nutrients in banana oatmeal pancakes These pancakes are rich in fiber, potassium, and healthy carbs. The oats provide energy, while bananas add natural sweetness and nutrients. In this post, we explored how to make banana oatmeal pancakes using simple ingredients. You learned about each step, from blending oats to cooking the pancakes. I shared tips for perfecting your pancakes and variations to suit your taste. These pancakes are tasty and healthy. They are easy to make and fun to share. Next time you crave pancakes, try this recipe. You’ll enjoy every bite.

Delicious Banana Oatmeal Pancakes Easy Breakfast Recipe

Start your day right with my easy and delicious banana oatmeal pancakes! This simple recipe packs in wholesome ingredients while

To make nut-free granola bars, you need simple, healthy ingredients. Here’s what you will need: - 2 cups rolled oats - 1 cup puffed rice cereal - 1/2 cup sunflower seeds - 1/2 cup pumpkin seeds - 1/2 cup dried cranberries (or other dried fruits) - 1/2 cup honey or maple syrup - 1/4 cup coconut oil, melted - 1 teaspoon vanilla extract - 1/2 teaspoon cinnamon - 1/4 teaspoon salt These ingredients combine to create a chewy, sweet, and satisfying snack. You can customize your bars for more flavor and nutrition. Consider adding: - Dark chocolate chips for sweetness - Chia seeds for fiber - Flaxseeds for omega-3 fatty acids - Coconut flakes for a tropical twist - Other dried fruits, like raisins or apricots These add-ins can make your bars even more delicious and healthy! Each ingredient in your granola bars offers health benefits: - Rolled oats provide fiber, which helps digestion. - Puffed rice cereal adds crunch without extra calories. - Sunflower seeds are rich in vitamin E and magnesium. - Pumpkin seeds boost protein and iron levels. - Dried cranberries add antioxidants and natural sweetness. - Honey or maple syrup offer quick energy and flavor. - Coconut oil provides healthy fats for energy. - Vanilla extract enhances flavor without extra sugar. - Cinnamon can help regulate blood sugar levels. - Salt balances flavors and enhances taste. By using these ingredients, you not only create a tasty treat but also a snack that supports your health. For the full recipe, check the detailed instructions to guide you through this fun cooking adventure! Start by preheating your oven to 350°F (175°C). Take an 8x8 inch baking pan and line it with parchment paper. Let some paper hang over the sides. This helps you lift the bars out later. In a large mixing bowl, add 2 cups of rolled oats, 1 cup of puffed rice cereal, 1/2 cup of sunflower seeds, and 1/2 cup of pumpkin seeds. Toss in 1/2 cup of dried cranberries, 1/2 teaspoon of cinnamon, and 1/4 teaspoon of salt. Mix everything well. You want a good blend for the best flavor. In another bowl, whisk together 1/4 cup of melted coconut oil, 1/2 cup of honey (or maple syrup), and 1 teaspoon of vanilla extract. Make sure they are fully mixed. This blend adds moisture and sweetness to the bars. Pour the wet mix over the dry ingredients. Stir until every piece is coated. Transfer this mixture into your lined pan. Press it down firmly with a spatula or your hands. Bake for 20-25 minutes until the edges turn golden. Once baked, let it cool in the pan for about 10 minutes. Then, move it to the fridge and let it set for 1 hour. After it's firm, lift the granola out using the parchment. Cut it into bars or squares. Enjoy your tasty snack! For the complete recipe, check the [Full Recipe]. When picking oats, go for rolled oats. They work best in granola bars. Rolled oats are thicker than quick oats. They give your bars a nice chewy texture. Check the label for whole oats. Whole oats have more nutrients and taste. Avoid instant oats as they can turn mushy when baked. To keep your bars from falling apart, use the right mixture. The wet ingredients are key here. Honey or maple syrup acts like glue. It helps everything stick together. Make sure to press the mixture firmly into the pan. Use your hands or a spatula for even pressure. This step helps bond the ingredients when baking. One common mistake is not measuring ingredients correctly. Precision is key for great texture. Another mistake is baking too long. Keep an eye on the color; you want golden edges. If they cool too fast, they can become crumbly. Let them cool in the pan for a bit before cutting. For the full recipe, check out Nut-Free Power Granola Bars. Enjoy your healthy snacks! {{image_2}} You can make your nut-free granola bars fun with different flavors. Try adding chocolate chips or mini marshmallows for a sweet twist. You can also mix in spices like nutmeg or ginger for warmth. If you love fruits, consider using dried mango, apricots, or raisins. Each flavor brings a new taste to your bars. This way, you can enjoy a new snack each time. Pumpkin and sunflower seeds are great, but there are many other seeds to try. Chia seeds add a nice crunch and boost of fiber. Flax seeds are rich in omega-3s and can make your bars even healthier. Hemp seeds have a nutty taste and are packed with protein. Each seed gives a unique flavor and texture to your granola bars. You can change the sweetener in your granola bars. If you want a lighter option, use agave syrup. Brown rice syrup is another great choice for a milder taste. For a sugar-free option, you could use mashed bananas or unsweetened applesauce. Each sweetener will alter the taste, so experiment to find your favorite. Remember, the right sweetener can make your bars even tastier. For the full recipe and more tips, check out the recipe section. To keep your nut-free granola bars fresh, store them in an airtight container. This helps prevent moisture from ruining their texture. You can also wrap each bar in parchment paper. This method adds a nice touch when you grab a snack on the go. These granola bars stay fresh for about one week at room temperature. If you keep them in the fridge, they can last for two weeks. Always check for any signs of spoilage, like a strange smell or dry texture. If you want to save your granola bars for later, freezing is a great option. Wrap each bar tightly in plastic wrap and then place them in a freezer bag. They can last up to three months in the freezer. When you’re ready to eat, just let them thaw in the fridge overnight or at room temperature for a few hours. For the full recipe, check out the Nut-Free Power Granola Bars. Yes, nut-free granola bars can be gluten-free. Use certified gluten-free oats. Many oats may contain gluten due to cross-contamination. Look for brands that clearly label their products as gluten-free. Always check the ingredient list for any hidden gluten sources. This ensures you enjoy a safe and tasty snack. You can definitely customize this recipe! Swap in your favorite seeds or dried fruits. Try chia seeds for added nutrition or coconut flakes for a tropical twist. You can also use agave syrup instead of honey. Remember to keep the ratios similar to ensure the bars hold together well. Check local grocery stores for nut-free granola bars. Many health food stores offer a good variety. Online retailers also have options. Look for brands that clearly state “nut-free” on the packaging. This helps you find safe choices easily. Nut-free snacks are great for many reasons. They are safe for people with nut allergies. They usually contain healthy ingredients like seeds and oats. These snacks can provide energy without allergens. Nut-free options often have lower calories than nut-based snacks. This makes them a good choice for kids and adults alike. In this post, we explored how to make nut-free granola bars. We covered essential and optional ingredients and their health benefits. Next, I shared easy step-by-step baking instructions. We discussed tips to choose the best oats and common mistakes to avoid. You can also try different flavor variations and learn proper storage methods. Nut-free snacks offer tasty safety for many diets. You can enjoy healthy treats made at home. Remember, you have options when it comes to flavors and ingredients. Happy baking!

Nut-Free Granola Bars Easy Healthy Snack Idea

Looking for a tasty and healthy snack that’s nut-free? You’re in the right place! I’ll guide you through making easy

- 1 medium eggplant, sliced into 1/2-inch rounds - 1 cup all-purpose flour - 2 large eggs, beaten - 1 cup breadcrumbs (preferably Italian-style) - 1 cup marinara sauce, plus extra for dipping - 1 1/2 cups shredded mozzarella cheese - 1/2 cup grated Parmesan cheese - 1 teaspoon dried oregano - 1 teaspoon garlic powder - Salt and pepper to taste - Fresh basil leaves for garnish - Olive oil for frying When picking your eggplant, look for firm ones with shiny skin. They should feel heavy for their size. This means they are fresh and full of flavor. Before slicing, wash the eggplant well to remove any dirt. Sprinkle salt on the slices to draw out excess moisture. Let them sit for about 30 minutes. This step helps reduce bitterness and makes your bites crispier. Rinse and pat them dry after salting. If you want a lighter option, you can use whole wheat flour instead of all-purpose flour. You can also swap the breadcrumbs with crushed cornflakes for a gluten-free choice. For a creamier texture, try using provolone cheese with the mozzarella. If you prefer a different flavor, you can use fresh herbs like thyme or rosemary instead of dried oregano. Start by preheating your oven to 375°F (190°C). Line a baking sheet with parchment paper. Slice the eggplant into 1/2-inch rounds. Sprinkle them lightly with salt. This helps draw out moisture. Let them sit for about 30 minutes. Rinse the slices under cold water, then pat them dry with paper towels. This step helps avoid sogginess. Set up a breading station. Place flour in one bowl, beaten eggs in another, and breadcrumbs mixed with oregano, garlic powder, salt, and pepper in a third bowl. Dip each eggplant slice into the flour first. Make sure it is well-coated. Next, dip it into the egg, then coat it with the breadcrumb mixture. Press the breadcrumbs onto the slice to make sure they stick well. In a large skillet, heat olive oil over medium heat. Once it’s hot, fry the breaded eggplant slices. Cook them in batches, about 2-3 minutes on each side. They should turn golden brown. Transfer the fried slices to a paper towel-lined plate to drain excess oil. In a greased baking dish, start layering. Spread a thin layer of marinara sauce on the bottom. Add half of the fried eggplant. Then, add half of the marinara sauce, half of the mozzarella, and half of the Parmesan cheese. Repeat this for the second layer. Top the final layer with any remaining mozzarella and Parmesan cheese. Bake in the oven for 20-25 minutes. When the cheese is bubbly and golden brown, they are ready. Let the Eggplant Parmesan Bites cool slightly. Serve them hot with extra marinara sauce for dipping. Garnish with fresh basil leaves before serving. For the full recipe, check out the detailed instructions above! To keep your eggplant bites crispy, salt the slices first. Salt draws out moisture and helps reduce sogginess. After 30 minutes, rinse the slices and pat them dry. This step is key for crunch. Use fresh breadcrumbs for better texture. They stick well and give a nice crunch. Fry the eggplant slices in olive oil over medium heat. This prevents burning and ensures even cooking. Fry in small batches to keep the oil temperature steady. If the oil cools too much, the eggplant can absorb oil and become greasy. For a crispy finish, bake the bites after frying. This will also melt the cheese nicely. Serve your eggplant bites hot with extra marinara sauce for dipping. Fresh basil leaves add a nice touch. You can also pair them with a simple salad. A light green salad balances the richness of the bites. For a fun twist, try adding crushed red pepper flakes for some heat! {{image_2}} Eggplant Parmesan Bites are already vegetarian. You can add more veggies. Try layering in spinach or bell peppers. These will give extra flavor and nutrients. You can also switch to a different sauce, like pesto. It’s a fun twist! To make these bites gluten-free, switch the flour and breadcrumbs. Use almond flour or a gluten-free blend. For the breadcrumbs, try crushed gluten-free crackers. This keeps the crunch and taste while making it friendly for those with gluten issues. Cheese is key in this dish. You can mix it up. Use provolone for a sharper taste. Or try goat cheese for a creamy texture. Mixing mozzarella with cheddar or gouda can add a unique twist. Just remember, keep some Parmesan for that salty kick. To store your Eggplant Parmesan Bites, first let them cool. Place them in an airtight container. You can keep them in the fridge for up to three days. Make sure they are not stacked too high. This keeps them from getting soggy. When you want to enjoy your Eggplant Parmesan Bites again, preheat your oven to 350°F (175°C). Place the bites on a baking sheet. Heat them for about 10-15 minutes. This way, they will get warm and crispy again. You can also use a microwave, but the oven makes them taste better. If you want to freeze the bites, it’s best to freeze them before baking. After breading the eggplant, arrange them in a single layer on a baking sheet. Freeze them for an hour, then transfer them to a freezer bag. They can stay in the freezer for up to two months. When ready to cook, bake them straight from the freezer. Just add a few extra minutes to the cooking time. For the full recipe, check the link provided. Yes, you can make Eggplant Parmesan Bites ahead of time. Prepare them fully and store them in the fridge. You can bake them later. Just reheat in the oven. This helps keep them crispy. The best dipping sauces include marinara sauce, garlic aioli, or spicy ranch. Marinara pairs great with the cheesy bites. You can also try a basil pesto for a fresh twist. Each sauce enhances flavor. To make Eggplant Parmesan Bites spicier, add red pepper flakes to the breadcrumb mix. You can also use spicy marinara sauce. Another option is to add hot sauce to the egg mixture. Adjust according to your taste. For the full recipe, check the earlier section that lists all the ingredients and steps clearly. Enjoy making these tasty bites! Eggplant Parmesan bites are tasty and easy to make. We covered the key ingredients and preparation tips, so you'll be ready to cook. I shared steps for prepping, breading, and frying the eggplant. Don't forget the tips for making them crispy and the fun serving ideas. You can even try different variations or store leftovers for later. Enjoy making this dish and impressing everyone with your skills! Cooking can be fun and rewarding, especially with these simple bites.

Eggplant Parmesan Bites Tasty and Simple Appetizer

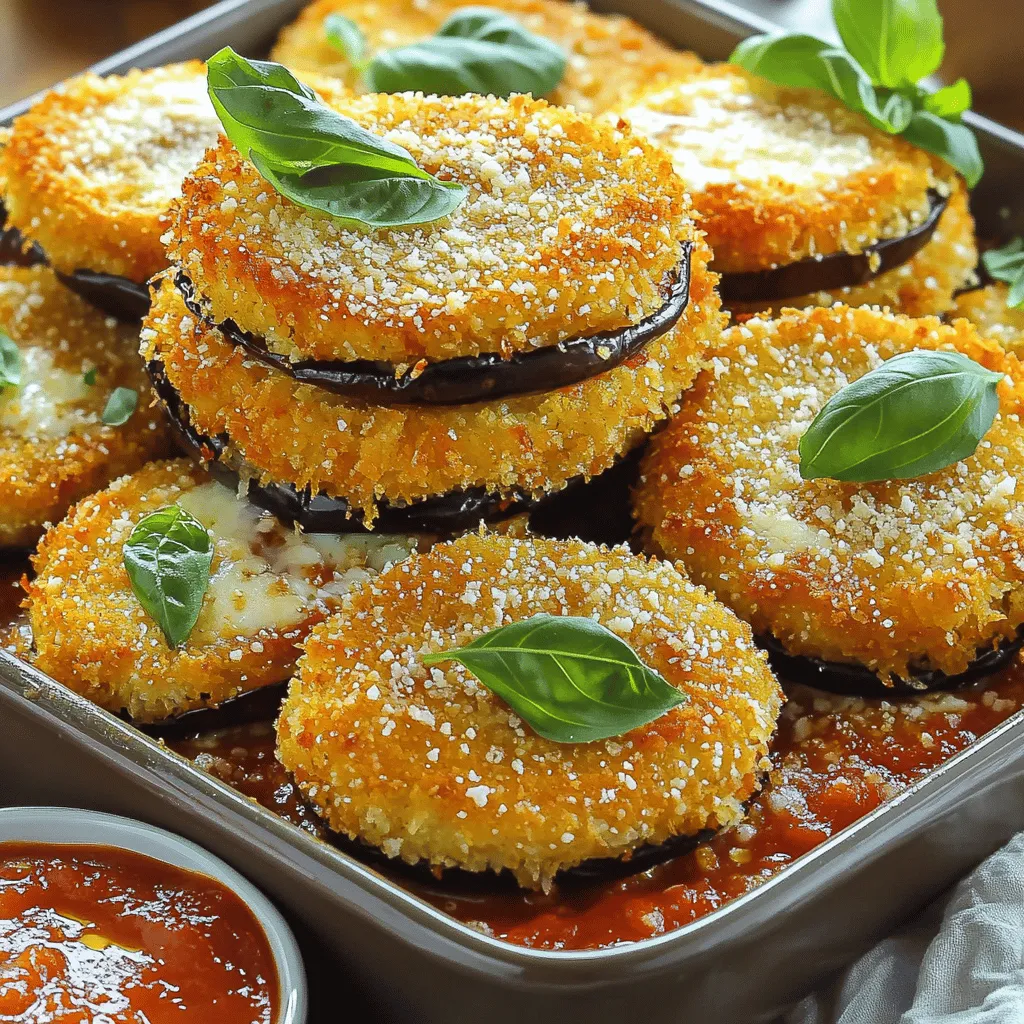
Craving a tasty snack? Let me introduce you to Eggplant Parmesan Bites! These little gems pack all the flavor of

- 1 can (15 oz) chickpeas - 1 cup cherry tomatoes - 1 cucumber - 1/4 red onion - 2 cups mixed salad greens - 1 avocado - 2 tablespoons olive oil - Seasoning: smoked paprika, garlic powder, cumin, salt, and pepper - 2 tablespoons fresh lemon juice - 2 tablespoons tahini - 1 tablespoon water (for thinning) - Fresh parsley Gathering the right ingredients makes a big difference. For this crispy chickpea salad, use canned chickpeas for a quick option. Rinse and drain them well. This helps remove extra sodium and gives a better taste. Cherry tomatoes add a burst of sweetness. Dice your cucumber into small pieces for a nice crunch. The red onion gives a sharp bite. Mix it all with salad greens like spinach or arugula for freshness. The avocado adds creaminess to the dish. It pairs well with the crispy chickpeas. The tahini dressing brings it all together. Use fresh lemon juice for brightness. The tahini adds a nutty flavor. Mix in a bit of water to thin it out. For a pop of color, add fresh parsley as a garnish. This simple ingredient list makes your salad flavorful and healthy. You can find the full recipe at the end of this section. - Preheat your oven to 400°F (200°C). This heat makes the chickpeas crispy. - In a large bowl, mix the drained chickpeas with 2 tablespoons of olive oil. Add 1 teaspoon of smoked paprika, 1/2 teaspoon of garlic powder, 1/2 teaspoon of cumin, and salt and pepper to taste. Stir until all the chickpeas are coated. - Spread the seasoned chickpeas in a single layer on a baking sheet. Use parchment paper for easy cleanup. - Roast the chickpeas for 25-30 minutes. Shake the pan halfway through cooking to ensure they crisp evenly. - In a large bowl, combine 1 cup of halved cherry tomatoes, 1 diced cucumber, 1/4 finely chopped red onion, and 2 cups of mixed salad greens. - In a small bowl, whisk 2 tablespoons of fresh lemon juice, 2 tablespoons of tahini, and 1 tablespoon of water together until smooth. Adjust with more water to reach your desired dressing consistency. - Once the chickpeas are done roasting, let them cool slightly. Then, add them to the salad bowl with 1 diced avocado. - Drizzle the tahini dressing over the salad and toss gently to mix everything. - Garnish with fresh parsley before serving. For the full recipe, check the detailed instructions provided earlier. Enjoy your crispy chickpea salad! To get crispy chickpeas, start by drying them well. Use a clean towel to pat them dry after rinsing. This step removes moisture. Then, toss the chickpeas with olive oil and spices in a large bowl. Make sure every chickpea gets a good coat. Spread them out on a baking sheet. Leave space between each chickpea. This helps them crisp up nicely. Bake in a preheated oven at 400°F (200°C). Check them halfway through and shake the pan. This ensures even cooking. Keep an eye on them near the end. They should look golden brown and feel crunchy. To boost flavor, try adding extra seasonings. A pinch of cayenne can add heat. Fresh herbs like cilantro or dill can brighten the dish. You can also mix in some lemon zest for a fresh taste. For dressings, tahini works great, but don’t stop there. A yogurt-based dressing can add creaminess. You could also drizzle balsamic glaze for a sweet touch. Top your salad with nuts or seeds for added crunch. To prep ahead, wash and cut your veggies in advance. Store them in airtight containers to keep them fresh. You can also roast the chickpeas ahead of time. Just let them cool, then keep them in a sealed bag. For the dressing, whisk it up and store it in the fridge. This keeps it fresh for several days. When you’re ready to eat, just combine everything. You’ll have a tasty meal ready in no time! For the full recipe, check the earlier section. {{image_2}} You can make this crispy chickpea salad your own! Here are some fun ideas: - Add diced bell peppers for crunch. - Toss in shredded carrots for sweetness. - Include sliced radishes for a peppery bite. - Mix in fresh herbs like basil or mint for a burst of flavor. - For protein, crumbled feta cheese adds creaminess. - Grilled chicken or shrimp can make it heartier. The dressing can change the whole taste! Here are some options: - A balsamic vinaigrette adds a tangy twist. - A yogurt-based dressing gives a creamy texture. - Try a zesty lime dressing for freshness. - You can also make a homemade ranch dressing for a fun twist. - Just mix yogurt, herbs, and a splash of lemon juice. This salad fits every season! You can adapt the recipe easily: - In spring, use fresh peas and asparagus. - Summer is perfect for ripe peaches or watermelon. - In fall, add roasted sweet potatoes or apples. - Winter veggies like kale or Brussels sprouts work great too. - Always use what’s fresh at the market for the best taste. For the full recipe, check out the detailed steps and enjoy! To keep your crispy chickpea salad fresh, store it in a sealed container. Place the salad in the fridge right after serving. This helps maintain the flavor and texture. To keep the chickpeas crispy, store them separately. When you want to eat the salad again, add the chickpeas just before serving. This way, they stay crunchy. You can freeze the chickpeas, but not the whole salad. Freezing changes the texture of the fresh veggies. To freeze chickpeas, let them cool after roasting. Then, place them in a freezer-safe bag. When you want to use them, thaw them in the fridge overnight. Reheat them in the oven for a few minutes to regain crispiness. Your crispy chickpea salad can last up to three days in the fridge. However, it's best to eat it sooner for the best taste. Watch for signs of spoilage, like a bad smell or slimy veggies. If you notice these signs, it's time to toss the salad. Enjoy the freshness of your salad while it lasts! To get crispy chickpeas, start with drained and rinsed ones. Toss them in olive oil and spices. Spread them on a baking sheet in a single layer. Bake at 400°F (200°C) for 25-30 minutes. Shake the pan halfway for even roasting. This will give you that perfect crunch! Yes, you can use dried chickpeas! First, soak them overnight in water. Then, boil them until they're tender. This may take 1-2 hours. Once cooked, drain and rinse before using them in the recipe. Dried chickpeas can add a fresher taste to your salad. To boost protein, consider adding grilled chicken or feta cheese. You can also mix in some quinoa or chickpea pasta. Nuts and seeds like almonds or sunflower seeds are great, too. These ingredients will help make your salad even more filling and nutritious. This blog post showed how to make a tasty, crispy chickpea salad. You learned ingredient choices, step-by-step preparation, and ways to enhance flavor. I shared tips for storage and variations to keep it fresh and fun. Remember, you can add different veggies, dressings, or proteins. Enjoy this healthy dish any time. It brings bright flavors and crunch to your table. Make it your own, and share with friends for a great meal!

Crispy Chickpea Salad Flavorful and Healthy Choice

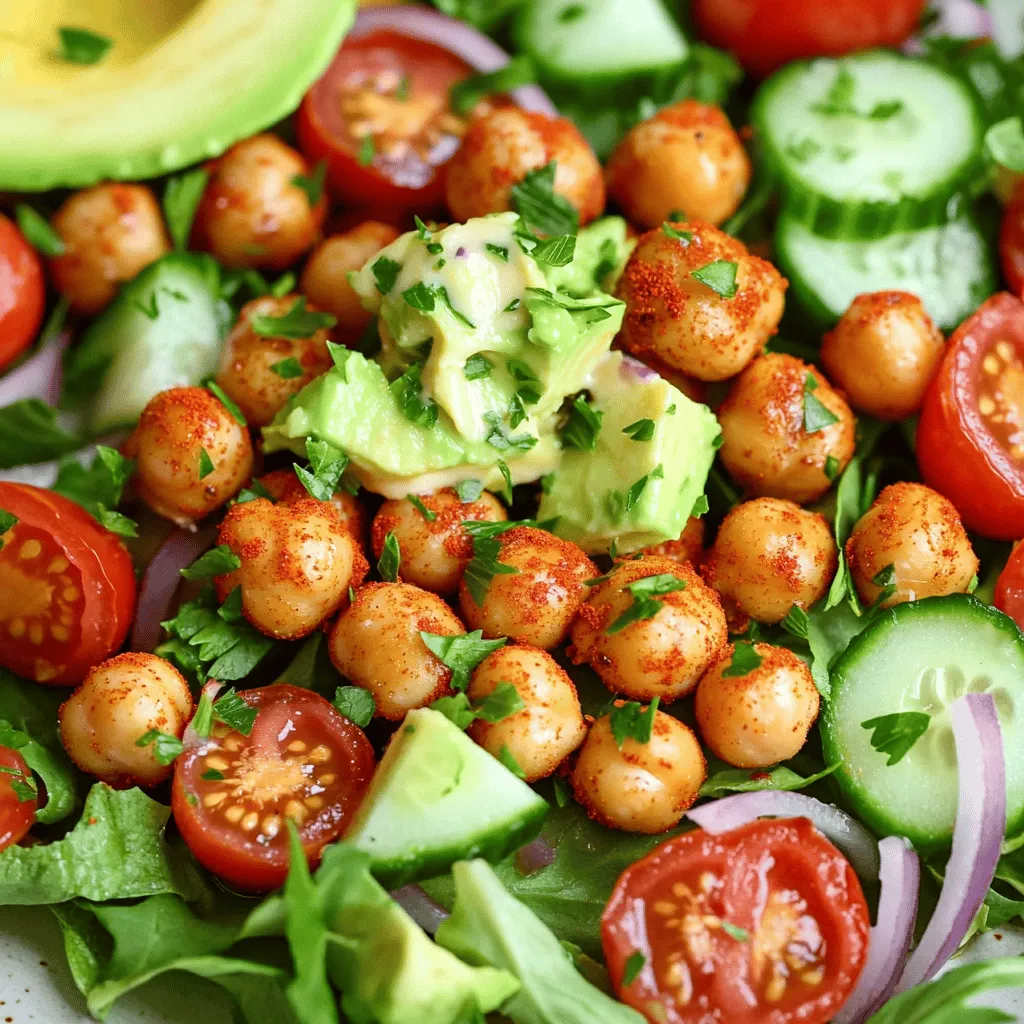
Looking for a fresh, tasty meal? My Crispy Chickpea Salad is perfect for you! This salad is packed with flavor

When making this salad, you need fresh and colorful ingredients. Here is what you will use: - 1 cup quinoa, rinsed - 2 cups vegetable broth (or water) - 1 cup cherry tomatoes, halved - 1 cucumber, diced - 1 red bell pepper, chopped - 1/2 red onion, finely chopped - 1/2 cup Kalamata olives, pitted and sliced - 1/2 cup feta cheese, crumbled (optional for a vegan version) - 1/4 cup fresh parsley, chopped - 1 teaspoon dried oregano - 3 tablespoons olive oil - 2 tablespoons lemon juice - Salt and pepper to taste Every ingredient brings great taste and health benefits: - Quinoa is a complete protein. It helps build muscles. - Cherry tomatoes are rich in vitamins A and C. They boost your immune system. - Cucumber keeps you hydrated and adds crunch. - Red bell pepper is full of antioxidants. It supports eye health. - Red onion has anti-inflammatory properties. It can help your heart. - Kalamata olives provide healthy fats. They are good for your skin. - Feta cheese adds protein and calcium. It strengthens bones (use a vegan alternative if needed). - Fresh parsley is high in vitamins K and C. It adds freshness. - Dried oregano has antibacterial properties. It adds flavor and health benefits. - Olive oil is heart-healthy and adds richness. - Lemon juice adds brightness. It is a good source of vitamin C. - Salt and pepper enhance all the flavors in the salad. You can easily swap some ingredients for your taste: - Use brown rice instead of quinoa for a different grain. - Zucchini can replace cucumber for a softer texture. - If you don’t have red bell pepper, try yellow or orange ones. - Use green olives if you prefer a different flavor. - For a dairy-free option, skip the feta or use nut-based cheese. - You can add chickpeas for extra protein and fiber. For the full recipe, check [Full Recipe]. Start by rinsing 1 cup of quinoa under cold water. This step removes any bitterness. In a medium saucepan, bring 2 cups of vegetable broth or water to a boil. Once boiling, add the rinsed quinoa. Reduce the heat to low, cover, and let it simmer. Cook for about 15 minutes or until all the liquid disappears. Fluff the quinoa with a fork and let it cool in the pot. While your quinoa cools, chop your vegetables. You will need: - 1 cup cherry tomatoes, halved - 1 cucumber, diced - 1 red bell pepper, chopped - 1/2 red onion, finely chopped - 1/2 cup Kalamata olives, pitted and sliced - 1/2 cup feta cheese, crumbled (optional) - 1/4 cup fresh parsley, chopped Add all these beautiful veggies to a large mixing bowl. In a small bowl, whisk together: - 3 tablespoons olive oil - 2 tablespoons lemon juice - 1 teaspoon dried oregano - Salt and pepper to taste Once mixed, pour the dressing over the salad. Toss gently to coat every ingredient. Add the chopped parsley and give it one last mix. Now, let the salad chill in the fridge for at least 30 minutes. This waiting time helps the flavors blend well. Enjoy your vibrant Mediterranean quinoa salad! For the full recipe, check out the earlier sections. To cook quinoa perfectly, rinse it first. This step removes bitter saponins. Use a ratio of one cup quinoa to two cups of liquid. I prefer vegetable broth for extra flavor. Bring the broth to a boil, then add the quinoa. Reduce heat, cover, and simmer for about 15 minutes. When done, fluff it with a fork. Let it cool before mixing it into the salad. This keeps the grains separate and light. Chilling the salad plays a big role in the taste. Once you mix all the ingredients, cover the bowl with plastic wrap. Place it in the fridge for at least 30 minutes. This time helps the flavors blend well. If you can chill it longer, even better! The salad will taste fresher and more vibrant. Serve it cold or at room temperature for the best experience. Fresh herbs can elevate your Mediterranean quinoa salad. I love using parsley, but you can try others too. Fresh basil, mint, or dill work well. Add the herbs right before serving. This keeps their bright flavor intact. Chop them finely for an even spread throughout the salad. The fresh herbs give a burst of flavor and a lovely aroma. Enjoy experimenting with different herbs to find your favorite blend. {{image_2}} You can easily make this salad vegetarian or vegan. For a vegetarian version, add feta cheese for a creamy touch. If you prefer a vegan option, simply skip the cheese. The salad stays fresh and tasty without it. You can also replace the feta with avocado. This gives a rich flavor and creaminess. Feel free to play with the ingredients! Here are a few ideas: - Chickpeas: Add protein and fiber. - Spinach or Kale: Add greens for extra nutrients. - Artichoke Hearts: These add a unique flavor. - Sun-Dried Tomatoes: They bring a sweet, tangy taste. - Nuts or Seeds: Try walnuts or sunflower seeds for crunch. Each of these can enhance the taste and texture of your salad. Mix and match to create your perfect dish! This salad is great for many events. For a picnic, serve it in a big bowl. It looks colorful and inviting. For a dinner party, place it in smaller bowls. Garnish with extra parsley for a pop of color. If you’re having a barbecue, pair it with grilled meats. The fresh flavors balance well with smoky dishes. You can also serve it as a light lunch. Just add some bread or pita on the side. For the full recipe, check out the details above! Enjoy making your Mediterranean Quinoa Salad! Store your Mediterranean quinoa salad in an airtight container. This keeps it fresh. Make sure to cool the salad to room temperature first. Avoid letting it sit out for too long. When stored properly, this salad lasts about 3 to 5 days in the fridge. The flavors may deepen over time, making it even tastier. Just check for any signs of spoilage before eating. This salad is best served cold or at room temperature. If you prefer it warm, gently heat it in a pan on low. Avoid using a microwave, as it can change the texture. Always add fresh herbs or a drizzle of lemon juice to brighten the flavors. For the full recipe, refer to the complete instructions above. The best way to prepare quinoa is simple. First, rinse the quinoa under cold water. This removes a bitter coating called saponin. Next, bring two cups of vegetable broth to a boil. Add one cup of rinsed quinoa, reduce the heat, and cover. Cook for about 15 minutes. The quinoa is ready when it absorbs all the liquid. Fluff it with a fork for a light texture. This method keeps the grains from getting mushy and gives you perfect quinoa for your salad. Yes, you can make Mediterranean Quinoa Salad ahead of time. In fact, the flavors blend better after chilling. Prepare the salad and store it in the fridge for up to three days. Just remember to keep the salad covered in a bowl. When you're ready to eat, you can serve it cold or at room temperature. This makes it great for meal prep or picnics! Yes, quinoa is very healthy. It is a complete protein, meaning it has all nine essential amino acids. Quinoa is also high in fiber, which helps with digestion. It is gluten-free, making it perfect for those with gluten sensitivities. Additionally, quinoa contains vitamins and minerals like magnesium, iron, and B vitamins. Including quinoa in your diet can support overall health and wellness. It's a great choice for a balanced meal! Mediterranean quinoa salad is easy and fun to make. We covered the key ingredients and their health perks. You learned how to cook quinoa, prepare veggies, and whip up a tasty dressing. The tips help you chill the salad and boost its flavor. Plus, I shared fun ways to mix it up for any gathering. Store leftovers well and know how long they last. You can enjoy this salad fresh or prepared ahead. Get creative, and make this dish your own!

Mediterranean Quinoa Salad Fresh and Flavorful Dish

Are you ready to enjoy a fresh and flavorful dish? This Mediterranean Quinoa Salad is the perfect mix of taste

To make a rich and creamy chocolate avocado mousse, gather these ingredients: - 2 ripe avocados, peeled and pitted - 1/2 cup unsweetened cocoa powder - 1/3 cup maple syrup - 1/4 cup almond milk - 1 teaspoon vanilla extract - 1/4 teaspoon sea salt - Pinch of cinnamon (optional) - Dark chocolate shavings (optional) - Fresh berries (optional) Each ingredient plays a key role. The avocados create a smooth texture while adding healthy fats. Unsweetened cocoa powder gives that deep chocolate flavor we all love. Maple syrup acts as a sweetener, making it perfect for dessert. Almond milk keeps it light and creamy. Vanilla adds warmth, while sea salt heightens all the flavors. A hint of cinnamon can bring a warm twist if you like. For finishing touches, dark chocolate shavings or fresh berries make it pretty and tasty. You can find the full recipe for Chocolate Avocado Mousse in the recipe section. - Combine ingredients in a blender. - Use two ripe avocados, cocoa powder, maple syrup, almond milk, vanilla extract, sea salt, and cinnamon if you like. - Blend until smooth and creamy. Scrape down the sides as needed. - Taste the mousse and adjust sweetness to your liking. - Transfer mousse to serving bowls. - Cover the bowls with plastic wrap or a lid. - Refrigerate for at least 30 minutes to 1 hour. This helps the mousse set and flavors blend well. - Garnish with dark chocolate shavings for a rich touch. - Add fresh berries on top for a burst of color and flavor. - Pair with a dollop of coconut whipped cream for extra creaminess. - Serve alongside crunchy cookies for a fun texture contrast. For the complete recipe, check the Full Recipe. Enjoy making this rich and creamy treat! To make the best chocolate avocado mousse, start with ripe avocados. They should be soft to the touch but not too mushy. Ripe avocados blend smoothly and create a creamy base. If they are too firm, the mousse will be chunky. When blending, use high speed. This helps to break down the avocado fully. Stop the blender once to scrape the sides. This ensures an even mix. Blend for about 1-2 minutes until you see a velvety consistency. You might want to adjust the sweetness of your mousse. Start with the amount of maple syrup in the recipe. After blending, taste it. If you want it sweeter, add more syrup. Blend again to mix it in well. If you prefer other sweeteners, try agave nectar. Honey is another option, but it’s not vegan. You can also use stevia or monk fruit for a low-calorie option. To take your mousse to the next level, think about adding spices. A pinch of cinnamon gives a warm flavor. You can also try a dash of sea salt. It enhances the chocolate taste. For other flavor combinations, consider adding coffee. A bit of espresso powder boosts the chocolate flavor. You can also infuse it with citrus, like orange zest. This adds a fresh twist to your mousse. For more ideas, check out the full recipe. {{image_2}} To make this mousse vegan, you can swap out a few items. Use almond milk or any plant-based milk instead of dairy milk. For sweetening, choose maple syrup or agave nectar. Both options keep it tasty and vegan-friendly. Want to spice things up? You can add peanut butter or any nut butter to the mix. This twist gives the mousse a rich, nutty flavor. You can also infuse the mousse with citrus zest, like orange. The zest brightens the chocolate and adds a fresh kick. If you need to change serving sizes, it’s simple! You can double the recipe for a party or cut it in half for a small treat. The ideal size is about half a cup per person. This portion lets everyone enjoy their dessert without overdoing it. For larger gatherings, consider using small cups for a fun presentation. To store leftover chocolate avocado mousse, place it in an airtight container. This keeps it fresh. The mousse lasts about 3 to 5 days in the fridge. Make sure to cover it well to avoid any odors from other foods. Yes, you can freeze chocolate avocado mousse! Use a freezer-safe container for best results. It can last up to 2 months in the freezer. When ready to eat, thaw it overnight in the fridge. This helps to keep the texture creamy. Check for a change in color or smell. If the mousse becomes brown or has an off odor, it is best to discard it. Always trust your senses when it comes to food safety. Enjoy your chocolate avocado mousse while it’s fresh for the best taste! For the full recipe, refer back to the ingredients and instructions. Chocolate avocado mousse is a rich and creamy dessert made from ripe avocados and cocoa powder. The avocados give it a smooth texture, while cocoa adds a deep chocolate flavor. This mousse is not just tasty; it is also dairy-free and can be made vegan. The ingredients blend well, creating a decadent treat that feels indulgent. Yes, you can make this mousse ahead of time. It tastes even better after some chilling. Make it a day before your event, and let it sit in the fridge. Just cover it well to keep it fresh. When you are ready to serve, add your favorite garnishes for a lovely touch. Yes, this mousse is a healthier dessert option. Avocados are full of healthy fats, which are good for your heart. They also have fiber, vitamins, and minerals. Cocoa powder is rich in antioxidants. With maple syrup as a sweetener, you get a natural touch. Overall, this mousse can fit well into a balanced diet. Absolutely! You can use other sweeteners if you prefer. Honey, agave nectar, or even stevia work well. Just keep in mind that each sweetener has a different level of sweetness. Start with a small amount and taste as you mix. Adjust until you find the perfect sweetness for your mousse. To make this mousse nut-free, simply swap almond milk for a nut-free milk. Options like oat milk, soy milk, or coconut milk are great choices. These will keep the mousse creamy without using any nuts. Always double-check labels to ensure they meet your dietary needs. In this post, we explored how to make delicious chocolate avocado mousse. We covered the necessary ingredients, preparation steps, and ways to enhance flavors. I shared tips to perfect the texture and adjust sweetness. Variations allow you to customize this treat for any diet. Lastly, I provided essential storage info to keep your mousse fresh. This mousse is not just tasty; it's a fun way to enjoy healthy ingredients. Now it’s your turn to try making this dessert and impress your friends. Enjoy your cooking adventure!

Chocolate Avocado Mousse Rich and Creamy Treat

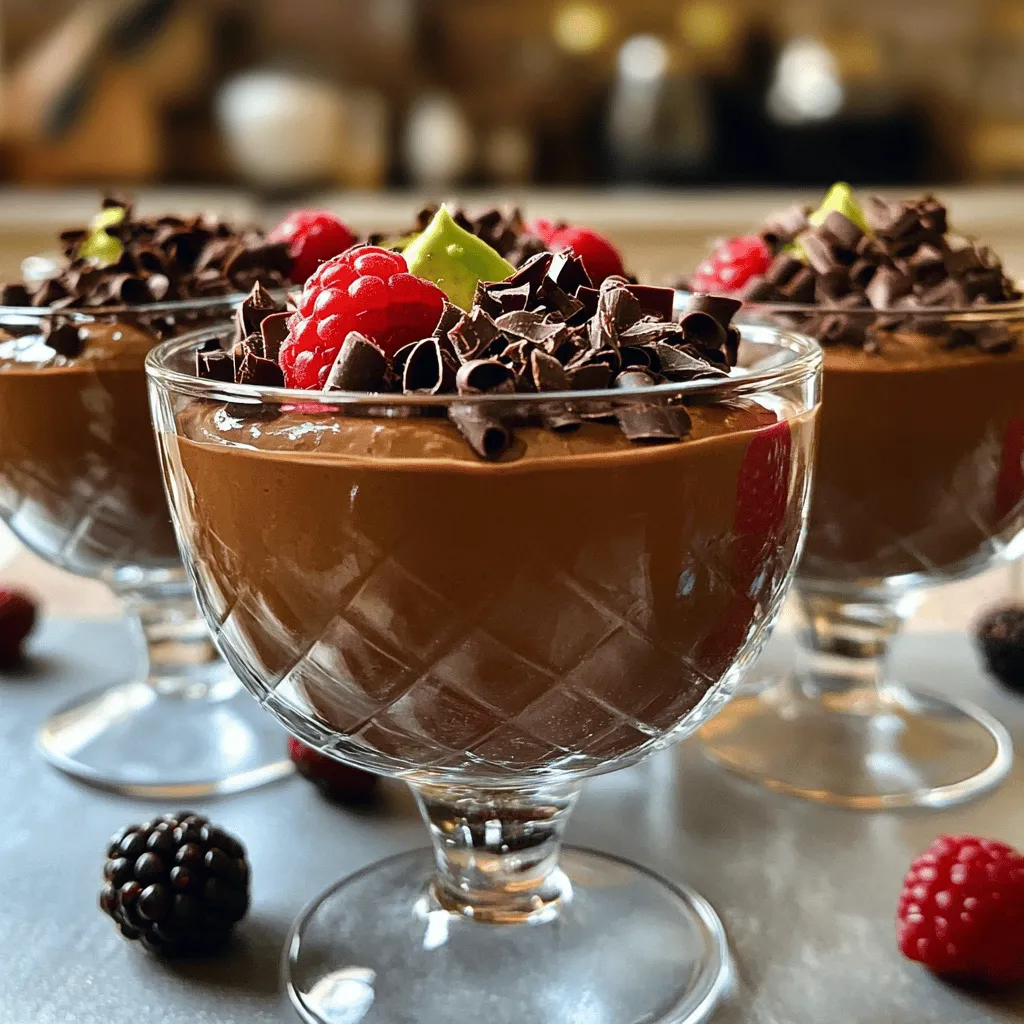
Are you ready to indulge in a dessert that’s both rich and healthy? Chocolate Avocado Mousse combines creamy avocados with

To make sweet potato black bean tacos, gather these main ingredients: - 2 medium sweet potatoes, peeled and diced - 1 can (15 oz) black beans, rinsed and drained - 1 tablespoon olive oil - 1 teaspoon ground cumin - 1 teaspoon smoked paprika - ½ teaspoon garlic powder - Salt and pepper to taste - 8 small corn tortillas These ingredients create a tasty base. Sweet potatoes give the tacos a sweet, creamy texture. Black beans add protein and fiber, making them filling. Olive oil and spices bring depth to the flavors. You can enhance your tacos with these optional toppings: - 1 avocado, sliced - 1 cup red cabbage, thinly sliced - Fresh cilantro, for garnish - 1 lime, cut into wedges These toppings add freshness and color. Avocado provides healthy fat, while red cabbage adds crunch. A squeeze of lime brightens the dish and balances the flavors. For this recipe, you will need: - Baking sheet - Mixing bowl - Small saucepan - Skillet These tools help you prepare the tacos with ease. The mixing bowl is for tossing the sweet potatoes in oil and spices. The baking sheet holds the sweet potatoes while they roast. A small saucepan warms the black beans, and the skillet heats the tortillas. For the full details on how to prepare these delicious tacos, check out the Full Recipe. 1. Start by preheating your oven to 400°F (200°C). This helps the sweet potatoes cook evenly. 2. In a mixing bowl, toss the diced sweet potatoes with olive oil, cumin, smoked paprika, garlic powder, salt, and pepper. Make sure they are well coated for great flavor. 1. Spread the seasoned sweet potatoes in a single layer on a baking sheet. This ensures they roast nicely. 2. Roast in the preheated oven for about 25-30 minutes. Stir halfway through to get that perfect caramelization. You want them tender and golden. 1. In a small saucepan, gently heat the black beans over medium heat. This takes about 5 minutes. Make sure they’re warmed through. 2. For more flavor, season the beans with a pinch of salt and cumin. This really enhances their taste. 1. While the sweet potatoes and beans cook, warm the corn tortillas. You can do this on a skillet or over a gas flame for a few seconds. This makes them pliable and tasty. 2. To assemble, place a few roasted sweet potato cubes in the center of each tortilla. Then add a spoonful of warm black beans. 3. Top each taco with sliced avocado, a handful of red cabbage, and a sprinkle of fresh cilantro. 4. Serve with lime wedges on the side for squeezing over the tacos. This adds a zesty kick! For the full recipe, check out the Sweet Potato Black Bean Tacos section. Enjoy making these delicious tacos! To ensure even roasting, cut sweet potatoes into similar-sized pieces. This helps them cook at the same rate. Spread them out on the baking sheet. Avoid crowding to allow steam to escape. For the best tortilla heating methods, use a skillet on medium heat. Warm each tortilla for about 30 seconds on both sides. You can also heat them directly over a gas flame for a charred flavor. To enhance flavor, consider adding a pinch of cayenne or chili powder to the sweet potatoes. Smoked paprika adds a nice depth, but feel free to experiment. If you want to improve texture, try adding toasted pumpkin seeds or crunchy radishes as toppings. They add a tasty crunch to your tacos. These tacos are vegan and gluten-free. The sweet potatoes and black beans provide great nutrition. Sweet potatoes are rich in vitamins A and C. Black beans offer fiber and protein, making this meal filling. You can enjoy these tacos while staying healthy and satisfied. {{image_2}} You can easily swap the black beans for pinto or kidney beans. Each type adds a unique taste. If you want something different, try using chickpeas. They work well and add protein. For the sweet potatoes, consider using butternut squash or acorn squash. These options bring a lovely sweetness and a different texture to your tacos. Grilling sweet potatoes adds a smoky flavor. Cut them into thick slices and grill until tender. Roasting gives a crispy edge and deepens the flavor. You can also use a slow cooker for a hands-off approach. Just combine the ingredients and let them cook on low for a few hours. This method makes the flavors blend beautifully. These tacos pair well with a fresh salad or a side of rice. You can serve them with lime wedges for extra zing. A simple avocado salad complements the flavors nicely. For drinks, try a light beer or a refreshing iced tea. Both enhance the meal's taste and balance the spices. To keep your sweet potato black bean tacos fresh, store leftovers in the fridge. Place the tacos in an airtight container for up to three days. If you want to freeze them, wrap each taco tightly in plastic wrap. Then, put them in a freezer-safe bag. They can last for up to three months frozen. When you are ready to eat your tacos, you can reheat them easily. Use an oven or a skillet. To reheat in the oven, preheat it to 350°F (175°C). Place the tacos on a baking sheet and warm them for about 10-15 minutes. If using a skillet, heat it on medium. Add the tacos and warm them for about 5 minutes on each side. To keep the tortillas fresh, wrap them in a damp paper towel before reheating. This helps them stay soft and pliable. Enjoy your tacos just like they were fresh! For the full recipe, check out the complete guide. How to make sweet potato black bean tacos vegan? To make these tacos vegan, stick to the base recipe. Use corn tortillas, sweet potatoes, and black beans. For toppings, skip any dairy and stick with avocado, cabbage, and cilantro. Can I use other vegetables in this recipe? Yes, you can! Feel free to add bell peppers, zucchini, or corn. These veggies add color and flavor. Just chop them to a similar size as the sweet potatoes for even cooking. How do I make this recipe spicy? For a spicy kick, add jalapeños or chili powder. You can also serve with hot sauce or diced fresh chili. Adjust to your spice level for the best taste. What is the best way to cook sweet potatoes? The best way to cook sweet potatoes is to roast them. This brings out their natural sweetness and creates a crispy texture. Peel and dice them, toss with olive oil and spices, then roast at 400°F. Are black beans good for my health? Yes, black beans are very healthy! They are high in protein and fiber. They help with digestion and keep you full. Plus, they have many vitamins and minerals. How long do sweet potato black bean tacos last? These tacos last for about 3-4 days in the fridge. Store them in an airtight container to keep them fresh. Can I meal prep these tacos for the week? Absolutely! You can prepare the sweet potatoes and black beans in advance. Keep them separate from the tortillas and toppings. When ready to eat, just assemble the tacos fresh. Check out the Full Recipe for more details! In this post, I covered how to make tasty sweet potato black bean tacos. I shared key ingredients, like sweet potatoes and black beans, along with optional toppings. You learned the best cooking tools and step-by-step instructions for preparation, roasting, and assembling. Final thoughts: This recipe is fun and healthy. Mix and match ingredients to fit your taste. Enjoy exploring different flavors and making these tacos your own!

Sweet Potato Black Bean Tacos Flavorful and Filling Meal

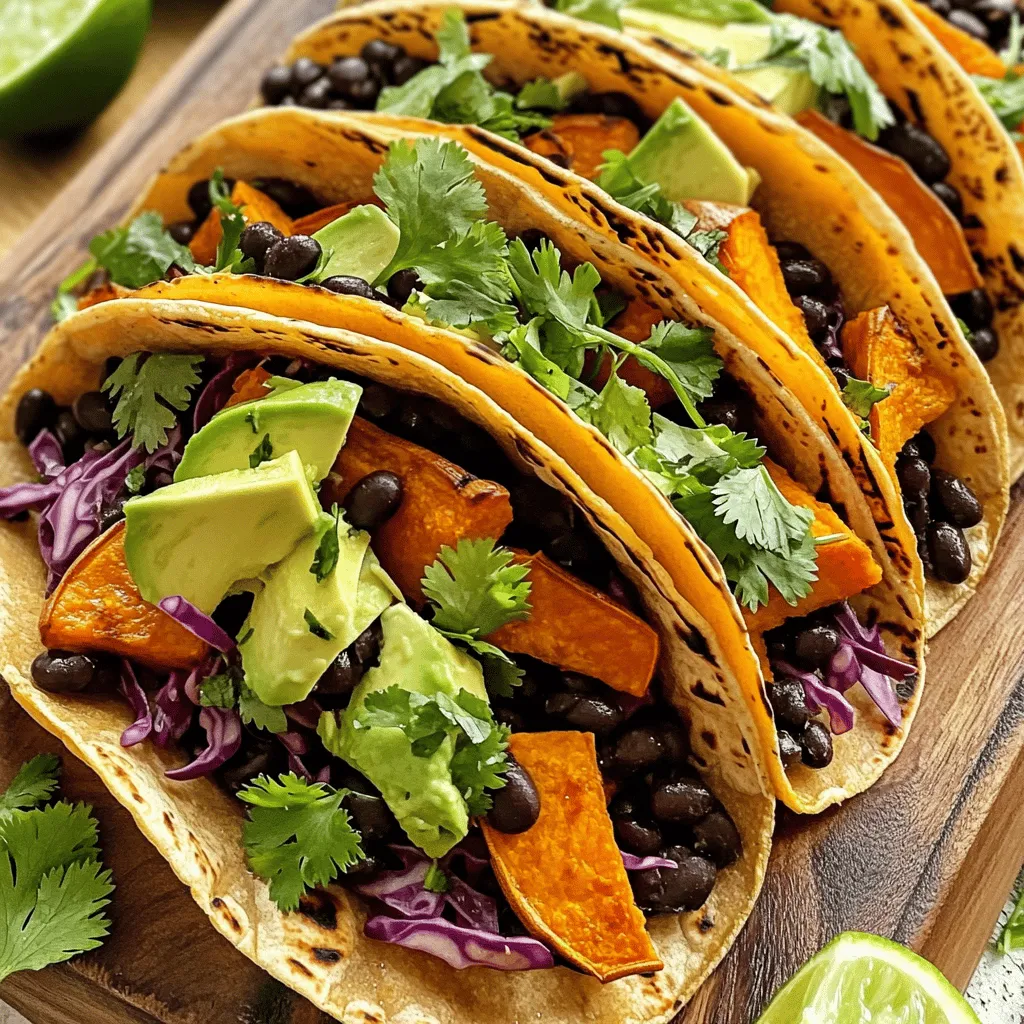
Looking for a tasty and quick dinner idea? Sweet Potato Black Bean Tacos are a game-changer! These tacos pack a

- 4 large bell peppers (any color) - 1 cup cooked quinoa (or rice) - 1 cup black beans, drained and rinsed - 1 cup corn (frozen or fresh) - 1 cup diced tomatoes (canned or fresh) - 1 teaspoon cumin - 1 teaspoon chili powder - Salt and pepper to taste - 1 cup shredded cheese (cheddar or Monterey Jack) - ½ cup chopped green onions - Fresh cilantro for garnish (optional) To make cheesy stuffed bell peppers, you need fresh ingredients. Choose bright bell peppers for color and taste. I like to mix quinoa with black beans for protein. Corn adds sweetness, while tomatoes bring moisture. For spices, cumin offers warmth, and chili powder gives a kick. Adjust salt and pepper to your liking. The toppings are just as important! Shredded cheese melts perfectly on top. Green onions add crunch, and cilantro adds freshness. You can find the full recipe details above to guide you through making this simple meal. You’ll enjoy each bite! - Preheat the oven to 375°F (190°C). - Slice the tops off each bell pepper and remove seeds and membranes. - Brush outsides with olive oil and place in a baking dish. First, I warm up my oven. It gets the cooking process started right. I slice the tops off the bell peppers. I make sure to remove all the seeds and membranes. This keeps the filling from getting too messy. Next, I brush the outsides with olive oil. This step helps the peppers roast nicely. I then place them cut side up in a baking dish. - Combine quinoa, black beans, corn, diced tomatoes, spices, and half of the cheese. - Season with salt and pepper to taste. For the filling, I mix cooked quinoa with black beans, corn, and diced tomatoes. I add spices like cumin and chili powder. This gives the mix great flavor. I also stir in half of the cheese for creaminess. I season it all with salt and pepper. A quick taste helps me find the right balance. - Stuff the bell peppers with the quinoa mixture. - Top with remaining cheese and cover with foil. - Bake for 20 minutes, then uncover and bake until cheese is bubbly. Now comes the fun part! I stuff each bell pepper with the filling. I press it down gently to fit it all inside. Then, I sprinkle the remaining cheese on top. The cheese makes everything melty and delicious. I cover the dish with foil to keep the heat in. I bake them for 20 minutes. After that, I remove the foil and bake until the cheese is bubbly and golden. The aroma fills my kitchen, making it hard to wait! For the full recipe, you can check out the details to get started on your own cheesy stuffed bell peppers. - Use fresh ingredients for the best flavor. Fresh peppers make a big difference. - Adjust baking time for preferred pepper tenderness. If you like them soft, bake a bit longer. - Experiment with different cheese combinations. Cheddar, Monterey Jack, and pepper jack all work well. - Consider adding a spicy cheese for extra flavor. It can really elevate the dish. - Garnish with green onions and cilantro. This adds color and freshness. - Pair with a side salad for a complete meal. A crisp salad complements the peppers nicely. You can find the full recipe to get started on these cheesy stuffed bell peppers! {{image_2}} You can change the protein in your stuffed peppers. Use ground turkey or beef instead of black beans. This switch gives a hearty flavor. Ground turkey is leaner, while beef adds richness. You can also try different legumes. Chickpeas or lentils work well for a tasty vegetarian option. They add protein and fiber, making the dish filling. If you want a vegetarian twist, there are great swaps. Substitute quinoa with couscous or barley. These grains offer different textures and flavors. You can also add diced veggies like zucchini or mushrooms. These choices will boost nutrients and taste. They make your peppers colorful and healthy. To take the flavor up a notch, add salsa or hot sauce to the filling. This gives a spicy kick that many enjoy. If you like creaminess, add avocado or guacamole as a topping. This adds richness and balances the dish. Don't be afraid to mix and match until you find your favorite combination. For more ideas, check out the Full Recipe. After you enjoy your cheesy stuffed bell peppers, store any leftovers in an airtight container. This helps keep them fresh. They taste best when eaten within three days. If you wait longer, they may lose their flavor and texture. You can freeze stuffed peppers before baking them. This makes for a great meal prep option. Just place the unbaked peppers in a freezer-safe container. When you're ready to cook, thaw them in the refrigerator overnight. This way, they are ready for baking. For the best texture, reheat your stuffed peppers in the oven. Set the oven to 350°F (175°C) and warm them for about 20 minutes. If you're short on time, you can use the microwave. Place the peppers in a microwave-safe dish, cover, and heat for about 2-3 minutes. Just be careful not to overcook them. Yes, but they may have a softer texture after baking. Frozen peppers can work in a pinch. Just know they tend to lose some of their crunch. Rice, couscous, or any grain works well. You can pick what you like best. Each option brings its own taste and texture. Add jalapeños or use a spicy cheese in the filling. Adjust the amount to fit your heat level. This way, you can enjoy a kick that suits you. Increase the total baking time by approximately 15-20 minutes. This extra time allows the peppers to cook through. Keep an eye on the cheese to make sure it melts perfectly. Stuffed bell peppers are a healthy, tasty meal packed with nutrients. You start by filling colorful peppers with a mix of quinoa, black beans, corn, and spices, then bake until bubbly. Feel free to adapt the recipe with different proteins, grains, or spices. Remember to store leftovers properly to enjoy them later. Try these tips and tricks to find your favorite way to stuff peppers. This meal is simple yet satisfying, making it perfect for any occasion. Cook with joy, and share your tasty results!

Cheesy Stuffed Bell Peppers Flavorful and Simple Meal

Are you ready to transform dinner with a colorful dish that’s sure to impress? Cheesy stuffed bell peppers blend juicy

- 2 cans (12.4 oz each) refrigerated cinnamon rolls with icing - 4 large eggs - 1 cup milk - 1 teaspoon vanilla extract - 1 teaspoon ground cinnamon - 1/2 teaspoon nutmeg - 1/2 cup maple syrup - Optional Ingredients: chopped pecans or walnuts, raisins To make my cinnamon roll casserole, I use simple ingredients. Each item plays a key role in creating that warm, gooey delight. First, the refrigerated cinnamon rolls form the base. Their sweet, soft texture is a must. Next, I add eggs. They bring richness and help bind everything together. Milk adds creaminess, while vanilla extract gives a sweet aroma. Ground cinnamon and nutmeg enhance the classic cinnamon flavor. They make the dish smell like a bakery! Maple syrup adds sweetness and a hint of caramel. You can also sprinkle in some chopped nuts or raisins for extra flavor and crunch. These are optional but highly recommended. With these ingredients ready, you can create a dish that's quick and satisfying. Just follow the recipe, and you'll have a delightful cinnamon roll casserole in no time! - Preheat the oven to 350°F (175°C). - Grease the baking dish. To start, I set my oven to 350°F. This temperature helps the casserole cook evenly. Next, I grease my 9x13-inch baking dish with non-stick spray or butter. This step is key to keep the casserole from sticking. - Cut the cinnamon rolls and place them in the dish. - Whisk egg mixture and pour it over the rolls. I open the cans of cinnamon rolls and cut each roll into quarters. I spread these pieces in the greased dish. This makes sure each bite has that sweet flavor. In a mixing bowl, I whisk together 4 large eggs, 1 cup of milk, 1 teaspoon of vanilla extract, 1 teaspoon of ground cinnamon, and 1/2 teaspoon of nutmeg. This mixture brings rich taste and creaminess. After that, I pour it over the cinnamon roll pieces, soaking each one well. - Bake for 25-30 minutes. - Drizzle with icing after baking. Now, I bake the casserole for 25 to 30 minutes. I look for a puffed and golden brown top. While it bakes, I warm the icing from the cinnamon rolls. Once the casserole is done, I let it cool for about 5 minutes. Then, I drizzle the warm icing over the top. This adds a sweet finish to an already delightful dish. You can find the full recipe at [Full Recipe]. To get the perfect texture for your cinnamon roll casserole, focus on soaking. Make sure each piece of cinnamon roll is well-covered by the egg mixture. This helps achieve a fluffy, moist center. If you want a crispier top, bake it for an extra 5 minutes. Keep an eye on it, so it doesn't burn. Garnishing is key. I enjoy topping my casserole with extra chopped nuts or a sprinkle of powdered sugar. It adds a nice crunch and sweetness. You can also serve it with fresh fruit on the side. Slices of strawberries or bananas pair well. For drinks, try serving it with a warm cup of coffee or hot cocoa. If you need a dairy-free option, almond milk or oat milk works great in place of regular milk. You can still enjoy the same rich flavor. For a nut-free recipe, simply skip the chopped pecans or walnuts. You can also replace them with seeds like sunflower seeds for added crunch without the nuts. {{image_2}} You can make this dish even more fun! Try adding chocolate chips or fresh fruit. Chocolate chips give a sweet twist. Fruits like blueberries or strawberries add a fresh taste. You can also mix in different spices. Nutmeg, ginger, or cardamom can change the flavor. Just be sure to keep the balance. Too much spice can overpower the dish. Want a healthier option? Use whole grain cinnamon rolls. They add fiber and nutrients. You can also lower the sugar. Use less maple syrup or choose a sugar substitute. This makes it lighter but still tasty. If you need a gluten-free version, use gluten-free cinnamon rolls. Many brands offer this option now. For a vegan twist, swap eggs with flaxseed meal and use plant milk. This keeps it delicious while meeting dietary needs. These changes help everyone enjoy this treat. I hope these ideas inspire your cooking! For the full recipe, check out [Full Recipe]. To store leftovers, let the casserole cool. Place it in an airtight container. You can keep it in the fridge for up to 3 days. This helps keep the flavors fresh and tasty. For freezing, cut the casserole into portions. Wrap each piece in plastic wrap and then foil. This keeps it safe from freezer burn. You can freeze it for up to 2 months. When you're ready to eat, thaw it in the fridge overnight. Reheat in the oven at 350°F (175°C) until warm. You can also use the microwave, but be careful not to dry it out. Enjoy your Cinnamon Roll Casserole Delight! For the full recipe, check out the details above. How long can I store Cinnamon Roll Casserole? You can store Cinnamon Roll Casserole in the fridge for up to three days. Make sure to keep it in an airtight container to keep it fresh. Can I make this recipe ahead of time? Yes, you can prepare it the night before. Just cover the dish and place it in the fridge. In the morning, bake it fresh for breakfast. What is the best way to reheat leftovers? To reheat, place the casserole in the microwave for about one to two minutes. You can also warm it in the oven at 350°F for about 10-15 minutes. Can I use homemade cinnamon rolls instead? Yes! Homemade cinnamon rolls work great in this recipe. Just cut them into small pieces like the store-bought ones. Is it possible to make this dish without eggs? Absolutely! You can use a flax egg or applesauce as a substitute for eggs. This makes it vegan-friendly if you need that option. For the full recipe, check out the details above. This recipe for Cinnamon Roll Casserole is simple and fun. We covered the ingredients, from cinnamon rolls to egg mixtures, ensuring flavor and texture. I shared helpful baking tips and suggested garnishes. Variations allow you to explore flavors while keeping it healthy. With storage and freezing guidelines, you can enjoy leftovers too. Try this dish for a delightful breakfast or dessert. Your loved ones will surely enjoy it!

Cinnamon Roll Casserole Quick and Simple Delight

Looking for a sweet breakfast that’s quick and easy? You’ve come to the right place! My Cinnamon Roll Casserole is

- 2 cups cooked jasmine rice (preferably day-old) - 1 cup mixed vegetables (carrots, peas, and corn) - 1 bell pepper (any color), diced - 1 small onion, finely chopped - 2 cloves garlic, minced - 2 tablespoons soy sauce - 1 tablespoon sesame oil - 1 tablespoon vegetable oil - 2 green onions, sliced - 2 eggs (for added protein) - Salt and pepper to taste - Sesame seeds for garnish Gather these ingredients to make your Easy Vegetable Fried Rice. Using day-old rice makes a big difference. It holds its shape better when frying. Fresh rice can be used, but cool it first. Fresh vegetables add color and crunch. You can mix and match any veggies you love. The optional ingredients let you customize the dish. Adding eggs boosts protein and flavor. If you want a plant-based option, skip the eggs. This recipe is flexible, so have fun with it. Check out the Full Recipe for more details on cooking methods. - Cook jasmine rice ahead of time and let it cool. - Chop all vegetables and mince garlic before starting. Start with the rice. Day-old jasmine rice works best because it stays firm. Fresh rice can be used, but remember to cool it down first. Chopping your veggies and mincing garlic ahead of time saves you a lot of hassle later. This makes cooking smooth and quick. - In a large skillet or wok, heat vegetable oil over medium-high heat. - Sauté chopped onion for 2-3 minutes until translucent. Next, heat your oil in a large skillet or wok. Medium-high heat is perfect for this. Add the onion and sauté it for 2-3 minutes. The onion should turn translucent and fragrant. This step builds a great base for your fried rice. - Add minced garlic and mixed vegetables, cooking for 3-4 minutes. - Incorporate diced bell pepper and stir-fry for 2 additional minutes. Now, add your minced garlic and mixed vegetables. Stir them around for about 3-4 minutes. This helps soften the veggies while keeping them colorful. After that, toss in the diced bell pepper. Stir-fry for another 2 minutes for a nice crunch. - Push vegetables to one side, crack in eggs, and scramble until fully cooked. - Mix scrambled eggs with vegetables. If you want to add eggs, this is the time. Push the veggies to one side of the pan. Crack in the eggs and scramble them until they are fully cooked. Mix the eggs in with the veggies for extra flavor and protein. - Add day-old rice to the pan, breaking up any clumps. - Stir well to combine with the vegetable mixture. Now it’s time for the rice. Add your day-old rice to the pan. Break up any clumps so it mixes well. Stir everything together, ensuring the rice is coated with the veggie mixture. This is where the magic happens! - Drizzle soy sauce and sesame oil over the rice; mix thoroughly. - Season with salt and pepper to taste; top with green onions and sesame seeds. Finally, drizzle soy sauce and sesame oil over the rice. Mix it all very well. Taste and add salt and pepper as needed. For a beautiful finish, top with sliced green onions and sesame seeds. Enjoy your colorful veggie fried rice! For the complete recipe, check the Full Recipe section. - Use day-old rice for the best texture. Fresh rice can be too sticky. - Pre-chop all vegetables for quick cooking. This saves time and keeps things simple. - Stir-fry at high heat for better flavor and texture. This keeps the rice from getting mushy. - Avoid overcooking vegetables to maintain crunch. Aim for a bright color and firm bite. - Serve in large bowls or individual plates. This makes it easy for guests to help themselves. - Add lime for a fresh side garnish to enhance flavors. A squeeze of lime brightens the dish. {{image_2}} You can boost protein in your fried rice. Add tofu, chicken, or shrimp for more substance. If you prefer a plant-based option, use chickpea flour instead of eggs. This keeps the dish vegan-friendly and still tasty. Feel free to swap in seasonal veggies. Zucchini and bell peppers work well. You can also add leafy greens like spinach or kale. These greens not only add color but also pack in nutrition. Don’t hesitate to get creative with flavors. Try different sauces like teriyaki or hoisin for a unique taste. You can also spice things up with ginger or chili flakes. This adds a nice kick to your meal. Store your vegetable fried rice in an airtight container in the fridge. It stays fresh for up to 3 days. When it's time to eat, reheat it in a skillet for the best results. This method keeps the rice crispy and flavorful. If you want to keep it longer, freeze the fried rice in single-serving portions. It stays good for up to a month. To use it, thaw overnight in the refrigerator before reheating. This way, it retains its taste and texture. You can reheat your rice in two ways: in the microwave or by stir-frying. If it seems dry, add a splash of water while reheating. This helps to bring back moisture and flavor. Enjoy your meal! It takes about 30 minutes to make Easy Vegetable Fried Rice. You need 10 minutes to prep and 20 minutes to cook. You can use fresh rice, but day-old rice is better. Day-old rice has a firmer texture. If using fresh rice, cool it down well before cooking. Yes, this recipe is vegan-friendly. Just skip the eggs and use plant-based ingredients. Yes, you can add any vegetables you like. Use what you have on hand for more flavor and nutrition. You can easily make delicious vegetable fried rice using simple steps and fresh ingredients. We covered the main and optional ingredients, cooking techniques, and variations to suit your taste. Remember to use day-old rice for the best texture and to prep ahead for quick cooking. Get creative with protein additions and seasonal vegetables. This dish is easy to store and reheat. Enjoy your tasty meal!

Easy Vegetable Fried Rice Quick and Tasty Meal

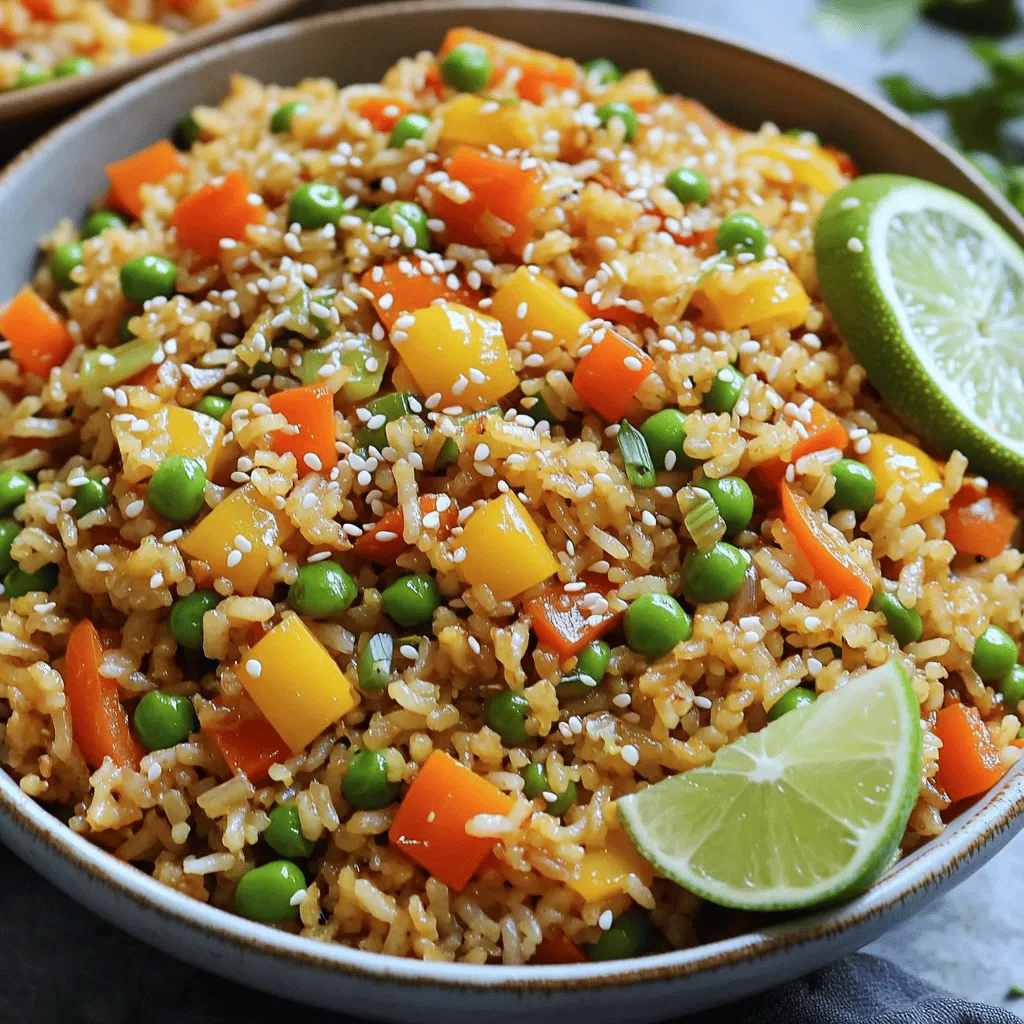
Looking for a quick and tasty meal that pleases everyone? You’ve come to the right place! This Easy Vegetable Fried

Older posts
Newer posts
← Previous Page1 … Page49 Page50 Page51 … Page58 Next →

dsad

© 2025 Cooking Wells • Built with GeneratePress

Our Policies

  • Copyright Policy
  • Cookie Policy
  • GDPR Policy
  • Privacy Policy
  • Disclaimer
  • Terms Of Use

More Information

  • Home
  • About
  • Contact
  • Appetizers
  • Dessert
  • Dinner
  • Drinks
©2025, Cooking Wells About Back To Top