Skip to content
DisclaimerTerms Of UseGDPR PolicyCookie Policy

Cooking Wells

  • Home
  • Drinks
  • Appetizers
  • Dinner
  • Dessert
  • About
  • Contact
  • Privacy Policy
DisclaimerTerms Of UseGDPR PolicyCookie Policy

Mia

To make satisfying avocado toast with poached egg, you need fresh ingredients. Here’s a detailed list of what you'll need: - 2 ripe avocados - 4 slices of whole-grain bread - 4 large eggs - 1 tablespoon apple cider vinegar - 1 teaspoon red pepper flakes - 1 tablespoon lemon juice - Salt and pepper to taste - Fresh microgreens or arugula for garnish - Olive oil for drizzling Each ingredient plays a key role in making this dish delicious and nutritious. The ripe avocados offer creaminess and healthy fats, while the whole-grain bread adds fiber. The eggs bring protein and richness, and the vinegar helps in poaching the eggs perfectly. Using lemon juice adds a bright flavor, and red pepper flakes give it a little kick. You can adjust the salt and pepper to fit your taste. For garnish, microgreens or arugula add freshness and color. Don't forget to drizzle olive oil for that extra touch of flavor. For the full recipe and instructions, check the recipe above. - Start by toasting 4 slices of whole-grain bread. Toast them until they are golden brown. - Once toasted, set the bread aside on a plate. - Cut 2 ripe avocados in half. Remove the pit and scoop the flesh into a bowl. - Mash the avocado with a fork until it is creamy but still has some lumps. - Stir in 1 tablespoon of lemon juice, 1 teaspoon of red pepper flakes, and add salt and pepper to taste. - Set up your poaching station by filling a medium saucepan with about 3 inches of water. - Heat the water over medium heat until it gently simmers. Add 1 tablespoon of apple cider vinegar. - Crack 1 egg into a small bowl, then gently slide it into the simmering water. Repeat for the other eggs. - Poach the eggs for about 3-4 minutes for a runny yolk. Adjust the time if you want firmer yolks. - Carefully remove the poached eggs with a slotted spoon. Place them on a paper towel to drain. - Take each slice of toasted bread and spread a generous amount of the mashed avocado on top. - Place a poached egg on each piece of avocado toast. - For extra flavor, sprinkle a little more salt, pepper, and drizzle olive oil on top. - Garnish with fresh microgreens or arugula for a vibrant touch. For the full details on this delicious dish, refer to the Full Recipe. To make a great poached egg, keep the water at a gentle simmer. Too much heat will break the egg apart. Adding vinegar helps the egg whites set faster. Use about one tablespoon of apple cider vinegar for every three inches of water. For a runny yolk, cook the egg for about 3-4 minutes. If you like a firmer yolk, add a minute or two to the cooking time. Look for avocados that feel slightly soft when you gently squeeze them. They should have a slight give, but not be mushy. Hass avocados are the best choice for this dish. They have a rich, creamy texture and great flavor. Other types, like Fuerte or Bacon, can work, but they are not as creamy. Serve your avocado toast with a side of fresh fruit or a simple salad. A cold drink like iced tea or fresh juice pairs well too. For brunch, this dish looks great on a platter. Use colorful plates and add herbs or microgreens for a pop of color. This makes it perfect for gatherings and impresses your guests. {{image_2}} Want to add some heat? Drizzle chili oil on top of your avocado toast. You can also add sliced jalapeños for a fresh kick. This spice enhances the creamy avocado and pairs well with the poached egg. It brings excitement to the dish and wakes up your taste buds. For a fancy twist, try adding feta cheese or smoked salmon. Crumble feta over the avocado for a tangy flavor. If you love seafood, place a slice of smoked salmon on top. Both options elevate the dish and add rich textures. They make your avocado toast feel like a special treat. If you want a plant-based choice, substitute the eggs with alternatives like tofu or chickpea scramble. Both options provide protein and nutrients. You can also try using avocado spread on toast topped with sliced tomatoes or cucumber. These alternatives keep the toast satisfying and delicious without eggs. Explore these variations to make your avocado toast a unique experience! For a full recipe, check out the complete guide on crafting this delightful dish. To save uneaten toast, wrap it tightly in plastic wrap. This keeps it fresh. Store in the fridge for up to two days. You can also place it in an airtight container. For the avocado, keeping it fresh is key. Squeeze some lemon juice on top before storing. This helps slow down browning. Use an airtight container for best results. You can also cover it with plastic wrap. To reheat toasted bread, use a toaster or an oven. Toasting again gives it a nice crisp. If using an oven, set it to 350°F and heat for about 5 minutes. For poached eggs, reheating needs care. Place the poached egg in warm water for about 2 minutes. This brings back the warmth without cooking it more. Enjoy your leftovers just as much as the first time! If you want the full recipe, check it out [here](#). Whole-grain bread is my top choice. It offers fiber and rich flavor. Sourdough also works well. It gives a nice tang and chewy texture. Gluten-free bread can be used too. Choose one that you enjoy. Yes, you can prepare it ahead of time. To prevent browning, add lemon juice. Store it in an airtight container. Press plastic wrap directly on the mixture. This limits air and keeps it fresh. You can replace the eggs with tofu. Silken tofu works great. You can also use chickpea flour to create a scramble. Add spices to boost the flavor. Try nutritional yeast for a cheesy taste. Avocado toast is full of healthy fats. It contains vitamins and minerals like potassium and vitamin E. It can help you feel full longer. One serving has about 300 calories, depending on toppings. Enjoy this tasty and nutritious meal! This blog post covered a delicious avocado toast recipe. It included ingredient lists, step-by-step instructions, and helpful tips. You learned how to toast bread, prepare ripe avocados, and poach eggs. We also explored tasty variations and storage advice. Avocado toast is versatile and healthy. You can customize it to fit your taste. Whether for brunch or a quick meal, this dish shines. Enjoy your cooking adventure with avocado toast!

Satisfying Avocado Toast with Poached Egg Delight

Are you ready to elevate your breakfast game? My recipe for Satisfying Avocado Toast with Poached Egg combines creamy avocado,

- 4 boneless, skinless chicken breasts - 1 can (13.5 oz) coconut milk - 2 tablespoons lime juice - Zest of 1 lime For Coconut Lime Chicken, the main ingredients are simple yet flavorful. You need juicy chicken breasts, creamy coconut milk, and bright lime juice. The zest of the lime adds extra punch. This combination makes a dish that is both fresh and rich. - 3 cloves garlic, minced - 1 tablespoon fresh ginger, grated - 1 teaspoon ground coriander - 1 teaspoon cumin - 1 teaspoon salt - ½ teaspoon black pepper Now, let’s talk about the spices. Garlic and ginger add warmth and depth. Ground coriander and cumin bring an earthy flavor. Salt and pepper balance everything. These spices will elevate your chicken, making it taste amazing. - Fresh cilantro - Lime wedges Finally, for garnish, fresh cilantro brightens the dish. Lime wedges are great for squeezing on top right before eating. Their fresh taste complements the chicken perfectly. For the complete recipe, check out the Full Recipe section. It will guide you through each step to create this delicious meal. First, grab a large bowl. You will mix the coconut milk, lime juice, and seasonings. Add the lime zest, minced garlic, grated ginger, ground coriander, cumin, salt, and black pepper. Stir it well until everything blends smoothly. This will be your flavorful marinade. Now, take your chicken breasts and coat them in the marinade. Make sure they are fully covered. This step is key for juicy chicken. Cover the bowl and refrigerate. Let it sit for at least 30 minutes. For even more flavor, you can marinate them for up to 4 hours. Next, preheat your grill or stovetop grill pan over medium-high heat. Brush it lightly with olive oil to keep the chicken from sticking. Now, take the chicken from the marinade. Let any extra marinade drip off, but save it for later. Cook the chicken for about 6-7 minutes on each side. It’s done when it reaches 165°F (75°C) and has a nice golden color. For the best flavor, marinate the chicken for at least 30 minutes. This time allows the chicken to soak up that delicious coconut and lime taste. If you can, aim for 2 to 4 hours. Longer marinating enhances the flavors even more. Just remember, don’t go over 4 hours. The chicken may get too soft. Managing heat is key when grilling. Preheat your grill to medium-high heat. This helps achieve a nice sear on the chicken. Cook each side for about 6 to 7 minutes. You want the internal temperature to reach 165°F (75°C). This ensures the chicken is safe to eat and super juicy. If you notice flare-ups, move the chicken to a cooler part of the grill. This way, it cooks evenly without burning. Pair your Coconut Lime Chicken with tasty sides. Rice or quinoa works well, soaking up the sauce. A fresh salad adds crunch and color. For a fun touch, serve with lime wedges and fresh cilantro on top. This makes it look beautiful and adds extra flavor. You can also drizzle the thickened marinade over the chicken for a lovely finish. This gives each bite a burst of flavor. For the full recipe, check the earlier sections. {{image_2}} You can swap chicken for shrimp or tofu. Shrimp cooks fast and adds a sweet taste. Marinate it just like the chicken. Cook until pink, about 3-4 minutes per side. Tofu is a great choice for a plant-based meal. Use firm tofu for a good texture. Press it to remove excess water. Cut it into cubes and marinate as you would chicken. Sauté it in a pan until golden brown, about 5-6 minutes. Add fresh herbs or spices for extra zing. Cilantro adds brightness and pairs well with lime. You may also try basil or mint for a different twist. For spices, consider red pepper flakes for heat. A dash of smoked paprika gives a subtle smokiness. Mix in a teaspoon of curry powder for a unique flavor. These additions can really elevate your dish. You can cook this dish in different ways. Oven-baking works well if you prefer a hands-off approach. Preheat your oven to 400°F (200°C). Place the marinated chicken in a baking dish and cover it. Bake for 25-30 minutes until cooked through. Stovetop frying is also an option. Heat a skillet over medium heat, add olive oil, and cook the chicken. This method gives a nice crust and keeps the chicken juicy. Aim for about 6-7 minutes per side, just as with grilling. You can explore these variations to find your perfect Coconut Lime Chicken. Check the Full Recipe for all the details. After cooking, let your Coconut Lime Chicken cool down. Place leftovers in an airtight container. This keeps the chicken fresh. Store it in the fridge for up to four days. Always label the container with the date. This helps you remember when you made it. If you want to keep your chicken longer, freezing is a great option. First, let the chicken cool completely. Then, put it in a freezer-safe bag. Remove as much air as you can. This prevents freezer burn. You can also freeze the marinade separately. It adds flavor when you thaw and cook the chicken later. To reheat your chicken, use the oven for the best results. Preheat your oven to 350°F (175°C). Place the chicken in a baking dish. Cover it with foil to keep moisture in. Heat for about 15-20 minutes. If you use the microwave, heat in short bursts. Check often to avoid drying out the chicken. Enjoy your meal warm and tasty! For the full recipe, check out the Coconut Lime Chicken. Yes, you can use bone-in chicken. It adds flavor and moisture. However, you need to adjust the cooking time. Bone-in chicken takes longer to cook. Aim for about 10-15 minutes more than boneless chicken. Always check the internal temperature with a meat thermometer. It should reach 165°F (75°C) for safety. I love serving Coconut Lime Chicken with rice or quinoa. They soak up the tasty sauce well. Grilled vegetables or a fresh salad also make great sides. For drinks, try coconut water or a fruity mocktail. They pair nicely with the dish's bright flavors. Yes, this recipe is naturally dairy-free! Coconut milk is a great substitute for cream. If you want a thicker sauce, use full-fat coconut milk. You can also add a splash of lime juice for extra brightness. All the flavors will still shine through, making it delicious. The best way to check is by using a meat thermometer. Insert it into the thickest part of the chicken. It should read 165°F (75°C) to ensure it's safe to eat. If you don't have a thermometer, cut the chicken open. The juices should run clear, not pink. In this article, we explored a delicious Coconut Lime Chicken recipe. We covered key ingredients like chicken, coconut milk, and lime, as well as essential spices. I shared tips for marinating and grilling to ensure great flavor. We discussed variations, storage methods, and answered common questions. With these simple steps, you can create a tasty dish everyone will love. Enjoy experimenting with flavors and cooking methods to make this meal your own! Happy cooking!

Coconut Lime Chicken Flavorful and Simple Recipe

Ready to excite your taste buds? This Coconut Lime Chicken recipe is both flavorful and simple! With juicy chicken breasts

Here are the simple and tasty ingredients you'll need for this chocolate chip cookie dough dip: - 1 cup all-purpose flour, toasted - ½ cup brown sugar, packed - ½ cup granulated sugar - 1 cup cream cheese, softened - ½ cup unsalted butter, softened - 1 teaspoon vanilla extract - ½ cup mini chocolate chips - ¼ cup chopped nuts (optional) - ½ teaspoon salt - Assorted dippers (like graham crackers, pretzels, or apple slices) Each ingredient plays a key role in making this dip rich and creamy. I love using toasted flour. It gives the dip a warm, nutty flavor. Cream cheese and butter make the dip smooth and rich. The sugars add sweetness, while vanilla gives it that classic cookie dough taste. Don't forget the mini chocolate chips! They add delightful bursts of chocolate in every bite. If you like a little crunch, try adding chopped nuts. The dippers are key too! They let you scoop up this delicious dip and enjoy it in fun ways. For the full recipe, you can check out the detailed instructions to whip up this irresistible snack. Enjoy your dipping! - Preheat the oven: Set your oven to 350°F (175°C). This step gets the oven ready for toasting. - Toasting the flour: Spread 1 cup of all-purpose flour on a baking sheet. Toast it for 5-7 minutes. Stir it a couple of times until it turns lightly golden. - Cooling the flour: Once toasted, let the flour cool completely. This keeps our dip safe to eat. - Combining cream cheese and butter: In a bowl, add 1 cup of softened cream cheese and ½ cup of softened unsalted butter. - Beating until creamy: Use an electric mixer on medium speed. Beat until the mixture is smooth and creamy. - Gradually including brown and granulated sugar: Slowly add ½ cup of brown sugar and ½ cup of granulated sugar. - Mixing until fluffy: Keep mixing until the dip is light and fluffy. Then, add 1 teaspoon of vanilla extract. Mix again until smooth. - Adding toasted flour and salt: Now, slowly add the cooled toasted flour and ½ teaspoon of salt. - Mixing thoroughly: Stir well until there are no dry spots left in the mixture. - Distributing mini chocolate chips: Gently fold in ½ cup of mini chocolate chips. - Adding optional chopped nuts: If you like, add ¼ cup of chopped nuts for some crunch. - Transferring to a serving bowl: Spoon the dip into a nice serving bowl. - Refrigerating the dip: Cover the bowl with plastic wrap. Chill it in the fridge for at least 30 minutes. This helps the flavors blend. - Final stir before serving: Right before serving, give the dip a quick stir. Enjoy it with your favorite dippers, like graham crackers or apple slices. To make the best chocolate chip cookie dough dip, toasting the flour is key. Raw flour may contain bacteria, so toasting makes it safe to eat. Preheat your oven to 350°F (175°C). Spread the flour on a baking sheet and toast it for about 5-7 minutes. Stir it once or twice until it turns light golden. Let it cool before adding it to your mix. Another important tip is to ensure all ingredients are at room temperature. This helps them blend smoothly. Softened cream cheese and butter mix better together, giving you a creamy base. Take them out of the fridge about 30 minutes before you start. When it’s time to serve, choose great dippers. Graham crackers are classic and crunchy. Pretzels add a nice salty touch. Fresh apple slices bring a sweet and juicy contrast. You can even use cookies for extra fun! You can pair the dip with other desserts too. Try it with brownies or ice cream for a sweet treat. It also works well as a fun snack at parties or family gatherings. Everyone loves dipping into this delicious cookie dough. Adjusting the sweetness in your dip is easy. If you prefer a less sweet taste, cut back on the sugars. Start with half the amount and taste as you go. You can always add more if needed. If you have dietary needs, substituting ingredients works well. Use gluten-free flour to make it gluten-free. You can swap cream cheese with a dairy-free version for a vegan option. Just ensure the substitutes blend smoothly to keep the dip creamy. For the full recipe, check out the details above. Enjoy making your chocolate chip cookie dough dip! {{image_2}} You can make this dip even more fun! Try adding peanut butter. Just mix in ½ cup of creamy peanut butter when you combine the cream cheese and butter. This adds a rich flavor. It pairs well with the chocolate chips. Another great option is to incorporate crushed cookies. You can crush some of your favorite cookies, like Oreos or chocolate wafers. Add about ½ cup of these crushed cookies when you fold in the chocolate chips. This gives a nice crunch and extra taste. If you want a lighter dip, use low-fat cream cheese. This swap helps reduce calories without losing flavor. Just replace the full-fat cream cheese in the recipe with the low-fat version. You can also adjust the sugars. Use a sugar substitute, like stevia or monk fruit. These options will keep your dip sweet but lower in calories. Make sure to check the conversion ratios on the package for the best results. You can make this dip special for holidays. Add seasonal spices like cinnamon or nutmeg for a warm touch. A splash of peppermint extract works great for winter gatherings. This makes the dip stand out during festive parties. For special occasions, customize the toppings. You can add colorful sprinkles for birthdays or heart-shaped chocolate for Valentine's Day. These little touches make your dip not just tasty but also fun and festive. For the full recipe, check out the main section. Enjoy creating your own unique versions of chocolate chip cookie dough dip! You can store your chocolate chip cookie dough dip in a few ways. Use an airtight container for best results. I recommend glass or plastic containers with tight-fitting lids. This keeps the dip fresh. Your dip will last about 5 days in the fridge. Just make sure to keep it covered. Yes, you can freeze the dip! It will stay good for about 3 months in the freezer. To freeze, place it in a freezer-safe container. Leave some space at the top for expansion. When you want to enjoy it again, you need to thaw it. To thaw the dip, move it to the fridge for several hours or overnight. This helps maintain its creamy texture. Once it is thawed, stir it well before serving. If it seems too thick, add a little milk to loosen it up. Enjoy your treat! Yes, you can eat cookie dough dip raw. However, you must consider safety. Raw flour may contain harmful bacteria. To make it safe, always toast the flour before mixing. This step kills harmful germs. The recipe also uses no raw eggs, so it's safe to eat. Cookie dough dip lasts about 4 to 5 days in the fridge. Store it in an airtight container for freshness. If you see any changes in smell or color, it's best to toss it. This ensures you enjoy the best flavor and quality. You can use many fun dippers! Here are some popular options: - Graham crackers - Pretzels - Apple slices - Vanilla wafers - Fresh strawberries Get creative! You can even use cookies or biscotti for a fun twist. The original recipe is not gluten-free due to the use of all-purpose flour. To make it gluten-free, substitute the flour with a gluten-free blend. You can also find gluten-free cookie dough mixes in stores. This way, everyone can enjoy this tasty dip. Yes, you can make this dip vegan with some easy swaps. Use vegan cream cheese and dairy-free butter. For the sugars, ensure they are vegan-friendly. You can also add nut milk to adjust the texture. This makes it a delightful treat for all. To achieve a smoother texture, make sure all your ingredients are at room temperature. This helps them blend nicely. You can also beat the mixture longer until it's creamy. If it's still thick, add a bit of milk or cream to loosen it up. This blog post covered how to make a delicious cookie dough dip. We discussed the key ingredients, step-by-step instructions, and helpful tips. You learned about adding flavor variations and making nutritious adjustments. Remember that toasting the flour is essential for safety and taste. Whether you serve it at a party or enjoy it yourself, this dip is a fun treat. Experiment with your favorite dippers and enjoy every bite. Making this dip is easy and rewarding, so dive in!

Chocolate Chip Cookie Dough Dip Irresistible Snack

Craving something sweet and fun? Chocolate Chip Cookie Dough Dip is the perfect solution! This creamy, dreamy dip offers all

To make a tasty bowl of Classic Chicken Noodle Soup, gather these required ingredients: - 1 tablespoon olive oil - 1 medium onion, diced - 2 carrots, sliced - 2 celery stalks, sliced - 3 garlic cloves, minced - 8 cups low-sodium chicken broth - 2 cups cooked chicken, shredded (preferably rotisserie) - 2 cups egg noodles - 1 teaspoon dried thyme - 1 teaspoon dried rosemary - Salt and pepper to taste - 1 cup fresh spinach (optional) - Fresh parsley, chopped (for garnish) These ingredients work together to create a warm, hearty meal. The olive oil helps cook the vegetables evenly. The onion, carrots, and celery form a solid base. Garlic adds a nice punch of flavor. Chicken broth brings depth and comfort. The cooked chicken makes it filling and satisfying. Egg noodles soak up the broth and add a great texture. Using dried thyme and rosemary enhances the soup’s aroma and taste. Salt and pepper finish it off perfectly. You can even add fresh spinach for a pop of color and added nutrients. Finally, a sprinkle of parsley gives your soup a fresh look and flavor. For the complete cooking process, check the Full Recipe. You’ll see how each ingredient joins to make this classic dish special. - Heat 1 tablespoon of olive oil in a large pot over medium heat. - Add 1 medium diced onion, 2 sliced carrots, and 2 sliced celery stalks. - Sauté these vegetables for about 5 minutes. They should soften and the onion will turn clear. - Now, stir in 3 minced garlic cloves. Cook for 1 minute until you smell the garlic. - Next, pour in 8 cups of low-sodium chicken broth. Bring this mixture to a boil. - Once the broth is boiling, turn the heat down to a simmer. - Add 2 cups of shredded cooked chicken and 2 cups of egg noodles. - Sprinkle in 1 teaspoon of dried thyme, 1 teaspoon of dried rosemary, and season with salt and pepper. - Let the soup cook for about 10 to 12 minutes. The noodles should be firm but not hard. - If you want, add 1 cup of fresh spinach. Cook for an extra 2 to 3 minutes until it wilts. - Taste the soup and adjust the seasoning as needed. - Serve the soup hot. Garnish it with fresh parsley for a nice touch. For the full recipe, check the details above. Enjoy this classic chicken noodle soup! To make great chicken noodle soup, start by choosing the right chicken. I recommend using rotisserie chicken. It’s already cooked, and it adds rich flavor. You can also use raw chicken. Just cook it in the broth first for extra taste. Next, let's talk about broth. A flavorful broth is key. Use low-sodium chicken broth. This lets you control the salt. Add in fresh herbs like thyme and rosemary. They boost flavor without extra calories. Let the broth simmer to bring all the flavors together. One common mistake is overcooking the noodles. Keep an eye on them during cooking. You want them al dente, not mushy. Add the noodles in the last few minutes of cooking. This keeps them firm and tasty. Another mistake is skipping seasoning. Don’t forget to add salt and pepper during cooking. Taste your soup as you go. Adjust the seasoning until it’s just right. This makes a huge difference in flavor. Using the right tools can make cooking easier. A large pot is best for this soup. It allows for plenty of room to cook all the ingredients. A good knife helps chop the vegetables quickly and safely. A wooden spoon is also helpful for stirring. It won’t scratch your pot and helps mix everything well. Finally, store leftovers in airtight containers. This keeps your soup fresh for the next meal. For the Full Recipe, check out the complete steps above. {{image_2}} You can make simple changes to make your soup healthier. For gluten-free options, choose rice noodles or gluten-free pasta. These swaps keep the soup tasty without the gluten. Adding leafy greens is another great idea. Spinach or kale adds nutrients and color. Toss them in during the last few minutes of cooking for a fresh touch. To boost flavor, try different herbs and spices. Fresh dill or basil can add a nice twist. You can also use a pinch of red pepper flakes for a touch of heat. Another option is to squeeze in some lemon juice. This adds brightness and zest to your soup. Just a little goes a long way. If you want to switch up the protein, consider turkey or even vegetable broth. Turkey gives a rich flavor and works great in this dish. For a plant-based option, add beans or tofu. They provide protein and make the soup hearty. This way, you can enjoy a meal that fits your diet. Check out the Full Recipe for more ideas! To store leftovers of Classic Chicken Noodle Soup, let it cool down first. Then, pour it into a clean container. Make sure to cover it tightly. This soup stays good in the fridge for about three to four days. Always check for off smells or changes in color before eating. To freeze your soup, use freezer-safe containers. Allow the soup to cool completely. Divide it into portions to make reheating easy later. Seal the containers well to prevent freezer burn. When ready to eat, thaw it in the fridge overnight. Reheat on the stove or in the microwave until hot. Stir often to heat evenly. Glass or plastic containers work well for storing soup. Choose containers that are airtight. This keeps the soup fresh longer. It’s also smart to label each container with the date. This way, you know when to use it by. The best way to reheat chicken noodle soup is on the stove. Pour the soup into a pot and heat it over medium heat. Stir it often to prevent sticking. Heat until it is warm all the way through. You can also use a microwave. Place soup in a bowl, cover it, and heat in short bursts. Stir in between to ensure even heating. Yes, you can make Classic Chicken Noodle Soup ahead of time. It tastes even better the next day! Make the soup and cool it down. Then, store it in an airtight container in the fridge. It will stay fresh for about three to four days. Just remember to reheat it well before serving. To make chicken noodle soup in a slow cooker, start by adding all the ingredients except the noodles. This includes the chicken, broth, veggies, and seasonings. Cook on low for six to eight hours or on high for three to four hours. Add the noodles during the last 30 minutes of cooking. This keeps them from getting mushy. Absolutely! Using rotisserie chicken is a great shortcut. Just shred the meat and add it to the soup. It saves time and adds a nice flavor. You can use leftover chicken from a store-bought rotisserie or any cooked chicken you have on hand. Chicken noodle soup pairs well with many sides. Try fresh bread or dinner rolls for dipping. A simple green salad adds freshness too. You can also serve crackers or a light sandwich. These options complement the soup and make for a hearty meal. For more ideas, check out the Full Recipe! Classic chicken noodle soup is simple and warm. We covered all the must-have ingredients, like olive oil and vegetables. You learned step-by-step how to make it, from sautéing to seasoning. Avoid common mistakes and use helpful tips for the best taste. Remember to explore fun variations or healthy swaps. Proper storage keeps leftovers fresh longer. You can even reheat it quickly. With these insights, you can create a delicious soup any time. Enjoy the warmth and comfort this dish brings to your table.

Classic Chicken Noodle Soup Flavorful and Hearty Meal

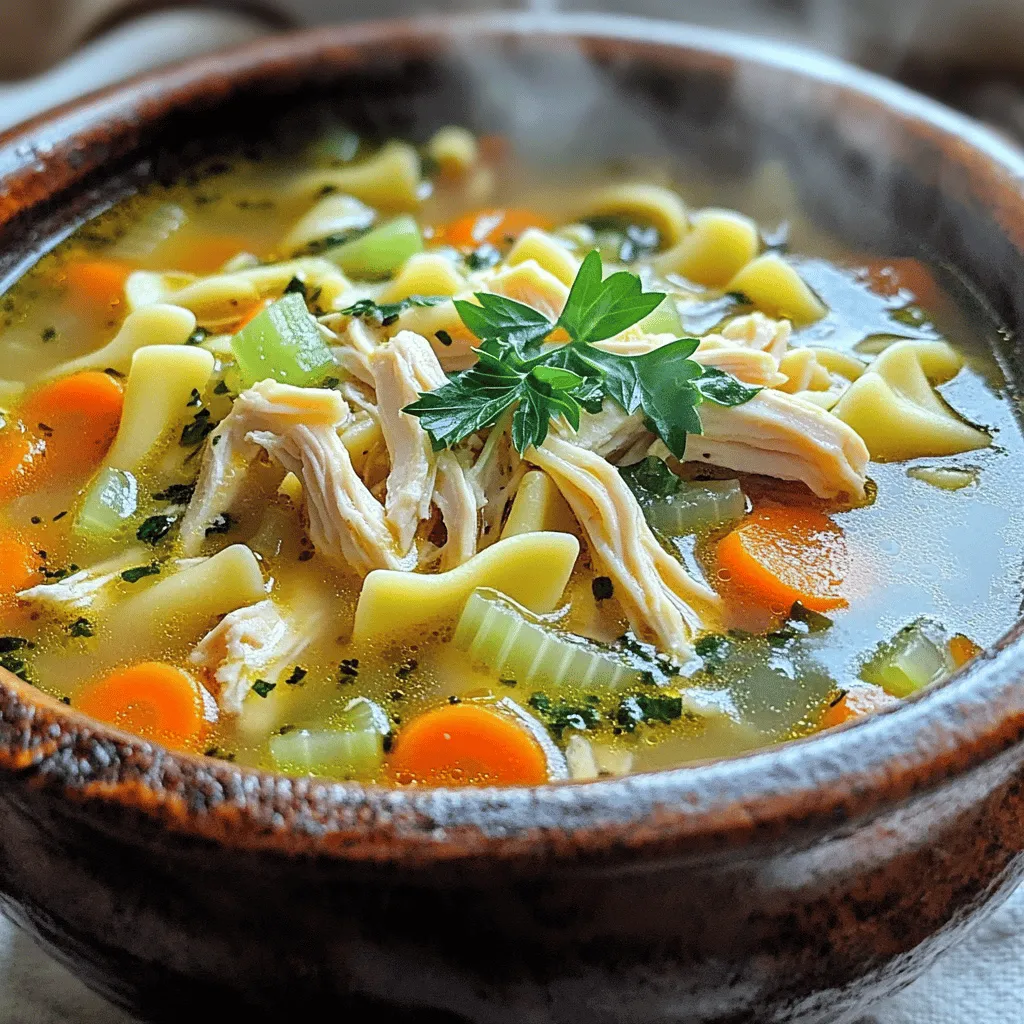
When the weather turns cold, there’s nothing better than a warm bowl of Classic Chicken Noodle Soup. This dish is

- 1 block (14 oz) firm tofu, pressed and cubed - 2 tablespoons cornstarch - 3 tablespoons vegetable oil (divided) - 1 bell pepper (red or yellow), sliced - 2 cups broccoli florets - 1 cup sugar snap peas - 3 green onions, chopped - 2 cloves garlic, minced - 1 tablespoon fresh ginger, grated - 2 tablespoons soy sauce - 1 tablespoon hoisin sauce - 1 teaspoon sesame oil - Salt and pepper to taste - Cooked rice or quinoa for serving - Sesame seeds, for garnish The main ingredients in this dish are simple yet vibrant. Firm tofu gives the dish a hearty base. I love using fresh vegetables like bell peppers, broccoli, and sugar snap peas. They add color and crunch. The sauces, like soy sauce and hoisin, bring depth and flavor. - Additional vegetables (carrots, zucchini, or mushrooms) - Protein alternatives (tempeh, seitan, or chickpeas) - Garnish suggestions (fresh herbs, chili flakes, or lime wedges) You can easily change this recipe to suit your taste. Feel free to add more veggies. Carrots and zucchini work great! You can also swap tofu for tempeh or chickpeas if you want. For garnish, fresh herbs or a splash of lime can brighten the dish. - Calories per serving: Approximately 300 - Common allergens: Soy, gluten (if using standard soy sauce) - Dietary considerations: Vegan, gluten-free options available This stir-fry packs around 300 calories per serving. It's also vegan, making it a good choice for many diets. Just check your soy sauce for gluten if that’s a concern. Enjoy this dish knowing it's both tasty and healthy! - Pressing the tofu: Start by wrapping the tofu in a clean kitchen towel. Place a heavy object on top. This will help remove the water. Let it sit for about 15 minutes. - Cutting into cubes: After pressing, take the tofu out of the towel. Cut it into 1-inch cubes. Make sure all pieces are even for cooking. - Heating vegetable oil: Heat 2 tablespoons of vegetable oil in a large skillet over medium-high heat. This will help the tofu get crispy. - Achieving the crispy texture: Add the tofu cubes to the skillet in a single layer. Cook for about 3-4 minutes on each side. Look for a golden color. Once crispy, remove the tofu from the skillet and set it aside. - Cooking order and time for each vegetable: In the same skillet, heat 1 tablespoon of oil. First, add the sliced bell pepper. Stir-fry for about 2 minutes. Then, add the broccoli and sugar snap peas. Cook for another 3 minutes until they are tender-crisp. - Adding aromatics (ginger, garlic): Next, add the minced garlic and grated ginger. Cook for 1 minute until you smell the aroma. This brings great flavor to the dish. - Adding sauces: Return the crispy tofu to the skillet. Pour in the soy sauce, hoisin sauce, and sesame oil. These sauces add depth and richness. - Ensuring even coating: Gently stir everything together. Make sure the tofu and vegetables are well-coated with the sauce. Cook for another 2-3 minutes to heat through. Enjoy this flavorful vegan delight with rice or quinoa. For the full recipe, check the earlier section. To get crispy tofu, pressing is key. Pressing removes extra moisture. This step helps the tofu fry better. Wrap the tofu in a towel and place something heavy on it. Let it sit for about 15 minutes. After pressing, cut the tofu into cubes. Use about 1-inch pieces for even cooking. Now, coat them with cornstarch. This coating creates a crunch when frying. Toss the tofu in a bowl with cornstarch until each piece is covered. High heat is essential for stir-frying. Heat your pan until it is hot. This helps the tofu get crispy fast. Add the tofu in a single layer. Avoid crowding the pan; this can make the tofu steam instead of fry. Cook the tofu for about 3-4 minutes on each side. Once golden brown, take it out of the pan. This leaves space for the vegetables. Stir-fry them next to keep them fresh and crunchy. Marinades can boost flavor. Try a mix of soy sauce and hoisin sauce. Add garlic and ginger for an extra kick. You can let the tofu marinate for 15 minutes before cooking. For garnishes, green onions and sesame seeds work well. They add a pop of color and flavor to your dish. You can also try nuts for crunch or fresh herbs for a bright finish. For the full recipe, check out the complete guide! {{image_2}} You can switch up the sauces for a new taste. If you want less salt, use low-sodium soy sauce. For a kick, try a spicy soy sauce or add some chili paste. You can also mix in sweet flavors with teriyaki sauce or hoisin sauce. Each sauce brings a fun twist to the dish. Besides tofu, you can use tempeh for a fuller taste. Chicken or shrimp work great too. If you choose chicken, cut it thin and cook it first. Shrimp cooks fast, so add it after the veggies. Adjust cooking times based on what protein you pick. This keeps everything safe and tasty. Feel free to swap in seasonal veggies like zucchini or carrots. Broccoli and bell peppers are classic, but fresh peas, snap peas, or even bok choy can shine. Frozen veggies are handy too; just make sure to thaw them first. They save time and still taste great. Each choice adds new flavors to your stir-fry. For the full recipe, check above. For storing your crispy tofu stir-fry, use airtight containers. Glass or BPA-free plastic works best. These containers keep moisture out and preserve the flavors. Your stir-fry will last about three to four days in the fridge. Make sure to cool it down before sealing. If you want to freeze your stir-fry, do it in a flat, resealable bag. Lay it flat in the freezer, so it freezes evenly. This method saves space and helps with quick thawing. When you’re ready to eat, thaw it overnight in the fridge. Reheat it in a pan over medium heat. This keeps the crispiness of the tofu intact. Batch cooking is a great idea for this dish. You can prepare a big batch and store it for the week. Pre-assemble the tofu and vegetables in containers. Keep the sauce separate until you’re ready to eat. This way, your stir-fry stays fresh and flavorful. When you want a meal, just cook the tofu, add veggies, and pour on the sauce. Enjoy your delicious, homemade meal in no time! Tofu can be bland on its own, but you can change that! Here are some tips: - Marinades: Soak tofu in soy sauce, garlic, or ginger. This adds deep flavor. - Seasonings: Sprinkle with salt, pepper, or spices like smoked paprika or chili powder. - Coating: Use cornstarch for a crispy texture. It also helps hold flavors. Try marinating tofu for at least 30 minutes for the best taste. You will love the results! Yes, you can prep many parts of the stir-fry in advance. Here’s how: - Tofu: Press and cube the tofu a day before. Store it in the fridge. - Veggies: Cut and store vegetables in airtight containers. They stay fresh for a few days. - Sauce: Mix the sauce ahead and keep it in the fridge. This makes cooking easier and faster on busy nights. Just stir-fry everything when ready! Reheating leftovers can be tricky. Here are two methods: - Microwave: Place the stir-fry in a bowl. Heat in short bursts, stirring in between. This keeps it moist. - Stovetop: Heat a little oil in a pan. Add the stir-fry and cook over low heat. Stir until warm. Using the stovetop can help keep the tofu crispy! Enjoy your meal again! This blog post covered making a crispy tofu stir-fry. You learned about key ingredients and healthier options. I shared step-by-step instructions to help you cook perfect tofu and vegetables. You also discovered tips for texture and flavor enhancements. With these techniques, you can customize your dish to suit your tastes. Remember, cooking is all about experimenting and enjoying the process. Dive in, have fun, and make a meal you'll love!

Crispy Tofu Stir-Fry Flavorful Vegan Delight

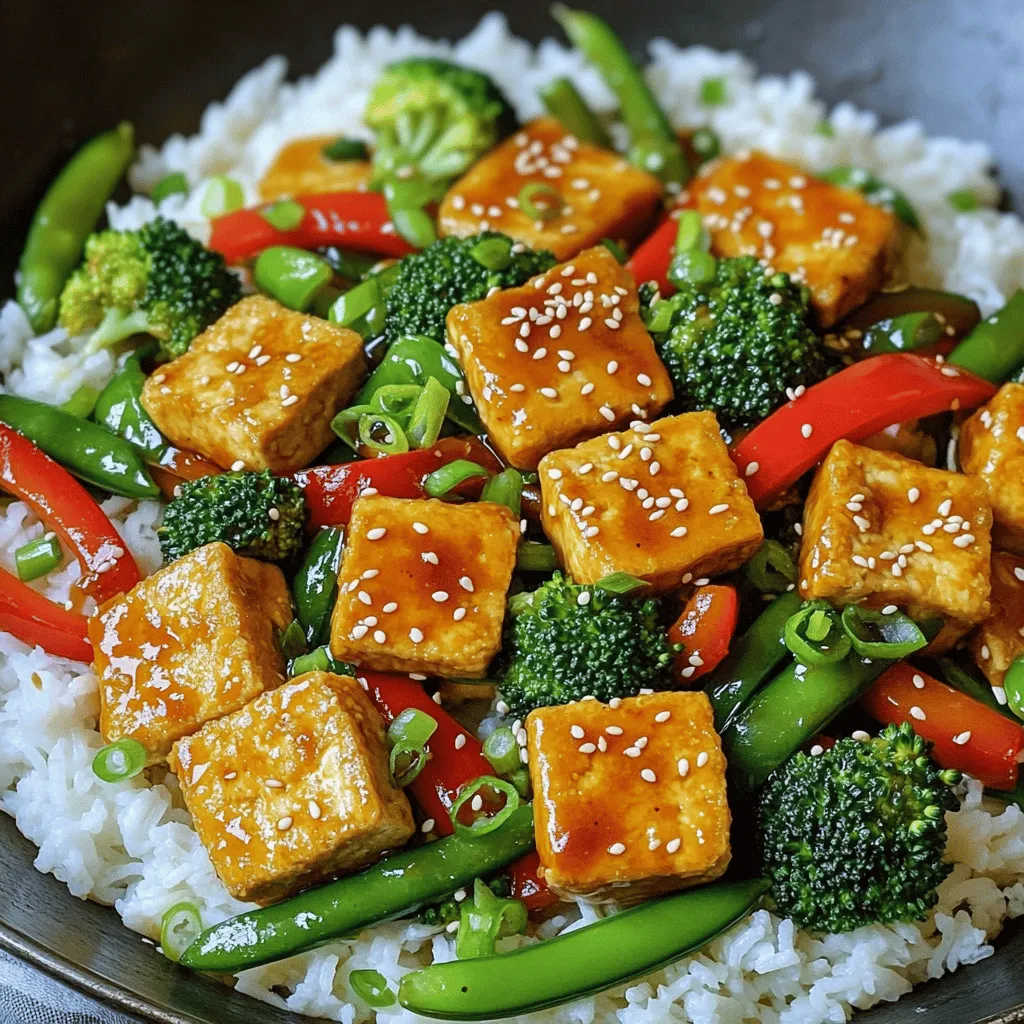
Are you craving a quick, tasty vegan meal? Look no further! My Crispy Tofu Stir-Fry is packed with flavor and

- 4 medium sweet potatoes - 1 cup shredded sharp cheddar cheese - ½ cup cooked black beans (drained and rinsed) - ½ cup corn kernels (fresh or frozen) - ¼ cup green onions, thinly sliced - 1 avocado, diced - ½ teaspoon smoked paprika - ½ teaspoon garlic powder - Salt and pepper to taste - Olive oil for brushing - Sour cream or Greek yogurt for serving (optional) - Fresh cilantro for garnish (optional) Each ingredient in loaded sweet potato skins adds flavor and nutrition. Sweet potatoes are the star. They bring a sweet and earthy taste. They are also rich in vitamins and fiber. The sharp cheddar cheese adds a creamy and tangy touch. Black beans add protein, making these snacks filling. Corn gives a nice crunch and sweetness. Green onions add a pop of freshness. Avocado brings creaminess and healthy fats. Spices like smoked paprika and garlic powder enhance the overall flavor. Olive oil keeps the skins crisp when baked. When choosing sweet potatoes, look for firm ones with smooth skin. Avoid any that have soft spots or blemishes. For cheese, fresh shredded cheese melts better than pre-shredded. When buying beans, canned ones are convenient, but dried beans are more flavorful. If you use frozen corn, check that it is free from added sugars. Fresh green onions should be vibrant and crisp. For avocado, choose ones that yield slightly when pressed. Quality ingredients make a big difference in taste. For a detailed guide on preparing these tasty treats, refer to the full recipe. To make loaded sweet potato skins, start by preheating your oven to 400°F (200°C). Scrub four medium sweet potatoes under running water. Poke a few holes in each with a fork. This helps steam escape while they bake. Place them on a baking sheet and brush with olive oil. Sprinkle some salt on top. Bake for 45-50 minutes, or until they feel tender when you poke them. After baking, take them out and let them cool a bit. Lower your oven temperature to 375°F (190°C). Cut each sweet potato in half lengthwise. Carefully scoop out some flesh, leaving a ¼-inch border. This keeps the skins sturdy. In a bowl, mix the scooped sweet potato flesh with black beans, corn, smoked paprika, garlic powder, and half of the cheese. Add salt and pepper to taste. Scoop this mixture into the sweet potato skins. Top the filled skins with the rest of the cheese. Return them to the oven and bake for another 15-20 minutes. You want the cheese to melt and bubble. Finally, take them out and add diced avocado, green onions, and fresh cilantro on top if you like. Serve warm with sour cream or Greek yogurt on the side. Always poke holes in the sweet potatoes before baking. This step prevents them from bursting in the oven. Use a fork to check if they are done. If they feel soft and tender, they are ready. When scooping out the flesh, be gentle. You want to keep the skins intact. Mix the filling well to ensure every bite is packed with flavor. Don’t skip the cheese on top; it adds a delicious, gooey layer. Bake until golden and bubbly for a perfect finish. 1. Scrub and Poke: Clean the sweet potatoes and poke holes. 2. Baking: Place on a baking sheet with olive oil and salt. 3. Cut and Scoop: Cut each potato and scoop out the flesh. 4. Mix: Combine the flesh with other ingredients. 5. Fill: Load the mixture into the skins. 6. Top and Bake: Add cheese and bake until melted. 7. Garnish: Top with avocado, green onions, and cilantro. You can find the full recipe at the end of this article for more details. Enjoy crafting this tasty snack! To boost flavor, use fresh herbs. They add brightness and depth. Consider fresh cilantro or parsley. A squeeze of lime juice can also wake up the dish. For texture, try mixing in crispy bacon bits or crunchy nuts. This adds a fun crunch to each bite. One mistake is overcooking the sweet potatoes. They should be tender but not mushy. Always poke holes before baking. This prevents them from bursting. Another mistake is skipping the seasoning. Salt and pepper enhance the taste greatly. Don’t forget to mix the filling well to combine flavors. You can easily make this dish vegan. Use dairy-free cheese and skip the sour cream. For gluten-free options, ensure all ingredients are gluten-free. If you don’t like black beans, try chickpeas or lentils. They add protein and fiber too. For a low-carb option, use zucchini skins instead of sweet potatoes. For the full recipe, check out the detailed instructions above. {{image_2}} You can mix and match toppings to create your perfect loaded sweet potato skins. Try adding cooked bacon bits for a smoky taste. You can also use different cheeses like pepper jack or Monterey Jack. Sautéed mushrooms make a rich, earthy filling. For a fresh twist, consider adding diced tomatoes or pickled jalapeños on top. Each topping adds a new layer of flavor. For a vegetarian version, skip the meat and focus on veggies. Use black beans or chickpeas for protein. You can also add sautéed spinach or roasted zucchini for extra nutrition. If you want a vegan option, replace cheese with vegan cheese or nutritional yeast. Top with a dollop of dairy-free yogurt for creaminess. These choices keep your dish satisfying and delicious. If you love heat, add some diced jalapeños or a dash of hot sauce. You can use spicy black beans or add a sprinkle of cayenne pepper for a kick. For a sweet twist, drizzle some maple syrup or honey over the top after baking. You can also mix in cinnamon with the sweet potato flesh for a warm flavor. These adaptations give you even more ways to enjoy your loaded sweet potato skins. To keep your loaded sweet potato skins fresh, place them in an airtight container. Make sure they cool down first. Store them in the fridge for up to four days. If you plan to eat them later, don’t add fresh toppings like avocado or sour cream yet. This keeps them fresh and tasty. To reheat your sweet potato skins, preheat your oven to 350°F (175°C). Place the skins on a baking sheet. Heat them for about 10-15 minutes, or until they are hot. This helps the cheese melt again and keeps the skins crispy. You can also use a microwave, but the skins may lose their crispness. If you want to save time, you can freeze the sweet potato skins. Prepare them as directed, but do not bake them after adding the filling. Wrap each skin tightly in plastic wrap, then place them in a freezer bag. They can stay in the freezer for up to three months. When ready to eat, thaw them in the fridge overnight and then bake as directed. Enjoy the full recipe for more details! You can serve many things with loaded sweet potato skins. A fresh salad pairs well. Try a simple green salad with a light dressing. You can serve salsa for a zesty kick. Guacamole is another tasty option. If you want more protein, add grilled chicken or shrimp. Chips and dip also make a great side. These skins are filling, so keep sides light. Loaded sweet potato skins last for about three to four days in the fridge. Store them in an airtight container. This keeps them fresh and flavorful. If you notice any signs of spoilage, like an off smell or mold, toss them out. Always check before eating leftovers to stay safe. Yes, you can make loaded sweet potato skins ahead of time. Prepare everything and fill the skins. Keep them in the fridge until you are ready to bake. This saves time on busy days. Just remember to bake them fresh when you are ready to eat. They will taste best this way. For the full recipe, check out the section above. In this blog post, we explored the essential ingredients for loaded sweet potato skins and how to select quality options. I provided step-by-step cooking instructions, key tips for success, and a helpful visual guide. We discussed ways to enhance flavor and texture and shared common mistakes to avoid. You also learned about different variations and storage tips to keep your meal fresh. Remember, cooking is fun, and experimenting is key. Take these tips and enjoy making loaded sweet potato skins your way!

Loaded Sweet Potato Skins Flavorful and Satisfying Snack

Looking for a snack that’s both tasty and easy to make? Loaded sweet potato skins might be your new favorite

- 4 salmon fillets (6 oz each) - 3 tablespoons fresh dill, chopped - 2 lemons (1 for juice, 1 sliced for garnish) - 3 tablespoons olive oil - 2 garlic cloves, minced - Salt and pepper to taste - Optional: lemon wedges for serving To make Lemon Dill Grilled Salmon, start with fresh ingredients. Fresh salmon fillets give the best taste. I use 4 fillets, each weighing around 6 ounces. Fresh dill is key for flavor, so grab 3 tablespoons. You'll need 2 lemons—one for juice and another for garnish. Olive oil adds richness, so use 3 tablespoons. Minced garlic brings depth, so include 2 cloves. Don’t forget salt and pepper to taste. If you like, serve with lemon wedges for an extra punch. - Grill or grill pan - Mixing bowl - Measuring spoons - Spatula You’ll need some basic tools to make this dish. A grill or grill pan is essential for cooking the salmon. A mixing bowl helps you combine the marinade. Use measuring spoons to get the right amount of each ingredient. Finally, a spatula is needed to flip the salmon on the grill. When you have these tools ready, you are set to create a tasty meal. For the full recipe, check out the complete guide. Start by whisking together a few simple ingredients. In a bowl, mix: - 3 tablespoons olive oil - Juice from 1 lemon - 2 minced garlic cloves - 3 tablespoons fresh dill, chopped - Salt and pepper to taste This marinade adds bright flavor to our salmon. The lemon brings tang, while the dill adds a fresh taste. Next, take your salmon fillets. They are usually 6 ounces each. Coat them well with the marinade. Make sure every part gets a nice layer of flavor. Place the salmon in a shallow dish. Cover it and refrigerate for at least 30 minutes. This time allows the flavors to blend deeply into the fish. Preheat your grill to medium-high heat, around 400°F (200°C). Remove the salmon from the fridge. Let any extra marinade drip off. Discard the leftover marinade for safety. Now, place the salmon on the grill skin-side down. Close the lid and grill for 5-7 minutes. After that, carefully flip the salmon using a spatula. Grill for another 4-6 minutes. The fish should be opaque and flake easily with a fork. During the last minute, add lemon slices on the grill. This will give a nice char. Once done, take the salmon off the grill. Let it rest for a couple of minutes. Enjoy your flavorful Lemon Dill Grilled Salmon, as it is a true delight! For the full recipe, check out the details above. To get those beautiful grill marks, preheat your grill well. A hot grill helps sear the salmon quickly, locking in juices. Aim for medium-high heat, around 400°F (200°C). This temperature is just right for grilling salmon. Place the fillets skin-side down first. The skin protects the fish and helps it cook evenly. To check if the salmon is done, look for a fork-tender texture. The fish should flake easily when you insert a fork. The color should change from bright pink to opaque. If it still looks shiny, give it a bit more time. Salmon cooks quickly, so keep an eye on it! Want to mix things up? Add different herbs or spices to your marinade. Try using fresh basil or parsley for a unique twist. You can also add a pinch of red pepper flakes for some heat. Experimenting with flavors makes your Lemon Dill Grilled Salmon even more exciting. For more details, check the Full Recipe! {{image_2}} You can easily change the flavor of this dish. Try using different citrus juices, like orange or lime. The zest from these fruits also adds a nice punch. Fresh herbs like thyme or parsley work well too. Just mix them in the marinade for a fresh taste. This variation brightens up the salmon and brings new life to your meal. If you like heat, add red pepper flakes or cayenne pepper to the marinade. Start with a small pinch. You can always add more if you want it spicier. The heat balances well with the lemon and dill. It adds excitement and warmth to each bite. This variation is great for those who love a little kick. You can cook this salmon in other ways too. If you don't have a grill, try baking it in the oven. Preheat your oven to 400°F (200°C). Place the salmon on a baking sheet lined with parchment paper. Bake for about 12-15 minutes. Another option is pan-searing. Heat some oil in a skillet over medium-high heat. Cook the salmon for about 4-5 minutes per side. Both methods keep the salmon moist and tasty. For the full recipe, check the earlier sections. To keep your leftover Lemon Dill Grilled Salmon fresh, store it in an airtight container. Make sure the salmon is cool before sealing it tightly. Place it in the refrigerator. It will stay good for up to three days. If you want to enjoy it later, don’t forget to label the container with the date. This helps you know how long it has been stored. If you want to save your salmon for a longer time, freezing is a great option. You can freeze both the marinade and the cooked salmon. For the marinade, pour it into a freezer-safe bag. Remove as much air as possible before sealing. This helps prevent freezer burn. For cooked salmon, wrap each piece tightly in plastic wrap, then put it in a freezer bag. You can freeze it for up to three months. Always label the bags with the date. When you’re ready to eat your leftover grilled salmon, reheating it properly is key. The best method is to use the oven. Preheat the oven to 350°F (175°C). Place the salmon on a baking sheet lined with foil. Heat it for about 10-15 minutes, or until warmed through. You can also use a microwave, but it may make the salmon a bit dry. If you choose this method, heat it in short bursts, about 30 seconds at a time. This way, you can keep the salmon moist and tasty. You should grill salmon for about 5-7 minutes on one side. Then, flip it and grill for another 4-6 minutes. The cooking time can change based on the thickness of your fillets. A thicker fillet may need more time. Always check for a fork-tender texture and an opaque color. This means the salmon is fully cooked. Yes, you can use frozen salmon! Just remember to thaw it first. You can do this by placing it in the fridge overnight. If you're short on time, run it under cold water. Thawed salmon cooks more evenly. Fresh salmon has a better texture, but frozen can still taste great. Several sides go great with Lemon Dill Grilled Salmon. Here are a few ideas: - Roasted vegetables - Quinoa or rice - Mixed green salad - Garlic bread - Steamed asparagus These sides add color and balance to your meal. They also complement the flavors of the salmon well. For the full recipe, check out the Lemon Dill Grilled Salmon section! In this post, I covered how to make Lemon Dill Grilled Salmon. I shared the key ingredients, step-by-step instructions, and useful tips for grilling. Remember to marinate your salmon well and check for doneness. You can also explore tasty variations to fit your flavor preference. Finally, I provided storage and reheating tips to enjoy your leftovers. With these insights, you can create a delicious meal that impresses anyone. Enjoy your cooking adventure!

Lemon Dill Grilled Salmon Flavorful and Fresh Meal

If you’re craving a dish that’s both flavorful and refreshing, look no further than my Lemon Dill Grilled Salmon. This

Here are the ingredients you need for garlic butter lobster tails: - 4 lobster tails - 1/2 cup unsalted butter - 4 cloves garlic, minced - 1 tablespoon fresh lemon juice - 1 teaspoon smoked paprika - 1 teaspoon sea salt - 1/2 teaspoon black pepper - 1 tablespoon fresh parsley, chopped (for garnish) - Lemon wedges (for serving) To make this dish, gather these tools: - Kitchen shears - Small saucepan - Baking dish - Brush for basting - Oven You can swap some ingredients if needed: - Use salted butter instead of unsalted for more flavor. - Fresh garlic can be replaced with garlic powder, but use less. - If you don’t have smoked paprika, regular paprika works too. - For a citrus twist, try lime juice instead of lemon juice. To start, get your lobster tails ready. Use kitchen shears to split them in half lengthwise. This step is key. It helps the flavors soak in better. After splitting, gently pull the meat out. Place it on top of the shell. This makes for a beautiful presentation. Next, we prepare the garlic butter sauce. Melt 1/2 cup of unsalted butter in a small saucepan over medium heat. Add 4 minced garlic cloves to the melted butter. Sauté for about 1-2 minutes. Be careful not to burn the garlic; this can ruin the flavor. Now, stir in 1 tablespoon of fresh lemon juice, 1 teaspoon of smoked paprika, 1 teaspoon of sea salt, and 1/2 teaspoon of black pepper. Let the mixture bubble for another minute. This sauce is rich and fragrant. Now it’s time to bake the lobster tails. Place them in a baking dish. Brush the tails generously with the garlic butter mixture. Make sure the meat is well-coated. Drizzle any leftover garlic butter on top. Bake in a preheated oven at 425°F (220°C) for 12-15 minutes. The lobster meat should be opaque and firm. You want the internal temperature to hit 140°F (60°C). Once cooked, take them out of the oven and let them cool a bit. Garnish with fresh parsley and serve with lemon wedges on the side. Enjoy this rich and savory delight! Select lobster tails that feel firm and heavy. Look for a smooth shell without cracks. The color should be vibrant, not dull. If possible, ask for tails from cold waters. They often have better flavor and texture. Fresh tails should smell like the sea, not fishy. Start with quality unsalted butter. It gives you full control over the dish's saltiness. Use fresh garlic for the best taste. Mince it finely to release more flavor. Adding lemon juice brightens the dish. Smoked paprika adds richness and depth to the butter. Mix these well for a balanced flavor. Cooking time can vary with tail size. Larger tails may need more time, while smaller ones cook faster. Always check the internal temperature. It should reach 140°F (60°C) for safe eating. If unsure, cut into the meat; it should be opaque and white. Adjust cooking time based on your oven's heat. {{image_2}} To add some heat, mix a teaspoon of red pepper flakes into your garlic butter. This spicy kick pairs well with the rich taste of lobster. You can also use hot sauce in the butter mix. Adjust the heat to fit your taste. A little spice can make your dish pop! For a fresh twist, try adding herbs to your garlic butter. Chop fresh basil, thyme, or dill and mix them in. These herbs will add layers of flavor to your lobster. You can also use dried herbs if fresh ones aren’t available. Just remember, dried herbs are more potent, so use less. Grilling or broiling lobster tails creates a nice char. For grilling, preheat the grill to medium-high heat. Brush the tails with garlic butter and grill for 6-8 minutes. Flip them halfway through for even cooking. If broiling, place the tails on a baking sheet and broil for 10-12 minutes. Both methods give a smoky flavor that is hard to resist. For the full experience, check the full recipe for all the details! After you enjoy your garlic butter lobster tails, store any leftovers right away. Place them in an airtight container. This helps keep the lobster fresh. I recommend eating leftovers within two days. The lobster can lose its texture if it sits too long. When you’re ready to enjoy your lobster again, reheat it gently. Preheat your oven to 350°F (175°C). Put the lobster tails in a baking dish. Add a little extra garlic butter on top. Cover the dish with foil to keep the moisture in. Heat for about 10 minutes, or until warmed through. You can also reheat in the microwave for 1-2 minutes. Just cover it to prevent drying out. If you want to save your lobster tails for later, freezing is a great option. Start by letting them cool completely. Wrap each tail in plastic wrap tightly. Then, place them in a freezer bag or airtight container. They can stay in the freezer for up to three months. When you’re ready to cook them, thaw in the fridge overnight before reheating. This method keeps the flavor and texture intact. For the full experience, check out the Full Recipe. You can tell lobster tails are cooked when the meat turns opaque. The shell also turns bright red. The internal temperature should hit 140°F (60°C). This ensures the lobster is safe to eat. If you check the meat and it feels firm, it’s ready. It's simple to check. Use an instant-read thermometer for best results. If you don’t have one, cut into the thickest part of the meat. If it is white and opaque, it is cooked. Yes, you can use frozen lobster tails. Just make sure to thaw them first. The best way to thaw is in the fridge overnight. If you're short on time, place them in cold water for about 30 minutes. Avoid using hot water, as it can cook the meat unevenly. Frozen lobster tails can still be tasty. Just follow the same cooking method as fresh tails. You may need to adjust the cooking time slightly, so check the internal temperature. Garlic butter lobster tails pair well with many sides. Here are some great options: - Creamy mashed potatoes - Grilled asparagus - Garlic bread - Steamed broccoli - Lemon rice Each of these sides complements the rich, buttery flavor of the lobster. Feel free to mix and match based on your taste. For the full recipe, check the provided details for more ideas. In this post, we covered the key steps to cook lobster tails. You learned about ingredients, equipment, and how to make garlic butter sauce. We shared tips for choosing fresh tails and adjusting cooking times. You also explored tasty variations and smart storage tips. Cooking lobster tails can be easy and fun. With practice, you can impress everyone at dinner. So, gather your ingredients and enjoy the process!

Garlic Butter Lobster Tails Rich and Savory Delight

If you want to impress everyone at dinner, you need to try Garlic Butter Lobster Tails. This rich and savory

To make this delicious soup, gather these fresh ingredients: - 1 medium butternut squash, peeled, seeded, and diced (about 4 cups) - 1 tablespoon coconut oil - 1 medium onion, chopped - 3 cloves garlic, minced - 1 tablespoon fresh ginger, grated - 1 tablespoon red curry paste (adjust according to spice preference) - 1 can (400ml) coconut milk - 4 cups vegetable broth - 1 tablespoon brown sugar (or maple syrup) - Salt and pepper, to taste - Juice of 1 lime - Fresh cilantro, for garnish - Toasted pumpkin seeds, for garnish Sometimes, you may not have all the ingredients on hand. Here are some easy swaps: - Butternut squash: Use pumpkin or sweet potato as alternatives. - Coconut oil: Olive oil or avocado oil can work well for sautéing. - Red curry paste: Try yellow curry paste or a mix of spices like cumin and turmeric. - Coconut milk: Almond milk or cashew cream can be used for a lighter version. This soup is not just tasty; it's packed with nutrients: - Butternut squash is high in vitamins A and C, aiding vision and boosting immunity. - Coconut milk provides healthy fats, which may improve heart health. - Ginger has anti-inflammatory properties and can help with digestion. - Garlic and onion are great for overall health, offering immune support. Enjoy this Coconut Curry Butternut Squash Soup knowing it’s both delightful and nutritious! For the full recipe, check out the recipe details. 1. Sauté Aromatics: In your large pot, heat 1 tablespoon of coconut oil over medium heat. Add the chopped onion and sauté it for about 5 minutes. The onion should turn translucent. Then, stir in 3 cloves of minced garlic and 1 tablespoon of grated ginger. Cook this mix for another 1-2 minutes until it smells amazing. 2. Add Squash and Curry Paste: Now, mix in 1 tablespoon of red curry paste. This adds a nice kick! Next, add the diced butternut squash, about 4 cups. Stir well to coat the squash with the spices. 3. Simmer with Coconut: Pour in 4 cups of vegetable broth and 1 can (400ml) of coconut milk. Bring this mixture to a gentle boil. Once boiling, reduce the heat to low. Cover the pot and let it simmer for about 20-25 minutes. The squash should be soft when done. 4. Blend the Soup: Carefully remove the pot from the heat. Use an immersion blender to puree the soup until it is smooth. If you don’t have one, you can pour the soup into a countertop blender in batches. Blend until it looks creamy. 5. Season and Adjust: Return the pureed soup to low heat. Stir in 1 tablespoon of brown sugar or maple syrup, along with the juice of 1 lime. Add salt and pepper to taste. Let it warm for a few minutes. 6. Serve and Garnish: Finally, ladle the soup into bowls. Garnish each bowl with fresh cilantro and a sprinkle of toasted pumpkin seeds for a tasty crunch. - Ensure the butternut squash is soft before blending. This helps achieve that velvety texture. - Blend in small batches if using a countertop blender. This prevents spills and makes blending easier. - If the soup is too thick, add a splash of vegetable broth or coconut milk to thin it out. - Large Pot: Use this for sautéing and simmering the soup. - Immersion Blender: This tool makes blending easy and keeps things simple. - Cutting Board and Knife: These are essential for chopping your veggies. - Measuring Cups and Spoons: Accurate measurements are key to great taste. If you want to dive deeper into the details, check the Full Recipe for precise measurements and additional insights! To make your Coconut Curry Butternut Squash Soup burst with flavor, focus on your base. Start with fresh onion, garlic, and ginger. Sauté these until they release their sweet aroma. This builds depth in your soup. Use good quality coconut milk for creaminess. Always taste as you cook. Adjust flavors by adding lime juice or sugar. This balance creates a layered taste. Spice can make or break your soup. If you love heat, add more red curry paste. Start with one tablespoon and taste. If you want it milder, reduce the paste by half. You can also add a dollop of yogurt at the end to cool it down. Remember, the soup will warm in the bowl, so aim for a balanced heat level. Serve the soup warm in a bowl. Add fresh cilantro and toasted pumpkin seeds on top. This adds a nice crunch. Pair it with crusty bread or a simple salad. For an extra touch, serve with lime wedges. The citrus brightens the dish. Enjoy this soup as a starter or main dish. For the full recipe, click here. {{image_2}} You can easily switch some ingredients to fit your needs. If you want to cut carbs, use cauliflower instead of butternut squash. For a nutty flavor, try adding tahini. If you like a creamier taste, use cashew cream instead of coconut milk. You can also mix in other veggies like carrots or sweet potatoes for more nutrition and taste. Feel free to get creative with spices! If you want more heat, add chili flakes or fresh chilies. For a smoky taste, sprinkle in some smoked paprika. You can also try other curry pastes like green curry for a different twist. Herbs like basil or mint can bring a fresh taste, too. These small changes can make a big difference in flavor. This soup is mostly vegan and gluten-free, but double-check your ingredients. Use vegetable broth to keep it vegan. Make sure your curry paste is gluten-free; some brands add wheat. If you want a richer flavor, add more coconut milk. This soup is already plant-based, so it's perfect for anyone looking for a healthy meal. For more options, check the Full Recipe for details. After making your coconut curry butternut squash soup, let it cool to room temperature. Pour it into airtight containers. This keeps it fresh and tasty. Store the soup in the fridge if you plan to eat it within a week. If you need more time, freezing is the way to go. To freeze the soup, use freezer-safe containers. Leave some space at the top for expansion. This soup can last up to three months in the freezer. When ready to eat, take it out and let it thaw in the fridge overnight. This helps keep the flavor just right. When reheating, use a pot on low heat. Stir it often to keep it from sticking. If the soup is thick, add a splash of vegetable broth or water. This will bring back its creamy texture. You can also use a microwave, but stir halfway through to heat it evenly. Enjoy your delicious soup just like the first time! For the complete recipe, refer to the [Full Recipe]. You can store this soup in the fridge for about 4 to 5 days. Make sure it cools down first. Use an airtight container for best results. For longer storage, freeze it. It can last up to 3 months in the freezer. Just thaw it in the fridge before reheating. This way, you can enjoy a warm bowl anytime! Yes, you can use fresh ingredients instead of canned ones. For example, use fresh coconut milk instead of canned. Just blend the fresh coconut with water to get a creamy texture. You can also use fresh squash instead of frozen. Fresh herbs can replace dried ones for better flavor. This keeps your soup vibrant and fresh! Yes, this soup is quite healthy! It contains lots of vitamins from the butternut squash. The coconut milk adds healthy fats. Spice from the curry can boost your metabolism. Plus, it’s low in calories, making it a great choice for a light meal. Pair it with a salad for a balanced dish. You can find the full recipe in the earlier section! Coconut curry butternut squash soup is a tasty and healthy dish. You can use different ingredients and spices to make it just right for you. Follow the easy steps for a smooth, creamy soup that everyone will love. Remember to store leftovers properly to enjoy them later. Explore variations to suit your diet or taste. Making this soup offers a fun cooking experience and a winning meal. Enjoy every spoonful!

Coconut Curry Butternut Squash Soup Flavorful Recipe

If you crave a warm, vibrant dish, this Coconut Curry Butternut Squash Soup will delight your taste buds! I’ll show

- 4 large bell peppers (any color) - 1 cup quinoa, rinsed - 2 cups vegetable broth - 1 can (15 oz) black beans, drained and rinsed - 1 cup corn (frozen or canned) - 1 small red onion, diced - 2 cloves garlic, minced - Spices: ground cumin, smoked paprika, chili powder - 1 cup diced tomatoes (fresh or canned) - 1 cup shredded cheese (cheddar or Mexican blend) - Salt, pepper, and fresh cilantro for garnish Let’s dive into what makes this dish so special. The bell peppers stand out with their vibrant colors. You can pick any shade you like, from green to red. Quinoa is a great base as it’s healthy and filling. Plus, it cooks quickly. The vegetable broth adds a rich flavor that makes the quinoa shine. The black beans and corn bring extra texture to each bite. They add protein and sweetness that balance the dish. Diced red onion gives a nice crunch. When you cook it, it becomes soft and sweet, adding depth. Now, the spices! Garlic, cumin, smoked paprika, and chili powder create a warm and inviting flavor. Diced tomatoes add juiciness and acidity, which brightens the entire dish. Cheddar or Mexican blend cheese melts beautifully on top, adding a creamy finish. Finally, a sprinkle of cilantro gives a fresh taste. It’s the perfect touch for this colorful veggie fiesta stuffed peppers recipe. With these ingredients, you can create a meal that’s not only tasty but also fun to make. - Preheat your oven to 375°F (190°C). - Cut the tops off the bell peppers. Remove the seeds and membranes. - Bring vegetable broth to a boil in a medium pot. - Add quinoa and reduce the heat to low. Cover the pot and let it simmer until fluffy, about 15 minutes. - In a large skillet, heat a drizzle of olive oil over medium heat. - Sauté diced onion and garlic until they turn soft, about 3-4 minutes. - Add black beans, corn, diced tomatoes, cumin, smoked paprika, chili powder, salt, and pepper. Cook for 5 more minutes to blend the flavors. - Stir the cooked quinoa into the vegetable mixture. Add half of the shredded cheese and mix well. - Stuff each bell pepper with the quinoa and vegetable mix. Press down gently to pack it in. - Top each stuffed pepper with the remaining shredded cheese. - Cover the baking dish with foil and place it in the oven. Bake for 25 minutes. - After 25 minutes, remove the foil and bake for an additional 10-15 minutes. This helps the cheese become bubbly and golden. You can find the complete details in the Full Recipe. - Look for firm, brightly colored peppers. - Choose uniform-sized peppers for even cooking. When picking bell peppers, I always check for firmness. If they feel soft, they are likely past their prime. Bright colors mean they are fresh and full of flavor. Uniform size is key too. It helps them cook at the same rate, so every bite is just right. - Adjust spice levels to taste and add other veggies if desired. - Ensure quinoa is fully cooked before mixing with vegetables. I love to customize the filling for my stuffed peppers. You can add spices or different veggies to match your taste. Just make sure your quinoa is fully cooked. If it’s not done, it can ruin the whole dish. Mix it well with the other ingredients for a balanced flavor. - Don’t overstuff the peppers; leave room for the cheese to melt. - Use a baking dish with high sides to prevent peppers from tipping over. One mistake I see often is overstuffing the peppers. They need space for the cheese to melt and bubble. Also, opt for a baking dish with high sides. This keeps the peppers upright and makes sure they cook evenly. Trust me, following these tips will make your stuffed peppers a hit! For a full recipe, check out the instructions above. {{image_2}} You can easily make this dish vegan. Just swap out the cheese for vegan cheese, or leave it out altogether. This keeps the peppers tasty and plant-based. You can also add more vegetables or legumes. Try chickpeas or spinach to boost protein and nutrients. Quinoa is naturally gluten-free. If you prefer, you can also use rice instead of quinoa. Both options work well and keep the dish gluten-free. Just make sure to cook the rice separately before mixing it with the filling. Don't be afraid to get creative with spices! Try adding Italian seasoning for a fresh twist. You can also mix in some salsa for a tangy kick. This adds flavor and moisture to the filling. Additionally, you can use different beans or lentils, like pinto beans or green lentils. This gives you a variety of flavors and textures in every bite. To keep your vegetarian stuffed bell peppers fresh, let them cool completely before refrigerating. This step helps prevent excess moisture, which can spoil the dish. Store them in an airtight container for up to 3–4 days. This ensures they stay tasty and safe to eat. If you want to save some for later, wrap each stuffed pepper tightly in plastic wrap. This keeps them from getting freezer burn. You can freeze them for up to 3 months. When you're ready to eat, just thaw them overnight in the fridge. Reheat them in the oven for the best results. This method keeps the peppers juicy and the cheese melty. For reheating, I suggest using the oven. Cover the peppers with foil to lock in moisture. This way, the filling stays warm and soft. If you're short on time, you can microwave them. Just keep in mind that the cheese might not be as melty when using the microwave. Enjoy your flavorful meal, even on busy days! Yes, prepare the filling and stuff the peppers the day before. Store covered in the fridge until ready to bake. This saves time and enhances the flavors. Just pop them in the oven when you're ready. To add some heat, mix in diced jalapeños or extra chili powder to the filling. You can start with a little and taste as you go. This way, you can get the spice level just right for your taste buds. Brown rice or couscous can be good substitutes. Both options work well and keep the dish hearty. You can even use wild rice for a nutty flavor or farro for extra chewiness. Look for bell peppers that feel heavy for their size and have smooth, taut skin. The color should be vibrant, whether it’s red, yellow, green, or orange. Avoid any with soft spots or wrinkles. These tips help ensure you get the freshest peppers for your dish. Vegetarian stuffed bell peppers are easy to make and packed with flavor. You need key ingredients like bell peppers, quinoa, black beans, and spices. Follow the step-by-step instructions for the best results. Remember to play with flavors and try different veggies. Store your leftovers properly to enjoy later. With these tips and tricks, you’ll create a dish everyone loves. Get ready to impress with a meal that’s healthy and satisfying!

Vegetarian Stuffed Bell Peppers Flavorful and Easy Dish

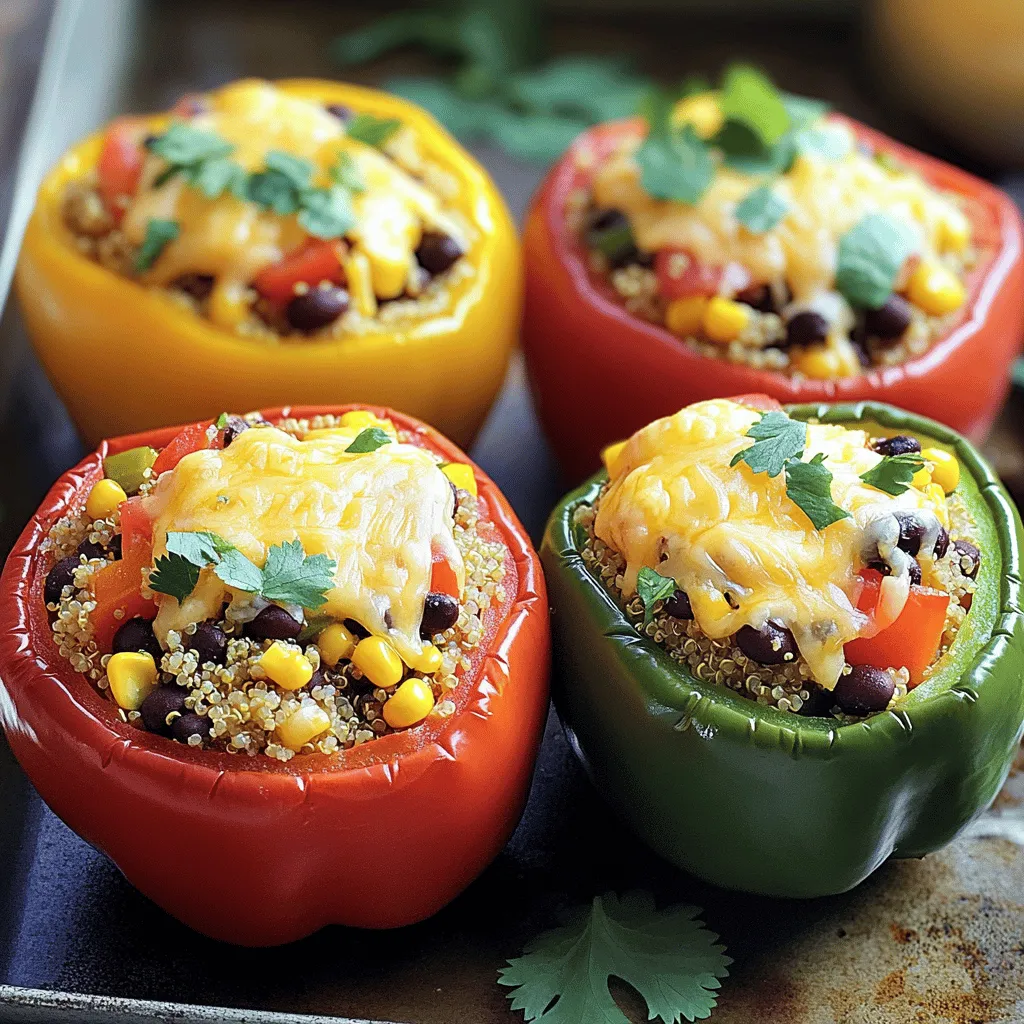
Looking for a tasty and easy meal? Vegetarian stuffed bell peppers are the answer! Packed with flavor and colorful veggies,

Older posts
Newer posts
← Previous Page1 … Page50 Page51 Page52 … Page58 Next →

dsad

© 2025 Cooking Wells • Built with GeneratePress

Our Policies

  • Copyright Policy
  • Cookie Policy
  • GDPR Policy
  • Privacy Policy
  • Disclaimer
  • Terms Of Use

More Information

  • Home
  • About
  • Contact
  • Appetizers
  • Dessert
  • Dinner
  • Drinks
©2025, Cooking Wells About Back To Top