Skip to content
DisclaimerTerms Of UseGDPR PolicyCookie Policy

Cooking Wells

  • Home
  • Drinks
  • Appetizers
  • Dinner
  • Dessert
  • About
  • Contact
  • Privacy Policy
DisclaimerTerms Of UseGDPR PolicyCookie Policy

Mia

To whip up these tasty bites, gather the following ingredients: - 1 cup almond butter - 1/2 cup rolled oats - 1/2 cup shredded coconut (unsweetened) - 1/4 cup honey or maple syrup - 1/4 cup dark chocolate chips - 1/4 cup chopped almonds - 1 teaspoon vanilla extract - A pinch of sea salt These ingredients come together to create a sweet and crunchy snack. Each bite bursts with the classic flavors of almond joy. If you have allergies, don't worry! You can swap ingredients easily. For nut allergies, use sunbutter or soy nut butter instead of almond butter. If you need a gluten-free option, make sure to choose gluten-free oats. You can also replace honey with agave syrup for a vegan-friendly treat. Using high-quality ingredients makes a big difference. Fresh almond butter has a rich taste that enhances the bites. Unsweetened coconut gives a natural sweetness without added sugars. Look for dark chocolate with at least 70% cocoa for a rich flavor and health benefits. High-quality ingredients lead to delicious results, making every bite worth it. Start by gathering all your ingredients. You need almond butter, rolled oats, shredded coconut, honey or maple syrup, dark chocolate chips, chopped almonds, vanilla extract, and sea salt. Make sure everything is at room temperature. This helps the mixing process. In a large mixing bowl, combine the almond butter, rolled oats, shredded coconut, and honey or maple syrup. Add a teaspoon of vanilla extract and a pinch of sea salt. Mix all the ingredients until they blend well. You want a sticky mixture that holds together. Next, fold in the dark chocolate chips and chopped almonds. This step ensures even flavor in each bite. Once your mixture is ready, it’s time to shape the energy bites. Scoop out about a tablespoon of the mix. Roll it between your hands to form a ball. Repeat this until you use all the mixture. Place each ball on a parchment-lined baking sheet. After shaping, refrigerate the bites for at least 30 minutes. This helps them firm up. Store them in an airtight container in your fridge for up to a week. Enjoy your Almond Joy Energy Bites as a quick snack or a fun treat! Store your Almond Joy Energy Bites in an airtight container. They stay fresh for a week in the fridge. If you want to keep them longer, freeze them for up to three months. Just make sure to separate them with parchment paper. This prevents them from sticking together. These energy bites work great as a snack or dessert. Serve them in a bowl at parties or pack them for lunch. You can also stack them in a glass jar for a fun display. Add a few extra chocolate chips or almonds on top for flair. Your friends and family will love these tasty bites! Mix in different ingredients for fun twists. Try adding dried fruit like cranberries or cherries. You can also swap almond butter for peanut butter if you prefer. For a spicier kick, add a pinch of cinnamon or nutmeg. Each change makes the bites unique and exciting! For the full recipe, check out the details above. {{image_2}} Each Almond Joy Energy Bite has about 120 calories. This makes them a great snack. You can enjoy them without guilt. If you eat two, that's 240 calories, which is still reasonable. These bites are perfect for a quick pick-me-up. Each bite packs about 3 grams of protein. The almond butter and chopped almonds add healthy fats. They also have 5 grams of sugar, mainly from honey or maple syrup. Plus, you get about 2 grams of fiber. This fiber helps keep you full longer. - Almond Butter: It's rich in vitamin E and magnesium. It helps with heart health. - Rolled Oats: They provide lasting energy and are good for digestion. - Shredded Coconut: This adds healthy fats and can boost energy. - Dark Chocolate Chips: They offer antioxidants and can improve mood. - Chopped Almonds: They add crunch and extra nutrients. These bites are not just tasty; they are good for you too. For the full recipe, check out the section above! You can customize your Almond Joy Energy Bites easily. Try adding different ingredients to change the flavor. For a nutty twist, mix in some peanut butter or cashew butter. If you love fruit, add dried cranberries or raisins. Want a spicier kick? A pinch of cinnamon or a dash of cayenne can do wonders. You can also swap dark chocolate chips for white chocolate for a sweeter bite. Making these bites vegan is simple. Just replace honey with maple syrup. For a gluten-free option, ensure you use certified gluten-free oats. This way, you can enjoy these bites while following your dietary needs. You can also try using coconut flour instead of oats for a different texture. You can easily change how sweet your energy bites are. If you want them less sweet, cut back on the honey or maple syrup. You could also use a sugar substitute like stevia or monk fruit. For a sweeter taste, add more chocolate chips or use sweetened coconut flakes. Taste as you mix to find your perfect sweetness. These adjustments let you create a treat that fits your taste and dietary needs. Feel free to explore, and enjoy each bite! If you want the full details, check out the Full Recipe. Almond Joy Energy Bites last up to a week in the fridge. Store them in an airtight container to keep them fresh. They make a great snack for busy days or a quick boost before workouts. Yes, you can freeze these energy bites. Place them in a freezer-safe bag or container. They will stay good for about three months. Just thaw them in the fridge before you enjoy them again. You can use peanut butter or sunflower seed butter as substitutes for almond butter. Both options work well and add tasty flavors. Choose based on your preference or any allergies. In this post, I covered how to make Almond Joy Energy Bites, focusing on quality ingredients and simple steps. I shared tips for storage, serving, and adjusting flavors to suit your taste. These bites not only taste great, but they also offer health benefits. Whether you're cooking for friends or just for you, these snacks are easy and fun to make. I hope you enjoy experimenting with different variations and flavors as much as I do!

Wholesome Almond Joy Energy Bites Quick and Easy Treat

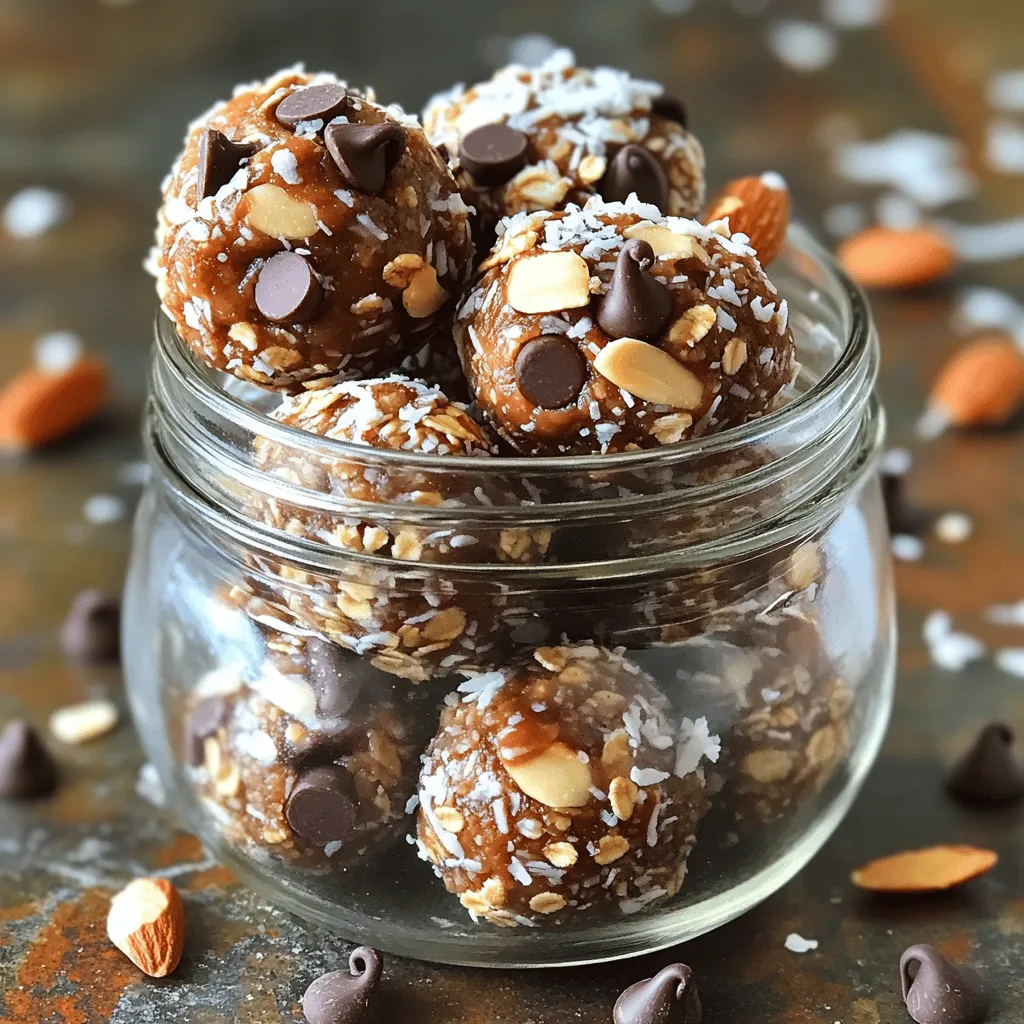
Are you craving something sweet but want to stay healthy? Try my Wholesome Almond Joy Energy Bites! These quick and

To make the best Peach Basil Iced Tea, gather these fresh ingredients: - 4 cups water - 4 black tea bags - 2 ripe peaches, pitted and sliced - 1/4 cup fresh basil leaves - 1/4 cup honey (adjust to taste) - Ice cubes - Lemon slices for garnish Using fresh ingredients gives the tea a bright flavor. You can adjust the honey for sweetness based on your taste. If you prefer a vegan option, swap honey for agave syrup. For those who use metric measurements, here are the conversions: - 4 cups water = 950 ml - 1/4 cup honey = 60 ml If you want to make more tea, double or triple the amounts. Just keep the same ratios for the best taste. Choosing ripe peaches is key. Look for peaches that are firm but slightly soft when you press them. They should have a sweet scent. For basil, choose bright green leaves with no browning. Fresh basil brings a burst of flavor to the tea. Start by boiling 4 cups of water in a medium saucepan. Use fresh, filtered water for the best taste. Once the water boils, take it off the heat. Add 4 black tea bags to the hot water. The steeping time is very important. Let the tea steep for about 5-7 minutes. If you like stronger tea, lean towards the 7-minute mark. If you prefer a lighter flavor, stick to 5 minutes. Black tea gives a rich base that pairs well with peach and basil. While your tea is steeping, prepare the peach basil mixture. Take 2 ripe peaches, pit them, and slice them. Place the peach slices along with 1/4 cup of fresh basil leaves and 1/4 cup of honey in a blender. Blend until smooth. This blending method helps release the flavors. Now, strain the mixture through a fine-mesh sieve into a large pitcher. Use a spatula to press down gently. This way, you extract as much juice as possible. You want a smooth drink without any solids. Once your tea has cooled to room temperature, it’s time to combine. Remove the tea bags from the brewed tea. Pour the strained peach basil mixture into the pitcher with the tea. Stir well to mix the flavors. For the best taste, chill the iced tea in the refrigerator for at least 1 hour. This chilling time allows the flavors to meld together beautifully. Serve the iced tea over ice cubes and enjoy the refreshing taste. For the full recipe, check the earlier section. To make your Peach Basil Iced Tea even tastier, try adding spices like cinnamon or ginger. These spices bring warmth and depth to your drink. You can also mix in other fruits, such as strawberries or apricots, to create new flavors. For sweetness, adjust the honey. Start with 1/4 cup, then taste. If you want it sweeter, add more honey little by little. Serve your iced tea in fun glasses. You can use mason jars for a rustic look or tall glasses for elegance. Add lemon slices to the rim for a burst of color. For a fancy touch, float a basil leaf on top of each glass. This not only looks pretty but also gives a hint of fresh aroma. One common mistake is over-steeping the tea. This can make your drink bitter. Stick to 5-7 minutes for the perfect strength. Another mistake is rushing the flavor melding. Let the tea chill in the fridge for at least one hour. This step helps all the flavors blend well together. If you skip this, your drink may taste flat. {{image_2}} You can change the herbs in your peach basil iced tea for new flavors. Try mint, thyme, or rosemary. Each brings its own taste and aroma. Mint adds a fresh kick, while thyme gives a warm note. Rosemary can lend a savory touch that surprises your palate. Herbal tea options also work well. Use chamomile or hibiscus for a floral twist. These choices can brighten your drink and add health benefits too. If you want to cut down on sugar, try natural sweeteners. Honey is great, but maple syrup or agave nectar works well too. They add sweetness without refined sugar. You can also use stevia or monk fruit. These options are sugar-free and low-calorie. Just adjust the amount to suit your taste. Each of these alternatives brings unique benefits and flavors to your iced tea. Changing fruits can make your iced tea exciting. In summer, add ripe strawberries or blueberries. In fall, try apples or pears for a cozy feel. For winter, consider cranberries or pomegranate seeds. Each fruit brings its own taste and vitamin boost. You can also create holiday-inspired versions. Add spices like cinnamon or nutmeg for a festive flair. These variations keep your peach basil iced tea fresh and fun all year long. To keep your peach basil iced tea fresh, use a glass or plastic pitcher. A tightly sealed container works well, too. Glass avoids any unwanted flavors from leaching. Store your iced tea in the fridge. It stays fresh for up to 3 days. After that, the taste may fade. Always check for any off smells or changes in color before serving. You cannot really reheat iced tea since it loses its flavor. If you want a hot version, brew a fresh batch of tea. You can still use leftovers creatively. Try adding it to smoothies or as a base for salad dressings. You can even freeze it into ice cubes for a fun twist in future drinks. To make Peach Basil Iced Tea from scratch, follow these steps in the [Full Recipe]. First, boil 4 cups of water in a medium saucepan. Then, steep 4 black tea bags in the hot water for 5-7 minutes. While it steeps, blend 2 ripe peaches, 1/4 cup of fresh basil leaves, and 1/4 cup of honey until smooth. Strain this mixture to remove solids. Once the tea cools, mix it with the peach-basil blend. Chill it for at least one hour. Finally, serve over ice and garnish with lemon slices. Yes, you can use fresh peaches instead of canned ones. Fresh peaches bring a vibrant taste and aroma. Choose ripe, juicy peaches for the best flavor. They should yield slightly when pressed. This choice enhances the drink's freshness and adds a natural sweetness. If fresh peaches are in season, they are your best option. However, if they are not available, canned peaches work well in a pinch. Peaches are rich in vitamins A and C. They also provide dietary fiber. Eating peaches may support skin health and aid digestion. Basil is known for its anti-inflammatory properties. It contains antioxidants, which help protect your body. Together, these ingredients create a refreshing drink that hydrates and revitalizes. Anecdotal evidence suggests that basil can help reduce stress and enhance mood. Enjoying this iced tea not only cools you down but also offers several health perks. In this blog post, I covered how to make Peach Basil Iced Tea. We discussed the best fresh ingredients and how to adjust for dietary needs. I shared step-by-step instructions, along with tips for perfect flavor and presentation. Remember to avoid common mistakes to get the best taste. You can even experiment with variations and store your drink properly. With this guide, you can create a refreshing drink that's not just delicious but also good for you. Enjoy your iced tea adventure!

Peach Basil Iced Tea Refreshing Summer Delight

Looking for a cool drink to beat the summer heat? Peach Basil Iced Tea is the perfect blend of sweetness

- 4 cups all-purpose flour - 2 teaspoons salt - 1 teaspoon sugar - 2 teaspoons instant dry yeast - 1 ½ cups warm water (about 110°F) - 2 tablespoons olive oil - 1 tablespoon dried oregano - 1 tablespoon dried thyme - 1 tablespoon garlic powder - 1 tablespoon rosemary, finely chopped (fresh or dried) - Cornmeal (for dusting) To make savory herb crusty bread, gather these simple ingredients first. The flour gives the bread its structure. Salt adds flavor and helps control yeast activity. Sugar feeds the yeast for a good rise. The instant dry yeast makes the dough rise quickly. Warm water activates the yeast for the best results. Olive oil adds moisture and flavor to the dough. Using dried herbs like oregano and thyme gives the bread its savory note. Garlic powder adds a punch of flavor, and rosemary gives it a lovely aroma. Lastly, cornmeal dusts the baking surface to prevent sticking and adds a nice texture. Make sure you have everything ready before you start. This will help the process go smoothly. You can find the full recipe for step-by-step instructions on how to create this delicious bread. - Combine Dry Ingredients: In a large bowl, add 4 cups of all-purpose flour, 2 teaspoons of salt, 1 teaspoon of sugar, 2 teaspoons of instant dry yeast, 1 tablespoon of dried oregano, 1 tablespoon of dried thyme, 1 tablespoon of garlic powder, and 1 tablespoon of rosemary. Mix them well. This helps the flavors to blend. - Mix Wet Ingredients: Next, create a well in the center of your dry mix. Pour in 1 ½ cups of warm water and 2 tablespoons of olive oil. Use a wooden spoon to mix. Keep stirring until the dough looks shaggy. - Kneading the Dough: Once the dough forms, move it to a floured surface. Knead it for about 10 minutes. You want it to be smooth and elastic. If it feels sticky, sprinkle a bit more flour. This step develops the gluten. - Placing in the Bowl: After kneading, place the dough in a greased bowl. Make sure the bowl is large enough. The dough needs room to grow. - Covering the Dough: Cover the bowl with a damp cloth. This keeps the moisture in. It helps the dough rise. - Ideal Rising Conditions: Let the dough rise in a warm place for 1 to 1.5 hours. It should double in size. A warm kitchen or near a sunny window works well. - Punching Down the Dough: After the first rise, gently punch the dough. This releases air bubbles. It helps to create a better texture. - Shaping Techniques: Shape the dough into a round ball or an oblong loaf. Your choice depends on how you like your bread. This step helps give it form. - Preparing for the Oven: Place the shaped dough on a cornmeal-dusted baking sheet. Cover it loosely again with the damp cloth. Let it rise for another 30-45 minutes. This second rise adds more flavor. - Preheating the Oven: Preheat your oven to 450°F (232°C). This high heat gives the bread a crusty finish. - Making Slashes on the Dough: Once the dough has risen, use a sharp knife to make a few shallow slashes on top. This allows steam to escape. - Adding Steam for a Crusty Texture: For a crusty exterior, place an oven-safe dish of water in the oven. The steam helps the bread bake evenly. - Baking Time: Bake the bread for about 25-30 minutes. It should be golden brown and sound hollow when tapped on the bottom. Now you have all the steps ready to make your savory herb crusty bread using the full recipe. Enjoy the process and the delightful smells as the bread bakes! Oven Temperature Tips To get a great crust, set your oven to 450°F (232°C). This hot temperature helps the bread rise quickly and forms a nice crust. If your oven has a hot spot, rotate the bread halfway through baking. This ensures even cooking and browning. Steam Creation Techniques Steam is key for a crusty exterior. Place a small oven-safe dish filled with water in the oven while it preheats. The steam keeps the dough moist, allowing it to expand. You can also mist the oven with water using a spray bottle just before closing the door. Suggested Herb Combinations Mixing herbs can boost flavor. Rosemary, thyme, and oregano work well together. You might also try basil or dill for a twist. Experiment to find what you like best! Using Fresh vs. Dried Herbs Fresh herbs add a bright taste but can be harder to find. Dried herbs are easy to use and have a strong flavor. If you use fresh herbs, double the amount since their flavor is milder. Addressing Sticky Dough If your dough is sticky, add a little more flour while kneading. Use just enough to make it manageable. Avoid adding too much flour, or the bread may become tough. How to Identify Proper Doneness Your bread is done when it looks golden brown. Tap the bottom; if it sounds hollow, it's ready. Use an instant-read thermometer to check; the center should be about 190°F (88°C). For the complete method, check the Full Recipe. {{image_2}} You can change the herbs to create new flavors. - Italian Herb Blend: Mix dried basil, parsley, and oregano. This blend gives your bread a classic Italian taste. - Mediterranean Inspired Additions: Use herbs like dill and tarragon. These add a bright and fresh flavor to your bread. Adding extra ingredients can make your bread even tastier. - Adding Cheese: Grate some Parmesan into the dough. It melts well and adds a rich flavor. - Adding Vegetables: Chopped sun-dried tomatoes add a sweet and tangy kick. You can also try olives for a briny touch. If you need a gluten-free version, you can still enjoy this bread. - Suitable Gluten-Free Flours: Use a blend of almond flour and coconut flour. These create a nice texture without gluten. - Adjustments Needed for Texture: Add more water and a binding agent like xanthan gum. This helps hold the bread together and improves the rise. For the complete recipe, check the Full Recipe. To keep your Savory Herb Crusty Bread fresh, wrap it well. You can use a bread bag or a cloth. Bread bags keep moisture in, while cloth lets it breathe. If you want a crusty texture, go with cloth. For a softer crust, use a bread bag. If you want to save the bread for later, freezing is great. First, let the bread cool completely. Then, wrap it in plastic wrap and foil. This prevents freezer burn. You can freeze it for up to three months. To thaw, take the bread out and unwrap it. Let it sit at room temperature for a few hours. You can also warm it in the oven for a few minutes to refresh the crust. How long does this bread last? When stored properly, it can last about three days at room temp. After that, it may get stale. Signs of staleness include a hard crust and dry texture. If the bread smells off or shows mold, it’s time to toss it. Enjoy your Savory Herb Crusty Bread fresh for the best taste! For the full recipe, check the main section. To make Savory Herb Crusty Bread, follow these steps: 1. Gather your ingredients: flour, salt, sugar, yeast, water, olive oil, and herbs. 2. Mix the dry ingredients in a large bowl. 3. Create a well in the mix, then add warm water and olive oil. 4. Stir until a dough forms. 5. Knead the dough on a floured surface for about 10 minutes. 6. Place the dough in a greased bowl and let it rise for 1 to 1.5 hours. 7. Once it doubles in size, punch it down and shape it. 8. Let it rise again for 30-45 minutes. 9. Preheat the oven to 450°F. 10. Bake for 25-30 minutes until golden brown and hollow when tapped. This process leads to a crusty, herb-filled delight. For more details, check the Full Recipe. Yes, you can use active dry yeast. Just follow these guidelines: - Use the same amount as instant yeast. - Activate the active dry yeast first. Dissolve it in warm water with sugar. Let it sit until bubbly. - Then, mix the activated yeast with your dry ingredients. This method works well and gives great results. There are several factors that can affect your crust texture: - Oven Temperature: Make sure your oven is hot enough. Preheat it well. - Steam: Adding steam helps create a crispy crust. Place a dish of water in the oven while baking. - Baking Time: Underbaking can lead to a softer crust. Ensure it is golden brown and sounds hollow when tapped. Adjust these factors to achieve that perfect crust. Savory herb crusty bread pairs well with many dips and spreads: - Herbed Olive Oil: Mix olive oil with fresh herbs for dipping. - Hummus: Creamy and flavorful, hummus complements the bread nicely. - Cheese Spreads: Soft cheeses like goat cheese or cream cheese work great. - Soups: Serve with your favorite soup for a hearty meal. These options enhance your bread experience! In this post, we covered how to make delicious savory herb crusty bread. Start with the right ingredients and follow each step carefully. I shared tips for perfecting your crust and enhancing flavor. Remember to try different variations that suit your taste. Store your bread properly for the best freshness. With these tools, you'll enjoy fresh bread right from your oven. Embrace this fun process and share your tasty results!

Savory Herb Crusty Bread Simple and Tasty Recipe

Are you ready to bake a loaf that will wow your family and friends? This Savory Herb Crusty Bread recipe

- 1 can (15 oz) chickpeas, rinsed and drained - 2 tablespoons olive oil - 1 teaspoon smoked paprika - 1 teaspoon cumin - 1/2 teaspoon garlic powder - 1/2 teaspoon chili powder - Salt and pepper to taste - 8 small corn or flour tortillas - 1 cup shredded red cabbage - 1 avocado, sliced - 1/4 cup fresh cilantro, chopped - Lime wedges, for serving For my crispy chickpea tacos, I love using canned chickpeas. They save time and are easy to work with. Rinse them well to remove the canning liquid. This step helps them crisp up better. Olive oil adds flavor and helps the spices stick. Smoked paprika brings a warm, smoky taste to the dish. Cumin adds depth and earthiness. Garlic powder and chili powder give it a nice kick. I always add salt and pepper to enhance all the flavors. For the tortillas, you can choose corn or flour. Both work well. I prefer small tortillas because they are easy to handle. They hold just the right amount of filling. The toppings are where the fun begins! Shredded red cabbage adds crunch and color. Avocado brings creaminess that balances the spices. Fresh cilantro adds brightness and freshness. Don’t forget lime wedges. A squeeze of lime gives the tacos a zesty kick. You can find the full recipe for these delicious tacos in the earlier sections. Enjoy creating your own crispy chickpea tacos! - Preheat the oven to 400°F (200°C). - In a mixing bowl, combine the rinsed chickpeas with 2 tablespoons of olive oil. - Add 1 teaspoon smoked paprika, 1 teaspoon cumin, 1/2 teaspoon garlic powder, and 1/2 teaspoon chili powder. - Season with salt and pepper to taste. - Toss everything well to coat the chickpeas evenly. - Spread the seasoned chickpeas on a baking sheet. - Make sure they are in a single layer for even cooking. - Roast in the oven for 25-30 minutes. - Shake the pan halfway through to help them cook evenly. - While the chickpeas roast, warm the tortillas in a skillet. - Heat them for about 30 seconds on each side. - On each tortilla, layer a handful of shredded red cabbage. - Add a generous spoonful of crispy chickpeas on top. - Finish with sliced avocado and a sprinkle of fresh cilantro. - Serve with lime wedges on the side for extra flavor. For the full recipe, check out the instructions above! - Ensure chickpeas are well-dried before seasoning. Wet chickpeas will not crisp. - Use high-quality olive oil. It adds flavor and helps with crunch. To dry chickpeas, drain them well and pat them with a towel. This simple step can make a big difference. When you use good olive oil, you elevate the taste. I recommend a robust oil for the best results. - Heat in a dry skillet for better texture than a microwave. A skillet gives a nice crisp edge. - Warm tortillas for about 30 seconds on each side. Keep the heat at medium to avoid burning. I find that a hot skillet makes the tortillas flexible and tasty. If you’re in a rush, the microwave works, but the texture won’t be as great. - Pair tacos with salsa or hot sauce. This adds a burst of flavor. - Ideal side dishes include rice or a fresh salad. They balance the meal well. Fresh salsa adds zing to the tacos. A side of rice or salad rounds out the dish. You can find the full recipe to create these delicious tacos and enjoy! {{image_2}} You can swap chickpeas for other legumes like black beans. Black beans give a nice taste and texture. If you want a different texture, try adding quinoa or lentils. Both are packed with protein and add a fun chewiness to your tacos. For a vegetarian or vegan twist, use plant-based toppings. Fresh herbs and spicy salsas can add great flavor. You can also choose gluten-free tortillas for those with dietary needs. These small changes keep the meal tasty and inclusive for everyone. Don’t be afraid to experiment with spices! Adding curry powder or taco seasoning can change the whole dish. You could also add cheese or dairy-free alternatives if you like. This way, you can create a flavor profile that suits your taste buds perfectly. For the full recipe, check out the details in the earlier section. To keep your crispy chickpeas fresh, store them in an airtight container. This helps maintain their crunch. You can place them in the fridge for about 3 to 5 days. If you want to reheat them, use the oven. Preheat it to 350°F (175°C) and bake for 5 to 10 minutes. This method brings back their crispy texture and taste. When it comes to tacos, it’s best to store the components separately. This keeps your tortillas from getting soggy. Use small containers for each ingredient. Store the crispy chickpeas, shredded cabbage, and avocado in different containers. You can keep the assembled tacos in the fridge for a short time, but they taste best fresh. You can freeze the chickpeas, but I don’t recommend freezing assembled tacos. If frozen, the tortillas can become mushy when thawed. Instead, freeze the chickpeas on a baking sheet. Once frozen, transfer them to a freezer-safe bag. They can last up to 3 months. When you want to use them, just reheat in the oven. To make chickpeas crispy, start with well-dried chickpeas. Drain them and pat them dry with a towel. This step is key. Then, mix them with olive oil and spices. Use smoked paprika, cumin, garlic powder, and chili powder for great flavor. Spread the chickpeas in a single layer on a baking sheet. Roast them at 400°F (200°C) for about 25 to 30 minutes. Shake the pan halfway through. This helps them cook evenly. You want them golden and crunchy, not soft. Yes, you can prepare these tacos ahead. Cook the chickpeas and store them in an airtight container. They stay fresh for about three days in the fridge. When you are ready to serve, reheat them in the oven for a few minutes. You can also warm the tortillas in a skillet. Prepare toppings like cabbage, avocado, and cilantro ahead too. Just keep them in separate containers. This way, you can assemble fresh tacos when you are ready to eat. Great toppings can really elevate your tacos. I suggest using shredded red cabbage for crunch. It adds a nice texture. Sliced avocado brings creaminess and healthy fats. Fresh cilantro adds a burst of flavor. You can also try adding hot sauce or salsa for some heat. Lime wedges are a must for that zesty kick. Remember, you can mix and match toppings to suit your taste. Enjoy creating your perfect taco! For the full recipe, check out the details above. Crispy chickpea tacos are simple and fun to make. Start with canned chickpeas and spices. Roast them until golden, then pile them in warm tortillas. Top with cabbage, avocado, and cilantro for freshness. These tacos shine with extra crispy chickpeas and fresh toppings. You can also try different flavors, proteins, or keep leftovers fresh. Enjoy these tasty tacos any night of the week!

Crispy Chickpea Tacos Flavorful and Easy Recipe

Looking for a tasty and simple meal? You’ll love these Crispy Chickpea Tacos! Packed with flavor and crunch, this recipe

To start, you need to preheat your oven. Set it to 400°F (200°C). This heat will cook the chicken just right. Next, mix your marinade. In a medium bowl, whisk together these ingredients: - 1/4 cup honey - 1/4 cup dijon mustard - 2 tablespoons olive oil - 2 cloves garlic, minced - 1 tablespoon apple cider vinegar - 1 teaspoon dried thyme - 1 teaspoon paprika - Salt and pepper to taste Whisk until it blends nicely. This mix is key to your honey mustard chicken thighs. Now, place the chicken thighs in a large baking dish. Make sure the skin side is up. This helps the skin get crispy. Pour the honey mustard mixture over the chicken. Use a spoon to make sure each piece is well coated. This sauce adds flavor and moisture to your chicken. Bake the chicken in the preheated oven. Cook it for 35-40 minutes. The chicken is done when it reaches an internal temperature of 165°F (75°C). You can check this with a meat thermometer. For extra crispiness, broil the chicken for 2-3 minutes at the end. This gives the skin a nice golden color. Now, let the chicken rest for 5 minutes before serving. Garnish with chopped fresh parsley. Serve your honey mustard chicken thighs with pride! You can find the Full Recipe for more details. To get the most flavor into your chicken thighs, start with the marinade. Mix honey, dijon mustard, olive oil, minced garlic, apple cider vinegar, thyme, paprika, salt, and pepper. Let the chicken sit in this mix for at least 30 minutes. This step helps the thighs absorb all those tasty flavors. For the best texture, use bone-in, skin-on chicken thighs. The skin crisps up nicely when baked, while the bone keeps the meat juicy. Bake the chicken at 400°F (200°C) for 35-40 minutes. A meat thermometer should read 165°F (75°C) when they are done. If you want extra crispiness, broil them for a few minutes at the end. Pair your honey mustard chicken thighs with sides that complement their sweet and tangy flavor. Roasted vegetables, like carrots and Brussels sprouts, work well. You can also serve it with a fresh green salad for a crunchy contrast. When it comes to presentation, place the chicken on a large platter. Drizzle the cooking juices over the top for a shiny finish. Adding fresh parsley as a garnish makes it look even better. This dish is perfect for gatherings and will impress your guests. For the full recipe, refer to the above details. {{image_2}} You can change the flavor of honey mustard chicken thighs by using different types of mustard. Try whole grain mustard for a grainy texture. Yellow mustard adds a tangy twist. Spicy mustard brings a kick that some may love. Adding heat with spices can make this dish exciting. A pinch of cayenne pepper adds warmth without overpowering the honey. You can also mix in some smoked paprika for a deeper flavor. If you want more heat, add red pepper flakes. Just remember to start small and taste as you go. If you need gluten-free options, use gluten-free mustard and oils. Check labels to ensure they are safe. For a low-carb version, replace honey with a sugar-free sweetener. This keeps the dish tasty without the carbs. To make the dish kid-friendly, reduce the mustard amount. Some kids find it strong. You can also add a dash of ketchup to balance the flavors. Serve with rice or mashed potatoes to make it more appealing. These changes keep everyone happy at the table. For the full recipe, check the recipe section above! After you make your honey mustard chicken thighs, let them cool down. To store, place them in an airtight container. This keeps the chicken fresh and tasty. You can keep it in the fridge for up to four days. When it's time to eat, just reheat it gently. This way, you enjoy the flavors again. If you want to keep the chicken longer, freezing is a great option. You can freeze the cooked chicken thighs. Just ensure they are in a freezer-safe bag or container. They can last for about three months in the freezer. When you want to eat them, take the chicken out and thaw it in the fridge overnight. To reheat, place the chicken in a baking dish. Cover it with foil to keep it moist. Bake it at 350°F (175°C) until heated through. This method helps keep the chicken juicy and flavorful. For a quick meal, you can also reheat it in the microwave. Just make sure to check the internal temperature is safe at 165°F (75°C). For a complete guide on making this dish, check out the Full Recipe! How to know when chicken is done cooking? You can check if the chicken is done by using a food thermometer. The thickest part of the thigh should reach 165°F (75°C). If you don’t have a thermometer, cut into the chicken. The juice should run clear, not pink. Don’t guess; always check to be safe! Can I use boneless chicken thighs? Yes, you can use boneless chicken thighs. They will cook faster than bone-in thighs. Adjust the cooking time to about 25-30 minutes. Make sure to check the internal temperature to ensure they are fully cooked. Can I marinate the chicken overnight? Yes, marinating the chicken overnight is a great idea! It allows the flavors to soak in deeply. Just cover the chicken in the honey mustard mix and store it in the fridge. This will give you even tastier results. What to do if I don’t have dijon mustard? If you lack dijon mustard, you can substitute with yellow mustard or whole grain mustard. The flavor will change slightly, but it will still be delicious. You can also mix honey with a bit of vinegar to mimic the tangy taste. For the complete recipe, check out the Full Recipe! This blog post covered essential ingredients and how to make delicious honey mustard chicken thighs. We discussed important steps for preparation, cooking, and final tips to enhance your dish. I shared ingredient swaps and helpful cooking tricks to ensure tasty results. Remember, you can adjust flavors and make it fit dietary needs. Whether refrigerating or freezing leftovers, proper storage is key. Follow these guidelines, and you'll impress everyone with your cooking skills. Enjoy your meal!

Honey Mustard Chicken Thighs Juicy and Flavorful Dish

Looking to impress your family with a simple yet delicious dish? Let me introduce you to Honey Mustard Chicken Thighs!

To make Garlic Butter Shrimp and Rice, you need a few key ingredients. Here’s what you will need: - 1 pound large shrimp, peeled and deveined - 4 tablespoons unsalted butter - 4 cloves garlic, minced - 1 cup long-grain white rice - 2 cups chicken or vegetable broth - 1 teaspoon dried oregano - 1 teaspoon paprika - 1 lemon, zested and juiced - 2 tablespoons fresh parsley, chopped - Salt and pepper to taste These ingredients give the dish its rich flavor and texture. Fresh shrimp taste the best, so choose the best quality you can find. Herbs and spices play a big role in making this dish special. Dried oregano adds a warm, earthy flavor. Paprika gives a slight smokiness and a nice color. Fresh parsley brightens everything up. The lemon juice adds zing and freshness. It cuts through the richness of the butter. Together, these flavors create a balance that makes each bite delightful. You can add some fun garnishes to make your dish even better. Here are a few ideas: - Lemon wedges for extra brightness - Additional parsley for color and flavor - A sprinkle of red pepper flakes for heat These last touches make your Garlic Butter Shrimp and Rice look and taste even more amazing. For the full recipe, follow the steps outlined in the previous sections. To start, we need to cook the rice. In a medium saucepan, combine 1 cup of long-grain white rice and 2 cups of chicken or vegetable broth. Bring it to a boil over high heat. Once it boils, lower the heat to low. Cover the pot and let it simmer for 15 to 18 minutes. The rice will absorb the broth and become tender. After the rice is cooked, fluff it with a fork. Mix in half of the fresh parsley, 1 teaspoon of dried oregano, and the zest of 1 lemon. Add salt and pepper to taste. This creates a bright, herb-infused rice that pairs well with the shrimp. While the rice cooks, let’s prepare the shrimp. Pat 1 pound of large shrimp dry with paper towels. Season them lightly with salt, pepper, and 1 teaspoon of paprika. This will add a nice flavor to the shrimp. Next, melt 4 tablespoons of unsalted butter in a large skillet over medium heat. Add 4 cloves of minced garlic to the butter. Sauté it for 1 to 2 minutes until it becomes fragrant. Be careful not to burn the garlic. Now, it's time to cook the shrimp. Add the seasoned shrimp to the skillet. Cook them for about 2 to 3 minutes on one side until they turn pink. Then flip them over and cook for another 2 minutes until they are fully cooked. Squeeze the juice of 1 lemon over the shrimp. Stir to coat them well in the garlic butter sauce. Let them cook for an additional minute to take in that lemon flavor. Now, it's time to serve this dish. Spoon the herb-infused rice onto plates. Top the rice with the garlic butter shrimp. Drizzle any remaining sauce from the skillet over the shrimp and rice. For a lovely touch, sprinkle the remaining fresh parsley on top. You can also serve with lemon wedges on the side. This adds a bright burst of flavor when squeezed over the dish. Enjoy your Garlic Butter Shrimp and Rice for a savory delight! For the full recipe, check out the complete instructions above. To get the best shrimp, start with fresh, large shrimp. Peel and devein them first. Pat them dry with paper towels. This step helps the shrimp sear nicely. Season them with salt, pepper, and paprika. When cooking, use medium heat. This keeps them juicy and tender. Cook them for about 2-3 minutes on one side. Flip them and cook for another 2 minutes. Their color changes to pink when done. Take care not to overcook them. Overcooked shrimp turn rubbery and tough. For this dish, you need some basic tools. A medium saucepan is great for cooking rice. A large skillet works best for the shrimp. A good quality spatula helps flip the shrimp gently. Use measuring cups and spoons for accuracy. Don't forget a cutting board and sharp knife for prep. A zester or grater is useful for lemon zest. Having these tools ready makes cooking easier. To add more flavor to your shrimp, use fresh herbs. Fresh parsley brightens the dish. Lemon zest adds a nice punch, while lemon juice brings acidity. If you want more heat, try some red pepper flakes. For a different taste, add a splash of white wine to the butter. Adjust the salt and pepper to your liking. These tiny tweaks can turn this recipe into a personal favorite. For a complete guide, check the Full Recipe for more tips. {{image_2}} If you want to mix things up, try using scallops or lobster instead of shrimp. Both options add a sweet, rich flavor. You can also use fish like salmon or tilapia. Just keep in mind that cooking times may vary. For scallops, cook them for about 2-3 minutes per side. For lobster, you can chop it into bite-sized pieces and cook it just like the shrimp. Each choice brings a new taste and texture to the dish. You can make a tasty vegetarian version by swapping shrimp for mushrooms or tofu. Both options soak up flavors well. For mushrooms, use large portobello or cremini, sliced thick. Sauté them in the garlic butter until golden. If you choose tofu, use firm tofu to keep its shape. Press it to remove excess water and then cube it before cooking. These swaps keep the dish rich and satisfying without meat. Do you love bold flavors? Add spices to change the taste of the dish. For a spicy kick, toss in red pepper flakes or cayenne pepper. You can also try adding curry powder or cumin for a warm, earthy flavor. If you love herbs, add fresh basil or cilantro to enhance freshness. Experimenting with spices can turn a simple meal into a flavor adventure! You can find the complete recipe for Garlic Butter Shrimp and Rice [here](Full Recipe). To keep leftover garlic butter shrimp and rice fresh, let it cool first. Place it in an airtight container. This helps keep flavors in and air out. Store it in the fridge for up to three days. To reheat your dish, use a skillet over low heat. Add a splash of broth or water to keep it moist. Stir gently until it is hot. You can also use a microwave. Heat it in short bursts, stirring in between. This way, it warms evenly and stays tasty. If you want to save it for later, freezing is a great option. Portion the shrimp and rice into freezer-safe bags. Remove as much air as you can before sealing. You can freeze it for up to three months. When ready to eat, thaw it overnight in the fridge. Then, reheat as mentioned above. Enjoy the flavor of garlic butter shrimp anytime! For the full recipe, check out the section above. To keep shrimp tender, avoid overcooking them. Cook shrimp just until they turn pink. This usually takes about 2-3 minutes per side. You can also try brining shrimp in salt water for 15-30 minutes before cooking. This helps them stay juicy and flavorful. Yes, you can use brown rice! However, brown rice takes longer to cook. Adjust the broth and cooking time accordingly. Brown rice usually needs about 40-45 minutes. It will add a nice, nutty flavor to your dish. You can keep leftovers in the fridge for up to 3 days. Store them in an airtight container. Reheat them slowly to preserve the flavors and texture. Enjoy your garlic butter shrimp and rice later with ease! For the complete recipe, check out the Full Recipe. In this blog post, I shared key ingredients for garlic butter shrimp, enhancing flavors with herbs and spices. I provided easy steps for herb-infused rice and cooking shrimp. You learned tips for perfect shrimp cooking and tools that help. I explored variations with seafood, vegetarian options, and different flavors. Finally, I added storage tips and answered common questions. Use these ideas to create a delicious meal. Enjoy your cooking and make it your own!

Garlic Butter Shrimp and Rice Savory Delight Recipe

Craving a meal that’s both quick and packed with flavor? Garlic Butter Shrimp and Rice is your answer! This dish

To make the Thai Peanut Noodle Salad, you need these main items: - 8 ounces rice noodles - 1 cup shredded carrots - 1 red bell pepper, thinly sliced - 1 cucumber, julienned - 2 green onions, chopped - 1 cup red cabbage, finely shredded - 1/2 cup cilantro leaves, chopped - 1/2 cup roasted unsalted peanuts, roughly chopped Each of these ingredients brings unique benefits to your salad: - Rice noodles are gluten-free and easy to digest. - Carrots add crunch and are rich in vitamins A and C. - Red bell pepper provides sweetness and is high in antioxidants. - Cucumber gives a refreshing taste and hydrates your body. - Green onions add a mild onion flavor and aid digestion. - Red cabbage is packed with fiber and supports gut health. - Cilantro enhances flavor and has anti-inflammatory properties. - Peanuts add protein and healthy fats, making the salad filling. For the creamy peanut dressing, gather these essential components: - 1/4 cup creamy peanut butter - 3 tablespoons soy sauce - 2 tablespoons lime juice - 2 tablespoons honey or maple syrup - 1 teaspoon sesame oil - 1 teaspoon grated fresh ginger - 1 tablespoon water (more if needed for consistency) - Optional: Red pepper flakes for heat If you need substitutions, here are some ideas: - Use almond butter instead of peanut butter for a nut-free option. - Swap soy sauce with tamari to make it gluten-free. - Maple syrup can replace honey for a vegan choice. - For a spicier kick, try adding more red pepper flakes or sriracha. These ingredients create a rich, savory dressing that pairs perfectly with the salad. You can find the full recipe to make this vibrant dish and enjoy the delightful mix of flavors. To cook the rice noodles, start by boiling water in a large pot. Once boiling, add the noodles. Cook them for about 4-6 minutes or until soft. Drain the noodles in a colander. Rinse them under cold water. This stops the cooking and cools them down fast. Cooling helps keep the noodles from sticking together. For the peanut dressing, grab a medium bowl. Add creamy peanut butter, soy sauce, lime juice, honey or maple syrup, sesame oil, and grated ginger. Whisk these together until smooth. If the mixture is too thick, add a little water. You can adjust the taste with red pepper flakes for some heat. This dressing is key for flavor! In a large mixing bowl, combine the cooled noodles, shredded carrots, red bell pepper, cucumber, green onions, red cabbage, and cilantro. Mix these gently. It is important to coat everything evenly with the dressing. This way, each bite is full of flavor. For serving, use a large, shallow bowl. Pile the salad high for a nice look. Garnish with extra cilantro and a few whole peanuts on top. This makes it more appealing. Chill the salad for at least 15 minutes if you have time. Serve it cold or at room temperature. You can enjoy this salad at picnics, parties, or as a refreshing meal. Check out the Full Recipe for more details! - Prep Ahead: You can make the salad a few hours before serving. Chop the veggies and store them in the fridge. - Cook Noodles Early: Prepare the rice noodles in advance. Cool and store them for later use. - Store-Bought Help: If you're in a rush, grab pre-cut vegetables from the store. It saves time and still tastes fresh. - Spice It Up: Add red pepper flakes for heat. You can also use Sriracha for a bolder taste. - Extra Crunch: Toss in some chopped peanuts or sesame seeds for added texture. - Garnishes: Fresh cilantro and lime wedges make your dish pop. They add color and flavor to each bite. These tips will help you make the most of your Thai peanut noodle salad. For the full recipe, don’t forget to check the details! {{image_2}} You can easily add protein to your Thai Peanut Noodle Salad. Chicken, shrimp, or tofu all work great. If you choose chicken, grill or sauté it first. For shrimp, simply boil or sauté until pink. Tofu is best when cubed and pan-fried until golden brown. The protein you pick can change the salad's flavor. For chicken, add a dash of garlic powder. With shrimp, a sprinkle of lime zest brightens the taste. If you use tofu, try marinating it in soy sauce for a savory kick. Making this salad vegan-friendly is simple. Just skip the honey and use maple syrup instead. Swap out the peanut butter for almond or sunflower seed butter if needed. You can also replace soy sauce with tamari to make it gluten-free. Even with these swaps, the flavor stays rich and bold. Use fresh herbs like basil or mint for a fragrant touch. These small changes keep the salad tasty, while sticking to your dietary needs. Using seasonal vegetables can make your salad even more exciting. In spring, add snap peas or asparagus. In summer, try fresh corn or zucchini. In fall, roasted butternut squash adds warmth. Winter veggies like kale or Brussels sprouts also work well. Adjust the dressing based on what's fresh. If you have fresh herbs, blend them into the peanut dressing. This adds a new layer of flavor. Feel free to experiment and make this salad your own! For the complete recipe, check out the Full Recipe. To keep your Thai Peanut Noodle Salad fresh, follow these steps: - Cool Down: Let the salad cool completely before storing. - Use Airtight Containers: Store the salad in airtight containers. This helps keep it fresh longer. - Refrigeration: Always store your salad in the fridge. It stays good for up to 3 days. - Separate Components: If possible, store the dressing separately. This prevents the noodles from getting soggy. These practices help maintain flavor and texture. Freshness is key for a tasty salad. When it comes to reheating this salad, noodles can be tricky. Here are some helpful tips: - Microwave: If you want warm noodles, place them in a microwave-safe bowl. Add a splash of water. Heat in short bursts, stirring often until warm. - Stovetop: You can also reheat on the stovetop. Add a little water to a pan. Heat gently over low heat while stirring. - Serving Cold: If you prefer, serve the salad cold. It tastes great straight from the fridge. Leftovers are still delicious. Enjoy your meal however you like! You can store Thai Peanut Noodle Salad in the fridge for about three days. Keep it in an airtight container. The freshness can change based on the ingredients. If you add a lot of veggies, they may get soggy. It’s best to eat it fresh for the best taste. Yes, you can make this salad ahead of time! Prepare the salad and dressing separately. Store each in airtight containers in the fridge. Combine them right before serving. This keeps the noodles and veggies crisp. If you're allergic to peanuts, try almond butter or sunflower seed butter. These options give a nice taste but differ from peanut butter. Almond butter is creamier, while sunflower seed butter has a unique flavor. Experiment to find what you like best! Yes, the salad can be gluten-free if you choose the right ingredients. Use gluten-free soy sauce or tamari for the dressing. For noodles, rice noodles work great! Always check labels to avoid hidden gluten. Thai Peanut Noodle Salad is a vibrant dish full of flavors, textures, and healthy ingredients. We explored key components, from the noodles to the flavorful peanut dressing. I shared tips on preparation, serving, and storing your salad. You can customize flavors with proteins or adjust for dietary needs. This salad is easy to make ahead and great for any occasion. Enjoy experimenting with variations to match your tastes. With these techniques, you’ll serve a dish that impresses every time.

Thai Peanut Noodle Salad Fresh and Flavorful Dish

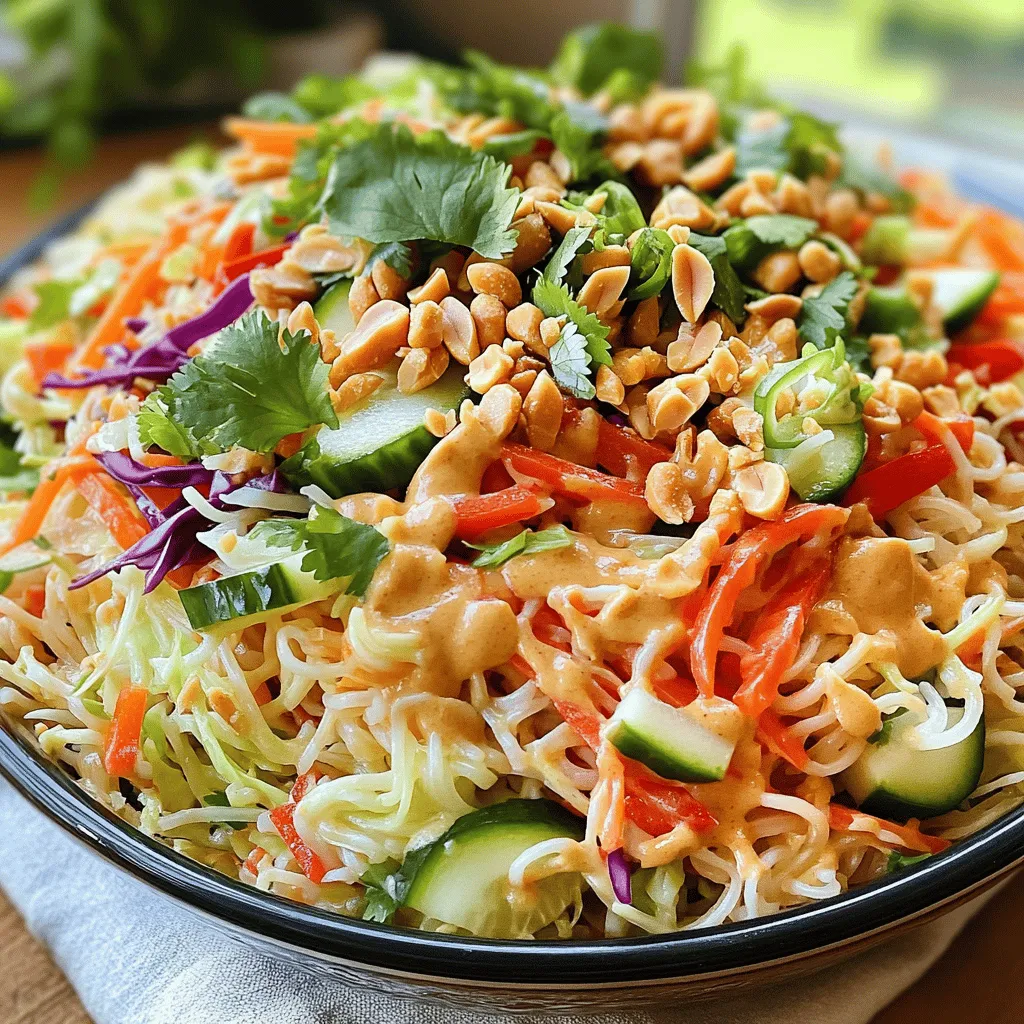
Craving a dish that bursts with flavor and freshness? Thai Peanut Noodle Salad delivers just that! Packed with vibrant veggies,

- Chicken Breasts: You need 4 boneless, skinless chicken breasts. They are great for grilling. They cook evenly and stay juicy. - Marinade Components: - 1/4 cup olive oil - 3 tablespoons fresh lime juice - 2 tablespoons chili powder - 1 tablespoon garlic powder - 1 teaspoon onion powder - 1 teaspoon smoked paprika - 1 teaspoon cumin - 1 teaspoon salt - 1/2 teaspoon black pepper - Zest of 1 lime These ingredients mix well to give a zesty flavor. The lime juice adds freshness. The chili powder brings heat, while the spices create depth. - Garnish and Sides: - Fresh cilantro, chopped (for garnish) - Lime wedges (for serving) Cilantro adds a pop of color and flavor. Lime wedges give a zesty kick when served. This recipe is easy and fun. You can find the full recipe above for more details. To make the marinade, gather all your ingredients. In a medium bowl, add the olive oil, lime juice, chili powder, garlic powder, onion powder, smoked paprika, cumin, salt, black pepper, and lime zest. Mix everything together well. Use a whisk to combine the ingredients thoroughly. This helps blend the flavors and ensures an even taste. Now, let’s marinate the chicken. Place the chicken breasts in a shallow dish or a resealable plastic bag. Pour the marinade over the chicken. Make sure every piece is well coated. Seal the bag or cover the dish. For the best flavor, refrigerate for at least 1 hour. If you have more time, marinate for up to 4 hours. This longer time helps the chicken absorb the flavors better. Next, it’s time to grill. Preheat your grill to medium-high heat, around 450°F (230°C). If you are using a grill pan, heat it over medium-high heat on your stovetop. When the grill is ready, take the chicken out of the marinade. Let any excess marinade drip off. Place the chicken on the grill and cook for about 6-7 minutes on each side. Check the internal temperature; it should reach 165°F (75°C). You’ll know it’s done when you see nice grill marks. After grilling, let the chicken rest for 5 minutes. This step is key. Resting helps the juices stay inside the chicken, making it juicy and tender. Enjoy your delicious chili lime grilled chicken as part of the full recipe! Achieving Attractive Grill Marks To get those perfect grill marks, preheat your grill well. A hot grill sears the chicken quickly. Place the chicken on the grill and don’t move it for about 6-7 minutes. This helps create those nice lines. After that, flip the chicken and repeat. Managing Flare-ups Flare-ups happen when fat drips onto the heat source. To manage them, keep a spray bottle of water nearby. If flames rise, quickly spray them. You can also move the chicken to a cooler spot on the grill until the flames die down. Suggested Seasoning Adjustments If you want more heat, add more chili powder. For a tangy flavor, try more lime juice. You can also mix in herbs like oregano or thyme for a different twist. Adjust these based on your taste. Using Fresh vs. Dried Spices Fresh spices often have a stronger flavor. If you have fresh cilantro, use it! Fresh lime juice also brightens the dish. Dried spices work well too, but use them in larger amounts since they are less potent. Plating Suggestions for Serving Slice the grilled chicken after resting. Arrange it on a colorful plate. Add lime wedges and sprinkle with cilantro. This makes the dish look fresh and inviting. Garnishing with Fresh Ingredients Don’t forget to garnish! Fresh herbs like cilantro add color and flavor. You can also add a few lime slices for extra zest. This makes your dish pop on the table. For the complete recipe, check out the Full Recipe. {{image_2}} You can change up the protein in this recipe. Try using turkey breasts instead of chicken. Turkey gives a nice flavor and is just as easy to cook. You can also use tofu for a vegetarian option. Tofu soaks up the marinade well, making it tasty and satisfying. Adjusting the spice level is easy too. If you like it hot, add more chili powder or some cayenne. For milder flavors, reduce the chili powder or skip it altogether. Everyone’s taste is different, so feel free to play around! Pair your chili lime grilled chicken with fresh sides. A crisp salad works great to balance the flavors. You can also serve it with rice, which soaks up the juices. Try adding some avocado slices for creaminess. For sauces and dips, consider a tangy salsa or creamy ranch dressing. A dollop of guacamole adds a fun twist. These sides make the meal colorful and exciting. If you can’t grill, don’t worry! You can bake the chicken in the oven. Preheat your oven to 400°F (200°C). Place the marinated chicken on a baking sheet. Bake for 25 to 30 minutes, or until it reaches 165°F (75°C). Using the stovetop is another option. Heat a skillet over medium-high heat. Cook the marinated chicken for about 6-7 minutes on each side. It will still be juicy and full of flavor. For the full recipe, check out the details above. Enjoy all these variations and make this dish your own! When you have leftover chili lime grilled chicken, store it in an airtight container. This keeps the chicken fresh and safe. The best practice is to cool the chicken first. Then, place it in the fridge. For optimal taste, eat it within three to four days. To reheat your grilled chicken, use the oven or stovetop. The oven method is best. Preheat it to 350°F (175°C). Place the chicken on a baking sheet and cover it with foil. Heat for about 15-20 minutes until warm. The stovetop is quick too. Heat a skillet over medium heat. Add a splash of water to keep it moist. Cook for about 5 minutes on each side. This helps to maintain flavor and texture. If you want to save your chicken longer, freezing is a good option. Wrap each piece in plastic wrap, then place it in a freezer bag. Make sure to squeeze out the air. Properly stored, it can last for up to three months. When you're ready to eat, thaw the chicken in the fridge overnight. This keeps the chicken juicy and tasty. For the best chili lime flavor, marinate the chicken for at least 1 hour. This time allows the marinade to soak into the chicken. If you can wait, marinate for up to 4 hours. Longer marination deepens the flavor. Yes, you can use frozen chicken. However, it’s best to thaw it first. Thaw the chicken overnight in the fridge. If you cook it from frozen, adjust the cooking time. It may take a few extra minutes to cook through. Chili lime grilled chicken pairs well with many sides. Here are some great options: - Grilled vegetables: Such as bell peppers, zucchini, and corn. - Rice: Try cilantro lime rice for a fresh touch. - Salad: A simple green salad with lime vinaigrette works well. - Tortillas: Serve with warm tortillas for tasty wraps. To ensure your grilled chicken is done, check the internal temperature. It should reach 165°F (75°C). You can also check for clear juices when you cut into the chicken. If the juices run clear, it’s ready to eat. Look for nice grill marks, too; they show that the chicken is cooking well. In this article, we covered how to make chili lime grilled chicken from start to finish. We explored essential ingredients like chicken breasts and spices, and learned how to prepare the marinade for maximum flavor. I shared grilling tips and tricks for perfecting your technique and offered alternatives for variations and storage. Mastering this dish will impress your family and friends. Enjoy the process and taste the delicious results!

Chili Lime Grilled Chicken Flavorful and Easy Recipe

Ready to spice up your dinner? This Chili Lime Grilled Chicken recipe is both flavorful and easy to make. With

To make a tasty vegetable curry, you need some key items. Here is the list: - 1 tablespoon coconut oil - 1 onion, diced - 3 cloves garlic, minced - 1 tablespoon fresh ginger, grated - 1 tablespoon curry powder - 1 teaspoon turmeric - 1 teaspoon cumin - 1 can (14 oz) coconut milk - 1 cup vegetable broth - 2 cups mixed vegetables (carrots, bell peppers, and peas) - 1 can chickpeas, drained and rinsed - 1 tablespoon soy sauce - 2 cups spinach leaves - Salt and pepper to taste - Fresh cilantro for garnish These ingredients work together to create a rich and creamy dish. The coconut milk adds a smooth texture, while spices bring warmth and depth. You can make this curry your own! Here are some fun options: - Add diced potatoes for more heartiness. - Use sweet potatoes for a sweeter taste. - Swap chickpeas with lentils for a different protein. - Include any veggies you have, like zucchini or broccoli. - For a spicy kick, add diced jalapeños or red pepper flakes. Feel free to experiment and find what you like best. Serving your vegetable curry well makes it even more enjoyable. Here are some ideas: - Serve it over fluffy basmati rice for a filling meal. - Pair it with warm naan or pita bread to soak up the sauce. - Add a side salad for some crunch and freshness. - Top with yogurt or a dairy-free alternative for creaminess. - Sprinkle fresh cilantro on top for an extra pop of flavor. These serving suggestions enhance the curry’s taste and make it a feast for the eyes! For the complete recipe, check out the Full Recipe section. First, gather all your ingredients. You will need: - 1 tablespoon coconut oil - 1 onion, diced - 3 cloves garlic, minced - 1 tablespoon fresh ginger, grated - 1 tablespoon curry powder - 1 teaspoon turmeric - 1 teaspoon cumin - 1 can (14 oz) coconut milk - 1 cup vegetable broth - 2 cups mixed vegetables (carrots, bell peppers, and peas) - 1 can chickpeas, drained and rinsed - 1 tablespoon soy sauce - 2 cups spinach leaves - Salt and pepper to taste - Fresh cilantro for garnish Chop the onion, garlic, ginger, and vegetables. This step helps them cook evenly. In a large pot, heat the coconut oil over medium heat. Add the diced onion and cook for about 5 minutes. The onion should look clear. Then, stir in the minced garlic and grated ginger. Cook these for about 1-2 minutes until you smell that great aroma. Next, add the spices: curry powder, turmeric, and cumin. Mix them in for about a minute. Now, pour in the coconut milk and vegetable broth. Bring this mixture to a gentle simmer. Time to add the mixed vegetables and chickpeas. Cook for 10-15 minutes. The veggies should be tender but still bright. Stir in the soy sauce and spinach, cooking for another 2 minutes. The spinach should wilt nicely. Once everything is cooked, taste it. Add salt and pepper if needed. Let the curry sit for a few minutes. This resting time helps the flavors blend. Serve the curry over fluffy basmati rice. Don’t forget to add fresh cilantro on top for color and taste. And there you have it: a vibrant vegetable curry ready to enjoy! For the full recipe, see the details above. To boost flavor in your vegetable curry, use fresh herbs and spices. Fresh garlic and ginger add a bright taste. Sauté them early to release their oils. Always toast your spices for a minute before adding liquids. This step brings out their rich flavors. Don’t rush the simmering time. Letting it bubble gently helps the ingredients meld together. Avoid using too much water when cooking. It can dilute your curry's flavor. Make sure to chop your vegetables evenly. Uneven sizes cook at different rates. Don’t skip the salt! It enhances all the flavors. Also, remember to taste as you cook. Adjusting flavors throughout the process is key. Start with a small amount of curry powder. You can always add more later. If it's too spicy, stir in a bit of coconut milk. This will cool down the heat. Adding sugar can also balance spice. Don't forget about the garnish! Fresh cilantro adds a fresh taste and can mellow spices too. For a full recipe, check out the vibrant vegetable curry section! {{image_2}} To make your vegetable curry heartier, add protein. You can use chickpeas or tofu. Both options give your dish a nice texture. For meat lovers, chicken or shrimp works well too. Cook the protein separately and mix it in. This adds flavor and makes the meal more filling. Use seasonal vegetables to keep your curry fresh. In spring, try asparagus and green beans. Summer is perfect for zucchini and corn. In fall, pumpkin and squash bring warmth. Winter calls for root veggies like potatoes and turnips. You can mix and match to suit your taste and what's in season. Many curries use cream, but you can keep it dairy-free. Coconut milk is a great substitute. It adds creaminess and flavor. For a nutty taste, try almond milk or cashew cream. These options make the dish vegan-friendly. You can enjoy a rich curry without any animal products. For the full recipe, check the link. After enjoying your vibrant vegetable curry, let it cool first. Place the curry in an airtight container. You can store it in the fridge for up to five days. Make sure to label the container with the date. This helps you keep track of how fresh it is. When you are ready to enjoy the leftovers, you can reheat them easily. Pour the curry into a pot. Heat it on medium-low, stirring often. This helps it warm evenly. You can also use a microwave. Place the curry in a microwave-safe bowl and cover it. Heat in 30-second bursts, stirring in between, until hot. If you want to save your curry for later, freezing is a great option. Let the curry cool completely. Then, transfer it to a freezer-safe container. Leave some space at the top for expansion. You can freeze it for up to three months. When you are ready to eat, thaw it in the fridge overnight. Reheat it as described above. Enjoy your meal any time! It takes about 30 minutes to make Easy Vegetable Curry. You spend 10 minutes prepping the ingredients and 20 minutes cooking. This quick time makes it a great choice for busy nights. Yes, you can use frozen vegetables. They save time and keep well. Just add them in the same way as fresh ones. The cooking time may be a bit shorter since frozen veggies are often pre-cooked. You can serve vegetable curry with rice or naan bread. Both options soak up the sauce well. You might also try it with quinoa for a different twist. Fresh cilantro on top adds a nice touch. To make Easy Vegetable Curry gluten-free, use gluten-free soy sauce. Many brands offer this option. Always check labels to ensure they meet gluten-free standards. The rest of the ingredients are already gluten-free, making this dish easy to adapt. For the full recipe, check out the detailed steps above. In this post, we explored how to make Easy Vegetable Curry. We covered essential ingredients, preparation steps, and cooking tips to maximize flavor. You learned about tasty add-ins, ways to adjust spice levels, and how to serve this dish. Finally, remember to store leftovers properly and consider variations to fit your needs. With practice, you will create a curry that delights everyone at the table. Enjoy your cooking!

Easy Vegetable Curry Flavorful and Simple Recipe

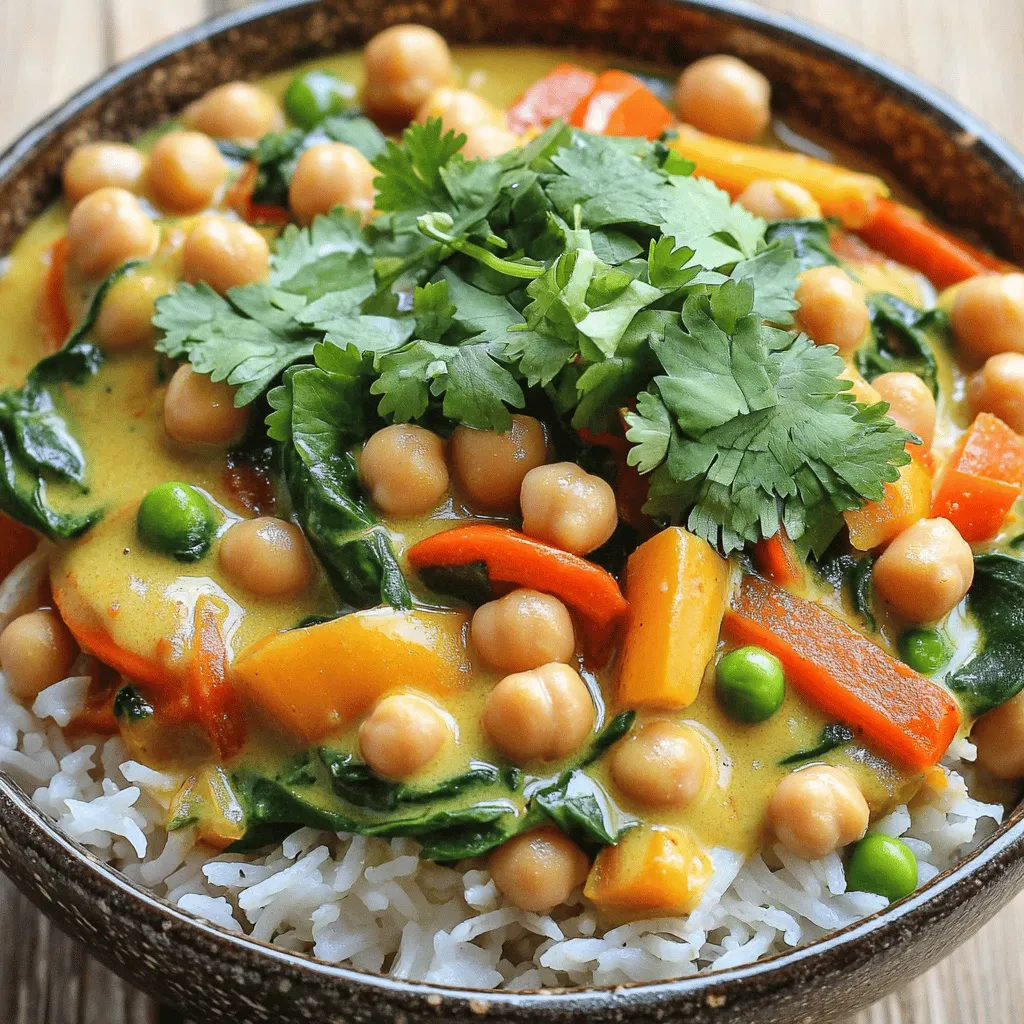
If you crave a dish that’s both tasty and simple, you’re in the right place. My Easy Vegetable Curry is

The right ingredients make creamy avocado pasta a special dish. Here’s what you need: - Ripe avocados - Garlic - Fresh basil leaves - Parmesan cheese or nutritional yeast - Lemon juice - Olive oil - Salt and pepper - Spaghetti or your preferred pasta - Garnishes (cherry tomatoes, crushed red pepper flakes) Using ripe avocados is key. They should feel soft but not mushy. Garlic adds a nice zing, while fresh basil gives the dish a fragrant lift. You can choose Parmesan for a rich taste or nutritional yeast for a vegan option. Lemon juice keeps the sauce bright and fresh. Olive oil adds creaminess and helps blend the sauce smoothly. Salt and pepper enhance every bite. You can pick any pasta you like, but spaghetti works well. For garnishes, cherry tomatoes bring a pop of color. Crushed red pepper flakes add a spicy kick. This combination of flavors makes every plate of creamy avocado pasta fresh and enjoyable. For the full recipe, you can refer to the earlier mentioned section. To start, boil a big pot of salted water. Salt helps flavor the pasta. Once the water is boiling, add 12 oz of spaghetti or your favorite pasta. Cook it until it is al dente, which usually takes about 8 to 10 minutes. This means it should be firm but not hard. Remember to check the package for exact times. After cooking, reserve 1 cup of that pasta water before draining it. Set the drained pasta aside to cool slightly. Now, let’s make the creamy avocado sauce. Use a food processor for the best results. In it, combine 2 ripe avocados, 2 cloves of minced garlic, 1/4 cup of fresh basil leaves, 1/4 cup of grated Parmesan cheese, 2 tablespoons of lemon juice, and 1/4 cup of olive oil. Blend these ingredients until the mixture becomes smooth and creamy. If the sauce seems too thick, add a splash of the reserved pasta water. This helps reach the right consistency for pouring. Next, it’s time to combine everything. In a large mixing bowl, toss the cooked pasta with the avocado sauce. Make sure the pasta is well coated. Then, add salt and pepper to taste. It’s important to mix everything thoroughly. If the sauce is still too thick, you can adjust it with a bit more reserved pasta water. This will help create a lovely creamy texture. Now, let’s serve this delicious dish. Plate the creamy avocado pasta into bowls. For a pop of color, garnish each bowl with halved cherry tomatoes. If you want a bit of spice, sprinkle some crushed red pepper flakes on top. For a final touch, drizzle a little olive oil over the dish and add a few whole basil leaves. This not only enhances flavor but also adds beauty to your meal. Enjoy your creamy avocado pasta! When picking avocados, look for a few signs. A ripe avocado feels slightly soft when you gently squeeze it. The color should be dark green to almost black. If it has any large dark spots, avoid it. Select avocados that feel heavy for their size. To make sure you have the best avocados, check the stem area. If it comes off easily and is green underneath, the avocado is ripe. If it is brown, the avocado may be overripe. To make your creamy avocado pasta even better, add some herbs and spices. Fresh herbs like parsley or cilantro can give it a fresh twist. You might also consider adding a bit of garlic powder or onion powder for depth. For cheese, try alternatives like feta or goat cheese. They add a nice tangy flavor. Nutritional yeast is a great vegan option that gives a cheesy taste without dairy. You can easily change the serving size of this dish. If you need more servings, just double the ingredients. For fewer servings, cut the recipe in half. If you have leftovers, store them in an airtight container. Keep the pasta and sauce separate to maintain freshness. The avocado sauce may brown, but a splash of lemon juice can help keep it bright. {{image_2}} To make this creamy avocado pasta vegan, you can swap the cheese. Instead of Parmesan, use nutritional yeast. It gives a cheesy taste while keeping it plant-based. You can also add plant-based protein. Chickpeas or lentils work great. They add texture and make the dish more filling. If you need a gluten-free meal, choose alternative pasta. Options like chickpea or brown rice pasta are excellent. They cook well and taste great. Follow the package instructions for cooking times. Be careful not to overcook the pasta, as gluten-free varieties can become mushy. Using seasonal vegetables can elevate your dish. In summer, add fresh zucchini or bell peppers. In fall, consider roasted butternut squash or spinach. These veggies add color and flavor. For garnishing, use fresh herbs like parsley or chives. They bring freshness to each bite and make your dish look appealing. After enjoying your creamy avocado pasta, store any leftovers in the fridge. Place the pasta in an airtight container. This helps keep it fresh for up to three days. To prevent browning, cover the surface with plastic wrap. This keeps air away from the avocado sauce. If you want to enjoy your pasta warm later, reheat it gently. Use a pan on low heat and add a splash of olive oil or reserved pasta water. This will help revive its creamy texture. For longer storage, you can freeze the avocado sauce. Start by placing the sauce in a freezer-safe bag. Make sure to remove as much air as possible. You can freeze it for up to three months. When you're ready to use it, thaw it in the fridge overnight. To reheat the sauce, warm it in a saucepan over low heat. Stir it often for even heating. If it seems too thick, add a bit of water or olive oil. This will help restore its smooth and creamy texture. For the complete recipe, check out the Full Recipe. Yes, you can make this dish ahead of time. To do this, prepare the avocado sauce first. Store it in an airtight container and cover the top with plastic wrap. This helps prevent browning. Cook the pasta when you're ready to eat. Combine the pasta with the sauce just before serving. This keeps the pasta fresh and the sauce creamy. If your avocados are hard, you can ripen them fast. Place them in a paper bag. Add an apple or banana to the bag. These fruits give off ethylene gas, which speeds up ripening. Close the bag and leave it at room temperature. Check daily until they are soft enough to use. If you're looking for a healthier option, try zucchini noodles or "zoodles." They are low in carbs and high in fiber. Another option is whole grain pasta, which adds more nutrients. For a gluten-free choice, use chickpea pasta or lentil pasta. These options keep the dish tasty while meeting different dietary needs. This blog post showed you how to make a tasty avocado pasta dish. We covered key ingredients, cooking steps, and serving tips. You learned to choose ripe avocados and enhance flavors. Plus, we explored vegan and gluten-free options. No matter your taste, there’s a way to enjoy this dish. Try it out, experiment with flavors, and make it your own. With simple storage tips, you can enjoy leftovers later too. Enjoy your cooking journey!

Creamy Avocado Pasta Fresh and Flavorful Meal

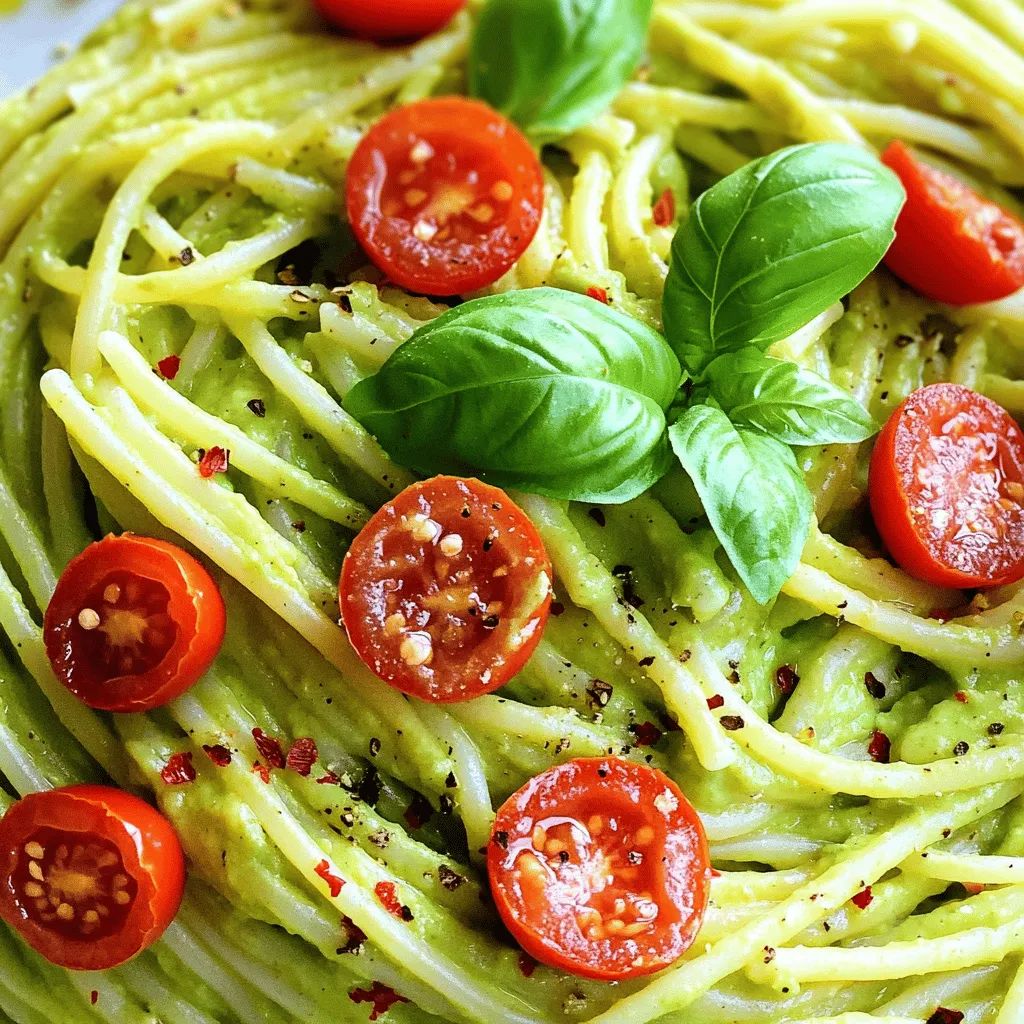
Looking for a fresh meal that’s both creamy and delicious? You’ll love my creamy avocado pasta! This dish brings rich

Older posts
Newer posts
← Previous Page1 … Page51 Page52 Page53 … Page58 Next →

dsad

© 2025 Cooking Wells • Built with GeneratePress

Our Policies

  • Copyright Policy
  • Cookie Policy
  • GDPR Policy
  • Privacy Policy
  • Disclaimer
  • Terms Of Use

More Information

  • Home
  • About
  • Contact
  • Appetizers
  • Dessert
  • Dinner
  • Drinks
©2025, Cooking Wells About Back To Top