Skip to content
DisclaimerTerms Of UseGDPR PolicyCookie Policy

Cooking Wells

  • Home
  • Drinks
  • Appetizers
  • Dinner
  • Dessert
  • About
  • Contact
  • Privacy Policy
DisclaimerTerms Of UseGDPR PolicyCookie Policy

Mia

- Chicken Wings: 2 lbs - Butter: 1/2 cup unsalted, melted - Garlic: 6 cloves, minced - Parmesan Cheese: 1 cup, grated - Fresh Parsley: 2 tablespoons, chopped - Seasonings: garlic powder, onion powder, salt, pepper, red pepper flakes (optional) For my Homemade Garlic Parmesan Wings, I start with fresh chicken wings. You need about 2 pounds. This will give you enough for a group or a good snack. Next, I use unsalted butter. You will need half a cup, melted. The butter adds richness and helps the flavors stick. Garlic is a must! I use six cloves, minced finely. This gives the wings that strong garlic flavor. If you love garlic, feel free to add more! For the cheese, I choose Parmesan. You will want one cup, grated. This adds a salty and nutty taste that pairs well with the garlic. I also like to add fresh parsley. You need about two tablespoons, chopped. This adds color and freshness to the dish. Finally, I mix in some seasonings. Use garlic powder, onion powder, salt, pepper, and red pepper flakes if you like some heat. These simple ingredients enhance the overall flavor of the wings. You can find the full recipe for these wings, which includes detailed steps and tips, to make your cooking experience even better! 1. Preheat Oven: Set your oven to 400°F (200°C). This high heat helps the wings get crispy. 2. Prepare Baking Tray: Line a baking tray with parchment paper. This makes cleanup easy and keeps the wings from sticking. 1. Combine Ingredients: In a large bowl, mix together the melted butter, minced garlic, garlic powder, onion powder, salt, and pepper. If you like heat, add the red pepper flakes. Stir well until combined. 2. Toss Wings: Add the chicken wings to the bowl. Toss them in the garlic mixture until they are well coated. Every wing should have some of that tasty garlic goodness. 1. First Bake: Spread the wings evenly on the prepared baking tray. Bake them for 40-45 minutes, flipping halfway through. This helps them cook evenly and get crispy all around. 2. Sauce Preparation: While the wings bake, mix grated Parmesan cheese and chopped parsley in a small bowl. This will add a fresh flavor and a nice touch when you coat the wings later. Following these steps will give you delicious Homemade Garlic Parmesan Wings. For the full recipe, check out the details above! Ensuring Crispiness: To get that perfect crunch, follow these steps: - Use a baking tray lined with parchment paper. This helps with easy cleanup and lets air flow. - Spread the wings out on the tray. Make sure they don’t touch. This helps them cook evenly. - Flip the wings halfway through baking. This ensures both sides get crispy. - Bake them at 400°F (200°C) for 40-45 minutes. This high heat helps to crisp the skin. Flavor Enhancements: Want to boost the taste? Here are a few ideas: - Add a teaspoon of smoked paprika for a subtle smoky flavor. - Mix in some lemon zest for a fresh twist. - Use fresh herbs like thyme or rosemary for an earthy touch. - For extra heat, sprinkle in more red pepper flakes or a dash of hot sauce. Presentation Ideas: Make your wings look as good as they taste: - Serve the wings on a large platter. - Garnish with fresh parsley and a sprinkle of extra Parmesan cheese. This adds color and flavor. - Use a few lemon wedges on the side for a bright touch. Dip Pairings: Pair your wings with the right sauces: - Ranch dressing is a classic choice. It cools down the garlic flavor. - Blue cheese dressing adds a rich, tangy taste. - Try a spicy buffalo sauce for a kick. It balances the creamy Parmesan well. These tips will help you create tasty, crispy homemade garlic Parmesan wings. For the full recipe, check out the detailed instructions above. {{image_2}} You can spice up your wings in fun ways. For a kick, try spicy garlic Parmesan. Just add more red pepper flakes or a splash of hot sauce to the butter mix. This gives the wings a nice heat without overpowering the garlic and cheese flavors. If you want to change it up, try herb variations. You can mix in fresh herbs like thyme or rosemary. These herbs add a fresh taste that pairs well with the rich garlic and cheese. Feel free to experiment with different herbs to find your favorite! You can also switch how you cook these wings. If you own an air fryer, here’s how to adjust the recipe. Preheat your air fryer to 375°F. Cook the wings for about 25-30 minutes, shaking the basket halfway through. This method makes the wings super crispy while using less oil. Want a grilled option? Here’s what to do. Preheat your grill to medium heat. Coat the wings in the garlic mixture, then grill them for about 20-25 minutes. Flip them often to get that smoky flavor and nice grill marks. Grilled wings are perfect for summer cookouts! For a complete guide, check out the Full Recipe for all the details. To store your wings, place them in airtight containers. This keeps them fresh and tasty. They can last in the fridge for up to three days. When you want to eat them again, you need to reheat them well. For the best results, use your oven. Preheat it to 350°F (175°C). Place the wings on a baking tray and heat for about 10-15 minutes. This keeps the wings crispy and warm. You can freeze both uncooked and cooked wings. If you choose to freeze uncooked wings, place them in a freezer bag. When you want to cook them, you can bake them straight from the freezer. If you have leftover cooked wings, let them cool first. Then, store them in airtight containers or freezer bags. They can last up to three months in the freezer. To thaw frozen wings, the safest way is to move them to the fridge overnight. This allows them to thaw slowly. You can also use cold water to defrost them quickly. Just place the sealed bag in cold water for about an hour. After thawing, cook or reheat them as you like. For the full recipe, check out the details above! Can I use frozen wings for this recipe? Yes, you can use frozen wings. Just add extra time to cook them. Thawing is not needed. Cook them until they are fully done. How long do garlic Parmesan wings last in the fridge? These wings last about 3 to 4 days in the fridge. Store them in an airtight container. Make sure they cool before sealing. What should I serve with Homemade Garlic Parmesan Wings? Serve them with ranch or blue cheese dressing. Fresh veggies like carrots or celery pair well, too. You can add chips or fries for a fun meal. What's the best way to ensure wings are cooked through? Check the internal temperature. It should reach 165°F (75°C). Use a meat thermometer for accurate results. Bake until they are golden brown and crispy. How can I make the wings more flavorful? Try adding more spices like paprika or cumin. You can also marinate the wings overnight. This gives them extra taste and makes every bite delicious. In this post, I shared how to make tasty garlic Parmesan chicken wings. We covered ingredients, preparation steps, baking methods, and storage tips. Plus, I offered variations to spice up your wings. Remember, crispiness is key, and you can easily customize flavors. Try different herbs or cooking methods to find your favorite. Enjoy your wings with great dips and serve them proudly. Now, you have everything you need to create perfect wings every time!

Homemade Garlic Parmesan Wings Flavorful and Easy Recipe

Are you ready to tantalize your taste buds with a delicious homemade treat? My Garlic Parmesan Wings recipe gives you

- 4 large bell peppers (any color) - 2 cups fresh spinach, chopped - 1 cup feta cheese, crumbled - 1 cup cooked quinoa (or rice) - 1/2 cup cherry tomatoes, diced - 1/4 cup red onion, finely chopped - 2 cloves garlic, minced - 1 teaspoon olive oil - 1 teaspoon dried oregano - Salt and pepper to taste - Fresh parsley, for garnish When making spinach and feta stuffed peppers, it's key to use fresh ingredients. The bell peppers serve as a tasty shell. You can choose any color you like. Red, yellow, or green all work well. Fresh spinach adds a nice green touch. It packs a lot of nutrients too. Feta cheese gives a creamy, salty flavor. It melts just right when baked. Quinoa or rice acts as a filling base. They both add texture and heartiness. Cherry tomatoes lend a sweet and juicy bite. Red onion brings a bit of sharpness. Garlic adds depth to the dish. Olive oil helps with cooking and flavor. Dried oregano adds a hint of earthiness. Salt and pepper balance out all the tastes. Fresh parsley makes a great garnish. It adds color and freshness to the dish. This recipe is not only delicious but also simple. Each ingredient plays a role in making the stuffed peppers stand out. You can find the full recipe [Full Recipe]. 1. Preheat your oven to 375°F (190°C). This step is key for even cooking. 2. Prepare the bell peppers. Cut the tops off and remove the seeds and membranes. Set them aside for later. 3. Sauté garlic and onion. In a large skillet, heat one teaspoon of olive oil over medium heat. Add two cloves of minced garlic and a quarter cup of finely chopped red onion. Cook for about 2-3 minutes until they soften. 4. Combine sautéed ingredients with quinoa or rice. Stir in two cups of chopped spinach to the skillet. Cook until the spinach wilts, which takes about 2 minutes. 5. In a large mixing bowl, combine the sautéed mixture with one cup of cooked quinoa (or rice), half a cup of diced cherry tomatoes, and one cup of crumbled feta cheese. Add one teaspoon of dried oregano, salt, and pepper to taste. Mix well for a tasty filling. 6. Pack the filling into the peppers. Spoon the spinach and feta mixture into each bell pepper, packing it tightly. 7. Cover the dish. Place the stuffed peppers in a baking dish. Add about a quarter cup of water to the dish to help steam the peppers while they bake. 8. Bake the peppers. Cover the dish with foil and bake for 25 minutes. After that, remove the foil and bake for another 10-15 minutes. This will make the peppers tender and slightly browned on top. Feel free to check out the Full Recipe for more details! To make sure your peppers are tender, cook them right. Pre-bake them for 15 minutes before stuffing. This softens the skin and helps them cook through. Use a glass or ceramic baking dish. These materials heat evenly, so your peppers cook well. Want more flavor? Try adding spices like cumin or smoked paprika to the filling. Fresh herbs like basil or dill can also brighten up the dish. For a tasty drizzle, use a balsamic reduction or a squeeze of lemon juice. This adds a nice touch and enhances the overall taste. Serve your stuffed peppers with a fresh green salad. A light vinaigrette pairs well. For a fun twist, place them upright on a large platter. Drizzle olive oil on top and sprinkle parsley for color. This makes a beautiful presentation that impresses guests. You can find the full recipe in the previous sections. {{image_2}} You can easily change this recipe to fit your taste. If you like meat, add ground beef or turkey to the filling. Cook the meat first before adding it to the veggies. For a lighter option, use ground chicken or turkey. You can also try plant-based meat if you want a vegetarian choice. Feel free to add more veggies to the mix. Chopped zucchini, mushrooms, or even corn can add flavor and texture. Each extra veggie brings its own taste and makes the dish more colorful. Switching up your herbs can make a big difference in taste. Instead of oregano, use basil for a sweeter flavor. Thyme or rosemary can also add a nice touch. Experiment with different spices until you find your favorite mix. Cheese options are fun too! Instead of feta, try goat cheese for a tangy taste. Mozzarella melts beautifully and gives a creamy texture. You can even mix different cheeses for a richer flavor. Take your stuffed peppers on a trip around the world! For a Mediterranean twist, add olives and sun-dried tomatoes. These ingredients bring a taste of the sun to your plate. If you want a Latin flair, mix in black beans and corn for a hearty filling. A little cumin or chili powder can add zest. You might even top them with avocado or salsa for an extra kick. Exploring these variations allows you to create new meals every time, keeping your cooking exciting. For the full recipe, check out the [Full Recipe]. To keep your spinach and feta stuffed peppers fresh, store them in an airtight container. Place a paper towel in the container to absorb moisture. This helps keep the peppers crisp. They will last up to four days in the fridge. Make sure to let them cool completely before sealing. When you want to enjoy your leftovers, the best way to reheat them is in the oven. Preheat the oven to 350°F (175°C). Place the peppers on a baking sheet and cover them with foil. This helps keep them moist. Bake for about 15-20 minutes until they’re heated through. To avoid soggy peppers, skip the microwave and stick with the oven. If you want to save some for later, freezing is a great option. First, wrap each stuffed pepper tightly in plastic wrap. Then, place them in a freezer bag or container. They can last up to three months in the freezer. When you’re ready to eat, you can thaw them overnight in the fridge. For a quicker method, microwave them for a few minutes until thawed. Bake stuffed peppers at 375°F (190°C). Cover them with foil for 25 minutes. Then, uncover and bake for another 10 to 15 minutes. This timing helps the peppers soften and the tops brown slightly. Yes, you can prep stuffed peppers ahead of time. Assemble them and store in the fridge for a day. Just bake them right before serving. This saves time and keeps the meal fresh. Serve the stuffed peppers on a bright platter. Drizzle olive oil on top for shine. Add fresh parsley for color. This makes each pepper look tasty and inviting. Absolutely! You can use rice, couscous, or farro instead. Each grain adds a unique taste and texture. Just ensure it's cooked before mixing it with the filling. Stuffed peppers are packed with nutrients. They are low in calories and high in vitamins. Spinach adds iron, while feta brings calcium. The mix offers protein from quinoa too. Pair stuffed peppers with a simple salad or bread. A side of roasted veggies works well too. This adds balance and extra flavor to your meal. For more ideas, check out the Full Recipe. Stuffed peppers are a tasty and healthy dish you can easily make. We covered the ingredients, steps, and tips for perfecting your peppers. Remember to choose the right fillings and adjust flavors to fit your taste. These peppers are great for any meal. With various options, you can enjoy them your way. Try them out and get creative! Enjoy the benefits of a nutritious yet delicious meal.

Spinach & Feta Stuffed Peppers Flavorful and Easy Meal

Looking for a simple yet delicious meal? Spinach and feta stuffed peppers are your answer! In this article, I’ll guide

To make a savory vegetable frittata, gather these ingredients: - 6 large eggs - 1 cup spinach, chopped - 1/2 cup bell peppers (any color), diced - 1/2 cup cherry tomatoes, halved - 1/4 cup red onion, finely chopped - 1/4 cup feta cheese, crumbled - 1/4 cup milk (or dairy-free alternative) - 2 tablespoons olive oil - 1 teaspoon garlic powder - 1 teaspoon dried oregano - Salt and pepper to taste - Fresh herbs (basil or parsley) for garnish The right vegetables bring life to your frittata. Spinach adds a soft, slightly earthy taste. Bell peppers add sweetness and crunch. Cherry tomatoes offer juicy bites that burst with flavor. Red onion gives a mild sharpness that balances the dish. These veggies not only taste great but also bring color and nutrition. Using eggs is classic for frittatas. They provide protein and a creamy texture. You can choose whole milk for richness, or try a dairy-free milk for a lighter option. Feta cheese adds tang and creaminess. Feel free to switch it up with other cheeses like cheddar or goat cheese for different flavors. For a vegan option, you can use silken tofu blended until smooth instead of eggs. Start by preheating your oven to 350°F (175°C). This step is key for cooking the frittata evenly. Next, grab your large, oven-safe skillet. I love using cast iron for this recipe, as it holds heat well. Pour 2 tablespoons of olive oil into the skillet. Heat it over medium heat. Once hot, add the finely chopped red onion and diced bell peppers. Cook these for about 3-4 minutes. You want them soft but not browned. Now, stir in the chopped spinach and halved cherry tomatoes. Cook until the spinach wilts, about 2-3 minutes, then remove the skillet from the heat. In a separate bowl, whisk together 6 large eggs, 1/4 cup milk, and seasonings. This includes 1 teaspoon of garlic powder, 1 teaspoon of dried oregano, and a pinch of salt and pepper. Make sure to whisk until everything is well mixed and fluffy. Pour your egg mixture over the sautéed vegetables in the skillet. Gently stir to combine. Now, sprinkle 1/4 cup of crumbled feta cheese evenly on top. This cheese adds a nice tangy flavor to the dish. Cook the frittata on medium heat for about 3-5 minutes. You’ll notice the edges start to set; that means it’s time to move to the oven. Transfer the skillet to the preheated oven. Bake for 15-20 minutes, or until the center is set and the top is golden. Remove from the oven and let it cool for a few minutes before slicing into wedges. Don't forget to garnish with fresh herbs like basil or parsley for extra flavor. This step-by-step guide helps you create a delightful savory vegetable frittata that’s easy and full of flavor. For the complete recipe with detailed instructions, check out the Full Recipe. To make the best savory vegetable frittata, timing is key. Start by sautéing your vegetables on medium heat. Aim for about 3-4 minutes for the red onion and bell peppers. When you add spinach and tomatoes, cook for just 2-3 minutes. This keeps them fresh and vibrant. After combining your egg mixture, cook it on the stovetop for 3-5 minutes. This helps set the edges before baking. In the oven, bake for 15-20 minutes until the center is firm. A fluffy frittata feels light and airy. To achieve this, whisk your eggs well until they are fully combined. Adding milk or a dairy-free alternative also helps create a softer texture. Don't skip the step of cooking it on the stovetop first. This allows the frittata to rise as it bakes. Avoid overcooking in the oven; check for a slight jiggle in the center. Using the right skillet is essential for a successful frittata. An oven-safe skillet works best. Cast iron or non-stick options are great choices. These materials heat evenly and prevent sticking. Make sure to use enough olive oil to coat the bottom. This step adds flavor and helps with easy serving. Your frittata will slide out smoothly when it’s time to serve. For more detailed instructions, check the Full Recipe. {{image_2}} You can change the flavor by adding different vegetables. Try zucchini, mushrooms, or broccoli. These veggies bring new tastes and colors. You can also mix in root veggies like sweet potatoes. Just make sure to chop them small and cook them first. This helps them soften and blend well with the eggs. Cheese can really change your frittata's taste! Instead of feta, try cheddar or goat cheese. Both melt nicely and add a rich flavor. You can also use mozzarella for a creamier texture. For a sharper bite, consider using Parmesan. Each cheese will give your dish a unique twist. Don’t forget that the cheese gets mixed with the eggs, so pick one you love! If you want a vegetarian option, use plant-based cheese or skip the cheese altogether. You can replace eggs with tofu or chickpea flour. For a vegan frittata, blend silken tofu with spices for a creamy base. This adds protein and keeps it filling. Remember, you can use any veggies you like, so feel free to get creative. For the full recipe and detailed instructions, check the original recipe. After you make the frittata, let it cool down. Slice it into wedges and place them in an airtight container. Store the container in the fridge. Your frittata will stay fresh for up to four days. If you want to keep it longer, consider freezing it. When you're ready to eat leftovers, you can reheat them easily. Preheat your oven to 350°F (175°C). Place the frittata slices on a baking tray. Heat for about 10-15 minutes until warmed through. You can also use a microwave. Just cover the frittata with a damp paper towel. Heat for about 1-2 minutes, checking to avoid overheating. If you want to freeze the frittata, slice it first. Wrap each slice tightly in plastic wrap, then place it in a freezer bag. Label the bag with the date. The frittata can stay in the freezer for up to three months. When you’re ready to eat, thaw it in the fridge overnight and reheat as described. The frittata will taste great even after freezing! You can tell your frittata is done when the center is firm. Stick a knife in the middle; if it comes out clean, it’s ready. The top should look slightly golden. I usually check around 15 minutes into baking. Absolutely! You can use any herbs you like. Fresh basil, dill, or thyme work well. For spices, try chili powder or smoked paprika for a kick. This lets you change the flavor to fit your taste. I like to slice the frittata into wedges. Serve it warm or at room temperature. For a nice touch, add a sprinkle of fresh herbs on top. Pair it with a simple salad for a full meal. You can change it up easily! Swap in your favorite veggies or cheeses. Try zucchini, mushrooms, or even artichokes. You can also add cooked meats like ham or bacon for extra flavor. For step-by-step guidance, check the Full Recipe. It covers everything you need to make this delicious frittata. In this guide, we explored making a delicious frittata. We covered key ingredients like vegetables and cheese, ensuring great flavor. I shared step-by-step instructions, tips for perfect texture, and storage options. You can customize with different veggies or make it vegetarian. Remember, practice makes perfect. Don’t hesitate to play around with flavors. Enjoy experimenting and happy cooking!

Savory Vegetable Frittata Easy and Flavorful Meal

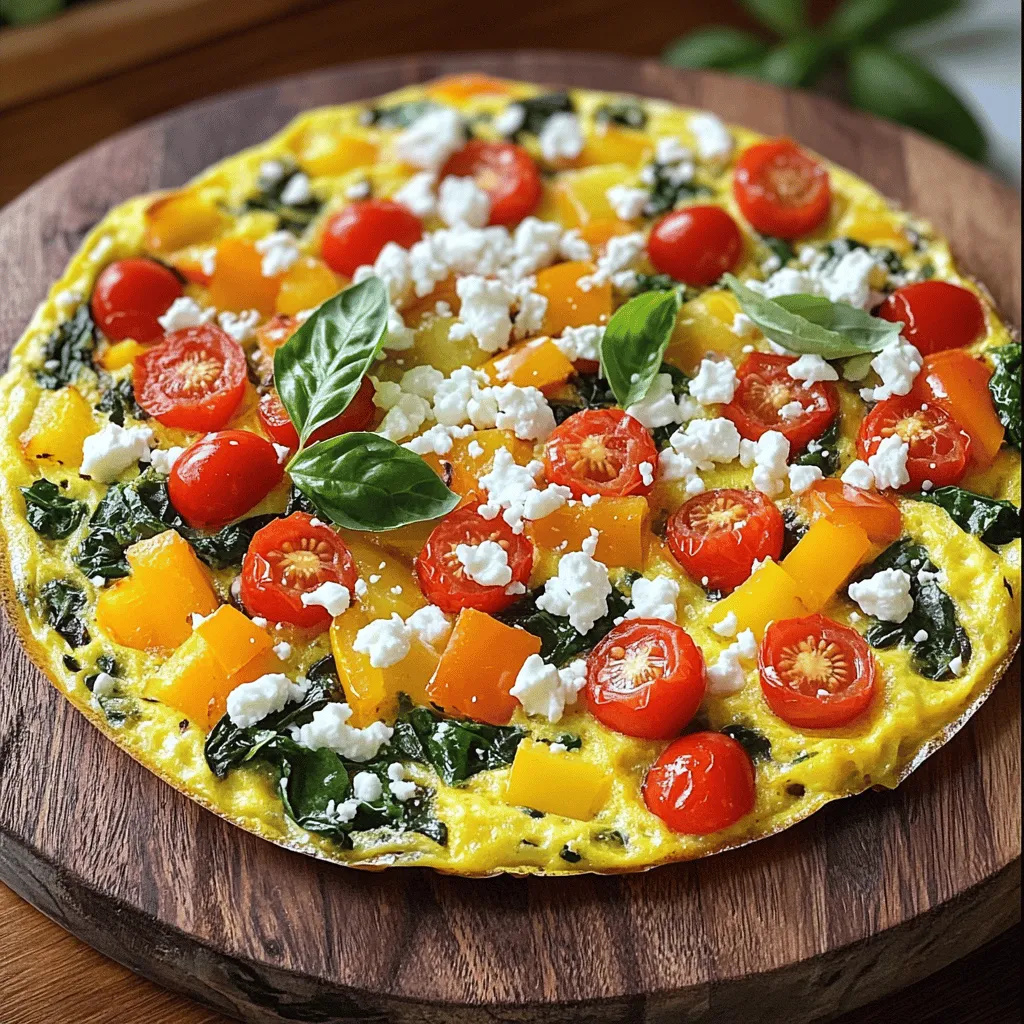
Want to whip up a tasty meal that’s quick and easy? This savory vegetable frittata is the answer! Packed with

One-Pan Garlic Chicken and Asparagus is a simple meal that packs big flavor. This dish brings together juicy chicken and crisp asparagus, all in one pan. You can have dinner ready in about 45 minutes. You only need a few fresh ingredients to make it shine. - 4 boneless, skinless chicken breasts - 1 pound asparagus, trimmed - 4 cloves garlic, minced - 1 lemon, zested and juiced - 3 tablespoons olive oil - 1 teaspoon dried thyme - 1 teaspoon smoked paprika - Salt and pepper to taste - ¼ cup grated Parmesan cheese (optional) - Fresh parsley, chopped (for garnish) These ingredients blend well. The garlic and lemon add zest, while the thyme and paprika give depth. Don’t skip the fresh parsley; it brightens the dish. You need basic tools to make this meal. Here’s what I recommend: - Large bowl for mixing - Baking sheet - Cooking brush or spoon for spreading marinade - Meat thermometer to check chicken doneness Having these tools ready helps you cook smoothly. You’ll enjoy the process and the tasty result! To start, gather your ingredients. You need olive oil, minced garlic, lemon zest, lemon juice, dried thyme, smoked paprika, salt, and pepper. In a large bowl, mix these ingredients together. This mix will add great flavor to your chicken. The lemon juice and zest brighten the dish. The garlic gives it a wonderful aroma. Take your chicken breasts and place them in the bowl with the marinade. Make sure each piece is fully coated. This step is key for flavor. If you have time, let the chicken sit in the marinade for at least 15 minutes. Longer marinating helps the flavors soak in better. Now it’s time to prepare your baking sheet. Place the marinated chicken breasts in the center. Next, trim your asparagus and arrange it around the chicken. This layout allows the veggies to cook in the chicken's juices. Drizzle any leftover marinade over the asparagus for extra flavor. Preheat your oven to 400°F (200°C). Place the baking sheet in the oven and let it bake for 25-30 minutes. Check that the chicken reaches an internal temperature of 165°F (75°C). Once done, take the sheet out and let it rest for 5 minutes. This resting time keeps the chicken juicy. Garnish with fresh parsley for a nice touch. Enjoy your meal! For the complete cooking instructions, see the Full Recipe. To make your One-Pan Garlic Chicken and Asparagus shine, start with fresh ingredients. Fresh garlic and lemon zest boost the taste. For a flavor twist, add a splash of balsamic vinegar to the marinade. You can also try adding a pinch of red pepper flakes for heat. Make sure to let your chicken marinate for at least 15 minutes. If time allows, marinate it for a few hours. This helps the flavors soak deep into the chicken. Safety in the kitchen is key. Always wash your hands before and after handling raw chicken. Use separate cutting boards for meat and vegetables to avoid cross-contamination. When checking the chicken's doneness, use a meat thermometer. The chicken should reach 165°F (75°C) to be safe to eat. Always let the chicken rest for a few minutes after baking. This helps the juices stay inside, making it tender and juicy. To get perfectly cooked chicken, start with even-sized pieces. This helps them cook at the same rate. Use a meat thermometer to check doneness. If you don’t have one, cut the chicken in the thickest part. The juices should run clear, with no pink inside. Let the chicken rest for five minutes after baking. This allows the juices to redistribute, keeping it moist. For the best taste, serve hot with a sprinkle of fresh parsley. Enjoy your meal! {{image_2}} You can change the asparagus to many other veggies. Broccoli, green beans, or bell peppers work great. Carrots or zucchini add nice colors and textures. Feel free to mix and match to fit your taste. Just cut them into similar sizes for even cooking. Not a chicken fan? You can use shrimp or salmon instead. Both cook fast and soak up flavors well. If you prefer plant-based options, try tofu or tempeh. Make sure to adjust cooking times for these proteins. Shrimp cooks in about 10 minutes, while fish takes around 15 minutes. Changing herbs can boost your dish’s taste. Try rosemary for a woodsy flavor or basil for a fresh note. If you like heat, add red pepper flakes or cayenne. Mix and match spices like cumin or coriander for a twist. The right herbs can turn this meal into something special, so get creative! After you enjoy your One-Pan Garlic Chicken and Asparagus, store the leftovers right. Let the dish cool down. Then, put it in an airtight container. It stays fresh for up to three days in the fridge. Make sure to keep the chicken and asparagus together. This helps to maintain their flavor and moisture. When you're ready to eat again, reheating is easy. Place the chicken and asparagus on a baking sheet. Preheat your oven to 350°F (175°C). Heat for about 15-20 minutes. This way, the chicken will stay juicy and the asparagus tender. You can also use the microwave. Heat in short bursts, checking every minute. Stir gently to avoid overcooking. If you want to keep your meal longer, freeze it. First, let it cool completely. Then, place it in a freezer-safe bag or container. Remove as much air as possible. It can last up to three months in the freezer. When you’re ready to eat, thaw it in the fridge overnight. Reheat as mentioned above for a tasty meal. For the best taste, I recommend enjoying it fresh. But freezing is a great option for meal prep. Yes, you can use frozen chicken. However, thaw it first. This helps the chicken cook evenly. You can thaw it overnight in the fridge or use the microwave. After thawing, follow the same marinade steps. This will keep your dish flavorful and juicy. You can pair this dish with many sides. Here are some options: - Rice: A fluffy white or brown rice works well. - Quinoa: A nutty alternative that adds protein. - Salad: A fresh green salad can brighten your meal. - Bread: A crusty bread is great for soaking up juices. These sides balance the meal and make it more filling. Check the chicken's internal temperature. It should reach 165°F (75°C). You can use a meat thermometer to check this. If you don’t have one, cut into the thickest part. The meat should be white, not pink. Juices should run clear. This ensures your chicken is safe to eat. In this blog post, we covered how to make a delicious One-Pan Garlic Chicken and Asparagus. You learned about fresh ingredients, essential tools, and step-by-step cooking instructions. We also shared tips for flavor and safety, plus variations for other proteins. Proper storage methods help keep leftovers fresh. Remember, it’s easy to adjust this recipe to fit your needs. Enjoy trying new flavors and cooking confidently. You can make this meal your own!

One-Pan Garlic Chicken and Asparagus Tasty Meal Guide

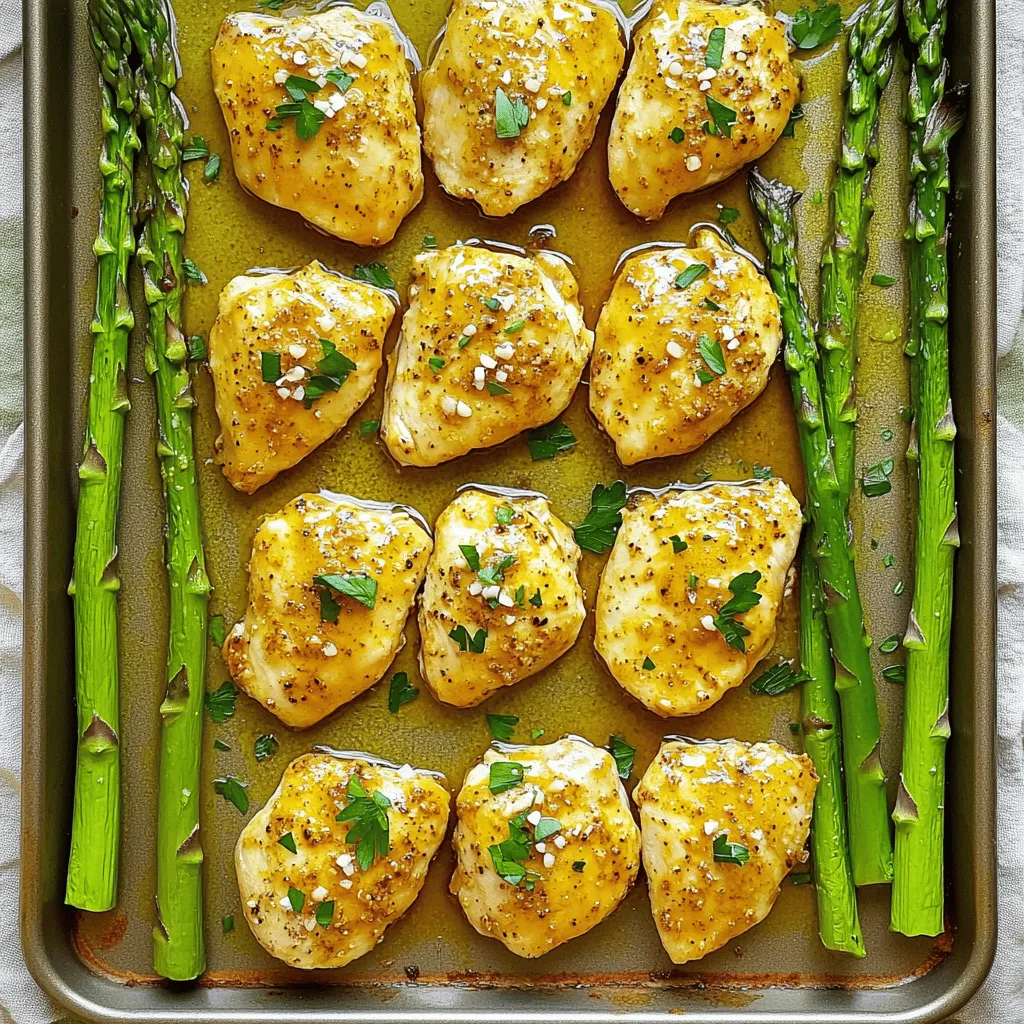
Looking for a quick and tasty meal? This One-Pan Garlic Chicken and Asparagus is your answer! You’ll love the blend

- 2 cups cooked white rice - 3 cups broccoli florets (fresh or frozen) - 1 cup shredded sharp cheddar cheese - 1 cup cream of mushroom soup - 1/2 cup milk - 1/4 cup grated Parmesan cheese - 1/2 teaspoon garlic powder - 1/2 teaspoon onion powder - Salt and pepper to taste - 1 cup crispy fried onions (for topping) You might want to swap the cream of mushroom soup. You can use a homemade version or try cream of chicken soup. Both give a nice flavor. For cheese, feel free to mix it up! Mozzarella or gouda can also work well. They will change the taste slightly but still make it cheesy. I love using fresh broccoli for its bright color and crunch. It gives a nice texture to the dish. If you choose fresh broccoli, steam it lightly before adding it to the casserole. This helps it cook well without being mushy. Frozen broccoli is a great choice too. It’s quick and easy! Just make sure to thaw and drain it first. This prevents excess water in your casserole. You want that cheesy goodness to shine through! 1. First, preheat your oven to 350°F (175°C). This is important for even cooking. 2. Next, take a large mixing bowl and combine the cooked white rice, broccoli florets, shredded sharp cheddar cheese, cream of mushroom soup, and milk. 3. Add the garlic powder, onion powder, salt, and pepper to the bowl. Stir everything until you mix it well. 1. Now, transfer the mixture into a greased 9x13 inch baking dish. Spread it out evenly. 2. Top the casserole with the grated Parmesan cheese for a nice flavor boost. 3. Place the dish in the oven and bake it for 30 minutes. 4. After 30 minutes, take the casserole out and sprinkle the crispy fried onions on top. 5. Return the casserole to the oven and bake it for another 10-15 minutes. This will make the onions golden and crispy. 1. Allow the casserole to cool for a few minutes after baking. This helps it set slightly. 2. For a pretty presentation, garnish with a sprinkle of fresh parsley. 3. Serve it hot, and pair it with your favorite protein for a complete meal. 4. This dish goes well with a side salad or some crusty bread for a hearty feast. For the full recipe, check out the details shared earlier! To make perfect rice, start with the right water-to-rice ratio. Use 2 cups of water for every cup of rice. Rinse the rice to remove excess starch. This helps prevent clumping. Bring the water to a boil, then add the rice. Cover it and reduce the heat to low. Cook for about 18 minutes. Remove it from heat and let it sit for 5 minutes. Fluff it with a fork before using it in the casserole. When storing cooked rice, let it cool first. Place it in an airtight container. This keeps it fresh for up to four days in the fridge. If you freeze it, use it within three months. For best results, label your container with the date. To make your casserole creamy, add a touch of sour cream or cream cheese. These ingredients blend well and boost flavor. You can also mix in some cooked spinach or sautéed mushrooms for extra creaminess. For the best melted cheese, choose sharp cheddar or a blend of cheeses. Grate the cheese yourself for better melting. Mix the cheese in with the other ingredients before baking. This ensures it melts evenly throughout the dish. To ensure even cooking, spread the mixture in the baking dish evenly. Avoid packing it too tightly. This helps the heat circulate and cook all parts well. To prevent a dry casserole, don’t skip the milk or cream of mushroom soup. They add moisture. If you notice the casserole seems dry after baking, cover it with foil. This helps retain steam and keeps it moist. {{image_2}} You can easily make this dish vegetarian. Just skip the meat and stick with the veggies. For a gluten-free option, swap the cream of mushroom soup for a gluten-free brand. You can also make your own soup from scratch, using safe ingredients. Want to add some protein? You can mix in cooked chicken or turkey. These meats pair well with the cheese and broccoli. If you prefer a vegetarian option, consider adding chickpeas for protein. You can also switch up the veggies. Try adding bell peppers or carrots for extra color and flavor. To boost the taste, consider adding herbs like thyme or parsley. These herbs brighten the dish and add freshness. If you like it spicy, toss in some jalapeños. They give the casserole a nice kick. With these variations, you can make your cheesy broccoli rice casserole unique every time you serve it. For the full recipe, check out the details above! To keep your Cheesy Broccoli Rice Casserole fresh, let it cool first. Then, place it in an airtight container. You can store it in the fridge for up to four days. If you want to keep it longer, freeze it. For freezing, use a freezer-safe container or wrap it well in plastic wrap. It can last in the freezer for up to three months. When it’s time to enjoy leftovers, I recommend reheating in the oven. Preheat your oven to 350°F (175°C). Place the casserole in a baking dish and cover it with foil. This helps keep it moist. Heat for about 20 minutes or until warm. If you want to avoid sogginess, do not add extra liquid. You can also use the microwave, but the oven gives better texture. You can make this casserole ahead for busy days. Prepare the dish but don’t bake it yet. Cover it and store it in the fridge for up to two days before baking. For meal prep, divide the casserole into individual servings in meal containers. This makes it easy to grab and go. Make sure the containers are microwave-safe for quick reheating. You can pair this casserole with many sides. Here are some great options: - Grilled chicken or baked fish - A fresh garden salad - Roasted carrots or green beans - Garlic bread or dinner rolls These sides add a nice balance to the dish. They also help round out your meal. Yes, you can use brown rice. It adds a nutty flavor and more fiber. However, you need to adjust the cooking time. Brown rice takes longer to cook than white rice. - Cook the brown rice for about 40-45 minutes before mixing it with other ingredients. - Ensure it's tender before adding to the casserole. Absolutely! You can prepare the casserole a day in advance. Just follow these tips: - Mix all the ingredients as stated in the recipe. - Cover and store it in the fridge. - When ready to bake, let it sit at room temperature for 30 minutes before cooking. This method saves time and makes serving easier. To turn this dish into a full meal, consider adding protein. Here are some ideas: - Shredded chicken or cooked ground beef - Canned tuna or diced ham - Cooked beans for a vegetarian option Adding these proteins boosts the dish's nutrition and makes it more filling. You can also toss in extra veggies for added color and health benefits. This recipe for Cheesy Broccoli Rice Casserole combines simple ingredients in a delightful way. You learned about the key components, cooking methods, and variations. There are many ways to adapt it to fit your taste or diet. Keep in mind storage tips for leftovers to enjoy later. With a few simple steps, you can craft this dish easily. Enjoy cooking and sharing this tasty casserole with friends and family!

Cheesy Broccoli Rice Casserole Flavorful and Easy Dish

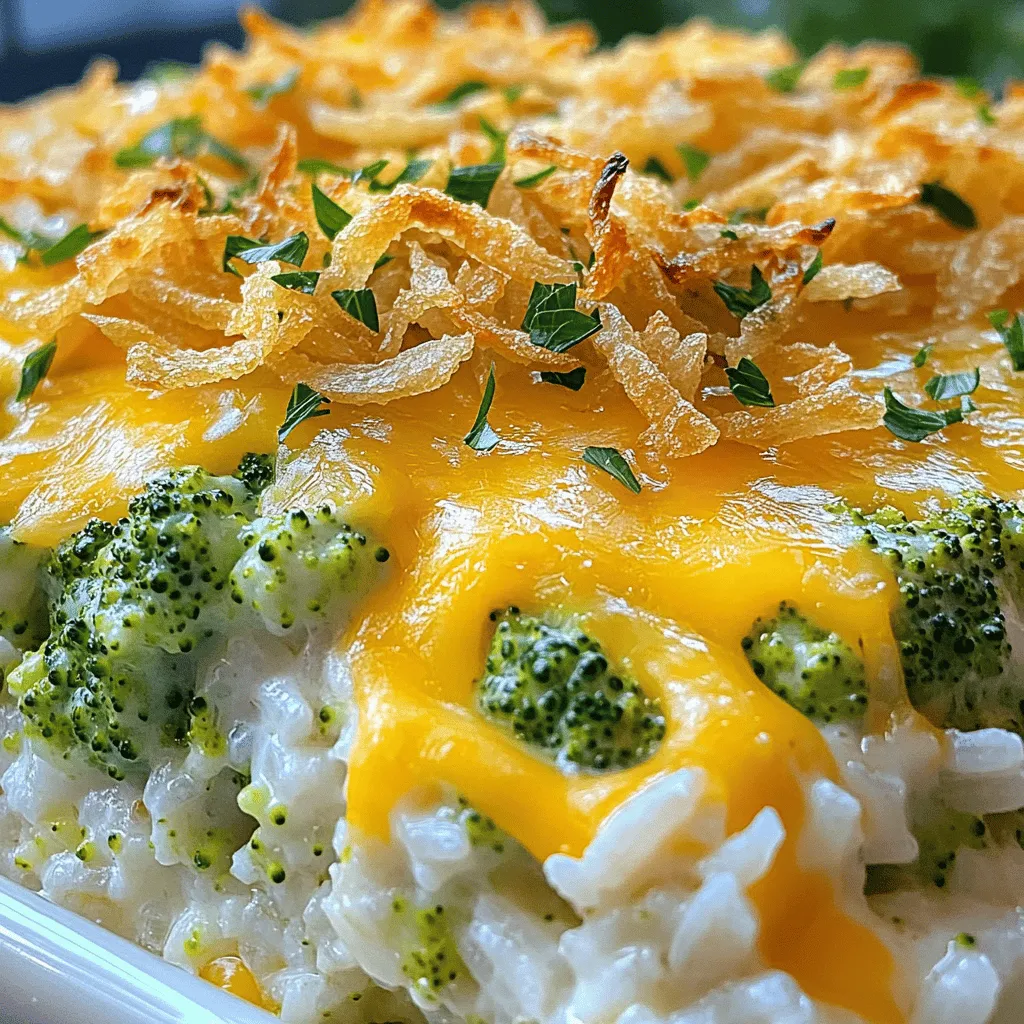
Are you ready to whip up a delightful dish that’s both cheesy and comforting? This Cheesy Broccoli Rice Casserole is

- Quinoa and Liquid Base You need 1 cup of rinsed quinoa and 2 cups of water or vegetable broth. The liquid helps the quinoa cook and gives it flavor. - Fresh Produce: Mango, Avocado, and Vegetables This salad shines with vibrant flavors. You will need: - 1 ripe mango, diced - 2 avocados, diced - 1 red bell pepper, finely chopped - 1/2 red onion, finely chopped - 1 cup cherry tomatoes, halved - 1/4 cup fresh cilantro, chopped - Dressing Components The dressing ties everything together. Use these ingredients: - Juice of 1 lime - 2 tablespoons olive oil - Salt and pepper to taste - Optional Spicy Ingredient If you want some heat, add 1 small jalapeño, minced. This gives the salad a nice kick. Gather these ingredients for a fresh and healthy delight. For the full recipe, check out the Mango Avocado Quinoa Salad 🥭🥑. Start by rinsing 1 cup of quinoa under cold water. This step removes any bitterness. Next, combine the rinsed quinoa with 2 cups of water or vegetable broth in a medium saucepan. Bring the mixture to a boil over high heat. Once it boils, lower the heat to a simmer. Cover the pot and let it cook for 15 minutes. The quinoa will fluff up and absorb the liquid. After 15 minutes, take it off the heat. Let it cool for a few minutes before you move on. While the quinoa is cooking, chop your fresh ingredients. Dice 1 ripe mango and 2 avocados into bite-sized pieces. Finely chop 1 red bell pepper and 1/2 red onion. Halve 1 cup of cherry tomatoes. Finally, chop 1/4 cup of fresh cilantro. Keep all the ingredients ready in a large bowl. In a small bowl, whisk together the juice of 1 lime, 2 tablespoons of olive oil, salt, and pepper. If you like some heat, you can add 1 small jalapeño, minced. Mix everything well until it forms a smooth dressing. Taste it and adjust the salt and pepper if needed. Now it's time to bring everything together. In your large bowl with the fresh ingredients, add the cooled quinoa. Pour the dressing over the top. Gently toss all the ingredients together. Be careful not to mash the avocado. You want to keep everything nice and chunky. Let the salad sit for at least 15 minutes. This wait allows the flavors to blend well. You can serve it cold or at room temperature. If you want, you can put it in the fridge for a bit longer. The longer it chills, the tastier it gets. Enjoy this refreshing dish! For more details, check the Full Recipe. To get fluffy quinoa, rinse it well under cold water. This removes the bitter coating. Next, use a ratio of 1 cup quinoa to 2 cups water or broth. Bring it to a boil, then lower the heat and cover. Let it cook for about 15 minutes. When done, fluff it with a fork. Let it cool to room temperature before adding it to your salad. Choosing ripe mango and avocado is easy. For mango, look for a slight give when you press gently. The color should be vibrant, often a mix of green and yellow. For avocado, check that it feels soft but not mushy. A darker skin usually means it is ripe. If you find them hard, let them sit at room temperature for a few days. When you mix the salad, be gentle. Start by adding the quinoa and veggies in a large bowl. Pour the dressing over them. Use a spatula to fold the ingredients together. This method helps keep avocado chunks intact. You want to mix well, but avoid smashing the avocados. To make your salad look beautiful, use a large, shallow bowl. Arrange the salad neatly in the center. Garnish with extra cilantro for a fresh touch. Add lime wedges around the edge for color and zest. Whole cherry tomatoes on top give a nice pop. This way, your salad looks as good as it tastes. Check out the Full Recipe for more details! {{image_2}} Adding protein can make your Mango Avocado Quinoa Salad more filling. You can include beans, chicken, or shrimp. - Black beans bring a nice, earthy flavor and are high in fiber. - Grilled chicken adds a savory taste and extra protein. - Shrimp cooks quickly and pairs well with fresh flavors. Mix and match these options to find your favorite blend. The dressing can change the salad's taste. You can try different dressings to suit your taste. - Honey lime dressing adds sweetness. Just mix honey with lime juice and olive oil. - Soy sauce and sesame oil bring an Asian flair. Combine for a unique touch. - Avocado dressing made with blended avocado, lime, and yogurt gives a creamy texture. Feel free to experiment with flavors for a twist on this classic dish. Using seasonal ingredients can keep your salad fresh and exciting. Change up the fruits and veggies based on what’s in season. - Summer: Add fresh corn or diced cucumbers for crunch. - Fall: Try roasted butternut squash for sweetness. - Winter: Pomegranate seeds offer a pop of color and tartness. These swaps make your salad fun and new every time you prepare it. You can find the full recipe for the Mango Avocado Quinoa Salad here. To store leftover Mango Avocado Quinoa Salad, place it in an airtight container. This keeps moisture in and prevents the salad from drying out. Make sure to press out any air before sealing. Store it in the fridge for the best results. This will help to keep the flavors fresh. When stored properly, the salad lasts about 3 days in the fridge. After this time, the avocado may brown and the flavors may fade. If you notice changes in color or smell, it’s best to toss it. Freshness is key in enjoying this dish. Freezing this salad is not ideal. The texture of the avocado and quinoa can change when frozen. If you must freeze it, do so without the avocado. You can add fresh avocado when you thaw and serve. This keeps the salad tasty and fresh. For the complete preparation steps, check the Full Recipe. Yes, you can make this salad a day before. Just keep it in the fridge. The flavors blend well overnight. However, add the avocado right before serving. This keeps it fresh and green. If you need a substitute, try brown rice or couscous. Both options work well. They add a nice texture and flavor. You can use farro or bulgur too. Just adjust cooking times based on what you choose. Absolutely! This salad is perfect for meal prep. It keeps well in the fridge for up to three days. Pack individual servings in containers for easy lunch options. Just remember to add dressing before eating. I recommend fresh mango and avocado for the best taste. Canned fruit can be mushy and less flavorful. If you must use canned, drain it well. Rinse canned avocado to reduce any strong flavor. But fresh is always better! For the full recipe, check out the [Full Recipe]. The Mango Avocado Quinoa Salad is fresh, tasty, and easy to make. We covered the main ingredients, like quinoa, mango, and avocado. You learned how to cook quinoa and prepare the fresh veggies. We discussed tips for fluffy quinoa and avoiding mashed salad. Plus, we provided variations for added protein and flavor. In short, enjoy this nutritious salad that you can customize. It’s great for any meal and perfect for meal prep!

Mango Avocado Quinoa Salad Fresh and Healthy Delight

If you’re looking for a bright and fresh dish, look no further! My Mango Avocado Quinoa Salad is packed with

- 1 lb boneless, skinless chicken breasts - 2 large lemons (zest and juice) - 1/4 cup fresh basil, finely chopped - 4 cloves garlic, minced - 1/4 cup olive oil - 1 teaspoon honey - 1 teaspoon salt - 1/2 teaspoon black pepper - 1 teaspoon red pepper flakes (optional) - Skewers (wooden or metal) The key to my Lemon Basil Chicken Skewers is in the ingredients. I use one pound of boneless, skinless chicken breasts. This keeps the dish light and tender. The chicken should be cut into one-inch cubes. Next, I grab two large lemons. I use both the juice and zest for a bright, fresh flavor. The zest adds a punch, while the juice helps marinate the chicken. I also include a quarter cup of fresh basil. This herb brings an aromatic touch to the dish. Finely chop it for the best flavor release. Now, let’s talk about the marinade. I use four cloves of minced garlic. Garlic adds depth and flavor. I also mix in a quarter cup of olive oil. This oil helps keep the chicken moist. To balance the flavors, I add one teaspoon of honey. This gives a hint of sweetness. I season with one teaspoon of salt and half a teaspoon of black pepper. These spices enhance the taste. If you like heat, one teaspoon of red pepper flakes is optional. Finally, don’t forget the skewers! Wooden or metal skewers work well. If you choose wooden ones, soak them in water for 30 minutes. This prevents them from burning on the grill. For the full recipe, check out the complete guide. To start, grab a large mixing bowl. Combine the following ingredients: - Lemon juice from 2 large lemons - Zest from those same lemons - 1/4 cup of fresh basil, finely chopped - 4 cloves of minced garlic - 1/4 cup of olive oil - 1 teaspoon of honey - 1 teaspoon of salt - 1/2 teaspoon of black pepper - 1 teaspoon of red pepper flakes (optional) Mix these well to create a bright and flavorful marinade. The lemon and basil will shine here, bringing fresh taste to the chicken. Next, add your chicken pieces to the bowl. The chicken should be cut into 1-inch cubes. Make sure to coat the chicken thoroughly with the marinade. This step helps the chicken absorb all those tasty flavors. Cover the bowl with plastic wrap and pop it in the fridge. Let it marinate for at least 30 minutes, but up to 2 hours gives the best results. While your chicken marinates, it’s time to prep for grilling. If you are using wooden skewers, soak them in water for at least 30 minutes. This step stops them from burning on the grill. If you're using metal skewers, you can skip this step. Also, preheat your grill or grill pan over medium-high heat. A little oil on the grill grates prevents sticking. Now comes the fun part! Thread your marinated chicken onto the skewers. Leave a little space between each piece. This helps them cook evenly. Place the skewers on the grill and cook for about 10-15 minutes. Turn them occasionally to get nice grill marks. You know they are done when the internal temperature reaches 165°F. Once cooked, take them off the grill and let them rest for a few minutes before serving. For the full recipe, check out the details above. To get the best taste, marinate your chicken longer. I suggest at least two hours. This allows the flavors to soak in deeply. The lemon juice brightens the dish, while the basil adds freshness. If you have the time, let it marinate overnight. Your taste buds will thank you! Grilling can be tricky, but I have some tips. First, make sure your grill is hot. This helps the chicken cook evenly. Oil the grill grates lightly to prevent sticking. Use a pair of tongs to turn the skewers regularly. This way, the chicken gets nice grill marks without burning. How you present your food matters. Serve the skewers on a big platter. Add some fresh basil leaves and lemon wedges for color. You can also pair them with tzatziki sauce or a cucumber salad. This adds a cool contrast to the warm chicken. For the full recipe, check back for easy steps! {{image_2}} You can swap chicken for other proteins. Shrimp works well and cooks fast. Tofu is a great option for a vegetarian twist. Just remember to add more marinade time for tofu. You can also use beef or pork if you prefer. Adjust cook times based on the protein you choose. To make your skewers more exciting, try adding different herbs. Fresh parsley or cilantro can change the taste. You can also mix in spices like paprika or cumin for warmth. Try using lime juice instead of lemon for a zesty twist. Each change can make your meal unique and fun. Mix and match ingredients on your skewers. Add bell peppers, onions, or cherry tomatoes for color. Fruits like pineapple or peach can bring a sweet touch. These combinations not only add flavor but also make your dish look great. Explore different pairings to find your favorite! For more ideas, check out the Full Recipe. After you enjoy your Lemon Basil Chicken Skewers, store any leftovers right away. Place them in an airtight container. This keeps them fresh and tasty. You can refrigerate the skewers for up to three days. If you want to keep them longer, freeze the skewers. They can last up to three months in the freezer. When freezing, wrap them tightly in plastic wrap, then place them in a freezer bag. This prevents freezer burn. To reheat your chicken skewers, the oven works best. Preheat your oven to 350°F. Place the skewers on a baking sheet. Cover them with foil to keep them moist. Heat for about 10-15 minutes or until warmed through. You can also reheat them in a skillet over medium heat. Just add a splash of water to keep them juicy. Heat for about 5-7 minutes, turning occasionally. Leftover Lemon Basil Chicken Skewers stay safe to eat for three days in the fridge. If you freeze them, they are good for about three months. Always check for any off smells or changes in texture before eating. If you notice anything odd, it's best to toss them. Enjoy your skewers with confidence! You should marinate the chicken for at least 30 minutes. For the best flavor, I recommend two hours. This time allows the chicken to soak up all the tasty lemon and basil flavors. The longer you marinate, the more flavorful the chicken will be. No, you should soak wooden skewers before using them. Soaking helps prevent burning on the grill. I suggest soaking them in water for at least 30 minutes. This keeps your skewers intact while cooking and lets the chicken shine. These skewers taste great with a variety of sides. Here are some delicious options: - Cucumber salad - Tzatziki sauce - Grilled vegetables - Rice or quinoa - Garlic bread These sides add freshness and balance to your meal. No, it is not safe. Chicken should reach an internal temperature of 165°F. If you see pink, use a meat thermometer to check. Eating undercooked chicken can lead to foodborne illness, so always check the temp. To prep these skewers in advance, marinate the chicken one day before. Keep it in the fridge until you are ready to grill. You can also thread the chicken onto skewers a few hours in advance. Just cover them and keep them cool until grilling. This makes your cookout stress-free! Lemon Basil Chicken Skewers are simple and tasty. We discussed the main ingredients and marinade, as well as easy steps to prepare and grill. Tips for flavor and presentation can make your dish stand out. You can use different proteins or flavors to mix things up. Proper storage and reheating keeps leftovers tasty. Remember to have fun with it. Enjoy making this meal for family and friends. Your next cookout will be a hit. Get ready for smiles and compliments!

Lemon Basil Chicken Skewers Flavorful Grilling Delight

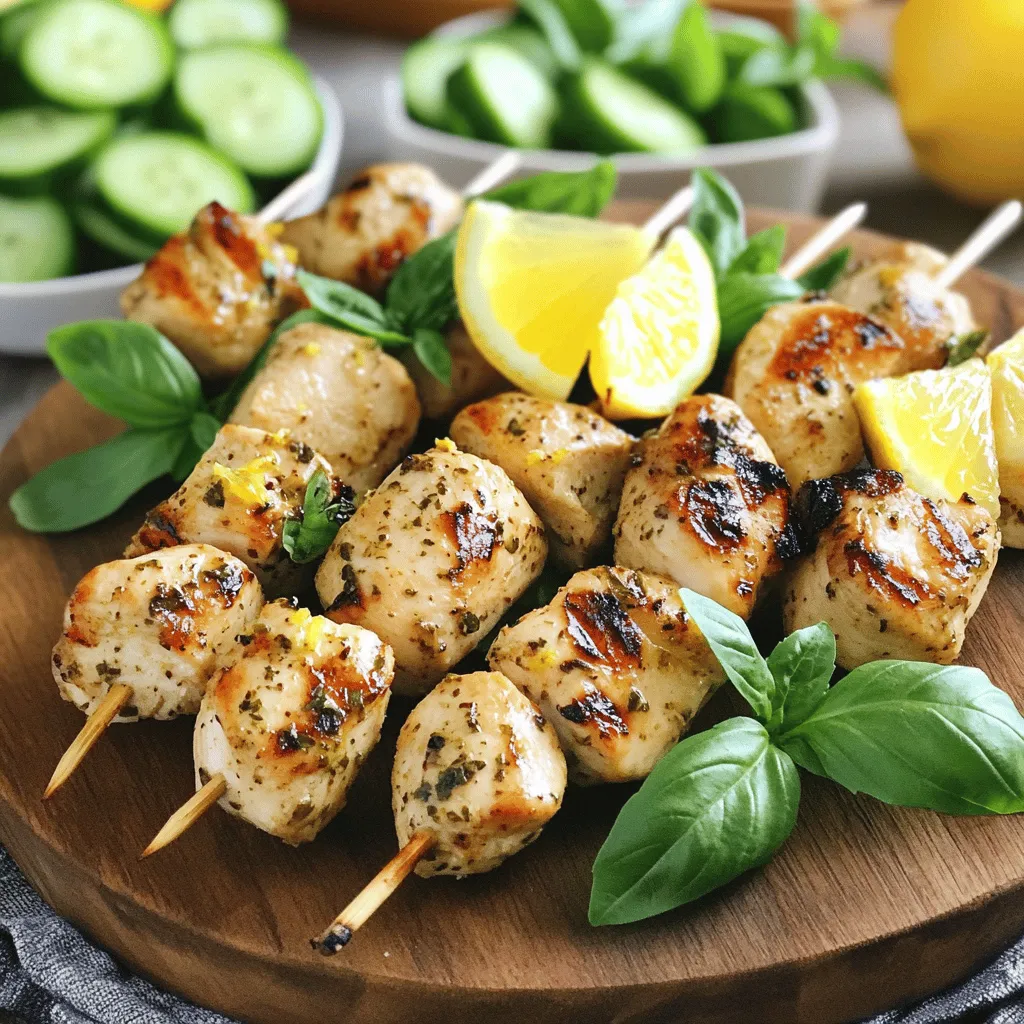
Get ready to fire up the grill with my Lemon Basil Chicken Skewers! This fresh and zesty dish combines juicy

To make easy chicken enchiladas, you need fresh and simple items. Here is a list of the main ingredients: - 2 cups cooked chicken, shredded - 1 cup black beans, drained and rinsed - 1 cup corn, frozen or fresh - 1 cup shredded cheese (cheddar or Monterey Jack) - 1/2 cup diced onion - 1 tablespoon olive oil - 1 teaspoon garlic powder - 1 teaspoon cumin - 1/2 teaspoon chili powder - 8 flour tortillas - 2 cups enchilada sauce (store-bought or homemade) - Fresh cilantro, for garnish - Sour cream, for serving These ingredients come together to create a delightful dish. The shredded chicken gives a hearty base. Black beans and corn add nice texture and nutrition. The cheese melts beautifully, making every bite creamy. You can customize your enchiladas with fun toppings. Here are some great ideas: - Avocado slices - Sliced jalapeños - Chopped green onions - Diced tomatoes - Extra cheese - Lime wedges These toppings add color and extra flavor. You can mix and match based on your taste. Don't hesitate to get creative! If you don’t have some ingredients, substitutions work well. Here are a few options: - Use rotisserie chicken instead of cooking your own. - Swap black beans for pinto beans or kidney beans. - Try zucchini or bell peppers in place of corn. - Use corn tortillas instead of flour tortillas for a gluten-free option. - Replace cheddar with pepper jack for a spicy kick. These substitutions can help you make enchiladas with what you have on hand. Cooking should always be fun and flexible! For the complete recipe, check the Full Recipe section. First, gather all your ingredients. You need cooked chicken, black beans, corn, cheese, and onion. Measure out two cups of shredded chicken. Rinse and drain one cup of black beans. If you use frozen corn, let it thaw. Chop half a cup of onion. Heat one tablespoon of olive oil in a skillet. Add the onion and cook until it looks clear. This takes about three to four minutes. Now it’s time to mix everything. In a large bowl, combine the chicken, black beans, corn, and half of the cheese. Add one teaspoon of garlic powder, one teaspoon of cumin, and half a teaspoon of chili powder. Stir well. Next, pour one cup of enchilada sauce into a baking dish. Take a tortilla and spoon some mixture in the center. Roll it up tightly and place it seam-side down in the dish. Repeat this with the rest of the tortillas. After all are in the dish, pour the rest of the enchilada sauce on top. Sprinkle the remaining cheese over everything. Cover the dish with foil and bake at 375°F for 20 minutes. Then, remove the foil and bake for another 10 to 15 minutes. The cheese should be bubbly and golden. Once done, let the enchiladas cool for a few minutes. Garnish with fresh cilantro. Serve hot with sour cream on the side. Enjoy your delicious meal! For the complete cooking process, check out the Full Recipe. To make the best chicken enchiladas, focus on your filling. Use fresh, cooked chicken. I like to shred it for easy mixing. Combine it with black beans, corn, and cheese. This mix packs flavor and texture. Don't forget to season well. Garlic powder, cumin, and chili powder add great taste. Spread enchilada sauce on the bottom of your dish. It prevents sticking and adds moisture. Roll the tortillas tight, and place them seam-side down. This keeps them from unraveling while baking. If you're short on time, use rotisserie chicken. It’s already cooked and saves you steps. You can skip cooking the chicken and just shred it. Use store-bought enchilada sauce to save time. You can also use pre-shredded cheese. This cuts prep time in half. Don't worry about making everything from scratch. You’ll still get tasty enchiladas without the fuss. Seasoning is key to great chicken enchiladas. Start with basic spices like garlic powder and cumin. Add a pinch of salt and pepper for balance. If you like heat, try adding cayenne pepper or diced jalapeños. Fresh cilantro on top brightens the dish. It adds color and a fresh taste. For a creamier texture, mix in sour cream with your filling. This small change makes a big difference. For more flavor ideas, check out the Full Recipe. {{image_2}} You can make these enchiladas vegetarian by swapping chicken for mushrooms or zucchini. Use your favorite veggies, like bell peppers or spinach. These will add flavor and texture. You can still follow the same steps in the full recipe. Just remember to sauté the veggies until they're soft before mixing them. If you love heat, add more spice! You can use spicy enchilada sauce or add jalapeños. You can even mix in chipotle peppers for a smoky flavor. Try different sauces too, like green tomatillo sauce. Each sauce brings a unique taste. Adjust the spice level to suit your taste buds. Think outside the box! You can add black olives, diced tomatoes, or avocado. Try different meats, like turkey or beef, for a twist. You can even use quinoa for extra protein. Mixing in some cream cheese creates a rich filling. The options are endless, so get creative and have fun! Once you finish your meal, let the enchiladas cool down. Place any leftovers in an airtight container. This keeps them fresh. Store them in the fridge for up to three days. If you want to enjoy them later, freezing is a great option. To reheat your enchiladas, use an oven for best results. Preheat it to 350°F (175°C). Place the enchiladas in a baking dish and cover with foil. Heat for about 15-20 minutes. This method helps keep them moist. You can also use a microwave, but the oven keeps the tortillas crisp. Freezing enchiladas is simple and smart. Wrap each one tightly in plastic wrap. Then, place them in a freezer bag. They can last for up to three months. When you're ready to eat, thaw them overnight in the fridge. Then, reheat them in the oven for a fresh taste. The best cheese for chicken enchiladas includes cheddar and Monterey Jack. These cheeses melt well and add great flavor. Cheddar gives a sharp taste, while Monterey Jack provides a creamy texture. You can also mix both for a richer taste. Yes, you can prepare enchiladas ahead of time. Just assemble them without baking. Cover them tightly with foil or plastic wrap. Store them in the fridge for up to 24 hours. When you're ready, bake them as usual. This saves time on busy days. To prevent soggy tortillas, warm them before filling. Heat them in a dry skillet for about 30 seconds per side. This makes them pliable and less likely to soak up moisture. You can also use a thicker sauce for added protection. A layer of sauce at the bottom of the dish helps too. Enjoy your enchiladas with the right texture! In this article, we covered how to make easy chicken enchiladas. You learned about key ingredients, step-by-step assembly, and tips for the best flavor. We also explored variations, storage, and answered common questions. Now you have the tools to create delicious meals at home. Enjoy the process and share these tasty dishes with others!

Easy Chicken Enchiladas Quick and Tasty Recipe

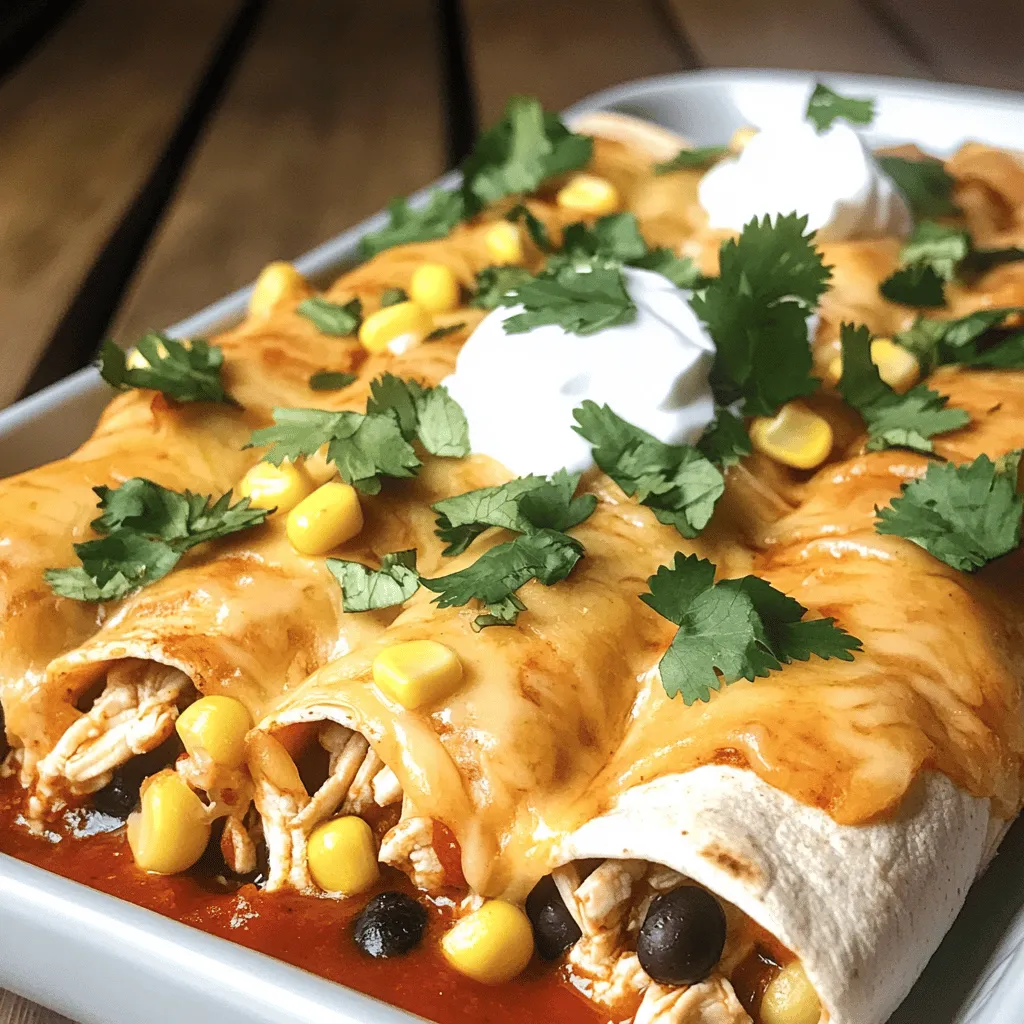
Looking for a quick, tasty meal? You’ll love my Easy Chicken Enchiladas recipe! With just a few simple ingredients, you

- 1 cup frozen spinach, thawed and drained Spinach gives this dip a fresh taste. Frozen spinach is easy to use. Make sure to drain it well to avoid a watery dip. - 1 cup canned artichoke hearts, chopped Artichokes add a unique flavor. They bring a nice texture. Use high-quality canned artichokes for the best taste. - 1 cup cream cheese, softened Cream cheese makes the dip creamy. Softening it helps mix well. Choose full-fat cream cheese for extra richness. - 1/2 cup sour cream Sour cream adds a tangy flavor. It also helps create a smooth dip. Use fresh sour cream for the best results. - 1/2 cup mayonnaise Mayonnaise adds extra creaminess. It helps bind all the ingredients. Select a good-quality mayo for a richer taste. - 1 cup shredded mozzarella cheese Mozzarella gives the dip a cheesy pull. It melts well and adds great flavor. Use fresh mozzarella for the best melt. - 1/2 cup grated Parmesan cheese Parmesan brings a salty, nutty flavor. It adds depth to the dip. Freshly grated Parmesan is always better than pre-grated. - 2 cloves garlic, minced Garlic adds a strong aroma and taste. It enhances all the flavors in the dip. Always use fresh garlic for the best impact. - 1 teaspoon lemon juice Lemon juice brightens the flavors. It balances the creaminess. Fresh lemon juice works best for a zesty kick. - Salt and pepper to taste Seasoning enhances all the flavors. Adjust to your liking for the best taste. - Optional: red pepper flakes for heat Red pepper flakes add spice. They can make the dip exciting. Add as much as you like for your spice level. Using quality ingredients makes a big difference in taste. Each component works together to create a creamy and delicious dip. For the full recipe, check out the detailed instructions above! To make creamy spinach artichoke dip, follow these simple steps. First, gather your ingredients. You will need: - 1 cup frozen spinach, thawed and drained - 1 cup canned artichoke hearts, chopped - 1 cup cream cheese, softened - 1/2 cup sour cream - 1/2 cup mayonnaise - 1 cup shredded mozzarella cheese - 1/2 cup grated Parmesan cheese - 2 cloves garlic, minced - 1 teaspoon lemon juice - Salt and pepper to taste - Optional: red pepper flakes for heat 1. Preheat your oven to 375°F (190°C). This step is crucial for even cooking. 2. In a large bowl, mix the cream cheese, sour cream, and mayonnaise. Make sure the cream cheese is soft. This helps create a smooth dip. 3. Add the minced garlic, lemon juice, salt, and pepper. Stir well to blend the flavors. Taste and adjust the seasoning if needed. 4. Fold in the spinach and artichoke hearts. Be gentle here, so you don’t break the artichokes too much. 5. Add in the mozzarella and Parmesan cheese. Mix until everything is combined. The cheese adds creaminess and flavor. 6. Transfer the mixture to a baking dish. Spread it evenly with a spatula. For a cheesy finish, sprinkle more mozzarella on top. 7. Bake for 25-30 minutes. You want it bubbly and golden brown. Keep an eye on it to avoid burning. 8. Cool slightly before serving. This dip is best warm. Enjoy your creamy spinach artichoke dip with tortilla chips or fresh veggies. A little sprinkle of red pepper flakes on top makes it look beautiful, too. Check the Full Recipe for more details! To make your dip truly shine, consider these tips: - Recommended seasoning adjustments: Start with salt and pepper. Add more if needed. For a zesty kick, mix in a pinch of red pepper flakes. Taste as you go to find your perfect balance. - Best techniques for creaminess: Use softened cream cheese for easy mixing. Beat it well with sour cream and mayonnaise until smooth. This is key for a creamy texture. You can add a splash of milk if it seems too thick. - Pointers for achieving the perfect golden top: Spread extra mozzarella on top before baking. This gives a nice, gooey finish. Bake until the top is golden brown and bubbly, about 25-30 minutes. Let it cool for a few minutes before serving. For the full recipe, check out the complete instructions. {{image_2}} You can change this dip in many fun ways. Let's talk about cheese first. Instead of mozzarella, try using gouda or cheddar. Gouda adds a nice smoky flavor. Cheddar gives a sharper taste. Both will change your dip but keep it creamy. Next, you might want to add some protein. Cooked chicken or crispy bacon can make the dip heartier. Shred the chicken and mix it in. Crumble the bacon on top for a crunchy bite. This makes a great snack for game day or any party. If you want a vegetarian or vegan dip, there are easy swaps. Instead of cream cheese, use a vegan cream cheese. You can also replace sour cream and mayonnaise with cashew cream or tofu. These swaps keep your dip rich and tasty without dairy. Feel free to get creative! Each swap offers a new twist on the classic recipe. Check out the Full Recipe for more ideas on how to make it your own. For storing leftovers, use an airtight container. Glass containers work great, but plastic ones are fine too. Make sure the dip is cool before sealing the container. This dip keeps well in the fridge for about three to four days. When you want to reheat the dip, I recommend using the oven. Preheat it to 350°F (175°C). Place the dip in an oven-safe dish. Heat for about 15-20 minutes, or until it's warm and bubbly. You can also microwave it, but be careful. Microwaving can make it dry if you heat it too long. Stir halfway through to keep it creamy. Remember, this creamy spinach artichoke dip tastes best when fresh. Enjoy the flavors! You can make this dip ahead of time. Mix all the ingredients as the recipe shows. Once mixed, store it in a covered dish in the fridge. You can keep it there for up to two days. When ready to serve, bake it as directed. Yes, you can freeze this dip. After mixing, place it in a freezer-safe container. Be sure to leave some space at the top. When you want to enjoy it, thaw it in the fridge overnight. Then, bake it as usual. Many dippers work well with this dip. Here are some great options: - Tortilla chips - Fresh veggies like carrots and celery - Toasted baguette slices - Pita chips - Crackers Yes, you can make a healthier dip. Use Greek yogurt instead of sour cream and mayonnaise. You can also reduce the cheese or use low-fat versions. Add more veggies to boost the nutrition without losing flavor. For the full recipe, you can refer back to the section above. We explored the essential ingredients needed for a great dip. Each ingredient plays a role in flavor and texture. The step-by-step instructions showed you how to prepare and cook effectively. Tips and tricks helped you perfect the creaminess and golden top. We discussed variations, so you can customize the dip to your taste. Lastly, we covered proper storage for leftovers and answered common questions. With these insights, you can now create a delicious Creamy Spinach Artichoke Dip that impresses everyone. Enjoy making it!

Creamy Spinach Artichoke Dip Tasty and Simple Recipe

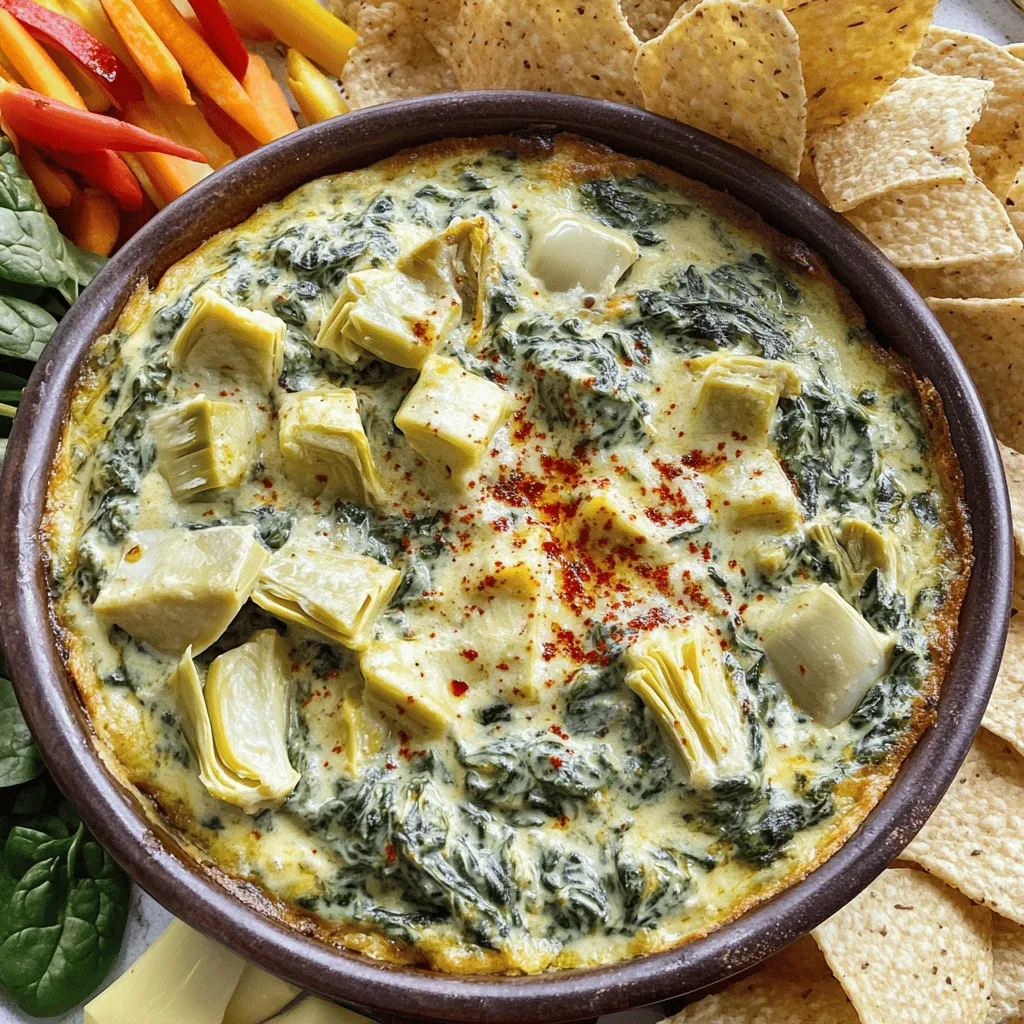
Are you ready to impress your friends with a delicious dip? My Creamy Spinach Artichoke Dip recipe is both tasty

For savory breakfast muffins, gather these simple ingredients: - 1 cup all-purpose flour - 1 cup whole wheat flour - 1 tablespoon baking powder - 1/2 teaspoon baking soda - 1/2 teaspoon salt - 1/4 teaspoon black pepper - 1 teaspoon dried oregano - 1 cup buttermilk - 1/4 cup olive oil - 2 large eggs - 1 cup cooked and crumbled breakfast sausage (or vegetarian alternative) - 1/2 cup shredded cheddar cheese - 1/4 cup chopped green onions - 1/4 cup sun-dried tomatoes, chopped (optional) You can easily swap some ingredients to fit your taste. If you want a gluten-free option, use a gluten-free flour blend. Instead of buttermilk, use plain yogurt or regular milk. For a dairy-free version, choose almond milk with a bit of vinegar. If you don't have sausage, you can use cooked bacon or a meat-free substitute. Fresh herbs can replace dried oregano for a brighter taste. Each savory breakfast muffin packs a good amount of protein and fiber. They are filling and can keep you satisfied until lunch. The muffins have about 180 calories each. This is a rough estimate, so use specific brands for accuracy. They also provide calcium, iron, and essential vitamins. For a healthier twist, you can reduce the cheese or add more veggies. Don't forget to check the Full Recipe for complete nutrition facts. Making savory breakfast muffins is simple. You need to gather all the ingredients first. This recipe uses both all-purpose and whole wheat flour for a hearty texture. Make sure to have everything ready before you start. 1. Preheat your oven to 375°F (190°C). Line a muffin tin with paper liners or grease it lightly. 2. In a large bowl, mix the all-purpose flour, whole wheat flour, baking powder, baking soda, salt, black pepper, and dried oregano. Whisk them well. 3. In another bowl, blend the buttermilk, olive oil, and eggs until smooth. 4. Create a well in the dry mix and pour in the wet mix. Fold gently until just combined. Don't overmix to keep the muffins light. 5. Now, add the cooked sausage, cheddar cheese, green onions, and sun-dried tomatoes if you like. Fold everything in evenly. 6. Spoon the batter into the muffin cups, filling each about 3/4 full. 7. Bake for 18-22 minutes. Check if they are golden brown and a toothpick comes out clean. 8. Let the muffins cool in the tin for 5 minutes. Then, transfer them to a wire rack to cool completely. To get the best texture, do not overmix the batter. This keeps the muffins fluffy. Use fresh ingredients, especially the baking powder and baking soda. They should be active to help your muffins rise well. If you want a crunchy top, sprinkle a bit of cheese on top before baking. For the full recipe, you can check the details above! To bake the best savory muffins, follow a few simple steps. Always preheat your oven. This helps muffins rise and cook evenly. Use fresh ingredients for the best flavor. Measure your flour properly; too much can make muffins dense. Mix wet and dry ingredients separately to avoid lumps. When combining, fold gently to keep the muffins light. You can easily change flavors in your muffins. Add herbs like basil or thyme for a fresh taste. Try different cheeses, like feta or mozzarella. For a spicy kick, mix in diced jalapeños. You can swap breakfast sausage for cooked bacon or mushrooms. Sun-dried tomatoes add a nice touch, but they are optional. Experiment with flavors you love; the options are endless! Using the right tools can make baking easier. A good muffin tin is key. Silicone or non-stick pans work well for easy removal. Use paper liners for easy cleanup. A whisk is great for mixing, and a spatula helps fold ingredients gently. Keep a toothpick handy to check if your muffins are done. With these tools, you’ll create delicious muffins every time! For the complete recipe, check out the Full Recipe section. {{image_2}} Savory breakfast muffins can easily fit a vegetarian or vegan diet. To make a vegetarian version, simply swap sausage with cooked mushrooms or spinach. You can also add diced bell peppers for more flavor. For a vegan option, use plant-based milk and flax eggs instead of eggs. Mix 1 tablespoon of ground flaxseed with 2.5 tablespoons of water for each egg. Cheese adds richness to your muffins. Use sharp cheddar, feta, or mozzarella for different tastes. You can mix in vegetables like zucchini, carrots, or roasted red peppers. This boosts nutrition and flavor. Try pairing cheese with sun-dried tomatoes for a tangy kick. Spices and herbs bring the muffins to life. Experiment with herbs like thyme, basil, or rosemary. A pinch of red pepper flakes can add heat. For a twist, try adding curry powder or cumin for a unique flavor. Always taste the batter before baking to find the right balance. Explore these variations to make savory breakfast muffins your own. Check out the Full Recipe for more tips! To keep your savory breakfast muffins fresh, place them in an airtight container. This helps maintain moisture and flavor. You can store them at room temperature for up to three days. If you want to keep them longer, refrigeration is a good option. Just make sure to wrap each muffin tightly in plastic wrap before placing them in the fridge. Freezing is a great way to keep muffins for future breakfasts. First, let the muffins cool completely. Then, wrap each muffin in plastic wrap and place them in a freezer bag. Be sure to label the bag with the date. These muffins can last up to three months in the freezer. When you are ready to enjoy them, you can simply thaw them in the fridge overnight. Reheating your muffins is easy. You can use the oven or microwave. For the oven, preheat it to 350°F (175°C). Place the muffins on a baking sheet and heat for about 10 minutes. If you prefer the microwave, heat each muffin for about 20-30 seconds. This warms them up nicely without making them dry. Enjoy your muffins warm for the best taste! For the full recipe, check out the full recipe section. Savory breakfast muffins are a tasty choice for any morning. They are easy to make and very filling. You can use many flavors in these muffins. You might wonder about the best ways to store them. To keep them fresh, place them in an airtight container. This will help them stay soft for days. You can also freeze them. Just wrap each muffin and place them in a freezer bag. If you want to switch up the protein, there are great options. You can use cooked bacon instead of sausage. Another tasty choice is cooked turkey or chicken sausage. For a vegetarian option, try crumbled tofu or tempeh. You can also skip the meat and add more veggies. Spinach, bell peppers, or mushrooms work well. Each choice adds its own flavor and keeps your muffins exciting. These muffins pair well with many dishes. You can serve them with a side of fruit for a fresh touch. Greek yogurt or cottage cheese adds creaminess and protein. If you like heat, a drizzle of hot sauce brings a nice kick. You can also enjoy them with a warm cup of coffee or tea. For a complete meal, serve them with scrambled eggs or a simple salad. Explore more options and mix flavors to find your favorites! For the full recipe, see the section above. You learned about ingredients for savory breakfast muffins, including substitutions and nutrition facts. I shared step-by-step baking instructions and tips for the best muffin texture. Additionally, we explored flavor variations and the right equipment to use. Finally, I provided storage tips and answered common FAQs. Now, you have the tools to bake delicious muffins. Follow these tips, and enjoy your homemade creations!

Savory Breakfast Muffins Perfect for Any Morning

Start your mornings right with savory breakfast muffins that are easy to make and delicious! Whether you’re in a rush

Older posts
Newer posts
← Previous Page1 … Page52 Page53 Page54 … Page58 Next →

dsad

© 2025 Cooking Wells • Built with GeneratePress

Our Policies

  • Copyright Policy
  • Cookie Policy
  • GDPR Policy
  • Privacy Policy
  • Disclaimer
  • Terms Of Use

More Information

  • Home
  • About
  • Contact
  • Appetizers
  • Dessert
  • Dinner
  • Drinks
©2025, Cooking Wells About Back To Top