Skip to content
DisclaimerTerms Of UseGDPR PolicyCookie Policy

Cooking Wells

  • Home
  • Drinks
  • Appetizers
  • Dinner
  • Dessert
  • About
  • Contact
  • Privacy Policy
DisclaimerTerms Of UseGDPR PolicyCookie Policy

Mia

To make coconut crusted shrimp, gather these fresh ingredients: - 1 lb large shrimp, peeled and deveined - 1 cup all-purpose flour - 2 large eggs - 1 cup shredded coconut (sweetened or unsweetened) - 1 cup breadcrumbs (panko for extra crunch) - 1 teaspoon garlic powder - 1 teaspoon paprika - Salt and pepper to taste - Vegetable oil for frying - Fresh lime wedges for serving - Optional: cilantro for garnish You can adjust some ingredients if needed. Here are some great swaps: - Use almond flour instead of all-purpose flour for a gluten-free option. - Replace eggs with a flaxseed mixture for a vegan choice. - Try unsweetened coconut for a less sweet flavor. - If you do not have panko, regular breadcrumbs work too. Choosing fresh shrimp is key for great taste. Look for these signs: - Choose shrimp that smell clean and mild, not fishy. - Check for firm flesh and a shiny appearance. - Avoid shrimp with black spots or a dull look. - If buying frozen, ensure they are solid and not clumped together. By following these tips, you will have the best ingredients for coconut crusted shrimp. For the full recipe, be sure to check the details above. First, you need to prepare the shrimp. Take 1 pound of large shrimp, peeled and deveined. Pat them dry with paper towels. This helps the breading stick better. Next, season the shrimp lightly with salt, pepper, and 1 teaspoon of garlic powder. This mix adds a nice flavor. Now, let’s set up the breading station. You need three separate bowls. In the first bowl, place 1 cup of all-purpose flour. In the second bowl, beat 2 large eggs until mixed well. In the third bowl, combine 1 cup of shredded coconut with 1 cup of breadcrumbs. Panko breadcrumbs give extra crunch. With the shrimp ready and the breading station set, it’s time to fry. Heat about 1/4 inch of vegetable oil in a large skillet over medium-high heat. The oil should be hot but not smoking. To test it, drop in a small piece of bread. If it sizzles, you’re good to go. Carefully place the coated shrimp in the hot oil. Do this in batches to avoid overcrowding. Fry each shrimp for about 2-3 minutes on each side until golden brown. Once done, use a slotted spoon to remove the shrimp and place them on a plate lined with paper towels. This will help drain excess oil. Now your coconut-crusted shrimp is ready to enjoy! For the full recipe, check the complete details above. To get that crunchy bite, use panko breadcrumbs. They add a light and airy feel. Make sure your oil is hot before frying. If it is not hot enough, the shrimp will soak up oil. Fry the shrimp in small batches. This keeps the oil temperature steady and ensures even cooking. After frying, place the shrimp on paper towels to absorb extra oil. This step keeps them crispy. One common mistake is not drying the shrimp. Wet shrimp won't hold the coating well. Another error is overcrowding the pan. This can lower the oil's temperature, leading to soggy shrimp. Ensure you use enough oil for frying. If you skimp on the oil, the shrimp may not cook evenly. Finally, don’t skip the seasoning. Salt and pepper enhance the shrimp's flavor greatly. Serve your shrimp with fresh lime wedges. The lime juice brightens the flavors. You can also pair it with a sweet dipping sauce, like a mango salsa or sweet chili sauce. These add a nice fruity touch. For a colorful plate, add a side salad with fresh greens. You can find the full recipe for Coconut Crusted Shrimp in this article. Enjoy your cooking! {{image_2}} You can swap shrimp for other proteins. Try chicken, fish, or even tofu. Each option brings its own flavor. For chicken, cut it into strips. For fish, use firm types like cod or halibut. Tofu works great for a vegetarian twist. Adjust cooking times based on protein choice. Chicken may need longer, while fish cooks quicker. Enjoy the same crispy coconut coating with these variations! Frying gives a crispy texture, but baking is lighter. When baking, use a little oil to help the coating crisp up. Preheat the oven to 400°F (200°C). Place the shrimp on a lined baking sheet. Bake for about 15-20 minutes, flipping halfway through. You will still get a tasty treat. It helps to use panko breadcrumbs for extra crunch when baking. You can spice up your coconut crust! Add garlic powder, paprika, or cayenne for heat. You could also mix herbs like cilantro or parsley into the coconut. Try lime zest for a bright twist. A touch of curry powder gives an exotic flair. Experiment with what you enjoy. These simple changes can turn a good dish into something truly special. For more ideas, check the Full Recipe. To keep your coconut crusted shrimp fresh, store them in the fridge. Place the shrimp in an airtight container. This helps to lock in moisture and flavor. Refrigerate them for up to two days. If you have leftovers, try to cool them down first. This keeps them from steaming and getting soggy. You can also freeze coconut crusted shrimp for later. Let them cool completely before freezing. Arrange the shrimp on a baking sheet in a single layer. Place the sheet in the freezer for about an hour. This prevents them from sticking together. Once frozen, transfer the shrimp to a freezer bag. They can stay good for up to three months. To reheat your shrimp, avoid the microwave. This can make them rubbery. Instead, use an oven or skillet for the best results. Preheat your oven to 375°F (190°C). Place the shrimp on a baking sheet and heat for about 10 minutes. If using a skillet, add a little oil and heat on medium until warm. This helps to keep them crispy and delicious. You can find the full recipe for these delightful bites in the earlier sections of this article. The best shrimp for this recipe is large, fresh shrimp. Look for shrimp labeled as 16/20 count. This means there are 16 to 20 shrimp per pound. Fresh or frozen shrimp both work well, but fresh often tastes better. Always choose shrimp that is firm and smells like the ocean. Avoid shrimp that smells strong or has a slimy texture. Yes, you can prepare Coconut Crusted Shrimp ahead of time. You can coat the shrimp and then place them on a baking sheet. Cover the sheet with plastic wrap and refrigerate it for up to 2 hours. This helps the breading stick better. However, it’s best to fry them just before serving to keep them crispy. If you freeze them, do so before frying. Just remember to thaw them before cooking. Coconut Crusted Shrimp tastes great with many sauces. A classic choice is sweet chili sauce. It adds a nice kick and sweetness. You can also serve it with a tangy lime dipping sauce. Mix lime juice, mayo, and a touch of honey for a quick sauce. If you like heat, try a spicy sriracha aioli. This adds a creamy and spicy kick to each bite. For more ideas, check out the Full Recipe for additional pairing suggestions. Coconut crusted shrimp offers a tasty treat and simple steps to follow. We explored ingredients, cooking methods, and variations. Remember to choose fresh shrimp for the best flavor. Use tips to avoid common mistakes and achieve that perfect crunch. Whether you fry or bake, serving suggestions enhance every bite. Now, you can store leftovers easily, ensuring they stay delicious. With the right sauces and side dishes, coconut crusted shrimp becomes a hit at any meal. Enjoy experimenting with this versatile recipe!

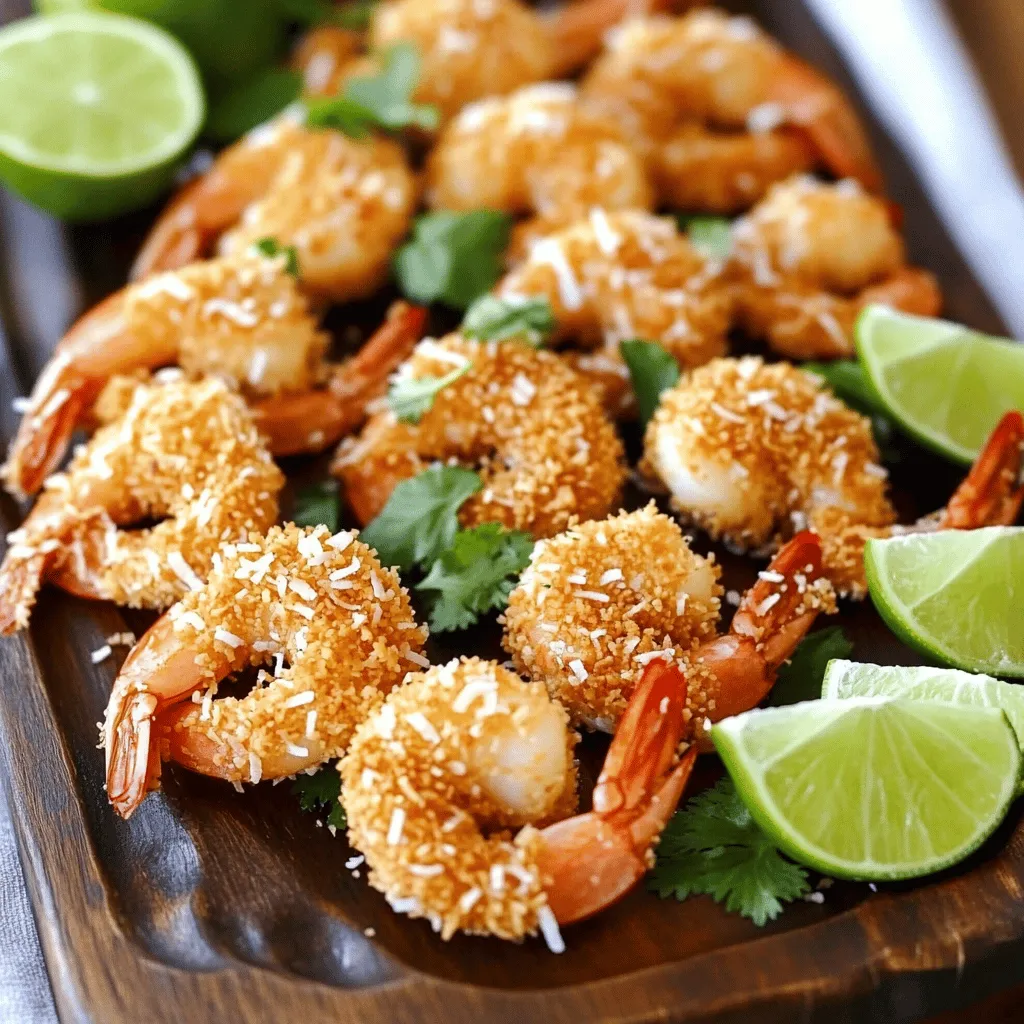
Coconut Crusted Shrimp Crispy and Flavorful Delight

Are you ready to indulge in a crispy, flavorful delight? My Coconut Crusted Shrimp recipe will transform your dinner table

For this Maple Dijon Brussels Sprouts dish, you will need the following items: - 1 pound Brussels sprouts, trimmed and halved - 3 tablespoons olive oil - 2 tablespoons pure maple syrup - 1 tablespoon Dijon mustard - 1 teaspoon garlic powder - Salt and pepper to taste - Optional: 1/4 cup pecans, roughly chopped - Optional: 1/4 cup dried cranberries These ingredients bring together sweet, savory, and nutty flavors. The Brussels sprouts are the star, while the maple syrup adds a nice sweetness. Dijon mustard gives it a tangy kick. Garlic powder enhances the taste, making it all come together. If you want to add some crunch and richness, toss in the pecans. Dried cranberries add a pop of color and sweetness. This dish is easy to make and perfect for any meal. For the full recipe, check the earlier sections. - Preheat the oven to 400°F (200°C). - In a large bowl, mix the halved Brussels sprouts with: - 3 tablespoons olive oil - 2 tablespoons pure maple syrup - 1 tablespoon Dijon mustard - 1 teaspoon garlic powder - Salt and pepper to taste. - Toss until the sprouts are well coated. - Spread the sprouts on a baking sheet in a single layer. - Make sure they are not overcrowded; this helps them roast well. - Roast in the oven for 20-25 minutes. Stir halfway through for even cooking. - In the last 5 minutes, add the chopped pecans if you're using them. - This gives them a nice crunch. - After roasting, sprinkle dried cranberries on top before serving. - These add a burst of sweetness and a pop of color. You can find the full recipe details above. To get the best texture in your Maple Dijon Brussels sprouts, do not overcrowd the baking sheet. If you put too many on the sheet, they will steam instead of roast. This will make them soggy. Instead, spread them out in a single layer. The heat needs space to circulate and crisp them up. I like to place the baking sheet in the middle rack of the oven. This helps them roast evenly and turn golden brown. You can boost the flavor of your Brussels sprouts with more herbs and spices. Try adding thyme or rosemary for a fresh taste. Garlic powder works great, but fresh garlic can add more depth. For a deeper taste, consider marinating the Brussels sprouts in the olive oil, maple syrup, and Dijon mustard for an hour before roasting. This will let the flavors soak in. Maple Dijon Brussels sprouts go well with many dishes. They make a great side for roasted chicken or pork. You can also serve them with grains like quinoa or rice for a hearty meal. If you want to impress during holiday meals, pair them with a festive main dish, like glazed ham or turkey. They add color and flavor that everyone will love. For the full recipe, check out the details above. {{image_2}} Brussels sprouts are small but mighty! They are packed with vitamins like C and K. These vitamins help our body fight off colds and keep our bones strong. Brussels sprouts are also high in fiber, which is great for digestion. Plus, they contain antioxidants that help protect our cells from damage. Maple syrup is more than sweet. It offers minerals like manganese and zinc. These minerals can support a healthy immune system. Dijon mustard adds a zesty kick and has low calories. It also contains beneficial compounds that may help with digestion. A serving size of Maple Dijon Brussels sprouts is about one cup. This dish has around 150 calories per serving. You get 8 grams of fat, 20 grams of carbs, and 5 grams of protein. This balance makes it a tasty and healthy choice for any meal. You can enjoy this dish with confidence, knowing it is both flavorful and nutritious! For the complete recipe, check out the [Full Recipe]. You can change up the flavors in your Maple Dijon Brussels sprouts. Here are two tasty ideas: - Maple Balsamic Brussels Sprouts: Swap Dijon mustard for balsamic vinegar. It adds a tangy sweetness. This change brings a new layer of flavor. - Spicy Dijon Brussels Sprouts: Add a pinch of cayenne pepper or red pepper flakes. This gives a nice kick. If you love heat, this is a great option. Feel free to mix in different ingredients based on what you like: - Suggestions for different nuts or seeds: Instead of pecans, try walnuts or sliced almonds. They offer a nice crunch. You can also use sunflower seeds for a nut-free option. - Alternatives for maple syrup: If you don’t have maple syrup, honey works well. It gives a nice sweetness too. Agave nectar is another good choice. You can easily adapt this recipe for different diets: - Vegan and gluten-free options: This recipe is already vegan. Just ensure your Dijon mustard is gluten-free. Most brands are fine. - Low-carb variations: If you follow a low-carb diet, skip the dried cranberries. They add sugar. Instead, use fresh herbs for flavor. To keep leftover Maple Dijon Brussels sprouts fresh, place them in an airtight container. They can stay good in the fridge for up to three days. If you want to keep them longer, freeze them in a freezer bag for about three months. Remember to cool them down first before storing. Yes, you can reheat Brussels sprouts! The best way is to use the oven. Preheat it to 350°F (175°C). Spread the sprouts on a baking sheet and heat for about 10 minutes. This method keeps them crispy. You can also use a microwave, but they may get soft. Heat them for about one to two minutes, checking often. Maple Dijon Brussels sprouts go well with many main dishes. They match nicely with roasted chicken or grilled salmon. For a vegetarian option, try them with quinoa or lentils. You can also serve them alongside mashed potatoes or a fresh salad for a complete meal. This post covered how to make Maple Dijon Brussels sprouts with simple steps and tasty tips. You learned about the fresh ingredients and their health benefits. Remember to roast the sprouts at 400°F for perfect texture. Try adding nuts or cranberries for extra flavor. Whether you're planning a holiday meal or a weeknight dish, these sprouts are a great choice. Enjoy your cooking and the health gains that come from these tasty bites!

Maple Dijon Brussels Sprouts Flavorful and Easy Recipe

Looking for a side dish that’s both delicious and easy to make? You’ll love these Maple Dijon Brussels Sprouts! With

To make Avocado Deviled Eggs, you'll need a few simple ingredients. Here’s the list: - 6 large eggs - 1 ripe avocado - 2 tablespoons Greek yogurt - 1 tablespoon Dijon mustard - 1 tablespoon lime juice - 1/2 teaspoon garlic powder - 1/4 teaspoon smoked paprika - Salt and pepper to taste - Fresh cilantro for garnish (optional) - Sliced radishes for decoration (optional) These ingredients blend together to create a creamy, flavorful filling. The ripe avocado adds a rich texture and healthy fats. Greek yogurt gives a tangy note and keeps it light. Dijon mustard and lime juice add a zesty kick. Garlic powder and smoked paprika bring depth to the flavor. You can choose to garnish with cilantro and radishes to make your dish pop. Enjoy each bite as a healthy, tasty treat! For the full recipe, follow the steps to make these delicious snacks. Start by placing the eggs in a saucepan. Fill it with water so the eggs are covered by about an inch. Turn the heat to high and bring the water to a boil. Once boiling, cover the pan and take it off the heat. Let the eggs sit for 9 to 12 minutes. Use 9 minutes for creamy yolks and 12 minutes for firmer ones. After the time is up, move the eggs to a bowl of ice water. This stops the cooking and cools the eggs for easy peeling. Let them sit in the ice water for about 5 to 10 minutes. Once the eggs are cool, gently tap them to crack the shells. Peel the eggs under running water; this helps a lot. Cut each egg in half lengthwise. Carefully remove the yolks and place them in a mixing bowl. Now, add the ripe avocado, Greek yogurt, Dijon mustard, lime juice, garlic powder, smoked paprika, salt, and pepper to the yolks. Use a fork to mash everything together until it’s smooth and well mixed. This filling is where the flavor and nutrition come alive! Now it’s time to fill the eggs! Spoon or pipe the avocado mixture back into the hollowed egg whites. Fill them generously for a tasty bite. For a bit of flair, sprinkle extra smoked paprika on top. If you like, you can also garnish with fresh cilantro and slices of radish. This adds color and a bit more flavor. Enjoy your healthy and delicious avocado deviled eggs, packed with flavor and nutrition! You can find the full recipe to guide you through this process. To cook perfect eggs, start with cold water. Place the eggs in a pot. Cover them with water, about one inch above the eggs. Bring the water to a boil. Once it boils, cover the pot and remove it from the heat. Let the eggs sit for 9 to 12 minutes. If you want creamy yolks, choose 9 minutes. For firmer yolks, go for 12 minutes. After time is up, cool the eggs in ice water for 5 to 10 minutes. This stops the cooking and makes peeling easier. If you have leftover avocado deviled eggs, store them in the fridge. Use an airtight container to keep them fresh. Place a piece of plastic wrap over the eggs to reduce air exposure. They stay good for up to two days. After that, the avocado may brown, so enjoy them soon! You can switch up the recipe with different ingredients. If you want a vegan option, replace the egg yolks with blended chickpeas. Use tahini instead of Greek yogurt for creaminess. You can also add spices like cayenne for heat. Try other herbs too, like dill or chives, for new flavors. Mix and match to find your favorite taste! For the full recipe, check the details above. {{image_2}} To spice things up, add some heat to your avocado deviled eggs. You can mix in a teaspoon of hot sauce or some finely chopped jalapeños. This adds a nice kick. If you want more flavor, consider adding some cayenne pepper or chili powder. These spices give a warm, zesty taste. You can also top the eggs with sliced jalapeños for extra crunch and heat. For a Mediterranean twist, add some chopped olives and sun-dried tomatoes. These ingredients bring rich, savory flavors. You can swap Greek yogurt for creamy feta cheese. This gives a tangy taste that pairs well with avocado. To finish, sprinkle some fresh herbs like dill or parsley on top. This makes your dish colorful and fresh. To make these eggs vegan, skip the eggs and use tofu. Silken tofu works best for a creamy texture. Blend it with avocado, lime juice, and spices from the base recipe. This creates a rich filling without using eggs. You can add nutritional yeast for a cheesy flavor. Serve with a sprinkle of paprika for color. This version is healthy and perfect for plant-based diets. For the full recipe, check the details above. Store your avocado deviled eggs in the fridge. Use a sealed container to keep them fresh. They taste best when eaten within three days. If you want to keep them longer, separate the filling from the egg whites. This helps maintain texture and flavor. For longer storage, freeze the filling. Place it in an airtight container or a freezer bag. You can keep it frozen for up to a month. When ready to use, thaw it in the fridge overnight. Then, fill your egg whites just before serving. To keep your eggs fresh, avoid adding the garnish until serving time. This keeps the presentation nice and prevents sogginess. If you notice browning on the avocado filling, add a splash of lime juice. This keeps the color bright and appetizing. Always check for any off smells before eating. If something seems off, it's best to toss it. Enjoy your avocado deviled eggs while they're fresh! To stop the avocado from turning brown, use lime juice. It has citric acid that slows oxidation. When you mix it with the avocado, the color stays bright. Cover the mixture with plastic wrap. Press it tightly against the surface to keep air out. This helps keep it fresh longer. Yes, you can make this recipe ahead of time. Prepare the filling and store it in the fridge. Keep it in an airtight container to avoid browning. You can also boil the eggs a day before. Just fill them with the avocado mixture when you are ready to serve. If you don’t have Greek yogurt, use sour cream instead. It adds a nice tang and creaminess. You can also use mashed silken tofu for a dairy-free option. This will keep the dish smooth and tasty while being lighter. To check if your eggs are hard-boiled, do the spin test. Place an egg on a flat surface and spin it. If it spins smoothly, it’s hard-boiled. If it wobbles, it’s still raw. You can also crack an egg open; if the yolk is firm and yellow, it's done. This blog post covered how to make tasty avocado deviled eggs. We explored the simple ingredients and step-by-step instructions for cooking and assembling them. I shared tips for cooking eggs perfectly and storing leftovers. You also learned about fun variations, like the spicy or vegan options. Enjoy making these healthy snacks. They're not just yummy; they're easy too! Try them at your next gathering or just for fun. Happy cooking!

Avocado Deviled Eggs Packed with Flavor and Nutrition

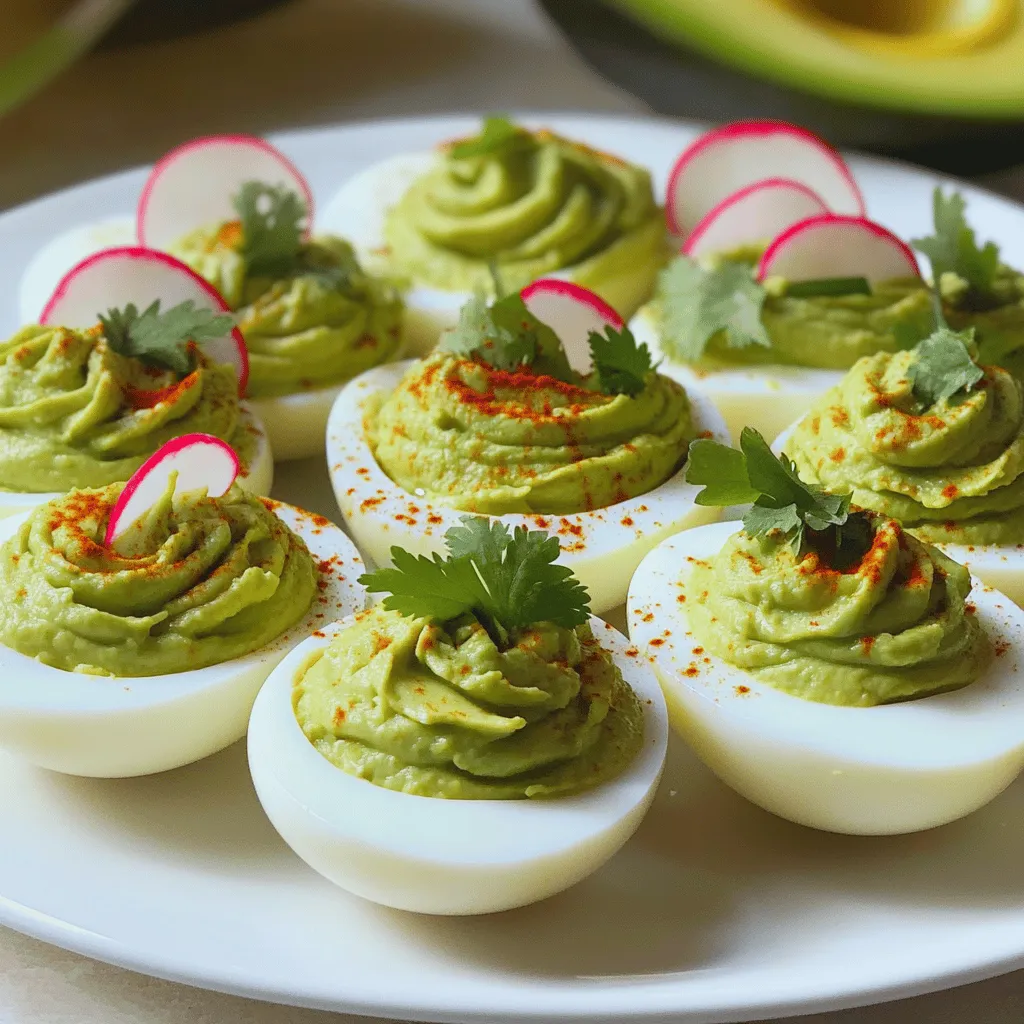
Looking for a fresh twist on a classic appetizer? Try my Avocado Deviled Eggs! They are creamy, flavorful, and packed

To make Almond Joy Energy Bites, you need these simple ingredients: - 1 cup rolled oats - 1/2 cup almond butter - 1/4 cup honey or maple syrup - 1/4 cup unsweetened shredded coconut - 1/4 cup mini chocolate chips - 1/4 cup chopped almonds - 1 teaspoon vanilla extract - Pinch of salt These ingredients come together to create a tasty and nutritious snack. Each one plays a key role in the flavor and texture. If you don’t have an ingredient, don’t worry! Here are some swaps you can try: - Use peanut butter instead of almond butter. - Swap honey for agave syrup for a vegan option. - Try sweetened coconut if you prefer a sweeter bite. - Use dark chocolate chips for a richer taste. Making these changes can keep the recipe fun and fresh! These bites offer a healthy snack option. Here’s a quick look at the nutrition: - Calories: About 150 per bite - Protein: 4 grams - Fat: 8 grams - Carbs: 15 grams - Fiber: 2 grams Almond Joy Energy Bites provide energy and satisfaction. They are great for a quick snack or a boost before activity. For the full recipe, check out the section above. First, gather all your ingredients. You will need rolled oats, almond butter, and honey or maple syrup. Mix these three in a large bowl. Blend them well until they form a thick paste. Next, add unsweetened shredded coconut, mini chocolate chips, chopped almonds, vanilla extract, and a pinch of salt. Stir until all the ingredients mix evenly. This ensures each bite has a good blend of flavors. After mixing, refrigerate the mixture for 30 minutes. This step makes it easier to roll into bites. When mixing, use a sturdy spoon or spatula. This helps combine the sticky almond butter and honey. If the mixture is too dry, add a little extra almond butter. If it feels too wet, add more oats. You want a dough that holds together but isn't too sticky. Taste the mixture! This is your chance to adjust sweetness or add more chocolate chips if you like. Once the mixture is chilled, it’s time to roll. Take small portions, about one tablespoon each. Roll the mixture between your hands to form a ball. Aim for bites that are about 1 inch in diameter. If your hands stick, dampen them slightly with water. Place the rolled bites on a parchment-lined plate. You can sprinkle extra chocolate chips or coconut on top for extra flair. Enjoy your snack! For the complete recipe, check out the Full Recipe. To make these bites stand out, try adding a pinch of sea salt. It brings out the sweetness. You can also swap in different nut butters, like cashew or peanut. Each nut adds its own taste. If you love coconut, use toasted coconut flakes instead of unsweetened. This adds a richer flavor. For a hint of spice, add a dash of cinnamon or even a splash of almond extract. Store your Almond Joy Energy Bites in an airtight container. Keeping them in the fridge keeps them fresh for up to a week. If you want them to last longer, freeze them. Just grab a few bites and let them thaw in your hand. They taste great right from the freezer too! These bites are perfect for a quick snack or a healthy dessert. Pair them with fresh fruit, like banana or apple slices. You can also serve them with a cup of your favorite tea or coffee. They make a great treat for kids after school. For a fun twist, serve them at parties on a cute platter. Your guests will love them! {{image_2}} You can switch up the nuts in your Almond Joy Energy Bites. Instead of almonds, try cashews or walnuts. Chopped pecans add a nice crunch too. Each nut brings a unique flavor and texture. This makes each batch special. Use your favorite nuts or whatever you have on hand. Want to change the sweet taste? You can swap honey for agave syrup. Maple syrup works well too. If you like a lower sugar option, try using mashed banana or unsweetened applesauce. These choices still keep your bites sweet and tasty. Add more fun to your energy bites with extra flavors. You can toss in some cocoa powder for a richer taste. A dash of cinnamon gives a warm note. Try adding a few drops of coconut extract for a tropical twist. You can also use dried fruits like raisins or cranberries for a chewy texture. These add-ins make your bites even more delicious. For the full recipe, check out the [Full Recipe]. To keep your Almond Joy Energy Bites fresh, store them in an airtight container. Place the container in the fridge. This will help them stay firm and tasty. The cold keeps the ingredients fresh. You can enjoy these bites for up to a week when stored this way. If you want to save some for later, freezing is a great option. After rolling the bites, lay them on a baking sheet. Make sure they don’t touch each other. Freeze them for about an hour. Once they are firm, move them to a freezer-safe bag or container. This way, you can enjoy them for up to three months. Just thaw them in the fridge overnight before eating. Almond Joy Energy Bites can last about a week in the fridge. If you freeze them, they last up to three months. Always check for any changes in smell or texture. If they look off, it’s better to toss them. Keeping an eye on freshness helps you enjoy your tasty treat! Almond Joy Energy Bites last about a week in the fridge. Store them in an airtight container. This helps keep them fresh and tasty. You can enjoy them every day for a week! If you want to keep them longer, consider freezing them. Yes, you can make these energy bites vegan! Just swap the honey for maple syrup. Both sweeteners work well in the recipe. Also, check that the chocolate chips are dairy-free. This way, you can enjoy the bites without any animal products. These energy bites offer several health benefits. They contain rolled oats, which provide fiber. Fiber helps you feel full longer. Almond butter gives you healthy fats and protein, which are good for energy. The coconut adds antioxidants, while chocolate chips bring joy! Absolutely! You can use any nut butter you like. Peanut butter, cashew butter, or sunflower seed butter all work well. Each nut butter gives a different flavor. Try different ones to find your favorite taste in these energy bites. For the full recipe, check out the section above. In this post, we explored how to make delicious Almond Joy Energy Bites. We covered the ingredients needed, along with healthier swaps. You learned step-by-step how to prepare, mix, and shape the bites for the best texture. Flavor tips and storage advice helped ensure freshness. You can also enjoy creative variations like different nuts or sweeteners. These energy bites are not only tasty, but they also pack health benefits. Now, you can enjoy and share these bites anytime, knowing you have a fun and healthy snack at hand.

Almond Joy Energy Bites Simple and Tasty Treat

Are you craving a sweet snack that fuels your energy? Then you’ll love my Almond Joy Energy Bites! These simple

- Baby spinach - Strawberries The star of this salad is the fresh produce. I love using baby spinach because it is tender and mild. It adds a nice base to the salad. Strawberries bring a burst of sweetness and color. When selecting strawberries, look for bright red ones with a shiny skin. This ensures they are ripe and full of flavor. - Feta cheese - Sliced almonds Feta cheese adds a creamy, salty touch. It pairs well with the sweet strawberries. Sliced almonds give the salad a nice crunch. They also add healthy fats and protein. You can toast the almonds for an extra depth of flavor. - Balsamic vinegar - Honey - Olive oil The dressing is simple yet delicious. Balsamic vinegar brings acidity and depth. Honey adds sweetness to balance the tanginess. Olive oil makes the dressing smooth. Mix these three together for a bright, zesty flavor that enhances the salad. For the complete details, you can check the Full Recipe. Start by mixing the key ingredients. In a large salad bowl, place 4 cups of fresh baby spinach. Then, add 1 cup of hulled and sliced strawberries. Toss them gently to mix. This blend creates a fresh and vibrant base for your salad. Next, it’s time for cheese and nuts. Add 1/2 cup of crumbled feta cheese to the bowl. This cheese adds a creamy texture and tangy flavor. Then, sprinkle in 1/4 cup of sliced almonds. They give a nice crunch and a nutty taste. Now, let’s make the dressing. In a small bowl, whisk together 2 tablespoons of balsamic vinegar, 1 tablespoon of honey, and 1 tablespoon of olive oil. This mix creates a sweet and tangy dressing. Add salt and pepper to taste. Ensure you whisk well until it’s fully combined. With the salad and dressing ready, it’s time to combine them. Drizzle the dressing over your salad mix. Toss gently to coat all ingredients evenly. This step makes every bite flavorful. Finally, add some zing by topping the salad with 1/4 cup of thinly sliced red onion. This will give the salad a nice bite. Serve your Strawberry Spinach Salad right away or chill it for 15 minutes for a refreshing taste. For the full recipe, you can refer to the earlier section. Enjoy your delicious creation! Choosing ripe strawberries is key to a great salad. Look for berries that are bright red and firm. Avoid those that are soft or have dark spots. Smell them, too! Fresh strawberries have a sweet scent. Freshness of spinach also matters. Pick baby spinach with deep green leaves. It should feel crisp and vibrant. Avoid wilted or yellow leaves. Fresh spinach adds a nice crunch to your salad. Adjusting sweetness and acidity makes a big difference. Start with the balsamic vinegar and honey. Taste it after mixing. If you want it sweeter, add more honey. If you prefer a tangy flavor, add extra vinegar. Use good-quality olive oil. It brings a rich taste to the dressing. A little salt and pepper can balance the flavors, too. Ideal pairings with the salad can enhance your meal. This salad goes well with grilled chicken or fish. You can also serve it as a side with your favorite sandwich. For a fun twist, try adding crispy bacon or nuts. They add texture and flavor. Enjoy the fresh and vibrant taste of this salad! For the full recipe and more inspiration, check out Strawberry Spinach Delight. {{image_2}} You can easily boost your salad with protein. Grilled chicken or shrimp works great. Just slice them up and toss them in. The chicken adds a hearty feel, while shrimp gives a light, fresh taste. It makes your salad a full meal. Plus, both options pair nicely with the sweet strawberries. Want to switch up the flavor? Try a citrus vinaigrette! Use fresh orange or lemon juice for a bright twist. Mix it with olive oil, salt, and pepper. This tangy option livens up the salad. It enhances the sweetness of the strawberries and complements the spinach. You can even add a touch of honey for balance. Need a vegan or allergy-friendly version? Simply skip the feta cheese and use nuts instead. You can also swap out the honey for maple syrup. This keeps the sweetness without using animal products. Always check for any allergies with your guests. With these adjustments, everyone can enjoy this salad! For the full recipe, check out Strawberry Spinach Delight. Store leftover strawberry spinach salad in a sealed container. This keeps it fresh longer. If you can, eat it within two days. The spinach can wilt quickly. If you notice it getting soggy, remove the dressing. Keep the dressing separate until you're ready to eat. No, you cannot freeze this salad. Freezing changes the texture of the spinach and strawberries. When thawed, they become mushy. It is best to enjoy this salad fresh. Make a new batch when you crave it. You can store the salad in the fridge for about two days. After that, the taste and texture will decline. If the salad starts to smell or look bad, throw it away. Always trust your senses. For the full recipe, check the steps above. To make a basic strawberry spinach salad, follow these simple steps: 1. Gather your ingredients: You need fresh baby spinach, strawberries, feta cheese, sliced almonds, and red onion. 2. Mix spinach and strawberries: In a large bowl, combine 4 cups of baby spinach with 1 cup of hulled and sliced strawberries. Toss gently. 3. Add cheese and nuts: Sprinkle 1/2 cup of crumbled feta cheese and 1/4 cup of sliced almonds on top. 4. Make the dressing: In a small bowl, whisk together 2 tablespoons of balsamic vinegar, 1 tablespoon of honey, 1 tablespoon of olive oil, and some salt and pepper. 5. Combine salad and dressing: Drizzle the dressing over the salad. Toss gently to coat all ingredients. 6. Add red onion: Top with 1/4 cup of thinly sliced red onion for extra flavor. You can add many ingredients to enhance your salad's taste. Here are some suggestions: - Nuts: Try walnuts or pecans for a different crunch. - Fruits: Add blueberries or mandarin oranges for a sweet twist. - Herbs: Fresh mint or basil can bring a refreshing touch. - Protein: Grilled chicken, shrimp, or chickpeas can make it more filling. - Cheese: Goat cheese adds a creamy taste that pairs well. Yes, strawberry spinach salad is very healthy. Here’s why: - Spinach: It’s full of vitamins A and C, iron, and fiber. - Strawberries: They are low in calories and high in antioxidants. - Feta cheese: This adds calcium and protein but is lower in fat than other cheeses. - Almonds: They provide healthy fats and protein, which can help keep you full. You can prep this salad in advance. Here are some tips: - Store ingredients separately: Keep the spinach, strawberries, and dressing in separate containers. This keeps everything fresh. - Dress before serving: Add the dressing right before you eat to keep the salad crisp. - Chill for a bit: If you want, chill the salad for 15 minutes before serving. This enhances the flavors. For a complete guide, check the Full Recipe for all the details. This blog post covered how to make a delicious strawberry spinach salad. We explored key ingredients, from fresh produce to dairy and nuts. You learned to prepare the salad step-by-step, make a tasty dressing, and assemble everything perfectly. I shared tips to select the best ingredients and offered serving suggestions. You also discovered variations to fit different tastes and dietary needs. Remember, this salad is not just healthy; it’s versatile too. Enjoy making it your own!

Strawberry Spinach Salad Fresh and Vibrant Delight

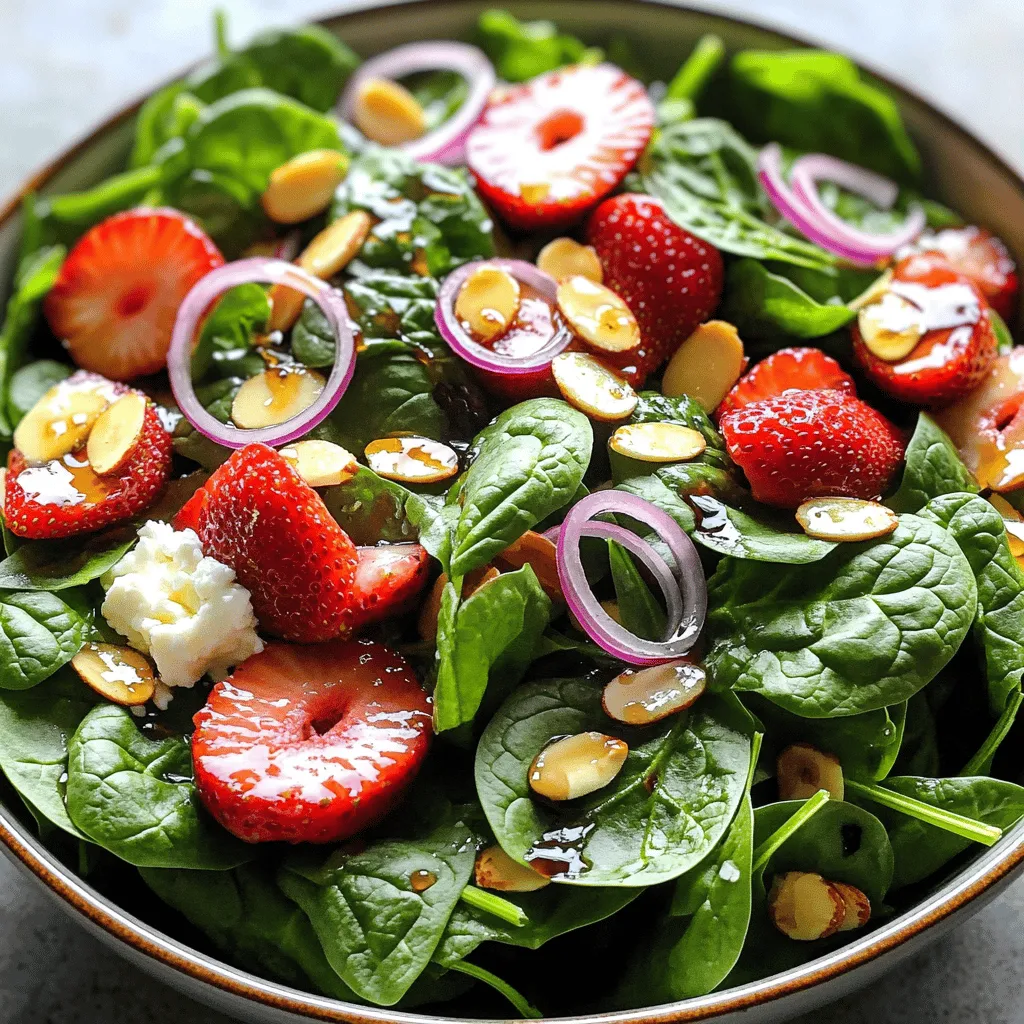
Are you ready for a fresh and vibrant delight that’s perfect for any occasion? This Strawberry Spinach Salad combines the

- 3 cups rolled oats - 1 cup pecan halves, chopped - 1/2 cup sliced almonds - 1/2 cup unsweetened shredded coconut - 1/2 cup maple syrup - 1/4 cup coconut oil, melted - 1 teaspoon vanilla extract - 1/2 teaspoon cinnamon - 1/4 teaspoon nutmeg - 1/4 teaspoon salt - 1/2 cup dried cranberries (or your choice of dried fruit) - 1/4 cup chia seeds (optional for added nutrition) The main ingredients create the heart of your granola. Rolled oats give it a chewy base. Chopped pecans add a nice crunch and flavor. Sliced almonds bring a different nutty taste. Shredded coconut adds sweetness and a tropical touch. Next, for the wet ingredients, maple syrup is vital. It sweetens your granola and gives it that rich flavor. Melted coconut oil helps everything stick together. Vanilla extract adds a warm, inviting aroma. Spices and add-ins make your granola special. Cinnamon and nutmeg bring warmth and depth. Salt balances the sweetness and enhances flavors. Dried cranberries give a pop of color and chewiness. Chia seeds are optional but boost nutrition and provide omega-3s. For the Full Recipe, refer back to the beginning. Enjoy making this nutritious snack! First, preheat your oven to 350°F (175°C). This prepares it for baking. Next, line a large baking sheet with parchment paper. This helps your granola not stick to the sheet. In a large bowl, combine: - 3 cups rolled oats - 1 cup pecan halves, chopped - 1/2 cup sliced almonds - 1/2 cup unsweetened shredded coconut - 1/2 teaspoon cinnamon - 1/4 teaspoon nutmeg - 1/4 teaspoon salt Stir these ingredients together well. This mix gives your granola flavor and crunch. In another bowl, whisk together: - 1/4 cup coconut oil, melted - 1/2 cup maple syrup - 1 teaspoon vanilla extract Pour this mixture over your dry ingredients. Mix until everything is coated. Then, spread the granola mixture evenly on the baking sheet. Bake the granola in your preheated oven for 20-25 minutes. Stir halfway through baking for even browning. It should turn golden brown. Once done, remove it and let it cool on the baking sheet. It will become crunchier as it cools. Once cooled, stir in 1/2 cup dried cranberries or your choice of dried fruit. Now, your maple pecan granola is ready! For the complete recipe, check out [Full Recipe]. To get that nice crunch, bake your granola evenly. Stir it halfway through baking. This helps it brown evenly. If you don’t stir, some parts might burn while others stay soft. After baking, let it cool completely. This cooling time is key. The granola will get crunchier as it cools. You can change how sweet your granola is by adjusting the maple syrup. If you like it sweeter, add more syrup. If you want it less sweet, use less syrup. Start with half a cup and taste it before baking. You can always add a bit more if you want. Remember, the flavor will deepen as it bakes. Store your granola in an airtight container. This keeps it fresh and crunchy. Glass jars or plastic containers work well. Make sure they are sealed tightly. Your granola can last up to two weeks when stored properly. If you want it to last longer, keep it in the fridge. Enjoy it as a quick snack, breakfast, or topping on yogurt. Check out the Full Recipe for more tips. {{image_2}} You can switch out pecans for other nuts. Walnuts, almonds, or hazelnuts work great. Each nut adds a unique taste and crunch. If you want a milder flavor, use sliced almonds. For a richer taste, walnuts can be your go-to. Hazelnuts add a fun twist with their distinct taste. Feel free to mix and match for your perfect blend! Adding spices can take your granola to the next level. Cinnamon and nutmeg are great, but you can also try cardamom or ginger. You might like to add vanilla or almond extract for a flavor boost. If you enjoy chocolate, mix in cocoa or cacao powder. This adds richness and a deep flavor. Dried fruits can really brighten up your granola. Try adding raisins, apricots, or even figs. Each dried fruit adds sweetness and texture. For fresh toppings, consider berries, bananas, or apples. Fresh fruits make it more vibrant and tasty. You can mix dried and fresh fruits for a fun combo! For the complete recipe, check the [Full Recipe]. Oats and nuts are packed with nutrients. Oats provide fiber, which helps digestion. They also contain antioxidants that can lower cholesterol. Nuts, like pecans and almonds, have healthy fats. These fats support heart health and help keep you full. Coconut adds a unique flavor and healthy fat, too. It contains medium-chain triglycerides (MCTs), which may boost energy. Chia seeds are tiny powerhouses. They are rich in omega-3 fatty acids, protein, and fiber. This helps keep you satisfied longer. You can enjoy this granola in many ways. Try it as a snack straight from the jar. You can also mix it with yogurt for a quick breakfast. Add fresh fruits for extra vitamins. Pour some milk over it for a crunchy cereal. One serving of this granola has about 200 calories. It contains around 8g of protein and 10g of healthy fats. You will also get about 30g of carbs, including fiber. This balance makes it a great snack or breakfast option. For the full recipe, check the earlier section. Homemade granola lasts about two weeks. Store it in an airtight container. Keep it in a cool, dry place. If you want it to last longer, store it in the fridge. This helps keep it fresh and crunchy. Yes, you can! Just use gluten-free oats. Many brands offer gluten-free options. Check the labels to be sure. If you want to add other grains, try quinoa flakes or puffed rice. Absolutely! You can add your favorite spices. Try nutmeg, ginger, or cardamom. You can also switch up the nuts. Walnuts or almonds work great. Dried fruits like raisins or apricots add a nice touch too. Yes, kids can help! They can mix dry ingredients. Measuring and pouring are fun tasks. Older kids can help with stirring and spreading the granola on the baking sheet. It’s a great way to bond and teach them cooking skills. There are many options! You can add yogurt, fresh fruits, or nut butter. Try adding chocolate chips for a sweet kick. Seeds like pumpkin or sunflower seeds also make a great addition. For the complete cooking instructions, check out the [Full Recipe]. You learned how to make a tasty granola from scratch. We covered ingredients and key steps. We discussed tips for the perfect crunch and how to store your granola. You can customize flavors and even involve kids in the process. Enjoy breakfast or snacks with this healthy treat. Keep it fun and creative as you make each batch your own. Dive in, explore, and enjoy your homemade granola journey!

Maple Pecan Granola Crunchy and Healthy Snack Recipe

Are you ready to whip up a tasty and healthy treat? This Maple Pecan Granola recipe is the perfect snack

- 2 cups edamame in pods (fresh or frozen) - 3 tablespoons olive oil - 4 cloves garlic, minced - 1 teaspoon red pepper flakes - 2 tablespoons soy sauce - 1 tablespoon sesame oil - 1 teaspoon sesame seeds (optional) - Chopped green onions for garnish - Salt, to taste When I make Spicy Garlic Edamame, I love using fresh edamame. They taste great and are easy to find. If frozen is all you have, that works too! Now, let’s look at what makes this dish not just tasty but also good for you. - Calories per serving: About 200 calories - Key vitamins and minerals: Edamame is rich in protein, fiber, and vitamins A, C, and K. This dish packs a healthy punch. Edamame provides plant protein, making it a great snack. Plus, garlic adds flavor and health benefits. It can boost your immune system and is great for your heart. For the full recipe, check out the details above. To start, you can use either fresh or frozen edamame. If you choose frozen, cook them according to the package instructions. This usually means boiling them for a few minutes until tender. Once cooked, drain the edamame and set them aside. If you're using fresh edamame, boil them in salted water for about 5-6 minutes. This helps them stay tender and flavorful. Next, grab a large skillet and add 3 tablespoons of olive oil. Heat it over medium heat. Once the oil is warm, add 4 cloves of minced garlic. Sauté it for about 1-2 minutes. Keep an eye on the garlic. You want it fragrant but not burnt. Burning garlic can spoil your dish. Now it's time to combine everything. Add your cooked edamame to the skillet with the garlic. Toss them well to coat with the garlic oil. Then, pour in 2 tablespoons of soy sauce and 1 tablespoon of sesame oil. Stir to mix everything evenly. Let it cook for another 2-3 minutes until the edamame are heated through. Taste your dish and sprinkle salt if needed. Finally, transfer it to a serving bowl and garnish with sesame seeds and chopped green onions. For the full recipe, check the section above. To make your spicy garlic edamame just right, you can adjust the heat. Start with one teaspoon of red pepper flakes. If you like it hotter, add more. You can also use other spices like chili powder or cayenne for a different kick. Both can enhance the flavor without overpowering the garlic. Serving your edamame in a bright bowl makes it pop. Choose colors like red or blue to catch the eye. You can sprinkle sesame seeds on top for added crunch. Chopped green onions also make a nice touch. Place a small dish of extra soy sauce on the side for dipping. This adds both style and function to your dish. One mistake is overcooking the garlic. Keep an eye on it, so it stays golden, not brown. Burnt garlic can taste bitter. Another mistake is not using fresh ingredients. Fresh garlic and edamame really boost the flavor. Always check for quality when you shop to make sure your meal shines. {{image_2}} You can change the flavor of your spicy garlic edamame in fun ways. First, try adding citrus zest. A bit of lemon or lime zest adds brightness. This zest brings a fresh taste that makes each bite pop. You can also use different oils, like avocado oil, for a richer flavor. This oil pairs well with garlic and adds a unique twist to the dish. Switching up the sauce can also enhance your edamame. Teriyaki or hoisin sauce gives a sweet touch. This sweetness balances the garlic and spice beautifully. If you enjoy a kick, try spicy mayo as a dip. This adds creaminess and extra heat, making the dish even more exciting. You can easily adapt this recipe for different diets. For a vegan option, stick with soy sauce and avoid any animal products. Most ingredients are already plant-based, making this easy. If you need gluten-free edamame, just use tamari instead of soy sauce. Tamari gives you the same great flavor without gluten. To keep your spicy garlic edamame fresh, store it in an airtight container. It’s best to let the dish cool before sealing. This way, you prevent condensation, which can make your dish soggy. When stored properly, your leftovers can last about 3 to 5 days in the fridge. Just remember to label the container with the date, so you know when to enjoy them. You can reheat your edamame in two main ways: microwave or stovetop. For the microwave, place the edamame in a safe dish, cover it, and heat for about 1-2 minutes. Stir halfway through to make sure it warms evenly. If you prefer the stovetop, heat a little olive oil in a pan over medium heat and add the edamame. Stir until heated through. This method helps keep the texture and flavor intact, ensuring they taste just as great as when you first made them. To cook frozen edamame, follow these steps: 1. Boil Water: Start by boiling a large pot of water. 2. Add Edamame: Once boiling, add the frozen edamame pods. 3. Cook: Let them cook for about 5-7 minutes. They should be tender but not mushy. 4. Drain: Drain the edamame in a colander and set them aside. Cooking frozen edamame is quick and easy. You can use them in many dishes or enjoy them on their own. You cannot eat the edamame pods. Only the beans inside are edible. The pods are tough and not good for eating. When you cook edamame, just pop the beans out of the pods. Enjoy the soft, green beans that are rich in protein and fiber. Edamame is packed with nutrients. Here are some key benefits: - High in Protein: Edamame contains a lot of protein, making it great for plant-based diets. - Rich in Fiber: It helps with digestion and keeps you full longer. - Vitamins and Minerals: Edamame offers vitamins like K and folate, plus minerals like iron and calcium. - Antioxidants: They contain antioxidants that help fight free radicals in the body. Including edamame in your diet can boost your health in many ways. You can find Spicy Garlic Edamame in many Asian restaurants. Look for places that serve Japanese or Chinese food. It's often found as a starter or appetizer. You can also make it at home using the Full Recipe for a tasty treat. Yes, you can make Spicy Garlic Edamame ahead of time. Here are some tips: - Cook and Cool: Prepare the edamame and let them cool completely. - Store: Place them in an airtight container in the fridge. - Reheat: When ready to eat, simply reheat in a skillet or microwave. Making it ahead saves time and makes snack prep easy! In this post, I covered how to make spicy garlic edamame. We discussed the simple ingredients you need and the easy steps to prepare it. Cooking edamame brings out its great taste. Remember, overcooking garlic is a common mistake to avoid. You can customize your dish with spices or different oils. Proper storage ensures your leftovers stay fresh. Embrace the flavors and make this dish your own. Enjoy your cooking adventure with edamame!

Spicy Garlic Edamame Flavorful and Simple Recipe

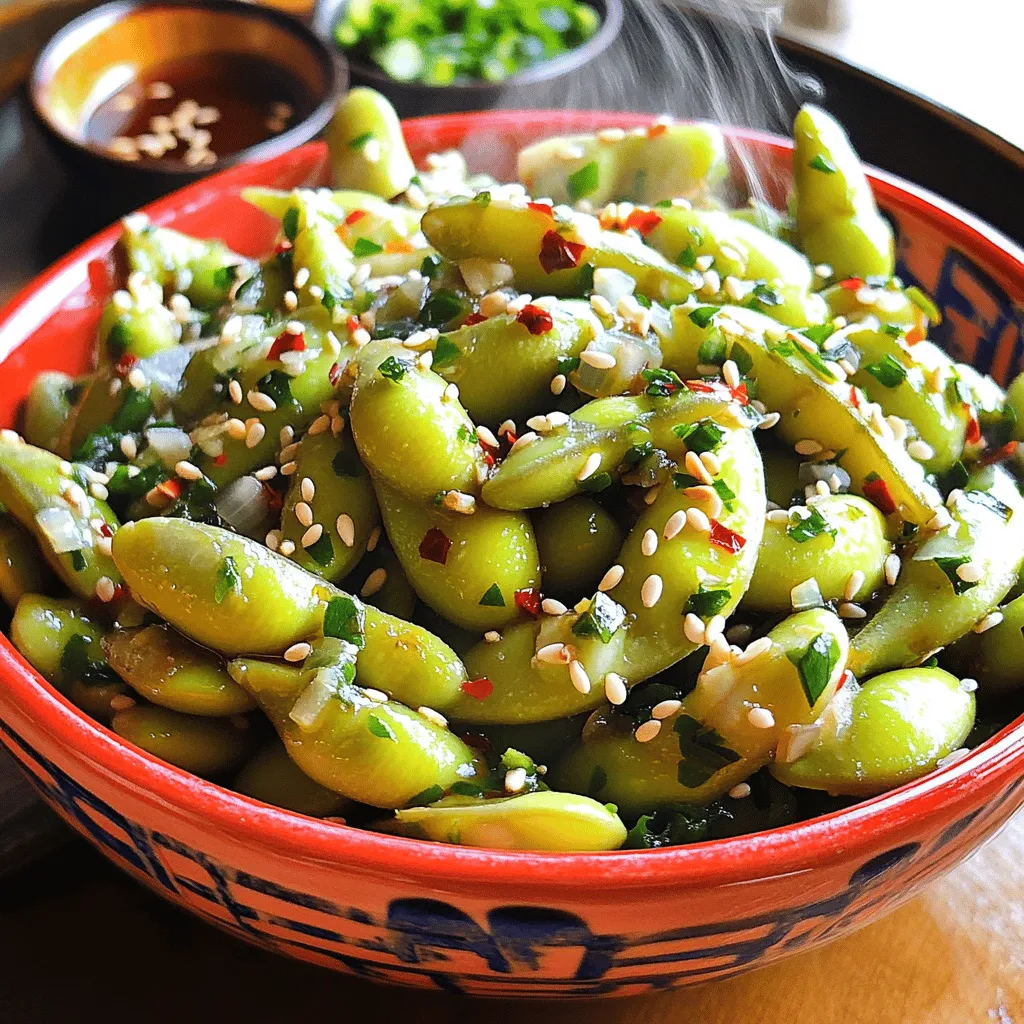
Looking for a quick, tasty snack? Spicy Garlic Edamame is the answer! This easy recipe packs a flavorful punch and

To make Banana Nutella Waffles, you need simple ingredients. Here’s what you need: - 1 cup all-purpose flour - 1 tablespoon sugar - 2 teaspoons baking powder - 1/2 teaspoon salt - 1 large egg - 1 cup milk - 1/4 cup vegetable oil - 1 teaspoon vanilla extract - 1 ripe banana, mashed - Nutella for drizzling These items come together to create a fluffy, tasty waffle. The ripe banana adds natural sweetness and moisture. Toppings make your waffles even better. Try these: - Sliced bananas - Chopped nuts (like walnuts or pecans) - Whipped cream - Maple syrup Each topping adds a new flavor and texture. You can mix and match to find your favorite. If you don’t have some ingredients, don’t worry! You can swap them out: - Use whole wheat flour for a healthier option. - Almond milk works well if you need a dairy-free choice. - You can replace the egg with a mashed banana for a vegan option. - For sweeteners, try honey or maple syrup instead of sugar. These substitutions help you make Banana Nutella Waffles fit your needs. You can still enjoy the same great taste! For the full recipe, check out the link. Start by gathering your ingredients. You will need flour, sugar, baking powder, salt, an egg, milk, vegetable oil, vanilla, and a ripe banana. In one bowl, mix the dry ingredients: flour, sugar, baking powder, and salt. In another bowl, beat the egg. Then, add the milk, oil, vanilla, and mashed banana. Mix until it is smooth. Now, pour the wet mix into the dry mix. Stir gently until just combined. A few lumps are okay. This batter makes the waffles light and fluffy. Next, preheat your waffle maker. This step is key for crispy waffles. Lightly grease the waffle maker if needed. Pour batter onto the hot surface, using a ladle. Spread it out evenly. Close the lid and cook for 3 to 5 minutes. The waffles should turn golden brown. Carefully lift them out once they are done. Be gentle to avoid breaking them. Now for the fun part! Place the waffles on a plate. Drizzle Nutella over the top generously. Add sliced bananas and some chopped nuts on top for crunch. You can also sprinkle a bit of powdered sugar for extra sweetness. These Banana Nutella Waffles are perfect for breakfast or a sweet snack. For the full recipe, check out the earlier section! To get those waffles nice and crispy, start with a hot waffle maker. Preheat it well before adding the batter. Use a light spray of non-stick oil to help with crispiness. Pour enough batter so it spreads but does not overflow. Close the lid and resist the urge to peek too soon. Wait until the light indicates they are ready, usually around 3-5 minutes. One common mistake is overmixing the batter. This makes waffles tough instead of fluffy. Another mistake is not preheating the waffle maker. Your waffles won't cook evenly if it’s not hot enough. Lastly, don’t let the waffles sit in the maker too long. This can make them soggy instead of crispy. A good quality waffle maker is key. Look for one that has adjustable heat settings. A mixing bowl and whisk are essential for combining your ingredients. Use a ladle or measuring cup to pour the batter evenly. Finally, a silicone spatula helps to remove the waffles without scratching your maker. For the full recipe, check out the complete guide. {{image_2}} You can play with flavors to make your waffles unique. Try adding cinnamon to the batter. A pinch of nutmeg also adds warmth. For a fruity twist, mix in some blueberries or chopped strawberries. You can even add a splash of almond extract for a nutty flavor. Each of these adds a fun touch to the classic taste. Nutella isn’t just for drizzling! You can spread it on top of warm waffles. You can also mix it into the batter for a rich taste. For a fun twist, try using flavored Nutella, like hazelnut or white chocolate. It changes the flavor and makes it more exciting. You can easily adapt this recipe for different diets. For gluten-free waffles, swap the all-purpose flour for a gluten-free blend. Make sure the blend has a good structure. For a vegan option, replace the egg with a mashed banana or flax egg. Use plant-based milk and oil too. These little changes keep the taste delicious and fun for everyone. Check the Full Recipe for more details! To keep your leftover waffles fresh, cool them to room temperature. Stack them neatly on a plate. Cover them with plastic wrap or aluminum foil. This will help keep them from drying out. Store the covered waffles in the fridge for up to three days. When you're ready to enjoy your waffles again, you can reheat them. Place the waffles in a toaster or oven. Heat them at 350°F for about 5 to 7 minutes. This will make them warm and crispy again. You can also use a microwave, but this may make them soft. If you want to freeze your waffles, let them cool completely first. Place them in a single layer on a baking sheet. Freeze them for about an hour, then transfer them to a freezer bag. Remove as much air as possible before sealing. You can freeze them for up to three months. When you want to eat them, just reheat as mentioned above. This makes meal prep easy and fun! For the full recipe, check out the details above. To make Banana Nutella Waffles from scratch, follow these steps: - Mix dry ingredients: In a bowl, whisk together flour, sugar, baking powder, and salt. - Combine wet ingredients: In another bowl, beat an egg. Add milk, vegetable oil, vanilla, and mashed banana. Mix well. - Combine both mixtures: Pour the wet mix into the dry mix. Stir gently until just combined. A few lumps are okay. - Cook the waffles: Preheat your waffle maker, then pour in the batter. Cook until golden brown. - Serve: Drizzle Nutella on top and add sliced bananas and nuts. This recipe gives you about four waffles, perfect for sharing or enjoying alone! Yes, you can make the batter ahead of time. Store it in the fridge for up to 24 hours. Just remember: when ready to cook, stir the batter gently again. If it thickens, add a splash of milk to loosen it up. This makes it easy for a quick breakfast! If you want to swap Nutella, try these options: - Peanut butter: It adds great flavor and protein. - Almond butter: A nutty choice that's also delicious. - Chocolate syrup: For a sweeter, gooey topping. - Fruit spreads: Use berry or apple spreads for a fruity twist. Each option gives a unique taste while still being yummy on your waffles! You learned how to make delicious banana Nutella waffles. We covered ingredients, simple steps, and tips for crispy perfection. I shared tasty variations and storage options to keep your waffles fresh. Remember, you can mix flavors and adjust for diets like gluten-free or vegan. Waffle-making can be fun, and now you have the tools to impress. Enjoy your tasty breakfast and share it with friends!

Savory Banana Nutella Waffles Easy and Delicious Treat

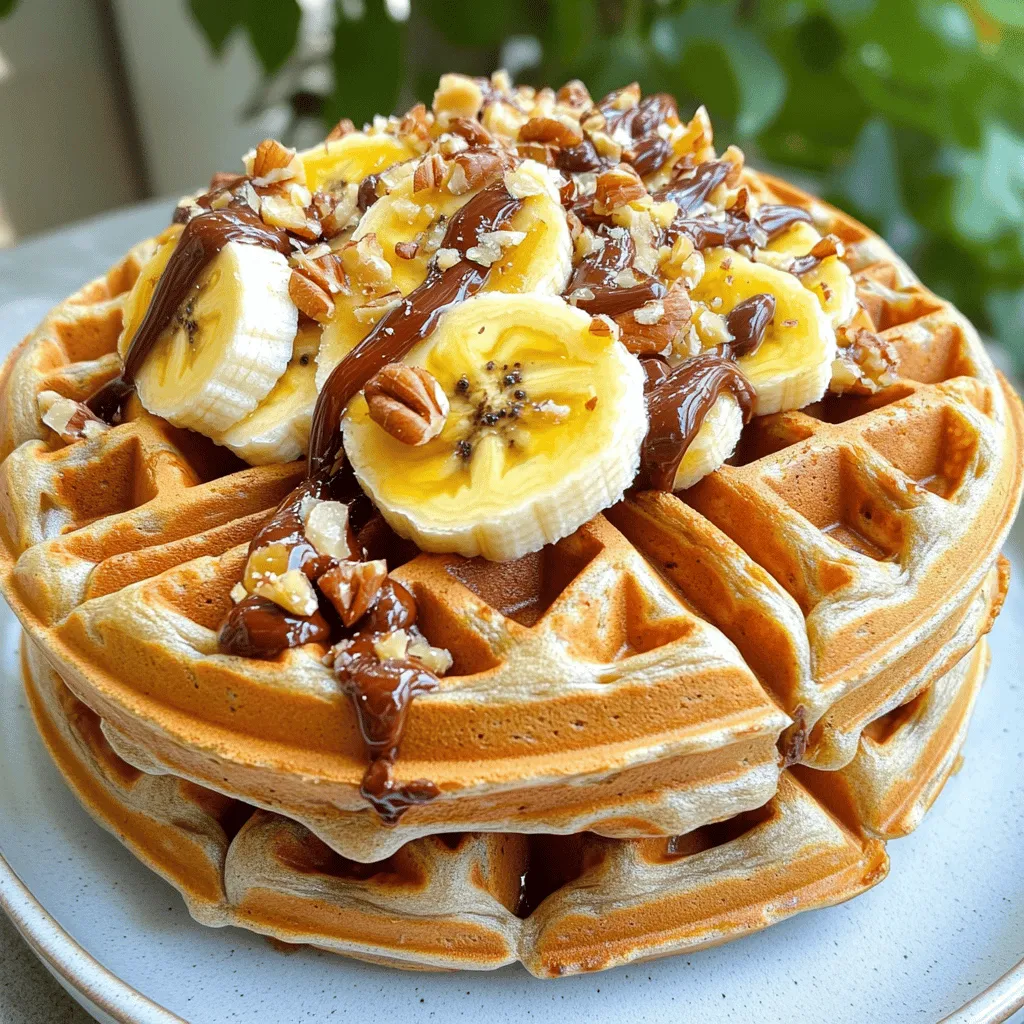
Who doesn’t love a treat that combines the creamy goodness of Nutella with ripe bananas? In this post, I’ll show

To make delicious sweet potato fries, gather these main ingredients: - 2 large sweet potatoes, peeled and cut into fries - 2 tablespoons olive oil - 1 teaspoon smoked paprika - 1 teaspoon garlic powder - Salt and pepper to taste These ingredients create the perfect blend of flavors and textures for your fries. The sweet potatoes provide natural sweetness, while smoked paprika adds depth. For the chipotle aioli, you will need: - 1 cup mayonnaise - 1-2 chipotle peppers in adobo sauce, finely minced - 1 tablespoon lime juice - 1 teaspoon cumin This aioli is creamy with a smoky kick. The chipotle peppers give it a spicy depth, making it a perfect dip for the fries. You can elevate your dish with these optional garnishes and spices: - Fresh cilantro, chopped (for garnish) Adding fresh cilantro brightens the dish and adds a pop of color. You can also sprinkle extra smoked paprika or lime zest for more flavor. For the full recipe, check out the [Full Recipe]. Start by peeling your sweet potatoes. Then, cut them into thin fries. Aim for uniform size so they cook evenly. Place the fries in a large bowl. Add 2 tablespoons of olive oil, 1 teaspoon of smoked paprika, and 1 teaspoon of garlic powder. Sprinkle salt and pepper to taste. Toss everything together until the fries are well coated. This step is key for flavor. Now, preheat your oven to 425°F (220°C). Line a baking sheet with parchment paper. Spread the sweet potato fries in a single layer on the sheet. Make sure they don’t touch to get crispy. Bake for about 25-30 minutes. Flip the fries halfway through for even cooking. They should turn golden and crispy. While the fries bake, prepare the chipotle aioli. In a mixing bowl, combine 1 cup of mayonnaise. Add 1 to 2 minced chipotle peppers in adobo sauce for heat. Squeeze in 1 tablespoon of lime juice and add 1 teaspoon of cumin. Mix well until smooth. Taste and adjust the heat by adding more chipotle if needed. This dip will take your fries to the next level. Once the fries are done, let them cool slightly. This helps them stay crispy. Serve your sweet potato fries hot with the chipotle aioli on the side. Garnish with chopped fresh cilantro for a nice touch. Enjoy this tasty treat! For the full recipe, check the details above. To make your sweet potato fries extra crispy, cut them evenly. Aim for a uniform thickness, around 1/4 inch. This helps them cook at the same rate. Toss them in olive oil and seasonings, then spread them out on a baking sheet. Avoid crowding the fries. This allows hot air to circulate and crisp them up. You can also soak the cut fries in water for 30 minutes before baking. This removes excess starch, which helps them get crispy. To save time, you can prep the sweet potatoes a day ahead. Cut them into fries and store them in a bowl of water in the fridge. This keeps them fresh and ready for cooking. You can also mix the aioli ingredients earlier. Just store it in an airtight container. This way, you can whip up this dish quickly when you’re ready to serve. A few tools can make your cooking journey smoother. Start with a good knife for cutting the sweet potatoes. A cutting board and a large bowl help with mixing. You’ll need a baking sheet lined with parchment paper for easy cleanup. A whisk or fork works well for mixing the aioli. Finally, having a spatula on hand helps you flip the fries halfway through baking. These tools ensure a fun and simple cooking experience. For the complete recipe, check out the Full Recipe. {{image_2}} You can change the flavor of your sweet potato fries with different seasonings. For a spicy kick, try adding cayenne pepper. If you like a hint of sweetness, mix in some cinnamon with your olive oil. You can also use Italian herbs like oregano or thyme for a fresh taste. Another option is to sprinkle some nutritional yeast for a cheesy flavor without dairy. These alternatives keep your fries exciting and tasty. The chipotle aioli is fantastic, but you can explore other flavors too. For a classic twist, use roasted garlic instead of chipotle. You could also mix in fresh herbs like basil or dill for a bright touch. If you enjoy a tangy flavor, add some Dijon mustard or a splash of vinegar. Each aioli flavor brings a new experience, making every dip special. Sweet potato fries with aioli are perfect for sharing. Set them out in a big bowl at your next party. You can also make a dipping station with different aioli flavors to please all guests. Consider pairing your fries with a fresh salad or a platter of veggies. This combo makes for a colorful and yummy spread. For a fun twist, serve the fries in small cones for a cute presentation. Remember, the key is to make it fun and inviting for everyone. Check out the Full Recipe for more ideas. If you have leftover sweet potato fries, store them in an airtight container. Let them cool before sealing to keep moisture out. They stay fresh for about 2-3 days in the fridge. If you want to enjoy them later, consider freezing them. Place fries in a single layer on a baking sheet. Once frozen, transfer them to a freezer bag. They can last up to 3 months! To bring back that crispy texture, reheat your fries in the oven. Preheat to 400°F (200°C). Spread the fries on a baking sheet in a single layer. Bake for about 10-15 minutes, flipping halfway through. This method helps avoid soggy fries. You can also use an air fryer for extra crunch! Set it to 350°F (175°C) and cook for about 5-7 minutes. Store leftover chipotle aioli in a sealed container in the fridge. It keeps well for about 1 week. If you want to add some depth, stir in a splash of lime juice before serving. This will keep the flavor fresh and bright. If you make a larger batch, consider freezing it in ice cube trays. Once frozen, transfer to a freezer bag. This way, you can use just what you need later. For the full recipe, check out the details above! Yes, you can use regular potatoes. Russet or Yukon Gold work well. They have a great texture and flavor. However, sweet potatoes add a unique sweetness. This sweetness pairs nicely with the smoky aioli. If you choose regular potatoes, adjust cooking time. Watch for golden color and crispiness. To make the aioli spicier, add more chipotle peppers. You can also mix in cayenne pepper or hot sauce. Start with a little. Taste as you go to find your perfect heat level. This way, you can control the spice. A little goes a long way, so be careful! Yes, you can easily make this recipe vegan. Swap mayonnaise for a plant-based version. There are many tasty options available. Use vegan mayo to keep the creamy texture. The rest of the recipe stays the same. You’ll still enjoy all the flavors and crunch! The best way to cut sweet potatoes is to slice them evenly. Aim for about 1/4 inch thick. This size helps them cook evenly. Start by cutting off the ends. Then, slice the potato lengthwise. Make long strips, then cut those into fries. Uniform size ensures perfect cooking every time. This blog post shared how to make tasty sweet potato fries and chipotle aioli. You learned the key ingredients and step-by-step instructions to create them. I offered tips for crispiness and ideas for variations to keep things fun. Storing leftovers was also covered, so you can enjoy them later. In the end, cooking these fries and aioli can bring joy to any meal. Use your creativity to explore flavors and enjoy every bite!

Sweet Potato Fries with Chipotle Aioli Delight

Are you ready to elevate your snacking game? In this post, I’ll show you how to whip up mouthwatering sweet

To make creamy spinach tortellini, gather these simple ingredients: - Cheese Tortellini (12 ounces) - Fresh Spinach (2 cups, chopped) - Olive Oil (1 tablespoon) - Garlic (3 cloves, minced) - Heavy Cream (1 cup) - Parmesan Cheese (1 cup, grated) - Nutmeg (1/2 teaspoon, freshly grated if possible) - Salt and Pepper to taste - Optional Ingredients (Crushed red pepper flakes, Fresh basil for garnish) Each ingredient plays a key role in creating a rich and satisfying dish. The cheese tortellini serves as a hearty base. Spinach adds color and nutrition. Olive oil brings richness, while garlic adds depth. Heavy cream creates that luscious texture. Parmesan cheese adds umami and saltiness. Nutmeg gives a warm, aromatic hint. Don't forget salt, pepper, and optional spices to elevate your dish! For the full recipe, check out the complete cooking instructions. - Prepare tortellini according to package instructions. - Ensure tortellini is al dente before draining. This gives it a nice bite. - Heat olive oil in a skillet over medium heat. This will add flavor. - Add minced garlic and sauté until fragrant. This takes about a minute. - Stir in chopped spinach and cook until wilted. It should take 2-3 minutes. - Lower heat and add heavy cream, simmer gently. This builds the sauce. - Gradually mix in parmesan cheese until melted. This adds creaminess. - Season with nutmeg, salt, pepper, and optional red pepper flakes. This brings out flavor. - Gently fold cooked tortellini into the creamy sauce. Make sure every piece is coated. - Allow to thicken slightly before serving. This helps the sauce cling to the pasta. For the complete process, check out the Full Recipe. To make your sauce creamy, use heavy cream. It adds richness and smoothness. When you pour the cream into the pan, keep the heat low. This helps prevent curdling. Stir the sauce often as it simmers. If you see any lumps, lower the heat more. To boost flavor, try adding crushed garlic or a pinch of cayenne. Fresh herbs like basil or parsley can brighten the dish. You can also swap Parmesan for other cheeses. Try using mozzarella for a milder taste or Gruyère for a nutty flavor. Pair creamy spinach tortellini with a fresh salad or garlic bread. A light, crunchy salad balances the rich sauce. For plating, use a wide bowl to show off the dish. Add a sprinkle of cheese and a basil leaf on top for color. This makes your meal look as good as it tastes. {{image_2}} You can add protein to your creamy spinach tortellini for extra flavor. Chicken, shrimp, or sausage work great. If you choose chicken, cook it in the skillet before adding garlic. For shrimp, add it when the spinach wilts. Sausage can be crumbled and browned first. Adjust cooking times to ensure each protein is cooked through. You can also mix in other veggies. Try bell peppers, zucchini, or mushrooms. These add texture and flavor. For a fresh twist, use seasonal produce. In spring, add peas or asparagus. In fall, consider butternut squash. Just make sure to sauté them well with the spinach. You can make this dish fit your diet. Look for gluten-free tortellini if you need it. Many brands offer this option. For a vegan version, swap heavy cream for coconut cream and use nutritional yeast instead of cheese. These changes keep the dish rich and tasty while meeting your dietary needs. To keep your creamy spinach tortellini fresh, use airtight containers. Glass or plastic containers work well. Make sure the tortellini is cool before sealing. This helps prevent steam buildup. Store in the fridge for up to three days. You can reheat creamy spinach tortellini in two ways: microwave or stovetop. For the microwave, place it in a bowl and cover it. Heat in short bursts, stirring often. For stovetop, use a non-stick pan on low heat. Add a splash of cream to keep it creamy. Stir gently until heated through. To freeze creamy spinach tortellini, let it cool first. Portion it into freezer-safe bags or containers. Remove as much air as possible. Label the containers with the date. It will last for up to three months. When ready to eat, thaw it overnight in the fridge. Reheat as mentioned above. Enjoy it just like fresh! For the full recipe, check out the link provided above. Yes, you can use frozen tortellini. Frozen tortellini saves time and is easy to find. Pros of frozen tortellini: - Convenient and quick to cook. - Longer shelf life than fresh tortellini. Cons of frozen tortellini: - May have a different texture than fresh. - Might take slightly longer to cook. To make creamy spinach tortellini lighter, you can swap some ingredients. - Use half-and-half instead of heavy cream. - Try low-fat cheese or less cheese overall. - Add more vegetables like zucchini or bell peppers. - Use less oil or a cooking spray for sautéing. This dish goes well with many sides. - A simple green salad with vinaigrette is great. - Roasted vegetables add flavor and color. - Garlic bread complements the creamy sauce nicely. - Light soups, like a tomato basil, work well too. For detailed cooking instructions, check the [Full Recipe](#). This blog post shared a simple and tasty way to make creamy spinach tortellini. You learned about the ingredients, cooking steps, and ways to enhance flavor. We also explored options for protein and veggies. Finally, I covered storage tips and answered common questions. Now you can make this dish deliciously your own. Enjoy cooking and share this meal with friends or family. Simple recipes like this can create joy at the table.

Creamy Spinach Tortellini Easy and Flavorful Recipe

If you’re craving a dish that’s both easy and packed with flavor, Creamy Spinach Tortellini is the answer! This delightful

Older posts
Page1 Page2 … Page76 Next →

dsad

© 2025 Cooking Wells • Built with GeneratePress

Our Policies

  • Copyright Policy
  • Cookie Policy
  • GDPR Policy
  • Privacy Policy
  • Disclaimer
  • Terms Of Use

More Information

  • Home
  • About
  • Contact
  • Appetizers
  • Dessert
  • Dinner
  • Drinks
©2025, Cooking Wells About Back To Top