Berry Yogurt Popsicles Refreshing Summer Treat

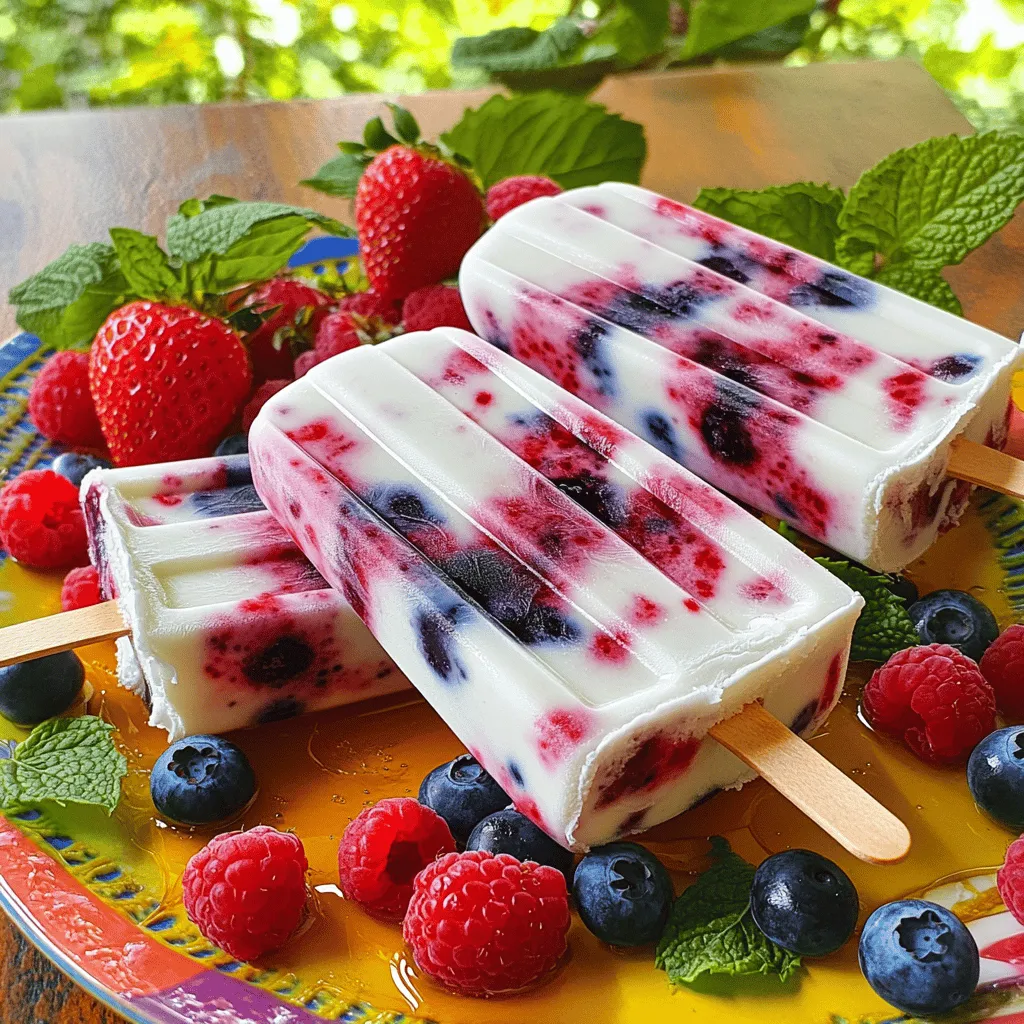
Are you ready to beat the summer heat with a delightful treat? These Berry Yogurt Popsicles are not only refreshing but also packed with flavor and nutrition. I’ll guide you through making these easy, fun pops that your whole family will love. We’ll explore the best ingredients, share helpful tips, and even offer tasty variations. So grab your blender, and let’s get started on this delicious journey!

Ingredients

Detailed Ingredient List

When making berry yogurt popsicles, the main ingredient is Greek yogurt. You can choose between plain or vanilla. Plain Greek yogurt offers a tangy flavor, while vanilla adds a touch of sweetness. Both options work well, but I lean towards vanilla for a richer taste.

Next, let’s talk about the berries. I love using a mix of strawberries, blueberries, and raspberries. Each berry brings its unique flavor and color. Strawberries offer sweetness, blueberries add a mild tartness, and raspberries provide a lovely burst of flavor. Feel free to experiment with your favorite berries!

Sweeteners and Extras

For sweeteners, I often use honey or maple syrup. Honey gives a floral note, while maple syrup adds a hint of earthiness. You can adjust the amount based on your taste. Both options are natural and delicious!

Adding a teaspoon of vanilla extract enhances the flavor. It makes the popsicles taste even better. The vanilla pairs well with the yogurt and berries, creating a creamy, dreamy treat.

Equipment Needed

To make these popsicles, you’ll need some kitchen tools. First, I recommend using popsicle molds. They come in various shapes and sizes, so choose what you like best.

You’ll also need a blender or food processor. This helps mix the berries smoothly. If you want some berry chunks, just blend lightly. It’s fun to see the different colors and textures in each popsicle!

For the full recipe, you can check the Full Recipe section. Enjoy your summer treat!

Step-by-Step Instructions

Preparation Steps

To start, you need to blend the berries right. I use a blender for this. Add the mixed berries and honey or maple syrup. Blend until smooth but keep some small berry chunks. This gives your popsicles great texture.

Next, mix the yogurt. In a bowl, combine Greek yogurt, vanilla extract, and a pinch of salt. Stir until it’s creamy and well-blended. This mixture will be the base of your popsicles.

Layering Techniques

For a marbled effect, take half of the berry mixture. Gently swirl it into the yogurt mixture. This creates a beautiful look.

When filling your molds, alternate layers of yogurt and the remaining berry puree. This adds color and taste. Be careful not to overfill to prevent spills. Leave a little space at the top of each mold.

Freezing Process

Now, it’s time to freeze. Place the molds in the freezer. The ideal freezing time is at least 4 to 6 hours. This makes sure your popsicles are solid.

To remove the popsicles, run warm water over the outside of the molds. This helps them slide out easily. Serve your popsicles right away for a refreshing treat!

For the complete recipe, check out the Full Recipe section.

Tips & Tricks

Achieving the Best Texture

To make creamy yogurt popsicles, use full-fat Greek yogurt. It gives a rich and smooth feel. Blend the yogurt well with the other ingredients. You want it to be creamy, not watery.

To keep berry chunks, blend the mixed berries until smooth, but do not over-blend. Leave some small pieces. This adds a nice bite and burst of flavor in every lick.

Presentation Ideas

For an inviting look, serve the popsicles on a colorful platter. Bright colors make them more fun. You can add fresh mint leaves on top for a pop of green. This little touch makes the dish look fancy.

Try adding extra berries around the popsicles. This gives a fresh look and shows off the ingredients. You can even drizzle a bit of honey over for added sweetness.

Troubleshooting Common Issues

If your popsicles won’t come out, run warm water on the outside of the molds. This helps loosen them. You can also try twisting the sticks gently.

If they taste too sweet, adjust the sweetness next time. Use less honey or maple syrup. You can also add a squeeze of lemon juice. This gives a nice balance to the sweetness.

For the full recipe, refer to the Berry Bliss Yogurt Popsicles section.

Variations

Flavor Combinations

You can easily change up the flavor of your berry yogurt popsicles. Try adding other fruits like banana or mango. These fruits add natural sweetness and a creamy texture. You can also mix in granola for a fun crunch. This makes each bite exciting and adds a new layer of flavor.

Dietary Adjustments

If you want to make these popsicles vegan-friendly, use coconut yogurt instead of Greek yogurt. Coconut yogurt is just as creamy and delicious. You can also switch out honey or maple syrup for sugar alternatives like agave nectar or stevia. This way, you keep your treats sweet and healthy.

Seasonal Options

Seasonality plays a big role in flavor. In spring and summer, use strawberries, blueberries, and raspberries. In fall, consider using apples or pears blended into the mix. In winter, frozen berries work great too! You can adapt the recipe to include other flavor profiles, like citrus fruits or even chocolate. This keeps your popsicles fresh and fun all year round. For more on making these popsicles, check the Full Recipe.

Storage Info

Best Practices for Freezing

To store your berry yogurt popsicles, place them in an airtight container. This keeps them fresh and tasty. If you don’t have a container, wrap the molds tightly in plastic wrap. Make sure you seal them well to prevent air from getting in.

To avoid freezer burn, do not leave popsicles in the freezer for too long. Cover them completely. You can also add a layer of parchment paper between popsicles for extra protection.

Shelf Life

You can keep popsicles in the freezer for about two months. After that, their taste may change. If you see ice crystals or a dry surface, the popsicles may be past their prime. They might still be safe to eat, but they won’t taste as good.

Reusing Popsicle Molds

Cleaning your popsicle molds is easy. Just wash them with warm soapy water. Rinse well and let them dry completely. This helps prevent any leftover flavors from mixing into your new popsicles.

You can use leftover ingredients in fun ways. If you have extra berry mix, try adding it to smoothies or yogurt bowls. You can also freeze it in ice cube trays for tasty ice cubes. These can brighten up your drinks on hot days. For the full recipe, check out the Berry Bliss Yogurt Popsicles.

FAQs

Can I use frozen berries instead of fresh?

Yes, you can use frozen berries. Frozen berries are often picked at peak ripeness, which means they have great flavor. They make prep easy since you don’t need to wash or chop them. Just toss them in the blender straight from the freezer. However, be aware that frozen berries may make your mixture a bit watery. You can solve this by draining excess juice before blending.

How long do these popsicles last in the freezer?

These popsicles last about two months in the freezer. After that, they may lose their flavor or texture. For the best taste, enjoy them within that time frame. Always keep them in an airtight container to prevent freezer burn.

Can I make these without added sugar?

Yes! You can skip added sugar. Instead, use ripe bananas or dates for natural sweetness. These options add flavor without extra sugar. You can also use unsweetened applesauce as a sweetener. Adjust the amount to match your taste.

What are good substitutes for Greek yogurt?

If you need a dairy-free option, try coconut yogurt or almond yogurt. Both have a creamy texture. They work well in this recipe and keep the pops cool and refreshing. Just make sure to choose unsweetened varieties for the best flavor. You can also use regular yogurt if you prefer.

For the full recipe, check out the Berry Bliss Yogurt Popsicles section.

Making tasty yogurt popsicles is simple and fun. We explored key ingredients, like Greek yogurt and berries. You learned about mixing, layering, and freezing techniques. I shared tips to enhance flavor and texture and how to fix common issues. You can enjoy endless variations, from fruit mixes to dietary swaps. Remember to store them right for the best taste. Now you can create delicious popsicles all summer long! Enjoy the process, and let your creativity shine!

When making berry yogurt popsicles, the main ingredient is Greek yogurt. You can choose between plain or vanilla. Plain Greek yogurt offers a tangy flavor, while vanilla adds a touch of sweetness. Both options work well, but I lean towards vanilla for a richer taste. Next, let's talk about the berries. I love using a mix of strawberries, blueberries, and raspberries. Each berry brings its unique flavor and color. Strawberries offer sweetness, blueberries add a mild tartness, and raspberries provide a lovely burst of flavor. Feel free to experiment with your favorite berries! For sweeteners, I often use honey or maple syrup. Honey gives a floral note, while maple syrup adds a hint of earthiness. You can adjust the amount based on your taste. Both options are natural and delicious! Adding a teaspoon of vanilla extract enhances the flavor. It makes the popsicles taste even better. The vanilla pairs well with the yogurt and berries, creating a creamy, dreamy treat. To make these popsicles, you'll need some kitchen tools. First, I recommend using popsicle molds. They come in various shapes and sizes, so choose what you like best. You'll also need a blender or food processor. This helps mix the berries smoothly. If you want some berry chunks, just blend lightly. It’s fun to see the different colors and textures in each popsicle! For the full recipe, you can check the Full Recipe section. Enjoy your summer treat! To start, you need to blend the berries right. I use a blender for this. Add the mixed berries and honey or maple syrup. Blend until smooth but keep some small berry chunks. This gives your popsicles great texture. Next, mix the yogurt. In a bowl, combine Greek yogurt, vanilla extract, and a pinch of salt. Stir until it’s creamy and well-blended. This mixture will be the base of your popsicles. For a marbled effect, take half of the berry mixture. Gently swirl it into the yogurt mixture. This creates a beautiful look. When filling your molds, alternate layers of yogurt and the remaining berry puree. This adds color and taste. Be careful not to overfill to prevent spills. Leave a little space at the top of each mold. Now, it’s time to freeze. Place the molds in the freezer. The ideal freezing time is at least 4 to 6 hours. This makes sure your popsicles are solid. To remove the popsicles, run warm water over the outside of the molds. This helps them slide out easily. Serve your popsicles right away for a refreshing treat! For the complete recipe, check out the Full Recipe section. To make creamy yogurt popsicles, use full-fat Greek yogurt. It gives a rich and smooth feel. Blend the yogurt well with the other ingredients. You want it to be creamy, not watery. To keep berry chunks, blend the mixed berries until smooth, but do not over-blend. Leave some small pieces. This adds a nice bite and burst of flavor in every lick. For an inviting look, serve the popsicles on a colorful platter. Bright colors make them more fun. You can add fresh mint leaves on top for a pop of green. This little touch makes the dish look fancy. Try adding extra berries around the popsicles. This gives a fresh look and shows off the ingredients. You can even drizzle a bit of honey over for added sweetness. If your popsicles won’t come out, run warm water on the outside of the molds. This helps loosen them. You can also try twisting the sticks gently. If they taste too sweet, adjust the sweetness next time. Use less honey or maple syrup. You can also add a squeeze of lemon juice. This gives a nice balance to the sweetness. For the full recipe, refer to the Berry Bliss Yogurt Popsicles section. {{image_2}} You can easily change up the flavor of your berry yogurt popsicles. Try adding other fruits like banana or mango. These fruits add natural sweetness and a creamy texture. You can also mix in granola for a fun crunch. This makes each bite exciting and adds a new layer of flavor. If you want to make these popsicles vegan-friendly, use coconut yogurt instead of Greek yogurt. Coconut yogurt is just as creamy and delicious. You can also switch out honey or maple syrup for sugar alternatives like agave nectar or stevia. This way, you keep your treats sweet and healthy. Seasonality plays a big role in flavor. In spring and summer, use strawberries, blueberries, and raspberries. In fall, consider using apples or pears blended into the mix. In winter, frozen berries work great too! You can adapt the recipe to include other flavor profiles, like citrus fruits or even chocolate. This keeps your popsicles fresh and fun all year round. For more on making these popsicles, check the Full Recipe. To store your berry yogurt popsicles, place them in an airtight container. This keeps them fresh and tasty. If you don’t have a container, wrap the molds tightly in plastic wrap. Make sure you seal them well to prevent air from getting in. To avoid freezer burn, do not leave popsicles in the freezer for too long. Cover them completely. You can also add a layer of parchment paper between popsicles for extra protection. You can keep popsicles in the freezer for about two months. After that, their taste may change. If you see ice crystals or a dry surface, the popsicles may be past their prime. They might still be safe to eat, but they won’t taste as good. Cleaning your popsicle molds is easy. Just wash them with warm soapy water. Rinse well and let them dry completely. This helps prevent any leftover flavors from mixing into your new popsicles. You can use leftover ingredients in fun ways. If you have extra berry mix, try adding it to smoothies or yogurt bowls. You can also freeze it in ice cube trays for tasty ice cubes. These can brighten up your drinks on hot days. For the full recipe, check out the Berry Bliss Yogurt Popsicles. Yes, you can use frozen berries. Frozen berries are often picked at peak ripeness, which means they have great flavor. They make prep easy since you don’t need to wash or chop them. Just toss them in the blender straight from the freezer. However, be aware that frozen berries may make your mixture a bit watery. You can solve this by draining excess juice before blending. These popsicles last about two months in the freezer. After that, they may lose their flavor or texture. For the best taste, enjoy them within that time frame. Always keep them in an airtight container to prevent freezer burn. Yes! You can skip added sugar. Instead, use ripe bananas or dates for natural sweetness. These options add flavor without extra sugar. You can also use unsweetened applesauce as a sweetener. Adjust the amount to match your taste. If you need a dairy-free option, try coconut yogurt or almond yogurt. Both have a creamy texture. They work well in this recipe and keep the pops cool and refreshing. Just make sure to choose unsweetened varieties for the best flavor. You can also use regular yogurt if you prefer. For the full recipe, check out the Berry Bliss Yogurt Popsicles section. Making tasty yogurt popsicles is simple and fun. We explored key ingredients, like Greek yogurt and berries. You learned about mixing, layering, and freezing techniques. I shared tips to enhance flavor and texture and how to fix common issues. You can enjoy endless variations, from fruit mixes to dietary swaps. Remember to store them right for the best taste. Now you can create delicious popsicles all summer long! Enjoy the process, and let your creativity shine!

Berry Yogurt Popsicles

Cool down this summer with delightful Berry Bliss Yogurt Popsicles! Made with creamy Greek yogurt and a blend of fresh mixed berries, these popsicles are not only refreshing but also packed with flavor. Perfect for a snack or dessert, they're easy to make and require just 15 minutes of prep. Ready to beat the heat? Click through to explore this simple, healthy recipe and whip up your own batch of berry bliss!

Ingredients
  

2 cups Greek yogurt (plain or vanilla)

1 cup mixed berries (strawberries, blueberries, raspberries)

2 tablespoons honey or maple syrup (adjust sweetness to taste)

1 teaspoon vanilla extract

A pinch of salt

Optional: Fresh mint leaves for garnish

Instructions
 

In a blender, combine the mixed berries and honey/maple syrup. Blend until smooth but leave a few small chunks of berries for texture if desired.

    In a mixing bowl, combine the Greek yogurt, vanilla extract, and a pinch of salt. Stir until well blended and creamy.

      Take about half of the berry mixture and gently swirl it into the yogurt, creating a marbled effect.

        Spoon the yogurt and berry mixture into popsicle molds, alternating layers of yogurt and the remaining berry puree for an attractive appearance.

          Insert sticks into the molds and fill to the top.

            Cover with a lid or plastic wrap and freeze for at least 4-6 hours or until fully solid.

              To remove the popsicles, run warm water over the outside of the molds for a few seconds.

                Prep Time: 15 mins | Total Time: 6 hours | Servings: 6-8 popsicles

                  - Presentation Tips: Serve the popsicles on a colorful platter, garnished with fresh mint leaves and additional berries for a vibrant summer treat!

                    Leave a Comment

                    Recipe Rating