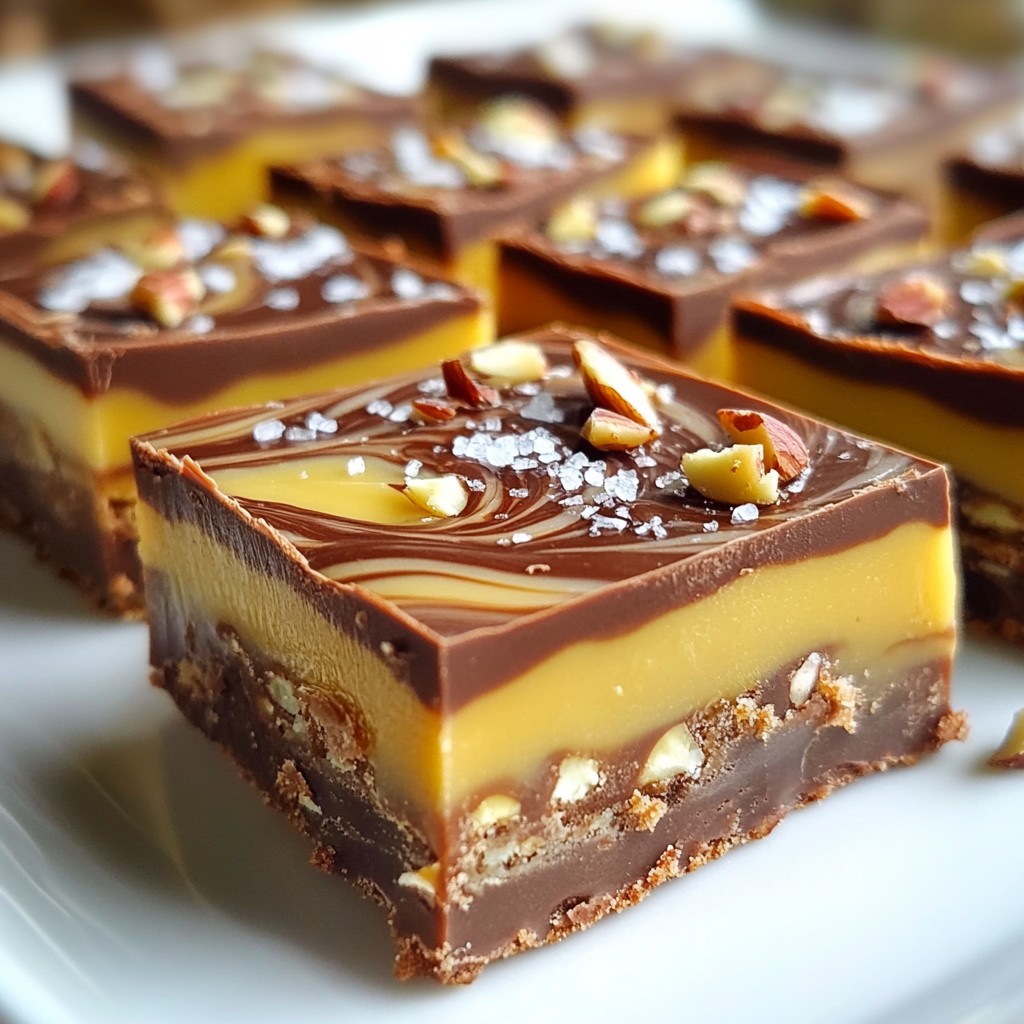
Craving a sweet treat that’s both rich and creamy? You’ve come to the right place! My Caramel Chocolate Chip Fudge is an easy delight that melts in your mouth. With simple ingredients and straightforward steps, you’ll whip up this smooth fudge in no time. Say goodbye to boring snacks and hello to a dessert that satisfies your sweet tooth! Let’s dive into this tasty recipe together.
Why I Love This Recipe
- Decadent Flavor: This fudge combines rich chocolate and sweet caramel, creating a deliciously indulgent treat that's hard to resist.
- Easy to Make: With just a few simple ingredients and straightforward steps, this recipe is perfect for both novice and experienced bakers.
- Customizable: You can easily adapt this fudge by adding your favorite nuts or toppings, making it a versatile dessert for any occasion.
- Impressive Presentation: Once cut into squares, this fudge looks beautiful on a plate, making it a great option for gatherings and gifts.
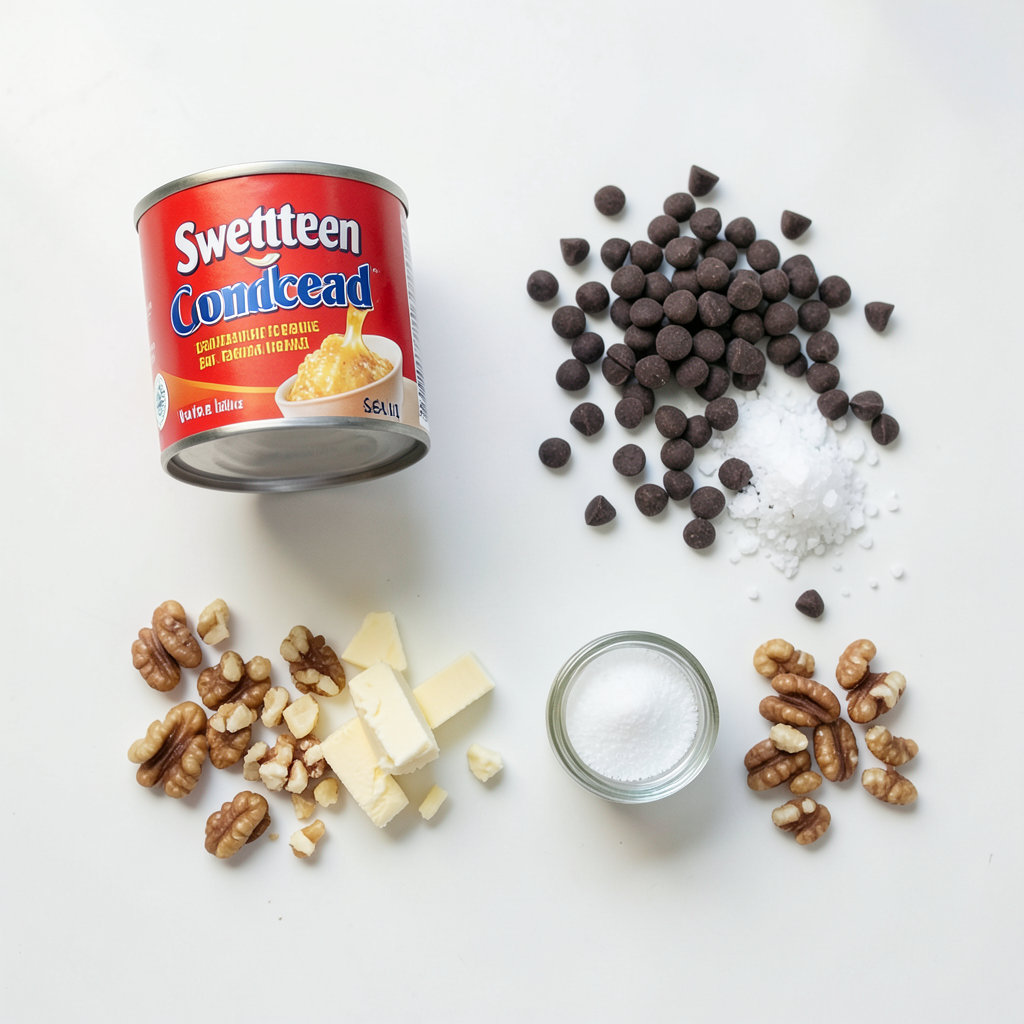
Ingredients
List of Essential Ingredients
To make this caramel chocolate chip fudge, you need the following items:
- 1 can (14 oz) sweetened condensed milk
- 2 cups semi-sweet chocolate chips
- 1 cup caramel bits
- 1/4 cup unsalted butter
- 1 teaspoon vanilla extract
- 1/2 teaspoon sea salt
- 1 cup finely chopped nuts (optional)
Possible Substitutions
You can swap some ingredients for different flavors. Here are some ideas:
- Use white chocolate chips instead of semi-sweet ones for a different taste.
- If you want a nut-free fudge, just skip the nuts.
- Swap caramel bits for homemade caramel if you feel adventurous.
- Coconut milk can replace condensed milk for a dairy-free option.
Description of Key Ingredients
Each ingredient plays an important role in this fudge:
- Sweetened condensed milk: This gives the fudge its rich and creamy texture.
- Semi-sweet chocolate chips: They add a deep chocolate flavor.
- Caramel bits: These bring sweetness and a chewy element to the fudge.
- Unsalted butter: Butter enhances the smoothness and richness.
- Vanilla extract: This adds warmth and depth to the flavors.
- Sea salt: A pinch of salt balances the sweetness and adds flavor.
- Chopped nuts (optional): Nuts give crunch and extra flavor to each bite.
With these ingredients, you will create a fudge that is smooth, sweet, and totally irresistible!
Step-by-Step Instructions
Preparation of Baking Pan
First, grab an 8x8 inch square baking pan. Line it with parchment paper. Leave some paper hanging over the sides. This will help you lift the fudge out later. Make sure the paper covers the bottom and sides well. This step is key for easy removal.
Melting Chocolate and Caramel
Next, take a medium saucepan and set it on low heat. Add the sweetened condensed milk, unsalted butter, and semi-sweet chocolate chips. Stir this mixture constantly. Keep stirring until it melts and looks smooth. Remove it from the heat and mix in the vanilla extract and sea salt. If you want, fold in finely chopped nuts at this stage for extra crunch.
Now for the caramel! Place the caramel bits in a microwave-safe bowl. Heat them in the microwave in 30-second bursts. Stir in between each heating. Stop when the caramel is totally smooth. This step is simple but very important.
Layering the Fudge
Pour half of your fudge mixture into the prepared pan. Spread it evenly across the bottom. Then, drizzle the melted caramel on top of this layer. Use a spatula to spread the caramel gently. This creates a lovely, gooey layer.
Now, pour the remaining fudge mixture over the caramel layer. Smooth it out with a spatula to make it nice and even. If you like, sprinkle some sea salt on top for extra flavor. Refrigerate this layered treat for at least 2 hours. Once set, lift the fudge out of the pan using the overhanging parchment. Cut it into squares and enjoy!
Tips & Tricks
Achieving the Perfect Texture
To make fudge that melts in your mouth, you need the right balance. The sweetened condensed milk and butter create a creamy base. Stir them gently and slowly over low heat. If you rush, the fudge may become grainy. Make sure the chocolate chips fully melt before adding the vanilla and sea salt. This step is key for a smooth finish.
Flavor Enhancements
Want to take your fudge to the next level? You can add a few extras. A pinch of espresso powder can boost the chocolate flavor. Try a splash of almond extract instead of vanilla for a twist. Adding a sprinkle of flaky sea salt on top enhances the sweet and salty contrast. If you like nuts, fold in finely chopped ones for crunch.
Common Mistakes to Avoid
There are a few pitfalls to watch out for. Don’t skip lining your pan. This helps with easy removal later. Avoid using high heat when melting the chocolate. It can burn quickly. If your fudge doesn’t set, it may need more time in the fridge. Always let it chill for at least two hours to firm up. Lastly, don’t forget to cut the fudge into squares after it cools. This makes serving easy!
Pro Tips
- Use Quality Chocolate: Always opt for high-quality semi-sweet chocolate chips for a rich and authentic flavor.
- Caramel Consistency: Be sure to melt the caramel bits slowly and stir to avoid any lumps for a smooth layer.
- Chill for Best Results: Allow the fudge to chill in the refrigerator for the full two hours to ensure it sets properly.
- Custom Flavors: Experiment with adding different extracts, like almond or hazelnut, for a unique twist on your fudge.
Variations
Gluten-Free Adaptations
To make this fudge gluten-free, you can easily swap out any regular ingredients. Use gluten-free chocolate chips and caramel bits. Most sweetened condensed milk is gluten-free, but check the label. This ensures you avoid any hidden gluten. Always read labels for safe options. Gluten-free fudge tastes just as good!
Flavor Twist Ideas
If you want to try new flavors, add some fun mix-ins. You can use peppermint extract instead of vanilla for a minty fudge. Or, try orange zest for a citrus twist. Want a nutty flavor? Add almond or hazelnut extract. You can also mix in crushed cookies or candy bars for extra crunch. The options are endless, so be creative!
Nut-Free Options
For a nut-free version, simply leave out the nuts. The fudge still tastes amazing without them. You can also add seeds like pumpkin or sunflower seeds for a bit of crunch. This keeps the fudge safe for those with nut allergies. Just make sure all other ingredients are nut-free. Enjoy a sweet treat without worry!
Storage Info
How to Store Leftovers
To keep your fudge fresh, wrap it tightly in plastic wrap. You can also place it in an airtight container. Store it in the fridge for the best taste. Fudge stays soft and smooth this way. If you love a little chill, enjoy it straight from the fridge.
Freezing Fudge
You can freeze fudge for up to three months. Cut it into squares before freezing. Place the pieces in a single layer on a baking sheet. Freeze for about two hours. Once firm, transfer them to a freezer-safe bag. Remember to label the bag with the date. Thaw in the fridge for a few hours before serving.
Shelf Life Tips
Homemade fudge can last about one week in the fridge. Keep it in a cool place away from heat. If you want to keep it longer, freeze it. Be sure to check for any signs of spoilage, like off smells or dryness. Enjoy your fudge at its best for as long as possible!
FAQs
How do I know when the fudge is set?
You can tell the fudge is set when it feels firm to the touch. After two hours in the fridge, it should hold its shape well. You can also test it by gently pressing down with your finger; it should not leave an indent. If it feels soft, give it more time to chill.
Can I use different types of chocolate?
Yes, you can use different types of chocolate. Dark chocolate adds a rich taste, while milk chocolate makes it sweeter. You can also mix chocolates for a unique flavor. Just remember to adjust the sweetness if you change the chocolate type.
What can I add to make the fudge more interesting?
You can add many things to jazz up your fudge. Consider mixing in:
- Chopped nuts for crunch
- Dried fruit for a chewy texture
- A pinch of espresso powder for depth
- Sea salt flakes for a salty kick
- Crushed cookies for a fun twist
These additions can elevate your fudge and make it special.
This guide covered essential ingredients, step-by-step instructions, and tips for perfect fudge. You learned about key substitutions, texture tricks, and storage advice. Remember to avoid common mistakes for better results. Experiment with variations to create your unique fudge. Enjoy making your fudge and share it with friends. Each bite can bring joy, warmth, and sweet memories to your kitchen. Your fudge journey is just beginning, so have fun, and keep experimenting!