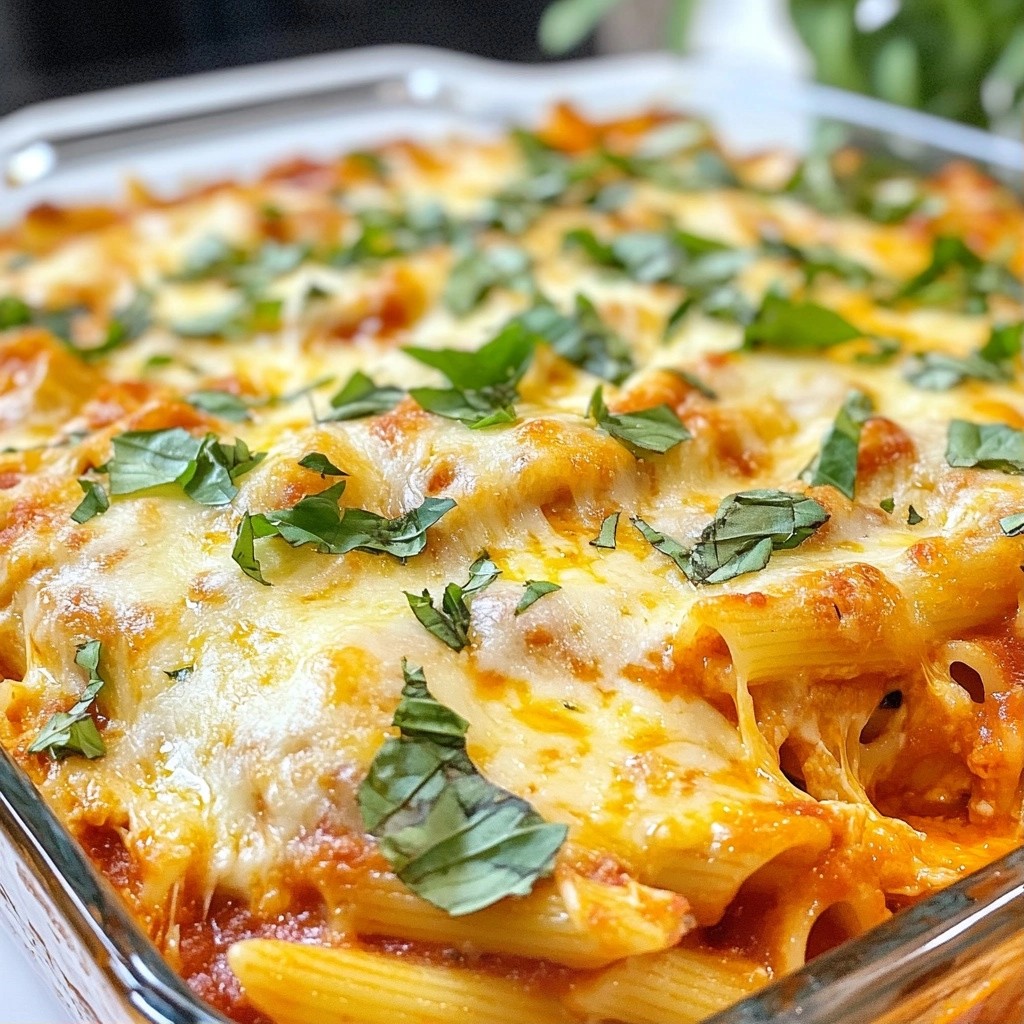
If you're looking for an easy, delicious dinner that you can stash in the freezer, I’ve got just the dish for you! This Cheesy Freezer-Friendly Chicken Parmesan Casserole is not only creamy and cheesy, but it also warms up beautifully. In this post, I'll share the simple ingredients, step-by-step instructions, and clever tips to make this meal a family favorite. Get ready to simplify your weeknight dinners!
Why I Love This Recipe
- Easy to Prepare: This casserole comes together quickly, making it perfect for busy weeknights.
- Freezer-Friendly: Make a double batch and freeze one for a quick meal later on!
- Cheesy Goodness: With layers of mozzarella and Parmesan, every bite is a cheesy delight.
- Versatile: Swap in your favorite pasta or add veggies for a personal touch!
Ingredients
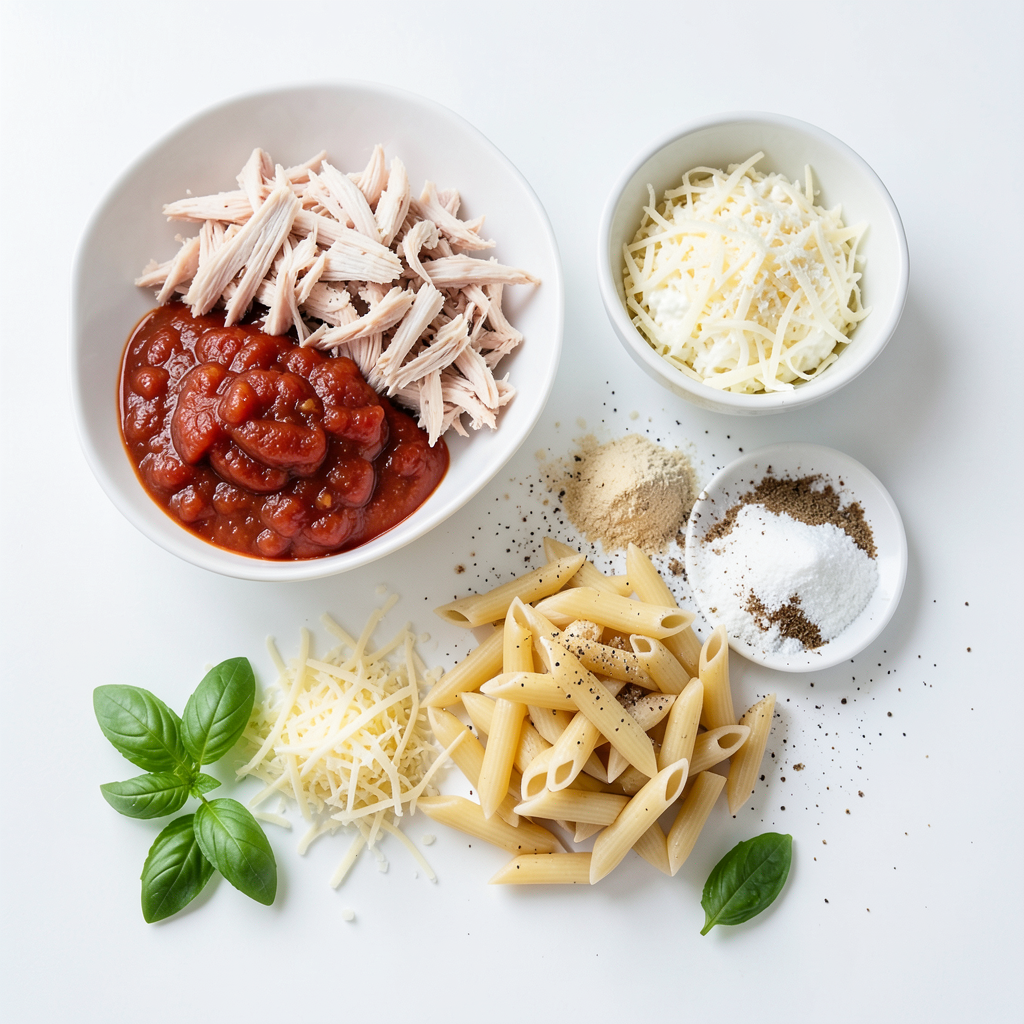
List of Main Ingredients
To make the cheesy freezer-friendly chicken parmesan casserole, gather these items:
- 2 cups cooked chicken, shredded
- 2 cups marinara sauce
- 1 cup ricotta cheese
- 2 cups shredded mozzarella cheese
- 1 cup grated Parmesan cheese
- 2 cups cooked penne pasta or rotini
- 1 teaspoon Italian seasoning
- ½ teaspoon garlic powder
- ½ teaspoon onion powder
- Salt and pepper to taste
These ingredients work together to create a tasty and filling dish. The chicken gives protein, while the cheese adds richness. The marinara sauce brings in flavor and moisture. The pasta acts as a hearty base, making this casserole a complete meal.
Optional Garnishes
While the dish is great as is, you can add some fresh basil leaves on top for a pop of color and flavor. A sprinkle of extra Parmesan cheese can enhance the cheesy goodness. These garnishes make the casserole look even more appealing and fresh.
Substitutions and Alternatives
You can swap the chicken for turkey or even a meat-free option like lentils. If you don't like ricotta, cottage cheese works well too. For a lighter version, choose zucchini noodles instead of pasta. Each option keeps the spirit of the dish while adding a unique twist.
Step-by-Step Instructions
Preparation Steps
1. Start by preheating your oven to 350°F (175°C). This step is key for even cooking.
2. In a large mixing bowl, combine the cooked chicken and marinara sauce.
3. Add ricotta cheese, Italian seasoning, garlic powder, onion powder, salt, and pepper.
4. Mix all the ingredients well until they blend into a creamy sauce.
5. In another bowl, take the cooked pasta and mix it with half a cup of mozzarella and half a cup of Parmesan cheese.
6. Now, layer half of the pasta mixture in a 9x13-inch baking dish. Spread it evenly across the bottom.
7. Pour the chicken mixture over the pasta layer, spreading it out with a spatula.
8. Top it off with the remaining pasta, then sprinkle the rest of the mozzarella and Parmesan cheese on top.
Baking Process
1. Cover the dish with aluminum foil. This helps the casserole cook evenly.
2. Bake in the preheated oven for 25 minutes.
3. After 25 minutes, carefully remove the foil.
4. Bake for an additional 15 minutes. You want the cheese to be bubbly and golden brown.
5. Once done, remove it from the oven. Let it sit for 5-10 minutes. This makes slicing easier.
Serving Suggestions
1. Slice the casserole into squares.
2. Serve on plates with a sprinkle of fresh basil leaves for a pop of color.
3. A side salad complements this dish well.
4. This casserole is perfect for meal prep and freezing. Just thaw it overnight before baking!
Tips & Tricks
How to Perfect the Cheese Layer
To get that perfect cheese layer, use a mix of mozzarella and Parmesan cheese. Mozzarella melts well, while Parmesan adds a nice crunch. Spread half of each cheese on the top layer. This creates a tasty golden top.
Ensuring Even Cooking
To make sure your casserole cooks evenly, layer the ingredients well. Spread the chicken mixture evenly over the pasta. This helps every bite have great flavor. Also, cover the dish with foil at first to trap heat. This keeps the casserole moist. Remove the foil towards the end to let the cheese brown nicely.
Common Mistakes to Avoid
One common mistake is not mixing well. If you don’t mix all the ingredients, some bites may taste bland. Another mistake is skipping the resting time after baking. Letting the casserole sit for 5-10 minutes helps it set. This makes slicing easier and keeps it from falling apart.
Pro Tips
- Use Rotisserie Chicken: For a quicker prep time, use store-bought rotisserie chicken instead of cooking your own. This will save you time and add a delicious flavor to your casserole.
- Make It Ahead: This casserole can be assembled in advance and stored in the fridge for up to 24 hours before baking. Just cover it tightly with foil to prevent it from drying out.
- Customize Your Cheese: Feel free to mix and match different cheeses such as provolone or gouda for added depth of flavor. This will give your casserole a unique twist!
- Freezer-Friendly: When freezing, make sure to wrap the casserole tightly in plastic wrap and then foil to prevent freezer burn. Thaw it overnight in the fridge before baking for best results.
Variations
Vegetarian Options
You can easily turn this dish vegetarian. Just swap the chicken for cooked lentils or roasted vegetables. Use mushrooms, zucchini, or bell peppers for great flavor. You can also use tofu for added protein. These swaps keep the dish hearty and satisfying without meat.
Different Pasta Choices
While penne and rotini work well, feel free to experiment. Fusilli, farfalle, or even whole wheat pasta can add a fun twist. Gluten-free pasta is also an option if needed. Just make sure to cook the pasta al dente. This helps it hold up in the casserole.
Flavor Additions and Customizations
Add more flavor with spices. Try red pepper flakes for heat or fresh herbs like oregano and thyme. For a rich taste, mix in some sun-dried tomatoes or olives. You can also use different cheeses. Cheddar or gouda can give a unique twist. Experiment and make the dish your own!
Storage Info
Freezing Instructions
You can freeze this casserole for later. After baking, let it cool completely. Once cool, cover it tightly with plastic wrap and aluminum foil. This helps keep out air and moisture. Label it with the date to track freshness. You can freeze it for up to three months. If you want to prepare it unbaked, follow the same steps. Just don’t bake it before freezing.
Reheating Tips
To reheat, first thaw the casserole overnight in the fridge. Preheat your oven to 350°F (175°C). Place the casserole in the oven for 25-30 minutes. Cover it with foil for even heating. Remove the foil for the last 10 minutes to get that cheesy top bubbly and golden. Check that it’s hot throughout before serving. You can also microwave individual portions for a quick meal.
Shelf Life
When stored in the fridge, this casserole lasts about three to four days. Keep it in an airtight container to maintain freshness. If you notice any changes in smell or color, it’s best to toss it. Always trust your senses; they guide you well in the kitchen.
FAQs
Can I use uncooked chicken?
No, I don’t recommend using uncooked chicken in this recipe. The casserole needs cooked chicken for the best flavor and texture. Using cooked chicken also saves time. You can use rotisserie chicken or any leftover cooked chicken. Both options work well!
How long can I freeze the casserole?
You can freeze this casserole for up to three months. Just make sure to wrap it tightly. Use aluminum foil or a freezer-safe dish. To thaw, place it in the fridge overnight. This method ensures even heating when you bake it.
Can I make this casserole ahead of time?
Yes, you can make this casserole ahead of time. Prepare it up to the baking step, then cover and refrigerate. It can sit in the fridge for one day before baking. Just add a few extra minutes to the baking time if it’s cold from the fridge. This makes meal prep easy and quick!
In this article, we covered key ingredients, cooking steps, and helpful tips. You learned how to perfect your casserole with the right flavors, cooking methods, and storage advice. Remember, variations make each dish unique. Don’t hesitate to experiment with vegetables or herbs. With practice, you’ll avoid common mistakes and create tasty meals every time. Enjoy the journey of cooking and sharing with loved ones. Your perfect casserole awaits!