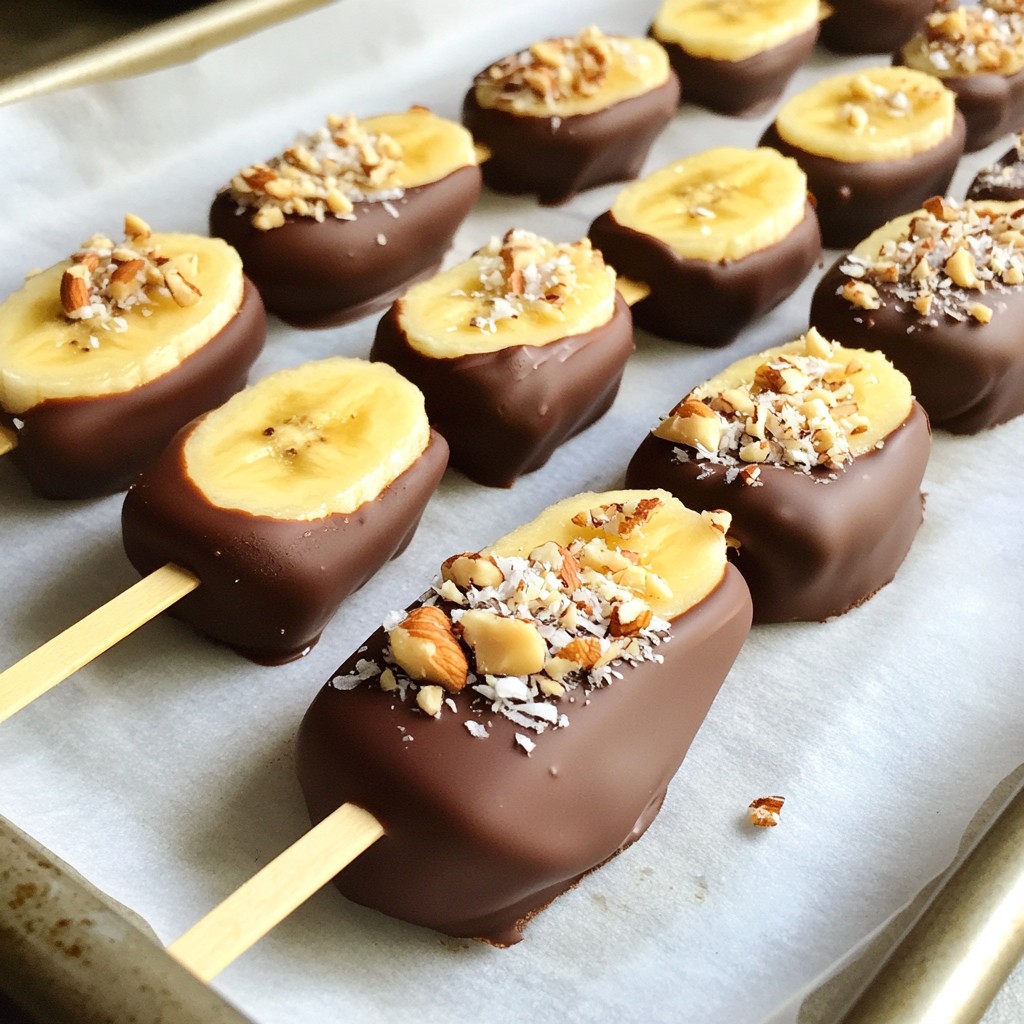
Looking for a fun and easy treat? Chocolate Covered Banana Pops are the perfect snack! With just a few simple ingredients, like ripe bananas and dark chocolate, you can whip up this tasty dessert in no time. It's great for kids and adults alike. Plus, you can customize each pop with your favorite toppings. Ready to impress your friends and family? Let’s dive into the step-by-step guide for making these delicious pops!
Why I Love This Recipe
- Simple and Fun: Making chocolate-covered banana pops is a simple process that is enjoyable for both kids and adults alike.
- Healthy Treat: These pops are made with ripe bananas, providing a naturally sweet treat that's healthier than many store-bought desserts.
- Customizable: You can easily customize the toppings, using your favorite nuts, sprinkles, or even drizzles of white chocolate for an extra touch.
- Perfect for Any Occasion: These banana pops are great for parties, snacks, or a fun summer treat, making them versatile for any event.
Ingredients
List of Required Ingredients
- 3 ripe bananas
- 1 cup dark chocolate chips
- 1 tablespoon coconut oil
- 1/2 cup chopped nuts (e.g., almonds, walnuts, or hazelnuts)
- 1/4 cup shredded coconut (unsweetened)
- Wooden popsicle sticks
To make chocolate covered banana pops, you need simple, tasty ingredients. I love using ripe bananas for their sweetness. Dark chocolate chips give a rich flavor, while coconut oil helps the chocolate melt smoothly. You can pick your favorite nuts for crunch. I enjoy almonds, but walnuts or hazelnuts work well too. Unsweetened shredded coconut adds a tropical touch. Finally, you’ll need wooden popsicle sticks to hold the banana pops. Gather these items, and you’ll be ready to create a fun, delicious treat!

Step-by-Step Instructions
Preparation of Bananas
Start by peeling each banana. Cut each banana in half. This makes them easy to eat. Next, insert a wooden popsicle stick into the cut end of each banana half. This step creates a fun pop shape. Make sure the stick goes in at least halfway.
Freezing the Banana Pops
Line a baking sheet with parchment paper. This keeps the pops from sticking. Place the prepared banana pops on the sheet. Put them in the freezer for at least 1 hour. This helps them get firm and ready for chocolate.
Melting the Chocolate
In a microwave-safe bowl, combine the dark chocolate chips and the coconut oil. This mix helps the chocolate melt smoothly. Heat it in the microwave in 30-second intervals. Stir the mix between each interval. Stop when the chocolate is completely melted and smooth.
Dipping and Decorating
Take the frozen banana pops out of the freezer. Quickly dip each banana half into the melted chocolate. Let any extra chocolate drip off. While the chocolate is still wet, roll the banana in chopped nuts or shredded coconut. This adds great texture and flavor.
Final Freezing
Place the decorated banana pops back on the parchment-lined baking sheet. Repeat this for all banana halves. Once all pops are coated, return them to the freezer. Freeze them for an additional 30 minutes to set the chocolate. Enjoy your fun and tasty treat!
Tips & Tricks
Best Practices for Melting Chocolate
To melt chocolate well, you have to be careful. Avoiding overheating is key. If you heat it too fast, it can burn. Use short bursts in the microwave. Start with 30 seconds, then stir. Keep going until it’s smooth. If you want a simple double boiler, fill a pot with water. Place a bowl over it and heat slowly. This helps keep the chocolate at the right temperature.
Different Coating Options
You can get creative with your toppings. Nuts like almonds, walnuts, or hazelnuts add a nice crunch. If you want more fun, try adding sprinkles or colorful toppings. You could even use crushed cookies for extra flavor. These choices make each pop special and unique.
Serving Suggestions
When your banana pops are ready, think about how to present them. A decorative platter makes them look great at parties. You can also wrap them in cellophane for gifts. This adds a fun touch and makes them easy to share. Everyone will love these tasty treats!
Pro Tips
- Choose Ripe Bananas: Make sure your bananas are ripe for the best flavor and creaminess. Look for bananas with a few brown spots for optimal sweetness.
- Use Quality Chocolate: Opt for high-quality dark chocolate chips for a richer taste. The better the chocolate, the more delicious your pops will be!
- Experiment with Toppings: Don’t hesitate to get creative! Try different toppings like sprinkles, crushed cookies, or even mini chocolate chips for variety.
- Store Properly: Keep your chocolate-covered banana pops in an airtight container in the freezer to maintain freshness and prevent freezer burn.
Variations
Flavor Infusions
You can add flavor to your chocolate covered banana pops by mixing in extracts or spices. For example, vanilla extract brings warmth, while peppermint oil gives a festive twist. You can even sprinkle cinnamon or nutmeg for a cozy touch. These small additions can change the whole taste of your treat.
Healthier Alternatives
Switching to dark chocolate makes your pops a bit healthier. Dark chocolate has less sugar and more antioxidants than milk chocolate. If you want a fruity twist, try using other fruits. Strawberries, apples, or pineapple chunks work great. Just dip them in chocolate like you do with bananas.
Themed Creations
Make your banana pops fun for holidays by adding themed decorations. Use red and green sprinkles for Christmas or orange and black for Halloween. You can also create unique shapes using cookie cutters. This way, you make your treats look as good as they taste.
Storage Info
Best Practices for Storing
To store your chocolate covered banana pops, follow these steps:
- Freezing: Place the pops in a single layer on a baking sheet. Make sure they don’t touch. Freeze them for about 30 minutes after decorating. This helps the chocolate set. After that, you can stack them in an airtight container. Add parchment paper between layers to avoid sticking.
- Reheating: Banana pops are best enjoyed frozen. If you want to soften them, let them sit at room temperature for a few minutes. Do not heat them in the microwave, as this will melt the chocolate.
Shelf Life
- Duration for optimal freshness: Chocolate covered banana pops can stay fresh for about 1 to 2 months in the freezer. They will taste best if eaten within the first month.
- Signs of spoilage: Check for any ice crystals forming on the chocolate. This can indicate freezer burn. If the bananas look brown or mushy, it’s time to throw them away. Always trust your senses; if they smell off, it’s best not to eat them.
FAQs
Can I use milk chocolate instead of dark chocolate?
Yes, you can use milk chocolate. It will taste sweeter and creamier than dark chocolate. Milk chocolate has more sugar, which makes it less healthy. Dark chocolate has more cocoa and antioxidants. If you want a richer flavor, stick with dark chocolate.
How long do I need to freeze the banana pops?
You should freeze the banana pops for at least one hour. This time helps the bananas get firm. If you want the chocolate to set well, freeze them for another 30 minutes after dipping. This gives you the best texture and taste.
Can I make these vegan-friendly?
Yes, you can easily make these vegan. For chocolate, choose dairy-free chocolate chips. Coconut oil is already vegan, so you're good there. You can also use nuts and coconut as toppings, which are vegan too. Enjoy!
You now have a clear guide to make delicious banana pops. We discussed the right ingredients, step-by-step instructions, and tips for perfecting your treats. You can explore cool variations and learn how to store them properly.
Try different coatings or flavors to make these pops unique. Enjoy sharing them at parties or keeping them as a tasty snack. With these skills, you can create fun and yummy frozen treats for everyone to enjoy!