Looking for a delicious twist on classic mashed potatoes? Try my Creamy Roasted Garlic Mashed Cauliflower Delight! This dish pairs the rich flavor of roasted garlic with silky smooth cauliflower for a tasty, low-carb alternative. It’s perfect for family dinners or any occasion. Plus, I’ll guide you through each simple step to achieve the best texture and flavor. Let’s dive in and make something delightful!
Why I Love This Recipe
- Delicious Flavor: The combination of roasted garlic and creamy texture creates a rich and satisfying dish that rivals traditional mashed potatoes.
- Healthier Alternative: This recipe is lower in carbs and calories compared to classic mashed potatoes, making it a great option for health-conscious eaters.
- Easy to Make: With simple ingredients and straightforward steps, this dish can be prepared quickly and easily, perfect for any weeknight dinner.
- Versatile Side Dish: It pairs well with a variety of main courses, from grilled meats to vegetarian entrees, making it a great addition to any meal.
Ingredients
Main Ingredients
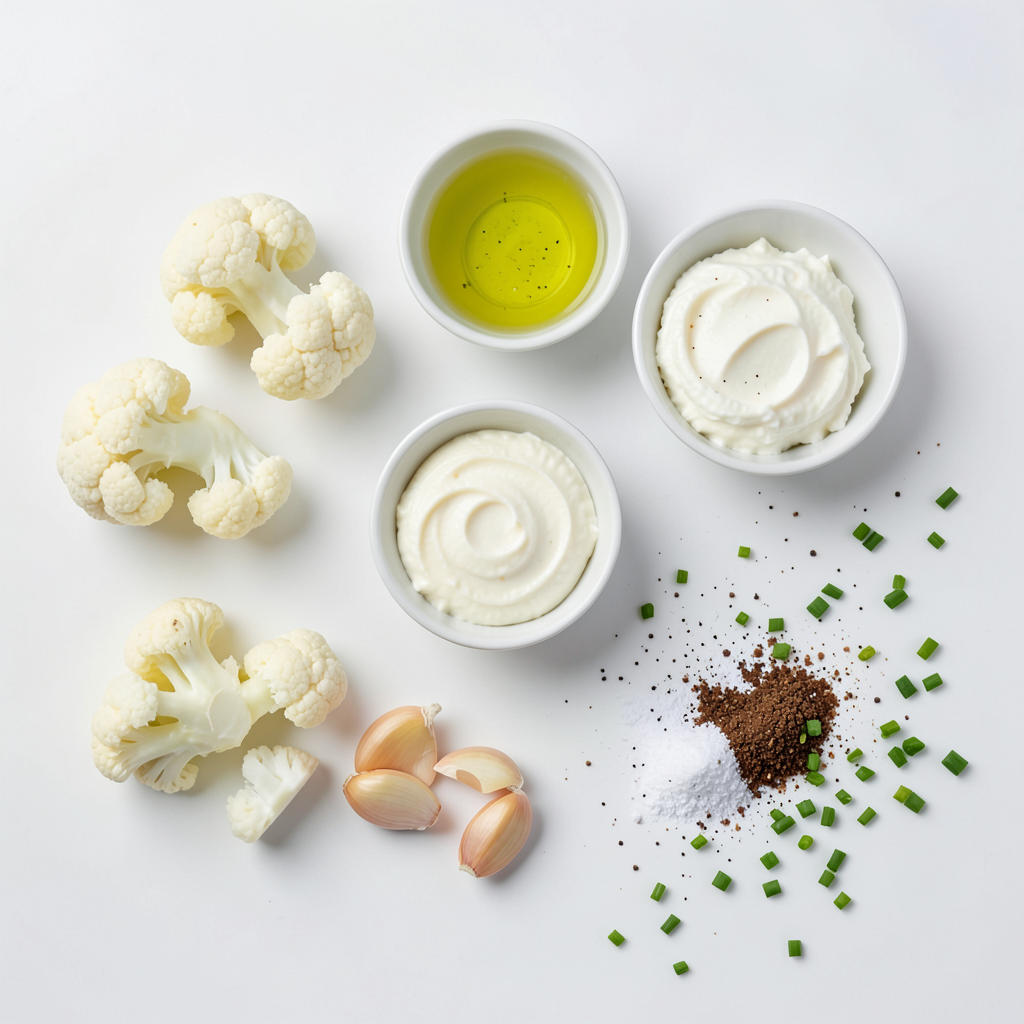
- 1 large head of cauliflower, cut into florets
- 6 cloves of garlic, peeled
- 1/2 cup cream cheese, softened (or dairy-free alternative)
- 1/4 cup unsweetened almond milk (or milk of choice)
The main ingredients for creamy roasted garlic mashed cauliflower are simple yet powerful. The cauliflower gives a smooth texture. Garlic adds a rich flavor. Cream cheese makes it creamy, while almond milk keeps it light. You can swap cream cheese for a dairy-free option if needed.
Seasonings and Garnishes
- 3 tablespoons olive oil
- 1/4 teaspoon nutmeg (optional)
- Salt and pepper to taste
- Chopped chives for garnish
Seasonings elevate this dish. Olive oil adds richness. Nutmeg brings warmth, but it's optional. Salt and pepper enhance all the flavors. Chives add a fresh touch on top. Together, they make each bite even better.
Step-by-Step Instructions
Preparation Steps
1. Preheat your oven to 400°F (200°C). This helps the vegetables cook evenly.
2. On a baking sheet, toss the cauliflower florets and peeled garlic cloves with 2 tablespoons of olive oil. Make sure each piece is well coated for the best flavor.
Roasting Process
1. Spread the cauliflower and garlic in a single layer. This allows them to roast properly.
2. Roast in the preheated oven for about 25-30 minutes. You want the cauliflower to be tender and the garlic to be golden and aromatic.
3. Once roasted, remove them from the oven. Let the cauliflower and garlic cool for a few minutes. This cooling step helps when processing.
Blending Instructions
1. In a food processor, combine the roasted cauliflower, garlic, cream cheese, and almond milk. Blend until smooth and creamy. Remember to scrape down the sides as needed for an even texture.
2. Add salt, pepper, and nutmeg (if using) to taste. Blend again to mix in the seasonings well.
3. If you want a creamier texture, add a splash more almond milk. Blend again until you reach your desired consistency.
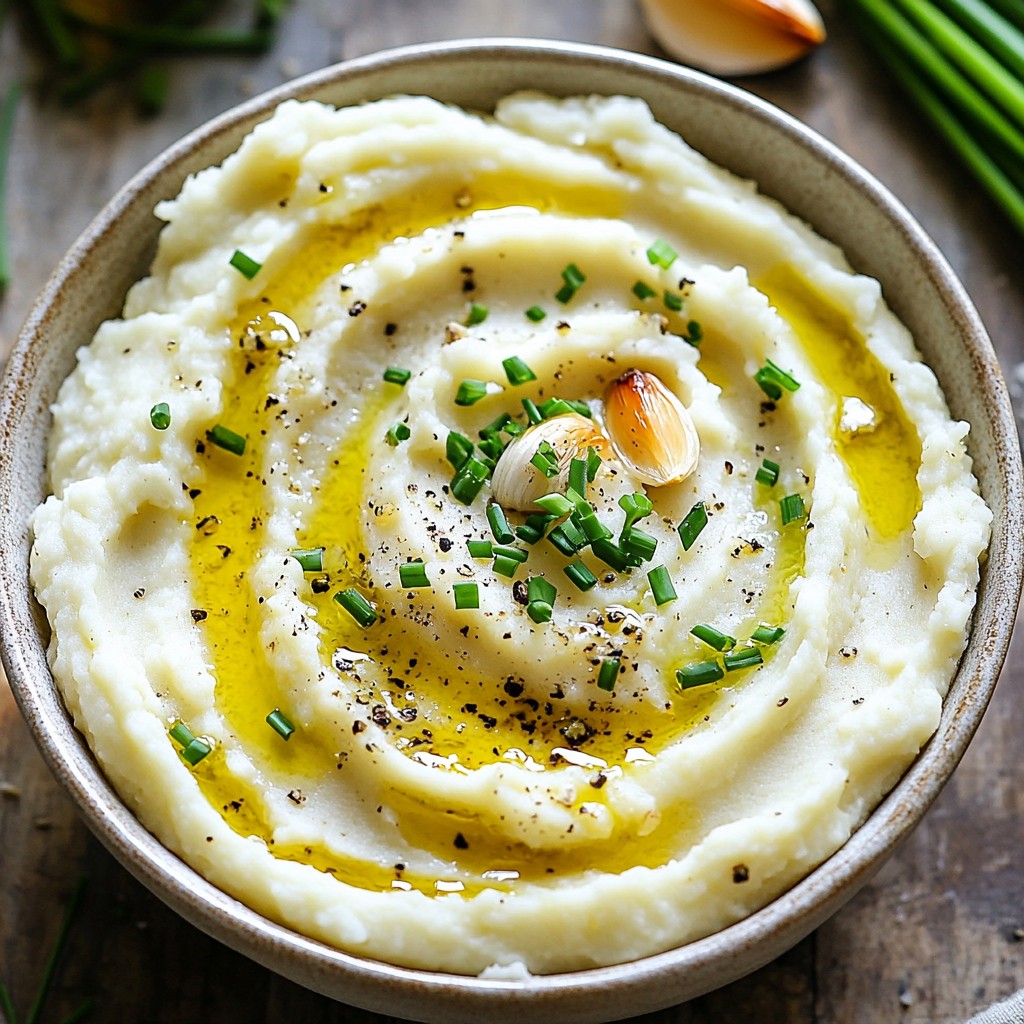
4. Transfer the mashed cauliflower to a serving bowl. Create a small well in the center. Drizzle the remaining olive oil over the top and garnish with chopped chives. Enjoy your dish!
Tips & Tricks
Ensuring Creaminess
- The role of cream cheese: Cream cheese adds a rich texture and smoothness. It makes the mashed cauliflower taste creamy and decadent. If you want a lighter dish, choose a low-fat cream cheese.
- Adjusting the almond milk: Almond milk helps achieve the right consistency. If your mash is too thick, add a bit more almond milk. Start with a tablespoon and blend again until creamy.
Flavor Enhancements
- Adding herbs or spices: Fresh herbs like thyme or rosemary boost flavor. You can also try garlic powder or onion powder for extra depth. A pinch of paprika adds warmth and color.
- Alternative seasoning ideas: Instead of salt and pepper, use lemon juice for brightness. Nutritional yeast can give a cheesy flavor without dairy. Get creative with your favorite herbs!
Presentation Tips
- Serving suggestions and garnishing options: Serve the mash warm in a rustic bowl. Drizzle olive oil on top for shine. A sprinkle of chopped chives adds color and a fresh taste. You can also add toasted pine nuts for crunch.
Pro Tips
- Choose the Right Cauliflower: Opt for a large, fresh head of cauliflower that feels heavy for its size. This ensures a more flavorful and tender mash.
- Roasting for Flavor: Roasting the garlic and cauliflower enhances their natural sweetness and adds depth to the dish, so don't skip this step!
- Adjust the Creaminess: Depending on your preference, you can adjust the consistency by adding more almond milk or cream cheese until you reach your desired creaminess.
- Garnish for Appeal: A drizzle of olive oil and a sprinkle of fresh chives not only add flavor but also make your dish visually appealing, so don’t forget this final touch!
Variations
Dairy-Free Options
If you want to keep this dish dairy-free, you can swap out the cream cheese. Here are some great substitutes:
- Silken tofu: This gives a creamy texture without dairy.
- Cashew cream: Blend soaked cashews with water for a rich base.
For plant-based milk, I suggest:
- Unsweetened almond milk: It’s light and nutty.
- Coconut milk: Use it for a richer flavor.
Flavor Variations
You can add cheese to enhance the taste. Try these options:
- Parmesan: Grated Parmesan adds a salty kick.
- Cheddar: Sharp cheddar brings a bold flavor.
Experiment with spices for new tastes:
- Smoked paprika: This adds a nice smoky depth.
- Cumin: A hint of cumin gives a warm, earthy note.
Additional Ingredients
Mixing in other vegetables can boost nutrition. Consider these:
- Carrots: They add sweetness and color.
- Spinach: Stir in fresh spinach for a pop of green.
For protein enhancements, try:
- Cooked chickpeas: They add fiber and protein.
- Shredded chicken: This makes it a heartier dish.
Storage Info
Refrigeration Guidelines
To store leftovers, let the mashed cauliflower cool to room temperature. Place it in an airtight container. This helps keep it fresh and tasty. I recommend glass or BPA-free plastic containers for best results. You can keep it in the fridge for about 3 to 4 days.
Freezing Instructions
To freeze, scoop the mashed cauliflower into freezer-safe bags or containers. Squeeze out extra air before sealing. Label the bags with the date. You can freeze it for up to 3 months. When you're ready to eat, thaw it overnight in the fridge. For quicker thawing, use the microwave on a low setting.
Reheating Tips
For reheating without losing texture, use the stovetop or oven. Heat it gently over low heat, stirring often. If it seems thick, add a bit of almond milk to loosen it. You can also reheat in the oven at 350°F (175°C) for about 15-20 minutes. Cover it with foil to keep it moist.
FAQs
What is the nutritional value of creamy roasted garlic mashed cauliflower?
Creamy roasted garlic mashed cauliflower is a tasty dish. It has about 130 calories per serving. The main nutrients include:
- Carbohydrates: 6 grams
- Protein: 3 grams
- Fat: 11 grams
The dish also offers fiber, vitamins C and K, and minerals like calcium and potassium. It is lower in carbs than traditional mashed potatoes, making it a great choice for many diets.
Can I use frozen cauliflower for this recipe?
Yes, you can use frozen cauliflower. Frozen cauliflower is convenient and saves time. However, it may have more moisture. Here are some tips:
- Thaw and Drain: Thaw the cauliflower fully and drain excess water.
- Roasting: Roast it longer to remove moisture and enhance flavor.
- Texture: The texture might differ slightly but will still taste great.
How can I make this recipe lower in calories?
You can modify the recipe to cut calories. Here are some suggestions:
- Cream Cheese: Use Greek yogurt or a low-fat option instead.
- Milk: Swap almond milk with unsweetened coconut milk for fewer calories.
- Olive Oil: Reduce the amount of olive oil or use a spray.
These swaps keep the dish creamy while lowering calories. Enjoy your delicious and healthier mashed cauliflower!
This blog post covered how to make creamy roasted garlic mashed cauliflower. It provided a list of key ingredients and offered step-by-step instructions. You learned tips for ensuring creaminess and flavor, plus variations to try. We also discussed storage methods for leftovers.
In conclusion, this recipe is easy to adapt for any diet. Enjoy making it your own and share it with friends!