No Bake Pumpkin Cheesecake Cups Creamy Delight Recipe

Are you craving a dessert that’s simple yet delicious? Look no further! These No Bake Pumpkin Cheesecake Cups blend creamy pumpkin flavor with a crunchy crust. They are perfect for any time of year, especially fall. I’ll guide you through each step, from choosing the best ingredients to avoiding common mistakes. Get ready to impress your friends and family with this easy, sweet treat that everyone will love!

Ingredients

List of Essential Ingredients

To make No Bake Pumpkin Cheesecake Cups, gather these simple items:

– 1 cup graham cracker crumbs

– 1/4 cup unsalted butter, melted

– 2 (8 oz) packages cream cheese, softened

– 1 cup pumpkin puree

– 1 cup powdered sugar

– 1 teaspoon vanilla extract

– 1 teaspoon ground cinnamon

– 1/2 teaspoon ground nutmeg

– 1/2 cup heavy whipping cream

– Whipped cream, for topping

– Crushed pecans or walnuts, for garnish

These ingredients create a creamy and flavorful dessert. Each part plays a role in texture and taste.

Substitutions for Dietary Needs

If you have dietary needs, there are easy swaps. For gluten-free options, use gluten-free graham crackers. Instead of cream cheese, try dairy-free cream cheese for a vegan version. You can also use coconut cream in place of heavy whipping cream.

Tips on Choosing Quality Ingredients

Quality matters in cooking. Fresh cream cheese gives the best taste and texture. Look for pumpkin puree without added sugar or spices. Using pure vanilla extract enhances flavor. Always check the freshness of your spices; fresh ground cinnamon and nutmeg will make a big difference. Choose unsalted butter for better control over saltiness.

These tips help you make the best No Bake Pumpkin Cheesecake Cups. For the full recipe, check the details above.

Step-by-Step Instructions

Preparation of the Crust

To start, gather your ingredients. You need graham cracker crumbs and melted butter. In a medium bowl, mix the crumbs with the butter. Make sure to coat all the crumbs well. This helps create a tasty crust. Next, take small cups or jars. Divide the crumb mixture evenly into each cup. Press it down firmly. This will be the base of your dessert.

Making the Pumpkin Cheesecake Filling

Now, let’s make the creamy filling. In a large bowl, add softened cream cheese. Beat it until it is smooth and fluffy. Then, add the pumpkin puree and powdered sugar. Mix in vanilla extract, cinnamon, and nutmeg. Keep beating until everything is well combined. In another bowl, whip the heavy cream until it forms stiff peaks. Gently fold this whipped cream into your pumpkin mix. Be careful not to deflate the cream. This step gives your cheesecake a light texture.

Assembling the Cups and Chilling

It’s time to assemble your cups! Spoon the pumpkin cheesecake filling over the crusts in each cup. Layer it generously for a rich taste. Once done, place the cups in the fridge. Chill them for at least four hours. This helps the cheesecake set. Just before serving, add a dollop of whipped cream on top. Sprinkle crushed pecans or walnuts for a nice crunch. Enjoy your no bake pumpkin cheesecake cups! For the full recipe, refer to the recipe section above.

Tips & Tricks

Common Mistakes to Avoid

When making no bake pumpkin cheesecake cups, avoid a few common mistakes. First, do not skip softening the cream cheese. Cold cream cheese makes it hard to mix. Second, be gentle when folding in the whipped cream. Over-mixing can deflate it, making your dessert less fluffy. Lastly, ensure your crust is packed tightly. A loose crust will crumble when you serve it.

How to Ensure Creamy Consistency

To keep your cheesecake cups creamy, start with room temperature cream cheese. Beat it well until smooth before adding other ingredients. When combining pumpkin puree and spices, make sure they are mixed evenly. This helps avoid lumps. Whipping the heavy cream is key, too. Whip it until stiff peaks form, then fold it in slowly. This keeps the mixture light and airy.

Serving and Presentation Suggestions

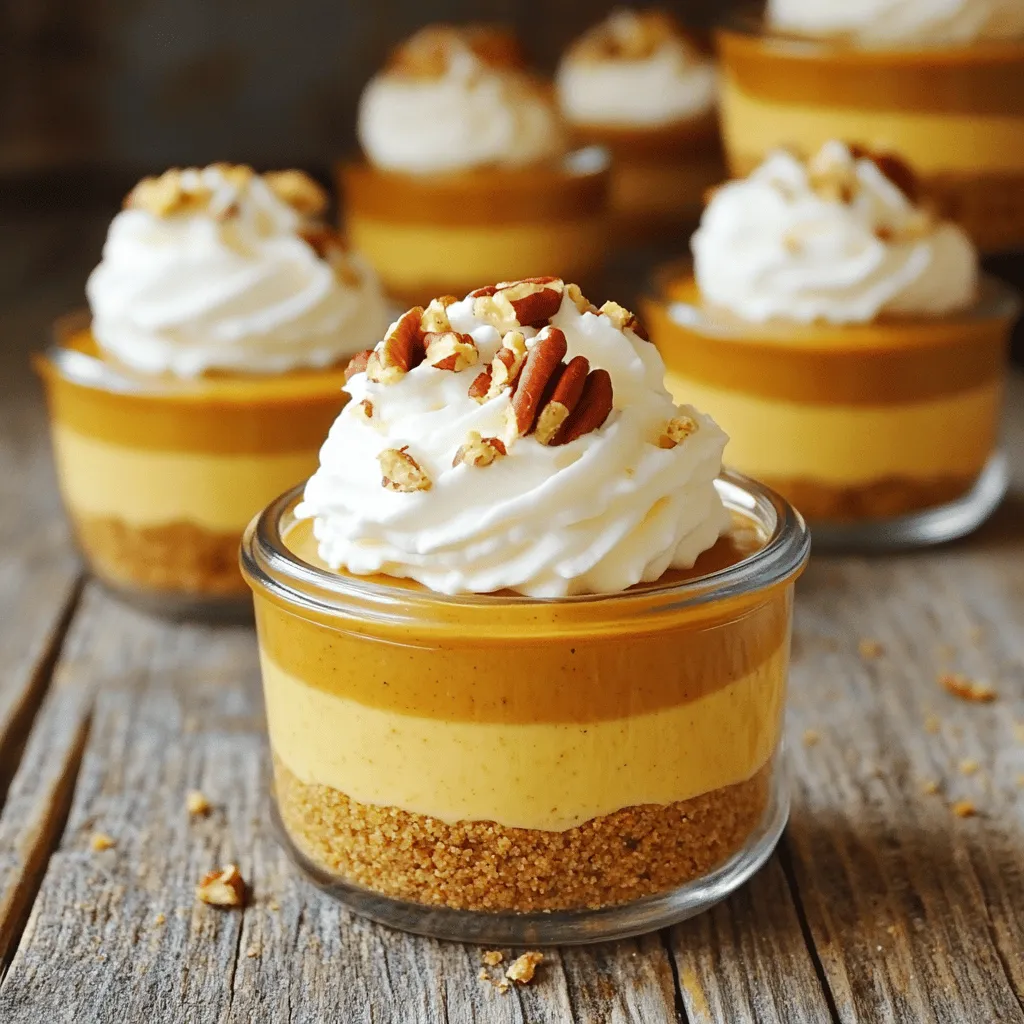
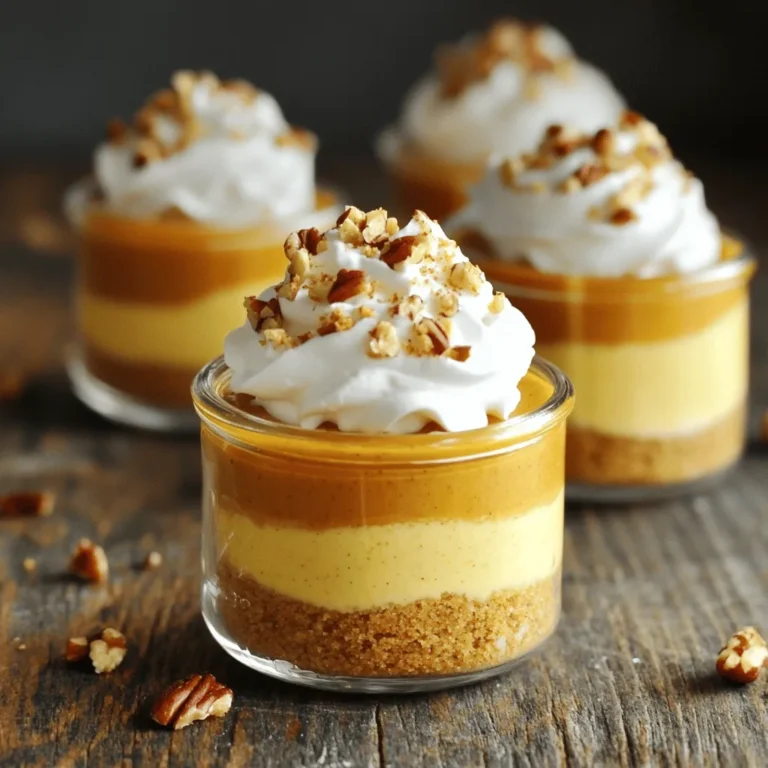
For serving, use clear cups or jars to show off those beautiful layers. Top each cup with a generous dollop of whipped cream. A sprinkle of crushed pecans or walnuts adds a nice crunch. You can also drizzle a bit of caramel sauce for extra sweetness. Chill your cups for at least four hours before serving. This helps the flavors meld together. For the full recipe, check out the details above.
Variations

Flavor Additions (Chocolate, Maple, etc.)

You can easily switch up the flavors in your pumpkin cheesecake cups. Try adding a few tablespoons of cocoa powder for a chocolate twist. Chocolate melts smoothly into the pumpkin mix. You can also drizzle in some maple syrup for a sweet touch. The rich flavor of maple pairs well with pumpkin. Mix these in when you combine the pumpkin and cream cheese. This way, the flavors blend well.

Alternative Serving Methods (Mason Jars, Parfaits)

Serving your cheesecake cups can be fun! Mason jars are great for this dessert. They look cute and are easy to transport. Just layer the crust and filling inside the jars. You can also make a parfait. In this method, layer the crust, filling, and whipped cream in a tall glass. This creates a beautiful, layered look. It also gives everyone a chance to see the lovely colors.

Gluten-Free or Vegan Options

If you have dietary needs, don’t worry! You can make this dessert gluten-free. Use gluten-free graham crackers for the crust. For a vegan version, swap the cream cheese with vegan cream cheese. Use coconut cream instead of heavy cream. The taste will still be amazing! You can enjoy this treat without any worry.

Storage Info

Best Practices for Storing Cheesecake Cups

To store your no bake pumpkin cheesecake cups, keep them in the fridge. Cover each cup with plastic wrap or a lid. This helps retain freshness. It also prevents any odors from other foods in the fridge. Make sure they are sealed tightly. You want to keep them as creamy and delicious as possible.

Freezing Instructions for Longer Storage

If you want to keep them longer, you can freeze the cheesecake cups. Just make sure they are in airtight containers. This will help avoid freezer burn. When you’re ready to eat them, take them out of the freezer. Let them thaw in the fridge overnight for the best taste. They may lose some creaminess when frozen, but they’ll still be tasty!

Shelf Life and Reheating Tips

These cheesecake cups last about 5 days in the fridge. After that, they may start to lose their texture and flavor. If you freeze them, they can last for up to 2 months. You do not need to reheat these cups. Serve them cold for the best experience. Enjoy them straight from the fridge for a refreshing treat!

FAQs

How to make No Bake Pumpkin Cheesecake Cups?

To make No Bake Pumpkin Cheesecake Cups, start with the crust. Mix graham cracker crumbs and melted butter in a bowl. Press this mix into the bottom of cups. Next, beat softened cream cheese until smooth. Add pumpkin puree, powdered sugar, vanilla, cinnamon, and nutmeg. Mix until combined. In a new bowl, whip heavy cream until stiff peaks form. Fold this into the pumpkin mix. Spoon the filling into the cups over the crust. Chill for at least four hours. Top with whipped cream and crushed nuts before serving. Check the Full Recipe for detailed steps.

Can I use canned pumpkin for this recipe?

Yes, you can use canned pumpkin for this recipe. It saves time and ensures a good texture. Just make sure you choose 100% pumpkin puree. Avoid pumpkin pie filling, as it has added sugar and spices. Canned pumpkin adds flavor and keeps the process simple.

What can I use as a substitute for heavy cream?

If you need a substitute for heavy cream, you have a few options. You can use coconut cream for a dairy-free version. Another choice is to combine milk and butter. Mix 3/4 cup milk with 1/4 cup melted butter. This mix will mimic the fat content of heavy cream, making it a good alternative.

How long do No Bake Pumpkin Cheesecake Cups last?

No Bake Pumpkin Cheesecake Cups last about 4 to 5 days in the fridge. Store them in an airtight container to keep them fresh. If you want to keep them longer, consider freezing them. They can last up to 2 months in the freezer. Just thaw them in the fridge before serving.

In this article, we explored how to make No Bake Pumpkin Cheesecake Cups. You learned about key ingredients, including clever substitutions for different diets. I provided simple, step-by-step instructions for making the crust and filling, along with tips to avoid common mistakes. You also discovered fun variations and best storage practices.

These cups are not only tasty but also easy to share. Try them out for your next gathering. Enjoy your delicious dessert creation!
To make No Bake Pumpkin Cheesecake Cups, gather these simple items: - 1 cup graham cracker crumbs - 1/4 cup unsalted butter, melted - 2 (8 oz) packages cream cheese, softened - 1 cup pumpkin puree - 1 cup powdered sugar - 1 teaspoon vanilla extract - 1 teaspoon ground cinnamon - 1/2 teaspoon ground nutmeg - 1/2 cup heavy whipping cream - Whipped cream, for topping - Crushed pecans or walnuts, for garnish These ingredients create a creamy and flavorful dessert. Each part plays a role in texture and taste. If you have dietary needs, there are easy swaps. For gluten-free options, use gluten-free graham crackers. Instead of cream cheese, try dairy-free cream cheese for a vegan version. You can also use coconut cream in place of heavy whipping cream. Quality matters in cooking. Fresh cream cheese gives the best taste and texture. Look for pumpkin puree without added sugar or spices. Using pure vanilla extract enhances flavor. Always check the freshness of your spices; fresh ground cinnamon and nutmeg will make a big difference. Choose unsalted butter for better control over saltiness. These tips help you make the best No Bake Pumpkin Cheesecake Cups. For the full recipe, check the details above. To start, gather your ingredients. You need graham cracker crumbs and melted butter. In a medium bowl, mix the crumbs with the butter. Make sure to coat all the crumbs well. This helps create a tasty crust. Next, take small cups or jars. Divide the crumb mixture evenly into each cup. Press it down firmly. This will be the base of your dessert. Now, let’s make the creamy filling. In a large bowl, add softened cream cheese. Beat it until it is smooth and fluffy. Then, add the pumpkin puree and powdered sugar. Mix in vanilla extract, cinnamon, and nutmeg. Keep beating until everything is well combined. In another bowl, whip the heavy cream until it forms stiff peaks. Gently fold this whipped cream into your pumpkin mix. Be careful not to deflate the cream. This step gives your cheesecake a light texture. It’s time to assemble your cups! Spoon the pumpkin cheesecake filling over the crusts in each cup. Layer it generously for a rich taste. Once done, place the cups in the fridge. Chill them for at least four hours. This helps the cheesecake set. Just before serving, add a dollop of whipped cream on top. Sprinkle crushed pecans or walnuts for a nice crunch. Enjoy your no bake pumpkin cheesecake cups! For the full recipe, refer to the recipe section above. When making no bake pumpkin cheesecake cups, avoid a few common mistakes. First, do not skip softening the cream cheese. Cold cream cheese makes it hard to mix. Second, be gentle when folding in the whipped cream. Over-mixing can deflate it, making your dessert less fluffy. Lastly, ensure your crust is packed tightly. A loose crust will crumble when you serve it. To keep your cheesecake cups creamy, start with room temperature cream cheese. Beat it well until smooth before adding other ingredients. When combining pumpkin puree and spices, make sure they are mixed evenly. This helps avoid lumps. Whipping the heavy cream is key, too. Whip it until stiff peaks form, then fold it in slowly. This keeps the mixture light and airy. For serving, use clear cups or jars to show off those beautiful layers. Top each cup with a generous dollop of whipped cream. A sprinkle of crushed pecans or walnuts adds a nice crunch. You can also drizzle a bit of caramel sauce for extra sweetness. Chill your cups for at least four hours before serving. This helps the flavors meld together. For the full recipe, check out the details above. {{image_2}} You can easily switch up the flavors in your pumpkin cheesecake cups. Try adding a few tablespoons of cocoa powder for a chocolate twist. Chocolate melts smoothly into the pumpkin mix. You can also drizzle in some maple syrup for a sweet touch. The rich flavor of maple pairs well with pumpkin. Mix these in when you combine the pumpkin and cream cheese. This way, the flavors blend well. Serving your cheesecake cups can be fun! Mason jars are great for this dessert. They look cute and are easy to transport. Just layer the crust and filling inside the jars. You can also make a parfait. In this method, layer the crust, filling, and whipped cream in a tall glass. This creates a beautiful, layered look. It also gives everyone a chance to see the lovely colors. If you have dietary needs, don’t worry! You can make this dessert gluten-free. Use gluten-free graham crackers for the crust. For a vegan version, swap the cream cheese with vegan cream cheese. Use coconut cream instead of heavy cream. The taste will still be amazing! You can enjoy this treat without any worry. To store your no bake pumpkin cheesecake cups, keep them in the fridge. Cover each cup with plastic wrap or a lid. This helps retain freshness. It also prevents any odors from other foods in the fridge. Make sure they are sealed tightly. You want to keep them as creamy and delicious as possible. If you want to keep them longer, you can freeze the cheesecake cups. Just make sure they are in airtight containers. This will help avoid freezer burn. When you're ready to eat them, take them out of the freezer. Let them thaw in the fridge overnight for the best taste. They may lose some creaminess when frozen, but they’ll still be tasty! These cheesecake cups last about 5 days in the fridge. After that, they may start to lose their texture and flavor. If you freeze them, they can last for up to 2 months. You do not need to reheat these cups. Serve them cold for the best experience. Enjoy them straight from the fridge for a refreshing treat! To make No Bake Pumpkin Cheesecake Cups, start with the crust. Mix graham cracker crumbs and melted butter in a bowl. Press this mix into the bottom of cups. Next, beat softened cream cheese until smooth. Add pumpkin puree, powdered sugar, vanilla, cinnamon, and nutmeg. Mix until combined. In a new bowl, whip heavy cream until stiff peaks form. Fold this into the pumpkin mix. Spoon the filling into the cups over the crust. Chill for at least four hours. Top with whipped cream and crushed nuts before serving. Check the Full Recipe for detailed steps. Yes, you can use canned pumpkin for this recipe. It saves time and ensures a good texture. Just make sure you choose 100% pumpkin puree. Avoid pumpkin pie filling, as it has added sugar and spices. Canned pumpkin adds flavor and keeps the process simple. If you need a substitute for heavy cream, you have a few options. You can use coconut cream for a dairy-free version. Another choice is to combine milk and butter. Mix 3/4 cup milk with 1/4 cup melted butter. This mix will mimic the fat content of heavy cream, making it a good alternative. No Bake Pumpkin Cheesecake Cups last about 4 to 5 days in the fridge. Store them in an airtight container to keep them fresh. If you want to keep them longer, consider freezing them. They can last up to 2 months in the freezer. Just thaw them in the fridge before serving. In this article, we explored how to make No Bake Pumpkin Cheesecake Cups. You learned about key ingredients, including clever substitutions for different diets. I provided simple, step-by-step instructions for making the crust and filling, along with tips to avoid common mistakes. You also discovered fun variations and best storage practices. These cups are not only tasty but also easy to share. Try them out for your next gathering. Enjoy your delicious dessert creation!
No Bake Pumpkin Cheesecake Cups

Delight your taste buds with these No Bake Pumpkin Cheesecake Cups! These easy-to-make treats are perfect for fall gatherings or a cozy dessert at home. With layers of creamy pumpkin goodness and a crunchy graham cracker crust, they’re sure to impress. Ready in just 15 minutes plus chilling time, these delightful cups make the perfect indulgence. Click through for the full recipe and treat yourself today!

Ingredients
  

1 cup graham cracker crumbs

1/4 cup unsalted butter, melted

2 (8 oz) packages cream cheese, softened

1 cup pumpkin puree

1 cup powdered sugar

1 teaspoon vanilla extract

1 teaspoon ground cinnamon

1/2 teaspoon ground nutmeg

1/2 cup heavy whipping cream

Whipped cream, for topping

Crushed pecans or walnuts, for garnish

Instructions
 

In a medium bowl, combine the graham cracker crumbs and melted butter. Mix until the crumbs are well coated.

    Divide the crumb mixture evenly into serving cups or small jars, pressing it down firmly to create a base layer.

      In a separate large bowl, beat the softened cream cheese until smooth and creamy.

        Add the pumpkin puree, powdered sugar, vanilla extract, cinnamon, and nutmeg to the cream cheese mixture. Beat until all ingredients are thoroughly combined.

          In another bowl, whip the heavy cream until stiff peaks form. Gently fold the whipped cream into the pumpkin mixture until incorporated, being careful not to deflate the cream.

            Spoon the pumpkin cheesecake filling over the crusts in the cups, layering it generously.

              Chill in the refrigerator for at least 4 hours or until set.

                Just before serving, top each cheesecake cup with a dollop of whipped cream and a sprinkle of crushed pecans or walnuts for added texture.

                  Prep Time: 15 minutes | Total Time: 4 hours 15 minutes | Servings: 6

                    Leave a Comment

                    Recipe Rating