If you love quick snacks that pack a healthy punch, you’re in the right place! These Nutty Make-Ahead Peanut Butter Oatmeal Bars are perfect for a busy lifestyle. With simple ingredients like rolled oats, natural peanut butter, and crunchy nuts, they deliver flavor and energy. I’ll guide you through easy steps to prepare these tasty bars, plus tips to customize your batch. Let’s dive in and create a treat you’ll enjoy anytime!
Why I Love This Recipe
- Nutritious Ingredients: These bars are packed with wholesome ingredients like oats, chia seeds, and nuts, making them a great source of energy and nutrients.
- Easy to Make: With just a few simple steps, you can whip these up in no time, making them perfect for busy mornings or snacks on the go.
- Customizable: You can easily modify the recipe by adding your favorite nuts or even swapping peanut butter for almond or cashew butter.
- Make-Ahead Convenience: These bars store well in the fridge or freezer, making them an ideal make-ahead snack option for the week.
Ingredients
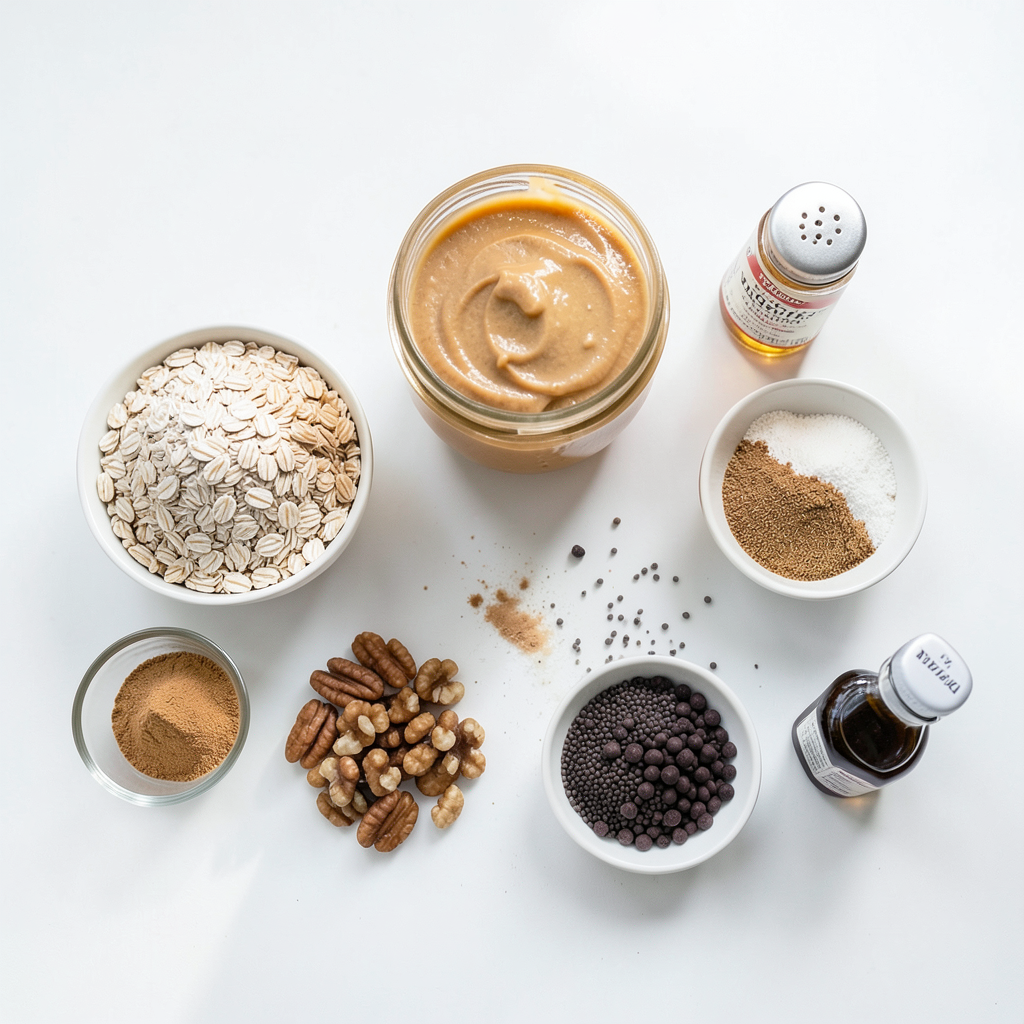
To make Nutty Make-Ahead Peanut Butter Oatmeal Bars, you need simple and wholesome ingredients. Here’s what to gather:
- 2 cups rolled oats
- 1 cup natural peanut butter
- 1/2 cup honey or maple syrup
- 1/2 cup almond flour
- 1/4 cup chia seeds
- 1/4 cup chopped nuts (walnuts, pecans, or hazelnuts)
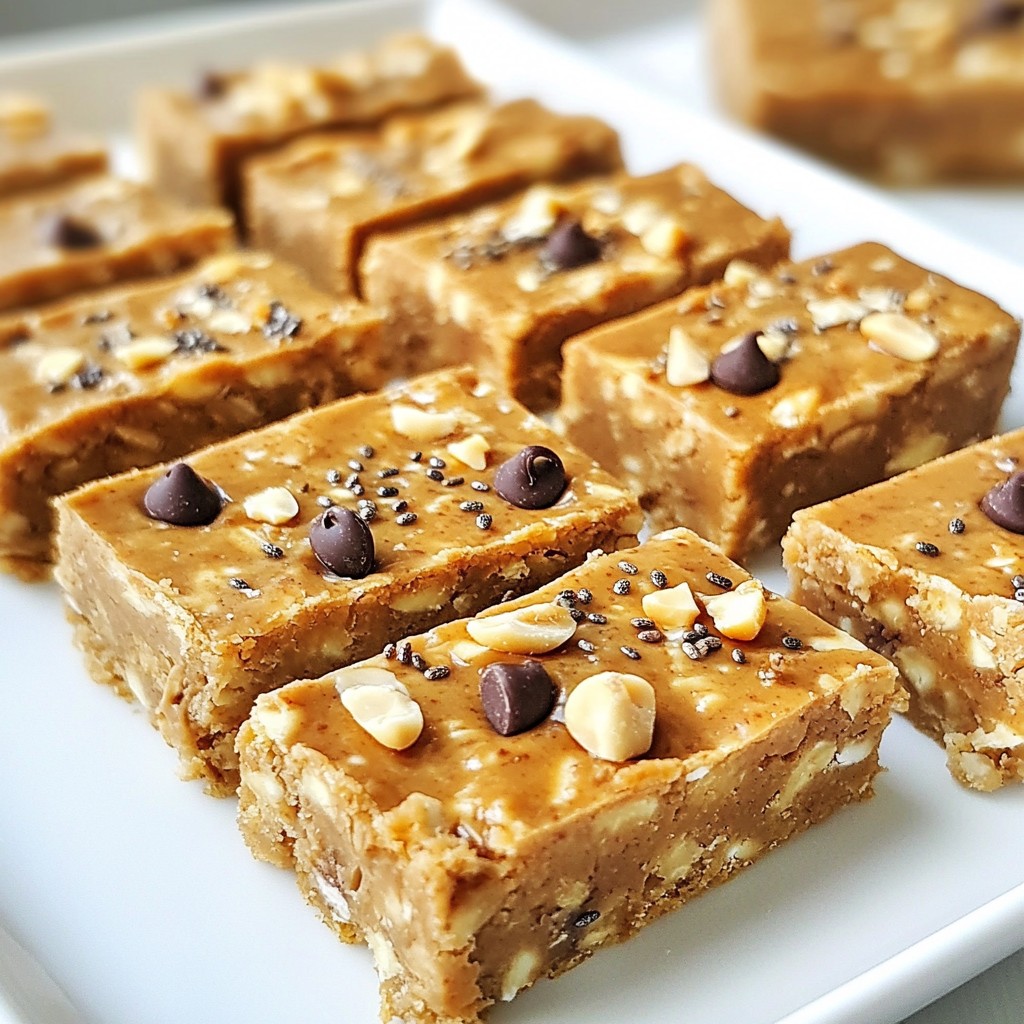
- 1/4 cup dark chocolate chips (optional)
- 1 teaspoon vanilla extract
- 1/2 teaspoon ground cinnamon
- A pinch of salt
Each ingredient plays a special role. Rolled oats give the bars their chewy base. Natural peanut butter adds creaminess and rich flavor. Honey or maple syrup sweetens your bars while keeping them moist. Almond flour makes the texture light. Chia seeds add fiber and healthy fats.
Chopped nuts not only add crunch but also boost protein. Dark chocolate chips can bring a sweet touch if you choose to include them. Vanilla extract enhances the flavor, while cinnamon adds warmth. Finally, salt balances all the tastes.
If you want to make these bars your own, feel free to swap ingredients. You can use different nuts or sweeteners. The possibilities are endless!
Step-by-Step Instructions
Preparation and Baking
1. Preheating the oven and preparing the baking pan
First, set your oven to 350°F (175°C). This heat is perfect for baking. Line an 8x8-inch baking pan with parchment paper. Leave some paper hanging over the sides. This helps you lift the bars out later.
2. Mixing dry ingredients in one bowl
In a large mixing bowl, add the rolled oats, almond flour, chia seeds, chopped nuts, cinnamon, and salt. Mix these together well. This step is key for even flavor in every bite.
3. Combining wet ingredients in another bowl
In a separate bowl, combine the natural peanut butter, honey (or maple syrup), and vanilla extract. Stir until you achieve a smooth mix. This blend brings sweetness and creaminess to the bars.
4. Adding wet ingredients to dry and mixing thoroughly
Now, pour the peanut butter mixture into the bowl with dry ingredients. Mix well until everything is coated. If you like, fold in dark chocolate chips for a tasty surprise.
5. Transferring mixture to the baking pan and baking time
Scoop the mixture into the prepared baking pan. Use a spatula to press it down firmly and evenly. Bake for 15 to 20 minutes. Keep an eye on it; you want the edges to turn golden brown.
These steps will guide you to make delicious Nutty Make-Ahead Peanut Butter Oatmeal Bars. Enjoy the process and the tasty results!
Tips & Tricks
Customizing Your Bars
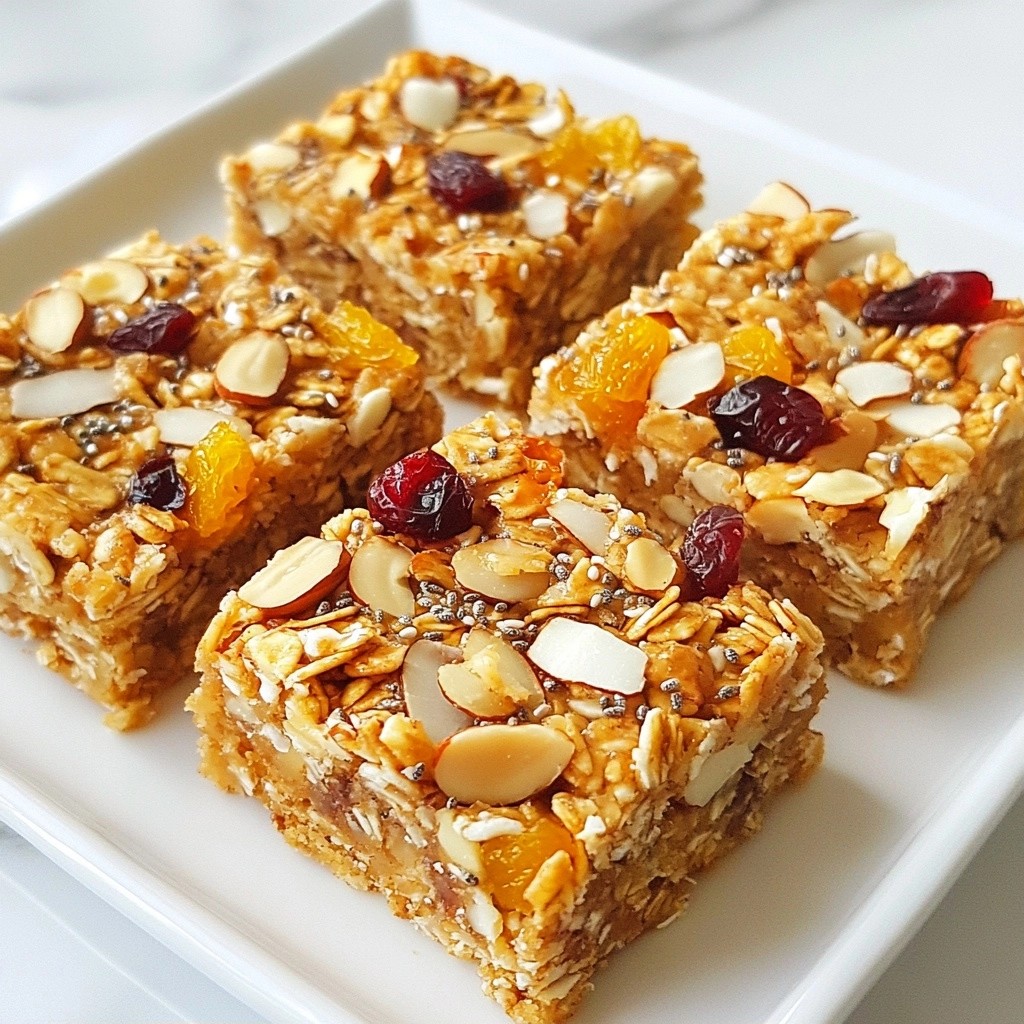
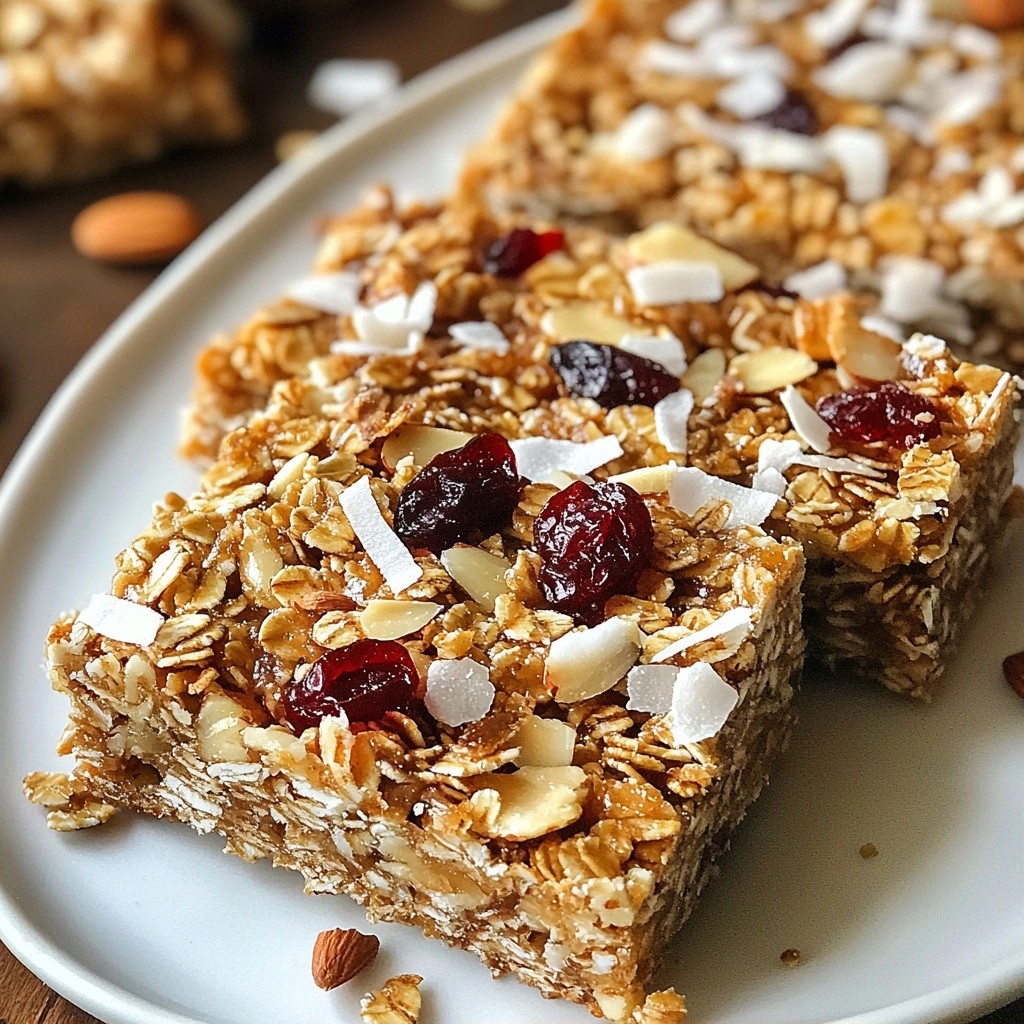
You can swap peanut butter for any nut butter you like. Almond butter adds a nice twist. Sunflower seed butter is great for nut-free needs. You can also change sweeteners. Try agave nectar if you want a lighter taste. If you prefer less sweetness, reduce the honey or maple syrup. For nuts and seeds, mix it up! Use pumpkin seeds or cashews for a fun crunch. You can even add dried fruits like cranberries or raisins.
Ensuring Proper Texture
To keep your bars from being crumbly, make sure to press the mixture firmly into the pan. This helps bind the ingredients together. Another tip is to let them cool completely before slicing. For a chewy texture, use natural peanut butter instead of the processed kind. You can also try adding an extra tablespoon of honey or a bit more nut butter.
Serving Suggestions
These bars are perfect for pairing with yogurt or fresh fruit. They also work well with a glass of milk or a smoothie. If you need breakfast on the go, grab a bar and take it with you. They make a great snack during the day or after a workout. You can even crumble them over ice cream for a fun dessert!
Pro Tips
- Use Creamy Peanut Butter: For the best texture, opt for creamy natural peanut butter. It blends seamlessly with the oats and creates a softer bar.
- Chill Before Cutting: After baking, allow the bars to cool completely in the refrigerator for about an hour before cutting. This helps them hold their shape better.
- Experiment with Add-ins: Feel free to customize your bars by adding dried fruits like cranberries or apricots, or swapping in different nuts for a unique flavor.
- Store Properly: Keep the bars in an airtight container in the fridge for up to a week. For longer storage, freeze them in individual portions and thaw as needed.
Variations
Flavor Variations
You can spice up your bars with fun flavors. Adding dried fruits like cranberries or raisins gives a sweet burst. Shredded coconut adds a tropical touch. You might also try flavored nut butters. Almond, cashew, or even chocolate peanut butter can change the taste. These simple swaps make each batch unique.
Dietary Considerations
If you're gluten-free, use certified gluten-free oats. This keeps your bars safe for all diets. For a vegan version, swap honey with maple syrup. This small change keeps the bars sweet without any animal products. Both options still taste amazing and fit different needs.
Presentation Options
Make your bars look extra special! You can drizzle yogurt on top for creaminess. Adding more chocolate chips makes them a treat. A sprinkle of nuts can also add a nice crunch. These ideas make your bars not just tasty but pretty, too!
Storage Information
Best Storage Practices
To keep your Nutty Make-Ahead Peanut Butter Oatmeal Bars fresh, use an airtight container. This prevents moisture from making your bars soggy. A glass or plastic container with a tight seal works well. If you want to store them for a longer time, consider freezing them.
- For refrigerator storage, place the bars in an airtight container.
- For freezer storage, wrap each bar in plastic wrap. Then, put them in a freezer bag. This will help maintain their flavor and texture.
Shelf Life
These bars stay fresh for about a week in the fridge. Store them in the airtight container I mentioned before. If you freeze them, they last up to three months. When you want to eat one, just take it out and let it thaw at room temperature.
- In the fridge: up to 1 week.
- In the freezer: up to 3 months.
By following these steps, you can enjoy your bars at their best!
FAQs
How to make Nutty Make-Ahead Peanut Butter Oatmeal Bars more nutritious?
You can boost nutrition in these bars easily. Add seeds like pumpkin or sunflower. Try using whole grain oats for fiber. You can also mix in dried fruits like raisins or cranberries. These add natural sweetness and vitamins. Using less sweetener helps too, as the oats and nuts provide flavor.
Can I make these bars without nuts?
Yes, you can make these bars nut-free. Just skip the chopped nuts in the recipe. Use seeds like sunflower or pumpkin instead. You can still enjoy a great texture and taste. Remember to check for allergies if sharing with others.
What are some ideas for serving these oatmeal bars?
These bars are great for breakfast or snacks. Try pairing them with yogurt or fresh fruit. You can also serve them with smoothies for a full meal. For a treat, drizzle some chocolate on top. They also make nice gifts for friends and family.
How do I know when the bars are done baking?
You can tell the bars are done when the edges turn golden brown. A light press in the center should feel firm but not hard. If you want, check with a toothpick. It should come out clean, meaning they are ready to cool.
Can I customize the sweetness level in the recipe?
Absolutely! You can adjust the honey or maple syrup to your taste. If you prefer less sweet, use less than half a cup. You can also try adding mashed bananas for natural sweetness. This way, you can enjoy your bars just how you like them.
These oatmeal bars are easy to make and fun to customize. You learned about the key ingredients, step-by-step baking, and helpful tips for the best texture. Exploring variations and storage options can keep your snacks fresh. Get creative with flavors and serving ideas to suit your taste. Remember, you can adjust sweetness and make these bars your own. Enjoy your delicious, homemade peanut butter oatmeal bars anytime!