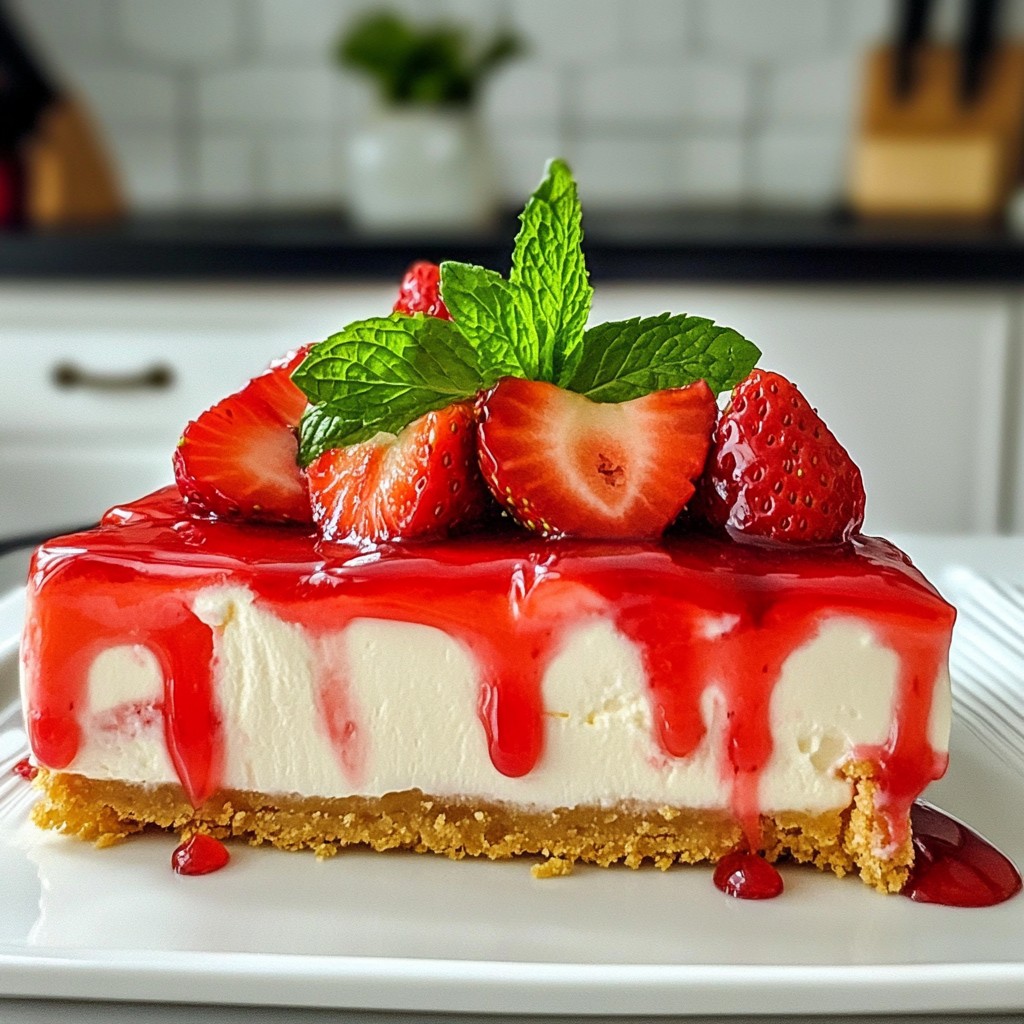
Looking for a dessert that screams summer while being easy to make? The Strawberry Cheesecake Icebox Pie is just that! With its creamy filling and fresh strawberry topping, this dish will keep your friends and family coming back for more. In this guide, I’ll share all the steps to create a delicious pie, tips to avoid common mistakes, and even variations to try. Let's dive in and make dessert the highlight of your meal!
Why I Love This Recipe
- Refreshing Flavor: This pie is bursting with the fresh taste of strawberries, making it a perfect treat for warm days.
- No-Bake Convenience: With no baking required, it's an easy and quick dessert that saves time in the kitchen.
- Creamy Texture: The combination of cream cheese and whipped cream creates a luscious filling that melts in your mouth.
- Versatile Presentation: It's a stunning dessert that can be garnished with mint leaves for an elegant touch, perfect for any occasion.
Ingredients
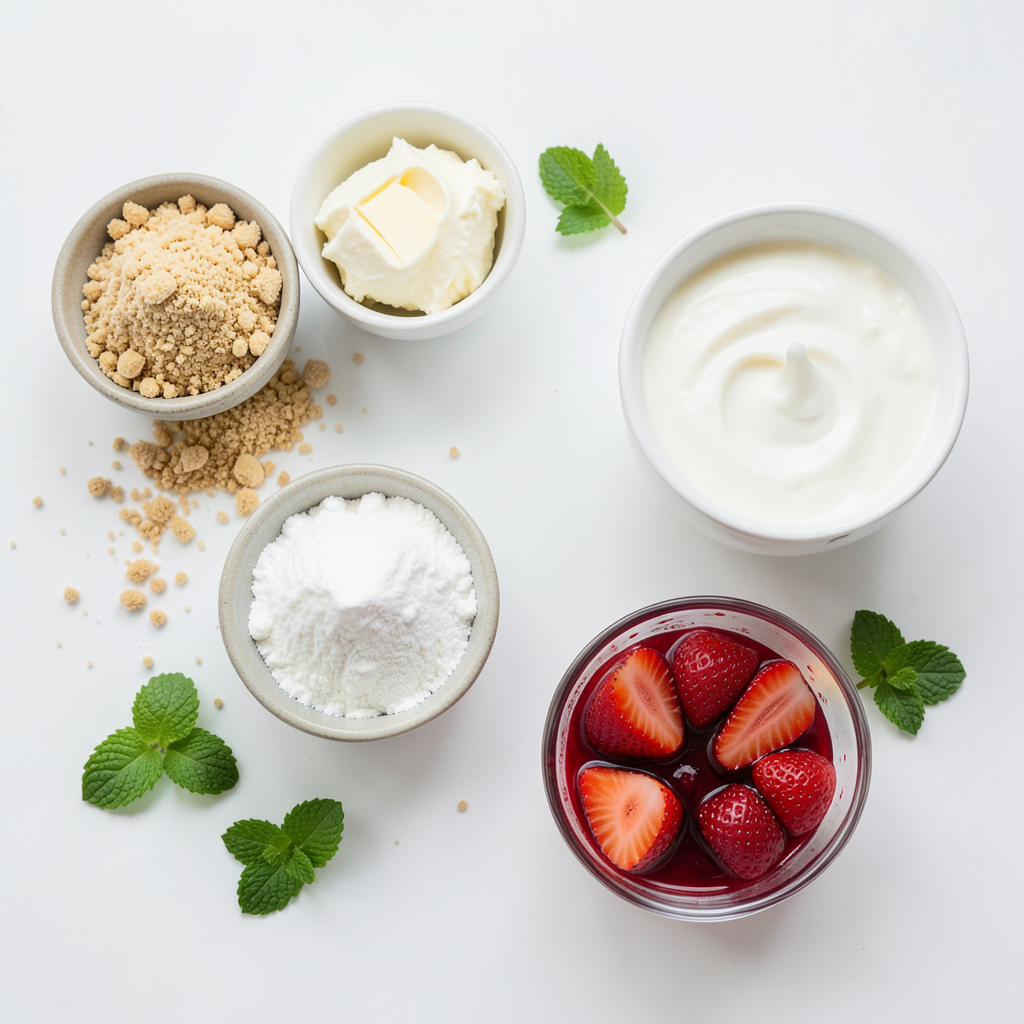
Detailed List of Ingredients
To make the Strawberry Cheesecake Icebox Pie, gather these key items:
- 1 ½ cups graham cracker crumbs
- ½ cup unsalted butter, melted
- 1 cup cream cheese, softened
- 1 cup powdered sugar
- 1 teaspoon vanilla extract
- 1 cup heavy whipping cream
- 2 cups fresh strawberries, hulled and sliced
- ¼ cup strawberry jam
- Fresh mint leaves for garnish (optional)
These ingredients create a smooth, creamy pie with a crunchy crust. Each part plays a role in the taste and texture.
Ingredient Substitutions
If you need to swap out some ingredients, here are a few ideas:
- Use *digestive biscuits* instead of graham crackers for the crust.
- You can swap *coconut cream* for heavy cream, but it will have a different flavor.
- If you don’t have strawberries, try *blueberries* or *raspberries* for a twist.
These substitutions can change the taste, but they still keep the pie fun and easy.
Importance of Fresh Ingredients
Using fresh ingredients is vital for this pie. Fresh strawberries give the best flavor and color. They also make the pie look great.
Cream cheese should be soft for easy mixing. If it’s cold, it can form lumps. Quality butter adds a rich taste to the crust.
For the best results, always choose the freshest items you can find. Fresh ingredients make your pie taste homemade and special.
Step-by-Step Instructions
Preparing the Graham Cracker Crust
To start, gather your ingredients. You will need graham cracker crumbs and melted butter. In a bowl, mix 1 ½ cups of graham cracker crumbs with ½ cup of melted butter. Mix it well until it looks like wet sand. Now, take a 9-inch pie pan. Press the crumb mixture into the bottom and up the sides. Make sure it is firm and even. Once done, put the crust in the fridge to set while you work on the filling.
Making the Cream Cheese Filling
Next, you will make the cream cheese filling. In a large mixing bowl, beat 1 cup of softened cream cheese with an electric mixer. Mix until it is smooth and creamy. Then, add 1 cup of powdered sugar and 1 teaspoon of vanilla extract. Blend this mixture until it is fully combined and creamy. This filling will be rich and delicious.
Whipping the Heavy Cream
Now, it’s time to whip the heavy cream. In a separate bowl, pour in 1 cup of heavy whipping cream. Use a mixer to whip it until stiff peaks form. This means the cream will hold its shape. Be gentle when you fold this whipped cream into the cream cheese mixture. You want to keep it light and fluffy. This step adds airiness to your pie.
Assembling the Pie Layers
Take the chilled crust out of the fridge. Spread half of the cheesecake filling over the crust evenly. Next, layer half of the 2 cups of sliced strawberries on top of the filling. Then, add the rest of the cheesecake filling on top of the strawberries. Finally, layer the remaining strawberries. This creates beautiful layers in your pie.
Drizzling with Strawberry Jam
Now for a sweet touch! Warm ¼ cup of strawberry jam in the microwave for a few seconds. This makes it easy to drizzle. Use a spoon or squeeze bottle to drizzle the jam over the top of the strawberries. The jam adds a nice shine and extra flavor.
Chilling Techniques for Best Results
To finish, cover the pie with plastic wrap. Place it in the refrigerator for at least 4 hours. For the best texture, chill it overnight. This waiting time allows the flavors to meld and the pie to set. When you're ready to serve, slice it into wedges and enjoy!
Tips & Tricks
Common Mistakes to Avoid
When making your Strawberry Cheesecake Icebox Pie, avoid these common mistakes:
- Not chilling the crust: Always chill the crust before adding the filling. This keeps it firm.
- Overmixing the cream: When mixing the whipped cream, stop as soon as stiff peaks form. Overmixing can turn it into butter.
- Using warm ingredients: Make sure your cream cheese is soft but not warm. Warm cream cheese can make your filling too runny.
How to Achieve the Perfect Whipped Cream
To get perfect whipped cream for your pie, follow these steps:
- Start with cold heavy cream. Cold cream whips better and faster.
- Use a clean bowl and beaters. Any grease can stop the cream from whipping.
- Beat on medium speed until you see soft peaks. Then, increase the speed to high until stiff peaks form.
- Gently fold the whipped cream into the cream cheese mixture. This keeps it light and fluffy.
Tips for Slicing and Serving
For the best slices and serving, keep these tips in mind:
- Use a sharp knife. A sharp knife cuts cleanly through the pie.
- Dip the knife in warm water before slicing. This helps the knife glide through the filling.
- Wipe the knife clean between slices. This keeps each piece looking neat.
- Serve chilled. The pie tastes best when it’s nice and cold. Garnish with fresh mint leaves for a pop of color and flavor.
Pro Tips
- Use Fresh Strawberries: For the best flavor and texture, always use fresh, ripe strawberries. They enhance the overall taste of the pie and provide a beautiful presentation.
- Chill Thoroughly: Allow the pie to chill for at least 4 hours, or preferably overnight. This helps the cheesecake filling to set properly and improves the texture.
- Customize Your Toppings: Feel free to experiment with different toppings like blueberries or raspberries. You can also add a drizzle of chocolate for an extra touch of sweetness.
- Make It Ahead: This pie can be made a day in advance, making it perfect for gatherings. Just keep it covered in the refrigerator until ready to serve.
Variations
Alternative Fruit Toppings
You can change the fruit on top of the pie. Instead of strawberries, try blueberries or raspberries. Both berries add a nice tartness. You can also mix fruits for a colorful look. Just make sure the fruit is fresh for the best taste. Slice the fruit thin, so they sit well on the cream.
Different Flavor Profiles (Chocolate, Lemon, etc.)
Add a twist by changing the flavors. For a chocolate version, mix cocoa powder into the cream cheese. You can also melt dark chocolate and fold it in. If you like lemon, add lemon juice and zest to the cream cheese mix. This gives the pie a bright, zesty kick. Each flavor gives a new taste to this classic dish.
Gluten-Free Options
To make this pie gluten-free, swap the graham crackers. Use gluten-free cookie crumbs instead. You can find these at most stores. Just check the label to ensure they are truly gluten-free. The rest of the recipe stays the same. Enjoy this pie without worry if you have gluten sensitivity.
Storage Info
How to Properly Store Leftovers
To keep your Strawberry Cheesecake Icebox Pie fresh, cover it well. Use plastic wrap or foil. Store it in the fridge. This keeps the pie cool and tasty. It helps maintain its creamy texture. Make sure to eat it within 3 days for the best flavor.
Freezing Instructions
If you want to save some pie for later, freezing works well. First, slice the pie into pieces. Wrap each slice in plastic wrap tightly. Place the wrapped slices in a freezer bag. Label the bag with the date. You can freeze it for up to 2 months. When you’re ready to eat, thaw it in the fridge overnight.
Shelf Life of the Pie
The shelf life of your Strawberry Cheesecake Icebox Pie depends on how you store it. In the fridge, it lasts about 3 days. If frozen, you can keep it for 2 months. After thawing, eat it within 2 days. Always check for any signs of spoilage before serving.
FAQs
What is an Icebox Pie?
An icebox pie is a chilled dessert. It is easy to make and does not need baking. You create the crust and filling, then chill it until set. This pie is perfect for hot days. The creamy filling and fresh fruit make it refreshing.
Can I make this pie in advance?
Yes, you can make this pie ahead of time. I suggest making it a day before serving. This allows the flavors to meld. Plus, it sets up nicely in the fridge. Just cover it well to keep it fresh.
How do I prevent the crust from getting soggy?
To keep the crust crisp, chill it before adding the filling. Use melted butter to bind the crumbs well. You can also bake the crust for a few minutes. This helps it stay firm when you add the creamy filling.
Can I use frozen strawberries?
Yes, frozen strawberries work well. Thaw them and drain excess liquid. Fresh strawberries have a better taste, but frozen ones are a good backup. They still add sweetness and color to your pie.
What can I do with leftover filling?
You can use leftover filling in many ways. Try it as a dip for fruit or graham crackers. You can also spread it on toast. If you have extra crust, make mini pies with it. The options are endless!
This blog post provided a complete guide to making a delicious icebox pie. We discussed essential ingredients, how to prepare each layer, and tips to make your pie shine. Remember to use fresh ingredients for the best flavor. Don’t forget to check out variations and storage tips to keep your pie tasty. Making this treat is easy and rewarding. With practice, you'll impress family and friends. Enjoy your pie-making journey!