Skip to content
DisclaimerTerms Of UseGDPR PolicyCookie Policy

Cooking Wells

  • Home
  • Drinks
  • Appetizers
  • Dinner
  • Dessert
  • About
  • Contact
  • Privacy Policy
DisclaimerTerms Of UseGDPR PolicyCookie Policy

NO-ING-IMG

- Pasta and Protein Choices - 8 oz rotini pasta - 1 lb ground beef (or turkey for a leaner option) - Vegetables and Seasoning - 1 packet taco seasoning - 1 can (15 oz) diced tomatoes with green chilies - 1 cup beef broth (or vegetable broth) - 1 cup frozen corn - 1/2 cup red bell pepper, diced - 1/2 cup onion, diced - 2 cloves garlic, minced - Salt and pepper to taste - Dairy Components - 1 cup shredded cheddar cheese - 1 cup shredded pepper jack cheese - 2 tablespoons olive oil This recipe uses rotini pasta, which holds sauce well. Ground beef gives a rich taste, but turkey works too. The taco seasoning adds great flavor. Diced tomatoes with green chilies bring heat and tang. Beef broth keeps it moist. Frozen corn adds sweetness and color. Diced red bell pepper and onion add crunch. Garlic gives it depth. For cheese, I love a mix of cheddar and pepper jack. Cheddar melts well, while pepper jack adds a kick. Olive oil helps sauté the veggies, adding richness. Don't forget salt and pepper for balance. Each ingredient plays a vital role in making this dish flavorful and satisfying. {{ingredient_image_1}} Boiling and Draining the Pasta Start by bringing a large pot of salted water to a boil. Once it bubbles, add 8 ounces of rotini pasta. Cook it according to the package instructions until it is al dente, which usually takes about 8-10 minutes. After that, drain the pasta in a colander and set it aside. Timing for Optimal Texture Timing is key for great pasta. Al dente means the pasta is firm but not hard. This helps prevent it from getting mushy when you mix in the sauce later. Preparing the Skillet In a large skillet, heat 2 tablespoons of olive oil over medium heat. This oil will add flavor and help cook the veggies. Proper Cooking Times Add 1/2 cup of diced onion, 1/2 cup of diced red bell pepper, and 2 minced garlic cloves. Sauté these for about 3-4 minutes until they soften. Stir them often to avoid burning. Food Safety Tips Add 1 pound of ground beef or turkey to the skillet. Make sure the meat is cooked to at least 165°F to keep it safe. Achieving the Best Texture Cook the meat for about 5-7 minutes. Break it into small pieces with a wooden spoon. This helps it brown evenly and mix well with the vegetables. Mixing in Taco Seasoning Once the meat is browned, stir in 1 packet of taco seasoning, 1 can (15 oz) of diced tomatoes with green chilies, and 1 cup of beef or vegetable broth. Simmering for Depth of Flavor Let everything simmer for about 3 minutes. This step melds the flavors and makes the dish tasty. Incorporating Corn and Pasta Now, add 1 cup of frozen corn and the cooked pasta back into the skillet. Ensuring Even Distribution Gently stir everything together. Make sure the pasta and corn are evenly mixed with the meat and sauce. Cook it for an additional 2-3 minutes until everything is heated through. Techniques for Perfect Cheese Melt Reduce the heat to low. Sprinkle 1 cup of shredded cheddar cheese and 1 cup of shredded pepper jack cheese over the top. Final Cooking Tips Cover the skillet with a lid and let it sit for about 2-3 minutes. This step melts the cheese and makes it all gooey and delightful. Adjusting Spice Levels You can change the spice level to fit your taste. If you like it hot, add chili powder or diced jalapeños. For a milder dish, use less taco seasoning or choose a mild version. Always taste as you go. This helps you find the right balance. Adding Extra Vegetables Boost nutrition by adding more veggies. Try diced zucchini, spinach, or mushrooms. You can also mix in black beans for extra protein. Adding vegetables not only enhances flavor but also makes the dish colorful. How to Serve from the Skillet Serving the Cheesy Taco Pasta from the skillet keeps it warm and inviting. Use a large spoon to scoop portions directly onto plates. This casual style makes it feel homey and fun. Plus, it saves on dishes! Garnishing Ideas for Visual Appeal Garnish with fresh cilantro for a pop of green. You can also add sliced jalapeños for color and heat. A sprinkle of extra cheese on top makes it look extra delicious. Use a lime wedge on the side for a zesty touch. These small details make your meal visually stunning. Pro Tips Use a Pasta with Texture: Opt for rotini or another pasta shape that can hold onto the sauce and cheese, enhancing every bite. Experiment with Proteins: Try using ground chicken, pork, or even a meat substitute for a vegetarian option to customize the dish to your taste. Spice it Up: Add diced jalapeños or a dash of hot sauce for an extra kick if you enjoy a bit of heat in your meals. Make Ahead: Prepare the dish in advance and store it in the fridge. Reheat it in a skillet, adding a splash of broth if it gets too thick. {{image_2}} You can make a meatless version of Cheesy Taco Pasta Skillet. One easy way is to use high-protein alternatives like beans or lentils. These options add great flavor and texture. You can replace the ground beef with one can of black beans or one cup of cooked lentils. Both work well with taco seasoning. For cheese, you can mix it up too. Try using mozzarella or a spicy cheese blend. Both will melt nicely and give a great taste. If you want to switch up the pasta, there are many options. You can use penne, fusilli, or even whole wheat pasta. Each type brings its own fun twist. Just remember that cooking times may change based on the shape. For example, penne takes about 11-13 minutes to cook. Fusilli cooks in about 8-10 minutes. Always check the package for timing, so your pasta is al dente. You can also adapt this recipe for a slow cooker. Start by cooking the meat and veggies in a skillet. This adds flavor before you transfer them to the slow cooker. Once in the slow cooker, add the cooked pasta, tomatoes, corn, and broth. Set it to low for 4-6 hours. This way, all the flavors meld together nicely. Just add the cheese in the last 30 minutes. This helps it melt perfectly. Best Storage Practices After enjoying your Cheesy Taco Pasta Skillet, let it cool down. Store it in an airtight container. This keeps the flavors fresh and prevents spills. If you have a big batch, divide it into smaller containers for easy access. Shelf Life of Leftover Dish You can store your leftovers in the fridge for up to three days. If you want to keep it longer, consider freezing it. Frozen portions can last up to three months. Just remember to label the containers with the date. Methods for Reheating Pasta Dishes Reheating can be simple. Use the microwave or the stovetop. For the microwave, heat in short bursts. Stir after each burst to heat evenly. On the stovetop, add a splash of broth or water to help it warm up without drying out. Tips for Maintaining Creaminess To keep that cheesy goodness, stir in a bit of extra cheese or a splash of cream while reheating. This helps revive the creamy texture. Avoid high heat, as it can make the cheese clump together. Yes, you can. To make this dish gluten-free, choose gluten-free pasta. There are many brands available. Look for options made from rice, quinoa, or lentils. These alternatives cook well and taste great. If you like heat, add some spicy ingredients. Try diced jalapeños or red pepper flakes. You can also use spicy taco seasoning. Adjust the amount to your taste. Start with a little, then add more if you want. You have great options for lean proteins. Ground turkey works well as a substitute. You can also use ground chicken or plant-based meat. These choices keep the dish healthy while still being tasty. Check the pasta for doneness by tasting it. It should be firm but tender, known as al dente. Look for a slight bite in the center. This texture keeps the pasta from becoming mushy. Yes, you can freeze this meal. Let it cool completely before packing it. Use an airtight container or freezer bag. It stays good for about three months. To reheat, thaw in the fridge and warm it on the stove. In this post, we explored making Cheesy Taco Pasta Skillet. We covered essential ingredients, step-by-step cooking, and tips for customization. You can create your own dish by adjusting spices or adding veggies. Don't forget the storage tips for leftovers and reheating. Remember, cooking is fun and allows for creativity. Enjoy every bite of your delicious meal!

Cheesy Taco Pasta Skillet Quick and Flavorful Meal

Are you ready for a meal that’s quick, cheesy, and packed with flavor? My Cheesy Taco Pasta Skillet is the

To create a vibrant Lemon Garlic Broccolini, you need fresh, quality ingredients. Here’s what you will need: - 1 pound broccolini, trimmed - 3 tablespoons olive oil - 4 cloves garlic, minced - Zest of 1 lemon - Juice of 1 lemon - 1 teaspoon red pepper flakes (optional) - Salt and pepper to taste - 2 tablespoons grated Parmesan cheese (or nutritional yeast for a vegan option) - Lemon slices for garnish Using fresh broccolini is key. Look for bright green, firm stems. The olive oil adds richness, while garlic brings a savory punch. Lemon zest and juice will brighten the dish with fresh flavor. If you like a little heat, add red pepper flakes. The cheese adds creaminess, but you can skip it for a vegan twist. When you gather these ingredients, you set the stage for a healthy and tasty side dish. {{ingredient_image_1}} 1. First, fill a large pot with water and add salt. Bring it to a boil. 2. When the water is boiling, add 1 pound of trimmed broccolini. Blanch it for 2 minutes. This keeps it bright green and crisp. 3. After 2 minutes, drain the broccolini. Then, place it in an ice bath. This stops the cooking and helps it stay crunchy. 4. Once the broccolini is cool, drain it again and set it aside. 1. In a large skillet, pour in 3 tablespoons of olive oil. Heat it over medium heat. 2. Add 4 cloves of minced garlic and, if you like spice, 1 teaspoon of red pepper flakes. Sauté for about 1 minute until the garlic smells good. Be careful not to burn it. 3. Now, add the blanched broccolini to the skillet. Toss it well to coat it with the garlic oil. Sauté for an extra 3-4 minutes until it’s heated through. 1. Remove the skillet from heat. Stir in the zest and juice of 1 lemon for a fresh taste. Season with salt and pepper to your liking. 2. Transfer the broccolini to a serving platter. Sprinkle 2 tablespoons of grated Parmesan cheese on top or use nutritional yeast for a vegan option. 3. Garnish with lemon slices for a lovely finish. Enjoy this bright and tasty side dish! When selecting broccolini, look for bright green stems. They should feel firm but not hard. The florets should be tight and not wilted. Avoid any yellowing or browning. Fresh broccolini has a crisp texture and vibrant color. This indicates it's at its best. One common mistake is overcooking broccolini. This can make it mushy and dull. Always blanch it for just two minutes. Immediately place it in an ice bath to stop cooking. This keeps the bright green color and crispness. Another mistake is burning garlic. Garlic cooks fast and can turn bitter. Sauté it on medium heat and watch it closely. Stir often to prevent burning. This keeps the flavor fresh and tasty. Lemon garlic broccolini pairs well with many dishes. Try it alongside grilled chicken or fish. It also complements pasta and rice dishes nicely. For a simple meal, serve it with quinoa. Top with extra lemon slices for a burst of flavor. Enjoy this vibrant side dish! Pro Tips Blanching Is Key: Blanching the broccolini in salted water helps to preserve its vibrant color and crisp texture, making it more appealing on the plate. Garlic Timing: To prevent burning, add garlic to the skillet after the oil is hot but not smoking; sauté it just until fragrant. Adjusting Heat: If you prefer a spicier dish, feel free to increase the amount of red pepper flakes or add a pinch of cayenne pepper. Cheese Alternatives: For a vegan option, nutritional yeast not only adds a cheesy flavor but is also a great source of B vitamins. {{image_2}} If you want a vegan dish, you can skip the Parmesan. Instead, use nutritional yeast. It gives a cheesy taste without any dairy. Just sprinkle a few tablespoons on the broccolini before serving. You still get flavor, and it keeps the dish plant-based. You can also try adding more flavor to your broccolini. Fresh herbs like thyme or basil work great. You might also want to add a pinch of cumin or smoked paprika. These spices give the dish a warm, earthy taste. Experiment and find what you love best! Grilling or roasting broccolini can change the taste and texture. For grilling, just toss the broccolini with oil and spices. Then place it on a hot grill for about 5-7 minutes. This adds a nice smoky flavor. Roasting is easy too. Spread it on a sheet pan and roast in the oven at 425°F for about 15 minutes. Both methods give you a delicious twist on this healthy side dish. To store leftover Lemon Garlic Broccolini, let it cool first. Place it in an airtight container. This helps keep it fresh. Broccolini stays good for about 3 to 4 days. You can also cover it tightly with plastic wrap. Just make sure to push out any air. To reheat broccolini, I recommend using a skillet. Heat it on medium and add a splash of olive oil. This helps maintain its texture. Sauté for about 2 to 3 minutes until warmed through. You can also use a microwave. Just cover it lightly and heat in short bursts, checking often. If you want to freeze broccolini, blanch it first. This keeps its bright color and crispness. After cooling in an ice bath, drain well. Place the broccolini in a freezer bag. Try to remove as much air as possible. It can last for up to 3 months in the freezer. When ready to use, thaw in the fridge overnight. Broccolini cooks quickly. It usually takes about 5 to 6 minutes in total. First, I blanch it for 2 minutes. This keeps it bright and crisp. After that, I sauté it for 3 to 4 minutes. This gives it a nice flavor from the garlic and lemon. Yes, you can use regular broccoli. However, it needs different cooking times. Broccoli takes longer to cook than broccolini. You should steam or blanch it for about 4 to 5 minutes. The flavor is also different. Broccolini is sweeter and more tender. Adjust your seasoning and cooking time for the best taste. Broccolini is very healthy. It is low in calories and high in vitamins. Here are some key benefits: - Vitamins: It contains vitamins A, C, and K. These help your skin and boost your immune system. - Minerals: Broccolini offers calcium and iron, which are good for bones and blood. - Fiber: It has fiber that helps digestion. Eating broccolini can support your overall health. It is a great choice for a side dish! In this post, we explored how to prepare and enjoy broccolini. We discussed essential ingredients, like garlic and lemon, plus cooking and storage tips. Remember to avoid overcooking to keep its vibrant color. You can even try grilling for a different flavor. Broccolini is versatile and packed with nutrients, making it a great choice for meals. I hope you feel inspired to try these tips and recipes in your kitchen. Enjoy every bite!

Lemon Garlic Broccolini Flavorful and Healthy Side Dish

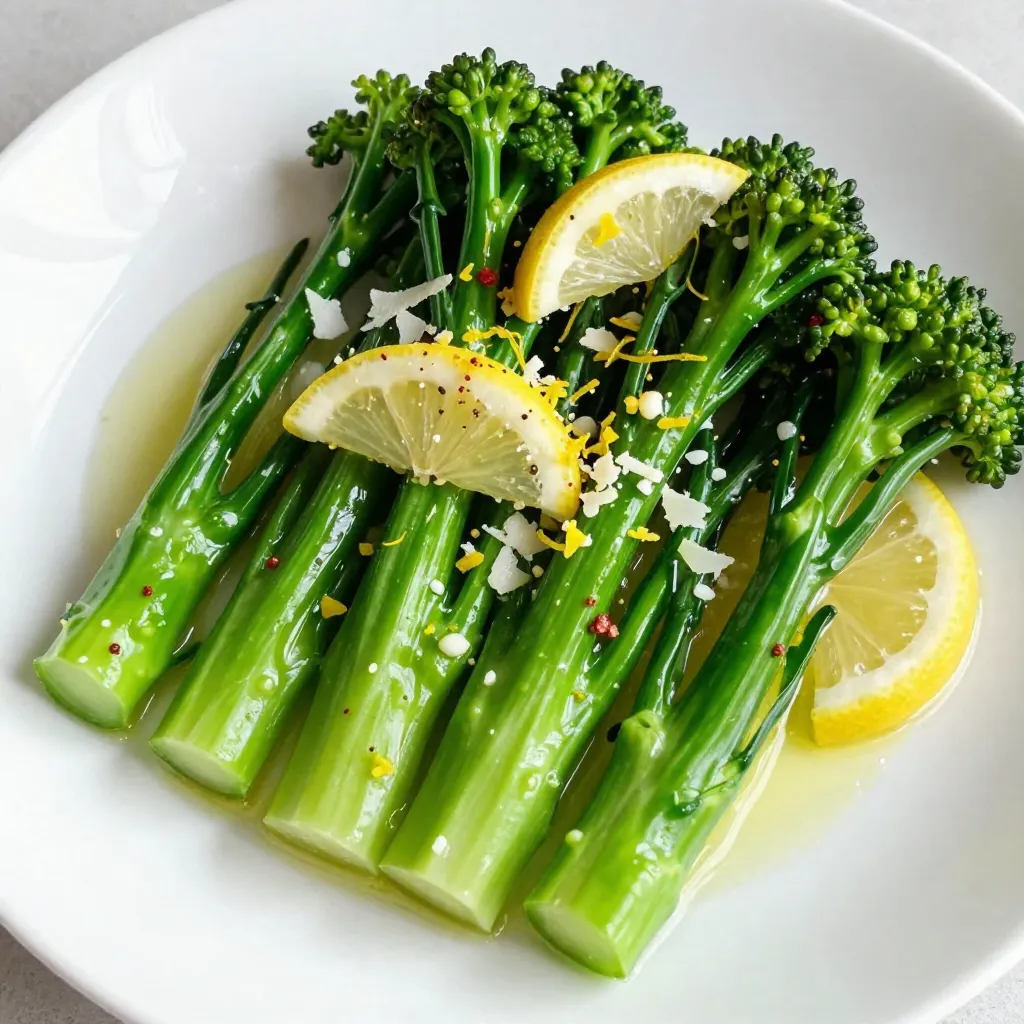
Looking for a fresh and tasty side dish? Lemon Garlic Broccolini is your answer! This vibrant veggie pairs perfectly with

Creamy Garlic Parmesan Orzo uses simple yet rich ingredients. Here’s what you need: - 1 cup orzo pasta - 3 cups vegetable broth - 2 tablespoons olive oil - 4 cloves garlic, minced - 1 small onion, finely chopped - 1 cup heavy cream - 1 cup grated Parmesan cheese - 1 teaspoon Italian seasoning - Salt and pepper to taste - Fresh parsley, chopped, for garnish These ingredients make a creamy and flavorful dish. The orzo pasta serves as a great base. The garlic and onion add depth, while the Parmesan brings a salty, nutty kick. You can adjust the recipe with some optional ingredients. Try adding: - Cooked chicken or shrimp for protein - Lemon zest for brightness - Spinach or peas for color and nutrition - Red pepper flakes for heat These ingredients can elevate the dish. Add them based on your taste and what you have on hand. Selecting good ingredients makes a big difference. Here are a few tips: - Pasta: Choose high-quality orzo. Look for brands that use semolina for a better texture. - Broth: Use low-sodium vegetable broth. This lets you control the salt level. - Olive Oil: Opt for extra virgin olive oil. It has a more robust flavor. - Cream: Use fresh heavy cream. This ensures a rich and creamy sauce. - Cheese: Grate your Parmesan cheese fresh. Pre-grated cheese may not melt as smoothly. By following these tips, you can ensure your Creamy Garlic Parmesan Orzo tastes fantastic. Quality ingredients lead to a more enjoyable meal. {{ingredient_image_1}} First, grab a medium saucepan. Pour in 3 cups of vegetable broth. Heat it on medium until it simmers. Now, add 1 cup of orzo pasta. Cook it as the package says, about 8-10 minutes. You want it al dente, firm but not hard. Once done, drain the pasta in a colander and set it aside. Next, let's make the sauce. Take a large skillet and heat 2 tablespoons of olive oil over medium heat. Chop 1 small onion finely. Add it to the skillet and sauté for 2-3 minutes. You want it soft and translucent. Then, add 4 minced garlic cloves. Stir them for 1-2 minutes. Be careful not to burn the garlic; it can turn bitter. Now, pour in 1 cup of heavy cream. Stir well and bring it to a gentle simmer. Let it cook for about 5 minutes. You’ll notice it thickening slightly. After that, stir in 1 cup of grated Parmesan cheese and 1 teaspoon of Italian seasoning. Mix until the cheese melts and the sauce is creamy and smooth. It's time to bring it all together! Add the cooked orzo pasta into the skillet. Stir well to coat the orzo with the creamy garlic sauce. Taste it and add salt and pepper as needed. Remove the skillet from the heat. Let it sit for a couple of minutes; this helps the flavors blend. Before serving, chop fresh parsley and sprinkle it on top for a pop of color and freshness. Enjoy your creamy garlic Parmesan orzo! To get great texture, cook the orzo in broth. The broth adds flavor and keeps it moist. Stir the orzo gently as it cooks. This helps it cook evenly. Once it's al dente, drain it well. Don't rinse the orzo; this keeps the starch that helps sauce stick. When mixing in the sauce, make sure to coat every piece. This gives you creamy bites in each spoonful. One mistake is overcooking the orzo. This can turn it mushy. Always check the cooking time on the package. Another mistake is adding the cheese too early. You want it to melt smoothly into the sauce, not clump. Adding salt too soon can also be an issue. Wait until the dish is almost done before seasoning to taste. Finally, don’t skip the parsley garnish. It adds a fresh touch that brightens the dish. Leftovers can be fun! You can add cooked chicken or shrimp for protein. This makes the dish heartier. Toss in some veggies like spinach or peas for added nutrition. If it's too thick, stir in a splash of broth or cream. This keeps it creamy and prevents it from drying out. For a zing, try a squeeze of lemon juice. It brightens the flavors and makes it lively. Pro Tips Use Fresh Garlic: Freshly minced garlic adds a robust flavor that powdered garlic cannot replicate. Quality Parmesan Matters: Opt for freshly grated Parmesan instead of pre-packaged for the best melting and flavor. Don't Overcook the Orzo: Cook the orzo until al dente to prevent it from becoming mushy once mixed with the creamy sauce. Add Extra Veggies: For a nutrient boost, consider adding spinach or peas to the dish just before serving. {{image_2}} You can easily add protein to your creamy garlic parmesan orzo. Chicken and shrimp are great choices. For chicken, cook diced pieces in olive oil before adding the garlic and onion. This adds rich flavor to the dish. If you prefer shrimp, add them after the garlic. Cook until they turn pink and then mix them in with the orzo. This simple change makes the meal heartier. To make this dish vegetarian, just skip the chicken or shrimp. You can use vegetable broth for the base. For a vegan version, swap the heavy cream with coconut cream or cashew cream. Nutritional yeast can replace Parmesan for that cheesy flavor. These swaps keep the dish delicious while meeting dietary needs. Adding fresh herbs can change the flavor of your orzo. Basil, thyme, or rosemary work well. Chop the herbs finely and stir them in right before serving. This gives a fresh taste and brightens up the dish. You can also sprinkle some lemon zest for a citrusy kick. These small changes create a unique twist on your creamy garlic parmesan orzo. To keep your creamy garlic parmesan orzo fresh, store it in an airtight container. Let it cool to room temperature before sealing. This prevents steam from building up, which can make the orzo soggy. You can keep it in the fridge for up to three days. If you want to enjoy it later, freezing is a great option. When reheating, use a pan on low heat for the best results. Add a splash of vegetable broth or cream to help restore the sauce's creaminess. Stir often to ensure even heating. You can also use the microwave. Just cover the dish and heat in short intervals. Stir it well in between to keep it smooth. If you're planning to freeze creamy garlic parmesan orzo, do so before adding the cheese. Cook the orzo and prepare the sauce, then let both cool. Combine them in a freezer-safe container. This dish can last up to three months in the freezer. To serve, thaw it in the fridge overnight. Reheat it on the stove, adding cheese at the end for that creamy touch. To make creamy garlic parmesan orzo, follow these steps: 1. Cook the orzo: Start by heating vegetable broth in a medium saucepan. Once it simmers, add 1 cup of orzo. Cook for 8-10 minutes until it is al dente. Drain it and set aside. 2. Sauté onions and garlic: In a large skillet, heat 2 tablespoons of olive oil over medium heat. Add 1 small chopped onion and cook for 2-3 minutes. When it turns translucent, add 4 minced garlic cloves. Cook for another 1-2 minutes. 3. Make the creamy sauce: Pour in 1 cup of heavy cream into the skillet. Stir and let it simmer for about 5 minutes. This will thicken the sauce. 4. Add cheese and season: Stir in 1 cup of grated Parmesan cheese and 1 teaspoon of Italian seasoning. Mix until the cheese melts and the sauce is creamy. 5. Combine: Add the cooked orzo to the skillet. Stir well to coat the orzo in the sauce. Season with salt and pepper to taste. 6. Garnish and serve: Let it sit for a couple of minutes, then garnish with fresh parsley before serving. Yes, you can use different types of pasta. However, keep in mind that orzo's small size makes it unique. Here are some options: - Small shells: They hold sauce well and add a fun texture. - Farfalle: Also known as bow-tie pasta, it adds a playful touch. - Ditalini: This small, tube-like pasta works great too. Adjust the cooking time based on the type of pasta you choose. Always aim for al dente. If you need a substitute for heavy cream, here are some options: - Half-and-half: This will provide a similar creaminess but will be a bit lighter. - Coconut cream: For a dairy-free option, this adds a nice flavor. - Greek yogurt: Mix it with a little milk for a creamy texture without the fat. Choose a substitute based on your dietary needs and flavor preferences. We covered the key ingredients for creamy garlic parmesan orzo and shared tips for choosing the best ones. I detailed step-by-step instructions for making the dish. You learned about cooking techniques and common mistakes to avoid. Plus, I shared ways to add protein or tweak the recipe for different diets. In the end, this dish is flexible and simple. You can make it your own with different flavors and ingredients. Enjoy cooking and experimenting with creamy garlic parmesan orzo!

Creamy Garlic Parmesan Orzo Rich Flavorful Delight

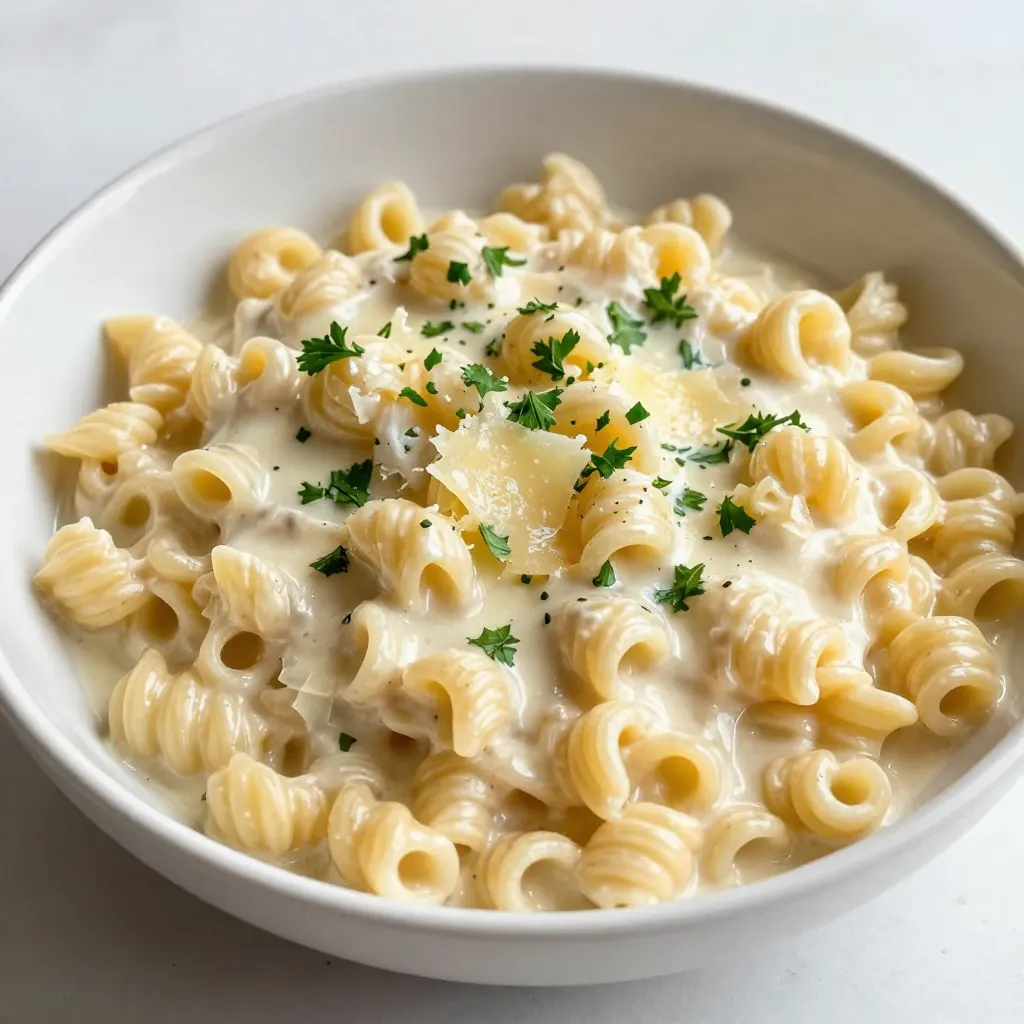
If you love pasta with rich, creamy flavors, you’re in for a treat! My Creamy Garlic Parmesan Orzo is a

To make Caramel Pretzel Brownies, you need a few simple ingredients. Here’s the list: - 1 cup unsalted butter (2 sticks) - 2 cups granulated sugar - 4 large eggs - 1 teaspoon vanilla extract - 1 cup all-purpose flour - 1 cup unsweetened cocoa powder - ½ teaspoon salt - 1 cup pretzels, coarsely crushed - 1 cup caramel sauce - Sea salt for sprinkling Each ingredient plays a key role in creating that perfect mix of sweet and salty. The butter serves as the base, giving the brownies a rich, smooth texture. Granulated sugar adds sweetness, while eggs provide structure. The vanilla extract enhances flavor, making it even better. The all-purpose flour and cocoa powder form the brownie base, giving it that chocolatey goodness. Salt balances the sweetness, while crushed pretzels add crunch and a savory touch. The caramel sauce brings in that gooey, sweet element. Lastly, a sprinkle of sea salt on top elevates the flavor, making each bite pop. Gather these ingredients before you start, and you’ll be on your way to a delicious treat! {{ingredient_image_1}} 1. Preheat your oven to 350°F (175°C). This step warms up the oven for even cooking. 2. Grease a 9x13 inch baking pan. Line it with parchment paper for easy removal later. 3. In a large saucepan, melt 1 cup of unsalted butter over medium heat. Once melted, take it off the heat. 4. Stir in 2 cups of granulated sugar. Mix well until the sugar blends smoothly. 5. Add 4 large eggs, one at a time. Mix well after each egg. Then, stir in 1 teaspoon of vanilla extract. 1. In a separate bowl, whisk together 1 cup of all-purpose flour, 1 cup of unsweetened cocoa powder, and ½ teaspoon of salt. 2. Gradually mix the dry ingredients into the butter and sugar mixture. Stir until just combined. 1. Pour half of the brownie batter into the prepared pan. Spread it evenly across the bottom. 2. Drizzle half of the caramel sauce over the brownie batter. Leave space at the edges for a neat look. 3. Carefully spoon the rest of the brownie batter on top. Spread it gently. 4. Drizzle the remaining caramel sauce over this layer. Create a nice marbled effect. 5. Optionally, sprinkle extra crushed pretzels on top for added crunch. 1. Bake the brownies in the preheated oven for 25-30 minutes. Check for doneness with a toothpick. 2. If the toothpick comes out with a few moist crumbs, they are ready. 3. Once baked, remove the pan from the oven. Sprinkle a pinch of sea salt on top while they are warm. 4. Let the brownies cool in the pan for at least 30 minutes. Use the parchment paper to lift them out. 5. Cut into squares and serve. Enjoy every bite of this sweet treat! To get that perfect brownie texture, timing is key. Bake your brownies for about 25 to 30 minutes. Remember, every oven is different. You may need to adjust the time. To check for doneness, insert a toothpick into the center. It should come out with a few moist crumbs. If it’s clean, the brownies may be overbaked. Trust your instincts! Choosing the right caramel sauce can make a big difference. I love using a rich, buttery caramel. You can also try salted caramel for a sweet and salty twist. Feel free to add extras to the batter. Chopped nuts, chocolate chips, or even a hint of espresso can boost the flavor. Mix it up and create your own twist! For drinks, I recommend pairing your brownies with milk or coffee. The creaminess of milk balances the sweetness. A hot cup of coffee enhances the chocolate flavor. When serving, cut your brownies into neat squares. You can sprinkle some extra crushed pretzels on top for a fun crunch. A drizzle of caramel sauce over each piece adds a nice touch! Pro Tips Fresh Ingredients: Using fresh eggs and high-quality cocoa powder will enhance the flavor and texture of your brownies. Caramel Consistency: Ensure your caramel sauce is warm and pourable when drizzling to achieve a beautiful marbled effect. Cooling Time: Allow the brownies to cool completely before cutting to achieve clean edges and prevent them from falling apart. Storage Tips: Store brownies in an airtight container at room temperature or in the fridge for longer freshness. {{image_2}} You can mix up the flavors of your caramel pretzel brownies easily. Adding chocolate chips is a quick way to boost chocolate flavor. Use semi-sweet or dark chocolate chips for a rich taste. You might also try white chocolate chips for a sweet twist. Nuts can add a nice crunch. Walnuts or pecans work well for this. Just chop them coarsely and fold them into the batter. This adds depth and texture to your brownies. If you need gluten-free options, swap all-purpose flour with a gluten-free blend. Many blends work well in baking. Just follow the package instructions to get the right amount. For vegan substitutions, replace the eggs with flaxseed meal or applesauce. Use a vegan butter or coconut oil instead of regular butter. Ensure the caramel sauce is vegan too. This way, everyone can enjoy these tasty brownies. Seasonal toppings can add fun flair to your brownies. For holidays, consider using festive sprinkles or crushed candy canes. This makes them eye-catching and adds a holiday vibe. In summer, try fresh berries on top. Blueberries or raspberries add a fruity touch that brightens the flavor. You can also mix in seasonal spices like cinnamon during fall for a warm, cozy taste. To keep your caramel pretzel brownies fresh, let them cool completely first. Cooling prevents sogginess. Once cool, wrap them tightly in plastic wrap. This seals in moisture and keeps them soft. You can also place them in an airtight container. A glass container works well for this. Brownies have a good shelf life. At room temperature, they stay fresh for about 3 to 4 days. If stored in the fridge, they can last up to a week. The cold helps keep the caramel firm. But remember, cold brownies may not taste as rich. If you want warm brownies, reheating is key. Use a microwave for quick warming. Heat for about 10-15 seconds. This keeps the caramel gooey. You can also use an oven. Preheat it to 350°F. Place the brownies on a baking sheet for 5-10 minutes. This method helps maintain their texture and flavor. Can I use store-bought caramel sauce? Yes, store-bought caramel sauce works well. It saves time and offers great taste. Just drizzle it over the brownies as you would homemade. What if I don’t have pretzels? If you don’t have pretzels, you can use crushed cookies or nuts. These will add a different crunch and flavor. Just make sure whatever you use can balance the sweetness. Can these brownies be made ahead of time? Absolutely! You can bake these brownies a day or two in advance. Just store them in an airtight container. This allows the flavors to meld. Why are my brownies too dry? Brownies can turn dry if they bake too long. Check them a few minutes before the time is up. Also, be sure to measure your ingredients correctly. How do I fix brownies with too much caramel? If your brownies have too much caramel, it can make them soggy. Next time, drizzle less caramel on top or mix in less. Letting them cool can also help firm them up. Where to find unique toppings You can find unique toppings at specialty food stores or online. Look for flavored sea salts, gourmet chocolates, or even crushed candy bars. Links to similar recipes For more delicious ideas, check out recipes for salted caramel chocolate bars or chocolate-covered pretzel cookies. These treats share that sweet and salty vibe. Now you know how to make delicious caramel pretzel brownies. We covered the key ingredients and steps, like mixing wet and dry elements and baking them to perfection. I also shared tips for great texture and serving ideas. Remember, you can customize these brownies with your favorite flavors or dietary needs. Store them well to keep them fresh and tasty. Enjoy these sweet treats at any time of the year!

Caramel Pretzel Brownies Irresistible Chocolate Delight

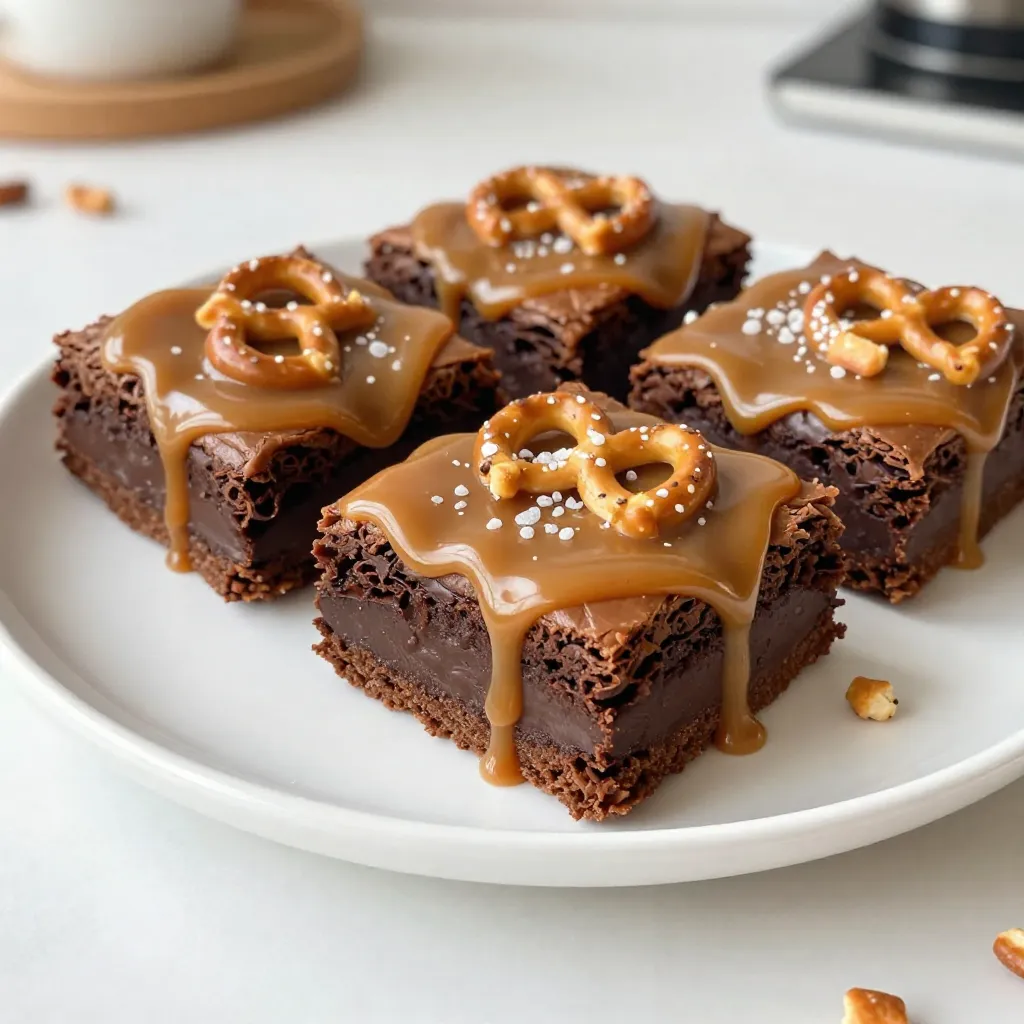
Get ready to indulge in the perfect treat: Caramel Pretzel Brownies! This delightful mash-up combines rich chocolate, gooey caramel, and

- 1 cup long-grain white rice - 2 cups vegetable broth - 2 cups fresh broccoli florets - 1 cup shredded cheddar cheese - 1 cup cream of mushroom soup - 1/2 cup sour cream - 1/2 teaspoon garlic powder - 1/2 teaspoon onion powder - Salt and pepper to taste - 1/2 cup breadcrumbs - 2 tablespoons olive oil - 1/4 cup grated Parmesan cheese (optional for topping) I love how simple this list is. You need just a few key items to make this dish shine. First, the long-grain white rice is your base. It cooks up fluffy and pairs well with all the flavors. Vegetable broth adds depth and makes the rice taste great. Next, fresh broccoli florets bring color and crunch. I always choose fresh for the best taste. Shredded cheddar cheese is a must. It melts beautifully, giving that gooey, cheesy goodness we all crave. Cream of mushroom soup adds creaminess and umami. If you want, you can make your own or use a good store-bought brand. Sour cream gives a nice tang and richness to the mix. For seasoning, garlic powder and onion powder add great flavor. Don’t forget salt and pepper to taste. Breadcrumbs provide a crunchy topping. I love mixing them with olive oil for extra flavor. Lastly, you can sprinkle grated Parmesan cheese on top if you like. It adds a nice touch. Gather these ingredients, and you are ready to make a delicious Cheesy Broccoli Rice Casserole! {{ingredient_image_1}} 1. Preheating the oven: First, set your oven to 350°F (175°C). This helps the casserole bake evenly. 2. Cooking the rice: In a medium pot, bring 2 cups of vegetable broth to a boil. Add 1 cup of long-grain white rice. Cover it and lower the heat. Let it simmer for 15-20 minutes. The rice should be soft and the broth absorbed. 3. Steaming broccoli: While the rice cooks, steam 2 cups of fresh broccoli florets. Place them in a pot with a little water. Steam for about 3-4 minutes. They should be bright green and tender. Drain and set aside. - In a large bowl, take the cooked rice and steamed broccoli. Add 1 cup of shredded cheddar cheese, 1 cup of cream of mushroom soup, and 1/2 cup of sour cream. Sprinkle in 1/2 teaspoon of garlic powder and 1/2 teaspoon of onion powder. Season with salt and pepper. Mix well until every piece is coated. - Transferring to baking dish: Grease a 9x13 inch baking dish and pour the rice and broccoli mix into it. Spread it out evenly. - Adding breadcrumb topping: In a small bowl, mix 1/2 cup of breadcrumbs with 2 tablespoons of olive oil. Stir until the breadcrumbs are coated. Sprinkle this mixture over the casserole. - Baking time and temperature: Bake in your preheated oven for 25-30 minutes. You want the top to be golden and bubbly. Once done, take it out and let it sit for about 5 minutes before serving. To get the best rice texture, use long-grain white rice. Rinse it well before cooking. This removes extra starch and helps keep the rice fluffy. Cook your rice in vegetable broth for added flavor. Let it simmer until tender, about 15-20 minutes. For steaming broccoli, use a pot with a small amount of water. Steam the florets for about 3-4 minutes. This keeps the bright green color and nutrients. It’s key to avoid overcooking. You want the broccoli tender but still crisp. If you don’t have cream of mushroom soup, you can use cream of chicken soup or make your own. A simple mix of heavy cream and mushrooms works well, too. For cheese, cheddar is classic, but you can try Monterey Jack or Gruyère for a twist. Each cheese gives a unique flavor. Pair this casserole with a fresh salad or some roasted chicken for a complete meal. It fits perfectly for family dinners or potlucks. You can serve it during holidays or cozy nights in. Everyone loves a warm, cheesy dish! Pro Tips Choosing the Right Rice: Long-grain rice works best for this casserole as it remains fluffy and separates easily. Avoid using sticky rice varieties for a better texture. Fresh vs. Frozen Broccoli: While fresh broccoli provides the best flavor and texture, frozen broccoli can be a convenient alternative. Just make sure to thaw and drain it well before adding. Make It Creamy: For an extra creamy texture, consider adding a bit more sour cream or a splash of cream before baking. This enriches the overall flavor. Leftovers Storage: Store any leftovers in an airtight container in the fridge for up to 3 days. Reheat in the oven for the best texture, or in the microwave for a quicker option. {{image_2}} You can add more veggies to the casserole for extra flavor and nutrition. Carrots, peas, or bell peppers work great. Just chop them small so they cook well. You may want to steam these veggies like the broccoli. This keeps them bright and tasty. Mixing in different colors makes the dish fun and appealing. Adding protein can make your casserole heartier. Cooked chicken or crispy bacon are both great choices. If you use chicken, shred it into small pieces before mixing. For bacon, cook it first, then crumble it. Both options will add a savory touch. You could even mix in some cooked sausage for a spicy kick. If you need a vegan option, swap the cheese and cream. Use vegan cheese and coconut cream instead. For a gluten-free version, choose gluten-free breadcrumbs. You can also use brown rice for more fiber. These swaps keep the dish tasty while meeting different diet needs. To keep your Cheesy Broccoli Rice Casserole fresh, store it in the fridge. Use an airtight container to prevent drying. It will stay good for up to three days. When you want to eat it, just reheat in the oven or microwave. If you want to save some for later, freezing works well. Let the casserole cool completely before freezing. Then, place it in a freezer-safe container. You can also wrap it in aluminum foil. It keeps well for up to three months. When you are ready to eat, thaw it overnight in the fridge. Reheat in the oven at 350°F until hot. In the fridge, your casserole lasts about three days. If you freeze it, you can keep it for three months. Just make sure to check for any signs of freezer burn before using. This way, you can enjoy your delicious dish without any worries! How long can I keep leftover Cheesy Broccoli Rice Casserole? You can keep leftover casserole in the fridge for about 3 to 5 days. Store it in an airtight container to keep it fresh. Can I make this casserole ahead of time? Yes, you can prepare the casserole a day before. Just cover it tightly and store it in the fridge. When ready, bake it directly from the fridge. Is it possible to use frozen broccoli instead of fresh? Absolutely! Frozen broccoli works well. Just thaw it and drain excess water before adding it to the mix. What should I do if my rice is overcooked? If your rice is overcooked, try to mash it slightly with a fork. Mix it with the other ingredients. This can help blend flavors and textures. Can I make this recipe in advance and reheat later? Yes, you can. Just bake the casserole, let it cool, and then refrigerate it. Reheat in the oven at 350°F until warmed through. Is this dish suitable for a vegetarian diet? Yes, this casserole is vegetarian. Just ensure your cream of mushroom soup is also vegetarian. What are the nutritional benefits of broccoli in this recipe? Broccoli is high in vitamins C and K. It also provides fiber and helps boost your immune system. It’s a healthy addition to any meal. In this blog post, we covered everything about making Cheesy Broccoli Rice Casserole. We discussed the essential ingredients, step-by-step instructions, and tips for success. You learned about ingredient swaps and serving ideas, making this dish flexible and tasty. We also explored variations, storage options, and answered common questions. This casserole is simple and fun to make, perfect for any meal. Enjoy making it your own!

Cheesy Broccoli Rice Casserole Comfort Food Delight

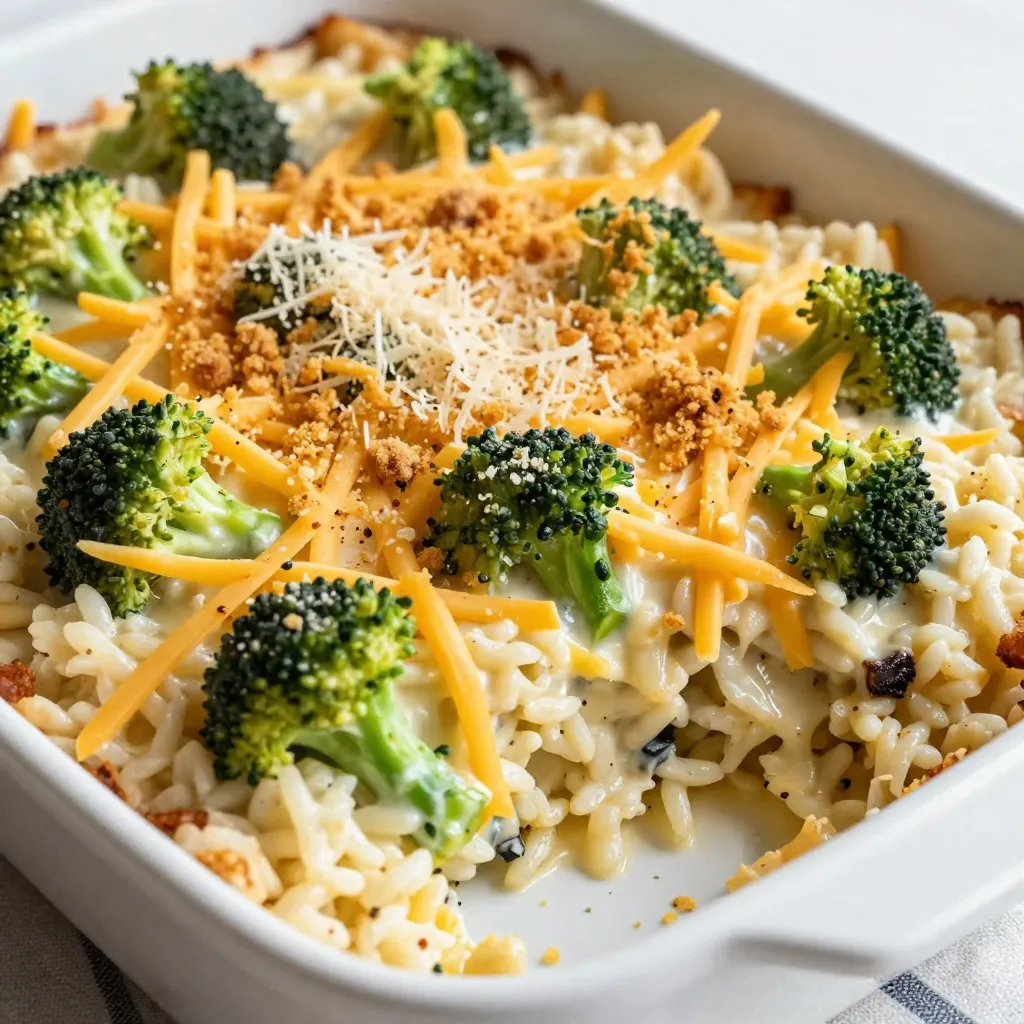
If you’re searching for a warm and cheesy dish that delights every palate, this Cheesy Broccoli Rice Casserole is just

- 1 cup fresh strawberries, hulled and halved - 2 ripe kiwis, peeled and chopped - 1 banana, sliced - 1/2 cup Greek yogurt (or dairy-free alternative) - 1/2 cup coconut water (or milk of your choice) - 1 tablespoon honey or maple syrup (optional) - 1/2 teaspoon vanilla extract - A handful of ice cubes The ingredients for a Strawberry Kiwi Smoothie are simple and fresh. You start with the fruits. Strawberries give a sweet and tangy flavor. Kiwis add a nice tartness, while bananas make it creamy. To boost the smoothie, Greek yogurt adds protein and creaminess. If you want a dairy-free option, use coconut yogurt instead. Coconut water or milk gives a light and refreshing base. You can choose to sweeten your smoothie. Honey or maple syrup works well if you like it sweeter. The vanilla extract adds a nice touch of flavor, too. Ice cubes are essential for that cool, refreshing sip. Gather all these ingredients, and you’ll be ready to blend a delicious Strawberry Kiwi Smoothie! {{ingredient_image_1}} Start by hulling and halving the strawberries. This means removing the green tops and cutting them in half. Next, peel the kiwis and chop them into small pieces. For the banana, just slice it into rounds. Make sure to gather all your ingredients so you’re ready to blend. Now, grab your blender. Combine the strawberries, kiwis, and banana in it. Don’t forget to add the Greek yogurt and coconut water. If you like it sweeter, add honey or maple syrup. Toss in a handful of ice cubes for a nice chill. Blend everything on high speed until it’s smooth and creamy. This should take about 30 to 45 seconds. After blending, taste your smoothie. If you want it sweeter, add more honey or syrup. Pour the smoothie into glasses and enjoy it right away. The flavors will be at their best when fresh! To make a great smoothie, you need ripe fruits. Choose strawberries that are red and firm. Look for kiwis that feel slightly soft but not mushy. These signs show they are sweet and ready to eat. Store your fruit in the fridge if you won't use them right away. This keeps them fresh for a longer time. Avoid washing them until you are ready to use them. Moisture can cause them to spoil faster. If your smoothie is too thick, add more liquid. Coconut water works well, but you can use milk, too. Start with a little and blend again until you reach your desired thickness. For a colder drink, add extra ice cubes. This gives your smoothie a refreshing chill that’s perfect for hot days. Blend the ice in until it’s smooth. You can boost the nutrition in your smoothie. Adding protein powder gives you extra energy. Spinach is a great option, too; it blends in well and adds vitamins. If you want to swap yogurt, try a dairy-free alternative like almond yogurt. For sweeteners, use maple syrup or agave instead of honey for variety. This makes it easy to fit your taste and diet. Pro Tips Choose Ripe Fruits: Make sure your strawberries and kiwis are ripe for the best flavor. Ripe fruits will make your smoothie naturally sweeter and more delicious. Frozen Banana Option: For a thicker texture, you can freeze the banana slices ahead of time. This will give your smoothie a creamy consistency without needing extra ice. Customize with Greens: Add a handful of spinach or kale for an extra nutrient boost. The flavors of the fruits will still shine through, and you won't even taste the greens! Blend in Stages: If your blender struggles, blend the harder fruits first (like bananas and kiwis) with a bit of liquid, then add the other ingredients. This helps achieve a smoother blend. {{image_2}} You can make your smoothie even healthier! Try adding leafy greens like spinach or kale. These greens boost nutrition without changing the taste much. You can also add nut butter like almond or peanut. This adds protein and healthy fats. Chia seeds or flaxseeds are great too. They are full of omega-3s and fiber. Feel free to experiment with other fruits! Mango and pineapple can add a tropical twist. You can blend them with strawberries and kiwis for a new flavor. Adding spices can also change the taste. Try a pinch of cinnamon for warmth or some ginger for a kick. These flavors can enhance your smoothie and make it even more fun to drink. Want a dairy-free version? Use a dairy-free yogurt like coconut or almond yogurt. This keeps your smoothie creamy without dairy. For sweetening, skip the honey. Instead, use maple syrup or agave nectar. These options are vegan and still sweet. You can enjoy a tasty smoothie while sticking to your diet! If you have leftover smoothie, store it in a sealed jar or container. It keeps well in the fridge for up to 24 hours. To preserve the taste, shake or stir it before drinking. Smoothies can lose some flavor over time, so it's best to drink them fresh. To freeze your smoothie, pour it into ice cube trays or freezer-safe bags. This method works great for single servings. Smoothies can last in the freezer for up to three months. When you're ready to drink, thaw it overnight in the fridge. For a quick option, blend the frozen smoothie directly with a bit of liquid. Leftover fruits can shine in other recipes. You can add strawberries or kiwis to oatmeal or yogurt. They also work well in salads. Try blending bananas into pancakes or muffins for added flavor. Use these fruits creatively in breakfast or snacks to reduce waste. A Strawberry Kiwi Smoothie is a tasty treat packed with nutrition. Each serving contains about 200 calories. It has vitamins A and C, which help keep your skin healthy. You'll also get fiber from the fruits, which aids digestion. The Greek yogurt adds protein and calcium, promoting strong bones. Yes, you can easily swap Greek yogurt. Here are some options: - Use dairy-free yogurt like almond or coconut yogurt. - Try cottage cheese for a creamy texture. - Silken tofu is a great plant-based choice too. These alternatives work well for different diets. If you want a sweeter smoothie, here are some tips: - Add more honey or maple syrup to taste. - Use ripe bananas, which add natural sweetness. - You can also blend in dates or a splash of orange juice. These options help you customize the flavor. Yes, this smoothie can fit well in a weight loss plan. It uses whole fruits that provide fiber and nutrients. The Greek yogurt adds protein, which keeps you full longer. Coconut water hydrates without added sugars. Focus on these ingredients to support a healthy diet. This blog post guides you in making a delicious Strawberry Kiwi Smoothie. You learned the best ingredients like fresh fruits, Greek yogurt, and optional sweeteners. I gave you step-by-step instructions for preparing and blending. You also discovered tips for selecting the best fruits and ensuring the perfect consistency. To enhance your smoothie, try new fruits, greens, or nut butter. Store extras properly to maintain freshness. With these ideas, enjoy a tasty, healthier treat that fits your needs!

Strawberry Kiwi Smoothie Refreshing and Nutritious Drink

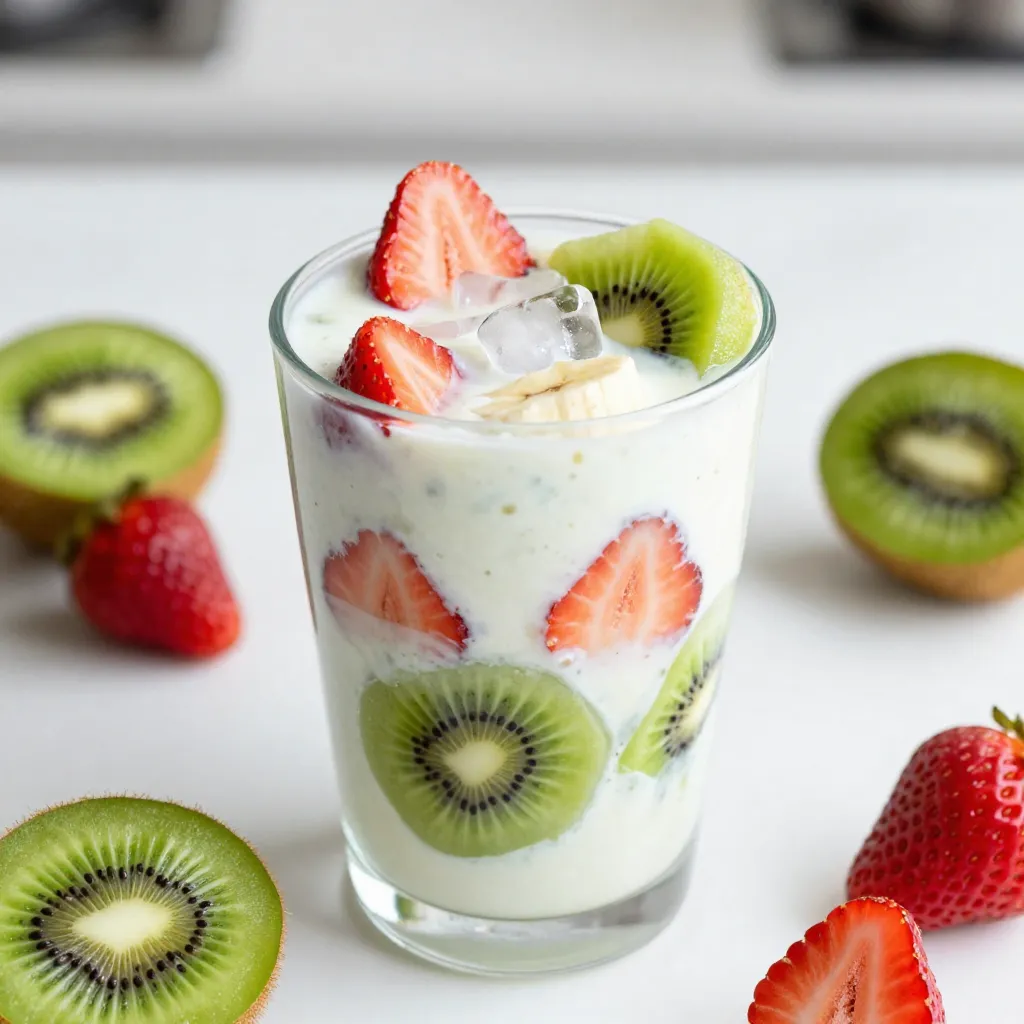
Looking for a quick and tasty way to boost your day? A Strawberry Kiwi Smoothie is both refreshing and nutritious.

- 8 slices of thick-cut bread (challah or brioche) - 8 oz cream cheese, softened - 1 cup fresh strawberries, hulled and sliced - 1/4 cup powdered sugar - 1 tsp vanilla extract - 4 large eggs - 1/2 cup milk - 1 tsp cinnamon - 1/2 tsp salt - 2 tbsp butter (for cooking) - Maple syrup (for serving) - Extra strawberries and powdered sugar (for garnish) To make Strawberry Cream Cheese Stuffed French Toast, you need a few key items. Start with your bread. I love using thick-cut challah or brioche. These options give the toast a soft and rich taste. The cream cheese is the star here. It needs to be softened for easy mixing. Next, fresh strawberries are a must. You’ll need to hull and slice them. They add a sweet and juicy bite that pairs so well with the cream cheese. For sweetness, powdered sugar is great. It blends nicely into the cream cheese. Also, don’t forget the vanilla extract for flavor. You’ll also need eggs for the custard base. Milk makes it creamy, and cinnamon adds warmth. A pinch of salt enhances all the flavors. Finally, butter is used for cooking the French toast in the skillet. Serve it with maple syrup, extra strawberries, and a dusting of powdered sugar for a beautiful finish. {{ingredient_image_1}} To start, gather your mixing bowl. Add 8 oz of softened cream cheese. Next, toss in 1 cup of sliced strawberries. Then, sprinkle in 1/4 cup of powdered sugar. Finally, pour in 1 tsp of vanilla extract. Mix these well until you achieve a smooth and creamy texture. This will be the delicious filling for your French toast. Now, take 4 slices of thick-cut bread. I like using challah or brioche for this. Spread a generous amount of the cream cheese mixture on each slice. Then, top each with another slice of bread. Press down gently to help the filling stick. You now have your stuffed sandwiches ready for cooking. In another bowl, whisk together 4 large eggs, 1/2 cup of milk, 1 tsp of cinnamon, and 1/2 tsp of salt. Make sure it is well blended. Next, heat a large skillet over medium heat. Add 2 tbsp of butter and let it melt, coating the skillet. Now, dip each sandwich into the egg mixture. Ensure both sides are well-coated. Place the sandwiches in the skillet. Cook for about 3-4 minutes on each side. You want them golden brown and cooked through. Once done, remove the French toast from the skillet. Let them rest for a minute. Cut them in half diagonally. Serve warm with maple syrup, extra strawberries, and a dusting of powdered sugar. Enjoy your delightful treat! When you pick bread for your French toast, think about two things: thickness and flavor. Thick-cut bread works best. It holds the filling well and soaks up the egg mix. I like using challah or brioche. Both add a rich taste and soft texture. You can also try sourdough for a tangy twist. Just make sure it is fresh. Stale bread can turn mushy and lose its charm. To get a fluffy and creamy filling, you need to blend the cream cheese well. Start with softened cream cheese. Mix in sliced strawberries and powdered sugar. This gives you a smooth texture. Add a bit of vanilla for extra flavor. When you cook the toast, dip each sandwich in the egg mix. Let it soak for a few seconds. This will help the bread absorb the mix and stay soft inside. Serve your stuffed French toast warm for the best taste. Drizzle maple syrup over the top. You can also add more fresh strawberries for a nice touch. Dust with powdered sugar for a pretty finish. If you want something extra, try whipped cream or yogurt. These toppings add a fun twist and make your dish feel special. Enjoy your lovely breakfast! Pro Tips Choose the Right Bread: For the best texture and flavor, opt for thick-cut bread like challah or brioche, which holds up well to the creamy filling and egg mixture. Make Ahead: Prepare the cream cheese filling in advance and store it in the refrigerator. You can assemble the sandwiches the night before and cook them in the morning for a quicker breakfast. Perfect Cooking Temperature: Keep the skillet at medium heat to ensure the French toast cooks evenly and doesn't burn. Adjust the heat as necessary to maintain the perfect golden color. Serving Suggestions: Elevate your presentation by garnishing with fresh strawberries and a dusting of powdered sugar, along with a generous drizzle of maple syrup for added sweetness. {{image_2}} You can swap strawberries for other fruits. Try bananas, blueberries, or raspberries. Each fruit adds its own flavor. For a tropical twist, use mango or pineapple. These fruits pair well with cream cheese and add sweetness. Add spices or extracts to boost flavor. A pinch of nutmeg gives warmth. You can also try a dash of almond extract for a nutty taste. Cinnamon is a classic choice and works great too. Mixing in a bit of cocoa powder creates a chocolatey delight. If you want gluten-free options, use gluten-free bread. Many brands offer delicious choices. For a dairy-free version, try using nut cream cheese or tofu. You can also use almond or coconut milk in the egg mixture. These swaps keep the flavor while meeting dietary needs. To store leftovers, let the French toast cool first. Place it in an airtight container. You can keep it in the fridge for up to three days. If you have extra cream cheese filling, store that in a separate container. This helps keep flavors fresh. When you’re ready to eat, reheat the French toast in the oven. Preheat your oven to 350°F (175°C). Place the French toast on a baking sheet. Heat it for about 10-15 minutes. This keeps it warm and crispy. You can also use a skillet. Heat the skillet over medium-low heat. Cook each piece for about 2-3 minutes per side. Enjoy it warm with syrup and fresh strawberries! Yes, you can prepare the stuffed French toast ahead. Make the cream cheese mixture and spread it on the bread. Then, assemble the sandwiches but do not cook them. Place the sandwiches in the fridge. You can keep them for up to a day. When you're ready to eat, simply dip them in the egg mixture and cook as usual. This saves time and makes breakfast easy. If you need a cream cheese substitute, try mascarpone or ricotta cheese. Both create a creamy filling that tastes great. You can also use Greek yogurt for a lighter option. Just remember that the flavor and texture may change slightly. These alternatives still pair well with the strawberries. To make this French toast gluten-free, choose gluten-free bread. There are many tasty options available now. You can also use gluten-free flour for the egg mixture if you want to thicken it. Just ensure all ingredients are certified gluten-free, especially the powdered sugar and vanilla extract. Enjoy this delicious meal worry-free! Now you know how to make delicious Strawberry Cream Cheese Stuffed French Toast. We covered ingredient choices, preparation steps, and even tips for variations. Remember to choose good bread and ensure the filling is creamy. Don’t forget your favorite toppings to add more flavor. This recipe is flexible and can fit different diets. I hope you enjoy making this dish and sharing it with others. Happy cooking!

Strawberry Cream Cheese Stuffed French Toast Delight

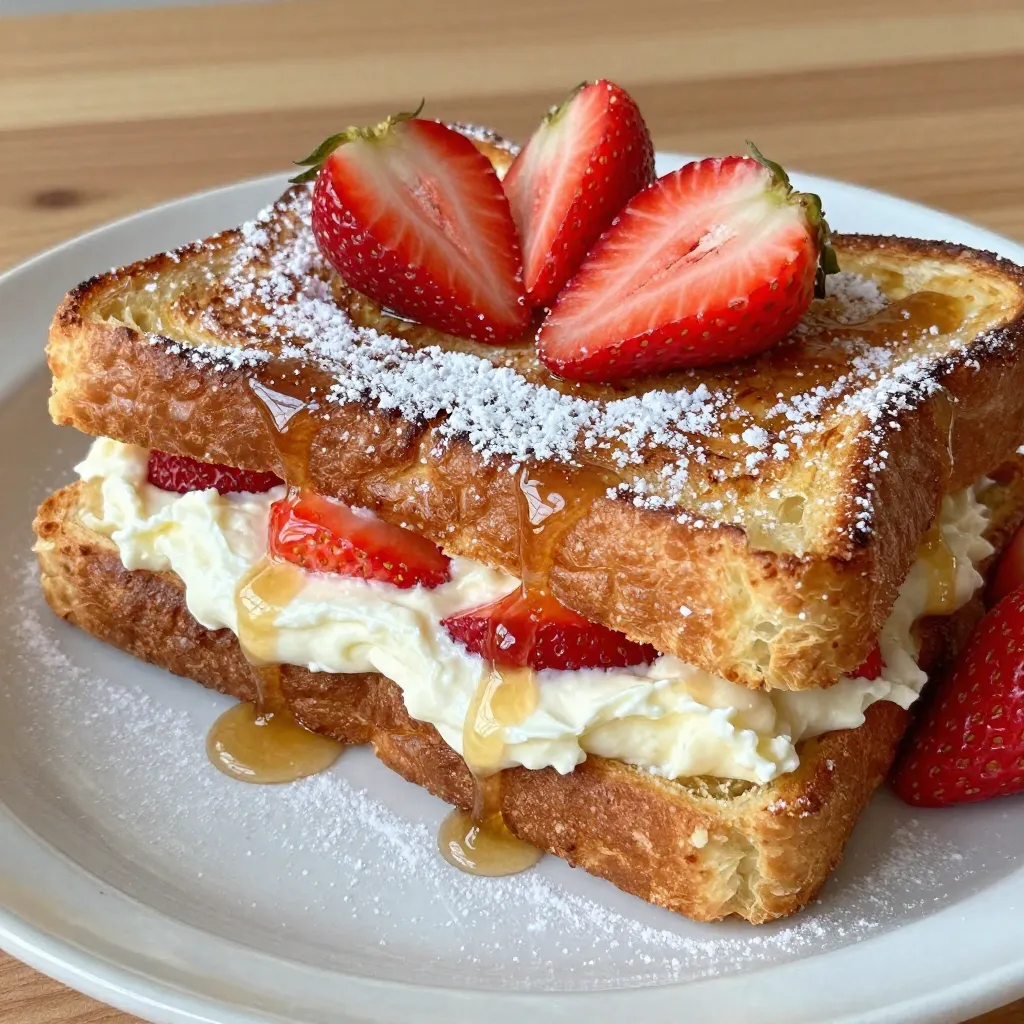
Looking for a breakfast that combines sweet and creamy in the best way? Strawberry Cream Cheese Stuffed French Toast Delight

- 2 packs of instant ramen noodles - 1 red bell pepper, sliced - 1 carrot, julienned - 1 zucchini, sliced - 1 cup broccoli florets - 4 cloves garlic, minced - 1 inch ginger, grated - 1 tablespoon vegetable oil Instant ramen noodles form the base of this dish. They cook quickly and soak up flavors well. Fresh vegetables add color and crunch. I like using bell pepper, carrot, zucchini, and broccoli. Aromatics like garlic and ginger boost the flavor. They bring warmth and depth to each bite. - 2 tablespoons soy sauce - 1 tablespoon sriracha (adjust to taste) - 1 tablespoon sesame oil - Salt and pepper to taste Soy sauce gives the dish a rich umami taste. Sriracha adds heat, and you can adjust it to fit your spice level. Sesame oil adds a nutty flavor, making each bite special. Don’t forget salt and pepper. They help balance the flavors. - 1 tablespoon sesame seeds - 2 green onions, chopped Garnishes make your meal look and taste better. I love using sesame seeds for crunch. Chopped green onions add a fresh taste and bright color. They give the dish a finishing touch. {{ingredient_image_1}} First, cook the ramen noodles as the package says. Boil water and add the noodles. Let them cook for about three minutes. Once they are soft, drain them well. Set the noodles aside for later. Next, heat one tablespoon of vegetable oil in a large skillet or wok. Use medium-high heat for best results. When the oil is hot, add four cloves of minced garlic and one inch of grated ginger. Stir these for about 30 seconds. You want them to smell great, not burn. Now it’s time for the veggies! Toss in one sliced red bell pepper, one julienned carrot, and one sliced zucchini. Stir-fry these for two to three minutes until they start to soften. Then add one cup of broccoli florets. Cook for two more minutes. You want the broccoli to be bright green and still crunchy. It’s time to bring everything together! Add the cooked ramen noodles to the skillet. Gently toss them with the vegetables. Pour in two tablespoons of soy sauce and one tablespoon of sriracha. Mix everything well to coat the noodles. Then, drizzle in one tablespoon of sesame oil. Stir for another minute to let the flavors blend. Finally, remove the skillet from heat. Add two chopped green onions for a fresh kick. Serve the ramen stir-fry in a large bowl. For a nice touch, sprinkle with sesame seeds on top. Enjoy your meal! To get a great stir-fry, keep the heat high. This helps cook the veggies fast. You want them crisp, not mushy. Stir constantly while cooking. This prevents sticking and ensures even cooking. If you want more heat, add more sriracha. Start with one tablespoon. Taste your dish and increase if needed. For those who like less spice, cut the sriracha in half. You can still enjoy the garlic and ginger flavors. Want to take it up a notch? Try adding different seasonings. A splash of rice vinegar can brighten the dish. You can also mix in some oyster sauce for a deeper flavor. If you like sweet, add a bit of honey. Explore different sauces for fun variations. Pro Tips Use Fresh Ingredients: Fresh vegetables enhance the flavor and texture of your stir-fry. Opt for seasonal produce for the best taste. Adjust Spice Level: Tailor the amount of sriracha to your heat preference. Start with less and add more if you like it spicier. Perfect Noodle Texture: Ensure the ramen noodles are cooked just until al dente. They will continue to cook slightly when stir-fried with the vegetables. Garnish with Care: A sprinkle of sesame seeds and fresh green onions not only adds flavor but also makes the dish visually appealing. {{image_2}} You can change up the protein in this dish to suit your taste. Chicken, beef, or shrimp all work well. Just cook them first and add them to the stir-fry. If you want a vegetarian or vegan meal, use tofu or tempeh. These options soak up the flavors and add a nice texture. If you need a gluten-free meal, use gluten-free ramen or rice noodles. Many stores sell these options. Check the labels to ensure your sauces are gluten-free too. Some soy sauces contain gluten, so look for tamari as a great substitute. You can swap vegetables based on what’s fresh. For spring, try asparagus or snap peas. In the fall, add pumpkin or Brussels sprouts. This dish is flexible, so mix and match your favorite veggies. Just keep the cooking times in mind to ensure everything stays crisp and tasty. To keep your Spicy Garlic Ramen Stir-Fry fresh, place leftovers in an airtight container. Make sure to cool the stir-fry to room temperature before sealing. This method helps to lock in flavor and moisture. Store it in the fridge for up to three days. After that, the taste and texture may change. When you're ready to enjoy your leftovers, use a skillet or wok for reheating. Heat it on medium heat and add a splash of water or broth. This keeps the noodles moist and prevents them from getting mushy. Stir frequently to ensure even heating. You can also use a microwave, but add a few drops of water to avoid drying out the noodles. If you want to freeze your stir-fry, let it cool completely first. Place the stir-fry in freezer-safe bags or containers. Remove as much air as possible to avoid freezer burn. It will stay good for up to three months. To thaw, move it to the fridge overnight. For best results, reheat it right after thawing to keep the flavors intact. Yes, you can use different types of ramen noodles. Instant ramen works best for this dish. You can also try fresh ramen from an Asian market. If you want a gluten-free option, use rice noodles. They will still soak up the flavors well. To make this dish vegetarian, skip any meat. You can add tofu for protein. Firm tofu is a great choice. Simply cube it and stir-fry with the veggies. You can also use edamame or chickpeas for extra protein. Both options add great flavor and texture. If you want less heat, try using hoisin sauce. It adds a sweet flavor without all the spice. You can also use chili garlic sauce if you want a similar flavor. For a milder taste, try a touch of sweet chili sauce. Adjust according to your spice level preference. Yes, this recipe is easy to double. Just double all the ingredients. Make sure to use a larger skillet or wok. You want enough space to stir-fry everything well. Cooking time may be a bit longer, so keep an eye on the vegetables. This blog post showed you how to make a tasty ramen stir-fry. We covered the main ingredients, like instant noodles and fresh veggies. I shared step-by-step instructions, tips for your stir-fry technique, and easy variations. Remember, you can adjust flavors and add proteins to suit your taste. Enjoy creating this dish for yourself or your friends. Try it with seasonal veggies for a fresh twist! Happy cooking, and savor your delicious ramen stir-fry!

Spicy Garlic Ramen Stir-Fry Flavorful and Simple Meal

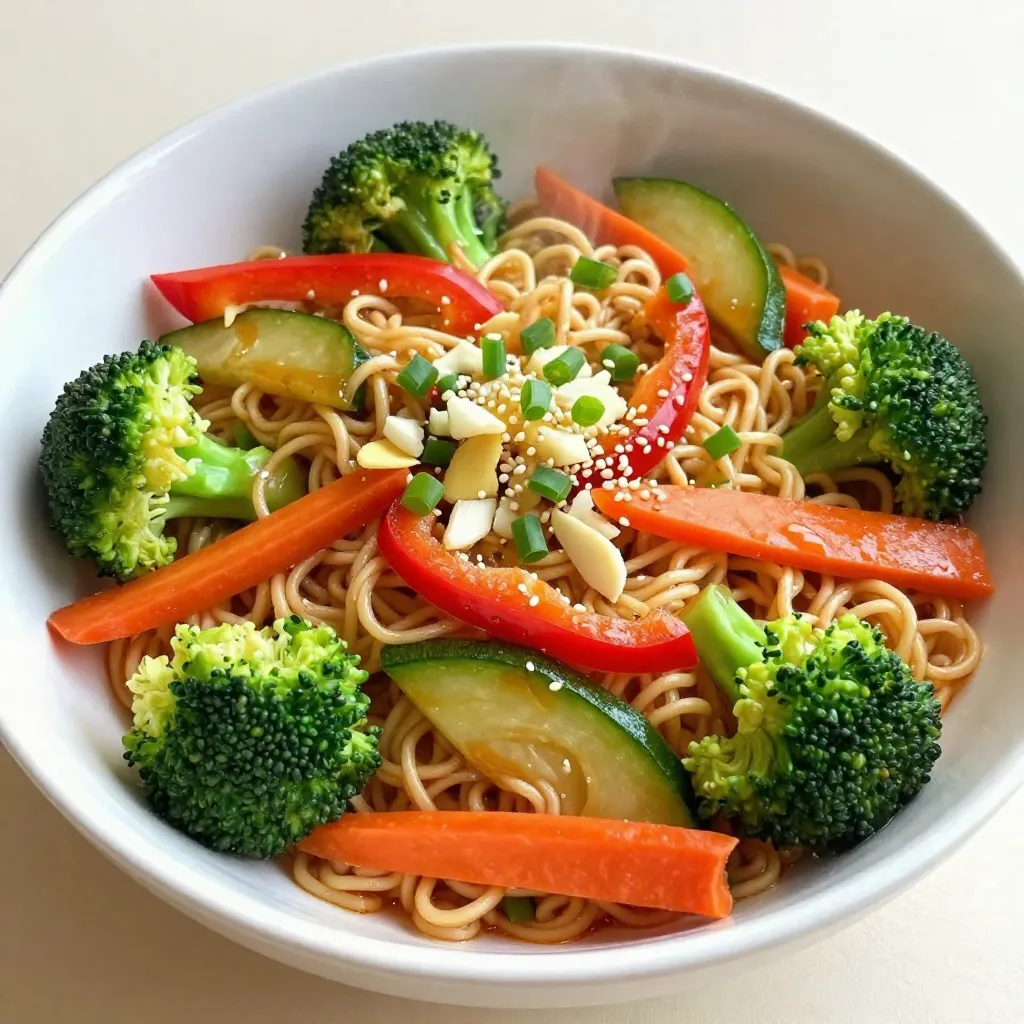
If you’re craving a quick and tasty meal, look no further! My Spicy Garlic Ramen Stir-Fry is packed with flavor

- 1 cup all-purpose flour - 1/2 cup granulated sugar - 1/2 teaspoon baking powder - 1/4 teaspoon baking soda - 1/4 teaspoon salt - 1/2 cup cream cheese, softened - 1/4 cup unsalted butter, softened - 1 large egg - 1 teaspoon vanilla extract - 1/2 cup Greek yogurt - 1 cup fresh blueberries - 1 tablespoon lemon juice - Zest of 1 lemon - 2 tablespoons brown sugar (for topping) If you're out of an ingredient, don't worry. You can swap some items easily. Use whole wheat flour instead of all-purpose flour for a nutty taste. You can use light brown sugar in place of granulated sugar. If you don't have Greek yogurt, regular yogurt works too. For a dairy-free option, use vegan cream cheese and butter. Eggs can be replaced with a flax egg or applesauce if you're going vegan. Fresh blueberries can make or break your muffins. Look for berries that are plump and firm. They should have a deep blue color with a light grayish bloom. Avoid berries that are soft or have green or red spots. Check for any signs of mold in the container. If you can, buy local berries; they often taste better and are fresher. When you get home, store them in the fridge and wash them just before using. {{ingredient_image_1}} Start by preheating your oven to 350°F (175°C). This step is key for even baking. Line a muffin tin with paper liners or spray it with non-stick cooking spray. In a medium bowl, mix together the flour, granulated sugar, baking powder, baking soda, and salt. Make sure these dry ingredients are well combined. In a large bowl, beat the softened cream cheese and butter until they are light and fluffy. This is where the magic begins! Add in the egg, vanilla extract, Greek yogurt, lemon juice, and lemon zest. Beat on medium speed until everything is smooth and well mixed. Next, gradually add the dry flour mixture to the wet mix. Stir it until just combined; be careful not to overmix. Gently fold in the fresh blueberries, ensuring they are evenly spread throughout the batter. Now that your batter is ready, evenly divide it into the muffin tin. Fill each cup about 3/4 full. This allows room for the muffins to rise. To add a touch of sweetness, sprinkle brown sugar on top of each muffin. Bake the muffins in your preheated oven for 18-20 minutes. To check if they are done, insert a toothpick into the center of a muffin. If it comes out clean, they are ready! After baking, let the muffins cool in the tin for about 5 minutes. This helps them firm up a bit. Then, transfer them to a wire rack to cool completely. For storage, keep the muffins in an airtight container at room temperature. They will stay fresh for a few days. If you want to keep them longer, consider freezing them. Just make sure they are completely cool before you freeze them! To keep your muffins moist, use fresh Greek yogurt. This adds creaminess and moisture. Make sure not to overmix the batter. Overmixing can lead to dense muffins. Gently fold in the blueberries to avoid breaking them. Start with softened cream cheese. This helps it mix smoothly with the butter. Beat them together until fluffy. Add the egg and other wet ingredients slowly. Mixing too fast can create lumps. The goal is a smooth and creamy mixture. Use an oven thermometer to check your oven temperature. An even heat helps the muffins cook well. Fill each muffin cup about 3/4 full for the best rise. Rotate the muffin tin halfway through baking for even cooking. Check for doneness with a toothpick; it should come out clean. Pro Tips Use Fresh Blueberries: For the best flavor and texture, opt for fresh blueberries instead of frozen. This will ensure that your muffins are bursting with juicy goodness. Room Temperature Ingredients: Make sure your cream cheese and butter are at room temperature before mixing. This helps achieve a smooth and fluffy batter without lumps. Don’t Overmix: When combining the wet and dry ingredients, mix until just combined. Overmixing can lead to dense muffins, so a gentle fold is key. Cool Properly: Allow the muffins to cool in the tin for a few minutes before transferring to a wire rack. This prevents them from becoming soggy on the bottom. {{image_2}} You can switch up the blueberries for other fruits. Try raspberries, strawberries, or blackberries. Each fruit adds a unique taste. For example, raspberries give a nice tartness. Strawberries add sweetness and color. Whatever fruit you choose, keep the amount the same. This way, your muffins will still bake well. Want to make these muffins vegan? No problem! Replace the egg with a flaxseed egg. Mix 1 tablespoon of ground flaxseed with 2.5 tablespoons of water. Let it sit for 5 minutes to thicken. For the cream cheese, use a vegan alternative like cashew cream. Replace Greek yogurt with plant-based yogurt. These swaps keep the muffins tasty and light. If you need gluten-free muffins, use gluten-free flour. Look for a blend that works well in baking. You can also use almond flour or coconut flour. Just remember to adjust the liquid a bit. You might need less yogurt or butter. This helps keep the muffins moist. Enjoy the same great flavor without the gluten! To keep your blueberry cheesecake muffins fresh, store them in an airtight container. This protects them from air and moisture. Place a paper towel at the bottom of the container. This absorbs excess moisture and helps maintain texture. You can store them at room temperature for up to three days. If you want to keep them longer, refrigeration is a good option. Just remember, refrigeration can change the texture slightly. Freezing muffins is simple. First, let them cool completely. Wrap each muffin tightly in plastic wrap. Make sure no air gets in. Then, place the wrapped muffins in a freezer-safe bag. Label the bag with the date and type of muffin. They will stay fresh for about three months in the freezer. When you're ready to eat, just take out a muffin and let it thaw. To reheat your muffins, you have a few options. For the oven, preheat to 350°F (175°C). Place the muffin on a baking sheet for about 10 minutes. This warms them evenly. For a quicker option, use the microwave. Heat each muffin for about 15-20 seconds. Keep an eye on them to avoid overcooking. Enjoy your warm muffins with a cup of coffee or tea! To make blueberry muffins from scratch, gather your ingredients. You will need flour, sugar, baking powder, baking soda, salt, cream cheese, butter, an egg, vanilla extract, Greek yogurt, lemon juice, lemon zest, blueberries, and brown sugar. Start by mixing the dry ingredients in one bowl. In another bowl, beat the cream cheese and butter until fluffy. Add the egg and other wet ingredients to the cream cheese mix. Slowly combine the dry mix with the wet mix. Gently fold in the blueberries. Fill a muffin tin and bake at 350°F for 18-20 minutes. Yes, you can use frozen blueberries. They work well in muffins. Just remember not to thaw them before adding them to the batter. This keeps the muffins from turning purple. Frozen blueberries can give you a nice, juicy burst of flavor. You know the muffins are done when a toothpick comes out clean. Insert it into the center of a muffin. If it comes out without batter, they are ready. The tops should also look golden and slightly firm to the touch. Serve blueberry cheesecake muffins warm or at room temperature. They look great on a tiered muffin stand or a pretty platter. You can dust them with powdered sugar and add extra blueberries on the side. This makes them even more appealing and tasty for your guests. This post covered how to make blueberry cheesecake muffins from scratch. We discussed ingredients, tips for selecting fresh blueberries, and even ingredient substitutions. I shared step-by-step instructions for batter preparation, baking, and storage. You learned tricks for moist muffins and perfect cream cheese mixtures. Plus, I provided variations, such as vegan and gluten-free options. Remember, the best muffins come from fresh ingredients and practice. Enjoy baking, and share your delicious muffins with friends and family!

Blueberry Cheesecake Muffins Easy and Delicious Treat

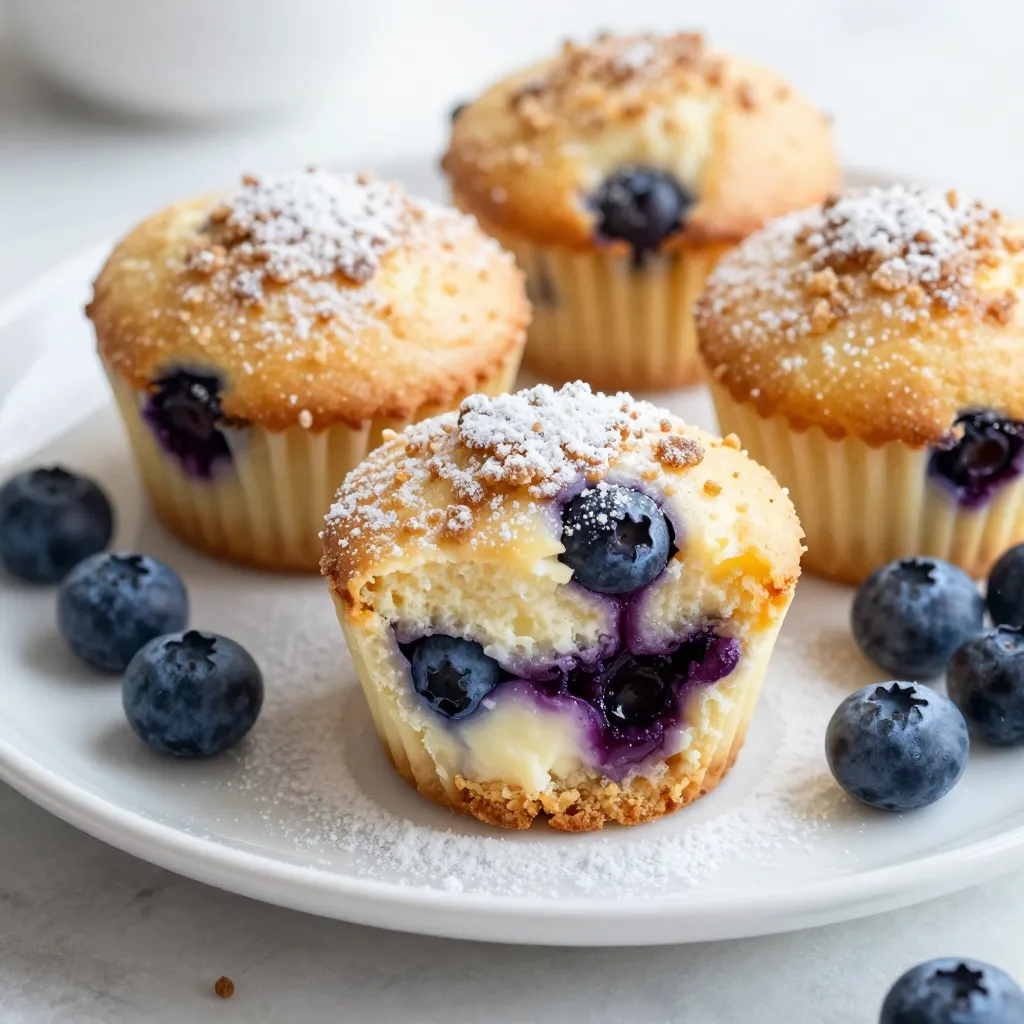
If you crave a sweet treat that’s easy and fun to make, you’re in the right place! Blueberry Cheesecake Muffins

To make a great Spicy Thai Zoodle Salad, you need fresh and vibrant ingredients. Here’s what you will need: - 2 medium zucchinis, spiralized into zoodles - 1 red bell pepper, thinly sliced - 1 cup shredded carrots - 1/2 cup sugar snap peas, halved - 1/4 cup fresh cilantro, chopped - 1/4 cup roasted peanuts, roughly chopped - 2 green onions, sliced - 2 tablespoons sesame oil - 1 tablespoon fresh lime juice - 2 tablespoons soy sauce (or tamari for gluten-free) - 1 tablespoon sriracha (adjust for spice preference) - 1 teaspoon honey or maple syrup (optional, for sweetness) - Salt to taste These ingredients bring a mix of flavors and textures that make this salad stand out. The zoodles replace pasta, making it light and fresh. You can add more to enhance the flavor. Here are some optional ingredients: - Avocado, diced for creaminess - Red chili flakes for extra heat - Cucumber, sliced for crunch - Fresh mint, chopped for a refreshing twist These extras can make your salad even more delicious. Feel free to mix and match based on what you love. If you have dietary needs, there are easy swaps you can make: - Use spiralized carrots or sweet potatoes instead of zucchini for a different base. - Swap soy sauce with coconut aminos for a soy-free option. - Replace peanuts with sunflower seeds or almonds for nut-free diets. - Use agave syrup instead of honey for a vegan choice. These substitutions keep the spirit of the salad while meeting your needs. Enjoy experimenting with different ingredients! {{ingredient_image_1}} To start, I take two medium zucchinis and spiralize them into zoodles. Spiralizing is fun and easy! I use a spiralizer, but a julienne peeler works too. Once I have my zoodles, I place them in a large mixing bowl. This is the base of my salad. Next, I add a sliced red bell pepper, shredded carrots, and halved sugar snap peas. These veggies add color and crunch. I mix them gently with the zoodles, making sure they blend well. This step sets up the salad for a great taste. Now it's time to make the dressing. I grab a small bowl and whisk together 2 tablespoons of sesame oil, 1 tablespoon of fresh lime juice, and 2 tablespoons of soy sauce. For a kick, I add 1 tablespoon of sriracha. If I want a hint of sweetness, I add 1 teaspoon of honey or maple syrup. I mix until it’s well combined and smooth. This dressing gives the salad its spicy flavor. With the zoodles and dressing ready, I pour the dressing over the zoodle mixture. I toss everything gently to coat the veggies evenly. Next, I add 1/4 cup of chopped cilantro, 1/4 cup of roughly chopped roasted peanuts, and 2 sliced green onions. I toss it all lightly again. Finally, I taste my salad and adjust the salt or spice levels if needed. I let the salad rest for 10 minutes. This helps the flavors meld together. Now it’s ready to serve! To make zoodles, use fresh, firm zucchinis. First, wash them well. Cut off both ends. Place the zucchini in a spiralizer and twist. Aim for thin spirals, about the size of spaghetti. This makes them easier to eat. If you don’t have a spiralizer, you can use a vegetable peeler. Just slice long, thin strips. To create a tasty salad, mix flavors well. Start with a good base of zoodles. Add colorful veggies like red bell pepper and carrots for crunch. For a fresh kick, mix in lime juice and soy sauce. Adjust the sriracha to fit your spice level. A bit of honey or maple syrup adds sweetness. Taste as you go to find the right balance. Serve the salad in a large, shallow bowl. This shows off the colors and textures. Top it with chopped peanuts and cilantro for a nice finish. You can chill it before serving to enhance the flavors. This salad is great as a main dish or a side. Enjoy it with grilled chicken or tofu for a full meal. Pro Tips Choose Firm Zucchini: Selecting firm, fresh zucchinis will give you better texture in your zoodles and prevent them from becoming mushy. Adjust Spice Level: Feel free to adjust the amount of sriracha according to your spice preference. Start with less if you're unsure and add more to taste. Let It Rest: Allowing the salad to sit for at least 10 minutes after tossing helps the flavors meld together for a more delicious dish. Substitutions: You can easily customize this salad by adding your favorite veggies or proteins like tofu or grilled chicken for added nutrition. {{image_2}} Want to make your zoodle salad more filling? You can easily add protein. Grilled chicken or shrimp works great. Just cook them first and slice them thin. Tofu is a good choice if you prefer a plant-based option. Simply cube it and pan-fry until golden brown. Add your protein right before serving. It keeps the salad fresh and tasty. This salad is perfect for everyone. If you want a vegetarian version, skip the chicken or shrimp. You can add more veggies instead, like bell peppers or mushrooms. For a vegan option, replace honey with maple syrup. It offers that sweet taste without any animal products. Feel free to mix in beans for extra protein. Black beans or chickpeas add a nice touch. Not everyone loves heat. You can adjust the spice level based on your taste. If you like it mild, use less sriracha or leave it out. Add more lime juice for a zesty kick instead. If you enjoy spice, add more sriracha or include chili flakes. Always taste as you go. This lets you find the perfect balance for your palate. To store leftover Spicy Thai Zoodle Salad, place it in an airtight container. This keeps the salad fresh and tasty. Make sure to eat it within three days for the best flavor. If you notice the zoodles get too watery, drain them slightly before serving. This helps keep the texture nice. Freezing zoodles can change their texture. They may become mushy once thawed. If you want to freeze them, try blanching the zoodles first. Boil them for one minute, then cool them in ice water. Dry them well and place in a freezer bag. Use within one month for the best taste. For the best storage, use glass or BPA-free plastic containers. Look for ones with tight-fitting lids. These containers help keep air out and preserve the salad's crunch. If you have a lot of dressing, store it separately. This prevents the zoodles from getting soggy. Zoodles are noodles made from zucchinis. They are a great low-carb alternative to pasta. To make zoodles, you need a spiralizer. You can also use a julienne peeler if you don't have one. Just take a medium zucchini and spiralize it until you get long strands. You can use about two zucchinis for this salad. It's easy and fun! Yes, you can prepare the salad ahead of time. Just keep the dressing separate until you are ready to eat. This will help the zoodles stay fresh and crunchy. You can mix the salad ingredients and place them in the fridge. When you are ready to serve, add the dressing and toss it all together. It tastes great even after a day or two in the fridge! If you want a milder salad, try using a sweet chili sauce. It adds flavor without too much heat. You can also use a small amount of soy sauce and some honey for sweetness. If you like, add a pinch of crushed red pepper for a hint of spice. Adjust the sauces to find the perfect balance for your taste! In this blog post, we explored how to make a Spicy Thai Zoodle Salad. We discussed key ingredients, preparation steps, and useful tips. You learned about variations, storage, and answers to common questions. Zoodles are a fun way to enjoy a healthy meal. Try different flavors and add your favorite proteins. Keeping the salad fresh is easy with the right storage methods. Enjoy making this dish your own!

Spicy Thai Zoodle Salad Fresh and Flavorful Delight

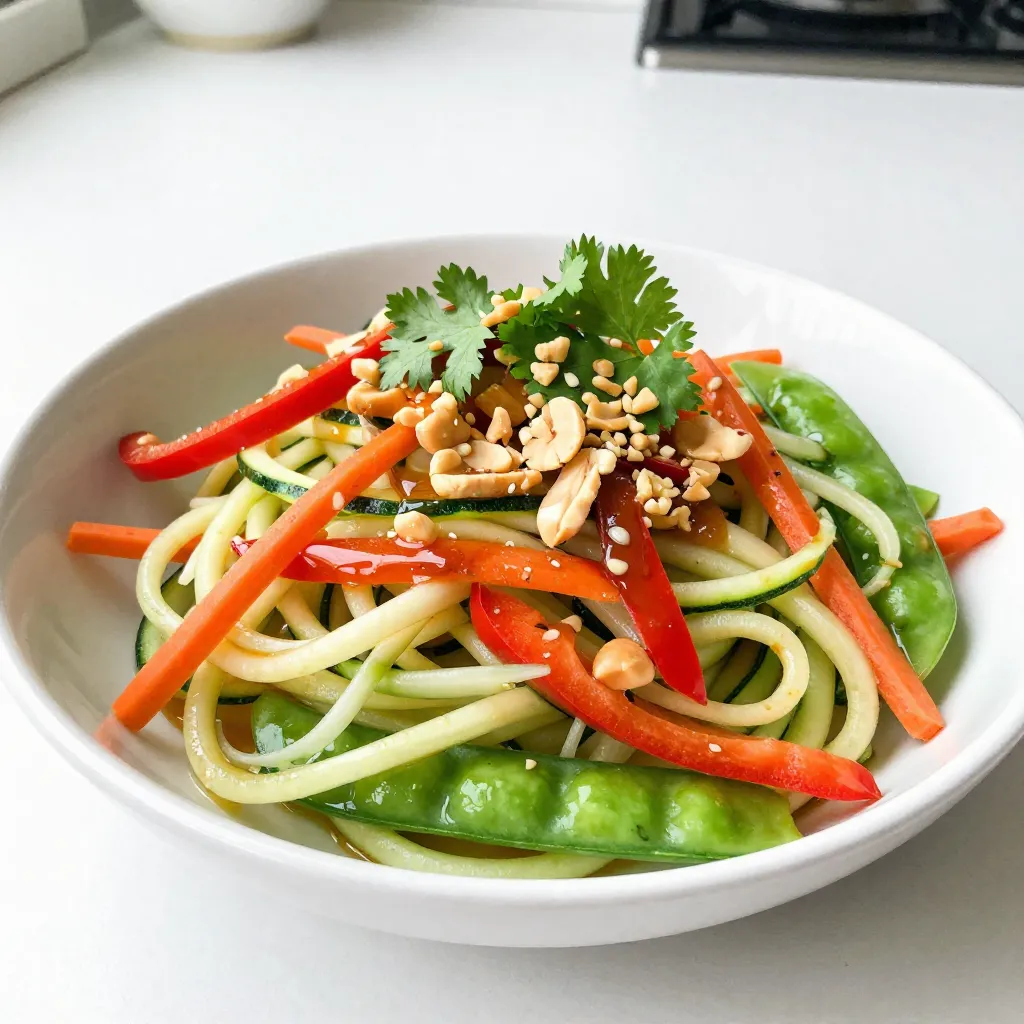
Looking for a fresh and flavorful dish to spice up your meals? The Spicy Thai Zoodle Salad is here to

Older posts
Page1 Page2 … Page86 Next →

dsad

© 2026 Cooking Wells • Built with GeneratePress

Our Policies

  • Copyright Policy
  • Cookie Policy
  • GDPR Policy
  • Privacy Policy
  • Disclaimer
  • Terms Of Use

More Information

  • Home
  • About
  • Contact
  • Appetizers
  • Dessert
  • Dinner
  • Drinks
©2026, Cooking Wells About Back To Top