Skip to content
DisclaimerTerms Of UseGDPR PolicyCookie Policy

Cooking Wells

  • Home
  • Drinks
  • Appetizers
  • Dinner
  • Dessert
  • About
  • Contact
  • Privacy Policy
DisclaimerTerms Of UseGDPR PolicyCookie Policy

NO-ING-IMG

To make this tasty pumpkin spice latte smoothie, you will need: - 1 cup unsweetened almond milk (or milk of choice) - 1/2 cup canned pumpkin puree - 1 banana, frozen - 1 tablespoon nut butter (peanut or almond) - 1 teaspoon pumpkin pie spice - 1 tablespoon maple syrup (adjust for sweetness) - 1 teaspoon vanilla extract - 1/2 cup ice cubes - Whipped coconut cream (for topping, optional) - A sprinkle of cinnamon (for garnish) Each ingredient brings its own special flavor. The almond milk adds creaminess. The pumpkin puree gives a rich taste. The frozen banana makes the smoothie smooth and cold. Nut butter adds protein, while the maple syrup sweetens it just right. You can easily swap some ingredients if you need to. If you can't find almond milk, any milk works well. You can use any nut or seed butter you like. If you prefer a different sweetener, honey or agave syrup will also taste great. If you want a thicker smoothie, add a bit more banana or some oats. For a lighter version, skip the nut butter. Toppings can make your smoothie more fun! Try adding whipped coconut cream on top. It adds a nice texture and flavor. A sprinkle of cinnamon or nutmeg gives it a festive touch. You could even add some chocolate shavings or chopped nuts for crunch. Each topping adds a new taste and makes your smoothie look fancy. Enjoy creating your perfect pumpkin spice latte smoothie! To make this smoothie, start by gathering your ingredients. You will need: - 1 cup unsweetened almond milk (or milk of choice) - 1/2 cup canned pumpkin puree - 1 frozen banana - 1 tablespoon nut butter (peanut or almond) - 1 teaspoon pumpkin pie spice - 1 tablespoon maple syrup (adjust to taste) - 1 teaspoon vanilla extract - 1/2 cup ice cubes First, measure out each ingredient. It helps to have everything ready to go. This makes the blending process quick and easy. Now, it's time to blend! In your blender, add the almond milk, pumpkin puree, frozen banana, nut butter, pumpkin pie spice, maple syrup, vanilla extract, and ice cubes. Blend on high until the mixture is smooth and creamy. If needed, stop the blender and scrape down the sides. This helps to combine all the ingredients well. Once blended, taste the smoothie. If you want it sweeter, add more maple syrup. Blend again briefly to mix. Pour the smoothie into tall glasses. For a special touch, top it with whipped coconut cream if you like. Then, sprinkle a bit of cinnamon on top. Serve immediately with a straw or a spoon. Enjoy this tasty fall treat! To make your Pumpkin Spice Latte Smoothie extra creamy, blend in a frozen banana. The banana adds a smooth texture and natural sweetness. You can also add more nut butter. This will give your smoothie a rich taste. If you want a thicker feel, use less almond milk. Just blend until you reach your desired thickness. I recommend using unsweetened almond milk for this smoothie. It has a mild flavor that works well with pumpkin. Other great options are oat milk or coconut milk. Both add creaminess without strong flavors. If you like dairy, regular milk or cream will work too. Choose what you enjoy most to make it your own. Taste your smoothie before serving. If you find it needs more sweetness, add more maple syrup. Start with a small amount, like half a tablespoon, then blend again. You can also use honey or agave syrup for sweetness. Remember, it’s all about your taste. Adjust it until it’s just right for you! {{image_2}} You can add protein powder to boost your smoothie. This makes it a great snack or meal. Just one scoop of your favorite protein powder works well. It blends smoothly with the other ingredients. You get a creamy texture and added nutrition. This variation is perfect after a workout or on a busy morning. If you want a dairy-free option, use almond milk or coconut milk. Both milks give a nice flavor. You can also use oat milk for a creamy touch. Just make sure to check the labels for added sugars. This way, you keep the smoothie healthy and tasty. You can make this smoothie your own by adding spices. Try a pinch of nutmeg or a dash of ginger. These spices enhance the fall flavors. For toppings, think about using crushed nuts or granola. They add crunch and flavor. You can also use chocolate shavings for a sweet twist. Each change makes the smoothie feel fresh and new every time you make it. After you make your Pumpkin Spice Latte Smoothie, store any leftovers in a clean jar. Seal it tightly. Keep it in the fridge for one to two days. The smoothie may separate, so shake it well before drinking. You can freeze the smoothie for later use. Pour it into ice cube trays. Once frozen, transfer the cubes to a freezer bag. This way, you can blend a quick smoothie anytime. Just blend a few cubes with some almond milk when you want a treat. Smoothies are best cold, but you can warm them if you prefer. Pour the smoothie into a saucepan. Heat it on low. Stir often to avoid cooking it too much. Remove it from heat once warm. Enjoy your cozy drink! Yes, you can use fresh pumpkin. Cook and blend it until smooth. Canned pumpkin is easier, but fresh adds a fun twist. If you use fresh, make sure to measure out 1/2 cup for the right amount. Fresh pumpkin gives a bright flavor and more texture. To make this smoothie vegan, choose plant-based milk. Unsweetened almond milk works great. Use maple syrup for sweetness, as it is vegan. Make sure any nut butter you pick is also vegan. This way, you keep all the yummy flavors without any dairy. This smoothie is packed with nutrients. Pumpkin is high in fiber and low in calories. It also has vitamin A, which is good for your eyes. The banana adds potassium, which is great for your heart. Nut butter gives protein, helping you feel full longer. Pumpkin pie spice has antioxidants, supporting your health too. This blog post guided you through making a delicious pumpkin spice latte smoothie. We covered the key ingredients, substitutions, and optional toppings. Then, we shared step-by-step instructions and tips to improve your smoothie’s creaminess. You learned about variations for different diets. Finally, I provided storage tips and answered common questions. This tasty drink is easy to make and perfect for any season. Enjoy your smoothie adventure!

Pumpkin Spice Latte Smoothie Tasty Fall Treat

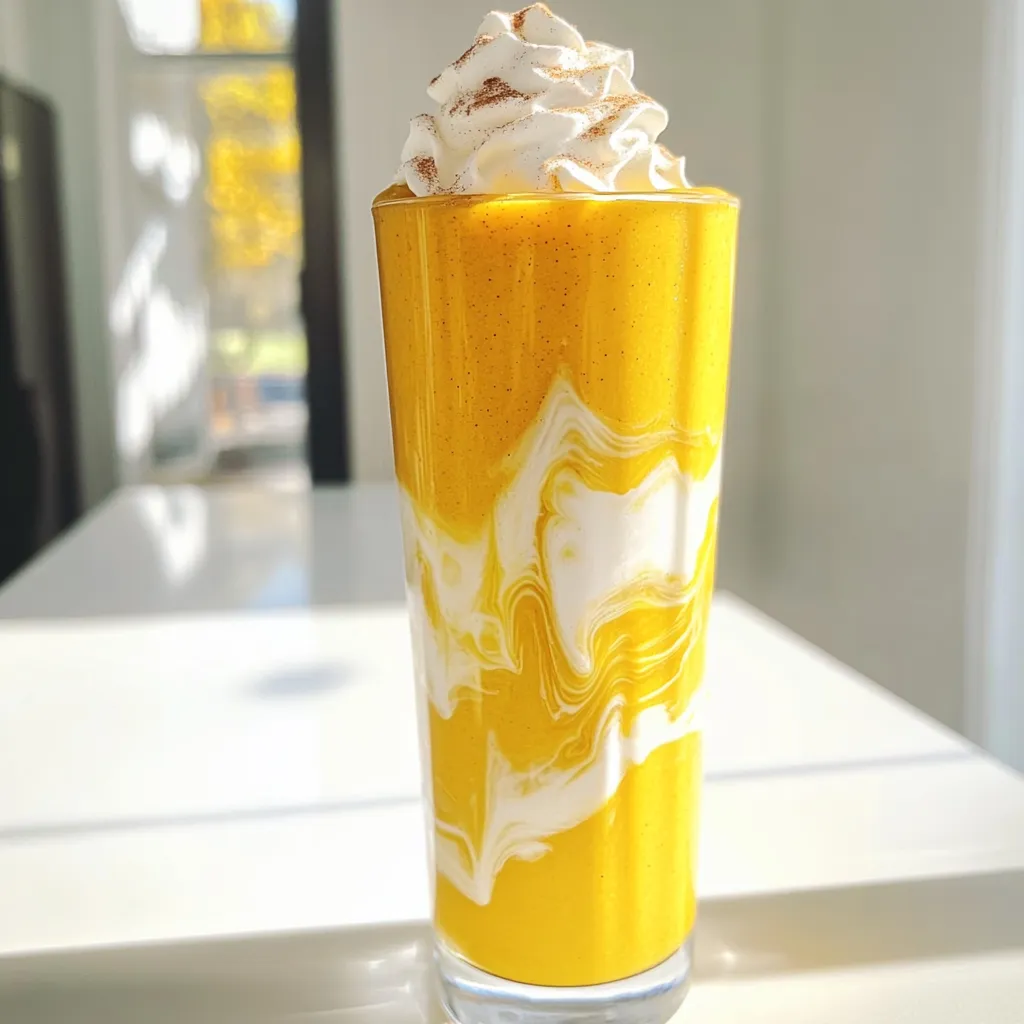
Craving a cozy fall treat? You need to try my Pumpkin Spice Latte Smoothie! It’s a simple blend of flavors

- 1 cup natural peanut butter - 1/2 cup honey or maple syrup - 2 cups rolled oats - 1/2 cup vanilla protein powder - 1/4 cup unsweetened cocoa powder - 1/4 cup chopped peanuts - 1/2 cup mini chocolate chips - 1/2 cup caramel sauce (store-bought or homemade) - A pinch of salt The first ingredient is natural peanut butter. It gives the bites a creamy texture. You can swap it for almond butter if you prefer. Honey or maple syrup acts as a sweetener. Both work, but maple syrup is vegan. Rolled oats are key for a chewy base. Quick oats will work too, but they change the texture. Vanilla protein powder adds protein and taste. You can use chocolate protein powder if you want a richer flavor. Unsweetened cocoa powder brings a chocolatey taste. If you want a milder flavor, skip it. Chopped peanuts add crunch and a nutty flavor. Try sunflower seeds for a nut-free option. Mini chocolate chips bring sweetness and fun. Dark chocolate chips are a great choice if you want less sugar. Finally, caramel sauce makes it decadent. You can make your own or buy it. This list covers all you need. Now you can create your No Bake Snickers Protein Bites with ease! 1. Mixing the peanut butter and sweetener Start by grabbing a large mixing bowl. Add 1 cup of natural peanut butter and 1/2 cup of honey or maple syrup. Stir them together until smooth. This creates a sweet base for your bites. 2. Incorporating dry ingredients Next, add 2 cups of rolled oats, 1/2 cup of vanilla protein powder, and 1/4 cup of unsweetened cocoa powder. Don’t forget a pinch of salt! Mix everything well until it looks even. This step adds texture and flavor. 3. Rolling the mixture into bites Now, take about a tablespoon of the mixture. Roll it into a small ball using your hands. Place each ball on a parchment-lined baking sheet. You should get about 12 to 15 bites. Make sure they are evenly spaced. 4. Adding caramel sauce Finally, drizzle or dollop 1/2 cup of caramel sauce over each protein bite. This gives them a sweet and gooey finish. You can use store-bought or homemade caramel. After these steps, put the baking sheet in the fridge for at least 30 minutes. This makes the bites firm and ready to enjoy! To make the best No Bake Snickers Protein Bites, focus on the texture first. You want a mix that sticks together but isn't too wet. If it feels dry, add a touch more peanut butter or honey. If it’s too wet, add more oats. Chilling is key for the right firmness. After rolling your bites, place them in the fridge. Chill them for at least 30 minutes. This helps them firm up nicely. If you need them firmer, leave them a bit longer. For sweetness, taste as you go. Honey and maple syrup both add sweetness. If you want a sweeter bite, add more honey or chocolate chips. If you prefer less sweetness, cut back on the syrup or chocolate. Each bite should balance flavors well. The rich peanut butter pairs perfectly with cocoa and caramel. Adjust these to fit your taste. Enjoy being creative with your snacks! {{image_2}} You can easily change up these No Bake Snickers Protein Bites. Here are some fun ideas: - Vegan-friendly options: Use almond butter or sunflower seed butter. Swap honey for maple syrup or agave nectar. This keeps your bites plant-based and tasty. - Nut-free alternatives: If you need a nut-free snack, try sunflower seed butter. Replace chopped peanuts with pumpkin seeds. This still gives you crunch without nuts. - Flavor variations: Want to mix it up? Add shredded coconut for a tropical twist. You can also try different protein powders like chocolate or caramel. These small changes keep the bites exciting and new. Feel free to get creative! The base recipe is so flexible. You can make your own unique version that fits your taste. To keep your No Bake Snickers Protein Bites fresh, store them in an airtight container. This helps to prevent them from drying out or absorbing scents from the fridge. - Best practices for storage: Place a piece of parchment paper between layers if you stack them. This keeps them from sticking together. - Shelf life considerations: When stored properly, these bites last about one week in the fridge. After that, they may lose flavor and texture. - Freezing options for longer-term storage: If you want to save some for later, freeze them. Place the bites in a single layer on a baking sheet. Freeze them for about two hours, then transfer them to a freezer-safe bag. They can last for up to three months in the freezer. Just thaw in the fridge before enjoying. By following these steps, you ensure that every bite remains delicious and ready to satisfy your snack cravings! Can I use different nut butters? Yes, you can use other nut butters. Almond butter or cashew butter work well. Each will change the taste slightly, but they will still be tasty. Just make sure the nut butter is natural and smooth for best results. How do I make these bites even healthier? To make these bites healthier, add more oats and less sweetener. You can also use a lower-calorie sweetener instead of honey or maple syrup. Adding chia seeds or flaxseeds boosts nutrition too. Can I substitute the protein powder? Absolutely! You can use any flavor of protein powder you like. If you want a vegan option, try a plant-based protein powder. Just keep in mind that this may change the taste and texture. What can I do if the mixture is too sticky? If your mixture is sticky, add a bit more oats or protein powder. This will help absorb the moisture. You can also chill the mixture for a bit before rolling it into bites. You now have a complete guide on making No Bake Snickers Protein Bites. We covered ingredients, preparation steps, and useful tips to perfect your bites. Remember, you can easily customize these treats to fit your diet. Store them properly to enjoy their taste and texture for longer. Use what you learned to create a delicious and healthy snack. Enjoy experimenting with flavors and share your favorite variations!

No Bake Snickers Protein Bites Easy and Tasty Snack

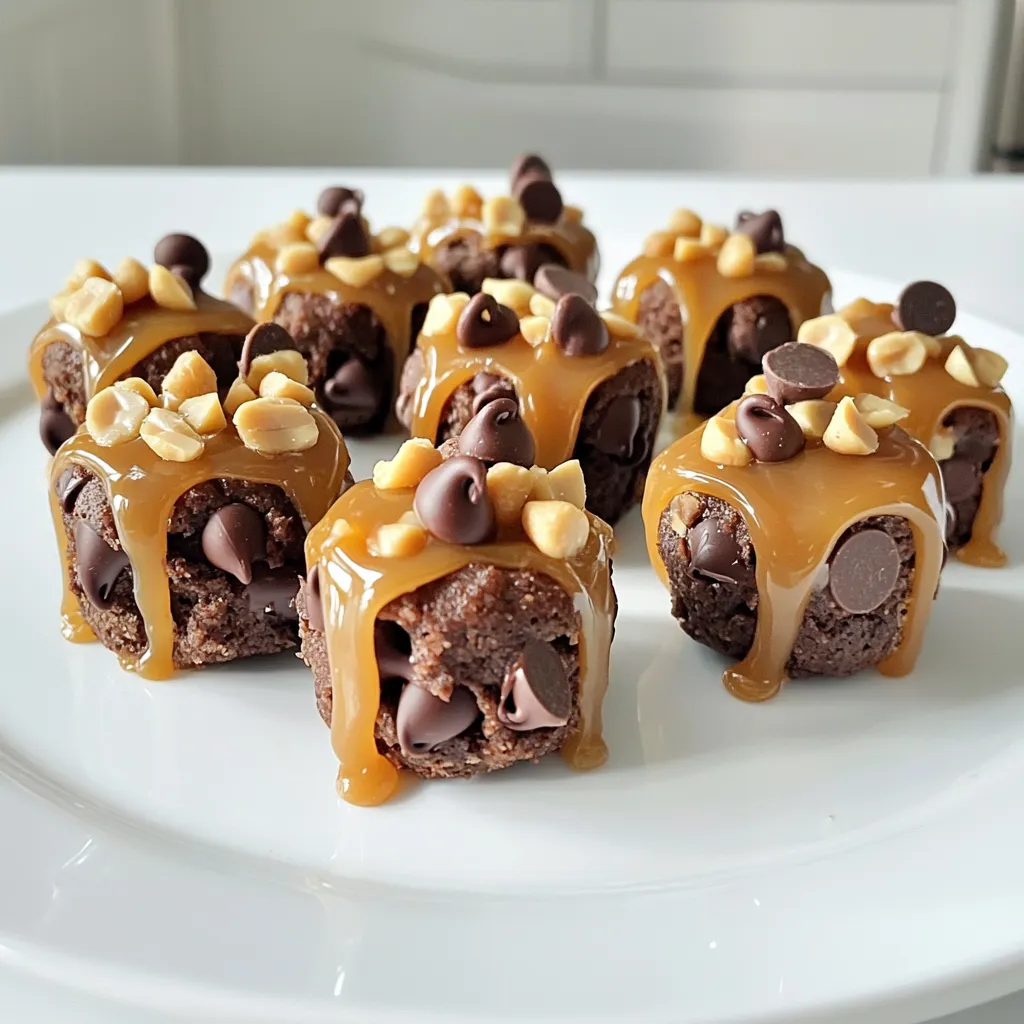
Looking for a quick and tasty snack? You’ll love these No Bake Snickers Protein Bites! They’re simple to make and

To make this chili, you need a few key ingredients: - 1 tablespoon olive oil - 1 pound boneless, skinless chicken breasts, diced - 1 onion, diced - 3 cloves garlic, minced - 2 cans (15 oz each) white beans, drained and rinsed - 2 cups low-sodium chicken broth - 1 cup cream cheese, softened - 2 teaspoons ground cumin - 1 teaspoon chili powder - 1 teaspoon smoked paprika - Salt and pepper to taste These ingredients work together to create a rich and creamy chili. The white beans add a nice texture, while the chicken makes it hearty. You can add some optional ingredients to enhance the flavor: - 1 jalapeño, seeds removed and finely chopped This adds a kick of heat if you like spicy food. Fresh cilantro is great for garnish. Lime wedges also bring a fresh zing to each bowl. You can substitute some ingredients if needed: - Use turkey or pork instead of chicken for a different flavor. - Swap cream cheese for Greek yogurt for a lighter option. - Use vegetable broth instead of chicken broth for a vegetarian version. These swaps keep the dish tasty while meeting your dietary needs. Always feel free to experiment and make the recipe your own! I start by setting my Instant Pot to the sauté function. Then, I add one tablespoon of olive oil and let it heat for about a minute. This step is key for a good flavor base. Next, I add one pound of diced chicken. I season it with salt and pepper. I sauté it for about three to four minutes. I want the chicken to brown lightly. After that, I stir in one diced onion and three minced garlic cloves. I cook this mix for two more minutes. The onion should become soft and clear. Now, I add two cans of white beans, which I drained and rinsed. I pour in two cups of low-sodium chicken broth. Then, I sprinkle in two teaspoons of ground cumin, one teaspoon of chili powder, and one teaspoon of smoked paprika. If you like some heat, add a finely chopped jalapeño. I mix everything well. After that, I close the lid and set the pot to cook on high pressure for ten minutes. When the cooking time ends, I let the pressure release naturally for five minutes. Then, I use quick release for any leftover steam. I open the lid and add one cup of softened cream cheese. I stir until it melts into the chili. Finally, I taste and adjust the seasoning with salt and pepper. I serve it hot, topped with fresh cilantro and lime wedges. This chili is creamy, tasty, and perfect for any meal! For great chili, always use fresh ingredients. I recommend using good-quality chicken and beans. Make sure to sauté your chicken until it’s golden. This step adds flavor. Use the sauté function well; it really helps build a tasty base. Always adjust the liquid levels. Too much broth can make your chili thin. For the creamiest chili, cream cheese is key. Make sure to soften it before adding. This helps it melt smoothly. Stir in the cream cheese after cooking. This keeps it creamy and rich. If you want extra creaminess, add a splash of heavy cream too. One common mistake is overcooking the chicken. This can make it tough. Always remember to use the right cooking time. Another mistake is not seasoning enough. Taste your chili before serving. Adjust salt and pepper to your liking. Lastly, don’t skip the natural pressure release. This step helps keep your chili thick and flavorful. {{image_2}} You can easily make this chili vegetarian. Just swap chicken for extra beans or veggies. Use 3 cans of white beans for protein. You can add bell peppers, zucchini, or corn for more texture. Replace chicken broth with vegetable broth for a rich flavor. This keeps the chili creamy and tasty. If you like heat, add more spice. Start with a pinch of cayenne pepper. You can also toss in crushed red pepper flakes. For a unique twist, try adding fresh diced jalapeños. Remember, adjust to your taste. Your chili will warm you up and excite your taste buds. This recipe is flexible with beans. You can mix different types, like black or pinto beans. Using a mix can add depth and interesting flavors. Combine two cans of white beans with one can of black beans. This gives a nice contrast in color and flavor. Be creative and find your favorite mix! After you enjoy your chili, store leftovers in an airtight container. Let it cool first, then cover it tightly. You can keep it in the fridge for up to four days. Make sure to label the container to track how long it's been stored. To freeze your chili, pour it into freezer-safe bags or containers. Leave some space at the top for expansion. Seal the bags tightly and remove as much air as possible. Your chili can last in the freezer for about three months. Thaw it overnight in the fridge before you reheat. When it's time to heat up your chili, you have a few options. You can use the stove or your microwave. If using the stove, pour the chili into a pot and heat over medium heat. Stir often to prevent it from sticking. If using a microwave, place it in a bowl and cover it. Heat in short bursts, stirring in between. Always check that it's heated through. Adjust the seasoning as needed before serving again. Yes, you can use frozen chicken. Just add a few extra minutes to the cooking time. The Instant Pot can cook frozen chicken well. It will turn out tender and juicy. Make sure to cut the chicken into smaller pieces for even cooking. To spice it up, add more jalapeño or chili powder. You can also use cayenne pepper for extra heat. Start with a small amount and taste as you go. This way, you can find the right heat level for you. This chili pairs well with rice or cornbread. You can also serve it with tortilla chips for crunch. A side salad adds fresh flavors, too. Don’t forget lime wedges for a zesty kick! Yes, you can make it in a slow cooker. Just sauté the chicken and veggies first. Then, add everything to the slow cooker. Cook on low for 6-8 hours or on high for 3-4 hours. Stir in the cream cheese at the end. This chili lasts about 3-4 days in the fridge. Store it in an airtight container to keep it fresh. If you want to keep it longer, consider freezing it. It can last up to 3 months in the freezer. This blog post outlined a simple way to make creamy white bean chicken chili. I shared essential and optional ingredients, along with tips for perfect cooking. You learned about storing leftovers and options for spice levels. In the end, this recipe is easy to customize. Don't be afraid to experiment. Enjoy your flavorful chili and share it with friends or family. Cooking should be fun and tasty!

Instant Pot Creamy White Bean Chicken Chili Delight

Craving a warm, hearty meal that’s easy to make? Look no further! My Instant Pot Creamy White Bean Chicken Chili

To make Slow Cooker Moroccan Chickpea Stew, you will need the following ingredients: - 2 cans (15 oz each) chickpeas, drained and rinsed - 1 medium onion, diced - 2 cloves garlic, minced - 2 carrots, peeled and diced - 1 red bell pepper, diced - 1 yellow bell pepper, diced - 1 can (14 oz) diced tomatoes - 1 cup vegetable broth - 2 tablespoons olive oil - 2 teaspoons ground cumin - 2 teaspoons ground coriander - 1 teaspoon smoked paprika - 1 teaspoon ground cinnamon - ½ teaspoon cayenne pepper (adjust to taste) - Salt and pepper to taste - 1 cup spinach leaves, chopped - Fresh cilantro or parsley, for garnish - Optional: Cooked couscous or quinoa for serving If you don’t have all the ingredients, here are some great swaps: - Chickpeas: Use lentils or white beans instead. - Vegetable broth: Chicken broth works too. - Spinach: Kale or Swiss chard are tasty options. - Diced tomatoes: Use fresh tomatoes or tomato sauce. - Olive oil: Any cooking oil will do, like avocado oil. These swaps keep the stew tasty while using what you have at home. This stew is not just delicious; it's also healthy! Here’s a quick look at the nutrition per serving: - Calories: About 220 - Protein: 10g - Fat: 7g - Carbohydrates: 35g - Fiber: 10g - Sugar: 6g This stew is full of plant-based protein and fiber. It is perfect for a filling meal! Start by gathering all your ingredients. You will need: - 2 cans (15 oz each) chickpeas, drained and rinsed - 1 medium onion, diced - 2 cloves garlic, minced - 2 carrots, peeled and diced - 1 red bell pepper, diced - 1 yellow bell pepper, diced - 1 can (14 oz) diced tomatoes - 1 cup vegetable broth - 2 tablespoons olive oil - 2 teaspoons ground cumin - 2 teaspoons ground coriander - 1 teaspoon smoked paprika - 1 teaspoon ground cinnamon - ½ teaspoon cayenne pepper (adjust to taste) - Salt and pepper to taste - 1 cup spinach leaves, chopped - Fresh cilantro or parsley, for garnish - Optional: Cooked couscous or quinoa for serving Now, in your slow cooker, add the diced onion, minced garlic, carrots, and both bell peppers. Then, stir in the chickpeas and diced tomatoes with their juices. Next, pour in the vegetable broth. In a small bowl, mix the cumin, coriander, smoked paprika, cinnamon, cayenne pepper, salt, and pepper. Add this spice mix into the slow cooker and stir well. Drizzle the olive oil over the top and give it another gentle stir. Cover the slow cooker and set it on low for 6-8 hours or high for 3-4 hours. You want the vegetables to be tender and the stew to be full of flavor. About 15 minutes before you serve, stir in the chopped spinach. This will wilt the spinach into the stew. Taste your stew and adjust the seasoning if needed. Serve it hot over a bed of cooked couscous or quinoa if you like. Don’t forget to add fresh cilantro or parsley for garnish! To get the best flavor, start by sautéing your onions and garlic. This step brings out their sweetness. It makes your stew taste rich and inviting. You can also add spices early. This helps them bloom and release their unique aromas. Stir them in with the vegetables before adding liquids. Letting the stew cook low and slow is key. It helps all the flavors blend perfectly. If you like heat, add more cayenne pepper. Start with a small pinch, then taste. You can always add more, but you can’t take it out. For a milder stew, skip the cayenne altogether. You can also balance the heat with a bit of sweetness. A touch of honey or brown sugar can help calm the spice. For a creamier texture, try adding a dollop of plain yogurt before serving. It brings a nice tang. You can also blend part of the stew. Just scoop out some chickpeas and veggies, blend them, and stir them back in. This thickens the stew without losing any flavor. Adding a splash of coconut milk is another option. It adds richness and a hint of sweetness. {{image_2}} You can easily boost this stew with more protein. Consider adding diced chicken or lamb. You can also mix in lentils for a hearty feel. If you want more veggies, add zucchini, sweet potatoes, or green beans. These options make the stew even more colorful and fun! Feel free to play with spices! Try adding turmeric or ginger for a different flavor. You can also use garam masala for a warm twist. If you love heat, add more cayenne or red pepper flakes. Each spice change gives you a new taste experience. Serve this stew over cooked couscous or quinoa. Both grains soak up the stew's flavors well. You can also use rice or serve it with crusty bread. For a fresh touch, top it with cilantro or parsley. These options make each meal feel special! Store any leftover Moroccan chickpea stew in an airtight container. Let the stew cool first. This helps keep the flavor and texture. Place it in the fridge for up to 4 days. If you want to keep it longer, freezing is best. To freeze the stew, use freezer-safe bags or containers. Make sure to leave some space for expansion. Label the bags with the date. You can freeze the stew for up to 3 months. When you are ready to eat, just take it out and thaw it in the fridge overnight. To reheat, you can use the stove or the microwave. If using the stove, add a bit of broth or water to keep it moist. Heat it on low and stir often. If using the microwave, place it in a bowl and cover it. Heat in short bursts, stirring in between. This helps heat it evenly. Always check the temperature before serving to ensure it's hot throughout. If you need a chickpea swap, try using lentils. They cook well in the stew and add protein. White beans or black beans are good options too. Just adjust cooking time as needed. Lentils usually cook faster than chickpeas. Taste and texture will change but still be tasty. Yes, this stew is both vegetarian and vegan! It uses vegetable broth as the base. All the ingredients are plant-based, so you can enjoy it without worry. If you want to add some protein, you can toss in tofu or tempeh. They absorb the flavors well and add texture. You will know the stew is done when the veggies are tender. The chickpeas should be soft but not mushy. If you cook on low, this takes about 6-8 hours. On high, the stew will be ready in 3-4 hours. Give it a stir to mix in the spinach before serving. In this post, we covered key ingredients for a flavorful stew and how to prepare it. I shared tips for enhancing flavor, adjusting spice levels, and providing variations for your dish. Storing leftovers properly helps keep your stew fresh. Remember, you can make this recipe fit your needs by swapping out ingredients. Cooking should be fun and creative. Enjoy experimenting in your kitchen!

Slow Cooker Moroccan Chickpea Stew Simple and Tasty

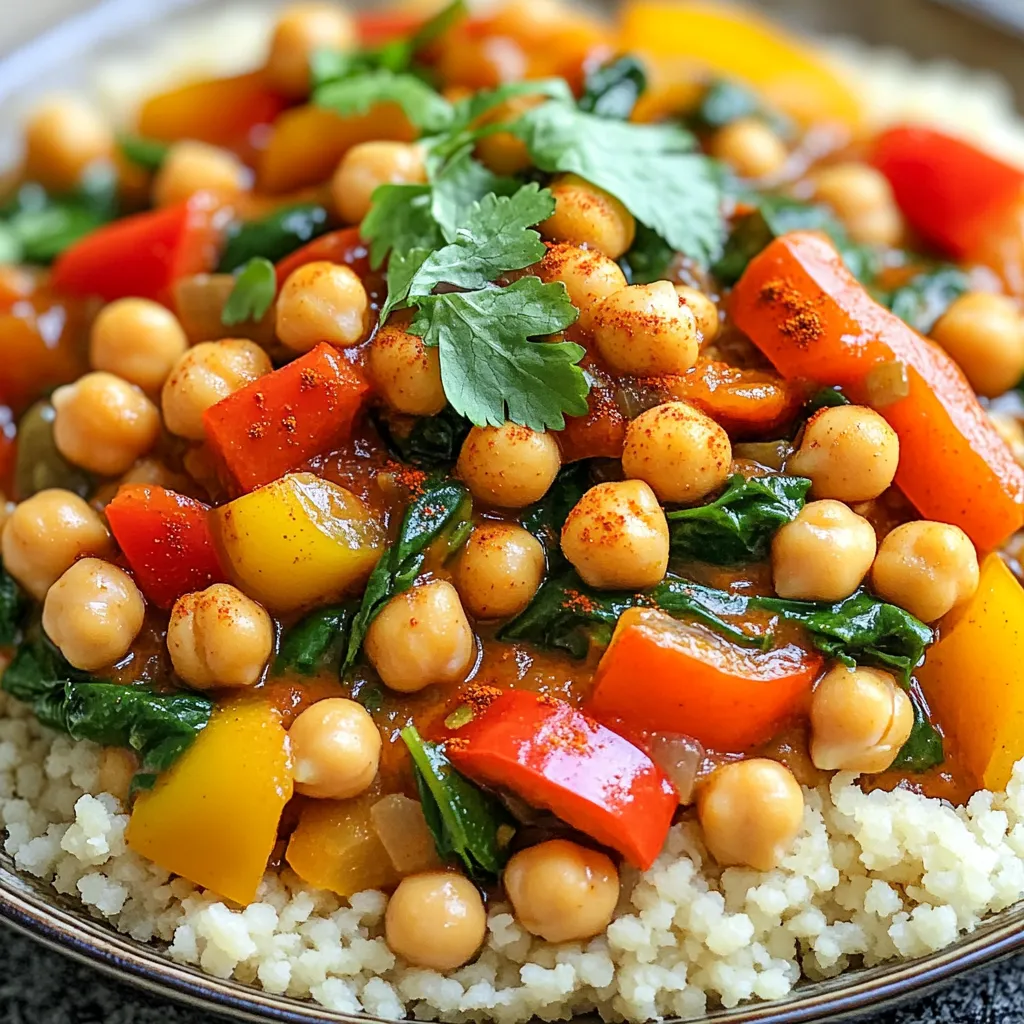
Discover the rich, warm flavors of Morocco right in your kitchen with my Slow Cooker Moroccan Chickpea Stew. This easy

- 1 lb boneless, skinless chicken thighs - 1 cup all-purpose flour - 2 large eggs, beaten - 1 cup panko breadcrumbs - Salt and pepper to taste - 1 teaspoon garlic powder - 1 teaspoon ginger powder - 1 cup sweet chili sauce - 1 tablespoon soy sauce - Green onions and sesame seeds for garnish The main ingredients for Air Fryer Sweet Chili Chicken Bites include chicken thighs, flour, eggs, and panko breadcrumbs. I love using boneless, skinless chicken thighs. They stay juicy and tender, which makes the bites super tasty. For the seasoning, I use salt, pepper, garlic powder, and ginger powder. These flavors add depth and warmth to the chicken. You can adjust the salt and pepper to your liking. The sauce is where the magic happens! Sweet chili sauce and soy sauce mix together to create a sticky and sweet glaze. This sauce is rich and pulls all the flavors together. I also recommend garnishing with sliced green onions and sesame seeds. They add a nice crunch and a pop of color to your dish. Gather these ingredients, and you are ready to make a delicious meal that everyone will love! - First, season the chicken with salt, pepper, garlic powder, and ginger powder. - Mix well in a large bowl to coat all the pieces. - Next, set up a breading station. Place flour in one bowl, beaten eggs in another, and panko breadcrumbs in a third bowl. - Preheat your air fryer to 370°F (190°C) for about five minutes. - Lightly spray the basket with cooking spray to stop sticking. - Arrange the chicken bites in a single layer in the air fryer basket. Do not overcrowd them. - While the chicken cooks, combine sweet chili sauce and soy sauce in a small saucepan. - Stir the mixture over medium heat and let it simmer for about five minutes. This will thicken the sauce slightly. To get that perfect crispiness, I always use panko breadcrumbs. They give the chicken a nice crunch. Also, avoid overcrowding the air fryer basket. If you pack it too tight, the chicken won’t cook evenly. Make sure to coat the chicken evenly. Start by dredging each piece in flour, shaking off the extra. Then dip it in the beaten eggs. Finally, press the panko breadcrumbs firmly onto the chicken. This helps them stick well. For a beautiful presentation, plate the chicken bites with extra sweet chili sauce. This adds color and flavor. You can also add fresh herbs like green onions or cilantro. They make the dish look fresh and inviting. {{image_2}} You can easily spice up your chicken bites. Just add chili flakes to the breading. This gives a nice heat. You can also mix sriracha into the sweet chili sauce. This adds a bold flavor that many love. If you want to switch it up, use chicken breast instead of chicken thighs. Chicken breast cooks well and stays juicy. You can also try shrimp or tofu. Both options provide great taste and texture. For a gluten-free version, swap the all-purpose flour for almond flour. This keeps the coating light and crispy. Use gluten-free panko breadcrumbs instead of regular ones. This ensures everyone can enjoy these bites without worry. To store leftover chicken bites, let them cool first. Place them in an airtight container. This helps keep them fresh and tasty. You can also use plastic wrap or a zip-top bag. Make sure to squeeze out air for better storage. For freezing leftovers, let the chicken bites cool completely. Place them in a freezer-safe bag or container. Label it with the date. This helps you know how long they have been stored. When you want to eat them, thaw in the fridge overnight. Reheat in the air fryer for a crispy finish. Heat them at 350°F (175°C) for about 5-7 minutes. In the fridge, chicken bites last for 3-4 days. If frozen, they stay good for 2-3 months. Always check for any off smells or changes in color before eating. Safe storage helps keep your meals tasty and healthy! You should cook chicken bites for 12 to 15 minutes in the air fryer. It's best to shake the basket halfway through. This step helps them cook evenly and get crispy. The chicken should turn golden brown and reach an internal temperature of 165°F (74°C). Yes, you can use frozen chicken, but it will take longer to cook. I recommend thawing the chicken first. This ensures even cooking and better texture. If you cook from frozen, add about five extra minutes to the cooking time. Check that the internal temperature reaches 165°F (74°C) for safety. Here are some great ideas for side dishes and accompaniments: - Rice: Serve with steamed jasmine or basmati rice. - Vegetables: Pair with stir-fried or roasted veggies for balance. - Salad: A fresh cucumber or cabbage slaw adds crunch. - Dipping Sauces: Offer extra sweet chili sauce or a spicy mayo. - Noodles: Try with rice noodles for a fun twist. These options will round out your meal and make it even more enjoyable! This blog explored a tasty way to make sweet chili chicken bites. We covered the key ingredients, like chicken thighs, panko, and sweet chili sauce. You learned how to prepare and air fry them for a perfect crisp. I shared tips on breading and serving, as well as fun variations for flavor. With these easy steps, you can create a delicious dish that pleases everyone. Enjoy making this recipe your own!

Air Fryer Sweet Chili Chicken Bites Crispy Delight

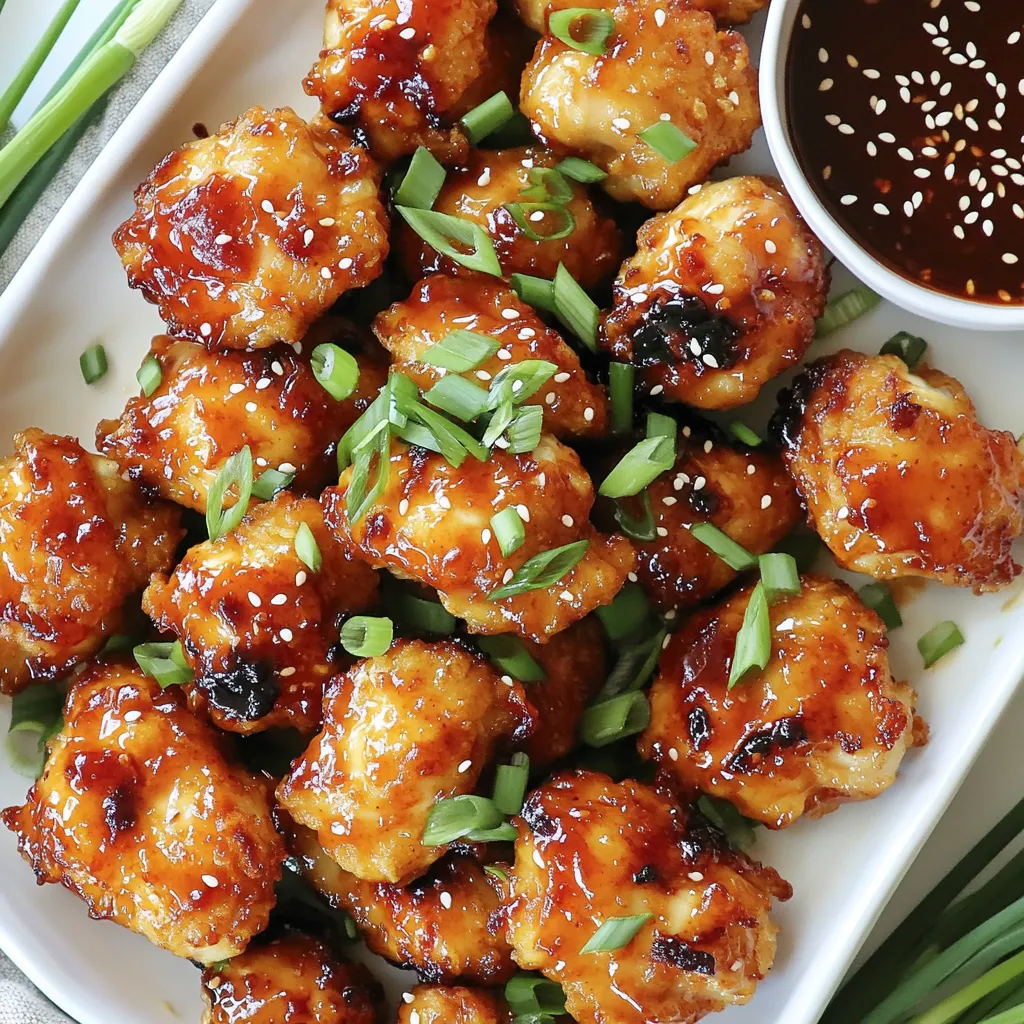
Looking for a tasty, easy snack? Let me introduce you to my Air Fryer Sweet Chili Chicken Bites! Crisp on

- 1 cup rolled oats - 2 cups almond milk (or any milk of choice) - 1 ripe banana, mashed - 1/4 cup walnuts, chopped - 2 tablespoons pure maple syrup - 1 teaspoon cinnamon - 1/2 teaspoon vanilla extract - Pinch of salt To create this warm and tasty oatmeal, gather these simple ingredients. The oats form the base and provide fiber. Almond milk gives it creaminess. A ripe banana adds natural sweetness. Walnuts bring a nice crunch and flavor. Maple syrup is the star for a cozy touch. Cinnamon and vanilla add warmth and aroma. The salt balances the sweetness. - Sliced bananas - Additional walnuts - Drizzle of maple syrup - Chia seeds These toppings elevate your oatmeal. Sliced bananas add freshness. More walnuts give extra crunch. A drizzle of maple syrup enhances sweetness. Chia seeds can add texture and nutrition. - Rolled oats can be swapped with quick oats for faster cooking. - Any milk can replace almond milk, like cow’s milk or soy milk. - If you dislike walnuts, try pecans or almonds instead. - Maple syrup can be replaced with honey or agave syrup. These swaps let you customize your oatmeal. Use what you have on hand. You can enjoy this dish in many ways. It’s flexible and fun to make! To make this cozy dish, start by gathering your ingredients. In a medium pot, mix 1 cup of rolled oats with 2 cups of almond milk. Heat this over medium heat until it gently simmers. Next, add in 1 ripe mashed banana, 1/4 cup of chopped walnuts, 2 tablespoons of pure maple syrup, 1 teaspoon of cinnamon, 1/2 teaspoon of vanilla extract, and a pinch of salt. Stir everything well to blend the flavors. Cook this mix for about 5-7 minutes. Stir occasionally while it cooks. The oatmeal will thicken and take on a lovely texture. To get the perfect oatmeal, watch the cooking time closely. You want it creamy but not too runny. If it gets too thick, you can always stir in a splash of almond milk. If you like it thicker, let it cook a bit longer. After cooking, remove the pot from the heat and let it sit for a minute. This helps it thicken a bit more before serving. Serve your oatmeal in rustic bowls for a cozy feel. Top it with extra sliced bananas and walnuts for added crunch. A drizzle of maple syrup on top gives it a sweet finish. You could even sprinkle some chia seeds for a nutritious boost. For a fun touch, add a sprinkle of cinnamon on top. Enjoy this warm bowl of comfort, perfect for any time of day! You can change this recipe up to fit your taste. Try adding different fruits like berries or apples. You can also mix in some nut butter for extra creaminess. If you love chocolate, sprinkle in some cocoa powder or dark chocolate chips. Use different nuts, like pecans or almonds, for new textures. Each choice can change the flavor and make it fun. Mornings can be hectic. To save time, prep your oats the night before. Combine oats and milk and store in the fridge. In the morning, just heat it up. You can also mash the banana the night before. This way, you only need to stir in the ingredients when you cook. Quick and easy meals can still be yummy! Store any leftover oatmeal in an airtight container. It will stay fresh in the fridge for about three days. When you reheat, add a splash of milk to restore creaminess. Heat it in the microwave or on the stove, stirring often. If it becomes too thick, just add more milk until it reaches your favorite texture. Enjoy your cozy oatmeal again! {{image_2}} You can use different types of milk for this oatmeal. Almond milk is a great choice. It adds a nutty flavor. You could also try oat milk, which makes it creamier. Coconut milk brings a sweet taste and richness. Regular cow's milk works well too. Each option gives its unique twist to the dish. Adding flavor can elevate your oatmeal experience. Try a spoonful of peanut butter for creaminess. Cocoa powder can give it a chocolatey kick. A dash of nutmeg adds warmth and depth. You can even mix in some dried fruit for sweetness. These flavors make each bowl special and fun. If you want a nut-free option, consider seeds. Sunflower seeds can replace walnuts nicely. They add crunch and nutrition. Pumpkin seeds are another great choice. They have a unique taste and boost protein. You can also skip nuts altogether and focus on fruit toppings. This keeps the oatmeal light and fresh. One serving of Cozy Maple Walnut Banana Bread Oatmeal has about 350 calories. It contains around 10 grams of protein, 14 grams of fat, and 55 grams of carbs. The oats give you fiber, which helps keep you full. The walnuts add healthy fats. Each ingredient has its own perks. - Rolled oats: Great for heart health and digestion. They lower cholesterol and control blood sugar. - Banana: Packed with potassium, they help with muscle function and heart health. - Walnuts: Full of omega-3 fatty acids, they boost brain health and fight inflammation. - Maple syrup: A natural sweetener, it has antioxidants that help protect your body. - Cinnamon: This spice may lower blood sugar and improve heart health. Serving sizes matter. This recipe makes two bowls, perfect for sharing. If you want a smaller portion, divide the oatmeal into three bowls. You can always save leftovers for later. Just remember to store it in the fridge. Reheat it gently with a splash of milk for the best taste. To make oatmeal creamier, use more milk. You can start with 2 cups of almond milk. Cook it slowly on low heat. Stir often to blend the flavors well. You can also add a bit of nut butter for richness. A spoonful of yogurt on top works great too. Yes, you can use steel-cut oats. They take longer to cook than rolled oats. Steel-cut oats need about 20-30 minutes to soften. You should use about 3 cups of water or milk for 1 cup of oats. The texture will be chewier and heartier. Store leftover oatmeal in an airtight container. Let it cool before sealing it. It keeps well in the fridge for up to 3 days. To reheat, add a splash of milk and warm it on the stove. You can also microwave it, stirring every 30 seconds. This blog post covered how to make great oatmeal. We explored key ingredients, optional toppings, and substitutions that fit your taste. The step-by-step instructions showed how to cook it right and achieve the best consistency. Tips for customizing your meal and saving time were shared. We also discussed variations, nutrition, and answered common questions. In the end, oatmeal is a simple, healthy choice for any meal. Enjoy your bowl of oatmeal and make it your own!

Cozy Maple Walnut Banana Bread Oatmeal Delight

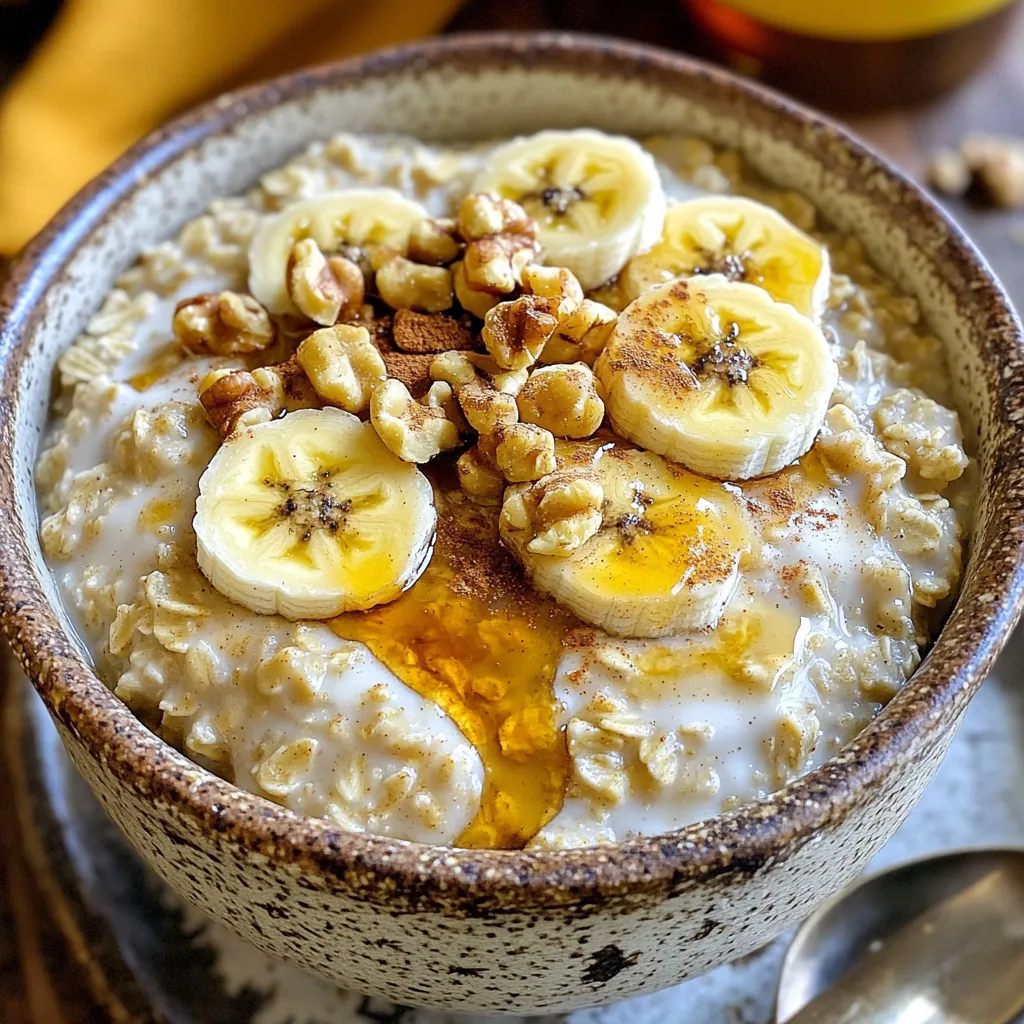
Warm, tasty, and full of flavor, my Cozy Maple Walnut Banana Bread Oatmeal Delight will change your breakfast game! Imagine

- 1 cup cottage cheese (low-fat or full-fat) - 1/4 cup Greek yogurt - 2 tablespoons maple syrup (or honey) - 1 teaspoon vanilla extract - 1 teaspoon cinnamon - 1/4 teaspoon nutmeg - 2 tablespoons almond flour (or oat flour) - 1/4 cup chocolate chips (optional, for extra sweetness) - Sliced apples - Graham crackers - Pretzels This dip is simple and packed with protein. Start with cottage cheese. You can use low-fat or full-fat, depending on your taste. Next, add Greek yogurt. This adds creaminess and a bit of tang. For sweetness, mix in maple syrup or honey. A touch of vanilla extract will give it a nice flavor. Don’t forget the spices! Cinnamon and nutmeg make it taste like a snickerdoodle cookie. For a thicker dip, add almond flour or oat flour. If you want a sweet touch, stir in chocolate chips. For dipping, I love using sliced apples, graham crackers, or pretzels. Each adds a fun crunch and different taste. Enjoy this tasty dip with friends or family. It’s perfect for gatherings or a cozy night in. 1. Start by taking a mixing bowl. Combine 1 cup cottage cheese and 1/4 cup Greek yogurt. 2. Use a hand mixer or food processor. Blend until smooth and creamy. This step is key for a silky texture. 1. Now, add your sweeteners and spices. Include 2 tablespoons maple syrup (or honey), 1 teaspoon vanilla extract, 1 teaspoon cinnamon, 1/4 teaspoon nutmeg, and a pinch of salt. 2. Blend the mixture again. This will mix everything well and give you that creamy consistency. 1. Next, stir in 2 tablespoons almond flour (or oat flour) to thicken the dip a bit. If you want, mix in 1/4 cup chocolate chips for extra sweetness. 2. Transfer the dip into a serving bowl. Lightly sprinkle some extra cinnamon on top for a nice garnish. 3. Serve immediately. Pair it with sliced apples, graham crackers, or pretzels for dipping. Enjoy your high-protein snack! For a smooth dip, you can use a hand mixer or a food processor. A hand mixer is great for small batches and gives you control. A food processor blends faster but can be harder to clean. I recommend blending for about 2-3 minutes. This ensures all the ingredients mix well and become creamy. If you want to change the sweet flavor, you can use agave syrup or stevia. Both options provide a unique taste. For spice adjustments, try adding nutmeg or a bit more cinnamon. Start with small amounts, then taste it. This way, you can find the right flavor for you. Serving your dip in a colorful bowl makes it pop! I love using a clear glass bowl to show off the creamy texture. You can drizzle extra maple syrup on top for a sweet touch. Sprinkle some cinnamon for a nice look. Place sliced apples, graham crackers, or pretzels around the dip. This creates an inviting display for your guests. {{image_2}} You can change the flavor of the dip for fun. Here are two tasty options: - Chocolate Snickerdoodle Dip: Add 1/4 cup of chocolate chips. Blend them into the dip for a rich taste. The chocolate adds a nice twist to the snickerdoodle flavor. - Pumpkin Spice Version: Replace the cinnamon with pumpkin pie spice. Add 1/4 cup of pure pumpkin puree. This gives the dip a warm, autumn vibe. You can also make this dip fit different diets. Here are some ideas: - Vegan substitutes: Use a plant-based yogurt instead of Greek yogurt. For sweetener, maple syrup works well. Make sure to check the labels for dairy-free options. - Gluten-free options: Almond flour is a great choice for thickening. If you want to use oat flour, make sure it is certified gluten-free. The dip tastes great with different dippers. Here are some fun ideas: - Incorporating seasonal fruits: Slice fresh pears or berries for a fruity touch. These add freshness to the creamy dip. - Unique dipping items: Try using cinnamon pita chips or pretzel crisps. They give a crunchy texture and pair well with the dip's flavor. - To store leftovers, place the dip in a clean container. - Use an airtight container to keep it fresh. - You can keep the dip in the fridge for up to five days. - If you see mold or a strange smell, throw it out. - For best texture, serve it cold, but you can warm it slightly. - If reheating, do it in short bursts in the microwave. This helps keep it smooth. Can I use non-dairy yogurt? Yes, you can use non-dairy yogurt. Look for a brand with a thick texture. Coconut or almond yogurt works well. This swap keeps the dip creamy and tasty. How can I make this dip spicier? You can add a dash of cayenne pepper or chili powder. Mix it in slowly to taste. This gives a kick but does not overpower the sweet flavor. How to calculate high-protein content To find the protein content, check the labels on your cottage cheese and yogurt. Both are great protein sources. Add the protein from chocolate chips if used. This dip packs a protein punch! Health benefits of ingredients Cottage cheese is rich in protein and calcium. Greek yogurt adds probiotics for gut health. Maple syrup gives natural sweetness, while cinnamon may help with blood sugar. Each ingredient adds nutrition. Adjusting for larger gatherings To serve more people, double or triple the recipe. Just adjust the ingredient amounts. A larger bowl helps display the dip nicely for sharing. Portion control tips Use small cups or bowls for serving. This helps control portions. Keep dippers nearby to encourage healthy snacking. Enjoying in moderation makes it even better! This blog post showed you how to create a tasty dip using simple ingredients. We discussed the main and secondary ingredients while sharing tips for the best texture. I outlined variations that fit different diets and provided storage advice for leftovers. In conclusion, making this dip can be fun and healthy. With your new knowledge, you can impress friends at any gathering. Enjoy experimenting with flavors and dip options to find your favorites!

High-Protein Snickerdoodle Cottage Cheese Dip Recipe

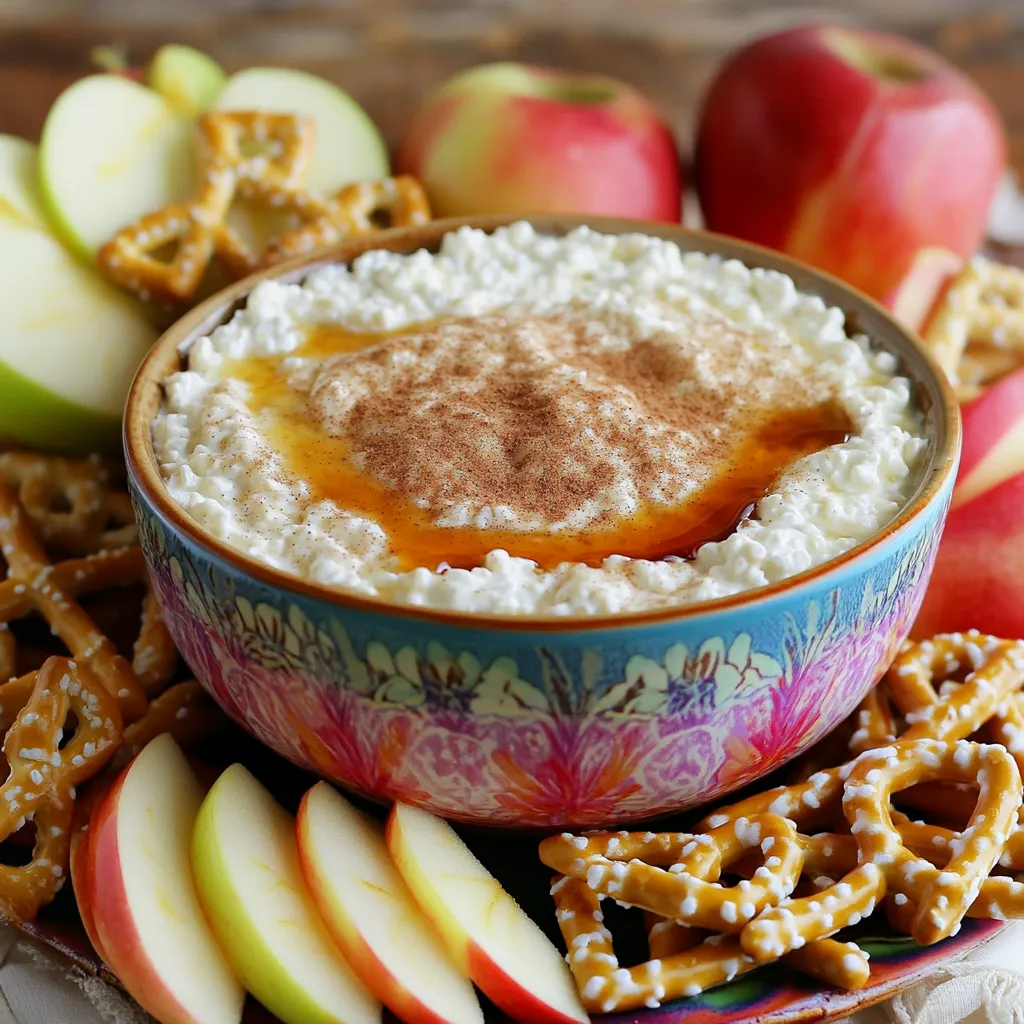
Are you ready to dive into a delicious treat that’s both tasty and easy to make? This High-Protein Snickerdoodle Cottage

- Rainbow carrots (1 lb, varied colors: purple, orange, yellow, white) - Olive oil (3 tablespoons) - Garlic (2 cloves, minced) - Fresh rosemary (1 tablespoon, finely chopped) - Fresh thyme (1 tablespoon, finely chopped) - Honey (1 teaspoon) - Lemon zest (from 1 lemon) - Salt and pepper (to taste) To make herb roasted rainbow carrots, you need fresh and vibrant ingredients. Rainbow carrots bring color and sweetness to your dish. Rainbow carrots are not just pretty; they have good taste and nutrients. You can find them in stores or farmers' markets. Choose a mix of colors for a fun look. Olive oil adds a rich flavor. It helps the carrots roast evenly and brings out their natural sweetness. Use good quality olive oil for the best taste. Garlic enhances the dish. It gives a warm, savory taste. Mince the garlic finely so it blends well with the other flavors. Fresh herbs like rosemary and thyme add depth. They provide earthy notes that work well with the sweetness of the carrots. Chop them finely to release their oils and aroma. Honey adds a touch of sweetness. It balances the flavors and helps the carrots caramelize in the oven. If you want to make it vegan, use maple syrup instead. Lemon zest brightens the dish. It adds a fresh, citrusy aroma and cuts through the sweetness of the carrots. Salt and pepper are key for flavor. They enhance all the other ingredients. Adjust them to your taste. Gather these ingredients, and you're ready to make a delicious side dish. {{ingredient_image_1}} Start by peeling the rainbow carrots. Use a sharp peeler to remove the skin. Next, cut the carrots into sticks. Aim for even pieces. This helps them cook uniformly. Now, let’s prepare the garlic and herbs. Take two cloves of garlic and mince them finely. Then, chop one tablespoon each of fresh rosemary and thyme. The fresh herbs will add great flavor. In a large bowl, combine the olive oil, minced garlic, and chopped herbs. Add one teaspoon of honey for a touch of sweetness. Then, include the zest of one lemon. This gives a bright flavor. Finally, season it with salt and pepper to taste. Mix well to create a smooth marinade. Toss the carrot sticks in the herb marinade. Make sure each piece is well coated. Next, spread the carrots in a single layer on a baking sheet. Line it with parchment paper to prevent sticking. Preheat your oven to 425°F (220°C). Roast the carrots for 25 to 30 minutes. Stir them halfway through for even cooking. You want them tender and slightly caramelized. When done, let them cool for a few minutes before serving. Enjoy the colorful, tasty side dish! To get evenly roasted carrots, spread them out on the baking sheet. Leave space between each piece. If they touch, they will steam instead of roast. For cooking times, smaller carrots need about 20 to 25 minutes. Larger ones may take 30 to 35 minutes. Always check for tenderness by poking with a fork. You can add more herbs for a twist. Try dill or parsley for a fresh taste. Spices like cumin or paprika can also add warmth. Using flavored olive oils can make a big difference. Garlic-infused oil boosts taste, while lemon oil adds brightness. Drizzle it on before serving for extra flavor. Pro Tips Choose Fresh Carrots: Look for firm carrots with vibrant colors. Fresh carrots will have a sweeter flavor and better texture when roasted. Uniform Cutting: Ensure the carrot sticks are of similar size for even cooking. This prevents some pieces from becoming overcooked while others remain crunchy. Marinate Longer: For enhanced flavor, consider marinating the carrots for at least 30 minutes before roasting. This allows the herbs and spices to penetrate the carrots. Experiment with Spices: Add a pinch of cayenne pepper or smoked paprika to the marinade for a unique twist on flavor. It adds complexity and a hint of heat. {{image_2}} You can cook herb roasted rainbow carrots in different ways. Each method gives a unique taste. - Air fryer option for quicker preparation: The air fryer is a great choice. It cooks the carrots fast and gives them a nice crisp. Set your air fryer to 400°F (200°C). Toss the carrots in the herb marinade and place them in the basket. Cook for 15 to 20 minutes. Shake the basket halfway through for even cooking. - Grilling the carrots for a smoky flavor: Grilling adds a beautiful smoky taste. Preheat your grill on medium heat. Toss the carrots in the marinade and place them on the grill. Cook for about 10 to 15 minutes, turning often. You want them tender and with grill marks. You can also adapt this recipe to fit different diets. It’s easy to make simple swaps. - Vegan adaptations by substituting honey: If you want a vegan dish, replace honey with maple syrup or agave. This keeps the sweetness without using animal products. - Gluten-free considerations: The recipe is already gluten-free. Just ensure all your ingredients are gluten-free. Most herbs and oils work well without gluten. These variations make herb roasted rainbow carrots fun and flexible for any meal. To store roasted rainbow carrots, let them cool first. Place them in a container. Use an airtight container to keep them fresh. You can store them in the fridge for about three to five days. If you want to keep them longer, consider freezing. They can last up to three months in the freezer. Just make sure to label the container with the date. When reheating, avoid the microwave if you can. The oven works best to keep the carrots crisp. Preheat your oven to 350°F (175°C). Spread the carrots on a baking sheet. Heat them for about 10 to 15 minutes until warm. If you have leftover carrots, you can add them to salads or grain bowls. They also work well in stir-fries or mixed with pasta. This way, you get to enjoy their great flavor again! Can I use regular carrots instead of rainbow carrots? Yes, you can use regular carrots. They will taste great, but rainbow carrots look more colorful and fun. They add a nice touch to your plate. What are the best herbs to pair with roasted carrots? Rosemary and thyme work well with carrots. You can also try dill or parsley for a fresh taste. Each herb adds its unique flavor, so feel free to mix! How can I make this recipe ahead of time? You can prepare the carrots and the marinade a day ahead. Just store them in the fridge. When you’re ready, roast them for a tasty side. Are herb roasted carrots healthy? Yes, herb roasted carrots are healthy. They are low in calories and high in vitamins. Carrots are great for your eyes and skin, making this dish a smart choice. Caloric content and nutritional benefits of rainbow carrots One pound of rainbow carrots has about 140 calories. They are rich in fiber, vitamin A, and antioxidants. Eating colorful veggies boosts your health and adds nutrients to your diet. In this post, we explored how to make delicious herb-roasted rainbow carrots. We covered the ingredients needed, simple steps to prepare them, and tips to enhance their flavor. You learned different cooking methods, dietary modifications, and how to store and reheat leftovers. Roasting rainbow carrots brings out their natural sweetness and color. Don’t hesitate to experiment with flavors and cooking methods. Enjoy your tasty, healthy dish made just for you!

Herb Roasted Rainbow Carrots Flavorful and Simple Side

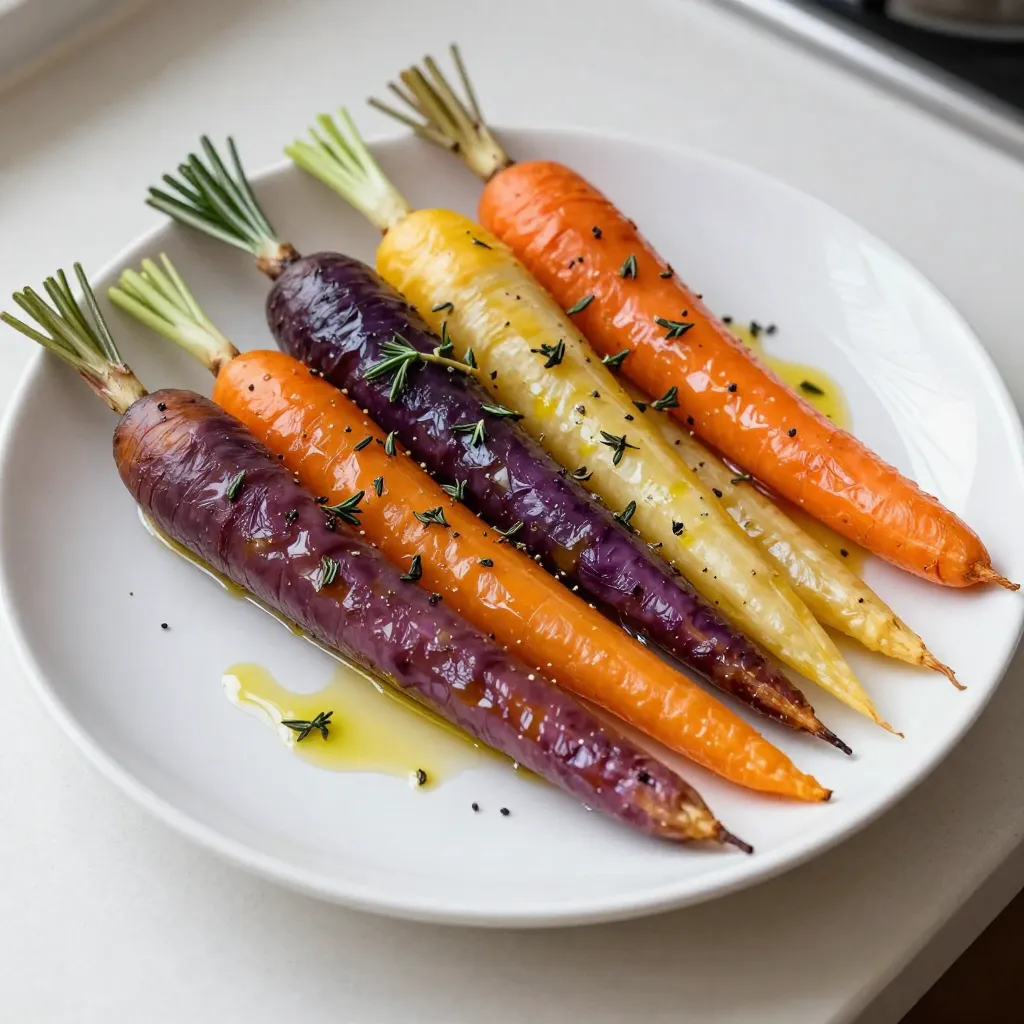
Looking for a vibrant side dish that bursts with flavor? Herb Roasted Rainbow Carrots are quick and easy to make!

- 2 cups all-purpose flour - 1 cup granulated sugar - 1 tablespoon baking powder - 1 teaspoon baking soda - 1 teaspoon cinnamon - ½ teaspoon salt - ½ cup unsalted butter, melted - 1 cup buttermilk - 2 large eggs - 2 cups apples, peeled, cored, and diced - ½ cup brown sugar (for crumble) - 1 cup rolled oats (for crumble) - 1 teaspoon vanilla extract - ½ teaspoon nutmeg (for crumble) Gathering the right ingredients is key to making great Apple Cinnamon Crumble Muffins. Start with all-purpose flour for a soft texture. You will also need granulated sugar to sweeten the muffins. Baking powder and baking soda help them rise nicely. Cinnamon adds that warm, comforting flavor we all love. Don't forget salt; it enhances all the other flavors. Melted unsalted butter gives richness to the muffins. Buttermilk adds moisture and tang. Two large eggs bind everything together. For the stars of the show, use two cups of apples. I recommend Granny Smith or Honeycrisp for a nice balance of sweet and tart. For the crumble topping, you need brown sugar for sweetness. Rolled oats give it a delightful crunch. A hint of vanilla extract adds warmth, and nutmeg rounds out the flavors perfectly. Each ingredient plays a role, so make sure you have everything ready before you start baking! - Preheat the oven to 375°F (190°C). - Line or grease a muffin tin. - In a large bowl, combine: - 2 cups all-purpose flour - 1 cup granulated sugar - 1 tablespoon baking powder - 1 teaspoon baking soda - 1 teaspoon cinnamon - ½ teaspoon salt - Stir well to mix. - In another bowl, whisk together: - ½ cup unsalted butter, melted - 1 cup buttermilk - 2 large eggs - 1 teaspoon vanilla extract - Mix until smooth. - Pour the wet mixture into the dry ingredients. - Stir gently until just combined; it's okay if the batter is lumpy. - Fold in 2 cups of diced apples. - In a small bowl, mix together: - ½ cup brown sugar - 1 cup rolled oats - ½ teaspoon nutmeg - A pinch of salt. - Add a tablespoon of melted butter and mix until crumbly. - Spoon the batter into each muffin cup, filling them two-thirds full. - Generously sprinkle the crumble topping over each muffin. - Bake for 18-22 minutes. - Check with a toothpick; it should come out clean. - Avoid overmixing the batter. This keeps the muffins soft and fluffy. - Use room temperature ingredients. This helps the batter mix well and rise better. - If you don't have buttermilk, use regular milk mixed with a bit of lemon juice. Let it sit for five minutes. - You can use different apples. Try Granny Smith for tartness or Honeycrisp for sweetness. - For a lovely look, dust the muffins with powdered sugar. Drizzle honey on top for extra sweetness. - Serve them with whipped cream for a rich touch. It adds creaminess and pairs well with the muffins. {{image_2}} You can easily change the taste of these muffins. Adding nuts like walnuts or pecans gives a nice crunch. You can also mix in dried fruits, like raisins or cranberries, for added sweetness. For a warm twist, try spices like cardamom or ginger. These spices add a unique flavor that pairs well with apples. For those needing gluten-free options, use almond flour or a gluten-free blend. This keeps the muffins tasty while meeting dietary needs. If you want a vegan version, replace eggs with flaxseed meal mixed with water. Swap buttermilk for almond milk with a splash of vinegar. This still gives you soft, moist muffins. Muffins can be made in various sizes. Mini muffins are perfect for snacks or kids. They bake faster, so keep an eye on them. Jumbo muffins are great for breakfast. They look impressive and fill you up. No matter the size, the taste stays great! To keep your apple cinnamon crumble muffins fresh, store them in an airtight container. This helps prevent them from drying out. You can also place a piece of bread in the container to keep them moist. Store the muffins at room temperature for up to three days. If you want to keep them longer, freezing is a great option. For freezing, wrap each muffin tightly in plastic wrap. Then, place them in a freezer bag or container. This will protect them from freezer burn. These muffins can stay fresh in the freezer for up to three months. To reheat your muffins, preheat your oven to 350°F (175°C). Place the muffins on a baking sheet and cover them with aluminum foil. This keeps them from getting dry. Heat for about 10-15 minutes. You can also use a microwave. Place a muffin on a microwave-safe plate. Heat for about 15-20 seconds. Enjoy them warm for the best taste! To check if your muffins are ready, use the toothpick test. Insert a toothpick into the center of a muffin. If it comes out clean, your muffins are done! If it has batter on it, bake for a few more minutes. Muffins usually take 18 to 22 minutes to cook. Yes, you can make these muffins ahead of time. Once baked, let them cool completely. Store them in an airtight container at room temperature for up to three days. You can also freeze them for up to three months. To freeze, wrap each muffin in plastic wrap, then place them in a freezer bag. For baking, I recommend using Granny Smith or Honeycrisp apples. Granny Smith apples add a nice tart flavor, while Honeycrisp apples are sweet and juicy. Both types hold up well during baking, giving you great texture in your muffins. In this post, we explored how to make delicious apple muffins. We covered ingredients, step-by-step instructions, and baking tips. I shared ideas for variations and storage as well. These muffins are not only tasty but also easy to customize for your needs. Enjoy them fresh or store them for later. Baking is fun, and these muffins bring joy to any kitchen. Now, get ready to create tasty treats!

Apple Cinnamon Crumble Muffins Tasty and Simple Treat

If you’re craving a delicious treat that’s both tasty and simple, you’ve hit the jackpot! My Apple Cinnamon Crumble Muffins

- 8 oz rice noodles - 3 tablespoons creamy peanut butter - 2 tablespoons soy sauce - 2 tablespoons sriracha - 1 tablespoon sesame oil - 2 tablespoons lime juice - 1 teaspoon grated ginger - 1 garlic clove, minced - 1 cup bell peppers (red, yellow, or green) - 1 cup shredded carrots - 1/4 cup chopped green onions - 1/4 cup crushed peanuts (for garnish) - Fresh cilantro (optional) To make spicy peanut noodles, gather these ingredients first. The rice noodles are the base of the dish. You will need creamy peanut butter for that rich flavor. Soy sauce adds saltiness, while sriracha gives it a nice kick. Sesame oil brings an extra layer of taste. Lime juice brightens the flavors. Grated ginger and minced garlic add depth. Fresh bell peppers and shredded carrots give color and crunch. Finally, you will top the noodles with green onions and crushed peanuts for garnish. Fresh cilantro is optional, but it adds a nice touch. With these ingredients, you can create a dish that is both quick and flavorful. To cook rice noodles, bring a pot of water to a boil. Add the 8 oz of rice noodles. Cook them for about 4-5 minutes or until soft. Stir the noodles often to prevent sticking. Once done, drain the noodles in a colander. After draining, rinse the noodles under cold water. This stops the cooking and keeps them from becoming mushy. Set the rinsed noodles aside while you prepare the sauce. In a small bowl, combine the sauce ingredients. You will need 3 tablespoons of creamy peanut butter, 2 tablespoons of soy sauce, 2 tablespoons of sriracha, 1 tablespoon of sesame oil, 2 tablespoons of lime juice, 1 teaspoon of grated ginger, and 1 minced garlic clove. Whisk these ingredients together until smooth. If the sauce is too thick, add a splash of warm water. This helps to reach the right thickness. You want a sauce that coats the noodles well. In a large mixing bowl, combine the cooked rice noodles, 1 cup of thinly sliced bell peppers, and 1 cup of shredded carrots. This adds color and crunch. Next, pour the spicy peanut sauce over the noodle mixture. Toss everything gently until the noodles and veggies are well coated in the sauce. Taste the mixture and adjust the seasoning if needed. You can add more sriracha for heat or lime juice for brightness. To serve the spicy peanut noodles, scoop them into bowls. For a nice touch, garnish with chopped green onions, crushed peanuts, and optional fresh cilantro. This adds flavor and makes your dish look great! Enjoy your meal! - Cook the rice noodles for the time on the package. This keeps them firm. - Rinse the noodles under cold water right after cooking. This stops the cooking. It also helps remove excess starch. - If your sauce is too thick, add a little warm water. This thins it out nicely. - To brighten the sauce, add lime juice. For more heat, mix in extra sriracha. - Garnish your noodles with chopped green onions and crushed peanuts. This adds color and crunch. - For an extra touch, sprinkle fresh cilantro on top. It gives a fresh taste. You can also serve the noodles in bowls or on plates for a nice look. {{image_2}} Making it vegan To make spicy peanut noodles vegan, swap regular soy sauce with a vegan option. This simple change keeps the dish plant-based. Ensure your peanut butter has no added ingredients that are not vegan. Gluten-free options For a gluten-free version, choose gluten-free soy sauce or tamari. You can also find rice noodles that are certified gluten-free. This keeps the flavor while making it safe for those with gluten allergies. Using different nut butters If you want to change flavors, try using almond or cashew butter instead of peanut butter. Each nut butter brings a unique taste. This can add a fun twist to your dish, so feel free to experiment! Alternative veggies to use You can mix in other vegetables if you want to switch it up. Broccoli, snap peas, or zucchini work well. Adding these not only boosts nutrition but also adds crunch and color to your meal. Modifying spiciness levels To adjust the spice level, change the amount of sriracha. If you like it mild, reduce it to one tablespoon or less. For extra heat, add more sriracha or a pinch of red pepper flakes. Adding additional spices You can also experiment with different spices. Try adding a bit of chili powder or cayenne pepper for more heat. This gives you control over the flavor and makes the dish your own. To keep your spicy peanut noodles fresh, store them in an airtight container. This helps prevent them from drying out or absorbing other odors in your fridge. You can keep them in the refrigerator for about 3 to 5 days. If you want to store them longer, consider freezing them. However, freezing may change the texture of the veggies. When it’s time to enjoy your leftovers, you have a few good options. The best way to reheat is in a pan over low heat. Add a splash of water or a bit of oil to help the noodles regain moisture. Stir frequently to heat evenly. You can also use the microwave. Place the noodles in a safe bowl, cover it, and heat in short bursts. This keeps the noodles from getting too hot too fast. To keep the flavor, consider adding a squeeze of lime or a dash of soy sauce before serving. Spicy peanut noodles are a quick and tasty dish. They mix rice noodles with a creamy peanut sauce and fresh veggies. People love them for their bold flavors and ease of prep. You can find these noodles in many Asian restaurants. They are a great option for lunch or dinner. Yes, you can make spicy peanut noodles ahead of time. Cook the noodles and mix in the sauce. Store them in a container in the fridge. They stay fresh for up to three days. Just add a splash of water before reheating. This keeps the noodles moist and tasty. Spicy peanut noodles pair well with many sides. Here are some ideas: - Steamed broccoli - Cucumber salad - Edamame - Spring rolls These sides add variety and balance to your meal. To add heat, increase the sriracha amount in the sauce. You can also add red pepper flakes or sliced jalapeños. Start with a little, then taste it. This way, you control the spice level without losing flavor. Yes, you can use other noodle types. Options like soba, udon, or whole wheat noodles work well. Cooking times may differ, so check the package. Adjusting the noodles gives you new textures and flavors to explore. In this post, we explored how to make tasty Spicy Peanut Noodles. We detailed the ingredients, shared easy steps, and provided tips for perfect results. You learned about storage and how to customize the dish. Now, you can enjoy a delicious meal that suits your taste. Whether you prefer it spicy or mild, this dish is simple and fun to make. Enjoy your cooking adventure!

Spicy Peanut Noodles Quick and Flavorful Recipe

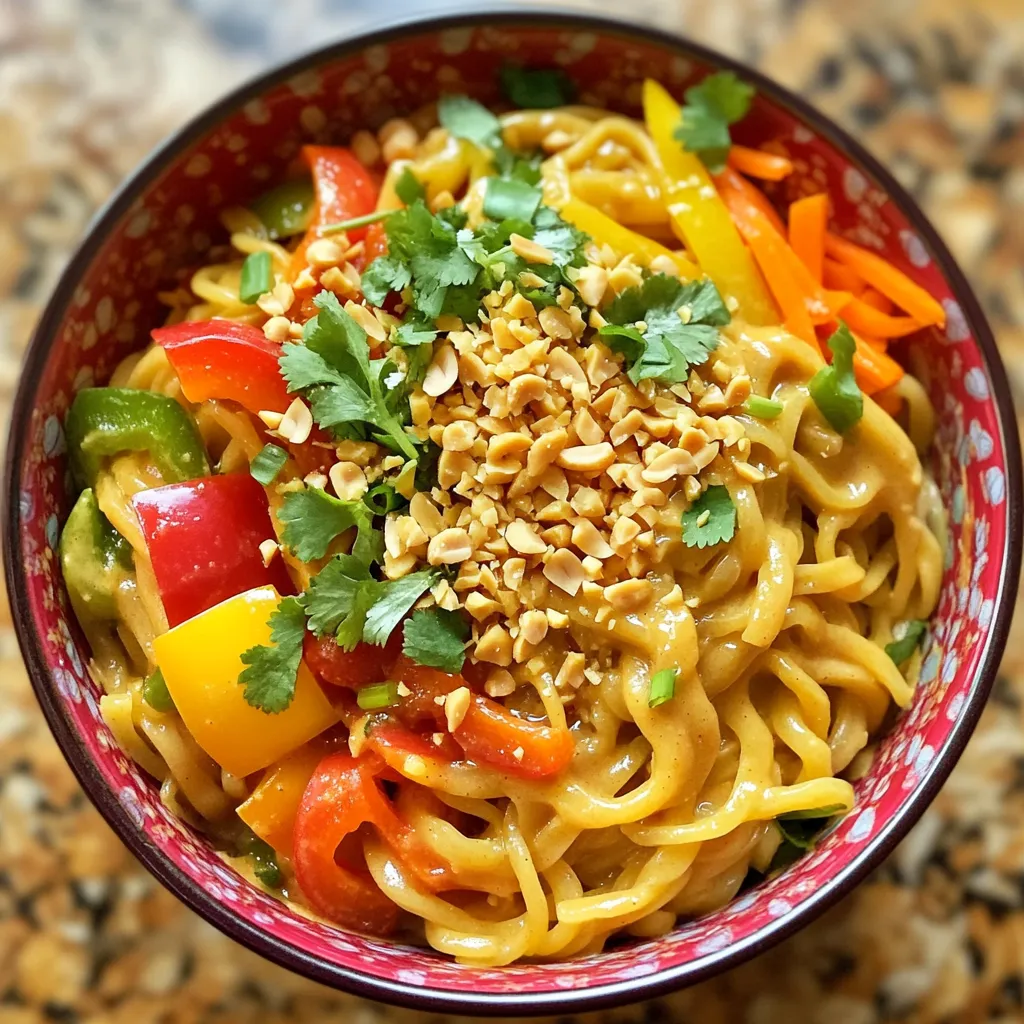
If you crave a dish that’s both quick and packed with flavor, look no further! This Spicy Peanut Noodles recipe

Older posts
Newer posts
← Previous Page1 … Page9 Page10 Page11 … Page86 Next →

dsad

© 2026 Cooking Wells • Built with GeneratePress

Our Policies

  • Copyright Policy
  • Cookie Policy
  • GDPR Policy
  • Privacy Policy
  • Disclaimer
  • Terms Of Use

More Information

  • Home
  • About
  • Contact
  • Appetizers
  • Dessert
  • Dinner
  • Drinks
©2026, Cooking Wells About Back To Top