Skip to content
DisclaimerTerms Of UseGDPR PolicyCookie Policy

Cooking Wells

  • Home
  • Drinks
  • Appetizers
  • Dinner
  • Dessert
  • About
  • Contact
  • Privacy Policy
DisclaimerTerms Of UseGDPR PolicyCookie Policy

NO-ING-IMG

- 4 medium zucchini, spiralized - 3 tablespoons olive oil - 4 cloves garlic, minced - 1/2 teaspoon red pepper flakes (optional) - 1/2 cup grated Parmesan cheese - Fresh parsley, chopped (for garnish) - Salt - Pepper - Lemon wedges To make Minute Garlic Parmesan Zucchini Noodles, you need simple yet fresh ingredients. Start with medium zucchini. I like to use four of them, spiralized into noodles. If you don't have a spiralizer, a vegetable peeler works well too. Next, grab some olive oil. You will need three tablespoons to sauté the garlic. Speaking of garlic, four cloves, minced, add a great punch of flavor. If you enjoy a little heat, toss in half a teaspoon of red pepper flakes—this step is optional. For a creamy finish, use half a cup of grated Parmesan cheese. It melts nicely and ties all the flavors together. Finally, don’t forget fresh parsley for a bright garnish. Add lemon wedges on the side for an extra zesty kick. In your pantry, keep salt and pepper handy to season your dish. They enhance all the natural flavors and help balance the taste. With these ingredients, you can make a quick and delightful meal that’s both healthy and satisfying. First, you need to prepare the zucchini. Spiralizing makes great noodles. Use a spiralizer to create long, thin strands. If you don't have a spiralizer, no worries! You can use a vegetable peeler to make ribbons or slice the zucchini thinly. Each method works well, but spiralizing gives the best noodle texture. Now, let’s cook the noodles. Start by heating three tablespoons of olive oil in a large skillet over medium heat. Once the oil is hot, add four minced garlic cloves. If you like a bit of spice, add half a teaspoon of red pepper flakes here. Sauté them for about one minute. You want the garlic to be fragrant, not brown. Next, it’s time to add the zucchini noodles. Toss them in the skillet with the garlic oil. Cook for two to three minutes. The goal is to keep them tender with a slight crunch. Season with salt and pepper to taste, then remove the skillet from the heat. Finally, stir in half a cup of grated Parmesan cheese. Mix until the cheese melts slightly and coats the noodles. Serve hot, garnished with fresh parsley and lemon wedges for a zesty finish! To get the best zoodles, cook them for just 2-3 minutes. This keeps them tender yet firm. If you cook them too long, they can turn mushy. To prevent extra moisture, always sauté them on high heat. This helps the water evaporate quickly. Want to add more flavor? Consider adding herbs like basil or oregano. A pinch of thyme can also work wonders. You can swap Parmesan for other cheeses like feta or goat cheese. Each cheese brings a unique taste to your dish. Make your dish look great! Garnish with fresh parsley for a pop of color. Add lemon wedges on the side for a zesty touch. You can serve these zoodles in a bowl or on a plate. A nice bowl makes it easy to enjoy every bite! {{image_2}} You can swap zucchini for other low-carb veggies. Spaghetti squash works well. It has a similar texture. You can also try yellow squash for a tasty twist. Both options keep it light and fresh. If you want a dairy-free version, try dairy-free cheese. There are many good brands today. Look for options made from nuts or soy. These melt nicely, giving you a great flavor without dairy. Want to amp up the taste? Add protein like shrimp or chicken. Cook the protein first, then mix it in. This adds heartiness to your dish. You can also play with sauces. Try a light pesto or a spicy marinara. Both options bring new life to your noodles. To store leftovers, place the zoodles in a clean, airtight container. Make sure they cool before sealing. Keep them in the fridge for up to three days. This helps maintain freshness. When you're ready to eat, check for any signs of spoilage. If you see any, discard them. If you want to freeze zoodles, it’s best to prepare them first. Cook the zucchini noodles just until tender. Then, let them cool completely. Portion them into freezer bags. Remove as much air as possible before sealing. This prevents freezer burn. Zoodles can stay fresh in the freezer for up to two months. To reheat zoodles, avoid the microwave if you can. Instead, use a skillet over low heat. Add a splash of olive oil to the pan. This helps keep the noodles from drying out. Stir gently until warmed through. If you prefer the microwave, heat in short bursts. Stir in between to keep the texture nice. Enjoy your tasty zoodles just like fresh! Zucchini noodles last about 3 to 5 days in the fridge. Store them in an airtight container to keep them fresh. Make sure to dry them well after washing. This helps prevent sogginess. Yes, you can make these noodles ahead. Cook them up to two days in advance. Let them cool completely before storing in the fridge. When you are ready to eat, reheat them in a skillet over medium heat. Add a splash of olive oil to help bring back their flavor. Garlic Parmesan zoodles pair well with many dishes. Here are some great options: - Grilled chicken or shrimp for protein. - A fresh salad for added crunch. - Garlic bread for a delightful side. - Roasted vegetables for extra flavor. - A light tomato sauce if you want more zest. These pairings enhance the dish and make for a balanced meal. Enjoy experimenting with different combinations! In this blog post, we explored fresh and pantry ingredients for making delicious zucchini noodles. I shared simple steps for preparing, cooking, and combining zoodles with tasty garlic and Parmesan. We also covered tips for perfect texture, flavor variations, and smart storage methods. Zucchini noodles are versatile and fun to make. They fit various diets and can adapt to your taste. Enjoy creating your own unique dishes with zoodles!

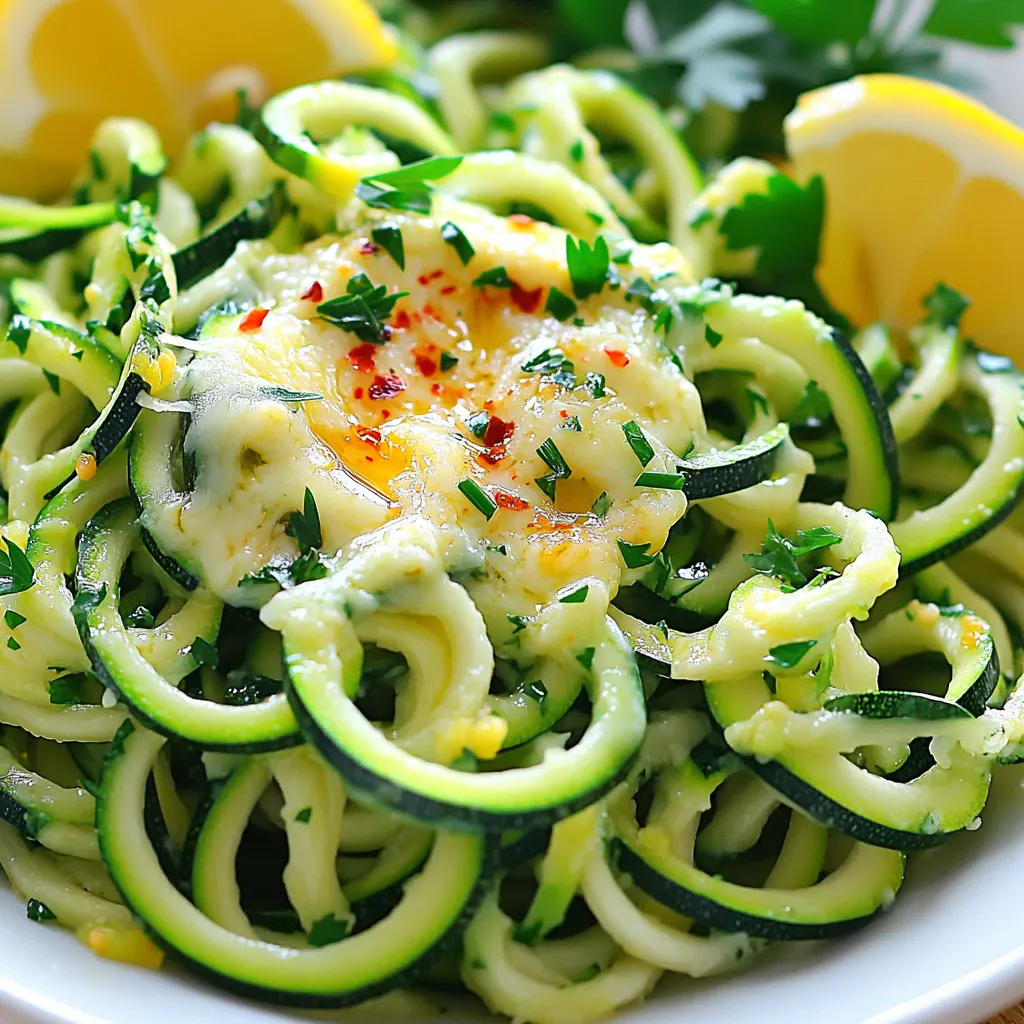
Minute Garlic Parmesan Zucchini Noodles Quick Delight

Looking for a quick, tasty dinner? Minute Garlic Parmesan Zucchini Noodles are your answer! In just a few minutes, you

- 8 slices of thick bread (Brioche or Challah work well) - 1 cup cream cheese, softened - 1 cup pumpkin puree - 1/2 cup powdered sugar The main ingredients create the rich and creamy filling. The thick bread holds everything together. Brioche or Challah adds softness and flavor. Cream cheese brings that smooth texture. Pumpkin puree adds the fall flavor we love. Powdered sugar sweetens the mix just right. - 1 teaspoon vanilla extract - 1 teaspoon ground cinnamon - 1/2 teaspoon ground nutmeg Flavor enhancers make this dish sing! Vanilla extract gives it warmth. Ground cinnamon adds a cozy spice. Nutmeg adds depth to the pumpkin flavor. Each spoonful will taste like autumn. - 4 large eggs - 1/2 cup milk - 1 tablespoon maple syrup - Butter for cooking The egg mixture binds everything together. Eggs create a golden crust when cooked. Milk makes the mixture rich and smooth. Maple syrup adds a touch of sweetness. Butter helps to cook the French toast evenly. Each bite will be warm and delightful. To make the filling, grab a mixing bowl. Add 1 cup of softened cream cheese. Next, add 1 cup of pumpkin puree. Then, sprinkle in 1/2 cup of powdered sugar. Pour in 1 teaspoon of vanilla extract. Add 1 teaspoon of ground cinnamon and 1/2 teaspoon of ground nutmeg. Mix everything until it becomes smooth and creamy. This filling will give your French toast that rich, pumpkin cheesecake flavor. Now it’s time to assemble the sandwiches. Take one slice of thick bread, like Brioche or Challah. Spread a generous layer of the pumpkin cheesecake mixture on top. Place a second slice of bread on top to form a sandwich. Repeat this step until you have made four sandwiches. Make sure the filling is thick enough for a tasty bite! In a separate bowl, whisk together 4 large eggs, 1/2 cup of milk, and 1 tablespoon of maple syrup. This mixture will coat the bread. Heat a large skillet over medium heat. Add 1 tablespoon of butter and let it melt. Dip each sandwich into the egg mixture, ensuring both sides get coated. Place them in the hot skillet. Cook for about 3-5 minutes on each side. Look for a golden-brown color. Don’t forget to add more butter to keep them from sticking. Once cooked, let them cool for a minute before serving. Enjoy your delicious Pumpkin Cheesecake Stuffed French Toast! To get the best results, use medium heat. This helps the French toast cook evenly. Make sure to coat your skillet with butter. This prevents sticking and gives a nice golden color. Dip each sandwich well in the egg mixture. This ensures a rich, custardy texture. Flip the sandwiches gently to keep the filling inside. Cook for about 3-5 minutes on each side. You'll know they're ready when they look golden brown. For a beautiful presentation, serve the French toast warm. Top each slice with a dollop of whipped cream. A sprinkle of pumpkin pie spice adds a festive touch. You can also drizzle some maple syrup on top for extra sweetness. Fresh berries or sliced bananas make great sides. They add color and freshness to the plate. Want to spice things up? Add a pinch of ginger or allspice to the filling. These spices pair well with pumpkin. You can also mix in some chocolate chips for a sweet twist. If you prefer, swap the powdered sugar for brown sugar. This gives a deeper flavor. Lastly, consider using nutty bread like whole wheat for added texture. {{image_2}} You can switch up the bread for this recipe. Different breads give unique textures. For a fluffy bite, use Brioche. For a more dense option, go with Challah. If you want something a bit heartier, try sourdough or whole grain. Each bread brings its own flavor and feel. Experiment with what you like best! If you need gluten-free options, use gluten-free bread. There are many brands available that taste great. For a dairy-free choice, swap cream cheese with a dairy-free alternative. You can find these in most stores today. Use almond or coconut milk in the egg mixture, too. These changes let everyone enjoy this treat! Want to add a new twist? Try mixing in chocolate chips. They’ll melt and create a rich, sweet surprise. You can also play with spices. Add ginger or cloves for extra warmth. If you like nuts, toss in some chopped pecans or walnuts. These little changes will make your stuffed French toast even more exciting! To keep your pumpkin cheesecake stuffed French toast fresh, start by cooling it. Let it sit at room temperature for about 30 minutes. This helps avoid moisture buildup. Once cool, wrap each piece in plastic wrap or place them in an airtight container. Store in the fridge for up to three days. When you're ready to enjoy leftovers, reheat in a skillet over low heat. This method keeps the toast crisp. Cook each side for about 2-3 minutes until warmed through. You can also use a microwave, but it may make the toast soft. If you choose this, heat in 30-second intervals until warm. You can freeze the stuffed French toast for later meals. Place the cooled slices in a single layer on a baking sheet. Freeze for about an hour until firm. After that, wrap each slice tightly in plastic wrap and place them in a freezer bag. They will stay good for up to two months. To thaw, move them to the fridge overnight before reheating. You can use several great options if you don’t have cream cheese. Here are some ideas: - Mascarpone cheese: This has a similar creamy texture. - Greek yogurt: It adds a tangy flavor and is lower in fat. - Silken tofu: Blend it until smooth for a vegan option. - Cashew cream: Soak cashews and blend them with a little water for a rich texture. Each of these will give a different taste but can work well in this recipe. Yes, you can prepare this dish ahead of time! Here’s how: - Make the filling: You can mix the pumpkin cheesecake filling a day in advance. Store it in the fridge in an airtight container. - Assemble the sandwiches: You can also make the sandwiches and keep them in the fridge. Use parchment paper between them to prevent sticking. - Cooking: When you are ready to eat, just cook them in the skillet. Cook them straight from the fridge for best results. This will save you time when you want to enjoy this treat! Making this recipe vegan is quite simple. Here’s what to do: - Replace cream cheese: Use silken tofu or vegan cream cheese for the filling. - Egg substitute: Use a flax egg or chickpea flour mixed with water instead of eggs. One flax egg equals 1 tablespoon of ground flaxseed mixed with 2.5 tablespoons of water. - Milk swap: Use almond milk, soy milk, or any plant-based milk you prefer. With these swaps, you can enjoy a vegan version of this tasty dish! This post detailed how to make delicious pumpkin spice French toast. We covered the main ingredients like thick bread, cream cheese, and pumpkin puree. You learned to prepare the filling, assemble the sandwiches, and cook them perfectly. Our tips helped you achieve golden-brown results and offered serving ideas. We also explored variations, storage tips, and answered FAQs. Now, you can whip up this tasty dish, impressing friends and family. Enjoy the process and make it your own!

Pumpkin Cheesecake Stuffed French Toast Delight

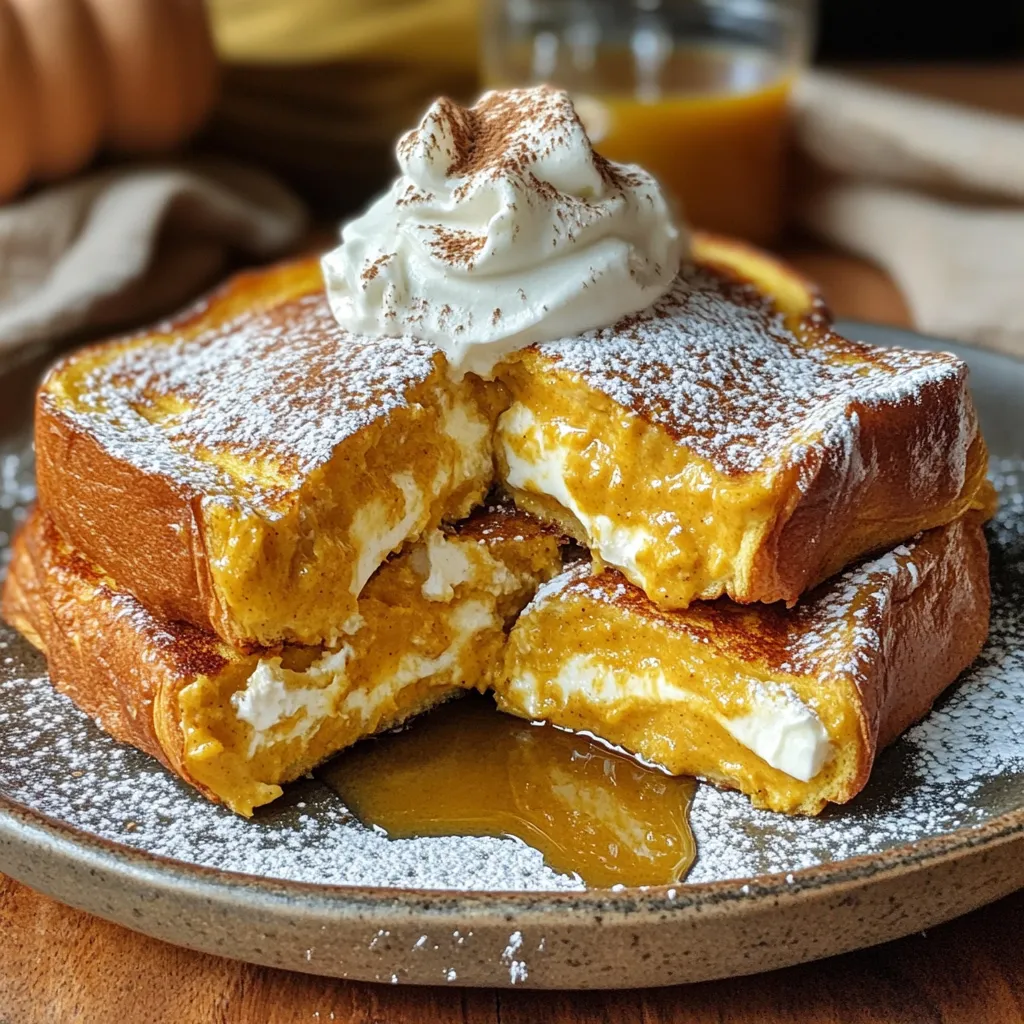
Get ready for a treat that takes breakfast to a new level! Pumpkin Cheesecake Stuffed French Toast combines creamy pumpkin

- 1 lb ground turkey - 12 oz pasta (preferably penne or rotini) - 1 medium onion, diced - 1 bell pepper, diced - 2 cloves garlic, minced I love using ground turkey for this dish. It cooks quickly and is lean. The pasta can be penne or rotini. Both types hold the sauce well. The veggies add flavor and texture. I prefer a mix of sweet bell pepper and onion. Garlic gives it a nice kick. - 1 tablespoon olive oil - 2 tablespoons taco seasoning - 1 can (15 oz) black beans, rinsed and drained - 1 can (15 oz) diced tomatoes, with juices - 2 cups chicken broth Olive oil helps sauté the veggies. Taco seasoning packs in flavor. The black beans add protein and fiber. Diced tomatoes bring moisture and zest. Chicken broth gives the pasta a rich taste. - 1 cup corn (fresh or frozen) - 1 cup shredded cheese (cheddar or Mexican blend) - Fresh cilantro for garnish Corn adds a sweet crunch. Cheese makes the dish creamy and rich. Fresh cilantro gives a pop of color and flavor. These optional ingredients make the meal even better. To start, heat one tablespoon of olive oil in a large pot over medium heat. Once hot, add one diced onion and one diced bell pepper. Sauté these for about three to four minutes. You want them to soften, which adds great flavor. Next, add two minced garlic cloves and one pound of ground turkey. Cook this for five to seven minutes. As it cooks, break the turkey apart with a wooden spoon until it is browned and fully cooked. Now, it’s time to add some spice! Stir in two tablespoons of taco seasoning. Make sure the turkey is well coated with this mix. Then, add 12 ounces of pasta, one can of rinsed and drained black beans, one can of diced tomatoes (with juices), and two cups of chicken broth. Toss in one cup of corn, too. Bring the mixture to a boil, then reduce the heat to low. Cover the pot and let it simmer for about 15 to 20 minutes. Stir occasionally to prevent sticking. You want the pasta to cook through and absorb most of the liquid. When the pasta is done, remove the pot from heat. Stir in one cup of shredded cheese until it melts and spreads throughout the dish. Finally, season with salt and pepper to taste. Serve warm, and if you like, sprinkle some fresh cilantro on top! To prevent pasta from sticking, stir throughout cooking. Use a large pot for more space. Add a splash of olive oil to the water for extra help. Adjusting the seasoning is key. Taste the dish before serving. Add more taco seasoning, salt, or pepper if needed. You want bold flavors in every bite. If you want to swap ground turkey, try lean ground beef or chicken. For a vegetarian option, use lentils or black beans. You can also change up the veggies. Try zucchini, spinach, or mushrooms. Each adds its own taste and texture. The best sides include a fresh salad or tortilla chips. These add crunch and balance to the meal. For presentation, serve in colorful bowls. Top with fresh cilantro and a squeeze of lime. It makes the dish pop! {{image_2}} You can easily make a vegetarian version of this dish. Simply swap ground turkey for plant-based turkey or use beans. Black beans work great, as they add protein and fiber. You can also mix in some kidney beans or chickpeas for extra flavor. This keeps the dish hearty and satisfying. If you need a gluten-free option, choose gluten-free pasta alternatives. Brands now offer many types of gluten-free pasta, like rice or chickpea pasta. Just make sure to check the cooking time, as it may differ from regular pasta. This way, everyone can enjoy the meal without worries. For those who love heat, you can add jalapeños or hot sauce. Diced jalapeños bring a fresh kick. You can also stir in hot sauce right before serving. Adjust the amount based on your spice level. This will create a bold and exciting flavor in your one-pot meal. To store leftovers, let the pasta cool first. Place it in an airtight container. This keeps it fresh for up to three days in the fridge. If you want to enjoy it later, make sure to label the container with the date. This helps you track freshness. For freezing, use a freezer-safe container. Divide the pasta into portions for easy thawing. Leave some space at the top of the container. The dish can freeze well for up to three months. To avoid freezer burn, wrap the container in plastic wrap before sealing. To reheat, use the stove or microwave. If using the stove, add a splash of water to keep it moist. Heat it on low, stirring often. If using a microwave, cover the dish with a damp paper towel. This keeps it from drying out. Enjoy your meal without losing that great texture! This dish takes about 35 minutes total. You will spend 15 minutes on prep. Then, the cooking time is around 20 minutes. Yes, you can make this dish ahead. Cook it fully and let it cool. Store it in the fridge for up to three days. To reheat, warm it on the stove. Add a splash of broth to keep it moist. You can use ground chicken or beef as a swap. For a plant-based option, try lentils or black beans. These choices add flavor and protein to your dish. We explored a quick and tasty one-pot taco ground turkey pasta recipe. You learned about the key ingredients like ground turkey, pasta, and several veggies. I also shared cooking tips and storage info for leftovers. Remember, you can adjust the recipe to fit your taste. Whether you want it spicy, vegetarian, or gluten-free, the options are endless. Enjoy your cooking and make it your own!

One-Pot Taco Ground Turkey Pasta Simple and Tasty Dish

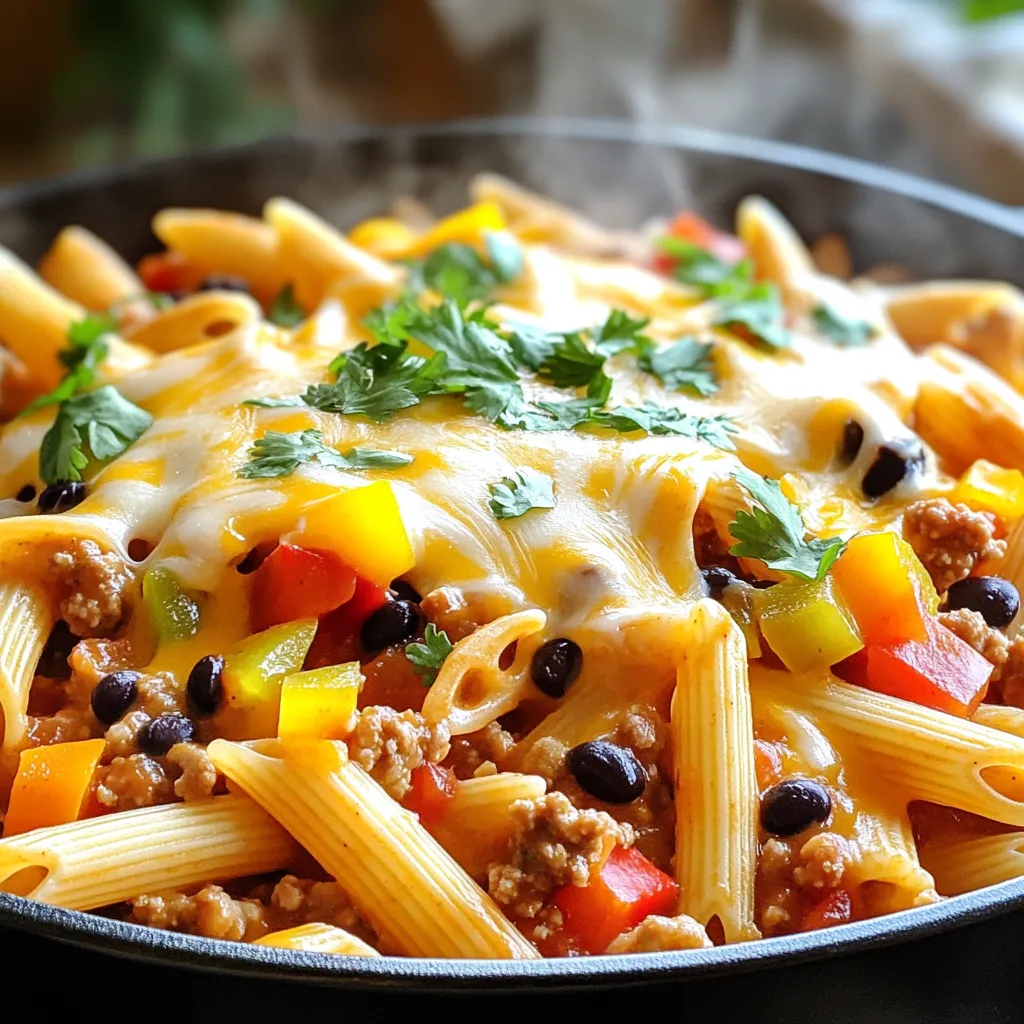
Looking for a quick meal that’s both simple and satisfying? This One-Pot Taco Ground Turkey Pasta is your answer! With

- 4 cups fresh broccoli florets - 1 medium onion, diced - 2 cloves garlic, minced - 4 cups vegetable broth - 2 medium potatoes, peeled and diced - 1 cup heavy cream - 2 cups shredded sharp cheddar cheese - 1 teaspoon salt - 1/2 teaspoon black pepper - 1/4 teaspoon red pepper flakes (optional for heat) - 2 tablespoons olive oil - Fresh parsley, chopped (for garnish) To make my creamy broccoli cheese soup, I choose fresh ingredients. Start with vibrant broccoli florets. They add flavor and color. I also use a medium onion. Dicing it brings out its sweet notes. Minced garlic gives a warm, comforting aroma. Next, I grab pantry staples. Vegetable broth forms the soup's base. I peel and dice two medium potatoes for creaminess. Adding heavy cream at the end makes the soup rich. Seasoning is key for great taste. Sharp cheddar cheese adds depth and richness. I use salt and black pepper to enhance all the flavors. If you like a kick, add red pepper flakes. Olive oil adds a lovely finish. Lastly, fresh parsley gives a pop of color on top. These ingredients work together to create a cozy dish. Each bite brings warmth and comfort. Enjoy the process of gathering these items. It sets the stage for a delicious meal ahead! To start, I heat olive oil in a skillet over medium heat. I add the diced onion and sauté it until it turns soft and clear, which takes about five minutes. Next, I mix in the minced garlic and let it cook for one more minute. This step adds a lovely aroma to the dish. Once done, I transfer the onion and garlic to the slow cooker. Now it’s time to add the main ingredients. I toss in four cups of fresh broccoli florets and two diced potatoes into the slow cooker. Then, I pour in four cups of vegetable broth, which gives the soup a rich base. I season it with one teaspoon of salt, half a teaspoon of black pepper, and the optional red pepper flakes if you like a little heat. After that, I stir everything well to make sure all the flavors mix. I cover the slow cooker and select the cooking time. I can cook it on low for six to seven hours or on high for three to four hours. I always check that the broccoli and potatoes are tender before moving on. Once the cooking time is up, I use an immersion blender to puree the soup. I blend it until it reaches the creaminess I want. If I don’t have an immersion blender, I can carefully transfer the soup to a blender in small batches. Now, I stir in one cup of heavy cream and two cups of shredded sharp cheddar cheese. I mix until the cheese melts and blends well. This gives the soup its creamy texture and cheesy flavor. I taste the soup and adjust the seasoning if needed. Finally, I get ready to serve it hot, topped with fresh parsley for a pop of color. To get that smooth texture, I recommend using an immersion blender. This tool is easy to use right in the slow cooker. Just blend until you see no chunks. If you don't have one, a regular blender works too. Just be careful not to fill it too high. You can blend in batches. If your soup is too thick, add more vegetable broth or cream. For a thicker soup, let it cook longer. The potatoes will break down and help thicken the mix. For a flavor boost, try adding thyme or basil. A pinch of nutmeg can also add warmth. If you're out of cheddar cheese, you can use Gruyère or Monterey Jack. Both melt well and add great taste. This soup pairs nicely with crusty bread. You can also serve it with a fresh salad. Try garnishing with extra cheese or a drizzle of olive oil. For fun, use a dollop of sour cream on top. And don’t forget to sprinkle some fresh parsley for color! {{image_2}} You can easily make this soup heartier by adding protein. Chicken, bacon, or tofu all work great. If you choose chicken, cook it first and shred it before adding. For bacon, cook it crispy, chop it up, and mix it in. If you prefer a plant-based option, add cubed tofu. It soaks up the flavors and adds a nice texture. For a lighter soup, you can use low-fat dairy. Swap heavy cream for low-fat milk or a plant-based milk. Almond or oat milk are tasty options. You can also use low-fat cheese. This keeps the soup creamy while cutting some calories. Cheese makes this soup rich and creamy. While sharp cheddar is a classic, you can try other cheeses too. Gruyère gives a nutty flavor. Monterey Jack adds a nice melt. For a kick, mix in pepper jack cheese. Experimenting with different cheeses will give you a unique twist each time you make it. Store your soup in an airtight container. It keeps well in the fridge for about 3-4 days. Ensure it cools to room temperature before sealing. This step helps maintain freshness. You can freeze the soup if you have extra. Use freezer-safe containers or bags. Leave some space for expansion. It stays good for about 3 months. To thaw, place it in the fridge overnight. This helps keep the flavor and texture. Reheat the soup on the stove for best results. Use low to medium heat to warm it slowly. Stir often to prevent sticking. If the soup seems thick, add a splash of broth or cream. You can also use a microwave, but be careful. Heat in short bursts, stirring in between. This keeps the soup creamy and delicious. Yes, you can use frozen broccoli. Just add it straight to the slow cooker. There’s no need to thaw it first. Frozen broccoli cooks well in the soup. It can save time, too! The soup will still be creamy and tasty. Just remember, frozen broccoli may cook faster than fresh. Keep an eye on your cooking time. You might want to check it a little earlier. To make this soup vegetarian, simply use vegetable broth. For a vegan version, swap out the heavy cream. You can use coconut milk or cashew cream instead. Both will add a rich flavor. For cheese, use a vegan cheese blend. These swaps keep the soup creamy and delicious. Always check labels to ensure they are dairy-free. This soup pairs well with many sides. Try serving it with crusty bread or a fresh salad. Grilled cheese sandwiches are a classic choice too. For something lighter, serve it with a veggie platter. If you want a warm touch, garlic bread is perfect. Each option adds a nice balance to the creamy soup. This blog post covered how to make a creamy broccoli soup. We looked at fresh ingredients, pantry staples, and seasonings. I shared step-by-step instructions for cooking the soup to perfection. You learned tips for achieving creaminess and enhancing flavors. Variations let you customize the soup to your taste. Finally, I included storage and reheating guidelines to keep leftovers fresh. Now, you’re ready to enjoy a tasty bowl of soup, whether you crave comfort or want something healthy. Enjoy your cooking!

Slow Cooker Creamy Broccoli Cheese Soup Delight

Are you ready to savor a bowl of warm, creamy goodness? My Slow Cooker Creamy Broccoli Cheese Soup Delight is

Gathering the right ingredients is key to making a delicious no-bake mint chocolate chip cheesecake. Here’s what you will need: - 1 ½ cups chocolate cookie crumbs (like Oreos or chocolate graham crackers) - ½ cup unsalted butter, melted - 16 oz cream cheese, softened - 1 cup powdered sugar - 1 teaspoon vanilla extract - 1 teaspoon peppermint extract - 1 cup heavy whipping cream - ½ cup mini chocolate chips - Green food coloring (optional, for a minty hue) - Fresh mint leaves for garnish (optional) Each ingredient plays a role in making this dessert creamy, rich, and refreshing. The chocolate cookie crumbs serve as a tasty crust, while the cream cheese adds a smooth texture. The whipped cream lightens the filling, making it fluffy. The mini chocolate chips add delightful bursts of chocolate in every bite. Feel free to adjust the mint flavor with the peppermint extract to suit your taste. If you want a fun color, use green food coloring to enhance the minty look. Lastly, garnish with fresh mint leaves for a pop of color and extra freshness. First, grab a mixing bowl. Combine 1 ½ cups of chocolate cookie crumbs with ½ cup of melted unsalted butter. Stir until every crumb is coated. Next, take a 9-inch springform pan. Press the crumb mixture firmly into the bottom. Make sure it is even. This step is crucial for a good base. Place the crust in the freezer to set while you prepare the filling. In another large mixing bowl, beat 16 ounces of softened cream cheese with an electric mixer. Keep mixing until it is smooth and creamy. Gradually add in 1 cup of powdered sugar. Mix until it is fully combined. Then, add 1 teaspoon of vanilla extract and 1 teaspoon of peppermint extract. If you want a minty green hue, add a few drops of green food coloring. Mix until the color is even. Now, take another bowl for the heavy cream. Whip 1 cup of heavy whipping cream until stiff peaks form. This step gives your cheesecake a light texture. Gently fold the whipped cream into the cream cheese mixture using a spatula. Be careful not to deflate the whipped cream. Finally, fold in ½ cup of mini chocolate chips, saving a few for later. Pour the filling over the chilled crust. Use a spatula to smooth the top. Make sure it looks nice and even. Now, cover the cheesecake with plastic wrap. Refrigerate it for at least 4 hours, but overnight is best. This chilling time helps it set perfectly. To get the best texture, start with room temperature cream cheese. Cold cream cheese can make your mixture lumpy. Softening it helps you achieve a smooth blend. Leave it out for about an hour before use. Next, whip the heavy cream to stiff peaks. This step adds lightness to your cheesecake. When the cream forms stiff peaks, it holds its shape well. Use a clean bowl and beaters for best results. You can adjust the mint flavor by using different extracts. If you want a stronger mint taste, add a bit more peppermint extract. Start with small amounts and taste as you go. Food coloring is great for presentation. A couple of drops of green food coloring can give your cheesecake a minty hue. Mix it in after adding the extracts. This makes your dessert look as good as it tastes. For garnishes, fresh mint leaves and extra chocolate chips work well. They add color and flavor. You can sprinkle some mini chocolate chips on top for a fun touch. Pair your cheesecake with beverages like coffee or mint tea. The rich flavors of the cheesecake blend nicely with these drinks. Enjoying them together makes for a delightful dessert experience. {{image_2}} You can get creative with your crust. Here are some fun ideas: - Graham Crackers: Swap chocolate cookies for graham crackers. This gives a classic taste. - Gluten-Free Crust: Use gluten-free cookies. Almond flour mixed with butter also works well. Want to mix things up? Here are some flavor ideas: - Different Extracts: Try adding almond or vanilla extract. This adds depth to the taste. - Mix-Ins: Toss in chopped nuts or fresh fruits. They bring new textures and tastes. You can make the chocolate even richer. Here are some options: - Dark Chocolate Chips: Use dark chocolate chips for a bolder flavor. They pair great with mint. - Chocolate Ganache Topping: Drizzle ganache on top for an extra chocolate kick. It adds a fancy touch. These variations let you put a personal spin on your no-bake mint chocolate chip cheesecake. Enjoy experimenting! To keep your no-bake mint chocolate chip cheesecake fresh, refrigeration is key. First, cover the cheesecake tightly with plastic wrap or aluminum foil. This prevents it from absorbing other odors in the fridge. Ideally, you should store it in the fridge for up to five days. After that, the taste may change. Always check for any signs of spoilage before serving. If you want to save some for later, freezing is a great option. First, slice the cheesecake into portions for easy serving. Wrap each slice in plastic wrap, then place them in an airtight container. This helps keep them fresh. You can freeze the cheesecake for up to three months. When you’re ready to enjoy it, move a slice to the fridge. Let it thaw overnight for the best taste. Avoid microwaving, as this can change the texture. Enjoy your delicious treat! Yes, you can make this cheesecake ahead of time. I recommend making it the day before you plan to serve it. This allows the flavors to blend and the cheesecake to set well. It can last up to three days in the fridge. Just cover it tightly with plastic wrap. You can tell when the cheesecake is set by checking its firmness. The filling should feel firm to the touch but still slightly jiggle in the center. If it feels too soft, give it more time in the fridge. It usually takes at least four hours to set, but overnight is best. If you need a substitute for heavy whipping cream, use coconut cream or a dairy-free whipped topping. Both options will keep a similar texture. You can also use sour cream for a tangy flavor if you want something different. While a springform pan is ideal, you can use other pans. A regular pie pan works fine, but it may be hard to remove slices. A glass baking dish can also work, but it won’t have the same look. The springform pan helps give a clean edge and a nice presentation. This blog post covers how to make a delicious cheesecake with a chocolate cookie crust and a minty filling. You learned about the key ingredients and the step-by-step process. Remember, the right cream cheese can make your cheesecake smooth. Don't forget to add fun flavors or customize the look! Whether you serve it for a party or a quiet night, following these tips ensures tasty results. Enjoy your cheesecake adventure and impress your friends!

No-Bake Mint Chocolate Chip Cheesecake Delight

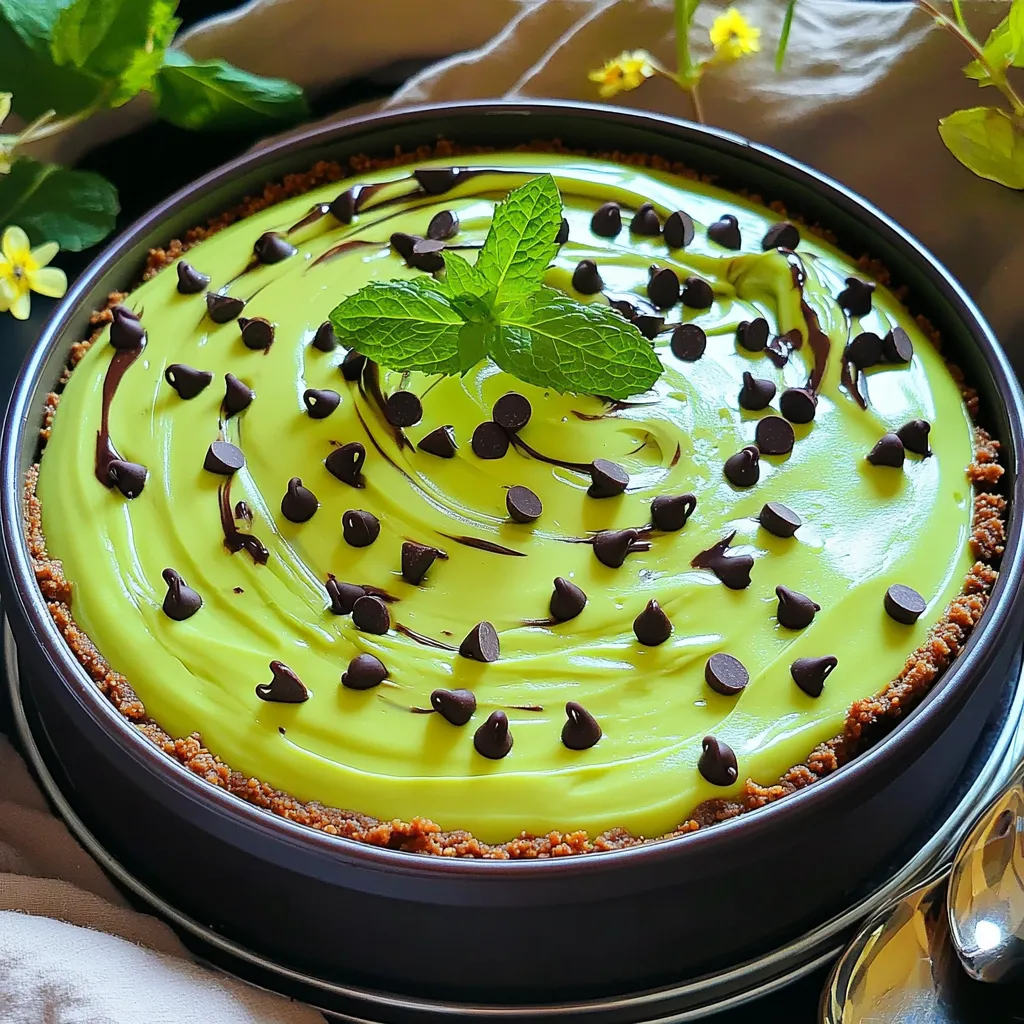
Looking for a simple yet scrumptious dessert? Let’s dive into a No-Bake Mint Chocolate Chip Cheesecake Delight! This recipe is

- 2 cups cooked, shredded chicken - 1 cup BBQ sauce (your favorite brand) - 1 bag (13 oz) tortilla chips - 2 cups shredded cheddar cheese - 1 cup black beans, drained and rinsed - 1 cup corn kernels (canned or frozen) - 1 jalapeño, sliced (optional) - 1/2 cup red onion, finely chopped - 1/4 cup fresh cilantro, chopped - 1 avocado, diced - 1/2 cup sour cream (or Greek yogurt) for serving - Salt and pepper to taste To make these nachos pop with flavor, I use cooked, shredded chicken. It’s quick and easy. Just grab your favorite BBQ sauce to coat the chicken. This adds a sweet and smoky taste. Next, you need tortilla chips. Choose sturdy chips that can hold all the toppings. For cheese, shredded cheddar is great. It melts well and has a sharp flavor. Black beans and corn add texture and nutrition. Drain and rinse the beans for the best taste. If you like a kick, add sliced jalapeños. They bring heat without overpowering the dish. Fresh red onion and cilantro give a nice crunch and brightness. Don’t skip the avocado! Its creaminess balances all the flavors. Lastly, don’t forget sour cream or Greek yogurt for the perfect finish. Season with salt and pepper to make everything shine. First, preheat your oven to 400°F (200°C). This step is key for even cooking. While the oven heats, take a medium bowl. Mix the cooked, shredded chicken with your favorite BBQ sauce. Stir until all the chicken is well-coated. Set this mix aside; it will add flavor to your nachos. Now, grab a large baking sheet. Spread out the tortilla chips evenly across the sheet. Make sure to cover the entire pan. This helps every bite be crispy and tasty. Next, add the BBQ chicken mixture on top of the chips. Try to spread it evenly. Then, sprinkle the black beans and corn over the chicken. This adds texture and flavor. It's time for cheese! Generously sprinkle shredded cheddar cheese over everything. Make sure to cover all the ingredients. If you like heat, add sliced jalapeño and chopped red onion on top of the cheese. Place the baking sheet in your preheated oven. Bake for about 10-12 minutes. You want the cheese to melt and bubble. Once done, take the sheet out and let it sit for about 5 minutes. This waiting time helps the cheese set a bit. Before serving, top with diced avocado and fresh cilantro. Add dollops of sour cream on the side. Finally, season with salt and pepper to taste. Enjoy your delicious nachos! To make the best nachos, you need even distribution of ingredients. Start by spreading the tortilla chips out in a single layer on your baking sheet. This helps the chips stay crispy. Next, when you add the BBQ chicken, spread it out evenly. This ensures every chip gets some tasty chicken. To avoid soggy chips, don’t add too many wet toppings at once. Save toppings like sour cream and avocado for the end. This keeps your chips crunchy and delicious! You can easily customize your nachos to fit your taste. If you don’t like black beans, try pinto beans or leave them out. You can also switch up the cheese. Cheddar is great, but pepper jack adds a nice kick. Want more heat? Add extra jalapeños or try spicy BBQ sauce. You can also mix in your favorite spices. Cumin or smoked paprika can add a fun twist! Pair your nachos with fun sides to make a meal. A fresh green salad or coleslaw adds crunch and balances the rich flavors. For drinks, cold soda or a fruity mocktail works well. If you enjoy beer, a light lager is a great match too. Enjoy your nachos with friends and family for the best experience! {{image_2}} You can add a fun twist by mixing in some fruits. Pineapple works great for this. Its sweetness balances the smoky BBQ flavor. You can also try mango or peaches. Just chop the fruit into small pieces and scatter them on top before baking. If you want a meat-free option, use plant-based proteins. You can swap the chicken for jackfruit or tofu. Both options soak up flavors well. They add a nice texture too. Just make sure to season them with BBQ sauce just like the chicken. Cheese is key for great nachos. While cheddar is a favorite, don’t stop there! You can use Monterey Jack for a milder taste. Pepper Jack adds a spicy kick. Crumbled feta or queso fresco can give a nice twist too. Mix and match to find your perfect blend! After enjoying your nachos, store any leftovers in an airtight container. This keeps them fresh. Make sure to cover the nachos with plastic wrap before sealing the lid. This extra step can help prevent air from getting in. Place your container in the fridge right away. Leftovers can stay good for about 3 days. To reheat your nachos, use the oven for best results. Preheat your oven to 350°F (175°C). Spread the nachos on a baking sheet. Heat them for about 10 minutes. This method keeps the chips crisp. You can also use a microwave if you are in a hurry. Place the nachos on a microwave-safe plate. Heat them for about 30 seconds to 1 minute. Be careful not to overheat, or the chips may get soggy. While nachos are best fresh, you can freeze some parts. The chicken, beans, and corn freeze well. Store these items in a freezer-safe bag. Remove as much air as possible before sealing. For best taste, use them within 2 months. Tortilla chips do not freeze well, as they can become chewy. It’s best to prepare fresh chips when you eat the frozen toppings later. To make nachos for a crowd, you can easily scale the recipe. Simply increase the amounts of each ingredient based on how many people you serve. Use larger baking sheets or multiple sheets to fit all the chips and toppings. Here’s a quick guide: - Chicken: 4 cups for 8 servings - BBQ Sauce: 2 cups - Tortilla Chips: 2 bags (13 oz each) - Cheese: 4 cups shredded - Beans and Corn: 2 cups each This way, everyone gets a generous helping! Yes, you can use homemade BBQ sauce! Making your own sauce can add a personal touch. Here are some tips for a tasty homemade BBQ sauce: - Combine ketchup, brown sugar, vinegar, and spices. - Add garlic powder and onion powder for flavor. - Adjust sweetness and tang to your liking. - Simmer on low heat for 15 minutes to blend flavors. Your homemade sauce can take these nachos to a new level! Pair your nachos with fun sides to make a full meal. Here are some great ideas: - Guacamole: Creamy and delicious. - Pico de Gallo: Fresh and zesty salsa. - Mexican Rice: A filling option. - Refried Beans: Adds more protein. - Corn Salad: Bright and crunchy. These sides will enhance your nacho experience! In this article, we explored how to make delicious BBQ chicken nachos. We covered the key ingredients, step-by-step instructions, and tips for perfect nachos. You can customize them with toppings and variations to suit your taste. Storing and reheating nachos was also discussed to extend your enjoyment. Remember, nachos are fun and easy to make. Enjoy experimenting with flavors and ingredients. Your next snack is just a few steps away!

Sheet-Pan BBQ Chicken Nachos Quick and Tasty Delight

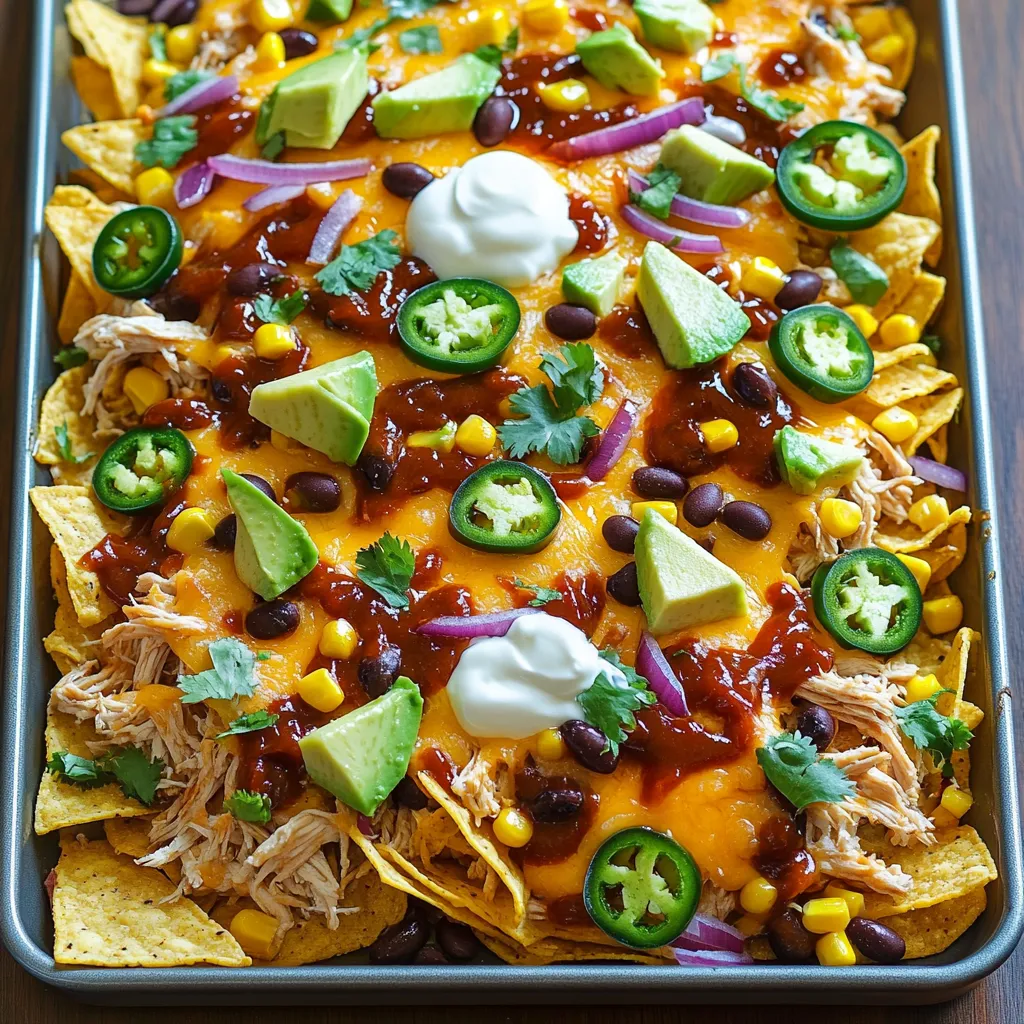
Get ready to impress your family with a fun twist on a classic! My Sheet-Pan BBQ Chicken Nachos recipe combines

- 1.5 pounds baby potatoes, halved - 3 tablespoons olive oil - 4 cloves garlic, minced Baby potatoes are the star here. Their small size makes them perfect for air frying. They cook quickly and get crispy on the outside. I recommend using fresh baby potatoes for the best flavor. Olive oil adds richness and helps the herbs stick. Minced garlic gives a strong, savory taste. Together, these ingredients make a great base for your dish. - 1 teaspoon dried rosemary - 1 teaspoon dried thyme - 1 teaspoon smoked paprika I love using dried rosemary and thyme. They add a lovely herbal note to the potatoes. Smoked paprika gives a touch of warmth and depth. Together, these herbs create a balanced flavor profile. You can adjust the amounts based on your taste. If you want a stronger flavor, feel free to add more. - Fresh parsley - Salt and pepper Fresh parsley brightens the dish. It adds a pop of color and freshness. Salt and pepper are essential for taste. They enhance all the flavors in the potatoes. Make sure to add salt and pepper to your liking. This simple garnish makes your dish look even more appealing. First, we need to preheat the air fryer. Set it to 400°F (200°C) and let it run for about 5 minutes. This step warms the fryer and helps cook the potatoes evenly. It also makes them crispier! Next, ensure you have the right temperature. A hot air fryer cooks food faster and gives a nice crunch. If the fryer is not hot enough, your potatoes may end up soft instead of crispy. Now, let’s mix the potatoes! Take a large bowl and add 1.5 pounds of halved baby potatoes. Pour in 3 tablespoons of olive oil. The oil helps the seasonings stick. Add 4 cloves of minced garlic, 1 teaspoon of dried rosemary, 1 teaspoon of dried thyme, and 1 teaspoon of smoked paprika. Don’t forget salt and pepper to taste! Toss all the ingredients together. Make sure the potatoes are well coated. This step is key for great flavor! Once your air fryer is ready, it’s time to arrange the potatoes. Place them in the fryer basket in a single layer. This helps them cook evenly and get crispy all around. Now, cook the potatoes at 400°F (200°C) for 15 to 20 minutes. Halfway through, shake the basket gently. This ensures all sides get a nice golden color. Keep an eye on them! When they are crispy and brown, they are ready to come out. Carefully remove the potatoes from the fryer. Garnish with freshly chopped parsley before serving. Enjoy your finger-licking garlic herb baby potatoes! To get your baby potatoes perfectly crispy, adjust the cooking time. Start with 15 minutes, then check for doneness. If they need more time, add 2-3 minutes. This way, you avoid undercooking or burning them. Cooking in a single layer is crucial. It allows hot air to circulate evenly, giving you that golden crunch. You can boost the flavor with extra herbs. Consider adding oregano or basil for a fresh touch. Fresh garlic packs a bigger punch than minced. If you choose fresh, use about 1-2 cloves, finely chopped. This choice makes a big difference in taste and aroma. These potatoes pair well with grilled meats or roasted veggies. They also work great as a snack on their own. For presentation, serve them in a nice bowl and sprinkle extra parsley on top. This adds a pop of color and makes your dish look inviting. Enjoy the flavors and impress your guests! {{image_2}} You can change the taste of your garlic herb baby potatoes easily. Adding cheese brings a creamy touch. Try shredded parmesan or cheddar for a rich flavor. Just sprinkle it on top after cooking. This will melt in and add a nice bite. If you love some heat, try a spicy version. Add chili flakes to the mix before air frying. Start with a pinch and adjust to your liking. This will give your potatoes a nice kick. You can make this dish fit your diet too. For a vegan option, simply skip the cheese. The potatoes still taste great without it. You can also use nutritional yeast for a cheesy flavor. This keeps it plant-based and tasty. If you're gluten-free, rest easy! This recipe is already gluten-free. Just ensure that your spices do not contain any gluten. This way, you can enjoy your potatoes without worry. Using seasonal herbs can change the dish. In spring, add fresh dill or chives for a bright flavor. In the fall, try sage for a warm feel. You can switch herbs based on what you find fresh at the market. Also, feel free to adapt to the vegetables you have. Instead of baby potatoes, use sweet potatoes or carrots. Just adjust the cooking time for different veggies. This keeps the dish fresh and exciting every time you make it. To keep your garlic herb baby potatoes fresh, follow best practices. First, let them cool to room temperature before storing. This helps prevent moisture buildup. Next, place the leftovers in airtight containers. These containers help keep out air and moisture, keeping your potatoes tasty. If you have a lot, divide them into smaller containers. This way, you only open what you need. Reheating these potatoes is easy, and the air fryer works best. Preheat your air fryer to 350°F (175°C). Place the potatoes in the basket in a single layer. Heat them for about 5-7 minutes. This method keeps them crispy. If you want, shake the basket halfway through. This helps them heat evenly and stay crunchy. You can freeze cooked garlic herb baby potatoes if you have extras. Let them cool completely. Then, place them in freezer-safe bags. Squeeze out as much air as possible before sealing. They will stay good for up to three months. When you want to eat them, thaw them in the fridge overnight. For best results, reheat them in the air fryer after thawing. This way, they regain their crispiness and taste. You can use many types of baby potatoes. Here are some favorites: - Yukon Gold: These have a buttery flavor and creamy texture. - Red Potatoes: These are slightly sweet and great for roasting. - Fingerling Potatoes: Their unique shape adds fun to the dish. All these potatoes work well in this recipe. They soak up the garlic and herbs nicely, making them more tasty. You can tell the potatoes are done by looking for a few signs: - Color: They should be golden brown. - Crispiness: The outside should feel crunchy. - Fork Test: Use a fork to poke them. They should feel soft inside. If you see these signs, your potatoes are ready to enjoy! Yes, you can cook these garlic herb baby potatoes using other methods. Here are some options: - Oven: Bake them at 425°F (220°C) for about 25-30 minutes. Toss them halfway through for even cooking. - Stovetop: Boil the potatoes first, then sauté them in a pan with oil and herbs until they are crispy. These methods still give you that tasty garlic and herb flavor. This blog post covered how to make garlic herb baby potatoes in an air fryer. We discussed the main ingredients like baby potatoes, olive oil, and garlic. I shared tips for achieving crispiness and enhancing flavor with herbs. You can also try fun variations and dietary swaps. Remember to store leftovers properly and reheat them for the best taste. With these steps and tips, you’ll master a tasty side dish that everyone will love. Enjoy creating this simple yet delicious recipe!

Air Fryer Garlic Herb Baby Potatoes Finger-Licking Treat

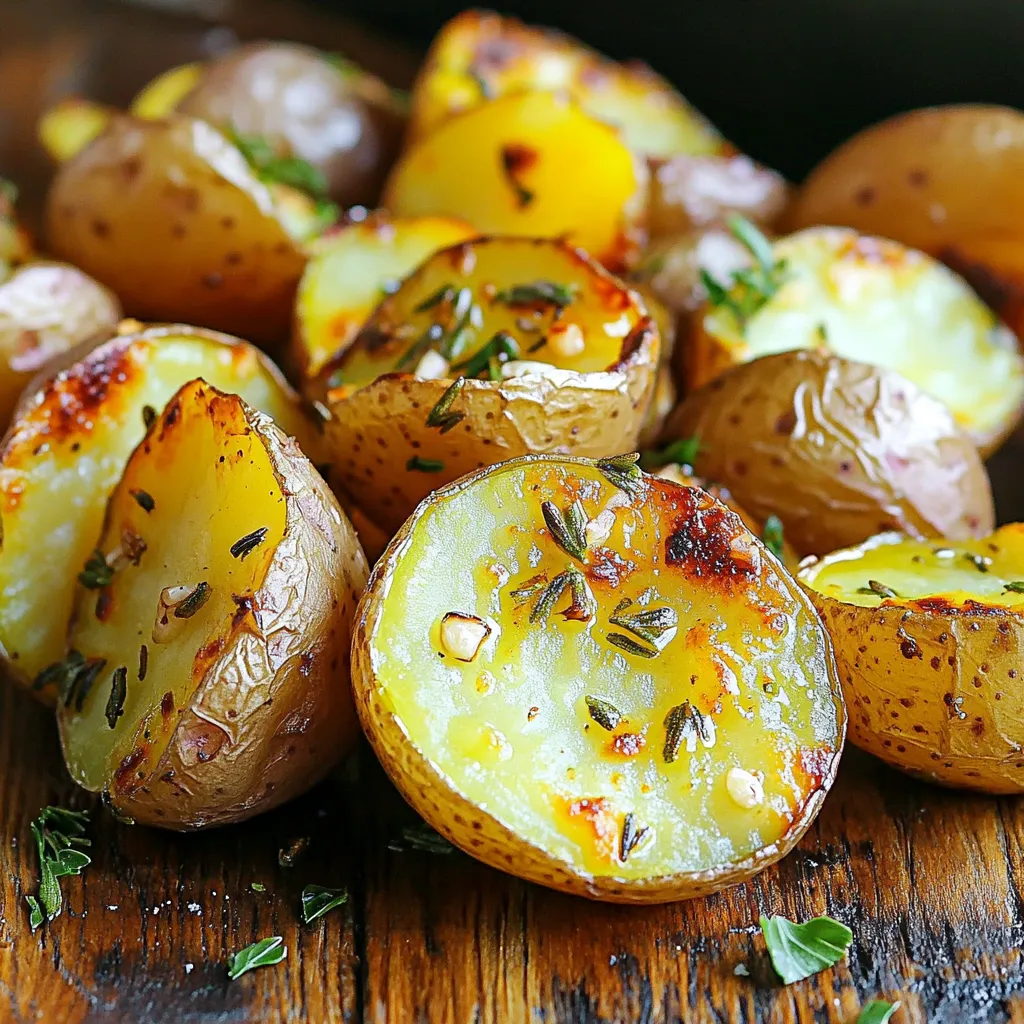
Are you ready to elevate your side dish game? Air Fryer Garlic Herb Baby Potatoes are a simple and tasty

- 1 large dragon fruit, scooped out - 1 frozen banana - 1 cup coconut milk (or almond milk) The star of this bowl is the dragon fruit. Its bright pink skin and green scales look cool. Inside, it has a sweet, mild taste. I love the way it blends into a creamy texture. A frozen banana adds natural sweetness and creaminess. Coconut milk or almond milk gives a rich base. Choose what you like! - 1/2 cup pineapple chunks (fresh or frozen) - 1 tablespoon chia seeds - Sweetener options like honey or maple syrup Adding pineapple gives a tropical twist. It brings a zesty flavor that pairs well with dragon fruit. Chia seeds add a nutty taste and a boost of nutrients. You can sweeten this bowl with honey or maple syrup. Just a bit goes a long way! - Sliced kiwi - Granola - Coconut flakes and edible flowers Toppings make this smoothie bowl special. Sliced kiwi adds a pop of green and tangy taste. Granola gives a crunchy texture. Coconut flakes bring a bit of sweetness. If you want to impress, add edible flowers. They make your bowl look pretty and fun! 1. Scooping out the dragon fruit Start by cutting the dragon fruit in half. Use a spoon to scoop out the bright pink flesh. You want to get as much as you can without leaving too much behind. It has a sweet, mild taste and a fun texture. 2. Freezing banana in advance Peel the banana and cut it into slices. Place the slices in a single layer on a plate or a baking sheet. Freeze the banana for at least two hours. This step helps make your smoothie thick and creamy. 1. Combining all ingredients in the blender In your blender, add the scooped dragon fruit, frozen banana, one cup of coconut milk, and half a cup of pineapple chunks. Also, add one tablespoon of chia seeds and honey or maple syrup if you want extra sweetness. 2. Achieving the desired consistency Blend everything on high speed. Stop to scrape down the sides if needed. If it’s too thick, add a bit more coconut milk. Blend until it is smooth and creamy. 1. Pouring the smoothie into a bowl Once blended, carefully pour the smoothie into a bowl. Make sure to leave some space at the top for your toppings. 2. Arranging toppings for an appealing presentation Now comes the fun part! Place sliced kiwi around the edge of the smoothie. Add a sprinkle of granola and a handful of coconut flakes. Finish with edible flowers for a bright, colorful look. Enjoy your beautiful creation right away! To get the right texture, coconut milk is key. It adds creaminess and flavor. If your smoothie is too thick, simply add more coconut milk. Blend until smooth and creamy. When blending frozen fruits, make sure your blender is powerful. Start on low speed and then increase it. This helps the fruits blend evenly without clumping. Want more nutrients? Add a scoop of protein powder or a handful of nuts. Both options boost protein and keep you full longer. You can also include superfoods like spirulina or maca powder. These add extra vitamins and minerals without changing the taste much. Presentation matters! Arrange your toppings in an artistic way. Start with slices of kiwi around the edge. Then, sprinkle granola and add coconut flakes. Finish with edible flowers for a pop of color. This makes your smoothie bowl not just tasty but also beautiful! {{image_2}} You can switch up the fruits in your smoothie bowl. Try using mango or papaya for a sweet twist. Both fruits add a creamy texture and bright flavor. You can also mix in berries like strawberries or blueberries. These berries add a burst of color and extra nutrients. They pair well with dragon fruit and add a nice tartness. If you want to make it dairy-free, use almond milk instead of coconut milk. Almond milk still gives you a nice creaminess. For those watching sugar, you can skip the honey or maple syrup. The natural sweetness from the fruit is often enough. If you need a sweetener, try stevia or monk fruit. Both options keep it low in sugar while adding some sweetness. You can boost the flavor with spices or herbs. Try adding a pinch of ginger for warmth or turmeric for a unique taste. Both spices have health benefits, too. Fresh mint or basil can add a refreshing note. These herbs bring a lovely aroma and flavor, making your bowl even more special. Mix and match to find your favorite combinations! To keep your smoothie fresh, store it in a clean jar. Seal the jar tightly. Place it in the fridge. Enjoy it within 24 hours for the best taste. If you want to keep it longer, freezing is a great option. Pour the leftover smoothie into ice cube trays. Once frozen, transfer the cubes to a freezer bag. This way, you can blend a quick smoothie later. For toppings, store fresh fruits and granola in separate containers. This keeps them crisp and tasty. Put sliced kiwi and other fruits in an airtight container. Granola should stay in a dry place. To keep edible flowers bright, place them in a damp paper towel. Then, put them in a sealed bag in the fridge. This helps them stay colorful for your bowl. You can use leftover smoothie ingredients in other meals. Mix extra dragon fruit into yogurt for a snack. Use the frozen banana in pancakes or oatmeal. Pineapple chunks can brighten up salads or salsas. Chia seeds are great in puddings or as a topping for desserts. These ideas help you waste less while enjoying more flavors. Dragon fruit is low in calories and high in fiber. One cup has about 60 calories, which makes it great for weight loss. It also has vitamin C, which helps boost your immune system. Antioxidants in dragon fruit fight free radicals and reduce inflammation. Chia seeds are tiny powerhouses. They have omega-3 fatty acids, which are good for your heart. They also provide protein and fiber, helping you feel full longer. Coconut milk adds healthy fats, which can support brain health. Together, they make a strong team for nutrition. Yes, you can prepare some ingredients early. Scoop out the dragon fruit and freeze it. You can also freeze the banana. Keep these in separate bags for easy use. Blend the smoothie bowl only when you are ready to eat. This keeps it fresh and tasty. Aim to eat it within a day for the best taste and texture. You can customize your smoothie bowl in many fun ways. If you're vegan, skip honey and use maple syrup instead. You can add more fruits like mango or berries for different flavors. For toppings, try nuts, seeds, or even yogurt. Popular choices include sliced bananas, berries, and granola. Feel free to mix and match to find your favorite combination! You learned how to make a tasty smoothie bowl with fun ingredients. Start with dragon fruit, frozen bananas, and a milk choice. You can add more fruit, chia seeds, and sweeteners for taste. Top it off with kiwi, granola, coconut, and pretty flowers. Customizing your bowl is easy. You can change fruits, adjust for diets, or add spices. Store leftovers right and keep toppings fresh for next time. Now go create your perfect smoothie bowl! Enjoy your yummy, nutritious treat any time.

Tropical Dragon Fruit Smoothie Bowl Fresh and Healthy

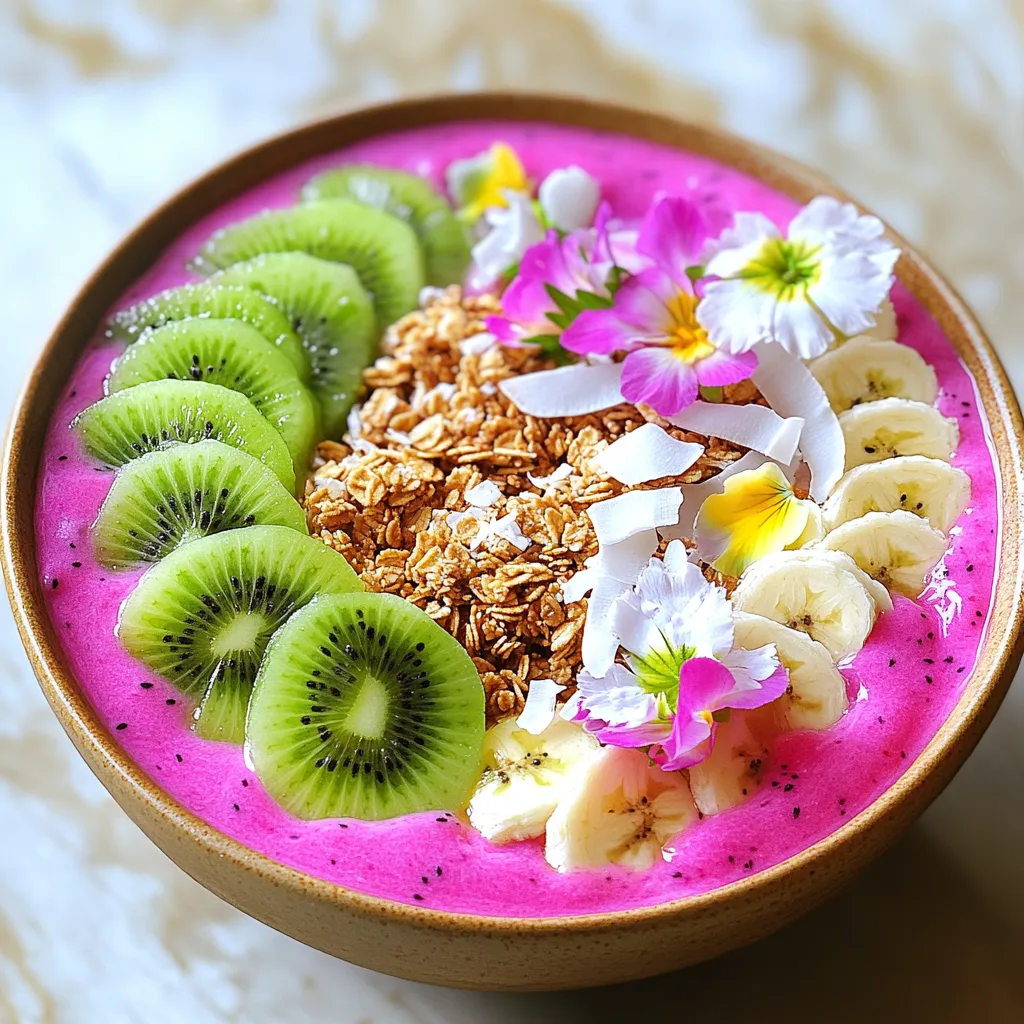
Are you ready to dive into a bowl of freshness? A Tropical Dragon Fruit Smoothie Bowl is your gateway to

- 1 cup cornmeal - 1 cup all-purpose flour - 2 tablespoons sugar - 1 tablespoon baking powder - 1/2 teaspoon salt For the dry ingredients, I use cornmeal for a hearty base. It gives the muffins a nice texture. The all-purpose flour adds structure and helps the muffins rise. A bit of sugar adds sweetness, while the baking powder makes them fluffy. Finally, a pinch of salt balances all the flavors. - 1 cup buttermilk - 2 large eggs - 1/4 cup unsalted butter, melted In the wet ingredients, buttermilk gives a rich taste. It also helps the muffins stay moist. Eggs help bind everything together. The melted butter adds richness and flavor, making the muffins even more delicious. - 1 cup shredded sharp cheddar cheese - 2 jalapeños, finely chopped (seeds removed for less heat) - 1/2 cup corn kernels (fresh or canned) For add-ins, sharp cheddar cheese gives a bold flavor. The jalapeños add a nice kick. You can adjust the heat by removing the seeds. Sweet corn kernels bring a burst of sweetness and texture. These add-ins make the muffins rich and flavorful. First, preheat your oven to 400°F (200°C). This step ensures your muffins bake evenly. Next, line a muffin tin with paper liners or grease it with non-stick spray. This helps the muffins pop out easily after baking. In a mixing bowl, combine 1 cup of cornmeal, 1 cup of all-purpose flour, 2 tablespoons of sugar, 1 tablespoon of baking powder, and 1/2 teaspoon of salt. Use a whisk to blend them well. This mix forms the base for your cornbread muffins. In another bowl, whisk together 1 cup of buttermilk, 2 large eggs, and 1/4 cup of melted unsalted butter. Make sure the mixture is smooth. This step adds moisture and richness to your muffins. Pour the wet mixture into the dry ingredients. Stir until just combined. Avoid overmixing; it's fine if the batter has some lumps. Then, gently fold in 1 cup of shredded sharp cheddar cheese, 2 finely chopped jalapeños, and 1/2 cup of corn kernels. This adds flavor and texture. Divide the batter evenly into the prepared muffin tin. Fill each cup about two-thirds full. This ensures they have room to rise without overflowing. Bake your muffins in the preheated oven for 15-18 minutes. They should turn golden brown on top. To check for doneness, insert a toothpick into the center. If it comes out clean, your muffins are ready. To get the best texture in your muffins, avoid overmixing. Mix the wet and dry ingredients just until they blend. Some lumps are okay! Overmixing makes the muffins tough. To ensure even baking, fill each muffin cup about two-thirds full. This helps them rise nicely. Rotate the muffin tin halfway through baking for even heat. You can adjust the heat level by using more or fewer jalapeños. For a milder muffin, remove all seeds. For a spicier kick, add extra jalapeños. Feel free to swap cheeses or add vegetables. Pepper jack cheese adds spice and flavor. Diced bell peppers or green onions can give a fresh twist. These muffins pair well with chili or soup. They add a great crunch and flavor. Serve them warm for the best taste. For a nice presentation, brush the tops with melted butter. Add a slice of jalapeño or a sprig of cilantro on top for color. This makes your dish look inviting and fun! {{image_2}} To make these muffins even spicier, you can add more jalapeños. Start with one extra jalapeño, chopped finely. If you love heat, feel free to add even more! Just remember to taste as you go. More jalapeños will give your muffins a great kick. If you prefer a sweeter flavor, consider adding sugar or honey. Just add one to two tablespoons of sugar to the dry mix. You can also use honey in the wet mix. This change makes a lovely, sweet treat. You can easily make these muffins gluten-free. Replace all-purpose flour with gluten-free flour blend. Also, check if your baking powder is gluten-free. This way, everyone can enjoy these tasty muffins without worry! To keep your jalapeño cheddar cornbread muffins fresh for a few days, follow these tips: - Allow muffins to cool completely before storing. - Place them in an airtight container. - Store at room temperature for up to three days. - For added moisture, you can place a slice of bread in the container. If you want to save your muffins for longer, freezing is a great option. Here’s how to do it: - Wrap each muffin tightly in plastic wrap. - Place wrapped muffins in a freezer-safe bag or container. - Label the bag with the date before placing it in the freezer. - They can last up to three months in the freezer. When you’re ready to enjoy your muffins again, here are the best ways to reheat them: - For a quick reheat, pop them in the microwave for 15-20 seconds. - For a crispier texture, warm them in the oven at 350°F (175°C) for 5-7 minutes. - You can also use a toaster oven for a few minutes until warm. Yes, you can use frozen corn. Just thaw it first. Drain any excess water. This keeps the batter from getting too wet. Frozen corn works well and still tastes great in the muffins. You can prep the dry ingredients a day ahead. Store them in an airtight container. When ready, mix the wet ingredients and combine them with the dry. This saves time and lets you enjoy fresh muffins quickly. If you don’t have buttermilk, make a substitute. Combine 1 cup of milk with 1 tablespoon of vinegar or lemon juice. Let it sit for 5 minutes. This will create a similar tangy taste and texture you need for the muffins. Yes, you can skip the jalapeños if you prefer milder muffins. The flavor will still be delicious without them. You might even add other spices or cheese for more flavor. These muffins last for 3 to 4 days at room temperature. Store them in an airtight container to keep them fresh. If you want to keep them longer, freeze the muffins for up to 3 months. In this post, we covered how to make delicious cornbread muffins. We looked at ingredients, steps, tips, and variations. You can customize your muffins with cheese and jalapeños. Remember, the right mixing and baking are key to great texture. Enjoy experimenting with flavors and serving them fresh. With simple storage tips, you can keep muffins tasty for longer. Dive into this fun baking adventure; your taste buds will thank you!

Jalapeño Cheddar Cornbread Muffins Rich and Flavorful

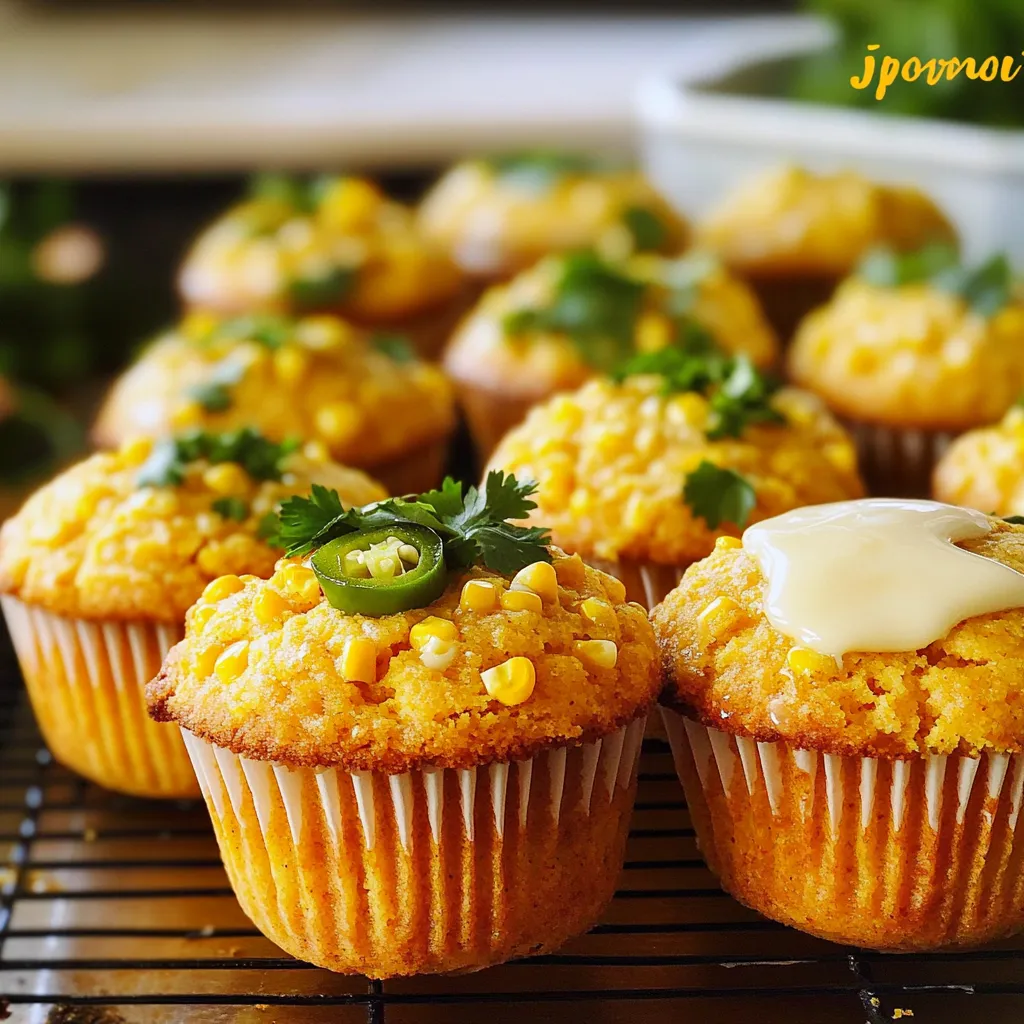
Get ready to spice up your baking with my Jalapeño Cheddar Cornbread Muffins! These flavorful treats are a perfect blend

- 1.5 lbs boneless, skinless chicken breasts - 1/4 cup honey - 1/4 cup lime juice (freshly squeezed) - 2 tablespoons soy sauce (or tamari for gluten-free) - 2 cloves garlic, minced - 1 teaspoon ground cumin - 1 teaspoon paprika - 8 small corn or flour tortillas - Fresh cilantro, chopped, for garnish - Lime wedges, for serving - Sliced avocado, optional for topping The honey lime chicken tacos are simple and full of flavor. You need key ingredients to make this dish shine. The chicken breasts are the star, providing a lean and juicy base. Honey brings sweetness, while lime juice adds a bright zing. For seasoning, soy sauce gives umami, and garlic adds depth. Ground cumin and paprika offer warmth and richness. Together, these ingredients create a balanced flavor profile that makes every bite delightful. When it comes to assembling the tacos, fresh tortillas hold everything together. I love using corn or flour tortillas, but you can choose what you like best. Topping the tacos with cilantro adds freshness, and lime wedges give a zesty touch. Sliced avocado is a nice optional addition for creaminess. Each ingredient plays a role in creating a dish that is not only tasty but also visually appealing. You will enjoy this meal with family or friends. To start, gather your ingredients. In a mixing bowl, combine these items: - 1/4 cup honey - 1/4 cup lime juice (freshly squeezed) - 2 tablespoons soy sauce - 2 cloves garlic, minced - 1 teaspoon ground cumin - 1 teaspoon paprika - 1/2 teaspoon salt - 1/2 teaspoon black pepper - 1/4 teaspoon cayenne pepper (optional for heat) Whisk these together until well mixed. The honey and lime create a lovely sweet and tangy flavor that will soak into the chicken. Next, place the 1.5 lbs of boneless, skinless chicken breasts in your slow cooker. Pour the honey lime marinade over the chicken, making sure every piece is well coated. Cover the slow cooker. If you cook on low, set it for 6-7 hours. For a quicker option, use high for 3-4 hours. When done, the chicken will be very tender and easy to shred. Once the chicken is fully cooked, remove it from the slow cooker. Use two forks to shred the chicken into bite-sized pieces. Mix the shredded chicken back into the sauce in the slow cooker. This step helps the chicken absorb all the flavors. While the chicken soaks up the goodness, warm your tortillas. You can do this on a skillet or in the microwave until they are soft and pliable. To assemble the tacos, take a warm tortilla and add a generous amount of the honey lime shredded chicken. Top it with fresh chopped cilantro and avocado slices if you like. Squeeze some lime juice on top for extra zing. Serve right away with lime wedges on the side. Enjoy your delightful meal! Cooking times vary based on your slow cooker setting. For low heat, aim for 6-7 hours. For high heat, 3-4 hours works well. The chicken is done when it shreds easily with a fork. Always check the center. If it is white and hot, it’s ready. Want a twist? Add spices like chili powder or herbs like oregano. You can also toss in diced jalapeños for heat. To warm tortillas, heat a skillet over medium heat. Place each tortilla in the skillet for about 30 seconds per side. This makes them soft and pliable. Pair your tacos with a side of black beans or a fresh corn salad. For salsas, a mango salsa adds sweetness or a pico de gallo gives freshness. For garnishing, sprinkle fresh cilantro on top. Add lime wedges on the side for a burst of zest. A slice of avocado makes it creamy and rich. {{image_2}} You can swap the chicken in this recipe for beef or tofu. This change offers new flavors and textures. If you use beef, choose a cut that shreds well, like chuck roast. For tofu, firm or extra-firm works best. Cooking times for different proteins: - Beef: Cook on low for 8-10 hours or high for 4-5 hours. - Tofu: Cook on low for 4-6 hours or high for 2-3 hours. This way, you can enjoy the same tasty honey lime flavor no matter your choice. Tortillas are fun to play with! You can use corn or flour tortillas, but there are other great options, too. Lettuce wraps make a fresh, low-carb alternative. You could also try grain-free tortillas if you want to skip gluten. Adaptable toppings and accompaniments: - Fresh salsa adds a zesty kick. - Shredded cheese brings creaminess. - Pickled veggies provide a tangy crunch. Feel free to mix and match your toppings for a unique taste! Want to take your tacos to the next level? You can add more herbs or spices for an extra boost. Cilantro, oregano, or even a bit of mint can add freshness. Experimenting with different citrus juices: - Try orange juice for a sweeter twist. - Grapefruit juice can add a tart zing. Mixing and matching flavors keeps things exciting and ensures each meal feels special. To keep your leftover tacos fresh, place them in an airtight container. This helps lock in flavors and moisture. Store them in the fridge for up to three days. For the best taste, reheat only the chicken. You can do this in a pan over medium heat. Stir occasionally until warmed through. Avoid reheating the tortillas too many times, as they can get tough. If you want to save some chicken for later, freezing works great. First, shred the leftover chicken and place it in a freezer-safe bag. Remove as much air as possible before sealing. Label the bag with the date. This chicken stays fresh for up to three months. When you're ready to enjoy it, thaw it in the fridge overnight. Reheat it in a pan or microwave until hot. Take care of your tortillas by storing them in a cool, dry place. You can also wrap them in foil to keep them soft. For avocados, keep them at room temperature until ripe. Once ripe, store them in the fridge to slow down spoilage. For cilantro, place the stems in a glass of water. Cover the leaves with a plastic bag and store in the fridge. This helps it stay fresh longer. Yes, you can use frozen chicken breasts. Just remember to increase the cooking time. If you cook on low, aim for about 8 hours. On high, you may need 4 to 5 hours. Always check that the chicken is fully cooked. Its internal temperature should reach 165°F. Frozen chicken may also result in a juicier dish since it retains more moisture. To add heat, consider these options: - Use more cayenne pepper in the marinade. - Add chopped jalapeños or serrano peppers to the slow cooker. - Top tacos with hot salsa or a spicy sauce. - Serve with sliced fresh chili peppers for a kick. Adjust the spice to fit your taste. It’s easy to modify! Here are some great side dishes and drinks: - Mexican rice adds a lovely base. - Black beans are a filling choice. - Corn salad brings brightness to the meal. - Serve with tortilla chips and salsa for crunch. - Pair with a refreshing limeade or iced tea. These options will enhance your taco night! This recipe for honey lime chicken tacos lets you enjoy great flavors with ease. You learned how to make a simple marinade, slow-cook chicken, and assemble tasty tacos. Plus, you gained tips for cooking and serving. Experiment with variations, such as using different proteins or tortillas. Store or freeze leftovers for quick future meals. Enjoy these tacos any night of the week! You'll impress family and friends with this delicious and quick dish. Get cooking and have fun!

Honey Lime Chicken Tacos Slow Cooker Delightful Meal

Looking for an easy, tasty meal? Honey Lime Chicken Tacos made in your slow cooker are the answer! With just

Older posts
Newer posts
← Previous Page1 … Page15 Page16 Page17 … Page86 Next →

dsad

© 2026 Cooking Wells • Built with GeneratePress

Our Policies

  • Copyright Policy
  • Cookie Policy
  • GDPR Policy
  • Privacy Policy
  • Disclaimer
  • Terms Of Use

More Information

  • Home
  • About
  • Contact
  • Appetizers
  • Dessert
  • Dinner
  • Drinks
©2026, Cooking Wells About Back To Top