Skip to content
DisclaimerTerms Of UseGDPR PolicyCookie Policy

Cooking Wells

  • Home
  • Drinks
  • Appetizers
  • Dinner
  • Dessert
  • About
  • Contact
  • Privacy Policy
DisclaimerTerms Of UseGDPR PolicyCookie Policy

NO-ING-IMG

- 8 oz cream cheese, softened - 1/2 cup powdered sugar - 1/2 cup chocolate hazelnut spread (like Nutella) - 1/4 cup heavy cream - 1 teaspoon vanilla extract The base of this dip is cream cheese. It gives the dip a rich taste and helps it stay creamy. I use softened cream cheese so it mixes well. Next, I add powdered sugar for sweetness. You can adjust the amount to match your taste. The chocolate hazelnut spread is the star of the dip. It adds a deep, nutty flavor that pairs with the cream cheese. Heavy cream makes the dip smooth and fluffy. Finally, vanilla extract adds a lovely aroma. Each ingredient plays a key role in creating a delicious dip. - 1/2 cup finely chopped hazelnuts - Fresh fruit (strawberries, bananas) - Graham crackers For garnishes, finely chopped hazelnuts add a nice crunch. You can use fresh fruit like strawberries or bananas for dipping. They add freshness and balance the sweetness. Graham crackers are also great for dipping. They offer a sweet and crunchy base that enhances the dip's flavor. These extras make the dip even more fun to eat. You can mix and match based on your mood or the season. Start by mixing the cream cheese. Place 8 ounces of softened cream cheese in a mixing bowl. Use an electric mixer to beat it until it’s smooth and creamy. This step is key to a good dip. Next, add the powdered sugar. Gradually mix in 1/2 cup of powdered sugar. Keep mixing until it blends well with the cream cheese. This makes the dip sweet and fluffy. Now, it’s time to mix in the chocolate hazelnut spread and heavy cream. Add 1/2 cup of chocolate hazelnut spread and 1/4 cup of heavy cream to the bowl. Also, add 1 teaspoon of vanilla extract. Beat the ingredients together until the mixture is smooth and fluffy. This creates that rich flavor we love. After mixing, taste the dip. If you want it sweeter, add more powdered sugar. Mix it in well until you’re happy with the sweetness. To finish, transfer the dip to a serving bowl. Use a spatula to smooth the top. This makes it look nice for serving. If you like, garnish with finely chopped hazelnuts. Sprinkle about 1/2 cup on top for added texture and flavor. Now, your Chocolate Hazelnut Cheesecake Dip is ready to enjoy! To get the best texture for your dip, you need to beat the cream cheese well. Start with softened cream cheese. Use an electric mixer to beat it until it’s smooth. This step makes the dip creamy and easy to mix with other ingredients. If you find your dip too thick, you can add a little more heavy cream. This will help achieve the right consistency. Choosing the right chocolate hazelnut spread is key. I like to use Nutella, but any good quality spread works. The flavor shines through and adds richness. Use fresh ingredients for dipping too. Strawberries and bananas not only taste great but also look beautiful. You can also try graham crackers for a crunchy contrast. Pair your dip with fresh fruit or graham crackers. They balance the creamy dip. For presentation, use a nice bowl and smooth the top. Sprinkle some chopped hazelnuts on top for added texture. This simple step makes the dip more inviting. Enjoy sharing this delightful treat at your next gathering! {{image_2}} You can easily make this dip fit your needs. For a dairy-free option, use dairy-free cream cheese. This swap keeps the dip creamy and rich without the dairy. If you want a healthier dip, try substituting sweeteners. You can use honey, maple syrup, or a sugar alternative. These options can help cut down on sugar while keeping it tasty. To add a fun twist, try a hint of coffee or espresso. This flavor pairs well with chocolate. Just mix in a teaspoon or two when you blend the dip. For a little kick, consider incorporating liqueurs like Frangelico. This hazelnut liqueur can boost the nutty flavor. Just a splash will do! Your dip can shine with different dippers. Fresh fruit works great. Strawberries and bananas are perfect choices. You can also try apples or pears for variety. If you want something crunchier, graham crackers are classic. But don’t stop there! Try pretzels for a sweet and salty mix. For a savory contrast, pair it with cheese or crackers. This balance of flavors makes it even more fun to eat! You can keep Chocolate Hazelnut Cheesecake Dip in the fridge for up to five days. Store it in an airtight container to keep it fresh. This dip tastes best when served cold, so chilling it for about 30 minutes before serving helps the flavors blend nicely. To store, simply cover the dip tightly with plastic wrap or a lid. Avoid placing it near strong-smelling foods, as it can absorb those odors. If you notice any change in texture or smell, it’s best to toss it out. Yes, you can freeze Chocolate Hazelnut Cheesecake Dip! It stays well in the freezer for about two months. Just make sure to use a freezer-safe container to prevent freezer burn. When you’re ready to enjoy it again, move the dip to the fridge for about 12 hours to thaw. If you need it quicker, you can leave it at room temperature for an hour. After thawing, give it a good stir to restore its creamy texture. If it seems too thick, you can add a bit of heavy cream to loosen it up. What can I use instead of cream cheese? You can use dairy-free cream cheese for a vegan option. Silken tofu also works well. Both provide a creamy base but may alter the taste slightly. How can I make the dip less sweet? To reduce sweetness, cut back on the powdered sugar. You can also use unsweetened cocoa powder. This will give a nice chocolate flavor without adding more sugar. Can I make the dip ahead of time? Yes, you can make this dip a day in advance. Just cover it tightly and keep it in the fridge. This allows the flavors to blend nicely. What are the best dippers for this chocolate hazelnut dip? Fresh fruits like strawberries and bananas are great. Graham crackers also pair well. For a twist, use pretzels for a salty contrast. How many calories are in Chocolate Hazelnut Cheesecake Dip? Each serving has about 250 calories. This can vary based on your choice of dippers and portion size. Are there any healthier alternatives? You can swap powdered sugar for a sugar substitute. Greek yogurt can replace some cream cheese for added protein and fewer calories. You learned how to make a tasty Chocolate Hazelnut Cheesecake Dip. We covered each ingredient, from cream cheese to heavy cream. I shared tips for getting the best texture and flavor. We also explored variations and dietary options to fit your needs. Finally, I included storage tips to keep it fresh. This dip is simple and fun for any occasion. Enjoy creating and sharing it with loved ones!

Chocolate Hazelnut Cheesecake Dip Irresistible Delight

Dive into a world of sweet bliss with our Chocolate Hazelnut Cheesecake Dip! This creamy, velvety treat is perfect for

To make these tasty kabobs, gather these key ingredients: - 1.5 pounds boneless, skinless chicken breasts, cut into 1-inch cubes - 1/4 cup olive oil - 2 tablespoons fresh lemon juice - Zest of 1 lemon - 2 cloves garlic, minced - 1 tablespoon dried oregano - 1 tablespoon fresh thyme leaves - Salt and pepper to taste - 1 red bell pepper, cut into 1-inch pieces - 1 yellow bell pepper, cut into 1-inch pieces - 1 red onion, cut into wedges - Skewers (if using wooden ones, soak them in water for 30 minutes) You’ll need a few tools to get started: - A large mixing bowl for the marinade - A whisk to mix your ingredients - Skewers for grilling your kabobs - A grill, either gas or charcoal - A meat thermometer to check the chicken’s doneness I recommend using fresh herbs when possible. They add a bright taste and aroma. Fresh thyme leaves and dried oregano work great together. If you use dried herbs instead, cut the amount in half. Dried herbs are more potent. Always remember, fresh herbs pack a punch that dried ones often can’t match. To start, gather your ingredients. You need olive oil, lemon juice, lemon zest, minced garlic, oregano, thyme, salt, and pepper. In a large bowl, whisk the olive oil, lemon juice, lemon zest, garlic, oregano, thyme, salt, and pepper together. This mix is your marinade. It's full of bright flavors that will soak into the chicken. Now, cut your chicken breasts into 1-inch cubes. Add the chicken to the marinade. Toss the chicken well to coat it fully in the mixture. Cover the bowl with plastic wrap. Let it marinate in the fridge for at least 1 hour. If you have time, let it sit overnight. The longer it marinates, the better the flavor. While the chicken marinates, prepare your vegetables. Cut the red bell pepper, yellow bell pepper, and red onion into 1-inch pieces. After marinating, grab your skewers. Thread the marinated chicken and the vegetables onto the skewers. Alternate between chicken and veggies for a colorful look. Preheat your grill to medium-high heat. Once it's hot, place the kabobs on the grill. Cook them for about 10-12 minutes. Turn the kabobs occasionally. You want the chicken to reach an internal temperature of 165°F. The veggies should look slightly charred. For great grill marks, don’t flip the kabobs too often. Let them sit on one side for a few minutes before turning. This will give them those beautiful lines. Also, make sure your grill is hot enough. A hot grill sears the chicken and veggies nicely. If you soak wooden skewers beforehand, they won’t burn on the grill. To keep chicken from sticking, start with a clean grill. Scrub the grates with a grill brush before cooking. Preheat your grill to medium-high heat. Use oil on both the grill grates and the chicken. This creates a barrier and helps prevent sticking. You can also use a non-stick spray for extra protection. Flip the kabobs gently with tongs, not forks, to keep the juices in. Soaking wooden skewers is key. It prevents them from burning on the grill. Submerge them in water for at least 30 minutes. For added flavor, you can soak them in broth or lemon juice. This gives your kabobs a little boost. Make sure to use a deep dish or bowl to hold the skewers fully submerged. You can cook these kabobs in several ways. Using the oven, preheat to 400°F (200°C). Place kabobs on a baking sheet and cook for about 20 minutes. For a broiler, set it to high and cook for 10-12 minutes, turning halfway. If using an air fryer, cook at 375°F (190°C) for 10-12 minutes. Each method gives a unique taste and texture, so feel free to experiment! {{image_2}} You can switch up the veggies in your kabobs. Try zucchini, mushrooms, or cherry tomatoes. These options add color and flavor. Each veggie cooks differently, so keep an eye on them. Zucchini gets soft, while bell peppers stay crisp. Mix and match to find what you love. Chicken is great, but you can also use beef, shrimp, or tofu. Beef adds a rich taste, while shrimp cooks fast and is light. Tofu is perfect for a plant-based meal. Make sure to adjust marinating time. For shrimp, just 15-30 minutes is enough. Tofu can soak up flavors well, so marinate it longer. Different regions have unique flavors for marinades. In the Mediterranean, use herbs like rosemary and mint. For Asian flavors, try soy sauce and ginger. Each marinade brings a new twist to your kabobs. Don’t be afraid to experiment! Mix in spices that excite your taste buds. The world is your kitchen. After enjoying your lemon herb grilled chicken kabobs, store leftovers for later. Place the kabobs in an airtight container. Make sure they cool down first. This keeps the chicken juicy and the veggies fresh. You can store them in the fridge for up to three days. When you're ready to eat the leftovers, reheating is simple. You can use a microwave or an oven. For the microwave, heat for one to two minutes. Check if the chicken is warm. In the oven, set it to 350°F (175°C) and heat for about 10 minutes. This brings back the delicious flavors. If you want to store kabobs for a longer time, freezing works well. Wrap the kabobs tightly in plastic wrap or foil. Then, place them in a freezer-safe bag. Make sure to remove as much air as possible. You can freeze them for up to three months. When you want to eat them, thaw in the fridge overnight and reheat as mentioned before. Yes, you can use frozen chicken. However, it is best to thaw it first. This way, the chicken absorbs the marinade better. Always remember to marinate the chicken for at least an hour. Lemon herb grilled chicken kabobs pair well with many sides. Here are some tasty options: - Rice or quinoa - Grilled vegetables - Fresh salad - Pita bread - Tzatziki sauce These sides balance the flavors and make a great meal. For maximum flavor, marinate the chicken for at least one hour. If you have more time, marinate it overnight. The longer you marinate, the more flavor the chicken will soak up. The chicken should reach an internal temperature of 165°F (75°C). This ensures it is safe to eat and fully cooked. Use a meat thermometer for accuracy when grilling. Lemon herb grilled chicken kabobs are simple and tasty. We covered key ingredients, tools, and how to grill them perfectly. Don’t forget to try fresh herbs for richer flavor. Remember to use the right techniques to prevent sticking and achieve those nice grill marks. You can also switch proteins or add veggies for variety. Store leftovers well for later meals. Enjoy grilling and delight in your delicious kabobs!

Lemon Herb Grilled Chicken Kabobs Flavorful and Easy

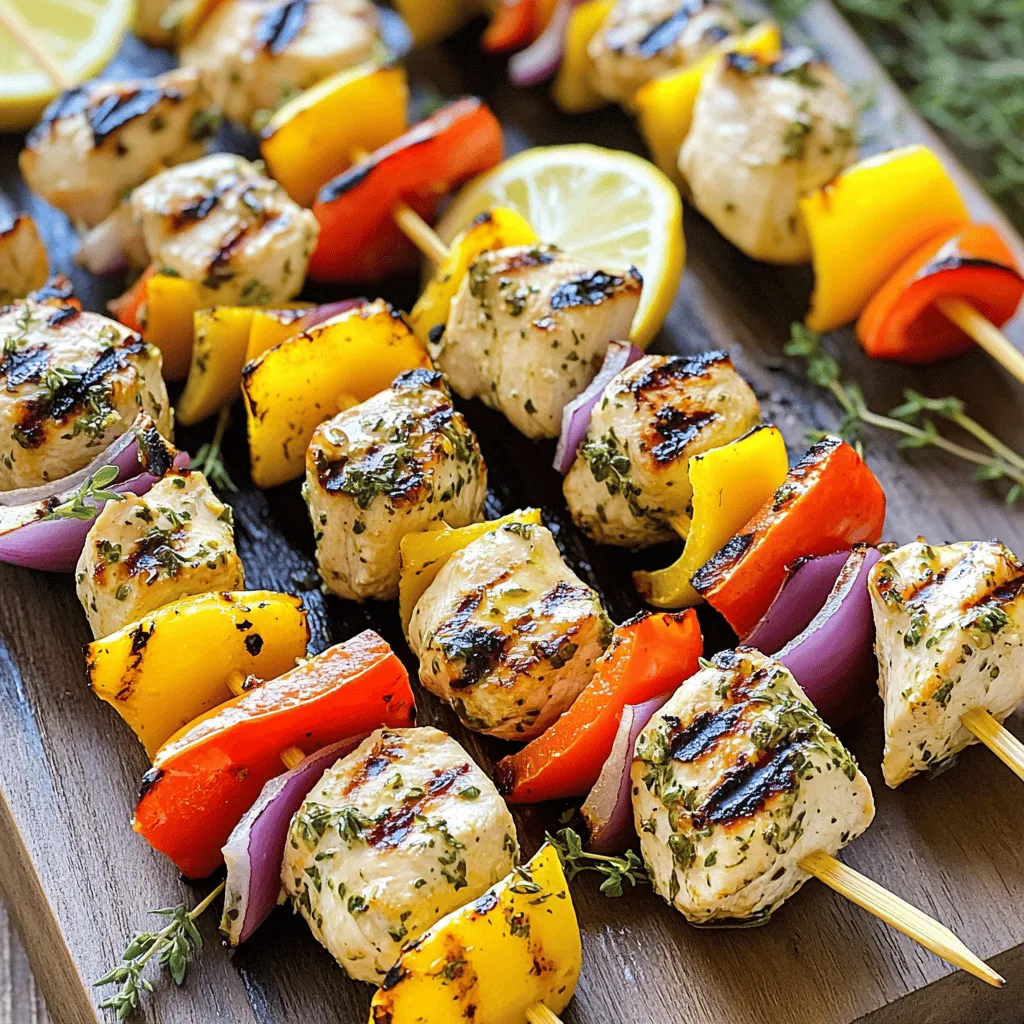
Are you ready to spice up your dinner? These Lemon Herb Grilled Chicken Kabobs are packed with flavor and super

- 4 bone-in chicken thighs, skin-on - 1 cup freshly squeezed orange juice - 2 tablespoons honey - 2 tablespoons soy sauce - 1 tablespoon olive oil - 3 cloves garlic, minced - 1 inch ginger, grated - 1 teaspoon cornstarch mixed with 1 tablespoon water (for thickening) - Salt and pepper to taste - Zest of 1 orange for garnish - Chopped green onions for garnish You can use skinless chicken thighs if you want less fat. For the orange juice, feel free to use store-bought juice. If you need a vegan option, use tofu instead of chicken. Maple syrup can replace honey for a different sweetness. Finally, low-sodium soy sauce is great if you watch your salt intake. When picking chicken thighs, look for pieces with bright skin and no dark spots. The meat should feel firm and moist. If you can, choose organic or free-range chicken for better flavor and quality. Always check the sell-by date to ensure freshness. First, take your chicken thighs out of the fridge. You want them cold but not frozen. Season both sides with salt and pepper. This adds flavor to the meat. Next, make the marinade. In a medium bowl, whisk together the orange juice, honey, soy sauce, minced garlic, and grated ginger. Mix until everything blends well. This marinade gives the chicken a sweet and tangy taste. Now, heat a large oven-safe skillet over medium-high heat. Add olive oil and let it warm up. Place the chicken thighs in the skillet, skin-side down. Sear them for about 5-7 minutes. You want the skin to turn golden brown and crispy. This step locks in the juices. Once the skin is brown, flip the thighs over. Pour your orange glaze mixture over the chicken. Let it simmer for 3-4 minutes. This helps the flavors blend nicely. After simmering, it’s time to thicken the glaze. Mix cornstarch with a tablespoon of water in a small bowl. Pour this mixture into the skillet and stir well. The glaze should thicken up quickly. Once it reaches the right thickness, transfer the skillet to your preheated oven. Roast the chicken for 25-30 minutes. You want the chicken to reach an internal temperature of 165°F (75°C). After baking, let it rest for a few minutes. This makes it juicier when you serve it. To get crispy skin, start with dry chicken thighs. Pat them with paper towels before cooking. This helps remove moisture. Sear the skin-side down first in a hot skillet. Cook for about 5-7 minutes until golden brown. Avoid moving the chicken too much during this time. This allows the skin to crisp up. For the best glaze, mix orange juice, honey, soy sauce, garlic, and ginger well. Simmer this mixture for 3-4 minutes to blend the flavors. If the sauce is too thin, use a cornstarch mixture to thicken it. Add one teaspoon of cornstarch mixed with one tablespoon of water. Stir it into the glaze until it reaches your desired thickness. Presentation makes your dish shine! Place the chicken thighs on a large plate. Drizzle extra orange glaze over them for a glossy look. Garnish with orange zest and chopped green onions. This adds color and freshness. Pair the chicken with steamed jasmine rice and roasted veggies for a complete meal. A colorful plate will impress your guests! {{image_2}} You can make orange glazed chicken thighs in different ways. Grilling gives a smoky flavor. Start by marinating the chicken in the orange glaze. Then, grill on medium heat for about 6-8 minutes per side. Make sure to brush with extra glaze while cooking. Slow cooking is another great option. Place the chicken thighs in a slow cooker with the orange glaze. Cook on low for 6-8 hours or high for 3-4 hours. This method makes the chicken super tender and juicy. To change the flavor, add spices or other citrus fruits. Try adding a pinch of cayenne for heat. It pairs well with the sweet orange. You can also mix in lemon or lime juice for a tangy twist. For a fragrant touch, add herbs like rosemary or thyme. These herbs enhance the orange flavor. You can also experiment with garlic powder or smoked paprika for depth. Pair your orange glazed chicken with tasty side dishes. Steamed jasmine rice complements the dish well. It soaks up the extra glaze nicely. Roasted vegetables are also a great match. Try carrots, bell peppers, or broccoli. Their natural sweetness works well with the orange glaze. For a fresh option, serve a simple green salad. A light vinaigrette can balance the rich flavors of the chicken. To store leftover orange glazed chicken thighs, let them cool first. Place them in an airtight container. You can keep them in the fridge for up to four days. Make sure the glaze is not too thick, as this can cause it to harden. If you want to keep them longer, freezing is a great option. When you need to reheat the chicken, the oven works best. Preheat your oven to 350°F (175°C). Place the chicken in an oven-safe dish and cover with foil. Heat for about 20 minutes or until warm. If you prefer the microwave, use a microwave-safe dish. Heat in short intervals to avoid drying it out. Add a splash of orange juice to keep it moist. To freeze, wrap each chicken thigh tightly in plastic wrap. Then place them in a freezer bag. They can last up to three months in the freezer. When you are ready to eat, take them out and thaw in the fridge overnight. For faster thawing, you can use the microwave on the defrost setting. After thawing, reheat as mentioned above for the best taste. You can serve many side dishes with orange glazed chicken thighs. Here are my favorites: - Steamed jasmine rice - Roasted vegetables like broccoli or carrots - A fresh salad with citrus dressing - Mashed potatoes or sweet potatoes - Quinoa with herbs These sides will balance the sweet glaze and make a great meal! Yes, you can use chicken breasts. They will cook faster than thighs. To keep them juicy, you should not overcook them. Check the internal temperature at 165°F (75°C). The glaze will still taste great, but you may miss the crispy skin that thighs offer. You can check if chicken thighs are cooked by using a meat thermometer. Insert it into the thickest part of the thigh. It should read 165°F (75°C). You can also cut into the meat. If the juices run clear and the meat is no longer pink, it is done. Always let the thighs rest for a few minutes before serving to keep them juicy. This blog post covered everything you need for making Orange Glazed Chicken Thighs. You learned about key ingredients, cooking steps, and tips for the best results. I shared how to achieve crispy skin and create a perfect glaze. We also explored storage options and answered common questions. With these tips, I hope you feel ready to cook delicious Orange Glazed Chicken Thighs. Enjoy sharing your tasty creation with friends and family!

Savory Orange Glazed Chicken Thighs Recipe Guide

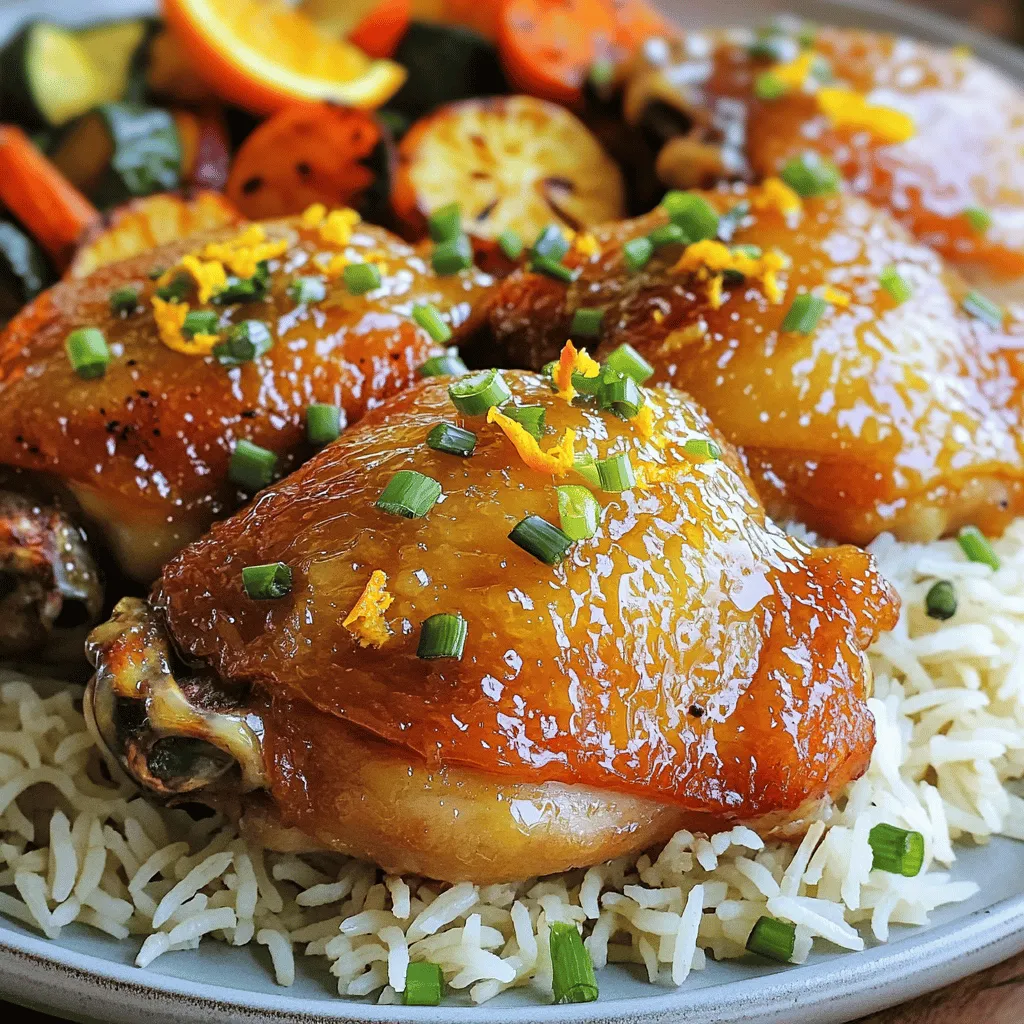
Are you ready to impress your family with a delicious meal? My Savory Orange Glazed Chicken Thighs recipe will do

- 2 cans of refrigerated cinnamon rolls (with icing) - 6 large eggs - 1 cup milk - 1 teaspoon vanilla extract - 1 teaspoon ground cinnamon - ¼ teaspoon nutmeg The main ingredients are simple and easy to find. The cinnamon rolls give a sweet base. Eggs, milk, and vanilla add richness. Cinnamon and nutmeg give warmth and spice. - ½ cup maple syrup - ½ cup chopped pecans (optional) - Powdered sugar for dusting Maple syrup adds a sweet touch. Chopped pecans give a nice crunch. Dusting with powdered sugar makes it look fancy. These additions can elevate your dish. - 9x13 inch baking dish - Mixing bowls - Whisk You need a baking dish to hold everything. A 9x13 inch dish works best. Mixing bowls help you combine the egg mixture. A whisk is key for mixing things well. Having the right tools makes cooking easier. First, preheat your oven to 350°F (175°C). This step is key to getting a nice bake. Next, grease a 9x13 inch baking dish. Use cooking spray or butter to coat the dish. This helps prevent sticking. Now, let’s prepare the cinnamon rolls. Open the two cans of refrigerated cinnamon rolls. Cut each roll into quarters. Place the pieces evenly in the greased baking dish. Spread them out so they bake evenly. In a large bowl, whisk together 6 large eggs, 1 cup of milk, and 1 teaspoon of vanilla extract. Add 1 teaspoon of ground cinnamon and ¼ teaspoon of nutmeg. Mix until it’s all well combined. This mixture gives flavor to the casserole. Now, pour the egg mixture over the cinnamon roll pieces. Make sure every piece gets coated. Use a spoon to help if needed. It’s time to bake! Drizzle ½ cup of maple syrup over the casserole. If you like, sprinkle ½ cup of chopped pecans on top. This adds a nice crunch. Press the cinnamon roll pieces down gently into the mixture. Bake in the preheated oven for 25-30 minutes. Check for doneness when it is puffed and golden brown. While it bakes, warm the icing from the cinnamon rolls in the microwave for 10-15 seconds. This makes it easier to drizzle later. After baking, let the casserole cool for 5 minutes. Then, drizzle the warmed icing over the top. Dust with powdered sugar before serving. Enjoy your delicious creation! To make your cinnamon roll French toast casserole perfect, start with even baking. Keep the oven at 350°F (175°C). This helps the dish bake evenly. You can also rotate the baking dish halfway through cooking. This helps avoid hot spots in your oven. When cutting the cinnamon rolls, use kitchen scissors. They make cutting the rolls into quarters quick and easy. You want each piece to be about the same size. This ensures even cooking and makes for a nice presentation. For toppings, keep it simple yet tasty. Drizzle warm icing over the top. A dusting of powdered sugar adds a nice touch, too. You can serve it with fresh fruit like berries or bananas for a pop of color and flavor. To make the casserole more indulgent, serve it with whipped cream or a scoop of vanilla ice cream. You can also add a side of crispy bacon for a savory touch. You can make this casserole in a slow cooker as well. Just prepare the mixture as usual and pour it into the slow cooker. Cook on low for about 3 to 4 hours. This method gives the casserole a soft, gooey texture. If you want to try an Instant Pot, use a cake pan that fits inside. Add one cup of water to the pot and place the pan on a trivet. Cook on high pressure for 25 minutes. This creates a moist casserole that cooks quickly. {{image_2}} You can make this dish even more fun by adding fruits. Blueberries and bananas work great. They add sweetness and texture. You can also try different nuts. Chopped walnuts or almonds add a nice crunch. If you want a treat, drizzle some chocolate over the top. It makes each bite special and rich. If you need gluten-free options, use gluten-free cinnamon rolls. Many brands offer tasty choices. For a dairy-free version, swap regular milk for almond or oat milk. You can also use egg substitutes like flaxseed meal or applesauce for a vegan twist. These changes keep the dish delicious while meeting dietary needs. You can make this casserole fit any holiday. During fall, add pumpkin spice or pecans for a cozy vibe. For winter, try using peppermint extract. In summer, fresh berries bring a light touch. Seasonal spices and flavors can turn this dish into a festive treat for any occasion. To store your Cinnamon Roll French Toast Casserole, let it cool first. Cover it tightly with plastic wrap or aluminum foil. This keeps it fresh and moist. It will stay good in the fridge for about 3 to 5 days. Always check for any signs of spoilage before enjoying again. You can freeze this casserole too! First, let it cool completely. Then, cut it into portions. Wrap each piece in plastic wrap and place them in a freezer-safe bag. Squeeze out as much air as you can. This will help keep it fresh for about 2 to 3 months. When you're ready to eat, thaw it in the fridge overnight. There are fun ways to enjoy leftovers! You can reheat a slice in the microwave for a quick breakfast. If you want a crisp top, pop it in the toaster oven. To make it feel special, drizzle some extra icing or maple syrup on top. Enjoy your tasty treat! Yes, you can prep this dish the night before. Start by cutting the cinnamon rolls and placing them in the baking dish. Then, mix the eggs, milk, vanilla, cinnamon, and nutmeg. Pour this mixture over the rolls. Cover the dish tightly with plastic wrap and store it in the fridge. In the morning, just bake it as directed. This way, you save time and enjoy a warm breakfast. I recommend a 9x13 inch baking dish. This size holds all the ingredients well. It ensures even cooking and helps the casserole rise nicely. Use a glass or ceramic dish for best results. These materials hold heat well and help brown the casserole evenly. Absolutely! If you use homemade cinnamon rolls, cut them into quarters just like the store-bought ones. You may need to adjust the baking time. Keep an eye on it and bake until golden brown. Homemade rolls might absorb more egg mixture, so check for doneness a bit earlier than the recipe states. Enjoy the fresh taste! In this article, we covered how to make a delicious cinnamon roll casserole. We discussed the main and optional ingredients, key kitchen tools, and step-by-step instructions. I shared tips for perfecting your casserole and how to store leftovers properly. Remember, you can switch up flavors or adjust for diets. Whether using a slow cooker or an oven, these recipes can bring joy to any meal. Enjoy making this dish your own with fun variations and serving ideas. It's all about experimenting and having fun in the kitchen!

Cinnamon Roll French Toast Casserole Simple Delight

Who doesn’t love a comforting breakfast that’s both easy and delicious? Cinnamon Roll French Toast Casserole is the perfect way

- Flatbread options: You can use store-bought flatbread for a quick meal. If you want to make it from scratch, use simple dough with flour and water. Either way, flatbread serves as a great base. - Chicken preparation details: I like to use cooked, shredded chicken. This saves time. You can use rotisserie chicken or cook chicken breasts at home. Just ensure it’s tender and easy to shred. - BBQ sauce suggestions: Choose your favorite BBQ sauce. A sweet or smoky flavor works best. Brands like Sweet Baby Ray’s or Stubb’s offer great options. You can even make your own if you’re feeling adventurous! 1. Preheating the oven: Start by turning your oven to 400°F (200°C). This heat will help make the crust crispy. 2. Mixing chicken with BBQ sauce: In a bowl, take your cooked, shredded chicken. Pour in 1/2 cup of BBQ sauce. Mix well until the chicken gets coated. Add smoked paprika, salt, and pepper to taste. This adds great flavor. 3. Preparing the flatbread: Grab your flatbread. If you bought it, make sure it's ready. Place it on a baking sheet lined with parchment paper. Brush each flatbread lightly with olive oil. This will help it crisp up. 1. Spreading the chicken mixture: Take the BBQ chicken you mixed earlier. Spread it evenly over the flatbreads. Make sure every corner gets some chicken. 2. Layering cheese and toppings: Now, sprinkle 1 cup of shredded mozzarella cheese over the chicken. Next, add the thinly sliced red onions and 1/2 cup of corn kernels. Spread them out so every bite is full of flavor. 3. Baking and checking doneness: Place the flatbreads in the hot oven. Bake for 12-15 minutes. Keep an eye on them. You want the cheese to melt and bubble, and the edges should turn golden brown. After baking, let the flatbreads cool for a couple of minutes. This makes them easier to slice. Enjoy your BBQ Chicken Flatbread Pizza! - Choosing the right BBQ sauce: Pick a BBQ sauce that you love. A sweet sauce makes the pizza rich. A tangy sauce adds a nice kick. Try different brands to find your favorite. - Suggested spices and seasonings: Add smoked paprika for a deeper flavor. A sprinkle of garlic powder gives extra taste. You can also use black pepper for some heat. - How to achieve a crispy flatbread: Brush olive oil on the flatbread before baking. Bake it until the edges are golden brown. Use a pizza stone for even better crispiness. - Ideal pairings and side dishes: Serve with a simple salad for freshness. Coleslaw adds a nice crunch. Pair with a light drink like lemonade to balance flavors. - Presentation ideas: Cut the pizza into wedges and arrange on a large platter. Garnish with cilantro for a pop of color. Use a drizzle of extra BBQ sauce on top for flair. - Best practices for leftovers: Store leftover pizza in an airtight container. Place parchment paper between slices to prevent sticking. Reheat in the oven for the best taste. {{image_2}} You can change this recipe to fit your taste. For proteins, try using shredded jackfruit for a vegan option. It gives a similar texture to chicken. You can also use pulled pork or turkey for a different flavor. If you need cheese alternatives, consider vegan cheese. It melts nicely and works well with BBQ flavors. You can also try goat cheese for a tangy twist. Want to get creative? Add sliced jalapeños for some heat. Pineapple chunks can add a sweet touch. You can also use bell peppers or spinach for extra veggies. In summer, fresh toppings shine. Try adding diced tomatoes or avocado. Fresh arugula gives a nice peppery taste too. These toppings make it light and refreshing. For winter, think comfort. Add roasted sweet potatoes for warmth. You can also sprinkle some feta cheese on top for a rich flavor. These additions will keep you cozy during colder months. To keep your BBQ chicken flatbread pizza fresh, follow these steps: - Cool Down: Allow the pizza to cool for about 10 minutes after baking. This helps to avoid sogginess. - Wrap It Up: Use plastic wrap or aluminum foil for wrapping. This keeps moisture in and flavors strong. - Fridge Storage: Place the wrapped pizza in the fridge. It stays good for 3-4 days. - Freezer Storage: For longer storage, put the pizza in an airtight container. It can last up to 2 months in the freezer. When it's time to enjoy your leftovers, reheating correctly is key: - Oven Method: Preheat your oven to 350°F (175°C). Place the pizza on a baking sheet. Heat for about 10 minutes. This keeps the flatbread crispy. - Microwave Method: If you're short on time, you can use the microwave. Place the pizza on a microwave-safe plate. Heat for about 30-60 seconds. The flatbread may be softer, but it’s quick and easy. For the best taste, I recommend the oven method. It brings back the original texture and flavor. Enjoy every bite! Can I use a different type of flatbread? Yes, you can use any flatbread you like. Pita bread or naan works well too. Just ensure it can hold the toppings without getting soggy. What can I substitute for mozzarella cheese? You can use cheddar, gouda, or even dairy-free cheese if needed. Each type will give a different taste and texture. How long does this dish take to prepare and cook? This dish takes about 25 minutes total: 10 minutes to prep and 15 minutes to bake. Is this recipe suitable for meal prep? Yes, this recipe is great for meal prep. You can prepare the chicken mix and store it in the fridge. Can I make BBQ Chicken Flatbread Pizza ahead of time? You can make it ahead. Just store the cooked flatbreads in the fridge. Reheat them when ready to serve. Where can I find good BBQ Chicken Flatbread Pizza at restaurants? Many casual dining spots offer BBQ chicken flatbreads. Look for places that focus on American or Italian cuisine. This blog post guides you through making BBQ Chicken Flatbread Pizza. We covered ingredients, steps for preparation and baking, plus tips for serving. Remember, you can customize with different proteins or toppings. Storage and reheating tips ensure you enjoy leftovers too. With practice and creativity, you’ll master this dish. Experiment with flavors and make it your own. Enjoy sharing this tasty meal with family and friends. Your homemade flatbread pizza journey starts now!

Savory BBQ Chicken Flatbread Pizza Quick and Easy Recipe

Are you craving a quick dinner that’s packed with flavor? This Savory BBQ Chicken Flatbread Pizza hits the spot! In

For this tasty mango coconut chia pudding, you will need: - 1 cup coconut milk (canned or carton) - 1/2 cup almond milk (or any milk of your choice) - 1/4 cup chia seeds - 1 tablespoon maple syrup (or honey) - 1 ripe mango, diced - 1/2 teaspoon vanilla extract - A pinch of sea salt - Toasted coconut flakes (for garnish) - Fresh mint leaves (for garnish) You can switch out some ingredients if needed. Use oat milk instead of almond milk. If you don’t have maple syrup, honey works well. You can also skip the sweetener if you prefer a less sweet pudding. Want a different fruit? Try bananas or berries instead of mango. Chia seeds pack a punch of nutrition. They are high in fiber, which helps digestion. They also have omega-3 fatty acids, great for heart health. Coconut milk is rich in healthy fats that give you energy. It also adds a creamy texture. Mango is full of vitamins A and C, which support your immune system. Almond milk is low in calories and can be a good source of calcium. The combination makes this pudding not just tasty, but healthy too! To make mango coconut chia pudding, start by gathering your ingredients. You will need: - 1 cup coconut milk (canned or carton) - 1/2 cup almond milk (or any milk of your choice) - 1/4 cup chia seeds - 1 tablespoon maple syrup (or honey) - 1 ripe mango, diced - 1/2 teaspoon vanilla extract - A pinch of sea salt - Toasted coconut flakes (for garnish) - Fresh mint leaves (for garnish) In a medium bowl, mix the coconut milk, almond milk, maple syrup, vanilla extract, and sea salt. Whisk it until smooth. Next, slowly add the chia seeds. Stir well to avoid clumps. Cover the bowl with plastic wrap or a lid. Refrigerate the bowl for at least 4 hours or overnight. The chia seeds will absorb the liquid and thicken the mixture. This time is key for a creamy pudding. If you leave it overnight, the texture will be even better. Once the pudding is set, stir it gently to break up any clumps. This ensures a smooth consistency. If you want a thicker pudding, add more chia seeds before refrigerating. For a fun presentation, layer the pudding in small glasses or bowls. Add a layer of diced mango between the pudding layers. Top with more mango and sprinkle toasted coconut flakes on top. This adds great flavor and crunch. Finish it off with fresh mint leaves for a pop of color. Serve chilled for a refreshing treat! To get your mango coconut chia pudding just right, start with the liquids. I recommend using a mix of coconut milk and almond milk. This blend gives a nice creamy base. Use 1 cup of coconut milk and 1/2 cup of almond milk. When you add the chia seeds, do it slowly. Stir them in as you go. This helps prevent clumps. After mixing, cover the bowl and chill it for at least 4 hours. If you can, let it sit overnight. This time lets the seeds soak up the liquid and thicken. A good stir before serving breaks up any clumps that may form. For extra flavor, try adding toppings and mix-ins. Diced mango adds sweetness and color. Toasted coconut flakes give a crunchy contrast. A touch of vanilla extract adds depth. You can also sprinkle a pinch of sea salt to balance the sweetness. If you like a sweeter pudding, add more maple syrup or honey. Don’t forget fresh mint leaves for a fresh taste and pretty look. A few common mistakes can ruin your pudding. First, don’t skip whisking the milk and chia seeds together. This step is key to preventing lumps. Second, avoid using too much chia. Stick to 1/4 cup for the right thickness. Lastly, don't forget to chill the pudding. Chilling is essential for it to set properly. If you rush, you might end up with a runny mix. Follow these tips, and your pudding will be a hit! {{image_2}} You can mix it up with other fruits. Some great choices include berries, kiwi, or banana. These fruits add different flavors and colors. You can also try using a blend of fruits for a fun twist. For example, add diced strawberries or blueberries for a burst of color. This recipe is already dairy-free. Use coconut milk and almond milk for a creamy base. If you want more options, try oat milk or cashew milk. Both will work well in this recipe. They keep it rich and tasty without any animal products. You can change the sweetness to fit your taste. Use less maple syrup for a less sweet pudding. You can also try using agave syrup or stevia. Each option gives a different flavor. Taste as you go to find your perfect level of sweetness. To keep your mango coconut chia pudding fresh, place it in an airtight container. Make sure the lid fits snugly. This helps to prevent any smells in your fridge. If you have layers of mango on top, cover them gently to avoid bruising. You can enjoy your pudding for up to five days in the fridge. After that, the texture may change. Always check for any signs of spoilage, like an off smell or mold. When stored properly, the taste and flavor stay great for several days. You can freeze this pudding, but it may change in texture. To freeze, pour it into ice cube trays or small containers. Leave a little space at the top as it expands. When you want to eat it, let it thaw in the fridge overnight. Stir well before serving to bring back its creamy texture. Chia seeds are tiny black seeds from the Salvia hispanica plant. They are rich in fiber, protein, and omega-3 fatty acids. Eating chia seeds can help with digestion. They also keep you feeling full longer. This makes them great for weight management. Plus, they are gluten-free and can be added to many dishes. Yes, you can use different types of milk. Almond milk is a great choice. You can also try oat milk, soy milk, or cashew milk. Each type of milk adds its own flavor. Just make sure to pick a milk you enjoy. Chia pudding needs at least four hours to set. For best results, leave it overnight. The chia seeds will swell and absorb the liquid. This creates the creamy pudding texture you want. Absolutely! You can skip the sweetener. The ripe mango adds natural sweetness. You can also use ripe bananas. If you want, try adding extra fruit for flavor. Adjust it to your taste! This blog post covered the key ingredients for your mango coconut chia pudding. We discussed how to prepare it and shared tips for the best results. You learned about flavor enhancements, variations, and how to store leftovers. Chia seeds are great for your health, and you can even tweak this recipe to fit your needs. Overall, this pudding is easy to make and delicious to enjoy. Give it a try and delight in the creamy, tasty goodness!

Mango Coconut Chia Pudding Creamy and Simple Recipe

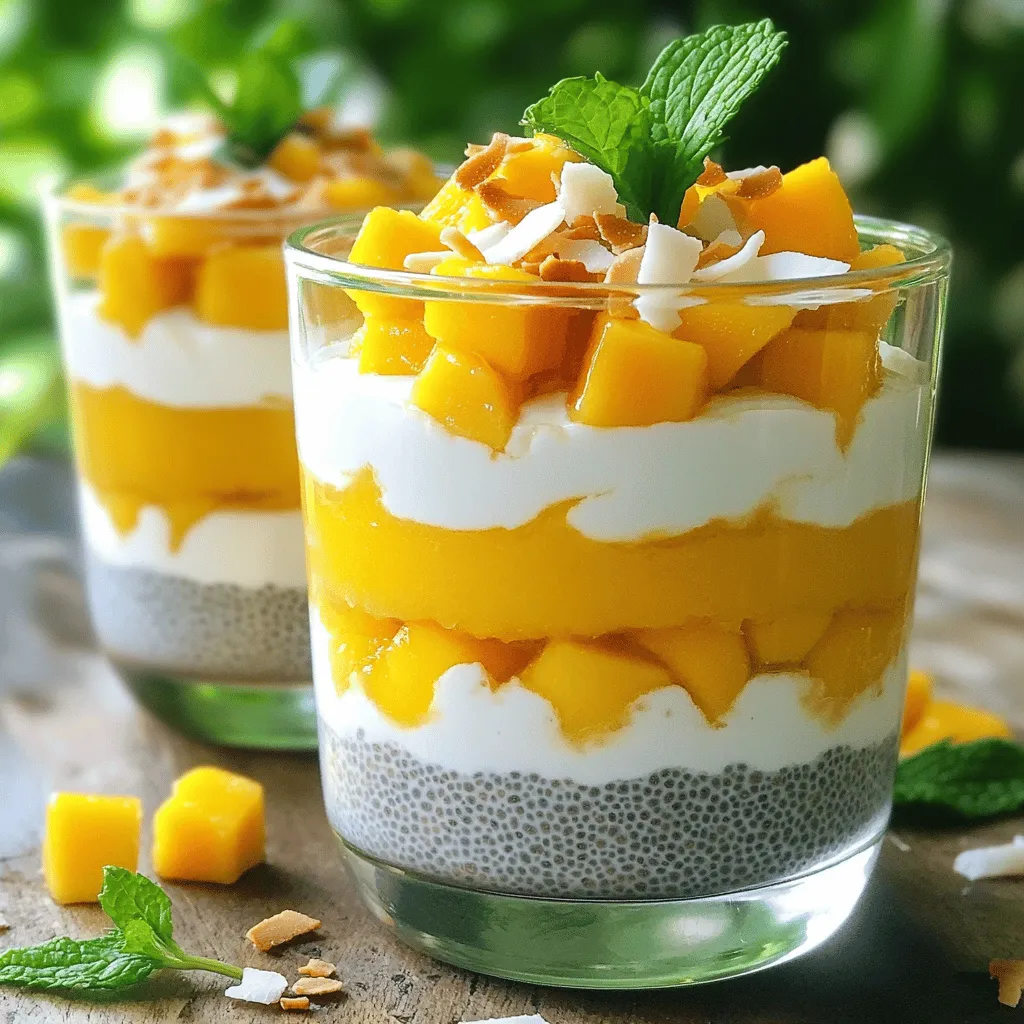
Are you craving a treat that’s both healthy and delicious? Look no further! This Mango Coconut Chia Pudding is creamy,

For this tasty dish, you need: - 4 boneless, skinless chicken breasts - 1 cup cream cheese, softened - 1 cup shredded mozzarella cheese - ¼ cup grated Parmesan cheese These ingredients give the dish a creamy and cheesy texture. The chicken is the main part, while the cheeses add rich flavor. The cream cheese makes the filling smooth and easy to mix. To add flavor, gather: - 2 cups fresh spinach, chopped - 2 garlic cloves, minced - 1 teaspoon dried Italian herbs (oregano, basil, thyme) - Salt and pepper to taste Fresh spinach brings color and nutrition. Garlic adds a lovely aroma. The Italian herbs give a nice touch of flavor, making every bite special. If you want a crunchy top, consider: - ½ cup breadcrumbs (optional, for topping) The breadcrumbs can add a nice crunch. You can use them if you like a little texture contrast with the soft filling. Start by heating a skillet over medium heat. Add 1 tablespoon of olive oil. Let it warm for a moment. Then, add 2 minced garlic cloves. Sauté until you smell the garlic, about 1 minute. Next, toss in 2 cups of chopped fresh spinach. Cook for 2-3 minutes until the spinach wilts. Remove the skillet from the heat and let it cool slightly. In a mixing bowl, combine the sautéed spinach with 1 cup of softened cream cheese, 1 cup of shredded mozzarella cheese, and ¼ cup of grated Parmesan cheese. Add 1 teaspoon of dried Italian herbs, salt, and pepper to taste. Mix everything until it’s smooth and creamy. Now, take 4 boneless, skinless chicken breasts. Use a sharp knife to cut a pocket in the thickest part of each breast. Be careful not to cut all the way through. Next, take the cheesy spinach mixture and spoon it into each chicken pocket. Make sure to fill them well. If you want, you can use toothpicks to secure the openings. This keeps the filling inside while cooking. Preheat your oven to 375°F (190°C). Place the stuffed chicken breasts in a greased baking dish. If you like a crunchy top, sprinkle ½ cup of breadcrumbs over the chicken. Bake for 25-30 minutes. Check that the chicken reaches an internal temperature of 165°F (75°C). Once done, remove the chicken from the oven. Let it rest for about 5 minutes. This helps keep the juices inside. When ready, slice each breast in half to show off that cheesy filling. Serve it on a plate with roasted vegetables or a fresh salad for a lovely meal. To ensure your chicken stays juicy and tender, choose boneless, skinless breasts. They cook evenly and absorb flavors well. When you cut the pocket for stuffing, only slice halfway through. This keeps the filling inside. Always let the chicken rest after baking. This step locks in moisture and flavors. You can boost the flavor in many ways. Try adding sun-dried tomatoes or roasted red peppers to the cheesy mixture. If you want a little heat, add crushed red pepper flakes. Instead of mozzarella, use provolone or gouda for a twist. You can swap cream cheese for ricotta if you like a lighter filling. Fresh herbs like basil or parsley can also brighten the dish. Presentation matters! Slice each chicken breast in half to reveal the cheesy spinach filling. Serve on a plate with a side of roasted veggies or a fresh salad for color. A drizzle of balsamic glaze adds a nice touch. Pair with a light white wine for a perfect dinner experience. Enjoy the flavors and share with friends! {{image_2}} You can play with the cheeses in this dish. Instead of cream cheese, try ricotta for a lighter feel. If you love strong flavors, swap mozzarella for fontina or gouda. Cheddar adds a sharp taste, while feta can give a nice tang. Each cheese brings its own charm. Mix and match to find your favorite combination. Feel free to boost nutrition by adding more veggies. Diced bell peppers or sun-dried tomatoes work well. Chopped mushrooms add great texture. You can also mix in artichoke hearts for a Mediterranean twist. Just remember to sauté them before mixing with the cheese. This keeps the filling nice and creamy. If you need gluten-free options, skip the breadcrumbs on top. You can also use gluten-free breadcrumbs if you want that crunch. Check the labels when choosing cheese to ensure they are gluten-free. This dish can easily fit into a gluten-free diet while still tasting amazing. To keep your Cheesy Spinach Stuffed Chicken fresh, let it cool first. Place the chicken in an airtight container. Store it in the fridge. It will last for up to 3 days. If you want to keep it longer, try freezing it. Just make sure to wrap it well to prevent freezer burn. Reheat your stuffed chicken in the oven for the best results. Preheat the oven to 350°F (175°C). Place the chicken in an oven-safe dish. Add a splash of chicken broth to keep it moist. Cover with foil and heat for 20-25 minutes. You can also use the microwave. Heat each piece for about 1-2 minutes. Check that the chicken is hot all the way through. Freezing your Cheesy Spinach Stuffed Chicken is easy and smart. Wrap each piece in plastic wrap or foil. Then place them in a freezer bag. Make sure to remove as much air as possible. You can freeze them for up to 3 months. When you’re ready to eat, let it thaw in the fridge overnight before reheating. Bake the Cheesy Spinach Stuffed Chicken at 375°F for 25 to 30 minutes. The chicken should reach an internal temperature of 165°F. This ensures it is fully cooked and safe to eat. Use a meat thermometer for the best results. It helps avoid dry chicken and keeps it juicy. Yes, you can use frozen spinach. Just remember to thaw and drain it first. Frozen spinach has a lot of water, which can make your filling too wet. After draining, chop the spinach into smaller pieces if needed. This will help mix it better with the cheeses. Several sides go great with Cheesy Spinach Stuffed Chicken. Here are some tasty options: - Roasted vegetables, like carrots and bell peppers - A fresh garden salad with a light dressing - Quinoa or rice for a hearty option - Garlic bread for a fun twist These sides complement the chicken's flavors and add color to your plate. Enjoy experimenting with different combinations! This blog post covers how to make Cheesy Spinach Stuffed Chicken. You learned about the key ingredients, including chicken, spinach, and different cheeses. I shared step-by-step instructions for preparing and baking the dish. You also found tips for perfect texture and flavor, along with variations to try. In the end, this dish offers great taste and flexibility. Use the storage tips to keep leftovers fresh. Enjoy making this recipe and impress your family at the table!

Cheesy Spinach Stuffed Chicken Flavorful Dinner Idea

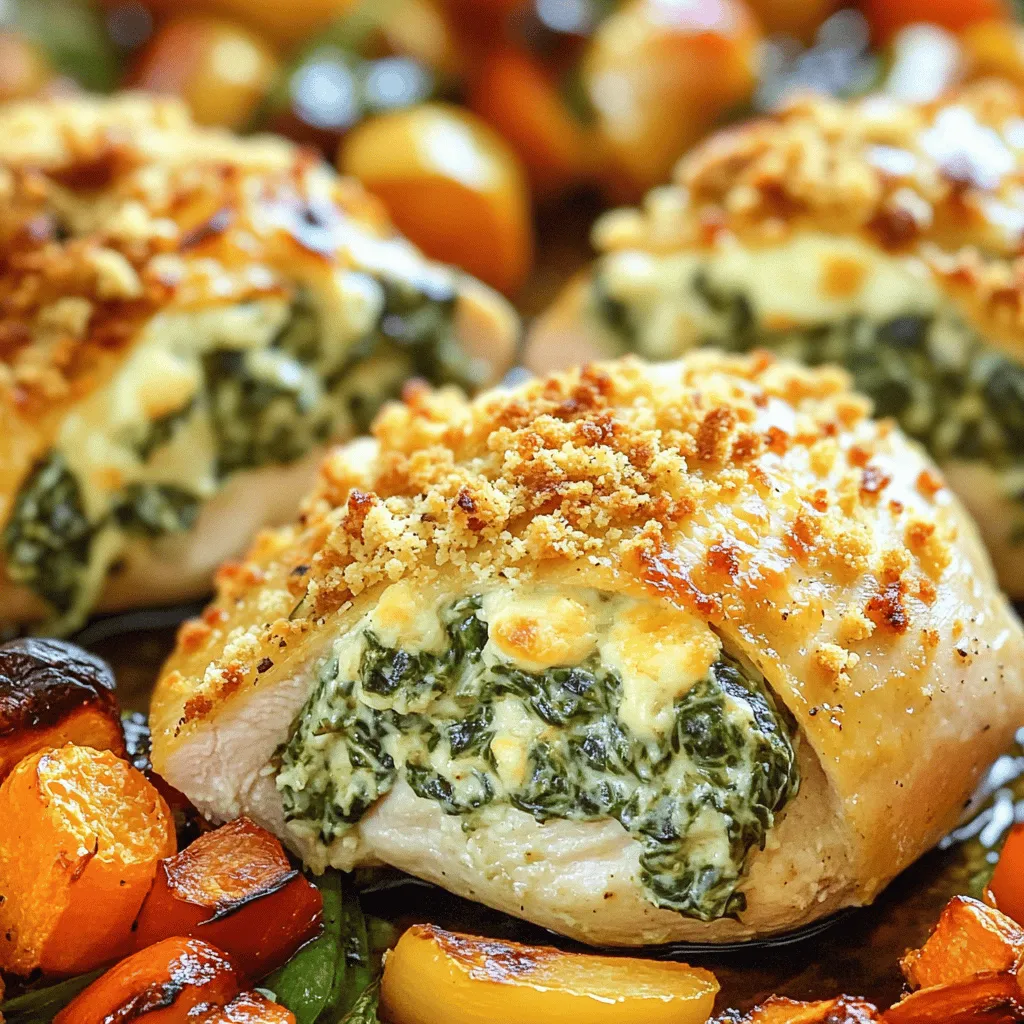
If you’re looking for a tasty dinner that’s easy to make, I’ve got the perfect recipe for you! Cheesy Spinach

- 1 cup almond butter - 1 cup rolled oats - 1/2 cup unsweetened shredded coconut These three ingredients form the heart of the Almond Joy Energy Bites. Almond butter gives a rich, nutty flavor. Rolled oats provide a chewy texture and help bind everything together. The shredded coconut adds a tropical touch and a slight sweetness. - 1/4 cup honey or maple syrup - 1/2 cup dark chocolate chips - 1/4 cup chopped almonds Honey or maple syrup is a sweet addition. It helps to keep the bites moist. Dark chocolate chips bring a rich, decadent taste. Chopped almonds add a nice crunch and enhance the almond flavor. - 1 teaspoon vanilla extract - A pinch of sea salt Vanilla extract deepens the overall flavor. It adds warmth and sweetness to the bites. A pinch of sea salt balances the sweetness and highlights all the flavors. These ingredients work together to create a tasty, energy-packed snack. You can mix and match based on your taste. Enjoy making these bites with your favorite flavors! First, take a large mixing bowl. Add 1 cup of almond butter. Next, pour in 1/4 cup of honey or maple syrup. Then, add 1 teaspoon of vanilla extract. Mix these ingredients well until the blend is smooth and creamy. This will form a tasty base for your energy bites. Now, it’s time to add more fun! Fold in 1 cup of rolled oats. Then, add 1/2 cup of shredded unsweetened coconut and 1/4 cup of chopped almonds. Don’t forget to toss in 1/2 cup of dark chocolate chips. Add a pinch of sea salt for flavor. Stir everything together until you have a sticky mixture. Using your hands, grab small portions of the mixture. Roll them into balls about 1 inch wide. Place the bites on a parchment-lined baking sheet. Once all the mixture is rolled, put the sheet in the fridge for at least 30 minutes. This chilling time helps the bites firm up. Enjoy your tasty Almond Joy Energy Bites after they cool! To get the right texture, you can adjust the stickiness with oats. If your mixture feels too wet, add more rolled oats. This helps bind everything together. Start with 1 cup of oats. If you want a firmer bite, add an extra 1/4 cup. This makes your energy bites easier to roll and eat. You can enhance the flavor by adding extra coconut or nuts. Try adding more shredded coconut for a stronger coconut taste. You can also mix in different nuts, like walnuts or pecans. This adds crunch and variety to each bite. Experiment to find your favorite combo! Serve the Almond Joy Energy Bites on a nice platter. For a great look, garnish with a sprinkle of shredded coconut. You can also drizzle melted dark chocolate on top. This makes them look fancy and tasty. Your friends will love the extra touch! {{image_2}} If you want a nut-free version, try using sunflower seed butter instead of almond butter. This swap keeps the taste rich and creamy. Sunflower seed butter also adds a nice dose of healthy fats. It is a great choice for those with nut allergies. Simply replace the almond butter with the same amount of sunflower seed butter in your recipe. You can change up the flavors of your Almond Joy Energy Bites. Add in some dried fruits like cranberries or apricots for a sweet touch. Also, spices like cinnamon or a pinch of nutmeg can bring warmth to the bites. Feel free to experiment with what you like. Mix and match until you find your perfect blend! To make your energy bites vegan, ensure all your ingredients are plant-based. Use maple syrup instead of honey. Check that your dark chocolate chips are dairy-free. This way, you can enjoy a delicious treat that fits your vegan diet. With these changes, you can still savor the rich flavors of Almond Joy Energy Bites. To keep your Almond Joy Energy Bites fresh, store them in an airtight container. Place the container in the fridge. This method helps maintain their taste and texture. They can last up to one week when stored properly. For longer storage, you can freeze the energy bites. Place them in a freezer-safe bag or container. They will stay good for up to three months. Make sure to label the bag with the date. This way, you won't forget when you made them! Check for any changes in smell or texture. If the bites smell off or feel dry and crumbly, it's best to toss them. Also, look for any mold. If you see it, don't eat them. Always prioritize your safety! Almond Joy Energy Bites last about one week in the fridge. Store them in an airtight container. If you want to keep them longer, freeze them. They can last up to three months in the freezer. Just let them thaw before you eat. Yes, you can use other nut butters. Peanut butter works well. Cashew butter or sun butter are good choices too. Just make sure the taste fits your preference. Each nut butter will change the flavor slightly, so feel free to experiment. Yes, these bites can be gluten-free. Just check your oats and other ingredients. Some oats may have gluten. Look for certified gluten-free oats to be safe. This way, you can enjoy your tasty bites without worry. This blog post shows how to make Almond Joy Energy Bites. You learned about the key ingredients, including almond butter and oats. I shared tips for perfecting texture and flavor. We explored storage methods to keep them fresh. You can also make variations like nut-free options or a vegan version. Now, you can enjoy these fun, tasty bites while knowing how to customize them. Try making them today for a healthy snack!

Almond Joy Energy Bites Easy and Tasty Recipe

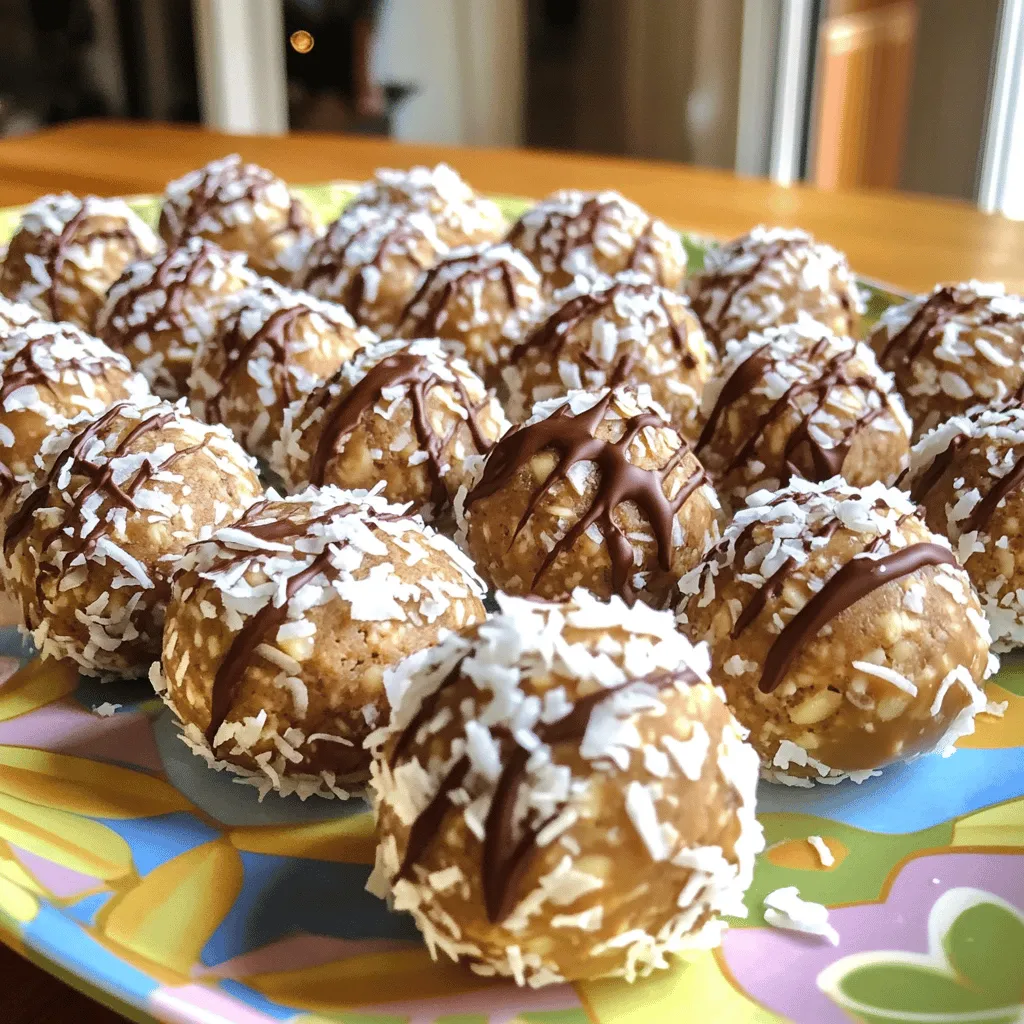
Are you looking for a quick and tasty snack? These Almond Joy Energy Bites are a perfect blend of almond

For this veggie packed minestrone soup, you will need: - 1 medium onion, diced - 2 carrots, diced - 2 celery stalks, diced - 1 zucchini, diced - 1 cup green beans, trimmed and cut into 1-inch pieces - 1 cup leafy greens (like spinach or kale), roughly chopped These fresh vegetables bring color and flavor to the soup. Each vegetable adds its unique taste and nutrients, making this dish both healthy and tasty. You will also need these pantry staples: - 1 tablespoon olive oil - 3 cloves garlic, minced - 1 cup diced tomatoes (fresh or canned) - 4 cups vegetable broth - 1 ½ cups canned kidney beans, rinsed and drained - 1 cup pasta (small shapes like ditalini or elbow) - 1 teaspoon dried basil - 1 teaspoon dried oregano - Salt and pepper to taste These ingredients form the base of your soup, giving it depth and warmth. Using vegetable broth keeps it light and full of flavor. To make your soup even better, consider these optional garnishes: - Grated Parmesan cheese for serving - Fresh parsley for garnish You can also play around with the soup. Try adding different vegetables based on what you have. This soup is flexible, and you can adjust it to your taste. Start with fresh veggies. First, gather your ingredients. You will need: - 1 tablespoon olive oil - 1 medium onion, diced - 2 carrots, diced - 2 celery stalks, diced - 3 cloves garlic, minced - 1 zucchini, diced - 1 cup green beans, trimmed and cut into 1-inch pieces Heat the olive oil in a large pot over medium heat. Add the diced onion, carrots, and celery. Cook them for about five minutes. You want them to soften a bit. Then, stir in the minced garlic, zucchini, and green beans. Cook for another three to four minutes, stirring often. Once your veggies are ready, it’s time to build the soup base. Add in: - 1 cup diced tomatoes (fresh or canned) - 4 cups vegetable broth - 1 ½ cups canned kidney beans, rinsed and drained - 1 teaspoon dried basil - 1 teaspoon dried oregano - Salt and pepper to taste Bring this mix to a gentle boil. The heat will bring out the flavors. Then, reduce the heat to a simmer. Now, it’s pasta time! Stir in: - 1 cup pasta (small shapes like ditalini or elbow) - 1 cup leafy greens (like spinach or kale), roughly chopped Cook the pasta according to the package instructions. This usually takes about eight to ten minutes. When the pasta is tender, add the leafy greens. Let them wilt for about two minutes. Finally, taste your soup. Add salt and pepper for extra flavor. Let it simmer for a couple more minutes. Now, your veggie-packed minestrone is ready to serve! To boost the taste of your minestrone soup, start with fresh herbs. Use basil and oregano for a great aroma. You can also add a splash of lemon juice or balsamic vinegar. This adds brightness and depth. I also like to use a good vegetable broth. It makes a big difference. If you want a bit of heat, toss in some crushed red pepper flakes. Just a pinch goes a long way. Cooking pasta right is key for your soup. I recommend adding the pasta to the pot just before serving. This way, it stays firm and does not get mushy. Follow the package instructions for the best results. Cook the pasta until it is al dente, or just firm to the bite. Remember, it will cook a bit more in the soup. If you plan to have leftovers, cook the pasta separately. This keeps it from soaking up all the broth. If you have dietary needs, there are easy swaps. For a gluten-free option, use gluten-free pasta. You can also use quinoa or rice as a base. If you’re avoiding beans, add more veggies instead. Peas or corn work well. For a vegan option, skip the cheese or use a plant-based alternative. This soup is versatile and can fit many diets. You can enjoy this dish your way! {{image_2}} You can boost the protein in your veggie packed minestrone soup. Here are some easy options: - Cooked chicken: Shred or dice cooked chicken and add it in. - Italian sausage: Brown some sausage in the pot before the veggies. - Tofu: Cube firm tofu and add it for a plant-based option. - Chickpeas: Swap kidney beans for chickpeas for a different taste. Adding these proteins makes the soup hearty and filling. It also helps balance the meal. Minestrone soup is perfect for using fresh, seasonal vegetables. Here are some ideas: - Spring: Use peas and asparagus. - Summer: Add corn and bell peppers for sweetness. - Fall: Incorporate squash or pumpkin for warmth. - Winter: Use root vegetables like parsnips or sweet potatoes. These swaps keep the soup fresh and exciting throughout the year. You can explore new flavors with each season. If you need a gluten-free version, many pasta types work well. Here are some great choices: - Rice pasta: It has a nice texture and cooks well. - Quinoa pasta: This adds a nutty flavor and is high in protein. - Zucchini noodles: Use a spiralizer for a low-carb option. These gluten-free options ensure everyone can enjoy the soup. They keep the dish satisfying and healthy for all diets. After enjoying your veggie packed minestrone soup, store leftovers in an airtight container. Let the soup cool to room temperature before sealing. This helps keep it fresh. You can keep it in the fridge for up to four days. Label the container with the date. This way, you won’t forget when you made it! Freezing is a great option if you want to save your soup for later. First, cool the soup completely before freezing. Then, pour it into freezer-safe containers. Leave some space at the top for the soup to expand. You can freeze it for up to three months. When you’re ready to eat it, just thaw it in the fridge overnight. To reheat your minestrone soup, you have a few options. If using the stove, pour it into a pot. Heat it over medium heat, stirring often until hot. You can also use the microwave. Place the soup in a microwave-safe bowl. Cover it loosely and heat in short bursts, stirring in between. Make sure it’s hot all the way through before serving. Enjoy your delicious soup again! If your soup is too thick, add more liquid. You can use vegetable broth or water. Start with a small amount, about half a cup. Stir well and check the texture. If it needs more, add a bit more liquid. Remember, simmering will thicken the soup. So, always adjust before serving. Yes, you can make minestrone soup in a slow cooker. Start by sautéing the onion, carrots, and celery in a pan. Then, add all the ingredients to the slow cooker. Use low heat for 6 to 8 hours or high heat for 3 to 4 hours. Add the leafy greens in the last 15 minutes. This method lets the flavors blend nicely. Minestrone soup will last in the fridge for about 3 to 5 days. Make sure to store it in an airtight container. If you want to keep it longer, consider freezing it. The soup can last for about 2 to 3 months in the freezer. Just remember to thaw it in the fridge before reheating. This blog post covered essential ingredients, step-by-step cooking, and useful tips for minestrone soup. You learned how to prepare fresh veggies, enhance flavor, and store leftovers. You can easily switch up ingredients for dietary needs and seasonal tastes. Remember, making minestrone soup can be fun and flexible. Experiment with flavors and enjoy tasty meals all week long. With these steps, you're ready to create a soup that warms your heart!

Veggie Packed Minestrone Soup Healthy Comfort Dish

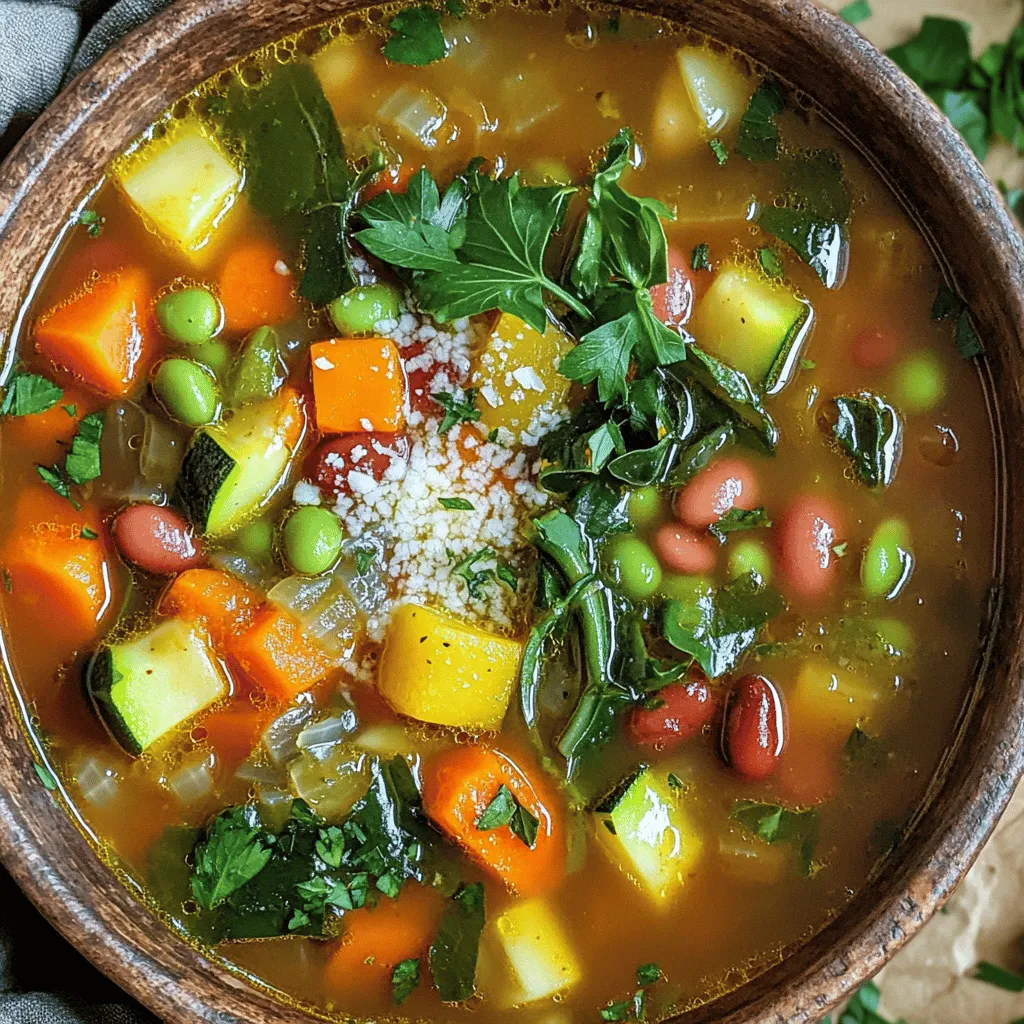
Looking for a warm and healthy meal? This Veggie Packed Minestrone Soup is your answer! Loaded with fresh veggies and

To make Spicy Thai Basil Chicken, gather these key ingredients: - 1 lb chicken breast, thinly sliced - 2 tablespoons vegetable oil - 4 cloves garlic, minced - 2-3 Thai bird's eye chilies, sliced (adjust for spice level) - 1 red bell pepper, sliced - 1 cup Thai basil leaves (fresh) - 2 tablespoons soy sauce - 1 tablespoon oyster sauce (optional) - 1 tablespoon fish sauce - 1 teaspoon sugar - 1 teaspoon ground white pepper - Cooked jasmine rice for serving These ingredients create a vibrant and tasty dish. The chicken breast provides protein, while Thai bird's eye chilies give it a spicy kick. Garlic adds depth, and the red bell pepper brings a sweet crunch. Fresh Thai basil leaves add an aromatic flavor that makes this meal truly special. Soy sauce, oyster sauce, and fish sauce create a rich umami base. Sugar softens the heat, and ground white pepper adds a subtle warmth to the mix. Serving it over jasmine rice makes a perfect meal. Feel free to adjust the spice by adding more or fewer chilies. Each ingredient plays a vital role in this quick dinner. Enjoy the process of cooking and savor the flavors! Start by slicing the chicken breast. Cut it into thin pieces, about 1/4 inch thick. Thin slices cook quickly and evenly. This makes sure your chicken is tender and juicy. 1. Heat the Oil: In a large skillet or wok, pour in the vegetable oil. Turn the heat to medium-high and let it get hot but not smoking. 2. Cook Garlic and Chilies: Add minced garlic and sliced chilies. Sauté them for about 30 seconds. You want to smell the garlic and see it turn golden. 3. Add Chicken: Now, increase the heat to high. Toss in the sliced chicken and stir-fry for 3-4 minutes. Cook until the chicken turns white and is no longer pink. 4. Incorporate Vegetables: Add the sliced red bell pepper. Stir-fry for another 1-2 minutes. This keeps the peppers a bit crisp. 1. Sauce It Up: Pour in soy sauce, fish sauce, and sugar. Add ground white pepper too. Stir everything well to coat the chicken and veggies. Let it cook for another 1-2 minutes. 2. Add Basil: Remove the skillet from the heat. Fold in fresh Thai basil leaves. Stir just until the basil wilts. 3. Serve: Plate the spicy Thai basil chicken over cooked jasmine rice. You can garnish with extra basil or chili slices if you like. Enjoy your meal! To get the right spice level, start with 2-3 Thai bird's eye chilies. If you want more heat, add extra chilies. For a milder taste, use fewer chilies. Balancing flavors is key. Combine soy sauce, oyster sauce, and fish sauce. Each sauce adds depth and richness. A touch of sugar helps balance the heat. Taste as you go to find your perfect mix. Stir-frying is all about high heat and quick cooking. Use a large skillet or wok for best results. Heat the oil until hot but not smoking. This helps the garlic and chilies release their flavor. When adding chicken, make sure it's in a single layer. This ensures even cooking. Keep your veggies crisp by adding them later in the cooking process. Stir-fry them until they are just tender, but still have a crunch. For a beautiful presentation, serve the dish in a bowl. Top it with a sprig of fresh basil. You can add lime wedges on the side. Lime adds a bright and fresh flavor. This dish pairs well with cooked jasmine rice, which soaks up the sauce nicely. Enjoy your meal! {{image_2}} You can switch the chicken for beef, pork, or tofu. Each option brings a new taste. Thinly slice beef or pork, just like the chicken. For tofu, use firm or extra-firm. Press it to remove water, then cut it into cubes. This way, the protein soaks up all the delicious sauces. To make a plant-based version, use mushrooms and tofu. Mushrooms add a nice umami flavor. Sauté them until soft before adding tofu. This combo keeps the dish satisfying and full of taste. Toss in some fresh veggies like bell peppers for extra color and crunch. Not everyone enjoys spicy food, and that's okay! To make it milder, use fewer Thai bird's eye chilies. You can also remove the seeds to lower the heat. Adding more sugar can balance the spice too. Taste as you go to find the right level for you and your guests. To keep your Spicy Thai Basil Chicken fresh, follow these steps: - Cool the dish to room temperature. - Place it in an airtight container. - Store it in the fridge for up to three days. - If you want to keep it longer, freeze it for up to three months. When freezing, use freezer-safe bags to prevent freezer burn. To reheat your meal, do this: - For the microwave, place the chicken in a bowl. - Add a splash of water to keep it moist. - Heat on medium for two to three minutes, stirring halfway. For the stove, heat a pan over medium-low. Add the chicken and a little water, stirring until hot. For safe consumption: - Refrigerated leftovers last up to three days. - Frozen leftovers can be eaten within three months. Always check for signs of spoilage before eating. If it smells off or looks strange, throw it out. If you cannot find Thai basil, you can try regular basil. It has a sweet taste but lacks the distinct flavor of Thai basil. You can also use mint for a fresh touch. Another option is holy basil, which has a peppery taste. Each substitute will change the dish's flavor, so choose based on your taste. Yes, you can prepare this dish ahead. Cook the chicken and store it in the fridge. Keep the sauce separate to prevent sogginess. You can also chop the veggies ahead of time. When ready to eat, just heat everything together. This saves time and makes dinner quick! This dish can be gluten-free with some changes. Use gluten-free soy sauce instead of regular soy sauce. Check the fish sauce as some brands may contain gluten. Avoid oyster sauce if it is not gluten-free. With these swaps, you can enjoy this tasty meal without worry. This guide shows you how to make Spicy Thai Basil Chicken. It covers key ingredients, step-by-step cooking, and helpful tips. Now you can adjust the spice level or swap proteins with ease. Remember, storing leftovers safely extends their shelf life. Experiment with flavors and enjoy this dish time and again. Your kitchen is a canvas, so let your creativity shine!

Spicy Thai Basil Chicken Flavorful Quick Dinner Meal

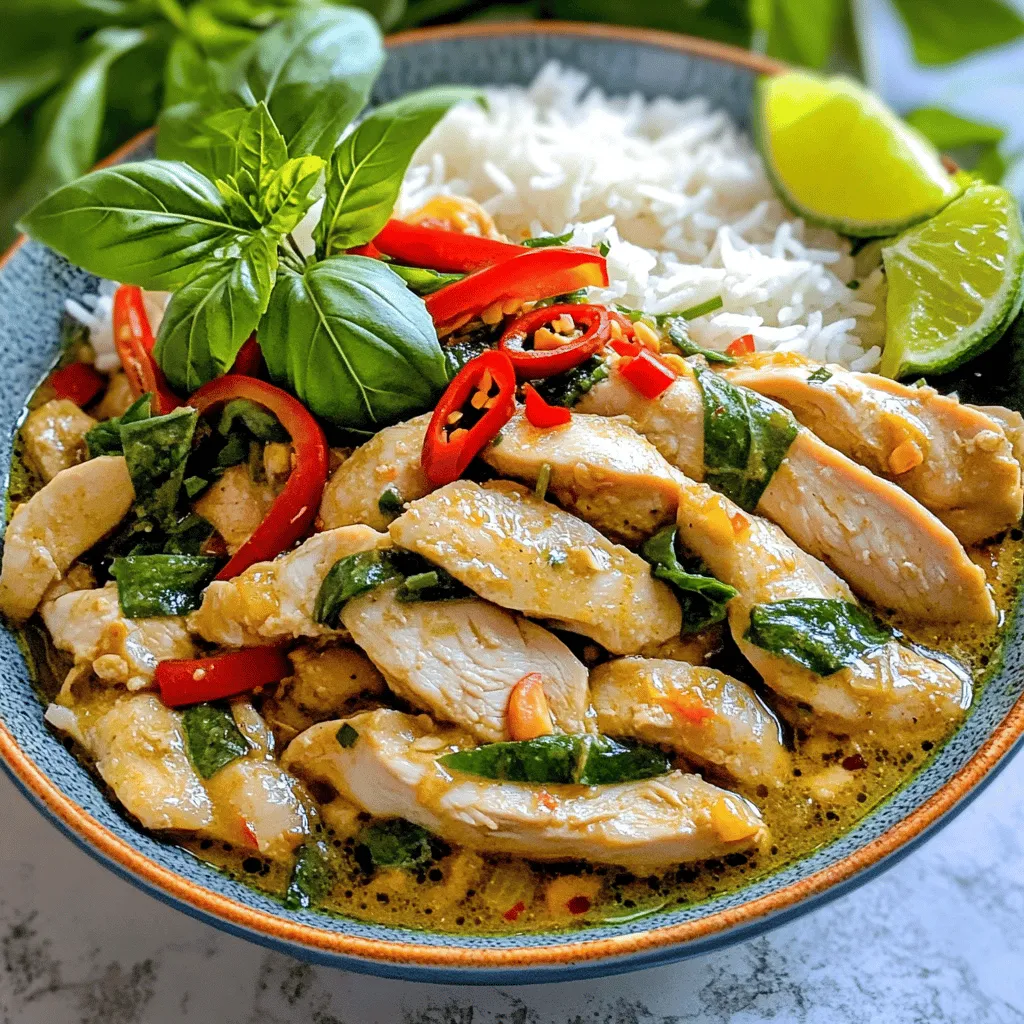
Craving a quick dinner that packs a punch? Let’s dive into Spicy Thai Basil Chicken! This dish combines juicy chicken,

Older posts
Newer posts
← Previous Page1 … Page20 Page21 Page22 … Page86 Next →

dsad

© 2026 Cooking Wells • Built with GeneratePress

Our Policies

  • Copyright Policy
  • Cookie Policy
  • GDPR Policy
  • Privacy Policy
  • Disclaimer
  • Terms Of Use

More Information

  • Home
  • About
  • Contact
  • Appetizers
  • Dessert
  • Dinner
  • Drinks
©2026, Cooking Wells About Back To Top