Skip to content
DisclaimerTerms Of UseGDPR PolicyCookie Policy

Cooking Wells

  • Home
  • Drinks
  • Appetizers
  • Dinner
  • Dessert
  • About
  • Contact
  • Privacy Policy
DisclaimerTerms Of UseGDPR PolicyCookie Policy

NO-ING-IMG

To make this rich and moist bread, you need: - 1 ½ cups grated zucchini (about 1 medium zucchini) - 1 cup all-purpose flour - ½ cup unsweetened cocoa powder - ½ teaspoon baking soda - ½ teaspoon baking powder - ¼ teaspoon salt - ½ teaspoon cinnamon - ½ cup granulated sugar - ½ cup brown sugar, packed - ½ cup vegetable oil - 2 large eggs - 1 teaspoon vanilla extract - ½ cup semi-sweet chocolate chips - ½ cup white chocolate chips - ½ cup dark chocolate chunks Grated zucchini is the star of this recipe. It adds moisture and a subtle flavor. Cocoa powder gives the bread a deep chocolate taste. The mix of sugars creates a perfect balance of sweetness. Gather these tools to make your baking easier: - A 9x5 inch loaf pan - Mixing bowls (one large, one medium) - Whisk for mixing - Spatula for folding - Grater for zucchini - Toothpick to check doneness Having the right tools helps you work faster and easier. A good loaf pan ensures even baking. You can add some fun flavors with these optional items: - Chopped nuts like walnuts or pecans - Spices like nutmeg for warmth - A pinch of espresso powder for depth These extras can make your zucchini bread even more special. You can mix and match to find your favorite combination. Start by preheating your oven to 350°F (175°C). This step is key for even baking. While the oven heats, grease your 9x5 inch loaf pan. Use butter or cooking spray to avoid sticking. Make sure the pan is ready before you mix your batter. In a medium bowl, combine the following dry ingredients: - 1 cup all-purpose flour - ½ cup unsweetened cocoa powder - ½ teaspoon baking soda - ½ teaspoon baking powder - ¼ teaspoon salt - ½ teaspoon cinnamon Whisk these ingredients together. This helps to mix them well and adds air. Proper blending ensures your bread rises evenly. In a large bowl, mix the wet ingredients. Start with: - ½ cup granulated sugar - ½ cup brown sugar, packed - ½ cup vegetable oil Add two large eggs, one at a time. Whisk after each egg. This makes the mixture smooth. Stir in 1 teaspoon of vanilla extract. This adds great flavor to your bread. Now, fold in 1 ½ cups of grated zucchini. Make sure it’s well mixed. Then, gently add the chocolate. Use: - ½ cup semi-sweet chocolate chips - ½ cup white chocolate chips - ½ cup dark chocolate chunks Mix carefully. You want to keep the batter light and fluffy. Pour the batter into your prepared loaf pan. Smooth the top with a spatula. Bake for 50 to 60 minutes. Check doneness by inserting a toothpick into the center. It should come out clean, with just a few moist crumbs. If there’s wet batter, bake a bit longer. Once ready, let the bread cool in the pan for 10 minutes. Then, move it to a wire rack to cool completely. Enjoy the rich, chocolatey aroma! To get the best texture, use fresh zucchini. Grate it finely for even mixing. After grating, squeeze the zucchini gently to remove some excess moisture. This step helps the bread stay soft without being too wet. When mixing your ingredients, stir just enough to combine them. Overmixing can make the bread dense. Aim for a moist, fluffy loaf that has a nice rise. One common mistake is not measuring the flour correctly. Too much flour can lead to dry bread. Use the spoon-and-level method to measure flour. Another pitfall is forgetting to grease the loaf pan. Always grease it well to prevent sticking. Lastly, do not skip the cooling step. Letting the bread cool properly helps it set and enhances flavor. You can easily add more zucchini to this recipe. Simply increase the grated zucchini to 2 cups. This adds moisture and boosts nutrition. Just be sure to watch the baking time. More zucchini may require a few extra minutes in the oven. Keep an eye on it and use a toothpick to check for doneness. {{image_2}} You can make this bread gluten-free. Use a gluten-free all-purpose flour instead of regular flour. Make sure it has a good blend of starches and proteins for the best result. You can also add a little xanthan gum if your blend does not contain it. This will help the bread rise and hold together better. The taste will still be rich and chocolatey, and the zucchini will keep it moist. Nuts can add a nice crunch to your bread. Walnuts or pecans work well. Chop them into small pieces and fold them in with the chocolate. You can also add dried fruits like raisins or cranberries for natural sweetness. Just keep the total mix-ins to about one cup to avoid changing the bread's texture. These additions boost flavor and add extra nutrients. You can switch up the chocolate types for fun flavors. Try using milk chocolate chips for a sweeter taste. You might also mix in some dark chocolate for a richer flavor. If you love white chocolate, you can add more white chocolate chips instead of semi-sweet. Each type of chocolate brings a unique taste, making your zucchini bread exciting every time you bake it. To keep your leftover zucchini bread fresh, wrap it tightly in plastic wrap. You can also place it in an airtight container. This helps maintain its moisture and flavor. Store it at room temperature for up to three days. If you live in a warm area, it’s best to keep it in the fridge. For longer storage, freezing is a great option. First, let the zucchini bread cool completely. Slice it into pieces for easy thawing later. Wrap each slice in plastic wrap, then place them in a freezer bag. Remove as much air as possible before sealing. This bread can last up to three months in the freezer. To reheat your zucchini bread, you can use the oven or microwave. For the oven, preheat to 350°F (175°C). Place the slices on a baking sheet. Heat for about 10 minutes. If using a microwave, heat for about 15-20 seconds per slice. This will keep the bread soft and tasty. Enjoy it warm for the best flavor! Yes, you can use applesauce instead of oil. This swap makes the bread lower in fat. Applesauce adds moisture and sweetness. Use the same amount of applesauce as oil. This change may also give a slight apple flavor. Triple chocolate zucchini bread stays fresh for about 3 to 4 days. Store it in an airtight container. You can also refrigerate it to extend its life. If frozen, it can last up to three months. Just make sure to wrap it tightly to avoid freezer burn. Yes, frozen zucchini works well in this recipe. Thaw the zucchini and drain any excess water. This helps keep the bread from becoming too soggy. Frozen zucchini can be just as tasty as fresh zucchini. You can serve this bread with a variety of tasty options. It pairs well with whipped cream or a scoop of ice cream. You might enjoy it with a drizzle of chocolate sauce. Fresh berries or a sprinkle of nuts can also add a nice touch. You learned how to make delicious triple chocolate zucchini bread in this post. We covered key ingredients, tools, and tips for the best taste and texture. I also shared easy steps for mixing, baking, and storing your bread. Experiment with variations like gluten-free options or adding nuts. Always remember to avoid common mistakes for perfect results. With the knowledge you now have, make your kitchen a fun place. Enjoy baking and sharing this treat!

Triple Chocolate Zucchini Bread Delightful and Easy Recipe

Are you ready to bake something that’s both delicious and easy? This Triple Chocolate Zucchini Bread is the perfect treat!

- 1 pound large shrimp, peeled and deveined - 1 bunch asparagus, trimmed - 4 cloves garlic, minced - 1/4 cup grated Parmesan cheese - 2 tablespoons olive oil - 1 teaspoon lemon zest - Salt and pepper to taste - 1/2 teaspoon red pepper flakes (optional) - Fresh parsley, chopped The main ingredients create a balance of flavor and texture in this dish. The shrimp gives you that juicy bite, while the asparagus adds a nice crunch. The garlic adds depth, making every bite exciting. For seasoning, the Parmesan cheese brings a rich, salty flavor. Olive oil keeps everything moist and flavorful. Lemon zest brightens the dish, adding a zing that wakes up your palate. Salt and pepper enhance all the flavors, while red pepper flakes can give you a bit of heat if you like. Finally, fresh parsley adds a pop of color and freshness. It’s a simple touch that makes your dish look great. With these ingredients, you set the stage for a delightful meal that is easy to prepare and sure to please. 1. Preheat your oven to 400°F (200°C). This step is key. A hot oven cooks the shrimp and asparagus just right. 2. In a large bowl, combine the shrimp, trimmed asparagus, minced garlic, olive oil, lemon zest, salt, pepper, and red pepper flakes. Toss well to coat all the ingredients. The flavors blend beautifully! 1. Line a large baking sheet with parchment paper. This makes cleanup easy and helps prevent sticking. 2. Spread the shrimp and asparagus mixture in a single layer on the baking sheet. Make sure they have space. This allows them to cook evenly. 3. Sprinkle the grated Parmesan cheese evenly over the shrimp and asparagus. This adds a creamy, cheesy flavor that you will love. 1. Bake in the preheated oven for 10-12 minutes. Look for the shrimp to turn pink and opaque. The asparagus should be tender yet crisp. 2. Remove the sheet pan from the oven and let it cool for a minute. This short cooling time helps keep the shrimp juicy. 3. Garnish with fresh chopped parsley before serving. It adds color and a fresh taste that brightens the dish. Enjoy this easy, tasty meal with your family or friends! - To cook shrimp perfectly, look for the color change. They should turn pink and opaque. - Avoid overcooking shrimp; it takes about 10-12 minutes in the oven. - For crisp asparagus, trim the ends and do not overbake. It should stay bright green and firm. - Serve right from the sheet pan for a casual feel. - For a fancier touch, use a large platter. - Drizzle with extra olive oil and fresh lemon juice before serving. - Add lemon wedges on the side for an extra zest. - Customize your dish by adding cherry tomatoes or bell peppers. - You can swap Parmesan with feta cheese for a different taste. - Try adding fresh herbs like basil or parsley for extra flavor. - Experiment with spices like paprika or cumin for a kick. {{image_2}} You can switch up the vegetables in this dish. Try bell peppers, zucchini, or green beans. Each of these veggies adds its own twist. If you want to replace the shrimp, use chicken or tofu for a different protein. Both options will soak up the garlic and cheese flavors well. Herbs can take your dish to the next level. Try adding basil or oregano for a fresh taste. These herbs bring a garden vibe to the meal. You can also introduce citrus flavors like lime or orange. They add a sweet and tangy kick that complements the shrimp perfectly. Pair this dish with a simple side salad or some crusty bread. A light, zesty salad helps balance the rich flavors. You can also serve it over rice or quinoa to make it a complete meal. Adding a grain makes it filling and satisfying. To store leftover shrimp and asparagus, let them cool first. Place them in an airtight container. This helps keep the shrimp juicy and the asparagus crisp. Make sure to store them in the fridge. They will stay fresh for up to three days. For best flavor, eat them sooner rather than later. When reheating in the oven, set it to 350°F (175°C). Place the shrimp and asparagus on a baking sheet. Heat for about 5-7 minutes. This keeps the shrimp tender and the asparagus crunchy. If you use the microwave, heat in short bursts. Check every 30 seconds to avoid overcooking. Cover with a damp paper towel to keep moisture in. Yes, you can freeze this dish! To do so, let it cool completely. Then, place it in a freezer-safe container. It can last for up to two months. To thaw, move it to the fridge overnight. You can also reheat from frozen, but it may take longer. Enjoy your meal any time you like! How long does it take to cook shrimp? Shrimp cooks quickly. It usually takes about 10 to 12 minutes in the oven. You will know they are done when they turn pink and opaque. Can I make this recipe in advance? Yes, you can prep the shrimp and asparagus ahead of time. Just store them in the fridge in an airtight container. When ready, bake them fresh for the best taste. How to make this dish gluten-free or dairy-free? To make it gluten-free, ensure your Parmesan cheese is labeled gluten-free. For a dairy-free option, you can skip the cheese or use a dairy-free cheese alternative. Can I increase the serving size, and how? Yes, you can easily increase the serving size. Just double or triple the ingredients and use a larger baking sheet. Make sure to spread the shrimp and asparagus in a single layer for even cooking. What can I use instead of asparagus? You can use green beans or broccoli instead of asparagus. Both options will also roast nicely and add great flavor. Can I replace garlic with powdered garlic? Yes, you can use garlic powder instead. Use about 1 teaspoon of garlic powder for every 4 cloves of minced garlic. It will still give your dish that nice garlic flavor. This dish combines shrimp, asparagus, and flavorful seasonings for a quick meal. You learned how to cook it perfectly with our step-by-step guide. Remember to try different vegetables and proteins for variety. Leftovers are easy to store and reheat. Feel free to adapt flavors and ingredients to your taste. Cooking can be simple and fun. Enjoy your meal and impress others with your skills!

Sheet Pan Garlic Parmesan Shrimp & Asparagus Delight

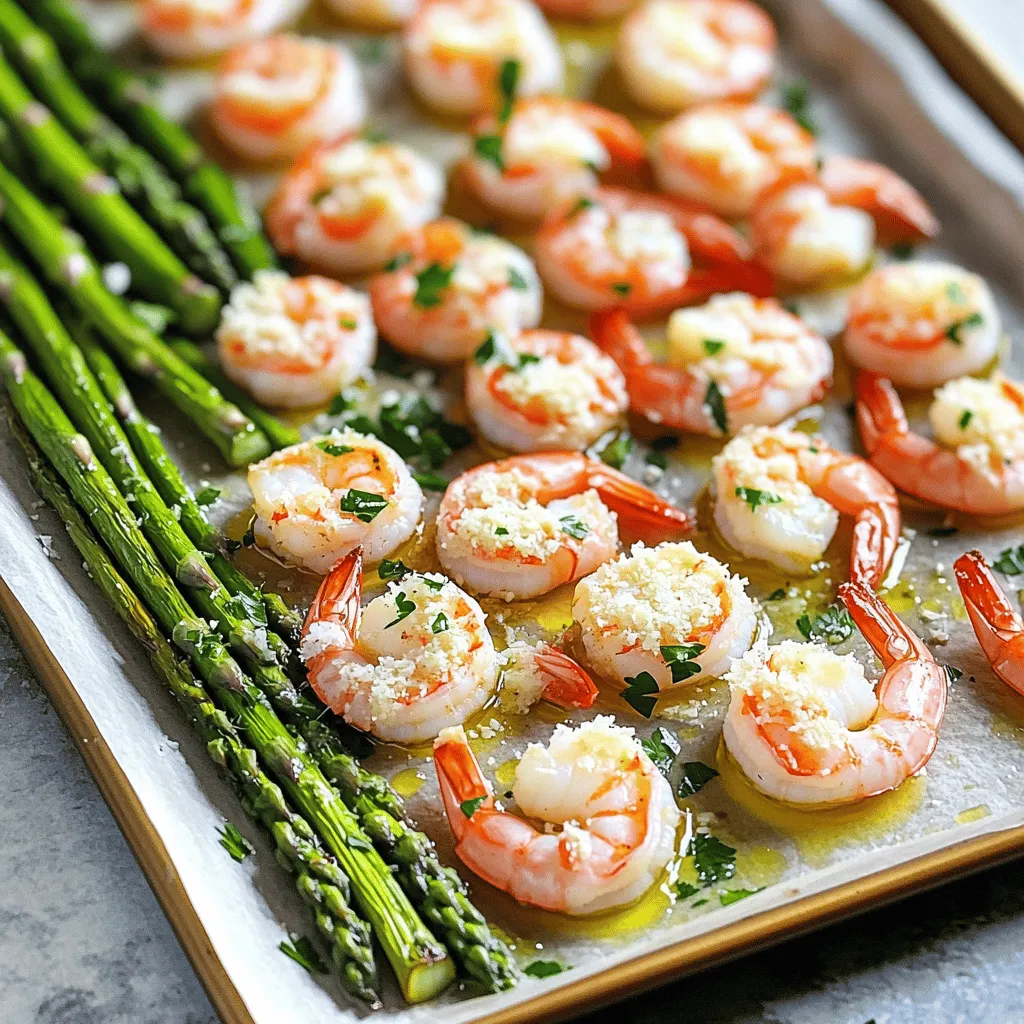
Get ready to impress your family with a delicious and easy meal! My Sheet Pan Garlic Parmesan Shrimp & Asparagus

To make creamy mushroom spinach ravioli, gather these items: - 12 ounces fresh or frozen ravioli (mushroom-filled is best) - 2 tablespoons olive oil - 1 small onion, finely chopped - 2 cloves garlic, minced - 8 ounces fresh spinach, roughly chopped - 8 ounces cremini mushrooms, sliced - 1 cup heavy cream - 1/2 cup grated Parmesan cheese - Salt and black pepper to taste - A pinch of nutmeg (optional) - Fresh basil or parsley for garnish Add extra flavor with these optional items: - A splash of white wine for depth - Red pepper flakes for heat - A squeeze of lemon juice for brightness If you need alternatives, try these substitutes: - Use ricotta-filled ravioli instead of mushroom-filled - Swap olive oil with butter for a richer taste - Replace heavy cream with half-and-half for a lighter sauce Start by boiling water in a large pot. Add salt to the water. This helps flavor the ravioli. Once the water boils, add 12 ounces of fresh or frozen ravioli. Cook them based on package directions until they are al dente. This usually takes about 3 to 5 minutes. After cooking, drain the ravioli and set them aside. Make sure to save a bit of the pasta water for later. Next, grab a large skillet and heat 2 tablespoons of olive oil over medium heat. Once hot, add 1 small finely chopped onion. Sauté the onion until it turns translucent. This will take about 3 to 4 minutes. Then, stir in 2 minced cloves of garlic and 8 ounces of sliced cremini mushrooms. Cook these together until the mushrooms soften and get a nice golden color. This should take about 5 to 6 minutes. Finally, add 8 ounces of roughly chopped spinach. Cook until the spinach wilts, which takes around 2 to 3 minutes. Now it's time to make the cream sauce. Lower the heat to medium-low. Pour in 1 cup of heavy cream and stir well to mix everything. Let this simmer for about 3 to 4 minutes. You want it to thicken slightly. Once it thickens, stir in 1/2 cup of grated Parmesan cheese. Keep stirring until the cheese melts and the sauce is nice and creamy. Season with salt, black pepper, and a pinch of nutmeg if you like. It's time to bring everything together! Gently add the cooked ravioli to the skillet with the sauce. Toss the ravioli in the sauce until they are well coated. If the sauce seems too thick, add a splash of the reserved pasta water. This will help reach your desired creaminess. To serve, plate the ravioli nicely. For an appealing look, use a large spoon to create a swirl of sauce on the plate. Place the ravioli in the center and sprinkle with extra grated Parmesan cheese. Add fresh basil or parsley for a lovely touch. Enjoy your creamy mushroom spinach ravioli! To cook your ravioli perfectly, bring a large pot of salted water to a boil. Add the ravioli and cook until they float. This usually takes about 3 to 5 minutes. Fresh ravioli cooks faster than frozen. Always check the package for specific times. Once cooked, drain carefully. Reserve a cup of that pasta water; it helps later. Add depth to your dish by using fresh herbs. Basil and parsley are great options. A pinch of nutmeg adds warmth to the sauce. You can also sprinkle some red pepper flakes for a slight kick. Always taste your sauce before serving. Adjust salt and pepper to your liking. Start your sauce by sautéing onions until they are soft. Add garlic next for a nice aroma. When you add mushrooms, cook them until golden. This brings out their rich flavor. Pour in heavy cream and stir well. Let it simmer for a few minutes. The key is to keep the heat low. Stir in Parmesan cheese until it melts for that extra creaminess. If the sauce is too thick, use the reserved pasta water to adjust it. {{image_2}} To make a vegan version, swap the heavy cream and cheese for plant-based options. Use coconut cream or cashew cream for creaminess. Nutritional yeast can add a cheesy flavor without dairy. Use any vegan ravioli you can find. It's a great way to enjoy this dish while keeping it plant-based. If you need a gluten-free meal, use gluten-free ravioli. Many stores offer this option now. You can also make your own ravioli using gluten-free flour. Just ensure the other ingredients, like broth and sauces, are gluten-free too. The dish will still be creamy and delicious! You can easily change the flavors by swapping ingredients. Try adding sun-dried tomatoes for a tangy twist. Use different mushrooms like shiitake or portobello for more depth. Fresh herbs like thyme or rosemary can enhance the taste too. Just keep it fun and mix what you love! To keep your creamy mushroom spinach ravioli fresh, place leftovers in an airtight container. Make sure to let the dish cool to room temperature first. Store it in the fridge for up to three days. If you notice any moisture, use a paper towel to absorb it before sealing the container. When you are ready to enjoy your leftovers, reheating is simple. You can use a microwave or stovetop. For the microwave, place the ravioli in a bowl and cover it with a damp paper towel. Heat for about one to two minutes, stirring halfway through. If using the stovetop, add a splash of cream or broth to a skillet. Warm it gently over low heat, stirring often, until heated through. If you want to save your ravioli for later, freezing is a great option. First, let the dish cool completely. Portion it into freezer-safe containers or bags. Remove as much air as possible to prevent freezer burn. You can freeze it for up to three months. To reheat from frozen, thaw it overnight in the fridge first. Then, follow the reheating tips for best results. Fresh or frozen mushroom-filled ravioli works best. It adds rich flavor and texture. The mushroom filling pairs well with the creamy sauce. If you cannot find mushroom ravioli, cheese-filled options are great too. Yes, you can prepare this dish ahead of time. Cook the ravioli and the sauce separately. Store them in the fridge. When ready to serve, combine them and heat gently. This way, you save time and still enjoy a tasty meal. You can serve this dish with a simple side salad. A light green salad complements the meal well. Garlic bread also makes a great side. It adds a nice crunch and flavor. Yes, you can use dried ravioli. However, you need to adjust the cooking time. Follow the package instructions to ensure it cooks properly. Dried ravioli may have a different texture but can still be delicious. To add spice, try adding red pepper flakes. Sprinkle them into the sauce while cooking. You can also use spicy sausage or chili oil for extra heat. Adjust the amount based on your spice preference. This post covered how to make creamy mushroom spinach ravioli. We looked at key ingredients, step-by-step cooking methods, and tips for rich flavor. I shared ways to customize the dish with variations and smart storage tips. Remember, cooking is fun! Use these ideas to create your perfect plate. Try different flavors and enjoy the process. Cooking at home makes every meal special.

Creamy Mushroom Spinach Ravioli Delightful Meal

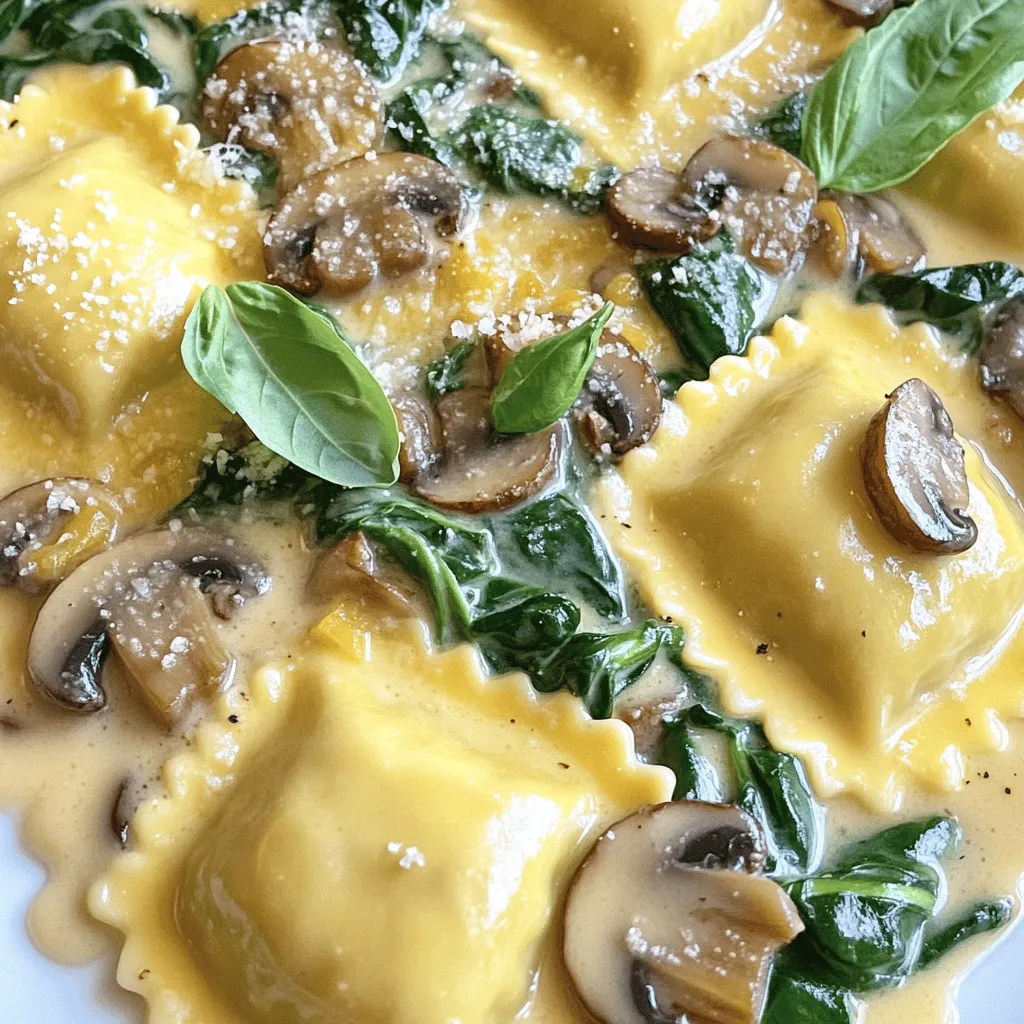
If you’re craving a delicious and satisfying meal, I have just the dish for you! My Creamy Mushroom Spinach Ravioli

- 1 cup pitted dates - 1 cup rolled oats - ½ cup unsweetened cocoa powder - ½ cup shredded coconut (unsweetened) - ½ cup almond butter (or your preferred nut butter) - ¼ cup honey or maple syrup - 1 teaspoon vanilla extract - ¼ teaspoon sea salt - Optional: 2 tablespoons of chia seeds Each serving contains about: - Calories: 150 - Protein: 4g - Carbohydrates: 20g - Fiber: 3g - Sugars: 8g - Fats: 7g These energy bars give you a good balance of nutrients. They provide natural sugars from dates and healthy fats from nut butter. You can easily swap ingredients based on your taste or needs. Here are some ideas: - Nut Butter: Use peanut butter or sunflower seed butter for nut-free. - Sweeteners: Maple syrup works well if you want a vegan option. - Cocoa Powder: Carob powder can replace cocoa for a different taste. - Chia Seeds: Flaxseeds can be a good alternative for added fiber. These swaps make it easy to customize the bars for any diet. Enjoy your time in the kitchen! To start, grab your food processor. Add 1 cup of pitted dates. Blend them until they form a sticky paste. If they seem dry, add a bit of warm water. This helps them blend better. Next, take a large mixing bowl. Combine 1 cup rolled oats, ½ cup cocoa powder, and ½ cup shredded coconut. If you like, add 2 tablespoons of chia seeds for extra nutrition. Mix all dry ingredients well. After blending the dates, add them to your dry mixture. Also, include ½ cup almond butter, ¼ cup honey or maple syrup, and 1 teaspoon vanilla extract. Use your hands or a spatula to mix everything together. The mix should be sticky but hold together. If it feels dry, add a bit more nut butter. This ensures a good texture. Prepare an 8x8 inch baking dish by lining it with parchment paper. This makes it easy to remove the bars later. Transfer the mixture into the dish, pressing it down firmly. Make sure it is even throughout. Place the dish in the refrigerator. Let it chill for at least 1-2 hours. This helps the bars firm up nicely. After chilling, lift them out using the parchment paper. Cut into bars or squares as you like. Enjoy your tasty, healthy snacks! To achieve the right texture, blend the dates well. They should form a sticky paste. If they don't, add a little warm water. When mixing the dry and wet ingredients, make sure to combine them fully. The mixture should feel sticky but not too wet. This balance helps the bars hold together well. These energy bars are great as snacks. You can serve them on a colorful platter. Adding extra shredded coconut on top makes them look nice. Pair them with a glass of milk or a smoothie for a treat. They are perfect for on-the-go energy or a post-workout boost. Avoid using dry or hard dates. They won’t blend well, and your bars will be crumbly. Also, don't skip the chilling time. This step firms up the bars, making them easier to cut and eat. Lastly, ensure you press the mixture firmly in the dish. This helps it hold together when you cut it. {{image_2}} You can change the taste of your energy bars easily. Adding spices or extracts makes a big difference. Try a pinch of cinnamon for warmth. A dash of nutmeg brings a cozy vibe. For a minty twist, add peppermint extract. You can even sprinkle in some espresso powder for a coffee kick. Each flavor twist makes the bars unique and fun. Nut butters are key to the bars' texture. You can swap almond butter for peanut or cashew butter. Each nut butter adds its own flavor. If you want a nut-free option, try sunflower seed butter. For sweeteners, you can use agave nectar or brown rice syrup instead of honey. This gives you more ways to customize your bars. Making these bars vegan is simple. Just replace honey with maple syrup. This keeps the sweetness while being plant-based. To ensure the bars are gluten-free, check your oats. Some oats may have gluten. Look for certified gluten-free oats in stores. These small changes help everyone enjoy these tasty treats! To keep your no-bake chocolate coconut energy bars fresh, store them in an airtight container. This helps prevent moisture and keeps them from drying out. You can use either glass or plastic containers. It’s best to layer parchment paper between the bars if you stack them. This way, they won’t stick together, and you can grab one easily! These energy bars last up to two weeks in the fridge. Their taste stays fresh, and they remain chewy. Just check for any signs of spoilage before eating. If they look or smell off, it's best to toss them. You can freeze these energy bars for longer storage. Wrap each bar in plastic wrap or aluminum foil. Then, place them in a freezer-safe bag or container. When you want one, just take it out and let it thaw in the fridge. They should stay good for up to three months in the freezer. Enjoy them whenever you need a quick snack! No, you should not use fresh dates. Fresh dates have too much moisture. This can make your bars too wet. Dried dates are stickier and work better. They help hold the bars together. If you only have fresh dates, you can dry them out first. This will make them more suitable for the recipe. To make your bars softer, add more nut butter or honey. This extra moisture helps create a softer texture. You can also reduce the oats. For firmer bars, add more oats or use less nut butter. You can also chill them longer in the fridge. The colder they are, the firmer they will become. Yes, there are many allergy-friendly options! If you have nut allergies, use sunflower seed butter instead of nut butter. For gluten-free bars, make sure to use certified gluten-free oats. You can also swap honey with agave nectar for a vegan version. These swaps keep the bars tasty and safe for everyone. This blog post shared how to make no-bake chocolate coconut energy bars. We covered the right ingredients, simple steps, and tips for the best bars. You learned about variations to fit your taste and how to store them. Remember, small changes can make your energy bars even better. These snacks are not just fun to make, but they are also tasty and nutritious. Now, with these steps and tips, you can create healthy energy bars at home. Enjoy your baking!

No-Bake Chocolate Coconut Energy Bars Delightful Recipe

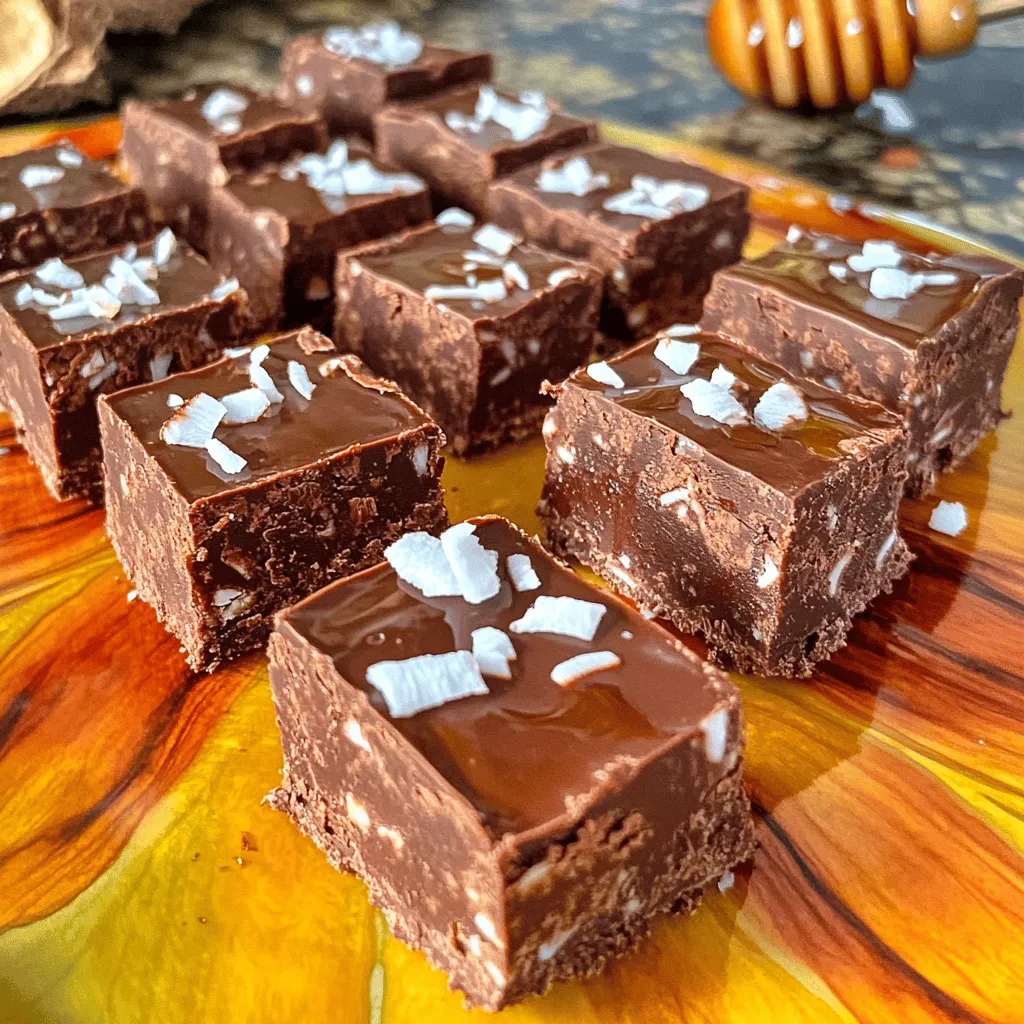
Are you ready to whip up a tasty treat that fuels your day? My No-Bake Chocolate Coconut Energy Bars are

- 1 sheet of puff pastry, thawed - 8 oz cream cheese, softened - 1/2 cup powdered sugar - 1 tablespoon lemon zest - 1 tablespoon lemon juice - 1 cup fresh blueberries - 1 egg, beaten (for egg wash) - 1 teaspoon vanilla extract - 1 tablespoon cornstarch - Pinch of salt - Puff pastry: This flaky dough gives the danish its light and airy texture. It puffs up when baked, creating layers that are crisp and golden. - Cream cheese: Softened cream cheese adds creaminess and richness. It balances the sweet and tart flavors of the lemon and blueberries. - Powdered sugar: This sugar dissolves easily, making the filling smooth and sweet. It helps create a lovely texture in the cream cheese mixture. - Lemon zest and juice: These add bright, fresh flavors. The zest gives a stronger lemon taste, while the juice adds acidity. - Fresh blueberries: Juicy and sweet, they provide bursts of flavor. They also create a beautiful color contrast in the danish. - Egg wash: This beaten egg gives the pastry a shiny, golden finish when baked. It also helps the dough pieces stick together. - Cornstarch: This thickener helps the blueberry filling set as it bakes. It keeps the filling from being too runny. - Pinch of salt: Just a little salt balances the sweetness and enhances other flavors in the dish. Each serving of this Blueberry Lemon Cream Cheese Danish contains about: - Calories: 250 - Fat: 15g - Carbohydrates: 28g - Protein: 4g - Fiber: 1g - Sugar: 8g This danish is a delightful treat. It combines creaminess, sweetness, and a hint of tartness. Enjoy it fresh from the oven for a special breakfast or snack! 1. Preheat your oven to 375°F (190°C). This step is key for great baking. 2. Take your puff pastry out and thaw it. On a floured surface, roll it out. Aim for a rectangle about 1/8-inch thick. 3. Cut the rolled pastry into four equal squares. Each square will hold the filling. 4. In a bowl, mix the softened cream cheese, powdered sugar, vanilla, lemon zest, lemon juice, and a pinch of salt. Stir until it is smooth and creamy. 5. In a separate bowl, toss the fresh blueberries with cornstarch. Gently coat them to help thicken the filling. 6. Place a generous spoonful of the cream cheese mix in the center of each pastry square. Top it with a tablespoon of the blueberry mix. 7. Fold the corners of each square towards the center. Pinch the seams to keep the filling secure. You can leave a small opening for the filling to peek through. 8. Brush the tops with the beaten egg. This gives them a lovely golden color. 9. Bake for 20-25 minutes. Look for a puffed and golden brown finish. 10. After baking, remove them from the oven. Let them cool for a few minutes before serving. - Dust with extra powdered sugar for a sweet touch. - Garnish with a sprig of mint for a pop of color. - These danishes taste best warm or at room temperature. Enjoy! To get the best puff pastry, keep it cold. Start with a cold surface and tools. Thaw the pastry in the fridge, not on the counter. Roll it gently to keep layers intact. This helps the pastry puff up nicely in the oven. You want it about 1/8-inch thick for the best texture. One common mistake is overworking the dough. This can lead to tough pastry instead of flaky layers. Another mistake is skipping the egg wash. The egg wash gives your danish a beautiful golden color. Make sure to brush it on before baking. Lastly, don’t forget to use cornstarch with the blueberries. It thickens the filling and prevents a soggy bottom. For deeper flavor, use fresh lemon zest. It brightens the cream cheese mix and pairs well with blueberries. You can also add a pinch of cinnamon for warmth. Mixing in a bit of vanilla extract enhances the taste, too. For texture, try not to overcrowd the filling. Leave space for the pastry to puff. Lastly, let the danishes cool slightly before serving. This helps the filling set and improves the overall taste. {{image_2}} You can change some ingredients to fit your taste. Try using Greek yogurt in place of cream cheese. It will give a tangy twist and a lighter texture. If you need a dairy-free option, use vegan cream cheese. For sweetness, you can swap powdered sugar with maple syrup or honey. Each substitute will give your danish a unique flavor. While blueberries shine in this recipe, other fruits work well too. Try fresh raspberries for a tart kick. Strawberries offer a sweet, juicy bite. If you want a tropical twist, use diced mango or pineapple. You can even mix fruits, like blueberries and strawberries, for a colorful treat! Seasonal flavors can elevate your danish. In spring, add fresh strawberries and mint for a refreshing taste. Summer brings ripe peaches, which add a sweet touch. In fall, use spiced apples or pears with cinnamon. Winter calls for cranberry and orange for a festive vibe. Play with flavors and enjoy the seasons in every bite! Store your leftover Blueberry Lemon Cream Cheese Danish in an airtight container. Make sure they are completely cool before sealing. This helps keep the crust crisp and the filling fresh. You can keep them in the fridge for up to three days. If you want them to last longer, freezing is a great option. To reheat the danish, preheat your oven to 350°F (175°C). Place the danish on a baking sheet. Heat them for about 10-15 minutes. This will help restore their crispy texture. You can also use a microwave if you’re in a hurry. Just heat them for 20-30 seconds, but know that the crust may become soft. If you want to freeze the danish, wrap each one tightly in plastic wrap. Then, place them in a freezer-safe bag or container. They can freeze well for up to three months. When you’re ready to enjoy, thaw them overnight in the fridge. Then, reheat them in the oven for the best results. Yes, you can prepare the filling ahead of time. Mix the cream cheese, sugar, lemon zest, and blueberries. Store it in the fridge for up to two days. When you’re ready, assemble and bake the danish. This saves time and helps you enjoy fresh danish without stress. If you need a cream cheese substitute, try mascarpone cheese. It has a similar texture and taste. Greek yogurt is another option, but it may change the flavor a bit. For a dairy-free option, use cashew cream. Blend soaked cashews until smooth for that creamy consistency. Your danish is done when it looks golden brown and puffy. The filling should bubble slightly, indicating it’s hot inside. Use a toothpick to check the pastry. If it comes out clean, the danish is ready. Let it cool slightly before serving for the best taste. In this post, I covered key ingredients and their benefits, giving you a solid base. I walked you through each step to make delicious pastry, from prep to baking. I also shared tips to avoid mistakes and ensure great flavor. Finally, we explored variations and storage to keep your pastries fresh. Remember, with practice, you can create amazing treats that impress everyone. Enjoy the process and keep experimenting in your kitchen!

Blueberry Lemon Cream Cheese Danish Delight Recipe

Looking to impress friends and family with a delicious treat? This Blueberry Lemon Cream Cheese Danish is a perfect choice!

For this Slow Cooker Tomato Basil Chicken, you will need: - 4 boneless, skinless chicken breasts - 1 can (14.5 oz) diced tomatoes with basil, garlic, and oregano - 1 cup fresh basil leaves, chopped - 3 cloves garlic, minced - 1 medium onion, finely chopped - 2 tablespoons olive oil - 1 teaspoon salt - 1/2 teaspoon black pepper To kick up the flavor, consider adding: - 1/2 teaspoon red pepper flakes for heat - 1/2 cup shredded mozzarella cheese for serving - Fresh basil leaves for garnish You will need some basic tools: - Slow cooker - Large skillet - Cutting board - Knife - Mixing spoon - Two forks for shredding chicken This simple list of ingredients and tools makes cooking easy and fun. With everything ready, you can focus on creating a delicious meal. Enjoy the process! First, gather your ingredients. You will need: - 4 boneless, skinless chicken breasts - 1 can (14.5 oz) diced tomatoes with basil, garlic, and oregano - 1 cup fresh basil leaves, chopped - 3 cloves garlic, minced - 1 medium onion, finely chopped - 2 tablespoons olive oil - 1 teaspoon salt - 1/2 teaspoon black pepper - 1/2 teaspoon red pepper flakes (optional for a kick) - 1/2 cup shredded mozzarella cheese (for serving) - Fresh basil leaves (for garnish) Now, chop the fresh basil, onion, and mince the garlic. This step adds a great flavor base. Next, heat olive oil in a large skillet over medium heat. Add the chopped onion and sauté until it turns clear, about 3-4 minutes. Then, add the minced garlic and cook for 1 more minute until it smells great. Remove the skillet from the heat. In the slow cooker, place the chicken breasts at the bottom. Season them with salt, black pepper, and red pepper flakes if you want some spice. Pour the can of diced tomatoes with their juices over the chicken. Add the sautéed onion and garlic mixture on top. Finally, sprinkle the chopped fresh basil over everything. Cover the slow cooker with its lid. Cook on low for 6 hours or on high for 3 hours. The chicken should be tender and fully cooked. Once the chicken is cooked, use two forks to shred it directly in the slow cooker. Mix the chicken well with the tomato sauce. This helps the flavors blend together. Before serving, sprinkle shredded mozzarella cheese over the chicken mixture. Let it melt for about 5 minutes. Serve the Tomato Basil Chicken hot, and garnish with fresh basil leaves. Enjoy this tasty meal with pasta or crusty bread for a full experience! To boost the flavor of your Slow Cooker Tomato Basil Chicken, use fresh herbs. Fresh basil gives a bright taste. You can also add a splash of balsamic vinegar for depth. If you want heat, add more red pepper flakes. For a savory touch, sprinkle in some Italian seasoning. This blend adds warmth and aroma. Don't forget to taste the sauce before serving. Adjust the salt and pepper to your liking. The cooking time can vary based on your slow cooker. If you use a larger cut of chicken, increase the time slightly. For smaller pieces, reduce the cooking time a bit. On low, cook for 6 hours; on high, cook for 3 hours. Always check that the chicken reaches an internal temperature of 165°F. This ensures it's safe to eat and tender. Serve your Tomato Basil Chicken over pasta for a hearty meal. The sauce clings to the noodles and makes each bite delicious. You can also pair it with crusty bread to soak up the sauce. For a fresh side, try a simple green salad. A drizzle of olive oil adds extra flavor. Another option is to serve it with steamed vegetables for a balanced plate. Don't forget to top it with fresh basil leaves for a pretty finish. {{image_2}} You can swap out the chicken for turkey. Turkey thighs work well here. If you want a richer flavor, try adding some sun-dried tomatoes. They add a nice tang. You can also use different herbs like oregano or thyme. This gives a fresh twist to the dish. If you like cheese, try adding Parmesan with the mozzarella. It adds depth and creaminess. To make this dish vegetarian, use portobello mushrooms instead of chicken. They soak up the flavors well. For a vegan option, try chickpeas or lentils. Both options are protein-rich and hearty. Use vegetable broth instead of chicken broth to keep it vegan. You can also add extra veggies like zucchini or bell peppers for more texture. If you want it spicy, add more red pepper flakes. Start with one teaspoon and adjust to your taste. You can also add a dash of cayenne pepper for extra heat. If you prefer mild flavors, skip the red pepper flakes. Instead, add a pinch of sugar to balance the acidity of tomatoes. Taste as you go to find your perfect spice level. To store leftovers, let the chicken cool down first. Place it in an airtight container. Make sure to include the sauce. Store it in the fridge for up to three days. If you want to keep it longer, consider freezing it. To reheat, you can use the microwave or stovetop. If using the microwave, start with one to two minutes. Stir it halfway through to ensure even heating. On the stovetop, heat in a skillet over medium heat. Add a splash of water or broth to keep it moist. Freezing is a great way to save time. Place the cooled chicken mixture in a freezer-safe container. It can last for up to three months in the freezer. When ready to eat, thaw it overnight in the fridge. Reheat it gently before serving. This way, you can enjoy your delicious meal later! Yes, you can use frozen chicken breasts. Just add an extra hour to the cooking time. The slow cooker will work well to cook them through safely. Just remember to check that they reach 165°F for safe eating. Some great sides include: - Cooked pasta - Crusty bread - Steamed vegetables - Rice These sides pair well with the rich flavors of the chicken. They help soak up the sauce, too! To make this dish gluten-free, ensure your diced tomatoes do not have added gluten. Most brands are gluten-free, but it’s always best to check. You can serve it with rice or gluten-free pasta for a complete meal. Leftovers will last about 3 to 4 days in the fridge. Store them in an airtight container to keep them fresh. If you want to save them longer, consider freezing the leftovers instead. In this article, we explored slow cooker tomato basil chicken, covering everything from key ingredients to cooking instructions. You learned how to prepare, cook, and serve delicious meals with helpful tips. Remember, you can customize flavors, adjust cooking times, and even substitute ingredients. Storage tips help you save leftovers for later. Keep experimenting with new ideas, and enjoy your cooking adventures! Your slow cooker is a powerful tool for easy, tasty meals.

Slow Cooker Tomato Basil Chicken Flavorful Dinner Idea

Looking for a delicious, hassle-free dinner? Try my Slow Cooker Tomato Basil Chicken! It’s packed with flavor but takes only

- 8 oz. Asian egg noodles or thin spaghetti - 3 tablespoons honey - 4 cloves garlic, minced - 3 tablespoons soy sauce - 1 tablespoon sesame oil - 1 teaspoon grated ginger - 1/2 teaspoon red pepper flakes (optional) - 2 green onions, sliced - Sesame seeds for garnish In this simple recipe, the main ingredients create a rich flavor. The Asian egg noodles or thin spaghetti are your base. Honey adds sweetness, while garlic brings a nice punch. Together, they form a delicious blend. You can enhance the dish with some additional ingredients. Soy sauce gives a savory touch, and sesame oil adds depth. Grated ginger offers a zing, and red pepper flakes can spice things up. You can skip the flakes if you prefer less heat. Lastly, garnishes complete the dish and make it pretty. Sliced green onions add color and freshness. A sprinkle of sesame seeds adds a crunch. Together, these ingredients make Minute Honey Garlic Noodles a tasty meal you can enjoy anytime! To start, fill a large pot with water. Bring the water to a rapid boil. Once the water is boiling, add 8 oz. of Asian egg noodles or thin spaghetti. Cook the noodles according to the package instructions. This usually takes about 3 to 5 minutes until they are al dente. After cooking, drain the noodles in a colander and set them aside. Next, grab a small bowl. In this bowl, whisk together 3 tablespoons of honey, 4 cloves of minced garlic, and 3 tablespoons of soy sauce. Make sure these are well mixed. Then, add 1 tablespoon of sesame oil and 1 teaspoon of grated ginger. If you like spice, toss in 1/2 teaspoon of red pepper flakes. This sweet and savory sauce will bring your noodles to life. Now, take a large skillet or wok. Heat the sauce over medium heat until it warms up. Add the cooked noodles to the skillet. Toss the noodles gently to coat them well in the sauce. Stir for about 2 to 3 minutes. This helps heat the noodles and thicken the sauce slightly. Once the noodles are heated, remove the skillet from the heat. Slice 2 green onions and add them to the noodles. Mix everything well. To serve, plate the noodles and sprinkle sesame seeds on top. You can also add more green onions for extra flavor and color. Enjoy your delicious Minute Honey Garlic Noodles! To make cooking quick, gather all your ingredients first. This saves time. Use a large pot for boiling water. It helps cook noodles evenly. Always check the package for cooking time. Cook noodles until they are al dente, which means they are firm to the bite. This keeps them from getting mushy in the sauce. You can make the dish even better with extra spices. Try adding a pinch of ground black pepper or some garlic powder. If you like it sweeter, add more honey. For saltiness, a bit more soy sauce does the trick. Taste as you go, and adjust to your liking. For this recipe, use a large pot for boiling noodles. A good skillet or wok is perfect for making the sauce. A whisk helps mix the sauce well. You might also want a set of measuring spoons for accuracy. These tools make cooking easier and more fun! {{image_2}} You can add chicken, shrimp, or tofu to your honey garlic noodles. Each protein brings its unique taste. For chicken, cut it into bite-sized pieces. Cook it in the skillet before adding the sauce. It usually takes about 5-7 minutes to cook through. For shrimp, sauté them for about 3-4 minutes until they turn pink. Tofu is a great option too. Just cube it and fry until golden. This takes about 5-6 minutes. Each protein option makes the dish more filling and tasty. Adding vegetables boosts the nutrition of your dish. Consider bell peppers, broccoli, or snap peas. Chop them into small pieces for even cooking. You can stir-fry these veggies for 3-4 minutes before adding the noodles. This way, they stay crisp and colorful. You can also toss in carrots or spinach at the end. They cook quickly and add bright flavors. If you're gluten-free, swap Asian egg noodles for rice noodles. They work well and taste great. For vegans, you can use maple syrup instead of honey. It gives a similar sweetness. Also, ensure your soy sauce is gluten-free. These swaps make the dish suitable for different diets and keep it delicious. To keep your Minute Honey Garlic Noodles fresh, store them in the fridge. Place leftovers in a clean, airtight container. This helps prevent drying out and keeps the flavors intact. Glass containers work well, but plastic ones are fine too. Make sure to seal the lid tightly. Your noodles will stay good for up to three days. When you’re ready to eat, you can reheat the noodles easily. The best method is to use a skillet. Heat it over medium-low heat. Add a splash of water or a bit of sesame oil to prevent sticking. Stir gently for about 5 minutes. You can also use the microwave if you’re in a hurry. Heat in short bursts of 30 seconds, stirring in between, until hot. This keeps the flavor and texture nice. Yes, you can freeze honey garlic noodles! First, let them cool completely. Use freezer-safe containers or bags. Remove as much air as possible. They can last for up to three months in the freezer. When you’re ready to eat, thaw them in the fridge overnight. After that, reheat them on the stove or in the microwave. Enjoy your delicious noodles anytime! You can use many types of noodles for this dish. Here are some great options: - Asian egg noodles: These have a nice texture and flavor. - Thin spaghetti: This is a common choice and works well. - Rice noodles: These are gluten-free and very light. - Udon noodles: For a thicker, chewier bite. Feel free to mix and match based on your taste! Yes, you can prep this dish ahead of time. Here are some tips: - Cook the noodles: You can boil them a few hours before. Rinse them with cold water to stop cooking. - Make the sauce: Mix the sauce and store it in the fridge. - Combine later: When ready to eat, just heat the sauce and noodles together. This saves time and keeps dinner stress-free! Adjusting spice is easy. Here’s how: - Skip the red pepper flakes: This makes the dish mild. - Add a small amount: If you want heat, start with a pinch. Taste and add more if needed. - Use fresh ginger: It adds flavor without much heat. This way, everyone can enjoy the dish! Pairing side dishes can elevate the meal. Here are some ideas: - Steamed vegetables: Broccoli or snap peas add color and crunch. - Grilled chicken or shrimp: Both add protein and flavor. - A fresh salad: A light salad can balance the sweetness. These sides make your meal more complete and delicious! This blog post covered all you need for honey garlic noodles. We explored the key ingredients, including noodles, honey, and garlic. I shared step-by-step cooking instructions for perfect results. You learned tips for flavor and efficiency, plus variations for proteins and veggies. Storage methods ensured your leftovers stay tasty. In conclusion, this dish is both easy and versatile. Try making it your own with different flavors or sides. Enjoy your cooking!

Minute Honey Garlic Noodles Simple and Tasty Dish

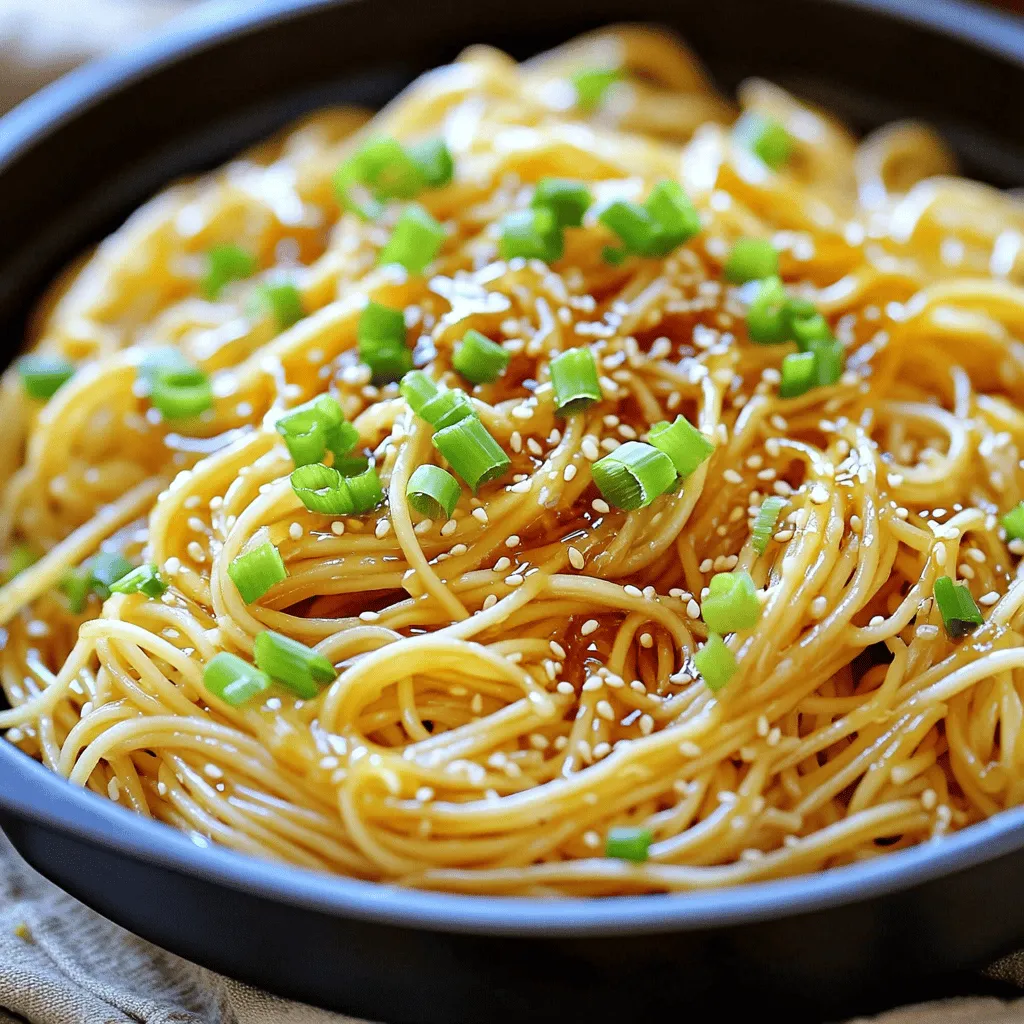
Looking for a quick and flavorful meal? Let me introduce you to Minute Honey Garlic Noodles, a simple dish that

- 1 lb ground beef (or a mix of beef & pork) - 1/2 cup breadcrumbs - 1/4 cup grated Parmesan cheese - 1 teaspoon Italian seasoning - 1 clove garlic, minced - 1/2 teaspoon salt - 1/4 teaspoon black pepper - 1 large egg - 1 cup mozzarella cheese, cut into small cubes - 1 cup marinara sauce (for dipping) - Fresh basil leaves, for garnish Gather these ingredients to make your savory air fryer mozzarella stuffed meatballs. You will need ground beef or a mix of beef and pork for a juicy base. Breadcrumbs and Parmesan cheese add flavor and texture. Italian seasoning and minced garlic bring in that classic Italian taste. For binding, use one large egg, and don't forget salt and black pepper for seasoning. The star ingredient is mozzarella cheese, which melts beautifully inside the meatballs. When serving, a warm marinara sauce is perfect for dipping. Fresh basil adds a nice touch and bright flavor. These ingredients come together to create a delicious dish that everyone will enjoy! - In a large mixing bowl, combine: - 1 lb ground beef (or beef & pork mix) - 1/2 cup breadcrumbs - 1/4 cup grated Parmesan cheese - 1 teaspoon Italian seasoning - 1 clove garlic, minced - 1/2 teaspoon salt - 1/4 teaspoon black pepper - 1 large egg Mix these well. Make sure every ingredient blends evenly. This step is key for flavor. - Take about 1 tablespoon of the meat mixture. - Flatten it in your palm. Place a cube of mozzarella cheese in the center. - Mold the meat around the cheese. Ensure it’s fully enclosed. - Shape it into a ball. Repeat with the rest of the mixture and cheese cubes. This method keeps the cheese inside, giving a nice surprise when you bite in. - Preheat your air fryer to 375°F (190°C). - Place the meatballs in a single layer in the air fryer basket. - Make sure they do not touch. This helps them cook evenly. Air fry for 10-12 minutes. Turn them halfway through. They should be golden brown. Check that the inside reaches 160°F (70°C). While they cook, heat marinara sauce in a small pot over low heat. This adds a nice touch when serving. - Choosing the right grind of meat: For the best flavor, use a mix of ground beef and pork. The pork adds fat, which keeps the meatballs tender. Aim for an 80/20 meat-to-fat ratio for juicy meatballs. - Adjusting breadcrumbs for consistency: Use fresh or dry breadcrumbs. Fresh breadcrumbs give a softer texture, while dry ones make a firmer meatball. Start with half a cup and adjust based on how moist your mixture feels. - Ensuring even cooking: Place meatballs in a single layer in the air fryer basket. Leave space between each meatball. This helps the hot air circulate and cooks them evenly. - Maintaining optimal temperature: Preheat your air fryer to 375°F (190°C). This step is key for a nice, crisp exterior. Avoid overcrowding the basket to prevent steaming. - Pairing with marinara sauce: Serve your meatballs hot with marinara sauce. This adds a rich, tangy flavor that complements the cheese inside. Heat the sauce gently while the meatballs cook. - Garnishing for presentation: Add fresh basil leaves on top before serving. This not only looks great but also adds a burst of fresh flavor. A sprinkle of grated Parmesan can enhance the dish too. {{image_2}} You can switch up the meat in this recipe. Ground turkey or chicken works well for a lighter option. These meats have less fat but still taste great. You can also try a mix of turkey and pork for more flavor. If you want a vegetarian option, use lentils or beans. They add protein and fiber while keeping the meatball shape. While mozzarella is classic, feel free to experiment. Cheddar, gouda, or pepper jack can add unique flavors. Mixing cheeses can also create a tasty surprise inside the meatball. Adding herbs like parsley or spices like crushed red pepper can boost flavor. This lets you customize the taste to your liking. Want to spice things up? Add hot sauce, smoked paprika, or garlic powder to the meat mixture. These ingredients can make the meatballs pop with flavor. You can also sneak in some finely chopped vegetables. Bell peppers, onions, or spinach can add nutrition and color. This way, you can make your meal even healthier while keeping it delicious. To store leftover meatballs, place them in an airtight container. This helps keep them fresh. Make sure the meatballs cool down before sealing the container. For reheating, use the air fryer at 350°F (175°C) for about 5-7 minutes. This keeps them crispy and warm. You can freeze cooked or uncooked meatballs. If freezing cooked meatballs, let them cool first. Then, arrange them on a baking sheet and freeze until firm. Transfer them to a freezer bag and remove as much air as possible. For uncooked meatballs, freeze them right after shaping. Thaw them in the fridge overnight before cooking. This keeps their flavor and texture intact. In the fridge, cooked meatballs last about 3-4 days. Uncooked meatballs can stay fresh for 1-2 days. When frozen, they last up to 3 months. Always check for signs of spoilage. If the meatballs smell off or have a slimy texture, it's best to throw them away. Air Fryer Mozzarella Stuffed Meatballs cook in about 10-12 minutes. Preheat your air fryer to 375°F (190°C). Place the meatballs in a single layer. Turn them halfway through to ensure even cooking. The meatballs are ready when they turn golden brown and reach an internal temperature of 160°F (70°C). Yes, you can use other cheeses! Try cheddar, gouda, or even pepper jack for a spicy twist. Just cut the cheese into small cubes, like mozzarella. Each cheese brings its own flavor and texture. Experiment to find your favorite! These meatballs can be healthy with a few tweaks. Use lean ground beef or turkey for fewer calories. Whole wheat breadcrumbs add fiber. Pairing with marinara sauce gives added nutrients. Remember to enjoy in moderation for a balanced meal. Making Air Fryer Mozzarella Stuffed Meatballs is simple and fun. We covered the key ingredients, like ground beef, breadcrumbs, and cheese. We also walked through step-by-step instructions for preparing, forming, and cooking the meatballs. Remember to try different meats and cheese types to personalize your dish. Keep your leftovers fresh by storing them properly. Enjoy these tasty meatballs with marinara and fresh basil for a great meal. With these tips and tricks, you can master this recipe and impress everyone at your table. Happy cooking!

Savory Air Fryer Mozzarella Stuffed Meatballs Recipe

Are you ready to elevate your snack game? These savory air fryer mozzarella stuffed meatballs are a must-try! Juicy ground

- 1 block (14 oz) firm tofu, drained and pressed - 1 cup broccoli florets - 1 red bell pepper, sliced - 1 yellow bell pepper, sliced - 1 carrot, thinly sliced - 2 tablespoons olive oil - 1/4 cup low-sodium soy sauce - 3 tablespoons honey or maple syrup - 1 tablespoon grated fresh ginger - 2 cloves garlic, minced - 1 teaspoon sesame oil - 1 tablespoon cornstarch - 1 tablespoon sesame seeds (for garnish) - Green onions, chopped (for garnish) You can swap tofu for tempeh or chickpeas. Both give great texture. For the veggies, use snap peas or zucchini instead of bell peppers. You can also try cauliflower instead of broccoli. If you need a low-sugar option, replace honey with agave syrup. For soy sauce, use coconut aminos for a soy-free choice. Fresh produce brings bright flavors and vibrant colors. It is often packed with nutrients and fiber, making meals healthier. Using fresh veggies helps you feel full while eating fewer calories. Plus, fresh food tastes better! When you use seasonal produce, you support local farmers and reduce your carbon footprint. Eating fresh helps you connect with your food and makes cooking more enjoyable. To start, preheat your oven to 400°F (200°C). Line a large baking sheet with parchment paper. Take your block of firm tofu and drain it. Press the tofu to remove excess water. This step helps the tofu absorb the flavor. Next, cut the tofu into bite-sized cubes. In a mixing bowl, add the cubed tofu. Then, pour in the olive oil, soy sauce, honey or maple syrup, ginger, garlic, and sesame oil. Toss everything well. Make sure the tofu is coated evenly. This will enhance the taste as it cooks. While the tofu marinates, chop your vegetables. Use a cup of broccoli florets, one sliced red bell pepper, one sliced yellow bell pepper, and a thinly sliced carrot. Arrange the vegetables on the other half of the baking sheet. Drizzle them with a bit of olive oil. Add a sprinkle of salt and pepper for flavor. This simple step brings out the natural sweetness of the veggies. Now, it’s time to bake! Place the baking sheet in your preheated oven. Bake for 25 to 30 minutes. Make sure to flip the tofu and veggies halfway through. This ensures everything cooks evenly. When the timer goes off, check for a golden and slightly crispy look. Once done, take it out of the oven and sprinkle sesame seeds on top. Serve it hot and garnish with chopped green onions. This adds a nice touch and extra flavor. Tofu can be tricky, but I have simple tips. First, always use firm tofu. This helps it hold shape when cooking. Press the tofu well before cutting. This removes excess water, allowing better flavor absorption. Cut the tofu into equal-sized cubes. This ensures they cook evenly. When seasoning, toss the tofu with oil and cornstarch. This creates a crispy exterior when baking. For perfect veggies, cut them into similar sizes. This helps them cook at the same rate. Broccoli florets should be small, while bell peppers can be sliced thin. The carrot should be cut into thin rounds. This way, all the veggies roast beautifully. Drizzle them lightly with olive oil. A pinch of salt and pepper will enhance their flavor. Remember to flip them halfway through cooking. This ensures even roasting and great texture. This recipe shines for meal prep. You can make a big batch and store leftovers. Divide the tofu and veggies into containers. They keep well in the fridge for up to four days. When ready to eat, just reheat in the microwave or oven. You can also mix in cooked rice or quinoa for a full meal. Feel free to add different sauces or toppings for variety. This keeps your meals exciting all week! {{image_2}} You can make this dish fully vegan. Just use maple syrup instead of honey. It adds sweetness without any animal products. Make sure your soy sauce is vegan too. This way, everyone can enjoy this tasty meal! Feel free to mix in your favorite veggies. Snap peas or mushrooms work great. You can also add zucchini or sweet potatoes. Just cut them into even pieces. This keeps cooking time the same. More colors on your plate make it look fun! If you like heat, add some red pepper flakes. You can also use sriracha or chili paste. Start with a small amount and taste. You can always add more, but you can't take it out! Adjust it to your liking for a fun kick. After you make your sheet pan teriyaki tofu and veggies, let it cool. Use an airtight container to keep it fresh. Store it in the fridge for up to four days. If you want to keep it longer, consider freezing it. To reheat, take the tofu and veggies out of the fridge. Place them on a baking sheet and preheat your oven to 350°F (175°C). Heat for about 15-20 minutes until warm. You can also use a microwave. Heat in short bursts, stirring in between, until hot. To freeze, place the cooled tofu and veggies in a freezer-safe bag. Squeeze out any air before sealing. This helps prevent freezer burn. It can stay frozen for up to three months. When you’re ready to eat, thaw it in the fridge overnight and reheat as needed. Yes, you can. Firm tofu is best for this dish. It holds its shape well during cooking. If you prefer softer tofu, use silken tofu. Just be careful when mixing it. It might break apart easily. You can use agave syrup or brown sugar as a substitute. Both add sweetness and flavor. If you want a sugar-free option, try using stevia or monk fruit sweetener. Adjust the amount to taste, as these sweeteners can be much sweeter than honey or maple syrup. To make this dish gluten-free, use gluten-free soy sauce. Look for tamari, which is a great alternative. Ensure all other ingredients are gluten-free too, like the cornstarch. This way, you can enjoy the same great flavors without gluten. This blog covered how to make a tasty dish using fresh ingredients. You learned about key ingredients, substitutions, and benefits of fresh produce. I shared step-by-step instructions for prepping tofu and roasting veggies. You also got helpful tips for perfecting textures and making this dish meal prep-friendly. Lastly, we discussed variations and proper storage techniques. Fresh ingredients make meals better, and you can always adjust recipes to fit your needs. Get cooking and enjoy this delicious, easy meal!

Powerful Sheet Pan Teriyaki Tofu & Veggies Recipe

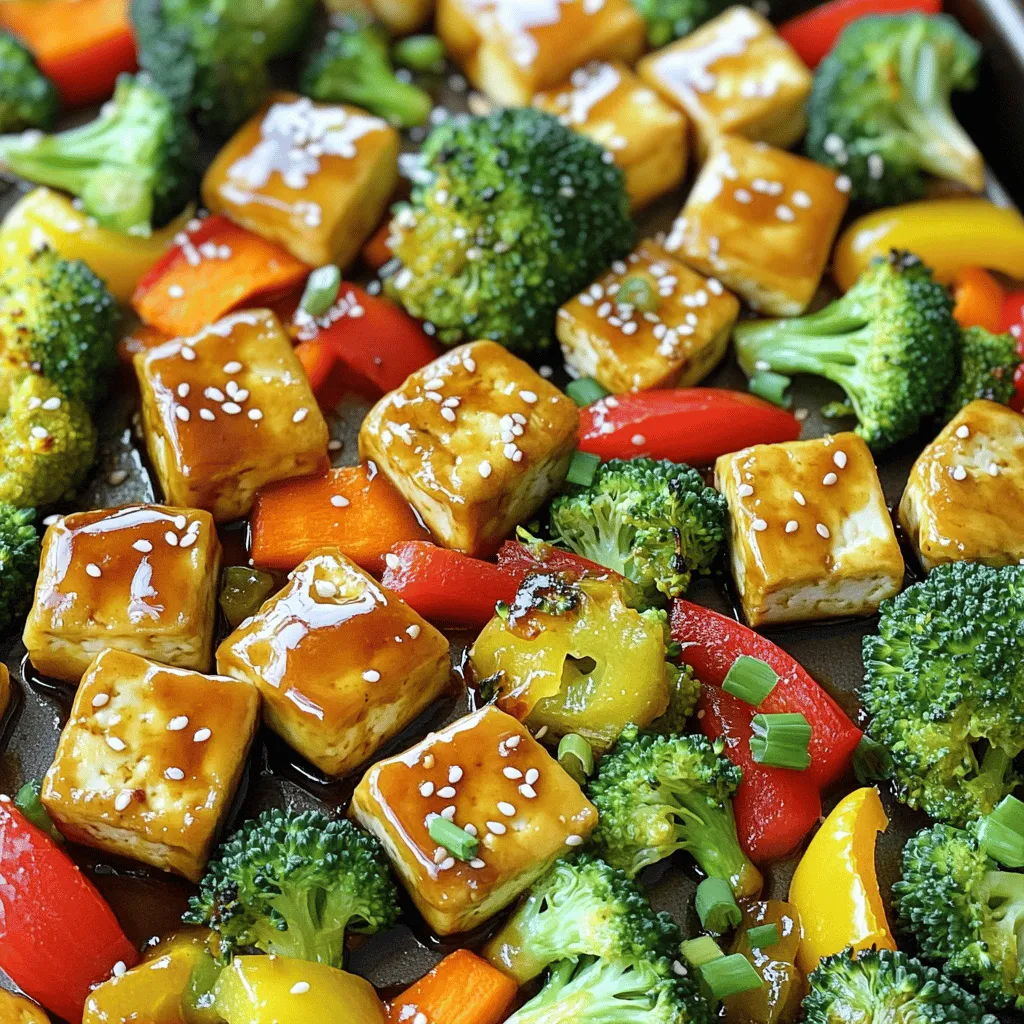
Are you ready to whip up a meal that’s tasty, quick, and healthy? My Powerful Sheet Pan Teriyaki Tofu &

- 1 cup Arborio rice - 4 cups vegetable broth - 1/2 cup heavy cream The main part of this dish is Arborio rice. This rice is special because it is starchy. It helps the risotto get that creamy texture. Vegetable broth adds flavor. You can use homemade or store-bought broth. Heavy cream brings richness and smoothness to the dish. - Fresh herbs (parsley, thyme, basil) - 1 lemon (zested and juiced) - 2 cloves garlic, minced - 1 small onion, finely chopped Fresh herbs give the risotto a bright taste. I love mixing parsley, thyme, and basil. Lemon adds a zing. The zest and juice brighten up the dish. Garlic and onion fill the dish with warmth and depth. They create a fragrant base that makes your kitchen smell amazing. - 2 tablespoons olive oil - 1 tablespoon unsalted butter - 1/2 cup grated Parmesan cheese - Salt and pepper to taste Olive oil adds a nice richness. The butter works with the oil to create a base for cooking. Parmesan cheese melts in, adding a salty touch. Salt and pepper are key to making all the flavors pop. They tie everything together and make the dish shine. First, heat the vegetable broth in a saucepan. Keep it warm on low heat. This step is vital, as warm broth helps the rice cook evenly. You want the broth hot but not boiling. This keeps your risotto creamy and smooth. Next, grab a large skillet and add olive oil and butter. Heat it over medium heat. Once hot, toss in the finely chopped onion. Cook until it’s translucent, about 3-4 minutes. This brings out its sweet flavor. Then, add the minced garlic and cook for one more minute. The aroma will fill your kitchen, making you hungry! Now, it's time to add the Arborio rice. Stir it in, coating the grains with the oil and butter. This helps to lock in flavor. Start adding the warm broth, one ladle at a time. Stir often. Allow the rice to absorb the liquid before adding more. This process takes about 18-20 minutes. You want the rice to be al dente, which means it should still have a little bite. When the rice is creamy, stir in the heavy cream. Add the lemon zest and lemon juice for freshness. Mix well. Then, fold in the grated Parmesan cheese. This adds richness and a savory touch. Season with salt and pepper to taste. Finally, remove the risotto from heat and gently stir in the fresh herbs. This adds a burst of color and flavor. Serve immediately for the best creamy texture! To make your risotto creamy, stir constantly. This action helps the rice release its starches, creating that rich texture. Start with warm broth. Add it slowly, one ladle at a time. Wait until the rice absorbs most of the broth before adding more. This method takes about 18 to 20 minutes. If you want a twist, try other grains like quinoa or farro. These grains will change the texture and taste but still give you a great meal. For a dairy-free option, use coconut cream or cashew cheese instead of heavy cream and Parmesan. This keeps the dish creamy and rich without dairy. Presentation matters! Serve your risotto in warmed shallow bowls. This keeps it warm and inviting. Garnish with fresh herbs, like parsley or basil, and a sprinkle of cheese. This adds color and a pop of flavor. A lovely presentation makes your meal feel special and even more enjoyable. {{image_2}} You can change your creamy lemon herb risotto by adding fresh vegetables. Asparagus and peas are great choices. They add color and crunch. Just toss them in when the rice is almost done cooking. For protein, consider adding chicken or shrimp. Cook the chicken first until it's golden and add it to the risotto. If you prefer shrimp, add them in the last few minutes so they stay tender. To boost flavor, try different herbs. Dill and chives give a unique twist. Just chop them finely and mix them in at the end. If you like a bit of spice, add red pepper flakes. Just a pinch can make your dish pop. Adjust the amount to your taste, but start small! If you're gluten-free, choose a gluten-free broth. Arborio rice is naturally gluten-free, so you’re good there. For vegan options, swap heavy cream with coconut milk or a nut-based cream. You can also omit the cheese or use a vegan cheese. This gives you a tasty dish that fits your diet! To keep your creamy lemon herb risotto fresh, store it in an airtight container. Place it in the fridge within two hours of cooking. This helps prevent bacteria growth. Risotto stays good in the fridge for about three days. For the best taste, eat it sooner rather than later. When reheating risotto, you want to keep it creamy. The stovetop is the best way to do this. Just add a splash of broth or water as you stir. Heat it gently over low heat. If you use a microwave, place it in a bowl with a lid. Add some broth or water to prevent it from drying out. Heat in short bursts, stirring in between. Yes, you can freeze risotto, but it may change texture. To freeze, cool it first. Portion it into freezer-safe bags or containers. Make sure to remove as much air as possible. You can freeze it for up to three months. When ready to eat, thaw it overnight in the fridge. Reheat using the stovetop method for best results, adding liquid as needed to regain creaminess. Arborio rice is the best choice for risotto. This rice has a high starch content. When cooked, the starch releases and creates a creamy texture. Arborio rice also absorbs flavors well, making it perfect for this dish. Its short, plump grains help achieve that rich creaminess you want. You can prepare some steps ahead of time. Chop your onion and garlic, and measure your rice. Heat the broth and keep it warm. This way, you can cook the risotto faster when you're ready. However, I suggest making risotto fresh for the best texture. Stirring risotto often is key to its creaminess. When you stir, you help release the starch from the rice. This starch thickens the dish and gives it a rich, velvety feel. If you don’t stir, the rice will not release enough starch, making the risotto less creamy. You can easily change the flavor with herbs and seasonings. Fresh herbs like parsley, thyme, and basil add brightness. You can also experiment with spices like black pepper or red pepper flakes for heat. Adding more lemon juice or zest can enhance the dish too. In this blog post, we explored how to make a creamy risotto. We covered essential ingredients like Arborio rice, vegetable broth, and heavy cream, plus flavor boosters and pantry staples. I shared step-by-step instructions on sautéing aromatics, cooking the rice, and finishing touches. You also learned tips for texture, substitutions, and variations. Remember, risotto is versatile and can adapt to your taste. Enjoy experimenting with flavors, seasonal ingredients, and dietary changes. Making risotto can be fun and satisfying!

Creamy Lemon Herb Risotto Delightful and Simple Meal

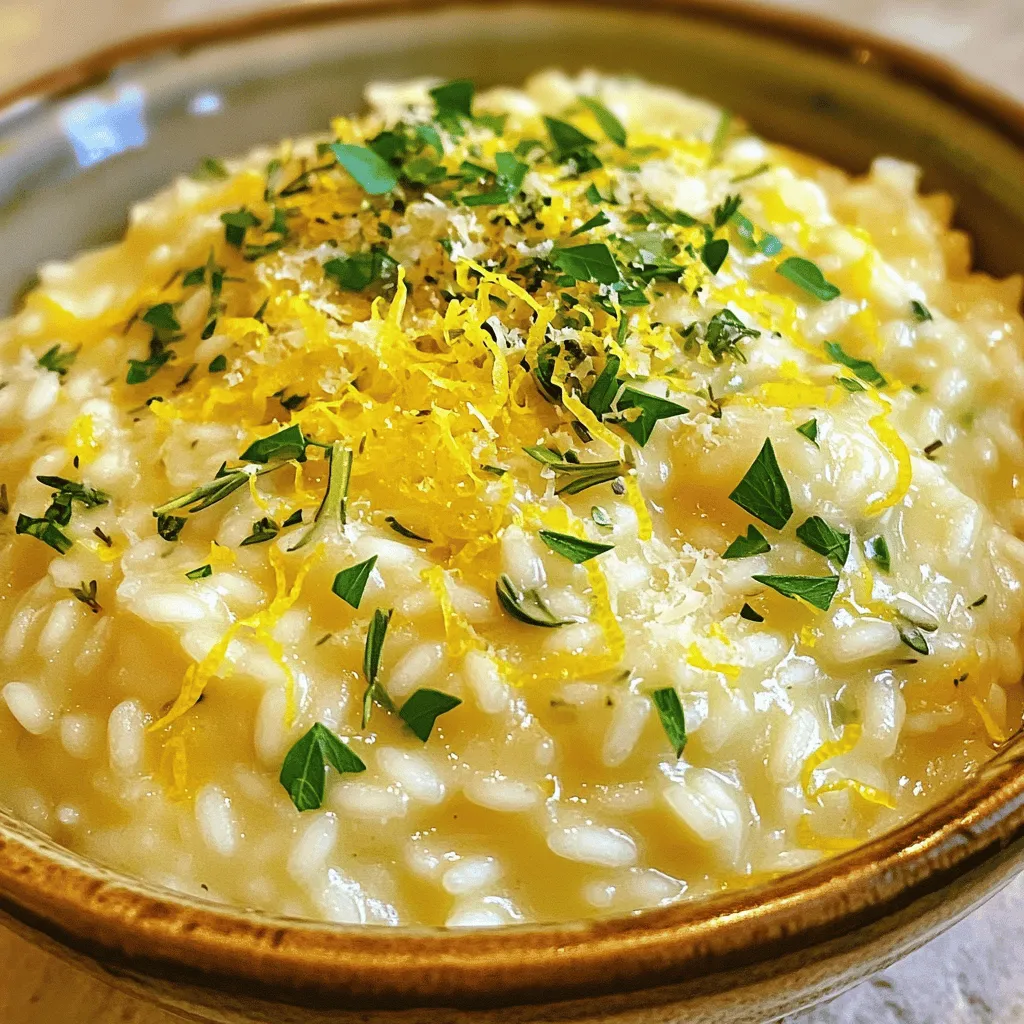
Looking for a quick yet scrumptious meal? Try my Creamy Lemon Herb Risotto! It’s simple, full of flavor, and perfect

Older posts
Newer posts
← Previous Page1 … Page21 Page22 Page23 … Page86 Next →

dsad

© 2026 Cooking Wells • Built with GeneratePress

Our Policies

  • Copyright Policy
  • Cookie Policy
  • GDPR Policy
  • Privacy Policy
  • Disclaimer
  • Terms Of Use

More Information

  • Home
  • About
  • Contact
  • Appetizers
  • Dessert
  • Dinner
  • Drinks
©2026, Cooking Wells About Back To Top