Skip to content
DisclaimerTerms Of UseGDPR PolicyCookie Policy

Cooking Wells

  • Home
  • Drinks
  • Appetizers
  • Dinner
  • Dessert
  • About
  • Contact
  • Privacy Policy
DisclaimerTerms Of UseGDPR PolicyCookie Policy

NO-ING-IMG

- 1 cup all-purpose flour - 2 tablespoons granulated sugar - 1 teaspoon baking powder - 1/2 teaspoon baking soda - 1/2 teaspoon salt - 1 cup buttermilk - 1 large egg - 2 tablespoons unsalted butter, melted - 1 teaspoon vanilla extract - 1/4 cup brown sugar - 2 tablespoons ground cinnamon - 4 ounces cream cheese, softened - 1/4 cup unsalted butter, softened - 1 cup powdered sugar - 1 teaspoon vanilla extract - 2 tablespoons milk The ingredients for the Cinnamon Roll Pancake Stack are simple yet key. First, gather the dry ingredients. Start with one cup of all-purpose flour. Then add two tablespoons of granulated sugar. Next, mix in one teaspoon of baking powder, half a teaspoon of baking soda, and half a teaspoon of salt. Now, let’s focus on the wet ingredients. You need one cup of buttermilk and one large egg. Melt two tablespoons of unsalted butter and add it to the mix. Don’t forget one teaspoon of vanilla extract to give it that sweet aroma. Next, we prepare the cinnamon filling. Combine a quarter cup of brown sugar with two tablespoons of ground cinnamon. This mix gives the pancakes their warm, spiced flavor. Lastly, we create the cream cheese frosting. Beat together four ounces of softened cream cheese and a quarter cup of softened unsalted butter. Add in one cup of powdered sugar and one teaspoon of vanilla extract. Mix in two tablespoons of milk to reach your desired creaminess. Having these ingredients ready will set you up for a fun and tasty cooking experience. - In a large bowl, whisk together: - 1 cup all-purpose flour - 2 tablespoons granulated sugar - 1 teaspoon baking powder - 1/2 teaspoon baking soda - 1/2 teaspoon salt - In another bowl, mix together: - 1 cup buttermilk - 1 large egg - 2 tablespoons unsalted butter, melted - 1 teaspoon vanilla extract - Pour the wet mix into the dry mix. Stir gently until just combined. A few lumps are fine. - In a small bowl, combine: - 1/4 cup brown sugar - 2 tablespoons ground cinnamon - Heat a non-stick skillet or griddle over medium heat. - Pour about 1/4 cup of the pancake batter onto the skillet. - While the pancake cooks for about 2-3 minutes, sprinkle a thin layer of the cinnamon filling on top. - Carefully flip the pancake and cook for another 2-3 minutes until golden brown. Repeat this for all the batter. - In a bowl, beat together until smooth: - 4 ounces cream cheese, softened - 1/4 cup unsalted butter, softened - 1 cup powdered sugar - 1 teaspoon vanilla extract - 2 tablespoons milk (add more if needed for consistency) - Stack pancakes on a plate. - Drizzle cream cheese frosting between each layer. - Top the stack with more frosting. To make great pancakes, avoid overmixing the batter. Mix just until the dry and wet ingredients blend. A few lumps are okay. Overmixing can lead to tough pancakes. Next, pay attention to your cooking temperature. Heat your skillet to medium. If it's too hot, the outside cooks too fast. If it's too low, the pancakes may not rise well. A non-stick skillet works best for even cooking. Achieving perfect creaminess in your frosting is key. Start with softened cream cheese and butter. Beat them well before adding sugar. This helps create a smooth mix. For sweetness, adjust the amount of powdered sugar. You can add more for a sweeter taste. If the frosting is too thick, add a little milk. This helps reach your desired consistency. You want it to drizzle nicely over the pancakes. {{image_2}} You can make your cinnamon roll pancake stack even more fun! Here are two easy ideas: - Adding chocolate chips: Stir in a handful of chocolate chips into the batter. They melt and create a gooey surprise in each bite. - Swapping for different extracts: Try using almond or maple extract instead of vanilla. This simple change adds a new flavor twist that can surprise your taste buds. Now, let’s talk about what to put on top of your pancakes! Here are some tasty ideas: - Topping ideas: Fresh berries, sliced bananas, or chopped nuts add color and crunch. You can also sprinkle some extra cinnamon for a nice touch. - Pairing with beverages: Serve your pancakes with a warm cup of coffee or tea. The warm drinks balance the sweetness of the pancakes. You can even try a glass of cold milk for a classic combo! To keep your cinnamon roll pancakes fresh, use an airtight container. This helps keep them moist. Place a piece of wax paper between layers if stacking. You can store them in the fridge for up to three days. If you want to keep them longer, consider freezing. They can last in the freezer for up to two months. Just make sure to wrap them tightly in plastic wrap before placing them in a freezer bag. For the best taste, reheat pancakes in a skillet. Heat the skillet on low, and add a small amount of butter. Place the pancake in the skillet and warm it for about two minutes on each side. This method keeps the pancakes soft and tasty. You can also use a microwave if you're short on time. Place a pancake on a microwave-safe plate. Heat for 20-30 seconds, checking for warmth. Add a drizzle of cream cheese frosting once heated for extra flavor. Yes, you can make these pancakes ahead of time. Here are some tips: - Prepare the pancake batter and store it in the fridge for up to 24 hours. - Cook the pancakes when ready. This keeps them fresh. - You can also cook the pancakes and cool them. Store them in an airtight container. They will last for 2-3 days in the fridge. To make this recipe gluten-free, follow these ingredient tips: - Swap all-purpose flour for a gluten-free blend. Check that it is a 1:1 substitute. - Ensure your baking powder is gluten-free. Some brands may add gluten. - Also, check your vanilla extract. Most are gluten-free, but always confirm. Yes, freezing these pancakes is easy! Here’s how: - Let the pancakes cool completely. - Place parchment paper between each pancake to avoid sticking. - Store them in a freezer-safe bag or container. They will keep for up to 2 months. To reheat, simply pop them in the toaster or microwave until hot. Enjoy! You learned how to make delicious cinnamon roll pancakes. I outlined the needed ingredients, from dry to wet. Then, I walked you through simple steps to create the pancakes and frosting. Don't forget the tips for perfecting your pancakes and tasty variations. These pancakes are fun, easy, and perfect for any meal. Enjoy making them for friends or family. You’ll impress everyone with your cooking skills!

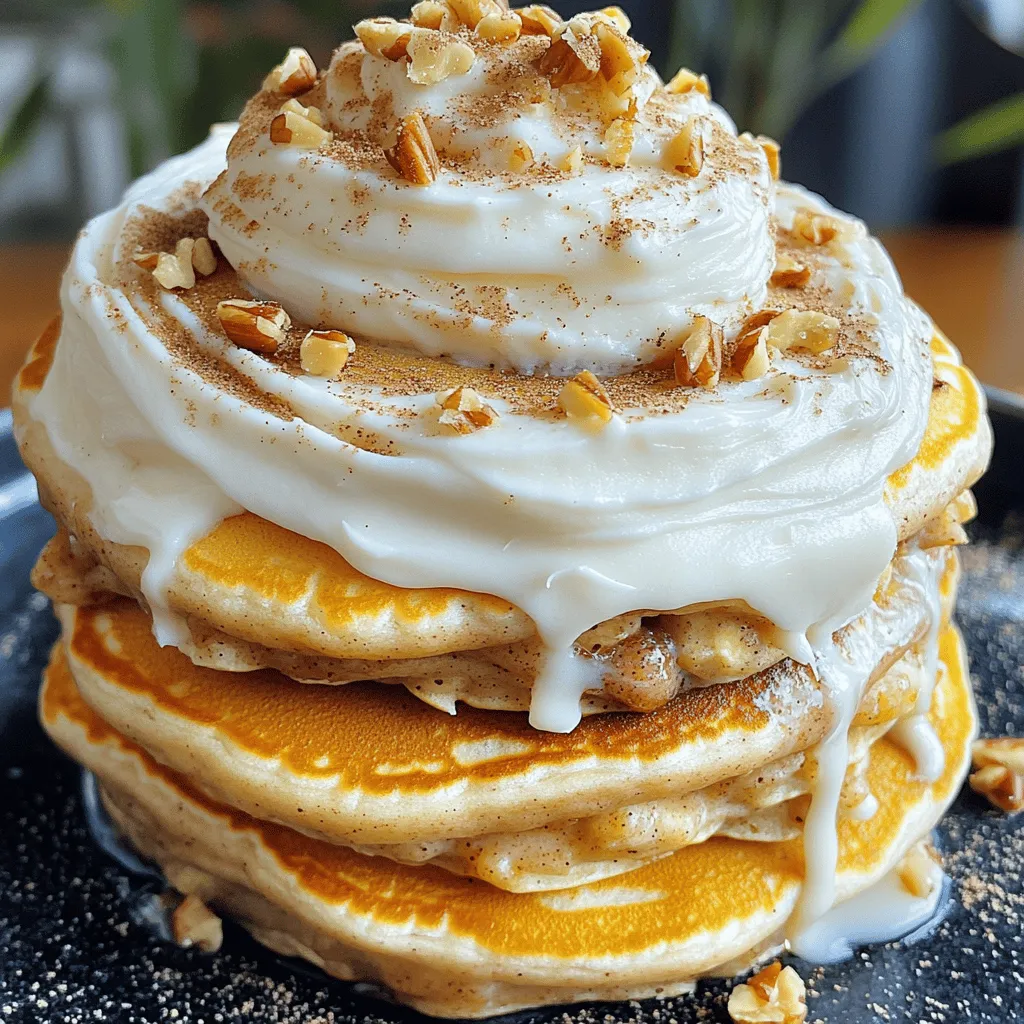
Cinnamon Roll Pancake Stack Tasty Breakfast Delight

Get ready for a breakfast treat that’s sure to wow your taste buds! The Cinnamon Roll Pancake Stack combines two

For these tasty teriyaki chicken lettuce cups, you'll need: - 1 lb ground chicken - 1/4 cup low-sodium soy sauce - 2 tablespoons honey - 2 tablespoons rice vinegar - 1 tablespoon sesame oil - 2 cloves garlic, minced - 1 teaspoon fresh ginger, grated - 1/2 cup bell pepper, diced (any color) - 1/2 cup carrots, shredded - 1/4 cup green onions, sliced - 1 tablespoon sesame seeds - 1 head of butter or romaine lettuce, leaves separated - Salt and pepper to taste These ingredients blend well to create a savory and sweet filling. The ground chicken cooks quickly and absorbs the rich flavors of the sauce. You might want to add a few extra ingredients for more taste and crunch. Consider: - Chopped water chestnuts for a nice crunch - Shredded cabbage for extra texture - Cilantro or mint for fresh herbs - Chopped peanuts for a nutty kick These add-ins can enhance your dish. They will bring new flavors and colors to your plates. Serve these lettuce cups with some tasty sides to complete your meal. Good choices include: - Steamed rice for a filling option - A side salad for freshness - Extra dipping sauce for more flavor These sides balance your meal and make it even more enjoyable. You could even serve some pickled vegetables for a tangy twist. First, heat the sesame oil in a large skillet over medium heat. Add minced garlic and grated ginger. Sauté for about one minute until it smells great. Next, add the ground chicken to the skillet. Use a spatula to break it apart. Cook until it is browned and no longer pink, about 5 to 7 minutes. Then, stir in the low-sodium soy sauce, honey, and rice vinegar. Mix well to coat the chicken. Let it cook for 2 to 3 more minutes until the sauce thickens a bit. Now it’s time to add some crunch! Toss in the diced bell pepper and shredded carrots. Cook these veggies for about 2 minutes. You want them to be tender but still crisp. If you like, season with salt and pepper to taste. This will add extra flavor to your dish. Once the chicken mixture is ready, remove it from the heat. Stir in the sliced green onions and sesame seeds. This adds a nice crunch and flavor. Now, take your butter or romaine lettuce leaves and separate them. Spoon the teriyaki chicken mixture into the center of each leaf. You can fold the sides over to create a cup. Arrange the filled lettuce cups on a platter. For a fun touch, garnish with extra sesame seeds and green onions! Enjoy your fresh and flavorful teriyaki chicken lettuce cups! To make the best teriyaki chicken, start with fresh ingredients. Ground chicken cooks quickly, so watch it closely. Use medium heat for even cooking. Sauté garlic and ginger until they smell great. This adds flavor right from the start. Stir the chicken often to break it apart. Make sure it browns nicely for taste. When adding the sauce, let it thicken a bit. This makes the chicken sticky and delicious. Serving is just as important as cooking. Arrange your filled lettuce cups on a big platter. This makes them look inviting. Sprinkle extra sesame seeds and sliced green onions on top. It adds a pop of color. You can also serve with a small bowl of dipping sauce. This gives everyone a chance to add their own flavor. Want to make your dish healthier? Try using ground turkey instead of chicken. It’s leaner and still tasty. You can swap honey with maple syrup for a different sweetness. If you need a lower sodium option, use coconut aminos instead of soy sauce. For a crunch, add chopped nuts like almonds. These swaps keep your dish yummy while being mindful of health. {{image_2}} You can easily make teriyaki chicken lettuce cups vegetarian or vegan. Use mushrooms or tofu instead of ground chicken. Both options soak up flavors well. For mushrooms, try shiitake or portobello for a hearty bite. If you choose tofu, press it to remove excess water. Crumble it before cooking to mimic the texture of ground chicken. Both options work great with the teriyaki sauce. To keep this dish gluten-free, swap out the soy sauce for tamari. Tamari is a gluten-free soy sauce that tastes similar. You can also use coconut aminos. It adds a sweet flavor without gluten. Be sure to check all other ingredients for gluten, like sesame oil and honey. Want to mix it up? Try different sauces for new flavors. A spicy sriracha sauce can add heat. For a sweeter touch, pineapple teriyaki sauce works well. You can also experiment with hoisin sauce for a rich taste. Each sauce adds its unique twist to your lettuce cups. Enjoy the fun of creating your own flavor combinations! To keep your leftover teriyaki chicken fresh, place it in an airtight container. Make sure to cool it down first. You can store it in the fridge for up to three days. Label the container with the date you made it. This helps you remember when to eat it. When you are ready to eat, reheating is simple. You can use the microwave or a skillet. For the microwave, place the chicken in a bowl and cover it. Heat for about one to two minutes. Stir halfway through to heat evenly. If using a skillet, add a splash of water, cover, and heat over medium heat for about five minutes. If you want to save teriyaki chicken for later, freezing works well. Use a freezer-safe bag or container. Squeeze out as much air as possible before sealing. You can freeze it for up to three months. When you’re ready to eat, thaw it in the fridge overnight. Reheat it as mentioned before. Always check for any off smells or colors before eating. Yes, you can use chicken thighs. Just chop them into small pieces. Cook them until they're fully done. This adds a different texture and flavor to the dish. The filled lettuce cups last for about two days. Store the filling and lettuce separately. This keeps the lettuce crisp and fresh. Butter lettuce and romaine work great. Both provide sturdy leaves that hold the filling well. They also add a nice crunch and fresh flavor. Yes, you can make the filling ahead. Store it in an airtight container in the fridge for up to three days. Just warm it up before serving. In this post, we explored how to make Teriyaki Chicken Lettuce Cups. We looked at the main ingredients and optional add-ins that boost flavor and texture. I shared step-by-step instructions for preparing and cooking the dish. You also learned tips for perfect cooking and presentation, plus healthy substitutions. Variations like vegetarian options and gluten-free adjustments cater to different diets. Finally, I provided storage info so you can enjoy leftovers. These cups are easy to make and fun to eat, making them a great meal for any occasion.

Teriyaki Chicken Lettuce Cups Fresh and Flavorful Dish

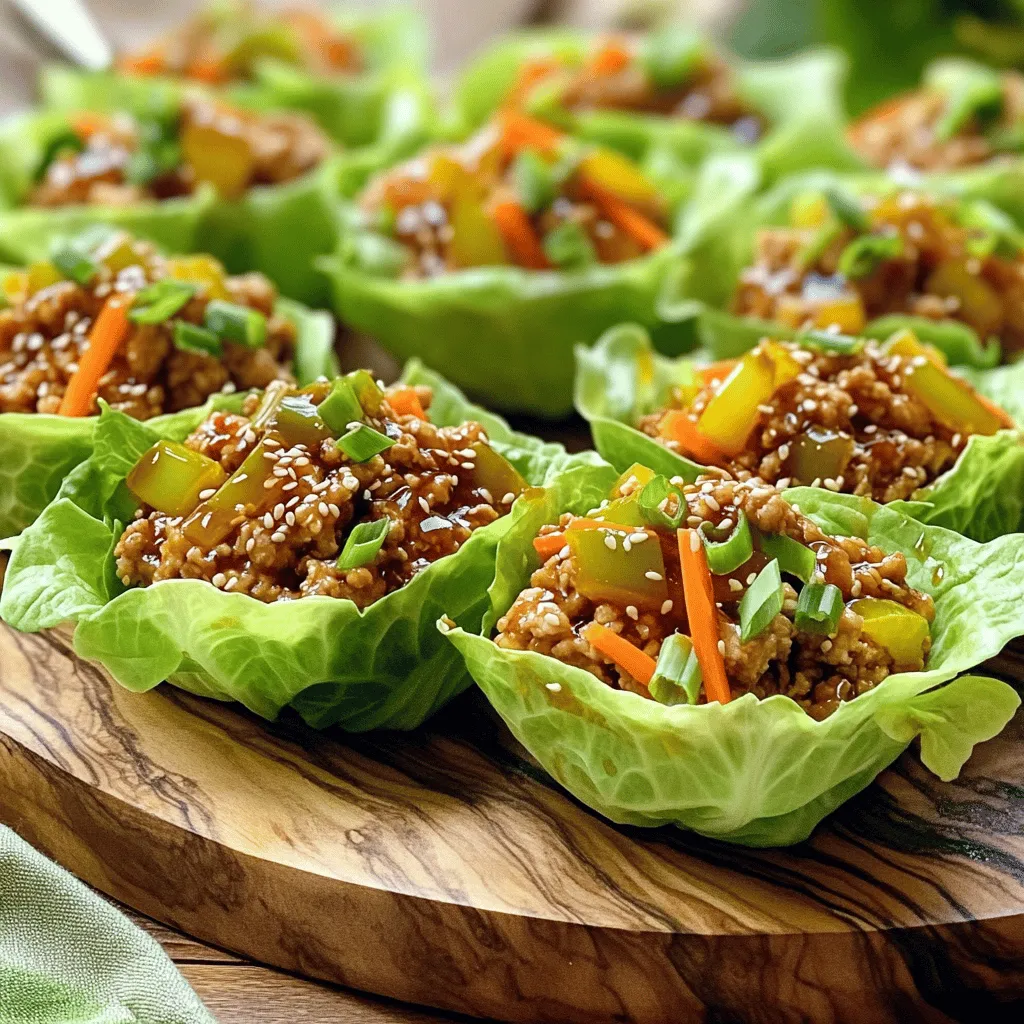
If you’re searching for a fun and tasty meal, try Teriyaki Chicken Lettuce Cups! These fresh wraps blend juicy chicken

To make blueberry pancake bites, you need: - 1 cup all-purpose flour - 2 tablespoons sugar - 1 tablespoon baking powder - 1/2 teaspoon salt - 1 cup milk - 1 large egg - 2 tablespoons melted butter - 1 cup fresh blueberries - 1 teaspoon vanilla extract - Cooking spray or oil for greasing These ingredients create a soft and fluffy bite. The blueberries add a nice burst of flavor. You can customize your pancake bites. Here are some ideas: - Chocolate chips for sweetness - Chopped nuts for crunch - Cinnamon for warmth - Lemon zest for brightness - Greek yogurt for extra protein These options let you mix things up and cater to your taste. You will need a few tools to make this recipe: - A large mixing bowl - A whisk for mixing - A separate bowl for wet ingredients - A mini muffin tin - Cooking spray or oil for greasing - A ladle or spoon for filling muffin cups - An oven for baking These tools help you create perfect blueberry pancake bites every time. To make blueberry pancake bites, start by gathering your ingredients. You need: - 1 cup all-purpose flour - 2 tablespoons sugar - 1 tablespoon baking powder - 1/2 teaspoon salt - 1 cup milk - 1 large egg - 2 tablespoons melted butter - 1 cup fresh blueberries - 1 teaspoon vanilla extract - Cooking spray or oil for greasing In a large bowl, whisk the flour, sugar, baking powder, and salt together. This helps to mix the dry items well. In another bowl, mix the milk, egg, melted butter, and vanilla extract. Stir until everything looks blended. Pour the wet mix into the dry mix. Stir gently until just combined. Don't worry about small lumps in the batter. Next, fold in the blueberries carefully to keep them whole. Now, preheat your oven to 350°F (175°C). While the oven heats up, grease a mini muffin tin with cooking spray or oil. This step helps prevent sticking. Use a small ladle or spoon to fill each mini muffin cup about 3/4 full. This amount allows room for the batter to rise. Bake them for about 10 to 12 minutes. They should turn golden brown. To check if they are done, insert a toothpick. If it comes out clean, they are ready! Once baked, let the bites cool in the pan for a few minutes. Then, transfer them to a wire rack to cool completely. Serve these bites warm for the best taste. You can add a drizzle of maple syrup, a dusting of powdered sugar, or some fresh blueberries on top. For a fancy touch, add mint leaves on the plate. These small details make your snack look great! One common mistake is overmixing the batter. Mixing too much makes the bites tough. You want to mix until you see a few lumps, which is fine. Another mistake is not folding in the blueberries gently. Crushing them can lead to a mushy texture. Lastly, be sure to grease the muffin tin well. This helps the bites pop out easily. To perfect your pancake bites, use fresh blueberries. They add great flavor and sweetness. Preheat your oven to 350°F for even cooking. Fill the muffin cups about 3/4 full. This gives the bites room to rise without overflowing. Check for doneness around the 10-minute mark. A toothpick should come out clean when they are ready. Serve your pancake bites warm for the best taste. Drizzle them with maple syrup for a sweet touch. You can sprinkle powdered sugar on top for a fun look. For a pop of color, add extra blueberries or mint leaves. Arrange the bites on a nice plate to impress your guests. This makes a simple snack feel special! {{image_2}} You can make blueberry pancake bites even more fun! Try adding chocolate chips for a sweet twist. You can also mix in some lemon zest for a refreshing taste. If you love nuts, try adding chopped walnuts or pecans. These flavors will give your bites a new kick. If you don’t have all-purpose flour, use whole wheat flour for a healthier option. You can replace milk with almond or oat milk for a dairy-free choice. For those who want less sugar, use a sugar substitute or remove it altogether. If you’re out of fresh blueberries, frozen ones work great too. Just thaw them first. These pancake bites are perfect for any time! Serve them at a birthday party with fun toppings. They also make a great snack for kids after school. For a cozy brunch, pair them with fresh fruit and whipped cream. You can even try them with yogurt for a tasty breakfast option. To keep your blueberry pancake bites fresh, store them in an airtight container. Place a piece of parchment paper between layers to avoid sticking. They stay good for up to three days in the fridge. If you want to enjoy them longer, freezing is a great option. To reheat, you can use the microwave or an oven. In the microwave, heat for 10-15 seconds. Check if they are warm enough. For the oven, preheat to 350°F (175°C) and bake for about five minutes. This method keeps them nice and fluffy. To freeze, first let the pancake bites cool completely. Then, place them in a single layer on a baking sheet. Freeze them for about an hour. Once frozen, transfer to a freezer bag. They last for up to three months. When you're ready to eat, just thaw and reheat! You can use frozen blueberries if you cannot find fresh ones. Just make sure to thaw and drain them first. You can also try chopped strawberries or raspberries for a different taste. Applesauce can work too, but it will change the texture. These pancake bites can last for about three days in the fridge. To keep them fresh, store them in an airtight container. If you want to enjoy them later, you can freeze them. They stay good for about a month in the freezer. Yes, you can make these pancake bites gluten-free! Just replace the all-purpose flour with a gluten-free blend. Look for a blend that works well for baking. You may need to adjust the liquid to get the right batter consistency. You can find pre-made blueberry pancake bites in some grocery stores. Check the frozen food aisle or the breakfast section. Some local cafes may also sell them fresh. Always look for brands that use real blueberries for the best flavor. You’ve learned how to make delicious blueberry pancake bites from scratch. We covered the key ingredients, tools, and step-by-step instructions. We also shared tips to avoid common mistakes and ways to customize your bites for all occasions. Remember, proper storage can keep them fresh longer. I hope you feel ready to try these tasty treats and impress everyone. Enjoy your cooking and have fun experimenting with flavors!

Blueberry Pancake Bites Tasty and Easy Snack Idea

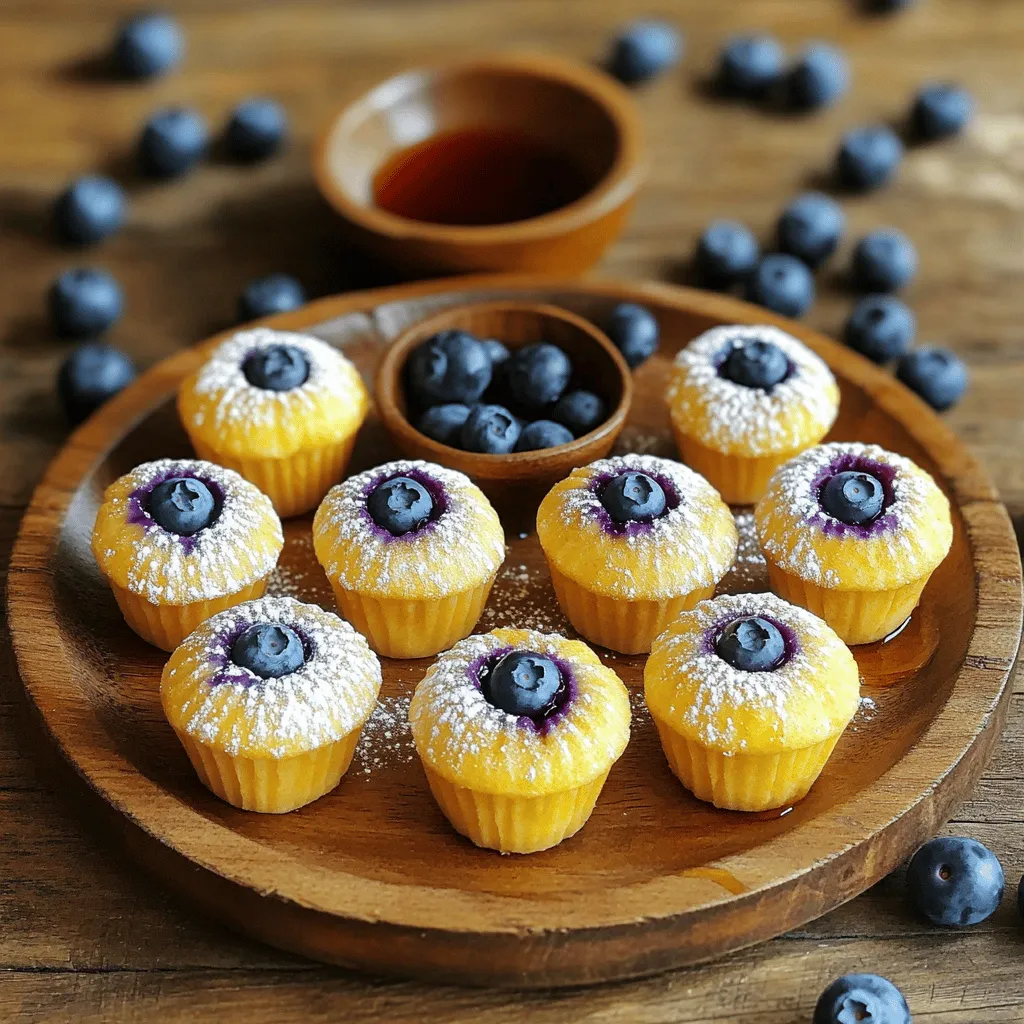
Looking for a fun and easy snack that’s bursting with flavor? Blueberry pancake bites are the answer! These tasty treats

- 1 cup fresh spinach, chopped - 1 cup artichoke hearts, drained and chopped - 1 cup cream cheese, softened - 1/2 cup sour cream - 1/2 cup mayonnaise - 1 cup shredded mozzarella cheese - 1/2 cup grated Parmesan cheese - 2 cloves garlic, minced - 1/2 teaspoon onion powder - 1/4 teaspoon red pepper flakes (optional) - Salt and pepper to taste To make a great creamy spinach artichoke dip, you need fresh ingredients. Start with one cup of fresh spinach. This adds color and nutrition. Next, grab one cup of artichoke hearts. They should be drained and chopped to blend well. You will need one cup of cream cheese, softened to mix easily. Use half a cup each of sour cream and mayonnaise to make it creamy and rich. For that cheesy goodness, get one cup of shredded mozzarella cheese and half a cup of grated Parmesan cheese. For flavor, add two cloves of minced garlic and half a teaspoon of onion powder. If you like heat, include a quarter teaspoon of red pepper flakes. Finally, use salt and pepper to taste. These ingredients come together to create a delicious dip that is hard to resist. Prepare to impress your friends and family with this tasty treat! - Preheat your oven to 350°F (175°C). - Grease your baking dish with a little oil or butter. - In a mixing bowl, combine 1 cup of softened cream cheese, 1/2 cup of sour cream, and 1/2 cup of mayonnaise. Mix until smooth. - Add 2 minced garlic cloves, 1/2 teaspoon onion powder, and 1/4 teaspoon red pepper flakes (if you want some heat). Stir well. - Stir in 1 cup of chopped fresh spinach and 1 cup of drained, chopped artichokes. Mix until everything is even. - Fold in 1 cup of shredded mozzarella and 1/2 cup of grated Parmesan cheese. Season with salt and pepper to taste. - Transfer the mixture into the greased baking dish. Spread it out evenly and smooth the top. - If you reserved some mozzarella, sprinkle it on top for a cheesy finish. - Bake in your preheated oven for about 25-30 minutes. Look for a bubbly and golden top. - Once done, take it out and let it cool for a few minutes. Now, it's ready to serve! To get the best texture, make sure to mix your ingredients well. When you bake the dip, it should be creamy and bubbly. The cheese needs to melt, and the top should get a nice golden color. Avoid overbaking, as this can dry out the dip. Check it after 25 minutes. If it looks bubbly and the top is golden, it's ready! For the best experience, serve your dip with crunchy items. Toasted baguette slices, tortilla chips, or fresh veggie sticks work great. These pair well with the creamy dip. For a fun twist, try using a hollowed-out bread bowl. This adds flair and makes it easy to enjoy. You can also sprinkle some fresh parsley or extra Parmesan on top for color. {{image_2}} For a vegan version of this dip, you can swap out dairy ingredients. Use cashew cream or silken tofu instead of cream cheese. For sour cream, try coconut yogurt or a store-bought vegan sour cream. Instead of mayonnaise, blend soaked cashews or use a vegan mayo. These changes keep the flavor creamy and rich without dairy. If you love heat, add jalapeños or hot sauce. Diced fresh jalapeños mixed in can give a nice kick. You can also drizzle hot sauce into the mix or serve it on the side. Adjust the amount based on your spice tolerance. This twist adds excitement and depth to the classic dip. To enhance the flavor, consider different cheeses. Swap mozzarella for gouda or pepper jack for a smoky taste. You can also add cream cheese with herbs for extra flavor. Mixing in some cheddar gives it a sharp bite. Don’t be afraid to experiment; cheese is a great way to make this dip your own! To keep your creamy spinach artichoke dip fresh, store it in the fridge. Use an airtight container to prevent moisture loss. The dip will stay good for about 3 to 5 days. When you want to reheat the dip, take it out of the fridge. Place it in an oven-safe dish. Cover it with foil to keep it from drying out. Heat at 350°F (175°C) for about 15 to 20 minutes. Stir it halfway through to keep it creamy. You can also microwave it in a bowl. Heat it in short bursts, stirring in between. You can freeze creamy spinach artichoke dip for later use. First, let the dip cool completely. Then, transfer it to a freezer-safe container. Make sure to leave some space at the top, as the dip will expand when frozen. Label the container with the date. The dip can last up to 2 months in the freezer. When you’re ready to eat it, thaw it in the fridge overnight. After thawing, reheat it as mentioned above. You may need to add a bit of sour cream or cream cheese to restore its creamy texture. Yes, you can make this dip ahead of time. Prepare the dip up to the baking step. Store it in the fridge for up to two days. When you are ready to bake, just take it out and let it sit for 15 minutes at room temperature. Then, bake as directed. This saves time for your party or gathering. If you want to switch it up, use other greens. Kale or Swiss chard work well. You can also try arugula for a peppery taste. Just make sure to chop them finely. Each green brings a new flavor and texture to the dip. Yes, there are gluten-free options for serving. Use gluten-free bread or chips. Rice crackers are another great option. You can even serve the dip with fresh veggie sticks. These choices let everyone enjoy the dip without worry. This blog post shared a simple and tasty spinach artichoke dip recipe. You learned about fresh ingredients, step-by-step mixing, baking, and serving tips. Remember, variations like vegan or spicy options keep it fun. Proper storage can help you enjoy leftovers later. Whether it’s game day or a party, this dip will please your guests. It’s easy to make and worth the effort. Dive in, share your creations, and enjoy every bite!

Creamy Spinach Artichoke Dip Irresistible Recipe

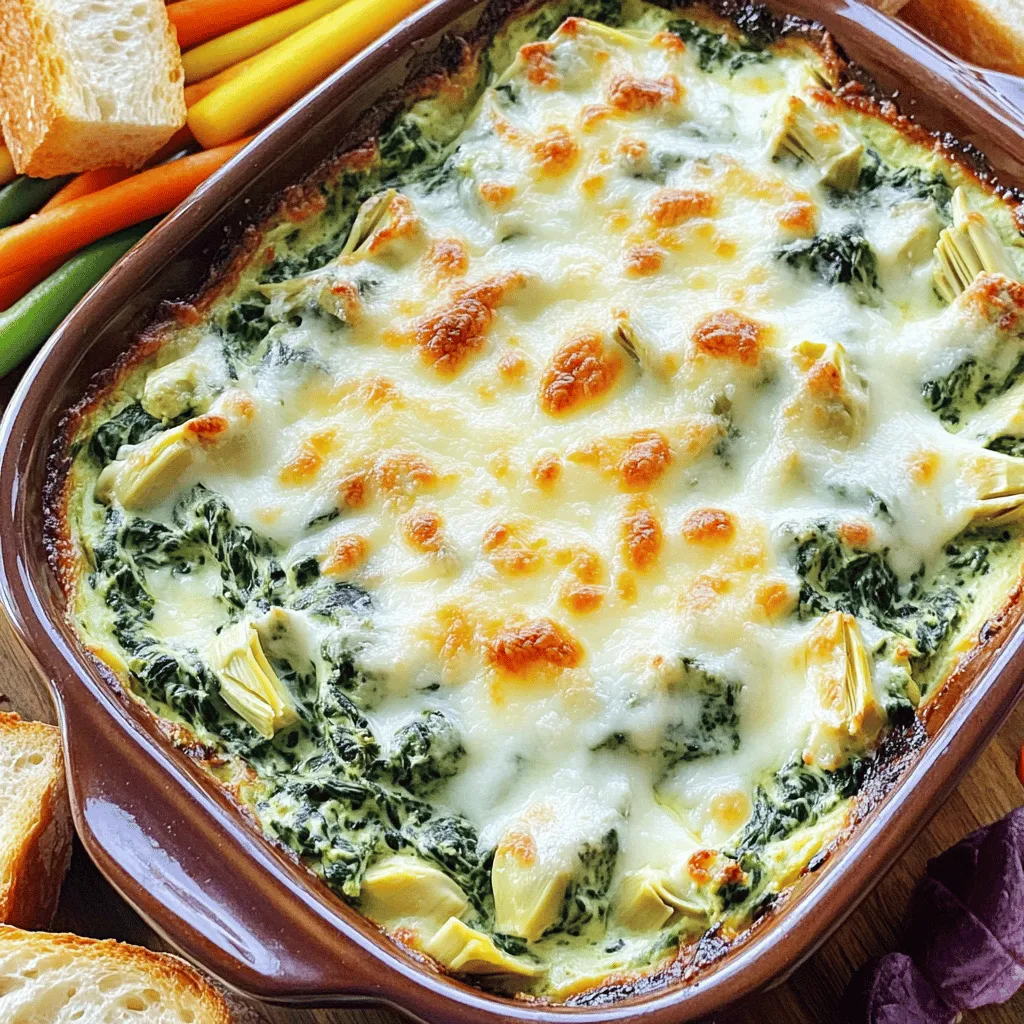
Are you ready to impress your friends and family with an amazing snack? This Creamy Spinach Artichoke Dip is rich,

- 4 salmon fillets (6 oz each) - 4 tablespoons unsalted butter - 4 cloves garlic, minced - 2 tablespoons fresh parsley, finely chopped - 1 tablespoon fresh dill, finely chopped - 1 tablespoon fresh lemon juice - Salt and pepper to taste - Lemon wedges for garnish When choosing your salmon, look for bright, moist fillets. Fresh salmon has a mild scent and firm texture. You can use wild-caught salmon for better flavor and nutrients. If you cannot find fresh herbs, dried ones work too. Use one-third the amount of dried herbs to match the flavor of fresh herbs. Salmon is a superfood packed with nutrients. It is rich in omega-3 fatty acids, which support heart health. Eating salmon can boost brain function and reduce inflammation. Salmon also provides high-quality protein, which helps with muscle repair and growth. Plus, it contains vitamin D, great for bone health. Enjoying this dish offers both great taste and health benefits. Start by preheating your oven to 375°F (190°C). This step is key for even cooking. Next, line a baking dish with parchment paper. This makes cleanup a breeze later on. Make sure the paper fits well in the dish. This small step saves you time and effort. Grab a small saucepan and place it on medium heat. Add 4 tablespoons of unsalted butter. Watch as it melts smoothly. Once melted, toss in 4 cloves of minced garlic. Stir it for about one minute. When the garlic smells great, it’s time to add more flavor. Mix in 2 tablespoons of finely chopped parsley and 1 tablespoon of finely chopped dill. Finally, add 1 tablespoon of fresh lemon juice. This brings a bright taste to the dish. Remove the pan from heat and set it aside. Now, let’s prepare the salmon. Place 4 salmon fillets, skin-side down, in your prepared baking dish. Sprinkle salt and pepper on both sides of the fillets. This helps bring out the fish's natural flavor. Pour the garlic butter herb mixture over the salmon. Make sure each fillet gets a good coat. It adds rich flavor and moisture. Now, slide the dish into your oven. Bake for 15-20 minutes. The salmon should be flaky and cooked through when done. Keep an eye on it, as cooking times may vary. When it’s ready, take the dish out and let it rest for a few minutes. This helps the juices settle. Enjoy your delicious garlic butter herb salmon! To cook salmon just right, check the thickness. For fillets around 6 oz, bake for 15-20 minutes. If the salmon flakes easily with a fork, it's done. You can also use a meat thermometer. Aim for an internal temperature of 145°F (63°C). Let the salmon rest for a couple of minutes after baking. This helps keep it juicy. Want to add some zing? Try adding spices like paprika or cayenne for heat. You can also squeeze in more lemon juice for brightness. Fresh herbs like thyme or basil work well too. For a citrus twist, include orange zest or lime juice. Each change gives a new taste to the garlic butter herb salmon. One mistake is overcooking the salmon. Keep an eye on the time and use a fork to test doneness. Another pitfall is not seasoning well. Salt and pepper are key to enhancing the salmon’s flavor. Lastly, don't skip the butter mixture. It adds richness and helps the herbs stick to the fish. {{image_2}} You can add asparagus to this dish for extra flavor and nutrition. Simply trim the asparagus and place it around the salmon in the baking dish. Drizzle the garlic butter mixture over both the salmon and asparagus before baking. The asparagus will cook along with the salmon and soak up that rich, buttery flavor. It’s a great way to make a full meal in one pan! For a zesty twist, try lemon pepper seasoning. Mix lemon zest and cracked black pepper into the garlic butter. This adds a bright, bold taste to your salmon. Just follow the same steps as the original recipe. The lemon pepper will give your dish a fresh kick, making it a hit at the dinner table. If you want a sweet touch, use honey in your garlic butter. Blend two tablespoons of honey into the melted butter with the garlic. This adds a lovely sweetness to the salmon. You will still follow the same baking steps. The honey will caramelize slightly, creating a delicious glaze on top of the fish. It's a fun way to change up the flavors! To store leftover salmon, first let it cool down. Place it in an airtight container. Make sure to cover it well. Leftover salmon stays fresh for up to three days in the fridge. If you plan to eat it later, store it right away. When reheating, avoid the microwave if you can. It can dry out the salmon. Instead, use the oven. Preheat your oven to 300°F (150°C). Place the salmon on a baking sheet. Heat it for about 10-15 minutes or until warm. This keeps the salmon moist and tasty. You can freeze garlic butter herb salmon if needed. Wrap each piece tightly in plastic wrap. Then, place it in a freezer bag. This helps prevent freezer burn. Frozen salmon can last for up to three months. To enjoy, thaw it in the fridge overnight before reheating. To cook salmon properly, use a fork to test it. When salmon is done, it should easily flake apart. You aim for an internal temperature of 145°F (63°C). A meat thermometer helps a lot. If you do not have one, watch the color change. Salmon goes from a bright pink to a lighter shade. This tells you it is cooked. Always let it rest for a few minutes after you take it out of the oven. This helps keep it juicy. Yes, you can use frozen salmon fillets. Just make sure to thaw them first. The best way to thaw is in the fridge overnight. If you are short on time, place them in a sealed bag and run under cold water. After thawing, pat them dry. This helps the garlic butter mix stick better. Just remember, if the fillets are still a bit icy, they may take longer to cook. Many side dishes work well with Garlic Butter Herb Salmon. Here are some tasty options: - Steamed broccoli: It adds color and nutrients. - Roasted asparagus: A great match for the flavors. - Garlic mashed potatoes: Creamy and comforting. - Quinoa salad: Adds a healthy grain option. - Simple green salad: Light and fresh to balance the meal. These sides complement the salmon well and round out your dinner nicely. This blog covered all you need for Garlic Butter Herb Salmon. We explored key ingredients, cooking steps, and tips for perfect results. You learned about the health benefits of salmon and enjoyed tasty variations. Remember to avoid common mistakes and store leftovers properly. With these insights, you can whip up this dish with ease. Enjoy cooking and sharing this delicious meal with others!

Garlic Butter Herb Salmon Flavorful and Easy Recipe

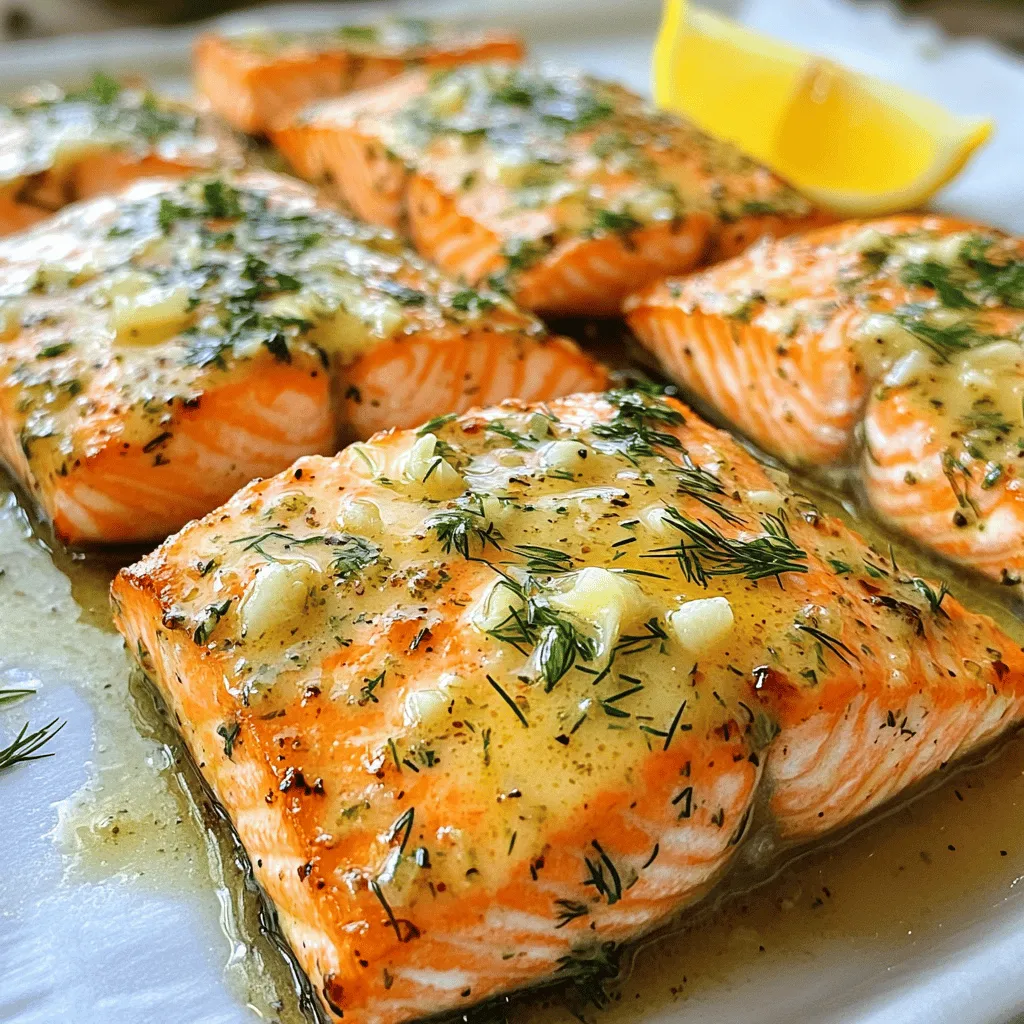
Looking for a flavorful and easy dinner option? Look no further than Garlic Butter Herb Salmon! This dish combines fresh

- 2 cups rolled oats - 1 cup pecans, chopped - 1/2 cup shredded coconut, unsweetened - 1/4 cup sunflower seeds - 1/2 cup maple syrup - 1/4 cup coconut oil, melted - 1 teaspoon vanilla extract - 1 teaspoon ground cinnamon - 1/4 teaspoon salt - 1/2 cup dried cranberries or raisins (optional) Choose rolled oats that are whole and not quick-cooking. They give a great texture. For pecans, look for fresh, crunchy ones. They add a rich taste. Unsweetened coconut is best to keep sugar low. Sunflower seeds should be raw or lightly toasted. This keeps them healthy. Use pure maple syrup, not pancake syrup. It tastes better and is healthier. Always check for quality in your vanilla extract. Fresh ingredients make a big difference. Rolled oats are rich in fiber, which helps digestion. Pecans provide healthy fats and protein, keeping you full. Shredded coconut adds healthy fats, too. Sunflower seeds are packed with vitamins and minerals. Maple syrup gives natural sweetness and some antioxidants. Coconut oil supports heart health. Cinnamon can help control blood sugar. Dried fruits like cranberries add fiber and natural sweetness. These ingredients together make a healthy snack option. First, gather your ingredients. You will need rolled oats, chopped pecans, shredded coconut, sunflower seeds, maple syrup, coconut oil, vanilla extract, ground cinnamon, salt, and optional dried fruits. 1. Preheat your oven to 300°F (150°C). 2. Line a baking sheet with parchment paper to prevent sticking. 3. In a large bowl, mix rolled oats, pecans, coconut, sunflower seeds, cinnamon, and salt. Stir well. Now, let’s make the granola. 1. In another bowl, whisk melted coconut oil, maple syrup, and vanilla extract. 2. Pour this wet mix over the dry ingredients. Stir until all is coated. 3. Spread the mix on the baking sheet. Press it down gently to form clusters. 4. Bake for 25-30 minutes, stirring halfway. Watch it closely to avoid burning. Once the granola is golden brown, it's time to cool it. 1. Remove it from the oven and let it cool on the sheet. 2. As it cools, it will harden into clusters. 3. If you use dried cranberries or raisins, stir them in now. 4. Break the granola into clusters. Store in an airtight container for up to 2 weeks. Now you have a tasty, healthy snack ready to enjoy! To make perfect granola clusters, use the right amount of wet ingredients. The maple syrup and coconut oil help bind the oats and nuts. You want them moist but not soggy. When mixing, ensure every piece gets coated. Press the mixture firmly onto the baking sheet. This step helps form those delightful clusters. One common mistake is overbaking. Keep an eye on your granola. It can go from golden to burnt quickly. Stir it halfway through baking for even browning. Another mistake is not letting it cool completely. The granola needs time to harden. If you break it apart too soon, it won’t form clusters. To boost flavor, try adding spices like nutmeg or ginger. These add warmth and depth. You can also mix in different nuts or seeds for crunch. For extra sweetness, consider adding a drizzle of honey. If you like fruity bites, mix in dried cranberries or raisins after baking. This way, they stay chewy. {{image_2}} You can easily change this recipe. Use different nuts like almonds or walnuts. You can swap the sunflower seeds for pumpkin seeds. If you don’t like coconut, leave it out. You can also add more oats or use a mix of grains. Try adding flaxseeds or chia seeds for extra nutrition. Want a twist on flavor? Add some cocoa powder for a chocolatey taste. You can mix in spices like nutmeg or ginger for warmth. Try using honey instead of maple syrup for a different sweetness. Experiment with dried fruits like cherries or apricots for a fruity kick. Making this granola fit your diet is easy. To keep it gluten-free, use certified gluten-free oats. For nut-free options, skip the pecans and use seeds instead. You can also replace coconut oil with vegetable oil for a different fat source. Always check labels to avoid hidden allergens. To keep your Maple Pecan Granola Clusters fresh, store them in an airtight container. This prevents air and moisture from getting in. I recommend using glass jars or sturdy plastic containers. Always place the container in a cool, dry spot, like a pantry. Your granola will stay fresh for up to two weeks. After that, it may lose some crunch. To check if it’s still good, look for any off smells or signs of moisture. If it smells or feels soft, it’s time to toss it. For longer storage, you can freeze the granola. Place it in a freezer-safe bag or container. Make sure to remove as much air as possible. Your granola can last up to three months in the freezer. When you’re ready to eat it, just thaw it at room temperature. Enjoy it crunchy and fresh! Yes, you can make this granola vegan. Just replace the honey with maple syrup. The other ingredients are already plant-based. Use coconut oil, oats, and nuts. This keeps the recipe simple and tasty. Homemade granola lasts up to two weeks. Store it in an airtight container. Keep it in a cool, dry place. If you want it to last longer, you can freeze it. In the freezer, it stays fresh for up to three months. If you do not have maple syrup, you can use agave nectar or honey. Both work well in this recipe. They add sweetness and help the granola stick. Adjust the amount based on your taste preference. In this blog post, we explored the ingredients, steps, and tips for making granola. You learned how to choose the best ingredients, bake perfectly, and store your granola for freshness. Remember, it's easy to adjust flavors and make your granola fit your diet. Keep these tips in mind to avoid common mistakes. With practice, you’ll create delicious, personalized granola that meets your needs. Enjoy this healthy snack anytime!

Maple Pecan Granola Clusters Easy and Healthy Snack

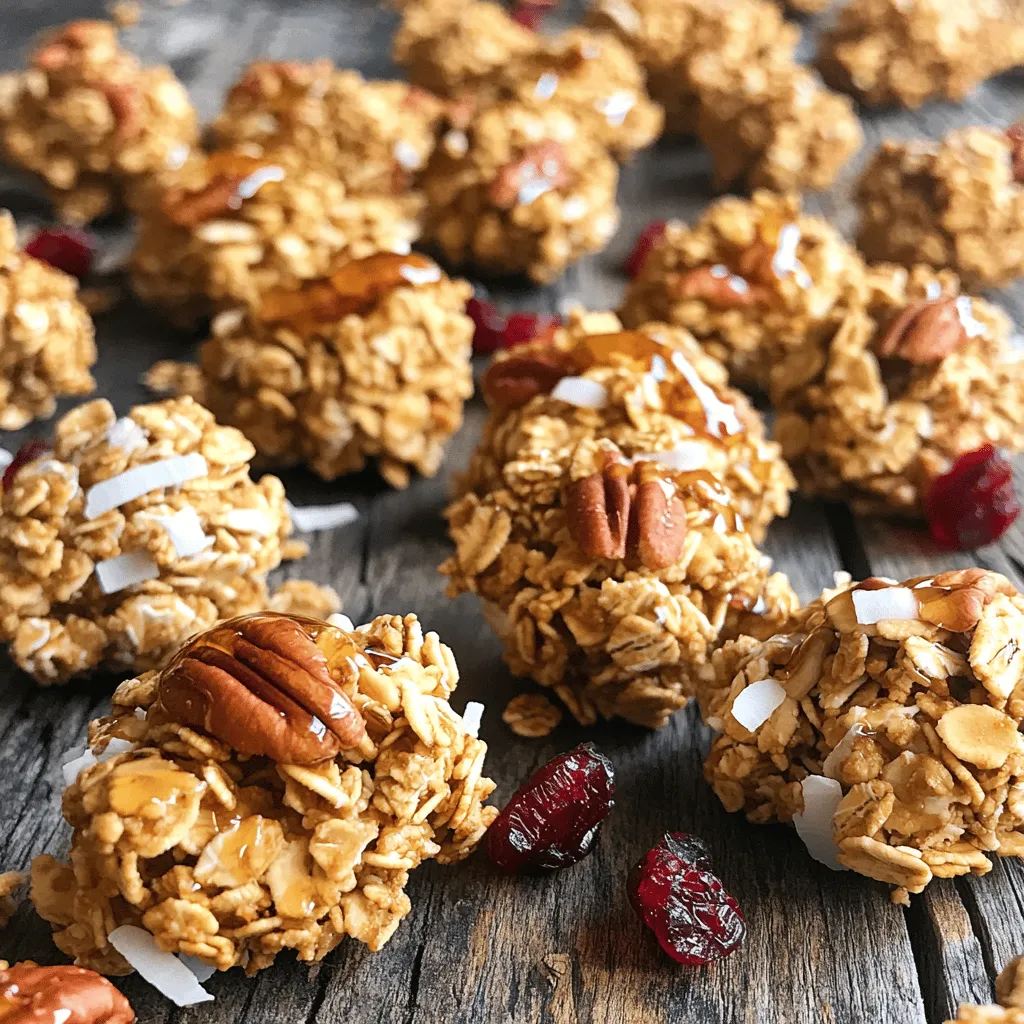
Looking for a tasty and healthy snack? You’ll love these Maple Pecan Granola Clusters! They’re easy to make and packed

- 2 large cucumbers - 1/4 cup soy sauce - 2 tablespoons rice vinegar - 2 tablespoons sesame oil - 1 tablespoon honey or agave syrup - 1 teaspoon fresh ginger, grated - 1/4 cup green onions, chopped - 1/2 teaspoon red pepper flakes (optional for heat) - Salt and pepper, to taste - Additional vegetables - Herbs for garnish - Protein additions Let's dive into the ingredients you'll need for this Asian Sesame Cucumber Salad. First, grab two large cucumbers. They should be firm and fresh for the best crunch. Next, get 1/4 cup of soy sauce. This adds a rich umami flavor. You will also need 2 tablespoons of rice vinegar for some tanginess. Sesame oil, with its nutty taste, is key too; you need 2 tablespoons of it. For sweetness, use either honey or agave syrup. You only need 1 tablespoon of this. Fresh ginger adds a nice kick; you'll want 1 teaspoon of it, grated. Don't forget the green onions! You’ll need 1/4 cup, chopped. If you like a bit of heat, add 1/2 teaspoon of red pepper flakes. Finally, season with salt and pepper to taste. If you want to enhance the flavor even more, consider adding more veggies or herbs for garnish. You can also toss in some protein like tofu or grilled chicken for a heartier dish. This salad is great for a light meal or as a side dish. Start by washing the cucumbers under cold water. This removes dirt and any chemicals. Next, slice the cucumbers thinly. Thin slices let the dressing soak in better. You can peel the cucumbers if you want a softer bite. Leaving the skin on adds crunch and color. In a large bowl, whisk together the soy sauce, rice vinegar, and sesame oil. This mix gives the salad its savory flavor. Add in honey or agave syrup for a touch of sweetness. Grate fresh ginger and mix it in. The ginger adds a nice kick. Now, toss the sliced cucumbers into the bowl with the dressing. Make sure each piece is coated well. Next, sprinkle in sesame seeds and chopped green onions. If you like some heat, add red pepper flakes too. Gently mix everything again, so it all blends nicely. Let the salad sit for at least 15 minutes. This helps the flavors mix together. For the best taste, refrigerate it for 30 minutes before serving. Chilling the salad makes it refreshing. When you’re ready to serve, give it a quick toss to mix the dressing again. - Slicing techniques for cucumbers: Use a sharp knife to slice cucumbers thin. Thin slices help the cucumbers soak up the dressing. You can use a mandoline for even slices. This method gives you a uniform look and texture. If you prefer a crunchier salad, keep the skin on. The skin adds texture and color. - Balancing flavors: The key to this salad is balance. The soy sauce brings saltiness. The rice vinegar adds tang. Honey or agave syrup gives sweetness. Grated ginger adds warmth. Adjust these flavors to your taste. If you want more spice, add more red pepper flakes. Taste as you go to find your perfect mix. - Presentation ideas: Serve the salad in a large, shallow bowl. This makes it easy to see the vibrant colors. Garnish with extra sesame seeds and cucumber slices. Adding thinly sliced radishes adds color and crunch. A sprinkle of fresh herbs can enhance the look as well. - Pairing with other dishes: This salad pairs well with grilled meats, rice dishes, or stir-fries. It is a great side for Asian-inspired meals. You can also serve it with tacos for a fresh twist. The crisp cucumbers complement rich dishes nicely. - Alternatives to soy sauce: If you need a gluten-free option, use tamari or coconut aminos. These alternatives provide a similar flavor without gluten. For a lighter option, try low-sodium soy sauce. - Sweetener options: If you want a different sweetener, maple syrup works well. You can also use agave syrup if you prefer. For a sugar-free option, consider a sugar substitute like stevia. {{image_2}} To give your salad a kick, try making it spicy. You can do this in two simple ways: - Adding more red pepper flakes: Just sprinkle in a bit more if you love heat. Start with an extra 1/4 teaspoon and adjust to your taste. This small change can add a nice zing. - Incorporating chili oil: Drizzle a little chili oil over the salad. This will boost the spice and add a deep flavor. Start with a teaspoon and add more if needed. You can also mix things up by adding more ingredients. Here are some ideas to enhance your salad: - Suggestions for proteins: Add diced tofu or grilled chicken for a protein boost. This makes the salad heartier and more filling. - Adding different veggies: Carrots and radishes can add color and crunch. Thinly slice them and toss them in with the cucumbers. If you have dietary needs, you can still enjoy this salad. Here’s how: - Adjusting ingredients to fit dietary needs: Use gluten-free soy sauce for a gluten-free version. For a vegan option, swap honey for agave syrup. This way, everyone can enjoy this tasty dish. To keep your Asian sesame cucumber salad fresh, store it in an airtight container. This helps lock in flavors. Place the salad in the fridge right after serving. If you have extra dressing, store it separately. This prevents the cucumbers from getting soggy. To keep them crunchy, add the dressing just before serving. Your salad will stay fresh for about 2 to 3 days in the fridge. After that, the cucumbers may lose their crunch. Look for signs that the salad has gone bad. If you see any water pooling at the bottom of the container, it’s best to throw it away. If it smells off or looks slimy, do not eat it. Freshness is key for the best taste! Let the salad sit for at least 15 minutes. This lets the flavors mix well. If you have time, it's even better to chill it for 30 minutes. The cold makes it taste fresher and more vibrant. Yes, you can make this salad ahead of time. It stays tasty for a few hours in the fridge. Just remember, the cucumbers can get soft if they sit too long. For best results, serve within a few hours of making it. If you have leftover dressing, store it in a sealed jar. Keep it in the fridge for about a week. You can use it on other salads or as a dip. It adds great flavor to many dishes! Yes, this salad is great for meal prep! Just keep the dressing separate until you are ready to eat. This keeps the cucumbers crunchy and fresh. You can enjoy it throughout the week with your meals. Absolutely! You can use any cucumber you like. English cucumbers are great for this salad. They are sweet and have fewer seeds. You can also try Persian cucumbers for a similar taste and crunch. In this article, I shared how to create a fresh, tasty cucumber salad using simple ingredients. We discussed the preparation steps, from slicing cucumbers to making the dressing. I also gave tips for enhancing flavor and serving ideas. Remember, you can adjust ingredients based on your needs. Whether you prefer spicy or mild, this salad fits many tastes. Enjoy the crunch and fresh flavors in every bite. This easy recipe brings joy to any meal, so get started and impress your guests!

Asian Sesame Cucumber Salad Crunchy and Refreshing Dish

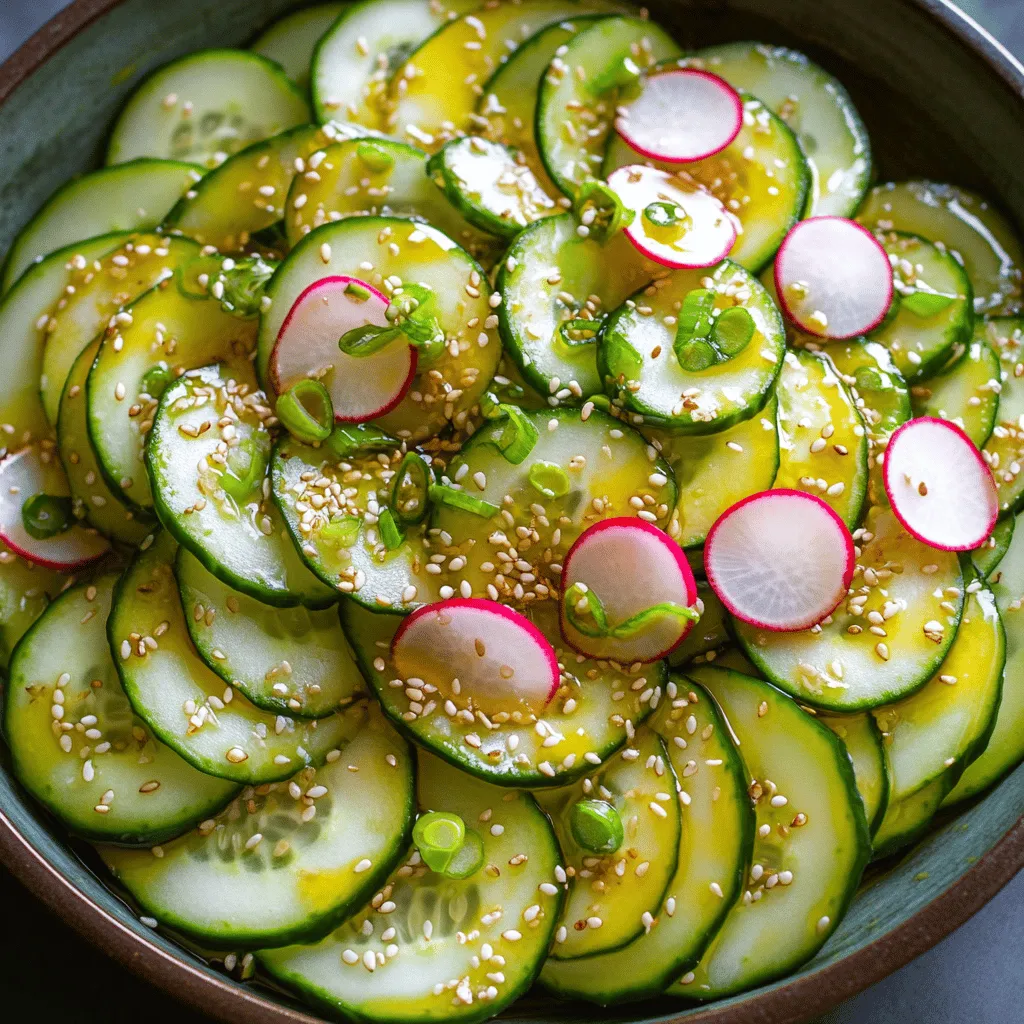
Looking for a quick, healthy dish? My Asian Sesame Cucumber Salad is crunchy, zesty, and refreshing! With just a handful

To make No-Bake Maple Pecan Energy Bites, gather these ingredients: - 1 cup rolled oats - 1/2 cup pecans, finely chopped - 1/2 cup almond butter (or peanut butter) - 1/3 cup pure maple syrup - 1/4 cup honey (or agave syrup for a vegan option) - 1/2 cup unsweetened shredded coconut - 1/4 teaspoon salt - 1 teaspoon vanilla extract - Optional: 1/4 cup mini dark chocolate chips These ingredients work together to create a tasty, healthy snack. The oats provide fiber, while the pecans add crunch and good fats. Almond butter gives a creamy texture, and maple syrup adds natural sweetness. You can customize your energy bites with these optional add-ins: - Dried fruit (like cranberries or raisins) - Seeds (such as chia or flaxseed) - Spices (like cinnamon or nutmeg) Adding these can enhance flavor and nutrition. Feel free to mix and match based on your taste! These energy bites are not just tasty but also nutritious. Here's a rough estimate per bite: - Calories: 100 - Protein: 3g - Fat: 5g - Carbohydrates: 10g - Fiber: 1g This snack provides energy without added sugars. It's perfect for a quick bite before or after workouts. Start by gathering all your ingredients. You will need rolled oats, finely chopped pecans, almond butter, maple syrup, honey, shredded coconut, salt, and vanilla extract. If you want, add mini dark chocolate chips for some extra sweetness. In a large mixing bowl, combine the rolled oats and chopped pecans. Make sure they mix well. This step helps create a solid base for your energy bites. Next, grab another bowl. In this bowl, whisk together the almond butter, maple syrup, honey, salt, and vanilla extract. Mix until it is smooth and creamy. This wet mixture adds flavor and binds everything together. Now, pour this wet mixture into the bowl with the oats and pecans. Add the shredded coconut and chocolate chips if you chose to include them. Mix everything well until all the dry ingredients are coated. This ensures each bite has great flavor. Once the mixture is combined, it’s time to form the energy bites. Use your hands to shape the mix into small balls about one inch wide. Place each ball on a lined baking sheet or plate. After forming all the bites, put them in the fridge for at least 30 minutes. This helps them firm up. Once they are set, you can store them in an airtight container. Keep them in the fridge, and they will last for about a week. To get the best texture for your energy bites, use rolled oats. They give a nice chew. If you want a softer bite, add more almond butter. Mix well to ensure every oat is coated. After mixing, let the mixture chill for a bit. This helps it firm up nicely. You can swap almond butter for peanut butter if you prefer. For a nut-free option, try sunflower seed butter. Honey can be replaced with agave syrup for a vegan treat. If you want to add a crunch, use walnuts instead of pecans. These bites are great for any time. Serve them as a quick snack or a healthy dessert. You can place them on a fancy plate for a gathering. For added flair, sprinkle extra coconut or chopped pecans on top. They also work well in lunch boxes or as post-workout fuel. {{image_2}} You can mix flavors to make your energy bites unique. Try adding dried fruits like cranberries or apricots. You can also add nuts such as walnuts or almonds. For a sweet kick, use cinnamon or a dash of nutmeg. If you love chocolate, mini dark chocolate chips are a great addition. Each flavor creates a new experience! If you need to adjust for diet, it's easy to swap ingredients. Use almond butter for nut allergies or peanut butter for a classic taste. To make it vegan, replace honey with agave syrup. You can also skip the chocolate chips or use dairy-free ones. These changes keep your energy bites tasty and safe for everyone. Using seasonal ingredients can make your bites extra special. In fall, add pumpkin spice or some pumpkin puree for a cozy touch. In summer, include fresh berries or coconut for a tropical flair. You can even mix in a bit of citrus zest in spring for a refreshing taste. Seasonal swaps keep your snacks fresh and fun! After you make the No-Bake Maple Pecan Energy Bites, place them in an airtight container. This will keep them fresh. Store the container in the refrigerator. Chilling helps them hold their shape. The bites need at least 30 minutes in the fridge to firm up after rolling. You can freeze these energy bites for later. Place them in a single layer on a baking sheet. Put the sheet in the freezer for about an hour. Once they are firm, transfer the bites to a freezer bag. They will stay good for up to three months. Just thaw them in the fridge before eating. In the refrigerator, these energy bites last for one week. If you freeze them, they stay fresh for three months. This makes them a great snack to have on hand. You can enjoy them anytime you want a quick pick-me-up. No-Bake Maple Pecan Energy Bites last about one week in the fridge. To keep them fresh, store them in an airtight container. The cold helps hold their shape and keeps flavors strong. After a week, they may lose some taste and texture. Yes, you can make these energy bites vegan! Simply swap honey for agave syrup. This change makes the recipe fully plant-based. Use almond butter or peanut butter for a creamy base. The rest of the ingredients are already vegan-friendly. These energy bites offer many health benefits. They contain rolled oats, which provide fiber for digestion. Pecans add healthy fats and protein, helping you feel full. Almond butter gives you energy and nutrients. Maple syrup adds natural sweetness without refined sugar. The shredded coconut offers antioxidants, boosting your immune system. Overall, these bites are a great snack! We explored how to make tasty No-Bake Maple Pecan Energy Bites. You learned about choosing ingredients and optional add-ins. The step-by-step guide showed how to mix and form the bites. Tips helped you perfect the texture and suggested variations for flavor. Lastly, we covered storage and answered common questions. These bites are a fun, healthy snack. Enjoy making them your own!

No-Bake Maple Pecan Energy Bites Tasty Snack Recipe

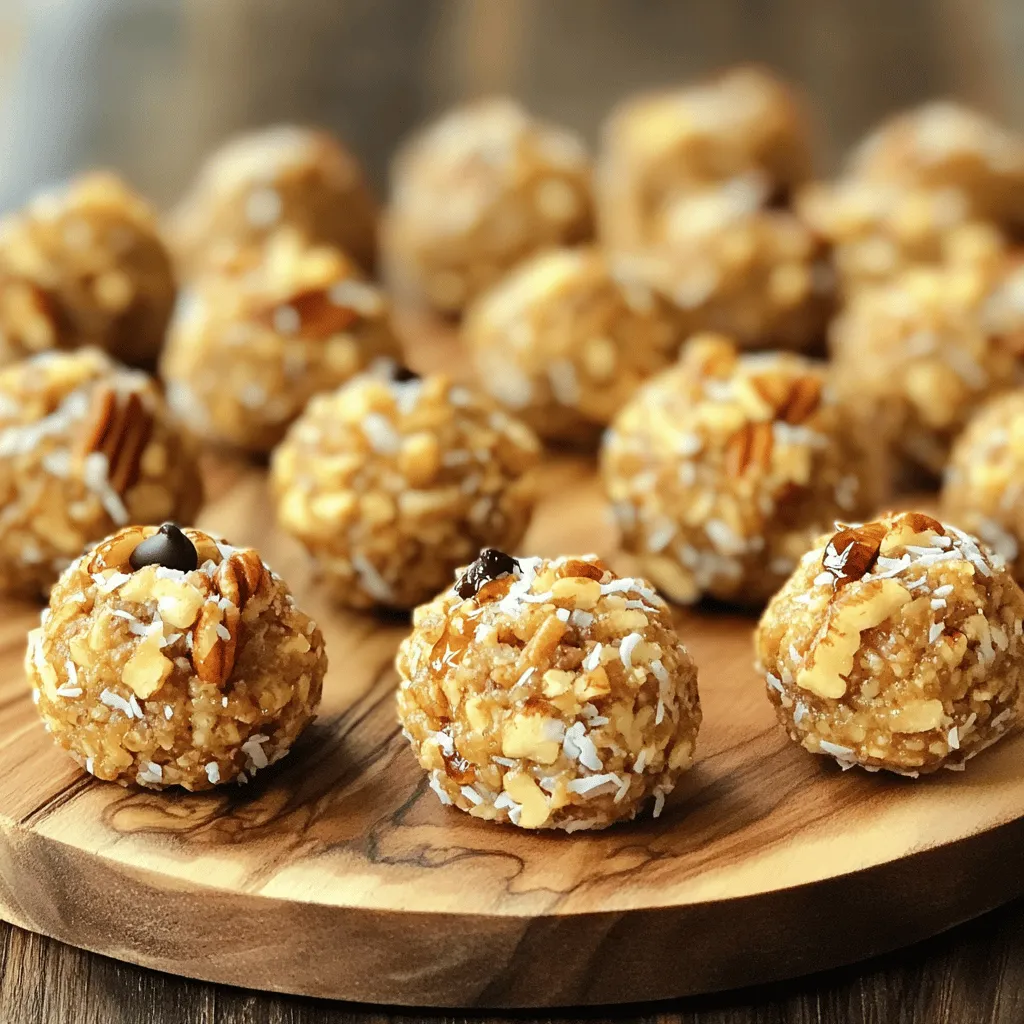
Looking for a quick and tasty snack? You’ll love these No-Bake Maple Pecan Energy Bites! They are simple to make

To make Slow Cooker Tuscan Tomato Soup, you need: - 2 cans (28 oz each) crushed tomatoes - 1 medium onion, chopped - 3 garlic cloves, minced - 2 carrots, diced - 2 celery stalks, diced - 4 cups vegetable broth - 1 teaspoon dried basil - 1 teaspoon dried oregano - 1 teaspoon red pepper flakes (optional) - 1 cup heavy cream or coconut milk - Salt and pepper to taste - Fresh basil leaves for garnish - Grated Parmesan cheese (optional) You can easily adapt this soup for different diets. For a dairy-free option, use coconut milk instead of heavy cream. This keeps the soup creamy and rich. If you need it gluten-free, check your vegetable broth. Most brands are gluten-free, but always read the label to be sure. For the best flavor, I suggest these brands: - Crushed Tomatoes: San Marzano tomatoes are great for depth of flavor. - Vegetable Broth: Swanson Organic Vegetable Broth is rich and flavorful. - Coconut Milk: Thai Kitchen makes a creamy coconut milk that works well. - Parmesan Cheese: BelGioioso Parmesan is excellent for grating over the soup. These choices help boost the taste and quality of your soup! Let’s get started on your Tuscan tomato soup. First, gather all your ingredients. You will need: - 2 cans (28 oz each) crushed tomatoes - 1 medium onion, chopped - 3 garlic cloves, minced - 2 carrots, diced - 2 celery stalks, diced - 4 cups vegetable broth - 1 teaspoon dried basil - 1 teaspoon dried oregano - 1 teaspoon red pepper flakes (optional) - 1 cup heavy cream or coconut milk - Salt and pepper to taste - Fresh basil leaves for garnish - Grated Parmesan cheese (optional) Now, chop the onion, carrots, and celery. Mince the garlic. It’s okay to use canned tomatoes; they save time. Add all these fresh ingredients into your slow cooker. Pour in the crushed tomatoes and vegetable broth next. Now, add the dried herbs and seasonings. Mix everything well. It should smell great already! You can cook this soup on low or high. If you choose low, your soup will need 6-8 hours. This slow method lets the flavors blend beautifully. If you want it done quicker, set the slow cooker to high. It will take about 3-4 hours. Either way, the soup will taste amazing! Once the soup is done cooking, it’s time to blend it. If you like a smooth soup, use an immersion blender. Blend until it’s creamy. If you prefer some chunks, only blend half of the soup. This gives you a nice mix of textures. After blending, stir in the heavy cream or coconut milk. Heat it on low for an extra 15-30 minutes. Now your Tuscan tomato soup is ready to serve! Enjoy it with fresh basil and Parmesan. To boost the flavor in your Slow Cooker Tuscan Tomato Soup, think about using herbs and spices. Fresh herbs add a bright taste. You can use fresh basil instead of dried. Just add it at the end of cooking for the best flavor. For a more complex taste, try adding garlic powder or onion powder. They work well if you want a stronger flavor. You can also play with spices. If you like heat, add more red pepper flakes. A pinch of sugar can balance acidity from the tomatoes too. Serve your soup in rustic bowls. A drizzle of cream on top looks nice. Fresh basil leaves add a pop of color. Pair the soup with crusty bread. It’s perfect for dipping! You can also add a side salad. A simple mix of greens with olive oil works great. For a heartier meal, serve it with grilled cheese sandwiches. They go well together and make a filling dinner. One mistake is not blending enough. Blend until smooth unless you want it chunky. If you blend too little, the soup can be watery. Another common error is overcooking the vegetables. They should be tender but not mushy. Stick to the cooking times for the best texture. Lastly, be careful with salt. Taste your soup before adding more. The broth and cheese can be salty on their own. Adjust slowly to avoid oversalting. {{image_2}} You can add protein to your soup for more heartiness. Cooked chicken or sausage works well. If you use chicken, shred it before adding. For sausage, slice it and brown it first for more flavor. If you prefer beans, use canned ones like white beans or chickpeas. Just rinse and stir them in during the last hour of cooking. This change makes the soup filling and nutritious. Feel free to add seasonal vegetables to enhance the soup's flavor. Zucchini, spinach, or bell peppers blend nicely. Chop them into small pieces to ensure they cook well. Add these veggies with the other ingredients at the start. This method allows the vegetables to soften and soak up the flavors. It also adds color and nutrition to your bowl. If you want a vegan version, swap heavy cream for coconut milk. Coconut milk adds a rich texture without dairy. You can also use cashew cream for a nutty flavor. To make cashew cream, blend soaked cashews with water until smooth. Stir your choice of cream into the soup before serving. This keeps it creamy and delicious, while still being plant-based. To store leftover soup, let it cool first. Pour it into an airtight container. You can keep it in the fridge for about 3 to 5 days. Make sure to label the container with the date. This helps you know when to eat it. If you want to freeze the soup, use freezer-safe bags or containers. Fill them up, leaving some space for expansion. The soup can last in the freezer for up to 3 months. When you’re ready to eat it, move it to the fridge the night before. This helps it thaw slowly and safely. To reheat the soup, pour it into a pot. Heat it on low to medium heat, stirring often. You can also use a microwave. Put it in a safe bowl and heat for 2 to 3 minutes. Stir halfway through for even warming. If the soup is too thick, add a splash of broth or water. Enjoy your warm bowl of soup! To thicken your soup, you can use a few methods. First, blend the soup longer. This will break down the veggies more. You can also add a cornstarch slurry. Mix one tablespoon of cornstarch with two tablespoons of cold water. Stir this mix into the soup and heat for a few minutes. Another option is to add more heavy cream or coconut milk. This adds richness and thickness. Yes, you can make this soup on the stovetop! Start by sautéing the onion, garlic, carrots, and celery in a pot for about 5 minutes. Then, add the crushed tomatoes, vegetable broth, and spices. Bring the soup to a boil, then lower the heat and simmer for 20-30 minutes. Blend the soup as you like and stir in the cream. It's quick and just as tasty! This soup will stay fresh in the fridge for about 3-4 days. Store it in an airtight container to keep it safe. If you want to keep it longer, think about freezing it. Just make sure to leave some space in the container for expansion. When you're ready to eat it, thaw in the fridge overnight and reheat on the stove. Enjoy every bite! This blog post covered everything you need to make a delicious soup. You learned about key ingredients, smart substitutions, and the best brands to use. We shared step-by-step instructions and tips to enhance flavor. You now have ideas for variations to suit your taste, plus storage and reheating advice. Soup can be a fun and easy meal for anyone. Enjoy the process, and feel free to experiment. Happy cooking!

Slow Cooker Tuscan Tomato Soup Simple and Hearty Meal

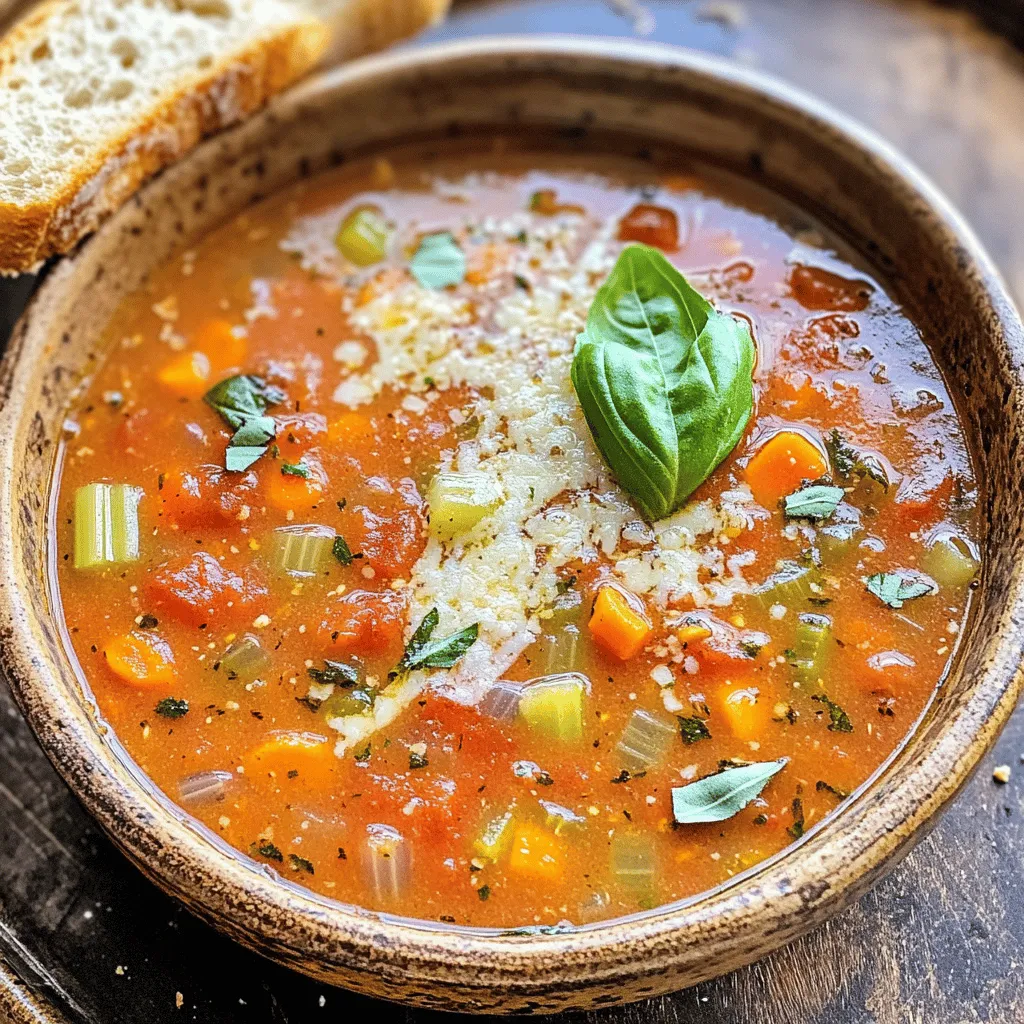
Are you ready to warm up with a bowl of rich and tasty soup? My Slow Cooker Tuscan Tomato Soup

To make this One-Pot Creamy Ranch Chicken Pasta, you will need these ingredients: - 2 tablespoons olive oil - 1 pound chicken breast, diced - 3 cups penne pasta - 4 cups chicken broth - 1 cup heavy cream - 1 packet ranch seasoning mix - 1 cup cherry tomatoes, halved - 1 cup frozen peas - 1 cup shredded cheese (cheddar or mozzarella) - Salt and pepper to taste - Fresh parsley, chopped (for garnish) These items come together to create a tasty meal. You get protein, carbs, and veggies in every bite. If you're missing an ingredient, don't worry! Here are some easy swaps: - Use vegetable broth instead of chicken broth for a vegetarian option. - Swap the penne pasta for rotini or fusilli if you prefer. - Replace heavy cream with half-and-half for a lighter version. - Use Greek yogurt in place of cream for a tangy twist. - You can try different cheeses like gouda or pepper jack for unique flavors. These substitutions can help you use what you have on hand. For this recipe, you will need some basic cooking tools: - A large pot - A cutting board - A sharp knife - A stirring spoon - Measuring cups and spoons Having these items ready will make your cooking smooth and fun. Enjoy the process! To start, I heat 2 tablespoons of olive oil in a large pot over medium heat. Once the oil is hot, I add 1 pound of diced chicken breast. I season it with salt and pepper. I sauté the chicken for about 5-7 minutes. I wait until it's cooked through and lightly browned. This step adds flavor and texture to the dish. Next, I add 3 cups of penne pasta to the pot. Then, I pour in 4 cups of chicken broth and add a packet of ranch seasoning mix. I stir it all well to combine. Bringing this mixture to a simmer is key. I cover the pot and let it cook for 10-12 minutes. I stir occasionally to keep the pasta from sticking. The goal is for the pasta to be al dente. After the pasta is cooked, I reduce the heat to low. I stir in 1 cup of heavy cream, 1 cup of halved cherry tomatoes, and 1 cup of frozen peas. This step makes the dish creamy and colorful. I let it cook for an additional 5 minutes. Everything needs to heat through and blend well. Finally, I remove the pot from heat. I mix in 1 cup of shredded cheese until it melts. I taste and adjust seasoning with salt and pepper. This sauce is rich and comforting, making the dish truly special. When you cook chicken, start with even-sized pieces. This helps them cook at the same rate. Use a meat thermometer to check the chicken's doneness. It should reach 165°F. Avoid overcrowding the pot. This can trap steam and make your chicken soggy. Sauté in batches if needed. Let the chicken rest for a few minutes before cutting. This keeps it juicy. To get a creamy sauce, use heavy cream. It blends well with the ranch seasoning. Stir in the cream slowly over low heat. This helps it combine better. For extra creaminess, add more cheese. Cheddar or mozzarella both work well. You can also mix in a bit of pasta water. It helps the sauce cling to the pasta. This dish is great on its own, but you can add sides. A fresh salad pairs nicely. Try a simple green salad with a light vinaigrette. Garlic bread is a tasty option too. For drinks, serve with iced tea or sparkling water. If you want a fun twist, add a sprinkle of red pepper flakes for heat. {{image_2}} You can easily add veggies to this dish. Try bell peppers for crunch and color. Spinach works great too; just stir it in at the end. Zucchini adds a nice texture. Broccoli florets can also boost nutrition and flavor. The more veggies you add, the better your pasta becomes! If you want to switch proteins, you have options. Turkey or pork works well instead of chicken. Shrimp cooks fast and adds a nice taste. You can use tofu for a vegetarian version. Just make sure to adjust cooking times so everything cooks evenly. Change the flavor with spices. Add garlic powder for a tasty kick. A bit of lemon juice brightens the dish. For a spicy twist, mix in red pepper flakes. You can even swap ranch seasoning for Italian herbs for a fresh taste. Each choice makes the dish fun and unique! To store your leftovers, let the dish cool first. Then, transfer it to an airtight container. Make sure to seal it well. This helps keep the pasta fresh. You can store it in the fridge for up to three days. When you're ready to enjoy your leftovers, heat them gently. You can use a microwave or a pot on the stove. If using a microwave, cover the dish and heat in short bursts. Stir in between to ensure even heating. If using a pot, add a splash of chicken broth. This keeps the pasta from drying out. Heat on low until warmed through. If you want to freeze this dish, use a freezer-safe container. Cool the pasta completely before packing it. It can last in the freezer for up to three months. When you’re ready to eat, thaw it in the fridge overnight. Reheat it on the stove with a bit of broth for a creamy texture. To make this dish dairy-free, swap the heavy cream. Use coconut cream or almond milk instead. Both options add creaminess without dairy. For cheese, try a dairy-free cheese or skip it altogether. This keeps the dish tasty and creamy. Yes, you can use any pasta you like. Bowtie, fusilli, or even gluten-free pasta works well. Just adjust the cooking time based on the pasta shape. Make sure to check for doneness. The key is to have it al dente. If you lack ranch seasoning, you can make your own. Mix equal parts of dried dill, garlic powder, onion powder, and parsley. Add salt and pepper to taste. This homemade mix gives a similar flavor. You can also use Italian seasoning as a quick option. In this blog post, I covered the key ingredients, step-by-step cooking, and helpful tips for your dish. You learned how to prepare chicken, cook pasta, and make a creamy sauce. We also discussed variations and storage methods to keep your food fresh. Feel confident in trying new flavors and ingredients. Cooking is fun, and so is experimenting. Enjoy your meal and share it with others!

One-Pot Creamy Ranch Chicken Pasta Easy and Delicious

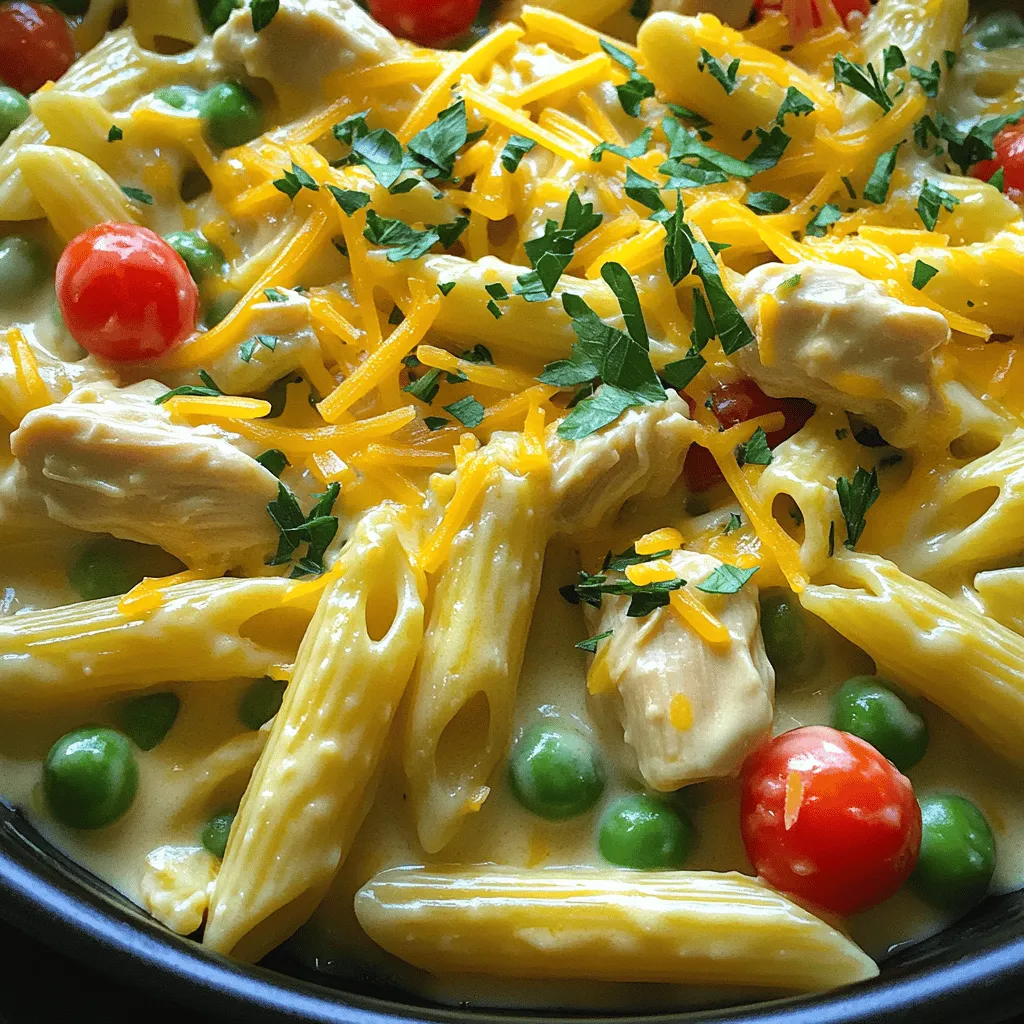
Looking for an easy, tasty dinner? You’ve found it with my One-Pot Creamy Ranch Chicken Pasta! This dish is simple

Older posts
Newer posts
← Previous Page1 … Page22 Page23 Page24 … Page86 Next →

dsad

© 2026 Cooking Wells • Built with GeneratePress

Our Policies

  • Copyright Policy
  • Cookie Policy
  • GDPR Policy
  • Privacy Policy
  • Disclaimer
  • Terms Of Use

More Information

  • Home
  • About
  • Contact
  • Appetizers
  • Dessert
  • Dinner
  • Drinks
©2026, Cooking Wells About Back To Top