Skip to content
DisclaimerTerms Of UseGDPR PolicyCookie Policy

Cooking Wells

  • Home
  • Drinks
  • Appetizers
  • Dinner
  • Dessert
  • About
  • Contact
  • Privacy Policy
DisclaimerTerms Of UseGDPR PolicyCookie Policy

NO-ING-IMG

- 4 medium sweet potatoes - 2 cups cooked chicken, shredded - 1/2 cup BBQ sauce - 1/4 cup ranch dressing - 1 cup corn (canned or frozen) - 1/2 cup black beans, rinsed and drained - 1 cup shredded cheddar cheese - 1/4 cup chopped green onions - Salt and pepper to taste - Fresh cilantro for garnish (optional) This recipe uses sweet potatoes as the base. They are sweet, soft, and healthy. Cooked chicken gives protein and flavor. BBQ sauce adds a tangy kick. Ranch dressing brings creaminess and zest. Corn adds texture and sweetness, while black beans boost fiber. Shredded cheddar cheese melts beautifully on top. Green onions finish the dish with crunch. Salt and pepper enhance all the flavors. Finally, cilantro is optional, but it adds a fresh touch. - Alternatives for BBQ sauce: You can use homemade BBQ sauce or a spicy sauce if you want heat. - Options for ranch dressing: Try Greek yogurt or a vegan ranch for a healthier option. - Substitutes for chicken and beans: You could use shredded turkey, tofu, or chickpeas for a different protein. To start, wash your sweet potatoes well. Use cold water and scrub them gently. This step removes dirt and helps keep the skin clean. After washing, poke several holes in each sweet potato with a fork. This allows steam to escape while they bake. Next, preheat your oven to 400°F (200°C). Place the sweet potatoes on a baking sheet. Bake them for 45-60 minutes. You want them tender but not mushy. Check for doneness by inserting a fork; it should slide in easily. While the sweet potatoes bake, it's time to make the filling. In a large bowl, combine the shredded chicken, BBQ sauce, ranch dressing, corn, black beans, salt, and pepper. Use a spatula to mix everything together. Make sure each piece of chicken gets coated in the sauce. To ensure even mixing, start with the liquid ingredients first. This helps them blend better with the chicken and veggies. You want a uniform mixture that is both tasty and colorful. Once the sweet potatoes are cooked, let them cool for a bit. Cut each sweet potato in half lengthwise. Use a fork to fluff the insides gently. This creates space for the filling. Spoon the BBQ ranch chicken mixture into each sweet potato half. Pack it in if necessary to fit all the filling. Now, top each stuffed sweet potato with shredded cheddar cheese. Return the filled sweet potatoes to the oven for another 10-15 minutes. This step melts the cheese and warms the filling. For perfectly melted cheese, keep an eye on them. Remove when the cheese is bubbly and golden. After baking, sprinkle chopped green onions on top. This adds flavor and a nice crunch. You can also add fresh cilantro for extra brightness. Enjoy your delicious BBQ ranch chicken stuffed sweet potatoes! - Bake sweet potatoes at 400°F (200°C) for best results. - Wash them well to remove dirt. - Poke holes with a fork to let steam escape. - Bake for 45-60 minutes until soft. - To ensure the filling is flavorful, mix chicken with BBQ sauce and ranch. - Add salt and pepper to your taste for extra flavor. - Garnish your stuffed sweet potatoes with chopped green onions. - Use fresh cilantro for a pop of color. - Drizzle extra BBQ sauce on top for a vibrant look. - Serve on a rustic wooden board for a warm, inviting feel. - Scoop out some sweet potato flesh to create a bowl effect. - If sweet potatoes are overcooked, they may be too mushy. - To fix this, use less cooking time next time. - If your filling is dry, add more BBQ sauce or ranch. - If it tastes bland, adjust seasonings and add more salt or pepper. - Mixing in some cheese can also add moisture and flavor. {{image_2}} To make this dish gluten-free, use gluten-free BBQ sauce and ranch dressing. Many brands offer great options that taste just as good. Check labels for gluten-free certification. For those who prefer vegetarian or vegan meals, swap out the chicken for chickpeas or lentils. Use a plant-based ranch dressing and BBQ sauce. This will keep the flavors bold and satisfying. You can easily change the flavor of this dish. Add spices like cumin, paprika, or chili powder for a kick. You can also mix in diced jalapeños for extra heat. Try different BBQ sauces for varied tastes. A sweet sauce works well with the sweet potatoes. A smoky sauce adds depth. Likewise, ranch dressing comes in many flavors, so explore garlic or spicy versions. These stuffed sweet potatoes pair nicely with a side salad or grilled veggies. Consider serving them with a tangy coleslaw for crunch. If you want to make this a meal prep option, prepare the filling ahead of time. Store it in the fridge. Then, when you are ready to eat, just bake the sweet potatoes and stuff them. This makes a quick, healthy meal any day of the week. To store leftovers of BBQ ranch chicken stuffed sweet potatoes, let them cool first. Then, wrap each stuffed sweet potato in plastic wrap or foil. You can also use an airtight container for better storage. This helps keep them fresh. Store them in the fridge for up to four days. - Use airtight containers or plastic wrap. - Keep in the fridge for up to four days. When reheating, I recommend using the oven. This method helps keep the sweet potatoes soft and the filling warm. Preheat your oven to 350°F (175°C). Place the stuffed sweet potatoes on a baking sheet and cover them with foil. Heat for about 20-25 minutes. Check that the cheese is melted and the inside is hot. - Use the oven for best results. - Heat at 350°F for 20-25 minutes. You can freeze stuffed sweet potatoes if you want to save some for later. Wrap each sweet potato tightly in plastic wrap and then in foil. This helps prevent freezer burn. They can stay good for up to three months in the freezer. When ready to eat, thaw them overnight in the fridge. Then, reheat in the oven as mentioned above. - Wrap tightly in plastic wrap and foil. - Freeze for up to three months. - Thaw in the fridge before reheating. What can I use instead of sweet potatoes? You can use regular potatoes. They will give a different taste but work well. You might also try butternut squash for a sweet flavor. Other options include acorn squash or even zucchini for a lighter meal. Can I make this recipe ahead of time? Yes, you can prepare the filling in advance. Store it in the fridge for up to two days. You can also bake the sweet potatoes ahead. Just reheat them before adding the filling. Caloric content and macronutrients Each serving has about 450-500 calories. It contains roughly 30 grams of protein, 50 grams of carbs, and 15 grams of fat. This makes it a filling meal that can fuel your day. Health benefits of the ingredients Sweet potatoes are high in fiber, vitamins, and minerals. They can help boost your immune system. Chicken provides lean protein, which is good for muscle health. Black beans add more fiber and protein, while corn adds essential nutrients. How to adjust cooking times for larger or smaller sweet potatoes If your sweet potatoes are larger, increase the baking time by 10-15 minutes. For smaller ones, check them at around 30-40 minutes. You want them soft all the way through. What to do if the filling is not heated through If the filling is cold, return the stuffed sweet potatoes to the oven. Bake them at 350°F for about 10 minutes. This will ensure the filling gets warm without overcooking the sweet potato. This blog post covers how to make delicious stuffed sweet potatoes. We explored key ingredients and their roles in the dish. Ingredient substitutions provide options if you lack certain items. The step-by-step guide ensures easy prep and assembly for perfect results. Helpful tips enhance flavor and presentation, while variations cater to different diets. Finally, proper storage and reheating keep leftovers tasty. Embrace these ideas to create a meal that delights your taste buds and fits your needs. Enjoy your cooking adventure!

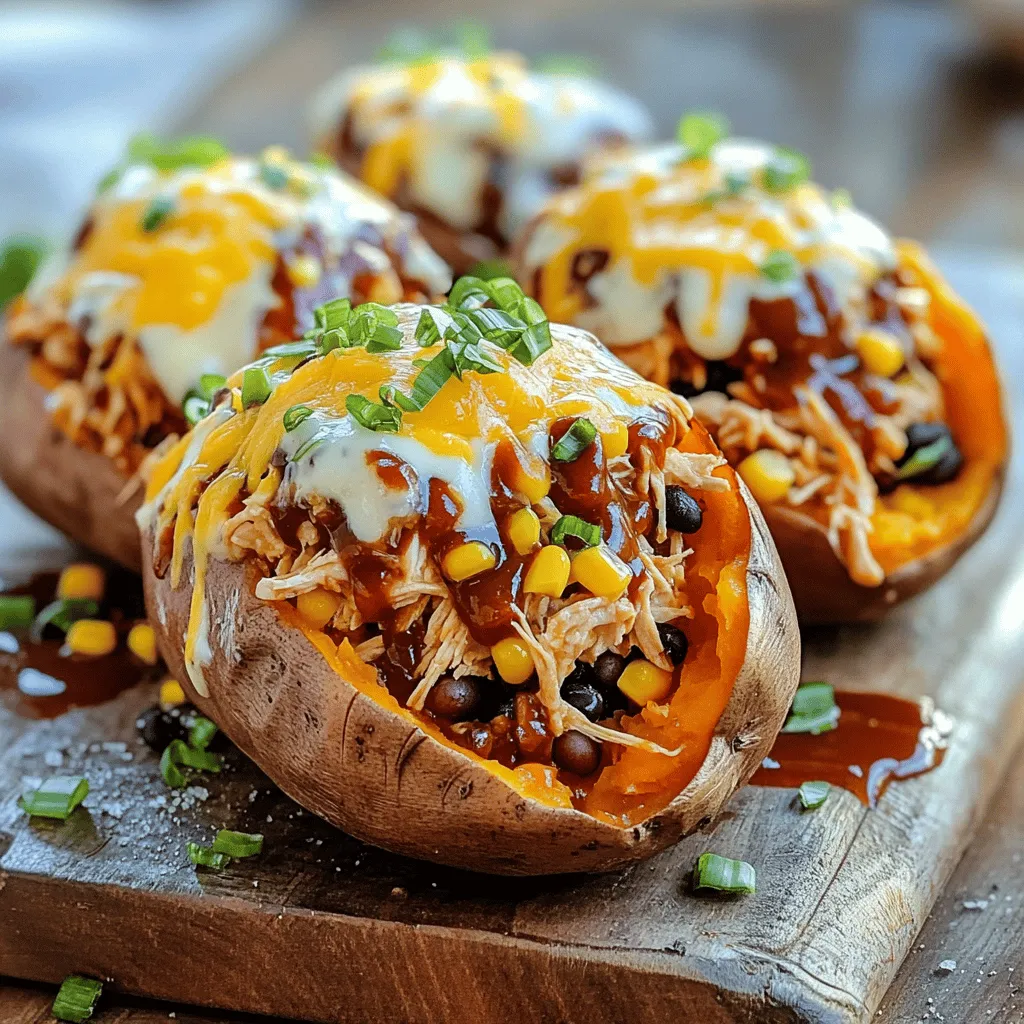
BBQ Ranch Chicken Stuffed Sweet Potatoes Recipe

Looking for a tasty and filling meal that’s easy to make? My BBQ Ranch Chicken Stuffed Sweet Potatoes are just

- 1 large cauliflower, cut into bite-sized florets - 1 cup all-purpose flour - 1 teaspoon garlic powder - 1 teaspoon onion powder - 1 teaspoon paprika - 1 cup water (or plant-based milk for creaminess) - 1 teaspoon salt - 1 cup breadcrumbs (panko or regular) - 1/2 cup orange juice (freshly squeezed for best flavor) - 1 tablespoon soy sauce - 2 tablespoons maple syrup - 1 teaspoon grated ginger - 1 teaspoon apple cider vinegar - Zest of 1 orange - Sesame seeds (for garnish) - Fresh cilantro, chopped (for garnish) If you need to swap some ingredients, here are a few ideas: - Use chickpea flour instead of all-purpose flour for a gluten-free option. - Instead of water, try using vegetable broth for added flavor. - You can use honey instead of maple syrup if you are not vegan. - For a soy-free glaze, substitute coconut aminos for soy sauce. When picking cauliflower, look for these signs: - Choose heads that feel heavy for their size. - The florets should be tightly packed and firm. - Avoid any yellow spots or dark patches. - Fresh leaves should look green and crisp. These tips help ensure you get the best cauliflower for your wings. Enjoy shopping! Start by preheating your oven to 425°F (220°C). Line a baking sheet with parchment paper. Take one large cauliflower and cut it into bite-sized florets. This step is key; smaller pieces cook more evenly. In a large bowl, mix one cup of all-purpose flour, one teaspoon of garlic powder, one teaspoon of onion powder, one teaspoon of paprika, and one teaspoon of salt. Gradually add one cup of water or plant-based milk. Whisk until smooth. Dip each cauliflower floret into the batter. Let excess batter drip off. Then, coat them with one cup of breadcrumbs. Ensure every piece is well-covered. Place the coated florets on the baking sheet in a single layer. While the wings bake, let’s make the orange glaze. In a small saucepan, combine half a cup of freshly squeezed orange juice, one tablespoon of soy sauce, two tablespoons of maple syrup, one teaspoon of grated ginger, one teaspoon of apple cider vinegar, and the zest of one orange. Heat the mixture over medium heat. Stir it until it reaches a gentle simmer. Allow it to reduce and thicken for about 5-7 minutes. After that, remove it from heat. This glaze gives the wings a sweet and tangy flavor that you will love. After baking for 25-30 minutes, check your wings. They should be golden and crisp. Remove them from the oven. Toss the cooked wings in the orange glaze until they are evenly coated. This step is important for flavor. Return the glazed wings to the oven for an extra 5-7 minutes. This helps caramelize the glaze, making it sticky and delicious. Once done, take them out and garnish with sesame seeds and chopped cilantro. Enjoy your tasty orange glazed cauliflower wings! To get that perfect crunch, start with dry cauliflower florets. Pat them down with a towel before dipping. Use panko breadcrumbs for extra crispiness. They create a light, airy texture. Make sure to coat each floret well in the batter and breadcrumbs. This helps them stay crispy during baking. Bake at 425°F (220°C) and flip halfway through. This ensures even cooking and browning. If you want even more crunch, try broiling the wings for a minute or two at the end. These orange glazed cauliflower wings shine on their own. Serve them as a fun appetizer or snack. They also work great as a side dish. Pair them with a fresh salad or grain bowl for a complete meal. You can even add them to tacos for a tasty twist. The sweet and tangy glaze makes them appealing to everyone, even picky eaters. For a colorful plate, add some carrot sticks and cucumber slices on the side. Dips can elevate your wings even more. A creamy ranch or zesty blue cheese dip pairs well with the sweet glaze. For a healthier option, try a yogurt-based dip with herbs. If you love spice, go for a sriracha mayo. As for sides, consider a crisp slaw or roasted veggies. These add a nice crunch and contrast to the wings. You can also serve them with fluffy rice or quinoa to balance the flavors. {{image_2}} To make spicy orange glazed cauliflower wings, add heat. Use 1-2 teaspoons of chili powder or cayenne pepper. Mix this into your flour blend before dipping the florets. You can also toss the wings in hot sauce after glazing. This kick will enhance the sweet orange flavor. If you want a different taste, try BBQ or teriyaki glazes. For BBQ, use your favorite sauce instead of the orange glaze. Brush it on during the last five minutes of baking. For teriyaki, mix soy sauce, brown sugar, and ginger. Toss the wings in this glaze for a sweet and savory twist. You can easily make this dish vegan. Substitute the all-purpose flour with chickpea flour. This will add a nutty flavor. Use plant-based milk in the batter for creaminess. Also, ensure your maple syrup is pure and vegan. To add more nutrition, toss in some chopped veggies like bell peppers or broccoli. To store leftover orange glazed cauliflower wings, first let them cool completely. Place them in an airtight container. Make sure to separate layers with parchment paper to avoid sticking. Store them in the fridge for up to three days. This keeps them fresh and ready for your next meal. When you are ready to enjoy your wings again, preheat your oven to 350°F (175°C). Spread the wings on a baking sheet. Heat for about 10-15 minutes, or until they are hot and crispy again. You can also use an air fryer for a quicker option. Just heat them at 350°F (175°C) for about 5-7 minutes. If you want to freeze your orange glazed cauliflower wings, follow these steps. First, let them cool completely. Then, place them in a single layer on a baking tray. Freeze them for about an hour to set. After that, transfer the wings to a freezer-safe bag or container. They can last up to three months in the freezer. When you’re ready to eat, bake them from frozen at 425°F (220°C) for about 20-25 minutes. Enjoy! Yes, you can prep these cauliflower wings ahead. Cut the cauliflower and make the batter. Store them in the fridge for up to 24 hours. When ready to cook, just coat them in breadcrumbs and bake. This saves time on busy days. You can enjoy these wings with many sauces. Here are a few ideas: - Ranch dressing for a creamy touch - Spicy sriracha for heat - Sweet chili sauce for a sweet kick - Blue cheese dressing for a bold flavor Experiment with your favorites! To thicken the orange glaze, let it simmer longer. Cook it until it reduces by half. You can also add a cornstarch slurry. Mix 1 tablespoon of cornstarch with 2 tablespoons of cold water. Stir this into the glaze while it simmers. This will give it a nice, thick texture. In this article, I shared a complete guide to making cauliflower wings. We covered the ingredients, cooking steps, and tips for a perfect texture. I also shared various glaze options, storage tips, and answered common questions. You can enjoy these tasty wings as a snack or meal. Try the variations to match your taste. With a little practice, you’ll make these crispy treats a favorite. So, get cooking and enjoy your delicious cauliflower wings!

Irresistible Orange Glazed Cauliflower Wings Recipe

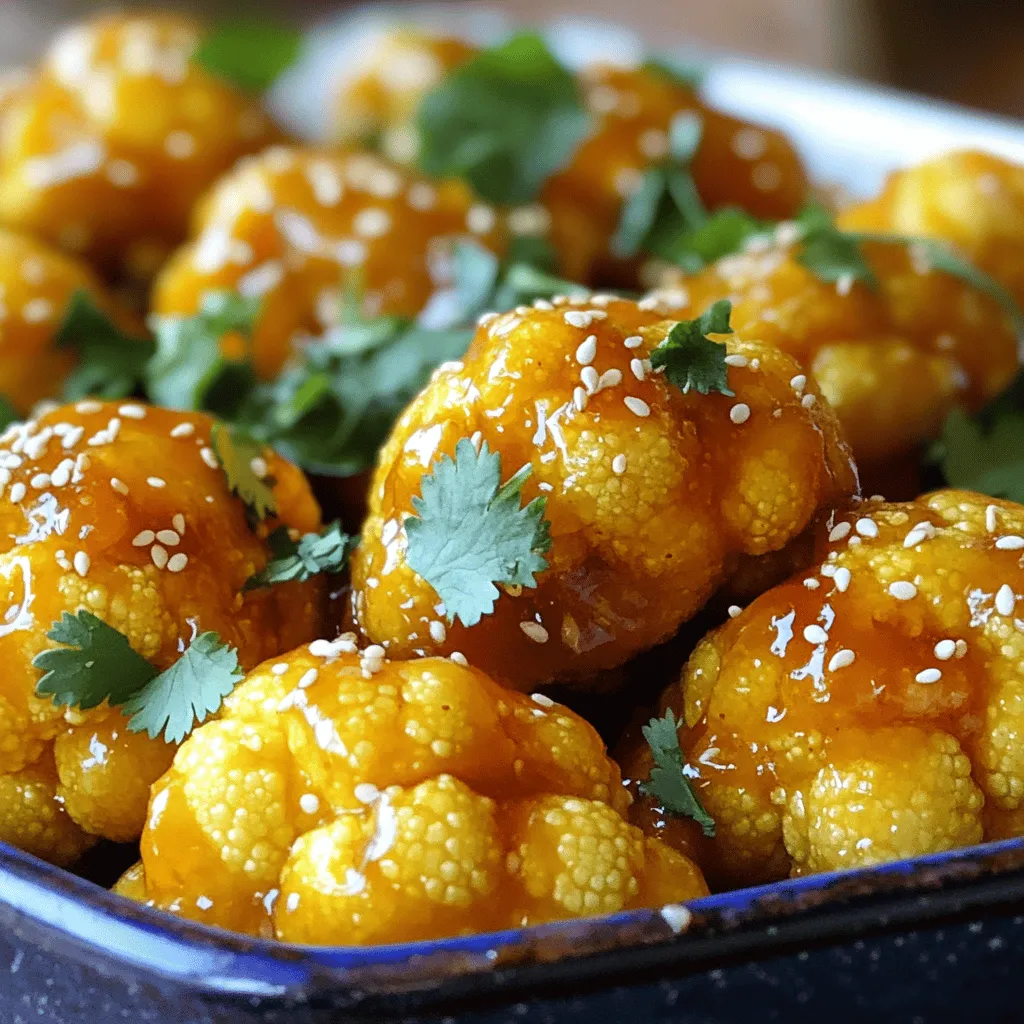
Craving a tasty snack that’s both healthy and fun? Look no further! My Irresistible Orange Glazed Cauliflower Wings are just

To make No-Bake Mint Chocolate Lasagna, you will need the following ingredients: - 1 package of chocolate graham crackers (about 14-15 crackers) - 1 cup heavy whipping cream - 1 cup powdered sugar - 1 teaspoon pure vanilla extract - 8 oz cream cheese, softened - 1 cup mint chocolate chips - 1/2 cup sour cream - 1 cup whipped topping (like Cool Whip) - 2 tablespoons mint extract - Grated dark chocolate or cacao nibs for garnish - Extra mint leaves for garnish (optional) You can swap some ingredients if needed: - Use regular graham crackers if you can't find chocolate ones. - Greek yogurt can replace sour cream for a tangy twist. - For a lighter option, use low-fat cream cheese. - If you dislike mint, try almond extract or orange zest instead. When picking your ingredients, quality matters. Here are some tips: - Choose fresh mint extract for the best flavor. - Look for high-quality chocolate graham crackers to enhance taste. - Always check the expiration dates on dairy products like cream cheese and sour cream. - Use real whipped cream for a richer texture over store-bought versions. These ingredient choices will set the stage for a tasty and delightful treat! {{ingredient_image_1}} Start by taking a mixing bowl. Pour in the heavy whipping cream. Use a mixer to beat the cream until it forms soft peaks. This means it should hold some shape but still be soft. Next, add the powdered sugar and vanilla extract slowly. Keep whipping until you see stiff peaks. This will make your cream fluffy and light. Once done, set it aside for later use. Grab another bowl and add the softened cream cheese. Beat it until it is nice and smooth. Then, pour in the mint extract and sour cream. Mix this well until it looks even. Now, take the whipped cream you prepped before. Carefully fold it into the cream cheese mixture. Do this gently, so you do not lose the air you whipped into the cream. Finally, fold in the mint chocolate chips. Keep it smooth and fluffy. Now, take a 9x9 inch square dish. Start by laying down some chocolate graham crackers at the bottom. This will be your first layer. Next, spread half of the mint cream cheese mixture over the crackers. Smooth it out evenly with a spatula. Add another layer of graham crackers on top. Repeat the process with the rest of the mint cream cheese mixture. Smooth it out again. Finish with one last layer of chocolate graham crackers. Cover the dish with plastic wrap. Place it in the fridge for at least 4 hours. If you can wait overnight, that’s even better! This helps all the flavors mix and makes it easier to slice. To get perfectly stiff peaks, start with cold heavy whipping cream. Use a clean bowl and beaters. Whip the cream on medium speed until soft peaks form. Then, add powdered sugar and vanilla extract. Keep whipping until you see stiff peaks form. This means the cream holds its shape well. Be careful not to overwhip, as it can turn grainy. When layering your lasagna, work quickly to keep the layers smooth. Start with a layer of chocolate graham crackers at the bottom. Spread half of the cream cheese mixture evenly over the crackers. Make sure it reaches the edges. Then, add another layer of graham crackers. Repeat with the remaining cream cheese mix. Finish with one last layer of crackers on top. This keeps the dessert neat and tidy. If the cream filling is too runny, try whipping the cream longer to get stiffer peaks. If the layers slide apart, ensure the lasagna chills long enough. Ideally, let it sit overnight. For a less sweet taste, reduce the powdered sugar in the cream filling. If you don't have chocolate graham crackers, regular ones work too, but the flavor changes slightly. Pro Tips Use Cold Ingredients: Ensure that your cream cheese and heavy cream are cold for optimal whipping. Cold ingredients whip better, leading to a fluffier filling. Chill Before Serving: Allow the lasagna to chill overnight if possible. This helps the layers set properly, enhancing the flavors and making it easier to slice. Garnish Creatively: For a stunning presentation, use a mix of grated dark chocolate and fresh mint leaves. This not only looks great but also adds extra flavor. Experiment with Flavors: Feel free to swap the mint extract for other flavors like almond or orange for a unique twist on this classic dessert. {{image_2}} You can change the flavor of your mint chocolate lasagna easily. For a rich chocolate mint taste, stick to mint chocolate chips. If you want a fresh peppermint flavor, swap the mint chocolate chips for regular chocolate chips. You can also add a drop more mint extract for a stronger peppermint kick. Just be careful not to overdo it! Want to mix in some fruit? You can layer fresh fruit like raspberries or strawberries. These fruits add a sweet and tart burst. Just thinly slice the fruit and place it between the layers of cream. You can also use banana slices for a creamy texture. This will add color and flavor to your dish. If you need a gluten-free treat, there is a simple fix. Choose gluten-free chocolate graham crackers. They are available in many stores now. This swap keeps the lasagna tasty without gluten. You can enjoy this dessert without any worry. Just make sure to check the label for gluten-free certification! To store leftovers, cover the lasagna tightly with plastic wrap or foil. This keeps it fresh and prevents it from drying out. You can also place it in an airtight container. Make sure to store it in the fridge. You can freeze No-Bake Mint Chocolate Lasagna for later. Slice it into squares and wrap each piece in plastic wrap. Then, place the wrapped pieces in a freezer-safe bag. This way, you can enjoy a treat whenever you want! In the fridge, this dessert stays good for about 3 to 5 days. Its flavors improve over time, so it's best to wait at least a few hours before serving. If you freeze it, it can last up to 2 months. Just remember to thaw it in the fridge before serving. Yes, you can use regular chocolate chips. The taste will differ. The mint flavor adds a special touch. If you prefer classic chocolate, this swap will still work. You should chill the lasagna for at least 4 hours. For best results, let it sit overnight. Chilling helps the layers set and flavors blend well. It also makes cutting easier. Yes, you can double this recipe. Just use a larger dish to hold more layers. Remember to adjust the chilling time if you make a bigger batch. More layers mean more fun! You learned about key ingredients and how to choose them wisely. I shared steps for preparing the cream filling and assembling the lasagna layers. Remember the tips for perfect peaks and how to troubleshoot issues. You can try fun variations for different flavors and textures. Finally, I covered the best ways to store your lasagna and answered common questions. This recipe is fun and flexible. Enjoy creating your own delicious version at home!

No-Bake Mint Chocolate Lasagna Irresistible Treat

Love mint and chocolate? You’re in for a treat! My No-Bake Mint Chocolate Lasagna is an easy dessert that will

- 1 pound large shrimp, peeled and deveined - 1 can (13.5 oz) coconut milk - 2 tablespoons red curry paste - 2 tablespoons fish sauce - Juice of 2 limes - Zest of 1 lime - 2 tablespoons brown sugar - 1 tablespoon ginger, minced - 3 cloves garlic, minced - 1 red bell pepper, sliced - 1 cup snap peas, trimmed - Fresh cilantro, for garnish - Cooked jasmine rice, for serving This recipe shines because of its fresh, vibrant ingredients. Let’s break them down: - Shrimp: Use large shrimp for the best texture. They cook quickly and soak up flavors well. - Coconut milk: This gives a creamy base. It adds richness and balances the spice. - Red curry paste: This paste gives heat and depth. It’s made from peppers, herbs, and spices. - Fish sauce: This adds umami flavor. It’s salty and rich, making your dish more savory. - Lime juice and zest: These bring brightness. The juice adds tang, while zest gives a fragrant touch. When picking shrimp, look for these tips: - Smell: Fresh shrimp should smell like the ocean, not fishy. - Color: Look for shrimp with a clear, shiny appearance. Avoid dull or discolored shrimp. - Texture: Fresh shrimp should feel firm to the touch. If it feels mushy, skip it. - Shell: If possible, buy shrimp with the shell on. It keeps them fresher longer. Selecting the right shrimp makes all the difference in your Thai Coconut Lime Shrimp dish. Enjoy the cooking! Start with a large skillet over medium heat. Pour in the can of coconut milk. Add the red curry paste, fish sauce, lime juice, lime zest, brown sugar, minced ginger, and minced garlic. Stir well until everything mixes nicely. You want to see bubbles form, which means the sauce is simmering. This step brings out the rich flavors of the dish. Now, it’s time for the vegetables. Add the sliced red bell pepper and snap peas to the skillet. Cook these for about 3 to 4 minutes. Stir them gently as they cook. You want them to be slightly tender but still crisp. This keeps the veggies bright and fresh. They add great color and crunch to your dish. Next, it’s shrimp time! Add the peeled and deveined shrimp to the skillet. Gently stir them into the sauce. Cook for another 4 to 5 minutes. Watch for the shrimp to turn pink and opaque. This shows they are done cooking. Once finished, taste the sauce and adjust it if needed. You might want more lime juice or a splash of fish sauce. Finally, serve your shrimp over jasmine rice and add fresh cilantro on top. Enjoy! When making Thai Coconut Lime Shrimp, avoid these common mistakes: - Overcooking the shrimp: Cook the shrimp just until they turn pink. This keeps them tender and juicy. - Using low-quality coconut milk: High-quality coconut milk gives a rich flavor. Check the label for added preservatives. - Skipping the lime zest: The zest adds bright flavor. Don’t skip this step! To boost the flavor of your dish, try these tips: - Add more lime juice: A splash of extra lime juice brightens the dish. Adjust to your taste. - Use fresh herbs: Fresh cilantro adds a lovely aroma. Sprinkle it on just before serving. - Incorporate more veggies: Try adding bok choy or carrots for extra crunch and color. Having the right tools makes cooking easier. Here are my top picks: - Non-stick skillet: This helps prevent sticking and makes cleanup easy. - Measuring cups and spoons: Precise measurements ensure balanced flavors. - Sharp knife: A good knife helps with slicing veggies smoothly. These tips will help you create a stunning dish that impresses everyone! Enjoy your cooking! {{image_2}} You can switch the shrimp for other proteins. Chicken or firm tofu works well. Use one pound of chicken breast, cut into bite-sized pieces. Cook it until golden before adding the sauce. For tofu, press it to remove water. Then, cut it into cubes and sauté until crisp. Both options absorb the flavors nicely and create a tasty dish. To make this dish vegan, swap shrimp for chickpeas or mushrooms. Use one can of chickpeas, rinsed and drained. Add them to the sauce after cooking the veggies. For mushrooms, use 8 ounces of sliced shiitake or button mushrooms. Cook them until tender and add to the sauce. This keeps the meal hearty and delicious. If you like heat, add more red curry paste. Start with one extra tablespoon and taste as you go. For a milder dish, reduce the curry paste to one tablespoon or use a sweet curry powder. You can also add a pinch of red pepper flakes for a quick heat boost. Always adjust to your taste for the best results. After cooking Thai Coconut Lime Shrimp, allow it to cool down. Then, place the shrimp in an airtight container. This keeps the dish fresh and tasty. You can store it in the fridge for up to 3 days. Make sure to seal the container well to prevent any odors from other foods. To reheat, you can use the stove or microwave. If using the stove, heat a skillet over medium-low heat. Add the shrimp with a splash of coconut milk to keep it moist. Stir gently until warmed through. If using a microwave, place the shrimp in a microwave-safe bowl. Heat in 30-second intervals, stirring in between to ensure even heating. If you want to save some for later, you can freeze the shrimp. Place it in a freezer-safe container or bag. Remove as much air as possible to prevent freezer burn. The shrimp can last in the freezer for up to 2 months. When ready to eat, thaw it in the fridge overnight before reheating. You can serve this dish with cooked jasmine rice. The rice absorbs the sauce and adds a nice texture. You could also add a fresh salad or steamed vegetables. A side of spring rolls or Thai noodles pairs well too. These options enhance the meal and make it more filling. To make Thai Coconut Lime Shrimp gluten-free, use gluten-free fish sauce. Many brands offer this option. Check the label to ensure it meets gluten-free standards. Also, pair it with rice instead of noodles that may contain gluten. This way, you keep the flavors while making it safe for gluten-free diets. Yes, you can use different types of shrimp. Medium or small shrimp work well too. Fresh, frozen, or even shrimp from the seafood counter are good choices. Just make sure they are peeled and deveined. The cooking time may change slightly based on their size. In this blog post, I shared a complete guide for making Thai Coconut Lime Shrimp. We covered key ingredients, step-by-step cooking instructions, and useful tips. Remember, fresh shrimp makes a big difference in taste. As you explore variations, think about proteins and spice levels that suit you. Proper storage can keep leftovers fresh, and reheating is simple. With these tips, you’ll create a delicious meal every time. Enjoy your cooking journey!

Thai Coconut Lime Shrimp Flavorful and Easy Recipe

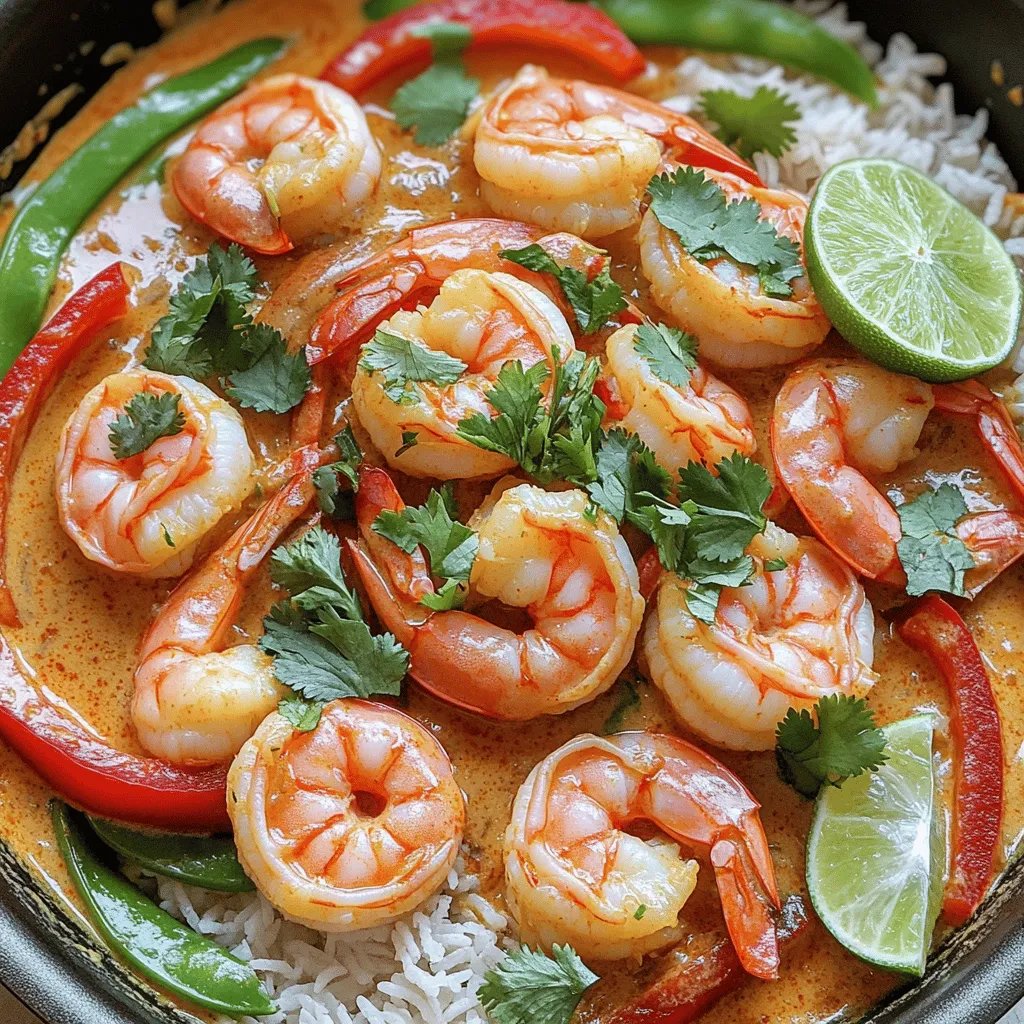
Craving a dish that combines zesty lime and rich coconut? You’re in for a treat! My Thai Coconut Lime Shrimp

- Dry Ingredients - 1 ½ cups all-purpose flour - 1 teaspoon baking powder - ½ teaspoon baking soda - ½ teaspoon salt - 1 teaspoon ground cinnamon - Wet Ingredients - ¾ cup granulated sugar - ½ cup brown sugar, packed - ½ cup unsalted butter, melted - 2 large eggs - ½ cup buttermilk - 1 teaspoon vanilla extract - 1 cup ripe peaches, diced (fresh or canned) - Streusel Topping Ingredients - ½ cup all-purpose flour - ¼ cup brown sugar, packed - ¼ cup rolled oats - ¼ cup unsalted butter, cold and cubed - 1 teaspoon ground cinnamon Gather these items before you start baking. Fresh peaches make these muffins taste great. If you have canned peaches, they work too. Make sure the butter is melted for the batter. The streusel topping needs cold butter for the right texture. Each ingredient plays a key role in making these muffins scrumptious. The sugars add sweetness, while the spices bring warmth. Enjoy the process of mixing and baking. It’s a fun way to make your kitchen smell amazing! First, you need to get your oven ready. Preheat it to 350°F (175°C). While it warms up, grab your muffin tin. You can line it with muffin liners or use cooking spray to grease it. This helps keep the muffins from sticking. Now, let’s make the wet mix. In a large bowl, whisk together ½ cup of melted unsalted butter and ¾ cup of granulated sugar until it blends well. Next, add ½ cup of packed brown sugar and mix until smooth. Then, crack in 2 large eggs one at a time. After the eggs, pour in ½ cup of buttermilk and 1 teaspoon of vanilla extract. Mix until everything is well combined. In a separate bowl, combine 1 ½ cups of all-purpose flour, 1 teaspoon of baking powder, ½ teaspoon of baking soda, ½ teaspoon of salt, and 1 teaspoon of ground cinnamon. Gradually add this dry mix into your wet ingredients. Stir gently until just combined. Be careful not to overmix. Finally, fold in 1 cup of diced ripe peaches. Make sure they are evenly spread in the batter. For the tasty streusel, take a small bowl. Combine ½ cup of all-purpose flour, ¼ cup of packed brown sugar, ¼ cup of rolled oats, and 1 teaspoon of ground cinnamon. Cut in ¼ cup of cold, cubed unsalted butter. Use a fork or pastry cutter to mix until it looks like coarse crumbs. Now for the fun part! Divide your muffin batter evenly into the prepared muffin tin. Fill each cup about 2/3 full. Then, sprinkle the streusel topping generously on each muffin. Place the tin in the oven and bake for 18-20 minutes. To check if they’re ready, insert a toothpick in the center. It should come out clean. Once they’re done, let the muffins cool in the pan for about 5 minutes. After that, transfer them to a wire rack to cool completely. For a special touch, serve these muffins warm with a light dusting of powdered sugar. Pair them with a cup of coffee or tea for a perfect treat! Pick ripe peaches for the best flavor. Look for peaches that are soft but not mushy. A sweet aroma is a good sign too. If you can't find fresh peaches, canned ones work well. Just make sure they are in juice, not syrup. Store fresh peaches at room temperature until they are ripe. Once ripe, keep them in the fridge. This helps them last longer. If you have leftover muffins, store them in an airtight container. They stay fresh for about 3 days at room temperature. Mix your wet and dry ingredients gently. Overmixing can make the muffins tough. Fill each muffin cup about two-thirds full. This allows room for rising. Check for doneness by inserting a toothpick. If it comes out clean, your muffins are ready! {{image_2}} You can make these muffins gluten-free. Use a 1:1 gluten-free flour blend. This blend often has a mix of rice flour, potato starch, and tapioca flour. It helps keep the muffins light and fluffy. Make sure to also add a bit of xanthan gum if your blend doesn't have it. This gum helps mimic the elasticity found in wheat flour. Peach Streusel Muffins are tasty, but feel free to switch up the fruit. Here are some great options: - Ripe bananas: Mash them into the batter for sweetness. - Blueberries: Fold in fresh or frozen blueberries for a pop of color. - Apples: Dice them up and mix them in for a crunchy texture. - Cherries: Pitted and halved cherries add a tart flavor. You can mix and match fruits to find your favorite combo! Personalize your muffins with fun flavor additions. Here are some ideas: - Nuts: Add chopped walnuts or pecans for crunch. - Spices: Try nutmeg or ginger for added warmth. - Citrus: A bit of orange or lemon zest brightens the flavor. - Chocolate chips: Fold in some dark chocolate chips for a sweet treat. These additions make the muffins even more special and tasty! To keep your muffins fresh, place them in an airtight container. This helps prevent them from drying out. Store them at room temperature for up to three days. If you want them to last longer, refrigeration is an option. However, it may change the texture slightly. If you want to save some for later, freezing is the best choice. First, let the muffins cool completely. Then, wrap each muffin in plastic wrap. Place them in a freezer-safe bag or container. This way, they can last up to three months in the freezer. When you're ready to eat one, just thaw it at room temperature. To enjoy your muffins warm, you can reheat them easily. If they are at room temperature, pop them in the microwave for about 10 to 15 seconds. For frozen muffins, microwave them for 30 seconds to one minute. You can also reheat them in the oven. Preheat the oven to 350°F (175°C) and warm the muffins for about 5 to 10 minutes. Enjoy them warm for the best taste! Yes, you can use frozen peaches in this recipe. Just make sure to thaw and drain them first. This helps keep the batter from getting too wet. Frozen peaches may be softer, but they still taste great! To check if your muffins are done, insert a toothpick into the center of one. If it comes out clean, your muffins are ready. They should also look golden brown on top. Yes, you can replace buttermilk with regular milk. Add one teaspoon of vinegar or lemon juice to the milk to make a quick substitute. Let it sit for five minutes before using. You can add a dusting of powdered sugar for sweetness. A drizzle of honey or maple syrup works well too. Chopped nuts or a dollop of yogurt adds a nice crunch and creaminess. These muffins stay fresh for about three days at room temperature. Store them in an airtight container to keep them moist. If you want them to last longer, consider freezing them. We explored the key steps to making delicious Peach Streusel Muffins. We covered ingredients, mixing, and tips for baking the best muffins. Remember to choose ripe peaches and store leftovers correctly. You can even try different fruits or make gluten-free versions. These muffins are a tasty treat any time of year. I hope you enjoy baking and sharing these muffins with friends and family. Happy baking!

Peach Streusel Muffins Scrumptious and Easy Recipe

Ready to make your kitchen smell amazing? This Peach Streusel Muffins recipe is easy and delicious! I’ll walk you through

- 1 large head of cauliflower, cut into florets - 1 tablespoon olive oil - 1 teaspoon chili powder - 1 teaspoon garlic powder - 1 teaspoon onion powder - 1/2 teaspoon smoked paprika - Salt and pepper to taste - 1 cup shredded cheese (cheddar or dairy-free alternative) - 1/2 cup black beans, rinsed and drained - 1 jalapeño, sliced (optional) - 1/4 cup diced tomatoes - 1/4 cup sliced green onions - 1/4 cup sour cream or vegan alternative - Fresh cilantro for garnish (optional) Gathering the right ingredients is key to making Air Fryer Nacho Cauliflower. Start with a large head of cauliflower. Cut it into bite-sized florets for even cooking. You will need one tablespoon of olive oil to help the seasonings stick. For flavor, use chili powder, garlic powder, onion powder, and smoked paprika. These spices give the cauliflower a nice kick. Don’t forget to add salt and pepper for balance. Next, cheese is the star of the show. Use one cup of shredded cheese, whether you prefer cheddar or a dairy-free option. If you want to take it up a notch, add some optional toppings. Black beans add protein and texture. Sliced jalapeños bring heat if you like it spicy. Fresh tomatoes and green onions add color and freshness. Finally, dollops of sour cream or a vegan alternative balance the flavors nicely. With these ingredients ready, you will create a tasty dish that everyone will love! First, set your air fryer to 400°F (200°C). This step warms the air fryer, which helps cook the cauliflower evenly. A hot air fryer gives the cauliflower a nice crunch. Take one large head of cauliflower and cut it into florets. Place them in a big bowl. Drizzle one tablespoon of olive oil over the florets. Then, add one teaspoon each of chili powder, garlic powder, and onion powder. Sprinkle in half a teaspoon of smoked paprika, along with salt and pepper to taste. Toss everything well until the florets are nicely coated with the spices. Now, place the seasoned florets in the air fryer basket. Spread them out in a single layer. If your air fryer is small, you may need to cook in batches. Air fry the cauliflower for 15 to 18 minutes. Remember to shake the basket halfway through. This step ensures all sides get crispy and golden. Once the cauliflower is done, take it out of the air fryer. Place the florets in a baking dish. Sprinkle one cup of shredded cheese evenly over the cauliflower. Add half a cup of rinsed black beans and sliced jalapeños on top of the cheese for an extra kick. Return the baking dish to the air fryer. Cook for an additional 3 to 5 minutes. This step melts the cheese until it bubbles. After that, carefully take it out. Top with diced tomatoes, sliced green onions, and dollops of sour cream. If you like, add fresh cilantro for a bright finish. Enjoy your delicious Air Fryer Nacho Cauliflower! To get crispy cauliflower, you need to coat it well. Use a tablespoon of olive oil to help the spices stick. Toss the florets in a big bowl until they are covered. The spices add flavor, and the oil helps make them crispy. Air fry them at 400°F for 15-18 minutes. Shake the basket halfway through to cook evenly. If you have a small air fryer, cook in batches. Cheese makes nachos great! You can use shredded cheddar for a classic taste. A dairy-free cheese works if you want a vegan version. Both options melt well and taste amazing. Sprinkle the cheese on the cauliflower after air frying. Return it to the air fryer to melt the cheese for 3-5 minutes. This step makes it gooey and delicious. Serve your nacho cauliflower hot and fresh. Add black beans and jalapeños for extra texture. Top with diced tomatoes and green onions for a burst of color. A dollop of sour cream or its vegan alternative adds creaminess. Fresh cilantro can give a nice pop of flavor. You can enjoy this dish as a snack or side. It pairs well with a cold drink or a fresh salad. {{image_2}} You can easily make this dish vegan. Just skip the cheese and sour cream. Use a dairy-free cheese made from nuts or soy. It melts well, too. You can also replace sour cream with a vegan option made from cashews. This keeps the flavors rich and creamy. If you love heat, add more spice. Use two jalapeños instead of one. You can also sprinkle some red pepper flakes on top for an extra kick. Another great idea is to mix in some hot sauce with your olive oil. This gives the cauliflower a nice spicy flavor. For those avoiding cheese, you can still enjoy great taste. Try using nutritional yeast. It adds a cheesy flavor without the dairy. Mix it into the spices before tossing with the cauliflower. You still get that delicious nacho feel with less fat. To store your Air Fryer Nacho Cauliflower, let it cool first. Place the leftovers in an airtight container. You can keep it in the fridge for up to three days. Make sure to separate the toppings if you want them to stay fresh. To reheat, use your air fryer again. Set it to 350°F (175°C) for about 5-7 minutes. This gives your cauliflower a nice crisp again. You can also use a microwave, but it may not stay as crispy. If you want to freeze the nacho cauliflower, place it in a freezer-safe bag. It can last up to two months in the freezer. When you are ready to eat it, thaw it in the fridge overnight before reheating. Yes, you can use frozen cauliflower. Thaw it first and pat it dry. This helps remove extra moisture. If you skip this step, the cauliflower may not get crispy. Toss the thawed cauliflower with olive oil and seasonings just like fresh florets. To spice it up, add more chili powder. You can also include sliced jalapeños. For extra heat, try adding cayenne pepper or hot sauce. Adjust the spice level to match your taste. I recommend 400°F (200°C) for the best results. This high heat gives the cauliflower a nice crunch. It cooks evenly and gets golden brown. Yes, you can skip the cheese. The cauliflower will still be tasty. For creaminess, try using guacamole or a vegan cheese. You can also add more toppings like beans or salsa for flavor. This blog post covered the key ingredients and steps to make delicious air fryer nacho cauliflower. We explored simple tips to ensure crispy florets and creative topping ideas. You can also customize your dish with variations, whether vegan or cheesy. Storing leftovers and reheating tips help you enjoy this treat later. Overall, this recipe is a fun and tasty option for snack time. Enjoy your cooking and get creative with flavors!

Air Fryer Nacho Cauliflower Easy and Tasty Recipe

Craving a tasty snack that’s both healthy and easy to make? Dive into my Air Fryer Nacho Cauliflower recipe. This

- 1.5 lbs boneless chicken breast, cut into bite-sized pieces - 1/4 cup balsamic vinegar - 1/4 cup honey - 2 tablespoons olive oil - 3 garlic cloves, minced - 1 teaspoon Dijon mustard - 1/2 teaspoon black pepper - 1 teaspoon salt - 1 teaspoon dried rosemary - 1 teaspoon dried thyme - 1 red bell pepper, diced - 1 yellow bell pepper, diced - 1 small red onion, cut into wedges The main star of this dish is the chicken. I use boneless chicken breast because it cooks evenly and stays juicy. The bite-sized pieces allow for quick cooking and easy eating. Next, we have the marinade components. The balsamic vinegar and honey work together to create a sweet and tangy flavor. Olive oil helps to keep the chicken moist. Garlic adds a lovely aroma, while Dijon mustard gives a little kick. The dried herbs, rosemary and thyme, add depth to the taste. Finally, the vegetables are key to this dish. I use colorful bell peppers and red onion. They add flavor and texture. Plus, they look great on the sheet pan. - Fresh parsley for garnish Garnishing with fresh parsley adds a pop of color and freshness. It also brightens the flavor. You can serve this dish with a side of rice or a green salad. They balance the sweetness of the chicken and veggies nicely. Preheating the oven Start by setting your oven to 400°F (200°C). This will ensure your chicken cooks evenly and quickly. Preheating helps to achieve that nice caramelization on the chicken and veggies. Preparing the marinade In a mixing bowl, combine the balsamic vinegar, honey, and olive oil. Add minced garlic, Dijon mustard, black pepper, salt, dried rosemary, and dried thyme. Whisk these ingredients together well. This marinade is key to giving your chicken bites a rich flavor. Marinating time Once your marinade is ready, add the bite-sized chicken pieces. Toss the chicken to coat evenly. Let it marinate for about 15 minutes. This short wait helps the flavors soak in and makes the chicken taste amazing. Arranging ingredients on the sheet pan While the chicken marinates, prepare your veggies. Dice the red and yellow bell peppers and cut the red onion into wedges. After marinating, take the chicken and place it on one side of the baking sheet. Leave space for the veggies. On the other side, add the bell peppers and onion. Drizzle a bit of olive oil over the veggies and sprinkle with salt and pepper. Baking instructions Bake everything in the preheated oven for 20-25 minutes. The chicken is done when it reaches 165°F (75°C) and the veggies are tender. Once finished, let it rest for a few minutes. Drizzle any leftover marinade on top for extra flavor. Garnish with fresh parsley before serving for a bright touch! How do you ensure chicken remains juicy? To keep chicken juicy, use boneless chicken breast. Cut it into bite-sized pieces. Marinating the chicken helps too. The balsamic vinegar and honey mix adds flavor and moisture. Bake it just until the chicken hits 165°F. Overcooking makes it dry. Why is marinating time important? Marinating time allows flavors to soak in. Even 15 minutes makes a big difference. The marinade has balsamic vinegar, honey, garlic, and herbs. These help to tenderize the chicken and boost taste. What are the best side dishes? Roasted bell peppers and onions pair well. You can also serve it with rice or quinoa. A fresh salad adds a nice touch. Try a simple green salad with lemon dressing. How can you present the dish? Serve the chicken bites and veggies on a big platter. Drizzle extra balsamic glaze on top for a glossy look. Add some fresh parsley for color. This makes your meal pop and look inviting. {{image_2}} You can switch up the chicken for other proteins. Turkey works well and gives a leaner bite. Pork is another great choice. It brings a nice flavor that pairs well with the marinade. Feel free to mix in different veggies too. Zucchini, broccoli, or even asparagus add a fresh twist. Each vegetable brings its own taste and texture. To boost the flavor, try adding spices. A pinch of cayenne pepper gives heat. You can also use smoked paprika for a rich, smoky taste. Explore different types of vinegar, too. Apple cider vinegar offers a sweet and tangy kick. Rice vinegar is milder and great for a lighter touch. Switching your honey can change the dish. Use wildflower honey for a floral note. Clover honey has a clean sweetness that works perfectly. These small changes keep the dish exciting and fresh each time you make it. After you cook the Sheet Pan Balsamic Honey Chicken Bites, let them cool first. Store leftovers in an airtight container. This will keep the chicken and veggies fresh. You can place them in the fridge for up to three days. Make sure to eat them within this time for the best flavor and safety. If you want to keep the chicken bites longer, freezing is a great option. Place the cooled chicken and veggies in a freezer-safe bag. Remove as much air as you can to prevent freezer burn. You can freeze them for up to three months. When you're ready to eat, thaw them in the fridge overnight. Reheat in the oven or microwave until they are warm. This way, you can enjoy your tasty meal again! How long should you marinate the chicken? I recommend marinating the chicken for about 15 minutes. This time allows the chicken to soak in the balsamic and honey flavors. If you have more time, you can marinate it for up to an hour. The longer it sits, the more flavor it absorbs. What can I do if I don’t have balsamic vinegar? If you don't have balsamic vinegar, you can use apple cider vinegar or red wine vinegar. Both options add a nice tang. You can also mix in a bit of honey to mimic the sweetness of balsamic. This keeps your dish flavorful and balanced. What is the ideal internal temperature for chicken? The ideal internal temperature for chicken is 165°F (75°C). Use a meat thermometer to check. This ensures the chicken is safe to eat and remains juicy. Can this recipe be made ahead of time? Yes, you can prep this recipe ahead of time. Marinate the chicken earlier in the day or the night before. Just store it in the fridge. You can also chop the vegetables ahead of time. This saves you time when you’re ready to cook. This blog post covered delicious chicken recipes and how to prepare, cook, and serve them. You learned about key ingredients like chicken, marinade, and veggies. I shared tips on keeping chicken juicy and presented creative serving ideas. We explored variations with alternative proteins and flavors to boost your dish. Finally, I provided storage info to keep leftovers fresh. Cooking can be fun and easy. Experiment, enjoy, and make each meal better than the last!

Sheet Pan Balsamic Honey Chicken Bites Flavor Boost

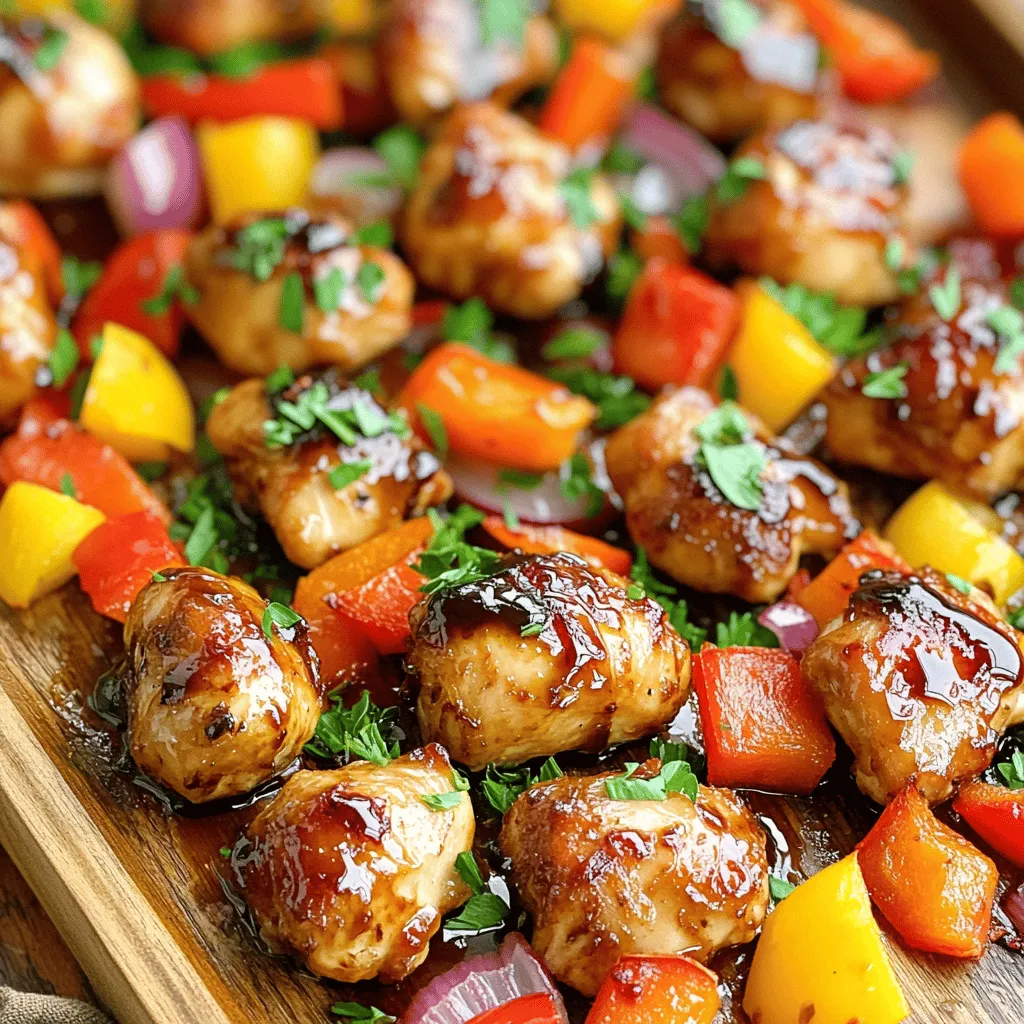
Are you ready to elevate your dinner game? In this post, I’ll guide you through my favorite Sheet Pan Balsamic

- 1 cup cold brewed coffee - 1 scoop chocolate protein powder - 1 frozen banana - 2 tablespoons almond butter - 1 tablespoon unsweetened cocoa powder - 1 tablespoon maple syrup (adjust for sweetness) - 1 cup almond milk (or milk of choice) - ½ teaspoon vanilla extract - Ice cubes (optional, for thickness) Each ingredient in the Protein Mocha Fudge Shake brings value. Cold brewed coffee adds caffeine. This gives you a quick energy boost. Chocolate protein powder helps build muscle. It also keeps you full longer. Frozen bananas provide natural sweetness and texture. They are rich in potassium, which is good for muscles. Almond butter adds healthy fats and protein. It helps with heart health too. Cocoa powder is full of antioxidants. It can improve mood and energy. Maple syrup offers sweetness and some minerals. Almond milk is low in calories and dairy-free. You can swap the cold brewed coffee for brewed tea if you want less caffeine. Any protein powder works, but vanilla or plant-based options fit well too. If you don’t have frozen bananas, fresh ones work fine. Just add ice to chill the shake. Peanut butter can replace almond butter if you want a different flavor. Any milk can be used, like oat or soy milk. If you need a sweeter shake, try honey or agave syrup. 1. Start with your blender. Add these ingredients: - 1 cup cold brewed coffee - 1 scoop chocolate protein powder - 1 frozen banana - 2 tablespoons almond butter - 1 tablespoon unsweetened cocoa powder - 1 tablespoon maple syrup - 1 cup almond milk - ½ teaspoon vanilla extract 2. Blend all the ingredients until smooth. Make sure there are no chunks from the banana or almond butter. 3. If you want a thicker shake, add ice cubes. Blend again until it reaches your desired thickness. 4. Taste your shake. If it needs more sweetness, add a bit more maple syrup. 5. Pour your shake into a tall glass. You can add a sprinkle of cocoa powder or a dollop of almond butter on top for a nice look. - Always start at a low speed. Gradually increase to avoid spills. - Stop and scrape down the sides if needed. This ensures everything blends well. - Blend for at least 30 seconds. This helps achieve a creamy texture. - For a thinner shake, add more almond milk. Blend well after adding. - To make it sweeter, add a little more maple syrup. Blend again to mix. - If you like it thicker, just add more ice cubes or a little more frozen banana. Serve your Protein Mocha Fudge Shake in a chilled glass. This keeps it cold longer. Add a drizzle of almond butter on top for a rich look. A coffee bean can add a nice touch. You can also sprinkle some cocoa powder for extra flair. This makes your shake look as good as it tastes. If you have extra shake, put it in a sealed container. Store it in the fridge for up to 24 hours. Before drinking, give it a good shake to mix it again. The shake may separate a bit, but that’s normal. If you want a cold drink, add ice before serving. To boost the flavor, try adding a pinch of cinnamon. This gives it a warm, spicy kick. For a sweeter taste, add more maple syrup or honey. You can also switch the almond butter for peanut butter. This will change the flavor but keep it tasty. Don’t be afraid to experiment with flavors and toppings! {{image_2}} You can boost your Protein Mocha Fudge Shake with superfoods. Here are a few ideas: - Chia seeds: Add 1 tablespoon for fiber and omega-3s. - Flaxseed: Ground flaxseed adds healthy fats and fiber. - Spinach: A handful gives vitamins without changing the taste. - Maca powder: This root adds energy and a nutty flavor. These additions turn your shake into a nutrient powerhouse. Mix and match to find your favorite combo! If you want a dairy-free or vegan shake, swap in plant-based items. Here are some tips: - Use coconut milk or oat milk instead of almond milk. - Replace almond butter with peanut butter or sunflower seed butter. - Choose vegan protein powder to keep it plant-based. These changes keep the shake creamy and delicious. You won’t miss the dairy! Experimenting with flavors can be fun! Here are some tasty ideas: - Peppermint mocha: Add a few drops of peppermint extract. - Nutty banana: Include extra banana and a pinch of cinnamon. - Spicy mocha: A dash of cayenne pepper adds warmth and kick. - Caramel mocha: Mix in a spoonful of caramel sauce for sweetness. Try these combos to find new favorites. The options are endless! You might have some shake left after enjoying your Protein Mocha Fudge Shake. To store it, pour the leftover shake into a clean container. Use a jar or a bottle with a tight lid. Seal it well and place it in the fridge. It will stay fresh for up to two days. When you want to drink it again, just give it a quick shake before enjoying. If you want to save your shake for later, freezing is a great option. Pour the shake into an ice cube tray or a freezer-safe container. This way, you can enjoy it whenever you want. When you're ready to drink, let it thaw in the fridge overnight. You can also blend the frozen cubes with a little almond milk for a quick and creamy treat. If you prefer your shake warm, you can gently heat it. Pour the shake into a saucepan. Warm it on low heat, stirring often. Avoid boiling, as this can change the taste. Once it reaches your desired warmth, enjoy it right away. A warm shake can be a cozy treat on a cool day! A Protein Mocha Fudge Shake is a tasty drink that blends coffee and chocolate flavors. It is smooth, creamy, and packed with protein. You make it with cold brewed coffee, chocolate protein powder, and a frozen banana. Almond butter adds a rich taste, while cocoa powder provides a deep chocolate flavor. You can adjust sweetness with maple syrup, and almond milk makes it creamy. This shake is perfect for a quick snack or energy boost. Yes, you can make this shake without protein powder. If you want a protein boost, use Greek yogurt or silken tofu. These options give a creamy texture and add protein. You can also add nuts or seeds for extra protein. Just remember, the taste and texture may change a bit. A Protein Mocha Fudge Shake contains about 350-400 calories. The exact amount depends on the ingredients you use. If you add more maple syrup or almond butter, the calories will go up. If you want fewer calories, try using less almond butter or a lower-calorie milk. Yes, this shake can work as a meal replacement. It has protein, healthy fats, and carbs. The banana and maple syrup give energy, while the almond butter adds staying power. For a complete meal, pair it with a piece of fruit or some whole grain toast. This way, you get more nutrients and fiber. This blog post provided key ingredients for a Protein Mocha Fudge Shake, highlighting their nutritional benefits. We explored step-by-step instructions for making the shake, including tips for blending. We shared storage tips and variations for extra flavor. In closing, this shake is not just tasty but also packed with nutrition. You can customize it to fit your needs. Enjoy experimenting with different flavors and ingredients to find your perfect blend.

Protein Mocha Fudge Shake Tasty and Energizing Treat

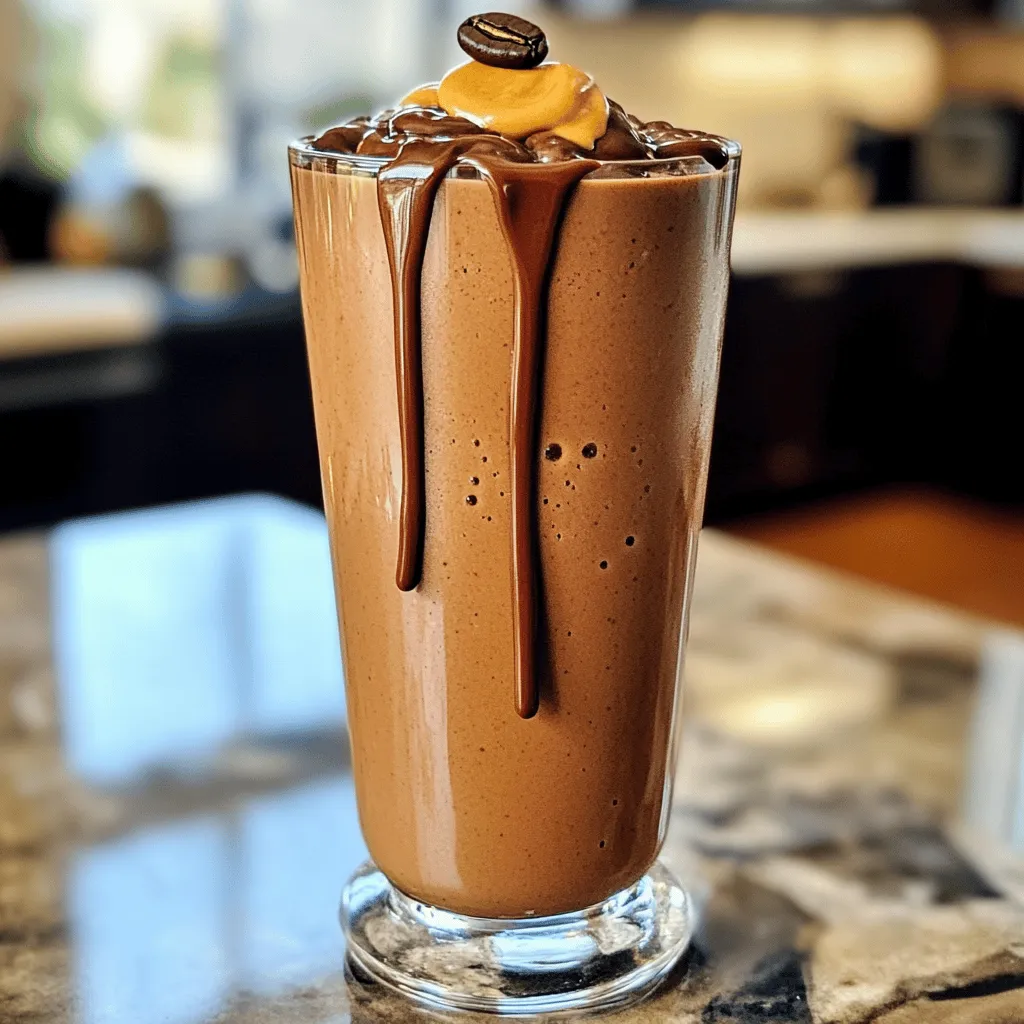
Looking for a delicious and energizing treat? You’ve found it! The Protein Mocha Fudge Shake combines rich coffee flavor with

- 2 boneless, skinless chicken breasts, thinly sliced - 4 cups chicken broth - 200g ramen noodles - 1 cup broccoli florets - 1 red bell pepper, sliced - 1 carrot, julienned - 1/3 cup creamy peanut butter - 3 tablespoons soy sauce - 2 tablespoons sriracha (adjust for spice) - 1 tablespoon fresh ginger, grated - 2 cloves garlic, minced - 1 tablespoon sesame oil To start, you need good quality chicken. I prefer boneless and skinless breasts for easy cooking. They cook fast and absorb flavors well. Next, ramen noodles are key. They add a nice chewiness. For crunch and color, load up on fresh vegetables. Broccoli, red bell pepper, and carrots are my go-tos. Peanut butter gives the dish its creamy texture. It pairs well with the savory soy sauce and spicy sriracha. Fresh ginger and garlic add depth, making each bite flavorful. Sesame oil adds a nice finish and aroma to the dish. - 2 green onions, sliced (for garnish) - 1 tablespoon sesame seeds (for garnish) Garnishes make your dish pop! I like to use green onions for their freshness. They add a bright touch. Sesame seeds give a nice nutty flavor and a bit of crunch. - Large pot - Measuring cups and spoons - Cutting board and knife To cook this dish, you need a large pot. It holds everything as it simmers. Measuring cups and spoons help you get the right amounts. A cutting board and knife are essential for slicing chicken and veggies. Having the right tools makes cooking easier and more fun! - Start by slicing the chicken breasts into thin pieces. - Next, chop your vegetables: slice the red bell pepper, julienne the carrot, and cut the broccoli into small florets. - Measure out ingredients like peanut butter, soy sauce, and sriracha. - In a large pot, heat the sesame oil over medium heat. - Add the sliced chicken and sauté it for about 5 to 7 minutes. Cook until it turns golden brown and is no longer pink. - Once the chicken is done, add minced garlic and grated ginger. Stir for about 1 minute until you smell the aroma. - Pour in the chicken broth and bring it to a gentle boil. - Stir in the creamy peanut butter, soy sauce, and sriracha. Mix well until the peanut butter melts into the broth. - Add the ramen noodles, broccoli, red bell pepper, and carrot to the pot. - Cook according to the noodle package instructions, usually about 4 to 5 minutes. You want the noodles to be tender, while the veggies stay slightly crisp. - After cooking, remove the pot from the heat and let it sit for a couple of minutes. - Serve hot in bowls, garnished with sliced green onions and sesame seeds. To make your ramen spicy, use sriracha. You can add more or less based on your taste. If you want more depth, try adding garlic powder or onion powder. Both add a nice kick. You can also use lime juice for brightness. A touch of fish sauce can bring umami too. For sautéing chicken, slice it thin. This way, it cooks fast and evenly. Heat the sesame oil on medium heat before adding the chicken. Stir often so it browns nicely. For vegetables, add them at the right time. Broccoli and bell peppers should stay crisp. Add them in the last few minutes of cooking. This keeps them vibrant and fresh. Pair your ramen with a simple side salad. A light green salad gives a nice crunch. You can also serve it with steamed rice for more carbs. Top your ramen with green onions and sesame seeds for a pretty finish. Enjoy your meal with friends for a fun time! {{image_2}} You can swap chicken for tofu or shrimp. Tofu adds a nice texture and absorbs the sauce well. Choose firm tofu for the best result. If you like shrimp, they cook fast and add a sweet flavor. Just add them in the last few minutes to avoid overcooking. Also, feel free to use different chicken cuts. Thighs are juicier than breasts and can enhance the dish. You can mix in other vegetables if you want. Snap peas or mushrooms work well. They add crunch and flavor. You can also try adding leafy greens like spinach or bok choy. These greens cook quickly and bring great color and nutrients. Just toss them in at the end for a pop of freshness. If you need gluten-free options, rice noodles work great. They cook fast and soak up the broth's flavor. For those with nut allergies, try sunflower seed butter instead of peanut butter. It gives a similar creamy texture without the nuts. Always read labels to ensure your choices fit your dietary needs. To store leftovers, let the ramen cool first. Place it in an airtight container. This keeps it fresh. You can save it in the fridge for about three days. The flavors will stay good, but the noodles may get soft over time. To freeze the ramen, let it cool completely. Transfer it to a freezer-safe container. Make sure to leave some space for expansion. It can last up to two months in the freezer. When you're ready to eat, thaw it in the fridge overnight. Reheat it on the stove or in the microwave, adding a splash of broth for moisture. In the fridge, this dish lasts about three days. After that, check for signs of spoilage. If you see mold or an off smell, it’s time to discard it. Always trust your senses. Fresh food is key for safety and taste. Yes, you can prepare this ramen in advance. To meal prep, cook the dish as usual. Let it cool completely. Then, store it in airtight containers in the fridge. It will stay fresh for up to three days. When ready to eat, reheat it on the stove or in the microwave. You may need to add a little broth to loosen it up. You can easily adjust the heat in this recipe. Start with less sriracha if you prefer mild flavors. Add more sriracha to increase the spice. You can also use chili flakes for a different type of heat. Taste as you add, so it suits your liking. If you have nut allergies, there are great alternatives. Sunflower seed butter works well and has a similar texture. You can also use soy nut butter or tahini for a different flavor. Each substitute will change the taste slightly, but they will still create a tasty dish. This post outlined how to make One-Pot Spicy Peanut Chicken Ramen. We covered key ingredients, step-by-step instructions, and tips for enhancing flavor. You learned about ingredient swaps and storage methods, so your meal can fit your needs. Enjoying your cooking process is important. Trying new flavors keeps meals exciting. Don’t hesitate to adjust this recipe to match your taste. Happy cooking!

One-Pot Spicy Peanut Chicken Ramen Delight Recipe

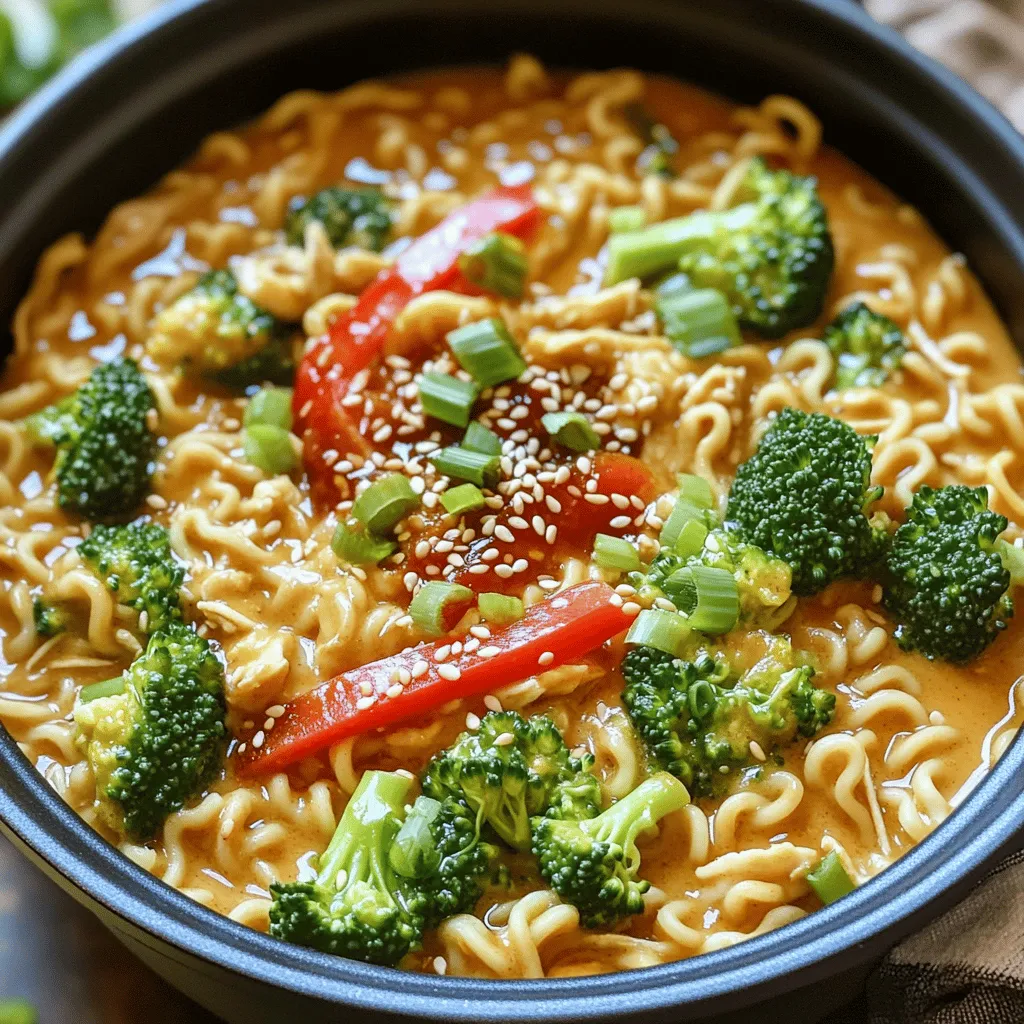
Craving a warm, comforting meal that packs a punch? You’re in the right place! My One-Pot Spicy Peanut Chicken Ramen

To make a Mint Chocolate Chip Protein Smoothie, you need fresh and simple ingredients. Here’s what you will use: - 1 cup unsweetened almond milk - 1 frozen ripe banana - 1 scoop chocolate protein powder - 1 tablespoon cocoa powder - 1 teaspoon mint extract - 1 tablespoon chia seeds - 1/4 cup fresh spinach (optional) - 1/2 cup ice cubes - Dark chocolate shavings or chips (for topping) - Fresh mint leaves (for garnish) Each ingredient plays a key role in making your smoothie both tasty and healthy. The almond milk is creamy and dairy-free. The frozen banana gives a nice sweetness and thick texture. Chocolate protein powder adds protein and rich flavor. Cocoa powder enhances the chocolate taste. Mint extract brings a refreshing twist. Chia seeds add fiber and help keep you full. Spinach is optional but packs in extra nutrients. Ice cubes make your smoothie cold and refreshing. Dark chocolate shavings are a treat on top, while fresh mint leaves make it pretty. Gather these ingredients, and you’re ready to blend up a delicious, nutritious smoothie! To make the mint chocolate chip protein smoothie, start by gathering your ingredients. 1. Combine ingredients in blender: In a blender, add 1 cup of unsweetened almond milk. Then, toss in 1 frozen ripe banana, 1 scoop of chocolate protein powder, 1 tablespoon of cocoa powder, and 1 teaspoon of mint extract. If you want extra nutrition, add 1/4 cup of fresh spinach. Finally, include 1 tablespoon of chia seeds and 1/2 cup of ice cubes. 2. Blend until creamy consistency: Blend all the ingredients on high speed. Watch as they mix together. You want a smooth and creamy texture. This should take about 30 seconds to 1 minute. 3. Taste and adjust flavors: After blending, take a taste. If you want it sweeter, you can add a little honey. If you desire a stronger mint flavor, add a bit more mint extract. Blend again for a few seconds. 4. Pour and serve: Once the taste is just right, pour the smoothie into a tall glass. For a special touch, top it with dark chocolate shavings or chips. Garnish with a sprig of fresh mint. Enjoy your delicious, protein-packed smoothie! To get the best texture for your Mint Chocolate Chip Protein Smoothie, follow these tips: - Use frozen banana: A frozen banana makes the smoothie creamy and thick. It adds natural sweetness too. - Blend in the right order: Start with the liquids. Add the almond milk first, then the banana, and follow with the powders. This helps everything blend well. - Blend on high: Blend on high speed until all ingredients mix into a smooth texture. This usually takes about 30 seconds. You can adjust the sweetness to fit your taste. If you like it sweeter, add a bit of honey or maple syrup. Just blend again for a few seconds to mix it in. For mint flavor, test it out! Start with one teaspoon of mint extract. If you want more mint, add a little more. Blend, taste, and repeat until it’s just right for you. Experiment with the recipe. You can try adding a bit of spinach for extra nutrients. It blends in well and keeps that lovely green color! Enjoy creating your perfect Mint Chocolate Chip Protein Smoothie! {{image_2}} You can easily customize your Mint Chocolate Chip Protein Smoothie. Here are some ideas: - Alternative dairy-free milk options: If you dislike almond milk, try oat, coconut, or soy milk. Each brings a unique flavor and texture to your smoothie. - Using different protein powder flavors: While I use chocolate protein powder, you can switch to vanilla or even mint-flavored protein. This change adds a fun twist to your drink. - Adding fruits or vegetables for nutrition boost: Want more vitamins? Toss in a handful of berries or a small scoop of avocado. These additions make your smoothie even creamier and more nutritious. You can also use fresh spinach, which is optional but provides great benefits without altering the taste much. Feel free to mix and match these ingredients. Experimenting can lead to your new favorite version of this tasty smoothie! To keep your Mint Chocolate Chip Protein Smoothie fresh, follow these tips: - Refrigeration methods: Store any leftover smoothie in an airtight container. This helps to keep it fresh in the fridge for up to 24 hours. Shake it well before drinking, as some ingredients may settle. - Freezing for later consumption: If you want to save your smoothie for later, pour it into ice cube trays or freezer-safe bags. This method allows you to freeze portions. When you are ready to enjoy it, blend the frozen cubes with a bit of almond milk until smooth. - Best practices for maintaining freshness: Always use fresh ingredients for the best flavor. If you add spinach, consume the smoothie right away. Fresh mint leaves can be added just before serving for a burst of flavor. Avoid leaving the smoothie out at room temperature for too long to ensure it stays safe and tasty. Yes, you can make this smoothie ahead of time. Blend the ingredients and store it in the fridge. It tastes best fresh, but you can keep it for up to 24 hours. Just give it a quick shake or stir before drinking. To boost the protein in your smoothie, consider adding more protein powder. You can also include Greek yogurt or cottage cheese. Both options add creaminess and protein without changing the taste much. If you lack mint extract, try using fresh mint leaves. Adding a handful of fresh mint gives a nice flavor. You can also use peppermint tea or a mint-flavored yogurt for a twist. Just adjust to your taste. This blog post shared the simple way to make a delicious smoothie. We covered key ingredients, preparation steps, and useful tips. You learned how to customize your smoothie with different flavors and storage options. Always feel free to change up the recipe to fit your taste. Smoothies are fun and healthy, offering so many choices. I hope you feel excited to blend your next masterpiece. Enjoy your smoothie adventure!

Mint Chocolate Chip Protein Smoothie Healthy Delight

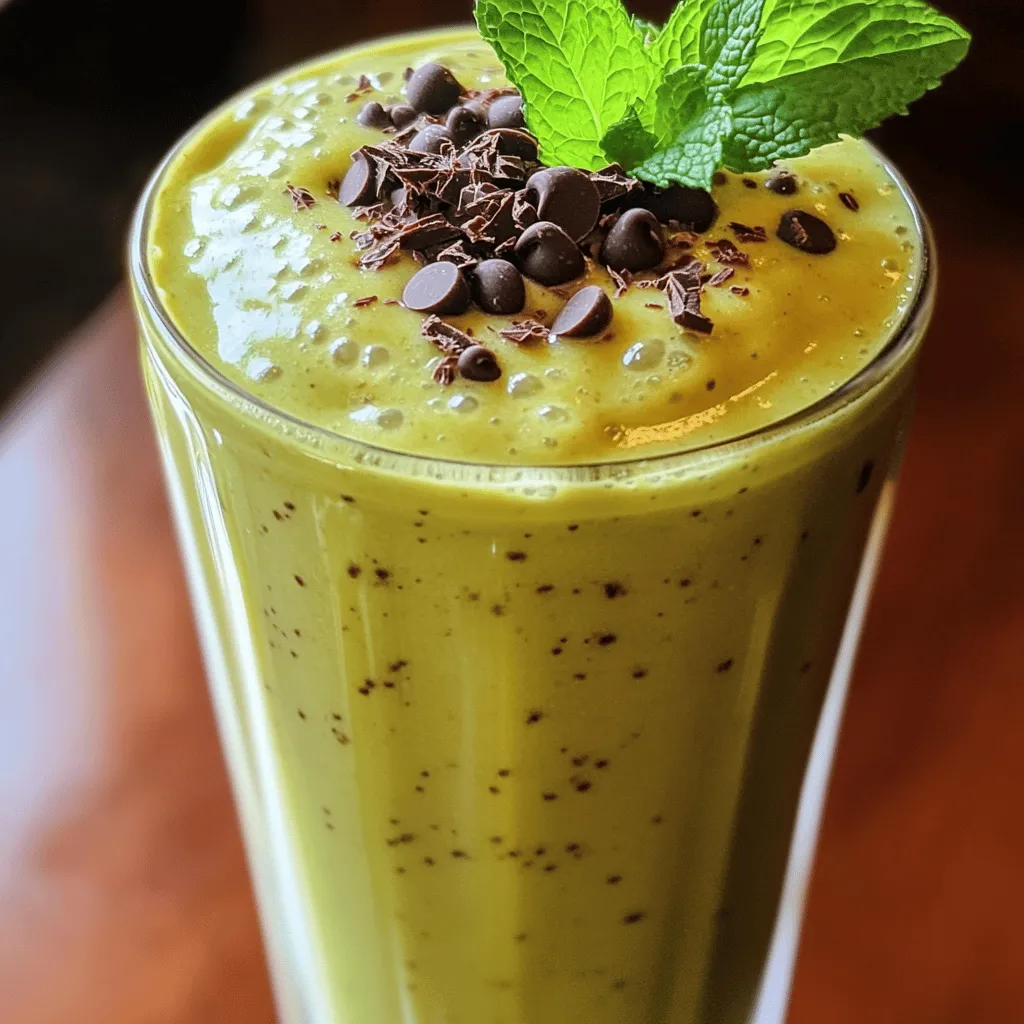
Looking to enjoy a delicious treat that packs a protein punch? The Mint Chocolate Chip Protein Smoothie is your answer!

Older posts
Newer posts
← Previous Page1 … Page25 Page26 Page27 … Page86 Next →

dsad

© 2026 Cooking Wells • Built with GeneratePress

Our Policies

  • Copyright Policy
  • Cookie Policy
  • GDPR Policy
  • Privacy Policy
  • Disclaimer
  • Terms Of Use

More Information

  • Home
  • About
  • Contact
  • Appetizers
  • Dessert
  • Dinner
  • Drinks
©2026, Cooking Wells About Back To Top