Skip to content
DisclaimerTerms Of UseGDPR PolicyCookie Policy

Cooking Wells

  • Home
  • Drinks
  • Appetizers
  • Dinner
  • Dessert
  • About
  • Contact
  • Privacy Policy
DisclaimerTerms Of UseGDPR PolicyCookie Policy

NO-ING-IMG

- 1 cup popcorn kernels (popped) - 1 cup granulated sugar - 1/4 cup unsalted butter - 1/4 cup corn syrup - 1/2 teaspoon baking soda - 1/2 teaspoon salt - 1 teaspoon vanilla extract For this recipe, you need fresh popcorn. You can pop it using any method you like. I love the stovetop method, as it gives great flavor. The sugar and butter create a sweet base for the caramel. Corn syrup helps the caramel stay smooth. Salt adds a nice contrast to the sweetness. - 1 cup semisweet chocolate chips Semisweet chocolate chips are my go-to for this treat. They melt well and add a rich flavor. You can also use dark chocolate for a bolder taste. Just melt them carefully in the microwave. Stir them until they are smooth and ready to drizzle. - Sea salt for sprinkling A pinch of sea salt on top makes a big difference. It enhances the flavor of chocolate and caramel. You can also try adding nuts or sprinkles. These options add a fun twist. Feel free to get creative with toppings! {{ingredient_image_1}} First, preheat your oven to 250°F (120°C). Next, pop 1 cup of popcorn kernels using your favorite method. You can use a stovetop, air popper, or microwave. After popping, place the popcorn in a large bowl. Be sure to remove any unpopped kernels. This step helps keep your snack safe and enjoyable. In a medium saucepan, mix together 1 cup of granulated sugar, 1/4 cup of unsalted butter, 1/4 cup of corn syrup, and 1/2 teaspoon of salt. Set the heat to medium and stir the mixture continuously. Wait for it to come to a boil. Once boiling, stop stirring. Let it boil for 4 to 5 minutes until it turns a golden brown color. Carefully remove the saucepan from the heat. Stir in 1/2 teaspoon of baking soda and 1 teaspoon of vanilla extract. Watch out! The mixture will bubble up. Pour the caramel sauce over the popcorn. Gently mix it to coat all the popcorn evenly. Spread the caramel-coated popcorn onto a lined baking sheet with parchment paper. Bake in the preheated oven for 30 minutes. Stir the popcorn every 10 minutes for even coating. Once baked, remove the popcorn and let it cool for about 15 minutes. While it cools, melt 1 cup of semisweet chocolate chips in a microwave-safe bowl. Do this in 30-second intervals, stirring each time until smooth. Drizzle the melted chocolate over the cooled popcorn. Before the chocolate sets, sprinkle a pinch of sea salt for a flavor boost. Let the chocolate harden at room temperature or refrigerate for faster setting. Once set, break the popcorn into pieces and enjoy! To get the right caramel, watch the color closely. Boil the mixture until it turns a rich, golden brown. This step is key for the best flavor. If it is too light, it won’t have that rich taste. If it is too dark, it may taste burnt. Use a candy thermometer if you have one. Aim for 240°F (115°C). Remember to stir non-stop until it starts to boil. Once boiling, stop stirring and let it cook. The bubbling will help form that perfect caramel. For smooth chocolate, use the microwave or a double boiler. If you use the microwave, heat in small bursts of 30 seconds. Stir the chocolate between each burst to prevent burning. Keep a close eye on it. If you see small lumps, keep stirring. They will melt as you mix. If you use a double boiler, fill the bottom pot with water. Heat it gently. Place the chocolate in the top pot and stir until it melts completely. When serving, break the popcorn into pieces for easy eating. You can use a large bowl or individual bags. Add a sprinkle of sea salt on top for a nice touch. This makes it look great and adds flavor. Pair your popcorn with a fun drink, like soda or hot chocolate. For a movie night, set up a popcorn bar with different toppings. Let your guests have fun choosing their favorites! Pro Tips Use Fresh Popcorn Kernels: For the best texture and flavor, use fresh popcorn kernels. Stale kernels may not pop properly, leading to a disappointing result. Temperature Matters: Ensure your caramel reaches a golden brown color for the best flavor. Too light, and it will be too sweet; too dark, and it may taste burnt. Cooling Time: Allow the popcorn to cool completely before breaking it into pieces. This helps the chocolate set properly and keeps the popcorn from becoming soggy. Mixing Techniques: When mixing the caramel with popcorn, use a large spatula and fold gently to avoid crushing the popcorn while ensuring even coverage. {{image_2}} Adding nuts to your chocolate caramel popcorn brings extra flavor and crunch. Try using nuts like pecans, almonds, or walnuts. Just roast them lightly before mixing them in. This step enhances their taste. Use about half a cup of nuts. Make sure to stir them in after you coat the popcorn with caramel. The nuts will add a delightful texture and make this treat even more special. Spices can change the flavor of your chocolate caramel popcorn entirely. Adding a pinch of cinnamon or nutmeg can give it warmth. For a fun kick, try adding cayenne pepper. Start with just a small amount. This will create a sweet and spicy mix that is hard to resist. Mix these spices into the caramel sauce for an even coating. You can also sprinkle some on top after adding chocolate for extra flavor. While semisweet chocolate is a classic choice, feel free to experiment. Dark chocolate can add a rich, robust flavor. Milk chocolate will add sweetness and creaminess. White chocolate offers a smooth, sweet contrast to the caramel. You can even mix different types of chocolate. This will create a beautiful marbled effect. Choose your favorite or mix them all for a unique treat! To keep your chocolate caramel popcorn fresh, store it in an airtight container. Make sure the container is sealed tight. Avoid using plastic wrap, as it does not keep air out well. Store the popcorn in a cool, dry place away from sunlight. This will help it stay crunchy and tasty. If you want to keep your popcorn fresh for longer, avoid squeezing the container. This can crush the popcorn and make it lose its crispness. You can also add a small packet of silica gel to absorb moisture. Just remember to keep it out of reach of kids and pets. For the best taste, enjoy your popcorn within a week. If your popcorn gets a bit soft, you can reheat it. Spread it out on a baking sheet. Set your oven to 250°F (120°C). Heat the popcorn for about 5-10 minutes. This will help restore some crunch. Keep an eye on it to prevent burning. Enjoy your treat warm and fresh! Yes, you can use microwave popcorn. Just make sure it is plain. The caramel sauce will coat it well. Avoid using buttered popcorn; it may alter the flavor. Popping your own kernels allows for a fresher taste. Store leftover popcorn in an airtight container. This keeps it fresh and crunchy. Place it in a cool, dry area. Avoid moisture to prevent sogginess. If stored correctly, it can last for up to a week. Yes, you can make this recipe ahead of time. Prepare it up to two days in advance. Just store it properly in an airtight container. This way, you can enjoy it later without losing flavor or texture. In this blog post, we explored how to make delicious chocolate caramel popcorn. We discussed essential ingredients like popcorn, caramel, and optional toppings. I gave you clear steps for preparation, from making the popcorn to baking it together. Tips helped you perfect your caramel and chocolate techniques. We also looked at fun variations and smart storage tips. Enjoy your homemade treat and get creative with your own flavor twists!

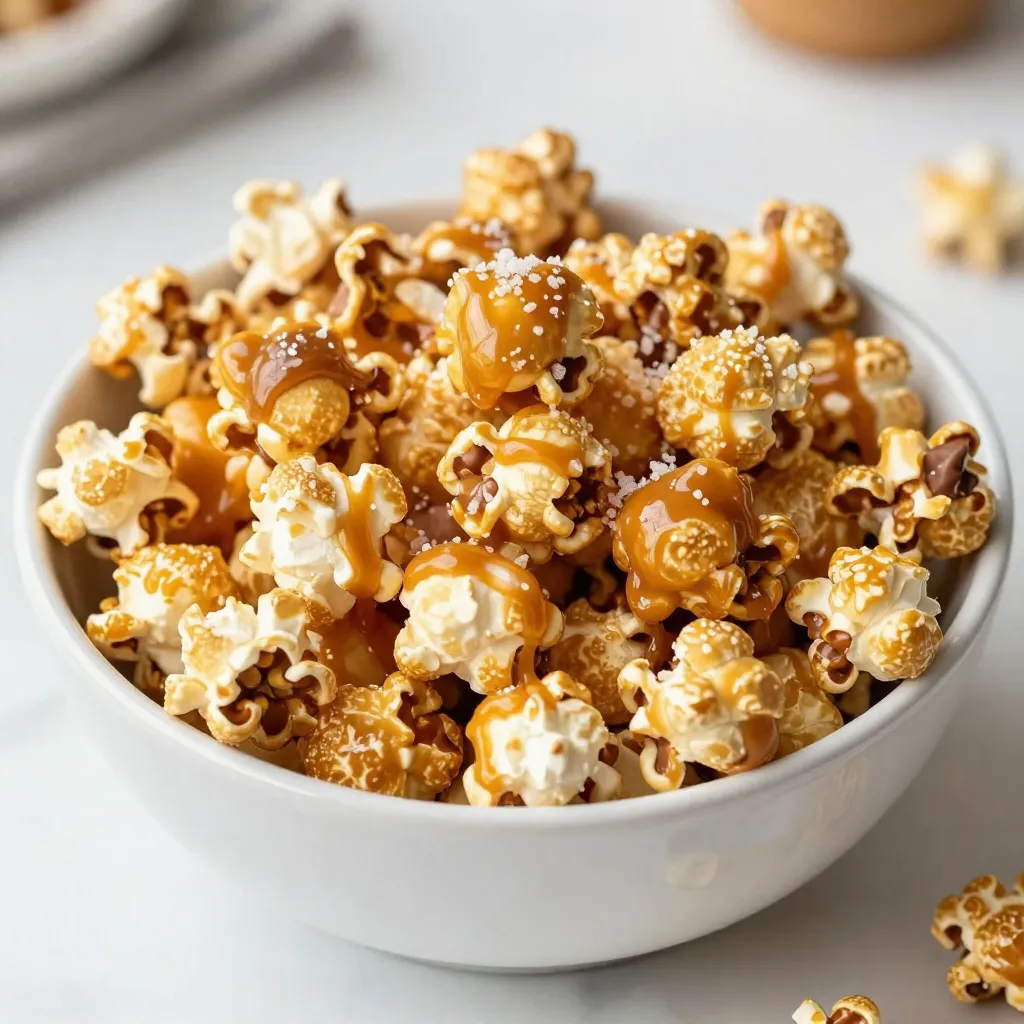
Chocolate Caramel Popcorn Delightful Sweet Treat

If you love sweet snacks, you’re in for a treat! Chocolate Caramel Popcorn is a fun and easy recipe that

To create taco stuffed avocados, you need simple and fresh ingredients. Here's what you'll need: - 2 ripe avocados, halved and pitted - 1 cup ground turkey or beef (or plant-based alternative) - 1 tablespoon taco seasoning - 1/2 cup black beans, rinsed and drained - 1/2 cup corn (fresh, canned, or frozen) - 1 cup diced tomatoes - 1/4 cup red onion, finely chopped - 1/2 cup shredded cheese (cheddar or Mexican blend) - 1/4 cup fresh cilantro, chopped - Juice of 1 lime - Salt and pepper to taste - Optional toppings: sour cream, sliced jalapeños, additional cilantro These ingredients bring bold flavors and vibrant colors to the dish. Ripe avocados are key for a creamy base. Ground turkey or beef adds protein. Taco seasoning gives it that classic taste. Black beans and corn add texture and nutrition. Diced tomatoes and red onion bring freshness. Shredded cheese melts perfectly on top. Fresh cilantro brightens the dish with its herbal notes. Lime juice adds a tangy kick. Salt and pepper enhance all the flavors. You can mix in optional toppings to customize your avocado. Enjoy creating this tasty treat! {{ingredient_image_1}} To start, you need to brown your ground meat. Heat a skillet over medium heat. Add the ground turkey or beef to the skillet. Cook it for about 5 to 7 minutes. Stir it often until it turns brown and is fully cooked. If there is extra fat in the skillet, drain it carefully. You want the meat to be lean and tasty. Next, sprinkle in the taco seasoning. Add a splash of water to help mix it in. Cook for another 2 to 3 minutes until the aroma fills your kitchen. This step adds a lot of flavor to your meat. While the meat cools, you can prepare the filling. In a mixing bowl, combine the black beans and corn. Make sure to rinse and drain the black beans first. Next, add in the diced tomatoes and finely chopped red onion. These ingredients add great texture and taste. Squeeze in the juice of one lime. This gives the filling a fresh kick. Finally, add salt and pepper to your taste. Mix all the ingredients well to ensure even flavor. Now, it’s time to stuff the avocados. First, take your ripe avocados. Carefully slice each avocado in half and remove the pit. Use a spoon to scoop out a bit of the flesh, making room for your filling. Next, fill each avocado half generously with the taco mixture. Don’t be shy; pack it in! After that, top each stuffed avocado with shredded cheese. You can use cheddar or a Mexican blend for extra flavor. Finish by sprinkling fresh cilantro on top. If you like, add optional toppings like sour cream or sliced jalapeños for some zing. To make taco stuffed avocados shine, start with ripe avocados. A ripe avocado feels slightly soft but not mushy. Look for dark green skin without deep indentations. Hass avocados are the best choice for stuffing. Their creamy texture makes each bite delightful. Avoid mushy fillings by cooking your meat properly. Cook ground turkey or beef until brown, then drain excess fat. This keeps your filling firm. Mix in taco seasoning and a splash of water. This step adds flavor without making the filling too wet. Balancing flavors is key. Use lime juice to brighten the mixture. The acid enhances the taste and keeps it fresh. Make sure to season with salt and pepper. Taste as you go to ensure a perfect mix. Taco stuffed avocados pair well with a fresh salad or rice. A side of tortilla chips adds crunch. For a beautiful dish, arrange stuffed avocados on a colorful plate. Add a sprinkle of cilantro on top for a pop of green. A slice of lime on the side adds a nice touch. Pro Tips Choose Ripe Avocados: Ensure your avocados are perfectly ripe for easy scooping and the best flavor. They should yield slightly to gentle pressure. Customize Your Fillings: Feel free to add other ingredients such as diced bell peppers or olives to the filling for added flavor and texture. Serve Immediately: For the best taste and texture, serve the stuffed avocados immediately after assembling, as the avocado can brown over time. Experiment with Toppings: Try different toppings like crumbled feta, salsa, or hot sauce to elevate the dish and cater to different taste preferences. {{image_2}} You can easily make taco stuffed avocados vegan or vegetarian. Swap the ground turkey or beef with plant-based meat. Lentils or quinoa are great protein options too. They add texture and flavor. You still get that tasty taco vibe without meat. Want more spice? Add chili powder or diced jalapeños to the filling. This will give your tacos a nice kick. You can also mix in diced bell peppers or zucchini for added crunch. The more colors, the better! Sour cream is classic, but try Greek yogurt for a healthier twist. You can also drizzle avocado crema or salsa verde on top. Fresh pico de gallo adds a burst of flavor. Don't forget to sprinkle extra cilantro for a fresh touch! To keep your taco stuffed avocados fresh, refrigerate them. Place them in an airtight container. This minimizes air exposure and slows down browning. Store them for up to two days. The filling can last up to three days if stored separately. To keep ingredient freshness, avoid mixing the avocado with the filling until ready to eat. This prevents the avocado from becoming mushy. If you have leftover filling, store it in another container. You can use it in salads or as a dip later! For reheating, the best method is using a microwave. Place the taco stuffing in a bowl, cover it with a damp paper towel, and heat for about one to two minutes. Stir halfway through to ensure even heating. To avoid sogginess in stored avocados, do not reheat them. Instead, enjoy them cold or at room temperature. If you want to warm the filling, do so separately. This keeps the avocado firm and tasty! Yes, you can prep taco stuffed avocados ahead of time. You can cook the filling and store it in the fridge. Just wait to stuff the avocados until you are ready to serve. This keeps the avocados fresh and prevents them from browning. If you want to make it even easier, prepare the filling a day in advance. The best beans for stuffing are black beans. They add flavor and protein. You can also use pinto beans or kidney beans if you prefer. Rinse and drain them well before mixing. Each bean type brings its unique taste to the dish. To prevent avocados from browning, use lime juice. The acid in lime juice slows down oxidation. Apply the juice directly to the avocado flesh. You can also cover them tightly with plastic wrap. Store them in the fridge until you are ready to serve. Yes, you can use different types of meat or protein. Ground turkey and beef are great choices. You can also use chicken or plant-based alternatives. Cook them as you would the ground meat, and season well. This gives you many options to fit your taste. Yes, there are gluten-free options for taco seasoning. Many brands offer gluten-free mixes. You can also make your own seasoning at home. Combine chili powder, cumin, garlic powder, and onion powder. This way, you control the ingredients and flavors. Taco stuffed avocados combine fresh flavors and healthy ingredients. We covered choosing ripe avocados, cooking the meat, and creating a tasty filling. You learned how to fill avocados and add thoughtful toppings. Remember, you can customize this dish to fit your diet. Store leftovers carefully to enjoy them later. Get creative with flavors to make it your own. This dish is sure to impress and satisfy everyone at your table. Enjoy making this tasty meal!

Taco Stuffed Avocados Bursting with Flavorful Goodness

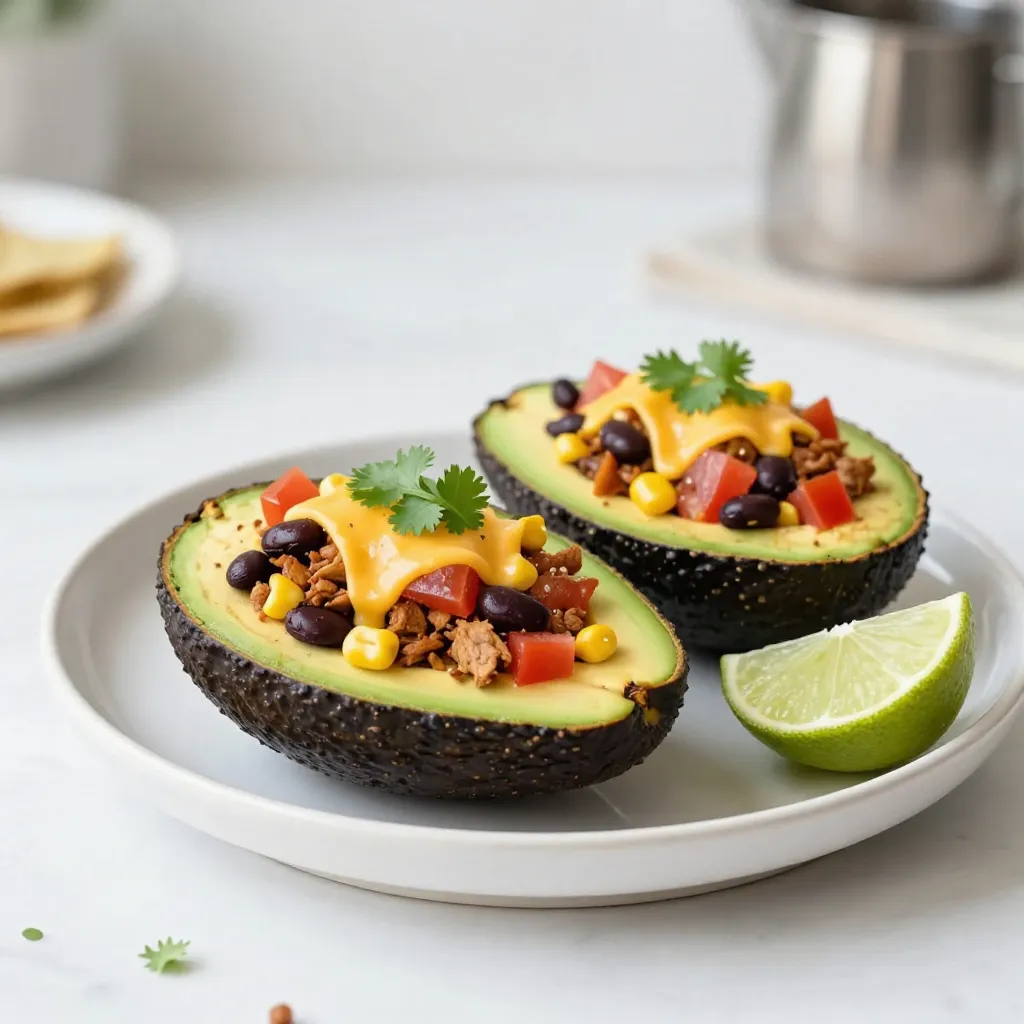
If you’re craving a fresh twist on taco night, you’ve come to the right place! Taco stuffed avocados are simple

- 1 can (15 oz) chickpeas, drained and rinsed - 2 cups fresh spinach, washed and chopped - 1 can (14 oz) coconut milk Chickpeas are the star here. They provide protein and a nice texture. Spinach adds color and nutrition. Coconut milk gives the dish a creamy, rich taste. - 1 medium onion, finely chopped - 3 cloves garlic, minced - 1 tablespoon ginger, grated Onions add sweetness and depth. Garlic brings strong flavor, while ginger adds warmth. These aromatics form a tasty base for our curry. - 1 tablespoon olive oil - 1 tablespoon curry powder - 1 teaspoon turmeric powder - 1 teaspoon cumin seeds - Salt and pepper to taste Olive oil helps to cook and meld the flavors. Curry powder and turmeric give the dish its warm color and earthiness. Cumin seeds add a nutty taste, while salt and pepper round everything out. These ingredients work together to create a cozy, flavorful dish. Each one plays an important role in making this Chickpea Spinach Coconut Curry a hit. {{ingredient_image_1}} To start, I heat olive oil in a large pan over medium heat. I add cumin seeds and sauté them for 1-2 minutes. This makes the seeds fragrant. Next, I add the finely chopped onion. I cook it for 5-7 minutes until it turns soft and translucent. After that, I stir in minced garlic and grated ginger. I cook these for another 1-2 minutes until they release their rich aroma. Now, it’s time to toast the spices. I sprinkle in curry powder and turmeric powder. I stir constantly for about 1 minute to bring out their flavors. Now, I pour in the can of coconut milk. I bring the mixture to a gentle simmer. This step creates a creamy base for my curry. Next, I add the drained chickpeas. I season with salt and pepper, letting it simmer for 10 minutes. This allows all the flavors to blend together beautifully. To finish, I stir in the washed and chopped spinach. I cook it for another 2-3 minutes until the spinach wilts. It adds a lovely green color and nutrients. After that, I taste the curry and adjust the seasoning if needed. Once I’m satisfied with the flavors, I remove the pan from heat. Now, it’s time to serve hot, garnished with fresh cilantro on top. Balance Flavors To make a great curry, you must balance sweet and savory. The coconut milk adds creaminess and mild sweetness. Adjust the salt to bring out the flavors. Always taste as you cook. If it feels flat, add a pinch of salt. If it’s too salty, add a squeeze of lime or lemon. Ideal Cooking Temperature Keep the heat medium when cooking. Too high can burn the spices. Too low may not bring out their full flavor. You want the curry to simmer gently. This helps the chickpeas soak up all the tasty spices. Pairing with Rice or Naan This curry shines when served with rice or naan. The rice absorbs the sauce, making each bite delightful. Naan is perfect for dipping and scooping up every bit. Try basmati rice for a fragrant touch. Garnishing Options Garnish your curry with fresh cilantro. It adds a pop of color and fresh flavor. You can also add a dollop of yogurt for creaminess. A sprinkle of red pepper flakes adds a nice kick. Modifying Ingredient Amounts To make your curry spicier, increase the curry powder. You can also add more cumin seeds. Start with small amounts, tasting as you go. This helps you find the right heat for your taste. Adding Heat For extra heat, add fresh chili peppers or red pepper flakes. You can add them while toasting the spices. Another option is to stir in some chili paste at the end. This gives a nice punch without overwhelming the dish. Pro Tips Use Fresh Spinach: Fresh spinach adds a vibrant color and better flavor compared to frozen spinach. Make sure to wash and chop it right before adding it to the curry. Adjust Spice Levels: If you prefer a spicier dish, consider adding a pinch of red chili flakes or a diced chili pepper along with the garlic and ginger. Garnish with Lime: A squeeze of fresh lime juice just before serving can elevate the flavors and add a refreshing zing to the dish. Make it a Meal: Serve this curry with steamed rice or quinoa for a complete meal, packed with protein and nutrients. {{image_2}} You can easily switch up the protein in this curry. Tofu works great. It soaks up flavors well. Just press it first to remove excess water. Then, cut it into cubes and sauté before adding it to the curry. You can also try other legumes. Beans like black beans or lentils can add a tasty twist. Just make sure to adjust the cooking time. Canned beans are quick, but dried beans need soaking and cooking. Adding more veggies makes this dish even better. Bell peppers can add color and crunch. Slice them into strips and toss them in with the onions. Carrots are another option. They add sweetness and texture. Chop them into small pieces and cook them with the onions. You can also mix in other greens like kale for extra nutrients. Don't be afraid to play with spices. Different spices can give your curry a new taste. Try adding garam masala for warmth. You could also experiment with curry blends from different regions. Herbs can also change the flavor. Fresh basil or mint can brighten the dish. Add them just before serving for the best taste. This way, you can make your curry unique every time. To store your Chickpea Spinach Coconut Curry, let it cool first. Transfer leftovers to an airtight container. The curry stays fresh for about 3 to 4 days in the fridge. Make sure to seal the container well to keep out air and moisture. You can freeze this curry for later use. First, let it cool completely. Place the curry in a freezer-safe container. Leave some space at the top for expansion. It will last up to 3 months in the freezer. Label the container with the date for easy tracking. Reheating the curry is easy. You can use the stove or microwave. For the stove, pour the curry into a pan and heat over low. Stir often to avoid burning. For the microwave, place the curry in a microwave-safe bowl. Heat in short bursts, stirring in between. Always check the temperature before serving to ensure it is hot throughout. You can use canned spinach, but fresh is better. Fresh spinach has more flavor and nutrients. Canned spinach often has added salt and a mushy texture. If you use canned, rinse it well to reduce salt. This way, you keep more taste and health benefits in your dish. Yes, this recipe is vegan-friendly. All the ingredients are plant-based. The chickpeas give protein, and coconut milk adds creaminess. You can enjoy this dish without any animal products. It’s a great choice for vegans and anyone who loves plants. This recipe is already gluten-free! All the ingredients are safe for a gluten-free diet. If you serve it with rice, use gluten-free rice. Always check for gluten in any packaged items. This way, you enjoy the curry without worry. This blog post shows you how to make a tasty chickpea curry. You learned about the main ingredients, spices, and cooking steps. I shared tips to perfect your dish and suggested tasty variations. Plus, I provided storage and reheating advice. Curry is fun to make and easy to customize. You can adjust flavors and try new ingredients. I hope you enjoy cooking and eating your delicious chickpea curry!

Chickpea Spinach Coconut Curry Tasty and Cozy Dish

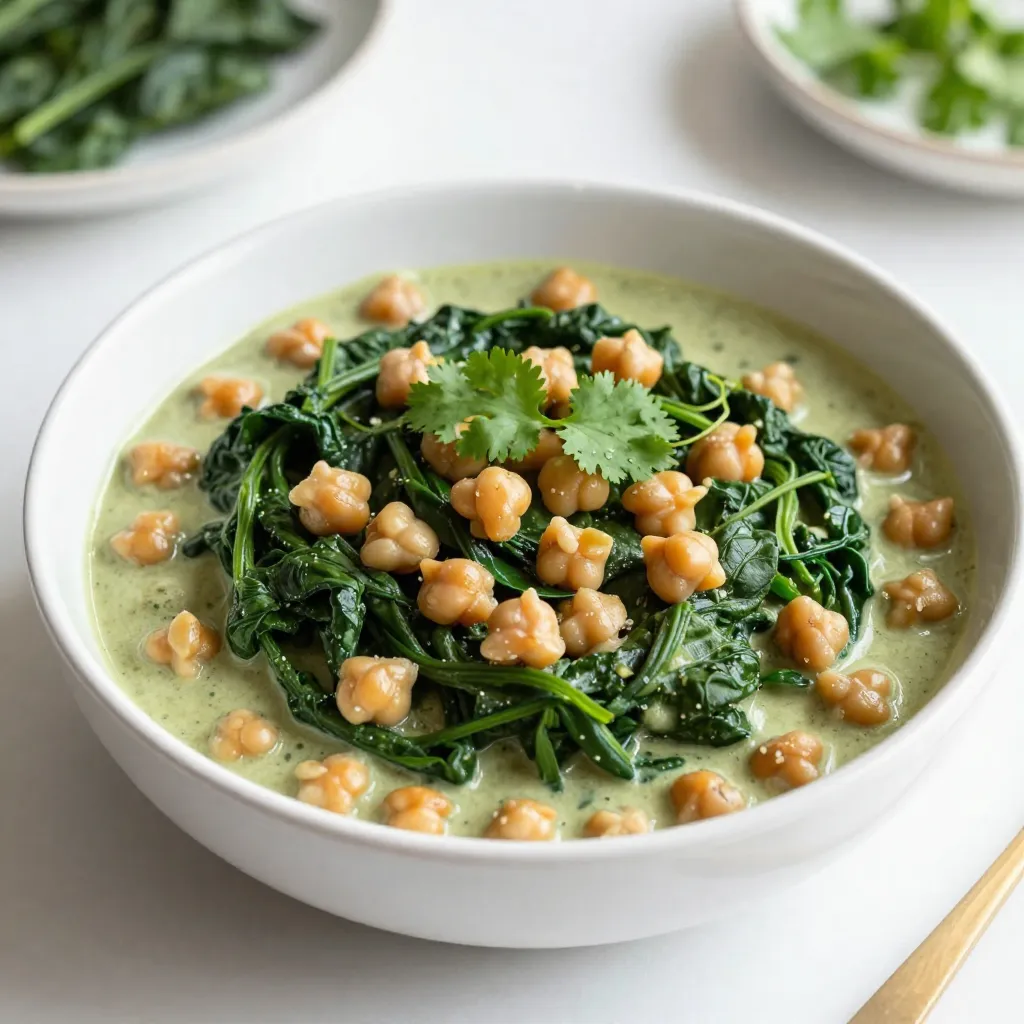
Craving a warm, tasty meal? You’re in the right place! This Chickpea Spinach Coconut Curry is not only cozy and

- 2 ripe bananas, mashed - 1 cup natural peanut butter - 1 cup rolled oats The main ingredients are simple and healthy. Ripe bananas give the cookies natural sweetness. Natural peanut butter adds creaminess and flavor. Rolled oats provide great texture and keep you full. - 1/2 teaspoon vanilla extract - 1/2 teaspoon baking soda - 1/4 teaspoon salt - Optional: 1/2 cup dark chocolate chips - Optional: 1/4 cup chopped walnuts or pecans Adding vanilla extract boosts the flavor. Baking soda helps the cookies rise and get fluffy. Salt balances the sweetness. You can mix in dark chocolate chips for a treat. Chopped walnuts or pecans add crunch and healthy fats. {{ingredient_image_1}} 1. First, preheat your oven to 350°F (175°C). Line a baking sheet with parchment paper. This helps to prevent sticking. 2. In a large bowl, mash the ripe bananas until smooth. Add the natural peanut butter. Mix them well until they are creamy and combined. 1. Now, add the rolled oats to the banana-peanut butter mix. Pour in the vanilla extract, baking soda, and salt. Stir everything together until it’s fully mixed. 2. If you want, fold in the dark chocolate chips and chopped nuts. This adds great flavor and texture to your cookies. 1. Use a tablespoon to scoop out dough portions. Place them on the prepared baking sheet, leaving about 2 inches between each scoop. 2. Next, use the back of a spoon to flatten each cookie slightly. They should look like small disks. 3. Bake your cookies in the oven for 10-12 minutes. You want the edges to be lightly golden. The centers may look soft, but they will firm up as they cool. 4. After baking, let the cookies cool on the baking sheet for about 5 minutes. Then, transfer them to a wire rack to cool completely. To make your cookies just right, start by mashing the bananas well. This helps create a smooth mix. If you want soft cookies, bake for about 10 minutes. For crunchier cookies, let them bake another minute or two. Keep an eye on them as they bake. The edges should turn golden. You can add fun flavors to your cookies! Try mixing in shredded coconut or dried fruit like raisins. This adds a nice chewiness. You can also use flavored peanut butter, like honey or chocolate, for a fun twist. It makes the cookies even more special. When it’s time to show off your cookies, arrange them on a wooden board or a bright plate. For a fun touch, sprinkle extra chocolate chips or nuts on top before serving. These cookies pair well with a glass of cold milk or a warm cup of tea. Enjoy the tasty treat! Pro Tips Use Overripe Bananas: The riper the bananas, the sweeter and more flavorful your cookies will be. Look for bananas with brown spots for the best results. Chilling the Dough: For a thicker cookie, consider chilling the dough for about 30 minutes before baking. This helps prevent them from spreading too much in the oven. Experiment with Mix-ins: Feel free to customize your cookies with different mix-ins like dried fruits, seeds, or coconut for added flavor and texture. Storage Tips: Keep the cookies in an airtight container at room temperature for up to a week, or freeze them for longer storage. Just thaw and enjoy! {{image_2}} You can make these cookies gluten-free easily. Just use gluten-free oats instead of regular rolled oats. This small change keeps the texture of the cookies while making them safe for those with gluten issues. Always check the labels of oats, as some may contain gluten due to cross-contamination. If you want a vegan version, look for vegan-friendly chocolate chips. There are many brands that do not use dairy. You can also skip the chocolate chips if you prefer. The cookies will still taste great with just the peanut butter and bananas. You can swap peanut butter for other nut butters. Almond butter or cashew butter work well. Both options add unique flavors to your cookies. Just remember that the taste and texture will change slightly, but it will still be yummy! To keep your cookies fresh, store them in an airtight container. A glass jar or a plastic container works well. Place a piece of parchment paper between layers if stacking. This helps prevent sticking. Keep the cookies at room temperature for the best taste. To freeze your cookies, let them cool completely first. Then, place them in a single layer on a baking sheet. Freeze for about an hour. Once firm, transfer them to a freezer-safe bag or container. Be sure to label it with the date. When you want to enjoy them, thaw the cookies at room temperature for about 30 minutes. You can also warm them in the oven for a few minutes. These cookies last about 4 to 5 days at room temperature. If you store them in the fridge, they can last up to a week. However, the taste and texture may change over time. For the best flavor, enjoy them fresh! You can make cookies without baking soda by using a different leavening agent. Baking powder is a great option. Use about 1 teaspoon of baking powder instead of baking soda. This helps the cookies rise while still keeping them soft. However, the texture may differ slightly. Yes, you can use natural sweeteners. Honey, maple syrup, or agave syrup work well. Use about 1/4 cup of your choice. Just remember to adjust the wet ingredients since these sweeteners add moisture. If you need a peanut butter substitute, try almond butter or sunflower seed butter. Both options have a similar texture and taste. If you have nut allergies, sunflower seed butter is a safe option. To check if the cookies are done, look for golden edges. The centers may still look soft, which is normal. They will firm up as they cool. Baking for 10-12 minutes usually gives great results. Yes, you can make the dough ahead of time. After mixing, store it in an airtight container. Keep it in the fridge for up to 24 hours. When ready to bake, just scoop and bake as usual. Peanut butter banana oat cookies are simple and fun to make. We covered the key ingredients you need, like ripe bananas and peanut butter. I shared easy steps for mixing and baking. You can add your favorite extras or adjust the texture. In the end, these cookies are not just tasty but also flexible. Whether you want gluten-free or vegan options, you can customize them. Enjoy your baking adventure—these cookies are sure to please everyone!

Peanut Butter Banana Oat Cookies Easy and Tasty Treat

Looking for a quick and yummy treat? You’ve found it! These Peanut Butter Banana Oat Cookies are easy to make

To whip up these delightful Chocolate Chip Caramel Cookie Bars, gather the following ingredients: - 1 cup unsalted butter, softened - 1 cup brown sugar, packed - 1/2 cup granulated sugar - 2 large eggs - 2 teaspoons vanilla extract - 3 cups all-purpose flour - 1 teaspoon baking soda - 1/2 teaspoon salt - 1 cup chocolate chips - 1 cup caramel bits or chewy caramels, chopped - 1/2 cup chopped nuts (optional) These ingredients create a perfect balance of sweet and salty. The butter adds richness, while the sugars bring a lovely sweetness. The eggs help bind everything together, giving the bars a soft texture. The all-purpose flour forms the base, while baking soda and salt enhance the flavors. Chocolate chips and caramel bits add a delightful chew. If you choose to add nuts, they give a nice crunch. You can swap in different types of chocolate or nuts for variety. Just be sure to measure accurately for the best results! {{ingredient_image_1}} 1. Preheat your oven to 350°F (175°C). Grease a 9x13 inch baking pan or line it with parchment paper. This helps the bars come out easily. 2. In a large bowl, cream together 1 cup of softened unsalted butter, 1 cup of packed brown sugar, and 1/2 cup of granulated sugar. Mix until it looks light and fluffy. This takes about 2-3 minutes. 3. Add 2 large eggs to the bowl, one at a time. Then stir in 2 teaspoons of vanilla extract. Make sure everything is well mixed. 1. In another bowl, whisk together 3 cups of all-purpose flour, 1 teaspoon of baking soda, and 1/2 teaspoon of salt. This will help your cookie bars rise and taste great. 2. Gradually mix the dry ingredients into the wet mixture. Stir until everything is fully combined. Do not overmix, as this can make the bars tough. 1. Fold in 1 cup of chocolate chips and 1 cup of caramel bits. You can also add 1/2 cup of chopped nuts if you like. This adds a nice crunch. 2. Spread half of the cookie dough in the bottom of the prepared baking pan. Press it down to form an even layer. 3. Bake this bottom layer for about 10 minutes. It should just start to set but not brown. 4. Remove the pan from the oven. Sprinkle the remaining cookie dough over the top. It’s okay if some of the bottom layer shows through. 5. Bake the bars for an additional 20-25 minutes. The top should be golden brown. A toothpick inserted in the center should come out clean. 6. Allow the bars to cool in the pan for at least 30 minutes. This makes cutting them easier. Enjoy your delicious treat! To get that perfect cookie texture, you want a mix of soft and chewy. Use softened butter, not melted. This helps create air pockets that give your bars lift. When you mix the butter and sugars, do it until it’s fluffy, about 2-3 minutes. Ingredient temperature is key. Make sure your eggs are at room temperature. They mix better, which helps the bars rise. Cold eggs can make your dough dense. For a great presentation, dust your bars with a sprinkle of sea salt. It adds a nice touch and contrast. Serve them warm for the best taste. A scoop of vanilla ice cream on top makes a perfect pairing. The cold ice cream and warm bars create a delightful mix. A common mistake is undercooking the bars. To avoid this, bake until the top is golden brown. A toothpick should come out clean when you test the center. Overmixing is another issue. When you combine the dry and wet ingredients, mix just until you don’t see flour. This keeps the bars tender. If you mix too much, they can become tough and dry. Pro Tips Use Room Temperature Ingredients: Ensure your butter and eggs are at room temperature for better incorporation and a smoother dough. Don't Overmix the Dough: Once you add the dry ingredients, mix just until combined to keep the bars soft and chewy. Chill the Dough: If time allows, chill the cookie dough for 30 minutes before baking. This helps the flavors develop and results in thicker bars. Add Sea Salt: A light sprinkle of flaky sea salt on top before baking enhances the chocolate and caramel flavors beautifully. {{image_2}} You can change these cookie bars in fun ways. One great idea is to add different types of chocolate. Dark chocolate brings a rich taste. White chocolate adds sweetness. You can mix and match as you like! Another option is to incorporate nuts. Pecans or walnuts work well. They add crunch and flavor. You can even try almonds or hazelnuts for something different. Always chop the nuts first for an even mix. If you need gluten-free options, you can swap all-purpose flour with gluten-free flour. This keeps the bars tasty without gluten. Make sure to check the flour blend for the best results. For vegan substitutions, use plant-based butter instead of regular butter. Replace eggs with flax eggs or applesauce. This keeps the bars moist and delicious. You can also choose dairy-free chocolate chips for a fully vegan treat. To keep your Chocolate Chip Caramel Cookie Bars fresh, follow these steps: - Cool Completely: Let the bars cool fully in the pan. - Use an Airtight Container: Place the bars in an airtight container. This helps prevent them from drying out. - Layer with Parchment Paper: If stacking, use parchment paper between layers to avoid sticking. - Refrigerate: Store in the fridge for up to a week. If you want to keep them longer: - Freeze: Wrap each bar in plastic wrap, then place them in a freezer bag. They can last up to three months in the freezer. To enjoy your bars warm again, try these methods: - Microwave: Place a bar on a plate. Heat for about 10-15 seconds. Check to avoid overheating. - Oven: Preheat the oven to 350°F (175°C). Place bars on a baking sheet. Heat for about 5-10 minutes, just until warm. Warm bars bring back that gooey, delicious texture. Enjoy them with a scoop of ice cream for an extra treat! How long do Chocolate Chip Caramel Cookie Bars last? These cookie bars stay fresh for up to one week. Store them in an airtight container. Keep them at room temperature. They may last longer in the fridge, but they can dry out. Can I use margarine instead of butter? Yes, you can use margarine. It will change the flavor a bit. Butter gives a richer taste and better texture. Use a stick margarine for best results. What to do if the bars are too sticky? If your cookie bars are too sticky, let them cool longer. Chilling them in the fridge for 30 minutes helps. You can also use a bit more flour next time. This makes the dough less sticky. Can I make these bars ahead of time? Yes, you can make them ahead. Bake the bars and cool them. Store them in an airtight container. You can freeze them for up to three months. Just thaw in the fridge before serving. What can I do with leftover caramel bits? Leftover caramel bits are great for many things. You can mix them into your next batch of cookies. They also work well in brownies or as a topping for ice cream. Melt them and drizzle over cakes for extra flavor. Are these cookie bars suitable for special occasions? Absolutely! These cookie bars are perfect for parties and gatherings. They look great and taste even better. You can dress them up with a sprinkle of sea salt or serve with ice cream for a treat. These chocolate chip caramel cookie bars are easy to make and fun to enjoy. You learned about the key ingredients and simple steps to create this tasty treat. I shared tips to ensure your bars turn out perfectly. Remember, you can vary flavors and adjust for dietary needs. Store leftovers correctly to keep them fresh. Now, get ready to impress your friends and family with your baking skills. Enjoy every bite of your delicious creation!

Chocolate Chip Caramel Cookie Bars Easy and Tasty Treat

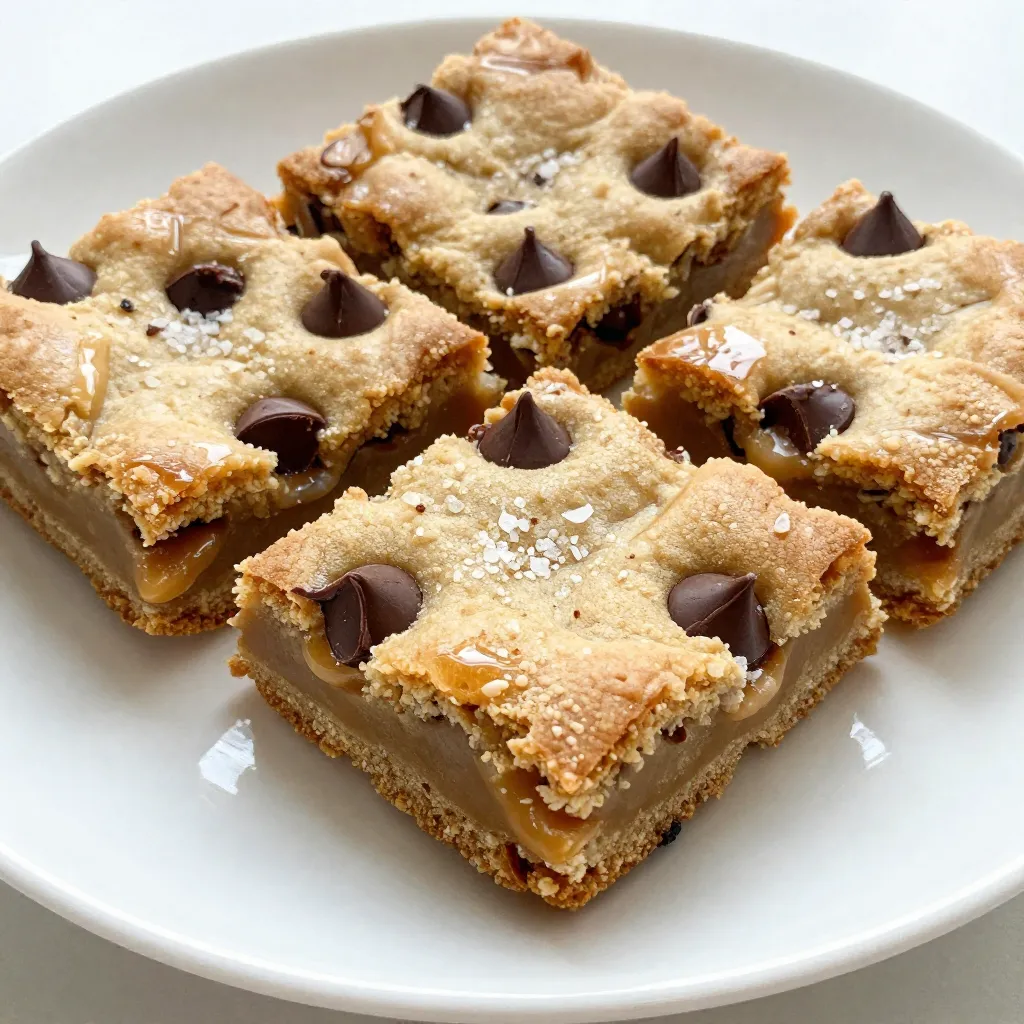
Are you ready to indulge in a sweet treat that’s easy to make? Chocolate Chip Caramel Cookie Bars combine gooey

To make Cranberry Pistachio Energy Bites, gather these simple ingredients: - 1 cup pitted Medjool dates - 1/2 cup rolled oats - 1/2 cup unsalted pistachios, shelled - 1/2 cup dried cranberries - 2 tablespoons chia seeds - 1 tablespoon honey or maple syrup - 1/2 teaspoon vanilla extract - A pinch of sea salt - Optional: shredded coconut for rolling These ingredients come together to create a tasty and healthy snack. Medjool dates add natural sweetness. They also provide fiber and energy. Rolled oats help with texture and keep you full. Pistachios add crunch and healthy fats. Dried cranberries give a sweet and tart flavor. Chia seeds are great for extra protein and omega-3s. Honey or maple syrup acts as a natural sweetener. The sea salt balances the sweetness. If you want a fun twist, consider using shredded coconut. It adds a nice texture and flavor. Gather these ingredients, and you're on your way to making delicious and nutritious energy bites! {{ingredient_image_1}} - Processing the Medjool dates Start by placing your pitted Medjool dates in a food processor. Blend them until they turn into a sticky paste. This paste acts as a natural sweetener and a binding agent. - Combining ingredients in the food processor Next, add in rolled oats, shelled pistachios, dried cranberries, chia seeds, honey, vanilla extract, and a pinch of sea salt. Pulse the mixture until it all comes together. It should be slightly chunky yet hold together well. If the mix seems dry, add a teaspoon of water, then pulse again. - Shaping the mixture into energy bites Once your mixture is ready, scoop out tablespoon-sized portions. Use your hands to roll these portions into tight balls. This step is crucial for the right bite size. - Refrigerating the energy bites Place the energy bites on a parchment-lined plate or in an airtight container. Refrigerate them for at least 30 minutes. This helps them firm up and makes them easier to handle. - Presentation tips for serving For a lovely presentation, arrange the energy bites on a wooden board or a decorative plate. You can garnish with whole pistachios and cranberries for a colorful touch. Enjoy these bites as a healthy snack or a post-workout treat! Cranberry Pistachio Energy Bites are not just tasty; they are good for you too. Each serving has around 100 calories. This makes them a smart choice for a snack. They pack in about 3 grams of protein, 2 grams of fiber, and healthy fats from pistachios. These bites help keep you full and energized. Benefits of Medjool dates and their natural sweetness Medjool dates are sweet and sticky. They add natural sweetness to the energy bites. They provide quick energy, thanks to their high natural sugar content. Plus, they are full of vitamins and minerals. Nutritional value of pistachios and cranberries Pistachios are rich in healthy fats, protein, and fiber. They help support heart health. Dried cranberries add a burst of flavor and are high in antioxidants. They help your body fight off harmful free radicals. Advantages of chia seeds in energy bites Chia seeds are small but mighty. They are full of omega-3 fatty acids, fiber, and protein. When you add chia seeds to your bites, you boost the nutritional value. Chia seeds also help bind the mixture together, making them perfect for snacks. Pro Tips Chill for Better Texture: Let the energy bites chill in the refrigerator for at least 30 minutes to help them firm up and achieve the perfect chewy texture. Mix and Match Ingredients: Feel free to customize your energy bites by swapping out the nuts or dried fruits based on your preference or what you have on hand. Keep Them Fresh: Store your energy bites in an airtight container in the refrigerator for up to a week, or freeze them for longer shelf life. Boost the Nutrition: Add in a scoop of protein powder or a tablespoon of nut butter for an extra nutritional boost, perfect for post-workout recovery. {{image_2}} - Over-processing the mixture: When you blend the ingredients, stop before it turns too smooth. You want some chunks for texture. If you blend too long, your bites may become gooey instead of firm. - Not allowing enough chill time: After shaping the bites, chill them for at least 30 minutes. This helps them firm up and hold their shape. If you skip this step, they'll be too soft and fall apart. - Adding spices or extracts: You can spice up your energy bites easily. Try adding a pinch of cinnamon or a dash of almond extract. These small changes can give your bites a new twist. - Experimenting with coating options: Rolling your energy bites in shredded coconut adds flavor and texture. You could also try cocoa powder or crushed nuts. Each option brings its own taste, so have fun with it! You can easily adjust this recipe to fit your needs. If you want a vegan option, use maple syrup instead of honey. Maple syrup adds a nice sweetness and keeps the bites plant-based. If you have nut allergies, don't worry! You can swap pistachios for seeds like sunflower or pumpkin seeds. These seeds offer a similar crunch and are safe for nut-free diets. You can also get creative with flavors in your energy bites. Try adding other dried fruits like apricots or raisins. Each fruit brings its own taste and adds more nutrients. If you're looking for a superfood boost, consider mixing in cacao nibs or a scoop of protein powder. Cacao nibs add a rich chocolate flavor, while protein powder can help fuel your day. These fun twists keep your snacks exciting and healthy! Can I freeze Cranberry Pistachio Energy Bites? Yes, you can freeze these energy bites. Place them in an airtight container. They can last up to three months in the freezer. Just thaw them overnight in the fridge when you want to eat them. How long do these energy bites last in the fridge? These energy bites stay fresh in the fridge for about one week. Keep them in an airtight container to maintain their flavor and texture. What can I substitute for pistachios? If you can’t find pistachios, try almonds, walnuts, or sunflower seeds. Each option brings a different taste and texture to the energy bites. What kitchen tools do I need? You will need a food processor, measuring cups, and a mixing bowl. A spatula helps to scrape the sides of the bowl. Can I make these energy bites without a food processor? Yes, you can! Chop the dates and nuts by hand. Then mix all the ingredients in a bowl, adding a splash of water if needed. Are there any other ways to enjoy energy bites? Absolutely! You can add them to your breakfast, use them as a quick snack, or take them to the gym. They also make great gifts, packed in a nice jar. Making these Cranberry Pistachio Energy Bites is easy and fun. You learned how to blend simple, healthy ingredients into tasty snacks. The key steps involved processing, shaping, and chilling the bites for the best flavor. Remember, these bites pack a nutritional punch while being good for you. Mix in your favorite flavors to make them unique. With a few tips, you can avoid common mistakes. Try out the variations to keep things exciting. Enjoy your tasty, healthy snacks!

Cranberry Pistachio Energy Bites Perfect for Snacking

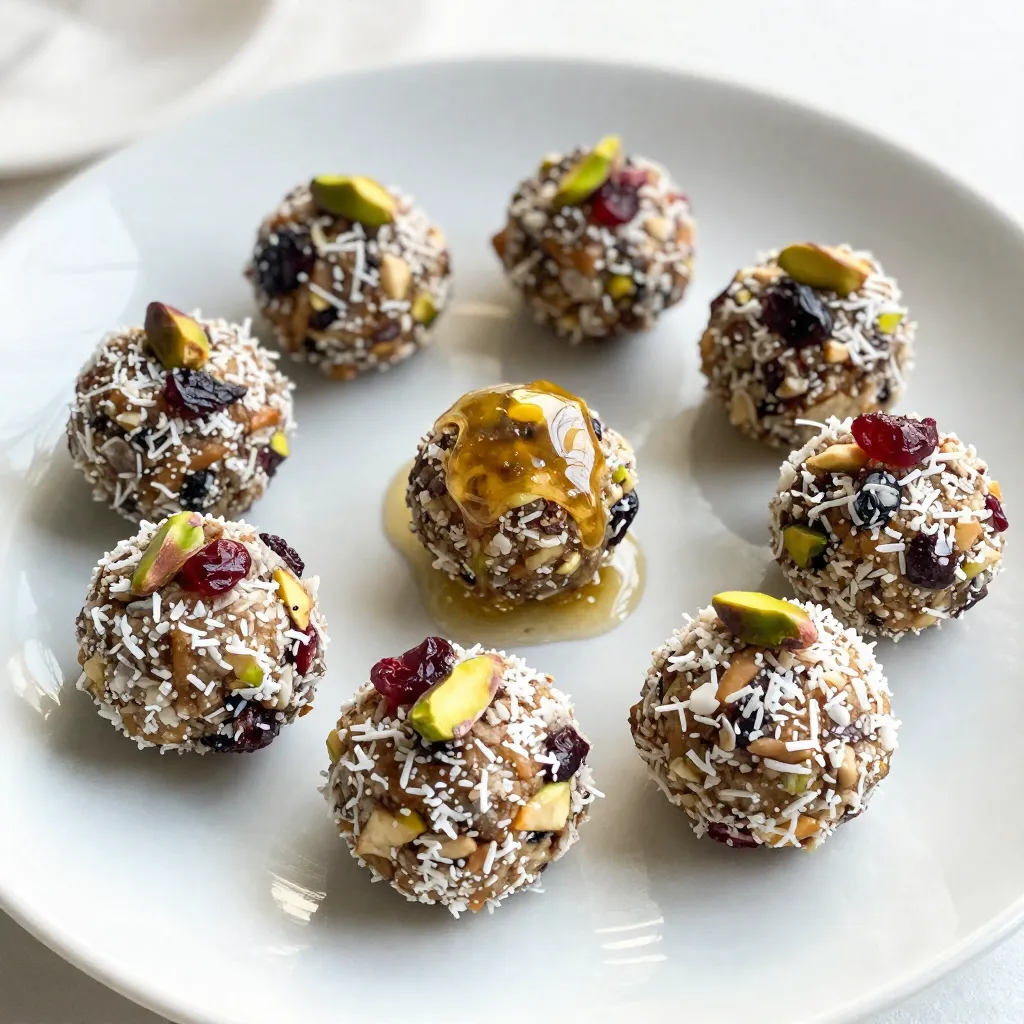
Do you need a healthy snack that’s easy to make and delicious? Look no further! My Cranberry Pistachio Energy Bites

Here are the ingredients you need for Maple Roasted Apple Sweet Potatoes: - 3 medium sweet potatoes, peeled and cubed - 2 large apples (such as Honeycrisp or Granny Smith), cored and diced - 1/4 cup pure maple syrup - 2 tablespoons olive oil - 1 teaspoon ground cinnamon - 1/2 teaspoon ground nutmeg - Salt and pepper to taste - 1/4 cup chopped pecans (optional, for added crunch) - Fresh thyme leaves, for garnish These ingredients work together to create a rich, sweet, and savory dish. Sweet potatoes give a creamy texture and a natural sweetness. Apples add a crisp bite and a fruity flavor. Maple syrup amplifies the sweetness while providing a lovely glaze. Cinnamon and nutmeg bring warmth and depth. Olive oil helps everything roast well, ensuring that the sweet potatoes and apples become tender. Feel free to skip the pecans if you prefer a softer dish. They add a nice crunch, but the dish is delicious even without them. Fresh thyme adds a touch of earthiness, making the dish feel fresh and bright. {{ingredient_image_1}} - Preheat the oven to 400°F (200°C). - Cube three medium sweet potatoes and dice two large apples. Start by getting your oven hot. This helps cook the sweet potatoes and apples evenly. While the oven heats, prepare your main ingredients. Peel and cube the sweet potatoes into bite-sized pieces. Then, take your apples, core them, and dice them up. I love using Honeycrisp or Granny Smith apples for their crisp texture and sweet-tart flavor. - Mix sweet potatoes and apples in a bowl. - Drizzle with maple syrup and olive oil. In a large mixing bowl, combine the cubed sweet potatoes and diced apples. This mix creates a great flavor combo. Next, drizzle 1/4 cup of pure maple syrup and 2 tablespoons of olive oil over the sweet potato and apple mixture. The maple syrup adds a sweet touch, while the olive oil helps everything roast nicely. - Season with cinnamon, nutmeg, salt, and pepper. - Spread mixture on a baking sheet. - Bake for 25-30 minutes, stirring halfway through. Now, sprinkle in 1 teaspoon of ground cinnamon, 1/2 teaspoon of nutmeg, and add salt and pepper to taste. Toss everything together until all the pieces are coated. Then, spread the mixture on a large baking sheet in a single layer. This step is key for even cooking. Bake in your preheated oven for 25-30 minutes. Remember to stir halfway through to ensure even roasting. This will give you fork-tender sweet potatoes and caramelized apples, which are simply delicious! To get fork-tender sweet potatoes, cut them into small cubes. This helps them cook faster. Aim for about one-inch pieces for even cooking. Check them with a fork after 25 minutes. If they are soft enough, they are done. Stirring halfway through roasting is key. This ensures even cooking and caramelization. When you stir, it helps the sweet potatoes and apples get golden brown all over. Don't skip this step! For extra taste, consider adding chopped pecans. They add a nice crunch that contrasts with the soft sweet potatoes. You can add them during the last 10 minutes of baking. This way, they toast but don’t burn. Fresh thyme leaves can elevate the dish. Add them after roasting for a burst of flavor. Thyme pairs well with both sweet potatoes and apples. Just sprinkle a few leaves on top before serving. It adds freshness and a lovely aroma. Pro Tips Choose the Right Apples: Opt for apples that hold their shape during cooking, like Honeycrisp or Granny Smith, for a perfect balance of sweetness and tartness. Cut Uniformly: Ensure the sweet potatoes and apples are cut into similar-sized pieces for even roasting and consistent texture. Enhance Flavor Depth: Adding a dash of vanilla extract or a squeeze of lemon juice can elevate the flavors and add complexity to the dish. Storage Tips: If you have leftovers, store them in an airtight container in the fridge for up to 3 days, making them great for meal prep! {{image_2}} You can change up the apples you use. Honeycrisp apples add sweetness. Granny Smith apples bring a nice tartness. You can also try Fuji or Gala apples for different flavors. Each apple will change the dish's taste. If you want to switch the sweet potatoes, use other root veggies. Carrots or parsnips work well. Both bring a sweet flavor that pairs nicely with apples. You can also try butternut squash for a richer taste. Just be sure to cut them into similar sizes for even cooking. Want to spice things up? Add ginger for warmth. A pinch of cayenne gives a kick. Both spices can create a nice balance with the sweet maple syrup. They help wake up the flavors in this dish. Dried fruits can also boost sweetness. Try adding raisins or cranberries. They soak up the maple syrup's sweetness and create a chewy texture. Mix them in before baking for a tasty surprise in each bite. To store leftover Maple Roasted Apple Sweet Potatoes, place them in an airtight container. This keeps them fresh. Make sure to let them cool first. Store the container in the fridge for up to three days. When you are ready to eat, just take out what you need. For long-term storage, you can freeze these sweet potatoes. First, let them cool completely. Then, spread them in a single layer on a baking sheet. Freeze for about two hours until firm. After that, transfer them to a freezer-safe bag or container. They will last for up to three months in the freezer. When you want to enjoy them again, reheat in the oven at 350°F (175°C). Bake until heated through, about 20-25 minutes. Can I make this recipe vegan? Yes, you can make this dish vegan. Just ensure you use pure maple syrup. The rest of the ingredients, like sweet potatoes and apples, are already plant-based. Olive oil is also vegan-friendly. What can I serve with Maple Roasted Apple Sweet Potatoes? These sweet potatoes pair well with many dishes. Try serving them with roasted chicken, grilled pork, or a fresh green salad. They also make a tasty side for a holiday feast! Can I use brown sugar instead of maple syrup? You can use brown sugar, but it will change the flavor. Maple syrup adds a nice depth that brown sugar cannot match. If you choose brown sugar, mix it with a splash of water to mimic the syrup's texture. What other nuts can I use instead of pecans? If you don't have pecans, walnuts or almonds work great too. Both add a nice crunch. Just chop them roughly before adding. This recipe for Maple Roasted Apple Sweet Potatoes combines sweet potatoes and apples for a tasty dish. You learned how to prepare and bake these ingredients, along with tips to ensure a perfect roast. Variations and storage tips make this recipe adaptable for any meal. Enjoy the flavors and textures while impressing your family and friends with this simple yet delicious dish. Cooking can be fun and easy!

Maple Roasted Apple Sweet Potatoes Flavorful Side Dish

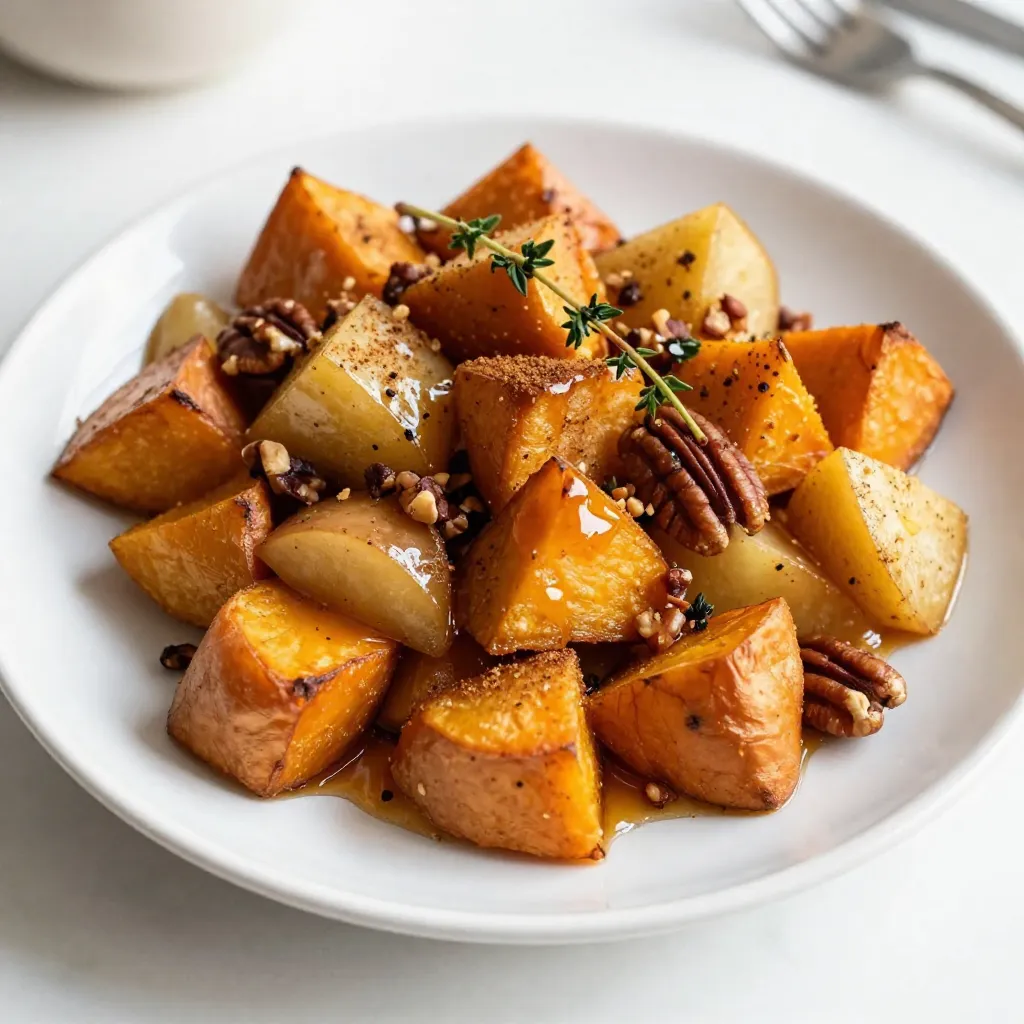
Looking for a side dish that bursts with flavor and warmth? Try my Maple Roasted Apple Sweet Potatoes! This dish

- 1 pound large shrimp, peeled and deveined - 3 cloves garlic, minced - 1/4 cup fresh lemon juice - Zest of 1 lemon - 1/4 cup olive oil For this dish, I always start with large shrimp. They grill well and stay juicy. You will need three cloves of garlic. Mince them finely for the best flavor. Fresh lemon juice is key, so squeeze it right before you use it. Don’t forget the lemon zest; it adds a bright taste. Finally, use good-quality olive oil to help the marinade stick. - 1 teaspoon paprika - 1/2 teaspoon red pepper flakes (adjust to taste) - Salt and pepper to taste Seasonings make this dish shine. Paprika gives color and a mild flavor. If you like heat, add red pepper flakes. Always adjust the amount to match your taste. Don’t skip salt and pepper; they help bring out all the flavors. - Fresh parsley, chopped (for garnish) - Lemon wedges (for serving) Garnish is more than just a pretty finish. Chopped fresh parsley adds a pop of color and freshness. Serve lemon wedges on the side. They give an extra burst of flavor when squeezed over the shrimp. This combination makes the dish look and taste amazing. {{ingredient_image_1}} To start, gather your ingredients. You need minced garlic, fresh lemon juice, lemon zest, olive oil, paprika, and red pepper flakes. In a medium bowl, whisk them together until fully mixed. This blend gives the shrimp a great taste. For more flavor, let the marinade sit for a few minutes. It helps the spices blend well. Once your marinade is ready, add the shrimp to the bowl. Make sure each shrimp gets coated well. This step is key to great flavor. Let the shrimp marinate in the fridge for at least 30 minutes, but you can go up to 2 hours if you want a stronger taste. The longer they sit, the better they soak up those tasty flavors. Before grilling, preheat your grill to medium-high heat. If you use wooden skewers, soak them in water for at least 30 minutes. This will prevent them from burning. Next, carefully thread the marinated shrimp onto the skewers. If using metal skewers, there’s no need for soaking. Place the skewers on the grill. Cook for about 2-3 minutes on each side. Look for the shrimp to turn pink and opaque. Be careful not to overcook them; they can become rubbery. After grilling, let the skewers rest for a minute. Enjoy your delicious Lemon Garlic Grilled Shrimp! To ensure you cook shrimp perfectly, watch for color and texture. The shrimp should turn pink and opaque when done. They should curl into a C shape, not an O. This shape means they are cooked just right. Overcooking makes them rubbery, so be careful. You can customize the spice levels in this recipe. If you prefer more heat, add more red pepper flakes. For a milder flavor, cut back on them. You can also mix in other seasonings, like cumin or coriander. Fresh herbs can add a nice taste too, such as chopped parsley or cilantro. Marinating shrimp for at least 30 minutes helps enhance the flavor. If you marinate for longer, up to 2 hours, the shrimp will soak in more taste. You can also swap olive oil for other oils, like avocado or sesame oil, for a different flavor twist. Pro Tips Marinate for Flavor: The longer you marinate the shrimp, the more flavorful they become. Aim for at least 30 minutes, but 2 hours will give you a deeper flavor profile. Perfectly Cooked Shrimp: Shrimp cook quickly; watch them closely. Remove them from the grill as soon as they turn pink and opaque to avoid a rubbery texture. Use Fresh Ingredients: Fresh garlic and lemon juice enhance the overall taste of the dish. Whenever possible, opt for fresh over bottled for the best flavor. Serve with a Twist: Pair the grilled shrimp with a refreshing salad or serve over rice for a complete meal. A touch of extra lemon juice just before serving can elevate the dish! {{image_2}} You can easily swap shrimp for other seafood. Try scallops or fish like salmon. Both work great with the lemon garlic flavor. If you prefer land-based options, chicken is a fantastic choice. Cut chicken breasts into bite-sized pieces and follow the same marinating steps. For a vegetarian twist, use firm vegetables like zucchini or bell peppers. Just cut them into chunks and marinate as you would the shrimp. Mixing herbs can change the taste of your dish. Add fresh cilantro or basil for a new twist. These herbs bring a bright flavor that complements the lemon well. You can also play with other citrus fruits. Lime or orange juice can add a unique touch to your marinade. Each one brings its own zest and freshness, making every bite exciting. Grilling is not the only way to cook your shrimp. Baking or broiling can also yield delicious results. Preheat your oven to 400°F and place the shrimp on a baking tray. They need about 8-10 minutes to cook through. If you prefer stovetop grilling, use a grill pan. Heat it over medium-high heat and cook the shrimp for about 2-3 minutes on each side. This method gives you a nice char without the outdoor grill. To keep your grilled shrimp fresh, place them in an airtight container. This helps prevent them from drying out or absorbing other smells. You can store them in the fridge for up to three days. Keep in mind that shrimp lose some flavor and texture over time. When it comes to reheating, you have a few options. You can use a microwave, but be cautious. Heat the shrimp in short bursts to avoid overcooking. If you prefer, you can also reheat them on the stovetop. Use low heat and add a splash of olive oil to keep them moist. This method helps maintain their flavor and texture. If you want to save shrimp for later, freezing is a great option. Place the shrimp in a single layer on a baking sheet. Freeze them for about an hour. Then, transfer them to a freezer bag. Make sure to squeeze out excess air to prevent freezer burn. They can last up to three months in the freezer. To thaw, simply place the frozen shrimp in the fridge overnight. If you're in a hurry, you can run them under cold water for a few minutes. This method helps keep them juicy and ready for reheating. You should marinate shrimp for at least 30 minutes. This time gives the shrimp a good flavor boost. If you have more time, let them sit for up to 2 hours. Longer marination enhances the taste and makes them more tender. Just remember, don’t over-marinate. If you do, the acid from the lemon juice can make the shrimp mushy. Yes, you can make this dish in advance. To do this, marinate the shrimp as normal. After marinating, you can store them in the fridge for up to 2 hours. If you want to prepare them even earlier, you can freeze the marinated shrimp. Just make sure to thaw them in the fridge before grilling for best results. This way, you save time on busy days. Lemon Garlic Grilled Shrimp works well with many dishes. Here are some great sides to consider: - A fresh green salad - Grilled veggies like zucchini or bell peppers - Rice or quinoa for a filling meal - Garlic bread to soak up extra sauce - A light white wine to enhance the meal These pairings will balance the zesty flavor of the shrimp and make your meal shine! In this blog post, we explored how to make delicious Lemon Garlic Grilled Shrimp. We covered essential ingredients like shrimp, garlic, and lemon juice. I shared step-by-step instructions, tips for perfectly cooked shrimp, and suggested variations. Remember, marinating enhances flavor, and you can experiment with different proteins and spices. Keep leftovers safe and know how to reheat them right. Enjoy this tasty dish with great sides. Happy cooking!

Lemon Garlic Grilled Shrimp Flavorful and Easy Recipe

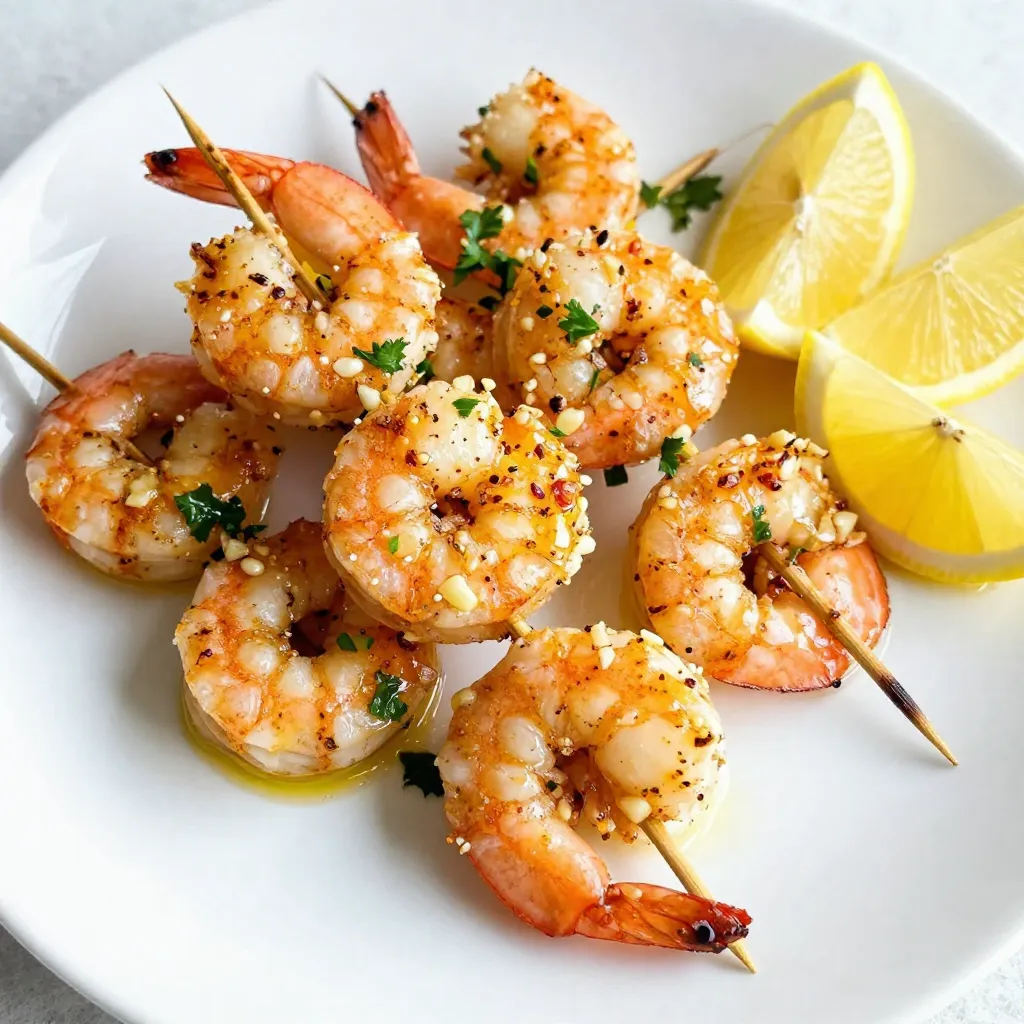
Get ready to delight your taste buds with my Lemon Garlic Grilled Shrimp recipe! This dish is simple to make

- 1 ½ cups all-purpose flour - 1 cup granulated sugar - ½ cup unsweetened cocoa powder - 1 teaspoon baking soda - ½ teaspoon salt - 1 cup brewed espresso or strong coffee, cooled - ½ cup vegetable oil - 1 teaspoon vanilla extract - 2 large eggs - 1 cup heavy cream (for frosting) - 2 tablespoons powdered sugar (for frosting) - 1 tablespoon instant coffee granules (for frosting) - Cocoa powder or shaved chocolate (for garnish) When picking ingredients for cappuccino cupcakes, quality matters. I use all-purpose flour for a light texture. Granulated sugar keeps the cupcakes sweet and moist. Unsweetened cocoa powder adds rich chocolate flavor. Baking soda helps the cupcakes rise, while salt enhances the taste. Cooled espresso or strong coffee gives a nice coffee punch. I prefer vegetable oil for moisture; it keeps the cupcakes soft. Vanilla extract adds warmth. The eggs bind everything together for a perfect structure. For the frosting, I choose heavy cream. It makes the frosting fluffy and rich. Powdered sugar ensures smoothness, and instant coffee granules boost the coffee flavor. Finally, cocoa powder or shaved chocolate makes a lovely garnish. If you need substitutions, I’ve got you covered. Use whole wheat flour for a healthier option. Coconut sugar can replace granulated sugar for a lower glycemic index. You can swap cocoa powder with carob powder if you want a caffeine-free version. For a dairy-free cupcake, try almond milk instead of heavy cream. Use a dairy-free cream option for the frosting. If you're vegan, applesauce can replace eggs. Remember, flavors may shift slightly with these swaps, but your cupcakes will still taste great! First, preheat your oven to 350°F (175°C). This step is key for baking. While the oven heats, take a muffin tin and line it with cupcake liners. The liners keep your cupcakes from sticking and make them easy to serve. Grab a large mixing bowl. In this bowl, add: - 1 ½ cups all-purpose flour - 1 cup granulated sugar - ½ cup unsweetened cocoa powder - 1 teaspoon baking soda - ½ teaspoon salt Whisk these ingredients together until they blend well. This dry mix creates a nice base for your cupcakes. In a separate bowl, mix the wet ingredients. You need: - 1 cup brewed espresso or strong coffee, cooled - ½ cup vegetable oil - 1 teaspoon vanilla extract - 2 large eggs Whisk these until smooth. Slowly pour this mix into the dry ingredients. Stir gently until just combined. A few lumps are okay; don’t overmix. Next, divide the batter evenly into the cupcake liners. Fill each about 2/3 full. Bake them in the preheated oven for 18-20 minutes. Check doneness with a toothpick. If it comes out clean, they are done. Let them cool in the tin for 5 minutes. After that, transfer them to a wire rack to cool completely. Now you’re ready for the frosting! Many people forget to cool their espresso before using it. Hot coffee can ruin the batter's texture. Overmixing is another common mistake. Mix until just combined for light cupcakes. Filling the liners too much can lead to messy cupcakes. Fill them only two-thirds full for the best rise. The key to great texture is using room temperature ingredients. Eggs and oil mix better when they are not cold. Make sure to beat the heavy cream until soft peaks form. This gives the frosting a fluffy and light feel. Adding instant coffee granules to the frosting helps enhance the coffee flavor. Let the cupcakes cool in the tin for five minutes. This keeps them moist and helps them lift out easily. Then, move them to a wire rack to cool completely. For frosting, use a piping bag for smooth and even layers. Dust with cocoa powder or sprinkle shaved chocolate on top for a lovely presentation. {{image_2}} You can change the flavor of your cappuccino cupcakes easily. For a mocha twist, add 1/4 cup of chocolate chips to the batter. This adds richness and pairs well with coffee. If you want a lighter taste, try vanilla. Use 1 tablespoon of vanilla bean paste in the batter. This will give you a lovely aroma and flavor. You can also mix in almond extract for a nutty hint. These small changes can make your cupcakes unique and fun. While whipped cream is great, you can try different frostings. Buttercream is creamy and rich. Make it by mixing 1 cup of softened butter with 4 cups of powdered sugar. Add 2 tablespoons of milk and 1 teaspoon of vanilla for flavor. Cream cheese frosting is another option. Use 8 ounces of softened cream cheese and mix with 1/2 cup of butter. Add 4 cups of powdered sugar and a splash of milk. Both of these frostings offer a different taste that complements the cupcakes. To make gluten-free cupcakes, swap the all-purpose flour for a gluten-free blend. Ensure the blend has xanthan gum for the best texture. For vegan cupcakes, replace eggs with 1/4 cup of applesauce per egg. Use almond milk instead of espresso or coffee. Swap vegetable oil with your favorite plant-based oil. These changes keep the cupcakes tasty while meeting different dietary needs. You can enjoy the deliciousness without worry! To keep your cappuccino cupcakes fresh, store them in an airtight container. This prevents air from drying them out. You can place a piece of wax paper between layers to avoid sticking. Keep the container at room temperature for best results. Avoid placing cupcakes in the fridge, as it can make them dry. Cappuccino cupcakes stay fresh for about three days when stored properly. If you notice any signs of mold or a change in smell, throw them away. For longer storage, use the freezing method below. These cupcakes freeze well, making them perfect for special events. To freeze, first let the cupcakes cool completely. Wrap each cupcake tightly in plastic wrap, then place them in a freezer-safe bag. They can last up to three months in the freezer. When you’re ready to enjoy, thaw them in the fridge overnight. Frost them just before serving for the best taste. Yes, you can use regular coffee. Just make sure it is strong. The flavor may change slightly, but it will still taste great. Brew your coffee with less water than usual. This gives you a stronger taste that works well in the cupcakes. To keep your cupcakes moist, do not overmix the batter. Mix until just combined. Use fresh ingredients, especially eggs and oil. Also, do not bake them too long; check with a toothpick around 18 minutes. If they come out clean, they are done. Let them cool in the tin for a few minutes, then move them to a rack. For decoration, pipe the whipped coffee frosting on top. Use a large star tip for a nice look. Dust with cocoa powder or sprinkle shaved chocolate on top. This adds flavor and makes them pretty. You can also add coffee beans for a special touch. Cappuccino cupcakes bring joy with every bite. We covered ingredients, step-by-step baking, and smart tips for success. You can create fun variations or store them for later. With simple swaps, these cupcakes fit many diets. Remember, a little care makes a big difference. Enjoy baking and sharing these treats with others. Your kitchen can become a cupcake paradise!

Cappuccino Cupcakes Simple and Irresistible Recipe

If you love coffee and cupcakes, you’ve come to the right place! My Cappuccino Cupcakes are simple to make and

To make garlic herb flatbread pizza, you need some simple key ingredients. Here’s what you will need: - 1 store-bought or homemade flatbread (12-inch size) - 2 tablespoons olive oil - 3 cloves garlic, minced - 1 teaspoon dried oregano - 1 teaspoon dried basil - 1 cup shredded mozzarella cheese - 1/2 cup cherry tomatoes, halved - 1/4 cup fresh basil leaves, torn - Salt and pepper to taste These basic ingredients come together to create a tasty and fragrant pizza. You can make this pizza your own by adding optional ingredients. Here are some fun choices: - Red pepper flakes for some heat - Sliced olives for briny flavor - Cooked chicken or sausage for protein - Fresh spinach for added greens Feel free to mix and match based on what you like. Having the right tools makes cooking easier. Here’s what you need to prepare this flatbread pizza: - Baking sheet or pizza stone - Small mixing bowl - Brush for the garlic herb oil - Knife for slicing tomatoes and fresh basil With these items, you can whip up your flatbread pizza quickly and easily. First, set your oven to 475°F (245°C). This high heat helps the flatbread crisp up nicely. While the oven heats, gather your ingredients. You need a flatbread, mozzarella cheese, cherry tomatoes, and herbs. Make sure your garlic is minced and ready. In a small bowl, mix 2 tablespoons of olive oil with 3 minced garlic cloves. Add 1 teaspoon each of dried oregano and dried basil. Sprinkle in salt and pepper to your taste. Stir well to blend all the flavors. This garlic herb oil will bring great taste to your flatbread pizza. Place the flatbread on a baking sheet or pizza stone. Use a brush to spread the garlic herb oil on the flatbread. Try to coat it evenly, especially the edges. Next, sprinkle 1 cup of shredded mozzarella cheese on top of the flatbread. Distribute 1/2 cup of halved cherry tomatoes over the cheese. If you like some heat, add a pinch of red pepper flakes now. Now, it's time to bake! Place the baking sheet in the oven and set a timer for 10-12 minutes. Look for the cheese to bubble and the edges to turn golden brown. Once done, take it out and let it cool for a minute. Finally, sprinkle torn basil leaves on top to add freshness. Enjoy your tasty garlic herb flatbread pizza! To make a great flatbread pizza, start with quality ingredients. Use fresh flatbread for the best taste. If you make your own, use a simple recipe. Keep the flatbread thin for a nice crisp. Brush the edges with garlic herb oil for extra flavor. Bake at high heat to get a golden crust. Crispy crust is key for flatbread pizza. Here’s how to get it right: - Preheat your oven to 475°F (245°C). - Bake directly on a pizza stone or a hot baking sheet. - Keep an eye on the time. Bake for 10-12 minutes. - Let it cool for a minute after baking. This helps the crust stay crisp. Fresh herbs add a burst of flavor. You can use basil, oregano, or even parsley. Here are some tips: - Add fresh herbs right before serving for the best taste. - Mix dried herbs into the garlic oil for a strong flavor base. - If you like, sprinkle some red pepper flakes for heat. - Always taste before serving and adjust the herbs if needed. {{image_2}} You can get creative with toppings on your flatbread pizza. Here are some fun ideas: - Grilled vegetables: Add bell peppers, zucchini, or mushrooms for extra flavor. - Pepperoni or sausage: For meat lovers, these add a nice kick. - Pineapple: If you love sweet and savory, pineapple works great. - Spinach: Fresh spinach adds color and nutrition. - Feta cheese: This adds a tangy taste that pairs well with herbs. Feel free to mix and match any of these toppings. Your flatbread pizza can be unique each time you make it! While mozzarella is a classic choice, you can use other cheeses too. Consider these options: - Parmesan: Sprinkle some on top for a sharp flavor. - Ricotta: This creamy cheese adds richness and pairs well with herbs. - Gouda: A nice melt with a smoky taste can elevate your pizza. - Vegan cheese: For plant-based diets, try cashew or almond cheese. Experimenting with different cheeses can change the whole vibe of your pizza. Making your flatbread pizza vegetarian or vegan is easy! - For vegetarian options, just avoid meat toppings and load up on fresh veggies. - To make it vegan, use a plant-based flatbread and cheese. You can also replace the olive oil with a vegan pesto. These adaptations let you enjoy the same great taste while catering to different diets. Enjoy creating your perfect flatbread pizza! To keep your leftover flatbread pizza fresh, let it cool first. Then, wrap it tightly in plastic wrap or aluminum foil. You can also place it in an airtight container. Store it in the fridge, where it should last for 2-3 days. Make sure to keep it away from strong-smelling foods to avoid unwanted flavors. When you are ready to enjoy your leftover flatbread pizza, you want it warm and tasty. Preheat your oven to 375°F (190°C). Place the pizza on a baking sheet. Bake for about 8-10 minutes. This method helps keep the crust crispy and the cheese melty. If you are in a hurry, you can use a microwave. Heat it in 30-second intervals until warm, but it won’t be as crispy. If you want to save your flatbread pizza for later, freezing works great. Wrap each slice in plastic wrap, then place them in a freezer bag. Remove as much air as possible to prevent freezer burn. You can freeze it for up to 2 months. When you want to eat it, thaw it overnight in the fridge. Then, reheat it in the oven for the best results. Yes, you can use any flatbread you like. Pita bread, naan, or even tortillas work well. Each type has its own taste and texture. Just make sure the flatbread is sturdy enough to hold the toppings. To keep your flatbread pizza crispy, try a few simple tricks. First, bake it at a high heat like 475°F (245°C). This helps the crust cook fast. Second, brush the flatbread with garlic herb oil before adding toppings. This creates a barrier. Lastly, avoid too much sauce or watery toppings. You can use many sauces to add flavor to your flatbread pizza. Try classic marinara for a traditional taste. Pesto gives a fresh, herby flavor. If you want a kick, drizzle some hot sauce. You can also mix olive oil with balsamic vinegar for a tasty twist. Garlic herb flatbread pizza is simple to make and delicious. We covered key ingredients and how to customize your pizza. You learned the best tools for cooking and step-by-step instructions for the process. Tips helped you achieve the perfect crispy crust, while variations showed you new topping ideas. Remember to store any leftovers properly, and reheating tips will keep flavors fresh. With these insights, you can impress anyone with your garlic herb flatbread pizza! Enjoy your cooking journey.

Garlic Herb Flatbread Pizza Easy and Flavorful Recipe

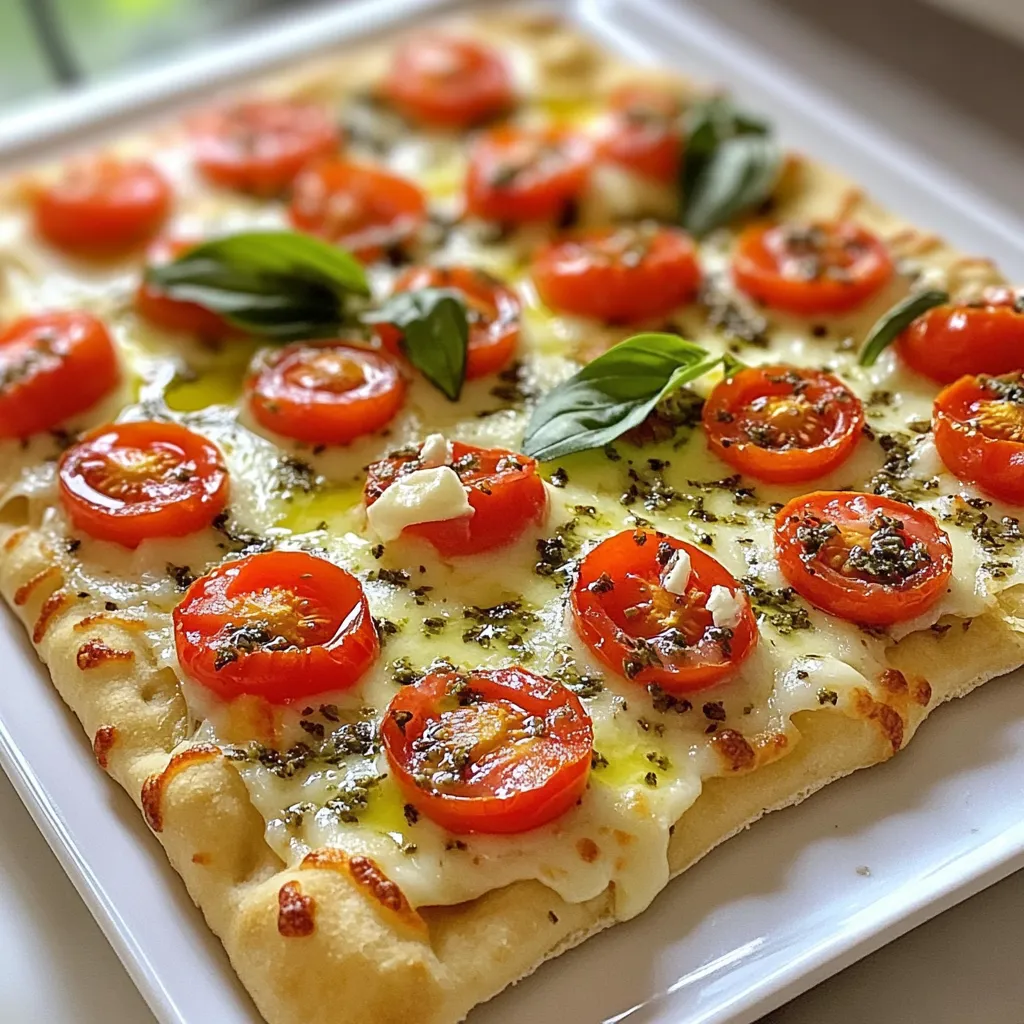
If you love pizza but want something simple and tasty, try my Garlic Herb Flatbread Pizza! This recipe is quick

Older posts
Newer posts
← Previous Page1 Page2 Page3 Page4 … Page86 Next →

dsad

© 2026 Cooking Wells • Built with GeneratePress

Our Policies

  • Copyright Policy
  • Cookie Policy
  • GDPR Policy
  • Privacy Policy
  • Disclaimer
  • Terms Of Use

More Information

  • Home
  • About
  • Contact
  • Appetizers
  • Dessert
  • Dinner
  • Drinks
©2026, Cooking Wells About Back To Top