Skip to content
DisclaimerTerms Of UseGDPR PolicyCookie Policy

Cooking Wells

  • Home
  • Drinks
  • Appetizers
  • Dinner
  • Dessert
  • About
  • Contact
  • Privacy Policy
DisclaimerTerms Of UseGDPR PolicyCookie Policy

NO-ING-IMG

- 4 boneless, skinless chicken thighs - 1 pound gnocchi (store-bought or homemade) - 1 cup cherry tomatoes, halved - 1 bell pepper, sliced (red, yellow, or orange) - 1 zucchini, chopped - 4 tablespoons pesto (store-bought or homemade) - 2 tablespoons olive oil - Salt and pepper to taste - Fresh basil leaves for garnish - Grated Parmesan cheese for serving When I think about the flavor boost in this dish, the main ingredients stand out. The chicken thighs provide a juicy base. They soak up all the flavors well. Gnocchi adds a unique, chewy texture that pairs perfectly with the chicken. Fresh vegetables like cherry tomatoes, bell peppers, and zucchini bring color and nutrition. Each ingredient adds a layer of taste. For seasoning, pesto is a game-changer. It brings a burst of freshness and herb flavor. Using high-quality olive oil enhances the dish further. Salt and pepper are essential, too. They balance the flavors and make everything pop. Don’t forget the optional garnishes! Fresh basil leaves give a vibrant touch. Grated Parmesan cheese adds a salty richness. Together, they elevate the dish and make it look gorgeous. - Preheat your oven to 400°F (200°C). This step is key for even cooking. - Prepare the chicken by placing the thighs on a large sheet pan. Drizzle one tablespoon of olive oil over them. Season with salt, pepper, and half of the pesto. Make sure the chicken gets a good coating. - In a mixing bowl, combine the gnocchi, cherry tomatoes, bell pepper, and zucchini. Add the remaining olive oil. Season this mix with salt and pepper. Toss in the rest of the pesto until all the ingredients are well coated. - Spread the gnocchi and vegetables evenly around the chicken on the sheet pan. This helps everything cook evenly. - Bake in the preheated oven for 25-30 minutes. The chicken should reach an internal temperature of 165°F (75°C). The gnocchi will turn golden and slightly crispy. To check if your chicken is done, use a meat thermometer. The safe internal temperature is 165°F (75°C). Insert the thermometer into the thickest part of the thigh. If it reads 165°F, your chicken is ready. For seasoning, I like to use salt and pepper. This adds flavor without overpowering the dish. Coat your chicken with half the pesto before cooking. This keeps it juicy and adds great taste. To get crispy gnocchi, use a hot oven. Bake at 400°F (200°C) for a nice golden color. Make sure to spread the gnocchi out on the pan. This helps them crisp up and not stick together. Avoid soggy vegetables by not overcrowding the pan. Leave space between each piece. This way, they roast instead of steam, keeping their crunch. For sides, a simple green salad pairs well. The freshness balances the rich flavors of the dish. You can also serve garlic bread for a cozy touch. For drinks, try a light white wine, like Sauvignon Blanc. It complements the pesto and chicken nicely. If you prefer non-alcoholic, a sparkling water with lemon works great! {{image_2}} You can change the protein in this dish. Try turkey or tofu for a twist. Both options bring unique flavors to the table. Switch up your veggies too. Asparagus or broccoli can add a nice crunch. They cook well with the chicken and gnocchi. Spices can take your meal to the next level. Add red pepper flakes for a kick. Just a pinch can make a big difference in taste. You can also experiment with different types of pesto. Basil pesto is classic, but sun-dried tomato or arugula pesto works great too. Each brings a new flavor profile to your dish. If you want to make this dish gluten-free, look for gluten-free gnocchi. Many brands offer tasty options that fit the bill. For a dairy-free version, skip the Parmesan cheese or use a dairy-free alternative. You can still enjoy a rich flavor without dairy. You can keep Sheet Pan Pesto Chicken and Gnocchi in the fridge for about 3-4 days. To store it well, use airtight containers. This helps keep the food fresh and tasty for your next meal. Freezing leftovers is a great option if you want to save some for later. Let the dish cool completely first. Then, place it in freezer-safe containers. Make sure to label with the date. You can freeze it for up to 2-3 months. When you’re ready to eat, thaw it overnight in the fridge. For the best taste, reheat in the oven. Preheat your oven to 350°F (175°C). Place the dish in an oven-safe dish and cover it with foil. Heat for about 20-25 minutes. This method keeps the chicken juicy and the gnocchi crispy. You can also use a microwave, but it may make the gnocchi soft. If using a microwave, heat in 1-minute bursts until warm. Enjoy your meal! Making this dish takes about 40 minutes. You need 10 minutes for prep and 25-30 minutes to cook. This quick time makes it great for busy nights. You can easily have a tasty meal ready in no time. Yes, you can use homemade pesto. Homemade pesto tastes fresh and bright. It allows you to control the ingredients. You can adjust the flavors to your liking. Store-bought pesto is quick and easy, but may contain preservatives. If you have time, I always recommend making your own. This dish pairs well with a simple green salad. A light vinaigrette will balance the meal. You could also serve crusty bread to soak up the sauce. Roasted vegetables add extra color and flavor. For drinks, a crisp white wine works nicely. This article covered how to make a tasty sheet pan pesto chicken and gnocchi dish. You learned about the key ingredients, like chicken thighs, gnocchi, and fresh veggies. We walked through preparation, mixing, and baking steps to ensure perfect results. In closing, don’t hesitate to mix and match ingredients. Experiment with flavors and enjoy your meal. Try these tips to keep your dish fresh and delicious, whether you serve it right away or store leftovers. Happy cooking!

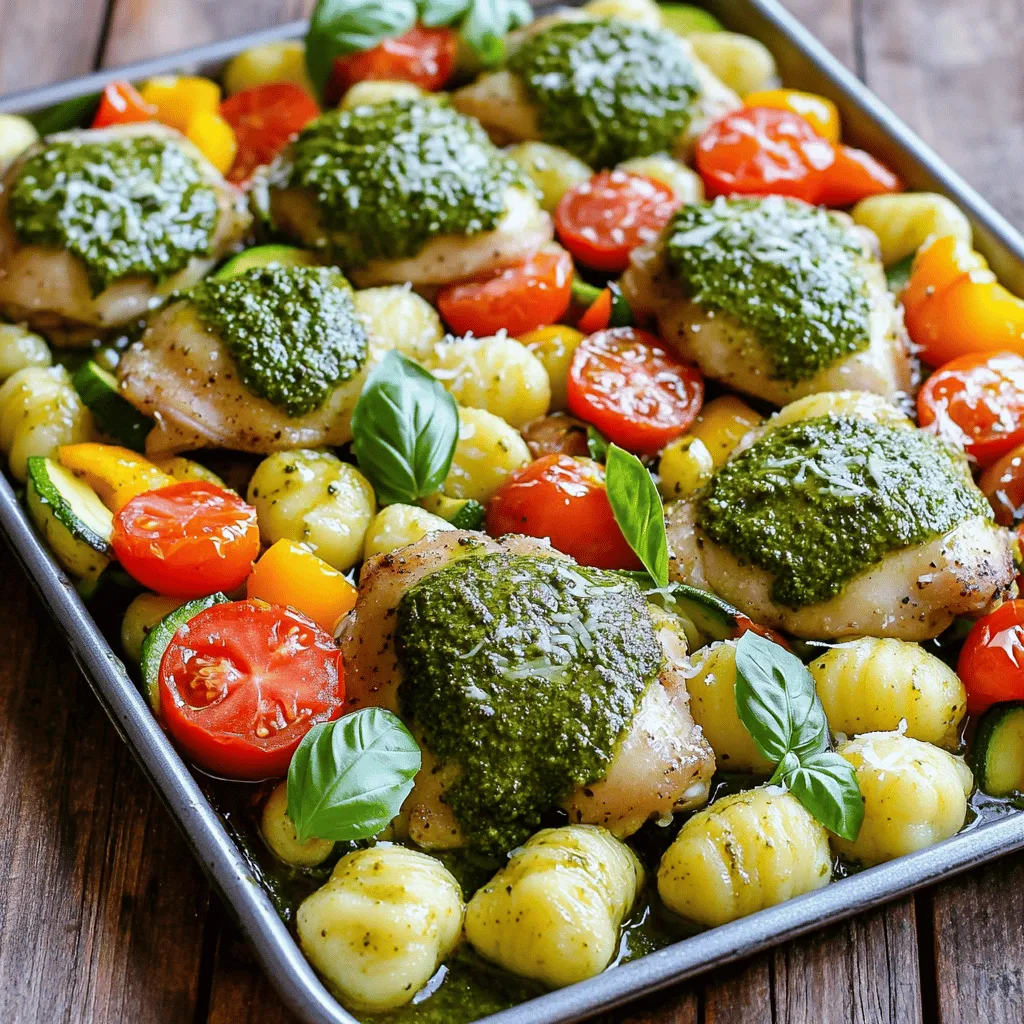
Sheet Pan Pesto Chicken and Gnocchi Flavor Boost

Get ready to elevate your dinner game with Sheet Pan Pesto Chicken and Gnocchi! This easy recipe combines juicy chicken

- 1 block (14 oz) firm tofu - Vegetable oil and sesame oil - Fresh vegetables: - 1 red bell pepper, sliced - 1 yellow bell pepper, sliced - 1 cup broccoli florets - 1 cup snow peas - 4 cloves garlic, minced - 1 inch ginger, grated - 3 tablespoons soy sauce - 1 tablespoon chili paste (adjust for spice preference) - 2 tablespoons cornstarch - Garnishing ingredients: - 2 green onions, sliced - Sesame seeds To start, drain the tofu. Place it between two plates with a weight on top. This presses out the extra moisture. Let it sit for about 15 minutes. Next, cut the pressed tofu into 1-inch cubes. This size helps the tofu cook evenly and get crispy. Now, it’s time to coat the tofu. In a large bowl, add cornstarch. Toss the tofu cubes in the cornstarch until they are all covered. This gives the tofu a crispy outer layer when cooked. Heat a large skillet or wok over medium-high heat. Add 1 tablespoon of vegetable oil. Once the oil is hot, add the tofu cubes in a single layer. Cook them for about 3-4 minutes on each side. You want them to be golden brown and crispy. Make sure to turn the tofu gently so it browns evenly. Once done, remove the crispy tofu from the pan and set it aside. In the same skillet, add the remaining tablespoon of vegetable oil. When the oil is hot, add 4 cloves of minced garlic and 1 inch of grated ginger. Sauté for about 30 seconds. You want to smell the fragrant garlic and ginger. Next, add the sliced red bell pepper, yellow bell pepper, broccoli florets, and snow peas. Stir-fry these vegetables for about 4-5 minutes. They should be tender but still crisp for the best texture. Now, lower the heat. Add 3 tablespoons of soy sauce, 1 tablespoon of chili paste, and 1 tablespoon of sesame oil. Mix these ingredients well to combine the flavors. Add the crispy tofu back into the skillet. Gently toss everything together for 1-2 minutes. Ensure the tofu gets coated in the sauce and heated through. This step is key for mixing the flavors well. Enjoy the delicious aroma filling your kitchen! To get crispy tofu, start by pressing it well. Remove excess water by wrapping the tofu block in a clean towel and placing a heavy object on top. Let it sit for at least 15 minutes. This step ensures the tofu absorbs flavors and gets crispy. After pressing, cut the tofu into 1-inch cubes. Coat the cubed tofu in cornstarch. This creates a crust when you fry it. Heat vegetable oil in a skillet over medium-high heat. Add the tofu in a single layer. Cook for 3-4 minutes on each side. Look for a golden brown color. If you want to avoid frying, you can air fry or bake the tofu. For air frying, set it to 400°F and cook for about 15 minutes. Toss halfway for even crispness. If baking, preheat the oven to 425°F and bake for 25-30 minutes. To adjust the spice, modify the chili paste used in the dish. Start with one tablespoon, then taste. If you want more heat, you can add more. You can also mix in some red pepper flakes for extra kick. Balancing flavors is key. Pair spicy elements with sweet or savory notes. If it’s too spicy, add a splash of soy sauce or a bit of sugar. This helps tone down the heat while keeping the taste great. For fresh-tasting vegetables, use quick stir-frying techniques. Cut your vegetables into uniform sizes. This ensures they cook evenly. Start with garlic and ginger first, then add your veggies. Add the denser vegetables, like broccoli, before softer ones, like bell peppers. This timing keeps them tender-crisp. Stir-fry for about 4-5 minutes and watch closely. You want bright colors and a slight crunch. This way, your dish is not only tasty but also visually appealing. {{image_2}} You can switch out the tofu for other proteins. Tempeh is a great vegan choice. It has a nutty taste and a firm texture. Chicken also works well if you prefer meat. Simply cut it into bite-sized pieces. Cook it the same way as tofu for that crispy finish. For a vegan option, use chickpeas or seitan. Chickpeas add protein and flavor. Seitan mimics meat texture and absorbs sauces well. These swaps keep your dish tasty and fun. Feel free to change the veggies in your stir-fry. Carrots, snap peas, and zucchini are excellent choices. You can also use mushrooms for a savory depth. Each veggie adds a unique flavor and color. Seasonal vegetables can make your dish fresh. In spring, add asparagus or peas. In fall, try butternut squash or brussels sprouts. This way, you enjoy the best of what nature offers. Mix up the sauces for new flavors. Instead of soy sauce, use tamari for a gluten-free option. You can also try teriyaki sauce for a sweet twist. Hoisin sauce gives a rich taste that pairs well with tofu. For heat, switch chili paste with sriracha or sambal oelek. Each sauce offers a different kick. Experiment with flavors to find what you love best. To store your crispy chili garlic tofu stir-fry, let it cool first. Place leftovers in an airtight container. This helps keep the dish fresh. You can refrigerate it for up to 3 days. If you want to keep it longer, consider freezing it. Use freezer-safe containers or bags. The stir-fry can last up to 3 months in the freezer. Reheating crispy tofu can be tricky. I suggest using an oven or air fryer. Preheat your oven to 350°F (175°C). Place the tofu on a baking sheet. Heat it for about 10-15 minutes. This keeps the tofu crispy. If using a microwave, cover the dish loosely with a lid. Heat in short bursts, about 30 seconds at a time. Be careful; the tofu can get soggy. Always check to make sure it’s hot throughout before serving. Using soft tofu changes the dish's texture. Firm tofu holds its shape well during cooking. Soft tofu is delicate and may break apart. It will not get crispy like firm tofu. For crispy results, stick with firm tofu. To increase the heat, add more chili paste. You can also sprinkle crushed red pepper flakes. Slicing fresh chili peppers works too. Start with a little, then taste as you go. This way, you can find your perfect spice level. The recipe can be gluten-free with some swaps. Regular soy sauce contains gluten. Use tamari or coconut aminos instead. Check other ingredients, like vegetable broth, for gluten. Always read labels to be sure. This blog post covers a tasty tofu stir-fry recipe. You learned about the main ingredients, like firm tofu and fresh veggies. I shared step-by-step instructions, tips for perfecting the dish, and storage info for leftovers. You also found variations for protein, vegetables, and sauces. In conclusion, this recipe is versatile and easy. With your new skills, you can create delicious meals that suit your taste. Don’t hesitate to try different ingredients and make this dish your own. Enjoy your cooking adventure!

Crispy Chili Garlic Tofu Stir-Fry Flavorful Delight

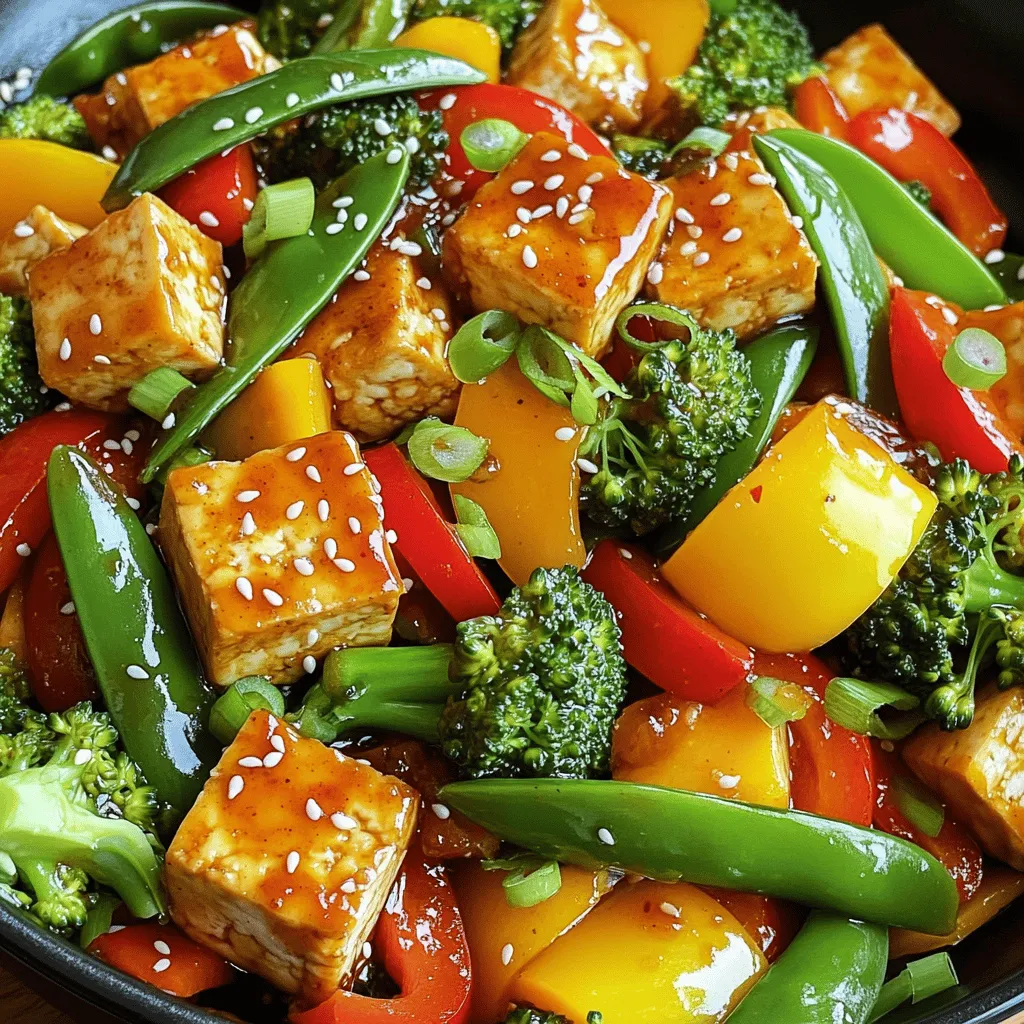
Are you ready to elevate your weeknight meals? My Crispy Chili Garlic Tofu Stir-Fry packs a punch of flavor and

- 1 cup all-purpose flour - 1/2 cup granulated sugar - 1/4 cup brown sugar - 1 tsp baking powder - 1/2 tsp baking soda - 1 tsp ground cinnamon - 1/2 tsp ground nutmeg - 1/4 tsp ground ginger - 1/4 tsp salt - 1/2 cup pumpkin puree - 1/2 tsp vanilla extract - 1/4 cup buttermilk (or milk with a splash of vinegar) - 1 large egg - 1/4 cup unsalted butter, melted - 1/2 cup granulated sugar (for rolling) - 1 tbsp ground cinnamon (for rolling) To make these donut holes, start with your dry ingredients. Mix flour, both sugars, baking powder, baking soda, cinnamon, nutmeg, ginger, and salt in a bowl. This blend gives your donut holes a warm, cozy flavor. Next, move to your wet ingredients. In a separate bowl, combine pumpkin puree, vanilla extract, buttermilk, egg, and melted butter. The pumpkin puree adds moisture and that signature fall taste. For the coating, you only need sugar and cinnamon. This will give your donut holes a sweet, spiced finish. These ingredients come together to create a delightful treat, perfect for any occasion. The blend of spices and pumpkin makes each bite a joy. 1. Preheat your oven to 350°F (175°C) and grease a mini muffin pan or donut hole maker. 2. In a large bowl, whisk together: - 1 cup all-purpose flour - 1/2 cup granulated sugar - 1/4 cup brown sugar - 1 tsp baking powder - 1/2 tsp baking soda - 1 tsp ground cinnamon - 1/2 tsp ground nutmeg - 1/4 tsp ground ginger - 1/4 tsp salt 3. In another bowl, mix: - 1/2 cup pumpkin puree - 1/2 tsp vanilla extract - 1/4 cup buttermilk (or milk with a splash of vinegar) - 1 large egg - 1/4 cup unsalted butter, melted 1. Gradually add the wet ingredients to the dry ingredients. 2. Fold until just combined. It's fine if there are a few lumps. 3. Using a small cookie scoop or spoon, fill each cavity of the mini muffin pan about 2/3 full with the batter. 1. Bake the donut holes for 10-12 minutes. Check with a toothpick; it should come out clean. 2. While they bake, prepare the coating by mixing together: - 1/2 cup granulated sugar - 1 tbsp ground cinnamon 3. Once baked, let the donut holes cool for about 5 minutes. Then gently roll them in the cinnamon-sugar mixture to coat. 4. Transfer the coated donut holes to a serving platter. These steps will help you make warm, fluffy donut holes with a lovely pumpkin spice flavor. Enjoy the cozy aroma as they bake! To get soft donut holes, avoid overmixing the batter. Mix until just combined. Some lumps are okay. If you mix too much, the donut holes will be dense. The baking time is also key. Bake them for 10-12 minutes. Check with a toothpick; it should come out clean. Want more flavor? Add other spices like cloves or allspice. These spices will boost the taste. If you use fresh pumpkin puree, the flavor shines through. Fresh puree gives a richer taste than canned. Serve your donut holes warm for the best experience. You can arrange them in a bowl. Add a sprinkle of cinnamon on top for a nice touch. For a festive look, place mini decorative pumpkins around the bowl. {{image_2}} For a tasty twist, try maple pumpkin spice donut holes. Substitute half the sugar with maple syrup. This gives a rich and sweet flavor. You can add maple extract for extra depth. Another fun option is chocolate chip pumpkin spice donut holes. Fold in half a cup of mini chocolate chips before baking. The chocolate pairs well with the warm spices. Both flavors offer a new take on this fall favorite. Want a gluten-free option? Use a mix of almond flour and coconut flour. This gives a light texture while keeping them delicious. For a vegan version, replace the egg with a flax egg. Mix one tablespoon of ground flaxseed with three tablespoons of water. Let it sit for five minutes to thicken. Swap the butter for coconut oil or vegan butter. These changes keep the taste amazing while catering to different diets. Present your donut holes in fun, holiday-themed ways. Use a festive bowl and add mini pumpkins for a cheerful touch. Arrange the donuts in a circle, and sprinkle extra cinnamon for flair. Pair them with seasonal beverages like hot cider or pumpkin spice lattes. This combination allows for a cozy fall experience. You can even offer a dipping sauce, like maple syrup, for extra fun! To keep your donut holes fresh, store them in an airtight container. This helps prevent them from drying out. Place a paper towel in the container to absorb moisture. This keeps the donut holes soft and tasty. If you plan to eat them within two days, you can leave them at room temperature. For longer storage, refrigerate them. You can freeze these donut holes for up to three months. First, let them cool completely. Then, place them in a single layer on a baking sheet. Freeze them for about an hour until firm. After that, transfer the donut holes to a freezer bag or container. Remove as much air as possible to prevent freezer burn. To thaw, take them out of the freezer and leave them in the fridge overnight. You can also microwave them for about 15 seconds for a quick thaw. To reheat your donut holes, the oven works best. Preheat your oven to 350°F (175°C). Place the donut holes on a baking sheet and warm for about 5 minutes. This keeps the outside crispy and the inside soft. You can also use the microwave, but use low power to avoid sogginess. Heat them for 10-15 seconds at a time until warm. Enjoy your delicious treats! To help your donut holes rise, use fresh baking powder and baking soda. These ingredients give your batter lift. Make sure to mix the dry ingredients well before adding the wet ones. Don’t overmix the batter; a few lumps are okay. This keeps your donut holes light and fluffy. Yes, you can use canned pumpkin. It saves time and still gives great flavor. Just make sure it’s pure pumpkin puree, not pumpkin pie filling. This ensures you get the right taste and texture in your donut holes. You can customize these donut holes in many ways. Try adding chocolate chips for a sweet twist. You can also mix in nuts or dried fruit for extra texture. For a spicier flavor, add more cinnamon or a pinch of cloves. Get creative and make them your own! Homemade donut holes taste best fresh. However, you can store them in an airtight container for up to three days. If you want to keep them longer, freeze them. They can last up to two months in the freezer. Just make sure to thaw them at room temperature before serving. Absolutely! You can use a mini muffin pan or a donut hole maker. If you have fun shapes, go ahead and use them. Just adjust the baking time as needed. Keep an eye on them to ensure they bake evenly and come out perfect! You now have a complete guide to making delicious pumpkin spice donut holes. We covered the key ingredients, simple steps, and helpful tips throughout the baking process. You can explore various flavors and adapt the recipe to fit dietary needs. Finally, you learned how to store and reheat them for maximum freshness. Enjoy creating these tasty treats during any season. Trust me, they will be a hit!

Bakery-Style Pumpkin Spice Donut Holes Delight

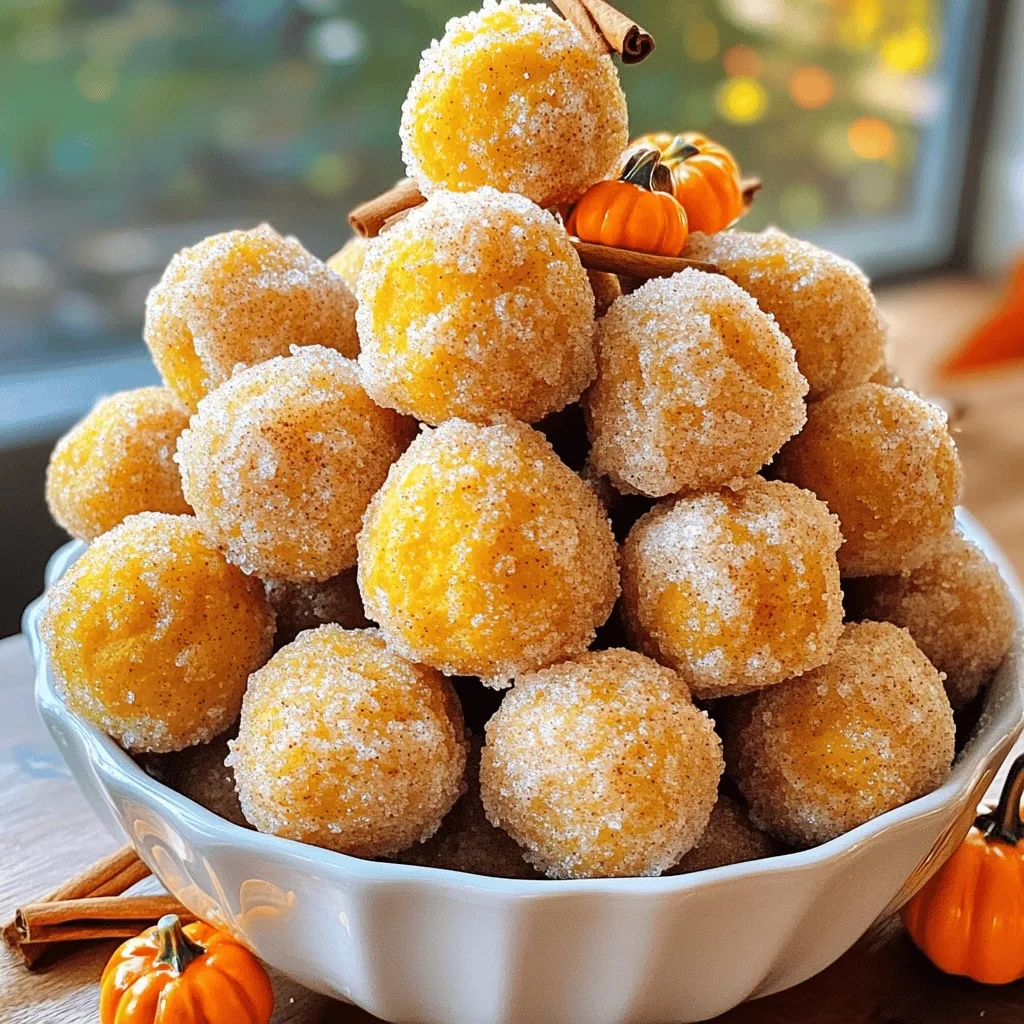
Craving a sweet taste of fall? My Bakery-Style Pumpkin Spice Donut Holes are here to satisfy that hunger! These bite-sized

- 1 ripe banana, frozen - 1 cup unsweetened almond milk (or your preferred milk) - 2 tablespoons natural peanut butter - 1 scoop vanilla protein powder (plant-based or whey) - 1 tablespoon chia seeds - 1 tablespoon honey or maple syrup (optional) - Toppings: sliced banana, granola, chopped nuts, shredded coconut, and a sprinkle of cinnamon - Banana: This fruit gives you quick energy and potassium. It helps your muscles and heart. - Almond milk: Low in calories and rich in vitamins, it hydrates without added fat. - Peanut butter: A good source of protein and healthy fats, it keeps you full longer. - Protein powder: It boosts your protein intake, which helps build and repair muscles. - Chia seeds: These tiny seeds are packed with fiber and omega-3 fatty acids. They help digestion. - Honey or maple syrup: Both add natural sweetness and provide quick fuel. Use them sparingly! - Toppings: They add crunch, flavor, and nutrients. Each topping offers unique benefits, like healthy fats or fiber. - Instead of almond milk, try oat milk or coconut milk for a different taste. - Swap peanut butter for almond or cashew butter if you want a new flavor. - Use agave syrup or stevia instead of honey or maple syrup for a lower-calorie sweetener. - For a nut-free option, you can use sunflower seed butter. To make the smoothie base, gather your ingredients. You need a frozen banana, almond milk, peanut butter, protein powder, and chia seeds. If you like it sweet, add honey or maple syrup. 1. Place the frozen banana in a blender. 2. Pour in the cup of almond milk. 3. Add two tablespoons of peanut butter. 4. Scoop in the protein powder and chia seeds. 5. If you want extra sweetness, include honey or maple syrup. 6. Blend on high until smooth and creamy. If the mix is too thick, add more almond milk. Toppings make your smoothie bowl look great and add flavor. Start by pouring the smoothie mix into a bowl. Then, arrange your toppings on the surface. Here are some ideas: - Sliced banana - Granola - Chopped nuts - Shredded coconut Start with the banana slices. Next, sprinkle on granola and nuts. Finish with shredded coconut. A light sprinkle of cinnamon adds a nice touch. For the best smoothie bowl, focus on texture. If it’s too thick, add more almond milk. Blend again until smooth. If you like it thicker, use less milk. Frozen bananas help thicken the mix. For a creamier base, use more peanut butter. This balance makes your smoothie bowl delightful. Using frozen bananas makes your smoothie bowl creamy and thick. Choose ripe bananas for the best taste. Peel and slice them before freezing. Place slices in a single layer on a plate or tray. Once frozen, store them in a bag for easy use. This method helps keep them fresh and ready when you want to blend. You can adjust sweetness based on your taste. If you like it sweeter, add honey or maple syrup. Start with one tablespoon and taste. You can always add more, but you can’t take it out! For a less sweet option, skip the added sweetener. The banana and peanut butter will still give you a nice flavor. A good blender is key to a smooth consistency. I recommend a high-speed blender for best results. Look for a model with strong blades. If you have a personal blender, that works too! Just blend in smaller batches if needed. Make sure to scrape down the sides. This helps mix everything evenly. {{image_2}} You can change the protein powder to fit your taste. I like vanilla, but you can try chocolate or strawberry. Plant-based protein works great if you want a vegan option. Look for ones with no added sugar. You can also use regular whey protein if you prefer dairy. The toppings can make your smoothie bowl fun and tasty. Try adding berries for a fruity twist. Sliced kiwi gives a refreshing crunch. If you want something sweet, use chocolate chips or dried fruit. Nuts add a nice crunch if you like texture. You can even sprinkle some seeds for extra nutrition. To make this smoothie bowl vegan, skip honey and use maple syrup instead. For a low-carb diet, avoid fruits like bananas and use avocado instead. You can also add unsweetened cocoa powder for flavor. Almond milk is low in carbs, so stick with that. If you have leftover smoothie, pour it into an airtight container. This keeps it fresh. Store it in the fridge for up to 24 hours. When you’re ready to drink it, shake or stir well. The smoothie may separate, but that’s normal. If it looks too thick, add a splash of almond milk to thin it out. You can save time by prepping ingredients ahead. Peel and slice the banana, then freeze it. Measure out the almond milk, peanut butter, and protein powder. Store them in containers in the fridge. This way, you can whip up your smoothie bowl in just minutes! For meal prep, blend your smoothie base and pour it into ice cube trays. Once frozen, pop out the cubes and store them in a bag. When you want a smoothie bowl, blend a few cubes with your milk of choice. This method keeps your smoothie fresh and ready for any time! Yes, you can skip the protein powder. The smoothie will still taste great. The banana and peanut butter provide some protein. You can also add Greek yogurt for extra protein without the powder. To make this smoothie bowl dairy-free, use almond milk. You can also try coconut milk or oat milk. These options keep it creamy and delicious without dairy. Some tasty toppings include: - Sliced banana - Granola - Chopped nuts - Shredded coconut - A sprinkle of cinnamon Feel free to mix and match these for a fun look and taste. To thicken your smoothie bowl, add more frozen banana or ice. You can also use less almond milk. Blend well until it reaches your desired thickness. This blog post shared essential ingredients for tasty smoothie bowls. You now know their nutritional benefits and how to swap dairy or sweeteners. I provided step-by-step instructions to help you make the perfect base and add fun toppings. You can customize flavors and textures with protein powders and toppings. Lastly, I covered how to store and prep your smoothies. Try these tips and enjoy your healthy creations. Smoothie bowls can be simple, fun, and good for you!

High-Protein Peanut Butter Banana Smoothie Bowl Recipe

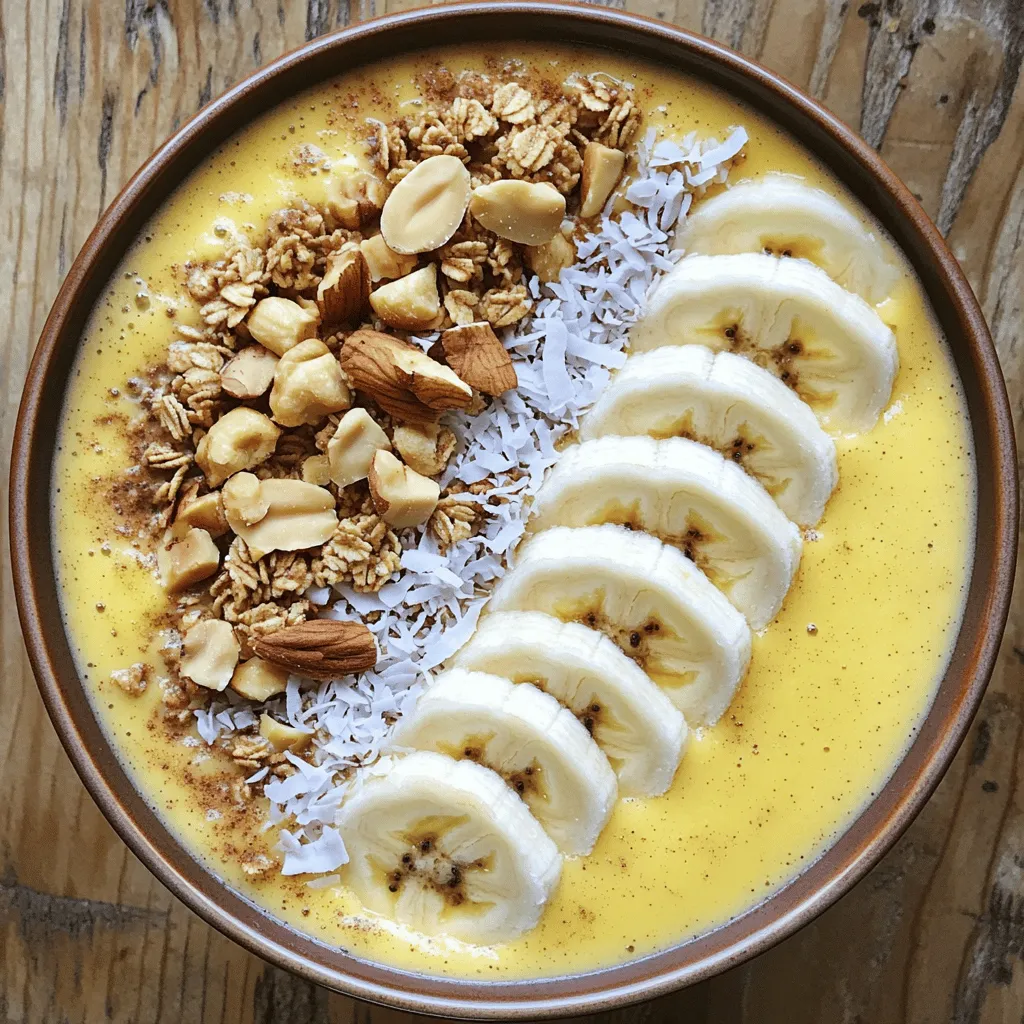
Looking for a quick, tasty, and healthy breakfast? This High-Protein Peanut Butter Banana Smoothie Bowl recipe hits the mark! With

- 1 lb (450g) large shrimp, peeled and deveined - 2 tablespoons olive oil - 5 cloves garlic, minced - 1 tablespoon ginger, grated - 1-2 teaspoons red pepper flakes (adjust to spice preference) - 2 tablespoons soy sauce (or tamari for gluten-free) - 1 tablespoon honey or maple syrup - 1 tablespoon lime juice - 1 teaspoon sesame oil - 1 head of butter or iceberg lettuce, leaves separated - Fresh cilantro and sliced green onions for garnish To make Minute Spicy Garlic Shrimp Lettuce Wraps, gather these fresh and vibrant ingredients. The large shrimp serve as the star of the dish, providing a juicy and tender bite. The garlic and ginger add a depth of flavor that wakes up your taste buds. Olive oil acts as the base for sautéing, ensuring that everything cooks nicely. For the sauce, red pepper flakes add heat, while soy sauce brings umami. Honey or maple syrup balances the spice with a touch of sweetness. The lime juice and sesame oil round off the flavors, giving the dish a zesty finish. Don’t forget the lettuce! It wraps around the shrimp, making each bite crisp and light. Fresh cilantro and green onions offer a burst of color and flavor, enhancing the presentation. Enjoy this quick and exciting meal that is sure to impress! First, grab a large skillet. Place it on the stove over medium-high heat. Add 2 tablespoons of olive oil. Let the oil heat up until it shimmers. This step helps the shrimp cook evenly and adds flavor. Once the oil is hot, add 5 cloves of minced garlic and 1 tablespoon of grated ginger. Sauté them for about 30 seconds. You want to smell their aroma. Be careful! Don’t let the garlic burn; it will taste bitter. Now, it's time for the shrimp. Add 1 pound of peeled and deveined shrimp to the skillet. Sprinkle in 1 to 2 teaspoons of red pepper flakes, along with salt and pepper. Stir-fry for about 3 to 4 minutes. You’ll know they are done when they turn pink and opaque. This means they are perfectly cooked. Next, pour in 2 tablespoons of soy sauce, 1 tablespoon of honey, 1 tablespoon of lime juice, and 1 teaspoon of sesame oil. Stir well to coat the shrimp. Cook for another minute until the sauce thickens a bit. This makes the shrimp extra tasty. Turn off the heat and take the shrimp out of the skillet. Grab a lettuce leaf from a head of butter or iceberg lettuce. Spoon some shrimp into the center of the leaf. Fold the lettuce around the shrimp to make a wrap. It's fun and easy! To make it look nice, top your wraps with fresh cilantro and sliced green onions. Serve the wraps on a platter. Add lime wedges and a small bowl of extra soy sauce for dipping. The colors and flavors will wow your guests! - Gluten-free options: Use tamari instead of soy sauce to keep it gluten-free. It has the same rich flavor and works well in this dish. - Alternative sweeteners: If you prefer not to use honey, maple syrup is a great choice. It adds a nice sweetness and keeps the dish vegan. Timing is key when cooking shrimp. They cook fast, so keep an eye on them. Cook the shrimp for about 3-4 minutes. They should turn pink and opaque. If you overcook them, they become rubbery. Trust me; no one wants rubbery shrimp. Serve your wraps with lime wedges on the side. They add a bright flavor when squeezed over the shrimp. A small bowl of extra soy sauce is also great for dipping. Fresh cilantro and sliced green onions not only look good but also add a nice crunch. Enjoy experimenting with different garnishes to make your wraps pop! {{image_2}} You can swap shrimp for other proteins. Chicken works well and cooks quickly. Just cut it into small pieces. Tofu is also a great choice if you want a plant-based meal. Use firm tofu for the best texture. Cook it the same way you would shrimp. This gives you more ways to enjoy the dish! To change the heat, adjust the red pepper flakes. Start with one teaspoon if you like mild flavors. You can add more if you want a kick. Another way to control heat is by using fresh chili peppers. Slice them up and cook them with the garlic and ginger. This adds a fresh, spicy taste! Adding more veggies can make your wraps even better. Try thin slices of bell peppers or carrots for crunch. You can also use shredded cabbage for added texture. Fresh herbs like basil or mint can boost flavor too. Mix these veggies with the shrimp for a great combo that’s healthy and colorful. To keep your shrimp wraps fresh, store them in an airtight container. Place the shrimp mixture in one container and the lettuce leaves in another. This way, the lettuce stays crisp. Use the leftovers within two days for the best taste. If you notice any change in smell or texture, throw it out. To reheat the shrimp, use a skillet over medium heat. Add a splash of water or broth to keep them moist. Stir gently until they are heated through, about 3-4 minutes. Avoid using the microwave, as it can make the shrimp rubbery. You want to keep that tender texture! You can prep the shrimp mixture a day ahead. Just store it in the fridge in an airtight container. On serving day, simply reheat it and assemble the wraps. For quick serving, wash and separate the lettuce leaves ahead of time. This makes it easy to grab and go! To make shrimp lettuce wraps, follow these steps: 1. Heat the oil: Start by heating olive oil in a large skillet over medium-high heat. 2. Sauté aromatics: Add minced garlic and grated ginger. Cook for about 30 seconds. Watch closely so the garlic doesn't burn. 3. Cook the shrimp: Toss in the shrimp, red pepper flakes, salt, and pepper. Stir-fry for 3-4 minutes. The shrimp should turn pink and opaque. 4. Add sauce ingredients: Pour in soy sauce, honey, lime juice, and sesame oil. Stir well for about a minute until the sauce thickens. 5. Prepare lettuce wraps: Remove from heat. Take a lettuce leaf and place some shrimp in the center. 6. Garnish and serve: Top with chopped cilantro and sliced green onions. Fold the lettuce around the filling to create a wrap. Enjoy right away! Yes, you can use frozen shrimp. Here are some tips: - Thawing: Thaw the shrimp overnight in the fridge or under cold running water for about 10 minutes. - Cooking time: Frozen shrimp may need an extra minute of cooking time. Make sure they are fully cooked and pink. - Texture: Using frozen shrimp can change the texture slightly. Fresh shrimp often have a firmer bite. For lettuce wraps, here are the best options: - Butter lettuce: Soft and pliable, it cradles fillings well. - Iceberg lettuce: Crisp and crunchy but less flexible. Great for added crunch. - Romaine lettuce: Sturdy and slightly bitter, it holds up well with heavy fillings. Choose the lettuce that fits your taste and desired texture for the wraps! You can create delicious shrimp lettuce wraps using simple ingredients and easy steps. Start by sautéing garlic and ginger before cooking your shrimp perfectly. Mix in your sauces to bring out great flavors. Remember, adding lime juice and garnishes makes the dish pop. Experiment with protein swaps and spice levels to fit your taste. Store leftovers properly and reheat them to keep your meal fresh. Now, you have a tasty dish that's fun to make and share! Enjoy your cooking adventure!

Minute Spicy Garlic Shrimp Lettuce Wraps Delight

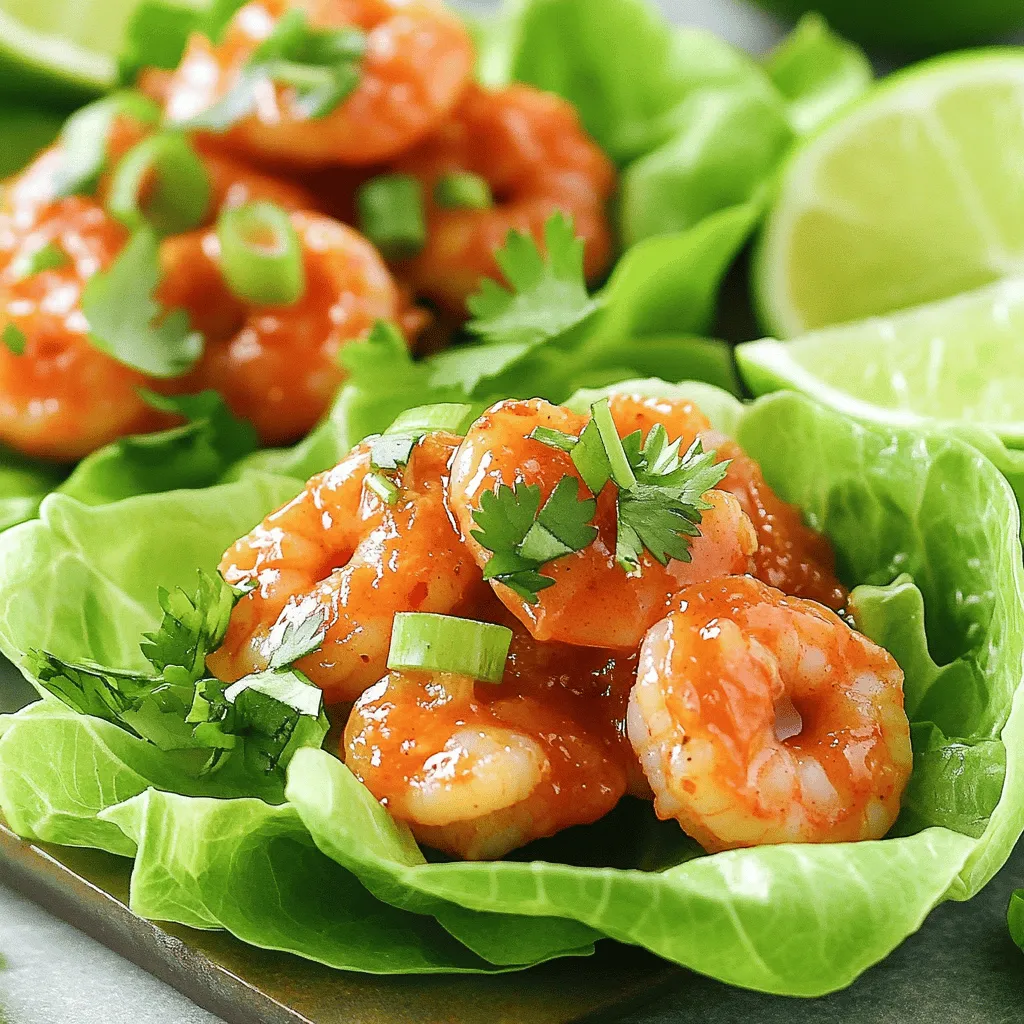
Welcome to a burst of flavor with my Minute Spicy Garlic Shrimp Lettuce Wraps Delight! You’ll love this quick recipe

- 1 cup dried green or brown lentils, rinsed - 1 medium onion, diced - 3 cloves garlic, minced - 2 carrots, diced - 2 celery stalks, diced - 1 can (14 oz) diced tomatoes, with juices - 4 cups vegetable broth - 1 teaspoon dried oregano - 1 teaspoon dried basil - 1 teaspoon thyme - 2 cups kale, chopped - Salt and pepper to taste - 2 tablespoons olive oil - Zest of 1 lemon - Juice of 1 lemon I love using dried lentils in this soup. They cook beautifully and pack in protein and fiber. Fresh vegetables, like onions, carrots, and celery, add flavor and texture. I always use diced tomatoes for a rich base. Vegetable broth brings everything together. The herbs, like oregano and basil, create a warm, inviting taste. Kale adds a healthy crunch. Lastly, lemon zest and juice brighten the soup. - Additional vegetables - Protein options You can customize this soup with extra vegetables. Try adding bell peppers, zucchini, or sweet potatoes for more color and taste. If you want to add protein, consider diced chicken, sausage, or even tofu for a vegetarian option. These additions can make your soup even heartier. Start by sautéing the onion, carrots, and celery. Take a skillet and heat up two tablespoons of olive oil over medium heat. Add the diced onion, carrots, and celery. Sauté these for about five to seven minutes. You want them to soften and become fragrant. Then, add three minced garlic cloves. Cook for one more minute. This step builds a strong flavor base for your soup. Next, it’s time to layer your lentils and veggies in the slow cooker. Add one cup of rinsed lentils to the pot. Then, pour in the sautéed vegetables, along with one can of diced tomatoes, including their juices. Now, add four cups of vegetable broth. Season the mix with one teaspoon each of dried oregano, basil, and thyme. Don't forget to add salt and pepper to taste. Stir everything well so the flavors blend. Cover the slow cooker and set it on low for six to eight hours. If you’re in a hurry, you can set it on high for three to four hours. Your goal is tender lentils. The longer you cook, the better the flavors meld together. About thirty minutes before serving, stir in two cups of chopped kale. Cover the pot again and let it cook until the kale wilts and softens. Right before serving, add the zest and juice of one lemon. This adds a fresh brightness to your soup. Taste and adjust the seasoning with salt and pepper as needed. Ladle the soup into bowls and enjoy it warm. It pairs wonderfully with crusty bread. For a nice touch, garnish with extra lemon zest or fresh herbs like parsley or basil. This adds color and enhances the flavor. Rinsing and checking the lentils Always rinse your lentils before cooking. This step helps remove dust and debris. Look for any small stones, as they can hide in the mix. Clean lentils cook more evenly and taste better. Avoiding mushiness To prevent mushy lentils, keep an eye on cooking time. If you overcook, they turn to mush. For slow cooking, 6-8 hours on low is great. Check the lentils near the end to ensure they stay firm. Additional herbs and spices to consider You can add more herbs for extra flavor. Try adding rosemary for a woodsy touch. A pinch of red pepper flakes brings a nice kick. Experiment with spices to find what you love best. Suggestions for making it creamier For a creamier soup, blend a small portion of it before serving. This method adds a nice texture. You can also stir in a splash of coconut milk or cream for richness. How to keep your slow cooker in top shape To keep your slow cooker clean, wash the pot after each use. Avoid using metal utensils, as they can scratch the surface. Store it in a dry place to prevent any mold or odors. Common troubleshooting tips If your soup is not cooking evenly, check the power cord. Ensure it is well plugged in. Sometimes, slow cookers need a few cycles to work their best. If your soup is too watery, remove the lid and cook on high for a while. {{image_2}} You can switch up the lentils in this soup. While I love green or brown lentils, you might try red lentils. They cook faster and create a thicker soup. Feel free to experiment with other types, too, like black lentils, for a unique twist. If you want to make this dish vegetarian or vegan, you have options. The recipe is already vegan since it uses vegetable broth. You can add plant-based protein, like chickpeas or tofu, for extra nutrition. This makes it hearty and filling. Want to add some spice? Try adding red pepper flakes or a pinch of cayenne pepper. This kick can wake up the soup’s flavors. For a different taste, think about adding spices like cumin or coriander. These spices give a warm, earthy profile that pairs well with lentils. You can also mix in flavors from other cuisines. For an Italian touch, add some parmesan cheese before serving. If you want a Middle Eastern flair, toss in some lemon zest and fresh herbs like cilantro or mint. Using seasonal vegetables can make this soup even better. In winter, root vegetables like parsnips or turnips work well. In summer, think about adding zucchini or bell peppers. These will keep the soup fresh and vibrant. You can also make a lighter version for summer. Reduce the amount of broth and add more fresh veggies. This creates a refreshing soup that’s great for hot days. Try serving it chilled for a different experience. After enjoying your soup, let it cool. Store leftovers in the fridge. Use airtight containers for the best results. The soup stays fresh for about five days. You can also use glass jars. They help you see what’s inside. You can heat the soup on the stove or in the microwave. For the stovetop, pour into a pot. Heat it over medium heat until warm. Stir often to keep it smooth. In the microwave, place the soup in a bowl. Cover it with a paper towel. Heat for one to two minutes, stirring halfway. This keeps the flavor and texture just right. To freeze the soup, let it cool completely. Use freezer-safe containers or bags. Leave some space at the top for expansion. Label with the date. The soup lasts up to three months in the freezer. To thaw, place it in the fridge overnight. You can also use the microwave for quick thawing. Reheat as mentioned above before serving. Yes, you can use canned lentils. They save time and cook faster. Drain and rinse them before adding to the slow cooker. If you use canned lentils, reduce the cooking time. Cook the soup for 2-3 hours on low. This helps the flavors combine without overcooking the lentils. If your soup is too thin, you have a few options. You can mash some lentils with a fork or blend a portion of the soup. This adds creaminess without extra ingredients. Another way is to add a tablespoon of cornstarch mixed with water. Stir it in and let it cook for a few minutes. Yes, you can easily make this soup on the stovetop. Start by sautéing the vegetables in a large pot. Then, add all the other ingredients. Bring it to a boil, then reduce to a simmer. Cook for about 30-40 minutes, or until the lentils are tender. Stir often to avoid sticking. This soup pairs well with crusty bread. A side salad can add freshness too. You might enjoy serving it with a scoop of pesto. It adds a nice herbal touch. You can also try a sprinkle of grated cheese for richness. The soup lasts about 4-5 days in the fridge. Store it in an airtight container. To keep it fresh, let it cool before sealing. Always check for any signs of spoilage before eating. If you want to keep it longer, consider freezing it. This blog post covered how to create a delicious slow cooker Tuscan lentil soup. We explored the main ingredients, including dried lentils, fresh vegetables, and the right herbs. I provided step-by-step instructions to help you prepare and cook the soup perfectly. We also shared useful tips and variations, plus ways to store leftovers. Overall, this soup is versatile and easy to make. You can customize it to suit your taste. Enjoy experimenting as you create your own tasty versions!

Slow Cooker Tuscan Lentil Soup Nourishing Comfort Dish

Slow Cooker Tuscan Lentil Soup combines rich flavors and warm comfort in every bowl. This dish is easy to make

- 1 cup all-purpose flour - 1/2 cup whole wheat flour - 1/2 cup sugar - 1 tablespoon baking powder - 1/4 teaspoon salt - 1/2 cup unsalted butter, melted - 1 large egg - 3/4 cup milk - 1 teaspoon vanilla extract - 1 cup fresh raspberries (or frozen, thawed) - 3/4 cup white chocolate chips Let’s dive into the ingredients! First, you need a mix of flours. I use all-purpose flour and whole wheat flour. The all-purpose flour gives the muffins a light texture while the whole wheat flour adds a nice nutty flavor. Next, you’ll want sugar. It sweetens the muffins and helps them brown. Baking powder is key. It makes the muffins rise and become fluffy. Don’t forget a pinch of salt! It boosts the flavors in your muffins. For the wet ingredients, start with melted unsalted butter. This will keep the muffins moist. Then, add an egg for richness and structure. Milk is next. It adds moisture. A splash of vanilla extract brings warmth and sweetness. Now onto the fun part—add-ins! Fresh raspberries are a must. They burst with flavor in every bite. If fresh ones are hard to find, frozen raspberries work too; just thaw them first. Finally, white chocolate chips add a creamy sweetness that pairs perfectly with tangy raspberries. Gather these ingredients, and you're all set for some delicious baking magic! - Preheat the oven to 375°F (190°C). - Line a muffin tin with paper liners. This step helps the muffins come out easily. - In a large bowl, whisk together: - 1 cup all-purpose flour - 1/2 cup whole wheat flour - 1/2 cup sugar - 1 tablespoon baking powder - 1/4 teaspoon salt - In another bowl, mix: - 1/2 cup unsalted butter, melted - 1 large egg - 3/4 cup milk - 1 teaspoon vanilla extract - Stir until the mixture is smooth and creamy. - Pour the wet mix into the dry mix. Gently fold together with a rubber spatula. Stop when the ingredients just combine. A few lumps are fine! - Carefully fold in: - 1 cup fresh raspberries - 3/4 cup white chocolate chips - Divide the batter evenly in the muffin cups, filling each about 3/4 full. - Bake the muffins for 18-22 minutes. Check if they are done by inserting a toothpick in the center. It should come out clean or with a few moist crumbs. - Once baked, let the muffins cool in the tin for 5 minutes. Then, transfer them to a wire rack to cool completely. To make your muffins fluffy, avoid overmixing the batter. When you combine the wet and dry ingredients, stir just until they come together. It's okay if some lumps remain; this keeps the muffins light. Also, use room temperature ingredients. When your butter, egg, and milk are warm, they mix better and create air. This air helps your muffins rise. Make sure your oven is accurate. An oven thermometer can help you check the temperature. If your oven runs hot, your muffins may bake too fast. This can lead to tough muffins. To check if your muffins are done, insert a toothpick in the center. If it comes out clean or with a few moist crumbs, they are ready. If it has wet batter, bake a bit longer. Serve the muffins warm for the best taste. Dust them with powdered sugar for a sweet touch. For a colorful look, arrange them on a platter with fresh raspberries scattered around. This makes them pop and adds to the fun! {{image_2}} - Gluten-free alternatives: You can swap the all-purpose flour with a gluten-free flour blend. This keeps the texture light. Make sure the blend has xanthan gum for better structure. - Dairy-free options: Use coconut milk or almond milk in place of regular milk. For butter, try coconut oil or a vegan butter substitute. These keep the muffins moist and tasty. - Different fruit options: If you want a twist, blueberries or chopped strawberries work great. They add new flavors while still being sweet and juicy. - Other types of chocolate: Instead of white chocolate, use dark chocolate chips or milk chocolate. Each choice brings a different taste and richness to your muffins. - Mini muffins: For bite-sized treats, fill mini muffin tins. Bake them for 10-15 minutes. This makes a great snack for kids or a fun party treat. - Jumbo muffins: If you want a hearty breakfast, go for jumbo muffins. Just fill the cups more and bake for 25-30 minutes. They will be fluffy and satisfying. To keep your muffins fresh, store them in an airtight container. This helps lock in moisture and flavor. You can use a simple plastic or glass container with a lid. Place a piece of parchment paper between layers if you stack them. This way, they won’t stick together. If you want to freeze your muffins, first let them cool completely. Wrap each muffin in plastic wrap tightly. Then, place them in a freezer bag or container. This prevents freezer burn. They can stay frozen for up to three months. When ready to eat, take them out and let them thaw overnight in the fridge. To reheat muffins, the oven works best. Preheat it to 350°F (175°C). Place the muffins on a baking sheet for about 10 minutes. This keeps them soft and warm. If you use a microwave, heat them for 15-20 seconds. But be careful; don’t overheat! Adding a damp paper towel can help prevent them from drying out. To make muffins fluffy, follow these tips: - Use fresh baking powder. This helps the muffins rise well. - Mix dry and wet ingredients separately. Combine them gently. - Avoid overmixing the batter. A few lumps are fine. - Let the batter rest for 10 minutes. This helps the gluten relax. These steps keep air in the batter, making your muffins light and soft. Yes, you can use frozen raspberries. They add great flavor too. However, they can change the texture. Frozen berries may make the batter wetter. Thaw them before adding to the mix. Pat them dry with a paper towel. This helps keep the muffins fluffy and not soggy. These muffins last for about 3-4 days at room temperature. Store them in an airtight container. For longer storage, keep them in the fridge for up to a week. If you want to keep them fresh for months, freeze them. Wrap each muffin tightly before freezing. Thaw them at room temperature or heat them in the oven. In this post, we covered the key ingredients for your muffins and how to mix them. I shared tips to achieve fluffiness and variations to try. You learned how to store and reheat your muffins for the best taste. Muffins can be a fun treat with endless options. Experiment with flavors and enjoy the process. Happy baking!

Fluffy Raspberry White Chocolate Muffins Recipe Delight

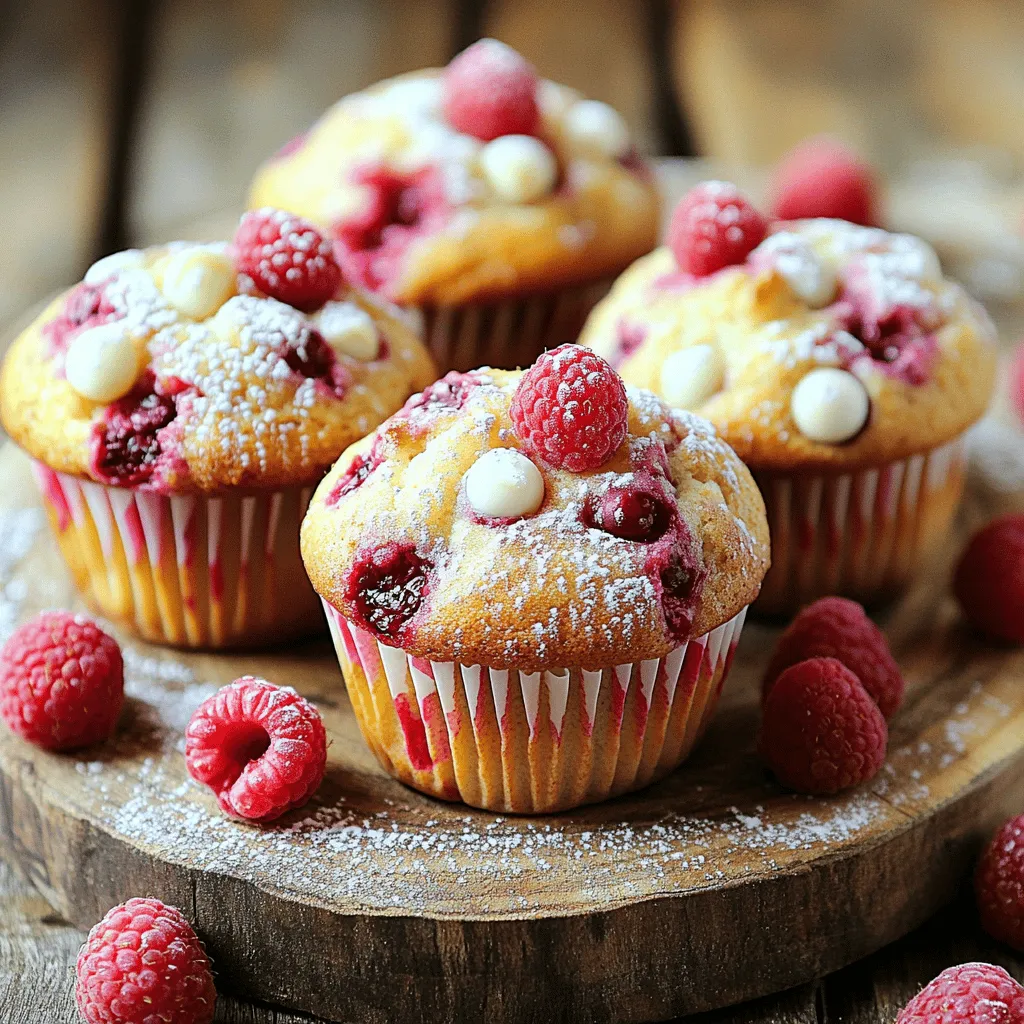
Looking for a treat that’s easy to make and bursting with flavor? These Fluffy Raspberry White Chocolate Muffins are sure

- 1 pound ground chicken - 1/2 cup breadcrumbs - 1/4 cup grated Parmesan cheese - 1 large egg The main ingredients create a tasty base for the meatballs. Ground chicken keeps them light and juicy. Breadcrumbs help bind the mix together. Parmesan adds a rich flavor that pairs well with garlic and herbs. The egg also helps hold everything in place. - 4 cloves garlic, minced - 1 tablespoon fresh parsley, chopped - 1 tablespoon fresh basil, chopped - 1 teaspoon dried oregano - 1 teaspoon salt - 1/2 teaspoon black pepper - 1 tablespoon olive oil Garlic gives a strong and savory punch. Fresh parsley and basil bring brightness to the dish. Oregano adds an earthy note. Salt and pepper enhance all the flavors. Olive oil is key for roasting the vegetables and adds a nice richness to the meatballs. - 1 zucchini, sliced into half-moons - 1 bell pepper, chopped - 1 red onion, diced The veggies not only add color but also nutrients. Zucchini cooks up soft and sweet. Bell pepper offers a sweet crunch. Red onion adds a bit of sharpness. Together, they balance the savory meatballs well. These ingredients work in harmony to create a meal full of flavor. You can mix, match, or swap them to suit your taste. Enjoy crafting this delicious dish! 1. Preheat your oven to 400°F (200°C). This helps the meatballs cook well. 2. Line a large baking sheet with parchment paper. This makes clean-up easy. 3. In a large bowl, mix the ground chicken, breadcrumbs, and Parmesan cheese. Add the egg, minced garlic, parsley, basil, oregano, salt, and pepper. Stir until all ingredients blend well. 1. Shape the mixture into meatballs about 1 to 1.5 inches wide. This size cooks evenly. 2. Place the meatballs on one side of the baking sheet. 3. On the other side, arrange sliced zucchini, chopped bell pepper, and diced red onion. Drizzle with olive oil and sprinkle with salt and pepper. 1. Bake for 20 to 25 minutes. The meatballs should reach 165°F to be safe to eat. 2. Check if the veggies are tender. They should be bright and soft. 3. Once cooked, take them out and let them cool for a few minutes before serving. To make great meatballs, size matters. Aim for meatballs about 1 to 1.5 inches wide. Use a small ice cream scoop or your hands to keep them uniform. This helps them cook evenly. When mixing, combine the ground chicken and ingredients gently. Overmixing can make the meatballs tough. Just mix until everything is blended. This keeps them light and flavorful. Choose colorful veggies for your sheet pan. Zucchini, bell peppers, and red onions add taste and appeal. They roast well and cook at the same time as the meatballs. Season the vegetables with olive oil, salt, and pepper. Toss them in the oil to coat evenly. This brings out their natural flavors and makes them tasty. For a delightful meal, pair the meatballs with fresh lemon wedges. Squeezing lemon juice adds brightness to the dish. You can also serve with a side of rice or a fresh salad for extra crunch. Plating is key! Arrange the meatballs in the center and scatter the veggies around. This creates a colorful presentation that looks as good as it tastes. {{image_2}} You can change the meat in this recipe. Ground turkey or beef works great. Each type brings its own flavor. If you want a lighter option, turkey keeps the dish healthy. Beef adds richness and deep taste. For a vegetarian option, use chickpeas or lentils. Mash them and mix with the other ingredients. You can also add some oats for texture. These choices keep the dish fun and fresh. Changing up the herbs is a simple way to add flavor. Try thyme or rosemary for a different taste. You can also mix in some red pepper flakes for heat. This adds a nice kick to the meatballs. Cheese is another way to boost flavor. Add feta for a tangy twist. Or sprinkle some smoked cheese for depth. Spices like paprika or cumin also work well. Feel free to experiment to find your favorite mix. Seasonal vegetables can keep this dish exciting. In summer, add corn or cherry tomatoes. In winter, think about root veggies like carrots or sweet potatoes. These swaps give you new flavors and textures each time. You can also add spinach or kale for extra nutrients. They cook down nicely and blend well with the meatballs. This keeps your meal colorful and healthy. Enjoy the creative process! To keep your meatballs fresh, store them in the fridge. Place them in an airtight container. They stay good for up to three days. If you want to keep them longer, freezing is a great option. Use a freezer-safe container or bag. Label with the date. You can freeze them for up to three months. To reheat your meatballs, the oven works best. Preheat it to 350°F. Place the meatballs on a baking sheet. Cover them with foil to keep moisture in. Heat for about 15 minutes. The microwave is quicker but can dry them out. If you use it, heat in short bursts. Check often to avoid overcooking. Leftovers last about three days in the fridge. After that, they may spoil. Signs of spoilage include a strange smell or color change. If you see any mold, throw them away. Always trust your senses! If in doubt, it's safer to discard the food. To keep your chicken meatballs moist, use these simple tips: - Add moisture: Include a bit more olive oil or another liquid. - Use fresh ingredients: Fresh herbs and garlic add moisture and flavor. - Don't overmix: Mix just enough to combine the ingredients. - Check cooking time: Cook until just done, around 20-25 minutes. These tips help you enjoy juicy meatballs every time. It's all about balancing flavors and keeping the moisture in. Yes, you can bake the meatballs without vegetables. - Adjust cooking time: Without veggies, the meatballs may need less time. Check them after 15 minutes. - Add extra flavor: Consider adding more herbs or spices to the chicken mix. - Serve with sides: Pair the meatballs with your favorite sides like rice or pasta. This way, you can still enjoy the tasty meatballs, even without the veggies. To make these meatballs gluten-free, simply swap the breadcrumbs. - Use gluten-free breadcrumbs: Many brands offer wheat-free options. - Try oats: Ground oats can also work well as a substitute. - Consider almond flour: This adds a nutty flavor and keeps the meatballs light. These swaps ensure everyone can enjoy your delicious meatballs without gluten. In this article, we explored how to make delicious chicken meatballs with veggies. We covered key ingredients like ground chicken and fresh herbs. You learned step-by-step instructions for preparation, baking, and serving. I shared tips for perfect meatballs and discussed fun variations to try. Finally, I provided guidelines for storing your leftovers. With these insights, you can create a tasty meal that fits your taste and needs. Enjoy cooking and experimenting with flavors for your next family dinner!

Sheet-Pan Garlic Herb Chicken Meatballs Delight

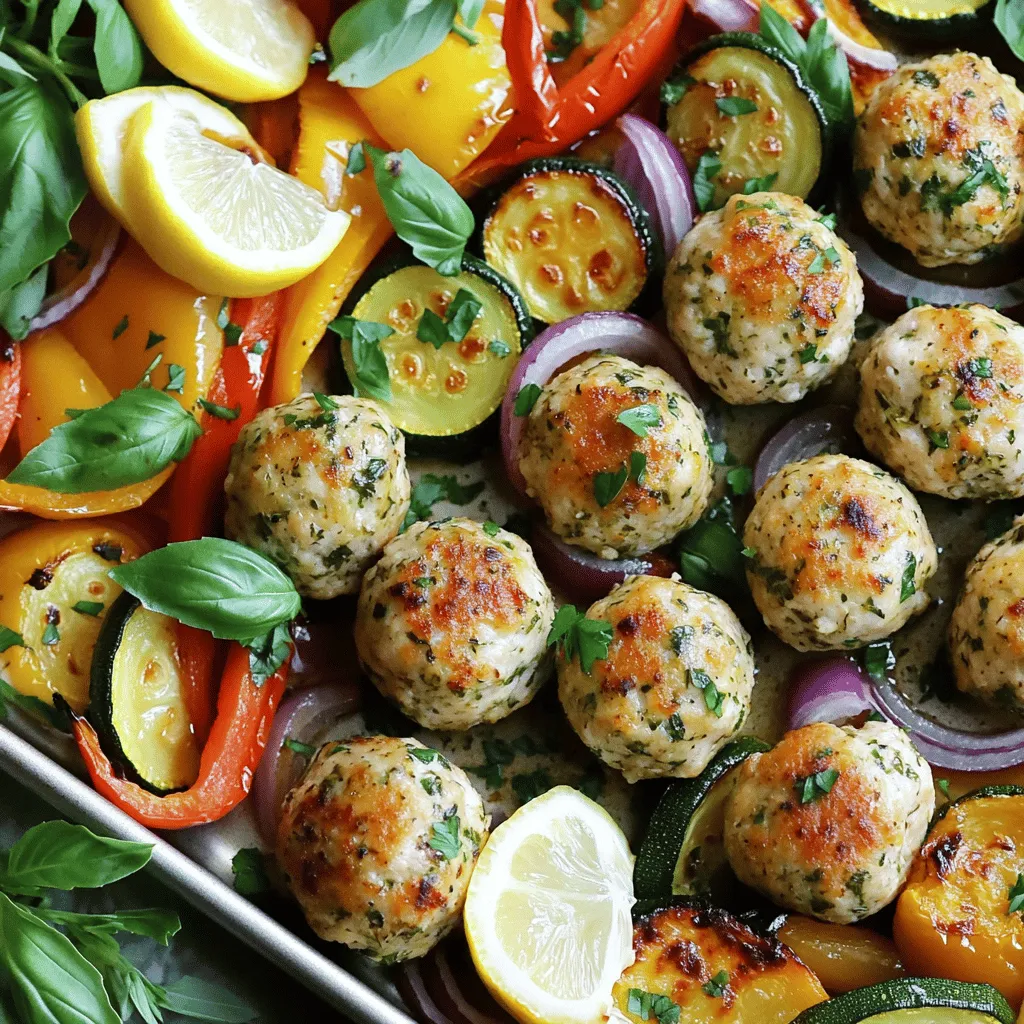
Looking for an easy and delicious meal? You’ve come to the right place! This recipe for Sheet-Pan Garlic Herb Chicken

- 1 cup graham cracker crumbs - 1/2 cup unsalted butter, melted - 8 oz cream cheese, softened - 1/2 cup powdered sugar - 1 teaspoon vanilla extract - 1/2 teaspoon ground cinnamon - 1 cup whipped cream (homemade or store-bought) - 1/2 cup mini cinnamon roll bites (store-bought or homemade, if desired) - 1 tablespoon caramel sauce (for drizzling) - Extra cinnamon for sprinkling This recipe is easy and fun! You'll need some key ingredients to make your no-bake cinnamon roll cheesecake cups. First, grab graham cracker crumbs. These will make a tasty crust. Use unsalted butter to hold the crumbs together. Next, cream cheese is a must. It gives the cheesecake its smooth texture. You will also need powdered sugar to sweeten the filling. Vanilla extract adds flavor. Ground cinnamon gives a warm spice that is perfect for this treat. Whipped cream is key for a fluffy texture. Mini cinnamon roll bites add a fun twist. Lastly, caramel sauce makes everything even sweeter, and extra cinnamon for garnish makes it look nice. With these ingredients, you can create a delightful treat that everyone will love! - First, grab a mixing bowl. - Add 1 cup of graham cracker crumbs. - Pour in 1/2 cup of melted unsalted butter. - Stir the mixture until it looks like wet sand. - Now, take small cups or jars. - Spoon the crumb mixture into each cup. - Press it down gently to form a solid base. - In a new bowl, beat 8 oz of softened cream cheese. - Add 1/2 cup of powdered sugar, 1 teaspoon of vanilla extract, and 1/2 teaspoon of ground cinnamon. - Mix until the filling is smooth and creamy. - Next, fold in 1 cup of whipped cream. - Be gentle so it stays fluffy. - Spoon the cheesecake filling over the crust in each cup. - Fill them about three-quarters full. - If you like, add mini cinnamon roll bites on top. - Drizzle 1 tablespoon of caramel sauce over each cup. - Finally, sprinkle a little extra cinnamon for flavor. - Chill the cups in the fridge for at least 2 hours before serving. To get the best texture in your cheesecake cups, start with the cream cheese. Soften it by leaving it out for about an hour. This step helps it mix smoothly. If you forget, you can microwave it in short bursts. Just don’t let it melt. Next, when you add whipped cream, fold it gently into the cream cheese mix. Use a spatula to lift and turn the mixture. This keeps the filling light and airy, which is key for a great texture. For a beautiful presentation, garnish your cheesecake cups. A small piece of cinnamon roll on top looks great. A light dusting of extra cinnamon adds a nice touch too. You can serve these cups chilled for a refreshing treat. If you want, they can also sit at room temperature for a bit. Just keep them cool if it's hot outside. A common mistake is overmixing the cheesecake filling. This can make it too dense. Mix until just combined for the best texture. Another mistake is not letting the cups set long enough. They need at least two hours in the fridge. This time allows the flavors to blend and the texture to firm up. {{image_2}} You can easily switch things up with new flavors. Adding chocolate or maple syrup makes a rich twist. Just mix some chocolate syrup into your cheesecake filling. For a sweet touch, drizzle maple syrup on top. You can also use fruit toppings like apples or cherries. Fresh fruit adds a nice burst of flavor and color. If you're looking for healthier choices, you have options. For the crust, swap graham crackers for gluten-free ones. This change keeps the dessert tasty for everyone! You can also use low-fat cream cheese. It cuts down on fat while keeping the creamy texture. You can adjust portions based on cup size. Mini cups are perfect for small bites, while regular cups give a more filling treat. The presentation also changes; mini cups look cute and fun, while regular cups feel more elegant. Choose your size based on your event or mood! You can store your no-bake cheesecake cups in the fridge for up to five days. To keep them fresh, cover the cups tightly with plastic wrap. This helps maintain their creamy texture. Avoid leaving them uncovered, as air can dry them out and change their taste. Yes, you can freeze no-bake cheesecake cups! They last up to three months in the freezer. To freeze, place the covered cups in a single layer in a freezer-safe container. When you're ready to enjoy them, thaw them in the fridge overnight. This keeps the texture smooth and creamy. Before serving, check the texture. If they seem a bit firm, let them sit at room temperature for about ten minutes. This helps them soften. For a fresh look, add a drizzle of caramel sauce and sprinkle cinnamon on top after refrigeration. This gives your dessert a nice touch and makes it look appetizing! Yes, you can make these cheesecake cups ahead of time. I recommend preparing them up to two days in advance. This gives the flavors time to blend and the cups time to set. Just store them in the fridge. Cover each cup with plastic wrap to keep them fresh. If you want a different option, you can use yogurt or sour cream. Both add creaminess to the cheesecake filling. For a dairy-free choice, try coconut cream. Just whip it up until it is fluffy. Each option will give a nice texture to your cheesecake cups. To make mini cinnamon roll bites at home, start with your favorite dough. Roll it out and spread butter, sugar, and cinnamon on top. Then, roll it up tight and cut it into small pieces. Bake them until golden. These bites are fun and easy to make! You can add them on top of your cheesecake cups for extra flavor. This blog post covered how to make delicious no-bake cheesecake cups. We went over the simple ingredients needed and provided clear steps for preparation. I shared tips for the best texture and how to avoid common mistakes. You can explore fun variations and learn how to store your treats properly. In the end, these cheesecake cups offer endless fun in the kitchen. Enjoy crafting your own flavors and impressing others!

No-Bake Cinnamon Roll Cheesecake Cups Delightful Treat

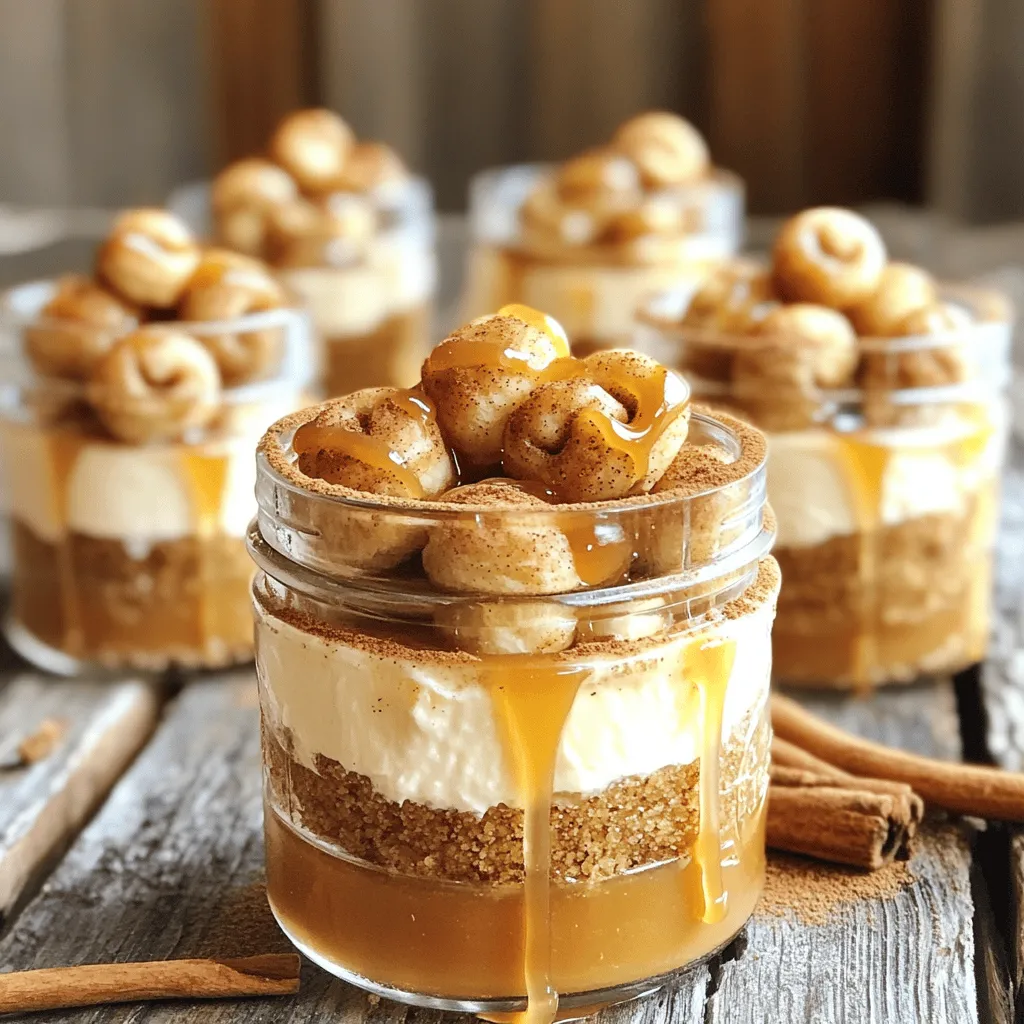
Are you ready for a sweet treat that’s both easy and delicious? My No-Bake Cinnamon Roll Cheesecake Cups are the

- 1 large head of cauliflower, cut into bite-sized florets - 1 cup all-purpose flour - 1/2 cup cornstarch - 1/2 cup gochujang (Korean chili paste) Cauliflower is the star of this dish. It provides a great texture and absorbs flavors well. The all-purpose flour gives the wings a nice crunch. Cornstarch helps achieve that golden crispiness everyone loves. Gochujang adds a sweet and spicy kick, making it essential for our sauce. - 1 teaspoon garlic powder - 1 tablespoon sesame oil - 2 tablespoons soy sauce - 1/4 cup honey or maple syrup Garlic powder adds a savory depth. Sesame oil gives a nutty flavor that complements the dish. Soy sauce brings saltiness and umami. Honey or maple syrup adds sweetness, balancing the heat from gochujang. - 1 tablespoon sesame seeds - Green onions, chopped Sesame seeds add crunch and a hint of nuttiness. Chopped green onions provide freshness and a pop of color. These garnishes make your dish look appealing and taste even better. - Rinse and Cut: Start by rinsing your cauliflower under cold water. This helps remove dirt and keeps it fresh. Cut the cauliflower into bite-sized florets. Aim for pieces about the same size for even cooking. - Ensuring Even Size: Uniform size matters. It helps each piece cook at the same rate. If some pieces are large, they may not get as crispy. - Combining Dry Ingredients: In a bowl, mix 1 cup of all-purpose flour, 1/2 cup of cornstarch, 1 teaspoon of garlic powder, 1 teaspoon of onion powder, 1/2 teaspoon of salt, and 1/4 teaspoon of black pepper. Stir until they blend well. - Adding Water to Batter: Gradually add 1 cup of cold water to the dry mix. Whisk it until smooth. The batter should be thick but pourable. - Preheating the Air Fryer: Set your air fryer to 375°F (190°C). Preheating is key for a crispy texture. - Cooking Times and Techniques: Arrange the battered florets in a single layer in the basket. You may need to cook in batches. Air fry for 15-20 minutes. Shake the basket halfway through cooking. This helps them crisp up evenly. - Combining Sauce Ingredients: In a separate bowl, mix 1/2 cup of gochujang, 1/4 cup of honey or maple syrup, 2 tablespoons of soy sauce, 1 tablespoon of rice vinegar, and 1 tablespoon of sesame oil. Stir until smooth. - Adjusting for Heat or Sweetness: Taste the sauce. If you like it spicier, add more gochujang. If you want it sweeter, add more honey. - Coating the Cauliflower Wings: Once the wings are done, transfer them to a large bowl. Pour the BBQ sauce over the hot cauliflower. Toss them gently until fully coated. - Best Serving Practices: For a beautiful finish, sprinkle with sesame seeds and chopped green onions. Serve warm for the best taste. Enjoy these wings as a main dish or an appetizer! Air Fryer Temperature Tips Set your air fryer to 375°F (190°C). This heat cooks the cauliflower well. It helps the batter turn crispy. I find this temperature makes a huge difference. If it's too low, the wings become soggy. Cooking in Batches Do not overcrowd the air fryer. If you pile the cauliflower, they won't crisp up. Cook them in batches instead. This way, every piece gets enough hot air. You’ll love the crunchiness that comes from this method. Spice Adjustments Want more heat? Add extra gochujang to your batter or sauce. You can also mix in some chili flakes for an extra kick. If you prefer a milder taste, use less gochujang. Always taste your sauce as you mix. Additional Garnishes Garnish with chopped green onions and sesame seeds. These add great flavor and color. You can also try adding crushed peanuts for a crunchy twist. Feel free to get creative with your garnishes! Batter Consistency If your batter is too thick, add a bit more cold water. The right thickness helps coat the cauliflower well. If it’s too runny, add a little flour or cornstarch. You want it to cling to the florets but not drip off. Cooking Time Adjustments Every air fryer works a bit differently. If your wings aren't golden after 15-20 minutes, check them. You may need a few extra minutes. Just keep an eye on them to avoid burning. Perfect timing leads to perfect wings! {{image_2}} You can change the flavor of your Air Fryer Korean BBQ Cauliflower Wings. Here are two fun ideas: - Spicy Garlic Variation: Add more garlic powder and a bit of red pepper flakes. This gives the wings a nice kick. Mix these into the batter before you coat the cauliflower. It makes each bite spicy and full of flavor. - Sweet and Sour Version: For a twist, use pineapple juice instead of water in the batter. You can also add a splash of rice vinegar to the BBQ sauce. This gives the wings a sweet and tangy taste that balances the heat of gochujang. You can easily adapt these wings to fit your diet. - Gluten-Free Substitutions: Use gluten-free all-purpose flour instead of regular flour. This keeps the texture the same while making it safe for gluten-free diets. Tamari can replace soy sauce to keep the dish gluten-free. - Vegan-Friendly Options: Use maple syrup in place of honey for a vegan option. This keeps the wings sweet without using animal products. Make sure to check your gochujang for any non-vegan ingredients. These wings are great on their own, but you can make them even better. - Pairing with Dips: Serve with a side of soy sauce or a spicy mayo. These dips add extra flavor to the wings. You can also try a cool yogurt dip to balance the heat. - Side Dish Ideas: Serve the wings with a crisp salad or steamed rice. Both pair well and make for a full meal. You can also add some pickled vegetables for a fun crunch. To keep your Air Fryer Korean BBQ Cauliflower Wings fresh, store them in the fridge. Place the wings in an airtight container. They can stay fresh for about 3 to 4 days. When you want to eat them again, reheating is easy. Preheat your air fryer to 350°F (175°C). Heat the wings for about 5 to 7 minutes. This keeps them crispy and tasty. If you want to save them longer, freezing is a great choice. First, let the wings cool completely. Place them in a freezer-safe container or a zip-top bag. Remove as much air as possible to prevent freezer burn. They can last up to 3 months in the freezer. When you're ready to enjoy them, thaw the wings in the fridge overnight. You can also use the microwave for quick thawing. After thawing, reheat in the air fryer as mentioned above. To keep your wings at their best, use good containers. Glass or BPA-free plastic containers work well. Make sure they are airtight to keep out moisture and air. Knowing how long they last is key. In the fridge, they are best within 4 days. In the freezer, they stay good for 3 months. Following these tips helps you enjoy your delicious Air Fryer Korean BBQ Cauliflower Wings for longer! To make the wings extra crispy, first, check your air fryer settings. Set it to 375°F (190°C). This temperature helps the batter cook evenly. Next, use a light coating of oil on the basket. It prevents sticking and adds crispiness. When cooking, shake the basket halfway through. This action ensures even cooking and browning all over. If you want an even crispier texture, try air frying in small batches. Less crowded wings cook better. Yes, you can use frozen cauliflower. However, you need to make some cooking adjustments. First, thaw the cauliflower completely. Pat it dry with a towel to remove extra moisture. A dry floret helps the batter stick better. Next, you may need to add a few extra minutes to the cooking time. Check for a golden color and crispy texture. For the best results, use fresh cauliflower when possible. It gives a better crunch and flavor. If you don't have gochujang, there are some alternative sauces you can try. Sriracha or chili paste works well for heat. Mix in a bit of sugar to mimic the sweetness of gochujang. You can also use a mix of miso paste and hot sauce. This option gives a unique flavor profile. Feel free to customize the flavor. Experiment with what you have in your kitchen to find your favorite mix! This post covers how to make delicious cauliflower wings. We included fresh ingredients, like cauliflower and gochujang. You learned step-by-step instructions for preparing, cooking, and serving. Use our tips for crispiness and troubleshooting. Experiment with variations and storage ideas to enjoy later. Dive into this tasty recipe and make it your own! Your culinary adventure starts with a simple head of cauliflower. Happy cooking!

Air Fryer Korean BBQ Cauliflower Wings Delight

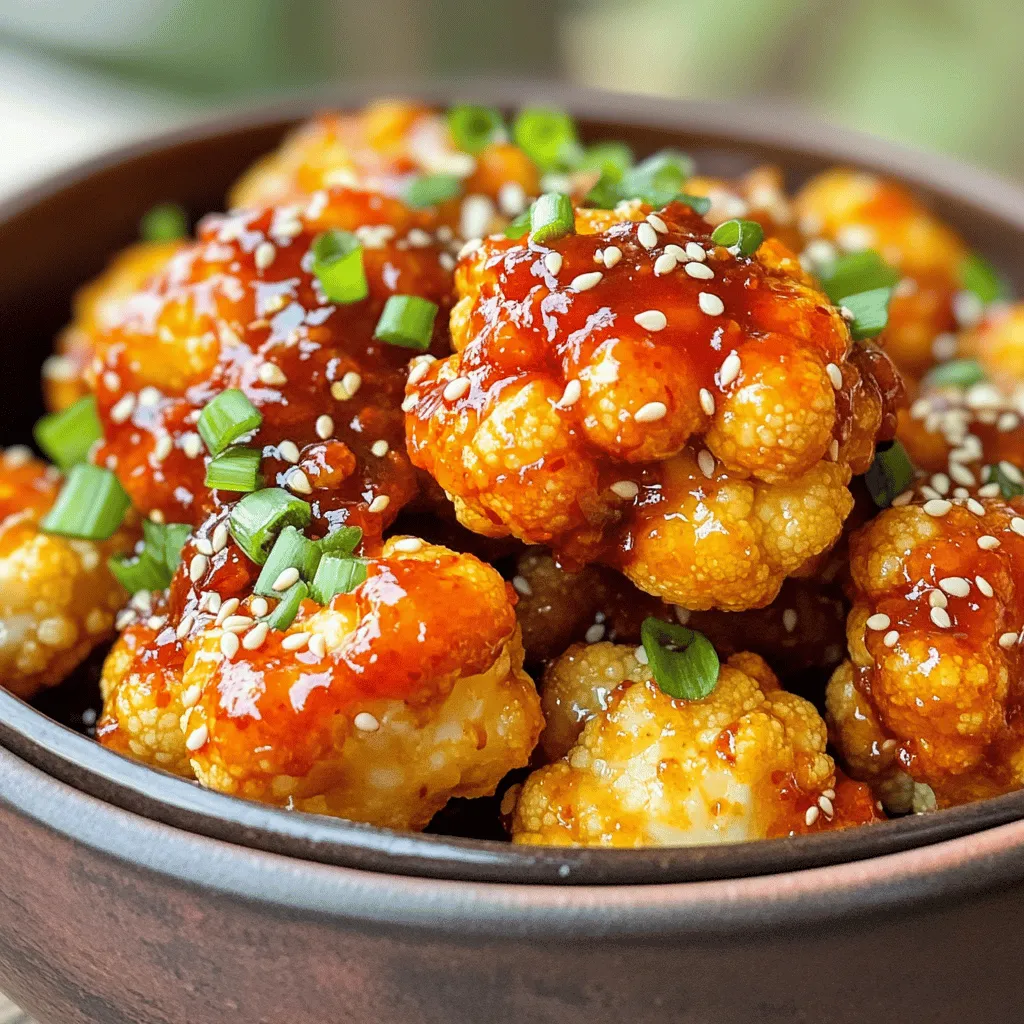
Are you ready to enjoy a tasty twist on your favorite snack? These Air Fryer Korean BBQ Cauliflower Wings are

Older posts
Newer posts
← Previous Page1 … Page32 Page33 Page34 … Page86 Next →

dsad

© 2026 Cooking Wells • Built with GeneratePress

Our Policies

  • Copyright Policy
  • Cookie Policy
  • GDPR Policy
  • Privacy Policy
  • Disclaimer
  • Terms Of Use

More Information

  • Home
  • About
  • Contact
  • Appetizers
  • Dessert
  • Dinner
  • Drinks
©2026, Cooking Wells About Back To Top