Skip to content
DisclaimerTerms Of UseGDPR PolicyCookie Policy

Cooking Wells

  • Home
  • Drinks
  • Appetizers
  • Dinner
  • Dessert
  • About
  • Contact
  • Privacy Policy
DisclaimerTerms Of UseGDPR PolicyCookie Policy

NO-ING-IMG

Fresh strawberries are the star of this recipe. You need about 2 cups. Choose ripe, sweet strawberries for the best flavor. Hulled and sliced, they add a bright color and taste to your pops. Basil leaves bring a unique twist. Use 1/4 cup of fresh basil, chopped finely. The herb adds a fragrant layer to the lemonade. It pairs well with the sweetness of the strawberries. Lemon juice adds zing! You will need 1/2 cup, which is about 2-3 lemons. Fresh juice works best for a bright flavor. Mix it with 1 cup of water to balance the tartness. You can sweeten your pops with 1/2 cup of honey or agave syrup. Adjust the sweetness to fit your taste. Honey gives a floral note, while agave is milder. For a fancy touch, consider lemon slices and extra basil leaves. These garnishes make your popsicles look pretty. They also hint at the flavors inside. Start by hulling and slicing 2 cups of fresh strawberries. This lets their sweet juice flow. Next, chop 1/4 cup of fresh basil leaves. The basil adds a nice herbal touch. Combine the strawberries and basil in a blender. Add 1/2 cup of lemon juice, which is about 2 to 3 lemons. The lemon juice gives the pops a bright flavor. Then, pour in 1 cup of water and a pinch of salt. The salt helps balance the sweetness. Blend the mixture until it is smooth. You can blend less if you want some strawberry pieces in your pops. Taste the mix to check the sweetness. If you want it sweeter, add more honey or agave syrup. You can adjust the sweetness to your taste. Get your popsicle molds ready. Pour the mixture into the molds, filling them about 3/4 full. This leaves room for the mixture to expand as it freezes. Carefully insert the popsicle sticks. Place the molds in the freezer. Let them freeze for at least 4 to 6 hours or until they are solid. Once the popsicles are frozen, it’s time to remove them. Take the molds out of the freezer and run warm water over the outside. Just a few seconds should do it. This helps loosen the pops. Gently pull the popsicles out of the molds. Serve them right away or store them for later. Enjoy your refreshing treat! To make these Strawberry Basil Lemonade Pops, you need a smooth mix. Start by blending the strawberries, lemon juice, and basil well. This will help the flavors mix nicely. If you want some texture, blend less. Leave a few small strawberry pieces for bite. A smooth blend gives a nice pop! Taste your mixture before freezing. If it’s not sweet enough, add more honey or agave syrup. You can adjust the sweetness based on your taste. Remember, after freezing, the pops might taste less sweet. So, make sure it’s a bit sweeter than you want it to be. This way, you'll get the perfect treat! When serving your pops, look for fun ways to impress. Place them on a bright plate or stand. Garnish with lemon slices and fresh basil leaves. This adds color and makes them look fancy. You can also serve them with a refreshing drink. A nice lemonade or iced tea pairs well. Enjoy your summer treat! {{image_2}} You can change the flavor of your pops by adding other fruits. Try using blueberries or raspberries for a twist. You can even mix in some mango or peach for a tropical vibe. Just keep the same ratio of fruit and liquid. This way, you will keep the texture smooth. Basil is great, but don’t stop there! Mint or rosemary can give a new taste to your pops. Chop the herbs finely so they blend well. You can also mix different herbs. This adds fun layers of flavor. Just remember, a little goes a long way. If you want a sugar-free option, use stevia or monk fruit. These sweeteners can give you the right taste without the sugar. If you want it vegan, keep using agave syrup instead of honey. Both options keep your pops healthy and tasty. Enjoy exploring these variations to make your pops perfect for any taste! To keep your Strawberry Basil Lemonade Pops fresh, follow these tips. First, make sure they are fully frozen before storage. This prevents ice crystals from forming. After freezing, store them in a freezer-safe bag. Remove as much air as possible before sealing. This helps avoid freezer burn. Label the bag with the date for easy tracking. These pops can last up to two months in the freezer. After that, they may lose flavor and texture. For the best taste, enjoy them within a month. If you notice any strange colors or smells, it’s best to toss them out. Always trust your senses when it comes to food safety. If you have leftover pops, avoid re-freezing them after they thaw. Once they thaw, bacteria can grow, making them unsafe. Instead, only freeze what you plan to eat. If you want to save some, enjoy them fresh and make a new batch later. This keeps your treats safe and delicious. Yes, you can use frozen strawberries! They work well in this recipe. Just thaw them first. This makes blending easier. You will still get the great flavor. The texture may be a bit different, but the taste remains delicious. These pops are already dairy-free! The recipe only uses fruit, herbs, and sweeteners. There is no milk or cream in the mix. Enjoy these pops without any dairy concerns. You have many options! You can use maple syrup, coconut sugar, or any sweetener you like. Just keep in mind that each sweetener has a different flavor. Taste as you go to find your perfect balance. To release the popsicles, run warm water over the outside of the molds. Do this for a few seconds. Then gently pull the popsicles out. This will help them come out smoothly without breaking. This blog post showed you how to make delicious strawberry-basil popsicles. You learned about fresh ingredients, easy steps, and fun tips. We covered ways to adjust sweetness and add flavors. You also discovered storage tips to keep your pops tasting great. These popsicles can suit many diets, too. Try adding different fruits or herbs for new twists. Enjoy your refreshing treats all summer!

Strawberry Basil Lemonade Pops Refreshing Summer Treat

Looking for a cool treat to beat the summer heat? Let me introduce you to the perfect blend of sweet

- 1 cup Arborio rice - 4 cups vegetable broth - 1 cup mushrooms, sliced The main ingredients create the base of your Mushroom Spinach Risotto. Arborio rice is key because it absorbs liquid well, giving you that creamy texture. Vegetable broth adds flavor and depth. Use fresh mushrooms, like cremini or button, for a savory taste. - 2 cups fresh spinach, chopped - 1 small onion, finely chopped - 2 cloves garlic, minced - 1 tablespoon olive oil - 1 tablespoon butter These additional ingredients add layers of flavor. Fresh spinach wilts perfectly into the risotto and gives it a bright color. Onion and garlic provide a sweet aroma while sautéing. Olive oil and butter add richness to the dish. - ½ cup grated Parmesan cheese - Salt and pepper to taste - Fresh parsley for garnish While not necessary, Parmesan cheese enhances the creaminess and adds a salty kick. Salt and pepper help you season the risotto to your liking. Fresh parsley makes the dish look beautiful and adds a pop of freshness. First, heat the vegetable broth. Use a saucepan and set it over low heat. You want the broth warm but not boiling. Keeping it warm helps the rice cook evenly. Next, grab a large skillet. Heat olive oil and butter over medium heat. Add the finely chopped onion. Sauté it until it turns translucent, which takes about 3-4 minutes. Now, add minced garlic and sliced mushrooms. Cook these together for 5-6 minutes. The mushrooms should become tender and release moisture. This step adds a lot of flavor to the dish. It's time to add the Arborio rice. Stir it in and cook for 2-3 minutes. This will let the rice absorb all the tasty flavors. Start adding the warm broth, one ladleful at a time. Keep stirring as you add broth. Let the rice absorb most of the liquid before adding more. This should take around 18-20 minutes. The rice should become creamy and al dente. When the rice is almost ready, fold in the chopped spinach. Cook for about 2-3 minutes until the spinach wilts. If you like, stir in grated Parmesan cheese. Season with salt and pepper to taste. Once done, allow it to sit for a couple of minutes before serving. This resting time helps the flavors come together nicely. Stirring often is key to a creamy risotto. This process helps release the starches in the rice. The more you stir, the creamier it gets. It’s fun to feel the rice change texture! Add broth slowly. Use one ladle at a time. Wait until the rice absorbs most of the liquid before adding more. This method takes about 18 to 20 minutes. Patience pays off! To boost flavor, season wisely. A little salt and pepper can make a big difference. Try adding a pinch of red pepper flakes for heat. Fresh herbs like thyme or basil also work well. Using high-quality broth is essential. A rich vegetable broth adds depth. If you have homemade broth, even better! It brings warmth and comfort to your dish. Serve risotto in shallow bowls for a nice look. The creamy texture looks inviting. For garnish, sprinkle fresh parsley on top. It adds color and freshness. Adding extra Parmesan cheese creates a lovely finish. Just a little sprinkle makes the dish shine. Serve it warm, and enjoy the smiles around your table! {{image_2}} You can add proteins to your Mushroom Spinach Risotto to make it heartier. Chicken or shrimp are great options. Just cook them in the skillet before adding the rice. If you prefer a vegan dish, try chickpeas or tofu. These options add protein without changing the dish’s flair. Feel free to swap out spinach and mushrooms for other veggies. Asparagus, peas, or zucchini can fit well. You can also use seasonal vegetables like squash in the fall or tomatoes in the summer. This helps keep the dish fresh and exciting. Cheese adds creaminess to risotto. Besides Parmesan, you can try goat cheese or feta for different flavors. If you want a dairy-free option, use nutritional yeast. It gives a cheesy taste without the dairy. Each choice adds a unique twist to the dish. To keep your Mushroom Spinach Risotto fresh, you should store it in the fridge. Place the risotto in an airtight container. Make sure it cools down first before sealing it. This helps prevent moisture buildup. It lasts about 3 to 5 days in the refrigerator. You can freeze Mushroom Spinach Risotto for longer storage. Use a freezer-safe container or a zip-top bag. Make sure to remove as much air as possible to prevent freezer burn. When you want to eat it, thaw it overnight in the fridge. Reheat it on the stove over low heat, adding a splash of broth or water to help it regain its creamy texture. For the best taste, eat the risotto within 3 to 5 days if refrigerated. If you freeze it, try to eat it within 2 to 3 months. This keeps it tasting great. Always check for any off smells or changes in texture before eating. Proper storage helps maintain the flavor and quality of your delicious dish! The best type of rice for risotto is Arborio rice. This rice has high starch content. The starch creates a creamy texture as you cook it. Other rice types, like jasmine or basmati, won’t give the same result. Arborio rice absorbs flavors well. It also cooks evenly, making it ideal for risotto. This is why it is a favorite among chefs. Yes, you can make risotto in advance. To prepare ahead, cook it until it is just al dente. Once cooled, store it in an airtight container. When you are ready to eat, warm it on the stove. Add a little broth to help restore creaminess. Stir constantly while heating. This keeps the rice from sticking. If you plan to make it a day ahead, follow these steps for the best results. Mushroom Spinach Risotto is quite healthy. It contains many nutrients and vitamins. Spinach is rich in iron, calcium, and vitamins A and C. Mushrooms also add fiber and antioxidants. Arborio rice provides carbohydrates for energy. Using vegetable broth adds flavor without extra calories. If you choose to skip the cheese, you cut down on fat. Overall, this dish can be a balanced meal when served in moderation. This blog post covered how to make Mushroom Spinach Risotto. We explored key ingredients like Arborio rice, mushrooms, and fresh spinach. I shared step-by-step instructions for preparing broth, sautéing vegetables, and cooking the risotto. Remember, stirring and choosing a quality broth are key for creaminess. You can play with proteins, vegetables, and even cheese to create your perfect dish. Enjoy your cooking journey and feel free to try different flavor combinations. Happy cooking!

Mushroom Spinach Risotto Savory Comfort Dish

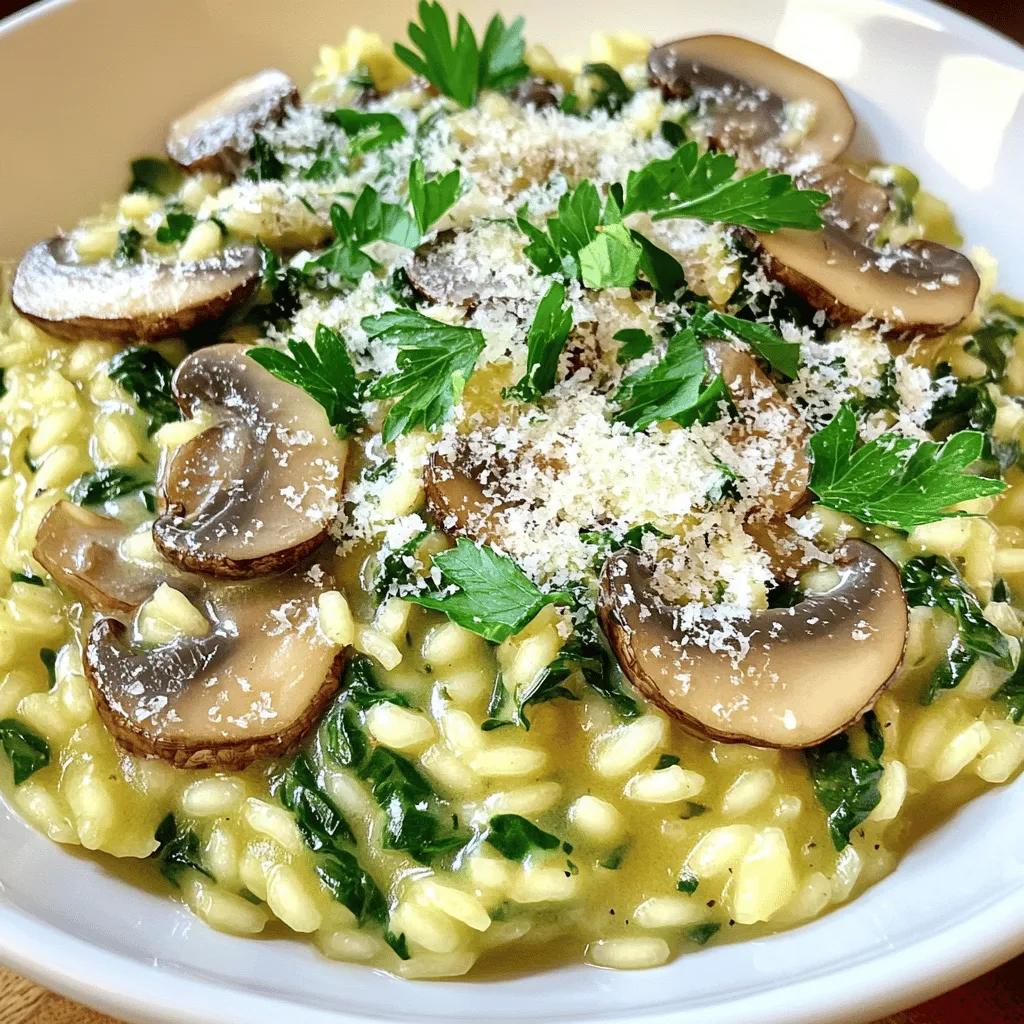
Craving a cozy meal? Mushroom Spinach Risotto is your answer! This dish combines creamy Arborio rice with earthy mushrooms and

For the brownie base, you need these key ingredients: - 1 cup unsalted butter, melted - 2 cups granulated sugar - 1 teaspoon vanilla extract - 4 large eggs - 1 cup all-purpose flour - 1 cup unsweetened cocoa powder - 1/2 teaspoon baking powder - 1/4 teaspoon salt These ingredients create a rich, fudgy brownie. The melted butter adds moisture. Sugar gives it sweetness, while cocoa powder brings that deep chocolate flavor. To make the cheesecake layer, gather these ingredients: - 8 ounces cream cheese, softened - 1/2 cup powdered sugar - 1 egg yolk - 1 teaspoon vanilla extract (for cheesecake layer) The cream cheese adds a creamy and tangy taste. The powdered sugar sweetens it just right. Mixing these creates a smooth, luscious layer that contrasts with the brownie base. You can make your brownies even better with these optional toppings: - Whipped cream - Powdered sugar for dusting - Chocolate sauce or caramel drizzle - Fresh berries for color and flavor These toppings add flair and extra flavor. Whipped cream gives a light touch, while chocolate sauce adds richness. Fresh berries brighten the dish with color and taste. Enjoy experimenting with these options! First, turn on your oven and set it to 350°F (175°C). This temperature helps the brownies bake evenly. Next, take a 9x13 inch baking pan and line it with parchment paper. Make sure to leave some paper hanging over the edges. This makes it easy to lift out the brownies later. In a large bowl, mix 1 cup of melted unsalted butter and 2 cups of granulated sugar. Stir until the mix is smooth. Next, add 1 teaspoon of vanilla extract. Then, crack in 4 large eggs, one at a time. Beat well after each egg to make it fluffy. In another bowl, whisk together 1 cup of all-purpose flour, 1 cup of unsweetened cocoa powder, 1/2 teaspoon of baking powder, and 1/4 teaspoon of salt. Slowly add this dry mix into the wet mix. Stir just until combined. Be careful not to overmix, or the brownies will be tough. For the cheesecake layer, take 8 ounces of softened cream cheese and beat it with 1/2 cup of powdered sugar. Mix until it is creamy. Then, add 1 egg yolk and 1 teaspoon of vanilla extract. Mix until just combined. You want a smooth texture but don’t overdo it. Pour half of the brownie batter into your prepared pan. Spread it out evenly. Next, drop spoonfuls of the cheesecake mix on top of the brownie layer. Use a knife or spatula to create a swirl effect. Pour the rest of the brownie batter on top and swirl again. This creates a beautiful marbled look. Bake in the preheated oven for 30-35 minutes. Check with a toothpick; it should come out with a few moist crumbs, not wet batter. Once baked, let the brownies cool for about 15 minutes in the pan. Then, lift them out using the parchment paper. Cool completely on a wire rack before slicing into squares. To get the best swirl, start with the right tools. Use a knife or a small spatula. After you drop the cheesecake mixture onto the brownie layer, gently drag the knife through both layers. Make sure to swirl, not mix. This way, you keep the layers separate yet blended. Aim for a marbled look that is both pretty and tasty. A few common mistakes can ruin your brownies. First, do not overmix the brownie batter. Overmixing can make the brownies tough. Second, do not skip the cooling time. Letting them cool helps the flavors set. Lastly, be careful not to bake too long. A toothpick should come out with a few moist crumbs, not wet batter. For serving, presentation is key. Place the brownies on a nice plate. Dust them lightly with powdered sugar for a sweet touch. Pair with a dollop of whipped cream for added flair. You can also add fresh berries for color. This makes your dessert look fancy and inviting, perfect for sharing. {{image_2}} You can change the flavors of your brownies easily. Try adding mint for a fresh twist. Just mix in a few drops of mint extract into the brownie batter. You can also use peanut butter. Swirl in some creamy peanut butter into the cheesecake layer for a nutty taste. For a fruity touch, add crushed raspberries to the cheesecake mix. This adds a tart flavor that pairs well with the chocolate. Want to make these brownies gluten-free? Swap out the all-purpose flour with a gluten-free blend. Make sure it has a 1:1 ratio for best results. You can also use almond flour for a nutty flavor. If you need dairy-free options, use vegan butter and a dairy-free cream cheese. These swaps keep the brownies delicious while catering to dietary needs. Serve your brownies warm with ice cream on top for a special treat. A scoop of vanilla or mint chocolate chip ice cream tastes great with warm brownies. You can also add fresh fruit like strawberries or raspberries for a nice contrast. Drizzle with chocolate sauce or caramel for extra sweetness. For a fancy touch, dust with powdered sugar before serving. This makes the presentation pop! To keep your chocolate swirl cheesecake brownies fresh, store them in an airtight container. This helps maintain their taste and texture. You can keep them at room temperature for up to three days. If your kitchen is warm, consider refrigerating them. Just remember, cold can dull the flavor a bit. Freezing is a great option if you want to save some brownies for later. First, cut them into squares. Wrap each square tightly in plastic wrap. Then, place the wrapped brownies in a freezer-safe bag or container. They can last for about three months in the freezer. When you’re ready to enjoy, let them thaw in the fridge or at room temperature. These brownies have a shelf life of about one week in the fridge. Before serving, you can reheat them in the microwave for about 10-15 seconds. This will make them warm and gooey again. Just be careful not to overheat, as they can get tough. Enjoy every bite! Yes, you can use dark chocolate. Just melt it down and use it in place of cocoa powder. Use about 3/4 cup of dark chocolate for one cup of cocoa powder. This change will give your brownies a richer flavor. Just make sure to adjust the sugar slightly, as dark chocolate can be less sweet than cocoa powder. To cut brownies cleanly, use a sharp knife. First, cool the brownies completely. Dip the knife in hot water, then wipe it dry. This helps create a clean cut. You can also use a plastic knife for an easier cut. Slice the brownies into squares for neat pieces. You can make these brownies a day in advance. Just bake and cool them, then store them in an airtight container. Keep them at room temperature for best taste. You can also freeze them for longer storage. Just wrap them well in plastic wrap and foil. When ready to eat, let them thaw before serving. In this post, we explored how to make rich brownies with a creamy cheesecake layer. We discussed key ingredients, step-by-step methods, and tips for the best results. You also learned about fun flavor variations and how to store leftovers. Brownies are a delightful treat that anyone can make. Try out the tips and enjoy your own sweet creation!

Chocolate Swirl Cheesecake Brownies Irresistible Delight

Get ready to indulge in a heavenly treat with my Chocolate Swirl Cheesecake Brownies! Imagine rich, fudgy brownies topped with

To make Herb Garlic Roasted Shrimp, you need simple yet fresh ingredients. These components will create a tasty dish. Here’s what you need: - 1 pound large shrimp, peeled and deveined - 4 cloves garlic, minced - 1/4 cup fresh parsley, chopped - 2 tablespoons fresh basil, chopped - 1 tablespoon fresh lemon juice - 1 teaspoon lemon zest - 1/2 teaspoon red pepper flakes (optional) - 3 tablespoons olive oil - Salt and pepper to taste - Lemon wedges for serving Each ingredient plays a key role. The shrimp provides a sweet and tender base. Garlic adds a rich flavor. Fresh herbs like parsley and basil brighten the dish. Lemon juice and zest bring a tangy kick. Red pepper flakes add warmth, if you like spice. Olive oil helps everything blend and roast well. Gather these ingredients before you start cooking. This will make the process smooth and fun. First, you need to preheat your oven to 400°F (200°C). This step is key for even cooking. While the oven heats, grab a large mixing bowl. In this bowl, combine four minced garlic cloves, chopped parsley, and basil. Add one tablespoon of lemon juice, one teaspoon of lemon zest, and optional red pepper flakes. Pour in three tablespoons of olive oil, then add salt and pepper to taste. Mix everything well to create a flavorful marinade. Next, add one pound of peeled and deveined shrimp to the bowl. Toss the shrimp until they are well coated with the marinade. This step ensures each shrimp gets a burst of flavor. Now, take a baking sheet and line it with parchment paper. Spread the marinated shrimp in a single layer on the sheet. Make sure they don’t overlap. This helps them roast evenly. Place the baking sheet in the preheated oven. Roast the shrimp for about 8 to 10 minutes. Watch closely as they change color. They are done when they turn pink and opaque. Do not overcook them, or they will become tough. Once you take the shrimp out of the oven, let them cool for a minute. For serving, garnish with extra fresh herbs and lemon wedges. This adds a nice touch and enhances the flavor. You can serve the shrimp with a side of rice or a fresh salad. These options complement the dish well and make a complete meal. Enjoy your Herb Garlic Roasted Shrimp! To make the best herb garlic roasted shrimp, you need to avoid overcooking. Shrimp cook fast. If you leave them in too long, they get tough and chewy. Watch for the color change. When shrimp turn pink and opaque, they are done. This usually takes about 8 to 10 minutes in the oven. Another key tip is to spread the shrimp in a single layer on the baking sheet. This helps them cook evenly. If they overlap, some shrimp may not roast well. Use parchment paper to keep them from sticking. You can make the dish even tastier with different marinades. Try adding a splash of soy sauce or a bit of honey for sweetness. You can also mix in other spices like cumin or paprika for a new twist. Consider using fresh herbs like thyme or cilantro. These can add a unique flavor to your shrimp. You might even want to add citrus zest from oranges or limes for a bright touch. The world of flavor is vast, so feel free to explore! {{image_2}} To spice things up, add chili or hot sauce. You can mix in red pepper flakes for some kick. Adjust the amount based on your heat preference. A little goes a long way. If you love heat, try adding fresh chopped chili. It gives a fresh zing to the dish. For a Mediterranean flair, include olives or feta cheese. Mix in sliced black olives for a briny taste. Crumbled feta adds a creamy texture and depth of flavor. Both options pair well with the herbs and garlic. This twist brings a new life to the dish. You can grill the shrimp for a smoky flavor. Preheat your grill to medium-high heat. Toss the shrimp in the marinade as usual. Skewer the shrimp for easy grilling. Grill them for about 2-3 minutes on each side. Watch closely to avoid overcooking. To store leftovers in the refrigerator, first let the shrimp cool. Place them in an airtight container. This keeps them fresh for up to three days. Make sure to seal the container tightly to avoid any strong scents. You can also cover the shrimp with plastic wrap if you prefer. For long-term storage, freezing is your best option. Start by marinating the shrimp as the recipe suggests. After marinating, spread the shrimp in a single layer on a baking sheet. Freeze them for about an hour until solid. Once frozen, transfer the shrimp to a freezer bag. Remove as much air as possible before sealing. These shrimp can last for up to three months in the freezer. To reheat the shrimp, use the oven for the best flavor and texture. Preheat your oven to 350°F (175°C). Place the shrimp on a baking sheet and cover with foil. This helps keep them moist. Heat for about 10 minutes or until warm. Avoid microwaving as it may overcook the shrimp. Enjoy the tasty flavors just as you did when they were fresh! Yes, you can use frozen shrimp. Just make sure to thaw them first. Place the shrimp in the fridge overnight or run them under cold water. Drain any excess water before marinating. Using frozen shrimp saves time and is still tasty. Shrimp cook quickly. They are done when they turn pink and opaque. This usually takes about 8-10 minutes in the oven. If you overcook them, they can get tough. So, keep an eye on them while they roast. You can serve this dish with many sides. Here are some ideas: - A fresh green salad - Rice or quinoa - Garlic bread - Roasted vegetables - Pasta with olive oil These sides complement the shrimp well and make your meal even better. Enjoy your cooking! This blog post showed you how to make Herb Garlic Roasted Shrimp. We covered prepping shrimp, marinating for flavor, and cooking tips. I also shared serving ideas and storage tips. Remember, cooking shrimp is easy if you avoid overcooking and use fresh herbs. Experiment with different flavors and variations. You can add heat or go Mediterranean. Keep it fun and adjust recipes to your taste. Enjoy your delicious shrimp dish!

Herb Garlic Roasted Shrimp Flavorful and Simple Dish

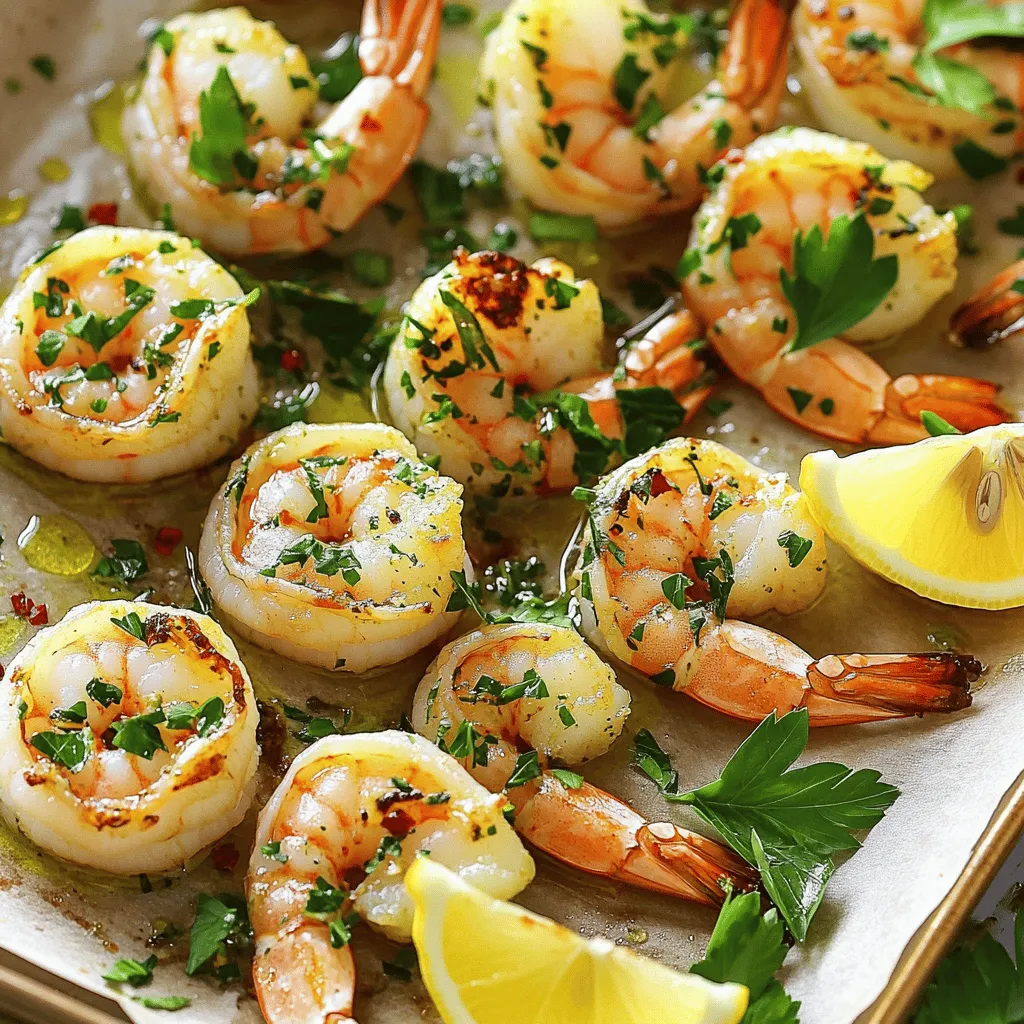
If you’re looking for a dish that is both tasty and easy to make, you’ve found it! Herb Garlic Roasted

- 2 cups fresh strawberries, hulled and sliced - 1 cup coconut milk (full-fat for creaminess) - 1/4 cup chia seeds - 1/4 cup honey or maple syrup (adjust for sweetness) - 1 teaspoon vanilla extract - Pinch of salt - Optional: Toasted coconut flakes for garnish Fresh strawberries give this jam its bright taste. Use ripe ones for the best flavor. Coconut milk adds creaminess and a hint of tropical taste. Chia seeds are key; they thicken the jam and add nutrition. You can choose honey or maple syrup as sweeteners. I prefer honey for its rich flavor. The vanilla extract enhances the overall taste, while a pinch of salt balances sweetness. To make it extra special, add toasted coconut flakes for garnish. They add crunch and a nice look. This jam is simple and uses just a few ingredients to make a fresh, tasty spread. Start by heating your sliced strawberries and sweetener in a medium saucepan. Use medium heat. Let them cook for about 5 to 7 minutes. Stir them now and then. You want the strawberries to soften and release their juices. Once they are soft, remove the saucepan from heat. Use a fork or potato masher to mash the strawberries. You can choose how smooth or chunky you want it. I like to leave some pieces for a nice texture. Next, stir in the coconut milk and chia seeds. Add the vanilla extract and a pinch of salt. Mix everything well until it is combined. Now, let the mixture sit for about 5 minutes. This is important! The chia seeds will start to absorb moisture and thicken the mix. After 5 minutes, stir again to make sure the chia seeds are spread evenly. Transfer the jam into a clean jar or airtight container. Allow it to cool at room temperature first. This helps the jam set better. After it cools, seal it and place it in the fridge. For best results, let the jam sit in the fridge for at least 2 hours. If you can wait overnight, it will thicken even more. Enjoy your fresh Strawberry Coconut Chia Jam! You can change the sweetness of your jam easily. Use less honey or maple syrup if you want it less sweet. Taste as you go! You can also add more sweetener if you like it sweeter. Keep in mind, different fruits have different levels of natural sweetness. You can use other types of milk too. Almond milk or oat milk works well if you want a lighter jam. Full-fat coconut milk gives it a creamy texture. Mix and match to find your favorite! The best way to enjoy this jam is on warm toast. Spread it on pancakes or waffles for a special treat. It also tastes great mixed into yogurt or oatmeal. Get creative! Use this jam in desserts like cakes or pastries. It’s perfect for filling tarts or adding to smoothies. You can even use it as a topping for ice cream. Enjoy exploring the many ways to use your strawberry coconut chia jam! {{image_2}} You can change the flavor of your jam easily. Adding citrus like lime or lemon brings a fresh zing. Just squeeze a tablespoon of juice into the mix. This brightens the taste and adds a lovely tartness. You can also try other fruits. Mixing strawberries with blueberries or raspberries creates a fun fruit medley. Each fruit adds its own unique flavor, making your jam even more exciting. This jam can fit many diets. For vegan options, swap honey for maple syrup. This keeps it plant-based and just as sweet. If you need a gluten-free option, this recipe is already safe. Chia seeds are naturally gluten-free. You can also make a low-sugar version. Use less sweetener or a sugar substitute. This lets you enjoy the jam without extra sugar. To keep your chia jam fresh, use a clean glass jar. Mason jars work great. Make sure the jar has a tight seal. This helps keep out air and moisture. Store the jam in the refrigerator. The jam stays fresh for up to one week. If you notice any changes in color or smell, it's best to toss it. You can freeze chia jam for longer storage. To freeze, scoop the jam into an airtight container. Leave some space at the top for expansion. Seal it tightly and label the container. The jam can last for up to three months in the freezer. When you want to use it, thaw the jam in the fridge overnight. You can also place it in warm water for a quick thaw. Once thawed, stir it well before use. Enjoy it on toast or in yogurt! Chia jam is a spread made with chia seeds. They thicken the mixture when mixed with fruit. This jam is easy and quick to make. You can use any fruit you like, but strawberries shine here. The chia seeds provide fiber and healthy fats, making it a nutritious choice. Homemade chia jam lasts about one to two weeks in the fridge. Store it in a clean jar with a lid. Always check for any changes in smell or color before using. If you notice anything off, it’s best to toss it. Yes, you can use frozen strawberries! They work well in this recipe. Just thaw them before cooking. Frozen strawberries may have more juice, so adjust the cooking time as needed. Yes, Strawberry Coconut Chia Jam is healthy! It has natural sugars from the fruit and honey or maple syrup. Chia seeds add fiber, protein, and omega-3s. Coconut milk provides healthy fats. This jam is a great choice for breakfast or snacks. To adjust sweetness, simply add more honey or maple syrup. Start with a little, then taste as you go. If it’s too sweet, you can add more strawberries or a splash of lemon juice to balance it out. This blog post has taken you through making Strawberry Coconut Chia Jam. You learned about the simple ingredients needed, like fresh strawberries and chia seeds. I shared easy step-by-step instructions to cook and store your jam. You can even customize the flavor or adjust sweetness to fit your taste. In closing, this jam is not just easy to make; it is also fun to enjoy. Try it on toast, pancakes, or even in desserts. Get creative and enjoy your homemade treat!

Strawberry Coconut Chia Jam Fresh and Flavorful Spread

If you love fruity spreads, you’ll adore Strawberry Coconut Chia Jam. This easy recipe combines fresh strawberries, creamy coconut, and

To create these tasty garlic butter mushroom steaks, you need: - 4 portobello mushrooms - 4 tablespoons unsalted butter - 4 cloves garlic, minced - 1 teaspoon fresh thyme leaves (or ½ teaspoon dried thyme) - 1 teaspoon fresh rosemary, chopped (or ½ teaspoon dried rosemary) - Salt and pepper to taste - 2 tablespoons olive oil These ingredients give you the rich, savory flavor you crave. The portobello mushrooms act as the main star, soaking up all that garlic goodness. You can add a few ingredients to boost the flavor even more: - A splash of balsamic vinegar - A pinch of red pepper flakes - A squeeze of fresh lemon juice These extras can enhance the depth of flavor. They give you a hint of brightness and a little heat. Garnishes make your dish look and taste better. Here are great options: - Fresh parsley, chopped - Grated Parmesan cheese - A drizzle of extra garlic butter Adding these garnishes makes your dish pop. They provide a fresh look and extra flavor. To start, you need to prepare the portobello mushrooms. Clean them gently with a damp cloth. This step helps remove dirt without damaging the mushrooms. Next, remove the stems. If you want a cleaner look, use a spoon to scrape out the gills. This makes the mushrooms look better and will help with cooking. Now, let’s make the delicious garlic butter sauce. In a small saucepan, melt the unsalted butter over medium heat. Once it melts, add the minced garlic, fresh thyme, and rosemary. Stir this mix for about 2-3 minutes. The garlic should smell great but not brown. This step brings out the best flavors. Next, heat olive oil in a large skillet over medium-high heat. Place the mushrooms cap side down in the skillet. Season them with salt and pepper for taste. Cook the mushrooms for about 5-7 minutes until they are browned. Then, flip them over to the gill side. Brush the garlic butter sauce generously on top. Cook for another 5-7 minutes while basting with more garlic butter. This keeps them moist and tasty. - Serving Suggestions: Once the mushrooms are tender and soaked in the garlic butter, remove them from the skillet. Let them rest for a minute. Plate the garlic butter mushroom steaks and drizzle any leftover sauce over them. Top with freshly chopped parsley for a pop of color. Enjoy! To cook your portobello mushrooms well, start with a hot skillet. Heat olive oil until it shimmers. Place the mushrooms cap-side down for even browning. Let them cook without moving for 5-7 minutes. Then, flip them over and add the garlic butter. This gives a nice sear and rich flavor. You can boost the taste of your mushrooms by using fresh herbs. Thyme and rosemary work great. Adding garlic gives a tasty kick. Don't forget to season with salt and pepper. Drizzle extra garlic butter on top before serving. This adds depth to each bite. One common mistake is not cleaning the mushrooms properly. Always wipe them with a damp cloth. Avoid soaking them in water. This makes them soggy. Also, don’t rush the cooking time. Let them brown well for a better texture. Lastly, don’t skip resting them after cooking. This helps the flavors settle. {{image_2}} You can switch up the mushrooms in this recipe. While portobello is great, try other varieties. Cremini mushrooms add a nice depth of flavor. Shiitake mushrooms bring a unique, earthy taste. You can even use button mushrooms for a milder flavor. Just remember to adjust cooking times if the size differs. Herbs and spices can elevate the flavor of your dish. Besides thyme and rosemary, consider using fresh basil or parsley. A pinch of red pepper flakes can add a kick. For a smoky touch, try a bit of smoked paprika. Mix and match based on your taste preferences. This is where you can get creative! Pair your garlic butter mushroom steaks with tasty sides. Roasted vegetables bring color and health. A crisp salad with lemon vinaigrette adds freshness. Consider serving with creamy mashed potatoes for comfort. You could also choose quinoa for a nutty flavor. These sides balance the rich flavors of the mushrooms perfectly. After you enjoy your garlic butter mushroom steaks, store any leftovers. Place them in an airtight container. This keeps them fresh and tasty. Make sure to cool the mushrooms before sealing the container. Store them in the fridge for up to three days. To reheat the mushrooms, use a skillet for the best results. Heat the skillet on medium-low. Add a little olive oil or butter. This helps get the mushrooms warmed up without drying them out. Cook for about five minutes, flipping them halfway through. You can also use the microwave if you are in a hurry. Just heat them for 30 seconds at a time until warm. But, this method might not keep them as tasty. If you want to keep the mushrooms longer, freezing is a great option. First, let them cool completely. Then, place them in a freezer-safe bag. Try to push out as much air as you can. This helps prevent freezer burn. They last up to three months in the freezer. When you are ready to eat them, thaw in the fridge overnight before reheating. Yes, you can use other mushrooms. Cremini and shiitake work well. They have great flavor and texture. If you prefer, you can also use button mushrooms. Each type gives a unique taste. Just adjust cooking times as needed for each kind. You can tell mushrooms are cooked when they turn a nice brown color. They should feel tender when you poke them with a fork. If they are still firm, give them a few more minutes. The garlic butter will add flavor as they cook. You can prepare the garlic butter in advance. Store it in the fridge for up to three days. Clean and prepare the mushrooms but cook them fresh. This helps keep their texture and flavor. Cooking just before serving makes them taste best. This blog post covered how to make garlic butter mushroom steaks. We discussed key ingredients, simple steps, and cooking tips. I shared common mistakes to avoid and creative variations to try. Remember, cooking should be fun, so don’t stress! Experiment with flavors and make it your own. Enjoy the process and serve your dish proudly. Happy cooking!

Garlic Butter Mushroom Steaks Flavorful Dinner Delight

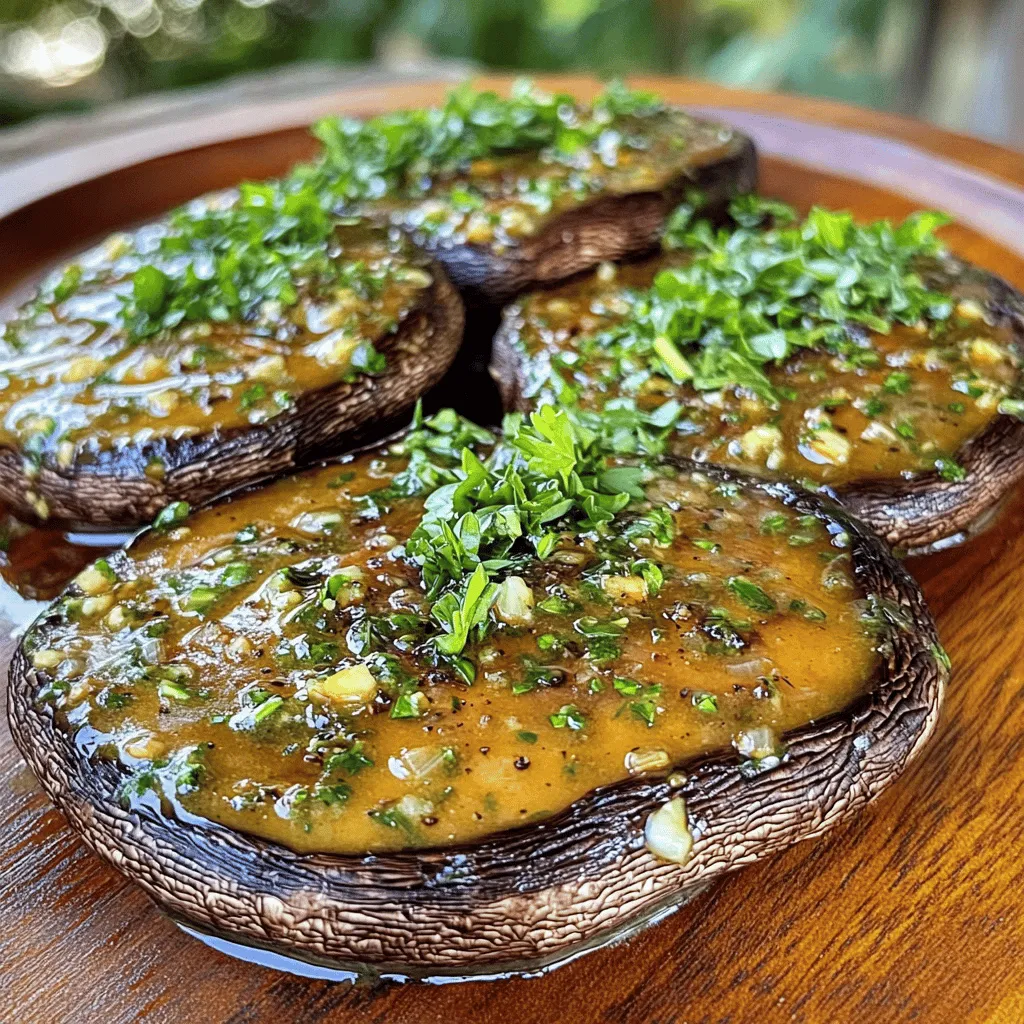
Craving a dinner that’s both easy and packed with flavor? Garlic Butter Mushroom Steaks deliver just that! In this post,

- 1 cup creamy peanut butter - 1/2 cup unsalted butter, melted - 1/2 cup brown sugar - 1/2 cup granulated sugar - 1 teaspoon vanilla extract - 1 1/2 cups graham cracker crumbs - 1/8 teaspoon salt - 1/2 cup salted caramel sauce (store-bought or homemade) - 1/2 cup semi-sweet chocolate chips - Sea salt for sprinkling Each ingredient plays a vital role in making these bars great. The creamy peanut butter gives a rich flavor and smooth texture. The unsalted butter adds moisture and helps bind everything together. Brown sugar adds a hint of caramel flavor, while granulated sugar provides sweetness. Vanilla extract enhances the flavor of the peanut butter. The graham cracker crumbs provide a crunchy base. The salt balances the sweetness. Our salted caramel sauce adds a sweet and salty twist. Finally, semi-sweet chocolate chips create a delicious topping, and the sea salt enhances all the flavors. If you want to make changes, here are some options. For a nut-free version, use sun butter instead of peanut butter. You can use coconut oil instead of unsalted butter for a dairy-free option. If you want less sugar, try using a sugar substitute like stevia. For a gluten-free version, use gluten-free graham cracker crumbs. These swaps keep the taste while meeting different diets. 1. Preheat your oven to 350°F (175°C). Grease an 8x8 inch baking pan. You can also line it with parchment paper for easy removal. 2. In a large bowl, mix the melted unsalted butter and creamy peanut butter. Add the brown sugar, granulated sugar, and vanilla extract. Stir until everything is smooth. 3. Gradually add the graham cracker crumbs and salt. Mix well until a thick mixture forms. 4. Pour half of this mixture into the prepared pan. Press it down evenly. 5. Drizzle half of the salted caramel sauce over this layer. Use a spatula to spread it gently. 6. Add the rest of the peanut butter mixture on top. Press it down again to keep it even. 7. Pour the remaining salted caramel sauce over the top. Spread it out evenly. 8. In a microwave-safe bowl, melt the semi-sweet chocolate chips. Heat them in 30-second intervals. Stir in between until smooth. 9. Drizzle the melted chocolate over the bars. You can create a marbled look if you wish. 10. Sprinkle sea salt over the chocolate layer. This adds a nice touch. 1. Place the pan in the oven and bake for 25-30 minutes. Look for the edges to turn golden brown. The center should be set but soft. 2. Keep an eye on the bars to avoid overbaking. 1. Once baked, remove the pan from the oven. Let it cool completely in the pan. 2. After cooling, slice the bars into squares. 3. For a nice touch, drizzle extra caramel and chocolate sauce on top. You can also add chopped peanuts for crunch. Serve on a decorative platter. To keep your salted caramel peanut butter bars fresh, store them in an airtight container. Place parchment paper between layers for easy serving. They stay fresh for about a week at room temperature. If you want them to last longer, refrigerate them. They will keep well for two weeks in the fridge. For added crunch, you can freeze them. Just wrap each bar tightly in plastic wrap before placing them in a freezer-safe bag. They can last up to three months in the freezer. For the best flavor, use high-quality peanut butter. Creamy peanut butter gives a rich taste. Choose salted caramel sauce that you love; it makes a big difference. If you prefer to make your own, use equal parts sugar and cream. Heat until the sugar dissolves, and then let it cool. Adding a pinch of sea salt on top enhances the sweet and salty balance. Also, ensure you melt the chocolate chips slowly. Stir often to keep it smooth. One common mistake is overmixing the peanut butter mixture. Mix until just combined; this keeps the bars light. Another mistake is not pressing the mixture down firmly enough. This makes the bars crumbly. Also, don’t skip the sea salt on top. It adds a nice contrast to the sweetness. Finally, avoid cutting the bars too soon. Let them cool completely for the best texture. {{image_2}} You can change the flavor of these bars in fun ways. Try adding crushed nuts, like almonds or walnuts, for crunch. Swap the semi-sweet chocolate chips for white chocolate chips. You can also use dark chocolate for a richer taste. If you love coconut, add shredded coconut to the peanut butter mix. Each twist brings a new taste to enjoy! Making gluten-free bars is easy! Use gluten-free graham crackers or almond flour instead of regular crumbs. Check that your caramel sauce and chocolate chips are gluten-free too. This way, everyone can enjoy these tasty treats without worry. You can also make these bars vegan! Replace the unsalted butter with coconut oil or vegan butter. Use maple syrup instead of brown sugar for sweetness. Choose dairy-free chocolate chips and a vegan caramel sauce. These changes keep the flavor while making it plant-based. To keep your salted caramel peanut butter bars fresh, store them in an airtight container. Place parchment paper between layers to avoid sticking. Keep them at room temperature for up to five days. For longer shelf life, you can store them in the fridge. Just remember, they taste best when they are at room temperature. Freezing these bars is super easy! First, cut them into squares. Wrap each piece in plastic wrap. Then, place them in a freezer-safe bag or container. Be sure to label the bag with the date. They can last up to three months in the freezer. When you’re ready to enjoy, let them thaw in the fridge or on the counter for a few hours. If you want to warm up your bars, it’s simple. Place a square in the microwave for about 10-15 seconds. This will make the caramel gooey again. Just watch it closely to avoid overheating. You can also enjoy them cold, as the flavors are rich and delightful even when chilled. If you don't have graham cracker crumbs, use crushed cookies. Vanilla wafers or digestive biscuits work well. You can also try using ground oats or almond flour for a different texture. Each option brings its own flavor to the bars. Yes, you can skip the caramel if you prefer. The bars will still taste great with just peanut butter and chocolate. You could also add a layer of jam or honey for sweetness. This change gives a new twist to the recipe. These bars stay fresh for about four days at room temperature. Store them in an airtight container to keep them soft. If you want them to last longer, consider refrigerating them. They can last up to a week that way. In this article, we explored the key ingredients and step-by-step process for making delicious bars. We discussed preparation, baking, and cooling tips to ensure success. I shared storage methods to keep your treats fresh and various options for different diets. These insights will help you create great bars while avoiding common pitfalls. Enjoy experimenting with different flavors and methods. Happy baking!

Salted Caramel Peanut Butter Bars Irresistible Treat

Get ready to indulge in a delightful treat! Salted Caramel Peanut Butter Bars combine rich flavors that will satisfy your

- 1 cup quinoa - 2 cups coconut water - 1 cup cherry tomatoes, halved - 1 cucumber, diced - 1 red bell pepper, diced - 1 cup corn (fresh or canned) - 1/2 cup red onion, finely chopped - 1/4 cup fresh cilantro, chopped - Zest and juice of 2 limes - 1 tablespoon olive oil - Salt and pepper to taste - Optional: 1 avocado, diced To make a fresh and tasty Coconut Lime Quinoa Salad, you need some special ingredients. First, the quinoa acts as the main base. It has a nice texture and absorbs flavors well. You will also need coconut water. This adds a hint of sweetness and a tropical twist. Fresh vegetables make this salad lively. Cherry tomatoes bring sweetness and color. A diced cucumber adds crunch and freshness. The red bell pepper gives a nice pop of flavor. Corn, either fresh or canned, adds a sweet bite. Red onion adds a bit of sharpness, while cilantro adds a fresh herb taste. For seasoning, you will need lime juice and zest. This gives the salad a bright and zesty flavor. Olive oil adds richness and helps bind the ingredients together. Don’t forget to add salt and pepper to taste. If you want to add creaminess, you can include diced avocado. It makes the salad even better. These ingredients come together to create a salad that is not just healthy but also fun to eat! To start, you will need a medium saucepan. Combine 1 cup of rinsed quinoa with 2 cups of coconut water. This mix gives your quinoa a sweet and tropical flavor. Place the saucepan on the stove over medium-high heat. Bring it to a boil. Once it starts boiling, reduce the heat to low. Cover the saucepan and let it simmer for about 15 minutes. The quinoa will absorb the coconut water and become fluffy. After cooking, remove it from the heat and let it sit for 5 minutes. Then, fluff it with a fork to separate the grains. While the quinoa cooks, it’s time to chop your veggies. Grab a large mixing bowl and add the following ingredients: - 1 cup cherry tomatoes, halved - 1 cucumber, diced - 1 red bell pepper, diced - 1 cup corn (you can use fresh or canned) - 1/2 cup red onion, finely chopped - 1/4 cup fresh cilantro, chopped Mix these colorful vegetables well. They add crunch, flavor, and a beautiful look to your salad. Now, combine your cooked quinoa with the vegetable mix in the large bowl. This step is key! It brings all the flavors together. Next, make a simple lime dressing. In a small bowl, whisk together: - Zest and juice of 2 limes - 1 tablespoon olive oil - Salt and pepper to taste Drizzle this dressing over your quinoa and veggies. Toss everything gently until it is well coated. If you want creaminess, fold in 1 diced avocado just before serving. This will make your salad even more delightful! To get your quinoa just right, rinse it well. Place the quinoa in a fine mesh strainer. Run cold water over it for about 1-2 minutes. This step removes any bitter taste. For perfect texture, cook quinoa with a 2:1 ratio of liquid to quinoa. Bring it to a boil, then lower the heat. Cover and simmer for around 15 minutes. Let it sit covered for 5 extra minutes. Fluff it gently with a fork afterward. Want to boost the taste? Try adding fresh herbs like mint or basil. They bring a bright twist to the salad. You can also sprinkle in spices like cumin or paprika for depth. Adjust the acidity by squeezing in more lime juice. This extra zing lifts the whole dish. Taste as you go to find your perfect balance. For a beautiful presentation, use a large, colorful bowl. Serve individual portions for a nice touch. Top each serving with a sprig of cilantro and a lime wedge. For a fresh look, add diced avocado on top. It adds creaminess and makes the salad pop. Keep it fun and inviting! {{image_2}} You can boost your salad with protein. Add chickpeas for a plant-based option. Black beans will add a nice texture. If you prefer meat, grilled chicken works great too. These additions make the dish more filling. They also enhance the flavor and nutrition. This salad is easy to adapt for different diets. To make it vegan, skip the avocado if you're not using it. For gluten-free needs, quinoa is already a safe choice. Just ensure any canned ingredients are gluten-free. Simple swaps keep everyone happy and healthy. Using seasonal veggies adds freshness. In summer, try adding fresh corn or bell peppers. In autumn, roasted squash or sweet potatoes are tasty. You can also include greens like spinach or kale in spring. These swaps keep the salad vibrant and fun all year long. To keep your Coconut Lime Quinoa Salad fresh, store it in an airtight container. Make sure to seal it well. This will help avoid any unwanted smells or flavors from your fridge. Keep your salad in the fridge for up to three days. If you add avocado, eat it within a day. The avocado can brown quickly. Can you freeze Coconut Lime Quinoa Salad? Yes, but it may change texture. Quinoa can freeze well, but fresh veggies do not. For best results, freeze only the quinoa. Let it cool completely, then place it in a freezer bag. Remove as much air as possible before sealing. You can keep it frozen for up to three months. When ready to eat, thaw the quinoa in the fridge overnight. The typical duration for keeping the salad refrigerated is around three days. After that, it may lose its taste and freshness. Always check for any signs of spoilage before eating. If it smells off or looks slimy, it’s best to discard it. Enjoy your delicious salad while it’s fresh for the best flavors! Yes, you can use regular water. However, it will change the flavor. Coconut water adds a sweet, nutty taste. It also gives a unique texture to the quinoa. If you want that tropical vibe, stick with coconut water. To make this salad ahead, cook the quinoa first. Allow it to cool before mixing. You can chop the veggies and store them separately. When ready to serve, mix everything together. This keeps the salad fresh and crunchy. Add the dressing just before serving to avoid sogginess. Many dressings go well with this salad. A simple balsamic vinaigrette adds a nice twist. You can also use a honey mustard dressing for a sweet touch. If you prefer creamy, try a yogurt-based dressing. Each option brings a new flavor to your meal. Coconut Lime Quinoa Salad is simple to make and packed with flavor. We covered essential ingredients, from quinoa to fresh vegetables. You learned how to cook quinoa perfectly and combine it with vibrant veggies. Remember, tricks to enhance taste and look matter too. Try adding protein or adjusting flavors to suit your taste. Store leftovers properly to keep them fresh. This salad is versatile and perfect for any meal. Enjoy creating your delicious version and impressing your friends with this healthy dish!

Coconut Lime Quinoa Salad Fresh and Flavorful Delight

Are you ready for a salad that bursts with flavor? This Coconut Lime Quinoa Salad combines tasty ingredients with a

To make a tasty creamy avocado cilantro dressing, gather these simple ingredients: - 1 ripe avocado - 1 cup fresh cilantro leaves, packed - 2 tablespoons lime juice - 1 small garlic clove - 1/2 cup Greek yogurt - 1/4 cup water (more as needed) - Salt and pepper to taste - Optional: A pinch of cayenne pepper for heat Each ingredient plays a key role in the flavor and texture of the dressing. The ripe avocado gives a rich, creamy base. Fresh cilantro adds a burst of freshness, while lime juice brings a zesty kick. The garlic clove gives a nice depth, and Greek yogurt adds creaminess without too many calories. Water helps to thin the dressing to your liking. Salt and pepper bring all the flavors together. If you want a little heat, cayenne pepper is a great choice. This dressing is not only easy to make but also delicious on salads or as a dip! 1. Cutting and scooping the avocado Start by slicing the avocado in half. Use a knife to safely remove the pit. Take a spoon and scoop the soft green flesh into your blender. 2. Adding ingredients to the blender Next, add the fresh cilantro leaves to the blender. Then, squeeze in the lime juice and add the garlic clove. Don't forget to add the Greek yogurt and water too. 3. Blending to desired consistency Blend all the ingredients together until creamy. If the mixture feels too thick, add a little more water. Blend again until you reach your desired smoothness. 4. Adjusting seasoning Taste your dressing. Add salt and pepper to brighten the flavor. If you like heat, sprinkle in a pinch of cayenne pepper and blend once more. - Achieving the right texture To get a smooth texture, make sure you blend long enough. If you see chunks, keep blending. You want it creamy and well mixed. - Avoiding lumps If you find lumps, try adding a bit more water and blending again. This will help break down any pieces. Always blend in short bursts to check the texture. What dishes go well with creamy avocado cilantro dressing? This dressing pairs perfectly with fresh salads, grilled veggies, and tacos. You can also use it as a dip for pita chips or fresh veggies. For a fun twist, drizzle it over a grain bowl or use it as a sandwich spread. How can you present this dressing nicely? Serve it in a small bowl, garnished with a sprig of cilantro on top. This adds color and makes it look fresh and inviting. You can also drizzle it over your dish for a beautiful finish. How can you adjust the flavors of the dressing? You can add fresh herbs like parsley or mint for a different taste. For a bit of heat, try adding a pinch of cayenne pepper or some finely chopped jalapeños. What if you have dietary needs? You can substitute Greek yogurt with a dairy-free yogurt for a vegan version. If you are watching your salt, use a low-sodium yogurt or skip the salt altogether. This dressing is flexible, so feel free to experiment! {{image_2}} To make a spicy version of this dressing, add jalapeños or cayenne pepper. Start with one small jalapeño, seeds removed for less heat. Blend it in with your other ingredients. If you like it hotter, add more cayenne. This spice will wake up the flavor and give your dressing a nice kick. If you want a vegan dressing, swap the Greek yogurt for a plant-based option. You can use coconut yogurt or cashew yogurt. These choices will keep the creamy texture without any dairy. They will also add a unique twist to the flavor. Feel free to experiment with different citrus juices. While lime juice is classic, lemon or orange juice can add a fun twist. Each citrus brings its own unique flavor. Try adding a splash of grapefruit juice for a refreshing zing. Just blend it in with the other ingredients, and enjoy your tasty creation! To keep your creamy avocado cilantro dressing fresh, use an airtight container. A glass jar with a lid works best. This helps prevent air from getting in and keeps the flavor strong. You can also use a plastic container, but make sure it seals well. When you store the dressing, place it in the refrigerator right away. This keeps it cool and safe to eat. Always remember to seal the container tightly before putting it away. If you want to avoid browning, press a piece of plastic wrap directly on the surface of the dressing before sealing. This reduces contact with air. The dressing lasts about three to five days in the fridge. After that, check for any changes in smell or color. If it smells off or looks brown, it’s best to toss it. To enjoy the best taste, use the dressing within the first few days. You can use this creamy avocado cilantro dressing on many dishes. It works great on fresh salads, especially those with mixed greens or grilled veggies. You can drizzle it over tacos, burritos, or even grilled chicken. It also makes a delicious dip for pita chips or fresh veggies. The flavor is bright and refreshing, adding a nice touch to any meal. Yes, you can make this dressing ahead of time. It is perfect for meal prep. Just blend it up and store it in the fridge. This way, you have a quick dressing ready for your meals during the week. Make sure to keep it in an airtight container to keep it fresh. This dressing usually stays fresh for about 3 to 5 days in the fridge. The lime juice helps preserve it a bit. Always check for any off smells or changes in color before using. If you see any, it’s best to toss it. I don’t recommend freezing this dressing. The texture can change once it thaws. The creamy avocado may separate, and it won’t blend back well. If you do decide to freeze it, use an airtight container and leave some space for expansion. When you thaw it, give it a good stir to mix everything back together. In this article, we explored how to make creamy avocado cilantro dressing. We covered the main ingredients like ripe avocado, cilantro, lime juice, and Greek yogurt. Then, I shared step-by-step instructions for preparation and blending. You learned tips for perfect texture and taste. We also looked at variations, serving ideas, and storage tips. Remember, this dressing is customizable, so feel free to experiment. Enjoy using it on your favorite dishes for a fresh flavor!

Creamy Avocado Cilantro Dressing Simple and Fresh Recipe

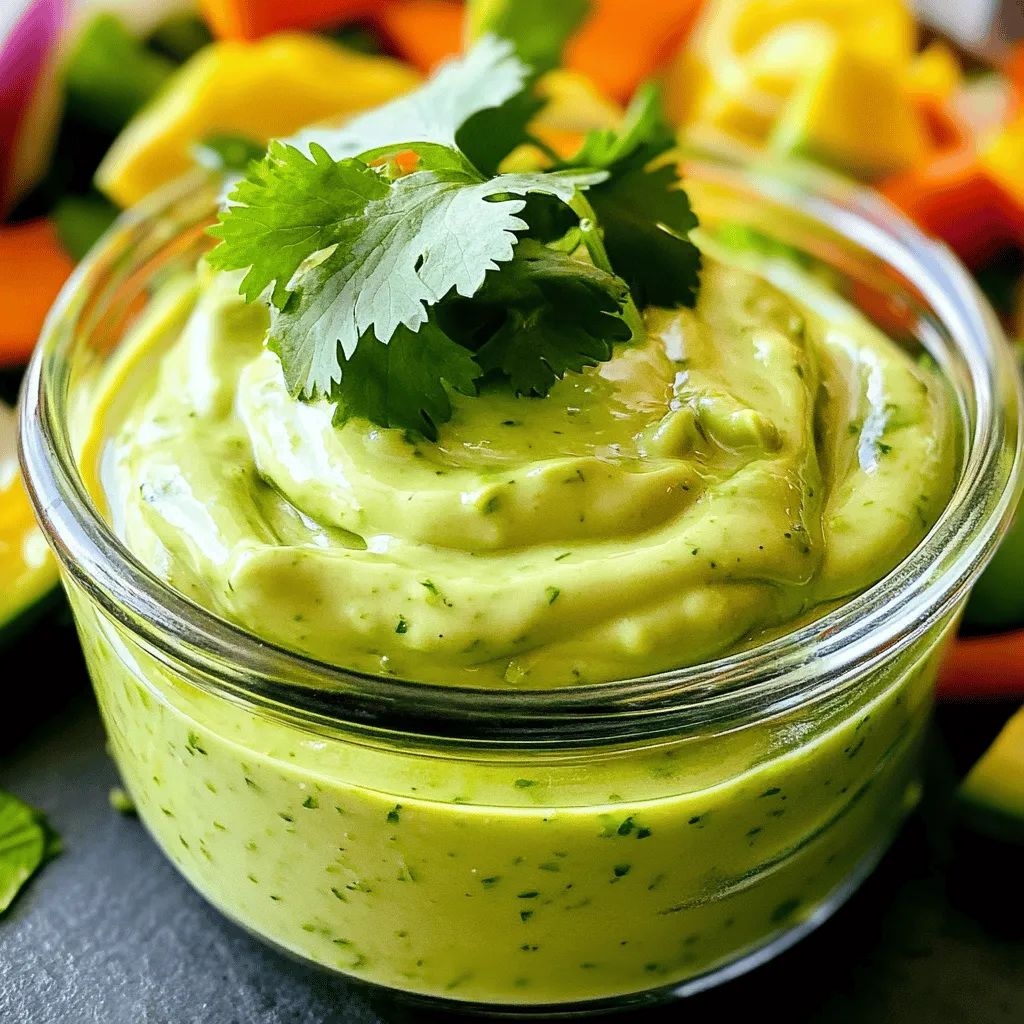
Looking for a fresh and easy way to elevate your meals? This Creamy Avocado Cilantro Dressing is the answer! With

- 1.5 pounds baby potatoes, halved - 4 tablespoons olive oil - 6 cloves garlic, minced - 1 teaspoon dried thyme - 1 teaspoon smoked paprika - 1 cup grated Parmesan cheese - Salt and pepper to taste - Fresh parsley, chopped (for garnish) - Lemon wedges (for serving) The main ingredients set the stage for great flavor. Start with 1.5 pounds of baby potatoes, halved. These are perfect for roasting. Their small size helps them cook evenly. Next, add 4 tablespoons of olive oil. This oil helps the potatoes crisp up nicely. Then, use 6 cloves of minced garlic. Garlic adds a bold flavor that you will love. For seasonings, you need 1 teaspoon of dried thyme. This herb brings a warm taste. Also, include 1 teaspoon of smoked paprika. It adds a slight smokiness that pairs well with the potatoes. The star of the show is 1 cup of grated Parmesan cheese. It melts into a delicious crust. Don’t forget salt and pepper to taste. These basic seasonings enhance all the flavors. For finishing touches, chop some fresh parsley for garnish. It adds a pop of color and freshness. Finally, serve with lemon wedges. A squeeze of lemon brightens the dish and balances the rich flavors. 1. First, preheat your oven to 425°F (220°C). This step is key for crispy potatoes. 2. Next, line your baking sheet with parchment paper. This helps with easy cleanup. 3. In a large bowl, combine the halved baby potatoes and olive oil. 4. Add in the minced garlic, dried thyme, smoked paprika, salt, and pepper. 5. Toss everything together until the potatoes are well-coated. 1. Now, spread the potatoes evenly on the lined baking sheet. 2. Make sure they are not overcrowded. This allows them to roast nicely. 3. Roast the potatoes in the preheated oven for 25-30 minutes. 4. Be sure to turn them halfway through. This helps them get golden and crispy. 1. Once the potatoes are roasted, take them out of the oven. 2. Immediately sprinkle grated Parmesan cheese over the hot potatoes. 3. Toss gently to help the cheese melt and coat the potatoes well. 4. Return the baking sheet to the oven for 3-5 more minutes. 5. This final step makes the cheese melty and slightly crispy. Enjoy your delicious Garlic Parmesan Roasted Potatoes! To get crispy potatoes, space them out evenly on the baking sheet. If they touch, they steam instead of roast. This means they won’t get that nice crunch. I suggest roasting at 425°F for 25 to 30 minutes. Check them halfway through and give them a turn. This helps them brown evenly. Fresh herbs can boost the flavor of your roasted potatoes. Try adding rosemary or parsley for a fresh taste. If you want to mix things up, consider using garlic powder or onion powder. You can also add red pepper flakes for a spicy kick. Experiment with flavors to find what you like best. Garlic Parmesan Roasted Potatoes pair well with many dishes. They go great with grilled chicken or fish. You can also serve them alongside a fresh salad. For garnishes, sprinkle more parsley on top or add a squeeze of lemon. Lemon brings out the flavors and adds a nice brightness to the dish. Enjoy your meal! {{image_2}} For those who follow a vegan or plant-based diet, you can easily swap ingredients. Instead of Parmesan cheese, try using nutritional yeast. It adds a cheesy flavor without dairy. Use a plant-based oil, like avocado oil, for roasting. This keeps the dish vegan-friendly while still tasting great. If you need a gluten-free option, you’re in luck! The recipe is naturally gluten-free. Just make sure that any seasonings you use are certified gluten-free. Most spices and herbs are safe, but always check the labels. Want to spice things up? Add red pepper flakes to the mix. Just a pinch can give your potatoes a nice kick. You can adjust the heat to your taste. This makes the dish more exciting and adds depth. You can also play with different cheese types. If you want a stronger flavor, consider using aged cheddar or Gruyère. Both will melt nicely and offer a unique taste. Mixing cheeses can also create a fun flavor profile. Get creative and find what you love! To keep your Garlic Parmesan Roasted Potatoes fresh, store them in the fridge. Use an airtight container to lock in flavor and moisture. This helps keep the potatoes from drying out. Make sure they cool down before sealing them in the container. They taste best when eaten within three days. When you are ready to enjoy the leftovers, reheating correctly is key to keeping them crispy. Preheat your oven to 400°F (200°C). Spread the potatoes on a baking sheet in a single layer. This helps them heat evenly. Bake for about 10-15 minutes, checking often. You want them hot and crispy again. Avoid using the microwave, as it can make the potatoes soggy. To make your Garlic Parmesan Roasted Potatoes crispy, follow these tips: - Use enough oil. Four tablespoons of olive oil work well for 1.5 pounds of potatoes. This helps them brown and crisp. - Spread the potatoes out. When laying them on the baking sheet, give them space. If they touch, they will steam instead of roast. - Flip them halfway. Turning the potatoes halfway through cooking ensures even crisping. Yes, you can prep these potatoes ahead of time. Here are some storage tips: - Cut the potatoes and toss them with oil and seasonings. - Place them in an airtight container. Store them in the fridge for up to 24 hours. - When you are ready to cook, just spread them on a baking sheet and roast. If you need a substitute for Parmesan cheese, consider these options: - Nutritional yeast offers a cheesy flavor and is dairy-free. - Grated Pecorino Romano cheese works well if you want a similar taste. - For a nutty flavor, try using ground cashews. They add a unique twist to the dish. In this article, I covered how to make Garlic Parmesan Roasted Potatoes. We explored the main ingredients, step-by-step instructions, and helpful tips for crispiness. I also shared variations for dietary needs and storage tips for leftovers. This dish is simple yet flavorful and can fit many diets. You can enjoy these potatoes as a side or a main dish. With these steps, you can create a tasty and satisfying meal. Try it out soon!

Garlic Parmesan Roasted Potatoes Crispy and Delicious

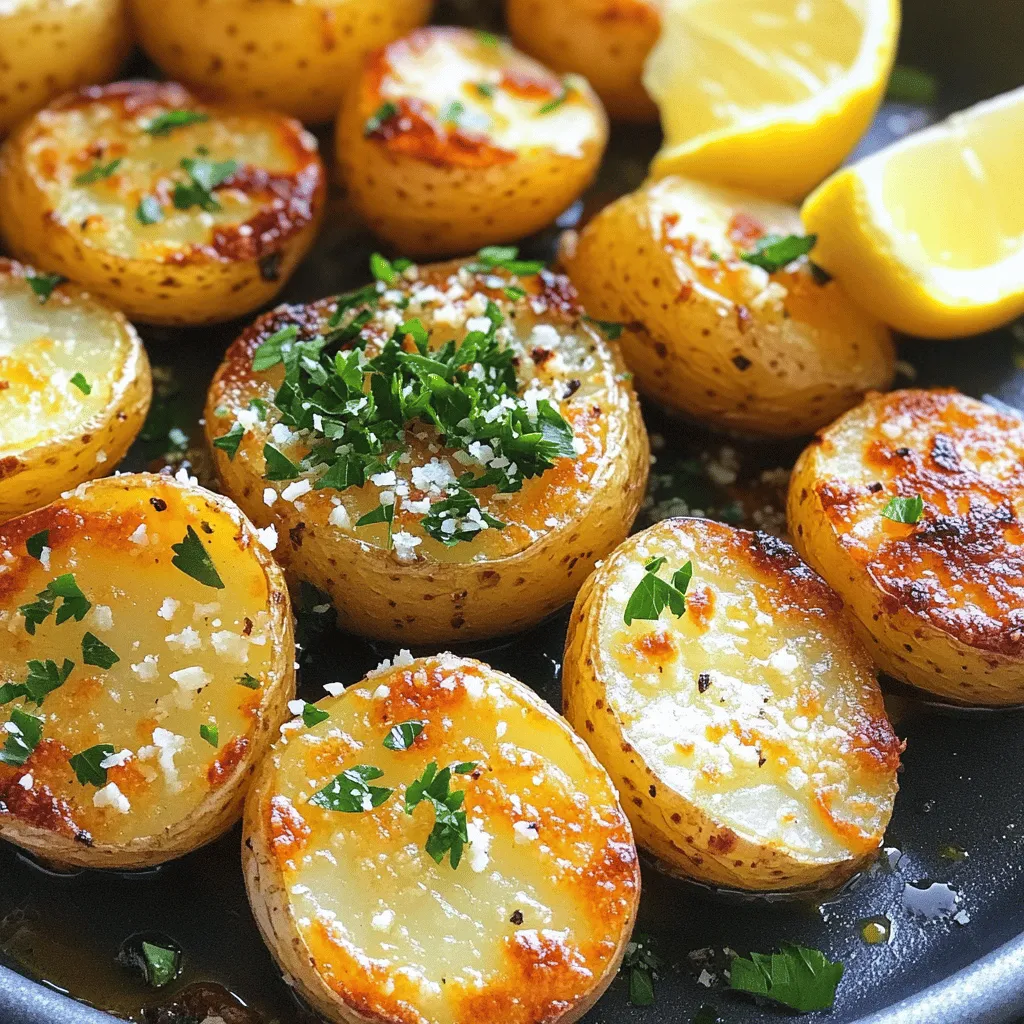
Get ready to elevate your dinner game with my Garlic Parmesan Roasted Potatoes! These crispy, cheesy bites are packed with

Older posts
Newer posts
← Previous Page1 … Page35 Page36 Page37 … Page86 Next →

dsad

© 2026 Cooking Wells • Built with GeneratePress

Our Policies

  • Copyright Policy
  • Cookie Policy
  • GDPR Policy
  • Privacy Policy
  • Disclaimer
  • Terms Of Use

More Information

  • Home
  • About
  • Contact
  • Appetizers
  • Dessert
  • Dinner
  • Drinks
©2026, Cooking Wells About Back To Top