Skip to content
DisclaimerTerms Of UseGDPR PolicyCookie Policy

Cooking Wells

  • Home
  • Drinks
  • Appetizers
  • Dinner
  • Dessert
  • About
  • Contact
  • Privacy Policy
DisclaimerTerms Of UseGDPR PolicyCookie Policy

NO-ING-IMG

- 1 cup rolled oats - 1 cup coconut milk - 1 ripe mango, diced - 1 tablespoon chia seeds - 1 tablespoon shredded coconut The main ingredients in Coconut Mango Overnight Oats create a tasty and filling meal. Rolled oats form the base. They soak up the coconut milk and become soft. Coconut milk gives a rich flavor. You can use canned or carton coconut milk. A ripe mango adds sweetness and a tropical twist. It brings bright color too. Chia seeds add fiber and help thicken the mix. Shredded coconut adds texture. I prefer unsweetened coconut for a pure taste. - 1 tablespoon honey or maple syrup - 1/2 teaspoon vanilla extract - Fresh mint leaves for garnish Optional ingredients let you customize your oats. Honey or maple syrup adds sweetness. You can skip it if you want less sugar. A dash of vanilla extract enhances the flavor. Fresh mint leaves brighten the dish. They add a nice touch when you serve. These extras make the oats more special without much effort. To make your Coconut Mango Overnight Oats, start by gathering your ingredients. In a medium bowl, combine the following: - 1 cup rolled oats - 1 cup coconut milk - 1 tablespoon chia seeds - 1 tablespoon honey or maple syrup (optional) - 1/2 teaspoon vanilla extract Stir everything together until it mixes well. Next, gently fold in half of the diced mango and the shredded coconut. This adds a nice flavor and texture. Now, divide this tasty mixture into two jars. Make sure to seal the jars tightly. Place them in the refrigerator overnight or for at least 4-6 hours. This soaking time allows the oats to soften and soak up the coconut milk. When you wake up, it's time to enjoy your oats! Stir the mixture well before serving. If you want a creamier texture, add a splash more coconut milk. For a special touch, garnish with more shredded coconut and some fresh mint leaves. These little details make your breakfast look and taste amazing! You can change the sweetness of your Coconut Mango Overnight Oats. Start with one tablespoon of honey or maple syrup. Taste the mix. If you want it sweeter, add more. Remember, you can always add more but can’t take it out! You can also switch up the fruits you use. Try adding berries like strawberries or blueberries. Pineapple can give a tropical twist. You can even mix different fruits for a fun flavor party! For the best texture, focus on the oats and milk ratio. One cup of rolled oats to one cup of coconut milk works well. If you like creamier oats, add more milk. Soaking time matters too. Leave the oats in the fridge overnight or for at least 4-6 hours. This lets them absorb the milk and soften nicely. If you’re in a hurry, soak for 30 minutes. But overnight gives you the best results! {{image_2}} You can make your Coconut Mango Overnight Oats even more fun! Adding nuts or seeds gives a great crunch. Try sliced almonds, walnuts, or pumpkin seeds. They also add healthy fats and protein. You can also switch up the fruits. Pineapple adds a sweet and tangy twist. Berries like strawberries or blueberries work well too. Just chop them small and mix them in. They not only taste good but also look pretty. If you follow a vegan diet, this recipe is perfect. Use maple syrup instead of honey for sweetness. Coconut milk is already dairy-free. For those who need gluten-free meals, rolled oats are safe. Always check labels to be sure. You can also cut sugar by using less sweetener or skipping it entirely. The natural sweetness from mangoes is often enough! You can keep coconut mango overnight oats in the fridge for up to five days. To keep them fresh, store them in airtight containers. Make sure to seal the lids tightly. This helps to prevent any odors from seeping in. If you notice any liquid separating, just give the oats a good stir before eating. This keeps them creamy and tasty. Yes, you can freeze overnight oats! To freeze, place the jars in the freezer before the oats soak. They can last up to three months. When you're ready to enjoy them, take them out and let them thaw in the fridge overnight. You can also warm them in the microwave if you prefer a warm breakfast. Just stir well and enjoy your delicious meal! Overnight oats are a simple and healthy breakfast. You mix rolled oats with liquid, like coconut milk. You let the oats soak overnight in the fridge. This softens the oats and makes them creamy. You can add fruits, seeds, or nuts for more flavor. They are easy to prepare and save time in the morning. Yes, you can use quick oats, but the texture will change. Quick oats cook faster and become mushy when soaked. If you like a creamier texture, quick oats work. For a chewier bite, stick with rolled oats. Both choices give you a tasty breakfast, but rolled oats are better for overnight oats. You can store coconut mango overnight oats in the fridge for up to five days. Make sure to keep them in a sealed jar. After five days, the oats may lose their taste or texture. Always check for freshness before eating. Enjoy your nutritious breakfast delight! In this blog post, we explored how to make coconut mango overnight oats with key ingredients like rolled oats, coconut milk, and ripe mango. I shared step-by-step instructions for preparation, storing, and serving. Customization tips and dietary options allow you to enjoy this dish your way. Remember to experiment with textures and flavors to find what you love most. Enjoy your delicious, healthy breakfast with ease. Your morning routine will never be the same!

Coconut Mango Overnight Oats Nutritious Breakfast Delight

Start your day with a burst of flavor! Coconut Mango Overnight Oats are a tasty and healthy breakfast option. Packed

For Lemon Garlic Shrimp Skewers, you will need: - 1 pound large shrimp, peeled and deveined - 3 tablespoons olive oil - 4 cloves garlic, minced - Zest and juice of 1 large lemon These core ingredients bring bold flavor. The shrimp give a sweet taste, while the garlic adds depth. The lemon brings a bright zing. To boost the taste, include: - 1 teaspoon smoked paprika - 1 teaspoon dried oregano - Salt and pepper to taste Smoked paprika gives a nice warmth. Dried oregano adds a hint of earthiness. Salt and pepper balance everything. When serving, consider adding: - Fresh parsley, chopped (for garnish) - Lemon wedges (for serving) Chopped parsley adds color and freshness. Lemon wedges let everyone squeeze in more flavor. This makes each bite even better. To start, gather a large mixing bowl. You need three tablespoons of olive oil. Next, add four cloves of minced garlic. Then, zest and juice one large lemon. This adds a bright flavor. After that, mix in one teaspoon of smoked paprika and one teaspoon of dried oregano. Finally, season with salt and pepper to taste. Whisk everything together until it blends well. The marinade should smell fresh and vibrant. Take one pound of large shrimp that are peeled and deveined. Add the shrimp to the bowl with the marinade. Toss them gently to coat every shrimp evenly. Make sure each shrimp gets a good amount of flavor. Cover the bowl with plastic wrap. Place it in the fridge for at least 30 minutes. This helps the shrimp absorb all that tasty goodness. Preheat your grill to medium-high heat. If you use wooden skewers, soak them in water for 30 minutes. This prevents them from burning on the grill. Once ready, thread about four to five marinated shrimp onto each skewer. Make sure they are snug but not too tight. Place the skewers on the hot grill. Cook them for about 2 to 3 minutes on each side. Look for the shrimp to turn opaque and develop grill marks. Be careful not to overcook them. When done, remove the skewers and let them rest for a minute. Garnish with chopped parsley and serve with lemon wedges. Enjoy your meal! Grilling shrimp is simple if you follow a few key tips. First, ensure your grill is hot. A hot grill gives the shrimp a nice sear. Use medium-high heat for the best results. Second, keep the shrimp in a single layer on the grill. This helps them cook evenly. Lastly, avoid flipping the shrimp too often. Let them sit for 2-3 minutes on each side. This allows the shrimp to get those beautiful grill marks. Cooking shrimp is quick, so watch the time closely. Grill the shrimp for about 2-3 minutes on each side. You want them to turn opaque and firm. Overcooked shrimp can become rubbery and tough. If you see them curling tightly, they are likely overdone. To check if they are ready, look for a nice pink color and a slight char. Choosing the right shrimp is key to tasty skewers. Look for large, fresh shrimp when shopping. They should be firm and smell like the ocean, not fishy. When possible, buy shrimp that are wild-caught. They often have better flavor than farmed shrimp. If you buy frozen shrimp, ensure they are peeled and deveined. This saves you time and makes prep easy. {{image_2}} You can change up the flavor with different spices. Try using cumin or chili powder for a kick. If you like fresh herbs, basil or cilantro can add a nice touch. For a hint of sweetness, add a pinch of brown sugar. Mixing these spices can make the dish unique and fun. If you don’t have a grill, you can cook the skewers in the oven. Preheat your oven to 400°F. Place the skewers on a baking sheet and bake for about 8-10 minutes. You can also use a broiler. Broil the skewers for 2-3 minutes per side until they are done. If you prefer the stovetop, heat a skillet over medium-high heat and cook for 2-3 minutes on each side. If you want a vegetarian version, use firm tofu or mushrooms. Cut them into cubes and marinate just like the shrimp. For seafood lovers, scallops or fish like salmon work well. They both soak up the marinade nicely. These options keep the meal tasty while catering to different diets. After enjoying your lemon garlic shrimp skewers, let them cool down. Place any leftovers in an airtight container. You can keep them in the fridge for up to two days. This helps keep the shrimp fresh and tasty. To reheat your skewers, use a grill or a pan. Heat it to medium. Cook for about 2-3 minutes on each side. This warms them up without losing flavor. You can also use a microwave, but it may make the shrimp a bit rubbery. If you do use a microwave, heat them in short bursts. If you want to freeze your marinated shrimp, place them in a freezer bag. Make sure to remove as much air as possible. You can freeze them for up to three months. When you're ready to cook, thaw them overnight in the fridge. This keeps the shrimp juicy and flavorful. You can tell shrimp are cooked when they turn from gray to pink. The flesh should be opaque, and they should form a C shape. If they curl tightly, they may be overcooked. Always cook shrimp for about 2-3 minutes per side. Yes, you can make these skewers ahead of time. Marinate the shrimp and store them in the fridge for up to 24 hours. This gives the shrimp more flavor. Just be sure to grill them fresh when you are ready to eat. Shrimp skewers go well with many sides. Here are some great options: - Garlic bread - Rice or quinoa - Grilled vegetables - A fresh salad - Couscous with herbs These sides balance the shrimp's flavor and add color to your meal. Enjoy mixing and matching! Lemon Garlic Shrimp Skewers are a simple dish full of flavor. We discussed the key ingredients, marinade steps, and grill tips to help you succeed. Variations let you explore new flavors, while storage tips ensure you don't waste any leftovers. Remember, the right cooking time is crucial for tender shrimp. Try serving with fresh sides to boost the meal. With these tips, you can impress anyone at your next cookout. Enjoy making your perfect skewers!

Lemon Garlic Shrimp Skewers Simple and Tasty Meal

Looking for a quick and tasty meal? Try my Lemon Garlic Shrimp Skewers! This dish is simple, fresh, and packed

- 1 cup cream cheese, softened - 1/2 cup unsalted butter, softened - 3/4 cup brown sugar, packed - 1/2 cup granulated sugar - 1 teaspoon vanilla extract - 1 cup all-purpose flour (heat-treated) - 1/2 teaspoon salt - 1 cup mini chocolate chips To make a tasty Chocolate Chip Cookie Dough Dip, you need a few key ingredients. First, cream cheese and unsalted butter create a rich and creamy base. You want to soften them to blend easily. Next, the sugars add sweetness and depth. Use packed brown sugar for a nice caramel flavor. Granulated sugar gives it a classic sweet touch. Don't forget the vanilla extract! This adds warmth and enhances the flavor. For the dough texture, heat-treat your all-purpose flour. This step makes it safe to eat. Finally, mini chocolate chips add that delicious cookie dough taste. - 1/2 cup crushed graham crackers - Assorted dippers (e.g., apple slices, pretzels, cookie pieces) For serving, sprinkle crushed graham crackers over the dip. They add crunch and look great. You can also use assorted dippers. Fresh apple slices give a crisp bite. Pretzels add a salty twist, and cookie pieces let you double the cookie fun. Feel free to mix and match your favorites! Start by beating the cream cheese and unsalted butter. Use a medium bowl and an electric mixer. Mix until the blend is smooth and creamy. This step is key for a rich dip. Next, combine the brown sugar and granulated sugar. Gradually add them to your cream mix. Then, stir in the vanilla extract. This adds a nice flavor to your dip. Now, let’s add the dry ingredients. First, use heat-treated flour. Heat-treating is easy! Just microwave the flour for one minute or bake it at 350°F for five minutes. This step keeps the dip safe to eat. Add the salt to the flour and mix. Then, fold in the mini chocolate chips. Be gentle to keep the chips whole. This will give your dip that classic chocolate chip taste. Transfer the dip to a serving bowl. Smooth the top with a spatula for a nice look. To finish, sprinkle crushed graham crackers on top. This gives a crunchy texture that pairs well with the creamy dip. Serve your dip right away. You can use apple slices, pretzels, or cookie pieces as dippers. Each adds a fun twist to your snack. Enjoy the rich flavors and creamy texture! To get a creamy texture, start with softened cream cheese and butter. Use an electric mixer for the best results. Mix until the blend is smooth and fluffy. Gradually add both sugars to avoid lumps. You want a silky, uniform dip. Make sure to heat-treat your flour before adding it. You can do this by microwaving it for one minute or baking it at 350°F for five minutes. This step helps eliminate any harmful bacteria. After mixing in the flour, the dip should still be smooth. Add chocolate chips gently to keep the dip creamy. You can boost flavors by adding spices or extracts. A pinch of cinnamon or a splash of almond extract can add depth. This simple step can make your dip stand out. Also, consider using different types of chocolate. Swap out mini chocolate chips for dark, white, or even peanut butter chips. Each type brings a unique taste. Experimenting with flavors can lead to fun new versions of your dip. Presentation makes a dish more appealing. Use a creative serving bowl to catch the eye. A colorful ceramic bowl or a rustic wooden platter can be great choices. For garnishing, try sprinkling crushed graham crackers on top. This adds a nice crunch. You can also add a few extra chocolate chips for decoration. Serve with assorted dippers like apple slices, pretzels, or mini cookies for a fun experience! {{image_2}} You can change up the taste of your chocolate chip cookie dough dip. One great twist is the peanut butter chocolate chip dip. Just mix in half a cup of creamy peanut butter when you add the cream cheese and butter. The blend of flavors will wow your taste buds! If you need a nut-free version, swap peanut butter for sun butter or soy nut butter. These options will keep your dip safe for nut allergies. For gluten-free options, use gluten-free flour instead of all-purpose flour. This change keeps the dip tasty and safe for those with gluten sensitivities. Make sure to check that your chocolate chips are also gluten-free. If you want a vegan alternative, use vegan cream cheese and a plant-based butter. You can also replace the sugars with coconut sugar for a healthier twist. This keeps the dip creamy and delicious without any animal products. To keep your cookie dough dip fresh, store it in the fridge. Use an airtight container to prevent it from drying out. It will stay tasty for about 3 to 5 days. If you want to keep it at its best, avoid mixing in the dippers until you are ready to serve. This keeps everything crunchy and fun! You can also freeze the dip for longer storage. Place the dip in a freezer-safe container, and cover it well. It will last for up to 3 months in the freezer. When you're ready to use it, thaw it in the fridge overnight. After thawing, stir well to bring back its creamy texture. If needed, you can gently reheat it in the microwave for a few seconds. Just be sure to stir often to avoid hot spots. Enjoy your delicious treat anytime! The best way to make chocolate chip cookie dough dip is to start with softened cream cheese and butter. Beat them together until smooth. Then, mix in the brown and granulated sugars. Stir in the vanilla extract next. Add heat-treated flour and salt to the mix. Finally, fold in the mini chocolate chips. Make sure everything is well combined for a creamy dip. You can use different types of flour, but it is best if you heat-treat them first. This step helps kill any harmful bacteria. You can use whole wheat flour or gluten-free flour as alternatives. Just ensure you treat them the same way as all-purpose flour. Cookie dough dip lasts about 3 to 5 days in the fridge. Store it in an airtight container to keep it fresh. If you notice any change in smell or texture, it’s best to toss it out. Always check before serving to ensure it’s still good. This blog post covered the essentials for making a delicious chocolate chip cookie dough dip. You learned about the key ingredients and step-by-step instructions. Plus, we shared tips on perfecting the texture and exciting variations to try. When serving this dip, creativity is key. Make it your own with different flavors and serving ideas. Remember, storage is crucial for keeping it fresh. Enjoy this fun treat with your favorite dippers, and impress everyone with your skills!

Chocolate Chip Cookie Dough Dip Luscious and Creamy

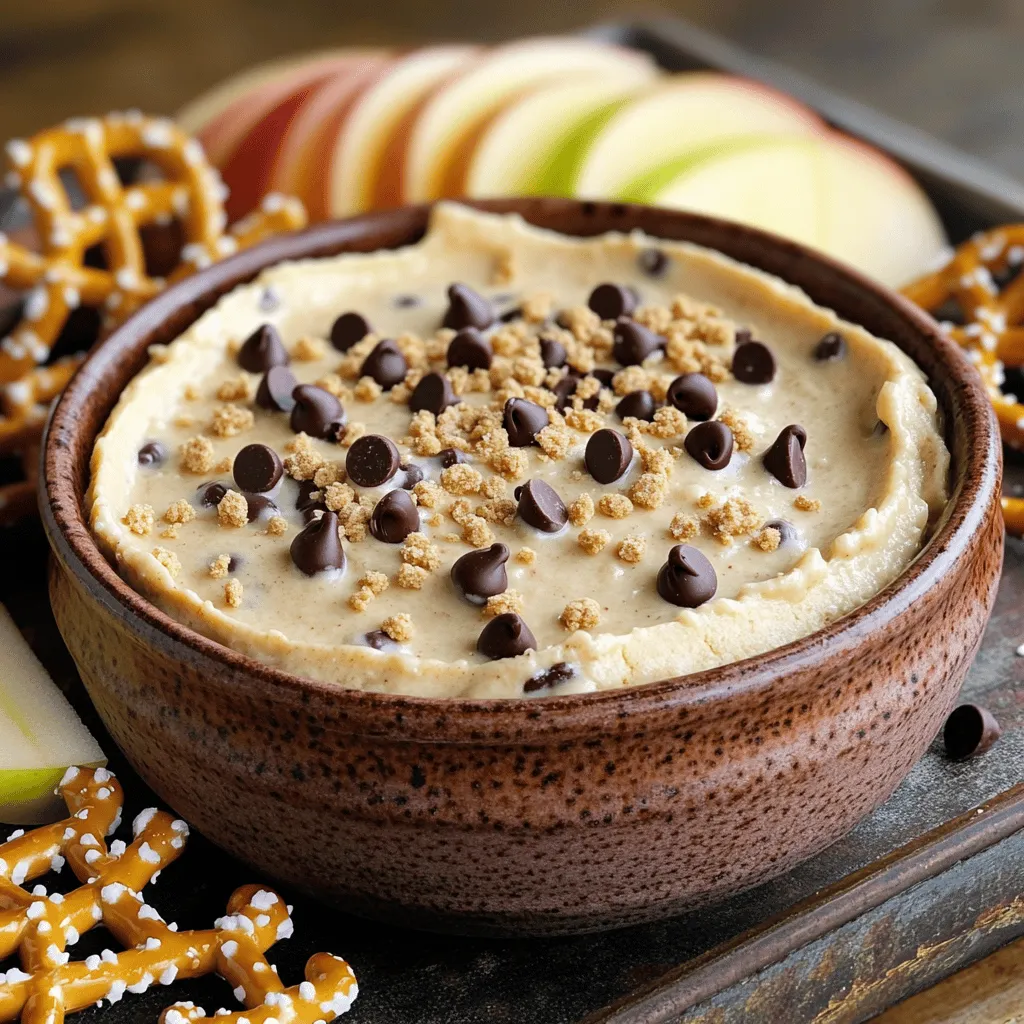
Ready to indulge in a sweet treat that’s sure to wow your taste buds? This Chocolate Chip Cookie Dough Dip

- 4 salmon fillets (about 6 oz each) - 2 tablespoons olive oil - 2 tablespoons fresh lemon juice - Zest of 1 lemon - 3 cloves garlic, minced - 1 teaspoon dried oregano - 1 teaspoon dried thyme - Salt and pepper to taste - 1 cup cherry tomatoes, halved - 1 cup zucchini, sliced - 1 cup bell peppers, sliced (assorted colors) - Fresh parsley, chopped, for garnish When it comes to measurements, precision matters for a great dish. Each salmon fillet should weigh around 6 ounces for even cooking. If you need a lighter meal, you can use 4-ounce fillets. Olive oil adds richness, but you can swap it for avocado oil if preferred. Fresh lemon juice brightens the dish. If you don’t have fresh, bottled juice works too, but use less. The zest of one lemon enhances the flavor. You can skip it, but I don’t recommend it. Garlic is key for depth. If you prefer, garlic powder works as a substitute. Dried oregano and thyme add aroma. Fresh herbs give better flavor but use double the amount if you have them. Lastly, use any colorful bell peppers you have, as each adds its own flair. Fresh herbs offer vibrant flavor and aroma. They brighten the dish and are great for garnishing. However, dried herbs are convenient and still tasty. Use dried if you are in a hurry. The general rule is to use one-third the amount of dried herbs as fresh. For this recipe, if you use fresh oregano or thyme, double the amount for a burst of flavor. So, if you love fresh herbs, feel free to use them. Both options work well, so choose what you have on hand. First, gather all your ingredients. You will need: - 4 salmon fillets (about 6 oz each) - 2 tablespoons olive oil - 2 tablespoons fresh lemon juice - Zest of 1 lemon - 3 cloves garlic, minced - 1 teaspoon dried oregano - 1 teaspoon dried thyme - Salt and pepper to taste - 1 cup cherry tomatoes, halved - 1 cup zucchini, sliced - 1 cup bell peppers, sliced (assorted colors) - Fresh parsley, chopped, for garnish Wash the vegetables well. Cut the zucchini and bell peppers into slices. Halve the cherry tomatoes. Place them all in a mixing bowl. In a small bowl, mix the olive oil, lemon juice, lemon zest, minced garlic, oregano, thyme, salt, and pepper. This mixture becomes your tasty marinade. Put the salmon fillets in a large zip-top bag or shallow dish. Pour the marinade over the salmon. Make sure each fillet is well coated. Let it sit for at least 15-20 minutes. This time allows the flavors to soak in. Preheat your oven to 400°F (200°C). While the oven heats, prepare the veggies. Drizzle them with olive oil and season with salt and pepper. Toss well to coat. On a large sheet pan, arrange the marinated salmon fillets in the center. Surround them with the seasoned vegetables. Bake everything in the preheated oven for 15-20 minutes. The salmon should flake easily with a fork when done. The veggies should be tender and vibrant. Once cooked, take the sheet pan out of the oven. Let it rest for a few minutes. Garnish your dish with freshly chopped parsley before serving. Enjoy your simple and tasty meal! To get perfectly cooked salmon, keep a close eye on the time. Bake the salmon for 15-20 minutes. It should flake easily when done. If it looks dry, you may have overcooked it. Using a fork, check if it comes apart easily. If it does, it's ready! You can boost the flavor of your salmon in many ways. Add fresh herbs like dill or basil for a new twist. A splash of white wine in the marinade adds depth. Try a bit of honey for a sweet touch. You can also mix in some capers for a salty bite. Experimenting with flavors will make your dish even more exciting! For the best veggies, cut them into even pieces. This helps them cook evenly. Bake the vegetables alongside the salmon. They will get tender, but still have a nice crunch. If you like your veggies softer, add them to the pan first. Give them a head start for about 5 minutes before adding the salmon. This way, everything will be just right! {{image_2}} You can change the flavor of your salmon by using different marinades. Try a honey mustard mix for a sweet kick. Combine 2 tablespoons of honey, 1 tablespoon of mustard, and a splash of apple cider vinegar. Another option is a soy sauce marinade. Mix 2 tablespoons of soy sauce with 1 tablespoon of sesame oil and a pinch of ginger. Both options add unique tastes to your dish. Feel free to swap in different vegetables based on what you have. Broccoli and asparagus work well. You can also use carrots for a sweet crunch. Just make sure to cut them into similar sizes to help them cook evenly. For a twist, try adding sweet potatoes or even green beans. This will keep your meal fresh and exciting. If you want a low-carb meal, focus on non-starchy veggies. Skip the bell peppers and use spinach or cauliflower. These choices keep your plate light and tasty. To ensure your meal is gluten-free, check your soy sauce. You can use tamari as a gluten-free option. These simple swaps let you enjoy this recipe while meeting dietary needs. Once your sheet pan lemon herb salmon is cooked, let it cool. Place the salmon and veggies on a plate. Don't leave them out for more than two hours. To store, use an airtight container. This keeps the meal fresh for up to three days. Make sure to keep it in the fridge. Label the container with the date. This helps you remember when you made it. When you are ready to eat the leftovers, you can reheat them. The best way is to use an oven. Preheat your oven to 300°F (150°C). Place the salmon and veggies on a baking sheet. Cover them with foil to keep them moist. Heat for about 10-15 minutes. You can also use a microwave, but be careful. Heat in short bursts to avoid overcooking. Check the food often to ensure it stays tasty. If you want to save some for later, freezing is a great option. First, let the salmon and veggies cool completely. Then, wrap each piece tightly in plastic wrap. Place them in a freezer-safe bag or container. Be sure to squeeze out as much air as possible. This helps prevent freezer burn. You can freeze them for up to three months. When you're ready to eat, thaw overnight in the fridge before reheating. This keeps the meal flavorful and enjoyable. You can tell when salmon is done by checking its color and texture. When cooked, salmon turns from dark pink to a lighter shade. The fish should flake easily with a fork. If the center is still raw or too shiny, it needs more time. Use a food thermometer for accuracy; the ideal temperature is 145°F (63°C). Yes, you can use frozen salmon! Just remember to thaw it first. Place the frozen salmon in the fridge overnight to defrost. If you’re short on time, you can run it under cold water. Once thawed, follow the same marinating steps. Cooking time may need a few extra minutes. This dish pairs well with many sides. Here are some tasty ideas: - Quinoa or rice for a hearty base. - A fresh green salad with a light dressing. - Garlic bread for a comforting touch. - Roasted potatoes for extra carbs. - Steamed broccoli or asparagus for a colorful plate. These options add flavor and balance to your meal. Enjoy mixing and matching! In this post, we explored how to prepare a delicious lemon herb salmon dish. We covered key ingredients, how to marinate and cook salmon, and tips for perfect results. You can add different flavors and vegetables to suit your taste. Proper storage helps keep meals fresh for later. Remember, cooking salmon well is about timing and temperature. With these steps, you can create a meal that impresses everyone. Enjoy your cooking and savor the flavors!

Sheet Pan Lemon Herb Salmon Simple and Tasty Meal

Looking for a quick and tasty dinner? I’ve got you covered with my Sheet Pan Lemon Herb Salmon recipe. This

- 2 cups all-purpose flour - 3 large eggs - 1 teaspoon salt To make the dough, I start with flour. I create a mound and form a well in the center. In this well, I add the eggs and salt. I use a fork to beat the eggs, mixing them with the flour. This forms a dough that I knead until smooth. - 1 cup ricotta cheese - 1 cup fresh spinach, chopped - 1/2 cup grated Parmesan cheese For the filling, I sauté garlic in olive oil first. I add chopped spinach and cook until it wilts. Once cooled, I mix the spinach with ricotta and Parmesan. This blend is creamy and packed with flavor. - 1 garlic clove, minced - 1/4 teaspoon nutmeg - 1 tablespoon olive oil - 1/2 cup heavy cream - Salt and pepper to taste - Fresh basil leaves for garnish To make the sauce, I heat heavy cream in a pan. I season it with salt and pepper. This creates a rich and creamy sauce for the ravioli. I also use nutmeg for a hint of warmth. Finally, I garnish the dish with fresh basil leaves for a pop of color and flavor. To start, gather your flour. Make a mound on a clean surface and create a well in the center. Crack the eggs into the well and add salt. Using a fork, mix the eggs gently. Gradually pull in flour from the edges. This helps form your dough. Once it starts to come together, knead the dough for about 8 to 10 minutes. Aim for a smooth, elastic texture. Wrap it in plastic wrap and let it rest for 30 minutes. Next, heat olive oil in a skillet over medium heat. Add minced garlic and cook until fragrant, about one minute. Then, add chopped spinach and sauté until it wilts. Once cooked, remove it from heat and let it cool slightly. In a bowl, mix the spinach with ricotta cheese, grated Parmesan, nutmeg, salt, and pepper. Stir until well combined. This creamy filling is the heart of your ravioli. Once your dough has rested, divide it into four pieces. Roll out one piece at a time into thin sheets, about 1/16 inch thick. You can use a pasta machine or a rolling pin. Dust the dough with flour to prevent sticking. Using a teaspoon, drop small mounds of filling on the rolled dough, leaving about 2 inches between them. Moisten the edges with water to help seal. Lay another sheet of dough on top and press down around the filling. Cut individual ravioli with a pasta cutter or knife. Bring a large pot of salted water to a boil. Carefully add the ravioli and cook for about 4 to 5 minutes. They are done when they float to the surface. Use a slotted spoon to remove them and drain. In a saucepan, heat heavy cream over medium heat. Season with salt and pepper. Let it simmer for a few minutes until slightly thickened. Finally, add the cooked ravioli to the cream sauce and gently toss them to coat. This rich sauce brings everything together beautifully. To make great ravioli, dough is key. Start with the right flour. Use all-purpose flour for a nice texture. Your dough should be smooth but not sticky. If it sticks to your hands, add a bit more flour. Knead the dough for about 8-10 minutes. This helps develop gluten, making the dough stretchy. After kneading, wrap it tightly in plastic. Let it rest for 30 minutes. This time allows the gluten to relax, making it easier to roll out. You can spice up the filling in many ways. Try adding herbs like basil or thyme for extra flavor. If you want a different taste, use feta or goat cheese instead of ricotta. These cheeses add a tangy kick. You can also mix in other veggies like mushrooms or artichokes. Just make sure they are cooked and cooled before mixing. This keeps the filling from getting watery. Knowing when your ravioli are done is simple. Fresh ravioli cook quickly, usually in 4-5 minutes. They float to the top when ready. Use a slotted spoon to lift them out. If you're feeling creative, try baking your ravioli. Place them in a baking dish, cover with sauce, and bake at 375°F for about 20 minutes. This gives a nice twist to the dish, adding a crispy layer. {{image_2}} You can change up the filling for your ravioli to keep things exciting. Here are two tasty ideas: - Mushroom and ricotta: Use sautéed mushrooms mixed with ricotta for a rich, earthy flavor. - Butternut squash and sage: This filling brings a sweet taste with a hint of warmth. Cook butternut squash until soft, then mix it with ricotta and fresh sage. Switching sauces can give your ravioli a new life. Consider these options: - Marinara sauce option: A classic, simple marinara sauce pairs well with the creamy filling. Just heat the sauce and toss it with your ravioli. - Pesto sauce variation: For a fresh twist, try basil pesto. The nutty and herbal flavors will brighten your dish. You can make this dish fit different diets too. Here’s how: - Substituting ingredients for gluten-free dough: Use almond flour or a gluten-free all-purpose blend. This will keep the dough tasty and safe for those avoiding gluten. - Vegan ricotta alternatives for filling: Swap ricotta for a mix of blended tofu, nutritional yeast, and lemon juice. This keeps the creamy texture without dairy. These variations will keep your creamy spinach ricotta ravioli fun and delicious! To keep uncooked ravioli fresh, store them in the fridge. Place them in an airtight container. Fresh ravioli last up to two days this way. If you want to keep them longer, freeze them. Lay the ravioli flat on a baking sheet. Make sure they do not touch. Freeze for an hour, then transfer them to a freezer bag. They can stay in the freezer for up to three months. For storing cooked ravioli, let them cool first. Place them in a sealed container. They can stay in the fridge for up to three days. To reheat, use a microwave or a pan. If using a microwave, add a splash of water. Cover the dish to keep the moisture in. If using a pan, add a little olive oil. Heat over low until warmed. This keeps the ravioli from drying out. Enjoy your leftover creamy spinach ricotta ravioli! You can prepare the dough a day ahead. After kneading, wrap it tightly in plastic wrap. Store it in the fridge. This resting time helps the dough relax, making it easier to roll out later. When you’re ready to use it, let it sit at room temperature for about 15 minutes. This way, the dough will be soft and easy to work with. Yes, you can use store-bought ravioli. This choice saves time and effort. However, pre-made ravioli may not have the same fresh taste. Look for high-quality brands to get better flavor. Store-bought ravioli cooks quickly, usually in just a few minutes. Just remember to pair it with a tasty sauce to enhance the dish. A light side salad works great with creamy spinach ricotta ravioli. Try a simple mix of arugula, cherry tomatoes, and a lemon vinaigrette. Garlic bread is another good option, adding crunch and flavor. You can also serve steamed vegetables for a healthy touch. Each side adds balance to your meal and brings out the ravioli's rich flavors. Making your own ravioli can be fun and rewarding. You start with simple ingredients like flour, eggs, spinach, and ricotta. I shared steps to make dough, prepare filling, and assemble ravioli. You also learned tips to improve your dish and explore variations, like different fillings and sauces. Remember, you can even customize this dish for dietary needs. Enjoy experimenting in the kitchen with fresh ravioli that fits your taste!

Creamy Spinach Ricotta Ravioli Flavorful Delight

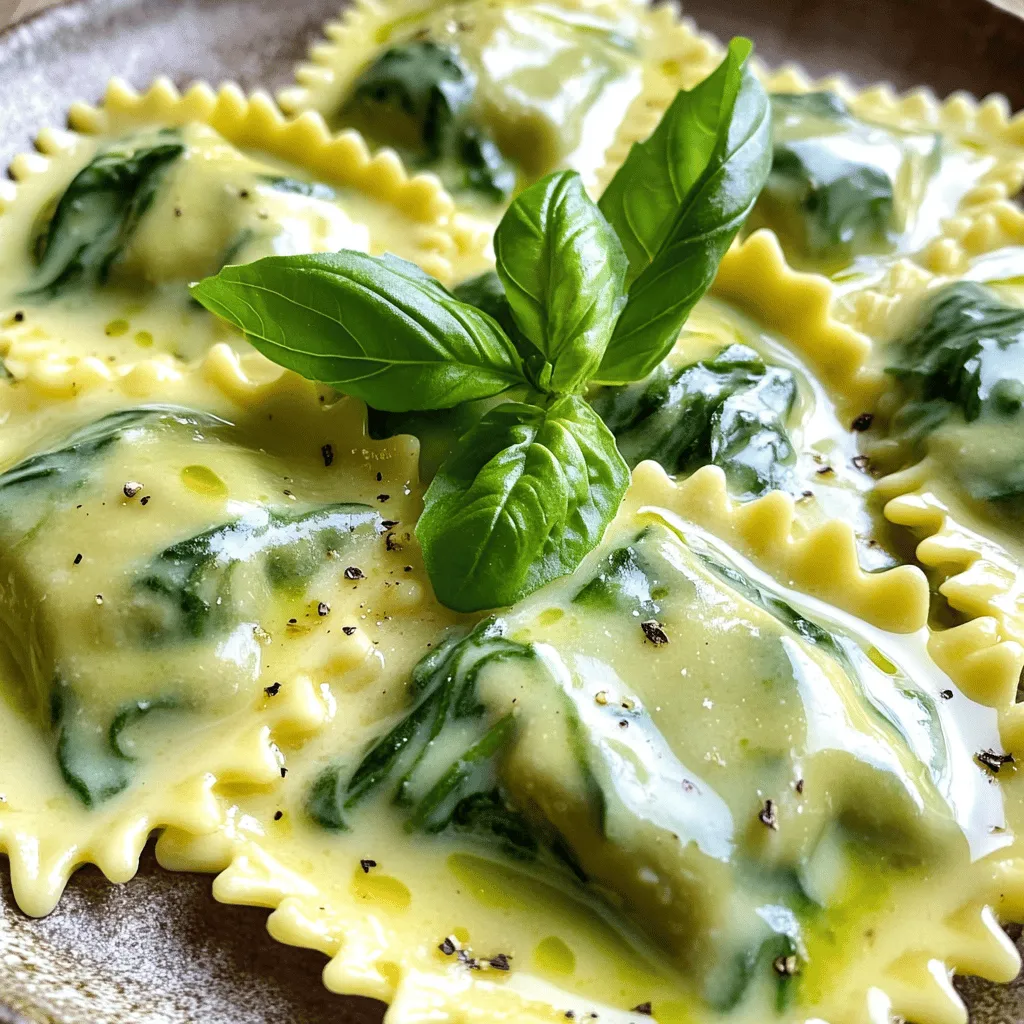
Get ready to enjoy a creamy spinach ricotta ravioli that bursts with flavor! In this post, we will explore how

Here are the ingredients you need for Peanut Butter Cup Overnight Oats. This recipe is simple and fun! - 1 cup rolled oats - 2 cups almond milk (or milk of your choice) - 1/4 cup creamy peanut butter - 2 tablespoons cocoa powder - 2 tablespoons maple syrup (or honey) - 1/2 teaspoon vanilla extract - 1/4 teaspoon salt - 1/4 cup mini chocolate chips (plus extra for topping) - Chopped peanuts (for garnish) These ingredients come together to create a tasty and filling breakfast. Rolled oats are the base, soaking up the milk and flavors. Almond milk keeps it light and creamy, while peanut butter adds richness. Cocoa powder gives that chocolatey kick, and maple syrup sweetens it just right. Mini chocolate chips add more chocolate flavor. I like to sprinkle chopped peanuts on top for a fun crunch. You can use any milk you prefer, too! This recipe is flexible and easy to make. Enjoy! - Combine 1 cup rolled oats, 2 cups almond milk, and 1/4 cup creamy peanut butter. - Stir until everything is well mixed. The oats should soak up the milk and peanut butter. - Mix in 2 tablespoons cocoa powder, 2 tablespoons maple syrup, 1/2 teaspoon vanilla, and 1/4 teaspoon salt. - Ensure the mixture is smooth and creamy. This adds richness and flavor to your oats. - Gently fold in 1/4 cup mini chocolate chips. - Divide the mixture into 4 jars, sealing each tightly. This makes for easy storage. - Refrigerate overnight or for at least 4 hours. This helps the oats soften and absorb flavors. - When ready to serve, give the oats a stir. Top with extra mini chocolate chips and chopped peanuts for crunch. To make your oats creamy, mix the peanut butter well. This helps it blend smoothly with the other ingredients. I find that using warm almond milk makes mixing easier. Heat it a bit before adding it to the oats. This small step greatly improves the texture of your overnight oats. You can adjust the sweetness to your liking. If you want it sweeter, add more maple syrup or honey. A little pinch of cinnamon adds a nice flavor boost too. It pairs perfectly with the chocolate and peanut butter. Serve your oats in clear jars. This shows off the beautiful layers and toppings. To make it pretty, layer the oats, chocolate chips, and chopped peanuts. This makes each spoonful look as good as it tastes. Enjoy your oats straight from the jar for a fun breakfast! {{image_2}} If you need a nut-free option, try using sunflower seed butter. This swap gives you a similar taste and texture without any nuts. Sunflower seed butter is smooth and creamy. It also adds a nice, nutty flavor. You can use the same amount as peanut butter. Just replace it in the recipe, and you are good to go! To make these oats vegan, you can use any plant-based milk. Almond milk works great, but oat milk or soy milk are also good choices. For sweeteners, consider using agave syrup or coconut sugar instead of honey. Both options keep your oats fully vegan. You can add fun flavors to your oats. Slices of banana or fresh berries make a tasty addition. They add sweetness and brightness to each bite. You can also try different nut butters. Almond, cashew, or even chocolate nut butter can change the taste. Just swap in your favorite nut butter for a new twist! You can store Peanut Butter Cup Overnight Oats for up to five days in the fridge. Use airtight jars to keep them fresh. Glass or plastic containers work well. Make sure they seal tightly to prevent any air from getting in. This keeps the oats creamy and flavorful. You can enjoy your oats cold, straight from the fridge. If you prefer them warm, there are easy ways to heat them. The microwave is a quick option. Heat in short bursts, about 15 to 30 seconds, stirring in between. This helps keep the texture smooth. Avoid boiling them, as that can make the oats mushy. You want to maintain that perfect bite! To make your overnight oats thicker, try these tips: - Use less milk. This reduces liquid and makes oats firmer. - Add an extra tablespoon of oats. This boosts thickness. - Mix in chia seeds. These absorb liquid and add texture. - Let the oats sit longer. The longer they sit, the thicker they get. Yes, you can use regular oats. However, they change the texture. Regular oats cook faster than rolled oats. This means they may become mushy in the fridge. If you prefer a firmer bite, stick with rolled oats. You can store your Peanut Butter Cup Overnight Oats for up to five days in the fridge. Use airtight jars for the best freshness. Make sure to stir well before eating. If you notice any separation, it's normal. Just mix it back together for a tasty treat. You learned how to make delicious Peanut Butter Cup Overnight Oats. We covered the basic ingredients, step-by-step instructions, and tips for the best taste and texture. Remember to customize these oats to fit your preference. Try different flavors or toppings to keep it exciting. Store them right for freshness, and you will enjoy your oats for days. This recipe is simple, healthy, and fun, making it easy for you to fuel your day. Enjoy your tasty creation!

Peanut Butter Cup Overnight Oats Tasty and Easy Recipe

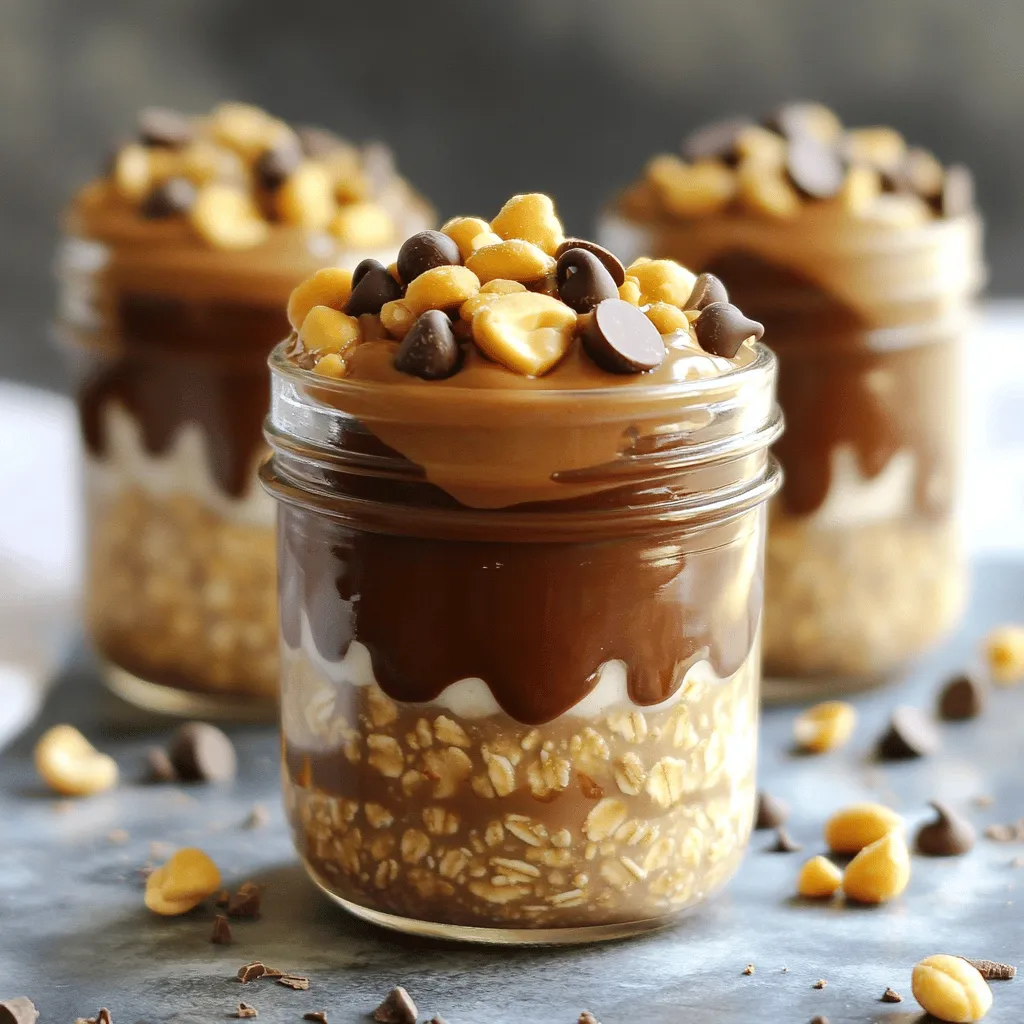
Looking for a quick breakfast that satisfies your sweet tooth? Look no further! My Peanut Butter Cup Overnight Oats recipe

- Fresh mango: Choose a ripe mango. It should feel slightly soft when pressed. Look for a rich golden color and a sweet aroma. - Habanero peppers: Use 1-2, depending on your spice level. The orange or red types are common. Habaneros are very hot. If you want less heat, use less. - Red onion: Use 1/2 finely diced. It adds a nice crunch and sharp flavor. - Bell pepper: Use 1/2 of a red or yellow bell pepper, diced. It adds sweetness and color. - Lime juice: Use 2 tablespoons of fresh lime juice. It brightens the salsa and balances the heat. - Fresh cilantro: Use 1/4 cup chopped. It adds freshness and a nice herbal note. - Salt: Add to taste. It enhances the flavors in the salsa. - Optional: If you prefer a touch of sweetness, add 1/2 teaspoon of honey. It balances the heat from the peppers. This mix of ingredients creates a bold and flavorful salsa. Each component plays a vital role in building the taste. Use fresh ingredients for the best results. To start, you need to prep the mango. Slice off both ends of the mango. Stand it up and peel the skin with a knife. Hold the mango steady and cut it into slices. Avoid the pit by following the shape of the fruit. Cut the flesh into small cubes. This way, you waste less fruit. Now, let’s handle the habanero. Always wear gloves when working with these peppers. Their oils can burn your skin. Cut off the stem and slice the pepper in half. Use a spoon to remove the seeds if you want less heat. Chop the pepper finely, and remember, start with one for less spice. Next, it’s time to mix your ingredients. You need to balance the flavors for a tasty salsa. Add the diced mango, habanero, red onion, and bell pepper into a bowl. Pour in the fresh lime juice and sprinkle with salt. If you like sweetness, add honey. Mix everything gently. Use a spatula to fold the ingredients together. Be careful not to mash the mango pieces. You want some texture in your salsa, not mush! Now, let the salsa rest. This is key for the flavors to blend. Cover the bowl and set it aside for at least 15 to 30 minutes. During this time, the heat of the habanero will mellow a bit, and the fruit flavors will shine. The wait makes all the difference in taste! To change the heat, start with one habanero. Taste the salsa and add more if you want it spicier. You can also try other peppers like jalapeños or serranos. They offer different heat levels and flavors. For milder salsa, use bell peppers instead of spicy ones. Store your salsa in an airtight container in the fridge. It stays fresh for about three days. To keep ingredients fresh, buy ripe mangoes and firm peppers. Before you prep, wash everything well. Keep cilantro in a glass of water, like flowers, to stay fresh. Mango habanero salsa pairs great with tortilla chips. It also shines as a topping for grilled meats. Try it on tacos or as a zesty addition to salads. For a fun twist, spoon it over fish tacos or mix it into rice bowls! {{image_2}} To make your mango habanero salsa even better, you can add more fruits. Pineapple and peaches work great. Their sweetness pairs well with the heat of the habanero. You can also try adding diced strawberries or kiwi for a unique twist. Other herbs and spices can enhance the flavor, too. Consider adding minced garlic for depth. A dash of cumin can give it a warm undertone. Try fresh mint if you want a refreshing touch. Each addition can bring new layers to your salsa. If you're looking for gluten-free and vegan options, you’re in luck! This salsa is naturally gluten-free and vegan. Just ensure that all your ingredients are fresh and free of any additives. For those wanting lower sugar or sodium, skip the honey and use less salt. You can also swap lime juice for lemon juice for a different taste without extra sugar. Salsa varies across cultures. In Mexico, they often add tomatoes and avocado. In the Caribbean, some use mango with black beans for a hearty side. You can also mix in influences from Thai cuisine. Adding fish sauce or cilantro can create a fun fusion. Explore what flavors you love and make this salsa your own! Store leftover salsa in an airtight container. Glass jars work great for this. They help keep the flavors fresh. Make sure to seal the lid tightly. Place the container in the fridge. Your salsa can last up to 3 days this way. You can freeze this salsa if you want to save some. First, pour it into a freezer-safe container. Leave a little space at the top. Salsa expands when frozen. To thaw, move it to the fridge the night before. Avoid using a microwave, as it can change the texture. Frozen salsa is best used within 3 months for best taste. Check for any changes in color or smell. If it smells sour or looks off, throw it away. Mold is another big sign; if you see any, do not eat it. Always trust your senses. If in doubt, it’s safer to discard it. Homemade mango habanero salsa can last about 3 to 5 days in the fridge. Keep it in an airtight container to help it stay fresh. After a few days, the flavors may change, and it might get watery. For the best taste, enjoy it within a few days. Yes, you can use frozen mango for this salsa. Frozen mango is often picked at peak ripeness, making it sweet. Just thaw it first and drain any extra juice. Fresh mango has a firmer texture, which adds a nice crunch. Both options are tasty, so pick what you prefer. If you dislike cilantro, try using parsley or green onions instead. Both will add a fresh taste without the strong flavor of cilantro. You could also use basil for a unique twist. Each option gives your salsa a different flavor, so feel free to experiment. Mango habanero salsa can be spicy, depending on how many habaneros you use. Habaneros are hot, but the sweetness of mango balances the heat. You can start with one pepper and taste as you go. If you want less heat, try using jalapeños or bell peppers instead. Making mango habanero salsa is fun and simple. You learned about fresh mangoes, habanero peppers, and how to mix ingredients for the best flavor. Proper storage helps keep your salsa fresh, while variations let you tailor it to your taste. Remember, you can adjust the spice level to suit your liking. Enjoy this salsa with chips or on tacos. Feel free to experiment with different fruits and herbs. Your kitchen adventure is just beginning!

Mango Habanero Salsa Bold and Flavorful Recipe

Looking for a salsa that packs a punch? My bold and flavorful Mango Habanero Salsa is the perfect blend of

To make spicy buffalo chicken meatballs, you need these main ingredients: - 1 lb ground chicken - 1/2 cup breadcrumbs - 1/4 cup grated Parmesan cheese - 1/4 cup finely chopped green onions - 1 large egg - 1/4 cup buffalo sauce (plus more for glaze) - 2 cloves garlic, minced - 1 teaspoon onion powder - 1 teaspoon smoked paprika - Salt and pepper to taste These ingredients come together to create a savory and spicy treat. You can add some extra flavor with these optional ingredients: - Celery sticks - Blue cheese dressing Celery sticks add crunch, while blue cheese dressing gives a creamy dip. They balance the heat of the meatballs nicely. To take your meatballs up a notch, consider these seasonings: - Extra garlic for more punch - A dash of cayenne pepper for heat - Fresh herbs like parsley for brightness These extra touches can help you customize the flavor to your liking. Enjoy making these spicy buffalo chicken meatballs! Start by preheating your oven to 400°F (200°C). This step is key for baking. Line a baking sheet with parchment paper to keep the meatballs from sticking. In a large bowl, combine 1 lb of ground chicken with 1/2 cup breadcrumbs. Add 1/4 cup of grated Parmesan cheese for a cheesy kick. Toss in 1/4 cup of finely chopped green onions for freshness. Crack in 1 large egg, then pour in 1/4 cup of buffalo sauce. Don’t forget to add 2 minced garlic cloves, 1 teaspoon of onion powder, 1 teaspoon of smoked paprika, and sprinkle salt and pepper to taste. Mix everything until well combined, but be careful not to overwork the chicken. Shape the mixture into small meatballs, about 1 inch in diameter. Place them on your prepared baking sheet. Bake in the oven for 20-25 minutes. You want them to be cooked through, reaching an internal temperature of 165°F (74°C). For a bolder taste, brush more buffalo sauce on the meatballs during the last 5 minutes of baking. This extra glaze adds a tasty kick. When done, remove them from the oven and let them cool slightly. Enjoy your spicy buffalo chicken meatballs warm! To make juicy meatballs, do not overwork the chicken. Mix until just combined. The breadcrumbs help hold everything together and add a nice bite. Adding grated Parmesan adds flavor and moisture. This keeps the meatballs tender. If you want a lighter texture, try adding a splash of milk. Not all buffalo sauces are the same. Some are very spicy, while others are milder. Look for a sauce that fits your taste. I like to use a medium heat sauce for a good balance. If you want more heat, add a bit of extra sauce during baking. This gives the meatballs a nice glaze. One mistake is not preheating the oven. Cooking meatballs in a hot oven helps them cook evenly. Another mistake is making them too big. Aim for about one inch in size. Larger meatballs may not cook all the way through. Finally, don’t skip the resting time after baking. Letting them sit for a few minutes makes them easier to serve. {{image_2}} You can switch the ground chicken for other meats. Ground turkey works well, too. If you want a lighter option, try ground chicken breast. For a richer taste, use pork. Each protein brings a unique flavor, but they all work great in this recipe. Change the buffalo sauce for other flavors. You can use a teriyaki sauce for a sweet twist. A spicy barbecue sauce adds a nice kick. For a tangy taste, try a honey mustard sauce. Each sauce can transform your meatballs into a new dish. Serve the meatballs with different dips. Ranch dressing is a crowd favorite. You can also use a spicy aioli for added flavor. Pair your meatballs with crunchy celery sticks. They make a fresh, cool side that balances the heat. You can also serve them on slider buns for a fun twist. To keep your spicy buffalo chicken meatballs fresh, store them in an airtight container. Make sure they cool down before sealing. This helps prevent sogginess. Place a piece of parchment paper between layers if stacking. This keeps them from sticking together. Leftovers last about three days in the fridge. When ready to eat again, reheating properly is key. Use the oven for best results. Preheat it to 350°F (175°C). Place the meatballs on a baking sheet. Heat for about 10-15 minutes, or until they are warm. You can also microwave them. Just cover with a damp paper towel and heat for 1-2 minutes. But keep in mind, the oven method keeps them crispy. Freezing meatballs is perfect for meal prep! After cooking, let them cool completely. Arrange them in a single layer on a baking sheet. Freeze for about an hour. Once frozen, transfer them to a freezer-safe bag. Label the bag with the date. Frozen meatballs can last up to three months. To reheat, bake directly from the freezer or thaw in the fridge overnight. To add more heat, use extra buffalo sauce in the mix. You can also add chopped jalapeños or red pepper flakes. These will boost the spice level. Adjust according to your taste. If you want a smoky flavor, use a spicier smoked paprika. Experiment until you find your perfect kick. Yes, you can use ground turkey instead of ground chicken. Turkey has a similar texture and taste. Just keep in mind that turkey may be a bit drier. To avoid dryness, add a little more buffalo sauce or some extra breadcrumbs. The flavor will still shine through. Great sides include celery sticks and blue cheese dressing. They add crunch and creaminess. You could also serve them with carrot sticks for a fresh bite. Another good option is a simple salad to balance the heat. These sides make the meal even more fun. Check the meatballs' internal temperature with a meat thermometer. They should reach 165°F (74°C) to be safe to eat. If you don’t have a thermometer, cut one in half. The inside should be white and hot. No pink should remain. This ensures they are cooked through and safe. In this blog post, we explored how to make Spicy Buffalo Chicken Meatballs. You learned about key ingredients, preparation steps, and tips for perfect texture. Remember, selecting the right buffalo sauce can elevate your dish. Don't shy away from trying new flavors or proteins. Store leftovers correctly for later enjoyment. With this guide, you can create a tasty meal that impresses friends and family. Enjoy experimenting and happy cooking!

Spicy Buffalo Chicken Meatballs Flavorful Game Day Treat

Get ready for game day with my Spicy Buffalo Chicken Meatballs! These savory bites pack a tasty punch and are

- 2 cups fresh strawberries, hulled and sliced - 2 ripe mangoes, peeled and diced - 2 tablespoons lime juice - Fresh mint leaves for garnish When you make Strawberry Mango Agua Fresca, you need fresh fruits. Strawberries bring sweetness and a bright color. Mangoes add a tropical twist and a smooth texture. Lime juice gives a nice zing. Fresh mint leaves add a refreshing touch for garnish. You will need specific amounts for each ingredient. Here’s what I use: - 2 cups strawberries - 2 ripe mangoes - 4 cups cold water - 2 tablespoons lime juice - 2-3 tablespoons sweetener This recipe serves 4 to 6 people. If you want to serve more, just double the amounts. For fewer servings, cut the amounts in half. For sweetness, you can use agave syrup or honey. Both are great, but they taste different. Agave syrup is milder, while honey has more flavor. You can adjust the sweetness to your taste. Start with 2 tablespoons and add more if you like it sweeter. Always taste before you serve! {{ingredient_image_1}} Start by hulling and slicing the strawberries. Next, peel and dice the mangoes. Combine the strawberries and mangoes in a blender. This mix gives a sweet and tangy flavor. Pour in 2 cups of cold water. Blend on high until the mixture is smooth. Blending on high helps break down the fruits well. This step is key for a creamy texture. Grab a fine mesh sieve. Place it over a large pitcher. Pour the blended fruit mixture into the sieve. This helps remove any seeds and pulp. Use a spatula to press the mixture through. This way, you get a clear liquid. Straining makes the drink smooth and refreshing. Now, add the remaining 2 cups of cold water to the pitcher. Stir well to combine everything. Next, pour in the lime juice. Add the agave syrup or honey, mixing until dissolved. Taste the mixture and adjust the sweetness if needed. Once mixed, chill the agua fresca in the refrigerator for at least 30 minutes. This chill time enhances the flavors, making your drink even better. To find the right sweetness, taste your agua fresca. If it's not sweet enough, add more agave syrup or honey. Start with small amounts. Mix well before tasting again. This way, you can reach your desired level of sweetness. Everyone's taste is different. Some like it sweeter, while others prefer it less sweet. For sweeter drinks, use more agave syrup. For a less sweet taste, cut back on the syrup. Balance is key to making everyone happy. Serve your strawberry mango agua fresca cold. It tastes best when chilled. Pour it over ice in your favorite glasses. This keeps the drink refreshing and cool. Garnish each glass with fresh mint leaves. This adds a nice pop of color and flavor. The mint gives a lovely aroma that makes the drink even better. Feel free to get creative with flavors! You can add other fruits like pineapple or peach. These fruits blend well with strawberries and mangoes. This adds a new twist to your agua fresca. You can also infuse your drink with herbs. Basil or mint can bring a fresh taste. Just add a few leaves while blending the fruits. This will give your agua fresca a unique flavor that surprises your guests. Pro Tips Use Ripe Fruits: Ensure your strawberries and mangoes are perfectly ripe for the best flavor and sweetness in your agua fresca. Adjust Sweetness: Taste your mixture before chilling and adjust the sweetness with more agave syrup or honey according to your preference. Chill Before Serving: Allow the agua fresca to chill for at least 30 minutes to enhance the flavors and serve it refreshingly cold. Garnish Creatively: Add slices of fresh fruit or additional mint leaves to the glasses for a beautiful presentation. {{image_2}} A serving of Strawberry Mango Agua Fresca has about 100 calories. This drink is light and refreshing. The key ingredients provide great nutrition. - Strawberries: High in vitamin C and fiber. They support skin health and digestion. - Mangoes: Packed with vitamins A and C. They help boost immunity and eye health. - Lime juice: Adds vitamin C and helps with hydration. - Agave syrup or honey: Both provide a natural sweetness. Strawberries and mangoes are full of vitamins and minerals. - Strawberries: Offer antioxidants that fight free radicals. They also help heart health. - Mangoes: Provide potassium, which helps control blood pressure. They also keep your skin healthy. Staying hydrated is essential. Agua fresca is a fun way to drink water. It tastes great and keeps you cool. Enjoying this drink helps you meet your daily hydration needs. You can make your Strawberry Mango Agua Fresca even more fun! Try adding other fruits. Pineapple adds a nice twist. Peaches bring a sweet flavor, too. Mix and match to find your perfect combo. For a tropical taste, blend strawberries and mangoes with coconut water. This gives a fresh, island vibe. You can also mix citrus juices like orange or grapefruit. They add a zesty kick that brightens the drink. Want some fizz? Adding sparkling water is easy! After blending and straining, mix in sparkling water instead of still water. This gives your agua fresca a bubbly texture. Pour it gently to keep the bubbles. If you want even more fizz, try soda water or club soda. These options add fun without extra sweetness. Just remember to serve it right away. The bubbles are best fresh! For younger taste buds, you might want less sweetness. Start with one tablespoon of agave syrup or honey. Taste it first before adding more. Kids can also enjoy it without lime juice. Instead, use a splash of orange juice. It gives a fruity twist that’s still tasty. You can even skip sweeteners altogether if the fruit is ripe. This way, it’s a healthy drink for everyone! Agua fresca means "fresh water" in Spanish. This drink is popular in Mexico and Central America. People make it by blending fruits with water and sweetener. You can find many flavors, like watermelon or cantaloupe. It is often served cold in large pitchers. You can enjoy it at parties or family gatherings. The bright colors and flavors make it a festive drink. Strawberry mango agua fresca lasts about three to four days in the fridge. To store it, pour it into a clean pitcher. Seal it with a lid or plastic wrap. Make sure to keep it cold. If you see any bubbles or a sour smell, it may have spoiled. Always check for signs of spoilage before serving. Yes, you can use frozen fruits for this drink. Just remember to thaw them first. Using frozen fruits can change the flavor and texture a bit. The drink may be thicker and colder. However, it will still taste refreshing. Adjust the sweetener based on how sweet the frozen fruit is. This blog post covered how to make Strawberry Mango Agua Fresca. We explored the fresh ingredients, measurements, and sweetener choices. You learned how to blend, strain, and chill the mixture for the best flavor. Plus, I shared tips to adjust sweetness and suggested fun variations. In the end, this drink is refreshing and easy to make. You can enjoy it on hot days or serve it at gatherings. With so many options, it’s sure to please everyone!

Refreshing Strawberry Mango Agua Fresca Delight

Looking for a cool, refreshing drink to beat the heat? Say hello to Strawberry Mango Agua Fresca! This delightful beverage

- 4 chicken thighs (bone-in, skin-on) - 3 tablespoons olive oil - Zest of 1 lemon - 1/4 cup fresh lemon juice - 4 garlic cloves, minced - 1 teaspoon dried oregano - 1 teaspoon dried thyme - Salt and pepper to taste - Fresh parsley, chopped (for garnish) Choosing the right chicken thighs is key. Bone-in and skin-on thighs stay juicy. They also add flavor. Olive oil gives moisture and taste. Fresh lemon juice brightens the dish. Lemon zest adds intense flavor. Minced garlic gives a nice kick. Oregano and thyme add depth to the taste. Salt and pepper enhance all the flavors. Finally, parsley adds a fresh touch. You can swap fresh lemon juice with bottled lemon juice. It works in a pinch but lacks some brightness. If you do not have fresh garlic, garlic powder can work but use less. You can replace olive oil with another oil like canola or avocado. If you need dried herbs, use Italian seasoning as a mix. Just remember, fresh herbs add the best taste. Start by preheating your oven to 400°F (200°C). This step is key for even cooking. In a large bowl, mix together the olive oil, lemon zest, lemon juice, minced garlic, oregano, thyme, salt, and pepper. Whisk these ingredients until they blend well. Next, add the chicken thighs to the bowl. Make sure each thigh gets a nice coating of the marinade. Let them sit for at least 15 minutes. If you have time, marinate them in the fridge for up to 2 hours. This helps the flavors soak in. Heat a large oven-safe skillet over medium-high heat. Once hot, place the chicken thighs skin-side down in the skillet. Sear them for 5-7 minutes. You want the skin to turn golden brown and crispy. This step locks in the juices. After that, flip the thighs over carefully. Pour any remaining marinade over the top. This adds more flavor as they cook. Then, transfer the skillet to the preheated oven. Bake the chicken for 25-30 minutes. Ensure the internal temperature reaches 165°F (75°C). This ensures the chicken is safe to eat. To get that perfect crispy skin, start with a hot skillet. The heat helps render the fat in the skin. Don’t crowd the skillet; this can cause steaming instead of searing. If you have more thighs, cook them in batches. Another tip is to pat the skin dry with paper towels before seasoning. This helps the skin crisp up better. Lastly, let the chicken rest for 5 minutes after cooking. This keeps the juices inside, making every bite tender and juicy. Marinating chicken thighs makes them taste better. The lemon juice and garlic work together to add flavor. I like to marinate for at least 15 minutes. For even more taste, try marinating for up to 2 hours in the fridge. This allows the chicken to soak up all the good stuff. Always coat the chicken well. Use a large bowl to mix the marinade. The right temperature is key for juicy chicken. Preheat your oven to 400°F (200°C). This heat helps cook the chicken evenly. Start by searing the thighs in a hot skillet. This gives the skin a golden crust. After searing, bake them until they reach 165°F (75°C). Use a meat thermometer to check. To boost flavors, try adding fresh herbs. Fresh parsley on top adds brightness. You can also switch herbs in the marinade. Rosemary or basil works well. If you want extra zing, add a pinch of red pepper flakes. This gives a nice kick to your dish. Always taste the marinade before adding the chicken. Adjust salt and pepper as needed for the perfect balance. {{image_2}} You can change the herbs and spices in this recipe. For a fresh taste, try fresh herbs instead of dried. Use 1 tablespoon of fresh oregano or thyme. You can also add rosemary for a woodsy flavor. For heat, add red pepper flakes. They give a nice kick to the dish. If you want something sweet, try adding a little honey or maple syrup. This will balance the tartness of the lemon. Feel free to experiment with the marinade. You can use lime juice instead of lemon juice for a zesty twist. Adding soy sauce can give a savory depth. You can also mix in some Dijon mustard for a tangy punch. If you like a sweeter flavor, include a tablespoon of brown sugar. Let your imagination run wild with these changes! Lemon garlic chicken thighs pair well with many sides. Serve them with rice or quinoa for a filling meal. Roasted vegetables or a fresh salad also make great choices. You can even add some crusty bread to soak up the tasty juices. For a complete meal, try serving with a light pasta dish. Whatever you choose, these thighs will shine on your plate! After cooking, let your lemon garlic chicken thighs cool down. Keep them in an airtight container. The chicken can stay fresh for up to 3 days in the fridge. Make sure to store it with any juices or sauce for extra flavor. If you want to save some chicken for later, freezing works great. Place the cooled chicken thighs in a freezer-safe bag. Press out as much air as you can before sealing. These can last for up to 3 months in the freezer. Label the bag with the date to keep track. To reheat, first thaw any frozen chicken in the fridge overnight. You can use an oven or a skillet for reheating. If using the oven, set it to 350°F (175°C). Heat for about 15 to 20 minutes, or until warm. A skillet will take about 5 to 7 minutes over medium heat. You can add a splash of broth or water to keep it juicy. Enjoy your chicken just as you made it! You can pair Lemon Garlic Chicken Thighs with many sides. Here are a few ideas: - Rice: Serve with fluffy white rice or lemon rice for a nice twist. - Vegetables: Roasted or steamed veggies like asparagus or green beans work well. - Salad: A fresh green salad with a light vinaigrette adds a crisp touch. - Potatoes: Mashed, roasted, or baked potatoes make a hearty side. These options round out the meal and complement the chicken's flavors. To keep chicken thighs juicy, follow these tips: - Marinate: Let the chicken sit in the marinade for at least 15 minutes. This builds flavor and moisture. - Cook at the right temperature: Cook them at 400°F (200°C) to get a nice sear while keeping them tender. - Use a meat thermometer: Check for an internal temperature of 165°F (75°C). This ensures they are done, not dry. - Rest the chicken: Let the thighs rest for 5 minutes after cooking. This helps the juices stay inside. These steps will help you achieve juicy, flavorful chicken every time. Yes, you can use boneless chicken thighs. They cook faster, so adjust your time: - Cooking time: Bake for about 20-25 minutes instead of 25-30 minutes. - Marinade soak: You can still marinate them for great flavor. Boneless thighs will be just as tasty and easy to prepare! This blog post covered all you need for cooking flavorful lemon garlic chicken thighs. We discussed key ingredients, cooking steps, and tips for crispy skin. You learned about substitutions and marinating strategies. We also shared variations and storage tips to extend your meal's lifespan. Remember, using the right ingredients and techniques can make a difference. Enjoy creating tasty dishes that impress your family and friends!

Lemon Garlic Chicken Thighs Flavorful and Easy Recipe

Craving a simple yet delicious dish? Look no further! My Lemon Garlic Chicken Thighs recipe is packed with flavor and

Older posts
Newer posts
← Previous Page1 … Page37 Page38 Page39 … Page86 Next →

dsad

© 2026 Cooking Wells • Built with GeneratePress

Our Policies

  • Copyright Policy
  • Cookie Policy
  • GDPR Policy
  • Privacy Policy
  • Disclaimer
  • Terms Of Use

More Information

  • Home
  • About
  • Contact
  • Appetizers
  • Dessert
  • Dinner
  • Drinks
©2026, Cooking Wells About Back To Top