Skip to content
DisclaimerTerms Of UseGDPR PolicyCookie Policy

Cooking Wells

  • Home
  • Drinks
  • Appetizers
  • Dinner
  • Dessert
  • About
  • Contact
  • Privacy Policy
DisclaimerTerms Of UseGDPR PolicyCookie Policy

NO-ING-IMG

- 4 salmon fillets (6 oz each) - 4 tablespoons unsalted butter - 4 cloves garlic, minced - 1 tablespoon fresh parsley, chopped - 1 tablespoon fresh dill, chopped - 1 tablespoon fresh thyme, chopped - Juice of 1 lemon - Zest of 1 lemon - Salt and pepper to taste - Lemon slices for garnish - Fresh herbs for garnish (optional) When you start making Garlic Butter Herb Salmon, gather these ingredients first. You need fresh salmon fillets, which have a nice pink color. The butter adds richness, while garlic gives it a strong flavor. Fresh herbs bring brightness to the dish. I love using parsley, dill, and thyme for their unique tastes. Don’t forget the lemon! The juice and zest add a fresh and tangy note. Salt and pepper enhance all the flavors. You can use lemon slices as a pretty garnish. Fresh herbs can also add color and taste. For the full recipe, follow the steps I laid out after this section. Every ingredient plays a role in making this dish both tasty and beautiful. Let’s get cooking! - Preheat oven to 400°F (200°C). - Prepare a lined baking sheet for the salmon. Start by preheating your oven. This step ensures your dish cooks evenly. While the oven warms up, take a baking sheet and line it with parchment paper. This helps with easy cleanup and keeps the salmon from sticking. - Melt butter in a saucepan. - Sauté garlic until fragrant. - Mix in herbs and lemon flavorings. Next, melt the butter in a small saucepan over medium heat. Once melted, add the minced garlic. Sauté it for about 1-2 minutes until it smells great. Be careful not to let it brown. After that, remove the saucepan from heat. Stir in the chopped parsley, dill, thyme, lemon juice, lemon zest, salt, and pepper. This mix becomes your garlic herb butter sauce. - Brush fillets with garlic herb butter. - Bake for 12-15 minutes. - Check for doneness and rest before serving. Now, place the salmon fillets on the lined baking sheet. Brush each fillet with the garlic herb butter sauce you made. Make sure to coat them well. Pour any leftover sauce over the fillets. Place the sheet in the preheated oven and bake for 12-15 minutes. Salmon is done when it flakes easily with a fork and reaches 145°F (63°C). After baking, let the salmon rest for a minute. This helps keep it juicy. Enjoy this flavorful dish! For the complete recipe, check the Full Recipe link. To check the salmon for doneness, use a fork. Gently poke the salmon fillet. If it flakes easily, your salmon is done. The internal temperature should reach 145°F (63°C). A meat thermometer can help with accuracy. Let the salmon rest for a minute after baking. Resting allows the juices to settle. This helps keep the salmon moist and flavorful. You can add more flavor with some optional ingredients. Consider adding capers for a briny kick. A splash of white wine can also enhance the sauce. These additions can elevate the dish. For sides, I recommend simple and fresh options. Steamed asparagus or green beans pair nicely. A light salad with lemon vinaigrette complements this dish well. Garnishing can make your dish look even better. Use lemon slices and fresh herbs like parsley or dill. This adds color and freshness to your plate. When serving, place the salmon on a clean plate. Drizzle any leftover garlic herb butter over the top. This creates an inviting and flavorful presentation. {{image_2}} You can use different types of salmon for this dish. Sockeye or Coho salmon works well. Each has its own taste and texture. Salmon steaks offer a thick cut, while fillets are thin and easy to cook. Steaks may take a bit longer to cook, so adjust your time. Feel free to play with the herbs and spices. Basil, oregano, or cilantro can change the flavor profile. If you like heat, add red pepper flakes for a spicy kick. A pinch goes a long way, so start small. You can grill or bake the salmon. Grilling gives a nice smoky flavor. Baking is easier and keeps the salmon moist. Poaching is another great choice. It keeps the fish tender and allows it to soak up flavors. Each method brings out different tastes in the salmon. For the full recipe, check out the Garlic Butter Herb Salmon recipe. To keep your Garlic Butter Herb Salmon fresh, place it in an airtight container. This helps avoid any strong smells in the fridge. You should store the salmon within two hours of cooking. If you do this, the salmon will stay tasty. You can keep it in the fridge for up to three days. When it's time to enjoy your leftovers, you can reheat salmon in a few ways. The oven works great for this. Preheat it to 300°F (150°C) and place the salmon on a baking sheet. Cover it with foil to keep it moist. Heat for about 10-15 minutes until warm. You can also use the microwave. Just cover the salmon with a paper towel and heat for 30 seconds at a time. This helps prevent dryness. Keep an eye on it so you don't overcook it. If you want to save some for later, you can freeze Garlic Butter Herb Salmon. First, let it cool completely. Then, wrap each fillet in plastic wrap. After that, place the wrapped fillets in a freezer bag or container. This method keeps the flavor and texture nice. You can freeze it for up to three months. When you're ready to eat, thaw it in the fridge overnight. This slow method helps keep it juicy and delicious. The ideal temperature for cooking salmon is 145°F (63°C). This ensures that the fish is safe to eat and still moist. If you prefer a more tender texture, you can take it out at 140°F (60°C). Cooking at 400°F (200°C) in the oven works well for this recipe. It cooks quickly and gives a nice crust. Yes, you can use frozen salmon. Just thaw it in the fridge overnight. If you’re short on time, you can also thaw it in cold water for about an hour. Be sure to pat it dry before cooking. This helps the garlic butter sauce stick better. Some great side dishes include: - Garlic mashed potatoes - Steamed asparagus - Roasted vegetables - Quinoa salad - Rice pilaf These sides balance the rich taste of the salmon. They also add color and nutrients to your meal. Garlic Butter Herb Salmon lasts about 3 days in the fridge. Store it in an airtight container to keep it fresh. Be sure to reheat gently to avoid drying it out. Enjoy your delicious leftovers! For the complete recipe, check out the Full Recipe. In this post, we explored how to make Garlic Butter Herb Salmon, detailing each ingredient and step. We discussed tips for perfecting the cooking process and suggested delicious variations. You learned about storing leftovers and reheating them without losing flavor. Remember, cooking should be fun and creative. Use this recipe as a base, but feel free to explore new ideas. Don't hesitate to experiment with flavors and techniques. Happy cooking!

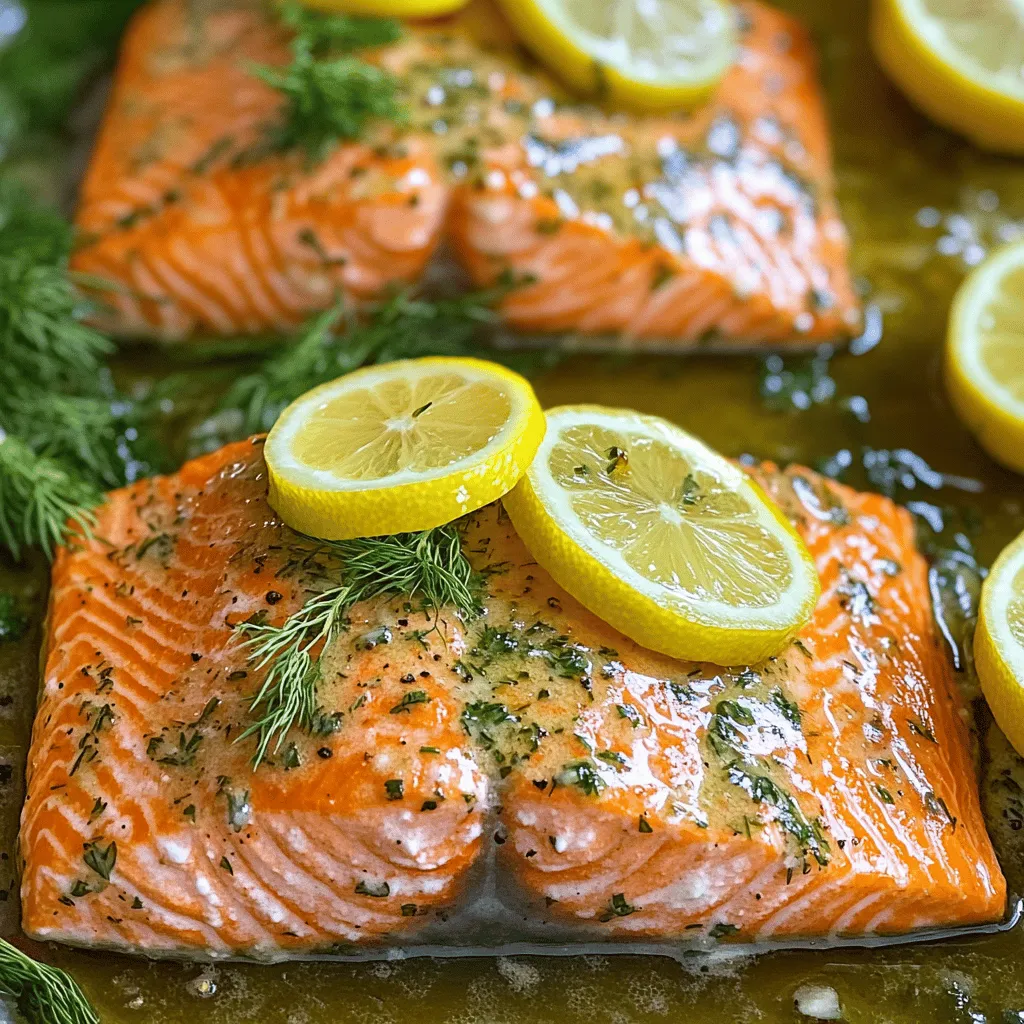
Garlic Butter Herb Salmon Flavorful and Easy Recipe

Are you ready to savor a dish that’s both flavorful and easy to make? Garlic Butter Herb Salmon combines the

- 1 cup all-purpose flour - 2 large eggs - 1 ½ cups milk - 2 tablespoons melted butter - 2 tablespoons sugar - ½ teaspoon vanilla extract - ½ teaspoon salt - ½ cup chocolate hazelnut spread - 1/4 cup roasted hazelnuts, crushed - Powdered sugar for dusting - Fresh berries (optional, for garnish) Finding the right ingredients is key to making great chocolate hazelnut crepes. You can easily find all these items at your local grocery store. I love using fresh eggs and whole milk for the best flavor. The chocolate hazelnut spread is the star of the show, so choose a quality brand that you enjoy. Roasted hazelnuts add a nice crunch, which I recommend for texture. - For all-purpose flour, you can use whole wheat flour or a gluten-free blend. - If you need dairy-free options, almond milk or oat milk works well. Instead of butter, try coconut oil or a vegan butter substitute. - For sugar, use maple syrup or agave nectar as a natural sweetener. These substitutions help you adjust the recipe to fit your needs. The taste may change slightly, but it can still be delicious. Always keep in mind that cooking is about finding what works for you. If you follow the [Full Recipe], you will make a tasty treat that everyone will love! To make the perfect batter, start by mixing the dry and wet ingredients. In one bowl, whisk together the all-purpose flour, sugar, and salt. In another bowl, beat the eggs and mix in the milk, melted butter, and vanilla extract. Slowly add the wet mix to the dry mix. Whisk until the batter is smooth and lump-free. Letting the batter rest is key. This helps the flour absorb the liquid and relaxes the gluten. Rest it for 30 minutes at room temperature. This step makes your crepes more tender and easy to work with. When it’s time to cook, heat a non-stick skillet on medium heat. Lightly grease it with butter. Pour about 1/4 cup of batter into the center of the skillet. Quickly swirl the pan to spread the batter evenly. Aim for a thin layer; this gives you that lovely crepe texture. Cook for 1-2 minutes. You’ll know it’s ready when the edges lift slightly and the bottom turns golden brown. Carefully flip the crepe using a spatula. Cook for another minute on the other side. Stack the crepes on a plate as you cook, keeping them warm. Now for the fun part! Take a cooked crepe and spread a generous tablespoon of chocolate hazelnut spread on one half. Sprinkle some crushed roasted hazelnuts over the spread for crunch. Fold the crepe in half, and then fold it again to form a triangle, or roll it up if you prefer. For serving, dust the filled crepes with powdered sugar. You can also add fresh berries for a colorful touch. Enjoy your delightful chocolate hazelnut crepes! For the complete recipe, check the Full Recipe section. To make light and fluffy crepes, I focus on the batter. Start with room temperature ingredients. This helps the batter mix well. I always let the batter rest for at least 30 minutes. Resting allows the gluten to relax, which makes the crepes tender. When cooking, use a hot pan but not too hot. A medium heat lets the crepes cook evenly without burning. Thin layers of batter are key for fluffiness. Swirl the batter quickly to spread it out. If you have extra batter, store it in the fridge. I recommend using an airtight container. The batter can last up to two days. Before using it again, give it a good stir. If it seems too thick, add a splash of milk. This ensures your crepes stay light and delicious. Yes, you can prep crepes in advance! I often make a batch the night before. Just stack them and cover with plastic wrap. They stay fresh in the fridge. When ready to serve, warm them in a skillet for a minute on each side. This brings back their soft texture. You can also freeze them for later use. Just layer parchment paper between each crepe. This prevents sticking. When you need them, thaw and warm them up. Enjoy your crepes any time with ease! For the complete process, check the Full Recipe. {{image_2}} If you want to skip nuts, you have many tasty options. Try using creamy peanut butter or almond butter instead of chocolate hazelnut spread. You can also use fruit spreads like raspberry or strawberry for a sweet twist. Another idea is to fill the crepes with whipped cream and fresh fruit. This makes a light and fun dessert. You can make your crepes even more special by adding flavors to the batter. For a vanilla touch, mix in an extra half teaspoon of vanilla extract. If you love citrus, add the zest of a lemon or orange. This gives a bright flavor that pairs well with chocolate. You can also try spices like cinnamon or nutmeg for warmth. Just a pinch can change the whole taste! Feeling adventurous? You can turn these sweet crepes into savory dishes. Start with the same batter but leave out the sugar. Then, fill them with cheese, spinach, or mushrooms. A bit of cooked chicken or ham also works great. Top with a light sauce or just some herbs for a delicious meal. These savory options are perfect for lunch or dinner. Explore these variations, and make your chocolate hazelnut crepes even more fun! For the full recipe, check out the complete guide. To keep cooked crepes fresh, stack them on a plate. Place a piece of wax paper between each crepe. This method prevents sticking and helps maintain texture. Cover the stack with plastic wrap or foil. Store in the fridge for up to three days. If you want them warm later, gently reheat them in a pan. Freezing crepes is a great way to save them for later. First, let the crepes cool completely. Then, stack them with wax paper in between. Wrap the stack tightly in plastic wrap and then place it in a freezer bag. Make sure to squeeze out any air to avoid freezer burn. When you're ready to enjoy them, simply thaw them in the fridge overnight. Reheat in a pan over low heat for the best taste. Cooked crepes last about three days in the fridge. If you freeze them, they can last up to two months. After that, the flavor and texture may start to fade. Always check for any signs of spoilage before using. For the freshest taste, enjoy them within the recommended time. To make Chocolate Hazelnut Crepes, start with the batter. Mix flour, sugar, and salt in one bowl. In another, beat the eggs and add milk, melted butter, and vanilla. Combine the wet and dry mixes. Whisk until smooth and let it rest. Heat a skillet and grease it lightly. Pour in the batter, swirl it thin, and cook until golden. Flip it and cook again. Spread chocolate hazelnut spread inside, sprinkle crushed hazelnuts, and fold. Dust with powdered sugar and enjoy! For the complete recipe, check the Full Recipe. Yes, you can swap the chocolate hazelnut spread for many delicious options. Try almond butter for a nutty taste. You can also use peanut butter if you love that classic flavor. For a fruit twist, spread some berry jam or fresh fruit puree. Nut-free options like sunflower seed spread work great too. Feel free to get creative with your choice! These crepes go well with many side dishes. Fresh berries add color and flavor. You can also serve them with whipped cream for extra creaminess. A scoop of vanilla ice cream makes it a treat! For a warm drink, pair with hot chocolate or coffee. Each option enhances the sweet flavors of the crepes. Enjoy mixing and matching! You can make delicious chocolate hazelnut crepes at home with simple ingredients. We discussed key ingredients, substitutes, and step-by-step instructions. I shared tips for fluffiness and storing options, plus ways to mix it up with flavors and fillings. In the end, enjoy these crepes as a sweet treat or a savory dish. Get creative and have fun in the kitchen!

Chocolate Hazelnut Crepes Perfect for Any Occasion

Craving a sweet treat that impresses at any gathering? Dive into the world of Chocolate Hazelnut Crepes! These delicious, thin

To make air fryer sweet potato fries, you need a few simple ingredients that bring out great flavor. Here is what you will need: - 2 large sweet potatoes, peeled and cut into fries - 2 tablespoons olive oil - 1 teaspoon paprika - 1 teaspoon garlic powder - 1/2 teaspoon onion powder - 1/2 teaspoon cayenne pepper (optional) - Salt and pepper to taste - Fresh parsley, chopped (for garnish) These ingredients work together to create a tasty and crispy snack. Sweet potatoes add natural sweetness and a lovely color. Olive oil helps them crisp up in the air fryer. The spices give the fries extra flavor that you will love. You can adjust the heat by adding more or less cayenne pepper. When you prepare these fries, remember to use fresh ingredients for the best taste. The parsley adds a nice touch of color on top. For the full recipe, follow along with the instructions to enjoy this delightful treat. To start, you need to peel the sweet potatoes. I use a simple vegetable peeler for this task. After peeling, cut the sweet potatoes into fries. Aim for about 1/4-inch thickness. This size helps them cook evenly. Uniform cuts ensure that every fry gets crispy and golden. If some pieces are thicker, they may not cook as well. Next, it’s time to season the fries. In a large bowl, add the cut fries. Drizzle in the olive oil, about 2 tablespoons. Toss the fries until they are well-coated. This step is key for flavor and crispiness. Then, sprinkle in the spices: paprika, garlic powder, onion powder, and optional cayenne pepper for some heat. Don’t forget to add salt and pepper! Mix everything well to ensure every fry has a good amount of flavor. Now, let's cook the fries in the air fryer. Preheat it to 400°F (200°C) for about 5 minutes. Once it’s ready, carefully place the seasoned fries in the basket. Make sure not to overcrowd the basket. If you have too many fries, they won’t cook evenly. Cook them for 12-15 minutes. Shake the basket halfway through to help with even cooking. You’ll know they are done when they look golden and crispy. Enjoy your delicious, crispy air fryer sweet potato fries! For the full recipe, check out the details above. To get your sweet potato fries crispy, start with dry fries. After cutting them, pat them with a paper towel. This removes excess moisture. Use a light coat of olive oil. Too much oil makes them soggy. Arrange the fries in a single layer in the air fryer basket. This allows hot air to circulate. I recommend shaking the basket halfway through cooking for even crispiness. For an extra crunch, consider using parchment paper. Just make sure to poke holes in it to let air flow. You can amplify the flavor of your fries with spices. Try adding some smoked paprika or cumin for a twist. A sprinkle of cinnamon can also give a sweet touch. For a kick, add more cayenne pepper. Pair your fries with tasty dipping sauces. A simple garlic aioli or spicy ketchup works well. You could also serve them with a yogurt dip for a fresh taste. Avoid overcrowding the air fryer basket. When fries are too close, they steam instead of fry. This leads to soft, unevenly cooked fries. Make sure to coat your fries evenly with oil and spices. If you don't, some will be bland while others are too salty. Finally, don't skip the preheating step. It ensures the fries cook properly from the start. For the full recipe, check out the earlier section. {{image_2}} You can play with different spices to make your fries special. For sweet flavors, try cinnamon or nutmeg. They add a warm touch. For savory options, mix in cumin or Italian herbs. These spices can bring a whole new taste to your fries. You can also take inspiration from regional flavors. For a Mexican twist, add chili powder and lime juice. For an Asian flair, use five-spice powder and soy sauce. Each mix gives your fries a unique taste and feel. Sweet potatoes are great, but other veggies can work too. Try yams for a similar flavor. Pumpkin also makes tasty fries with a different twist. You can even make fries from carrots or zucchini. Just cut them into the right shape and follow the same steps. If you want to make your dish healthier, consider oil substitutes. You can use cooking spray or even broth. These options help cut down on calories while keeping your fries tasty. Sweet potato fries pair well with many dishes. They go great with burgers or grilled chicken. You can even serve them with a fresh salad for a light meal. For a fun twist, try serving fries in wraps. Add some protein, like chicken or tofu, and pile on the veggies. This makes a delicious meal on the go. You can also layer fries in a sandwich for a crunchy bite. Check out the Full Recipe for all the details on making these fries. Enjoy your cooking! To keep your sweet potato fries fresh, store them in an airtight container. Make sure they cool down first. This stops them from getting soggy. Place the container in the fridge. They will stay fresh for about 3 to 5 days. To reheat fries and keep them crispy, the air fryer works best. Set it to 350°F (175°C) and cook for about 5 minutes. This gives you a crispy texture again. You can also use an oven. Preheat it to 400°F (200°C) and place the fries on a baking sheet. Heat for about 10 minutes. The microwave is quick, but it makes fries soft. So, I don’t recommend it. You can freeze both uncooked and cooked fries. For uncooked fries, lay them out on a baking sheet and freeze until solid. Then, place them in a freezer bag. To freeze cooked fries, let them cool completely. Then, put them in a freezer bag. When you want to cook frozen fries, don’t thaw them first. Just toss them in the air fryer straight from the freezer. Cook at 400°F (200°C) for about 15-20 minutes. Enjoy them crispy and tasty! For more details, check the Full Recipe. You cook sweet potato fries in an air fryer for 12 to 15 minutes. The exact time may change based on a few factors. The size of your fries matters. Thicker fries need more time. Also, your air fryer model can affect cooking times. It's best to check on them a few minutes before you think they’re done. They should be golden brown and crispy when ready. Yes, you can use frozen sweet potato fries in an air fryer. Start by preheating your air fryer. Set it to 400°F (200°C). Cook the frozen fries for about 15 to 20 minutes. Shake the basket halfway through to help them cook evenly. This method keeps them crispy and delicious. Sweet potato fries should be crispy on the outside and tender on the inside. To check, take one fry out and let it cool for a moment. If it feels firm and crunchy, it’s perfect. If it’s soft or mushy, it needs more time. Aim for that nice balance. Yes, you can cook other vegetables in the air fryer with sweet potato fries. Just ensure they have a similar cooking time. Good options include zucchini, bell peppers, or carrots. Cut them to similar sizes. This way, they cook evenly and taste great together. In this post, we've covered how to make crispy, tasty air-fried sweet potato fries. First, we listed all the ingredients and gave step-by-step instructions on prepping, seasoning, and cooking. Then, I shared tips for getting them extra crispy and variations for flavor. Lastly, we talked about storage and reheating. You now have everything you need to enjoy your fries, whether fresh or stored. With these easy steps, you can make fries everyone will love.

Air Fryer Sweet Potato Fries Crispy and Delicious Snack

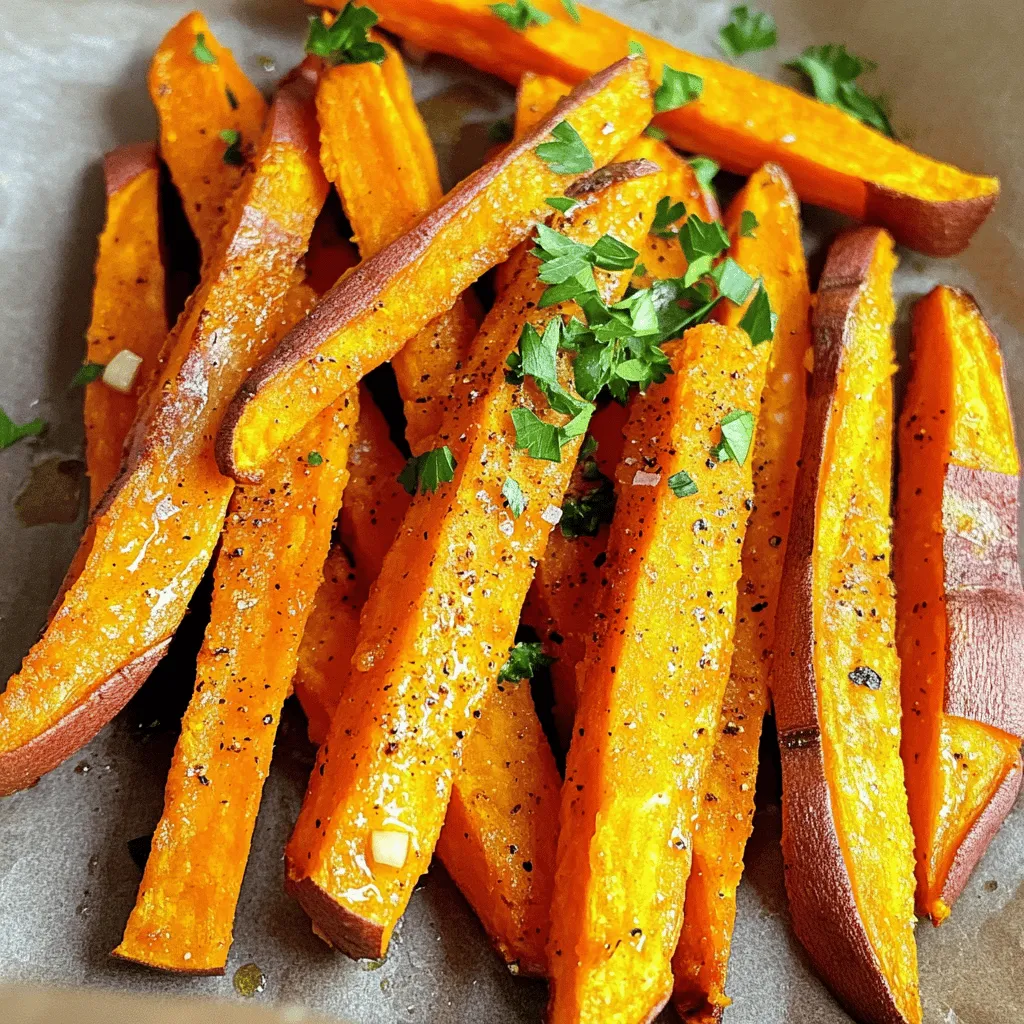
Craving a crispy and tasty snack? Look no further than air fryer sweet potato fries! These golden bites are easy

- 8 ounces pasta (penne or fettuccine) - 2 large red bell peppers - 3 tablespoons olive oil - 2 cloves garlic, minced - 1/2 cup heavy cream (or coconut cream) - 1/4 cup grated Parmesan cheese (optional) - Salt and pepper to taste - Fresh basil leaves for garnish - Crushed red pepper flakes (optional) When I make creamy roasted red pepper pasta, I love to start with fresh ingredients. The red bell peppers give this dish its rich, sweet flavor. I choose olive oil for cooking because it adds a nice depth. Garlic brings in a warm aroma that fills the kitchen. The cream adds a rich texture, making the sauce smooth. You can use heavy cream or coconut cream if you want a dairy-free option. I often add Parmesan cheese, but it’s totally fine to skip it if you prefer. For seasoning, I always include salt and pepper to enhance the flavors. Fresh basil leaves are key for garnish. They add a pop of color and a fresh taste. If you like heat, crushed red pepper flakes can spice things up. This list of ingredients is simple but very effective. Each item plays a role in making your dish delightful. If you want to see the full recipe, check out the section titled Full Recipe. - Preheat oven to 400°F (200°C). - Cut the red bell peppers in half and remove seeds. - Mince the garlic cloves finely. - Place peppers cut side down on a baking sheet. - Drizzle with olive oil. - Roast for 20-25 minutes until skins are blistered. - Let them cool slightly before peeling. - In a pan, heat olive oil over medium heat. - Sauté minced garlic for about 1 minute until fragrant. - Peel and chop the cooled peppers. - Add the peppers to the pan with garlic. - Pour in the heavy cream and bring to a gentle simmer. - Cook for 3-4 minutes to thicken slightly. - Blend the mixture until smooth using an immersion blender. - Cook the pasta according to package instructions. - Reserve a little pasta water before draining. - Toss the cooked pasta with the creamy roasted red pepper sauce. - Add reserved pasta water to reach the desired consistency. - Season with salt, pepper, and optional crushed red pepper flakes. Enjoy each step as you create this delightful dish! For the complete guide, check the Full Recipe. To get that smooth and creamy sauce, I recommend using an immersion blender. It blends right in the pot, making cleanup easy. If you don’t have one, a countertop blender works, too. Just be careful when transferring the hot sauce back. To adjust the sauce's consistency, save some pasta water. Add a little at a time to make the sauce thinner, if needed. This helps the sauce cling to the pasta better. To boost the flavor, consider adding spices like smoked paprika or Italian herbs. A pinch of nutmeg can also bring out the creaminess. You can add fresh herbs like thyme or parsley for a fresh taste. When serving, present the pasta in a large bowl. Top it with fresh basil leaves and a sprinkle of grated Parmesan. Drizzling a little olive oil adds a nice touch, too. For a spicy kick, sprinkle on crushed red pepper flakes. For the complete recipe, check out the Full Recipe. {{image_2}} If you want a dairy-free version, use coconut cream instead of heavy cream. Coconut cream gives a rich and creamy texture without dairy. It adds a slight sweetness too, balancing the flavors well. Just swap the heavy cream in the recipe with the same amount of coconut cream. You will enjoy a nice, creamy pasta that everyone can eat. You can add protein to your creamy roasted red pepper pasta for a heartier meal. Grilled chicken is an easy choice that pairs well. Shrimp also works great and cooks quickly. For a vegetarian option, try chickpeas or tofu. Just cook them separately and mix them into the pasta before serving. These options make your meal filling and satisfying. Let’s make this dish even more exciting with flavor variations! Adding sun-dried tomatoes gives a tangy taste that brightens the sauce. You can also toss in fresh spinach for a pop of color and nutrition. Spinach wilts down nicely and blends well with the creamy sauce. Feel free to experiment with other veggies you like. Each addition makes the dish unique, so have fun with it! To keep your creamy roasted red pepper pasta fresh, store it in an airtight container. Place it in the fridge if you plan to eat it soon. It stays good for about 3 to 5 days. If you want to save it for later, freeze it. Make sure to use a freezer-safe container. When frozen, it can last for about 2 to 3 months. Just remember to label your containers with the date! To reheat your pasta, use a skillet over low heat. Add a splash of water or cream to keep it moist. Stir often to warm it evenly. You can also use the microwave. Place it in a bowl, cover, and heat for 1 minute. Then stir and heat for another minute if needed. This helps keep the pasta from getting dry or tough. Enjoy your meal again like it was fresh! For this creamy roasted red pepper pasta, you can use different pasta types. I often recommend penne or fettuccine. Penne holds the sauce well in its tubes. Fettuccine, with its flat shape, creates a lovely, silky texture. You can also try spaghetti or farfalle if you want variety. Yes, you can prepare this dish ahead of time! Make the sauce and cook the pasta separately. Store them in airtight containers in the fridge. The sauce lasts for about four days. Cooked pasta can last for three days. Just reheat both when you're ready to eat! To add some heat, consider using crushed red pepper flakes. Start with a pinch and taste as you go. If you love spice, add more! You might also try cayenne pepper or hot sauce for an added kick. Adjust it to your taste for a spicy twist on the classic recipe! In this post, we explored how to make a creamy roasted red pepper pasta. We detailed the ingredients, gave step-by-step instructions, and shared tips for the best results. I hope you feel confident in trying variations to suit your taste, like adding protein or using coconut cream. Remember the storage tips to save leftovers without losing flavor. Enjoy your cooking, and remember, every dish you create adds to your skills!

Creamy Roasted Red Pepper Pasta Delightful Dinner

Are you ready to treat yourself to a delightful dinner? This Creamy Roasted Red Pepper Pasta is rich, flavorful, and

To make your Pina Colada Overnight Oats, gather these items: - 1 cup rolled oats - 1 cup coconut milk (preferably unsweetened) - 1/2 cup Greek yogurt (or dairy-free alternative) - 1/2 ripe banana, mashed - 1/2 cup pineapple chunks (fresh or canned) - 1 tablespoon shredded coconut - 1 tablespoon honey or maple syrup (optional for sweetness) - 1/2 teaspoon vanilla extract - Pinch of salt These ingredients blend to create a creamy, dreamy breakfast. The oats soak up the coconut milk, while the yogurt adds a rich texture. The banana and pineapple bring sweetness and flavor, making each bite feel like a vacation. For added flair, consider these toppings: - Extra pineapple chunks - Shredded coconut - Sliced banana - A sprig of mint These toppings not only make your dish look pretty but also add more flavor and texture. You can customize them based on your taste. If you need to swap some ingredients, here are a few ideas: - Use almond milk or oat milk instead of coconut milk. - Replace Greek yogurt with a plant-based yogurt for a vegan option. - Use maple syrup instead of honey for a vegan-friendly sweetener. These substitutions keep the dish tasty while meeting your dietary needs. Enjoy crafting your Pina Colada Overnight Oats with what you have on hand. For the full recipe, check the details above! To start, gather your ingredients: rolled oats, coconut milk, Greek yogurt, banana, pineapple, shredded coconut, honey or maple syrup, vanilla extract, and salt. In a medium bowl, mix the rolled oats, coconut milk, Greek yogurt, and mashed banana. Stir well until all the ingredients blend smoothly. Next, add the pineapple chunks, shredded coconut, and sweetener if you want some extra sweetness. Mix everything again until well combined. This step is key for a tasty dish! When you mix your ingredients, ensure they are well blended. This helps the oats soak up the coconut milk and flavors. If you want a creamier texture, use full-fat coconut milk. It makes a big difference! If you like more sweetness, add more honey or maple syrup. Don’t forget to taste as you go. Adjust to your liking! Once mixed, transfer the oat mixture into jars or containers. Make sure each jar seals tightly. Place them in the fridge overnight, or for at least four hours. The soaking time is crucial. It allows the oats to soften and absorb all the flavors. In the morning, stir your oats well. If you find them too thick, just add a splash of coconut milk. This will help reach your desired consistency. Top your oats with extra pineapple and coconut for a fun look. Enjoy your tropical breakfast! To get the best texture, choose rolled oats. They soak up liquid well. Avoid quick oats, as they can become mushy. Use a mixture of coconut milk and Greek yogurt for creaminess. This blend makes the oats thick yet smooth. If you find the oats too thick, add a splash of coconut milk in the morning. Stir well to get your desired consistency. Add fresh fruit like bananas or mango for a fruity twist. Pineapple adds sweetness and a tropical vibe. Shredded coconut gives a nice crunch. If you like a touch of sweetness, drizzle honey or maple syrup. A pinch of salt balances flavors and enhances sweetness. For more flavor, try adding a bit of cinnamon or nutmeg. These spices work well with the tropical theme. One mistake is not letting the oats soak long enough. For the best results, refrigerate overnight. If you skip this step, the oats won’t soften. Another mistake is using sweetened coconut milk. Unsweetened milk helps control the sweetness. Lastly, don’t forget to mix well before refrigerating. This ensures all ingredients blend together. Follow these tips for a perfect breakfast treat! {{image_2}} You can make your Pina Colada Overnight Oats even better by adding more fruits. Consider mango, kiwi, or papaya. These fruits add sweetness and color. You can mix them in or use them as toppings. Fresh fruits give your oats a fun twist. If you want a dairy-free version, use coconut yogurt instead of Greek yogurt. You can also try almond or soy milk for a unique taste. Maple syrup works great as a sweetener for vegans. These changes keep the dish creamy and delicious. To give your oats extra flavor, add spices like cinnamon or nutmeg. A drop of coconut extract boosts the coconut taste. You might even try a splash of rum extract for fun. These little tweaks can turn your oats into a tropical treat. By mixing these variations into your recipe, you can create endless versions of Pina Colada Overnight Oats. It's a great way to keep breakfast exciting and new. For the complete recipe, check the Full Recipe section. To store your Pina Colada Overnight Oats, use airtight jars or containers. Glass jars work great. Make sure to seal them well to keep the oats fresh. You can prep them the night before or even a few days in advance. Just remember to keep them in the fridge. This way, they stay cool and tasty. These overnight oats can last up to five days in the fridge. After this, they may lose some flavor and texture. If you want, you can reheat them in the microwave. Just add a little coconut milk to loosen them up. Heat them in short bursts, stirring in between. This keeps them creamy and delicious. Meal prep is a smart way to enjoy these oats. You can make a batch for the week. Just double or triple the recipe. Store each serving in its own jar. This makes breakfast easy and quick. You can grab a jar on busy mornings. Customize each jar with different toppings for variety. Try adding nuts or seeds for a crunch! Yes, you can make Pina Colada Overnight Oats in advance. I often prepare them the night before. This way, I have a quick and tasty breakfast ready to go. Just mix the ingredients and let them soak in the fridge overnight. They taste even better after a night of soaking. Overnight oats are a great choice for breakfast. They are rich in fiber, which helps with digestion. They also keep you full longer, so you won’t feel hungry soon after eating. The oats provide complex carbs that give you energy. Plus, adding fruits and yogurt boosts vitamins and protein. Freezing Pina Colada Overnight Oats is possible, but not ideal. Freezing can change the texture of the oats. If you want to freeze them, use airtight containers. When ready to eat, thaw them in the fridge overnight. It’s best to use fresh or refrigerated oats for the best flavor and texture. You can find the Full Recipe for Pina Colada Overnight Oats in the article. It gives you all the steps and ingredients you need. This recipe is easy to follow and perfect for anyone who loves breakfast. Enjoy making your own tasty version at home! Pina Colada Overnight Oats are simple and fun to make, as shown here. We covered key ingredients, easy steps, and helpful tips for great texture and flavor. Remember, you can add your favorite fruits or make it vegan with swaps. Proper storage keeps your oats fresh and tasty. Enjoy these delicious oats for breakfast. Try the variations to keep things exciting. Now, you can create a tasty and healthy meal every morning!

Pina Colada Overnight Oats Easy and Delicious Breakfast

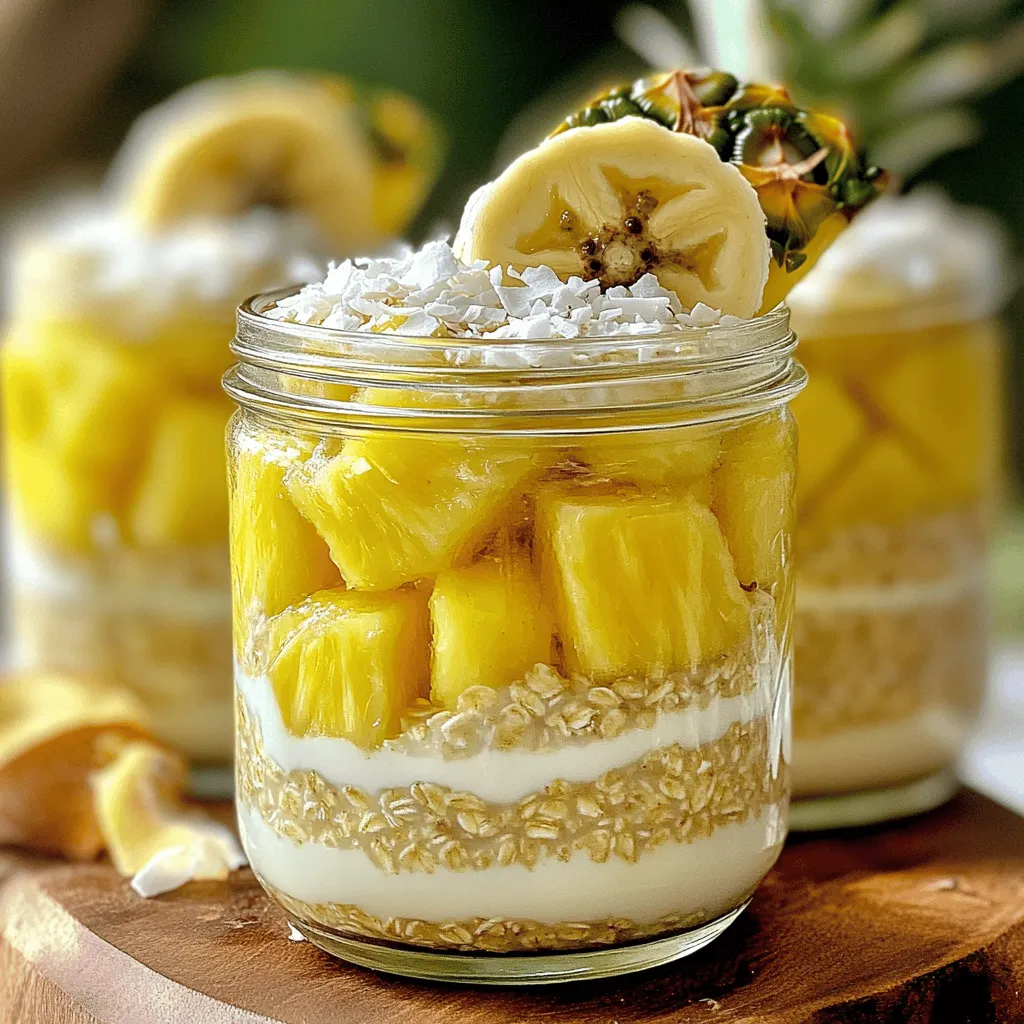
Wake up to a tropical delight with Pina Colada Overnight Oats! This easy recipe combines coconut, pineapple, and oats to
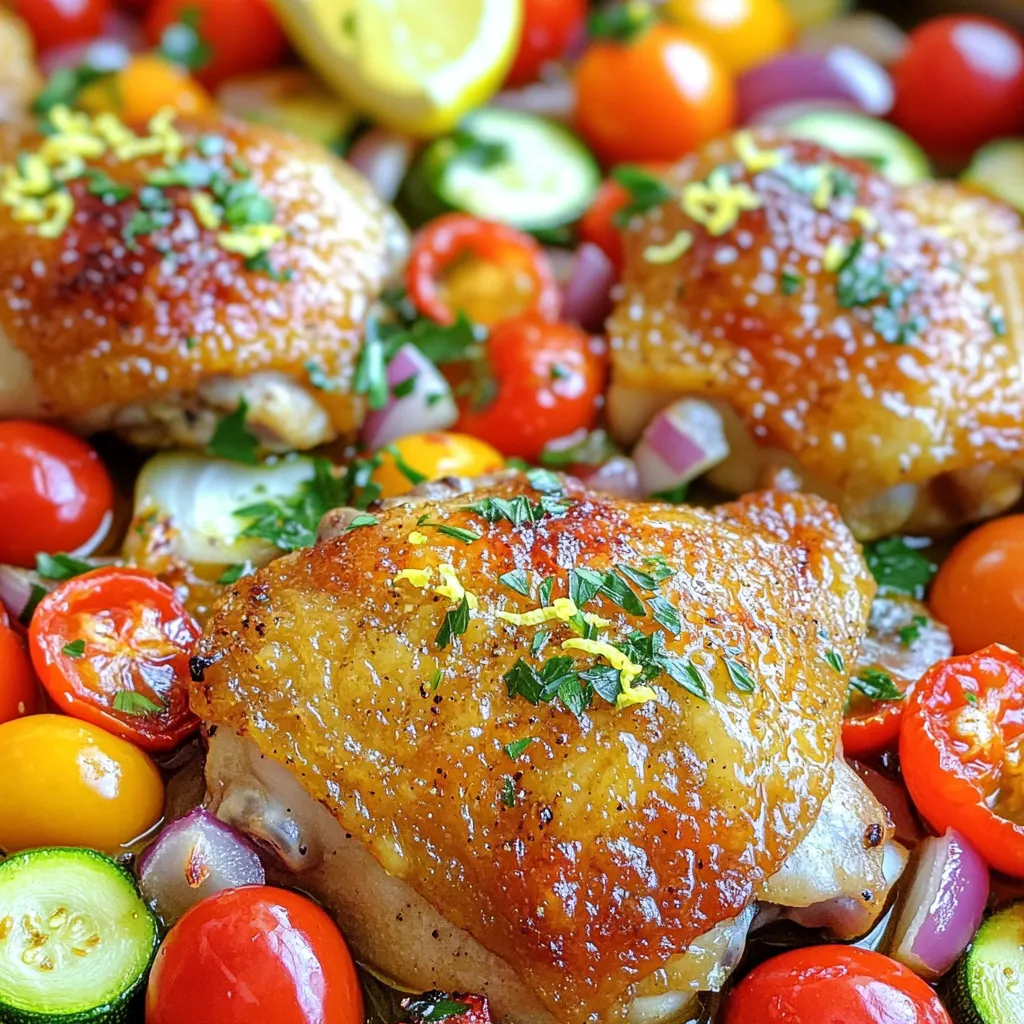
- 4 bone-in, skin-on chicken thighs - 1/2 cup honey - 4 cloves garlic, minced - 1/4 cup soy sauce (low sodium) - 2 tablespoons apple cider vinegar - 1 teaspoon fresh ginger, grated - 1 teaspoon sesame oil - Salt and pepper to taste - Fresh cilantro for garnish - Sesame seeds for garnish - Rice or quinoa - Steamed vegetables - Salad options Gathering the right ingredients is key to making great honey garlic chicken thighs. The chicken thighs are rich and juicy, and the honey adds a sweet touch. Garlic brings depth, while soy sauce gives that savory umami flavor. Apple cider vinegar adds a bit of tang, balancing the sweetness. You can also use fresh ginger for a warm spice. Sesame oil adds a nutty taste. Don’t forget to season with salt and pepper to enhance the flavors. For garnishing, fresh cilantro and sesame seeds brighten up the dish and add texture. Now, think about what to serve alongside these chicken thighs. Rice or quinoa makes a perfect base. Steamed veggies add color and crunch. A fresh salad can bring a nice contrast to the rich chicken. These simple sides round out your meal beautifully. For the full recipe, check out the [Full Recipe] section above. To start, I mix the marinade ingredients in a large bowl. I use honey, minced garlic, soy sauce, apple cider vinegar, grated ginger, sesame oil, salt, and pepper. I whisk them well until combined. Next, I reserve 1/4 cup of this marinade in a separate bowl for later. I take the chicken thighs and coat them fully with the marinade. Cover the bowl and place it in the fridge. I let them marinate for at least 30 minutes, but two hours gives a richer flavor. While the chicken marinates, I preheat the oven to 425°F (220°C). I heat a small amount of oil in an oven-safe skillet over medium-high heat. Once hot, I remove the chicken thighs from the marinade, discarding the used marinade. I place the thighs skin-side down in the skillet. I sear them for about 5 minutes until the skin turns golden brown and crispy. After searing, I flip the chicken thighs over and pour the reserved marinade on top. I carefully transfer the skillet to the preheated oven. I bake the chicken for 25 to 30 minutes until it reaches an internal temperature of 165°F (75°C). For a nice glaze, I switch the oven to broil during the last 5 minutes. I watch closely to caramelize the glaze, giving it a sticky finish. Now, it’s almost time to serve! To get the best flavor, marinate the chicken for at least 30 minutes. For even better taste, try to marinate it for 2 hours. The longer you marinate, the deeper the flavor becomes. Use low-sodium soy sauce for a nice balance. This type keeps the dish from being too salty. Searing the chicken is key to crispy skin. Heat a small amount of oil in your skillet. Place the chicken skin-side down and cook for about 5 minutes. This gives that nice golden brown color. When broiling the chicken, watch it closely. The glaze can burn quickly, and you want that perfect sticky finish. If your chicken thighs turn out dry, try reducing the cooking time. Check the internal temperature with a meat thermometer. Aim for 165°F (75°C) for juicy chicken. If you find the dish too sweet, add a little more soy sauce. This will balance out the sweetness and enhance the overall flavor. For the full recipe, check the details above. {{image_2}} You can change the sweetener in this dish. Agave syrup or maple syrup works well. They add a unique twist to the flavor. You can also switch up the herbs you use for garnish. Fresh parsley or green onions can add bright color and taste. If you want to grill the chicken, it’s easy! Just marinate as usual. Then, preheat your grill to medium-high heat. Cook the chicken thighs skin-side down for about 6-8 minutes. Flip and cook for another 6-8 minutes until done. This method gives a nice smoky flavor. You can also use a slow cooker. Place the marinated chicken in the cooker. Cook on low for 4-6 hours or on high for 2-3 hours. This method makes the chicken very tender and juicy. For sides, think Asian-inspired. Serve with jasmine rice or stir-fried veggies. They complement the flavors nicely. You can also get creative with garnishes. Try adding crushed peanuts, sliced chili, or lime wedges. These add texture and flavor to your meal. For the full recipe, check out the Honey Garlic Chicken Thighs section. To keep your honey garlic chicken thighs fresh, use airtight containers. Glass or plastic containers work well. Make sure to let the chicken cool down before sealing. Store the leftovers in the fridge right away. They will stay good for up to four days. You can freeze cooked chicken thighs for later meals. Wrap each thigh in plastic wrap, then place it in a freezer bag. This helps prevent freezer burn. To reheat, thaw the chicken in the fridge overnight. Heat it in the oven at 350°F (175°C) until warm. This usually takes about 15-20 minutes. Cooked chicken thighs are best eaten within four days in the fridge. If you freeze them, they last about three months. Watch for spoilage signs like a bad smell or a slimy texture. If you see these, it's best to throw the chicken away. Enjoy your honey garlic chicken like it’s meant to be enjoyed! If you want a honey substitute, use maple syrup. It has a similar sweetness. Agave syrup also works well. You can try brown sugar mixed with water for a quick fix. Just remember, the flavor may change slightly. Yes, you can use boneless chicken thighs. They cook faster than bone-in thighs. Reduce the baking time to about 20 minutes. Always check that the chicken reaches 165°F for safety. To make this dish gluten-free, swap soy sauce with tamari. Tamari has a similar taste and is gluten-free. You can also use coconut aminos. This option is slightly sweeter and less salty. Serve honey garlic chicken thighs with rice or quinoa for a filling meal. Steamed veggies like broccoli or green beans add crunch. A fresh salad with mixed greens also makes a nice side. Check the internal temperature of the chicken. It should reach 165°F (75°C). Look for golden brown skin and juices running clear. These signs show that your chicken is fully cooked. In this post, we explored honey garlic chicken thighs. You learned about key ingredients, step-by-step instructions, and helpful tips for perfecting the dish. Remember to adjust the marinade time for flavor and try different cooking methods. You can even swap ingredients to suit your taste. Storing leftovers properly will keep them fresh longer. Enjoy serving this delicious meal with your favorite sides. With these insights, you'll impress everyone at your table!

Honey Garlic Chicken Thighs Flavorful Dinner Delight

If you want a dinner that’s both easy and tasty, look no further than Honey Garlic Chicken Thighs. This dish

To make Cheesy Taco Stuffed Shells, gather these simple ingredients: - 20 jumbo pasta shells - 1 pound ground turkey or beef - 1 packet taco seasoning - 1 cup black beans, rinsed and drained - 1 cup corn, frozen or canned - 2 cups shredded cheddar cheese - 1 cup salsa (mild or spicy depending on preference) - 1 cup sour cream - 1/2 cup chopped green onions - 1/4 cup fresh cilantro, chopped (optional) - Salt and pepper to taste These ingredients blend well to create a tasty dish. The taco seasoning adds the right kick. The cheese makes each bite creamy and rich. When picking fresh ingredients, focus on a few key points: - Pasta Shells: Choose shells that are intact and not cracked. - Ground Meat: Look for meat that is bright in color. It should have no strange smell. - Beans and Corn: If using canned, check expiration dates. Rinsing beans helps remove extra sodium. - Cheese: Go for blocks of cheese instead of pre-shredded. Block cheese melts better. - Vegetables: For green onions and cilantro, choose vibrant, crisp ones. Avoid wilted leaves. Fresh ingredients make your dish pop with flavor. They also improve the look of your meal. You can switch out some ingredients without losing flavor. Here are a few ideas: - Ground Meat: Use shredded chicken or tofu for a lighter option. - Beans: Substitute black beans with pinto or kidney beans. - Salsa: Try using homemade salsa for a fresher taste. - Cheese: Swap cheddar for Monterey Jack or pepper jack for extra spice. - Sour Cream: Greek yogurt is a healthy alternative to sour cream. These swaps can fit your tastes or dietary needs. Feel free to get creative with your Cheesy Taco Stuffed Shells! For the full recipe, check below. First, gather your ingredients. You will need jumbo pasta shells, ground turkey or beef, taco seasoning, black beans, corn, shredded cheddar cheese, salsa, sour cream, green onions, and cilantro. Next, preheat your oven to 375°F (190°C). Cook the pasta shells according to the package instructions. Drain them once cooked and set aside. In a large skillet, brown the ground meat over medium heat. Make sure to break it up as it cooks. Drain any extra fat after browning. Add the taco seasoning, black beans, corn, salt, and pepper to the meat mixture. Stir well and cook for about five minutes. After that, combine one cup of shredded cheddar cheese with the meat mixture. Now, it's time to fill the shells. Take each cooked shell and fill it with the cheesy taco mixture. Arrange the filled shells in a greased 9x13 inch baking dish. Pour salsa evenly over the stuffed shells to cover them well. Then, sprinkle the remaining shredded cheddar cheese on top. Cover the dish with aluminum foil. Bake in the preheated oven for 20 minutes. After that, remove the foil and bake for another 10 to 15 minutes. You're looking for melted, bubbly cheese. Once done, take the dish out and let it cool slightly before serving. For a beautiful presentation, serve the stuffed shells on a large platter. Top each serving with a dollop of sour cream. Add chopped green onions and fresh cilantro for color and flavor. You can also provide extra salsa on the side for guests to add more to their plates. Enjoy the meal with a fresh salad or some tortilla chips for a complete dining experience. For full details on the recipe, refer to the Full Recipe section. To fill your shells evenly, I recommend using a small spoon or a piping bag. This way, you can control how much filling goes in each shell. Start by placing the filling into the shell's open end. Gently press down to pack it in. This ensures each bite is full of flavor. One big mistake is overcooking the pasta. If shells are too soft, they break easily. Cook them just until al dente. Also, don't skip the salsa on top. It adds moisture and flavor. Lastly, make sure not to rush the baking time. Give the cheese time to melt and bubble for that perfect finish. To get that gooey, stretchy cheese, use freshly shredded cheese. Pre-shredded cheese often has additives that can affect melting. Layer the cheese on top of the shells before baking. Cover the dish with foil for the first part of baking. This helps the cheese melt evenly. Remove the foil later to let the cheese brown slightly. For the full recipe, check out the steps mentioned above to create your own cheesy taco stuffed shells! {{image_2}} You can create tasty vegetarian stuffed shells by skipping the meat. Use a mix of black beans, corn, and chopped bell peppers. For a vegan twist, replace cheese with a dairy-free version. Nutritional yeast adds a cheesy flavor without dairy. You can also mash avocado for a creamy texture. To adjust the heat, use mild salsa for a softer taste. If you love spice, add diced jalapeños or use spicy taco seasoning. You can also sprinkle red pepper flakes over the top before baking. This way, everyone can enjoy their preferred spice level. Toppings can really make your dish pop. Consider adding sliced olives or chopped tomatoes on top. Fresh cilantro and green onions add a burst of flavor. A drizzle of lime juice brightens the dish too. Serve with sour cream or guacamole for extra creaminess. Each topping can change the taste and feel of your stuffed shells. For the full recipe, check out the detailed instructions. To store your leftover cheesy taco stuffed shells, let them cool first. Then, place them in an airtight container. Keep the container in the fridge. They will stay fresh for up to three days. If you want to keep them longer, consider freezing. When you are ready to enjoy those leftovers, preheat your oven to 350°F (175°C). Place the stuffed shells in an oven-safe dish. If they seem dry, add a splash of water or salsa. Cover the dish with foil to keep them moist. Heat for about 20 minutes or until everything is warm. You can also use a microwave for quick reheating. Just cover the dish and heat in 1-minute bursts until hot. To freeze cheesy taco stuffed shells, prepare them as usual but do not bake. Place the filled shells in a single layer on a baking sheet. Freeze them for about an hour, then transfer to a freezer bag. Remove as much air as possible before sealing. They can last up to three months in the freezer. When ready to eat, bake them from frozen. Just add 10 minutes to the baking time. For the best results, cover them with salsa and cheese before baking. For the complete recipe, check the Full Recipe section. To prevent pasta shells from breaking, cook them carefully. Boil them in a large pot of salted water. Make sure they have space to move. Stir gently while cooking. Follow the package's cooking time closely. Drain them and rinse them briefly in cold water. This stops the cooking process. Handle them with care when filling. Use a spoon to scoop in the filling gently. Yes, you can make Cheesy Taco Stuffed Shells ahead of time. Prepare the shells and filling as usual. Then, stuff the shells and place them in a baking dish. Cover the dish with plastic wrap and refrigerate. You can do this for up to 24 hours. When you are ready to cook, remove the wrap and pour salsa on top. Bake as directed in the Full Recipe. Many sides go well with Cheesy Taco Stuffed Shells. Here are a few great options: - Mexican Rice: Fluffy rice with spices adds a nice touch. - Guacamole: Creamy and fresh, perfect for dipping. - Corn Salad: A refreshing salad with sweet corn and lime. - Refried Beans: Smooth and savory, they complement the shells well. - Chips and Salsa: Crunchy chips with salsa make a great snack. These sides enhance the meal, add color, and offer different textures. Enjoy mixing and matching! This blog post guided you through making Cheesy Taco Stuffed Shells. We covered the key ingredients, tips for freshness, and tasty alternatives. You learned simple steps for preparation and baking, along with plating ideas to impress. I shared best practices, common mistakes to avoid, and how to get that perfect cheese melt. You also discovered variations, storage tips, and answers to frequently asked questions. Now, you can enjoy this dish with confidence. Happy cooking!

Cheesy Taco Stuffed Shells Simple Flavor Explosion

Get ready for a flavor explosion with my Cheesy Taco Stuffed Shells! This dish combines cheesy goodness with your favorite

- 4 bone-in, skin-on chicken thighs - 1 cup cherry tomatoes, halved - 1 red bell pepper, sliced - 1 zucchini, sliced - 1 red onion, cut into wedges - 3 cloves garlic, minced - 1 teaspoon dried oregano - 1 teaspoon dried thyme - ½ teaspoon smoked paprika - 1 lemon, zested and juiced - 3 tablespoons olive oil - Salt and pepper to taste - Fresh parsley, chopped (for garnish) The main ingredients in this dish are simple but packed with flavor. The chicken thighs are juicy, and the vegetables add freshness. The marinade brings everything together with a bright taste. The chicken thighs give a rich taste. The skin crisps up nicely, making every bite satisfying. Cherry tomatoes burst with sweetness when cooked. The red bell pepper and zucchini add crunch and color. The red onion adds a slight sweetness once roasted. The marinade is where the magic happens. The garlic adds a savory punch. Oregano and thyme bring a hint of earthiness. Smoked paprika gives a warm, smoky flavor. Lemon juice and zest brighten up the dish, making it lively. Before you start cooking, gather all your ingredients. This helps you stay organized. You can find the Full Recipe for more detailed steps on how to make this delicious meal. - Preheat the oven to 400°F (200°C). - In a large mixing bowl, combine the olive oil, minced garlic, lemon zest, lemon juice, dried oregano, thyme, smoked paprika, salt, and pepper. This mix creates a flavorful marinade. - Toss the chicken thighs in the marinade. Make sure they are fully coated in the mix. - Let the chicken marinate for at least 15 minutes. This step adds great flavor. - Arrange the marinated chicken and vegetables in an oven-safe skillet. Place them skin-side up for a nice crisp. - Bake in the oven for about 35-40 minutes. You want the chicken to cook through and the skin to turn golden. Check that the internal temperature reaches 165°F (75°C). - For extra crispiness, turn on the broiler for the last 2-3 minutes. Watch closely to prevent burning. - Once done, remove from the oven. Let it rest for a few minutes, then garnish with fresh parsley before serving. - For the complete recipe, check the Full Recipe section. - Use bone-in, skin-on chicken thighs for better flavor. They stay juicy and tasty. - Broil briefly at the end for a crispy finish. This adds a nice crunch. - Adjust seasoning based on personal preference. More salt or herbs can change the taste. - Add extra vegetables or herbs as desired. Try olives or capers for a kick. - Use a meat thermometer to check for doneness. Chicken should reach 165°F (75°C). - Consider marinating overnight for deeper flavors. This lets the spices soak in well. You can find the Full Recipe for Sunny One Pan Mediterranean Chicken to try these tips! {{image_2}} You can easily change the main protein in this dish. Substitute chicken with tofu for a vegetarian option. Fish also works well, giving it a light flavor. Seasonal veggies can add color and taste. Try squash, asparagus, or eggplant. You can also switch bell peppers. Use green, yellow, or orange peppers for variety. Herbs and spices add unique flavors to your dish. Experiment with rosemary or basil instead of oregano and thyme. Each herb brings a different taste. If you like heat, add a pinch of red pepper flakes. This small change can make your dish exciting and bold. This meal pairs well with many sides. Serve it with fluffy rice or nutty quinoa for a filling option. Crusty bread is great for soaking up juices. A fresh green salad adds crunch and color. Try adding lemon vinaigrette to brighten the meal. Enjoy the balance of flavors with each bite from this One Pan Mediterranean Chicken dish. Store any leftovers in an airtight container. They will stay fresh for up to 3 days. You can freeze portions of this dish for up to 3 months. Just make sure to seal in freezer-safe bags. To enjoy, simply reheat in the oven or microwave. When reheating, ensure the chicken reaches an internal temperature of 165°F (75°C). To keep it juicy, add a splash of broth during reheating. This helps retain moisture and keeps your meal flavorful. Enjoy your One Pan Mediterranean Chicken! To make One Pan Mediterranean Chicken, you start by marinating the chicken. Mix olive oil, garlic, lemon zest, thyme, oregano, paprika, salt, and pepper in a bowl. Toss chicken thighs in this mix and let them sit for 15 minutes. Next, preheat your oven to 400°F (200°C). In an oven-safe pan, place the chicken skin-side up. Add halved cherry tomatoes, sliced bell pepper, zucchini, and onion around the chicken. Drizzle any leftover marinade over the veggies. Bake for 35-40 minutes until the chicken reaches 165°F (75°C). Garnish with parsley before serving. For the full recipe, check the section above. Yes, you can use boneless chicken. Boneless chicken cooks faster than bone-in chicken. If you choose boneless, reduce the cooking time by about 10-15 minutes. Always check the internal temperature to ensure it reaches 165°F (75°C). Bone-in chicken offers more flavor due to the skin and bones, but boneless is a great option for quick meals. Many side dishes work well with One Pan Mediterranean Chicken. Here are some ideas: - Couscous or quinoa for a hearty base. - A fresh green salad for a crisp bite. - Roasted or steamed vegetables for added nutrients. - Crusty bread to soak up the juices. Choose sides that complement the Mediterranean flavors for the best experience. Cooking times for chicken can vary. For bone-in thighs, aim for 35-40 minutes at 400°F (200°C). Boneless thighs will need about 25-30 minutes. Always check the thickest part of the chicken to ensure it reaches 165°F (75°C). Using a meat thermometer helps confirm doneness and keeps the chicken juicy. This recipe combines vibrant veggies with juicy chicken thighs for a tasty dish. We covered the main ingredients, marinade, step-by-step cooking, and some handy tips. Remember, using bone-in, skin-on chicken gives great flavor. Experiment with different proteins and spices to make it your own. Enjoying this dish with sides like rice or salad completes the meal. With easy storage options, you can savor the leftovers too. Happy cooking!

One Pan Mediterranean Chicken Simple and Flavorful Meal

Are you craving a dinner that’s both simple and bursting with flavor? Look no further than my One Pan Mediterranean

To make a classic apple crisp, you need some key ingredients. Here’s what you will use: - 6 medium Granny Smith apples, peeled and sliced - 1 tablespoon lemon juice - 1 cup rolled oats - 1/2 cup all-purpose flour - 1/2 cup packed brown sugar - 1/2 cup granulated sugar - 1 teaspoon ground cinnamon - 1/2 teaspoon ground nutmeg - 1/4 teaspoon salt - 1/2 cup unsalted butter, softened and cubed These apples bring a tart flavor that balances the sweetness. The oats and butter create a crunchy topping. Want to enhance your apple crisp? Here are some optional add-ins: - 1/2 cup chopped walnuts - 1/2 cup raisins or dried cranberries - A splash of vanilla extract - A sprinkle of ginger or cardamom These add-ins give more texture and flavor. For example, walnuts add a nice crunch. Raisins bring a chewy sweetness that pairs well with apples. If you need to make swaps, here are some great options: - Use Honeycrisp or Fuji apples for a sweeter taste. - Swap brown sugar for coconut sugar for a different flavor. - Use almond flour instead of all-purpose flour for a gluten-free option. - Replace unsalted butter with coconut oil for a dairy-free version. These substitutions keep your apple crisp tasty, while fitting your dietary needs. You can still enjoy classic flavors with these simple changes. For the full recipe, check out the details above! First, wash your apples well. I like using Granny Smith apples for their tartness. Peel and slice them into thin pieces. You need about six medium apples for this recipe. After slicing, place them in a large bowl. Add one tablespoon of lemon juice to the apples. This step keeps the apples fresh and bright. Toss the apples gently to coat them with lemon juice. Next, transfer the apples into a greased 9x13 inch baking dish. Make sure they are spread out evenly. In another mixing bowl, gather your dry ingredients. Combine one cup of rolled oats, half a cup of all-purpose flour, and half a cup of packed brown sugar. Then, add half a cup of granulated sugar, one teaspoon of ground cinnamon, half a teaspoon of ground nutmeg, and a quarter teaspoon of salt. Mix these well to blend the flavors. Now, take half a cup of softened unsalted butter. Cut it into small cubes and add it to the dry mix. Use your fingers or a pastry cutter to mix until you see coarse crumbs. If you want more crunch, stir in half a cup of chopped walnuts. Now it’s time to bake. Preheat your oven to 350°F (175°C). Evenly spread the crumb mixture over the apples in the baking dish. Make sure to cover all the apples well. Place the dish in the oven and bake for 35 to 40 minutes. Check for a golden brown top and bubbling apples. Once it’s done, take it out of the oven. Let it cool for a few minutes before serving. Serve it warm, topped with a scoop of vanilla ice cream for a perfect treat. For the full recipe, see the details above. To get that perfect crisp texture, focus on your topping. Use cold butter. This keeps the topping crumbly. Mix it with your dry ingredients until it looks like coarse crumbs. Don’t overmix; it should stay light and airy. This helps it bake up crunchy and golden. Choosing the right apples is key. I love Granny Smith apples for their tartness. They hold their shape well when baked. Honeycrisp apples add sweetness and a nice bite. You can mix varieties for a complex flavor. Just make sure they are firm and fresh. Bake your apple crisp at 350°F (175°C). This temperature lets the apples cook well while crisping the topping. Check it after 35 minutes. The top should be golden brown, and you should see bubbles. If it is not done, give it another 5 minutes. Always let it cool a bit before serving. For the full recipe, check out the Heavenly Spiced Apple Crisp! {{image_2}} You can make a gluten-free apple crisp by changing a few ingredients. Use gluten-free oats and a gluten-free flour blend. This swap keeps the taste while making it safe for those with gluten issues. You still get that crunchy topping we all love. The apples stay juicy and sweet underneath. You can follow the full recipe for the best results. Spices elevate apple crisp in exciting ways. Besides cinnamon, try nutmeg or cardamom. These spices add warmth and depth. You can even use ginger for a little kick. Just a pinch can change the whole dish. Experiment with your favorite spices to find your unique taste. If you want a healthier apple crisp, there are great options. Use less sugar or swap it with honey or maple syrup. You can also add more oats and nuts for extra fiber. Apples are naturally sweet, so you might not need much sugar. This way, you enjoy a tasty dessert that feels good too. To keep your apple crisp fresh, place it in an airtight container. You can also cover it tightly with plastic wrap or aluminum foil. Store it in the fridge for up to five days. The crisp topping may lose some crunch over time, but the flavor stays great. To reheat, preheat your oven to 350°F (175°C). Place the apple crisp in an oven-safe dish. Cover it with foil to prevent burning. Heat for about 15-20 minutes, or until warm. This method helps keep the topping crispy. You can also microwave it for quick reheating. Heat for about 30 seconds to 1 minute. You can freeze apple crisp for later enjoyment. First, let it cool completely. Then, wrap it tightly in plastic wrap and foil to prevent freezer burn. Store it in the freezer for up to three months. To bake from frozen, preheat your oven to 350°F (175°C) and bake for about 45-60 minutes. The topping may not be as crisp, but the taste will still be delicious. For the full recipe, check out the details above. Yes, you can use other fruits in apple crisp. Berries, peaches, and pears work well. Mix fruits for more flavor. Try a blend of apples and pears for a tasty twist. Each fruit adds a unique taste, making the dish special. You can also use frozen fruits for a quick dessert. The main difference is in the topping. Apple crisp has oats in the topping, while apple crumble does not. The crumble topping is usually made from flour and butter. This gives it a finer texture. Crisp toppings are chunkier and add a nice crunch. Both are delicious, but the texture sets them apart. You know the apple crisp is done when the top is golden brown. The apples should be bubbling around the edges. Check after 35 minutes of baking. If the topping looks crisp and brown, it's ready. Let it cool for a few minutes before serving. This helps the juices settle. For the full recipe, check out the complete guide to making this classic dessert. In this blog post, we explored making a classic apple crisp. You learned key ingredients, optional add-ins, and substitutions. I provided clear steps for prepping apples, making the topping, and baking. We also discussed tips for perfect texture, the best apples, and timing. You discovered tasty variations, storage methods, and reheating tips. Baking apple crisp is fun and easy. With these tips, your dessert will always impress. Enjoy your delicious creations!

Classic Apple Crisp Irresistible Homemade Delight

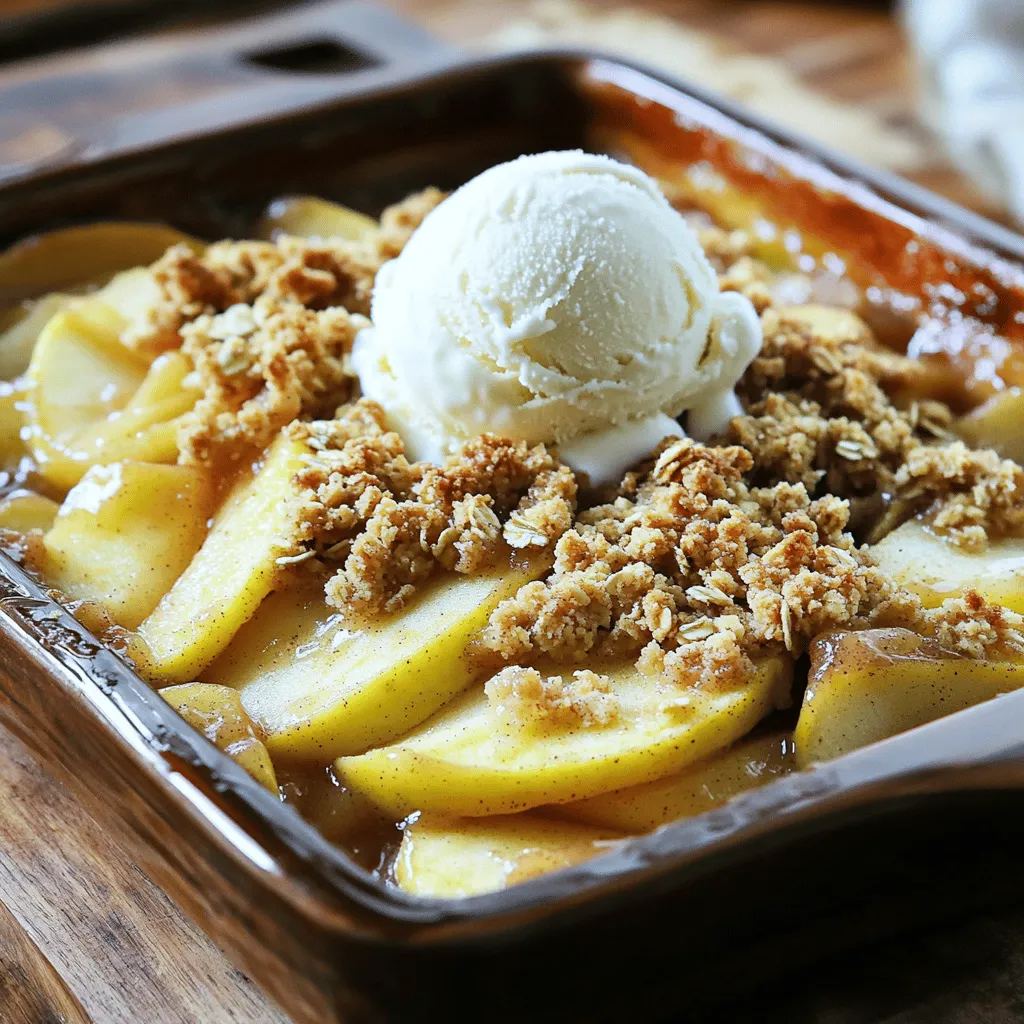
Are you craving something warm and sweet? Discover how to make a Classic Apple Crisp that will amaze your taste

- 1 pound white fish fillets (tilapia or cod) - 1 cup breadcrumbs (panko for extra crunch) - 1 tablespoon olive oil - 1 teaspoon paprika - 1 teaspoon garlic powder - 1 teaspoon cumin - 1/2 teaspoon chili powder - Salt and pepper to taste - 8 small corn or flour tortillas - 1 cup shredded cabbage - 1 ripe avocado, sliced - 1 lime, cut into wedges - Fresh cilantro for garnish - Optional: Hot sauce for serving When you make these air fryer fish tacos, use fresh fish. Tilapia or cod works great. The breadcrumbs give a nice crunch. Panko adds extra texture, which is a real treat. Olive oil helps the fish stay moist while it cooks. Seasoning is key. Paprika gives a warm color and flavor. Garlic powder adds depth, while cumin brings earthy notes. Chili powder adds a gentle kick. Don’t forget to add salt and pepper to taste. This balance makes every bite delicious. For the assembly, small tortillas are best. They hold the fish and toppings well. Shredded cabbage adds crunch and freshness. Slices of ripe avocado give creaminess. Fresh lime juice brightens the flavors. You can garnish with cilantro for a fresh touch. If you like heat, add hot sauce to finish. For the full recipe, check the detailed instructions. Enjoy making these tasty fish tacos! Start by patting the fish fillets dry with paper towels. This step is key for making the fish crispy. Moist fish will steam instead of fry, losing that nice crunch. Once dried, cut the fillets into strips. Aim for pieces about two inches wide. This size fits well in the tacos and cooks evenly. In a bowl, combine the breadcrumbs, paprika, garlic powder, cumin, chili powder, salt, and pepper. Mix everything well to create a flavorful coating. I like to add a pinch of extra paprika for more color and taste. This blend brings out the best in the fish. Feel free to adjust spices to your liking. Preheat your air fryer to 400°F (200°C). This ensures the fish cooks evenly. Next, dip each fish strip in olive oil, then coat it with the breadcrumb mixture. Press it gently to make sure it sticks well. Place the coated strips in a single layer in the air fryer basket. You may need to cook in batches to avoid crowding. Cook for about 8-10 minutes, flipping halfway through. Look for a golden color and crispy texture for the perfect finish. For the full recipe, you can refer to the [Full Recipe]. To get that crispiness you crave, air circulation is key. Air fryers work by moving hot air around the food. This helps create a crunchy outside and keeps the inside moist. Always place the fish in a single layer. If you stack it, the texture will suffer. For different fish types, cooking times vary. Here are some guidelines: - Tilapia or Cod: Cook for 8-10 minutes at 400°F (200°C). - Salmon: Aim for about 10-12 minutes. - Haddock: Cook for 8-10 minutes as well. If your fish isn't crispy enough, check your coating. Make sure the fish is dry before you dip it in oil and breadcrumbs. You want that mixture to stick well. If the fish is overcooked, it can dry out. If it's undercooked, it will feel too soft. Always check the texture and adjust time as needed. Pair your tacos with fresh sides like a zesty corn salad or black beans. For drinks, a light beer or a refreshing lime soda works well. Customize your toppings for maximum flavor. Try adding pickled onions, jalapeños, or a creamy sauce. These will take your fish tacos to the next level! For the full recipe, check out the Crispy Air Fryer Fish Tacos section. {{image_2}} You can switch the fish for other types. Salmon or haddock works well too. Each fish adds its own taste to your tacos. If you want a gluten-free option, use crushed cornflakes or gluten-free breadcrumbs. They still give a nice crunch without gluten. Want more heat? Add extra chili powder or some cayenne pepper. You can also mix in lime zest for a bright twist. For sauces, try a creamy avocado sauce or a zesty cilantro lime dressing. These options boost flavor and add fun. Corn tortillas are great for their flavor and texture. They hold up well with the fish. Flour tortillas are softer and easy to fold. If you want something lighter, try using lettuce wraps. They make a fresh and crunchy base for your fish. Enjoy exploring these tasty options! To keep your cooked fish tacos fresh, follow these steps: - Allow the tacos to cool down to room temperature. - Use an airtight container to store them. - Place parchment paper between layers to avoid sogginess. Store them in the fridge for up to three days. This method helps keep the flavors and texture intact. When reheating, use the air fryer for best results. This method keeps the fish crispy. - Preheat your air fryer to 350°F (175°C). - Place the tacos in the basket in a single layer. - Heat for about 5-7 minutes. Check to ensure they are hot throughout. This will help you enjoy the same great taste. Yes, you can freeze cooked fish tacos. However, freezing can change the texture. To freeze: - Separate the fish, tortillas, and toppings. - Wrap the fish tightly in plastic wrap. - Place it in a freezer bag. - Store tortillas flat in a freezer bag. - For toppings, keep them in small containers. Use within three months for the best flavor. When ready to enjoy, thaw in the fridge overnight before reheating. You can tell when the fish is done by its color and texture. Perfectly cooked fish looks opaque and flakes easily with a fork. It should not be raw or mushy. The ideal internal temperature for fish is 145°F (63°C). Use a food thermometer to check this. Yes, you can prep some ingredients ahead. Cut the fish and mix the seasonings a day before. Store them in airtight containers in the fridge. The tacos are best when fresh, but you can store them in the fridge for up to two days. For fish tacos, I recommend an air fryer with a basket design. Look for models that allow for even air circulation. Popular choices include the Philips Airfryer and the Ninja Foodi. These models often have adjustable temperature settings and timers, which help in cooking fish perfectly. You learned how to make tasty air fryer fish tacos with simple ingredients. I covered the best fish types, seasonings, and topping ideas. Remember the tips for crispy texture and troubleshooting common issues. These tacos are easy to customize and fun to serve. Try different tortillas or sauces for a unique spin. Don’t forget to store any leftovers correctly to keep them fresh. Enjoy making these fish tacos and impress your friends and family with your cooking skills!

Air Fryer Fish Tacos Crispy and Flavorful Delight

If you crave a meal that’s both crispy and bursting with flavor, you’ve come to the right place! My Air

Older posts
Newer posts
← Previous Page1 … Page46 Page47 Page48 … Page86 Next →

dsad

© 2026 Cooking Wells • Built with GeneratePress

Our Policies

  • Copyright Policy
  • Cookie Policy
  • GDPR Policy
  • Privacy Policy
  • Disclaimer
  • Terms Of Use

More Information

  • Home
  • About
  • Contact
  • Appetizers
  • Dessert
  • Dinner
  • Drinks
©2026, Cooking Wells About Back To Top