Skip to content
DisclaimerTerms Of UseGDPR PolicyCookie Policy

Cooking Wells

  • Home
  • Drinks
  • Appetizers
  • Dinner
  • Dessert
  • About
  • Contact
  • Privacy Policy
DisclaimerTerms Of UseGDPR PolicyCookie Policy

NO-ING-IMG

- 1 cup cream cheese, softened - 1/2 cup pumpkin puree - 1/4 cup powdered sugar - 1 teaspoon vanilla extract - 1 teaspoon pumpkin pie spice - 1/4 teaspoon ground cinnamon - 1/2 cup crushed graham crackers - 2 tablespoons melted butter - 1/4 cup chopped pecans (optional for topping) - Whipped cream (for serving) You need simple ingredients for these bites. Start with cream cheese. It gives a rich taste and smooth texture. Use softened cream cheese for easy mixing. Next, grab pumpkin puree. This adds flavor and moisture. Powdered sugar brings sweetness. It blends well without grittiness. Vanilla extract adds depth. Pumpkin pie spice gives that warm fall taste. A bit of ground cinnamon enhances the flavor. For the crust, crushed graham crackers are key. They provide a nice crunch. Melted butter helps bind the crumbs. Chopped pecans can add a lovely crunch on top. Finally, whipped cream is perfect for serving. Each ingredient plays a role in making these bites a delight. Start by gathering your ingredients. You need cream cheese, pumpkin puree, powdered sugar, and spices. In a medium mixing bowl, combine the softened cream cheese, pumpkin puree, powdered sugar, vanilla extract, pumpkin pie spice, and cinnamon. Use a hand mixer or a whisk to blend until smooth and creamy. This mixture should be thick and rich, perfect for our bites. Next, let’s make the crust. Take crushed graham crackers and mix them with melted butter in another bowl. Stir until the mixture looks like wet sand. This texture is key. It helps form a solid base for our cheesecake bites. Now, it’s time to assemble. Line a mini muffin tin with cupcake liners or spray it with non-stick cooking spray. Press about a teaspoon of the graham cracker mixture into the bottom of each muffin cup. This will be your crust layer. Then, spoon the pumpkin cheesecake mixture evenly over the crusts, filling each cup to the top. Smooth the tops with a spatula. If you like, sprinkle chopped pecans on top for a nice touch. Cover the muffin tin with plastic wrap and refrigerate for at least two hours or until firm. This chilling time is important for the bites to set well. Enjoy these tasty treats when they're ready! Start with softened cream cheese. This step is key for a smooth mix. Cold cream cheese makes lumps, which ruin the texture. Set your cream cheese out for about 30 minutes before mixing. For smooth blending, use a hand mixer or whisk. Mix until the mixture is creamy and well combined. If you notice lumps, keep mixing. This mixture should feel light and fluffy. Refrigerate the bites for at least 2 hours. This chilling time helps the bites set up nicely. You want them to be firm but not too hard. To check for firmness, gently press a bite with your finger. It should hold its shape without being too soft. If it feels too soft, let it chill a bit longer. Top each bite with a dollop of whipped cream. This adds a lovely touch and makes them look fancy. You can also sprinkle some chopped pecans on top for crunch. For presentation, use a nice plate or tray. Arrange the bites in a circle or in rows. This makes them fun to share at gatherings. {{image_2}} You can switch out pumpkin puree if you want. Try using sweet potato puree instead. It gives a similar texture and taste. Other good options include butternut squash or even mashed bananas for a fun twist. Adding spices can change the flavor too. If you want a bolder taste, try nutmeg or ginger. You can even mix in some cocoa powder for a chocolatey kick. These swaps let you create your own unique bites. For those who need dairy-free options, look for cream cheese made from nuts or soy. These can taste just as good as regular cream cheese. They still provide that creamy texture you want. If you need a gluten-free option, use crushed gluten-free cookies instead of graham crackers. Many brands offer tasty alternatives that work well for the crust. This way, everyone can enjoy your cheesecake bites. You can make these bites into a layered dessert. Just alternate layers of the crust and cheesecake mix in a small glass. This makes for a stunning presentation. When it comes to serving, think about how to plate them. Use colorful plates or add fresh fruit on the side. A drizzle of caramel or chocolate sauce can also make your bites look fancy. These small changes can impress your guests. To store leftovers, place the cheesecake bites in an airtight container. You can use a glass or plastic container with a lid. This way, they stay fresh and tasty. Make sure to keep them in the fridge. They will last for about 3 to 5 days. If you want to keep them longer, freezing is a good option. To freeze the bites, first chill them in the fridge for at least 2 hours. After that, gently pop them out of the muffin tin. Place them in a single layer on a baking sheet. Freeze them for 1 to 2 hours until they are firm. Then, transfer the bites into a freezer bag or container. Label it with the date. For thawing, move them from the freezer to the fridge. Let them thaw overnight. This keeps them creamy and delicious. You can also let them sit at room temperature for about 20 minutes before serving. Enjoy them with whipped cream on top! These bites can last up to five days in the fridge. Store them in an airtight container to keep them fresh. If you notice any moisture, it’s best to use paper towels to absorb it. This helps maintain their texture and flavor. Yes, you can make these bites a day or two in advance. Just prepare them, then cover and chill in the fridge. This allows the flavors to blend nicely. When it’s time to serve, simply top them with whipped cream and enjoy. You can use crushed cookies or cereal for the crust. Options like digestive biscuits or vanilla wafers work great. For those who need gluten-free options, try using almond flour or gluten-free cookies. They will provide a nice base for your cheesecake bites. In this blog post, I shared how to make No Bake Pumpkin Spice Cheesecake Bites. You learned about the key ingredients, like cream cheese and pumpkin puree. I walked you through the steps for mixing, crust making, and assembly. Tips for perfect texture and serving ideas helped round out the recipe. Remember to store leftovers correctly for freshness. These bites are easy, tasty, and perfect for any gathering. Enjoy your delicious treats and feel free to experiment with flavors or presentations!

No Bake Pumpkin Spice Cheesecake Bites Delightful Treat

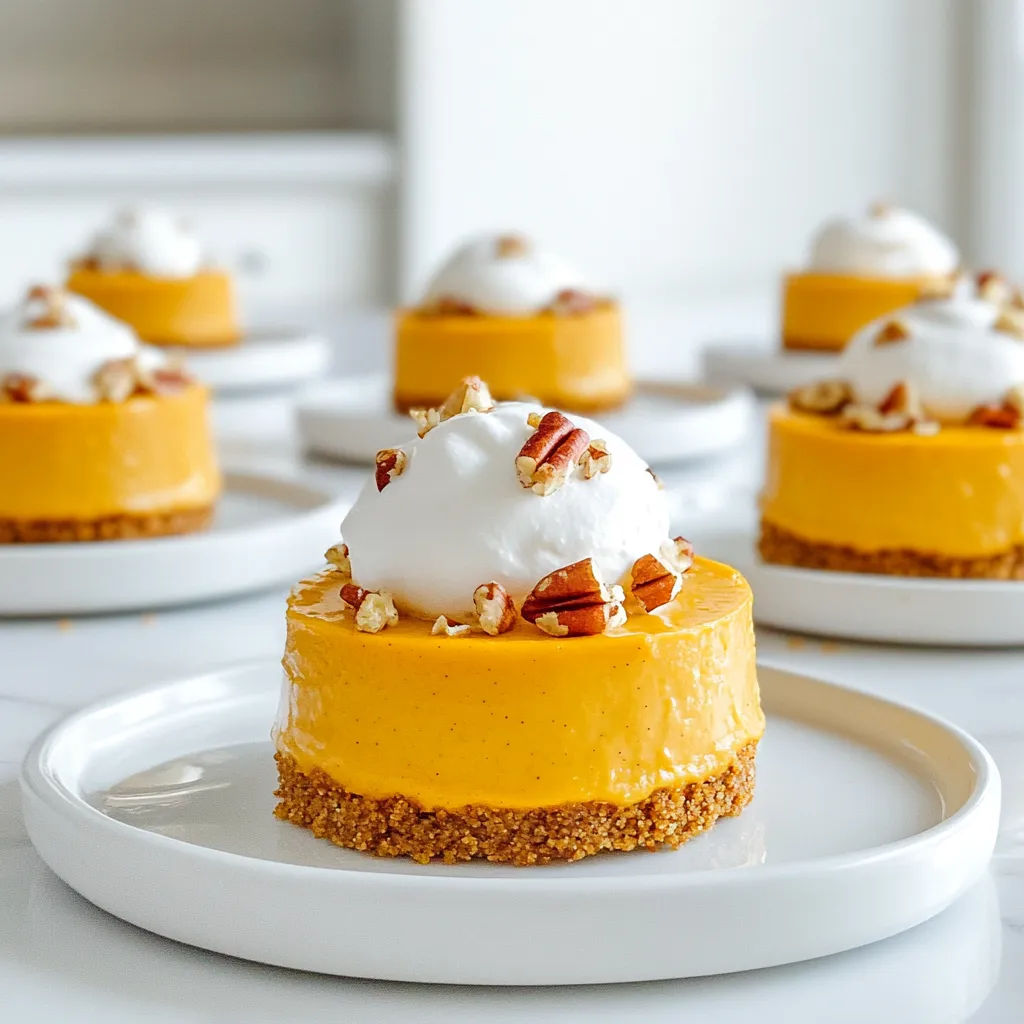
Craving a sweet treat that screams fall? These No Bake Pumpkin Spice Cheesecake Bites are your answer! They combine creamy

- 2 cups milk (dairy or non-dairy) - 1/2 cup brewed strong coffee or espresso - 1/4 cup apple cider - 2 tablespoons caramel sauce (plus extra for drizzling) - 1/4 teaspoon ground cinnamon - 1/4 teaspoon ground nutmeg - Whipped cream (for topping) - Apple slices (for garnish) - Cinnamon stick (optional, for garnish) To make a delicious Caramel Apple Spice Latte, you need just a few simple ingredients. Start with two cups of milk, which can be dairy or non-dairy. Choose what you like best! Next, brew half a cup of strong coffee or espresso. This gives your drink a rich flavor. You will also need a quarter cup of apple cider. The cider adds a sweet and fruity taste. For sweetness, use two tablespoons of caramel sauce. Don’t forget to save some for drizzling on top! You’ll also add a quarter teaspoon of ground cinnamon and a quarter teaspoon of ground nutmeg for warmth. Top your latte with whipped cream for creaminess. Finally, garnish with apple slices and a cinnamon stick if you want a fancy touch. - Dairy alternatives (almond, oat, etc.) - Sweetener options - Flavor enhancements (vanilla extract, pumpkin spice) Feel free to mix things up! You can use almond or oat milk if you prefer non-dairy options. For sweeteners, try honey or maple syrup. Want more flavor? Add a splash of vanilla extract or a pinch of pumpkin spice. These little changes can make your latte even more special! To make the best Caramel Apple Spice Latte, start with the right heating technique. Heat the milk and apple cider in a small saucepan over medium heat. Stir it gently. You want it warm, not boiling. Boiling can change the flavor and texture. Next, brew your strong coffee or espresso. Use a method you enjoy, like a French press or an espresso machine. The stronger the coffee, the better it will balance the sweet flavors in the latte. Now it’s time to assemble your drink. Pour the brewed coffee into a large mug. Slowly add the warm milk and cider mixture over the coffee. This pouring method helps layer the flavors nicely. Stir gently to blend everything together. Top your latte with a generous dollop of whipped cream. This adds creaminess and makes it look inviting. Drizzle extra caramel sauce on top. For the final touch, garnish with apple slices and a cinnamon stick if you like. Choosing the right mug can enhance your latte experience. I recommend using a large, clear mug to show off the beautiful layers. It makes the drink look as good as it tastes. For snacks or desserts, pair your latte with apple pie or cinnamon cookies. These treats complement the drink’s flavors well. Enjoy this cozy drink by a warm fire or on a chilly day for the best experience! To make your Caramel Apple Spice Latte pop, focus on the spices. Use fresh ground cinnamon and nutmeg. Fresh spices add a depth that pre-ground ones can't match. Mix a pinch of allspice or ground ginger for a kick. For a creamier texture, use whole milk or a rich non-dairy option like oat milk. Heat the milk gently to avoid boiling. This keeps it frothy and smooth. You can also whisk the milk while heating. This adds air and makes it creamier. One big mistake is overheating the milk. This can make it taste burnt and ruin your latte. Heat it slowly and watch closely. Another mistake is skipping the spices. Cinnamon and nutmeg bring warmth and flavor. Without them, your drink can taste flat. Don’t skip these key ingredients! You can easily make this drink iced or blended. For an iced version, chill the coffee and milk mixture. Pour it over ice and enjoy a refreshing twist. If you want a blended drink, add ice to your blender with the latte mix. Blend until smooth for a creamy, icy treat. You can also adjust sweetness levels. If you like it sweeter, add more caramel sauce. You can try maple syrup or honey for different flavors too. {{image_2}} You can play with the Caramel Apple Spice Latte for fun seasonal flavors. For autumn, try adding pumpkin puree. Just mix in a few tablespoons with the warm milk and cider. It gives a cozy, sweet taste that warms you right up. During the holidays, think peppermint or gingerbread. Swap a bit of caramel sauce for peppermint syrup. This twist creates a festive drink that feels like a warm hug. Or add gingerbread spice in place of cinnamon. Each option brings a new twist that makes your drink unique. Not a coffee drinker? No worries! You can make a caffeine-free version easily. Just skip the coffee and increase the apple cider to 1/2 cup. This keeps the drink warm and sweet without the jitters. You can also create an apple cider drink. Simply heat apple cider with milk and spices. This gives you a lovely drink that captures the essence of the Caramel Apple Spice Latte without any coffee. Want to adjust the recipe? It’s simple! For one cup, use 1 cup of milk, 2 tablespoons of apple cider, and 1 tablespoon of caramel sauce. This makes a perfect single serving. If you’re hosting a crowd, multiply the recipe. For a group of four, use 4 cups of milk, 2 cups of coffee, and 1 cup of cider. This way, everyone can enjoy a warm cup of this cozy drink. To store leftover syrup or cider, place it in a sealed jar. Keep it in the fridge. It will stay fresh for about a week. For milk, always keep it in the coldest part of your fridge. If you choose non-dairy milk, store it the same way. Almond, oat, and soy milk all last long when sealed tight. Yes, you can prepare components in advance. You can make the spiced milk and cider mix and store it in the fridge. Brew your coffee or espresso fresh when you're ready to serve. When reheating the milk mixture, do it slowly on low heat. This keeps all the flavors intact. Your prepared latte can last in the fridge for up to two days. After that, it may start to lose flavor and quality. Signs it’s no longer good to drink include a sour smell or off taste. Always trust your senses before enjoying your drink! You can brew coffee without a machine using simple methods. One option is the French press. Just add coffee grounds and hot water, then let it steep. Another way is to use a pour-over dripper. Place a filter, add coffee, and pour hot water slowly. You can also use instant coffee. Just mix it with hot water for a quick fix. Each method gives you a rich coffee flavor for your latte. Yes, you can make this latte vegan! Just swap dairy milk for almond, oat, or soy milk. For the caramel sauce, look for a vegan brand or make your own using coconut cream and sugar. These simple swaps keep the taste while making it plant-based. You can enjoy this cozy drink without dairy. This latte has several benefits. Apple cider contains antioxidants that help fight free radicals. Cinnamon can aid digestion and may lower blood sugar levels. If you use non-dairy milk, it can be lower in calories and fat. The whipped cream adds a bit of sweetness, but you can skip it for a lighter option. Overall, this drink can be a tasty treat with some healthy perks. You can find this latte at popular coffee chains like Starbucks and Dunkin'. They usually offer it during the fall season. The drink is often part of their special menu, so be sure to check if it’s available. Local coffee shops may also have their own version, especially around autumn. It's always nice to enjoy this drink while out with friends. In this blog post, we explored how to make a delicious Caramel Apple Spice Latte. We covered key ingredients, preparation steps, and ways to customize the drink. Remember to experiment with flavors and toppings for your perfect latte. Enjoying a warm, spiced drink can bring comfort and joy. Now, you're ready to create your own tasty versions! Share your favorite tweaks or look for new ways to enjoy this seasonal favorite.

Caramel Apple Spice Latte Delicious and Cozy Drink

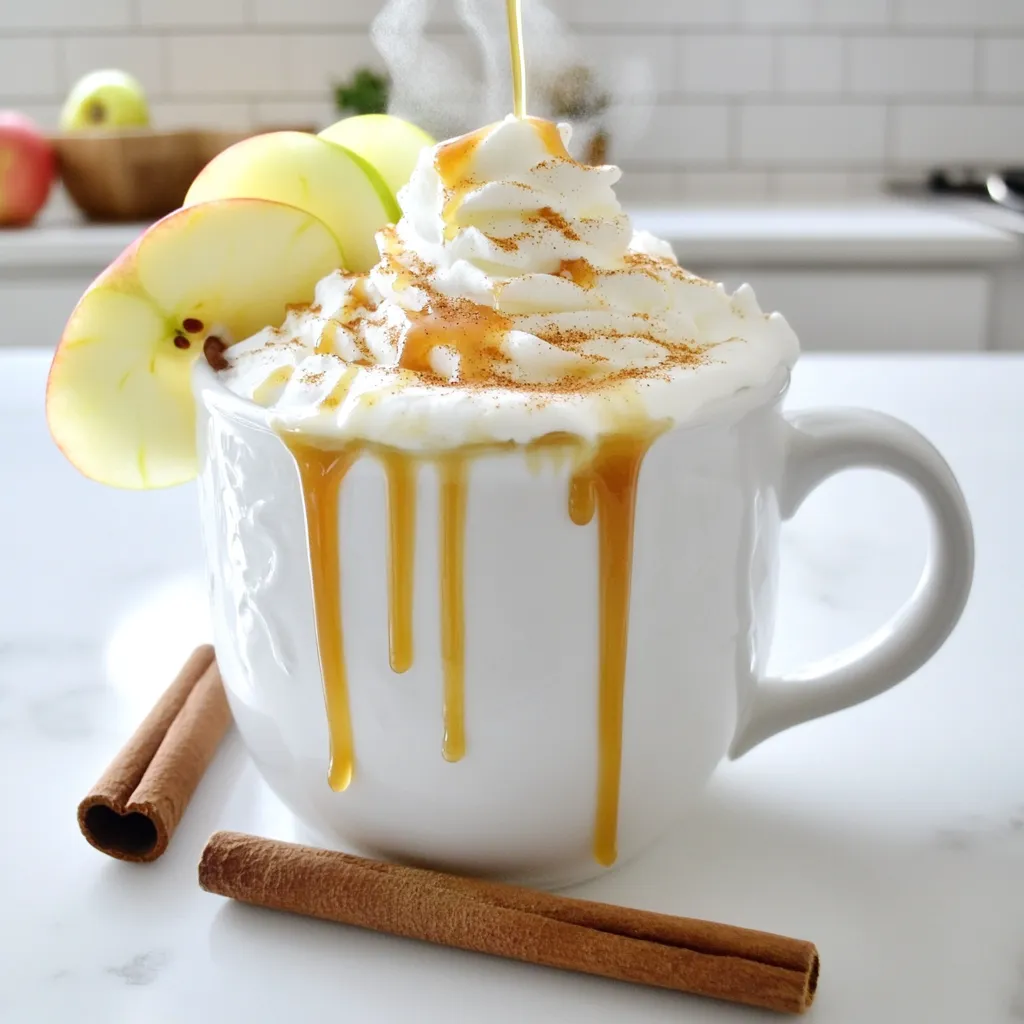
Get ready to warm your soul with a delicious Caramel Apple Spice Latte! This cozy drink blends rich coffee, creamy

To make Minute Garlic Shrimp Scampi, gather these simple ingredients: - 1 pound large shrimp, peeled and deveined - 4 tablespoons unsalted butter - 4 cloves garlic, minced - 1 tablespoon olive oil - 1 teaspoon red pepper flakes (adjust to taste) - 1 lemon, zested and juiced - ¼ cup fresh parsley, chopped - Salt and pepper to taste - 8 ounces spaghetti or linguine (optional, for serving) You can swap some fresh ingredients if needed. For shrimp, frozen shrimp works great. Just thaw it first. If you lack fresh garlic, use garlic powder. About 1 teaspoon is enough. No fresh parsley? You can use dried parsley, but use less—about 1 tablespoon. For lemon, bottled lemon juice is fine, but fresh juice tastes best. If you want less spice, skip the red pepper flakes or use a dash of paprika instead. Here are some tools to help you make the dish: - A large skillet for sautéing - A pot for boiling pasta (if using) - A sharp knife and cutting board for chopping - A spatula for mixing - Measuring cups and spoons for accuracy These tools will make your cooking smooth and easy. Enjoy the process as you create this tasty dish! First, gather your shrimp and pasta. If you choose to use pasta, cook it according to the package. Make sure to reserve ½ cup of the pasta water before draining. This helps create a nice sauce later. While the pasta cooks, peel and devein the shrimp if needed. Rinse them under cold water and pat them dry. This step helps the shrimp cook evenly. In a large skillet, heat the olive oil and 2 tablespoons of butter over medium heat. Once the butter melts, add the minced garlic and red pepper flakes. Sauté for 1-2 minutes until the garlic smells good. Be careful not to burn it, as burnt garlic tastes bitter. Next, toss in the shrimp, and season with salt and pepper. Cook the shrimp for about 2-3 minutes on each side. They should turn pink and opaque when done. Now, lower the heat and squeeze in the lemon juice and zest. Add the remaining butter and chopped parsley. Stir everything together until the butter melts and blends with the shrimp. If you cooked pasta, add it to the skillet. Use the reserved pasta water to create a light sauce. Toss until everything is mixed well. Taste it and adjust seasoning if needed. Serve the dish hot, and enjoy your lovely Garlic Shrimp Scampi! When picking shrimp, look for ones that are pink and firm. They should have a clean smell, not fishy. Fresh shrimp have a slight sheen and should feel cold to the touch. Buying shrimp that are frozen is also a great option. Just make sure they are properly thawed before cooking. To cook garlic just right, always start with medium heat. Add the minced garlic to the hot butter and oil mix. Sauté it for 1-2 minutes until it smells great. Watch closely! Burnt garlic turns bitter fast. If you’re unsure, take it off the heat early. You can always return it for a moment longer. If you like spice, add more red pepper flakes. Start with a small amount and taste. You can always add more for a kick! Other great ways to enhance flavor are adding lemon zest or fresh herbs. Try fresh basil or chives to switch it up. Experiment with these options to find your perfect balance. {{image_2}} To make a creamy garlic shrimp scampi, add heavy cream. Start by adding ½ cup of cream to the pan after you add the lemon juice and zest. This will create a rich sauce. Stir well to blend it in. This adds a nice, smooth texture and taste to the dish, making it even more satisfying. You can boost nutrition by adding vegetables. Some great choices include spinach, cherry tomatoes, or bell peppers. Add these to the skillet when you cook the garlic. They will soften but still keep their color. This also adds a pop of color to your dish, making it more appealing. For a gluten-free option, skip the pasta. Instead, serve the shrimp over zucchini noodles or cauliflower rice. Both options are low in carbs and full of flavor. If you want to keep it low-carb, just focus on the shrimp and sauce. You will still enjoy a tasty meal without the extra carbs. To keep your garlic shrimp scampi fresh, store leftovers in an airtight container. This helps to lock in flavor and moisture. Place the container in the fridge. Make sure to consume the shrimp within two days for the best taste. When reheating, avoid the microwave if you can. Use a skillet over low heat instead. This method warms the shrimp gently, keeping them tender. Add a splash of lemon juice or a bit of butter to keep the flavor bright. Stir often to avoid sticking. If you want to freeze your shrimp scampi, it’s best to do it before adding pasta. Place the shrimp and sauce in a freezer-safe bag. Remove as much air as possible before sealing. When ready to eat, thaw in the fridge overnight. Heat gently in a skillet to enjoy. Shrimp cook quickly. In total, it takes about 5 to 6 minutes. When you heat shrimp in a hot skillet, they turn pink and opaque. This shows they are done. If you overcook them, they can get tough. So, keep an eye on them as they cook. Yes, you can! Garlic Shrimp Scampi tastes great on its own. If you skip the pasta, serve it with rice or on a bed of veggies. You can even add it to salads for a fresh twist. The flavors of garlic, lemon, and shrimp shine through. There are many options to enjoy with Garlic Shrimp Scampi. Here are a few ideas: - Garlic bread to soak up the sauce - A light salad with mixed greens - Steamed broccoli or asparagus for a healthy side - Rice or quinoa for a hearty meal These sides pair well and make your meal complete. Choose what you like best! This blog post covered the ingredients, steps, tips, variations, and storage for perfect Garlic Shrimp Scampi. You learned how to choose shrimp and cook garlic just right. Adapting the recipe lets you try new flavors and suit any diet. Remember to store leftovers well for great taste later. With this knowledge, you can enjoy a delicious meal anytime. Keep cooking and have fun in the kitchen!

Minute Garlic Shrimp Scampi Quick and Flavorful Dish

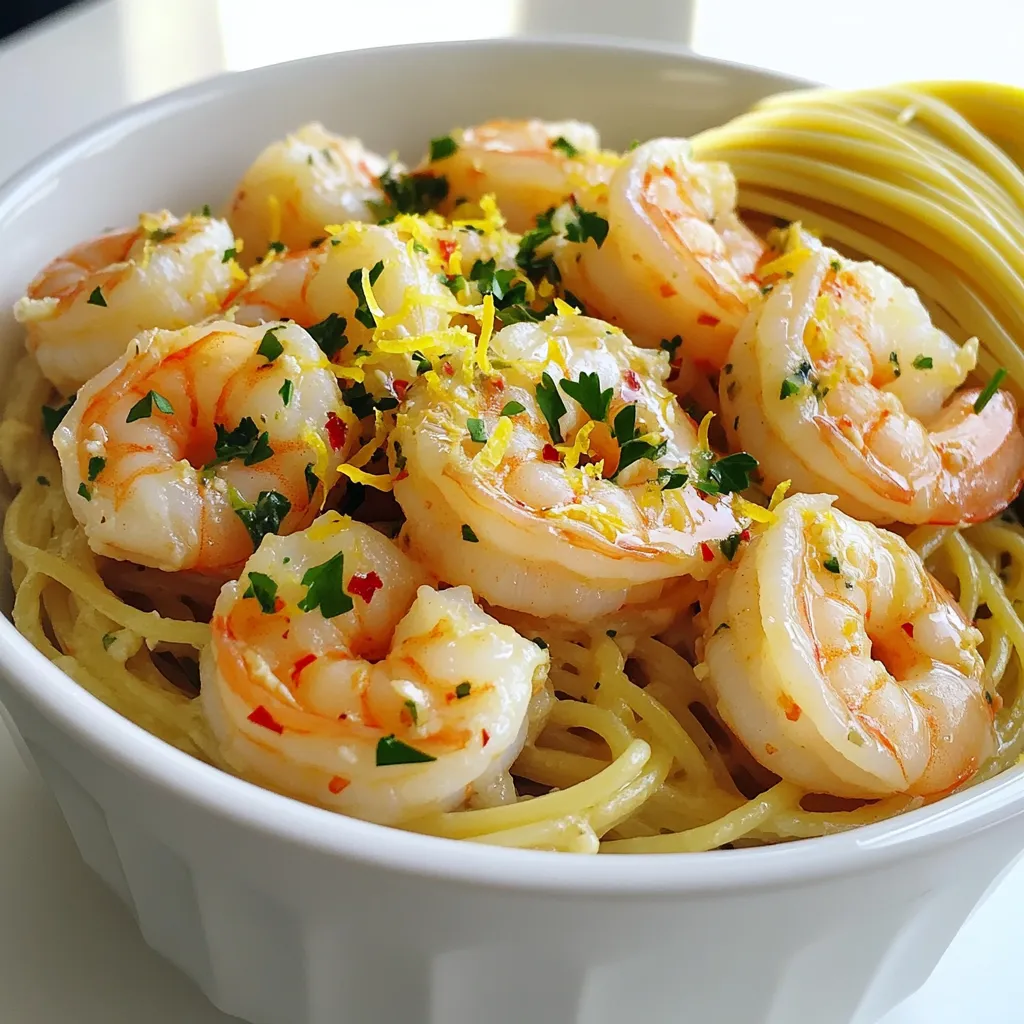
Are you craving a quick yet tasty meal? My Minute Garlic Shrimp Scampi is just what you need! With simple

For the main star, we need: - 1 medium cauliflower, cut into bite-sized florets - 1 cup all-purpose flour - 1 teaspoon garlic powder - 1 teaspoon onion powder - ½ teaspoon smoked paprika - ½ teaspoon salt - ½ teaspoon black pepper - 1 cup water (or plant-based milk) - ½ cup buffalo sauce (adjust for desired spice level) These ingredients create a tasty batter that makes the cauliflower crispy and full of flavor. To make the tacos even better, add these toppings: - 8 small corn or flour tortillas - 1 avocado, sliced - 1 cup shredded red cabbage - ¼ cup fresh cilantro, chopped - Lime wedges for serving These toppings add freshness and brightness to the spicy cauliflower. For the best tacos, you can use: - Small corn tortillas for a classic taste - Flour tortillas for a soft, chewy texture Both options work well, so choose based on your preference. Enjoy creating a perfect balance of flavors! To start, cut the medium cauliflower into bite-sized florets. This helps them cook evenly. Next, grab a large bowl. In this bowl, mix together the all-purpose flour, garlic powder, onion powder, smoked paprika, salt, and black pepper. Whisk these dry ingredients well. Once mixed, slowly add in the water or plant-based milk. Keep whisking until you form a smooth batter. This batter will coat the cauliflower nicely. Now it’s time to coat the cauliflower. Dip each floret into the batter, letting the extra drip off. Lay them on a plate lined with parchment paper. Preheat your air fryer to 375°F (190°C). Once ready, place the coated florets in the air fryer basket. Make sure to spread them out in a single layer. You might need to do this in batches. Air fry them for about 12 to 15 minutes. Halfway through, shake the basket to ensure they cook well. They should become golden and crispy. After frying, toss your hot cauliflower in a large bowl with buffalo sauce. Make sure each piece gets coated evenly. Now, warm the tortillas in a dry skillet or microwave. For each taco, place some buffalo cauliflower inside. Top it with sliced avocado, shredded red cabbage, and chopped fresh cilantro. Finally, squeeze fresh lime juice on top for an extra zing. Enjoy your tasty tacos! To get the best crispy cauliflower, start with dry florets. Moisture makes it soggy. After cutting the cauliflower, pat it dry with a towel. The batter should be thick but smooth. Dip each floret well, letting extra batter drip off. Place them in the air fryer without crowding. This helps hot air flow around each piece, making them crispy. Buffalo sauce is the star here. Choose your favorite brand or make your own. After air frying, toss the cauliflower in the hot sauce while it’s still warm. This helps the sauce stick better. If you like it spicy, add more sauce. For a milder taste, just add a little. Always taste before serving to adjust the flavor. These tacos shine with fresh toppings. Avocado adds creaminess. Shredded cabbage gives a nice crunch. Cilantro brings a fresh taste. Serve with lime wedges for a zesty kick. You can also add a side of rice or beans for a complete meal. Pair these tacos with a cold drink, like lemonade or iced tea, for a perfect summer treat. {{image_2}} You can make these tacos vegan and gluten-free easily. For the batter, swap all-purpose flour with gluten-free flour. Use plant-based milk, like almond or oat milk, to keep it vegan. Check the buffalo sauce label to ensure it is vegan-friendly. This way, you can enjoy a tasty meal without any animal products or gluten. If buffalo sauce is too spicy for you, try other sauces. A tangy barbecue sauce works well and adds sweetness. You can also use ranch or a creamy garlic dressing for a milder flavor. Mix and match sauces based on your taste. This gives you fun options to explore with each taco. Feel free to add more veggies to your tacos. Sliced bell peppers or sautéed onions bring extra flavor and color. You can also add roasted corn for a sweet crunch. The more veggies, the better! Mixing different textures makes your meal exciting and nutritious. These additions make each taco a unique experience. Store leftover buffalo cauliflower tacos in an airtight container. Make sure they cool first. Keep them in the fridge for up to three days. This helps preserve the flavors and texture, but they may get soft. To reheat, use an air fryer for the best results. Set it to 350°F (175°C). Heat the tacos for about 5 minutes. This will make them crispy again. You can also use a microwave, but the texture won't be as good. Heat them on a microwave-safe plate for 30-60 seconds. You can freeze the buffalo cauliflower before assembling the tacos. Place the cooked cauliflower in a freezer-safe bag, removing as much air as possible. It will last up to three months. When you're ready to eat, thaw it overnight in the fridge. Reheat as mentioned above before assembling the tacos. Yes, you can use frozen cauliflower. Just thaw and drain it first. Make sure to dry the florets well so the batter sticks. The cooking time might be slightly longer. Check for crispiness before serving. To tone down the heat, use less buffalo sauce. You can also add yogurt or sour cream on top. These toppings cool the spice while adding creaminess. Another option is to mix the buffalo sauce with a bit of ketchup for sweetness. The best toppings include sliced avocado, shredded cabbage, and fresh cilantro. You can also add diced tomatoes or pickled onions for extra flavor. A squeeze of lime juice brightens the taste. These toppings balance the heat of the buffalo sauce. These tacos stay fresh for about 2-3 days in the fridge. Store the cauliflower and toppings separately to keep them crisp. Reheat the cauliflower in the air fryer for best results. Enjoy them warm for a tasty meal! This post shows you how to make delicious cauliflower tacos. We covered ingredients, cooking steps, and helpful tips. You learned about toppings, sauces, and storage. You can create vegan and gluten-free options too. Cauliflower tacos are tasty, easy, and fun to make. So, gather your ingredients and start cooking! Enjoy a dish that everyone can love.

Air Fryer Buffalo Cauliflower Tacos Flavorful Treat

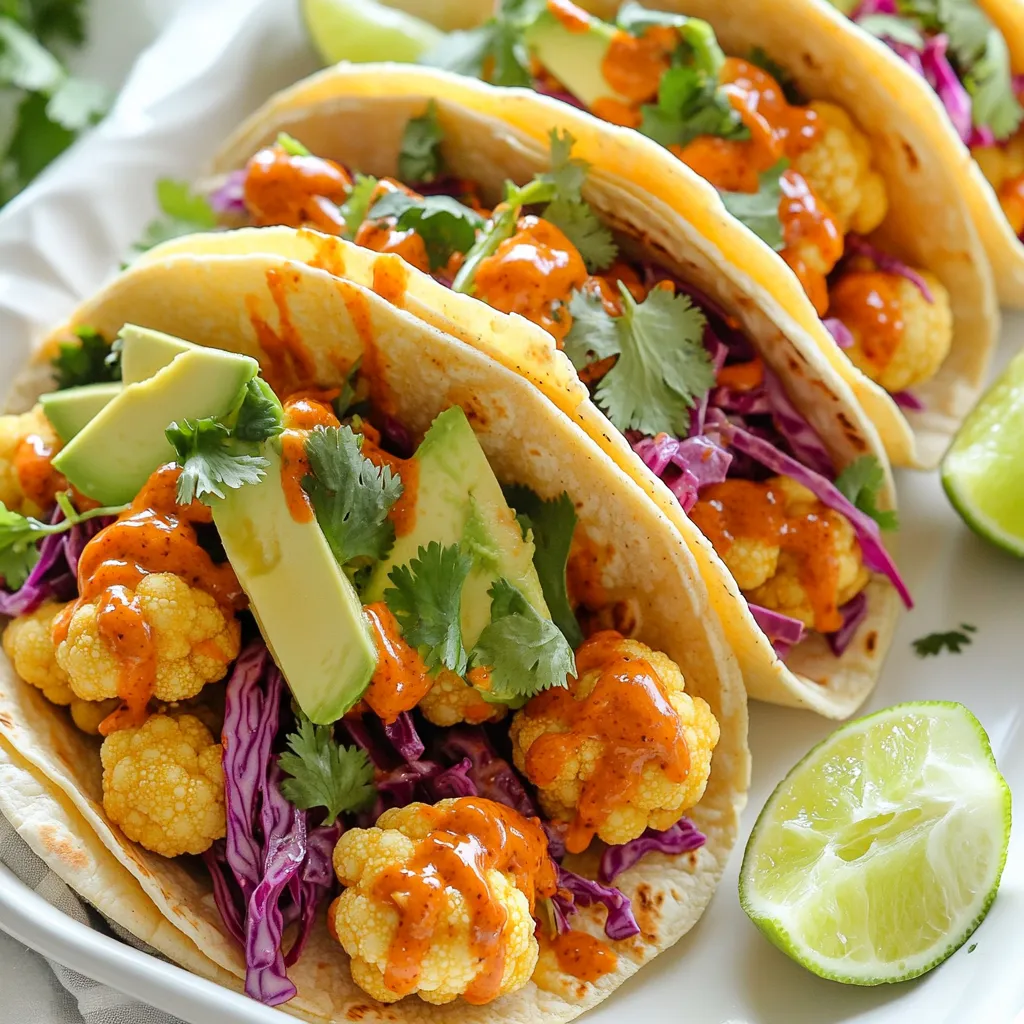
Craving a tasty twist on your taco night? Let me introduce you to Air Fryer Buffalo Cauliflower Tacos. These bites

To make these chai spiced sugar cookies, gather the following ingredients: - 2 ¾ cups all-purpose flour - 1 teaspoon baking powder - ½ teaspoon baking soda - ½ teaspoon salt - 2 teaspoons ground cinnamon - 1 teaspoon ground ginger - ½ teaspoon ground cardamom - ½ teaspoon ground cloves - 1 cup unsalted butter, softened - 1 cup granulated sugar, plus extra for rolling - ½ cup powdered sugar - 1 large egg - 1 teaspoon vanilla extract Using fresh spices is key for bold flavor. Ground spices lose potency over time. A jar of cinnamon may seem fine, but it might not pack a punch. Always check the expiry date. Fresh spices can transform your cookies from ordinary to extraordinary. They bring warmth and depth that makes your cookies shine. You can swap some ingredients if needed. Here are a few ideas: - Butter: Use coconut oil or margarine for a dairy-free option. - Egg: Replace with a flax egg (1 tablespoon flaxseed meal + 2.5 tablespoons water). - Flour: Whole wheat flour can work, but it may change the texture. - Sugar: You can use brown sugar for a richer flavor. Making these small changes allows you to fit your needs while keeping the cookies tasty. Experiment with what you have at home! Start by getting your oven ready. Preheat it to 350°F (175°C). Line two baking sheets with parchment paper. This helps the cookies not stick. A clean area helps you work faster and keeps things neat. In a medium bowl, combine the dry ingredients. Whisk together 2 ¾ cups of all-purpose flour, 1 teaspoon of baking powder, ½ teaspoon of baking soda, and ½ teaspoon of salt. Also, add 2 teaspoons of ground cinnamon, 1 teaspoon of ground ginger, ½ teaspoon of ground cardamom, and ½ teaspoon of ground cloves. Set this bowl aside. In a larger bowl, cream 1 cup of softened unsalted butter and 1 cup of granulated sugar. This should take about 3 to 4 minutes. Once fluffy, mix in ½ cup of powdered sugar until well blended. Next, add 1 large egg and 1 teaspoon of vanilla extract. Stir until everything is mixed well. Finally, add the dry mixture to the wet ingredients gradually. Mix just until combined. Chill your dough for about 30 minutes. This makes it easier to handle. Chilling helps the cookies keep their shape while baking. Don’t skip this step, as it is key for great results. Once your dough is chilled, scoop out tablespoon-sized portions. Roll each piece into balls. Roll the balls in granulated sugar before placing them on the baking sheets. Space them about 2 inches apart. Use a fork or the bottom of a glass to gently flatten each cookie. Bake them in your preheated oven for 10 to 12 minutes. Watch for light golden edges. After baking, let the cookies cool on the sheet for 5 minutes. Then, transfer them to a wire rack to cool completely. Enjoy your cookies with a warm cup of chai! To get the right texture, start with softened butter. This helps the cookies rise nicely. Beat the butter and sugar together until it is light and fluffy. This step is key. Also, remember to chill the dough for about 30 minutes. Chilling makes it easier to shape. It also helps the cookies hold their shape while baking. One mistake is skipping the chilling step. If you do, the cookies may spread out too much. Another mistake is not measuring the flour correctly. Too much flour can make the cookies dry. Use a spoon to scoop flour into your measuring cup, then level it off. Avoid overmixing the dough after adding the dry ingredients. This can lead to tough cookies. To bake evenly, make sure your oven is preheated to 350°F (175°C) before baking. Place the baking sheets in the center of the oven. If you have two sheets, rotate them halfway through. This way, all cookies get the same heat. Also, keep an eye on the cookies. Bake them until the edges are lightly golden. This usually takes about 10-12 minutes. {{image_2}} You can make these cookies even better with nuts or chocolate chips. Try adding ½ cup of chopped walnuts, pecans, or almonds. They add a nice crunch and flavor. If you love chocolate, mix in ½ cup of chocolate chips. Dark chocolate works well with chai spices. Adding these ingredients makes each bite more exciting. You can easily make these cookies vegan. Replace the unsalted butter with 1 cup of coconut oil or vegan butter. Use a flax egg instead of a regular egg. To make a flax egg, mix 1 tablespoon of ground flaxseed with 2.5 tablespoons of water. Let it sit for about five minutes until it thickens. This keeps the dough moist and fluffy. You can switch things up by adding seasonal flavors. For fall, mix in ½ cup of pumpkin puree. This makes the cookies moist and adds a warm taste. You can also add 1 teaspoon of pumpkin pie spice instead of some of the chai spices. This gives a cozy, festive twist to your chai spiced cookies. To keep your chai spiced sugar cookies fresh, store them in an airtight container. This helps prevent them from drying out. Place a piece of bread in the container. The bread keeps the cookies soft. If you want to keep them crisp, skip the bread. Always store cookies at room temperature. Avoid direct sunlight, as heat can make them stale quickly. You can freeze the dough for later use. After chilling the dough, scoop it into balls. Place the balls on a baking sheet lined with parchment paper. Freeze them for about two hours until solid. Then, transfer the frozen dough balls to a freezer-safe bag. Label the bag with the date and type of cookie. When ready to bake, just bake them straight from the freezer. You may need to add a minute or two to the baking time. Baked chai spiced sugar cookies can last up to one week when stored properly. If you want them to stay fresh longer, consider freezing them. In the freezer, they can last for up to three months. Always remember to check for any signs of spoilage before enjoying your cookies. Yes, you can make the dough ahead of time. Prepare the dough and chill it as instructed. After chilling, wrap it tightly in plastic wrap. Store it in the fridge for up to three days. You can also freeze the dough for up to three months. Just thaw it in the fridge overnight before baking. The best way to soften butter is to leave it at room temperature. Cut the butter into smaller pieces and place it in a bowl. It will soften faster this way. If you are in a hurry, you can microwave it for about 10 seconds on low power. Check it often to avoid melting. Cookies may spread too much if the butter is too warm. Ensure the butter is softened but not melted. Chilling the dough helps too. If you skip this step, the cookies may lose their shape. Also, check your measurements. Too much sugar or not enough flour can cause spreading. We covered key ingredients for your cookie recipe, emphasizing fresh spices and substitutions. You learned step-by-step methods, like mixing and chilling dough for the best texture. I shared tips to avoid common mistakes and how to enhance flavors for seasonal treats. Proper storage techniques help keep your cookies fresh longer. Remember, success lies in careful prep and practice. With these insights, you can now bake perfect cookies every time. Enjoy sharing your delicious treats!

Chai Spiced Sugar Cookies Irresistible Treat Recipe

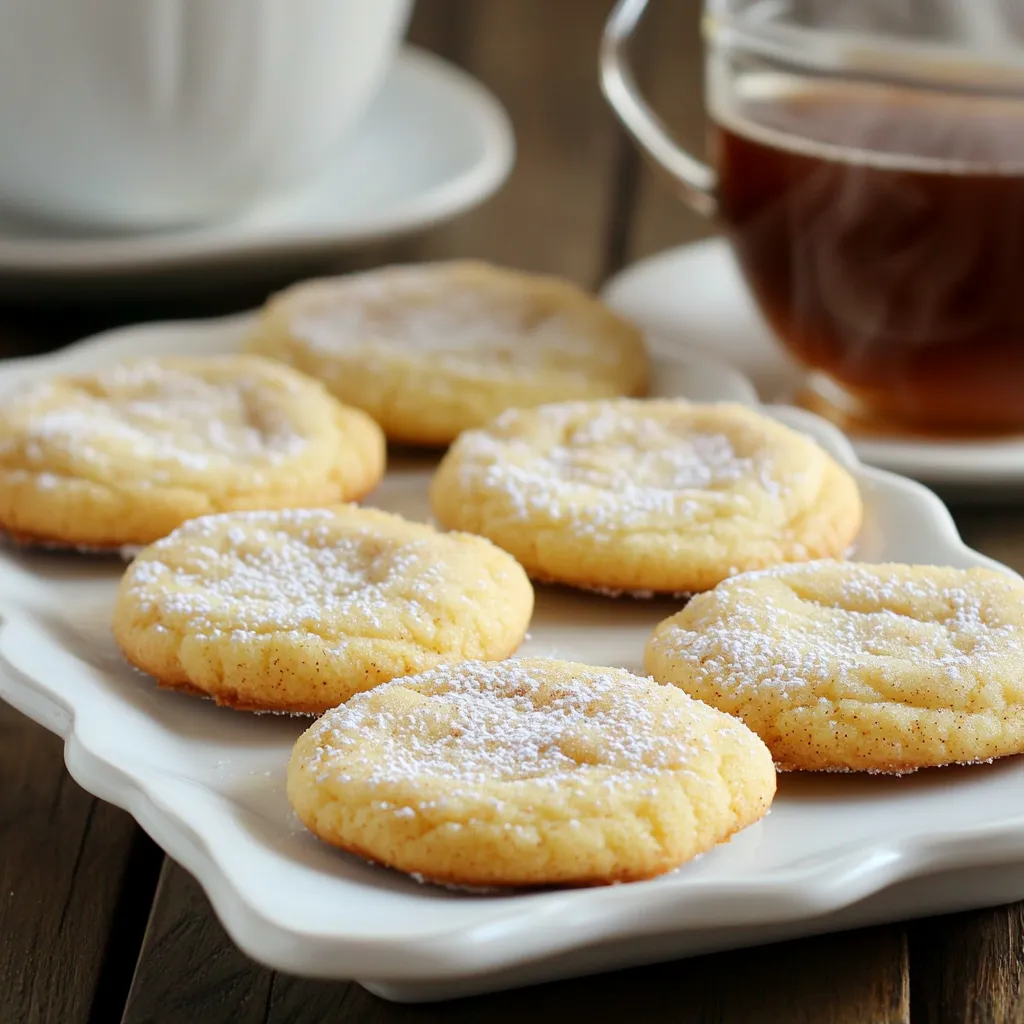
Ready to elevate your cookie game? These Chai Spiced Sugar Cookies combine warm spices with a soft, chewy texture. I’ll

- 1 cup all-purpose flour - 1/2 cup ground hazelnuts - 1/2 teaspoon baking powder - 1/4 teaspoon salt - 1/2 cup unsalted butter, softened - 1/2 cup brown sugar, packed - 1 large egg yolk - 1 teaspoon vanilla extract - 1/2 cup chocolate hazelnut spread (like Nutella) - Chopped hazelnuts for garnish These ingredients come together to create a rich, nutty cookie. The all-purpose flour provides the base. Ground hazelnuts add flavor and texture. Baking powder helps the cookies rise, while salt balances the sweetness. Softened butter and brown sugar give the cookies a chewy texture. The egg yolk adds richness, and vanilla extract enhances the overall taste. Finally, the chocolate hazelnut spread makes the cookies special. - Chopped hazelnuts - Powdered sugar for dusting - Extra chocolate hazelnut spread for dipping Garnishes are a fun way to customize your cookies. Chopped hazelnuts add crunch and a nice visual touch. Dusting with powdered sugar gives a sweet finish. Providing extra chocolate hazelnut spread for dipping makes your treat even more enjoyable. - Mixing bowls - Whisk - Baking sheet - Parchment paper - Spoon or small scoop - Wire rack for cooling Having the right tools helps make cooking easier. Mixing bowls are needed for combining the ingredients. A whisk helps mix dry and wet items well. Lining a baking sheet with parchment paper keeps cookies from sticking. A spoon or small scoop helps shape the dough into balls. A wire rack cools the cookies properly after baking. To start, preheat your oven to 350°F (175°C). This step warms your oven for baking. Next, take a medium bowl and whisk together these dry ingredients: - 1 cup all-purpose flour - 1/2 cup ground hazelnuts - 1/2 teaspoon baking powder - 1/4 teaspoon salt Set this bowl aside. In a large mixing bowl, beat together the softened butter and brown sugar. This mix should feel light and fluffy after about 2-3 minutes. Now, add one large egg yolk and 1 teaspoon of vanilla extract to the butter mix. Stir until it looks well blended. Gradually mix in your dry ingredients. Be careful here; mix just until combined. Overmixing can make the cookies tough. Once your dough is ready, scoop out tablespoon-sized portions. Roll each portion into a ball. Place these dough balls on a baking sheet lined with parchment paper. Space them about 2 inches apart to give them room to spread. Now, create an indentation in the center of each ball using your thumb or the back of a small spoon. This step is key for holding the chocolate hazelnut spread. Fill each thumbprint with about 1 teaspoon of chocolate hazelnut spread. Don’t be shy—this is where the flavor shines! For a crunchy touch, sprinkle chopped hazelnuts around the edges of each thumbprint. This adds texture and looks lovely, too. Now it's time to bake! Place your baking sheet in the preheated oven. Bake the cookies for about 12-15 minutes. Watch for the edges to turn slightly golden. When done, let the cookies cool on the baking sheet for 5 minutes. Then, move them to a wire rack to cool completely. Enjoy the delightful aroma wafting from your kitchen while they cool! To make soft cookies, use room-temperature butter. This helps mix air into the dough. Beat the butter and brown sugar until fluffy. This step adds lightness. Do not skip this part. Mix the dough just until it comes together. Overmixing can make cookies tough. The dough should be slightly sticky but not wet. This keeps the cookies soft. Stop mixing once you don’t see dry flour. For a perfect thumbprint, press gently with your thumb. Make sure not to press too hard. Aim for a deep enough indent to hold the filling. You can also use the back of a small spoon. This gives you control over the shape. Fill each thumbprint with just a teaspoon of chocolate hazelnut spread. Add chopped hazelnuts around the edge for crunch. {{image_2}} If you want a nut-free version, use sunflower seed flour instead of ground hazelnuts. It mimics the texture well. You can also swap the chocolate hazelnut spread for sunbutter. This keeps the flavor rich and creamy. Always check for nut allergies with guests. You can add a dash of cinnamon or espresso powder to the dough. This gives your cookies a warm, rich flavor. You might also try using almond extract instead of vanilla for a twist. Each addition can change the taste and make the cookies even more special. While chocolate hazelnut spread is a classic, you can get creative with fillings! Try fruit jams like raspberry or apricot for a fresh taste. Cream cheese frosting also works great if you want something rich. Each filling brings its own unique flavor to your cookies, making them fun and exciting. To keep your chocolate hazelnut thumbprint cookies fresh, store them in an airtight container. This method keeps them soft and chewy. Place parchment paper between layers to avoid sticking. Keep the container in a cool, dry place. Avoid storing them in the fridge, as this can make them hard. You can freeze these cookies for later enjoyment. First, let the cookies cool completely. Then, place them on a baking sheet in a single layer. Freeze them for about an hour. Once frozen, transfer the cookies to a freezer bag. Remove as much air as possible to prevent freezer burn. They can last up to three months in the freezer. When stored properly, these cookies last for about one week at room temperature. If you freeze them, they can last much longer. Remember to thaw them at room temperature for the best flavor. Enjoy them fresh for the best taste! Yes, you can use other nut flours. Almond flour works well in this recipe. It adds a nice flavor and texture. You can also try pecan or walnut flour. Just remember, each nut has a unique taste. So, be ready for slight changes in flavor. If you are nut-free, consider using sunflower seed flour. It gives a similar texture without nuts. To stop cookies from spreading, chill the dough first. After mixing, wrap it in plastic wrap and place it in the fridge for about 30 minutes. This helps keep the shape during baking. Also, make sure to use enough flour and nut flour. The right balance helps the cookies hold their shape. Lastly, avoid overmixing the dough, as this can make cookies spread more. Yes, you can make these cookies vegan with a few easy swaps. Replace the egg yolk with a flax egg. To make a flax egg, mix one tablespoon of ground flaxseed with three tablespoons of water. Let it sit for five minutes until it thickens. For the butter, use a vegan butter substitute. Use your favorite chocolate hazelnut spread that is dairy-free. These easy swaps keep the cookies tasty and vegan-friendly! This article covered key aspects of cookie making, from ingredients to storage. You learned about the best tools, dough preparation, and baking tips for soft cookies. I also shared variations for flavor and fillings. With proper storage, your cookies can last longer. Remember, experimenting adds fun to baking. Follow these steps to create delicious treats. Enjoy your cookie journey!

Chocolate Hazelnut Thumbprint Cookies Delightful Treat

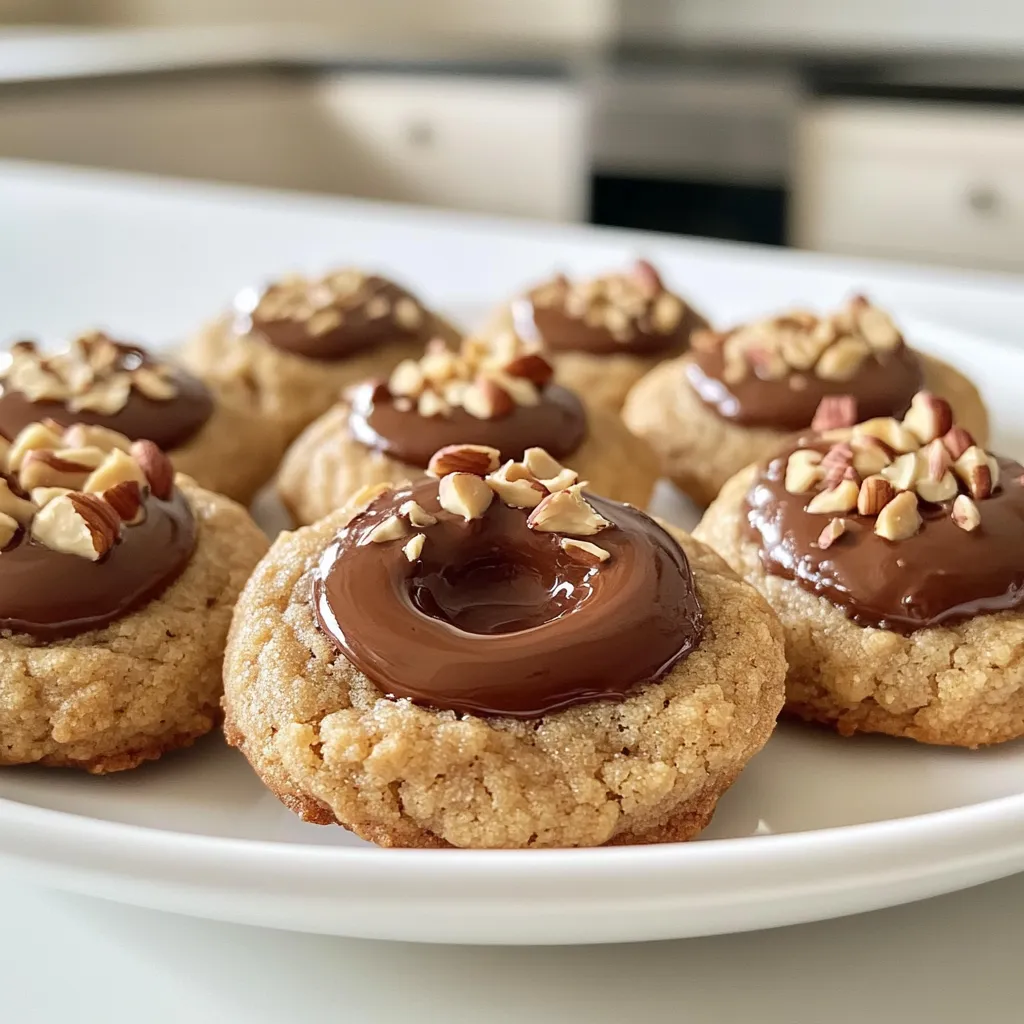
If you love cookies, you are in for a treat! Chocolate Hazelnut Thumbprint Cookies are a tasty mix of rich

To make Blackberry Sage Lemonade Popsicles, gather these fresh ingredients: - 2 cups fresh blackberries - 1 cup fresh lemonade - 1/4 cup honey or maple syrup - 4 fresh sage leaves - 1 cup water - Juice of 1 lemon These ingredients work together to create a bright, tasty treat. Fresh blackberries give a sweet and tart flavor. The lemonade adds zest, while the sage brings a unique touch. Honey or maple syrup adds sweetness, and the lemon juice enhances the overall taste. You can adjust the sweetness to your liking. If you prefer a sweeter popsicle, add more honey or syrup. For a tarter flavor, squeeze in more lemon juice. The balance of flavors in this recipe makes it fun to experiment. Using fresh, high-quality ingredients is key. Look for ripe blackberries that are deep purple. Fresh sage leaves should be vibrant and fragrant. This ensures your popsicles taste fresh and delicious. Now that you have the ingredients, you’re ready to create a refreshing treat that will keep you cool all summer long! 1. Start by bringing 1 cup of water to a simmer in a small saucepan. 2. Once the water is hot, add 4 finely chopped sage leaves. 3. Let the sage steep for about 5 minutes. This helps the sage flavor blend into the water. 4. After steeping, remove the pan from heat. Strain the sage water into a mixing bowl and discard the sage leaves. 1. In the mixing bowl, combine the sage-infused water with 2 cups of fresh blackberries. 2. Add 1/4 cup of honey or maple syrup for sweetness and 1 cup of fresh lemonade. 3. Squeeze the juice of 1 lemon into the mix for extra tartness. 4. Blend the mixture using an immersion blender or a regular blender until it is smooth. 1. Carefully pour the blackberry lemonade mixture into popsicle molds. Fill them about 3/4 full. This leaves space for expansion. 2. Insert popsicle sticks into the molds. 3. Place the molds in the freezer and let them freeze for 4 to 6 hours or until solid. 4. To release the popsicles, run warm water over the outside of the molds for a few seconds. Gently pull the popsicles out. To make your popsicles sweet, you can use honey or maple syrup. Honey adds a rich flavor, while maple syrup gives a unique twist. Start with 1/4 cup, but feel free to add more if needed. After mixing your ingredients, taste for sweetness. If it’s not sweet enough, squeeze in more lemon juice. This adds brightness and helps balance flavors. To avoid icy popsicles, blend your mixture well. Ice crystals form when there is too much water. Use an immersion blender or a regular blender for a smooth mix. Aim for a creamy texture before pouring into molds. Fill the molds about 3/4 full to allow room for expansion. This helps create the perfect popsicle shape. {{image_2}} You can make these popsicles even more fun by changing the flavors. Here are two great ways: - Substituting other berries: If you want a new taste, try using raspberries, strawberries, or blueberries instead of blackberries. Each berry adds its own flavor and color. This swap can make your popsicles bright and fresh. - Infusing with different herbs: Sage gives a unique taste, but you can try other herbs too. Mint or basil can add a refreshing twist. Just steep the fresh herbs in hot water like you did with the sage. This small change can make a big difference. You can adjust the sweetness in your popsicles with these options: - Using agave syrup: If you want a lighter sweetener, agave is a great choice. It blends well and has a mild flavor. You can switch it for honey or maple syrup in the same amount. - Exploring fruit juice options: Instead of using honey or syrup, you can try fruit juice like orange or pineapple juice. This can add sweetness and a nice fruity taste. Just make sure to adjust the total liquid amount to keep the right texture. To keep your blackberry sage lemonade popsicles fresh, place them in an airtight container. You can also wrap them in plastic wrap for added protection. Ensure they are completely frozen before storing. This prevents them from sticking together. These popsicles can last in the freezer for up to two months. After that, they may lose flavor and texture. When you're ready to enjoy your popsicles, remove them from the freezer. For quick thawing, run warm water over the outside of the molds. This helps to loosen the popsicles. You can also let them sit at room temperature for a few minutes. To serve, place the popsicles on a wooden board. Garnish with fresh blackberries and sprigs of sage for a fun touch. This not only makes them look great but adds extra flavor! Yes, you can use frozen blackberries. They work well in this recipe. Just thaw them slightly before blending. This will help them mix better. Frozen blackberries also keep their flavor and color. Popsicles take about 4 to 6 hours to freeze completely. The time may vary based on your freezer. I suggest checking them after 4 hours. They should be firm and icy. Yes, you can make these popsicles without sage. They will still taste great! If you skip the sage, try adding other herbs or flavors. Mint or basil could be refreshing alternatives. You can create tasty popsicles using fresh blackberries and sage. Start by infusing sage in hot water, then blend it with the blackberries, lemon juice, and sweeteners. Freeze your mixture in molds for a cool treat. Remember to adjust sweetness and try different flavors! In the end, these easy steps help you make a refreshing snack for everyone. Enjoy experimenting with your popsicles and share them with friends. You now have the tools to make a healthy and fun summer treat!

Blackberry Sage Lemonade Popsicles Refreshing Treat

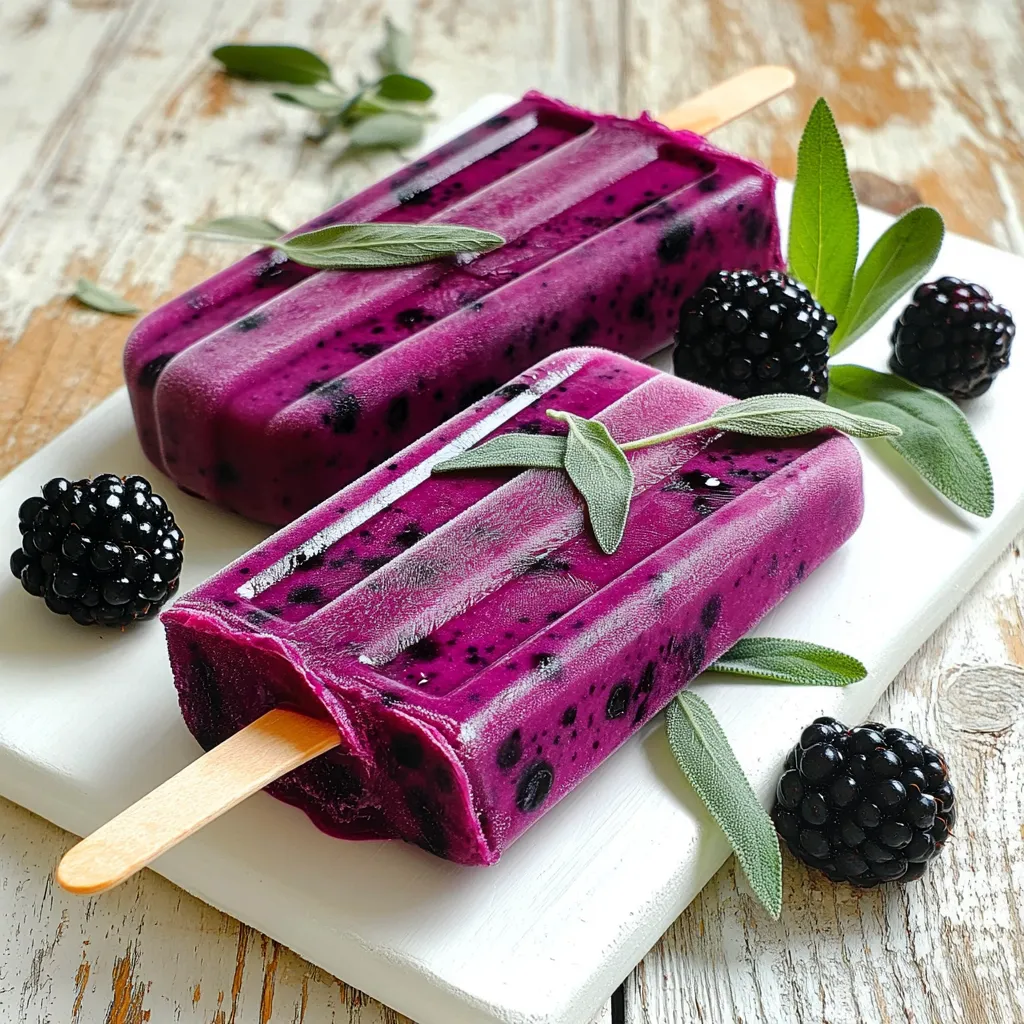
Beat the heat with my Blackberry Sage Lemonade Popsicles! These tasty treats blend sweet blackberries and fresh sage for a

- Salmon fillet: Use a 1 lb skinless and boneless salmon fillet. Fresh salmon gives the best taste. - Lettuce types for wraps: I prefer using butter or iceberg lettuce. Both types have crisp, sturdy leaves for the wraps. - Sweet chili sauce: This sauce adds a nice sweet and spicy flavor. It coats the salmon well. - Optional seasoning ingredients: You can also add soy sauce, sesame oil, grated ginger, and minced garlic. These spices deepen the flavor of the dish. - Fresh herbs and vegetables: Cilantro adds a bright touch. Thin slices of red bell pepper and julienned cucumber give extra crunch. - Serving suggestions with lime wedges: Serve the wraps with lime wedges on the side. A squeeze of lime brings out all the flavors. First, preheat your oven to 400°F (200°C). This sets the stage for cooking the salmon just right. Next, take a baking sheet and line it with parchment paper. This helps with easy cleanup and keeps the salmon from sticking. Now, let’s make the sauce mixture. In a small bowl, combine 1/4 cup sweet chili sauce, 1 tablespoon soy sauce, and 1 teaspoon sesame oil. Add 1 tablespoon of grated ginger and 2 minced garlic cloves. Mix it well. This sauce gives the salmon a sweet and spicy kick that pairs perfectly with fresh veggies. Now, place the salmon fillet on the prepared baking sheet. Pour the sauce mixture over the salmon. Make sure it’s fully covered in that tasty sauce. Bake the salmon for 15 to 20 minutes. You know it’s done when it flakes easily with a fork. This ensures the fish stays moist and flavorful. While the salmon bakes, wash and pat dry the lettuce leaves. These will hold all your yummy fillings. Once the salmon is finished, let it cool for a few minutes. Using a fork, flake the salmon into bite-sized pieces. To build your wraps, take a lettuce leaf. Place a spoonful of flaked salmon in the center. Add slices of red bell pepper and julienned cucumber on top. Finish with a sprinkle of chopped cilantro and sesame seeds. If you like, drizzle more sweet chili sauce over everything. Serve with lime wedges on the side for that extra zing. To avoid overcooking the salmon, keep an eye on the time. Bake the salmon for 15 to 20 minutes. Check it at the 15-minute mark. If it flakes easily with a fork, it's done. This ensures a moist and tasty fish. You can also grill or pan-sear the salmon. For grilling, preheat the grill and use a lightly oiled grill grate. Cook the salmon for about 4-5 minutes on each side. For pan-searing, heat oil in a skillet over medium heat. Cook the salmon for 4-6 minutes per side until golden brown. For plating, arrange the filled lettuce wraps on a large platter. Place lime wedges around the platter for color and freshness. This makes the dish look inviting. Pair your wraps with fresh fruit or a light salad. A cold drink like iced tea or a light beer works well. This can enhance the meal experience. You can add more flavor to your wraps. Consider adding sliced avocados for creaminess or jalapeño for heat. Fresh mango or pineapple can give a nice sweet touch. To adjust the spiciness, add more or less sweet chili sauce. If you want a kick, try adding sriracha or red pepper flakes. Taste as you go to find your perfect balance. {{image_2}} You can switch the salmon for chicken or tofu. Chicken breast works well. Just cook it until it’s no longer pink. For tofu, use firm tofu and press out excess water. Cut it into cubes and bake or sauté it until golden. You can also explore other seafood options. Shrimp or scallops can be great substitutes. Cook them in the same sauce for a tasty twist. Both options add a different texture and flavor to your wraps. For a vegetarian option, replace the protein with plant-based choices. Consider using chickpeas or black beans. These provide protein and fiber while keeping the dish light. Adding more vegetables can enhance your wraps. Try bell peppers, carrots, or avocado slices. They add crunch and color to your meal. You can also toss in some shredded cabbage for extra texture. You can play with sweet and spicy variations. If you like heat, add chili flakes or sriracha to the sauce. This will give your wraps a fiery kick. Using different sauces or marinades can also change the flavor. Teriyaki sauce or hoisin sauce can be great alternatives. Each sauce brings a unique taste to your dish, making it fun to experiment. To keep your sweet chili salmon lettuce wraps fresh, store them in the fridge. Place any leftover wraps in a clean container. Use a container with a tight lid to minimize air exposure. It’s best to keep the salmon and veggies separate from the lettuce. This way, the lettuce stays crisp. You can freeze the salmon and veggies, but not the lettuce. To freeze, place the salmon in a freezer-safe bag. Remove as much air as you can before sealing. For veggies, use a separate bag. When ready to eat, thaw the salmon and veggies in the fridge overnight. Reheat the salmon gently in the oven or microwave until hot. The wraps stay fresh in the fridge for about three days. After that, the quality declines. Look for signs of spoilage, like a sour smell or slimy texture. If you notice any of these, discard the wraps to stay safe. You can use many tasty options for wraps. Here are some ideas: - Collard Greens: These are sturdy and hold filling well. - Cabbage Leaves: They add a nice crunch and flavor. - Nori Sheets: Great for a sushi-like wrap. - Tortillas: For a fun twist, use whole wheat or corn tortillas. - Rice Paper: These give a fresh taste and are easy to use. Each option brings its unique flavor and texture. Choose what you like best! Yes, you can make the sweet chili salmon ahead. Here’s how: - Cook the Salmon: Follow the recipe, then let it cool. - Store: Place the salmon in an airtight container. It can last in the fridge for up to 3 days. - Reheat: Gently warm it in the oven or microwave before serving. Making the salmon ahead saves time. You can enjoy the wraps on busy days! These wraps have a mild spice level. The sweet chili sauce adds sweetness with a hint of heat. Here’s what to know: - Sweet Chili Sauce: It has a light spice. Perfect for most people. - Add More Spice: If you like heat, add sliced jalapeños or chili flakes. - Adjust to Taste: You can control the spice by adding less sauce. These wraps are a great way to enjoy flavor without too much heat. This blog post covered how to make delicious sweet chili salmon lettuce wraps. We explored the main ingredients, like fresh salmon and crispy lettuce. I shared tips on baking the salmon just right and assembling the wraps. You learned about different proteins and flavor variations, plus storage tips for leftovers. In short, this dish offers healthy options with great taste. Try these wraps for a fun meal. You can customize them to fit your taste easily. Enjoy cooking and discovering your favorite combinations!

Sweet Chili Salmon Lettuce Wraps Flavorful and Fresh

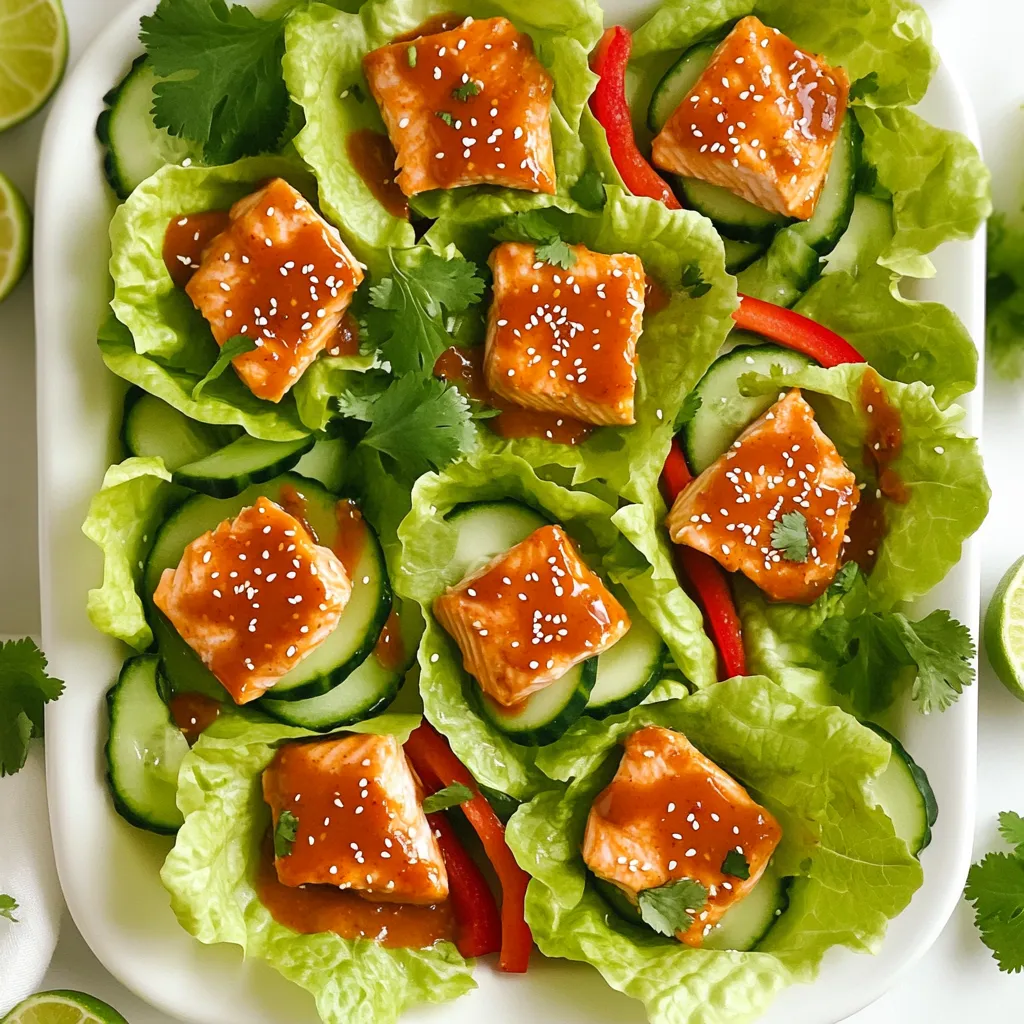
Are you ready to enjoy a burst of flavor with minimal effort? Sweet Chili Salmon Lettuce Wraps offer a fresh

To make a delicious Caramel Macchiato Icebox Cake, you need these key ingredients: - 2 cups heavy cream - 1 cup mascarpone cheese - 1/2 cup powdered sugar - 1 teaspoon vanilla extract - 1 cup strong brewed coffee, cooled - 1/2 cup caramel sauce - 24 ladyfinger cookies - 1 cup chocolate shavings for garnish - Extra caramel sauce for drizzling (optional) Each ingredient plays a big role in creating the rich flavor and creamy texture of this dessert. The heavy cream and mascarpone cheese give it a smooth and rich base. The coffee brings in that classic caramel macchiato taste. Lastly, the ladyfingers soak up the coffee and add a nice cake-like layer. You can personalize this dessert to fit your taste. Here are some optional ingredients you might consider: - A sprinkle of sea salt for a salted caramel touch - Espresso powder for a stronger coffee flavor - Flavored liqueurs like coffee or hazelnut for added depth - Fresh fruit, like sliced bananas or berries, to add freshness These options can help you create a unique version of this cake. Feel free to mix and match based on what you love. If you can’t find something on the list, don’t worry. Here are some substitutes you can use: - Swap heavy cream for whipped topping for a lighter option. - Use cream cheese instead of mascarpone if you want a tangier flavor. - Replace ladyfingers with sponge cake or graham crackers for a different texture. - Use homemade caramel sauce if you want to control the sweetness. These substitutions can make the recipe work for you, no matter the situation. Always feel free to experiment! Start by whipping 2 cups of heavy cream in a large bowl. Use an electric mixer on high speed. Whip until soft peaks form. In a separate bowl, mix 1 cup of mascarpone cheese, 1/2 cup of powdered sugar, and 1 teaspoon of vanilla extract. Blend these ingredients gently until smooth. Now, fold the whipped cream into the mascarpone mixture. Do this carefully to keep the fluffy texture. Next, take 1 cup of strong brewed coffee that’s cooled. Pour it into a shallow dish. Dip each ladyfinger cookie in the coffee briefly. Make sure they soak just a little. You don’t want them too soggy. Once dipped, place the soaked ladyfingers at the bottom of a rectangular or square baking dish. This will form your first layer. Now it’s time to build your cake. Spread a layer of the mascarpone mixture over the ladyfingers. Drizzle 1/4 cup of caramel sauce on top. Repeat the process. Add another layer of dipped ladyfingers, followed by more mascarpone, and another drizzle of caramel. Keep layering until you finish all the ladyfingers and mascarpone. End with a layer of mascarpone on top. Cover the dish with plastic wrap and refrigerate. Chill for at least 4 hours, but overnight is best. This helps the flavors mix. Before serving, garnish with chocolate shavings and extra caramel sauce if you like. To whip cream well, start with cold heavy cream. Use a clean bowl. An electric mixer on high speed works best. Whip until soft peaks form. This means the cream should hold its shape but still be smooth. Watch closely to avoid over-whipping. If you go too far, the cream can turn to butter. Dipping ladyfingers is key. Quickly soak each cookie in cooled coffee. Don't let them sit too long. A quick dip will keep them firm. If they soak too long, they become mushy. You want them soft but not falling apart. This gives the cake a nice texture. Chill the assembled cake for at least four hours. Overnight is even better. This time helps the flavors mix well. It also allows the ladyfingers to soften just right. If you rush this step, the cake may not set properly. Patience pays off, leading to a delicious dessert! {{image_2}} You can make this cake even more special by adding liqueurs. Try using coffee liqueur for a deeper flavor. You can also use hazelnut liqueur for a nutty twist. Just mix a little liqueur into your coffee before dipping the ladyfingers. This small change adds a new layer of taste. If you need a gluten-free option, use gluten-free ladyfingers. Many brands offer these cookies, and they taste great. You can also try gluten-free graham crackers. Just make sure they are firm enough to hold the layers. Soak them briefly in coffee to keep them from getting too soft. Change up the flavors to match the seasons. For fall, add pumpkin puree and spices like cinnamon and nutmeg to the mascarpone. This gives a warm, cozy feel. In winter, try peppermint extract mixed into the cream. Top with crushed candy canes for a festive crunch. Both variations keep the spirit of this cake while adding new flavors. To keep your Caramel Macchiato Icebox Cake fresh, store it in the fridge. Use an airtight container or cover it tightly with plastic wrap. This keeps the cake moist and tasty for up to three days. If you have more than you can eat, you can freeze it. Just remember, the cream layers may change a bit in texture. To freeze your icebox cake, first slice it into squares. This makes it easier to grab a piece later. Wrap each slice in plastic wrap, then place them in a freezer-safe bag. Make sure to remove as much air as possible. You can freeze the cake for up to three months. When you're ready to enjoy your frozen cake, take it out of the freezer. Let it sit in the fridge overnight to thaw slowly. If you're short on time, you can leave it at room temperature for about an hour. Once thawed, you might want to add a drizzle of fresh caramel sauce. This gives it a nice touch and makes it taste fresh again. Yes, you can make this dessert a day in advance. In fact, it tastes even better after sitting overnight. The flavors blend nicely when the cake chills for a longer time. Just cover it well with plastic wrap to keep it fresh. You can store the Caramel Macchiato Icebox Cake in the fridge for about three days. Make sure to keep it covered. After three days, it may lose its texture and taste. For best results, enjoy it within those days. Yes, you can use other cookies. If you want a gluten-free option, try almond cookies or gluten-free wafers. Just ensure they can soak up coffee without falling apart. Experimenting with different cookies can give the cake a new twist! This blog post covered how to make a Caramel Macchiato Icebox Cake. We explored essential and optional ingredients that you can use. The step-by-step guide helps you prepare, layer, and assemble the cake easily. I shared tips to whip cream well and keep ladyfingers from getting soggy. You can even try fun variations and learn the best ways to store leftovers. Enjoy this treat for any occasion, and feel free to experiment. Your cake will impress everyone with its taste and presentation!

Caramel Macchiato Icebox Cake Delightful and Easy Treat

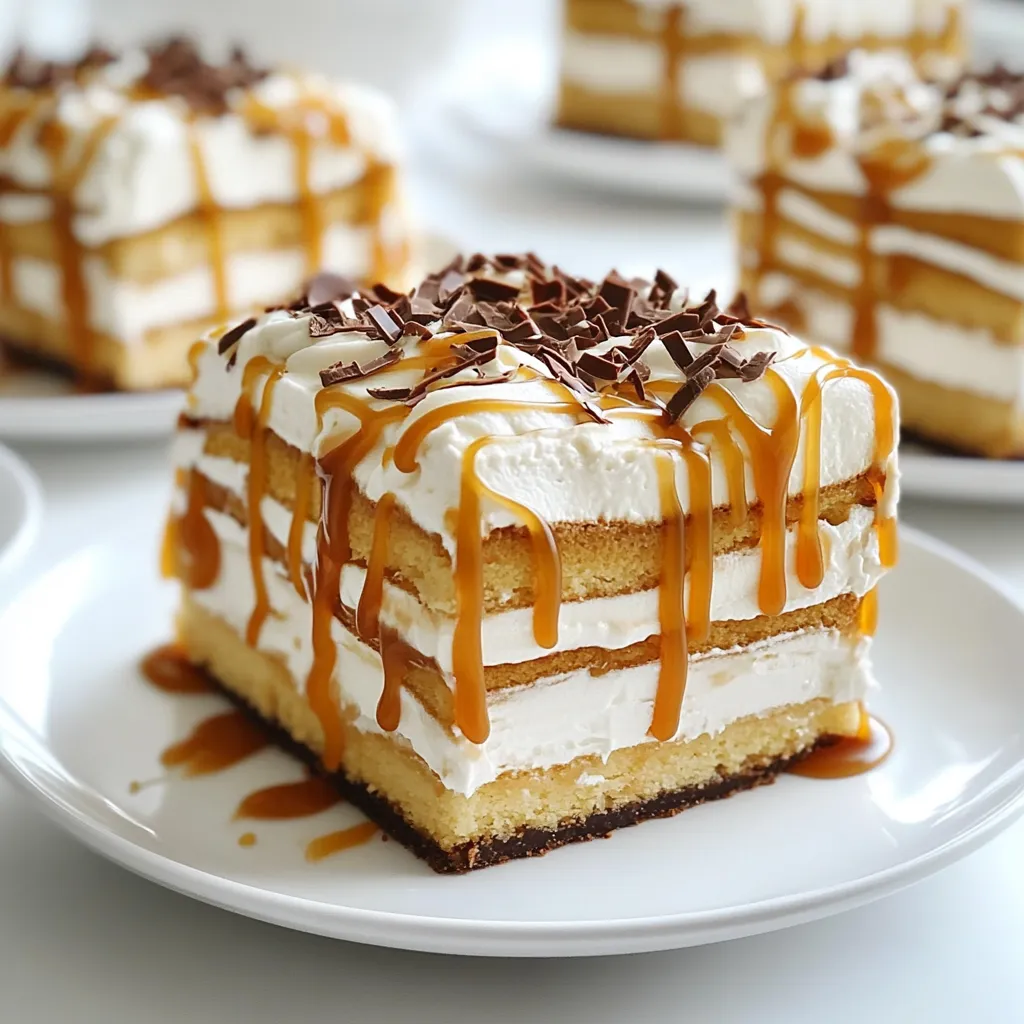
If you love coffee and dessert, you’ll adore this Caramel Macchiato Icebox Cake! This easy recipe combines rich caramel and

- 1.5 lbs baby Yukon Gold potatoes - 4 cloves garlic, minced - 1/2 cup grated Parmesan cheese - 1/4 cup olive oil - 1/4 cup heavy cream - Salt and pepper to taste - Fresh parsley, chopped - Optional: additional cheese When I think about comfort food, garlic Parmesan smashed potatoes always come to mind. These potatoes are rich, creamy, and packed with flavor. You can make them with just a few simple items. Baby Yukon Gold potatoes are perfect for this dish. They are soft and buttery. The garlic adds a nice kick, and the Parmesan cheese gives a tasty, cheesy finish. You also need olive oil, heavy cream, and salt and pepper. The olive oil helps create a crispy outside. The heavy cream makes the potatoes smooth and rich. Salt and pepper bring out the flavors of each ingredient. For a pretty finish, you can add fresh parsley on top. If you're feeling cheesy, sprinkle on more Parmesan before serving. This dish not only tastes great, but it also looks beautiful on a plate. You can serve it as a side or a main dish. 1. Boiling the potatoes: Start by placing 1.5 lbs of baby Yukon Gold potatoes in a large pot. Cover them with water and add a pinch of salt. Bring the water to a boil. Cook the potatoes until they are fork-tender, which takes about 15 to 20 minutes. 2. Draining and cooling: Once the potatoes are cooked, carefully drain them in a colander. Let them cool for a few minutes. This helps you handle them easily later. 1. Preheating the oven: While the potatoes cool, preheat your oven to 425°F (220°C). This temperature gives the potatoes a nice, crispy edge. 2. Mixing the garlic-Parmesan mixture: In a small bowl, combine 4 minced garlic cloves, 1/4 cup of olive oil, 1/4 cup of heavy cream, and 1/2 cup of grated Parmesan cheese. Add salt and pepper to taste. Mix it well until smooth. 1. Flattening the potatoes: On a lined baking sheet, place the cooled potatoes. Using a fork or potato masher, gently smash each potato. You want them slightly flattened but still intact. 2. Coating with the mixture: Drizzle or brush the garlic-Parmesan mixture over each smashed potato. Make sure they are well coated for maximum flavor. 1. Baking time and temperature: Place the baking sheet in the preheated oven. Bake the potatoes for 20 to 25 minutes. Look for crispy, golden edges as a sign they are ready. 2. Adding cheese before serving: In the last 5 minutes of baking, sprinkle any remaining Parmesan cheese on top of the potatoes. This adds an extra cheesy and delicious layer. Now you have a wonderful dish of Garlic Parmesan Smashed Potatoes ready to impress! Enjoy your cooking! To make the best smashed potatoes, start with baby Yukon Gold potatoes. They have a creamy texture that shines when cooked. Their natural buttery taste pairs perfectly with garlic and Parmesan. You can also try red potatoes if you prefer a different flavor. Achieving crispy edges is key. After smashing the potatoes, brush them with the garlic-Parmesan mixture. Bake them at 425°F (220°C). The high heat helps crisp the edges. For extra crunch, sprinkle more Parmesan cheese in the last few minutes of baking. Smashed potatoes are great with many dishes. They pair well with grilled meats, roasted vegetables, or a fresh salad. Consider serving them alongside a juicy steak or a nice piece of salmon for a hearty meal. For presentation, serve the smashed potatoes on a large platter. Drizzle any leftover garlic-Parmesan mixture on top. Finish with fresh parsley for color. This makes the dish look inviting and appetizing. If you need to make this dish gluten-free, you’re in luck. All the ingredients in this recipe are naturally gluten-free. Just ensure your Parmesan cheese is gluten-free as well. For dairy-free options, you can swap out the heavy cream with unsweetened almond milk or coconut cream. Use a dairy-free cheese to replace the Parmesan. This keeps the flavor while making it suitable for those who avoid dairy. {{image_2}} Adding herbs and spices can lift the flavor of your garlic Parmesan smashed potatoes. Consider using fresh rosemary, thyme, or chives. A sprinkle of paprika can bring warmth and color, too. For cheese variations, try mixing in mozzarella or cheddar. Cheese adds a creamy texture and rich taste. You can even use feta or goat cheese for a tangy twist. You can easily incorporate other vegetables into this dish. Chopped spinach or kale adds color and nutrients. Roasted bell peppers also bring a sweet taste. Combining with roasted garlic provides an extra punch of flavor. Roasting garlic mellows its bite and enhances its sweetness. Simply add it to the garlic-Parmesan mixture before brushing it on. For individual servings, use small ramekins or mini cast-iron skillets. This makes each portion feel special. You can also top them with a dollop of sour cream or a sprinkle of bacon bits. Smashed potato bowls are a fun way to serve this dish. Start with a base of smashed potatoes and layer toppings like cheese, sour cream, or chives. This style invites creativity and personal touches. To keep your Garlic Parmesan Smashed Potatoes fresh, store them in an airtight container. Place them in the fridge if you plan to eat them within a few days. This method helps maintain flavor and texture. For longer storage, you can freeze the potatoes. Just make sure they cool completely before freezing. Spread them on a baking sheet to freeze individually, then transfer to a freezer bag. This way, they won’t stick together. When it's time to enjoy your leftovers, the best method is to reheat them in the oven. Preheat your oven to 350°F (175°C) and place the potatoes on a baking sheet. Bake for about 15-20 minutes until they're hot and crispy again. You can also use a microwave for quick reheating, but this may make them softer. If you choose the microwave, heat in short bursts and check often. Garlic Parmesan Smashed Potatoes stay fresh in the fridge for about 3-5 days. If frozen, they can last for about 2-3 months. Always check for signs of spoilage. If the potatoes smell off or have a strange texture, it’s best to toss them. Enjoying them fresh is always the best way! You can prepare the potatoes a day before. Boil and smash them as usual. After smashing, store them in the fridge. On the day you want to serve, brush on the garlic-Parmesan mix and bake. This keeps the flavor fresh. Yes, you can try different cheeses. Cheddar or feta can add a nice twist. Just remember, the flavor will change a bit. Experiment and find your favorite mix! If you lack heavy cream, use whole milk or sour cream instead. Both options work well and keep the potatoes creamy. Adjust the amount based on your desired creaminess. Absolutely! Garlic Parmesan smashed potatoes store well in the fridge. Make a big batch and reheat when you need. They stay tasty for about four days. Yes, you can make it vegan! Substitute olive oil for butter and use a plant-based cream. Nutritional yeast can replace Parmesan cheese. This way, you keep the flavor but make it vegan-friendly. In this article, we explored how to make delicious Garlic Parmesan Smashed Potatoes. We covered the key ingredients, step-by-step cooking instructions, and helpful tips to perfect your dish. You can enhance flavors with spices or different cheeses. Don't forget about presentation and serving options. As you try this dish, remember that experimenting can lead to the best flavors. Enjoy your cooking journey!

Garlic Parmesan Smashed Potatoes Comfort Food Delight

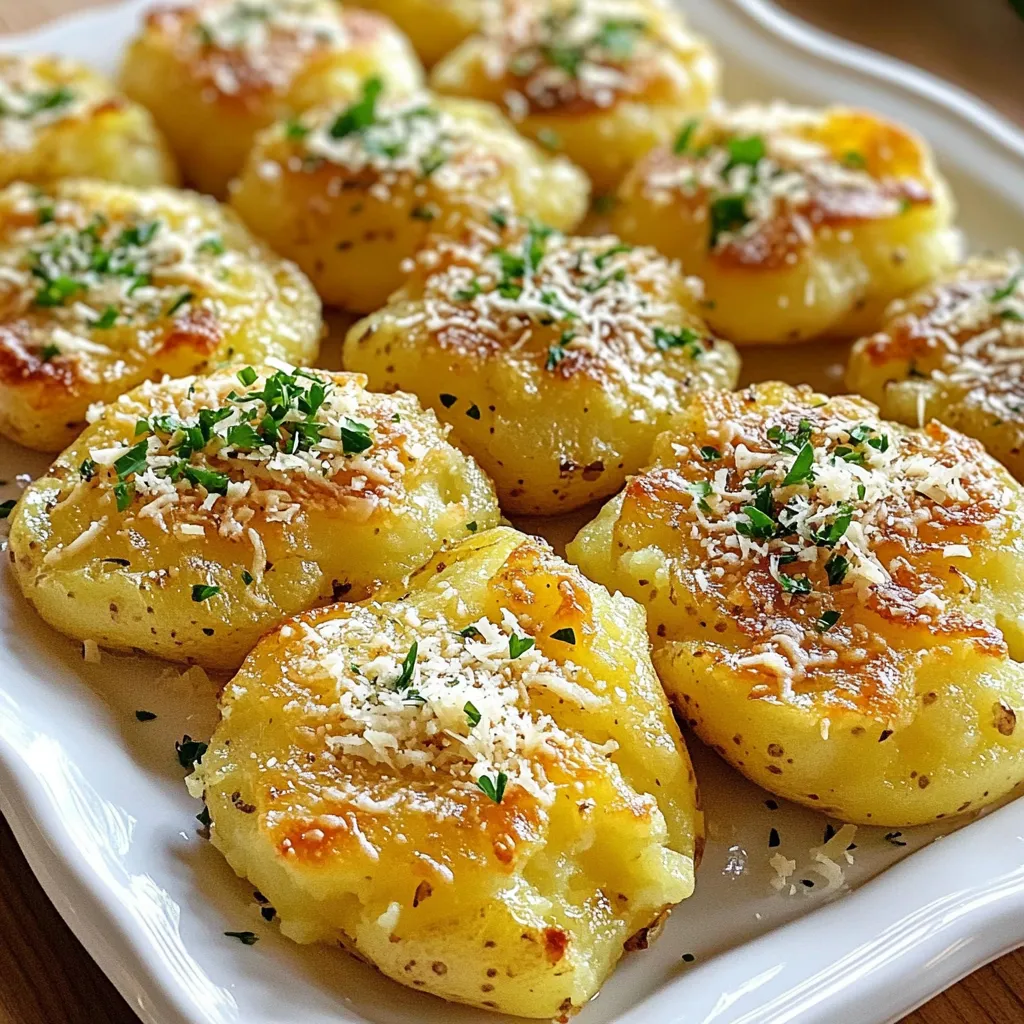
Are you ready for a comfort food delight? Garlic Parmesan Smashed Potatoes are here to steal the show! Bursting with

Older posts
Newer posts
← Previous Page1 … Page4 Page5 Page6 … Page86 Next →

dsad

© 2026 Cooking Wells • Built with GeneratePress

Our Policies

  • Copyright Policy
  • Cookie Policy
  • GDPR Policy
  • Privacy Policy
  • Disclaimer
  • Terms Of Use

More Information

  • Home
  • About
  • Contact
  • Appetizers
  • Dessert
  • Dinner
  • Drinks
©2026, Cooking Wells About Back To Top