Skip to content
DisclaimerTerms Of UseGDPR PolicyCookie Policy

Cooking Wells

  • Home
  • Drinks
  • Appetizers
  • Dinner
  • Dessert
  • About
  • Contact
  • Privacy Policy
DisclaimerTerms Of UseGDPR PolicyCookie Policy

NO-ING-IMG

- 1 cup milk chocolate chips - 1/2 cup white chocolate chips - 1/2 cup cocoa powder - 1/2 cup mini marshmallows - 1/4 cup crushed peppermint candy (optional for extra flavor) To make hot chocolate bombs, you need some simple ingredients. First, gather the milk chocolate chips. They create a rich outer shell. Next, use white chocolate chips for a sweet surprise inside. Cocoa powder adds that classic chocolate flavor. Don’t forget the mini marshmallows! They bring a fun texture and sweetness. You can also add crushed peppermint candy for a holiday twist. These ingredients are easy to find at most stores. You can even customize your bombs with other flavors. Try adding different toppings or flavorings. You can make them unique every time! For the full recipe, you can refer to the Hot Chocolate Bombs section. Enjoy making these delicious treats! To start, you need to melt your milk chocolate chips. Place one cup of chocolate chips in a microwave-safe bowl. Heat it in the microwave for 30 seconds. Stir well after each interval until it is smooth. This keeps the chocolate from burning. Next, prepare your silicone mold. Make sure it is clean and dry. The mold should preferably be sphere-shaped for the best hot chocolate bombs. Now, we coat the mold with melted chocolate. Use about one tablespoon of the melted milk chocolate for each cavity. Use the back of your spoon to coat the sides. Make sure the edges are thicker. This will help keep your bombs intact. After coating, place the mold in the fridge for about 15 to 20 minutes. This allows the chocolate to harden properly. Once set, carefully remove the chocolate shells from the mold. Next, fill half of the chocolate spheres. Add one heaping tablespoon of cocoa powder, some mini marshmallows, and a sprinkle of crushed peppermint if you like. To seal the bombs, warm a plate in the microwave for a few seconds. Take an empty chocolate half and press it on the plate to melt the edge slightly. Quickly place it on top of the filled half and press gently to seal it. Let your hot chocolate bombs cool completely. This ensures they hold their shape. Once cooled, store them in an airtight container. Keep them in a cool, dry place until you are ready to enjoy. When you want to enjoy one, place it in a mug. Pour hot milk over it and stir. Watch as it melts into a delicious hot chocolate drink. For the full recipe, refer to the initial list of ingredients and instructions. To make the best hot chocolate bombs, you need to melt chocolate well. Here are some simple tips: - Use a microwave-safe bowl for melting. - Heat the chocolate in 30-second bursts. - Stir the chocolate between each burst to avoid burning. - If the chocolate gets too thick, add a bit of vegetable oil. A smooth finish is key to great bombs. Make sure your chocolate is fully melted and glossy. If you see any lumps, keep stirring. If you need to, heat it a bit more. Get creative with your hot chocolate bombs! Here are some fun flavor ideas: - Try adding a dash of cinnamon or nutmeg for warmth. - Mix in some caramel or hazelnut for a sweet twist. - Use orange zest for a bright, fresh taste. You can also add seasonal decorations. For winter, use white chocolate drizzle or sprinkles. For Valentine’s Day, try heart-shaped decorations. Each bomb can be unique and fun! When it's time to enjoy your hot chocolate bombs, think about your milk choice. Here are my favorites: - Whole milk makes it rich and creamy. - Almond milk gives a nice nutty flavor. - Oat milk is great for a dairy-free option. For a fun serving idea, set up a hot chocolate bar at your next gathering. Let guests choose their favorite bomb, milk, and toppings. This makes every cup special and personal. For the complete recipe, check the [Full Recipe]. {{image_2}} You can make hot chocolate bombs in fun flavors. One option is pumpkin spice. This flavor adds warm spices like cinnamon and nutmeg. Just mix in some pumpkin spice with your cocoa powder. It's great for fall! Another delicious flavor is salted caramel. You can add caramel sauce to the inside of the bomb. A sprinkle of sea salt on top gives it a sweet-salty taste. Both these flavors make your hot chocolate unique and tasty. If you want vegan hot chocolate bombs, use dairy-free chocolate. Replace milk chocolate chips with a vegan option. You can also use almond or oat milk for your drink. This way, everyone can enjoy them! For gluten-free options, be sure to check the labels on your ingredients. Most chocolate and cocoa powders are gluten-free. You can make these bombs safe for those who can't have gluten. Make your hot chocolate bombs festive! For Christmas-themed bombs, use red and green sprinkles. You can also add peppermint extract or crushed candy canes inside. This adds a nice holiday touch. For Valentine's Day, try using pink or red chocolate. Fill the bombs with heart-shaped marshmallows. These special touches make your bombs perfect for sharing with loved ones. You can find the full recipe in the section above and create these fun variations at home! To keep your hot chocolate bombs fresh, use an airtight container. This helps to keep moisture out and preserves their taste. A glass jar or a plastic storage box works well. Make sure the container is clean and dry before you store the bombs. Store your hot chocolate bombs in a cool, dry place. The best temperature is around 68°F to 70°F (20°C to 21°C). Avoid areas that get hot, like near the stove or in direct sunlight. Hot chocolate bombs can last for about two weeks if stored correctly. You can enjoy them fresh or keep them for a cozy treat later. Watch for signs of spoilage. If you see any white spots or if they smell off, it’s best to throw them away. Chocolate can bloom when it absorbs moisture, which affects taste and texture. Always check your bombs before you use them for a tasty cup of hot chocolate. For the full recipe, check out the detailed instructions above. Hot chocolate bombs are fun treats. They are chocolate shells filled with cocoa mix and marshmallows. When you add hot milk, they melt and create a creamy drink. This treat became popular in recent years, with recipes shared online. People love how they look and taste. Yes, you can find hot chocolate bombs in many places. Local shops or bakeries often sell them. You can also buy them online from specialty stores or large retailers. Look for ones with good reviews to ensure quality. Using hot chocolate bombs is easy. Place one bomb in a mug. Then, pour hot milk over it. Stir well to mix everything. You will see the bomb melt, releasing the cocoa and marshmallows. Enjoy your warm drink! Kids can help make hot chocolate bombs. However, they should be careful with hot chocolate and melting chocolate. Here are some tips for safety: - Adult supervision is a must when melting chocolate. - Use microwave-safe bowls to avoid burns. - Be cautious with the molds, as they can be slippery. Making hot chocolate bombs can be a fun family activity! In this blog post, you learned how to create hot chocolate bombs. We covered all the needed ingredients and provided simple steps to melt chocolate and assemble the bombs. You also saw tips for customizing your treats and storage advice. Hot chocolate bombs are not just fun to make; they are delicious to share. With different flavors and themes, you can impress anyone. Enjoy making these tasty treats and let your creativity shine!

Hot Chocolate Bombs Delightful and Fun to Make

Hot chocolate bombs are the perfect treat for chilly days! These tasty treats are not just delicious; they’re fun to

- 1 ½ cups all-purpose flour - 1 teaspoon baking powder - 1 teaspoon baking soda - ½ teaspoon salt - 2 teaspoons ground ginger - 2 teaspoons ground cinnamon - ½ teaspoon ground nutmeg - ½ cup unsalted butter, softened - 1 cup brown sugar - 2 large eggs - 1 teaspoon vanilla extract - ½ cup buttermilk - ½ cup brewed coffee, cooled When making Gingerbread Latte Cupcakes, I always start with fresh ingredients. They add the best flavor and texture. The all-purpose flour gives the cupcakes a nice base. Baking powder and baking soda ensure they rise well. The salt balances the sweetness. Spices are key for the gingerbread flavor. Ground ginger, cinnamon, and nutmeg bring warmth and cheer. I like to use high-quality ground spices for the best taste. Softened butter makes the batter creamy and rich. Brown sugar adds moisture and a hint of caramel flavor. Eggs help bind everything together. Vanilla extract adds a sweet note, while buttermilk keeps the cupcakes soft. Lastly, brewed coffee brings depth to the taste, tying the gingerbread and latte flavors together. - Cream cheese frosting - Crushed gingerbread cookies For the frosting, I recommend cream cheese. It pairs well with the spices. It adds a tangy note that balances the sweetness of the cupcakes. Top each cupcake with a sprinkle of crushed gingerbread cookies. They add a fun crunch and enhance the festive look. If you want the full process, check out the Full Recipe. You’ll find all the steps to create these delightful treats. Enjoy your baking! 1. Preheat the oven: Start by setting your oven to 350°F (175°C). This helps the cupcakes bake evenly. 2. Prepare the muffin pan: Line a muffin pan with cupcake liners. This keeps the cupcakes from sticking and makes cleanup easier. 1. Combine dry ingredients: In a medium bowl, whisk together the flour, baking powder, baking soda, salt, ginger, cinnamon, and nutmeg. Mix until well combined. This step adds flavor and helps the cupcakes rise. 2. Cream butter and sugar: In a large bowl, cream the softened butter and brown sugar together until light and fluffy. This takes about 2-3 minutes. A good cream makes your cupcakes tender. 1. Add eggs and vanilla: Add the eggs one at a time, mixing well after each addition. Then stir in the vanilla extract. This gives your cupcakes a rich flavor. 2. Alternate dry ingredients and buttermilk: Gradually add the dry mixture and buttermilk to the butter mixture. Start and end with the dry ingredients, mixing until just combined. This keeps the batter light. 1. Fold in cooled coffee: Gently fold in the cooled brewed coffee into the batter. This adds a lovely coffee flavor to your cupcakes. 2. Fill cupcake liners and bake: Spoon the batter into the prepared cupcake liners, filling each about two-thirds full. Bake in the preheated oven for 18-20 minutes. Check with a toothpick; it should come out clean. 1. Cool in the pan and on a wire rack: Let the cupcakes cool in the pan for about 5 minutes. Then transfer them to a wire rack to cool completely. This helps them stay moist and fluffy. For the full recipe, check the detailed instructions on how to make these delightful treats. To make fluffy cupcakes, use room temperature ingredients. Start with your eggs and butter. When they mix with sugar, they create air. This air makes your cupcakes light. Another key is not to overmix. Mix just until your batter is combined. Overmixing makes your cupcakes dense. Frosting your cupcakes can be fun! Use a piping bag for a pretty swirl. If you don’t have one, a zip-lock bag works, too. For a smooth finish, make sure your frosting is soft. If it’s too thick, add a splash of milk. This helps it spread easily on top of your cupcakes. Want more spice? Try adding a pinch of ground cloves or allspice. These spices boost the warm flavors in your cupcakes. For coffee, use a rich brew. Dark roasts add depth. If you prefer something lighter, a medium roast works well, too. For the full recipe, check the details above! {{image_2}} You can switch up the frosting for your Gingerbread Latte Cupcakes. Cream cheese frosting is a classic choice. It adds a rich flavor that pairs well with gingerbread. You can also try a maple frosting for a nice twist. Maple adds sweetness and warmth. If you want vegan options, use coconut cream instead of butter. Blend it until smooth and add powdered sugar. You can make a simple vanilla vegan frosting too. Just mix vegan butter with vanilla and sugar. If you need gluten-free cupcakes, swap all-purpose flour for almond or oat flour. Both work well and add a nice flavor. You can also use a gluten-free blend, which gives a similar texture. For those who are dairy-free, replace buttermilk with almond milk. Add a splash of lemon juice to mimic the tang of buttermilk. This keeps your cupcakes moist and tasty without dairy. Want to make mocha cupcakes? Fold in some chocolate chips into the batter. This adds a deep chocolate flavor that complements the coffee notes. You can also play with spices. Try adding a pinch of cardamom or allspice for an extra kick. These spices add depth and warmth, perfect for the holidays. Experiment and see which flavors you love best! Store your baked Gingerbread Latte Cupcakes at room temperature. Keep them in an airtight container. This helps keep them moist. They can last for about three days this way. If you want to keep them fresh longer, place a piece of bread in the container. The bread adds moisture and helps the cupcakes stay soft. For long-term storage, you can freeze the cupcakes. First, let them cool completely. Then, wrap each cupcake in plastic wrap. Place the wrapped cupcakes in a freezer-safe bag or container. They can stay in the freezer for up to three months. When you’re ready to eat them, take out what you need. Thaw them in the fridge overnight. For a quicker method, leave them at room temperature for 1-2 hours. Avoid using a microwave, as it can make them dry. To check if your cupcakes are fresh, look for signs of spoilage. If they smell off or look moldy, throw them away. A simple way to test them is by touching the cupcake. If it feels hard or dry, it may not taste good. Enjoy your Gingerbread Latte Cupcakes while they are fresh for the best flavor! Making these cupcakes is fun and simple! First, gather all your ingredients. Then, preheat your oven to 350°F (175°C). Line a muffin pan with cupcake liners. In a medium bowl, mix the flour, baking powder, baking soda, salt, and spices. In another bowl, cream softened butter and brown sugar until fluffy. Add eggs and vanilla. Alternate mixing in the dry ingredients and buttermilk. Finally, fold in brewed coffee. Fill the cupcake liners and bake for 18-20 minutes. Let them cool before frosting. Yes, you can use instant coffee! Instant coffee gives you a strong flavor. Just mix two teaspoons of instant coffee with half a cup of hot water. This is a good substitute for brewed coffee. However, brewed coffee often adds a smoother taste. I recommend sticking with brewed coffee for the best flavor in your cupcakes. You can add a lot of fun touches! Use cream cheese frosting and sprinkle crushed gingerbread cookies on top. Add colorful holiday sprinkles for a festive look. Decorating with tiny candy canes or chocolate shavings can also be fun. Serve these cupcakes on a pretty platter for a holiday feel. Yes, you can make vegan adaptations! Use plant-based butter instead of regular butter. Replace eggs with flax eggs or applesauce. Use almond milk or soy milk in place of buttermilk. Ensure your coffee is also vegan. These swaps will keep the flavor while making them vegan-friendly. Pair these cupcakes with a warm cup of coffee or tea. For a holiday treat, serve with hot chocolate. You can also enjoy them with a scoop of vanilla ice cream. These pairings enhance the cozy flavors of the cupcakes. Yes, you can find the Full Recipe for Gingerbread Latte Cupcakes. Follow the detailed instructions for perfect results! In this post, we explored how to make delicious Gingerbread Latte Cupcakes. You learned about the key ingredients needed, along with step-by-step instructions. We also shared tips for perfecting your bake and ideas for variations to try. Remember, you can customize these cupcakes with different frostings and flavors. Feel free to experiment while baking. Enjoy your time in the kitchen, and share your creations with friends and family!

Gingerbread Latte Cupcakes Delightful Holiday Treat

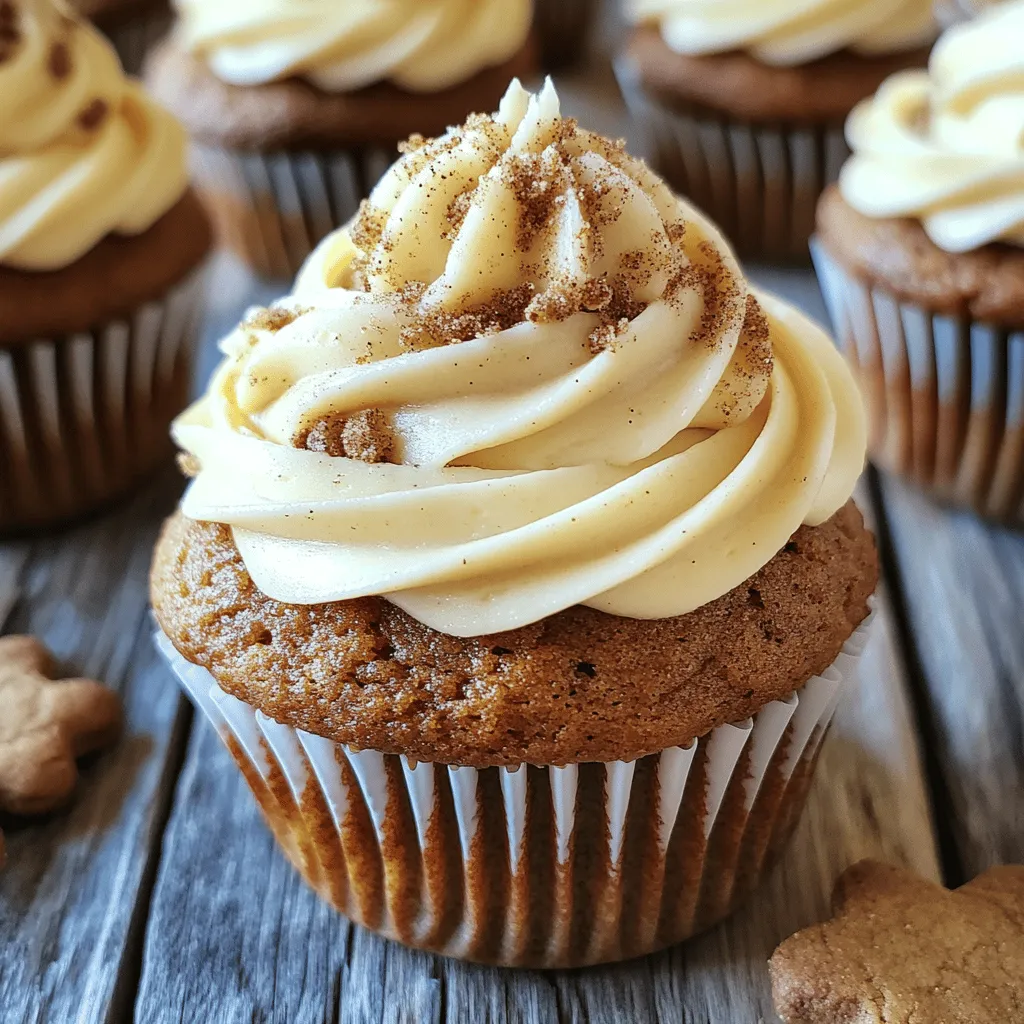
Looking for a festive treat that warms your heart? Look no further! Gingerbread Latte Cupcakes blend cozy spices with rich

To make delightful chai latte cupcakes, you need the following ingredients: - 1 ½ cups all-purpose flour - 1 tsp baking powder - ½ tsp baking soda - ¼ tsp salt - 1 tablespoon chai spice mix (cinnamon, ginger, cardamom, and cloves) - ½ cup unsalted butter, softened - 1 cup granulated sugar - 2 large eggs - 1 tsp vanilla extract - ½ cup buttermilk (or milk with 1 tsp vinegar mixed in) - ¾ cup strong brewed chai tea, cooled - ½ cup heavy cream (for frosting) - 1 ½ cups powdered sugar (for frosting) - A pinch of chai spice mix (for garnish) Each ingredient plays a key role in creating the perfect chai latte flavor. The chai spice mix adds warmth and depth to every bite. The buttermilk gives cupcakes a soft, tender crumb. The brewed chai tea infuses the cupcakes with a rich, aromatic taste. When you gather your ingredients, make sure they are fresh. Fresh spices enhance the flavors. Room temperature butter and eggs mix better and create a fluffier texture. For the full recipe, please refer to the recipe section above. Enjoy the process! - Preheat oven to 350°F (175°C). - Line cupcake pan with paper liners. - In a bowl, whisk together the flour, baking powder, baking soda, salt, and chai spice mix. - In a large bowl, cream the softened butter and granulated sugar until light and fluffy. - Add the eggs one at a time to the butter mixture. Mix well after each addition. Stir in the vanilla extract. - Alternate adding the flour mixture and buttermilk to the wet ingredients. Start and end with flour. Mix until just combined. - Gradually add the cooled brewed chai tea to the batter. Mix gently until incorporated. - Fill the cupcake liners about 2/3 full with the batter. - Bake in the preheated oven for 18-20 minutes. Check doneness with a toothpick inserted in the center. - Allow the cupcakes to cool completely on a wire rack. - For the frosting, whip heavy cream with an electric mixer until soft peaks form. Gradually add powdered sugar while whisking until stable. - Frost cooled cupcakes with the chai-flavored whipped cream. - Lightly sprinkle with a pinch of chai spice mix for garnish. For the [Full Recipe], follow these detailed steps closely to create the most delightful chai latte cupcakes. To get the best texture, do not over-mix the batter. Over-mixing makes the cupcakes dense. Mix just until the dry ingredients disappear. This keeps them light and fluffy. Always use room temperature ingredients. They blend better and create a smoother batter. Take out eggs and butter an hour before baking. To boost the flavor, add more spices. Consider a pinch of nutmeg or black pepper. These spices can deepen the chai taste. Always use freshly brewed chai tea for the batter. It makes a big difference in flavor. Brew a strong cup and let it cool before adding it to the mix. Position your cupcake liners correctly in the oven. Place them in the center for even heat. Avoid overcrowding the pan. If you pack too many in, they bake unevenly. Give each cupcake room to rise and shine. {{image_2}} If you need gluten-free cupcakes, swap regular flour for gluten-free flour. You can use almond flour or a blend made for baking. For vegan options, replace the butter with coconut oil or vegan butter. Use flax eggs instead of regular eggs. Mix one tablespoon of ground flaxseed with three tablespoons of water, then let it sit for a few minutes until thick. Want to add more fun to your cupcakes? Try adding chocolate chips or chopped nuts. They add texture and flavor. You can also use flavored extracts. Almond or coconut extract can bring a new taste to your chai latte cupcakes. Just add a teaspoon to the batter for a twist. For a tangy flavor, use cream cheese frosting. It pairs well with the spices in the cupcakes. If you prefer a vegan option, try coconut whipped cream. Chill a can of coconut milk, then whip the solid part until fluffy. Add powdered sugar to taste for a sweet touch. These variations let you customize your chai latte cupcakes for everyone! Check the Full Recipe for details on making these delightful treats. To keep your chai latte cupcakes fresh, follow these tips: - Refrigeration: Place cupcakes in an airtight container. Store in the fridge for up to five days. This will help them stay moist and tasty. - Freezing: To freeze cupcakes, wrap them in plastic wrap. Put them in a freezer-safe bag. They can last for up to three months. When ready to eat, thaw them in the fridge overnight. If you have leftover frosting, here’s how to store it: - Storing Frosting: Keep the frosting in an airtight container. It can stay fresh in the fridge for about a week. Always check for any changes before using it. - Re-whipping Frosting: If the frosting seems soft, whip it again. Use an electric mixer to make it fluffy again. This will help it hold its shape when you frost the cupcakes. For the full recipe, check out the detailed steps to create these delightful cupcakes. You can check with a toothpick. Insert it into the center of a cupcake. If it comes out clean, they're done! You can also look for a golden color on top and a slight spring back when you touch them. Yes, you can make the batter ahead of time. Store it in the fridge for up to 24 hours. When you're ready to bake, let it sit at room temperature for about 30 minutes. This helps with even baking. Pair these cupcakes with a warm cup of chai tea. You can also serve them with coffee or a glass of milk. For snacks, try some spiced nuts or fruit for a nice balance. These cupcakes last for about 3 to 4 days at room temperature. Keep them in an airtight container. If you want to keep them longer, store them in the fridge, where they can last up to a week. Absolutely! You can try other types of tea like Earl Grey or green tea. Each type will give a unique flavor to your cupcakes. Just make sure to brew it strong for the best taste. For the full recipe, check out the previous section! These chai latte cupcakes are a treat anyone can enjoy. We covered the key ingredients, mixing methods, and baking steps. I shared tips to enhance flavor and achieve the best texture. You can even experiment with variations for diet needs or taste preferences. Baking should be fun and creative. Try these cupcakes soon, and enjoy every bite. You’ll impress friends and family with your skills and delicious flavors. Happy baking!

Chai Latte Cupcakes Delightful and Easy Recipe

Do you crave a sweet treat that blends warm spices with rich flavor? Look no further! In this blog post,

To make these yummy apple cider cupcakes, gather these key ingredients: - 1 ½ cups all-purpose flour - 1 teaspoon baking powder - ½ teaspoon baking soda - ½ teaspoon salt - 1 teaspoon ground cinnamon - ½ teaspoon ground nutmeg - ½ cup unsalted butter, softened - 1 cup granulated sugar - 2 large eggs - 1 teaspoon vanilla extract - 1 cup apple cider - 1 cup diced apples (Granny Smith or Honeycrisp work well) These ingredients create a moist and flavorful cupcake. The apple cider gives it a sweet and tangy taste. The spices add warmth and depth. You can make these cupcakes even better with some fun toppings and add-ins: - Drizzle caramel sauce on top for extra sweetness. - Add chopped nuts for a crunchy texture. - Use cream cheese frosting for a richer flavor. These toppings can change the taste and look of your cupcakes. Feel free to get creative! If you can’t find something, don’t worry! Here are some easy swaps: - Use whole wheat flour instead of all-purpose flour for added health. - Swap unsalted butter with coconut oil for a dairy-free option. - Replace granulated sugar with brown sugar for a richer flavor. These substitutions keep the essence of the recipe while fitting your needs. Enjoy making these apple cider cupcakes your own! For the complete list of steps, check the Full Recipe. First, set your oven to 350°F (175°C). This temperature helps the cupcakes rise well. Next, grab a cupcake tin and line it with paper liners. This step keeps the cupcakes from sticking and makes for easy serving. In a medium bowl, add these dry ingredients: - 1 ½ cups all-purpose flour - 1 teaspoon baking powder - ½ teaspoon baking soda - ½ teaspoon salt - 1 teaspoon ground cinnamon - ½ teaspoon ground nutmeg Whisk them together until they look well mixed. This blend adds flavor and helps the cupcakes rise. Now, take a large mixing bowl. Cream together: - ½ cup unsalted butter, softened - 1 cup granulated sugar Mix them for about 3 to 5 minutes. The mixture should look light and fluffy. Next, add 2 large eggs one at a time. Make sure to mix well after each egg. Then, stir in 1 teaspoon of vanilla extract. Now, slowly add your dry mix to the wet mix, along with 1 cup of apple cider. Start and end with the dry ingredients. Mix until just combined. Finally, gently fold in 1 cup of diced apples. This step gives a fresh crunch to each bite. Using a spoon, fill each cupcake liner about 2/3 full with the batter. Place the tin in the oven and bake for 18 to 20 minutes. To check if they're done, insert a toothpick into the center. If it comes out clean, they are ready! Once baked, let the cupcakes cool in the tin for about 5 minutes. Then, move them to a wire rack to cool completely. If you like, drizzle with caramel sauce for a sweet touch. These cupcakes are a perfect treat for any occasion. For the full recipe, check the details above! To get the best cupcake texture, start with room-temperature ingredients. Use eggs and butter that are not cold. This helps mix them well and creates a fluffy batter. When you mix the butter and sugar, do it slowly at first. This avoids splattering. Cream them until the mix is light and airy. This adds air, helping the cupcakes rise. Be careful not to overmix the batter once you add the dry ingredients. Mix just enough to combine. This keeps your cupcakes tender. Measuring ingredients can make or break your cupcakes. For dry ingredients, use a spoon to scoop flour into a measuring cup. Do not pack it down. Level it off with a straight edge. For liquids, use a clear measuring cup. Fill it to the line while keeping it on a flat surface. This way, you get the right amount every time. Accurate measurements help ensure your cupcakes rise and bake evenly. To help your cupcakes bake evenly, place the tin in the center of the oven. This allows hot air to flow around them. Rotate the cupcake tin halfway through baking. This helps avoid hot spots in the oven. Use a toothpick to check for doneness. Insert it into the center of a cupcake. If it comes out clean, they are done. Let them cool in the tin for a few minutes before transferring them. This helps them set and keeps them from collapsing. Using these tips will help you create delicious and fluffy apple cider cupcakes. For the full recipe, check the section above. {{image_2}} You can add more flavor with spices. Try adding allspice or ginger to the mix. These spices will warm up your cupcakes. They give a nice kick that pairs well with apple cider. Mix in about half a teaspoon of your chosen spice. You can also make a spiced frosting. Use cinnamon or nutmeg in your frosting for extra flavor. Want a gluten-free option? Swap out the all-purpose flour for a gluten-free mix. Make sure it has a good binding agent. Look for a mix that contains xanthan gum. This helps the cupcakes rise and stay moist. The taste will still be great, so no worries there! Frosting can take your cupcakes to the next level. Cream cheese frosting is a classic choice. It adds a tangy taste that balances the sweetness. You can also use a simple vanilla buttercream. For a lighter touch, try a glaze made from powdered sugar and apple cider. Just mix until smooth and drizzle it over the cooled cupcakes. Each variation brings something new to the table. You can explore these ideas with the Full Recipe for Apple Cider Cupcakes. To keep your apple cider cupcakes fresh, store them in an airtight container. Place a piece of parchment paper between layers to avoid sticking. They stay good for up to three days at room temperature. If you want them to last longer, try refrigeration. Just make sure to cover them well. You can freeze these cupcakes if you have leftovers. Allow them to cool completely first. Wrap each cupcake tightly in plastic wrap. Then, put them in a freezer-safe bag. They can stay frozen for up to three months. When you're ready to enjoy them, just take out what you need. Reheating cupcakes is simple. If they are frozen, let them thaw in the fridge overnight. For a quick fix, use the microwave. Heat each cupcake for about 10-15 seconds. This warms them up without drying them out. If you want to refresh them, pop them in the oven at 350°F for a few minutes. Enjoy your delicious treats! Don't forget to check the full recipe for more details. Apple cider cupcakes stand out because they use apple cider in the batter. This adds a warm, fruity flavor that regular cupcakes lack. The spices, like cinnamon and nutmeg, boost the taste. The diced apples add texture and sweetness. Together, these elements create a cozy treat that feels special. Yes, you can use store-bought apple cider. It saves time and still tastes great. Look for cider that is pure and free of additives. Fresh cider gives the best flavor, but any quality cider works well. This makes baking apple cider cupcakes easy and fun. To check if the cupcakes are done, insert a toothpick into the center of one. If it comes out clean, they are ready. The tops should be lightly golden and spring back when touched. Keep an eye on them, as baking times can vary slightly. Absolutely! Apple cider cupcakes fit many occasions, like fall parties or holiday gatherings. Their unique flavor delights guests and adds a festive touch. Plus, they are easy to make in large batches. Drizzling caramel on top makes them even more special. Try these cupcakes for your next event! For the complete recipe, visit Full Recipe. To sum up, we explored how to make apple cider cupcakes. We covered essential ingredients and optional add-ins. The step-by-step instructions made baking easy. Plus, tips helped achieve the right texture. I shared fun variations and storage methods, ensuring your treats stay fresh. These cupcakes offer a tasty twist on a classic dessert. Enjoy them for any occasion, or simply savor them at home. Enjoy your baking journey!

Irresistible Apple Cider Cupcakes for Any Occasion

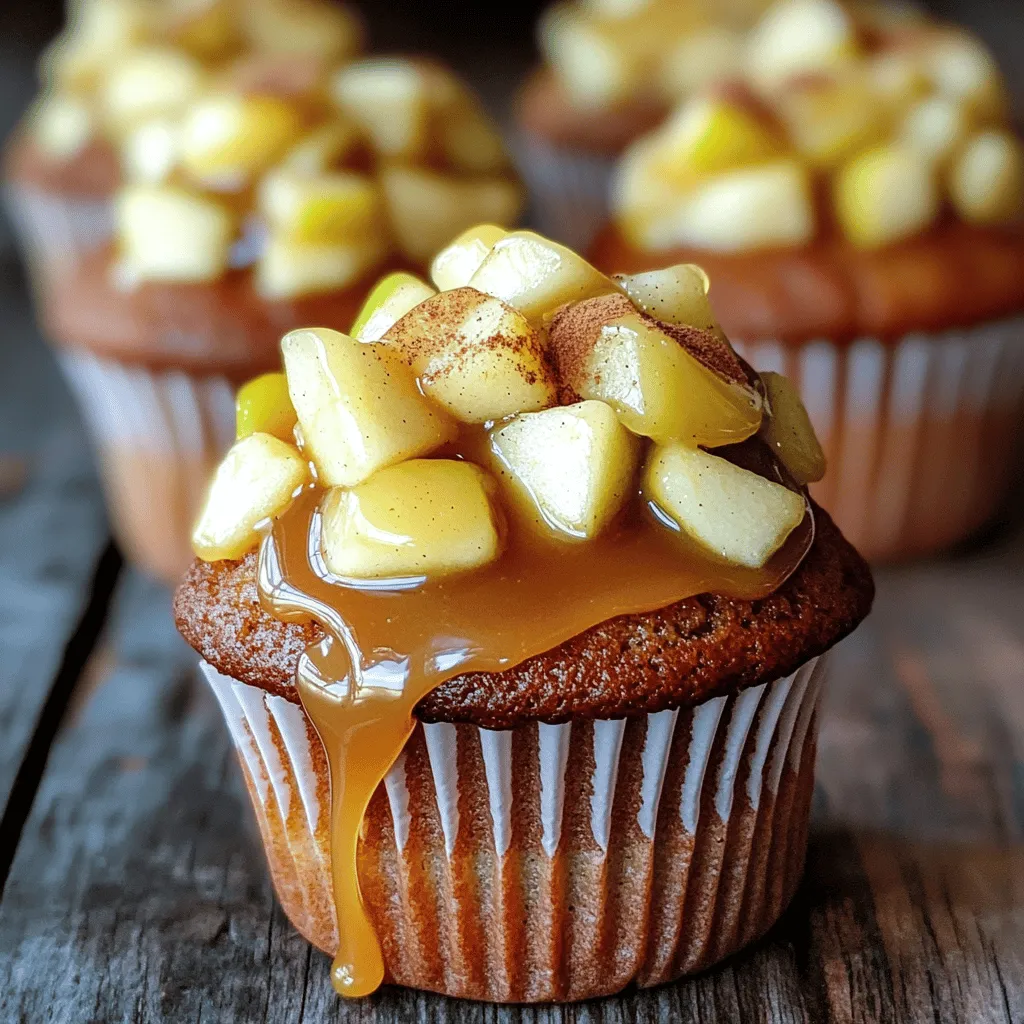
If you love the taste of fall, these apple cider cupcakes are for you. They’re soft, sweet, and packed with

- 2 cups all-purpose flour - 1/2 cup brown sugar - 1 tablespoon baking powder - 1/2 teaspoon baking soda - 1/2 teaspoon salt - 1 teaspoon ground cinnamon - 1/2 teaspoon ground ginger - 1/4 teaspoon ground nutmeg - 1/2 cup unsalted butter, cold and cubed - 1/2 cup canned pumpkin puree - 1/4 cup heavy cream - 1 large egg - 1 teaspoon vanilla extract - 1 cup powdered sugar (for glaze) - 2 tablespoons maple syrup These ingredients create a rich, warm flavor in the scones. Fresh spices like cinnamon and nutmeg make the scones smell amazing. The pumpkin puree keeps them moist and adds a soft texture. - 1/2 cup chopped nuts (like pecans or walnuts) - 1/2 cup chocolate chips - 1/2 teaspoon allspice Adding nuts gives a nice crunch. Chocolate chips add sweetness. Allspice can deepen the flavor profile. You can mix and match these extras to suit your taste. For the full recipe, check out the details above. Mixing Dry Ingredients Start by whisking together the dry ingredients. In a large bowl, combine 2 cups of all-purpose flour, 1/2 cup of brown sugar, 1 tablespoon of baking powder, 1/2 teaspoon of baking soda, and 1/2 teaspoon of salt. Add in 1 teaspoon of ground cinnamon, 1/2 teaspoon of ground ginger, and 1/4 teaspoon of ground nutmeg. Mix until everything is well blended. Incorporating Cold Butter Next, it’s time to add the butter. Take 1/2 cup of cold, unsalted butter and cut it into small cubes. Use a pastry cutter or your fingers to blend the butter into the flour mixture. You want it to look like coarse crumbs. This step adds a nice flakiness to your scones. Combining Wet Ingredients In a separate bowl, mix your wet ingredients. Combine 1/2 cup of canned pumpkin puree, 1/4 cup of heavy cream, 1 large egg, and 1 teaspoon of vanilla extract. Whisk these together until smooth. Then, pour this mixture into the dry ingredients. Gently stir until just moistened. Be careful not to overmix. Forming the Dough Once your dough is ready, turn it out onto a floured surface. Shape it into a disc about 1 inch thick. This thickness is key to get the right texture. Cutting into Wedges or Rounds Now it's time to cut the scones. You can cut the disc into wedges, like a pizza, or use a biscuit cutter for round scones. Make sure to keep the cuts clean to help them rise evenly. Preheating the Oven Before you bake, preheat your oven to 400°F (200°C). Prepare a baking sheet by lining it with parchment paper. This helps prevent sticking and ensures even baking. Baking Time and Temperature Place the scones on the prepared baking sheet. Bake them for 15-18 minutes. They should be lightly golden when done. Keep an eye on them to avoid over-baking. For the full recipe, check the section above. Enjoy your baking! Avoiding Overmixing Mixing the dough too much can ruin your scones. It leads to tough scones. When you combine the wet and dry ingredients, mix gently. Stop as soon as you see no dry flour. This keeps your scones soft and fluffy. Ensuring Proper Thickness Shape your dough into a disc about 1 inch thick. If it's too thin, your scones might bake too fast and burn. If it's too thick, they won't cook evenly. Use a ruler or your hands to check. Aim for that perfect thickness for great results. Serving Suggestions Serve your scones warm for the best flavor. Place them on a rustic wooden board. This adds charm. Drizzle a little extra maple syrup around them for a sweet touch. You can also serve them with butter or cream on the side. Decorative Ideas for Serving Sprinkle some cinnamon on top for a pop of color. Add pumpkin seeds for crunch. You can also use fresh herbs like thyme for a fun contrast. These little details make your scones look gourmet and inviting. For the complete recipe, check out the Full Recipe. {{image_2}} You can make your maple glazed pumpkin scones even better. One way is to add nuts or chocolate chips. Walnuts or pecans give a nice crunch and flavor. If you prefer chocolate, try semi-sweet or dark chips. Just fold them into the dough before shaping the scones. Another way to enhance flavor is by using different spices. Besides cinnamon, ginger, and nutmeg, you can try allspice or cardamom. These spices add warmth and depth. Just use a little to keep the pumpkin flavor strong. If you need gluten-free scones, swap all-purpose flour with a gluten-free blend. Look for one that works well for baking. You may need to adjust the liquid amounts slightly. Start with the same measurements and see if the dough feels right. For a vegan version, replace the butter with coconut oil or vegan butter. Use a flax egg instead of a regular egg. Mix one tablespoon of ground flaxseed with three tablespoons of water. Let it sit for a few minutes until it thickens. This will help bind your dough. Try these variations to make your maple glazed pumpkin scones fit your taste or dietary needs. Enjoy creating your perfect scone! For the complete recipe, check the Full Recipe link. To keep your maple glazed pumpkin scones fresh, follow these best practices: - Cool Completely: Let the scones cool on a wire rack. This step stops steam from making them soggy. - Airtight Container: Place the scones in an airtight container. This keeps them moist and flavorful. - Room Temperature: Store at room temperature for up to 3 days. If you need more time, consider freezing them. When stored correctly, these scones remain soft and tasty. They make a great snack or breakfast treat! You can reheat your scones using either the oven or microwave. Here’s how: - Oven Method: Preheat the oven to 350°F (175°C). Place the scones on a baking sheet. Heat for about 5-10 minutes. This method keeps them crispy outside and soft inside. - Microwave Method: Place one scone on a plate. Heat for 10-15 seconds. This method is quick but may make them a bit soft. Choose the method that works best for you. Enjoy your warm, delicious scones again! For the full recipe, check out the section above. To make your scones extra fluffy, avoid overmixing the dough. Mix just until the ingredients come together. Also, use cold butter and add baking powder. This helps in creating air pockets, making the scones light. Common Mistakes to Avoid: - Overmixing the dough can lead to tough scones. - Using warm butter prevents proper rising. - Skipping the baking powder can affect texture. Yes, you can freeze the dough before baking. Shape the scones and place them on a baking sheet. Freeze them until firm, then transfer to a freezer bag. This way, you can enjoy fresh scones anytime. Freezing Instructions and Storage Duration: - Freeze unbaked scones for up to three months. - Label the bag with the date for easy tracking. - When ready to bake, no need to thaw, just add a few extra minutes to bake time. You can use whole milk or a non-dairy milk like almond or soy milk. However, these options may change the texture. Heavy cream adds rich flavor and helps with moisture. Alternatives and Their Impact on Texture: - Whole milk gives a lighter scone. - Almond milk may make them less rich but still tasty. - Avoid low-fat milk for best results. Scones are best enjoyed fresh. They can stay fresh for about two days at room temperature. Store them in an airtight container. Shelf Life and Signs of Spoilage: - Check for dryness or hard texture. - Look for any mold or off smells. - Refrigerate for up to a week if needed, but they may become dense. For the complete recipe on Maple Glazed Pumpkin Scones, refer to the Full Recipe section. You learned how to make delicious scones from scratch. We covered the ingredients, step-by-step instructions, and helpful tips. You now know how to shape, bake, and store your scones. You can also explore fun flavor variations or make dietary adjustments. Remember, practice helps you make perfect scones. Enjoy sharing your fresh-baked treats!

Maple Glazed Pumpkin Scones Flavorful Fall Treat

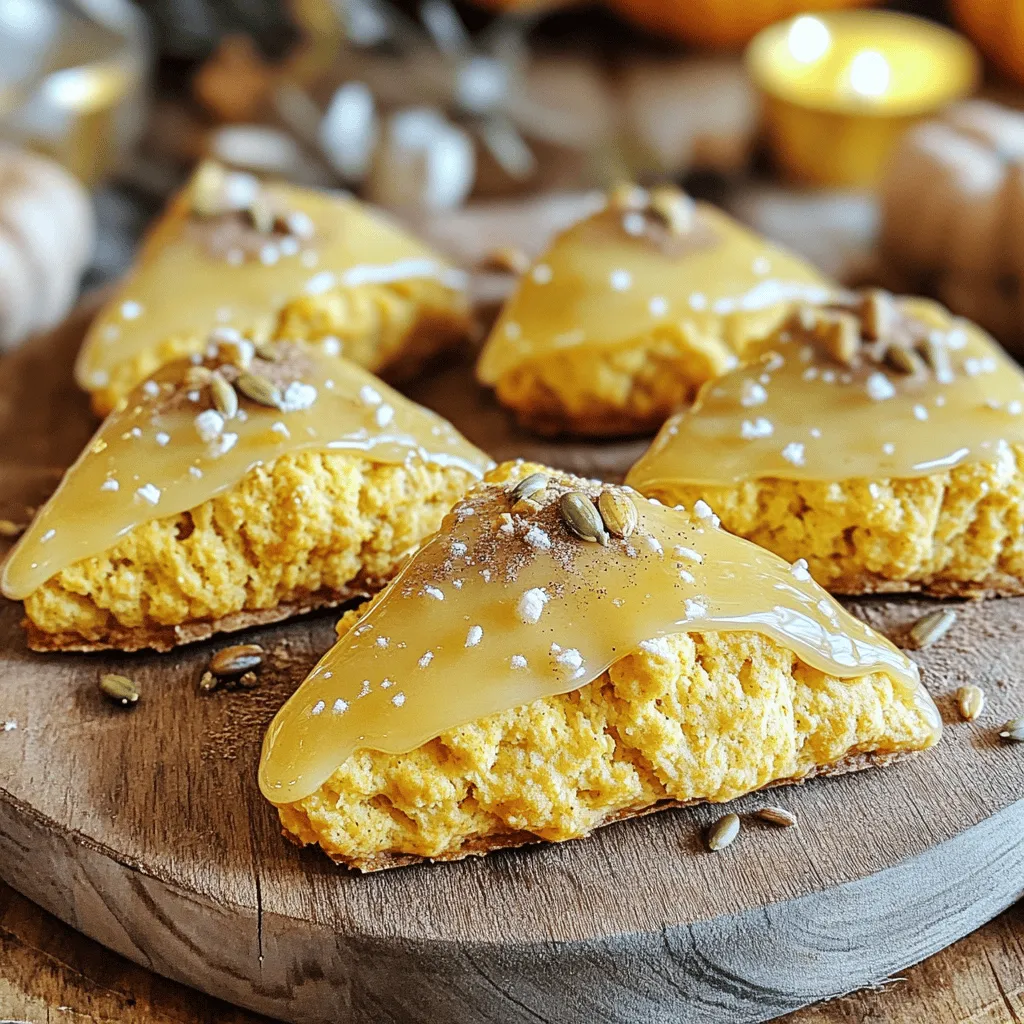
Fall is here, and it’s time to bake something special! Grab your apron and let’s make maple glazed pumpkin scones.

Gather these simple ingredients to make your Brown Butter Pumpkin Blondies: - 1 cup unsalted butter - 1 cup brown sugar - ½ cup granulated sugar - 2 large eggs - 1 cup pumpkin puree - 1 teaspoon vanilla extract - 2 cups all-purpose flour - 1 teaspoon baking powder - ½ teaspoon baking soda - ½ teaspoon salt - 1 teaspoon ground cinnamon - ½ teaspoon ground nutmeg - ½ teaspoon ground ginger - 1 cup white chocolate chips (or chopped walnuts) Each ingredient plays a role in creating rich flavors and a soft texture. The brown butter adds a nutty taste that pairs perfectly with pumpkin. Using both sugars gives a nice depth, while the spices bring warmth. You can choose white chocolate chips for sweetness or walnuts for crunch. For the full recipe, follow the steps outlined to create this delicious treat. Enjoy baking! - Preheat your oven to 350°F (175°C). Grease and line an 8x8-inch baking dish with parchment paper. - In a medium saucepan, melt 1 cup of unsalted butter over medium heat. Swirl it occasionally. Cook until it turns golden brown, about 5-7 minutes. The butter will smell nutty. Remove it from heat and let it cool slightly. - In a large mixing bowl, combine the brown butter, 1 cup of brown sugar, and ½ cup of granulated sugar. Mix well until fully combined. - Add 2 large eggs, 1 cup of pumpkin puree, and 1 teaspoon of vanilla extract to the sugar mixture. Whisk until smooth. - In another bowl, whisk together 2 cups of all-purpose flour, 1 teaspoon of baking powder, ½ teaspoon of baking soda, ½ teaspoon of salt, 1 teaspoon of ground cinnamon, ½ teaspoon of ground nutmeg, and ½ teaspoon of ground ginger. - Gradually add the dry ingredients to the wet mixture, stirring until just combined. Be careful not to overmix. - Fold in 1 cup of white chocolate chips or chopped walnuts, if you prefer. - Pour the batter into the prepared baking dish. Spread it evenly. - Bake for 25-30 minutes. Check doneness with a toothpick inserted in the center. It should come out clean, though a few moist crumbs are okay. - Allow the blondies to cool completely in the pan on a wire rack. Once cool, lift them out and cut into squares. For the full recipe, refer to the ingredients list above. To make your blondies shine, start with brown butter. Heat the butter until it turns golden brown. Swirl it gently in the pan. This step adds a nutty flavor that makes all the difference. Watch carefully to avoid burning. It should take about 5 to 7 minutes. Next, don’t overmix your batter. Mix just until you see no more dry flour. Overmixing makes the blondies tough. You want them soft and chewy. Trust me; less is more here. For a lovely presentation, dust your blondies with powdered sugar. A sprinkle of cinnamon on top adds warmth. Serve them warm for the best taste. Pairing these blondies with vanilla ice cream creates a dreamy dessert. The cold ice cream will melt slightly on the warm blondies, and it’s pure bliss. Be careful not to overbake your blondies. Check for doneness at 25 minutes. Insert a toothpick into the center. If it comes out clean or with few moist crumbs, they’re ready. Overbaking will dry them out, and no one wants that. Also, use room temperature ingredients. Cold eggs or butter can affect the batter's texture. Let your eggs sit out for a bit before mixing. This simple step helps create a uniform batter. For the Full Recipe, you can find all the details to create these delicious treats. {{image_2}} You can switch out sugars in this recipe. Try using coconut sugar or maple sugar. These options add a unique flavor. For butter, if you want a non-dairy choice, use coconut oil or vegan butter. Both work well and keep the blondies moist. Spices can lift the taste of your blondies. Consider adding allspice or cloves for a warm kick. You can also use different chocolates. Dark chocolate chips give a rich flavor. Milk chocolate offers a sweeter touch, while semi-sweet is a great middle ground. Get creative by adding nuts or dried fruits. Chopped pecans or walnuts bring crunch and texture. Dried cranberries or raisins add a sweet chewiness. You can also mix flavors, like adding orange zest for a citrus twist or a touch of espresso for depth. Check out the Full Recipe for more ideas! To keep your brown butter pumpkin blondies fresh, store them in an airtight container. This will keep the moisture in and the blondies soft. You can line the container with parchment paper to prevent sticking. If you have leftovers, avoid stacking them directly on top of each other. Instead, separate layers with parchment paper for best results. If you want to freeze your blondies, start by cutting them into squares. Place the pieces on a baking sheet lined with parchment. Freeze them for about an hour until firm. Then, transfer the squares to a freezer-safe bag or container. Squeeze out any air before sealing. To thaw, simply leave them in the fridge overnight. For a quick snack, you can microwave them for a few seconds. At room temperature, your blondies will last for about three days. After that, they may start to dry out. If you see any mold or change in smell, it's best to toss them. For longer storage, the freezer is your best friend. Brown Butter Pumpkin Blondies have a chewy texture. They feel soft and rich. They are not cakey like regular cake. The brown butter adds a nutty flavor that enhances the chewiness. You will love the contrast of the soft interior and slightly crisp edges. Yes, you can make these blondies ahead of time. Bake them and let them cool completely. Then, store them in an airtight container. They stay fresh for about five days at room temperature. If you want to keep them longer, freeze them. Just wrap them tightly in plastic wrap and then foil. Check your blondies by looking at the edges. They should look set and slightly golden. For a more precise test, use a toothpick. Insert it in the center of the blondies. If it comes out clean or with a few moist crumbs, they are done. Avoid overbaking, or they will become dry. To reheat blondies, use the oven or microwave. For the oven, set it to 350°F (175°C). Place the blondies on a baking sheet for about 5-10 minutes. For the microwave, heat them for 10-15 seconds. Check to ensure they don’t dry out. Enjoy them warm for the best flavor! For the Full Recipe, check the main section! Brown Butter Pumpkin Blondies are easy to make and taste amazing. We covered all the ingredients, preparation steps, and common mistakes to avoid. Plus, I shared tips for storage and fun flavor variations. Remember, browning the butter makes all the difference. When made right, these blondies will be your new favorite treat. Enjoy them warm, topped with ice cream or dusted with sugar. Happy baking!

Brown Butter Pumpkin Blondies Irresistible Delight

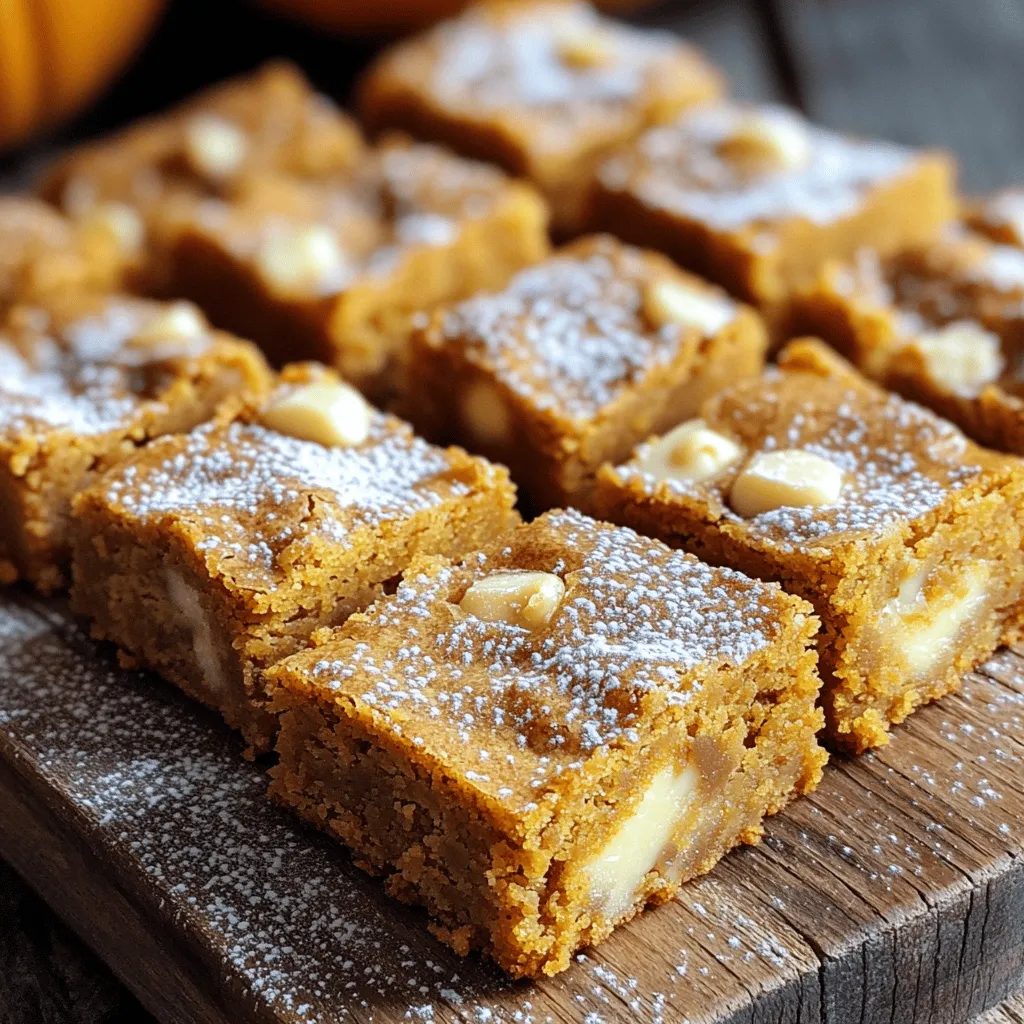
Get ready to indulge in the warm, sweet flavors of fall with my Brown Butter Pumpkin Blondies. These treats combine

- 4 large carrots, peeled and grated - 1/2 cup raisins or currants - 1/4 cup sliced almonds or walnuts - 1/4 cup fresh cilantro, chopped - 1 tablespoon ground cumin - 1 teaspoon ground cinnamon - 1 teaspoon ground coriander - 1/2 teaspoon cayenne pepper (adjust to taste) - 3 tablespoons olive oil - 2 tablespoons freshly squeezed lemon juice - Salt and pepper to taste To make this Moroccan spiced carrot salad, gather all your ingredients first. Fresh carrots are the star here. Choose large ones, as they deliver the best flavor when grated. The sweetness from raisins or currants adds a nice touch. I love using sliced almonds or walnuts for their crunch. Fresh cilantro brings a burst of color and flavor to the dish. Next, we need spices. Ground cumin is essential for that warm, earthy taste. Cinnamon adds a hint of sweetness, while coriander brings a bright note. Cayenne pepper gives it a slight kick; you can adjust the amount based on your spice preference. For the dressing, olive oil is key. It adds richness and helps blend the flavors. Fresh lemon juice brightens the salad, while salt and pepper enhance all the tastes. Make sure you have everything ready before you start, as it makes the process smooth and fun! {{ingredient_image_1}} First, peel and grate the carrots. Use a box grater or food processor for ease. You want about four large carrots to make this salad bright and colorful. Next, in a large mixing bowl, combine the grated carrots and half a cup of raisins or currants. The sweetness of the raisins adds a nice contrast to the carrots. In a smaller bowl, mix your spices. Use one tablespoon of ground cumin, one teaspoon of ground cinnamon, one teaspoon of ground coriander, and half a teaspoon of cayenne pepper. Adjust the cayenne to your taste for heat. Add three tablespoons of olive oil and two tablespoons of freshly squeezed lemon juice. Season with salt and pepper. Whisk this mixture well to blend all the flavors. Pour the spiced dressing over the carrot and raisin mixture. Toss everything together gently to coat the carrots evenly. Then, fold in a quarter cup of chopped fresh cilantro and a quarter cup of sliced almonds or walnuts for crunch. Let the salad chill for about 10-15 minutes. This waiting time allows the flavors to blend beautifully. Taste it before serving and adjust the seasoning, if needed. Adjusting Spice Levels You can change the spice levels based on your taste. If you love heat, add more cayenne pepper. Start with a little and taste as you go. This way, you find your perfect balance of spice. Fresh Herbs Addition Adding fresh herbs boosts the flavor. Cilantro is great, but you can also try mint or parsley. These herbs add freshness and flavor to the salad. Just chop them finely and mix them in. Serving Suggestions For a fun serving idea, use a rustic wooden bowl. This adds a warm touch to your dish. You can also serve it on a colorful plate. This makes the vibrant orange carrots pop. Garnishing Techniques Garnish with extra cilantro and whole nuts on top. This gives your salad a lovely look. It makes it inviting and ready to eat. A sprinkle of lemon zest can also add a nice touch. Using Pre-Packaged Ingredients You can save time by using pre-packaged grated carrots. They are easy to find in stores. This cuts down your prep time. You still get the same great flavor! Grating Carrots Efficiently If you prefer fresh carrots, use a box grater or food processor. These tools make grating quick and easy. You can grate all four carrots in just a few minutes. This keeps your salad prep fast and fun. Pro Tips Use Fresh Spices: Freshly ground spices enhance the flavor of the salad significantly. Consider grinding your cumin and coriander just before use for a more vibrant taste. Adjust Sweetness: Depending on your preference, you can add a tablespoon of honey or maple syrup for a touch of sweetness to balance the spices. Chill Before Serving: For an even more refreshing taste, refrigerate the salad for about 30 minutes before serving to let the flavors develop further. Experiment with Nuts: Feel free to swap almonds or walnuts with other nuts such as pistachios or pecans for a different texture and flavor experience. {{image_2}} You can switch up the nuts in this salad. If you don't have almonds or walnuts, try pecans or pistachios. Both add a nice crunch. For dried fruits, feel free to use dried apricots or figs instead of raisins or currants. These options add a new twist to the salad. Want a spicy kick? Add more cayenne pepper or even some diced jalapeños. This will make the salad lively. If you love citrus, add lemon or orange zest. This brightens the flavors and adds freshness to every bite. This salad is vegan-friendly already. You can enjoy it without any animal products. For gluten-free options, check your nuts and dried fruits. Most are gluten-free, but always read labels to be sure. This way, everyone can enjoy this tasty dish! - Refrigerating Leftovers After enjoying your Moroccan spiced carrot salad, store leftovers in a sealed container. This keeps the salad fresh and tasty. Place it in the fridge right away. It will stay good for a few days. - Freezing Options Freezing is not the best option for this salad. The texture of the carrots and nuts can change. If you must freeze it, pack it tightly in a freezer-safe container. Use it within a month for the best flavor. - Best Timeframe for Consumption Enjoy your salad within 3 to 5 days when stored in the fridge. This ensures you get the best taste and quality. - Signs of Spoilage Check for any off smells or changes in color. If the salad becomes mushy or dry, it’s time to toss it. Fresh ingredients are key to a great dish. - Enjoying Cold vs. Warm This salad is best served cold. The flavors blend beautifully when chilled. If you prefer it warm, heat it gently on low. Watch carefully to avoid overcooking the carrots. Enjoy it the way you like! To add heat to your salad, use more cayenne pepper. Start with 1 teaspoon. If you want more, gradually increase the amount. You can also try adding chili flakes or a dash of hot sauce. Mix these into the dressing for a balanced flavor. Taste as you go to find your perfect spice level. Yes, you can make this salad ahead of time. Prepare it up to a day in advance. Just skip adding the nuts and cilantro until you're ready to serve. This keeps the salad fresh and crunchy. Store it in the fridge in an airtight container. Let it sit for a few minutes at room temperature before serving. This salad pairs well with grilled chicken or fish. It also complements couscous or quinoa dishes nicely. Try it with pita bread and hummus for a light meal. For a complete dinner, serve with roasted vegetables. The bright flavors of the salad balance well with hearty dishes. This blog post explored the key ingredients, pasta techniques, and tips for a flavorful salad. We covered essential ingredients like carrots, nuts, and spices, along with simple preparation steps. I shared storage tips and ways to customize the recipe to fit your taste. In closing, this salad offers a tasty and healthy option for any meal. You can enjoy its flavors and adapt it as needed. Get creative, and make it your own!

Moroccan Spiced Carrot Salad Flavorful and Easy Recipe

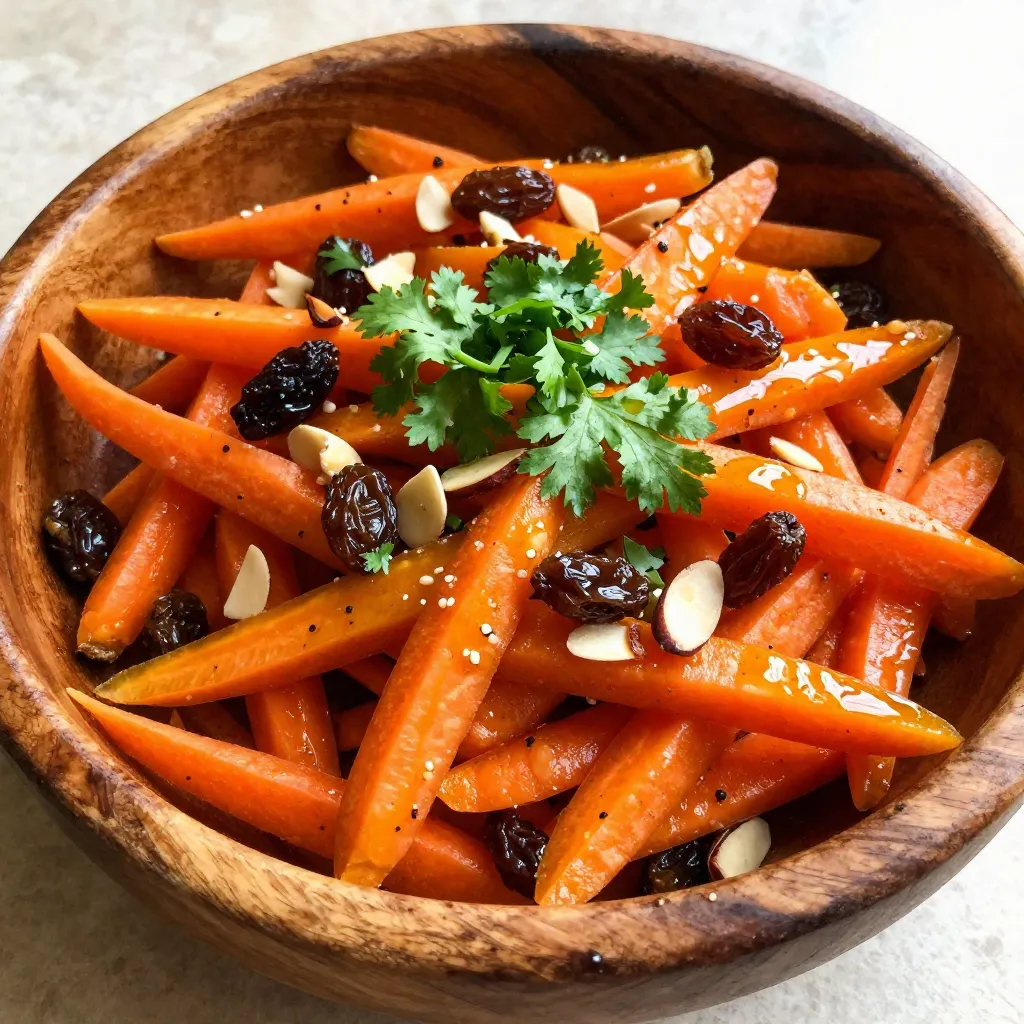
If you’re looking for a fresh, vibrant dish that’s packed with flavor, you’ve found it! This Moroccan Spiced Carrot Salad

- 1 ½ cups all-purpose flour - 1 cup apple cider - ½ cup granulated sugar - ¼ cup maple syrup - 1 large grated apple To start making these donuts, gather the essential ingredients. The all-purpose flour gives structure, while apple cider adds moisture and flavor. Use granulated sugar for sweetness, and maple syrup for that rich, warm taste. Grating a large apple, like Honeycrisp or Fuji, adds a delightful texture. - 1 teaspoon ground cinnamon - ¼ teaspoon nutmeg - Unsalted butter for richness For extra flavor, consider adding ground cinnamon and nutmeg. These spices elevate the taste and make your kitchen smell amazing. Unsalted butter adds richness, making the donuts even more delicious and moist. - Donut pan - Mixing bowls - Whisk and spatula - Toothpick for testing doneness You will need a donut pan to shape your treats. Mixing bowls help combine the dry and wet ingredients. A whisk and spatula are key for mixing. Lastly, a toothpick is essential for checking if the donuts are baked just right. These ingredients and tools set you up for success in making your maple cinnamon apple donuts. For the full recipe, check out the details above! - Preheat oven to 350°F (175°C). - Grease donut pan with non-stick spray. - Whisk together flour, baking powder, baking soda, cinnamon, nutmeg, and salt. - Combine apple cider, maple syrup, melted butter, egg, and grated apple. - Mix wet and dry ingredients just until combined. - Fill the donut pan and bake for 10-12 minutes. - Cool and coat in cinnamon-sugar mixture. Follow the [Full Recipe] for complete details. Enjoy the sweet taste of autumn! To get light and fluffy donuts, avoid overmixing the batter. When you mix the wet and dry ingredients, do it just until combined. If you stir too much, the donuts can become dense. Proper baking time and temperature also play a big role. Bake at 350°F for 10-12 minutes. Check with a toothpick; it should come out clean. Coating the donuts while they are warm helps the cinnamon-sugar stick better. After you take them out of the oven, let them cool for about five minutes. Then, roll each donut in the cinnamon-sugar mix. This gives them a sweet, crunchy exterior that is hard to resist. For a fun twist, serve the donuts with a drizzle of maple syrup. You can also offer a spiced cream cheese dip on the side. This adds a creamy texture and a new flavor layer. Arrange the donuts on a pretty platter to make them look even more tempting. {{image_2}} You can make these donuts even more fun! Try adding more spices, like ginger or cloves. Different apples can also change the taste. Honeycrisp apples are sweet, while Granny Smith apples add a tart kick. You can also switch up sweeteners. Use honey for a floral note or brown sugar for deeper flavor. Want to make a gluten-free version? You can use almond flour or coconut flour instead of regular flour. Just remember, this may change the texture a bit. If you're vegan, swap the egg for a flax egg. You can also use nut butter in place of butter for creaminess. These donuts taste great with coffee or chai. The warm spices in the drinks match the flavors of the donuts. You can also try serving them with a scoop of vanilla ice cream. It's a fun twist for a special treat. For the full recipe, check out the details above. You should store your maple cinnamon apple donuts in an airtight container. Keep them at room temperature. They stay fresh for up to 2 days. To enjoy these tasty treats later, freeze them. Wrap each donut tightly in plastic wrap. Place them in a freezer bag. You can freeze them for up to 3 months. When you want to eat them, reheat in the oven. This keeps them soft and warm. If you have leftovers, simply reheat them. Use the microwave for quick warming. For a crispier bite, use the oven. This way, they taste just as good as when they were fresh. Enjoy your delicious donuts warm for a great treat! Yes, you can prepare the batter and store it in the fridge. This makes it easy to bake fresh donuts when you want them. Just remember to mix the batter well before using it. Overmixing the batter can lead to denser donuts. Mix just until you see no dry flour. This keeps the donuts light and fluffy. Check local bakeries or specialty stores for these tasty treats. You can also look for online shops that sell gourmet donuts. Yes, you can use pears or peaches for a variation on the flavor. Both fruits add a nice sweetness and moisture. Feel free to experiment! Maple Cinnamon Apple Donuts are a delightful treat, combining warm spices and fresh apples. You learned the essential and optional ingredients needed to create these donuts. The step-by-step guide made baking simple, and tips will help you achieve the best texture. You can even try fun variations, whether dietary choices or different fruits. Store them properly to enjoy later. These donuts are sure to bring joy and flavor to your kitchen. Get ready to bake and enjoy every bite!

Maple Cinnamon Apple Donuts Irresistible Sweet Treat

Imagine sinking your teeth into a warm, fluffy Maple Cinnamon Apple Donut. The blend of sweet maple, spicy cinnamon, and

To make pumpkin cream cheese pancakes, gather these ingredients: - 1 cup all-purpose flour - 1 tablespoon baking powder - 1/2 teaspoon baking soda - 1/2 teaspoon cinnamon - 1/4 teaspoon nutmeg - 1/4 teaspoon ginger - 1/4 teaspoon salt - 1 cup milk - 1/2 cup canned pumpkin puree - 1 large egg - 2 tablespoons sugar - 1 teaspoon vanilla extract - 4 ounces cream cheese, softened - 2 tablespoons maple syrup (plus more for serving) - Butter or oil for cooking These simple ingredients blend together to create a warm and comforting dish. The pumpkin puree adds moisture and flavor. The cream cheese brings a rich, creamy note. The spices elevate the taste, making each bite a delight. You can adjust this recipe to fit your needs: - Gluten-free options: Use a gluten-free flour blend instead of all-purpose flour. - Dairy-free alternatives: Substitute almond milk for regular milk and use a dairy-free cream cheese. - Sweetener swaps: Replace sugar with maple syrup or honey for a natural sweetness. These substitutions ensure everyone can enjoy these pancakes. You can easily cater to various diets while still enjoying a delicious breakfast. To start, gather your ingredients. You will need: - 1 cup all-purpose flour - 1 tablespoon baking powder - 1/2 teaspoon baking soda - 1/2 teaspoon cinnamon - 1/4 teaspoon nutmeg - 1/4 teaspoon ginger - 1/4 teaspoon salt - 1 cup milk - 1/2 cup canned pumpkin puree - 1 large egg - 2 tablespoons sugar - 1 teaspoon vanilla extract - 4 ounces cream cheese, softened - 2 tablespoons maple syrup (plus more for serving) - Butter or oil for cooking First, mix the dry ingredients. In a large bowl, whisk together the flour, baking powder, baking soda, cinnamon, nutmeg, ginger, and salt. This step ensures even distribution of all flavors. Next, combine the wet ingredients. In another bowl, mix the milk, pumpkin puree, egg, sugar, vanilla extract, and softened cream cheese. Stir until the mix is smooth and creamy. This blend adds richness to the pancakes. Now, heat your skillet over medium heat. Add a small amount of butter or oil to coat the surface. Make sure it gets hot but not smoking. Once the skillet is ready, pour about 1/4 cup of pancake batter for each pancake. Cook until you see bubbles forming on the surface, which takes about 3-4 minutes. The edges should look set. When it's time to flip, use a spatula. Gently turn the pancake over and cook the other side for another 2-3 minutes, until golden brown. Adjust the heat if needed so they won't burn. Repeat this process until all the batter is used. Keep the pancakes warm on a plate while you finish cooking the rest. For a lovely presentation, stack your pancakes on a plate. Drizzle with maple syrup for great flavor. You can also add a dollop of whipped cream on top. A sprinkle of cinnamon adds a nice touch too. If you want to mix things up, try different maple syrup flavors. Maple syrup with vanilla or even a hint of orange can elevate your breakfast experience. To make the best pumpkin cream cheese pancakes, avoid over-mixing your batter. When you combine wet and dry ingredients, stir gently. A few lumps are fine. This keeps your pancakes light and fluffy. Ensuring the right skillet temperature is key. Heat your skillet over medium heat. If it's too hot, pancakes will burn. If it’s too cool, they will cook unevenly. A drop of water should sizzle and dance when the skillet is ready. You can enhance flavors in your pancakes. Adding chocolate chips or nuts gives a nice texture and taste. You might try walnuts or pecans for a crunchy twist. Don’t shy away from experimenting with spices. Adding a pinch of allspice or cloves can deepen the flavor. A bit of vanilla extract also enhances the sweet pumpkin taste. Pair your pancakes with tasty toppings. A drizzle of maple syrup is classic. You could also add fresh fruit, like sliced bananas or berries. Creamy yogurt is a great choice too. For a complete breakfast, serve with eggs or sausage. These sides balance the sweetness of the pancakes. They make your meal feel hearty and satisfying. {{image_2}} You can change up these pancakes with seasonal flavors. Try adding cranberries or apples for a fresh twist. Chopped apples add a nice crunch. Dried cranberries give a sweet and tangy taste. Both pair well with the pumpkin flavor. Another fun addition is using a pumpkin spice blend. This blend often includes cinnamon, nutmeg, and clove. It enhances the pumpkin taste and adds warmth to your dish. Just replace the cinnamon and nutmeg in the recipe with a teaspoon of the blend. If you want a vegan version, you can replace some ingredients. Use flaxseed meal mixed with water instead of the egg. Swap the milk for almond or oat milk. For cream cheese, look for a vegan alternative. These tweaks keep your pancakes tasty and plant-based. For a low-carb or keto option, use almond flour instead of all-purpose flour. You can also use sugar substitutes like erythritol or stevia. This way, you enjoy this treat while sticking to your diet plan. To make your pancakes even more exciting, add some citrus zest. A little lemon or orange zest can brighten the flavor. You can also try flavored syrups. Maple syrup is classic, but you might enjoy caramel or chocolate syrup too. Lastly, consider swapping in other fruit purees. Applesauce or mashed bananas can be fun replacements for pumpkin. Each option brings a new flavor and texture, making breakfast more fun. For more details, check out the Full Recipe. To keep your pumpkin cream cheese pancakes fresh, start by cooling them to room temperature. Then, stack pancakes with parchment paper between each one. This helps prevent sticking. Place the stack in an airtight container. You can also wrap individual pancakes in plastic wrap. Store them in the fridge for up to three days. You can reheat pancakes in the oven or microwave. For the oven, preheat it to 350°F (175°C). Place pancakes on a baking sheet and cover them with foil. Heat for 10 minutes. In the microwave, place pancakes on a microwave-safe plate. Heat for 20-30 seconds. To keep them fluffy, avoid overheating and check them often. To freeze pancakes, first cool them completely. Then, stack them with parchment paper in between. Wrap the stack in plastic wrap or foil. Place them in a freezer bag and remove as much air as possible. You can freeze pancakes for up to two months. When you're ready to eat, take them out and thaw overnight in the fridge or use the microwave. Enjoy your pancakes warm! For the full recipe, check out the details above. To make your pancakes fluffier, focus on a few key tips: - Use fresh baking powder: Check the expiration date and replace it if it's old. - Don't over-mix: Mix just until combined. Lumps are okay! - Separate the egg: Whip the egg white until stiff and fold it in gently. - Add an extra teaspoon of baking powder: This helps create more bubbles. - Let the batter rest: Allow it to sit for about 10 minutes before cooking. These tips give your pancakes that perfect airy texture. The air bubbles expand during cooking, making them light and fluffy. Yes, you can make the batter ahead of time! Here are some storage guidelines: - Refrigerate: Store the batter in an airtight container in the fridge for up to 24 hours. - Stir before cooking: Give it a gentle stir before pouring into the skillet, as it may thicken. - Use within a day: For best results, use the batter within a day to keep your pancakes fresh. Making the batter early can save time on busy mornings. These pancakes are delicious on their own, but you can enhance them with great toppings! Here are some ideas: - Maple syrup: A classic choice that pairs perfectly with pumpkin flavors. - Whipped cream: A dollop on top makes them extra special. - Chopped nuts: Walnuts or pecans add crunch. - Fresh fruit: Slices of banana or berries brighten up the plate. - Yogurt: A scoop adds creaminess and tang. Feel free to mix and match your favorite toppings. Enjoy the delicious flavors! In this article, we covered how to make delicious pumpkin cream cheese pancakes. We explored the key ingredients, substitutions, and step-by-step instructions. I shared tips for perfect texture and flavor, along with creative variations and storage methods. Try these recipes for a fun and tasty breakfast. Enjoy exploring different flavors and toppings! You’ll impress your family and friends with your skills. Happy cooking!

Pumpkin Cream Cheese Pancakes Delightful Morning Treat

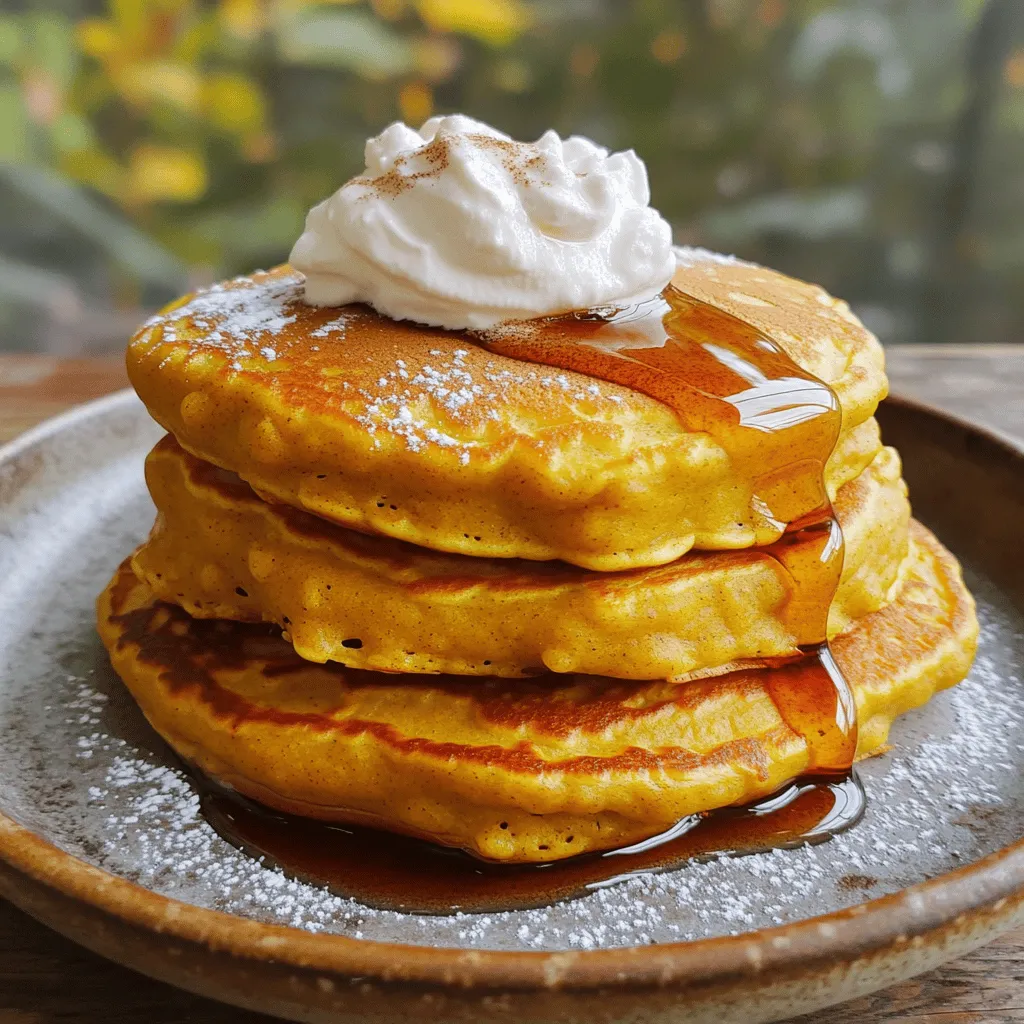
Wake up to a warm hug in pancake form with my Pumpkin Cream Cheese Pancakes! These soft, fluffy treats blend

- 1 lb ground chicken - 1/2 cup breadcrumbs - 1/4 cup grated Parmesan cheese - 1/4 cup green onions, finely chopped - 1 egg, beaten - 2 cloves garlic, minced - 1/2 teaspoon ginger powder - 1/4 teaspoon black pepper - Salt to taste - 1/2 cup sweet chili sauce - 1 tablespoon soy sauce - 1 tablespoon sesame oil - Sesame seeds for garnish - Fresh cilantro for garnish The right ingredients make all the difference. I love using ground chicken for these meatballs. It is lean and flavorful. Breadcrumbs help bind the meatballs and add a nice texture. Grated Parmesan cheese gives a rich taste. Green onions add a fresh crunch. I always use fresh garlic and ginger powder for depth. Black pepper and salt bring out all the flavors. Sweet chili sauce adds a sweet and spicy kick. Soy sauce enhances the umami, while sesame oil gives it a nutty aroma. Lastly, sesame seeds and fresh cilantro make the dish pop with color. - Mixing bowl - Baking tray - Parchment paper - Small saucepan - Measuring cups and spoons Having the right tools makes cooking easier. A mixing bowl is essential for combining all the ingredients. A baking tray lined with parchment paper helps with clean-up. Use a small saucepan for making the glaze. Measuring cups and spoons ensure you get the right amounts every time. For the full recipe, check out the linked section. - Preheat your oven to 400°F (200°C). - Line the baking tray with parchment paper. - Combine all ingredients in a mixing bowl. - Use the following ingredients: - 1 lb ground chicken - 1/2 cup breadcrumbs - 1/4 cup grated Parmesan cheese - 1/4 cup green onions, finely chopped - 1 egg, beaten - 2 cloves garlic, minced - 1/2 teaspoon ginger powder - 1/4 teaspoon black pepper - Salt to taste - 1/2 cup sweet chili sauce - 1 tablespoon soy sauce - 1 tablespoon sesame oil Mix thoroughly for flavor integration. You want every bite to taste amazing. - Shape the mixture into meatballs. Aim for about 1 inch in diameter. - Place them on the prepared baking tray. Leave space between each one. - Bake for 20-25 minutes until golden brown. You want them cooked through and firm. For the full recipe, refer to the earlier sections. Enjoy your cooking! To make great meatballs, use cold ingredients. Cold meat and eggs help keep the texture firm. This makes the meatballs hold their shape better when cooking. Be careful not to overmix the meatball mixture. Mixing too much can make them tough. Stir just until the ingredients blend, and you will get a nice, tender meatball. Adjust the sweetness and heat of the sauce based on your taste. If you want it sweeter, add more sweet chili sauce. For more heat, a dash of hot sauce works well. Simmer the glaze to deepen its flavor. This step helps blend the tastes and gives a rich, savory taste that makes the meatballs shine. Garnish your meatballs with sesame seeds and fresh cilantro. This adds color and flavor to your dish. For serving, consider placing the meatballs on a platter with toothpicks for easy grabbing at parties. You can also serve them over rice or noodles for a hearty family dinner. For the full recipe, check the complete list above. {{image_2}} You can easily switch up the protein in these meatballs. If you prefer turkey, it works great. Ground turkey keeps the dish light and lean. You can also use ground pork for a richer flavor. For those who want a meat-free option, try using lentils or chickpeas. Both options give a nice texture. Just mash or blend them with spices to form a base. You can add some grated vegetables for extra nutrition and flavor. If you love spice, try adding more heat to the sweet chili sauce. A splash of sriracha or red pepper flakes can do wonders. You can also mix in some lime juice for a zesty kick. Want to make your own glaze? It’s simple! Just combine honey, soy sauce, and a little vinegar. Simmer it until it thickens. This homemade glaze adds a unique twist to your meatballs. These meatballs taste amazing with rice or noodles. Serve them over fluffy jasmine rice for a tasty meal. If you like, toss them with noodles and vegetables for a quick stir-fry. They also shine as appetizers. Place them on a platter with toothpicks for easy serving at parties. Guests will love the sweet and spicy flavor. You can even drizzle extra sauce on top for a pretty finish. For the full recipe, check out the Sweet Chili Chicken Meatballs section above. After you enjoy your sweet chili chicken meatballs, let them cool down. This step is key for safety. Place the meatballs in an airtight container. This helps keep them fresh for later. Make sure to store them in the fridge. They can last for about three to four days this way. To reheat the meatballs, use your oven. Set it to 350°F (175°C) for best results. Place the meatballs on a baking sheet. Cover them with foil to keep moisture in. Heat them for about 15 minutes. This method keeps them juicy and tasty. You can also use a microwave. Heat them in short bursts of 30 seconds. Check often to avoid overcooking. You can freeze the meatballs for longer storage. Freeze them before or after baking. If you freeze them raw, shape them into balls and place them on a tray. Once frozen, transfer them to a bag. If baked, let them cool first. Then, store them in a freezer-safe container. To thaw, move them to the fridge overnight. Reheat them the same way as above for the best taste. To make Sweet Chili Chicken Meatballs, follow these key steps: 1. Preheat the oven to 400°F (200°C). 2. Mix the meatball ingredients in a large bowl. This includes ground chicken, breadcrumbs, and Parmesan cheese, along with green onions, beaten egg, garlic, ginger powder, black pepper, and salt. 3. Shape the mixture into small meatballs, about one inch in size. 4. Bake the meatballs for 20 to 25 minutes. They should be golden brown and cooked through. 5. Prepare the sweet chili glaze by mixing sweet chili sauce, soy sauce, and sesame oil in a small saucepan. Heat it gently. 6. Coat the meatballs in the glaze after baking. Toss them gently to ensure they are well-covered. This method gives you juicy meatballs with rich flavor. For the full recipe, refer to the recipe section. Yes, you can use other types of meat. Ground turkey works well and has a similar taste. Pork also makes a tasty option, adding a bit of richness. If you want a vegetarian choice, use plant-based ground meat or finely chopped mushrooms. Remember, each meat changes the flavor slightly. Ground turkey will be lighter, while pork will add more fat. Sweet Chili Chicken Meatballs pair well with several side dishes. Here are some popular ideas: - Rice: White, brown, or jasmine rice complement the meatballs nicely. - Noodles: Try serving them over rice noodles for a fun twist. - Vegetables: Steamed broccoli or stir-fried veggies add color and nutrition. - Salad: A fresh salad can balance the rich flavors of the dish. - Dipping sauce: Serve extra sweet chili sauce on the side for those who enjoy more heat. In this blog post, we explored how to make Sweet Chili Chicken Meatballs. You learned about essential ingredients, smart kitchen tools, and simple step-by-step instructions. I shared tips for perfecting meatballs and ways to present your dish. Don't forget the variations and storage tips to keep your meatballs fresh. This recipe is fun and easy to adapt. Enjoy creating your version and share it with family and friends. Remember, your cooking journey is all about trying new things and having fun!

Sweet Chili Chicken Meatballs Savory and Satisfying Dish

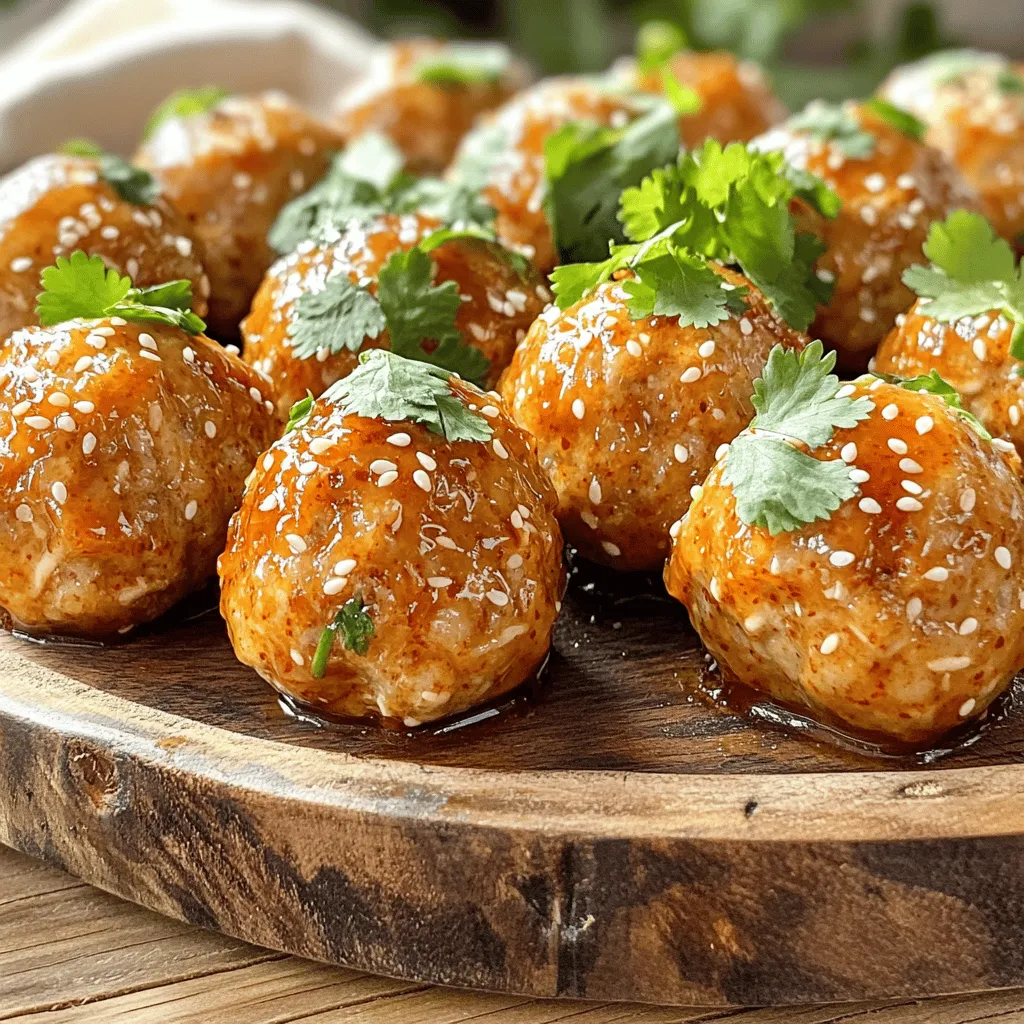
Love a dish that is both savory and satisfying? Sweet Chili Chicken Meatballs are the perfect blend of flavor and

Older posts
Newer posts
← Previous Page1 … Page50 Page51 Page52 … Page86 Next →

dsad

© 2026 Cooking Wells • Built with GeneratePress

Our Policies

  • Copyright Policy
  • Cookie Policy
  • GDPR Policy
  • Privacy Policy
  • Disclaimer
  • Terms Of Use

More Information

  • Home
  • About
  • Contact
  • Appetizers
  • Dessert
  • Dinner
  • Drinks
©2026, Cooking Wells About Back To Top