Skip to content
DisclaimerTerms Of UseGDPR PolicyCookie Policy

Cooking Wells

  • Home
  • Drinks
  • Appetizers
  • Dinner
  • Dessert
  • About
  • Contact
  • Privacy Policy
DisclaimerTerms Of UseGDPR PolicyCookie Policy

NO-ING-IMG

To make a tasty Zucchini Parmesan Bake, you'll need some simple ingredients. Here’s the list: - 4 medium zucchinis, sliced into thin rounds - 1 cup breadcrumbs (panko for extra crunch) - 1 cup grated Parmesan cheese - 2 cups marinara sauce (homemade or store-bought) - 1 cup shredded mozzarella cheese - 2 cloves garlic, minced - 1 teaspoon dried oregano - 1 teaspoon dried basil - Salt and pepper to taste - Fresh parsley for garnish Each ingredient plays a key role. The zucchini gives a fresh taste. The cheeses add creaminess and flavor. The marinara sauce brings a rich, tangy layer. For the best taste, I have some brand suggestions: - Panko Breadcrumbs: Kikkoman or Japanese brand are great for crunch. - Parmesan Cheese: Grana Padano or BelGioioso offer strong flavors. - Marinara Sauce: Rao’s Homemade or Classico for a rich taste. Using these brands can help boost your dish's flavor. They provide quality that can make your Zucchini Parmesan Bake even better. You can swap some ingredients if needed. Here are some ideas: - Zucchini: Yellow squash or eggplant work well too. - Breadcrumbs: Use crushed crackers for a different texture. - Parmesan Cheese: Pecorino Romano gives a saltier taste. - Mozzarella Cheese: Any melty cheese, like provolone, can replace it. These swaps can change the dish while keeping it delicious. Feel free to experiment and find what you love most in your Zucchini Parmesan Bake. For the full recipe, check out the link provided earlier. Start by preheating your oven to 375°F (190°C). This step is key to getting the cheese bubbly and golden. Next, grease a large baking dish with olive oil or cooking spray. This will help the dish cook evenly and make cleanup easier. Now, let’s prepare the breadcrumb mixture. In a medium bowl, combine the breadcrumbs, grated Parmesan cheese, minced garlic, dried oregano, dried basil, salt, and pepper. Mix well to ensure the flavors blend together. Set this aside for later. The fun part comes next! Begin layering half of the sliced zucchini in your baking dish. Make sure to spread the slices evenly. After the zucchini, sprinkle half of your breadcrumb mixture over the top. Then, pour half of the marinara sauce over that. Finally, add half of the shredded mozzarella cheese. Repeat this process with the remaining ingredients. Layer the rest of the zucchini, followed by the breadcrumb mixture, marinara sauce, and mozzarella cheese. This layering builds flavor and texture in every bite. Cover your dish with aluminum foil. This will trap moisture and cook the zucchini well. Bake it in the preheated oven for 25 minutes. After that, remove the foil. Continue baking for about 15 more minutes. You want the cheese to be bubbly and golden brown. Once it’s done, take it out of the oven and let it stand for 5-10 minutes. This allows the dish to set and makes serving easier. Before plating, garnish with fresh parsley for a pop of color and flavor. For the full recipe, check out the earlier sections. Enjoy your delicious Zucchini Parmesan Bake! When picking zucchini, look for firm ones. They should feel heavy for their size. Choose ones with smooth skin and bright color. Avoid any with blemishes or soft spots. These signs mean they may be old or spoiled. Fresh zucchini makes your dish taste great and keeps its texture. To cook zucchini evenly, slice it into thin rounds. Thin slices cook faster and evenly. Layer your zucchini in a baking dish without crowding. This helps heat circulate and cooks them well. For melting cheese, use a mix of mozzarella and Parmesan. These cheeses melt nicely and give a tasty topping. One mistake is not salting zucchini before baking. Salt helps draw out excess moisture. If you skip this step, your bake may turn out soggy. Another mistake is not covering the dish. Covering it keeps moisture in for the first part of cooking. Lastly, don't forget to let it sit after baking. This helps flavors meld and makes serving easier. For more details, check out the Full Recipe. {{image_2}} To make your Zucchini Parmesan Bake even better, try adding fresh herbs. Chopped basil or thyme brings a bright taste. You can also mix in other veggies, like bell peppers or mushrooms. These add color and texture. A pinch of red pepper flakes can give it a nice kick. If you love garlic, add an extra clove or two. This will boost the flavor in every bite. This dish is easy to make vegetarian or vegan. For a vegan version, swap the cheeses for plant-based options. Nutritional yeast can give a cheesy flavor without dairy. Use vegan breadcrumbs to keep it plant-based. Check the marinara sauce too; some brands have added sugars or fats that are not vegan. This way, you can enjoy a tasty meal that fits your diet. Zucchini Parmesan Bake is great on its own, but you can serve it with sides. A fresh salad with a light vinaigrette adds a nice crunch. Garlic bread is a popular choice too. For a more filling meal, pair this dish with pasta or quinoa. It’s also perfect for lunch the next day. Serve it warm and enjoy the leftovers with a sprinkle of fresh herbs on top. For more details, check the Full Recipe. To store leftovers, let the dish cool down first. Place the Zucchini Parmesan Bake in an airtight container. This keeps it fresh. You can store it in the fridge for up to three days. If you notice any moisture, use a paper towel to absorb it. When you are ready to enjoy leftovers, preheat your oven to 350°F (175°C). Place the Zucchini Parmesan Bake in an oven-safe dish. Cover it with foil to keep it moist. Heat for about 15-20 minutes. You want the cheese to melt again and the dish to be warm. You can also use a microwave for quick reheating. Heat it in 30-second intervals, stirring in between. If you want to keep it longer, freezing is a great option. Cut the bake into portions and wrap each piece in plastic wrap. Then, place the wrapped pieces in a freezer-safe bag. Remove as much air as possible. You can freeze Zucchini Parmesan Bake for up to three months. To reheat, thaw it in the fridge overnight. Then, bake it in the oven as mentioned earlier. For the best results, enjoy it fresh, but freezing works well for busy days. Check out the Full Recipe for more details! To make Zucchini Parmesan Bake gluten-free, simply swap regular breadcrumbs for gluten-free ones. You can find gluten-free panko breadcrumbs at many stores. These options will give your dish the same great texture without gluten. Yes, you can use other cheeses! Try a mix of mozzarella and cheddar for a melty twist. Feta cheese can add a nice tangy flavor. Goat cheese also works well, giving a creamy touch that blends nicely with the zucchini. Zucchini Parmesan Bake pairs well with a simple salad or garlic bread. A light side of steamed veggies complements the dish nicely. You can also enjoy it with pasta for a heartier meal. For a fun twist, serve it with a dollop of marinara on the side. Check out the Full Recipe for more ideas! Zucchini Parmesan Bake is simple and tasty, with fresh ingredients and clear steps. We covered key ingredients and top brands to use, along with easy substitutions. I shared detailed preparation and baking tips that help avoid common mistakes. You can also explore variations to fit your tastes and dietary needs. For storage, keeping leftovers fresh is key. With this guide, you now have all the tools to make a great dish. Enjoy experimenting with flavors and serving ideas!

Zucchini Parmesan Bake Savory and Satisfying Dish

If you’re looking for a tasty dish that highlights the fresh flavors of summer, try my Zucchini Parmesan Bake. This

To make this peach yogurt parfait, you need the following ingredients: - 2 ripe peaches, diced - 2 cups Greek yogurt (plain or vanilla) - 1/2 cup granola (or your favorite nutty mix) - 2 tablespoons honey or maple syrup - 1 teaspoon vanilla extract - 1/4 teaspoon cinnamon - Fresh mint leaves for garnish These ingredients work together to create a fresh and tasty delight. The peaches add sweetness, while the yogurt provides creaminess. Granola gives a nice crunch. You can change this recipe to suit your taste. Here are some fun options: - Berries (like strawberries or blueberries) for added flavor - Nuts (such as almonds or walnuts) for crunch - Coconut flakes for a tropical twist - Chia seeds for extra health benefits Feel free to mix and match these ingredients. Each option will add a new layer of flavor to your parfait. Sometimes, you may not have all the ingredients on hand. Here are some substitutes you can use: - Use regular yogurt if you don’t have Greek yogurt. - Swap peaches for any other fruit, like bananas or apples. - Honey can be replaced with agave syrup or sugar. - If you want a nut-free option, use seeds instead of granola. These substitutes keep the recipe tasty and easy to make. Just remember, the flavors might change a bit but will still be delicious! You can find the full recipe to guide you through the process. To start, grab a medium bowl. You will mix Greek yogurt, honey, vanilla extract, and cinnamon. Use a spatula or whisk to blend until the mix is smooth. This creamy base adds richness and flavor to your parfait. Now, it's time to layer. Take serving glasses or bowls. Start with about 1/4 cup of the yogurt mixture at the bottom. Next, add 1/4 of the diced peaches on top. Then, sprinkle about 2 tablespoons of granola. Repeat these layers until you fill the glasses. Finish with a layer of yogurt. Add a few peach slices and a sprinkle of granola on top. For the final touch, garnish with fresh mint leaves. This adds a pop of color and freshness. Serve the parfaits in clear glasses. This way, you can show off the beautiful layers. A drizzle of honey on top gives it an extra sweet note. Enjoy your Peach Yogurt Parfait Fresh and Tasty Delight! For the detailed recipe, check the Full Recipe section. When you pick peaches, look for ones that feel slightly soft. They should have a nice sweet smell. The skin should be smooth and a bit fuzzy. If the peach is too hard, it is not ripe. A ripe peach will have a golden hue, not green. You can also gently press it; if it gives a little, it’s ready to eat! Layering your parfait is key to its beauty. Start with a layer of yogurt at the bottom. Use about 1/4 cup for each layer. Next, add peaches, then granola. Keep repeating these layers. Make sure the last layer is yogurt. This keeps the granola crunchy. It also looks pretty! Use clear glasses to show off those lovely layers. Serve your parfait right after you make it. This keeps the granola crispy. You can add a drizzle of honey on top for sweetness. Fresh mint leaves add a nice touch of color and flavor. Try serving it at breakfast or as a snack. It’s a great way to impress your friends and family. For the full recipe, check out the Peach Paradise Yogurt Parfait! {{image_2}} You can change the taste of your parfait by using different fruits. Try berries like strawberries, blueberries, or raspberries. For a tropical twist, use mango or pineapple. Each fruit adds its own flavor and sweetness. You can even mix fruits together for a fun blend. Just remember to pick ripe fruit for the best taste. While Greek yogurt is a favorite, you can try other types too. Plain yogurt or flavored yogurt works well. You could even use low-fat or whole milk yogurt. If you want something creamier, go for a custard-style yogurt. Each option gives a unique texture and flavor to your parfait. To make a vegan version, swap out dairy yogurt for plant-based options. Almond, coconut, or soy yogurt are great choices. These yogurts still give you a nice creaminess. Use maple syrup or agave instead of honey for sweetness. You can make a delightful, dairy-free peach yogurt parfait easily! For the full recipe, check out Peach Paradise Yogurt Parfait . If you have leftover parfaits, store them in the fridge. Use an airtight container to keep them fresh. This helps maintain the yogurt's creaminess and the peaches' juiciness. Avoid stacking layers too high to prevent squishing. Enjoy your parfait within two days for the best taste. Meal prep makes mornings easier. Prepare the yogurt mixture and store it separately. Chop your peaches and keep them in a sealed bag. Store granola in a dry place to keep it crunchy. Layer everything just before you eat. This keeps the parfait fresh and tasty. Greek yogurt lasts about one to three weeks in the fridge. Check the date on the container. Fresh peaches can last around five days at room temperature. If they become too soft, use them right away. Granola usually lasts up to six months if sealed well. Always check for any signs of spoilage before using. For the full recipe, check out the Peach Paradise Yogurt Parfait . You can prepare the yogurt mixture a day before. Mix the Greek yogurt, honey, vanilla, and cinnamon. Store it in the fridge. Slice the peaches the night before too, but keep them in lemon juice to stop browning. Layer everything right before serving. This keeps the parfait fresh and tasty. I don’t recommend freezing the parfait. The yogurt may get icy and grainy when thawed. The peaches can turn mushy. If you want to save some, freeze the yogurt mixture without layers. When ready to eat, thaw it in the fridge and layer with fresh peaches and granola. You can swap granola with many tasty options. Try crushed nuts or seeds for crunch. Puffed rice or oats also work well. For a sweeter touch, use crushed cookies or cereal. These choices keep your parfait delicious and fun! To wrap up, we explored how to make a delicious peach yogurt parfait. We covered key ingredients and fun ways to change them up. I shared easy steps to make the parfait and tips for choosing the ripest peaches. Plus, I gave storage advice to keep your parfait fresh. Remember, you can get creative with fruits and yogurt options. Enjoy your tasty treat, and feel free to experiment!

Peach Yogurt Parfait Fresh and Tasty Delight

Are you ready to savor a delicious Peach Yogurt Parfait? This quick and easy treat combines fresh peaches, creamy yogurt,

To make the Easy Roasted Squash Medley, gather these fresh ingredients: - 1 medium butternut squash, peeled and cubed - 1 medium acorn squash, peeled and cubed - 2 cups Brussels sprouts, trimmed and halved - 1 red onion, chopped into wedges These squashes bring a lovely sweetness. Brussels sprouts add crunch and depth. The red onion gives a slight bite, balancing the dish. Next, you need to add flavors with these seasonings and oils: - 3 tablespoons olive oil - 2 tablespoons maple syrup - 1 teaspoon ground cinnamon - 1/2 teaspoon nutmeg The olive oil helps the veggies roast well. Maple syrup adds sweetness, while cinnamon and nutmeg give warmth and spice. This mix makes each bite special. For a touch of freshness, consider these optional garnishes: - Fresh thyme sprigs - Other garnish suggestions Thyme adds a lovely herb note. You can also use toasted nuts or cheese for extra flavor. These simple touches can elevate your dish even more. For the full recipe, check out the instructions to create this delicious Easy Roasted Squash Medley. 1. First, preheat your oven to 425°F (220°C). This step is key for even cooking. 2. Line a large baking sheet with parchment paper. This helps with easy cleanup. 3. Next, peel and cube the butternut squash and acorn squash. Aim for bite-sized pieces. 4. Halve the Brussels sprouts and chop the red onion into wedges. Keep the sizes uniform for even cooking. 1. In a large mixing bowl, add the cubed squash, Brussels sprouts, and red onion. 2. Drizzle the olive oil and maple syrup over the veggies. This adds great flavor. 3. Sprinkle in the cinnamon, nutmeg, salt, and black pepper. These spices give warmth to the dish. 4. Now, toss everything together. Make sure each piece is well coated in the oil and spices. 1. Spread the vegetable mixture evenly on the prepared baking sheet. This allows for nice roasting. 2. Roast in the preheated oven for 25-30 minutes. Stir halfway through for even cooking. 3. Look for the squash to be tender and lightly caramelized. This is when it is perfectly done. 4. Once finished, remove from the oven and let it cool slightly. Garnish with fresh thyme sprigs before serving. For the complete recipe, check the Full Recipe. When you pick squash, look for firm, smooth skin. Butternut squash has a sweet, nutty flavor. Its flesh is bright orange and very creamy. Acorn squash has a green, bumpy skin and tastes mildly sweet. It has a yellow-orange flesh. Both types are great for roasting. These squashes are in season from late summer to early winter. This means you can find them fresh at local markets during these months. The best oven temperature for roasting is 425°F (220°C). This heat caramelizes the natural sugars in the squash. Roast for about 25 to 30 minutes. Halfway through, stir the veggies for even cooking. You know the squash is done when it feels tender with a fork. It should have a golden color on the outside. To make the flavors pop, try marinating your squash. Just toss it in olive oil, maple syrup, and spices. Let it sit for 15 minutes before roasting. If you have a convection oven, use it! It cooks food faster and more evenly. This way, you get a perfect, crispy edge on your veggies. You can follow the Full Recipe for exact steps to enjoy this dish! {{image_2}} You can switch up the vegetables in this dish. Try sweet potatoes or carrots for a twist. You can also add bell peppers or zucchini for a colorful mix. For seasonings, consider using garlic powder, smoked paprika, or even a dash of chili powder. These options can give your squash medley a different flavor. If you're vegan, this recipe is already a great fit. Just skip any cheese you might add. For gluten-free folks, you can enjoy this dish without worry. If you want a low-carb option, skip the maple syrup. Instead, use a bit of balsamic vinegar for a sweet touch without the carbs. This roasted squash medley pairs well with proteins like grilled chicken, fish, or tofu. You can also serve it alongside quinoa or brown rice for a filling meal. For a light side, consider a simple green salad. You can even serve this dish as a vibrant topping on a grain bowl. The flavors work well together and make dinner easy and tasty! To store leftovers, let the squash medley cool first. Then place it in an airtight container. This keeps the flavors fresh. You can store it in the fridge for up to four days. It's best to eat it within this time for the best taste. If you want to freeze the squash medley, use a freezer-safe container or bag. Make sure it is cooled completely before packing it away. The medley will stay good in the freezer for up to three months. When you're ready to eat it, thaw it in the fridge overnight. Reheat in the oven or on the stove until hot. Look for signs that the dish has gone bad. If you see mold or it smells off, do not eat it. The texture should still be firm, not mushy. Always follow safe food handling practices. Wash your hands and surfaces before cooking. This keeps your food tasty and safe. Roasting squash takes about 25 to 30 minutes. You want it to be tender. The edges should get a nice golden color. Check it after 20 minutes to see if it needs stirring. This helps it roast evenly. You can use frozen vegetables, but fresh ones taste better. Frozen veggies may not roast well. They can become mushy and watery. If you use frozen, reduce the cooking time. Stir them carefully to avoid breaking them apart. Roasted squash medley pairs well with many dishes. Try serving it with grilled chicken or fish. It also complements grains like quinoa or rice. Add a simple salad for a fresh touch. Yes, you can prepare the squash medley ahead of time. Chop the vegetables and store them in the fridge. Toss them with oil and spices just before baking. You can also roast them and reheat later. For more details, check the Full Recipe. In this blog post, we've covered how to make an easy roasted squash medley. You learned about the main ingredients like butternut and acorn squash, along with seasonings like cinnamon and nutmeg. We discussed preparation, roasting, and tips for perfect flavor. Don't forget the variations and storage tips to keep your dish fresh. Roasted squash is not just tasty; it’s also versatile. You can serve it with many proteins or sides. Enjoy this delicious recipe and make it your own!

Easy Roasted Squash Medley Flavorful and Simple Dish

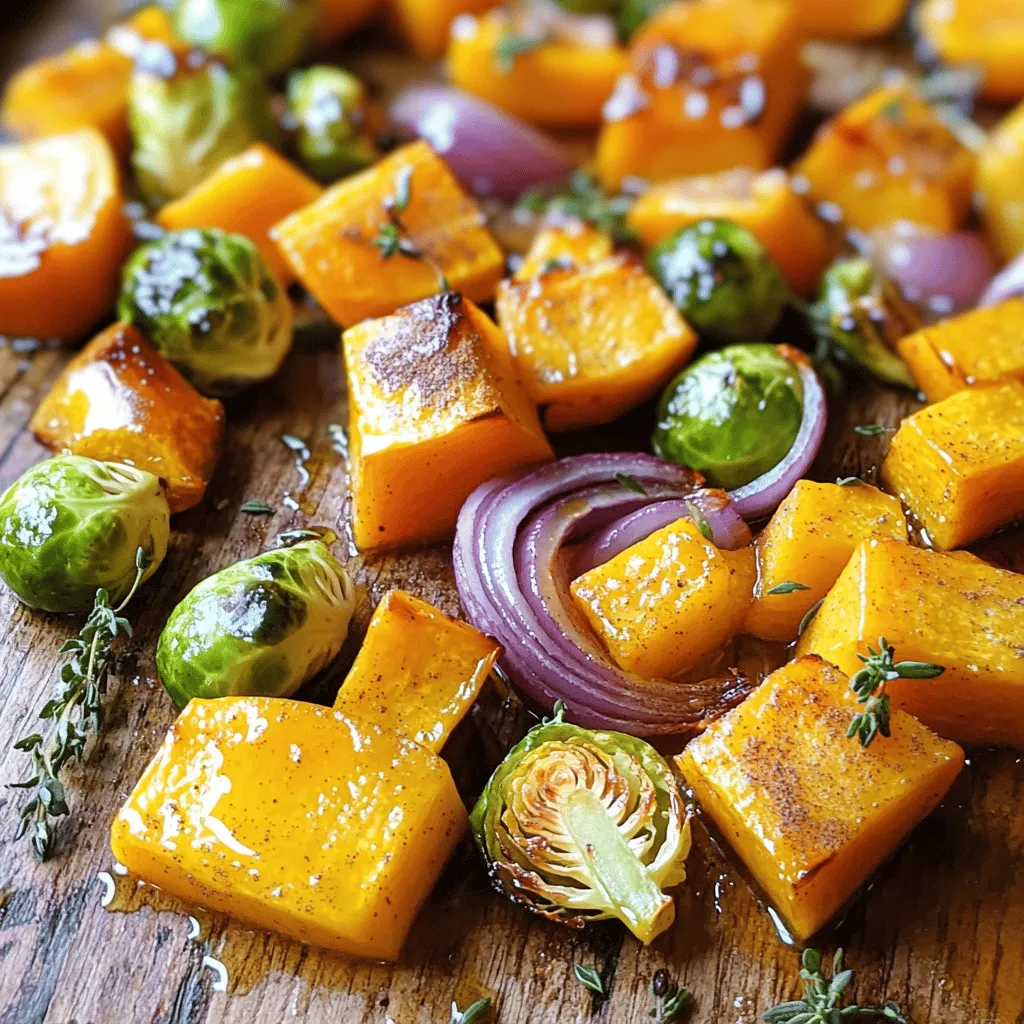
Are you ready to delight your taste buds with a colorful, Easy Roasted Squash Medley? This simple dish combines sweet

This no-bake peach pie cups recipe is simple and fun. Here’s what you need: - 2 cups fresh peaches, peeled and diced - 1 tablespoon lemon juice - 1 packet (8 oz) cream cheese, softened - 1 cup whipped cream or whipped topping - 1/4 cup powdered sugar - 1 teaspoon vanilla extract - 1 cup graham cracker crumbs - 1/4 cup unsalted butter, melted - Fresh mint leaves for garnish (optional) Each ingredient plays a key role. Fresh peaches bring sweetness and texture. Lemon juice adds a bright zing. Cream cheese makes the filling rich and creamy. Whipped cream lightens it up, while powdered sugar adds just the right touch of sweetness. Graham cracker crumbs form a crunchy base, and melted butter helps bind them together. The mint leaves, while optional, make a lovely garnish. Make sure to have everything ready before you start. This helps keep the process smooth. You can find the full recipe to guide you through each step. Enjoy the process and the delicious results! 1. Marinate the diced peaches Start by tossing 2 cups of diced peaches with 1 tablespoon of lemon juice. This mix adds a bright taste and helps keep the peaches fresh. Let them sit for about 10 minutes. This step is key for great flavor. 2. Beat the cream cheese In a large bowl, take 1 packet of softened cream cheese. Use a mixer to beat it until it is fluffy. This will be the creamy base for your cups. 3. Combine additional ingredients Gradually add 1/4 cup of powdered sugar and 1 teaspoon of vanilla extract to the cream cheese. Keep mixing until everything is well blended. Then, gently fold in 1 cup of whipped cream until the mixture is smooth. 1. Layering the graham cracker base In a small bowl, mix 1 cup of graham cracker crumbs with 1/4 cup of melted butter. Stir until the crumbs are coated. This will be the crunchy base for your cups. 2. Adding cream cheese mixture Grab small cups or glasses. Start by adding a spoonful of the graham cracker mixture to the bottom. Then, layer on some of the cream cheese mixture. 3. Topping with marinated peaches Next, add a layer of the marinated peaches on top. Repeat these layers until the cups are full. Finish with a dollop of cream cheese mixture and a few peach pieces on top for a pretty look. 1. Setting time before serving Place the cups in the fridge for at least 1 hour. This chilling time helps the flavors meld together and the cups to set. It makes each bite taste even better. - Properly storing leftovers: Keep your peach pie cups in the fridge. Use an airtight container to keep them fresh. They stay tasty for about three days. - Best containers for storage: Glass jars or plastic containers work well. Choose ones with tight lids to prevent air from getting in. - Presentation enhancements: Serve in clear cups to show off the layers. Top each cup with a mint leaf and a sprinkle of graham cracker crumbs for a nice look. - Pairing ideas with beverages: These cups go well with sweet tea or lemonade. A scoop of vanilla ice cream on the side adds a fun touch. - Overmixing ingredients: When you mix the cream cheese and whipped cream, mix gently. Overmixing can make it too thin and runny. - Not marinating peaches long enough: Let the peaches sit in lemon juice for at least 10 minutes. This step brings out their natural sweetness and flavor in the cups. {{image_2}} You can switch out peaches for other fruits. Berries work great, like strawberries or blueberries. You can also try apples or pears. Each fruit brings its own flavor. This keeps your dessert fresh and fun. Add spices like cinnamon for a twist. You can also mix fruits for a fruit medley. Get creative and find your favorite combo! Graham crackers are tasty, but you can use cookie crumbs too. Try chocolate or vanilla cookies for a new flavor. If you need gluten-free options, use gluten-free cookies. This way, everyone can enjoy the treat. Just crush your choice of cookies and mix them with butter. Simple and delicious! If you want a vegan option, substitute cream cheese with a dairy-free version. Look for brands that use nuts or soy. For a low-sugar or sugar-free treat, use sugar alternatives. Sweeteners like stevia or erythritol work well. These swaps keep your dessert tasty while fitting your diet. Enjoy your No-Bake Peach Pie Cups without worry! To keep your no-bake peach pie cups fresh, store them in the fridge. Use airtight containers for best results. This helps to keep the flavors intact and prevents drying out. You can also cover the cups with plastic wrap if you don’t have containers. If you want to save them for later, freezing is an option, but it may change the texture. Place them in freezer-safe containers or bags. Make sure to remove as much air as possible to prevent freezer burn. No-bake peach pie cups can stay fresh in the fridge for about 3 to 5 days. After that, they may lose their taste and texture. Look for signs of spoilage, like an off smell or changes in color. If you see any liquid pooling at the bottom, it’s best to toss them out. Enjoy your delicious treat while it's fresh! No-Bake Peach Pie Cups can last about three days in the fridge. Store them in an airtight container. This keeps them fresh and tasty. After three days, the peaches may start to lose their texture. Yes, you can use frozen peaches. Thaw them first and drain excess juice. This helps avoid a watery mixture. Frozen peaches can work great in this recipe. They offer a sweet and fruity flavor too. You can use Greek yogurt for a lighter option. It adds creaminess and a bit of tang. Another choice is coconut whipped cream for a dairy-free option. Both substitutes keep your cups delicious and smooth. Yes, this recipe is perfect for making ahead. You can prepare the cups a day in advance. Just cover them and store them in the fridge. This saves time and lets the flavors meld together nicely. Yes, refrigerating is very important. Chilling helps the layers set and firm up. It also enhances the flavor. Serve them cold for a refreshing treat. Enjoying them chilled makes each spoonful delightful! We reviewed how to create delicious No-Bake Peach Pie Cups. Start with fresh peaches and a creamy mix. Pay close attention to marinating the peaches and layering your ingredients. Remember to store leftovers properly and avoid common mistakes. Try variations with different fruits or bases to fit your taste. Overall, these cups deliver flavor without hassle. Enjoy them at your next gathering or as a treat for yourself. Dive into this easy recipe and share it with friends for happy moments!

No-Bake Peach Pie Cups Delightful and Simple Treat

Looking for a sweet treat that’s easy to whip up? Try my No-Bake Peach Pie Cups! They’re creamy, fruity, and

Creating a delicious tropical fruit salad starts with fresh ingredients. You want ripe and sweet fruits for the best taste. Here’s what you need: - 1 ripe pineapple, peeled and diced - 2 ripe mangoes, diced - 1 papaya, peeled and cubed - 1 cup strawberries, hulled and halved - 1 banana, sliced - 1/2 cup shredded coconut - 1 lime, juiced - 2 tablespoons honey or agave syrup (optional) - Fresh mint leaves for garnish Each serving of this tropical fruit salad is low in calories and full of vitamins. Fruits like mangoes and papayas give you vitamin C, which boosts your immune system. Pineapples help with digestion. Strawberries are rich in antioxidants. Bananas provide potassium, which is good for your heart. This salad not only tastes great but also nourishes your body. For the full recipe, you can check how to easily bring these flavors together! To start, wash all your fruits well. This keeps them clean and safe. For the pineapple, cut off the top and bottom. Stand it upright and slice off the skin. Dice the pineapple into small cubes. For the mangoes, cut along the seed and scoop out the flesh. Dice the mango into pieces. Next, peel the papaya and cut it in half. Remove the seeds, then cube the flesh. For the strawberries, remove the green tops and slice them in half. Lastly, slice the banana into rounds. When choosing fruits, look for ones that are firm but yield slightly when pressed. A ripe pineapple smells sweet at the base. Mangoes should feel soft but not mushy. Papayas should have a slight softness, and strawberries must be bright red with no dark spots. Now it’s time to mix the fruits. In a large bowl, add the diced pineapple, mangoes, papaya, strawberries, and banana. Toss them gently to combine. For the dressing, grab a small bowl. Squeeze the juice from one lime into it. Add honey or agave syrup, if you like. Whisk the lime juice and sweetener until mixed well. Drizzle this mixture over the fruit. Toss gently again to coat all the pieces evenly. Chill the salad in the fridge for about 30 minutes. This step is key as it helps the flavors blend. The cold fruit will taste even better! Before serving, gently fold in the shredded coconut. This adds a nice texture but be careful not to mash the fruit. Serve it in a bowl and enjoy your Tropical Paradise Fruit Salad! For the full recipe, check the top of this section. Freshness is key for a great tropical fruit salad. I always choose ripe fruits. Ripe fruits are sweet and juicy. They make the salad taste amazing. When you pick fruits, look for bright colors and a sweet smell. This means they are ripe and ready to eat. Balancing sweetness is important too. Lime juice adds a zesty kick. It makes the salad bright and refreshing. Start with one lime's juice. Taste as you go. If you want it sweeter, add honey or agave syrup. Just a bit can make a big difference. Serving your salad in a fun way makes it special. Use a big, clear bowl to show off the colors. You can also use individual cups for a personal touch. This makes it easy for guests to grab their own. Garnishing with fresh mint leaves adds a pop of color. The mint also adds a fresh taste. Just sprinkle a few leaves on top before serving. It makes your salad look beautiful and inviting. Leftovers can be stored for later. Use an airtight container to keep the salad fresh. It can last in the fridge for up to two days. But the fruit is best when fresh. Serving temperatures matter too. I like to chill the salad for about 30 minutes before serving. This helps the flavors mix and cools it down. Serve it cold for a refreshing treat. {{image_2}} You can enhance your tropical fruit salad by adding more fruits. Consider using kiwi, passion fruit, or dragon fruit. These fruits bring new flavors and colors. For kiwi, slice it thinly. Passion fruit adds a tangy kick, and dragon fruit adds a pop of pink. When adding these fruits, you may want to adjust the dressing. If you use more tart fruits, add a bit more honey or agave to balance the flavors. This keeps every bite delicious. If you want a lighter option, try substituting honey or agave with stevia. Stevia is a great natural sweetener with no calories. This change keeps your fruit salad sweet without added sugars. Also, consider using unsweetened coconut instead of sweetened. Unsweetened coconut gives texture without extra sweetness. These swaps make your tropical fruit salad healthier while still being tasty. You can create themed fruit salads for holidays or special events. For a summer party, try adding berries and mint to your tropical mix. This adds a festive touch. Pair your tropical fruit salad with grilled chicken or fish for a full meal. The bright flavors of the salad complement savory dishes well. You can even serve it in a pineapple shell for a fun presentation. This makes your dish stand out and impresses your guests. For the full recipe, check out the Tropical Paradise Fruit Salad section. To keep your tropical fruit salad fresh, use an airtight container. This method helps lock in moisture and flavor. You can store it in the fridge for up to three days. After that, the fruits may start to lose their crunch and taste. Always check for any signs of spoilage before enjoying leftovers. Can you freeze tropical fruit salad? Yes, you can! However, freezing may change the texture of some fruits. To freeze, place the salad in a freezer-safe container. Make sure to remove as much air as possible. This helps prevent freezer burn. Consume within three months for the best taste. Use glass or BPA-free plastic containers to store your fruit salad. Glass keeps fruits fresh longer and does not absorb smells. If you want an eco-friendly option, look for reusable silicone bags. They are a great way to store fruits without waste. Always choose containers that seal tightly to keep your salad safe and fresh. To pick ripe tropical fruits, look for these signs: - Pineapple: It should have a sweet smell and yield slightly when pressed. - Mango: Press gently; it should feel soft but not mushy. Look for deep color. - Papaya: A ripe papaya is golden and yields to gentle pressure. - Strawberries: They should be bright red and firm. Avoid any that are white or mushy. - Banana: Choose yellow bananas with some brown spots for sweetness. These indicators help ensure your salad tastes fresh and sweet. Yes, you can make this salad a few hours ahead of time. I recommend preparing it up to 4 hours in advance. Just keep it in the fridge to stay cool. The fruits will blend their flavors nicely. However, avoid making it a day before as some fruits might turn brown or mushy. Absolutely! This salad is great for meal prep. Here are my best tips: - Portion it out: Divide the salad into small containers for easy grab-and-go meals. - Use fresh fruits: Fresh fruits keep their taste and texture best. - Add dressing later: For best flavor, mix in the lime juice and honey right before you eat it. These steps help you enjoy this healthy delight all week long! For the full recipe, check out Tropical Paradise Fruit Salad. In this blog post, we explored how to make a delicious tropical fruit salad. We covered the ingredients, like fresh fruits and coconut, and shared tips for preparation and presentation. I emphasized the importance of using ripe fruits for the best taste. You can also try different variations for special occasions. With these simple steps, you can create a refreshing dish that’s sure to impress. Enjoy your tropical fruit salad, and don’t forget to have fun while making it!

Tropical Fruit Salad Refreshing and Healthy Delight

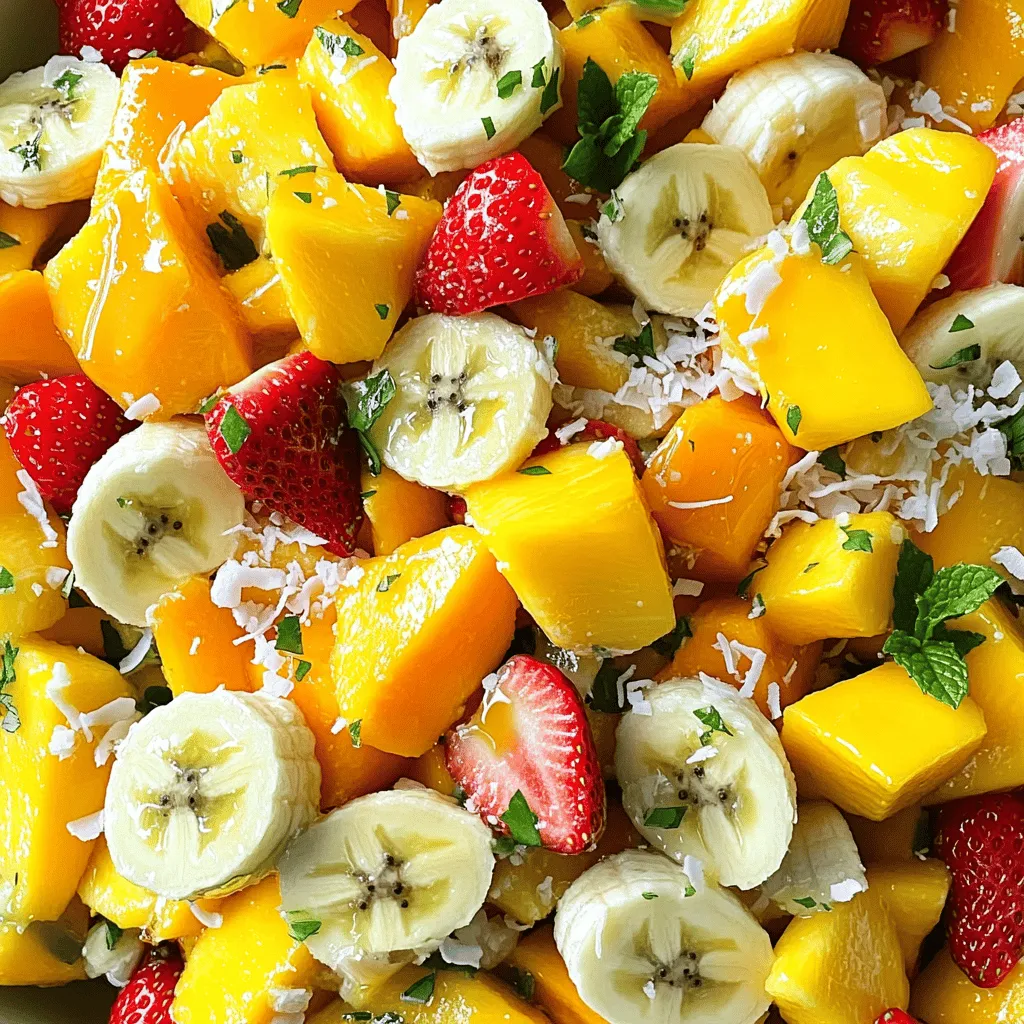
Are you ready to cool down with a vibrant bowl of Tropical Fruit Salad? This tasty mix combines sweet and

- 2 cans (15 oz each) chickpeas, drained and rinsed - 1 tablespoon coconut oil - 1 medium onion, chopped - 3 cloves garlic, minced - 1 tablespoon fresh ginger, grated - 1 can (14 oz) coconut milk - 1 can (14 oz) diced tomatoes - 2 tablespoons curry powder - 1 teaspoon ground cumin - 1 teaspoon turmeric - 1 teaspoon garam masala - Salt and pepper to taste - 2 cups spinach, fresh - 1 tablespoon lemon juice - Cooked basmati rice or quinoa for serving This dish packs a punch of flavor and health! The chickpeas give protein, while the spices add warmth. Coconut milk makes it creamy without dairy. You can find the full recipe for this easy chickpea curry at the end of this section. Feel free to tweak the spices! Want it spicier? Add more curry powder or some chili flakes. You can also add more veggies like bell peppers or kale. This recipe is all about making it your own! I love using fresh ingredients. They make a big difference in taste. The spinach adds color and nutrients. Don't skip the lemon juice! It brightens the dish and balances the flavors. For a nice touch, consider adding some optional garnishes. Fresh coriander leaves and lemon wedges elevate the dish. They make it look and taste even better! Enjoy this easy, tasty, and healthy meal. 1. Start by heating the coconut oil in a large saucepan over medium heat. This will help give your curry a rich, smooth base. 2. Next, add the chopped onion. Sauté it for about 5 minutes. You want it to become soft and translucent. 3. Then, stir in the minced garlic and grated ginger. Cook for another minute. This will make your kitchen smell amazing! 4. Now, it’s time to toast the spices. Add the curry powder, ground cumin, turmeric, and garam masala to the onion mixture. Stir well and cook for 2 minutes. This step brings out all the flavors of your spices. 5. Pour in the canned diced tomatoes and coconut milk. Stir it all together until well combined. The mixture should look vibrant and inviting. 6. Add the drained chickpeas to the saucepan. Mix everything well. Bring the mixture to a gentle simmer. This allows all the flavors to meld together. 7. Cover the pot and let it simmer for about 15 to 20 minutes. Stir occasionally. You want the curry to thicken slightly. 8. After that, stir in the fresh spinach. Cook for an additional 5 minutes until it wilts. This adds great color and nutrients to your dish. 9. Finally, season your curry with salt, pepper, and a squeeze of lemon juice to taste. This brightens the flavors wonderfully. You can find the full recipe in the article above. Enjoy your easy chickpea curry! To make the best easy chickpea curry, you can adjust the spice levels. If you like heat, add more curry powder or a pinch of cayenne. For a milder dish, use less spice. This way, you can make it perfect for your taste buds. If you want a creamier curry, add more coconut milk. This makes the dish rich and smooth. You can also mix in a bit of plain yogurt for extra creaminess. Both methods work well to enhance the texture. Pair your chickpea curry with rice or quinoa. Both options soak up the sauce and add great flavor. Cooked basmati rice is a classic choice. Quinoa adds a nice protein boost. For a beautiful dish, serve the curry in a deep bowl. Garnish with fresh coriander leaves. Add a wedge of lemon on the side for extra flavor. These small touches make your meal look and taste amazing. Check the Full Recipe for more details! {{image_2}} You can make this easy chickpea curry your own. Change up the veggies for a new twist. Add bell peppers for sweetness or kale for a nutrient boost. You can also try carrots or zucchini for extra crunch. If you want a different protein, swap chickpeas for lentils or tofu. Lentils cook fast and give a hearty texture. Tofu absorbs flavors well and adds protein. This recipe is great for many diets. It is vegan, so it has no animal products. It is also gluten-free, making it safe for those with gluten allergies. If you need to watch your salt, use low-sodium canned tomatoes and coconut milk. This keeps the dish healthy without losing flavor. Enjoy your tasty chickpea curry while meeting your dietary needs! To keep your Easy Chickpea Curry fresh, store it in an airtight container. Here are some best practices: - Refrigeration: Place the curry in the fridge within two hours of cooking. It stays good for about 3 to 4 days. Always let it cool before sealing it up. - Freezing: For longer storage, freeze the curry. Use a freezer-safe container and leave some space at the top for expansion. It can last up to 3 months. When you're ready to eat, just thaw it overnight in the fridge. Reheating your curry properly helps keep its flavor and texture. Here’s how: - Stovetop method: Place the curry in a saucepan over low heat. Stir often to prevent sticking. Add a splash of water or coconut milk if it looks too thick. - Microwave method: Use a microwave-safe bowl. Heat in short bursts of 1 minute, stirring in between. This ensures even heating. With these tips, your chickpea curry will taste just as good as the first day! Enjoy your delicious meal again and again. For the full recipe, check out the details above. How long does easy chickpea curry last in the fridge? Easy chickpea curry can last about 4 to 5 days in the fridge. Store it in an airtight container. Make sure it cools down before sealing. Can I make this curry in advance? Yes, you can make this curry in advance. It actually tastes better the next day. Let it cool, then store it in the fridge. What can I add to enhance the flavor? You can add a few things to boost the flavor. Try adding: - Extra spices like cayenne or paprika - Fresh herbs like cilantro or parsley - A splash of soy sauce for umami Is it possible to make a spicier version? Yes, you can make it spicier. Add fresh chilies while cooking or sprinkle red pepper flakes. Adjust the spice to your taste. Estimated calories per serving Each serving of easy chickpea curry has about 350 calories. This can vary based on added ingredients and serving size. Nutritional benefits of chickpeas Chickpeas are full of protein and fiber. They help with digestion and keep you full. They also provide iron, folate, and other vitamins, making them a healthy choice. This blog post guides you to make an easy chickpea curry. You learned about the simple ingredients, like chickpeas, coconut milk, and spices. I shared step-by-step instructions to help you cook and perfect this dish. Plus, I gave tips on storing leftovers and making it your own. Remember, you can adjust spices and try different veggies. Enjoy a healthy meal that's easy to prepare! Making this curry can bring joy to your kitchen. Dive in and let your taste buds explore!

Easy Chickpea Curry Tasty and Healthy Weeknight Meal

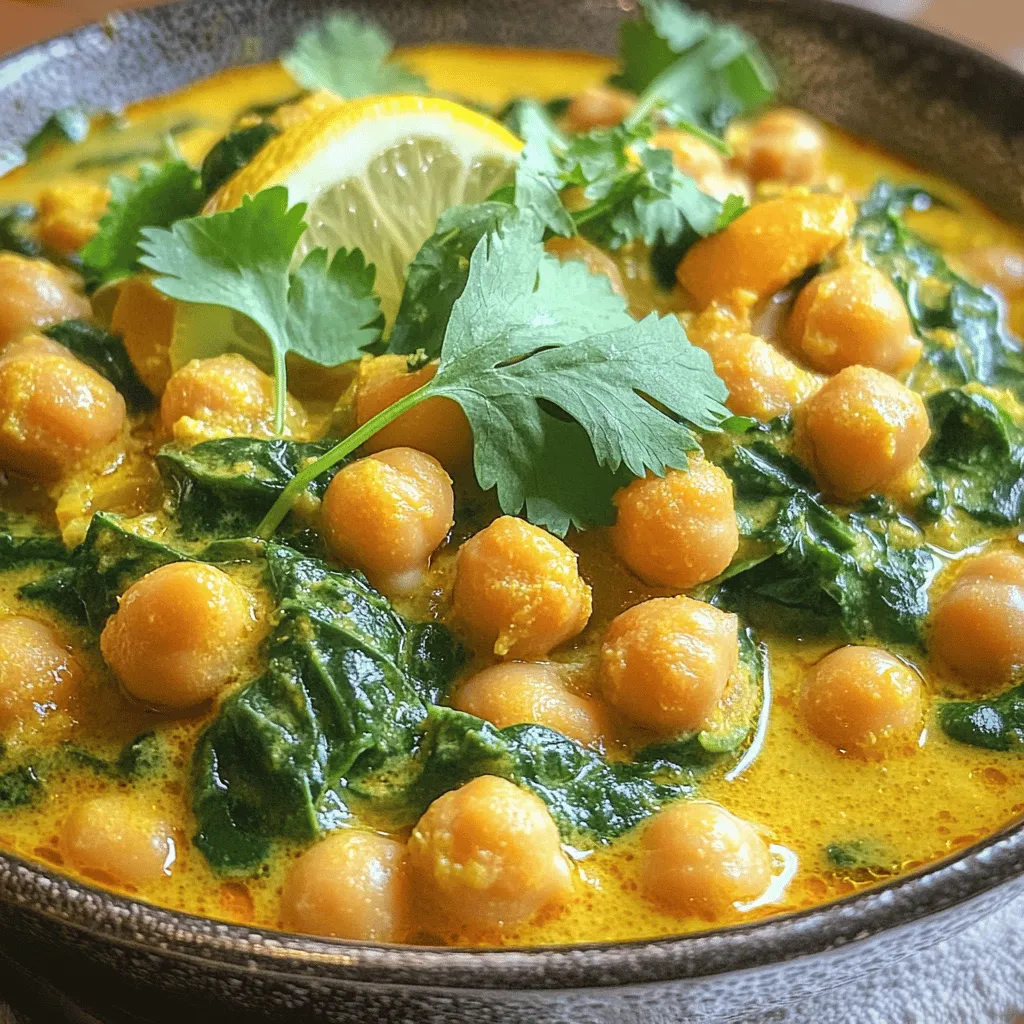
Looking for a quick and tasty dinner idea? My Easy Chickpea Curry is here to save the night! With simple

- 1 lb Brussels sprouts, trimmed and halved - 3 tablespoons olive oil - 4 cloves garlic, minced - Zest of 1 lemon - Juice of 1 lemon - 1 teaspoon salt - 1/2 teaspoon black pepper - 1/4 teaspoon red pepper flakes - 2 tablespoons grated Parmesan cheese When I make Lemon Garlic Roasted Brussels Sprouts, I start with the essential ingredients. First, I choose fresh Brussels sprouts. I trim them and cut them in half. This helps them cook evenly. I also use high-quality olive oil. It adds richness and helps the garlic flavor shine. Finely minced garlic gives a great aroma and taste. Next, I add some zest and juice from a lemon. The zest brightens the dish, while the juice adds tang. A touch of salt brings out all the flavors. For extra flavor, I often add black pepper and red pepper flakes. These spices enhance the taste and give a small kick. If I want a cheesy finish, I sprinkle some grated Parmesan cheese on top. This recipe is simple yet packed with flavor. You can find the full recipe at the beginning. Enjoy the cooking adventure! - Preheat oven to 425°F (220°C). - In a large mixing bowl, combine the halved Brussels sprouts, olive oil, minced garlic, lemon zest, lemon juice, salt, black pepper, and red pepper flakes. Toss well to ensure the sprouts are evenly coated. Starting with the prep, I love to get the oven hot. Preheating helps the sprouts crisp up nicely. Once your oven is ready, grab a mixing bowl. Toss in your trimmed and halved Brussels sprouts. Next, add olive oil to coat them. This oil helps with browning. Then, throw in the minced garlic. Garlic gives a nice kick of flavor. Next, zest a lemon into the bowl. The zest brings out a fresh taste. Squeeze the juice of that lemon in too. It brightens up the dish. Add the salt and black pepper for seasoning. If you want some heat, toss in red pepper flakes. Now, mix everything well so the sprouts are fully covered. - Spread on a baking sheet. - Roast for 20-25 minutes. Now it's time to roast! Take a baking sheet and spread the Brussels sprouts evenly. Place them cut-side down. This helps them caramelize. Roasting takes about 20 to 25 minutes. I like to stir them halfway through. This ensures even cooking and crispiness. Keep an eye on them. You want them golden brown and tender inside. - Sprinkle Parmesan cheese if desired. - Serve warm. When they’re done, take them out and check for that nice color. If you want, sprinkle grated Parmesan cheese on top while they are still hot. It melts wonderfully. Now, serve them warm. You can add extra lemon zest or a squeeze of lemon for flavor. Enjoy this tasty side dish with your favorite main course! For the full recipe, check out the comprehensive details provided. To get the best flavor from your Brussels sprouts, place them cut-side down on the baking sheet. This helps them caramelize nicely. The cut sides get crispy and brown, creating a tasty texture. Remember to stir them halfway through cooking. This action helps them roast evenly and prevents burning. You can have fun with the seasoning! Try adding different spices like smoked paprika or garlic powder. Fresh herbs can bring a lovely aroma to your dish. Consider using thyme or rosemary for a fresh twist. Just chop them fine and mix them in before roasting. A great way to make your dish pop is to garnish it with lemon zest. This adds color and a burst of flavor. You can also serve your Brussels sprouts with dips or sauces, like a creamy garlic sauce or a tangy vinaigrette. These options can elevate your meal and make it more exciting. For the full recipe, check out the earlier section! {{image_2}} You can change this dish in many fun ways. Adding bacon gives it a smoky flavor. Just chop some bacon and mix it with the Brussels sprouts before roasting. The bacon fat helps the sprouts cook evenly and adds great taste. You can also use different cheese options. Try feta or goat cheese for a tangy twist. They melt well and enhance the flavor. If you want a quicker option, try the air fryer. Set it to 375°F (190°C) and cook for about 15 minutes. Shake the basket halfway to ensure even cooking. The air fryer gives a crispy texture without needing much oil. You can also grill the Brussels sprouts. Just toss them in a grill basket and cook over medium heat for about 10-15 minutes. This method adds a nice smoky flavor and is great for summer cookouts. For vegan options, skip the cheese or use a plant-based substitute. Nutritional yeast can give a cheesy flavor without dairy. This dish is naturally gluten-free, so you don’t need to change much. Just make sure your other ingredients are gluten-free too. This way, everyone can enjoy the Lemon Garlic Roasted Brussels Sprouts. If you want to explore more ideas, check out the Full Recipe for extra tips and flavors. To store your Lemon Garlic Roasted Brussels Sprouts, let them cool first. Place them in an airtight container. Store this container in the fridge. They will stay fresh for about three to four days. If you want to freeze them, use a freezer-safe bag. Remove any air before sealing. They can last up to three months in the freezer. For the best taste, reheat Brussels sprouts in the oven. Preheat the oven to 350°F (175°C). Place the sprouts on a baking sheet. Heat for about 10 to 15 minutes until they are hot and crispy again. If you’re short on time, you can use the microwave. Place them on a safe plate and cover. Heat in 30-second bursts until warm. This method will not keep them as crispy. In the fridge, Lemon Garlic Roasted Brussels Sprouts last about three to four days. If you see any brown spots or a slimy texture, it’s time to toss them out. Trust your senses! If they smell off or look bad, don’t eat them. Always prioritize safety when it comes to food. Roasting Brussels sprouts takes about 20-25 minutes. Preheat your oven to 425°F (220°C). This high heat helps the sprouts get crispy. You want them tender inside and golden outside. Check them halfway through and stir for even cooking. Yes, you can prepare this dish ahead of time. Clean and cut the Brussels sprouts a day before cooking. Store them in the fridge in a sealed bag. Toss them with olive oil and garlic right before roasting. This keeps them fresh and tasty. These Brussels sprouts pair well with many dishes. Serve them alongside grilled chicken or fish for a healthy meal. They also go great with quinoa or rice. Add a fresh salad for a balanced plate. For a hearty meal, try them with steak or pork. Brussels sprouts are very healthy. They are low in calories but high in nutrients. They provide vitamins C and K, which are great for your body. Plus, they contain fiber, which helps your digestion. Eating Brussels sprouts can boost your immune system and help you feel full. Lemon garlic roasted Brussels sprouts are a tasty treat. We covered essential ingredients, cooking steps, and tips. You can vary flavors, methods, and storage options. Remember, roasting gives them a great crunch. Don't hesitate to add your favorite toppings or sides. Try this recipe for a fresh and healthy dish. You will enjoy the bright lemon flavor and savory garlic. Happy cooking!

Lemon Garlic Roasted Brussels Sprouts Flavorful Side Dish

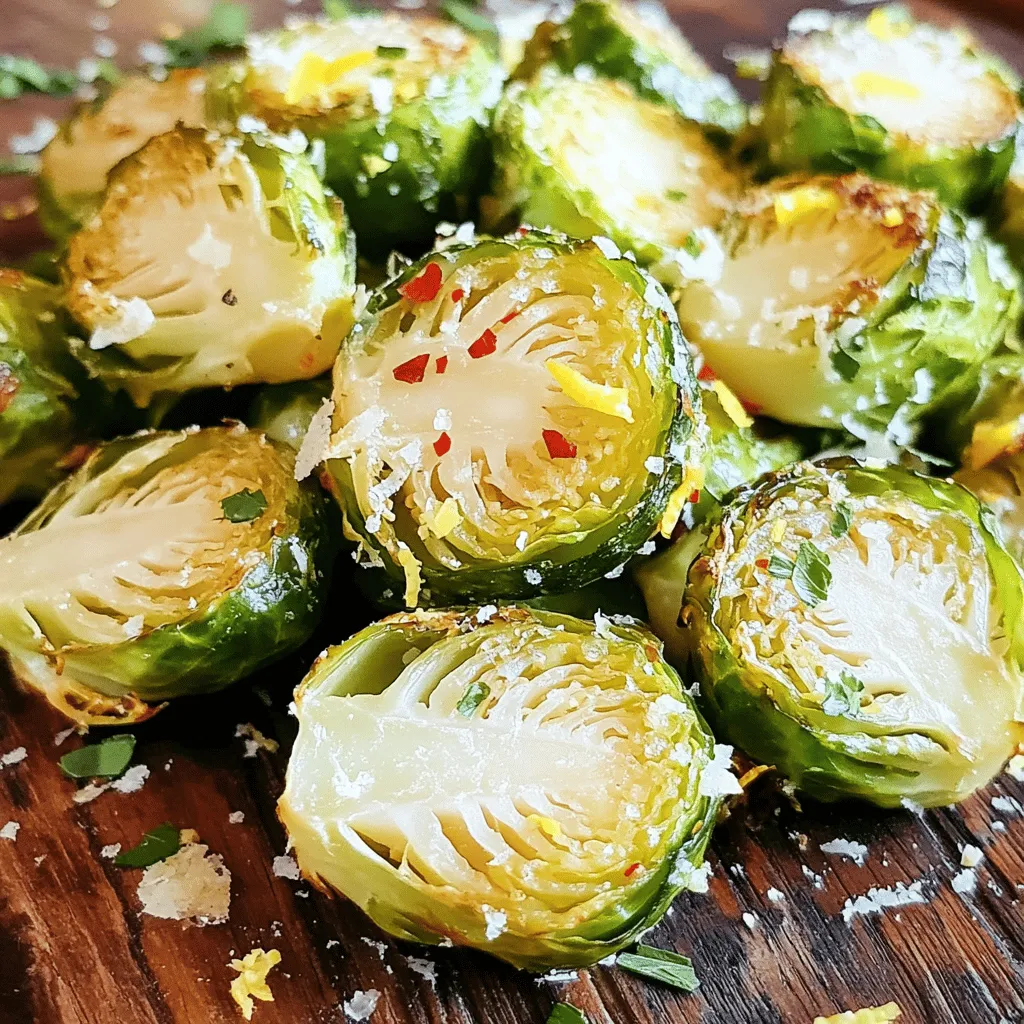
Looking for a side dish that bursts with flavor and nutrition? Try my Lemon Garlic Roasted Brussels Sprouts! This easy

- Firm tofu and its preparation Firm tofu is key for this dish. It holds its shape and crisps well. Start by draining and pressing it to remove excess water. This step is crucial for a crispy texture. Cut the tofu into 1-inch cubes for even cooking. - Essential vegetables for stir fry Choose colorful veggies for a vibrant dish. I use: - 1 cup broccoli florets - 1 bell pepper, sliced thinly (any color) - 1 carrot, julienned - 1 cup snap peas These vegetables add flavor and nutrition. You can mix and match based on what you have. - Sauces and seasonings used The right sauces make all the difference. I use: - 3 tablespoons soy sauce - 1 tablespoon sesame oil - 1 tablespoon honey or maple syrup These ingredients blend well to create a savory, sweet glaze for the stir fry. Garlic and ginger also provide great flavor. - Suggestions for extra toppings To finish your dish, consider adding: - 1 teaspoon sesame seeds - Chopped green onions These garnishes add a nice crunch and a pop of color. - Alternatives for garnish If you want to switch it up, try crushed peanuts or cilantro. They both enhance the dish's flavor and texture. For the full recipe, check the [Full Recipe]. First, you need to press the tofu. Drain it well and place it on a cutting board. Use a heavy object, like a cast iron pan, to press it for about 15 minutes. This helps remove extra moisture. After pressing, cut the tofu into 1-inch cubes. The size helps it cook evenly and get crispy. Next, coat the tofu cubes with cornstarch. Place the cubes in a bowl. Sprinkle the cornstarch over them. Toss gently until each piece is well coated. This coating is key for that perfect crispy texture. Now, heat 1 tablespoon of vegetable oil in a large non-stick pan or wok. Set the heat to medium-high. When the oil is hot, add the tofu cubes in a single layer. Fry them for about 5-7 minutes. Turn them occasionally. You want them golden brown and crispy on all sides. Once done, remove the tofu from the pan and set it aside. To achieve perfect crispiness, make sure the oil is hot before adding the tofu. If the oil is cool, the tofu will absorb it and become soggy. In the same pan, add the remaining tablespoon of oil. Then, toss in the broccoli, bell pepper, carrot, and snap peas. Stir-fry these for about 3-4 minutes. Each vegetable should be tender but still crunchy. After that, add the minced garlic and grated ginger. Cook for an additional minute. This helps release their amazing flavors and aromas. Next, mix the sauces with the vegetables. In a small bowl, whisk together soy sauce, sesame oil, and honey or maple syrup. Pour this mixture over the stir-fried vegetables. Toss everything well to ensure even coverage. Finally, add the crispy tofu back into the pan. Mix it gently with the vegetables and sauce. Cook for another 2 minutes until everything is heated through. For the full recipe and exact measurements, check the [Full Recipe]. To get crispy tofu, start with firm tofu. Press the tofu well to remove moisture. Moisture is the enemy of crispiness. Cut the tofu into cubes after pressing. Coat the cubes with cornstarch to create a crunchy crust. This helps the tofu fry better in the pan. - Tofu moisture tips: Press for at least 30 minutes. Use a heavy object to help. - Avoiding soggy tofu: Don't skip the cornstarch. Fry the tofu in a single layer. To keep your veggies crunchy, cook them quickly over high heat. Stir them often to avoid burning. Use a large pan or a wok for better heat distribution. This helps everything cook evenly. - Maintaining crunch in vegetables: Add them in the order of cooking time. Start with the hardest veggies. - Recommended cooking equipment: A non-stick pan or wok works best for stir-frying. Spices can add extra flavor to your stir fry. Try garlic, ginger, or even chili flakes for heat. Fresh herbs also brighten the dish. Pair your stir fry with rice or noodles for a complete meal. - Using spices for extra flavor: Add them early for a deeper taste. - Pairing with rice or noodles: Serve over jasmine rice or soba noodles. This adds texture and makes it filling. For the full recipe, check the earlier section in this article. {{image_2}} You can easily switch up your protein in this dish. If you prefer, use tempeh or seitan instead of tofu. Tempeh has a nutty taste and a firm texture. This makes it a great option for stir fries. Seitan, made from wheat gluten, is chewy and packs a punch of protein. You can also add legumes for extra protein. Chickpeas or black beans work well. They add a nice texture and boost the meal's nutrition. Just toss them in with the veggies to warm them up. Feel free to mix and match your veggies based on what you have. Seasonal vegetables work best. In spring, add asparagus or snap peas. In fall, try butternut squash or Brussels sprouts. Get creative! Swap out bell peppers for zucchini or use mushrooms for umami flavor. Adding a handful of spinach at the end gives a burst of color and nutrition too. Your sauce can vary too! If you want a vegan option, use maple syrup instead of honey. For gluten-free, swap soy sauce with tamari. Experiment with different flavors. Try adding chili paste for heat or peanut butter for creaminess. You can also mix in lime juice for a fresh twist. Your sauce can change the whole vibe of the stir fry! For the full recipe, check the main section. To store leftover stir fry, let it cool first. Place it in an airtight container. This keeps out air and moisture. You can keep it in the fridge for up to three days. After that, the flavors may fade, and the texture may change. Always check for odd smells or colors before eating. When reheating, you have two good options: the microwave or the stovetop. For the microwave, place the stir fry in a bowl. Cover it with a damp paper towel. Heat in short bursts of 30 seconds until warm. Stir in between to heat evenly. For stovetop reheating, put the stir fry in a pan over medium heat. Add a splash of water or oil to help it steam. Stir it often to avoid burning. To keep the tofu crispy, avoid covering the pan while heating. Heat until everything is hot, about 5 minutes. You want to enjoy that lovely crispiness! Yes, you can prep the crispy tofu stir fry in advance. Here are some best practices: - Cook the tofu: You can fry the tofu cubes and store them in the fridge. - Prep veggies: Chop your vegetables a day before. Keep them in airtight bags. - Sauce mix: Make the sauce ahead and store it in the fridge. - Reheat properly: When ready to eat, heat the tofu and veggies on the stove. If you have a tofu allergy or prefer another option, try these: - Tempeh: This fermented soy product has a nutty flavor and firm texture. - Seitan: This wheat-based protein works well in stir fry. - Chickpeas: Canned or cooked chickpeas add protein and a different texture. - Cauliflower: This veggie can mimic the texture of tofu when cooked. If you love heat, here are some ways to spice up your stir fry: - Add chili flakes: Sprinkle in red pepper flakes while cooking. - Sriracha: Mix a spoonful into your sauce for a spicy kick. - Fresh chilies: Slice fresh jalapeños or Thai chilis and toss them in. - Hot sauce: Drizzle your favorite hot sauce on top before serving. Yes, you can make this dish oil-free. Here are some methods: - Water sauté: Use water or vegetable broth to cook the veggies. - Non-stick pan: A good non-stick pan helps prevent sticking without oil. - Steaming: Steam the vegetables for a healthy alternative. - Oven roasting: Roast the tofu and vegetables in the oven for a different texture. Crispy tofu stir fry combines simple ingredients and techniques for great taste. You learned about essential tofu prep, choosing the right veggies, and mixing flavors for a delightful meal. Remember to keep tofu crisp and vegetables crunchy for the best results. Experiment with protein, sauces, and seasonal veggies to make it your own. With the tips provided, your stir fry will shine every time. Enjoy the process and the flavors that come together in this dish!

Crispy Tofu Stir Fry Flavorful Quick Weeknight Meal

Looking for a quick and tasty weeknight meal? This Crispy Tofu Stir Fry is just the answer! With easy steps

- 1 zucchini, sliced into thick rounds - 1 red bell pepper, cut into 1-inch squares - 1 yellow bell pepper, cut into 1-inch squares - 1 red onion, cut into quarters - 8 cherry tomatoes - 1 cup mushrooms, cleaned and stemmed These colorful veggies bring life to your skewers. Zucchini adds a soft bite. Bell peppers give a sweet crunch. Red onion brings a mild sharpness. Cherry tomatoes burst with flavor, while mushrooms add a hearty touch. Mixing these will make your dish pop. - 3 tablespoons olive oil - 2 teaspoons garlic powder - 1 teaspoon smoked paprika - 1 teaspoon dried oregano - Salt and pepper to taste The seasoning is vital for tasty skewers. Olive oil helps the veggies cook evenly. Garlic powder gives a savory punch. Smoked paprika adds a hint of smokiness. Oregano brings a fresh aroma. Salt and pepper enhance all the flavors. Mix these well to coat your veggies. - Fresh basil leaves Garnishes elevate your dish. Fresh basil leaves add a burst of color and flavor. They make your skewers look gourmet. Just sprinkle them on top right before serving. For the full recipe, check out the details provided earlier. Slicing and Chopping Start by slicing your zucchini into thick rounds. Cut the red and yellow bell peppers into 1-inch squares. Quarter the red onion and clean your mushrooms. Finally, wash the cherry tomatoes and set them aside. This mix of colors makes your skewers pop! Marinating In a large bowl, combine all the chopped veggies. In another bowl, mix olive oil, garlic powder, smoked paprika, dried oregano, salt, and pepper. Pour this marinade over the veggies. Toss them well until every piece is coated. Let them sit for a few minutes to soak up the flavors. Preheating Tips Preheat your grill to medium-high heat. This step is crucial. A hot grill ensures nice grill marks and helps the veggies cook evenly. Ensuring Grill Safety Before grilling, check your grill for any leftover food. Clean the grates if needed. This keeps your skewers from sticking and burning. Always have a spray bottle of water nearby to deal with flare-ups. Cooking Time and Temperature Thread the marinated veggies onto skewers, mixing colors and shapes for a stunning look. Place them on the grill for about 10-15 minutes. You want them tender but still crisp. Turning and Basting Turn the skewers every few minutes. This helps them cook evenly and get those beautiful grill marks. If you have extra marinade, brush it on the skewers while grilling. This adds extra flavor as they cook. For the full recipe, check out the section above! Vegetables Pairing Choose colorful veggies for your skewers. I love using zucchini, bell peppers, and mushrooms. They grill well and taste great together. You can also add onions and cherry tomatoes for extra flavor. Try mixing soft and crunchy veggies. This gives a nice texture contrast. Soaking Wooden Skewers If you use wooden skewers, soak them in water for about 30 minutes. This keeps them from burning on the grill. It’s a simple step that helps your skewers cook evenly. Direct vs Indirect Heat Grilling can use two heat methods: direct and indirect. Direct heat cooks food quickly over the flame. This is great for veggies that cook fast. Indirect heat is for longer cooking. Use it when you want to slow-cook larger pieces. For skewers, I recommend starting with direct heat. Using a Grill Basket A grill basket can save your veggies from falling through the grill. It holds smaller pieces together. This makes turning easier and helps with even cooking. If you have lots of small pieces, a grill basket is a must-have. Knowing When the Veggies are Done Look for bright colors and grill marks. Veggies should be tender but not mushy. You can also pierce them with a fork. If it goes in easily, they’re ready. Avoiding Overcooking Keep an eye on your skewers. Check them often while grilling. Overcooked veggies lose their flavor and crunch. Aim for about 10-15 minutes on the grill. This timing gives you the best results. For more details on making these tasty skewers, check the Full Recipe. {{image_2}} You can switch up your grilled veggie skewers with different vegetables. Try adding asparagus, eggplant, or even squash. Each adds its own taste and texture. You can also add proteins like tofu or halloumi. Tofu soaks up flavors well, while halloumi adds a creamy bite. Feel free to experiment with herbs and spices. Use fresh rosemary or thyme for a different flavor. You can also try different marinades. A balsamic vinaigrette or soy sauce can add a nice twist. For a spicy kick, add chili flakes or a touch of sriracha. Pair your skewers with dips and sauces. A cool yogurt dip or a zesty chimichurri works great. You can also serve your veggie skewers with grains like quinoa or a fresh salad. This adds more texture and makes for a complete meal. For the full recipe, check the details above. After enjoying your grilled veggie skewers, you might have some left. Store them in an airtight container. These can stay fresh in the fridge for up to three days. If you want to keep them longer, freezing is a great option. Place them in a freezer-safe bag or container. They can last for up to three months in the freezer. When it’s time to eat your leftovers, reheating is easy. Use the oven for the best taste. Preheat it to 350°F (175°C). Spread the skewers on a baking sheet. Heat for about 10 minutes until warm. You can also use a microwave if you are in a hurry. Just heat them for one to two minutes. To keep the veggies tasty, cover them with a damp paper towel in the microwave. Want to save time? Prepare your veggies in advance. Slice your zucchini, bell peppers, and onion a day before grilling. Store them in the fridge. You can also use grilled veggies in other dishes. Toss them in salads or pasta. Add them to wraps for a quick meal. These veggie skewers are not just for grilling; they add flavor to many meals! For the full recipe, check out the Grilled Veggie Skewers Delight. You should grill veggie skewers for about 10 to 15 minutes. Turn them every few minutes. This helps them cook evenly. You want them tender with nice grill marks. Yes, you can use frozen vegetables, but fresh tastes better. If you use frozen, thaw them first. Pat them dry to avoid excess moisture. This helps them grill nicely. Wooden or metal skewers work well for grilling. Wooden skewers need soaking in water first. This prevents them from burning. Metal skewers last longer and are easy to clean. Yes, grilled veggie skewers are very healthy! They are low in calories and rich in fiber. You get vitamins and minerals from the veggies, too. This makes them a great choice for meals. You can prepare the skewers ahead of time. Just keep them in the fridge until you're ready to grill. This saves time and makes for a quick meal. For the full recipe, check out the details above. Grilling veggie skewers is fun and simple. You learned about essential vegetables, tasty seasonings, and steps to grill safely. I shared tips to perfect your skewers and ways to mix flavors. Remember, try new veggies and spices for variety. Store leftovers properly to enjoy later. This method is healthy and great for meal prep. Enjoy your grilling and impress your friends with these delicious veggie skewers. Happy cooking!

Grilled Veggie Skewers Flavorful and Simple Delight

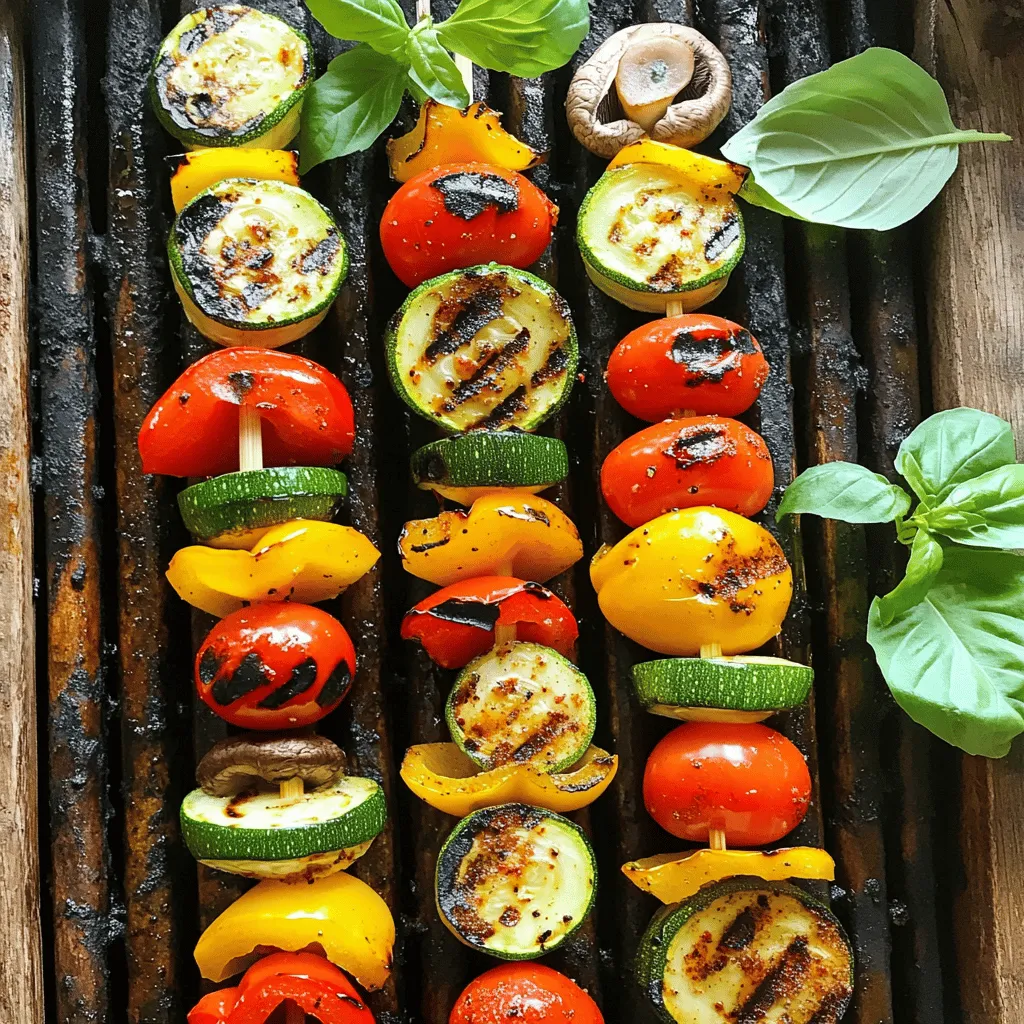
Ready to transform your backyard into a flavor-packed paradise? Grilled veggie skewers are your ticket to a quick, delicious meal

To make simple roasted veggies, gather these key ingredients: - 1 bell pepper (red, yellow, or orange), chopped - 1 medium zucchini, sliced - 1 medium eggplant, diced - 1 cup cherry tomatoes, halved - 1 red onion, chopped - 3 cloves garlic, minced - 3 tablespoons olive oil - 1 teaspoon dried oregano - 1 teaspoon smoked paprika - Salt and pepper to taste - Fresh basil leaves, for garnish These ingredients combine to create a colorful and tasty dish. The bell pepper adds sweetness, while the zucchini brings a nice crunch. Eggplant gives a rich flavor, and cherry tomatoes burst with juice. Garlic adds depth, and spices make everything pop. Using seasonal veggies boosts taste and freshness. In spring, try asparagus or peas. Summer is perfect for fresh corn or green beans. In fall, use butternut squash or sweet potatoes. For winter, consider root veggies like carrots or parsnips. These choices will keep your roasted veggies exciting and flavorful. If you have allergies, there are easy swaps. For gluten-free, all ingredients work well. If you avoid garlic, use onion powder for flavor. Need a nut-free option? Olive oil is safe and healthy. For a vegan option, this recipe is naturally vegan. You can modify it to fit your needs without losing taste. Check out the Full Recipe for more details on making this dish. To start, gather your ingredients. You need: - 1 bell pepper (red, yellow, or orange), chopped - 1 medium zucchini, sliced - 1 medium eggplant, diced - 1 cup cherry tomatoes, halved - 1 red onion, chopped - 3 cloves garlic, minced - 3 tablespoons olive oil - 1 teaspoon dried oregano - 1 teaspoon smoked paprika - Salt and pepper to taste - Fresh basil leaves, for garnish First, preheat your oven to 425°F (220°C). This step is crucial for even cooking. In a large bowl, mix the bell pepper, zucchini, eggplant, cherry tomatoes, red onion, and garlic. Make sure to chop them into similar sizes for even roasting. Next, drizzle the olive oil over the veggies. Sprinkle the dried oregano, smoked paprika, salt, and pepper on top. Toss well until every piece is coated. This helps the flavors blend together. Now, spread the vegetable mix in a single layer on a baking sheet lined with parchment paper. This keeps them from sticking and makes for easy cleanup. Roast in the preheated oven for 20-25 minutes. Check halfway through and stir the veggies. This ensures they cook evenly and get that nice caramelization. You want them to be tender but not mushy. Once your veggies are roasted, take them out and let them cool for a few minutes. They are best served warm. I love to garnish with fresh basil leaves for a pop of color and flavor. You can enjoy them alone or as a side dish. They pair well with grilled meats or tossed in pasta. For the full recipe, refer to the instructions above. The best oven temperature for roasting veggies is 425°F (220°C). This heat helps the veggies cook well. Higher temps can burn them, while lower temps can make them soggy. Always preheat your oven. This step ensures even cooking. Cooking times vary for each veggie. Here’s a quick guide: - Bell Peppers: Roast for 20-25 minutes. They soften nicely. - Zucchini: Takes about 15-20 minutes. Watch for a tender bite. - Eggplant: Needs 25-30 minutes. It becomes creamy and rich. - Cherry Tomatoes: Only need 10-15 minutes. They burst with flavor. - Red Onion: Cook for 20-25 minutes. It sweetens and softens. Always stir halfway through to cook evenly. To get crisp veggies, follow these tips. First, cut veggies into uniform sizes. This helps them cook at the same rate. Second, don’t overcrowd the baking sheet. Leave space for air to circulate. Third, use enough oil. A light coat keeps them from drying out. Finally, let them roast without stirring too often. This gives them that nice, crispy edge. For a full recipe, check the Colorful Roasted Veggie Medley. {{image_2}} You can boost the flavor of roasted veggies in many ways. Try adding fresh herbs. Chopped parsley, thyme, or rosemary can make a big difference. You can also use different spices. A pinch of cayenne pepper adds heat, while curry powder gives warmth. For more umami, consider adding soy sauce or balsamic vinegar. These simple changes will make your dish pop and taste fresh. Mixing veggies can create exciting flavors and colors. For a sweet taste, pair carrots with sweet potatoes. For a crunchy texture, add Brussels sprouts with bell peppers. You can also try a Mediterranean twist by using zucchini, eggplant, and tomatoes. Each combination brings a new experience to the table. Explore what you like best! You can take your roasted veggies to new places. Try a Mexican style by adding corn and black beans, topped with lime juice. For an Italian flair, use Italian herbs and add olives. An Asian twist can come from sesame oil and soy sauce with your veggies. Each culture offers unique flavors that will spark your creativity in the kitchen. For a full recipe, check out the Colorful Roasted Veggie Medley. After enjoying your roasted veggies, let them cool. Place the leftovers in an airtight container. This keeps them fresh in the fridge for up to three days. If you want to enjoy them later, storage is key. A good seal prevents moisture and keeps flavors intact. To reheat your roasted veggies, use the oven for the best texture. Preheat it to 350°F (175°C). Spread the veggies on a baking sheet. Heat them for about 10-15 minutes until hot. If you're in a hurry, you can use the microwave. Just warm them in 30-second intervals. Freezing is a great option for long-term storage. First, let the veggies cool completely. Then, spread them out on a baking sheet. Freeze them for about an hour. Once frozen, transfer them to a freezer bag. This method prevents clumping. You can keep them in the freezer for up to three months. When you're ready to use them, just roast from frozen or thaw in the fridge overnight. For more details, check the Full Recipe. To keep your veggies crisp, start with a hot oven, around 425°F (220°C). Cut your vegetables into even sizes. This helps them cook evenly. Use a large baking sheet, allowing space between each piece. If they touch, they steam, which makes them soggy. Try to keep them in a single layer. Toss them halfway through cooking for even browning. Some great choices are bell peppers, zucchini, eggplant, and cherry tomatoes. These veggies cook well together and share similar cooking times. You can also add red onions and garlic for extra flavor. Feel free to mix in seasonal veggies like carrots or Brussels sprouts as well. Just remember, keep the sizes even for best results. Seasoning is key to tasty roasted veggies. Start with olive oil to help the spices stick. Use salt and pepper for the basics. Add dried herbs like oregano for depth. Smoked paprika gives a nice smokey taste. You can also try garlic powder or onion powder for extra flavor. Fresh herbs like basil or parsley are great to add after cooking. This adds a fresh touch to your dish. Check out the Full Recipe for more tips! In this post, we explored the key ingredients and steps for roasting veggies. We discussed essential ingredients, seasonal finds, and substitutions for allergies. I shared clear instructions, tips for perfect roasting, and fun variations to try out. Storing and reheating leftovers was also included for your convenience. Take these ideas and make roasting vegetables fun and easy. Enjoy delicious flavors that fit your taste and your diet. Happy cooking!

Simple Roasted Veggies Quick and Flavorful Recipe

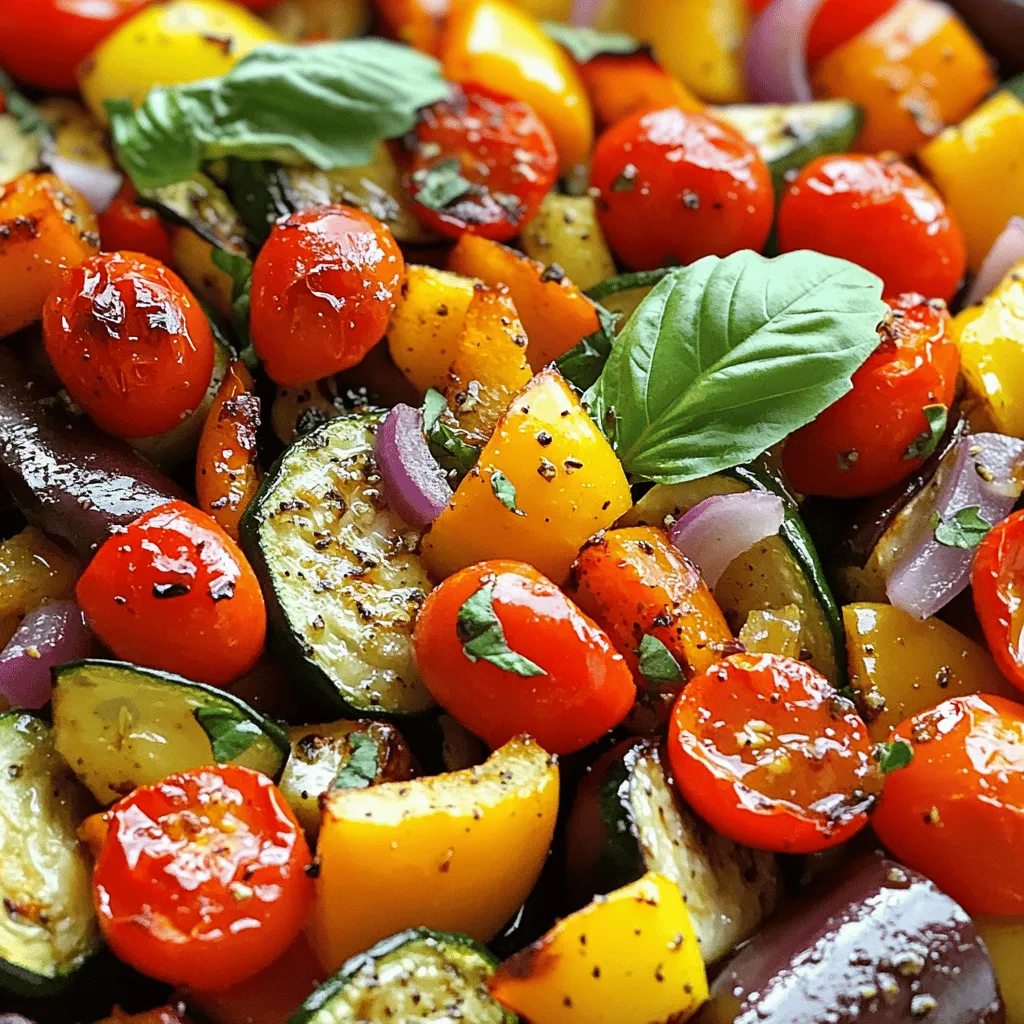
Looking to elevate your meals without fuss? My Simple Roasted Veggies recipe is quick, easy, and bursting with flavor. With

Older posts
Newer posts
← Previous Page1 … Page58 Page59 Page60 … Page86 Next →

dsad

© 2026 Cooking Wells • Built with GeneratePress

Our Policies

  • Copyright Policy
  • Cookie Policy
  • GDPR Policy
  • Privacy Policy
  • Disclaimer
  • Terms Of Use

More Information

  • Home
  • About
  • Contact
  • Appetizers
  • Dessert
  • Dinner
  • Drinks
©2026, Cooking Wells About Back To Top