Skip to content
DisclaimerTerms Of UseGDPR PolicyCookie Policy

Cooking Wells

  • Home
  • Drinks
  • Appetizers
  • Dinner
  • Dessert
  • About
  • Contact
  • Privacy Policy
DisclaimerTerms Of UseGDPR PolicyCookie Policy

NO-ING-IMG

- 1 cup canned pumpkin puree - 1/2 cup vegetable oil - 1/2 cup brown sugar, packed - 1/4 cup granulated sugar - 2 large eggs - 1 teaspoon vanilla extract - 1 1/2 cups all-purpose flour - 1 teaspoon baking soda - 1 teaspoon baking powder - 1 teaspoon ground cinnamon - 1/2 teaspoon ground nutmeg - 1/4 teaspoon ground cloves - 1/4 teaspoon salt - 1/3 cup all-purpose flour - 1/4 cup brown sugar, packed - 1/2 teaspoon ground cinnamon - 2 tablespoons unsalted butter, cold and cubed Gathering these ingredients is the first step in making your delightful muffins. Canned pumpkin puree gives the muffins their rich flavor and moisture. Vegetable oil adds softness. Brown sugar and granulated sugar sweeten them just right. You will also need eggs and vanilla extract to bind and flavor. All-purpose flour is the base of the muffin, while baking soda and baking powder help them rise. The spices—cinnamon, nutmeg, and cloves—bring warmth and coziness to each bite. Salt enhances all these flavors, making them pop. For the streusel topping, you need more flour, brown sugar, and cinnamon. Cold butter makes it crumbly and delicious. This topping is what makes the muffins extra special. 1. Preheat the oven and prepare muffin tin: Set your oven to 350°F (175°C). Line a muffin tin with paper liners or grease it lightly to prevent sticking. 2. Mix the wet ingredients: In a big bowl, combine 1 cup of canned pumpkin puree, 1/2 cup of vegetable oil, 1/2 cup of brown sugar, 1/4 cup of granulated sugar, 2 large eggs, and 1 teaspoon of vanilla extract. Whisk these items well until they blend smoothly. 3. Combine dry ingredients and mix with wet ingredients: In another bowl, sift together 1 1/2 cups of all-purpose flour, 1 teaspoon of baking soda, 1 teaspoon of baking powder, 1 teaspoon of ground cinnamon, 1/2 teaspoon of ground nutmeg, 1/4 teaspoon of ground cloves, and 1/4 teaspoon of salt. Gradually add this mix to the wet ingredients. Stir gently until just combined. Be careful not to overmix. 1. Combine dry streusel ingredients: In a small bowl, mix together 1/3 cup of all-purpose flour, 1/4 cup of brown sugar, and 1/2 teaspoon of ground cinnamon. This will give your muffins a sweet, crunchy topping. 2. Incorporate the cold butter: Add 2 tablespoons of cold, cubed unsalted butter to the flour mix. Use your fingers or a pastry cutter to blend until the mixture looks like coarse crumbs. This ensures a nice, crumbly texture. 1. Fill the muffin tin with batter: Spoon the muffin batter into the muffin cups, filling each one about 2/3 full. This allows room for the muffins to rise. 2. Add the streusel topping: Sprinkle a generous amount of your streusel topping over the batter in each muffin cup. This will create a delightful crunch on top. 3. Baking time and checking for doneness: Place the muffin tin in the preheated oven. Bake for 18-22 minutes. Check if they are done by inserting a toothpick into the center of a muffin. If it comes out clean, they are ready. Let them cool for 5 minutes in the pan. Then, transfer them to a wire rack to cool completely. Enjoy the sweet smell! Why is ingredient temperature important? Using room-temperature ingredients helps your muffins rise better. Cold eggs or oil can slow down the mixing process. This can lead to dense muffins instead of light and fluffy ones. How do I avoid overmixing? Mix the wet and dry ingredients until just combined. Lumps are okay! Overmixing can make your muffins tough. Gently fold the batter together to keep a soft texture. What substitutions can I make for healthier options? You can swap vegetable oil for applesauce. This adds moisture and cuts fat. You can also replace some all-purpose flour with whole wheat flour. This adds fiber and nutrients to your muffins. Can I add extras like nuts or chocolate chips? Absolutely! Fold in half a cup of walnuts or chocolate chips for extra flavor. You can also try adding dried fruits like cranberries or raisins. These additions make your muffins even more fun! What are some serving suggestions? Serve your muffins warm with a pat of butter on top. This adds richness and flavor. You can also dust them lightly with powdered sugar for a pretty touch. How should I store and display my muffins? Keep the muffins in an airtight container at room temperature. This keeps them fresh for up to three days. For a nice display, stack them on a rustic wooden platter. It adds charm to your table! {{image_2}} You can easily switch up the flavors in your muffins. For a maple syrup version, replace half the sugar with maple syrup. This adds a sweet, earthy taste that pairs well with pumpkin. Another fun option is chocolate chip pumpkin muffins. Just fold in 1 cup of chocolate chips after mixing the batter. The rich chocolate makes a great match with the warm spices. If you need gluten-free muffins, use a gluten-free flour blend instead of all-purpose flour. This keeps the muffins soft and yummy. For a vegan twist, swap the eggs for flax eggs. Just mix 1 tablespoon of ground flaxseed with 2.5 tablespoons of water. Let it sit for a few minutes until it thickens. Use almond or coconut milk in place of vegetable oil for moisture. In fall, adding cranberries or diced apples gives a bright twist to your muffins. Their tartness complements the sweetness of pumpkin. For the holidays, mix in festive spices like ginger or allspice. These spices add warmth and cheer to your baking, making it perfect for gatherings. To keep your cinnamon streusel pumpkin muffins fresh, store them properly. If you want to keep them at room temperature, place them in an airtight container. They will stay good for about 2 to 3 days. Make sure to keep them away from direct sunlight and heat. For longer storage, refrigerate the muffins. Place them in a container with a lid. They will last about a week in the fridge. Just let them cool completely before sealing them up. This helps prevent sogginess. Want to save some muffins for later? Freezing is a great option. First, let your muffins cool completely. Then, wrap each muffin in plastic wrap. After that, place them in a freezer bag or a freezer-safe container. This way, they will stay fresh for up to 3 months. When you're ready to eat a frozen muffin, simply take it out of the freezer. You can reheat it in the microwave for about 30 seconds. If you prefer, you can also warm it in an oven at 350°F for 10-15 minutes. Enjoy the cozy flavors whenever you want! To make your muffins fluffier, focus on your leavening agents. Use both baking soda and baking powder. Each one helps your muffins rise. Make sure to measure them carefully. For every cup of flour, you can use one teaspoon of baking powder and half a teaspoon of baking soda. Also, beat your eggs well. This adds air and helps with fluffiness. Yes, you can use fresh pumpkin. Start by roasting your pumpkin. Cut it in half, scoop out the seeds, and bake it at 350°F. Cook it until soft, about 45 minutes. After cooling, scoop out the flesh and mash it. You’ll need one cup of prepared pumpkin. Keep in mind, fresh pumpkin may have more moisture. Adjust your flour if the batter seems too wet. If you don't have vegetable oil, you can use other fats. Melted butter works well and adds flavor. You can also use coconut oil or olive oil. Both will change the taste slightly. Just ensure you use the same amount as the recipe calls for. If you want a lighter option, try applesauce. Use half the amount of applesauce compared to oil. This blog covers everything you need to make delicious muffins. We discussed key ingredients like pumpkin puree and spices, and how to create a tasty streusel topping. You learned step-by-step instructions to prepare the batter and bake perfectly fluffy muffins. Remember, you can customize flavors and store leftovers easily. Experiment and enjoy your baking journey. Creating your own muffin recipes can be fun and rewarding. Happy baking!

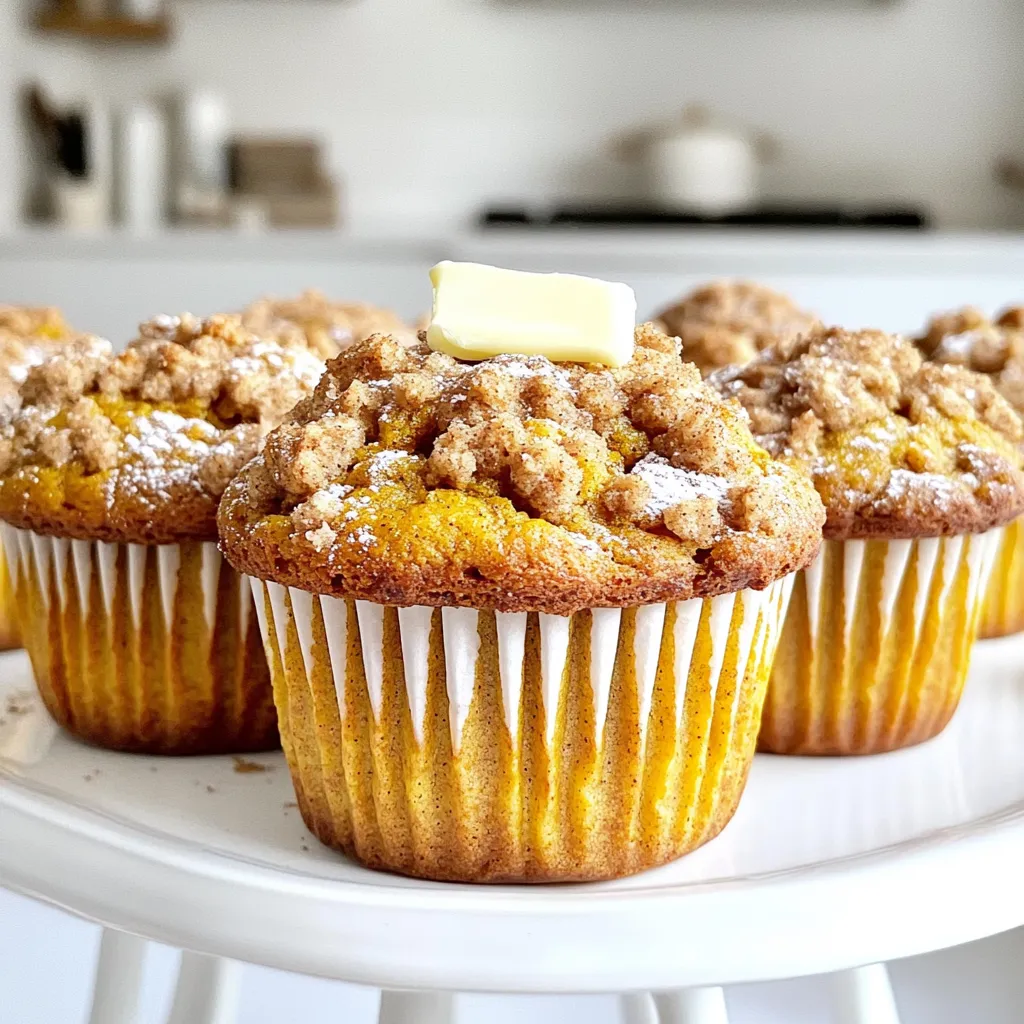
Cinnamon Streusel Pumpkin Muffins Delightful and Cozy

Cozy up your kitchen with my delightful Cinnamon Streusel Pumpkin Muffins! These muffins blend warm spices and sweet pumpkin for

- 1 cup unsalted butter (2 sticks) - 2 cups packed brown sugar - ¾ cup sugar - 1 cup sweetened condensed milk - 2 teaspoons vanilla extract - 3 cups all-purpose flour (heat-treated for safety) - 1 cup mini chocolate chips - 1 cup semisweet chocolate chips (for fudge topping) - 1 tablespoon coconut oil (for fudge topping) Gathering the right ingredients is key to making this fudge a hit. Start with unsalted butter, which gives you control over the salt level. You’ll need brown sugar for that deep caramel flavor and white sugar for sweetness. Sweetened condensed milk brings creaminess that binds the fudge together. Don’t skip the vanilla extract; it adds warmth and depth. The flour must be heat-treated to keep it safe since we don’t bake this dish. Mini chocolate chips give a fun texture, while the semisweet chocolate chips and coconut oil make the fudge topping creamy and smooth. These ingredients blend together to create a rich and sweet treat that will impress everyone. Each bite offers a delightful mix of cookie dough and fudge. Enjoy the process of gathering these ingredients! {{ingredient_image_1}} To start, you need to line an 8x8 inch baking pan. Take a piece of parchment paper and cut it to fit the pan. Place the paper in the pan, leaving some extra on the sides. This extra paper helps you lift the fudge out later. It makes serving much easier and cleaner! First, melt 1 cup of unsalted butter. You can do this in the microwave or on the stove. Make sure it’s fully melted and let it cool a bit before mixing. Then, in a large bowl, add 2 cups of packed brown sugar, ¾ cup of sugar, and 1 cup of sweetened condensed milk to the melted butter. Stir these together until they are smooth and well mixed. Next, stir in 2 teaspoons of vanilla extract for flavor. Now it's time to add the flour! Gradually mix in 3 cups of heat-treated all-purpose flour until a soft dough forms. Don’t overmix, or your dough may become tough. Finally, fold in 1 cup of mini chocolate chips to the dough. Now, let’s make the fudge topping. In a microwave-safe bowl, combine 1 cup of semisweet chocolate chips and 1 tablespoon of coconut oil. Microwave this mixture in 30-second bursts, stirring after each round, until it’s smooth. Once the fudge is ready, pour it over the cookie dough base. Use a spatula to spread it out evenly. Now, place the pan in the fridge. Let it chill for at least 2-3 hours. This step is key for getting the right texture. When the fudge is firm to the touch, it’s ready to slice and serve! To make the best cookie dough, avoid overmixing. Mix just until the flour is combined. If you mix too much, the dough can become tough. Gentle folding helps keep it soft. Also, ensure even distribution of chocolate chips. This way, every bite is a chocolate-filled delight. Use a spatula to fold the chips in gently. You want them spread throughout, not clumped in one spot. Melting chocolate can be tricky. The best method is to use a microwave. Combine semisweet chocolate chips and coconut oil in a bowl. Microwave in 30-second intervals. Stir between each interval to prevent burning. Stop when the chocolate is smooth and shiny. For enhanced flavor, consider adding a pinch of sea salt or a splash of vanilla. This will elevate the taste and make each bite unforgettable. Pro Tips Use Heat-Treated Flour: Ensure the flour is heat-treated to eliminate any potential bacteria, making your cookie dough safe to eat. Let the Butter Cool: Allow the melted butter to cool slightly before mixing with sugars to prevent the sugars from melting and creating a grainy texture. Chill Thoroughly: Be patient and chill the fudge for the recommended time to achieve the perfect firm texture that holds its shape when cut. Garnish for Presentation: Drizzle extra melted chocolate and sprinkle sea salt on top before serving to enhance the visual appeal and flavor contrast. {{image_2}} You can make your Chocolate Chip Cookie Dough Fudge even more fun with simple tweaks. Try adding nuts for a crunch. Chopped walnuts or pecans work well. You can also swap the chocolate chips. Use dark chocolate, white chocolate, or even caramel bits. Each option adds a unique taste. Flavor extracts can also enhance your fudge. A splash of mint extract adds a cool twist. Almond extract gives a rich, nutty flavor. Just a little goes a long way, so start small. Mix it in before adding the flour to ensure even flavor. If you need gluten-free options, it's easy to adapt this recipe. Replace all-purpose flour with gluten-free flour. Make sure to choose a blend that works well in baking. This way, everyone can enjoy the fudge. For a vegan alternative, swap the butter with coconut oil. Use a plant-based sweetened condensed milk instead. These changes keep the taste rich and creamy. You won't miss the traditional ingredients in this treat. To keep your Chocolate Chip Cookie Dough Fudge fresh, store it in a cool, dry place. If you plan to eat it soon, an airtight container works well. Here are some key tips: - Room Temperature: Keep fudge in an airtight container. It stays fresh for up to a week. - Refrigerator: If you want it to last longer, store it in the fridge. It can last for two weeks. - Avoid Moisture: Keep fudge away from moisture. This helps prevent it from becoming sticky. The best containers for storing fudge are glass or plastic. Choose ones with tight seals. They help keep the air out. You can also use wax paper to wrap individual pieces. This keeps them fresh and easy to grab. Freezing fudge is a great way to make it last longer. Here’s how to do it: 1. Cut into Squares: Slice your fudge into squares before freezing. This makes it easy to grab later. 2. Wrap Each Piece: Wrap each square in plastic wrap. Make sure it is tight. 3. Place in a Container: Put wrapped squares in a freezer-safe container. Label it with the date. When you’re ready to eat your fudge, thaw it properly. Here are two great methods: - In the Fridge: Move the fudge to the fridge. Let it thaw overnight for the best texture. - Room Temperature: If you’re in a hurry, leave it out at room temperature for a couple of hours. Following these steps helps keep your Chocolate Chip Cookie Dough Fudge tasty and fresh! Yes, you can make this fudge without baking. The cookie dough base does not need an oven. You mix the ingredients and chill them in the fridge. This makes the fudge easy and quick to prepare. The fudge can last about 2 to 3 days at room temperature. Keep it in an airtight container to keep it fresh. For longer storage, consider refrigerating it. No, you should not use regular flour. Heat-treated flour is safe to eat raw. It helps prevent any risk of foodborne illness. Always use heat-treated flour for this recipe. If your fudge doesn’t set, try chilling it longer. Place it in the fridge for a few more hours. If it still doesn’t firm up, you might need to reheat the fudge and add more chocolate chips. You can find pre-made fudge at local bakeries or specialty shops. Many online stores also sell this treat. Look for stores that focus on gourmet snacks for the best options. In this blog post, we explored how to make Chocolate Chip Cookie Dough Fudge. We covered ingredients, preparation, and tips for perfect results. From mixing the cookie dough to making the fudge topping, each step is important for great taste. Remember, you can modify recipes for dietary needs or flavors. Enjoy storing and serving your fudge with ease. With this guide, you can create a treat that delights everyone. Try it out and have fun in your kitchen!

Chocolate Chip Cookie Dough Fudge Delightful Treat

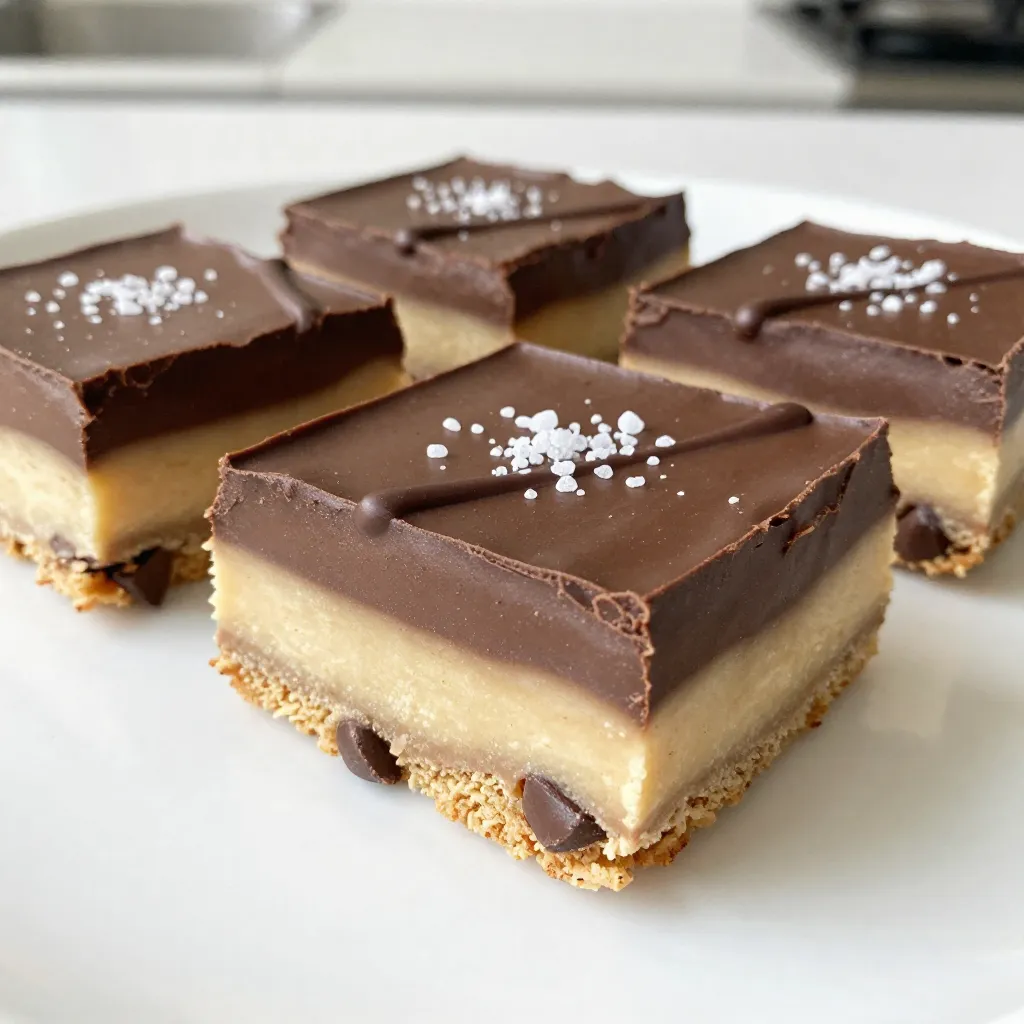
Are you ready for a sweet treat that combines two of your favorites—chocolate chip cookies and fudge? In this recipe,

To make a delicious Pumpkin Spice Cold Foam Brew, you need the following key ingredients: - 1 cup cold brewed coffee - 1/2 cup milk (or non-dairy alternative) - 1 tablespoon pumpkin puree - 1 tablespoon maple syrup (adjust for sweetness) - 1/2 teaspoon vanilla extract - 1/2 teaspoon pumpkin spice mix (plus extra for garnish) - Ice cubes These ingredients come together to create a rich and creamy drink that feels like a warm hug. You can add a few optional ingredients to make your brew even better: - Whipped cream: This adds a sweet, creamy touch. - Extra pumpkin spice: A sprinkle on top gives a nice aroma. Feel free to mix and match to find your perfect flavor! To create this tasty drink, you will need some handy tools: - Blender: This is key for making the cold foam. - Tall glass: Perfect for serving your brew. - Measuring spoons: For accurate ingredient amounts. With these tools, you'll whip up your Pumpkin Spice Cold Foam Brew in no time. Enjoy making it! To make the pumpkin spice cold foam, gather your ingredients. You need milk, pumpkin puree, maple syrup, vanilla extract, pumpkin spice mix, and ice cubes. 1. Combine Ingredients: In a blender, add 1/2 cup of milk, 1 tablespoon of pumpkin puree, 1 tablespoon of maple syrup, 1/2 teaspoon of vanilla extract, and 1/2 teaspoon of pumpkin spice mix. Toss in a handful of ice cubes. 2. Blend: Blend on high speed for about 30 seconds. You want the mixture to be frothy and well combined. This foam is the star of your drink. Now it’s time to put your drink together. 1. Fill the Glass: Take a tall glass and fill half of it with cold brewed coffee. Make sure to add some ice cubes for a chill. 2. Pour the Foam: Slowly pour your pumpkin spice foam over the cold brew. Watch it layer beautifully. 3. Top It Off: If you like, add whipped cream on top. Sprinkle some extra pumpkin spice for a nice touch. To get the best foam, here are some easy tips: - Use Cold Ingredients: Cold milk and coffee make the foam frothier. - Don't Overblend: Blend just until frothy. Overblending can make it too runny. - Adjust Sweetness: If you want it sweeter, add more maple syrup. Start with a small amount and taste. With these steps and tips, your pumpkin spice cold foam brew will be a tasty treat! To create a rich, frothy foam, use a high-speed blender. This helps blend air into the milk mixture. Start with cold milk. Cold milk froths better than warm milk. Use a mix of milk and pumpkin puree for a creamy texture. Blend for about 30 seconds for the best results. If you find your foam too thin, add a bit more pumpkin puree. The key to a great drink is balance. I recommend starting with one tablespoon of maple syrup. Taste it. If you want more sweetness, add a little more. You can also adjust the pumpkin spice mix. If you love spice, add a pinch more for a stronger flavor. Use pure vanilla extract for a rich taste. You can prep your foam in advance. Blend the milk, pumpkin puree, and spices the night before. Store it in the fridge. When morning comes, just give it a quick blend again. If you plan to make several servings, double the recipe. This way, you save time on busy mornings. Enjoy your coffee treat without the rush! {{image_2}} You can easily make this drink vegan. Just swap the milk for a non-dairy milk. Almond, oat, or coconut milk work well. Each choice adds a unique flavor. For a creamier texture, try using oat milk. It blends nicely with the pumpkin. Want to mix it up? Add flavor to the foam! A tablespoon of caramel syrup gives a sweet kick. Or try vanilla extract for a smooth taste. You can also use hazelnut syrup for a nutty twist. Be creative! Each flavor makes the drink special. Make this drink festive for the holidays. Add a pinch of nutmeg or ginger to the foam. These spices give it extra warmth. You can also mix in a bit of cocoa powder for a chocolatey touch. This drink can fit any season and mood! Store leftover cold brew in an airtight container. Use a glass jar or a bottle with a lid. Keep it in the fridge for up to two weeks. This way, you can enjoy it later. Just remember, the taste might change after a few days. If it gets too strong, add some water or milk to lighten it. Pumpkin spice foam stays fresh for a short time. Store it in a sealed container in the fridge. Use it within three days for the best taste. If it separates, just give it a quick stir. You can also freeze it in ice cube trays. This way, you can pop out a cube when you want some foam. Just thaw and blend it again for freshness. Cold brew is best cold, so don't reheat it. If you want warmth, mix it with hot water or milk. For the pumpkin spice foam, do not heat it either. Instead, blend it again to bring back the froth. This keeps the texture smooth and creamy. Pour it over your cold brew, and enjoy your drink! Pumpkin Spice Cold Foam Brew is a tasty coffee drink. It mixes cold-brewed coffee with a creamy pumpkin spice foam. You start with cold coffee, then blend milk, pumpkin puree, maple syrup, and spices. This drink looks pretty and tastes like fall. It’s perfect for anyone who loves pumpkin spice flavors. Yes, you can use regular coffee. Just brew your coffee strong and let it cool down. Cold brew has a smooth taste, but hot coffee works too. Make sure you chill it before you add the foam. The cold foam will still taste great on hot coffee. To make your Pumpkin Spice Cold Foam Brew vegan, use a non-dairy milk. Almond milk, oat milk, or coconut milk all work well. You can also check the maple syrup to ensure it’s pure and vegan. This way, you enjoy the same tasty drink without any dairy. This blog post explored how to make a delicious Pumpkin Spice Cold Foam Brew. You learned about the key ingredients and the right tools. I shared step-by-step instructions to prepare this tasty drink at home. We discussed tips for a creamy foam and ways to tweak its flavor. If you're busy, I provided ways to make it ahead. Making this drink can be fun and easy. Enjoy experimenting with flavors and variations. Happy brewing!

Pumpkin Spice Cold Foam Brew Flavorful Coffee Treat

Are you ready to enjoy the cozy flavors of fall in a cup? My Pumpkin Spice Cold Foam Brew is

- 4 salmon fillets - 2 tablespoons olive oil - 4 cloves garlic, minced - 1/2 cup grated Parmesan cheese - 1 cup cherry tomatoes, halved - 1 zucchini, sliced into half-moons - 1 bell pepper, sliced Salmon fillets are the star of this meal. They are rich in flavor and nutrients. The olive oil helps to keep the salmon moist. Garlic adds a punch of flavor. Parmesan cheese gives a delicious crust. Fresh vegetables round out the dish, adding color and nutrition. Cherry tomatoes bring sweetness. Zucchini and bell peppers add crunch. - 1 teaspoon dried basil - 1 teaspoon dried parsley - Juice of 1 lemon - Salt and pepper to taste Dried basil and parsley add depth to the dish. Lemon juice brightens the flavors. Salt and pepper enhance all the tastes. Together, these seasonings elevate the simple ingredients. - Fresh parsley for decoration - Lemon wedges for serving Fresh parsley adds a pop of color and freshness. Lemon wedges are perfect for squeezing over the salmon. They add a zesty touch that pairs well with the dish. Enjoy your gourmet meal with these simple yet effective garnishes. 1. First, preheat your oven to 400°F (200°C). This step gets the oven ready for baking. 2. Line a sheet pan with parchment paper. This makes cleanup easy. 3. In a small bowl, mix together: - 2 tablespoons olive oil - 4 cloves garlic, minced - 1/2 cup grated Parmesan cheese - 1 teaspoon dried basil - 1 teaspoon dried parsley - Juice of 1 lemon - Salt and pepper to taste Mix these ingredients until they combine well. This mixture will add great flavor. 1. Place the 4 salmon fillets in the center of your prepared sheet pan. 2. Brush each fillet generously with the garlic Parmesan mixture. Make sure each piece gets nice coverage. 3. Now, it’s time to arrange the vegetables. Place 1 cup of halved cherry tomatoes, 1 sliced zucchini, and 1 sliced bell pepper around the salmon. 4. Drizzle a little olive oil over the veggies, and sprinkle with salt and pepper. This enhances their taste. 1. Bake your dish in the preheated oven for 15-20 minutes. 2. Watch for the salmon to turn opaque and flaky. The veggies should become tender during this time. 3. Once done, remove it from the oven and let it rest for a couple of minutes. This helps the flavors settle. 4. Finally, garnish with fresh parsley before serving. Enjoy your quick and tasty meal! To get the best salmon, look for opacity and flakiness. When your salmon is done, it should have a light pink color and flake easily with a fork. This means it is cooked just right. Resting the salmon is very important. Let it sit for a couple of minutes after baking. This helps keep it juicy and enhances the flavors. Tender vegetables make the meal better. To achieve this, cut them into even sizes. This helps them cook at the same rate. Cherry tomatoes, zucchini, and bell peppers work well together. Adjust cook times if you use other vegetables. For denser veggies, like carrots or potatoes, cut them smaller or start cooking them first. Plating can elevate your meal. You can serve directly from the sheet pan for a family-style look or plate each piece individually. For a nice touch, add lemon wedges on the side. This adds freshness and a pop of color. Consider pairing your dish with a light salad or a crisp white wine to enhance the flavors. {{image_2}} You can easily change the flavor of this dish. Try using different herbs like thyme or dill. Spice things up by adding some chili flakes for heat. You can also mix in citrus flavors. A splash of orange juice or lime can brighten up the salmon. For cheese lovers, swap out Parmesan for feta or goat cheese. Each choice can take this dish in a new direction. If you need an alternative to salmon, you have options. Chicken breasts work well and cook in a similar time. Shrimp is another great choice; just adjust the baking time. For a plant-based option, use firm tofu. Be sure to press it to remove excess water. If you need gluten-free or dairy-free options, skip the cheese or choose a dairy-free substitute. Use gluten-free soy sauce for added flavor without the gluten. Seasonal vegetables can enhance this dish. In summer, try adding corn or asparagus for freshness. In winter, root veggies like carrots and parsnips can add warmth. You can also adapt the flavors to match the season. Use lighter, bright ingredients in warmer months. In cooler weather, opt for heartier flavors like smoked paprika or rosemary. Embrace what’s in season to keep your meals exciting and fresh! To keep your garlic Parmesan salmon fresh, place leftovers in an airtight container. Make sure to cool the dish before sealing it. Store it in the fridge for up to three days. This helps to keep the salmon and veggies tasty. When you're ready to enjoy leftovers, reheating is key. I recommend using an oven to maintain texture. Preheat your oven to 300°F (150°C). Place the salmon and veggies on a baking sheet. Heat for about 10 minutes. This way, you keep the flavors and avoid drying out the salmon. You can freeze garlic Parmesan salmon, but there are some rules. First, let it cool completely. Wrap each portion tightly in plastic wrap, then in foil. This prevents freezer burn. Thaw the dish in the fridge overnight before reheating. Avoid freezing raw salmon mixed with the sauce to ensure the best taste. Yes, you can use frozen salmon. Just make sure to thaw it first. Place it in the fridge overnight or run it under cold water. Fresh salmon has a better taste and texture, but frozen works well too. Adjust cooking time if needed. Garlic Parmesan salmon pairs well with many sides. Here are some great options: - Steamed broccoli - Quinoa or rice - Mashed potatoes - A fresh green salad - Roasted asparagus These sides add color and flavor to your meal. To check if your salmon is done, look for these signs: - The flesh should be opaque and flake easily with a fork. - Use a food thermometer; the internal temperature should reach 145°F (63°C). - You can also press gently with a finger; it should feel firm but not hard. These tips help you serve perfectly cooked salmon. Yes, you can prep this meal ahead of time. Here are some tips: - Marinate the salmon and store it in the fridge for up to 2 hours. - Chop the vegetables and keep them in an airtight container. - Assemble everything on the sheet pan, then cover it and refrigerate. When ready to cook, just preheat the oven and bake. Enjoy a quick meal! This blog post covered the key steps to create a tasty garlic Parmesan salmon dish. I shared the main ingredients, seasoning tips, and cooking instructions for perfect salmon. You learned about variations and how to store leftovers. Using this recipe can help you make a meal that impresses. Get creative with flavors, and don’t shy away from trying different vegetables. Enjoy making this dish and sharing it with others. Your dinner table will shine!

Sheet Pan Garlic Parmesan Salmon Quick and Tasty Meal

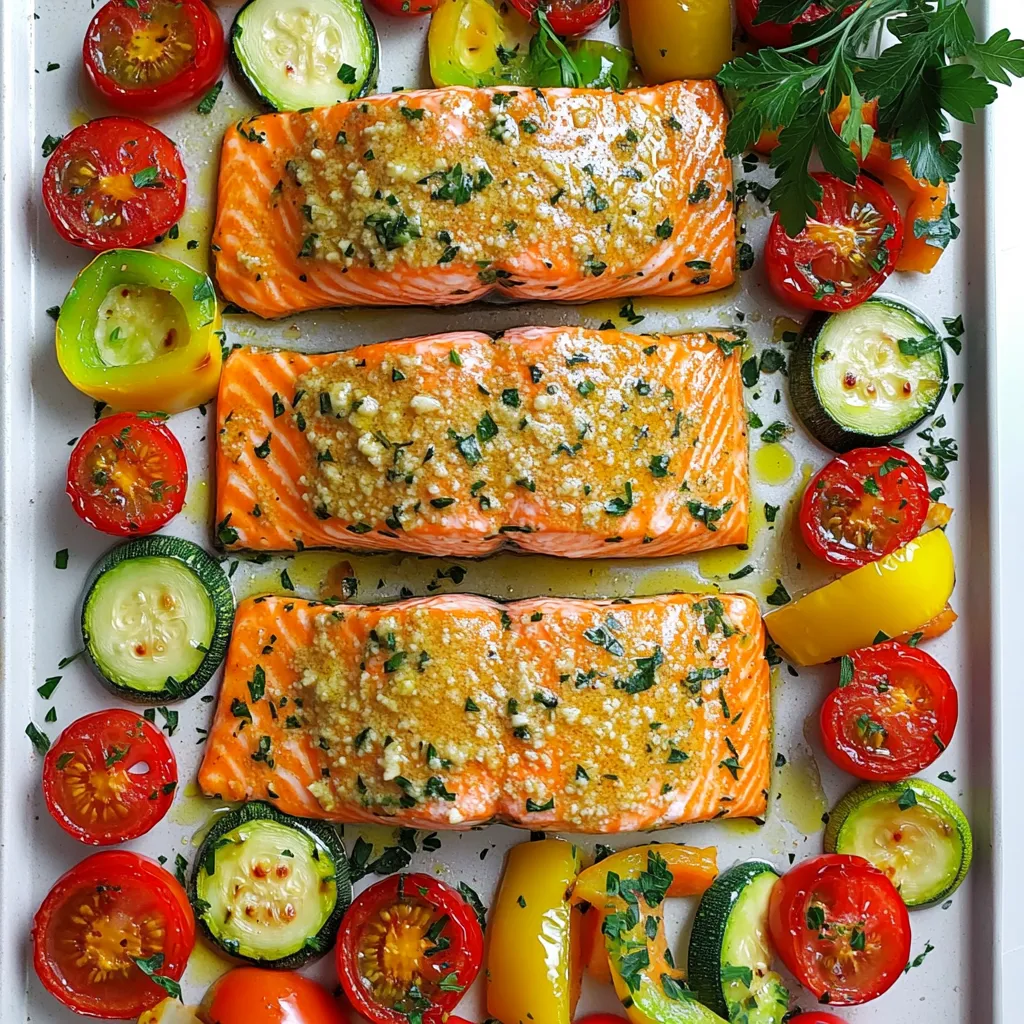
Looking for a quick and tasty dinner idea? Let me introduce you to my Sheet Pan Garlic Parmesan Salmon! This

To make One Pot Creamy Pesto Gnocchi, gather these items: - 1 pound potato gnocchi - 1 cup heavy cream - 1/2 cup basil pesto - 1 cup cherry tomatoes, halved - 1 cup spinach, roughly chopped - 1/2 cup grated Parmesan cheese - 2 tablespoons olive oil - 2 cloves garlic, minced - Salt and pepper to taste - Fresh basil leaves for garnish If you don’t have some of the key ingredients, here are some easy swaps: - Potato gnocchi: You can use cauliflower gnocchi for a lighter option. - Heavy cream: Substitute with half-and-half for a lighter sauce. - Basil pesto: Use sun-dried tomato pesto or make a homemade version. - Parmesan cheese: Grated Pecorino Romano works well too. Choosing the right produce makes your dish shine. Here are some tips: - Cherry tomatoes: Look for bright colors and a firm texture. Avoid any with wrinkles. - Spinach: Choose fresh, vibrant leaves. Avoid any that look wilted. - Basil leaves: Pick leaves that smell fresh and look bright green. This enhances the flavor of your dish. By picking fresh ingredients, you ensure that your One Pot Creamy Pesto Gnocchi tastes great! This dish is simple and quick. You will cook everything in one pot. This saves time and makes cleanup easy. You only need to chop a few ingredients. Gather your things before you start. You will need potato gnocchi, heavy cream, basil pesto, cherry tomatoes, spinach, Parmesan cheese, olive oil, garlic, salt, and pepper. 1. Heat Oil: Start by heating the olive oil in a large pot over medium heat. 2. Sauté Garlic: Add the minced garlic and cook for about 1 minute. It should smell great but not burn. 3. Cook Tomatoes: Toss in the halved cherry tomatoes. Cook for 2 to 3 minutes until they soften a little. 4. Add Cream: Pour in the heavy cream. Bring it to a gentle simmer and stir it occasionally. 5. Add Gnocchi: Now, add the potato gnocchi. Stir gently to coat them in the cream. Cook for 3 to 5 minutes until they float. This means they are done. 6. Mix in Pesto and Spinach: Stir in the basil pesto and chopped spinach. Mix until the spinach wilts. 7. Add Cheese and Season: Remove the pot from heat. Stir in the grated Parmesan cheese. Add salt and pepper to taste. 8. Adjust Consistency: If it’s too thick, add a splash of water or more cream until it looks good. 9. Serve: Serve right away, topped with fresh basil leaves and extra Parmesan cheese if you like. To check if the gnocchi is ready, look for them to float. When they float, they are usually cooked. You can also taste one to see if it is soft and tender. If it's not ready, give it another minute in the pot. Always stir gently to avoid breaking them apart. To make your One Pot Creamy Pesto Gnocchi super creamy, start with heavy cream. This rich base gives a nice mouthfeel. When you simmer the cream, keep the heat low. If it gets too hot, it may curdle. Stir often to keep it smooth. As you mix in the pesto, it adds both flavor and creaminess. If the sauce is thick, add a splash of water or more cream. This helps reach your perfect texture. Taste your dish as you cook. The balance of salt and pepper is key. Start with a pinch of salt and a few cracks of black pepper. Remember, the Parmesan cheese adds salt, too. After adding the pesto, taste again. You may want more salt or a touch of lemon juice for brightness. Trust your taste buds; adjust as you go for the best flavor. Cooking in one pot is fun and easy! Keep your pot deep to prevent spills. Use a wooden spoon to gently stir. This helps avoid breaking the gnocchi. Always sauté your garlic first for great aroma. When adding ingredients, layer them wisely. Start with garlic, then tomatoes, followed by the cream. This helps build flavor. Last, add the gnocchi and spinach. This ensures even cooking and delicious results. {{image_2}} This dish is already a hit for vegetarians. The creamy pesto sauce and gnocchi make a great pair. You can add more veggies to boost nutrition. Try bell peppers, zucchini, or mushrooms. These add flavor and color. You can also swap the Parmesan for a plant-based cheese. This keeps it creamy while making it vegan-friendly. Want to make this dish more filling? Add protein! Grilled chicken or shrimp works well. Simply cook them in the same pot before adding the garlic. If you want a meat-free option, use chickpeas or white beans. They add protein and are great for texture. Toss them in when you add the gnocchi for a balanced meal. You can easily switch up the flavors in this recipe. Consider adding lemon juice or zest for a fresh kick. A sprinkle of red pepper flakes gives it a nice heat. If you love herbs, try adding fresh thyme or oregano. For a richer taste, mix in sun-dried tomatoes or olives. These small changes can make your meal unique and exciting. After enjoying your One Pot Creamy Pesto Gnocchi, store any leftovers in an airtight container. Let the dish cool down to room temperature first. This helps keep the creamy texture intact. Place the container in the fridge, where it will stay fresh for up to three days. Always check for any signs of spoilage before eating. Reheating this dish can be simple. Use a microwave-safe bowl to warm it in the microwave. Heat in short bursts of 30 seconds. Stir the gnocchi in between to ensure even heating. If the dish seems too thick, add a splash of cream or water. This keeps it creamy and delicious. You can also reheat it on the stove. Just add a bit of olive oil to a skillet. Warm it over low heat, stirring often, until hot. Freezing One Pot Creamy Pesto Gnocchi is a great option for meal prep. First, let the dish cool completely. Then, place it in a freezer-safe container. You can also use freezer bags, removing as much air as possible. This will help prevent freezer burn. It can last up to three months in the freezer. To reheat, thaw it overnight in the fridge. Then, follow the reheating tips above for the best results. Yes, you can use store-bought pesto. It saves time and still tastes great. Look for a brand with fresh ingredients. Check the label to avoid added preservatives. Homemade pesto is also a fantastic option if you have time. Just blend fresh basil, garlic, nuts, and olive oil. One Pot Creamy Pesto Gnocchi lasts about 3 days in the fridge. Make sure to store it in an airtight container. The cream and pesto may separate slightly, but a quick stir will fix that. Reheat it gently on the stove for the best texture. You can serve it with a fresh salad or grilled vegetables. A side of crusty bread is perfect for soaking up the sauce. If you want more protein, try adding grilled chicken or shrimp on top. Enjoying it with a glass of white wine can elevate your meal too! In this post, we explored how to make One Pot Creamy Pesto Gnocchi. We covered key ingredients, cooking steps, and essential tips for a creamy texture. We also looked at variations, including vegetarian options and protein add-ins. Finally, I shared storage methods to keep your dish fresh. With these steps and tips, you can create a tasty meal that satisfies your cravings. Enjoy your cooking and let your creativity shine!

One Pot Creamy Pesto Gnocchi Quick and Tasty Meal

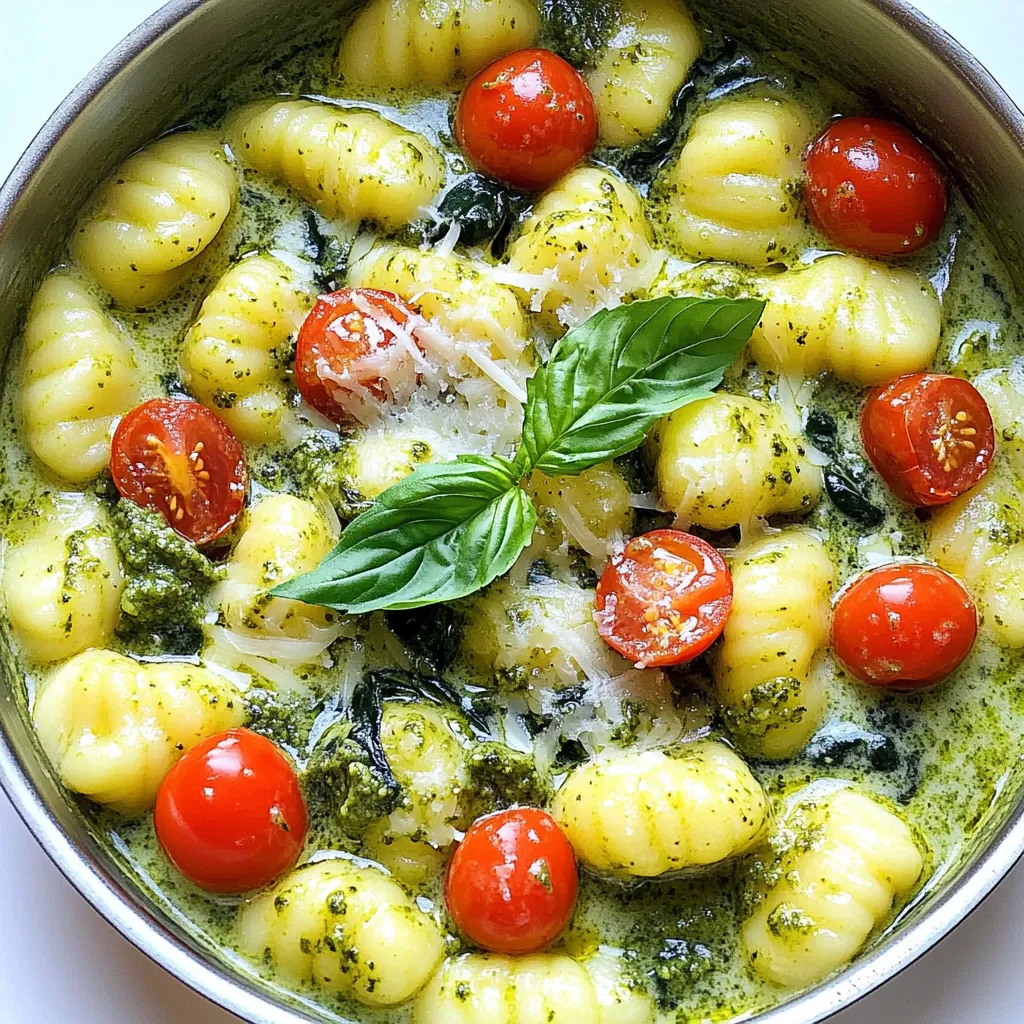
Looking for a quick and tasty meal? One Pot Creamy Pesto Gnocchi is the answer! You’ll love how simple it

- 1 cup rolled oats - 1 ½ cups almond milk (or milk of your choice) - ½ cup Greek yogurt (plain or vanilla) To start, rolled oats are the base of this recipe. They soak up the liquid and become soft and creamy. Almond milk, or any milk you like, adds moisture. Greek yogurt gives it a nice, rich texture. You can choose plain or vanilla yogurt based on your taste. - 1 tablespoon maple syrup (or honey) - 1 teaspoon vanilla extract - 1 cup fresh strawberries, sliced Next, we add flavor! Maple syrup or honey sweetens the oats. Vanilla extract adds a warm taste. Fresh strawberries are the star of this dish. They give a burst of juicy flavor and color. - ¼ cup chopped almonds or walnuts - Pinch of salt For extra crunch, you can add chopped almonds or walnuts. A tiny pinch of salt enhances all the flavors. These toppings make your oats even more delightful. Enjoy customizing your oats with these tasty options! To start, gather your ingredients. You need 1 cup of rolled oats, 1 ½ cups of almond milk, and ½ cup of Greek yogurt. Add 1 tablespoon of maple syrup and 1 teaspoon of vanilla extract for sweetness. Finally, grab a pinch of salt and 1 cup of fresh strawberries. 1. In a mixing bowl, combine the rolled oats, almond milk, Greek yogurt, maple syrup, vanilla extract, and a pinch of salt. Stir well. This mix will be the base of your overnight oats. 2. Now, gently fold in half of the sliced strawberries into the mix. This adds a fresh burst of flavor right into the oats. Next, it's time to portion the mixture. 1. Divide the oats mixture evenly into two jars or containers with lids. Make sure to leave some room at the top for toppings. 2. Top each jar with the remaining sliced strawberries. You can also sprinkle chopped almonds or walnuts for a nice crunch. This not only adds texture but also enhances the flavor. Now, let’s talk about refrigeration. 1. Seal the containers and refrigerate overnight, or at least for 4 hours. This soaking time allows the oats to absorb all the delicious flavors. 2. When you’re ready to eat, give the oats a good stir. You can enjoy them cold straight from the fridge or warmed up if you prefer. Both ways taste amazing! You can easily change the taste of your oats. For sweetness, try different syrups. Maple syrup adds a rich flavor. Honey gives a floral note. Add extra toppings for crunch. Chopped almonds or walnuts work great. You can also try granola or coconut flakes. These will give your oats a fun texture. To boost nutrition, use fortified almond milk. This milk adds vitamins and minerals. You can also use regular milk. Mix in seeds like chia or flaxseed. They add healthy fats and fiber. Adding more fruits increases vitamins. Blueberries or bananas can be great choices. Meal prep makes mornings easy. Make a batch for the week. Store them in jars or containers. This way, breakfast is always ready. Keep your oats in the fridge for up to three days. For the best taste, eat them fresh. Seal the jars tight to keep them from drying out. {{image_2}} You can switch out strawberries for other fruits. Blueberries and raspberries are great choices. They add a burst of flavor and color. You can also mix in bananas or mango. Bananas bring creaminess, while mango adds a tropical twist. Feel free to get creative! You can use different types of yogurt. Greek yogurt is popular, but try plant-based yogurt too. Almond, coconut, or soy yogurts work well. These options can change the taste and texture. For milk, almond milk is a classic choice. But you can explore oat, soy, or coconut milk as well. Each type of milk adds its own flavor to the oats. Spices can make your overnight oats special. Adding a pinch of cinnamon or nutmeg gives a warm taste. If you love chocolate, try mixing in some cocoa powder. For a nutty flavor, peanut butter is an excellent addition. It gives the oats a creamy texture and rich taste. Experiment and find your favorite flavor combinations! The oat mixture lasts up to five days in the fridge. Make sure to keep it in a sealed container. To prevent sogginess, store the toppings separate. This way, your oats stay fresh and tasty. You can freeze your overnight oats for convenience. First, prepare the oats as usual. Then, spoon the mixture into freezer-safe containers. Leave some space at the top for expansion. To defrost, place the container in the fridge overnight. You can also warm it in the microwave for a quick meal. Check your oats for changes in smell or color. If they smell sour or look off, it’s time to toss them. Always trust your senses when it comes to food safety. If unsure, it's better to be safe than sorry. To make your overnight oats vegan, swap Greek yogurt for plant-based yogurt. Use almond milk, oat milk, or soy milk instead of regular milk. These options keep the creaminess while being dairy-free. You can also use maple syrup for sweetness over honey, which is not vegan. You can use quick oats, but the texture will be different. Quick oats are thinner and will soak up liquid faster. This means they may turn mushy if soaked too long. If using quick oats, reduce the soak time to about two hours. Rolled oats provide a chewier texture that many people prefer. Strawberry shortcake overnight oats are both tasty and nutritious. They offer fiber from rolled oats, which aids digestion. The fresh strawberries provide vitamins, especially vitamin C, and antioxidants. Greek yogurt adds protein, which helps keep you full. Almonds or walnuts give healthy fats. Together, these ingredients can support your overall health and wellness. This guide covered the essentials of making delicious strawberry shortcake overnight oats. We explored key ingredients, mixing methods, and storage tips. I shared ways to customize your oats and enhance their nutrition. By experimenting with flavors and using different toppings, you can create your perfect breakfast. Keep this information handy for quick references and enjoy every bite of your healthy, tasty creation. Happy cooking!

Strawberry Shortcake Overnight Oats Delightful Recipe

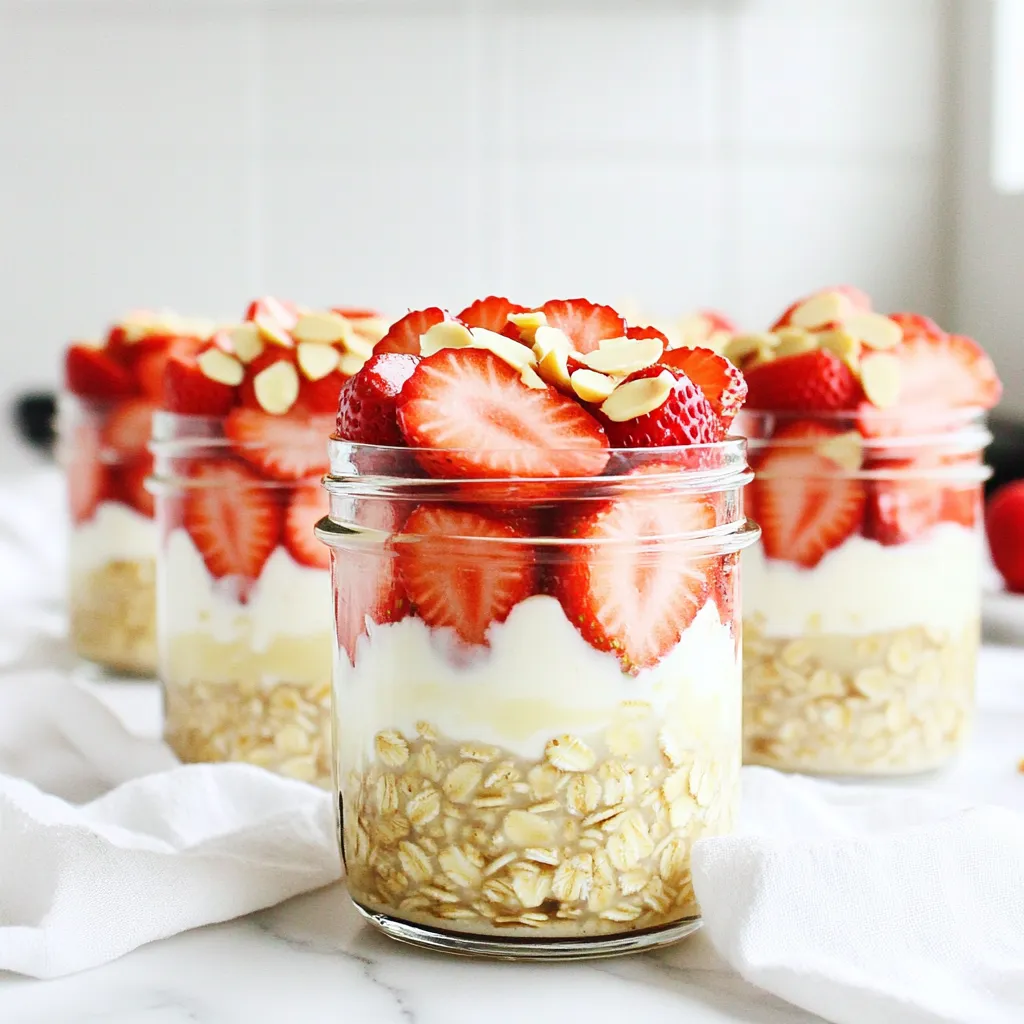
Are you ready for a delicious breakfast that’s easy to make? These Strawberry Shortcake Overnight Oats are a game changer

- 1 can (15 oz) chickpeas: Drain and rinse for best texture - 1 tablespoon olive oil: For added flavor and crispiness - 2 tablespoons everything bagel seasoning: Key flavor component - 1 teaspoon garlic powder: Enhances the overall taste - 1 teaspoon onion powder: Adds depth to the flavor - Salt, to taste: Important for seasoning balance - Fresh parsley: Adding color and freshness - Chives: A subtle onion flavor to complement Gather all your ingredients before you start cooking. It makes the process smooth and fun. The chickpeas are the star here. Rinse them well and dry them to get that crunch. Olive oil is key for a crispy texture. Everything bagel seasoning brings that unique taste that makes these chickpeas pop. Adding garlic powder and onion powder takes the flavor to another level. Don't forget salt; it helps bring out the best in all the flavors. For a nice finish, you can sprinkle fresh parsley or chives on top. They add a burst of color and flavor. This simple step makes your snack look even better! - Set temperature to 400°F (200°C) - Allow 5 minutes for preheating First, you need to preheat your air fryer. This step is key to getting crispy chickpeas. Set the temperature to 400°F (200°C) and let it warm up for about 5 minutes. Preheating helps the chickpeas cook evenly and get that perfect crunch. - Drain and rinse chickpeas thoroughly - Pat dry with a paper towel to remove moisture While the air fryer heats, prepare your chickpeas. Drain a 15 oz can of chickpeas and rinse them well under cold water. This step is important for removing excess salt and preserving texture. After rinsing, pat them dry with a paper towel. Removing moisture is crucial for achieving crispiness. - Combine chickpeas with olive oil and spices in a mixing bowl - Toss until evenly coated Next, it’s time to flavor the chickpeas. In a mixing bowl, add the dried chickpeas, 1 tablespoon of olive oil, 2 tablespoons of everything bagel seasoning, 1 teaspoon of garlic powder, and 1 teaspoon of onion powder. Add a pinch of salt to taste. Toss everything together until the chickpeas are evenly coated. This seasoning mix gives the chickpeas their delicious taste. - Arrange seasoned chickpeas in a single layer in the basket - Cook for 12-15 minutes, shaking halfway through Now, place the seasoned chickpeas in the air fryer basket. Make sure they are in a single layer for even cooking. Cook them for 12 to 15 minutes. Halfway through, shake the basket gently to ensure they crisp up nicely. Keep an eye on them. You want them golden brown and crunchy, not burnt. - Remove and let cool for 2 minutes - Garnish with parsley or chives if desired Once the cooking time is up, carefully remove the chickpeas from the air fryer. Let them cool for about 2 minutes. This cooling time helps them firm up. If you want, you can garnish them with fresh parsley or chives for a pop of color and flavor. Enjoy your crispy snack! To get crispy chickpeas, start by drying them well. Wet chickpeas won’t crisp up. Use a paper towel to pat them dry. This step is key for crunch. Next, spread the chickpeas in a single layer in the air fryer. This allows hot air to circulate, cooking them evenly. Overcrowding the basket can lead to soggy snacks. Keep an eye on your chickpeas as they cook. Look for a golden brown color; this means they are done. Cooking times may vary based on your air fryer brand. Check them around the 12-minute mark. If they aren't crispy yet, give them a few more minutes. Just don’t leave them too long, or they might burn. Once your chickpeas are ready, think about how to serve them. They pair great with dips like hummus or tzatziki. You can also use them to top salads for extra crunch. Adding these chickpeas gives your meal a fun twist. Enjoy experimenting with different ways to include them in your meals! {{image_2}} You can easily change the flavors of these chickpeas. For a spicy twist, add cayenne or paprika to the mix. This adds heat and a nice kick. If you prefer sweet snacks, swap the seasoning for cinnamon and sugar. The sweet version tastes great with coffee or tea. You can also experiment with different herbs and spices. For a Mediterranean vibe, try using Italian herbs like oregano, basil, and thyme. This mix brings a fresh taste to the chickpeas. If you want a unique flavor, use South Asian spices such as garam masala and turmeric. These spices add warmth and a lovely color. Do not worry if you do not have an air fryer. You can make these chickpeas in the oven. Set the oven to 400°F (200°C) and adjust the cooking time to 20-25 minutes. Remember to stir them halfway through. If you prefer stovetop cooking, use a skillet. Heat a little oil over medium heat and cook the seasoned chickpeas for about 10-12 minutes. Stir them often to avoid burning. Store your Air Fryer Everything Bagel Chickpeas in an airtight container. This keeps them crispy longer. For short-term use, keep them at room temperature. Avoid moisture, as it can ruin their crunch. These tasty snacks are best eaten within a week. After that, they may lose their flavor and texture. Signs of staleness include a soft exterior and lack of crunch. If they feel chewy, it's time to toss them. To reheat, use the air fryer for a few minutes. This method helps restore their crunch. Avoid the microwave; it can make them soft and soggy. Enjoy your chickpeas warm and crispy! Yes, but pre-cooking is necessary. You must soak and cook dried chickpeas before using them. This process helps them soften and become tender. After cooking, drain and rinse them well. Then, follow the same steps for seasoning and air frying. This ensures you get that perfect crispy texture. All ingredients listed are already vegan. Chickpeas are plant-based, and olive oil is also vegan. Everything bagel seasoning contains no animal products. Thus, you can enjoy this snack without worrying about animal ingredients. It’s a tasty choice for anyone following a vegan diet. Absolutely, customize to suit your taste preferences. You can add more garlic or onion powder for a stronger flavor. If you like spice, sprinkle in some cayenne pepper. For a sweeter twist, try adding cinnamon. The beauty of this recipe lies in its flexibility. So don’t hesitate to experiment! This blog covers how to make crispy chickpeas using an air fryer. We discussed key ingredients like chickpeas, olive oil, and everything bagel seasoning. You learned the step-by-step cooking process and tips for perfect crispiness. These chickpeas can be enjoyed as snacks or toppings. Don’t hesitate to experiment with flavors or cooking methods. You can make this dish your own. Enjoy your tasty, healthy treat!

Air Fryer Everything Bagel Chickpeas Crispy Snack

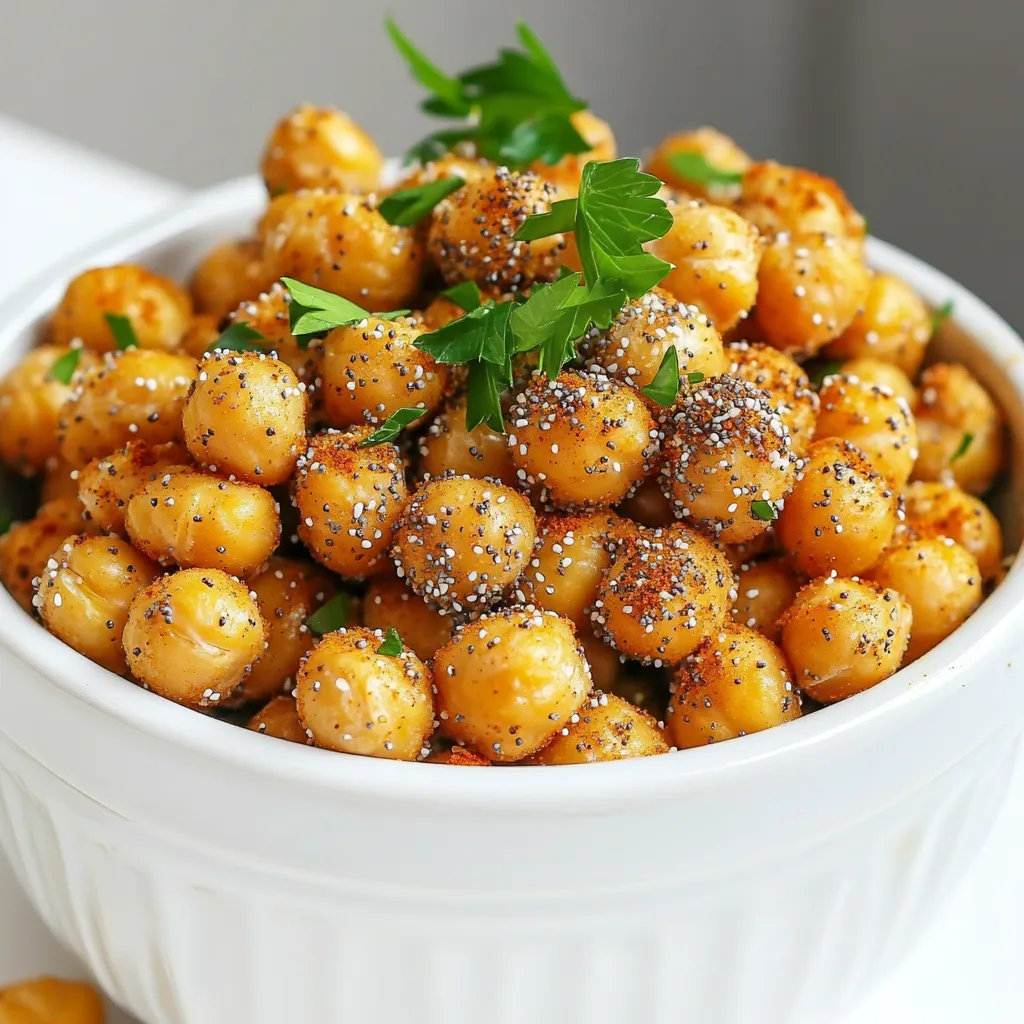
Craving a snack that’s crunchy, savory, and guilt-free? Look no further than my Air Fryer Everything Bagel Chickpeas! These chickpeas

- 1 cup quinoa - 2 cups vegetable broth - 2 cups broccoli florets - 1 cup shredded sharp cheddar cheese - 1 cup cottage cheese - 1/2 cup mozzarella cheese - 2 large eggs - 2 cloves garlic, minced - 1 teaspoon onion powder - 1 teaspoon mustard powder - Salt and pepper to taste - 1/2 teaspoon red pepper flakes (optional) - 1/2 cup breadcrumbs - 2 tablespoons olive oil Gather these ingredients before you start cooking. Quinoa is the base of this dish. It adds texture and keeps it filling. The vegetable broth enhances the flavor, making the quinoa taste rich and warm. Broccoli florets bring a nice crunch and color. The cheeses provide a creamy texture. Sharp cheddar gives a bold flavor, while cottage cheese adds moisture. Mozzarella melts beautifully, making every bite gooey. Garlic adds a pop of flavor. It pairs well with the cheese and broccoli. For seasonings, onion and mustard powders enhance the dish's depth. Adjust salt and pepper to suit your taste. If you want some heat, add red pepper flakes. Breadcrumbs on top create a crunchy finish. Olive oil keeps them golden brown. This mix of ingredients makes the bake savory and delicious. 1. First, preheat your oven to 375°F (190°C). Next, lightly grease a 9x13 baking dish. This helps the bake not stick. 2. Rinse 1 cup of quinoa under cold water. Then, add it to a medium saucepan with 2 cups of vegetable broth. Bring it to a boil. Lower the heat, cover, and let it simmer for about 15 minutes. Once the liquid is gone, let it sit for 5 minutes. Use a fork to fluff it up. 3. While the quinoa cooks, take 2 cups of broccoli florets and steam them for 3-4 minutes. You want them tender but still bright green. Drain and set aside. 1. In a large mixing bowl, combine the cooked quinoa, steamed broccoli, and 1 cup each of shredded cheddar cheese, cottage cheese, and mozzarella cheese. 2. Crack in 2 large eggs and add 2 cloves of minced garlic, 1 teaspoon of onion powder, and 1 teaspoon of mustard powder. Season with salt and pepper to taste. If you like a kick, add 1/2 teaspoon of red pepper flakes. Mix everything together until well blended. 1. Now, transfer the mixture into your prepared baking dish. Spread it evenly across the dish. 2. In a small bowl, mix 1/2 cup of breadcrumbs with 2 tablespoons of olive oil, making sure the crumbs are coated. Sprinkle this mix over the top of the quinoa bake for a nice crunch. 3. Bake in your preheated oven for 25-30 minutes. You want the top to be golden brown and the cheese bubbling. 4. Once done, let it cool for about 5 minutes before slicing and serving. Enjoy your creamy broccoli cheddar quinoa bake. To get fluffy quinoa, rinse it well first. Rinsing removes a bitter coating. After cooking, let it sit for a few minutes. Then, fluff it gently with a fork. This makes it light and airy. When steaming broccoli, don’t overdo it. Steam for only 3-4 minutes. You want it tender but still bright green. This keeps it fresh and crunchy in your bake. Choosing the right cheese can change the flavor. Sharp cheddar gives a strong taste. You can also use gouda or gruyère for a twist. Both melt well and add depth. If you don’t have sharp cheddar, try medium cheddar. It works great too. For a lighter option, consider low-fat cheeses. Experiment with what you have on hand. Adjusting the seasonings matters. If you like it savory, add more onion powder. For a zesty kick, try extra mustard powder. Want some heat? Red pepper flakes are perfect. However, you can use cayenne pepper instead. Just add a little at a time to avoid too much spice. {{image_2}} You can easily make this dish fit many diets. If you want a vegetarian option, this recipe is already a great choice. Just skip any meat toppings. For gluten-free options, ensure you use gluten-free breadcrumbs. Quinoa is naturally gluten-free too, making it safe for those with gluten sensitivities. Not a fan of quinoa? You can swap it with rice or couscous. Both work well and taste great. If you need a dairy-free option, there are many cheese substitutes available today. Look for vegan cheese that melts nicely. This way, you can still enjoy that creamy texture without dairy. Feel free to get creative with your vegetables. Peas, carrots, or bell peppers can add fun colors and flavors. Want more protein? Add cooked chicken or tofu for extra heartiness. These additions can make the dish even more filling and nutritious. To keep your leftovers fresh, let the bake cool first. This step is key. Use an airtight container for storage. You can keep it in the fridge for up to four days. If you want to save it longer, freezing is a great option. When you’re ready to eat, use the oven or microwave. For the oven, preheat to 350°F (175°C). Heat it for about 15-20 minutes. This method keeps the texture nice. If using the microwave, heat in short bursts. Check every minute until warm. To freeze the bake, let it cool completely. Cut it into portions. Wrap each piece in plastic wrap. Then place them in a freezer-safe bag. It will last for up to three months. When ready to eat, thaw it overnight in the fridge. Then reheat as mentioned above. The Creamy Broccoli Cheddar Quinoa Bake can last for up to 5 days in the fridge. Store it in an airtight container to keep it fresh. Always check for any signs of spoilage before eating. Yes, you can prepare the quinoa bake ahead of time. Cook the quinoa and steam the broccoli a day before. Mix all the ingredients and store them in the fridge. When you're ready, just bake it. This saves time and makes dinner easy. I love serving this bake with a simple side salad. A fresh garden salad pairs well. You can also add crusty bread for a filling meal. For a protein boost, grilled chicken or tofu complements this dish nicely. This blog post covered a tasty Creamy Broccoli Cheddar Quinoa Bake. I shared the key ingredients, from quinoa to cheese, and detailed every step for easy cooking. I included tips to perfect texture and create your own flavor twists. You learned how to store, reheat, and even freeze leftovers. Now, you can try this dish at home. Enjoy the rich flavors and the chance to customize it to your liking!

Creamy Broccoli Cheddar Quinoa Bake Savory Delight

Welcome to a dish that’s all about comfort and nutrition: Creamy Broccoli Cheddar Quinoa Bake! This savory delight combines wholesome

- 1 pound ground chicken - 3 tablespoons Sriracha sauce - 2 tablespoons honey - 2 tablespoons soy sauce (low-sodium) - 1 tablespoon rice vinegar - 1 tablespoon olive oil - 2 cloves garlic, minced - 1 tablespoon ginger, minced - 1 cup water chestnuts, diced - 1 small red bell pepper, diced - 1 green onion, sliced - 1 head of butter lettuce (or romaine), separated into leaves - Sesame seeds, for garnish - Fresh cilantro, for garnish To make Spicy Sriracha Honey Chicken Lettuce Wraps, I focus on fresh and bold flavors. The ground chicken serves as a great base. It cooks quickly and absorbs all the tasty sauces. Sriracha adds heat, while honey brings a sweet touch. Soy sauce and rice vinegar balance the mix, adding umami and tang. I love adding water chestnuts for crunch. They give each bite a fun texture. Diced red bell pepper adds color and sweetness. Green onion brings a fresh finish, making the wraps pop. For the wrap, I prefer butter lettuce. Its soft leaves hold the filling well. You can also use romaine if you like a sturdier wrap. Don’t forget the sesame seeds and cilantro! They make each bite look and taste special. Gather these ingredients, and you’re ready to create a meal that is full of flavor and fun. 1. Heat a large skillet over medium heat. 2. Add 1 tablespoon of olive oil to the skillet. 3. Mince 2 cloves of garlic and 1 tablespoon of ginger. 4. Sauté the garlic and ginger for about 1 minute. The smell will be nice! 5. Now, add 1 pound of ground chicken to the skillet. 6. Cook until the chicken is brown, about 5-7 minutes. Break it apart with a spatula. 1. In a small bowl, mix together: - 3 tablespoons Sriracha sauce - 2 tablespoons honey - 2 tablespoons low-sodium soy sauce - 1 tablespoon rice vinegar 2. Pour this sauce over the cooked chicken. 3. Stir well to coat the chicken evenly with the sauce. 1. Dice 1 cup of water chestnuts and 1 small red bell pepper. 2. Add these to the skillet. 3. Cook for another 2-3 minutes. The veggies should soften a bit. 4. Remove from heat and stir in sliced green onion. 5. To assemble, take a lettuce leaf. 6. Spoon a generous amount of the chicken mixture into the center. 7. Garnish with sesame seeds and fresh cilantro. Enjoy your wraps! To ensure the chicken is fully cooked, use a meat thermometer. Aim for a temperature of 165°F. This guarantees the chicken is safe to eat. Cook the chicken until it is no longer pink. Stir frequently for even cooking. If you want to adjust the spice level, you can add less Sriracha. For a milder taste, use only one tablespoon. You can also mix in some plain honey to balance the heat. For extra heat, add jalapeños or a sprinkle of red pepper flakes. The best sides to serve with lettuce wraps include rice or quinoa. These grains soak up the sauce well. You can also serve fresh veggies like carrots or cucumbers for crunch. Pair the wraps with dips or sauces for added flavor. A simple soy sauce or a spicy mayo works great. For a fresh twist, serve them with a lime wedge for a zesty kick. For substitutions, you can use ground turkey or beef if desired. They work well in this recipe. For a vegetarian option, try crumbled tofu or tempeh. Just make sure to adjust cooking times as needed. You can add extra toppings or mix-ins to your wraps. Try diced avocado for creaminess or shredded carrots for sweetness. Fresh herbs like mint or basil can elevate the dish too. Experiment and find your favorite combination! {{image_2}} You can swap ground chicken for ground turkey or beef. Both options work well in this dish. Ground turkey gives a leaner taste, while beef adds richness. If you prefer a meatless meal, try tofu or tempeh. Both options soak up flavors nicely. Simply crumble tofu or cube tempeh before cooking. Want to kick up the flavor? Add more spices like red pepper flakes or black pepper. Fresh herbs also enhance taste. Try cilantro, basil, or mint for a fresh twist. You can also play with sauces. Try hoisin or peanut sauce for a unique flavor. Each choice adds a new dimension to your wraps. Lettuce wraps are fun, but you can change them up. Use different types of lettuce like romaine or iceberg for a crunchier wrap. You can also serve the chicken mixture in bowls. Add rice or quinoa for a hearty meal. This way, everyone can customize their dish to their liking. To keep your Spicy Sriracha Honey Chicken Lettuce Wraps fresh, store them in the fridge. Place the chicken mixture in an airtight container. You can place the lettuce leaves in a separate bag. This helps keep them crisp. Store in the fridge for up to three days. If you want to keep the chicken mixture longer, you can freeze it. Let the chicken cool completely before transferring it to a freezer-safe bag. Squeeze out the air and seal it tight. This way, it can last for up to three months. When you’re ready to eat, thaw the chicken in the fridge overnight. Reheat it in a skillet over medium heat. Stir until it’s hot throughout. You can also microwave it. Just ensure it’s heated evenly. Leftovers of Spicy Sriracha Honey Chicken Lettuce Wraps are best eaten within three days. After that, the flavor and texture may change. If you notice any odd smells or changes, it’s best to toss them. Always trust your senses when it comes to food safety! These wraps pack a nice kick. Sriracha sauce is the main heat source. If you want less spice, use less Sriracha. You can also add more honey to balance the heat. Try adding a little bit of yogurt or sour cream. This helps cool down the spice too. Yes, you can prep these wraps ahead of time. Cook the chicken mixture and store it in the fridge. You can keep it for up to three days. When ready to serve, just reheat it. Assemble the wraps with fresh lettuce and toppings right before eating. This keeps the lettuce crisp and fresh. These wraps pair well with various sides. Try serving them with steamed rice or quinoa. You can also add a side of fresh veggies. A simple cucumber salad adds a nice crunch. For a complete meal, consider some spring rolls. They add a delicious touch to your dining experience. This article covered how to make Spicy Sriracha Honey Chicken Lettuce Wraps. We discussed all ingredients needed, from chicken to garnishes. I also shared steps for cooking the chicken and making the sauce. You learned tips to customize your wraps and ideas for storage. In the end, these wraps are fun to make and easy to enjoy. You can jazz them up with your favorite proteins and spices. Now, it's time for you to get cooking and try these delicious wraps!

Spicy Sriracha Honey Chicken Lettuce Wraps Delight

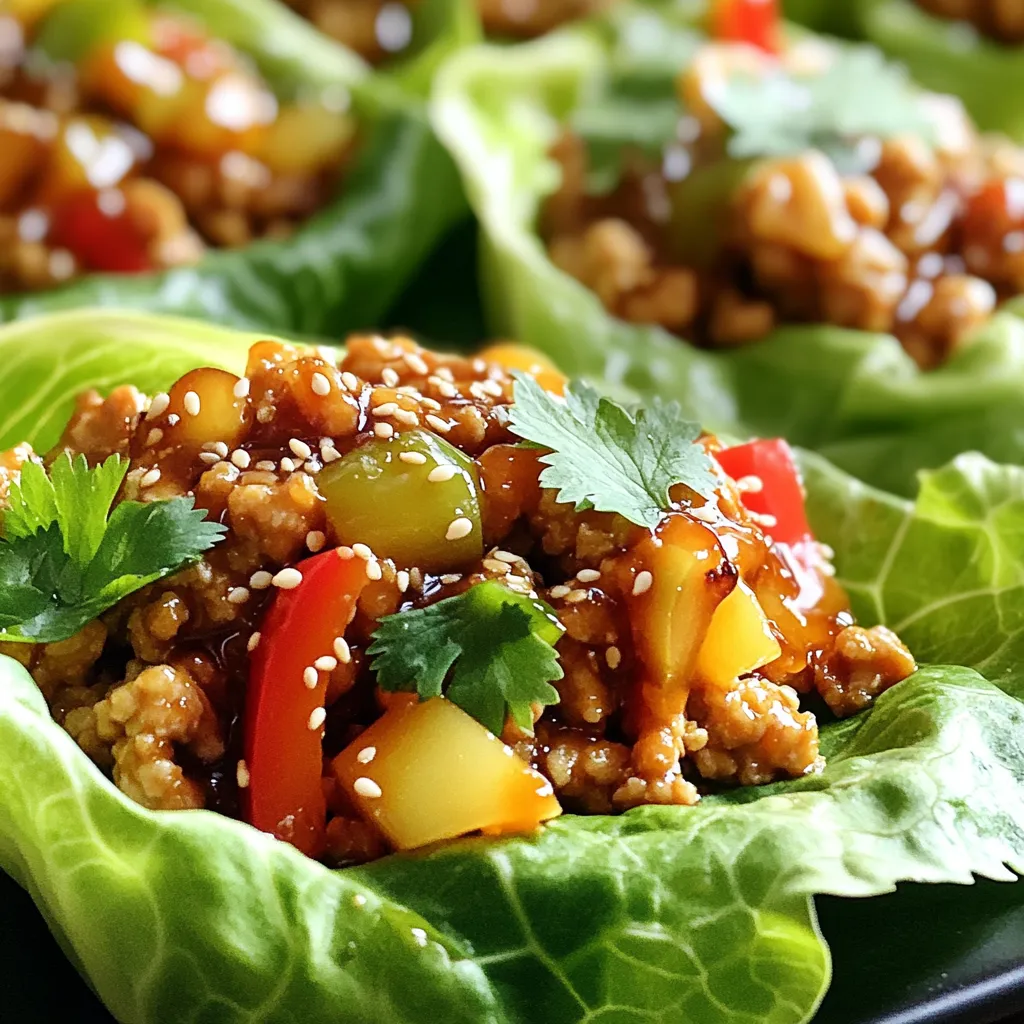
Are you ready to spice up your weeknight meals? These Spicy Sriracha Honey Chicken Lettuce Wraps are packed with flavor

To make this Maple Pecan Sweet Potato Casserole, you will need: - 4 medium sweet potatoes, peeled and cubed - 1/2 cup maple syrup - 1/4 cup unsalted butter, melted - 1/2 teaspoon cinnamon - 1/4 teaspoon nutmeg - 1/4 teaspoon salt - 1/2 cup milk (or plant-based milk) - 1 teaspoon vanilla extract - 1 cup pecans, chopped - 1/2 cup brown sugar - 1/2 cup mini marshmallows (optional) Each ingredient plays a key role. Sweet potatoes offer a creamy base. Maple syrup adds sweetness and a hint of flavor. Butter helps with richness. The spices give warmth. Milk makes everything smooth. Lastly, pecans and marshmallows provide a lovely crunch and sweetness on top. You can easily adapt this recipe for different diets: - Dairy-Free: Use plant-based milk instead of regular milk. Replace butter with coconut oil or a dairy-free spread. - Nut-Free: Omit the pecans or use seeds like sunflower seeds for a different crunch. - Gluten-Free: This recipe is naturally gluten-free. Just ensure all ingredients are labeled gluten-free. These swaps let everyone enjoy this dish without worry. When it comes to ingredients, quality matters. Here are some brands I trust: - Maple Syrup: Look for brands like Grade A Pure Maple Syrup from Vermont. It has a rich flavor. - Pecans: I recommend buying from brands like Fisher or Planters. They offer fresh, high-quality nuts. Using good ingredients makes a big difference in taste. Choose wisely! Start by peeling and cubing four medium sweet potatoes. Place them in a large pot and cover them with water. Bring the water to a boil over medium-high heat. Cook the sweet potatoes for about 15 minutes, or until they are fork-tender. Drain the potatoes and let them cool for a few minutes. This step ensures they mash easily. In a mixing bowl, mash the cooked sweet potatoes until they are smooth. Then, add in 1/2 cup of maple syrup, 1/4 cup of melted unsalted butter, 1/2 teaspoon of cinnamon, 1/4 teaspoon of nutmeg, and 1/4 teaspoon of salt. Pour in 1/2 cup of milk, or your choice of plant-based milk, and 1 teaspoon of vanilla extract. Mix all the ingredients together until everything is creamy and well combined. This will be the base for your casserole. In a separate bowl, combine 1 cup of chopped pecans with 1/2 cup of brown sugar. Pour in 1/4 cup of melted butter and stir until the pecans are coated. This topping adds a nice crunch and sweetness to your dish. If you want, you can also include 1/2 cup of mini marshmallows for an extra sweet touch. Preheat your oven to 375°F (190°C). Pour the sweet potato mixture into a greased 9x13-inch baking dish. Spread it out evenly. Next, sprinkle the pecan mixture over the sweet potato layer. If you chose to use mini marshmallows, scatter them on top now. Bake the casserole for about 25-30 minutes, or until it is bubbly and the topping is golden brown. After baking, let it rest for a few minutes before serving. Serve warm, garnished with whole pecans for a lovely look. To make creamy sweet potatoes, start with fresh, medium sweet potatoes. Peel and cube them evenly. Boil the sweet potatoes in water until they are fork-tender, about 15 minutes. This helps them cook evenly. After boiling, drain and let them cool slightly. Mash them until smooth in a bowl. Add maple syrup, melted butter, cinnamon, nutmeg, salt, milk, and vanilla extract. Mix until everything is well combined. This method ensures a rich and creamy texture. For a crunchy topping, use fresh pecans. Chop them roughly for great texture. Mix the chopped pecans with brown sugar and melted butter in a bowl. This mix adds sweetness and crunch. Spread the pecan mixture evenly on top of the sweet potato layer. If you like, sprinkle mini marshmallows on top for extra sweetness and a nice look. Bake until the topping is golden brown and bubbly, usually around 25-30 minutes. This creates a perfect, crispy layer. Serve your casserole warm right from the oven. I love adding whole pecans on top for a nice touch. For color, sprinkle some chopped parsley around the dish. This adds freshness and taste. Pair the casserole with roasted meats like turkey or ham. It also goes well with a simple green salad. You can even serve it as a sweet side for breakfast. It’s tasty any time of day! {{image_2}} You can easily make this casserole vegan and dairy-free. Instead of milk, use plant-based milk like almond or oat milk. Replace butter with coconut oil or vegan butter. For a creamy texture, add a bit more maple syrup to the sweet potato mix. This keeps the dish rich and sweet. These swaps allow everyone to enjoy this tasty treat. Mixing in different nuts or fruits can add fun flavors. You could try walnuts or pecans for crunch. If you want a fruity twist, add dried cranberries or chopped apples. Both fruits pair nicely with sweet potatoes. This will change the dish while still keeping it delicious. Don't be afraid to experiment with your favorite flavors. You can switch up the sweeteners for a unique taste. If you want less sugar, use agave syrup or honey instead of maple syrup. For a spicy kick, try adding ginger or allspice. These will enhance the flavor while keeping the dish sweet. Feel free to play with spices to find your perfect mix. Store any leftover Maple Pecan Sweet Potato Casserole in an airtight container. Place it in your fridge. It should stay fresh for about three to four days. Make sure to cool it to room temperature before sealing it up. This helps keep the texture nice. To reheat, you can use the oven or microwave. If you use the oven, set it to 350°F (175°C). Place the casserole in an oven-safe dish. Cover it with foil to keep it moist. Heat for about 15-20 minutes or until warm. If using a microwave, place a serving on a plate. Heat for 1-2 minutes, checking every 30 seconds to avoid overcooking. You can freeze the casserole for longer storage. First, let it cool completely. Then, wrap it tightly in plastic wrap and foil. This helps prevent freezer burn. It can stay in the freezer for up to three months. To defrost, move it to the fridge overnight before reheating. Enjoy your delicious dish later! Yes, you can use other potatoes, but sweet potatoes shine in this dish. They add a rich flavor and creamy texture. If you try regular potatoes, the taste will change. Yukon Golds can work well too, but they will not be as sweet. This casserole is easy to make gluten-free! Just use gluten-free breadcrumbs for the topping if you want a crunchy texture. All the other ingredients, like sweet potatoes and maple syrup, are naturally gluten-free. A 9x13-inch baking dish is perfect for this casserole. This size allows the sweet potato mix to bake evenly. If you use a smaller dish, the casserole may overflow. A larger dish will spread the mixture too thin. Yes, you can make this casserole ahead of time! Prepare it up to the baking step and cover it tightly. Store it in the fridge for one to two days. When ready to bake, just add a few extra minutes to the cooking time. This article covered making a delicious sweet potato casserole. We talked about ingredients, including swaps for diets, and brands to trust. You learned how to make the base and create the perfect pecan topping. We shared tips for a creamy texture and tasty variations. Storage advice and common questions helped round out the topic. I hope you feel ready to try this recipe. Enjoy making it your own!

Maple Pecan Sweet Potato Casserole Rich and Creamy Dish

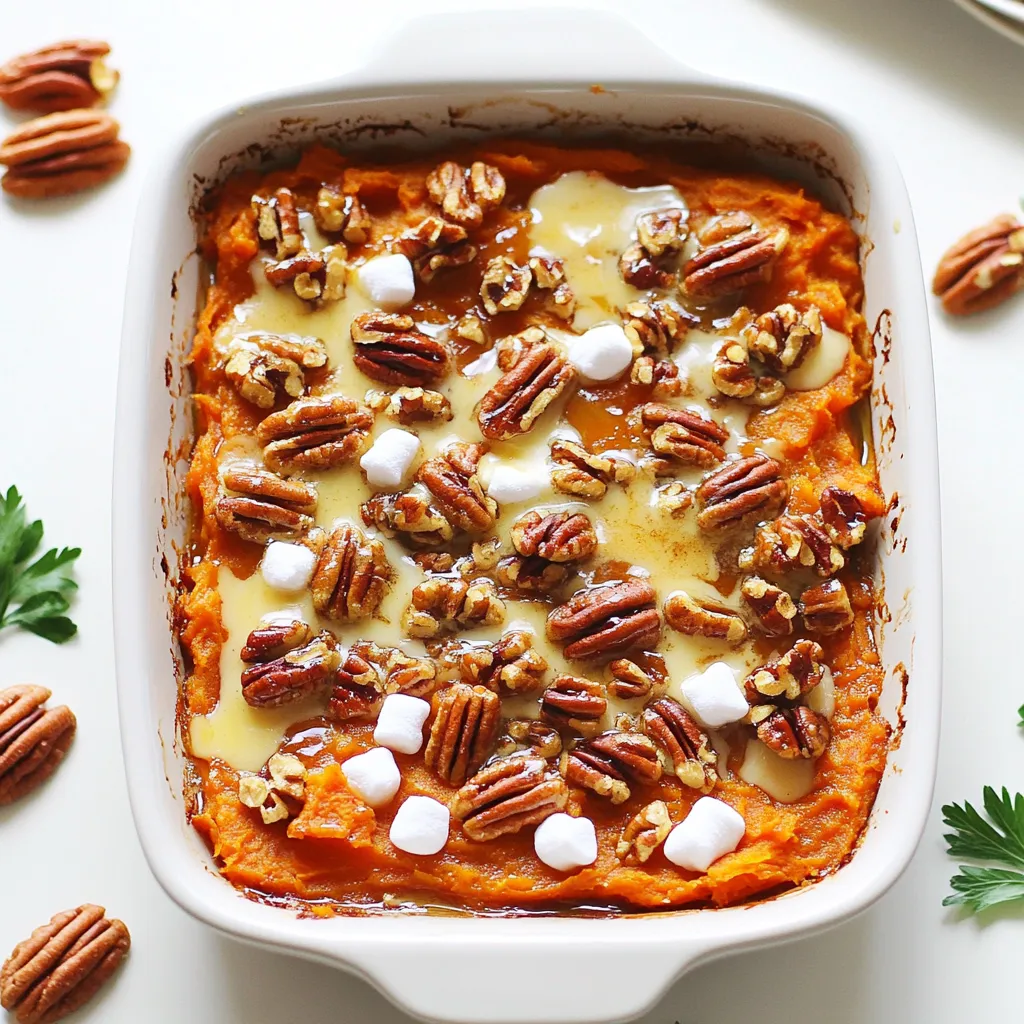
Are you ready to elevate your holiday table? My Maple Pecan Sweet Potato Casserole is rich, creamy, and bursting with

Older posts
Newer posts
← Previous Page1 … Page5 Page6 Page7 … Page86 Next →

dsad

© 2026 Cooking Wells • Built with GeneratePress

Our Policies

  • Copyright Policy
  • Cookie Policy
  • GDPR Policy
  • Privacy Policy
  • Disclaimer
  • Terms Of Use

More Information

  • Home
  • About
  • Contact
  • Appetizers
  • Dessert
  • Dinner
  • Drinks
©2026, Cooking Wells About Back To Top