Skip to content
DisclaimerTerms Of UseGDPR PolicyCookie Policy

Cooking Wells

  • Home
  • Drinks
  • Appetizers
  • Dinner
  • Dessert
  • About
  • Contact
  • Privacy Policy
DisclaimerTerms Of UseGDPR PolicyCookie Policy

NO-ING-IMG

To make a delicious roasted sweet potato salad, gather these simple ingredients: - 2 medium sweet potatoes, peeled and cubed - 1 tablespoon olive oil - 1 teaspoon smoked paprika - 1 teaspoon garlic powder - Salt and pepper to taste - 1 cup fresh spinach leaves - ½ cup cherry tomatoes, halved - ¼ cup red onion, thinly sliced - ⅓ cup feta cheese, crumbled - ¼ cup pecans, roughly chopped - 2 tablespoons balsamic vinegar - 1 tablespoon honey If you want to change things up, here are some great swaps: - Use butternut squash instead of sweet potatoes for a different flavor. - Swap olive oil for avocado oil for a richer taste. - Try regular paprika if you don't have smoked paprika. - Use onion powder in place of garlic powder for a milder taste. - Replace feta cheese with goat cheese for a tangy twist. - If you prefer nuts, sunflower seeds or pumpkin seeds work well too. - Maple syrup can replace honey for a vegan option. Each serving of this salad is packed with nutrients. Here’s a quick look at the nutritional info per serving: - Calories: ~350 - Protein: ~8g - Fat: ~20g - Carbohydrates: ~40g - Fiber: ~6g - Sugar: ~6g This salad is not just tasty but also full of vitamins and minerals. Enjoy your meal knowing it’s good for you! For the full recipe, check the details above. Start by gathering your ingredients. You need sweet potatoes, spinach, cherry tomatoes, red onion, feta, pecans, olive oil, smoked paprika, garlic powder, balsamic vinegar, honey, salt, and pepper. This mix gives you a nice balance of flavors. First, preheat your oven to 400°F (200°C). This step is key for a good roast. While the oven heats, peel and cube your sweet potatoes. Aim for uniform pieces. This way, they cook evenly. In a large bowl, toss the sweet potato cubes with olive oil, smoked paprika, garlic powder, salt, and pepper. Make sure all pieces get coated. This adds flavor as they roast. Next, arrange the sweet potatoes in a single layer on a lined baking sheet. Spacing helps them roast better. Roast for 25-30 minutes. Stir halfway through to ensure even cooking. They should be tender and slightly caramelized when done. Roasting is the best method for sweet potatoes. It brings out their natural sweetness. The high heat caramelizes the sugars, giving a nice texture. While the sweet potatoes roast, prepare your salad base. In a large bowl, mix fresh spinach, halved cherry tomatoes, sliced red onion, crumbled feta, and chopped pecans. This provides crunch and color. For the dressing, whisk together balsamic vinegar and honey in a small bowl. This combination adds a sweet and tangy kick to the salad. Once the sweet potatoes finish roasting, let them cool for about five minutes. Then, add them to your salad mix. Drizzle the balsamic dressing over the salad and toss gently. This blends all the flavors together. Adjust seasoning with salt and pepper as needed. For a lovely presentation, serve the salad in a large bowl. Add extra pecans and feta on top for a pop of color. Your roasted sweet potato salad is now ready to enjoy! This dish is perfect as a side or a main. For the full recipe, check the section above. To save time, prep your ingredients first. Peel and cube the sweet potatoes early. You can also wash and dry the spinach ahead. Measure out spices and have everything ready. This way, you can work fast. Roasting sweet potatoes brings out their natural sweetness. Cut them into small cubes for even cooking. Toss them well with olive oil and spices. Spread them out on a baking sheet. Make sure they don’t touch. This helps them roast, not steam. Stir halfway through to ensure even browning. Add more flavor by using fresh herbs like parsley or cilantro. You can also mix in nuts, like walnuts or almonds, for crunch. For a zesty kick, try adding lime juice. If you love heat, a pinch of cayenne pepper works great. Feel free to swap feta for goat cheese if you prefer. Enjoy experimenting with your own flavor twists! For the full recipe, check out the details above. {{image_2}} You can change this salad with the seasons. In spring, add fresh peas and radishes for a crisp, bright touch. Summer calls for fresh corn and diced bell peppers. In autumn, try adding roasted Brussels sprouts or apples for a sweet twist. Winter? Toss in some roasted carrots or pomegranate seeds for color and flavor. Each season brings new tastes that keep this salad exciting! Dressings can change the whole vibe of the salad. Try a lemon-tahini dressing for a nutty flavor. A creamy avocado dressing adds richness. For a spicy kick, mix in sriracha with olive oil. You can also switch up the toppings. Add pumpkin seeds for crunch, or swap feta cheese for goat cheese. These small changes create a fresh experience each time you make this dish. This salad is easy to make vegan and gluten-free. Simply leave out the feta cheese or use a plant-based cheese instead. For a gluten-free version, just ensure your dressing is gluten-free. You can also add extra beans, like chickpeas, for protein. These options make the salad friendly for various diets while keeping it tasty and satisfying! For more ideas and a full recipe, check out the [Full Recipe]. To store leftover roasted sweet potato salad, place it in an airtight container. This keeps the salad fresh and prevents any odors from mixing. Make sure to let it cool down first. You can store it in the fridge for up to three days. If you plan to eat it later, try not to mix the dressing in until you are ready. This helps keep the salad crisp. You can reheat the roasted sweet potato salad if you want it warm. Place it in a microwave-safe dish. Heat it for about 1-2 minutes. Stir halfway through to ensure even warming. Be careful not to overheat it, as this can make the sweet potatoes mushy. If you prefer, you can also eat it cold straight from the fridge. The shelf life of roasted sweet potato salad is about three days in the fridge. For longer storage, you can freeze it, but it is best to avoid freezing the salad with dressing. To freeze, pack the salad in a freezer-safe bag or container. Remove as much air as possible. This helps prevent freezer burn. It can last up to three months in the freezer. When you're ready to eat, thaw it in the fridge overnight and reheat as needed. Enjoy your delicious roasted sweet potato salad anytime! For the full recipe, check out the recipe section above. You can pair this salad with grilled chicken or fish. The sweet potatoes work well with meats. Try it with a light soup for a full meal. Also, serve it alongside crusty bread for a nice touch. This salad is great for picnics or potlucks. It is colorful and full of good taste. Yes, you can make this salad ahead. Roast the sweet potatoes and let them cool. Store them in the fridge until you are ready to mix. You can also prepare the salad base early. Just add the dressing when you’re ready to serve. This keeps the greens fresh and crisp. Look for sweet potatoes that feel firm and heavy. Avoid any with soft spots or blemishes. The skin should be smooth and free of cracks. Choose medium-sized ones for even cooking. If possible, pick organic sweet potatoes for better taste. You can find many kinds, but orange flesh is most common. Roasted sweet potato salad is simple and tasty. We covered the ingredients, cooking steps, and storage tips. You can boost flavor with quick tricks and try fun variations. If you plan ahead, meals can be easier. This salad is packed with nutrients and adaptable for your diet. Enjoy exploring your options, and make it your own. Trust me, this dish is sure to please!

Roasted Sweet Potato Salad Energizing and Flavorful Dish

Looking for a vibrant dish that’s both energizing and packed with flavor? You’ve found it! This Roasted Sweet Potato Salad

To make these tasty zucchini corn fritters, you will need: - 2 medium zucchinis, grated - 1 cup corn kernels (fresh or frozen) - 1/2 cup all-purpose flour - 1/2 cup cornmeal - 2 large eggs - 1/4 cup grated Parmesan cheese (optional) - 2 green onions, thinly sliced - 1/2 teaspoon garlic powder - 1/2 teaspoon onion powder - Salt and pepper to taste - Olive oil for frying Fresh corn brings bright flavor and crunch to your fritters. It makes the dish taste more vibrant. I love using fresh corn when it's in season. However, frozen corn is a great choice too. It’s easy to use and stays sweet. Just thaw and drain it well. Both options work, so choose what you have on hand. You can get creative with your fritters! Try adding: - Fresh herbs like cilantro or basil for a fresh taste - Spices such as cumin or paprika for warmth - Diced bell peppers for crunch and color - Chopped jalapeños for a spicy kick These optional ingredients can make your fritters even more fun and tasty. You can easily adjust the flavors to match what you like. For the full recipe, check out the details above and start cooking! To start, I grab my two medium zucchinis. I use a box grater or food processor to grate them. After grating, I place the zucchini in a clean kitchen towel. This step is key! I squeeze out the extra moisture. Removing moisture helps keep the fritters from getting soggy. Next, I take a large mixing bowl. I add the drained zucchini, one cup of corn kernels, and half a cup of all-purpose flour. Then, I add half a cup of cornmeal and two large eggs. If I want extra flavor, I add a quarter cup of grated Parmesan cheese. I also throw in two sliced green onions, half a teaspoon of garlic powder, and half a teaspoon of onion powder. Finally, I season with salt and pepper. I mix everything until it forms a thick batter. Now, it’s time to cook! I heat a generous drizzle of olive oil in a large skillet over medium heat. Once the oil is hot, I scoop about a quarter cup of the fritter mixture into the skillet. I shape it into a patty. I make sure not to overcrowd the pan. Cooking in batches works best! I cook the fritters for about three to four minutes on each side until they are golden brown and crispy. If the heat feels too high, I adjust it to prevent burning. After cooking, I remove them and place them on a paper towel-lined plate. This helps absorb extra oil. I repeat until all the batter is used. I serve the fritters warm, often with yogurt or sour cream for dipping. For the full recipe, you can refer to the earlier section. To get the best crispy fritters, start with dry zucchini. After grating, squeeze out the water using a clean kitchen towel. This step is key. If the zucchini is too wet, your fritters will turn out soggy. Also, don’t rush the cooking. Fry them on medium heat. If the heat is too high, the outside may burn while the inside stays raw. I love using olive oil for frying these fritters. It adds a nice flavor. You can also try avocado oil. It has a high smoke point and works well. Avoid using butter, as it can burn easily. A good oil helps to get that golden brown color and crispy texture. One common mistake is overcrowding the pan. This can trap steam and make your fritters soggy. Fry them in batches instead. Another mistake is not seasoning the batter enough. Taste is important! Adjust the salt and pepper to suit your liking. Lastly, don’t skip the resting time before frying. Letting the batter sit for a few minutes helps the flavors meld. For the full recipe, refer to the section above. {{image_2}} You can make zucchini corn fritters even more delicious by adding herbs and spices. Fresh herbs like basil, cilantro, or parsley can brighten the flavor. Dried herbs, like oregano or thyme, work well too. You can also try adding a pinch of cayenne pepper for a little heat. Just remember, start with a small amount and taste as you go. This way, you can find the perfect balance. If you have dietary restrictions, don’t worry! You can easily swap some ingredients. For a gluten-free option, use gluten-free flour instead of all-purpose flour. If you need a vegan recipe, replace eggs with flaxseed meal. Mix one tablespoon of flaxseed meal with three tablespoons of water and let it sit for five minutes. This will create a great binding agent. You can even omit the cheese, or use a dairy-free cheese if you prefer. These fritters are tasty on their own, but they shine with the right dips and sides. Serve them with yogurt or sour cream for a creamy touch. You can also pair them with a fresh salsa or a zesty avocado dip. For a complete meal, add a simple salad on the side. A mix of greens with a light vinaigrette works great. The refreshing crunch of the salad balances the fritters nicely. For the full recipe, refer to the section above. After enjoying your zucchini corn fritters, let them cool to room temperature. Place them in an airtight container. You can keep them in the fridge for up to three days. If you want to keep them longer, freezing is a great option. To reheat, use a skillet over medium heat. Add a splash of olive oil to the pan. Cook the fritters for about two to three minutes on each side. This way, they regain their crispy texture. You can also use an oven. Preheat it to 350°F (175°C). Place the fritters on a baking sheet and heat for about ten minutes. To freeze, arrange the fritters on a baking sheet in a single layer. Freeze them for about an hour until firm. Once frozen, transfer them to a freezer bag. They can last up to three months. When you're ready to eat, simply reheat them from frozen. The fritters will still taste fresh and delicious! Enjoy your zucchini corn fritters any time with these easy storage tips. For the full recipe, check out the complete instructions above. You can enjoy zucchini corn fritters with many tasty sides. I love serving them with yogurt or sour cream. These dips add a nice creaminess. You can also pair them with fresh salsa or guacamole. A crisp salad makes a great side too. Try a simple green salad or a corn salad. These options balance the flavors well. Yes, you can make zucchini corn fritters ahead of time. Cook them and let them cool completely. Then, store them in an airtight container in the fridge. They will stay fresh for about two days. When you are ready to eat, just reheat them in a skillet. This helps keep them crispy! To prevent soggy fritters, start by squeezing out excess moisture from the grated zucchini. This step is key. Use a clean kitchen towel to wring the zucchini well. Also, don’t overcrowd the pan when frying. Cooking in batches allows even cooking and crispiness. Lastly, place cooked fritters on a paper towel to absorb extra oil. In this article, we explored the best ingredients and steps for perfect zucchini corn fritters. We covered fresh and frozen corn choices, prepping zucchini, and mixing the batter. I shared tips for crispy fritters and common mistakes to avoid. We also looked at fun variations and how to store leftovers. Zucchini corn fritters can be a tasty part of any meal. With these tips, you’ll enjoy every bite.

Zucchini Corn Fritters Tasty and Simple Recipe

Are you ready to enjoy a tasty treat that’s easy to make? Zucchini corn fritters pack flavor and nutrition in

- 8 oz fettuccine or spaghetti - 2 cups mushrooms (cremini or button), sliced - 4 tablespoons unsalted butter - 4 cloves garlic, minced - 1/4 teaspoon red pepper flakes - 1/2 teaspoon dried thyme - 1/2 cup vegetable broth - 1/2 cup heavy cream - 1/4 cup grated Parmesan cheese (optional) - Fresh parsley for garnish - Salt and black pepper to taste - Different types of pasta (e.g., penne, linguine) - Additional herbs (e.g., basil, oregano) - Extra protein (e.g., chicken, shrimp) When I make Garlic Butter Mushroom Pasta, I love using simple and fresh ingredients. You can choose fettuccine or spaghetti for a classic base. The mushrooms bring a rich flavor. I prefer cremini or button mushrooms. They add a nice texture that pairs well with the creamy sauce. Butter is key in this dish. It gives the sauce that rich, savory taste. I always use unsalted butter, so I can control the saltiness. Fresh garlic adds a punch of flavor. Don't forget the red pepper flakes for a hint of heat. The thyme gives a lovely earthiness that complements the mushrooms. The vegetable broth adds depth to the sauce. Heavy cream is what makes this dish truly dreamy. If you like cheese, adding Parmesan on top is a great choice. It melts beautifully and adds a salty kick. For those who want to switch things up, try different pasta shapes or add fresh herbs. You can even add protein like chicken or shrimp for a heartier meal. This recipe is versatile, letting you customize it to your taste. You can find the full recipe for Garlic Butter Mushroom Pasta in the next section. - First, boil salted water in a large pot. - Add 8 oz of fettuccine or spaghetti. Cook until al dente. - Reserve 1 cup of pasta water, then drain the rest. Set the pasta aside. - In a large skillet, melt 4 tablespoons of unsalted butter over medium heat. - Add 2 cups of sliced mushrooms. Cook until they are browned and tender. - Stir in 4 cloves of minced garlic and 1/4 teaspoon of red pepper flakes. - Pour in 1/2 cup of vegetable broth to deglaze the pan. Scrape the bottom to lift up flavor. - Add 1/2 cup of heavy cream and 1/2 teaspoon of dried thyme. Stir and let it simmer. - Toss the cooked pasta with the sauce in the skillet. Mix well to coat every strand. - If the sauce is too thick, add some reserved pasta water for desired consistency. - Season with salt and black pepper to taste. Toss again before serving. - Serve warm, garnished with chopped parsley and grated Parmesan cheese if you like. This recipe is simple, yet full of flavor. It makes a delightful meal for any day. For the full recipe, check the detailed ingredients and steps. To get perfectly al dente pasta, start with a large pot of salted water. Bring it to a boil before adding your fettuccine or spaghetti. Cook it just until it’s firm to the bite. This should usually take about 8 to 10 minutes. Always check the package for exact times. After cooking, remember to reserve some pasta water. This helps adjust the sauce later. When sautéing mushrooms, heat your skillet over medium heat. Melt the butter and add the sliced mushrooms. Cook them for about 5 to 7 minutes. Look for a nice golden brown color. Stir occasionally to ensure even cooking. This step brings out their rich flavor. To add more depth to your sauce, consider using fresh herbs. Fresh parsley or thyme can really brighten the dish. You can also add a splash of lemon juice for acidity. If you prefer dried herbs, use them early in the cooking. They need time to release their flavor. For deeper taste, try adding a splash of white wine after sautéing the mushrooms. Let it simmer for a minute to cook off the alcohol. This adds a lovely complexity. Timing is key to keeping everything fresh. Start boiling your water while you slice the mushrooms. This way, you can cook the pasta and mushrooms almost at the same time. Keep an eye on both to avoid overcooking. If you're multitasking, gather all your ingredients first. This makes it easier to focus on cooking. Prepare your garlic and spices while the pasta cooks. This way, you can add them right after the mushrooms. Following this method will help you serve the meal hot and fresh. For the full recipe, check out the detailed instructions. {{image_2}} You can easily make this dish meat-free. You can substitute mushrooms with other vegetables. Spinach and zucchini work well. They add nice texture and flavor. If you want a vegan version, use vegan butter. You can also swap heavy cream for coconut cream. This keeps the creaminess without dairy. If you want a heartier meal, add grilled chicken or shrimp. Both pair well with the garlic butter flavor. For plant-based options, consider chickpeas or tofu. They soak up the sauce nicely and boost protein. To change the taste, add different spices. Lemon zest brightens the dish, while smoked paprika adds depth. You can also get creative with sun-dried tomatoes. They add a sweet yet tangy twist that elevates the dish. For even more flavor, try fresh herbs like basil or oregano. These add freshness and richness. Check out the [Full Recipe] to see how these variations can inspire your cooking! To store leftover Garlic Butter Mushroom Pasta, place it in an airtight container. This helps keep it fresh. You can store it in the fridge for 3 to 5 days. Before eating again, check for any strange smell or color. If you want to freeze the pasta, let it cool first. Then, transfer it to a freezer-safe container. Be sure to leave some space for expansion. You can freeze it for up to 3 months. To reheat without losing texture, thaw it in the fridge overnight before warming. To reheat your pasta, use the stove or microwave. On the stove, add a splash of water or broth. Stir it often until heated through. For the microwave, cover it loosely and heat in short bursts, stirring in between. To restore creaminess after freezing, add a little cream or butter while reheating. This will help bring back that lovely texture. Yes, you can use gluten-free pasta! I recommend brands like Barilla or Banza. They have great taste and texture. Cook them just like regular pasta. Make sure to check the package for cooking times. To add spice, use more red pepper flakes. You can also add fresh chili or hot sauce. For a smoky flavor, try adding smoked paprika. Taste as you go to find your perfect heat level. Pair this dish with a fresh salad or garlic bread. A light white wine, like Sauvignon Blanc, complements it well. Roasted vegetables also make a great side. You could even serve some grilled chicken for extra protein. Yes, you can prepare this dish ahead of time. Cook the pasta and sauce, then store them separately. Keep them in airtight containers in the fridge. To reheat, warm the sauce on low heat and add the pasta. For a lighter option, use half-and-half or whole milk. If you want a dairy-free choice, try coconut milk or cashew cream. These options still give a rich texture without the heavy cream. In this blog post, I covered how to make Garlic Butter Mushroom Pasta. I shared essential ingredients and step-by-step cooking instructions to help create a delicious dish. You can customize it with various pasta types, herbs, and proteins. In closing, this meal is quick, tasty, and flexible for different diets. Enjoy making it your own!

Garlic Butter Mushroom Pasta Simple and Savory Meal

Looking for a quick and tasty dinner idea? Garlic Butter Mushroom Pasta is your answer! This dish combines rich, savory

- 1 can (15 oz) chickpeas, rinsed and drained - 1 cup cherry tomatoes, halved - 1 cup corn (fresh, canned, or frozen) - 1 small red onion, finely diced - 1 avocado, diced - 1 bell pepper (red or yellow), diced - 1 jalapeño, finely chopped (optional for heat) - 1/4 cup fresh cilantro, chopped The main star of this salad is the chickpeas. They bring a hearty texture and protein. I love using canned chickpeas as they save time. Rinsing and draining them makes sure they are ready to go. Cherry tomatoes add a burst of sweetness. Halving them helps release their juices into the salad. Corn gives a nice crunch. You can use fresh, canned, or frozen corn based on your taste and what you have on hand. A small red onion adds a sharp flavor. Dice it finely so it blends well with the other ingredients. Avocado brings creaminess and healthy fats. Dicing it just right means every bite gets some smooth texture. The bell pepper adds color and sweetness. You can choose red or yellow for this dish. If you want a spicy kick, add jalapeño. Just chop it finely, and remove the seeds for less heat. Fresh cilantro ties everything together with a bright flavor. - 2 tablespoons lime juice - 2 tablespoons olive oil - 1 teaspoon chili powder - 1/2 teaspoon cumin - Salt and pepper to taste For the dressing, lime juice gives a fresh tang. It wakes up all the flavors. Olive oil adds richness and helps coat the salad. Chili powder and cumin bring warmth and depth. They are key to that Southwest flavor. Don’t forget to add salt and pepper to taste. This helps balance the flavors. You can find the full recipe in the section above. Enjoy making this colorful and tasty salad! - Rinse and drain the chickpeas. - Dice the vegetables. Start by rinsing your chickpeas. This helps remove any excess salt. Use a colander to drain them well. Next, grab your knife and cutting board. Dice your cherry tomatoes, red onion, bell pepper, and jalapeño. Chop the avocado last to keep it fresh. - Combine all ingredients in a large bowl. - Prepare the dressing. Now, take a large mixing bowl. Add the drained chickpeas, diced vegetables, and chopped cilantro. This mix is colorful and packed with flavor. Next, make the dressing. In a separate bowl, whisk together lime juice, olive oil, chili powder, cumin, salt, and pepper. This dressing adds zest and depth to your salad. - Toss the salad gently. - Let it sit for flavor melding. Drizzle the dressing over your salad mixture. Toss it gently so the avocado stays intact. This step ensures all the flavors mix well. Let the salad sit for about 10 minutes. This waiting time helps the flavors meld together beautifully. For the Full Recipe, check the main article. Enjoy your Southwest Chickpea Salad! Use fresh ingredients for the best flavor. Fresh produce gives a bright and crisp taste. Look for ripe avocados and bright colors in your vegetables. Adjust seasoning to suit your personal taste. Start with the basic recipe, then tweak it as you like. Add more lime juice for a tangy kick or extra chili powder for spice. Pair your salad with tortilla chips for a nice crunch. This adds texture and makes it fun to eat. You can serve the salad as a side dish with grilled meats or as a main course on its own. It’s filling and packed with flavor. For a twist, try it in a wrap with your favorite protein. Enjoy the versatility of this simple dish! {{image_2}} You can make fun swaps in this salad. If you want, try using black beans instead of chickpeas. They add a different flavor and texture. You can also add diced mango or pineapple for sweetness. This will give the salad a nice tropical twist. The fresh fruit pairs well with the spicy ingredients. If you prefer a creamier taste, try a yogurt-based dressing. It will add a rich texture to the salad. If you want to change the tanginess, use apple cider vinegar instead of lime juice. This swap adds a unique flavor that complements the other ingredients. To keep your Southwest Chickpea Salad fresh, store it in an airtight container. This will help prevent moisture loss and keep flavors intact. It tastes best when eaten within 2-3 days. After that, the veggies may lose their crispness, and the avocado could brown. Freezing this salad is not a good idea. The avocado does not freeze well. It turns mushy and changes texture, making the salad less enjoyable. Enjoy it fresh for the best taste and quality. For the full recipe, check out the details above! You can make this salad vegan by using a plant-based dressing. Simply swap any non-vegan ingredients for vegan options. For the dressing, use olive oil and lime juice. You can also add spices for more flavor. This way, you keep the taste while making it safe for all diets. Yes, you can prepare this salad ahead of time. Just remember to add the avocado right before serving. This helps prevent browning and keeps the salad looking fresh. You can mix all other ingredients and store them in the fridge. When ready, simply add the avocado and enjoy. This salad packs a punch of nutrition. It is high in protein and fiber, thanks to chickpeas. Avocado adds healthy fats, which are good for your heart. Eating this salad can help keep you full and satisfied. It's a great choice for anyone wanting a healthy meal. This chickpea salad is easy to make and full of flavor. You blend fresh veggies with a zesty dressing for a healthy dish. I shared tips on storage and some tasty variations to try. You can even customize the salad to fit your taste. Enjoy it right away or prep it in advance. Remember, keep the avocado for last to keep it fresh. Overall, this salad is a great way to eat well and feel good.

Southwest Chickpea Salad Flavorful and Simple Dish

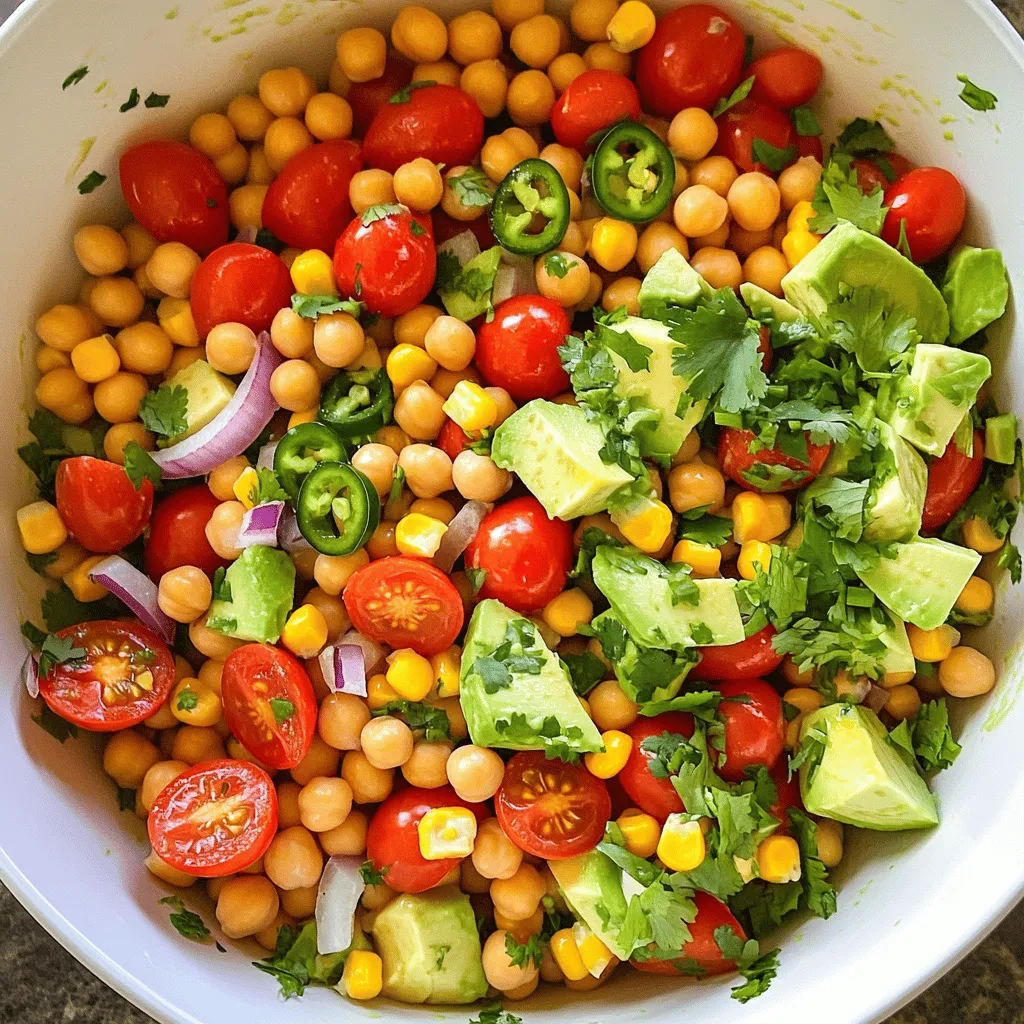
Looking for a fresh, tasty meal that’s easy to make? This Southwest Chickpea Salad is the answer! Packed with colorful

To create your Mediterranean grain bowl, gather these main ingredients: - 1 cup quinoa or farro, rinsed - 2 cups water or vegetable broth - 1 cup cherry tomatoes, halved - 1 cucumber, diced - 1 bell pepper (any color), diced - 1 can (15 oz) chickpeas, drained and rinsed - 1/2 cup Kalamata olives, pitted and halved - 1/4 red onion, thinly sliced - 1/2 cup feta cheese, crumbled - 1/4 cup fresh parsley, chopped - 3 tablespoons olive oil - 2 tablespoons lemon juice - 1 teaspoon dried oregano - Salt and pepper to taste You can add more flavors with these optional ingredients: - Avocado slices for creaminess - Spinach or kale for extra greens - Artichoke hearts for tanginess - Sun-dried tomatoes for depth - Grilled chicken or shrimp for protein Feel free to mix and match based on your taste! The ingredients in this bowl offer many health benefits: - Quinoa or farro: High in fiber and protein. Good for heart health. - Chickpeas: Packed with protein and excellent for digestion. - Vegetables: Cherry tomatoes and cucumbers are low in calories and high in vitamins. - Olives: Rich in healthy fats. They support your heart. - Feta cheese: Adds calcium and flavor, but use it in moderation. - Olive oil: Contains healthy fats and antioxidants. It’s great for skin health. - Lemon juice: Provides vitamin C and enhances flavor. These ingredients not only taste great together but also nourish your body! For the full recipe, check out the detailed cooking instructions. To start, grab a medium pot. Pour in 2 cups of water or vegetable broth. Bring it to a boil. Next, add 1 cup of rinsed quinoa or farro. Lower the heat to a gentle simmer. Cover the pot and let it cook for 15 to 20 minutes. Check the package for specific cooking times. When the grains are soft and water is absorbed, remove the pot from heat. Let it sit for 5 minutes, then fluff with a fork. While the grains cook, it’s time to chop your veggies. Take 1 cup of cherry tomatoes and cut them in half. Dice 1 cucumber and 1 bell pepper. Slice 1/4 of a red onion thinly. In a large bowl, mix these fresh veggies. Add 1 can of drained chickpeas and 1/2 cup of pitted Kalamata olives. Toss in 1/4 cup of chopped fresh parsley and 1/2 cup of crumbled feta cheese. Now, let’s make the dressing. In a small bowl, whisk together 3 tablespoons of olive oil and 2 tablespoons of lemon juice. Add 1 teaspoon of dried oregano, salt, and pepper to taste. This dressing adds flavor, so taste it and adjust as needed. After cooking the grains, add them to the bowl with veggies. Drizzle the dressing over the mixture. Gently toss everything until it’s well mixed. For serving, divide the grain bowl into four dishes. You can add more feta on top for extra flavor. A sprinkle of crushed red pepper flakes gives a nice kick. Enjoy your beautiful Mediterranean grain bowls! For the full recipe, check out the details again above. To cook grains perfectly, start with rinsing them. This removes dirt and extra starch. Use a pot with a tight lid. Bring water or broth to a boil before adding the grains. Turn the heat to low and cover. Let them simmer gently. Cooking time varies; quinoa takes about 15 minutes, while farro takes 25-30 minutes. After cooking, let the grains sit for five minutes before fluffing with a fork. This keeps them light and fluffy. To boost flavor, mix in fresh herbs like basil or dill. You can also try adding spices such as cumin or paprika. For a bit of heat, consider crushed red pepper flakes. Roasted nuts like almonds or pine nuts add crunch and depth. A splash of balsamic vinegar can give a sweet tang. You can even try different cheeses like goat cheese or ricotta for a twist. For more variety, add cooked shrimp or grilled chicken for protein. Make your grain bowls appealing and colorful! Use shallow, wide dishes to showcase the vibrant ingredients. Arrange the grains at the bottom, then layer the veggies on top. Drizzle the dressing artfully over the bowl. Top with crumbled feta and a sprinkle of fresh herbs. For added flair, serve with a lemon wedge for guests to squeeze on top. The bright colors and fresh ingredients will make your dish pop and look inviting! {{image_2}} You can swap the quinoa or farro in your grain bowl. Try brown rice or barley for a new texture. Millet offers a fun, nutty flavor. If you want a gluten-free option, use rice or buckwheat. Each grain has its own unique taste and benefits. Experiment with what you enjoy most. Proteins add heartiness to your Mediterranean grain bowls. Chickpeas are great, but you can also use lentils or black beans. Grilled chicken or shrimp can boost the flavor. Try adding tofu for a plant-based protein. Each option allows you to create a different dish every time. Using seasonal vegetables makes your dish fresh and exciting. In spring, add asparagus or peas. Summer is perfect for zucchini and corn. In fall, slice up roasted squash or sweet potatoes. Winter calls for hearty greens like kale or spinach. Choose what is in season for the best taste. Feel free to mix and match these ideas to create your own Mediterranean grain bowls. For the full recipe, check out the Mediterranean Grain Bowls section above. To store leftover Mediterranean grain bowls, first let them cool. Place them in an airtight container. This keeps the flavors fresh and prevents spills. You can store them in the fridge for up to three days. If you keep the dressing separate, it will help the veggies stay crisp. When you are ready to eat, take the bowls out of the fridge. You can reheat them in the microwave. Use a microwave-safe dish and cover it with a damp paper towel. Heat for about one to two minutes. Stir halfway through to warm evenly. If you want them warm but not hot, enjoy them cold as a salad! If you want to freeze the grain bowls, it’s best to freeze the grains and veggies separately. This keeps them fresh longer. Use freezer-safe containers or bags. Label them with the date. They can last up to three months in the freezer. When you’re ready to use them, thaw in the fridge overnight and reheat as needed. This way, you always have a quick meal ready! You can use rice or barley instead of quinoa or farro. Both options work well. Brown rice adds a nutty taste. Barley gives a chewy texture. You can also try bulgur or millet. Each grain offers unique flavors and nutrients. Yes, you can prepare these bowls ahead of time. Cook the grains and chop the veggies in advance. Store the grains and veggies separately. This keeps everything fresh. Mix them together when you're ready to eat. To make this recipe gluten-free, use quinoa or rice. Both options are gluten-free. Make sure to check labels on other ingredients too. Chickpeas and olives are usually gluten-free. Always read labels to ensure safety. Lemon vinaigrette pairs nicely with these bowls. You can also use tahini dressing for a creamier option. A yogurt-based dressing adds a tangy flavor. Experiment with different dressings to find your favorite. For the full recipe, check out the link! Mediterranean grain bowls are easy to make and packed with flavor. You learned about the main ingredients and their benefits. I provided step-by-step instructions to help you create your bowls. Remember the tips for cooking and presenting them effectively. You can explore variations to fit your tastes and know how to store leftovers. With these insights, you can enjoy healthy meals anytime. Dive in and make your own tasty grain bowl!

Mediterranean Grain Bowls Nutritious and Easy Recipe

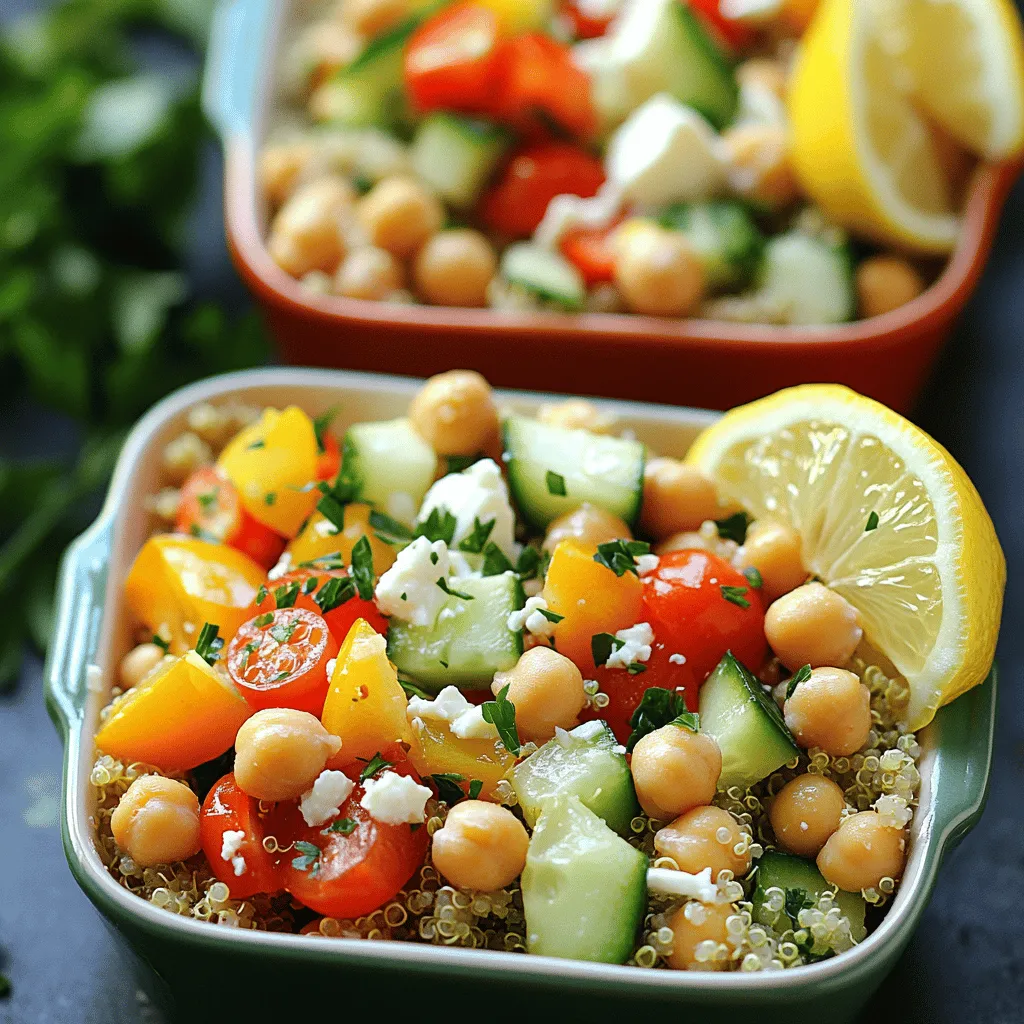
If you’re looking for a quick, healthy meal, Mediterranean grain bowls are the answer. Packed with fresh vegetables, wholesome grains,

- 2 cups cooked brown rice - 1 pound boneless, skinless chicken breasts, diced - 1 can (15 oz) black beans, rinsed and drained - 1 cup corn kernels (frozen or fresh) - 1 cup diced tomatoes (fresh or canned) - 1 avocado, diced - 1 cup shredded cheese (cheddar or Mexican blend) - Fresh cilantro, lime wedges, and seasonings To make these chicken burrito bowls, you need simple, fresh ingredients. Start with cooked brown rice as your base. Brown rice adds a nice nutty flavor and is healthier than white rice. Then, use boneless, skinless chicken breasts. These cook quickly and stay moist when seasoned well. Black beans give a creamy texture and add protein. Rinsing them removes excess sodium. Corn adds sweetness, while diced tomatoes bring brightness. Don't forget the avocado! It adds creaminess and healthy fats. Shredded cheese on top makes it even better. - Sour cream or Greek yogurt - Salsa or pico de gallo - Jalapeños for extra heat You can customize your burrito bowls with optional toppings. Sour cream or Greek yogurt adds a cool touch. Salsa or pico de gallo can bring some zest and freshness. If you like spice, add jalapeños for extra heat! For the full recipe, check out the Zesty Chicken Burrito Bowls. Enjoy your cooking adventure! - First, heat 1 tablespoon of olive oil in a large skillet over medium heat. - Then, add 1 pound of diced chicken breasts. - Season the chicken with 1 teaspoon each of cumin, paprika, garlic powder, and 1/2 teaspoon of chili powder. - Sprinkle salt and pepper to taste. - Cook the chicken for about 5-7 minutes. Stir it often until the chicken is fully cooked and no longer pink. - In four serving bowls, layer 2 cups of cooked brown rice as the base. - Next, add equal portions of the cooked chicken to each bowl. - Then, add 1 can of rinsed black beans, 1 cup of corn, 1 cup of diced tomatoes, and 1 diced avocado on top of the chicken. - Now, sprinkle 1 cup of shredded cheese and 1/4 cup of fresh cilantro over each bowl. - Finish with a squeeze of fresh lime juice for added flavor. - For a great presentation, serve the bowls with bright colors and keep the ingredients separated. - Add lime wedges on the side for an extra zing. Try out this recipe for Easy Chicken Burrito Bowls to enjoy a fun and tasty meal! You can find the Full Recipe to guide you through the steps. To cook chicken well, use medium heat. This helps it cook evenly. I suggest cooking chicken for about 5-7 minutes. Make sure it reaches a safe temperature of 165°F. To avoid dry chicken, don’t overcook it. You can also marinate the chicken before cooking to keep it juicy. You can easily swap ingredients to fit your taste. For example, use quinoa instead of brown rice. If you like heat, add jalapeños or a sprinkle of cayenne pepper. You can also mix in spices like oregano or coriander for a unique flavor. Experiment with different toppings like fresh salsa or Greek yogurt. Prepare your ingredients ahead of time. Chop veggies and cook the chicken in advance. Store each component separately to keep them fresh. You can mix them together when you are ready to eat. This makes weekday meals quick and easy. Plus, it helps you avoid waste! For the full recipe, check out the main article. {{image_2}} You can switch up the protein in your burrito bowls. Consider using beef, pork, or tofu. Each protein brings a unique taste. When you use beef or pork, cook it to a safe internal temperature of 145°F. For tofu, cook until golden brown, which takes about 7-10 minutes. Adjust cooking time based on the protein you choose. Ensure flavors blend well with your spices and toppings. Burrito bowls can fit many flavor styles. For a Mexican twist, stick with cumin, chili powder, and lime. For a southwest style, use smoked paprika and chipotle peppers. You can also mix in fresh herbs, like cilantro or parsley. Don’t forget to play with toppings! Adding salsa, guacamole, or jalapeños can change the whole dish. Try different seasonings to find your favorite mix. Making a meatless bowl is easy and tasty! Use black beans or lentils as your protein. You can also add roasted vegetables for more texture. For cheese lovers, look for dairy-free cheese options made from nuts or soy. This way, everyone can enjoy burrito bowls, no matter their diet. Don’t skip the lime juice; it adds a fresh touch. To keep your chicken burrito bowls fresh, store them in airtight containers. I prefer glass containers for easy reheating. Make sure to let the bowls cool down before sealing. This helps maintain their taste and texture. You can keep them in the fridge for up to three days. If you want to enjoy these bowls later, freezing is a great option. First, divide the ingredients into portions. Use freezer-safe containers or bags. Be sure to label them with the date. You can freeze the bowls for up to three months. To thaw, move a bowl to the fridge overnight. Reheat in the microwave until hot, about 2-3 minutes. Understanding how long ingredients last is key. Cooked chicken lasts about 3-4 days in the fridge. Cooked rice stays good for up to a week. Beans and corn can last in the pantry for years if dry. When fresh, tomatoes and avocados should be used within a few days. Signs of spoilage include off smells, discoloration, or mold. Always double-check before eating! For the full recipe, check the section above. Making Easy Chicken Burrito Bowls takes about 30 minutes. You spend 15 minutes prepping the ingredients. The cooking time is around 15 minutes. This quick recipe is perfect for busy nights. Yes, you can make these burrito bowls ahead. Cook the chicken and prepare the rice in advance. Store each ingredient in separate containers. This way, you can quickly assemble them when ready to eat. Burrito bowls go well with various sides. Consider serving tortilla chips with salsa. A simple side salad adds freshness. For drinks, cold lemonade or a light beer works great too. Enjoy your meal with these tasty pairings! Easy Chicken Burrito Bowls combine simple ingredients for a tasty meal. You learned how to cook chicken, layer ingredients, and customize your bowl. Tips for meal prep help you save time, while storage info keeps leftovers fresh. In the end, these bowls offer flexibility to suit your taste. Feel free to mix and match ingredients for unique flavors. Enjoy cooking this simple dish anytime!

Easy Chicken Burrito Bowls Quick and Simple Recipe

Are you ready to elevate your dinner game with a flavor-packed meal? These Easy Chicken Burrito Bowls check all the

- 2 pounds baby potatoes, halved - 3 tablespoons olive oil - 4 cloves garlic, minced - 1 cup freshly grated Parmesan cheese These main ingredients form the heart of the dish. The baby potatoes are small and tender, making them perfect for roasting. Olive oil helps create a crispy outer layer. Garlic adds a wonderful aroma and flavor. Parmesan cheese brings a rich, savory taste that pairs well with the potatoes. - 1 tablespoon fresh rosemary, chopped (or 1 teaspoon dried) - 1 teaspoon paprika - Salt and pepper to taste - Fresh parsley for garnish The seasoning and garnish elevate the dish. Fresh rosemary adds a hint of earthiness, while paprika gives a warm color. Salt and pepper balance the flavors. Fresh parsley brightens the dish and adds a pop of color. Together, these ingredients create a delightful blend that makes every bite memorable. For the full recipe, check the main article. 1. Preheating the oven: Start by setting your oven to 425°F (220°C). This high heat helps the potatoes get crispy. 2. Mixing the ingredients: In a large bowl, combine the halved baby potatoes with 3 tablespoons of olive oil. Make sure each potato gets a good coating of oil. Then, add 4 cloves of minced garlic, 1 cup of freshly grated Parmesan cheese, 1 tablespoon of chopped fresh rosemary, and 1 teaspoon of paprika. Season with salt and pepper to taste. Mix everything well until the potatoes are fully coated with the tasty mixture. 3. Spreading on the baking sheet: Line a baking sheet with parchment paper for easy cleanup. Spread the seasoned potatoes in a single layer. This helps them cook evenly and get nice and crisp. 4. Baking time and flipping tips: Roast the potatoes in the oven for 25-30 minutes. About halfway through, take them out and flip the potatoes. This ensures all sides get golden brown and crispy. 5. Cooling and garnishing before serving: Once they are done, remove the potatoes from the oven. Let them cool slightly. This keeps them from being too hot to handle. Before serving, sprinkle fresh parsley on top for a pop of color and flavor. You can find the Full Recipe for these tasty potatoes in the earlier sections. Enjoy your delicious side dish! To get the best crispy potatoes, space them well on the baking sheet. If they touch, they will steam instead of crisp. Keep them in a single layer. This allows hot air to circulate around each piece. I recommend an oven temperature of 425°F (220°C). This high heat helps achieve that golden brown finish we love. You can boost the flavor with extra spices and herbs. Try adding thyme or oregano for a fresh twist. If you enjoy heat, add a pinch of cayenne pepper. For a smoky flavor, swap paprika for smoked paprika. These simple changes can make your dish even more exciting. Presenting your crispy potatoes well makes them even more appealing. Serve them in a rustic wooden bowl. This adds charm to your dish. Garnish with fresh parsley and a sprinkle of Parmesan for extra flair. Placing a few sprigs of rosemary around the bowl gives a lovely look and aroma. Make your meal not only tasty but also beautiful! {{image_2}} You can switch the Parmesan cheese for other types. Try aged cheddar for a strong taste. Feta adds a salty kick that pairs well. Goat cheese gives a creamy texture and tang. Each cheese changes the flavor, so feel free to experiment! Mix in other veggies for extra color and taste. Carrots or bell peppers add sweetness. Broccoli or Brussels sprouts bring a nice crunch. Just chop them to a similar size as the potatoes. This way, everything cooks evenly and tastes great. Want to spice things up? You can add red pepper flakes for heat. Smoked paprika gives a smoky flavor. Italian seasoning adds a mix of herbs. Just adjust the amount to your taste. These changes keep the dish exciting and new. For the full recipe, check out the [Full Recipe]. After you enjoy your Parmesan Garlic Roasted Potatoes, store any leftovers in the fridge. Place them in an airtight container. This keeps them fresh and tasty. They can last about 3 to 4 days. If you want to enjoy them later, make sure to let them cool down first. This helps keep the moisture in check. To reheat, I suggest using an oven or an air fryer. These methods help keep the potatoes crispy. Preheat your oven to 350°F (175°C). Spread the potatoes on a baking sheet. Heat them for about 10 to 15 minutes. If you use an air fryer, set it to 350°F (175°C) and heat for about 5 to 7 minutes. Check them often to avoid burning. Yes, you can freeze Parmesan Garlic Roasted Potatoes! However, the texture may change. If you plan to freeze them, let them cool completely. Then, place them in a freezer-safe bag. Remove as much air as possible before sealing. They can last up to 2 months in the freezer. When you are ready to eat them, thaw in the fridge overnight before reheating. Parmesan Garlic Roasted Potatoes stay fresh for about three to five days in the fridge. Store them in an airtight container to keep them tasty. Yes, you can make these potatoes ahead of time. Cook them as directed, then let them cool. Once cooled, place them in the fridge. When you are ready to eat, simply reheat them in the oven for a few minutes. This keeps them crispy and warm. These roasted potatoes go well with many main dishes. Try serving them with grilled chicken, steak, or fish. They also pair nicely with a fresh salad or steamed vegetables. You can even serve them alongside a hearty soup for a cozy meal. For more ideas, check out the Full Recipe. Parmesan Garlic Roasted Potatoes are easy and delicious. We covered the key ingredients, like baby potatoes, garlic, and Parmesan cheese. You learned how to prepare, roast, and garnish them for the best results. I shared tips for crispy texture, flavor variations, and creative presentations. These potatoes shine as a side dish or snack. Enjoy trying this recipe and making it your own! With the right spices and techniques, you will impress everyone at your table. Happy cooking!

Parmesan Garlic Roasted Potatoes Easy and Flavorful Side

Are you ready to elevate your side dish game? Parmesan Garlic Roasted Potatoes are your new go-to! These tasty little

- 1 cup fresh or frozen blueberries - 1 ripe banana - 1/2 cup coconut milk - 1/2 cup Greek yogurt (or dairy-free alternative) - 1 tablespoon honey or maple syrup - 1/4 cup shredded coconut - 1 tablespoon chia seeds (optional) - Ice cubes (if using fresh blueberries) To make this smoothie, you need simple ingredients. Fresh blueberries add a wonderful taste. If you don’t have fresh ones, frozen will work too. The ripe banana gives smoothness and natural sweetness. Coconut milk makes it creamy and adds a tropical touch. Greek yogurt boosts the protein and adds a thick texture. Honey or maple syrup adds just the right sweetness. Shredded coconut gives a fun texture and extra flavor. Chia seeds are optional but they add fiber and healthy fats. If using fresh blueberries, add ice cubes for chill. - Protein powder - Spinach or kale for added nutrients - Other fruits (e.g., strawberries, mangoes) You can customize this smoothie with fun add-ins. Protein powder helps keep you full longer. Adding spinach or kale boosts nutrients without changing the taste. You can also mix in other fruits like strawberries or mangoes for new flavors. Get creative and make this smoothie your own! For the full recipe, check out Blueberry Coconut Bliss Smoothie. - Step 1: Combine key ingredients in the blender. Start with 1 cup of blueberries and 1 ripe banana. Then, add 1/2 cup of coconut milk and 1/2 cup of Greek yogurt. This mix gives a rich and creamy base. - Step 2: Adjust sweetness with honey or maple syrup. Add 1 tablespoon to start. Blend, taste, and add more if needed. This step personalizes the smoothie to your liking. - Step 3: Blend and check consistency. Turn the blender on high speed. Blend until the mixture is smooth and creamy. If it is too thick, add a little more coconut milk. If you like it colder, toss in some ice cubes. - Step 4: Garnish with shredded coconut. After pouring your smoothie into a glass, sprinkle some shredded coconut on top. It adds a nice texture and flavor. - Step 5: Serve and enjoy! Grab a straw or a spoon and savor every sip of your Blueberry Coconut Bliss Smoothie. You can find the full recipe above to recreate this energizing treat. Blueberries are a superfood packed with nutrients. They are rich in antioxidants, which help protect your body. These small fruits fight free radicals, keeping your cells healthy. Eating blueberries may support cardiovascular health. They can lower blood pressure and improve blood vessel function. This makes them great for your heart. Coconut adds a unique flavor and is great for your health. It contains healthy fats called medium-chain triglycerides (MCTs). These fats support energy and may help weight loss. Coconut also promotes better digestion. It contains fiber that helps your gut stay healthy and regular. The Blueberry Coconut Smoothie is both tasty and nutritious. It has about 300 calories per serving, depending on your ingredients. The smoothie offers a balanced mix of carbohydrates, protein, and fats. If you add chia seeds, you gain extra benefits. Chia seeds provide omega-3 fatty acids and more fiber. This smoothie makes a perfect snack or breakfast option. For the full recipe, check the section above. {{image_2}} To get a creamy texture in your blueberry coconut smoothie, blend it longer. Start on low speed and then increase to high. This helps mix everything well. If your smoothie is too thick, add a little more coconut milk. If it's too thin, add more yogurt or frozen fruit. When swapping ingredients, keep flavors in mind. You can use almond milk instead of coconut milk for a nutty taste. If you don’t have Greek yogurt, try regular yogurt or a dairy-free option. Each change can give your smoothie a new twist. To find the right sweetness, taste your smoothie after blending. If it’s not sweet enough, add more honey or maple syrup. Start with a teaspoon, blend, and then taste again. This way, you can control the sweetness easily. If you want to skip honey or maple syrup, consider ripe bananas or dates. Both add natural sweetness without extra sugars. Another option is to use a splash of vanilla extract for a sweet flavor boost without added sugar. You can change up the taste of your blueberry coconut smoothie by adding different fruits. Pineapple adds a sweet and tangy twist. Strawberries bring a lovely color and flavor. Just blend them in with your blueberries for a fruity mix. You can also incorporate spices to enhance the taste. A pinch of cinnamon warms up the smoothie nicely. Vanilla extract adds a sweet aroma without adding sugar. Both spices make your drink more exciting. This smoothie is easy to adjust for different diets. If you want a vegan or dairy-free option, just swap Greek yogurt for a coconut yogurt. Use maple syrup instead of honey for a vegan sweetener. You still get that creamy texture and taste. If you follow a low-carb or keto diet, you can skip the banana. Replace it with avocado for creaminess. This change keeps the smoothie tasty without the extra carbs. You can also use unsweetened coconut milk to keep it keto-friendly. You can find the full recipe above and make it your own! Storing your leftover smoothie is easy. First, pour it into an airtight container. You can keep it in the fridge for up to two days. Shake or stir it well before drinking. If you want to keep it longer, consider freezing it. Pour the smoothie into ice cube trays or freezer-safe bags. This way, you can use it later in new smoothies. Just blend the frozen cubes with fresh fruit or milk. Can I make this smoothie ahead of time? Yes, you can make this smoothie ahead of time. Store it in the fridge for quick breakfasts or snacks. Just remember to give it a good shake before enjoying. What can I use instead of Greek yogurt? If you want to skip Greek yogurt, try using dairy-free yogurt or cottage cheese. Both options will keep the smoothie creamy and tasty. Is it okay to use frozen blueberries? Absolutely! Frozen blueberries are great for smoothies. They add a nice chill and save you time. Just toss them in the blender without thawing. You’ll love the cool, refreshing taste. For the full recipe, check out the Blueberry Coconut Bliss Smoothie. This smoothie recipe gives you tasty health benefits. Blueberries, coconut, and yogurt pack nutrients for you. You learned how to mix and match ingredients. Options let you tailor flavors and dietary needs. With simple steps, your smoothie will be smooth and sweet. Don’t forget to try different fruits. Enjoy your tasty drink today, and feel proud of your healthy choice!

Blueberry Coconut Smoothie Energizing Health Boost

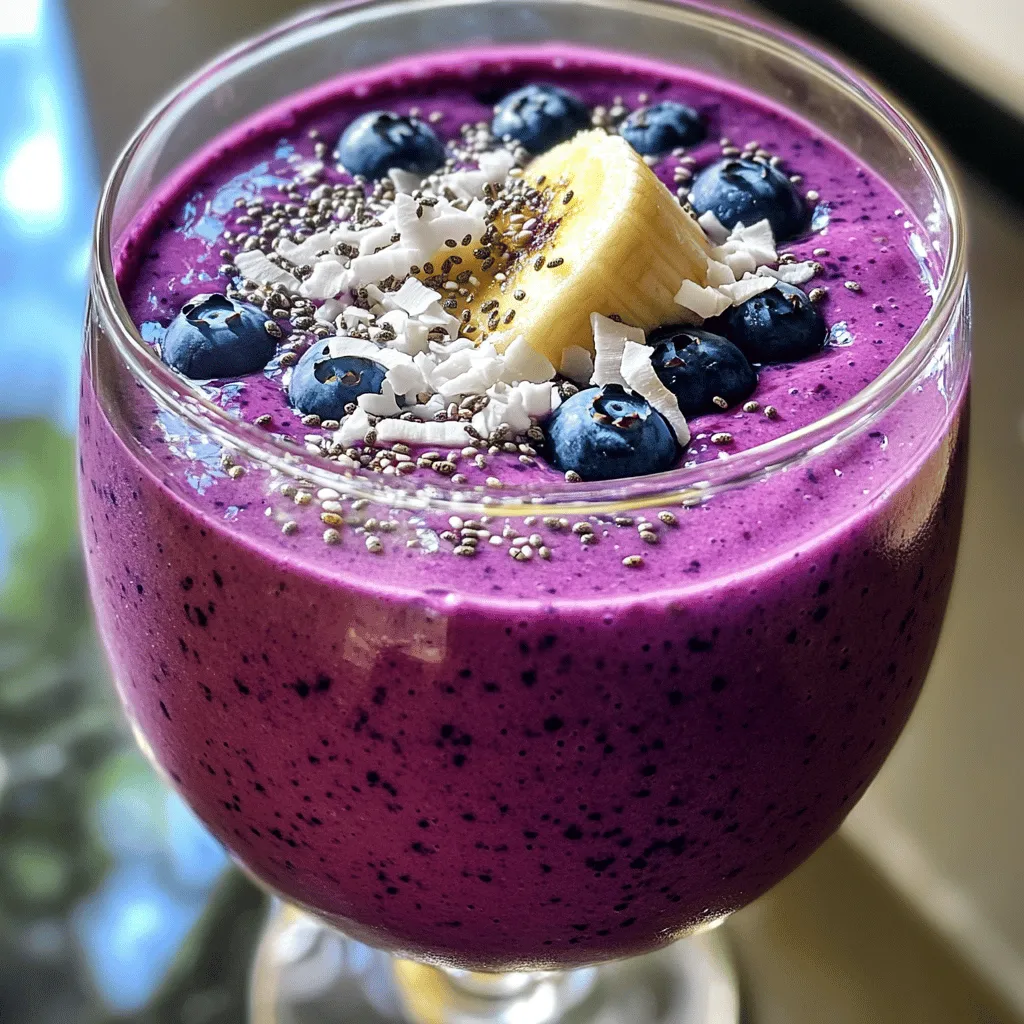
Looking for a quick energy boost? Try my Blueberry Coconut Smoothie! This creamy treat is packed with simple, tasty ingredients

- 500g boneless chicken thighs, cut into cubes - 1 cup plain yogurt - 1 tablespoon ginger-garlic paste - 1 large onion, finely chopped - 2 tomatoes, pureed - 1/2 cup coconut milk Chicken is the star of this dish. I prefer thighs for their juiciness. You can use chicken breasts if you want, but they may dry out. The yogurt tenderizes the chicken and adds a creamy texture. Ginger-garlic paste gives a punch of flavor. Onions and tomatoes form the base of the sauce. Onions add sweetness and depth. Pureed tomatoes contribute a rich, tangy taste and vivid color. Coconut milk adds creaminess without being heavy. It balances the spices well. - 2 tablespoons tikka masala spice blend - 1 teaspoon garam masala - Salt to taste The tikka masala spice blend is key. It usually has spices like cumin, coriander, and paprika. These spices create warmth and depth. Garam masala adds a final layer of flavor. It’s a mix of spices that enhances the dish. Don’t forget salt; it brings all the flavors together. - Fresh cilantro leaves for garnish - Additional spices Fresh cilantro adds a burst of color and freshness. It brightens the dish. You can also sprinkle more garam masala or chili powder for extra flavor. These garnishes make your plate look beautiful and inviting. For the full recipe, check out Easy Chicken Tikka Masala . To start, I mix yogurt, tikka masala spice blend, ginger-garlic paste, and salt in a bowl. I add the chicken cubes, making sure each piece is coated well. This step is key for deep flavor. After coating, I cover the bowl and let it sit. Allowing the chicken to marinate for at least 30 minutes helps the spices soak in. For even better taste, marinate overnight in the fridge. Marination time matters a lot. The longer you let the chicken sit, the more flavor it absorbs. This makes each bite juicy and packed with taste. If you’re in a hurry, even 30 minutes can help. But if you have time, overnight is best. This step is simple yet vital for great chicken tikka masala. Next, I heat vegetable oil in a large skillet over medium heat. I add finely chopped onions and sauté them until they turn golden brown. This usually takes about 5 to 7 minutes. The onions add sweetness and depth to the dish. After the onions are ready, I stir in pureed tomatoes. I cook this mix for about 5 minutes until it thickens. Then, I add the marinated chicken along with all the marinade. I let it cook for about 10 to 12 minutes. I stir occasionally to ensure even cooking. The chicken should be no longer pink when done. Once the chicken is cooked through, I stir in coconut milk and garam masala. This adds a rich creaminess to the dish. I let it simmer for another 5 minutes. This helps all the flavors blend together. When ready to serve, I like to garnish with fresh cilantro leaves. It adds a nice color and bright flavor. Pair this dish with rice or naan for a complete meal. For the full recipe, check out Easy Chicken Tikka Masala . Enjoy your cooking! Timing Tips for Best Flavor Marination is key for tasty chicken tikka masala. For the best flavor, marinate the chicken for at least 30 minutes. If you have more time, marinate it overnight. Longer marination lets the spices absorb better. Alternative Marinades If you're out of yogurt, don’t worry! You can use buttermilk or coconut yogurt instead. Both options keep the chicken tender and juicy. Each alternative adds its own twist to the dish. Recommended Cookware I recommend using a large skillet or a Dutch oven. These pans heat evenly and help the chicken cook perfectly. A non-stick surface helps prevent sticking and makes cleanup easy. Ensuring Chicken is Cooked Thoroughly Always check that chicken is fully cooked. The meat should be white, not pink, and juices should run clear. Using a meat thermometer is smart; the chicken should reach 165°F (74°C) for safety. Additional Spices to Try For an extra kick, consider adding a pinch of cayenne pepper or smoked paprika. These spices can elevate the dish and give it a unique flavor. Experimenting with cumin or coriander can also add depth. Adjusting Heat Levels To control spiciness, adjust the amount of tikka masala you use. Start small, then add more if you like it hotter. If it gets too spicy, add a bit more coconut milk to balance the heat. {{image_2}} You can make easy chicken tikka masala with tofu or paneer for a tasty vegetarian dish. Tofu absorbs flavors well and adds protein. Use firm tofu and press it to remove excess water. Cut it into cubes and marinate just like chicken. Paneer, a fresh cheese, is another great option. It holds its shape and adds a creamy texture. For yogurt, you can use plant-based options. Almond or coconut yogurt works well. They add a nice flavor without dairy. You can also try cashew cream for a richer texture. You can switch chicken for fish or lamb. Fish like salmon cooks fast and adds a nice taste. Just be careful not to overcook it. Lamb has a distinct flavor that pairs well with spices. Adjust the cooking time. Lamb needs about 15 to 20 minutes, while fish cooks in about 8 to 10 minutes. Adding vegetables can boost the nutrition of your meal. Try spinach, bell peppers, or peas. You can toss them in during the last few minutes of cooking. This keeps them vibrant and crisp. Infused broths can add depth to your dish. Use vegetable or chicken broth instead of water. This adds layers of flavor. You can also try adding a splash of coconut milk for a creamier texture. For more ideas, check the Full Recipe for easy chicken tikka masala. To keep your Chicken Tikka Masala fresh, use a tight container. Glass or plastic containers work well. Make sure the lid seals properly. This keeps out air and moisture. The shelf life of your dish is about 3 to 4 days in the fridge. Always check for any strange smells or colors before eating. If it looks or smells off, toss it out. If you want to save your Chicken Tikka Masala for later, freezing works great. First, let it cool to room temperature. Next, use airtight freezer bags or containers. Remove as much air as you can to prevent freezer burn. You can freeze it for up to 3 months. When you're ready to eat it, move it to the fridge for a night to thaw. This helps keep the texture nice. To keep the flavor, reheating is key. You can use the stovetop or microwave. The stovetop is often better for taste. Just heat it slowly over low heat. Stir often to avoid burning. If you use the microwave, cover your dish. Heat in short bursts, stirring in between. This way, it warms evenly. Enjoy your tasty meal! For the full recipe, check out the Easy Chicken Tikka Masala Full Recipe. You can use several substitutes for yogurt. - Dairy-Free Options: Try coconut yogurt or cashew cream. These options keep the dish creamy without dairy. - Alternative Ingredients: You can also use sour cream or buttermilk. These add a similar tangy flavor to the dish. Yes, you can make Chicken Tikka Masala in a slow cooker! - Slow Cooker Instructions: First, marinate the chicken as usual. Then, add all the ingredients to the slow cooker. Cook on low for 6-8 hours or high for 3-4 hours. - Cooking Time Adjustments: Ensure the chicken reaches an internal temperature of 165°F. Cooking times may vary based on your slow cooker model. You can easily adjust the spice level to your taste. - Tips for Reducing Spiciness: Use less tikka masala spice blend. You can also add more coconut milk to tone down heat. - Enhancing Flavor without Heat: Add fresh herbs like cilantro or a pinch of sugar. These can brighten the dish without adding spice. For the complete recipe, check out the Easy Chicken Tikka Masala Full Recipe. In this blog, we explored Chicken Tikka Masala ingredients, cooking steps, and variations. You learned about the key ingredients, like chicken, spices, and creamy dairy. I shared tips for marination and cooking techniques that enhance flavor. We also covered storage options and answered common questions. Cooking this dish can delight your taste buds. Experiment with ingredients to make it uniquely yours. Enjoy the warmth and comfort that this dish brings to your table!

Easy Chicken Tikka Masala Simple and Flavorful Meal

Craving a meal that bursts with flavor and is easy to make? This Easy Chicken Tikka Masala is just the

To make Honey Garlic Glazed Carrots, you will need: - 1 pound baby carrots, peeled - 2 tablespoons honey - 3 cloves garlic, minced - 2 tablespoons unsalted butter - 1 tablespoon olive oil - Salt and pepper to taste - 1 tablespoon fresh parsley, chopped (for garnish) You can use regular carrots if baby carrots aren't available. Just slice them into sticks. For honey, maple syrup works as a great substitute. If you want a vegan version, replace the butter with vegan butter or coconut oil. Fresh carrots are best for this dish. They have a better texture and flavor. Frozen carrots can work, but they may become mushy. If you use frozen carrots, cook them for less time. You want your carrots to stay crisp and tasty! To start, gather your ingredients. You need one pound of baby carrots, two tablespoons of honey, three cloves of minced garlic, two tablespoons of unsalted butter, and one tablespoon of olive oil. Don’t forget salt, pepper, and fresh parsley for garnish. 1. Heat a large skillet over medium heat. Add the olive oil and butter. Wait until it melts and bubbles. 2. Toss in the baby carrots. Sauté them for about five minutes. Look for a bright orange color. 3. Once they soften, mix in the minced garlic. Cook for two more minutes. Be careful; burnt garlic tastes bitter. 4. Now, drizzle the honey over the carrots. Stir well to coat them evenly. 5. Season with salt and pepper to your liking. Reduce the heat to low. Cook for an extra five to seven minutes. Stir often until the carrots are tender and the glaze thickens. 6. When done, take the skillet off the heat. Sprinkle chopped parsley on top for freshness. Sautéing is a quick way to cook food in a small amount of oil. It makes the carrots soft while keeping their bright color. Glazing adds flavor and shine. Honey works perfectly here, creating a sweet coating. - Choose baby carrots for a sweeter taste and more tender texture. - If using regular carrots, cut them into even pieces. Aim for about one-inch sections. - Keep an eye on the heat. Medium heat is best. Too high can burn the garlic. - Stirring often helps the glaze stick and prevents sticking to the pan. For the full recipe, you can refer to the detailed cooking instructions above. Enjoy your Honey Garlic Glazed Carrots! To get the best glaze, cook the carrots slowly. Start with medium heat to let them soften. Then, add the honey and garlic. This helps the glaze stick well. Stir the mixture often. This keeps the carrots coated and prevents burning. If the glaze is too thick, add a splash of water. For a thinner glaze, cook less time after adding honey. You can add extra flavors easily. Try a pinch of thyme or rosemary. These herbs pair well with honey and garlic. You may also add a squeeze of lemon juice. This will brighten the dish. For some heat, add a dash of red pepper flakes. Fresh parsley on top adds color and freshness. If your garlic burns, it can taste bitter. To avoid this, add garlic later in the cooking. Cook the carrots until they are just tender. If they are still hard, cook a bit longer. If the glaze does not stick, try reducing the heat. Let the glaze simmer more to help it thicken. You can find the Full Recipe above for more guidance. {{image_2}} You can switch out honey for other sweeteners. Maple syrup gives a nice flavor. Brown sugar adds a rich taste. Both options work well in this recipe. They create a sweet glaze that coats the carrots perfectly. Want to make your dish even better? You can add other vegetables like peas or green beans. They cook quickly and add color. Mix them in with the carrots to create a more vibrant dish. This adds both flavor and nutrition to your meal. If you like heat, try adding chili flakes or sriracha. A little spice can balance the sweetness of the glaze. Start with a small amount, then taste. You can always add more if you want extra heat. This twist makes your carrots stand out even more. For the full recipe, check out the details above! After enjoying your Honey Garlic Glazed Carrots, you might have some left. To store them, let them cool first. Place the carrots in an airtight container. This keeps them fresh and prevents them from drying out. Store the container in the fridge for up to four days. When you’re ready to eat the leftovers, reheating is key. You can use a skillet or microwave. For the skillet, add a splash of water and heat over low. This helps keep the carrots moist. If using the microwave, cover the container and heat in short bursts. Stir after each burst to ensure even heating. Want to save your Honey Garlic Glazed Carrots for later? Freezing is a great option. First, let the carrots cool completely. Then, place them in a freezer-safe bag. Remove as much air as possible to prevent freezer burn. They can last for up to three months in the freezer. When you’re ready to enjoy them, thaw in the fridge overnight before reheating. For the best taste, eat them within a month. Honey garlic glazed carrots can last about 3 to 5 days in the fridge. Make sure to store them in an airtight container. This keeps them fresh and tasty. If you notice any off smells or changes in color, it's best to throw them out. Yes, you can make honey garlic glazed carrots ahead of time. Just follow the full recipe, then cool the carrots before storing them. When you are ready to eat, just heat them gently in a pan. This helps keep the flavor and texture. One serving of honey garlic glazed carrots has about 120 calories. It contains 3 grams of fat, 20 grams of carbs, and 2 grams of protein. These carrots are also a good source of vitamin A. They offer a sweet and healthy side dish for any meal. In this blog post, we covered how to make Honey Garlic Glazed Carrots. I shared a full ingredient list and tips on choosing the best carrots. You learned step-by-step cooking methods and vital techniques for perfecting your dish. To enhance your carrots, consider flavor variations or alternative sweeteners. Proper storage helps keep leftovers fresh. With this guide, you can create a tasty side dish that impresses everyone. Enjoy your cooking!

Honey Garlic Glazed Carrots Delightful and Easy Recipe

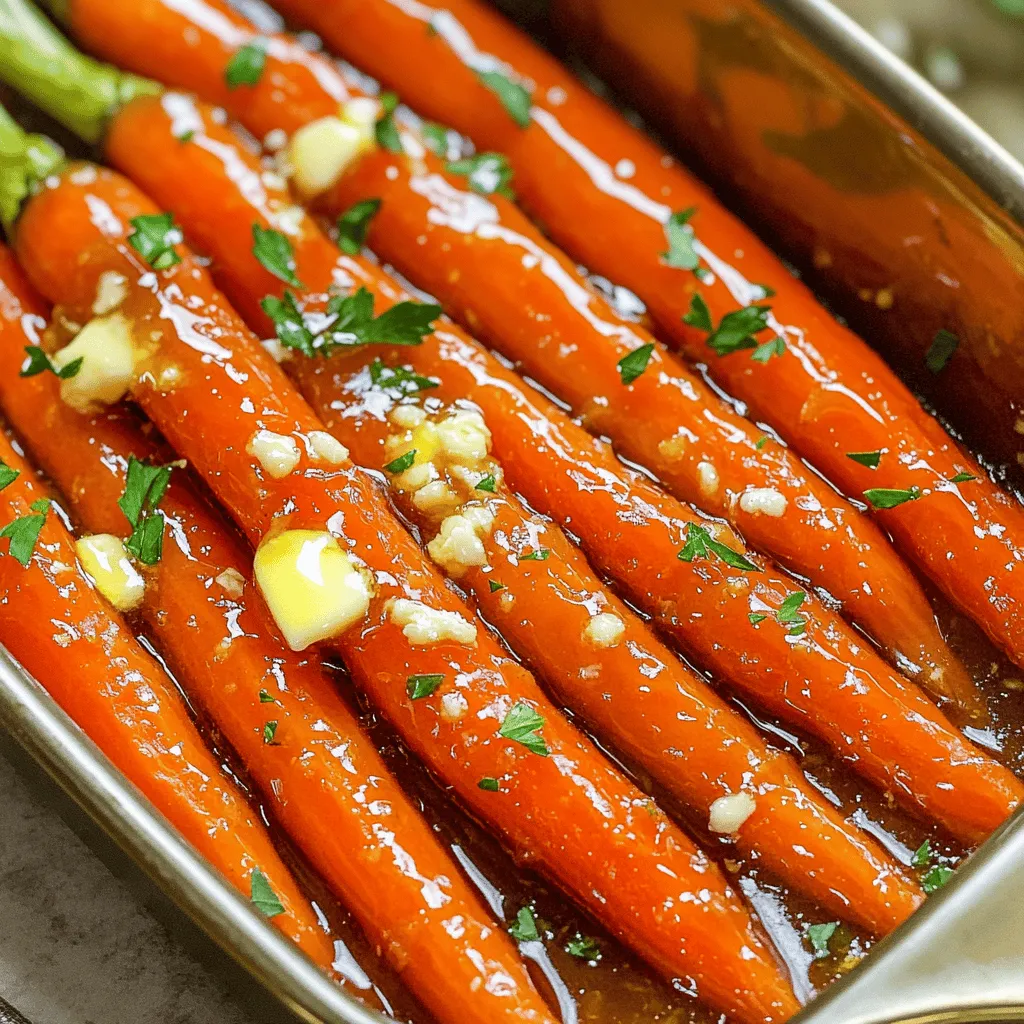
Are you ready to elevate your veggie game? Honey Garlic Glazed Carrots are sweet, savory, and super easy to make.

Older posts
Newer posts
← Previous Page1 … Page59 Page60 Page61 … Page86 Next →

dsad

© 2026 Cooking Wells • Built with GeneratePress

Our Policies

  • Copyright Policy
  • Cookie Policy
  • GDPR Policy
  • Privacy Policy
  • Disclaimer
  • Terms Of Use

More Information

  • Home
  • About
  • Contact
  • Appetizers
  • Dessert
  • Dinner
  • Drinks
©2026, Cooking Wells About Back To Top