Skip to content
DisclaimerTerms Of UseGDPR PolicyCookie Policy

Cooking Wells

  • Home
  • Drinks
  • Appetizers
  • Dinner
  • Dessert
  • About
  • Contact
  • Privacy Policy
DisclaimerTerms Of UseGDPR PolicyCookie Policy

NO-ING-IMG

This Avocado Tomato Cucumber Salad is fresh and easy. It combines simple ingredients for a tasty dish. You can make it in just 15 minutes. This salad is perfect for lunch or as a side dish. - 2 ripe avocados, diced - 2 cups cherry tomatoes, halved - 1 large cucumber, diced - 1/4 cup red onion, finely chopped - 1/4 cup fresh cilantro, chopped - 2 tablespoons lime juice - 1 tablespoon olive oil - Salt and pepper to taste - 1/2 teaspoon cumin (optional) Each ingredient adds its own flavor. The avocados provide creaminess, while tomatoes add sweetness. The cucumber brings a nice crunch. Together, they create a refreshing salad. Use fresh herbs like cilantro for extra flavor. Lime juice brightens the dish, making it even better. Feel free to explore the [Full Recipe] for detailed steps on how to mix these ingredients into a vibrant salad. Start by gathering all your fresh ingredients. In a large mixing bowl, combine the diced avocados, halved cherry tomatoes, and diced cucumber. These three ingredients bring great texture and taste to the salad. Next, add the finely chopped red onion and fresh cilantro to the mixture. The onion adds a nice crunch, while cilantro gives a burst of flavor. Mix these ingredients gently, so you don’t mash the avocado. In a small bowl, whisk together the lime juice, olive oil, cumin (if using), salt, and pepper. The lime juice adds brightness, while olive oil brings richness. The cumin is optional but adds a warm note. Make sure to blend everything well. This dressing will tie all the flavors together beautifully. Now, drizzle the dressing over the salad ingredients. Gently toss everything together until well combined. Be careful not to mash the avocado. Let the salad sit for about 10 minutes to allow the flavors to meld. This step helps the salad taste even better. Taste and adjust seasoning with more salt, pepper, or lime juice if needed. Enjoy this fresh and flavorful meal! For the complete recipe, check the Full Recipe section. To make the best avocado tomato cucumber salad, choose ripe avocados and tomatoes. Ripe avocados feel slightly soft when you press them. If they are hard, they need more time to ripen. For tomatoes, look for bright colors and smooth skin. They should also feel firm but not hard. This simple step makes your salad fresh and tasty. How you serve your salad can make a difference. You can use a large bowl for family meals or individual plates for a fancy touch. For extra flair, garnish with cilantro leaves. A sprinkle of cumin on top adds a nice flavor twist. You can also serve the salad with tortilla chips for a crunchy side. You can change the taste of your salad with different dressings. For a creamier option, try adding Greek yogurt to your dressing. If you like heat, a pinch of chili powder can spice things up. Always taste your salad before serving. You may want to add more salt, pepper, or lime juice. For the full recipe, refer to the recipe section. {{image_2}} You can change up the flavors of your salad easily. Swap in different veggies like bell peppers or radishes. For a spicy kick, add jalapeños or diced chili. You can also use different herbs. Try basil or parsley instead of cilantro. If you want a fruit twist, mango or pineapple work well, too. Each change gives a new taste to your dish. This salad fits many diets. It is naturally vegetarian and vegan. To make it gluten-free, just check your dressing ingredients. You can also add protein for extra nutrition. Chickpeas, black beans, or grilled chicken are great options. Each choice makes this salad more filling and satisfying. Using fresh, seasonal produce makes your salad taste even better. In summer, ripe tomatoes and cucumbers shine. In fall, you can add roasted squash or apples. Winter brings hearty greens like kale that add crunch. In spring, look for fresh herbs and baby greens. Each season brings new flavors to explore. For the complete recipe, check out the Full Recipe section. To keep your avocado tomato cucumber salad fresh, store it in an airtight container. This helps prevent the salad from browning or getting soggy. If you have leftovers, try to separate the dressing. Mixing it in can make the salad watery. Store the dressing in a small jar or bowl and add it just before serving. In the refrigerator, this salad stays fresh for about one to two days. However, the avocado can turn brown quickly. Make sure to eat it sooner if you notice any browning. If you keep the dressing separate, the salad may last a bit longer. I do not recommend freezing this salad. Freezing can change the texture of the avocado and cucumber. Both can become mushy when thawed. Instead, enjoy the salad fresh for the best taste and texture. If you want to prepare ahead, make the dressing and store it separately. You can store avocado salad in the fridge for about one day. After that, the avocado turns brown and mushy. To slow this down, cover it tightly. Use plastic wrap or an airtight container. You can also add lime juice to help keep the color bright. Yes, you can add many different veggies or proteins. Try adding bell peppers for crunch or corn for sweetness. Chickpeas or grilled chicken can boost protein. Just make sure to keep the flavors balanced. Taste it as you go to get it just right. This dish is very healthy. It offers good fats from avocados, which help your heart. Tomatoes are full of vitamins and antioxidants. Cucumbers keep you hydrated. This salad is low in calories and high in nutrients. It’s a great choice for a light meal or side dish. For the full recipe, visit the [Full Recipe]. This article walks you through making a fresh avocado salad. You learned about the key ingredients, step-by-step instructions, and tips for serving. I shared ways to customize the salad and how to store it for later. Remember, you can swap ingredients based on your taste and dietary needs. Making this salad can be fun and flexible. Enjoy this healthy dish packed with flavor any time.

Avocado Tomato Cucumber Salad Fresh and Flavorful Meal

Looking for a light and tasty meal? This Avocado Tomato Cucumber Salad is just what you need! With fresh ingredients

This soup is bright and full of flavor. You need these key ingredients: - 1 cup orzo pasta - 1 can (15 oz) chickpeas, rinsed and drained - 6 cups vegetable broth - 1 medium onion, diced - 2 cloves garlic, minced - 2 medium carrots, diced - 2 celery stalks, diced These main items create a hearty base. Orzo adds a nice texture, while chickpeas give you protein. The broth brings everything together, making each bite warm and comforting. To enhance the taste, we’ll use: - 1 teaspoon dried thyme - 1 teaspoon dried oregano - Salt and pepper to taste These herbs add a lovely aroma. Thyme brings earthiness, and oregano adds depth. Don’t forget to season with salt and pepper for balance. Finally, we’ll add some fresh flavors: - Juice of 2 lemons - Zest of 1 lemon - 2 tablespoons olive oil - Fresh parsley, chopped (for garnish) The lemon juice brightens the soup. The zest gives it a fresh kick. Olive oil adds richness, and parsley gives a pop of color. This recipe is a great way to enjoy a healthy meal. For the full recipe, check out the details above! Start by heating olive oil in a large pot over medium heat. Once hot, add the diced onion, carrots, and celery. These three vegetables form the base of your soup. Sauté them for about 5-7 minutes. You want them soft but not browned. This step builds a rich flavor. Next, stir in the minced garlic, dried thyme, and oregano. Cook for another minute. Garlic adds a nice aroma, and the herbs boost the taste. You should smell their warmth filling the kitchen. Now, it's time to add the vegetable broth. Pour it into the pot and bring it to a boil. Boiling is key to cooking the orzo properly. Once the broth bubbles, stir in the orzo and chickpeas. Reduce the heat to a gentle simmer. Let it cook for about 10 minutes. You want the orzo to be tender and the chickpeas warm. After the orzo is cooked, it’s time to add the lemon juice and zest. This is where the soup gets its fresh and bright flavor. Stir it in and then season with salt and pepper to taste. Taste your soup; adjust the seasonings if needed. Let the soup sit for a few minutes to meld the flavors. Now you have a delightful bowl of Lemon Chickpea Orzo Soup. For the full recipe, check out the details above. To achieve the best flavor balance in your Lemon Chickpea Orzo Soup, focus on the ingredients. Start with fresh veggies. They enhance the taste. Sauté the onion, carrots, and celery until soft. This step builds a tasty base. Do not rush; let the flavors develop. When cooking orzo, follow the package instructions. Usually, it takes about 10 minutes to cook. Stir often to prevent sticking. If you cook it too long, it can turn mushy. Add the orzo after the broth boils for the best texture. This soup is naturally vegan. The chickpeas add protein and keep it filling. If you need gluten-free options, swap orzo for a gluten-free pasta. Quinoa can also work well. For those with allergies, check the broth. Ensure it is free from allergens. To make your soup even better, consider toppings. A sprinkle of fresh parsley adds color and flavor. You can also add a dash of lemon zest for brightness. Serve with crusty bread for a hearty meal. Use shallow bowls for a beautiful presentation. For a fun twist, add a swirl of olive oil on top. This gives a rich finish. Enjoy your soup with a side salad for a complete meal. {{image_2}} You can change the grains and legumes in this soup. Try quinoa or farro instead of orzo. If you want extra protein, use lentils or black beans instead of chickpeas. Feel free to add different veggies to your soup. Spinach or kale adds green color and power. Bell peppers give a sweet crunch. You can also toss in sweet corn or diced tomatoes for a fresh touch. For a kick, add spices like cumin or smoked paprika. A pinch of red pepper flakes can also bring heat. If you want to change the citrus flavor, try lime or orange juice. Each adds a unique zest to the soup, making it even more delightful. In summer, add zucchini. It cooks quickly and has a light taste. You can slice it thin and stir it in during the last few minutes. During winter, use hearty greens like kale. It adds a robust texture, perfect for colder days. You can also add potatoes to make the soup more filling. Try using root vegetables like parsnips or turnips for variety. For the complete recipe, check the [Full Recipe]. To keep your Lemon Chickpea Orzo Soup fresh, store leftovers in the fridge. Use a good, airtight container. This prevents moisture loss and keeps flavors intact. Let the soup cool before sealing it. Label the container with the date. This helps you track freshness. To safely reheat the soup, pour it into a pot. Heat on low to medium, stirring often. This helps the soup warm evenly. You can also use a microwave. Place the soup in a microwave-safe bowl. Heat in short bursts, stirring in between. This keeps the orzo from getting mushy. You can freeze Lemon Chickpea Orzo Soup for up to three months. Use a freezer-safe container, leaving space for expansion. When ready to use, thaw the soup in the fridge overnight. For a quick thaw, run the sealed container under warm water. Reheat it on the stove or in the microwave. Enjoy every flavorful bite! How long can leftovers be stored in the fridge? You can store leftovers in the fridge for up to three days. Make sure to keep it in an airtight container to keep it fresh. Can I make this soup ahead of time? Yes, you can make this soup ahead of time. It tastes even better the next day. Just reheat it on the stove or in the microwave. Can I use fresh chickpeas instead of canned? You can use fresh chickpeas, but you'll need to cook them first. Soak them overnight and boil them until tender. This will add extra time to your prep. What can I serve with this soup? This soup pairs well with crusty bread or a fresh salad. You might also enjoy it with a light sandwich. Is this soup gluten-free? No, it is not gluten-free due to orzo pasta. You can use gluten-free pasta for a safe option. What are the health benefits of chickpeas? Chickpeas are packed with protein and fiber. They help keep you full and support digestion. They also provide vitamins and minerals, making this soup nutritious. Lemon Chickpea Orzo Soup is simple and packed with flavor. We covered the key ingredients, basic steps, and helpful tips. You can customize it to fit your diet or add seasonal veggies. Proper storage keeps it fresh for later enjoyment. This soup is warm, bright, and healthy. Make it your go-to recipe for any season. Enjoy the taste and comfort it brings!

Lemon Chickpea Orzo Soup Flavorful and Healthy Delight

If you’re looking for a warm, tasty dish, Lemon Chickpea Orzo Soup is perfect. This soup is not just delicious;

To make a tasty Grilled Peach Burrata Salad, you need fresh and simple ingredients. Here’s the list: - 2 ripe peaches, halved and pitted - 1 tablespoon olive oil - Salt and pepper to taste - 4 cups arugula or mixed greens - 8 oz burrata cheese, torn into pieces - 1/4 cup chopped fresh basil - 1/4 cup balsamic reduction - 1/4 cup toasted pine nuts or walnuts These ingredients create a perfect mix of sweet, creamy, and crunchy flavors. The ripe peaches bring summer vibes to your table. The burrata cheese adds a rich creaminess that pairs well with the greens. Fresh basil gives a bright touch, while the balsamic reduction adds tang and sweetness. Nuts provide a delightful crunch that rounds out the dish. Each bite is a celebration of flavor! If you want to see how to put this all together, check out the Full Recipe. - Preheat grill to medium-high heat. - Halve and pit the ripe peaches. - Brush cut sides with olive oil, then sprinkle salt and pepper. - Place peaches cut-side down on the grill. - Grill for about 3-4 minutes until grill marks appear. - Remove peaches and let them cool for a few minutes. - Grab a large serving bowl and arrange the greens. - Slice the grilled peaches into wedges. - Layer the peach wedges over the greens. - Tear burrata cheese into pieces and place it on top. - Sprinkle chopped basil over the salad. - Drizzle balsamic reduction for sweetness. - Scatter toasted pine nuts or walnuts for crunch. This simple method makes the Grilled Peach Burrata Salad a breeze. You can find the full recipe in the article. Enjoy every bite! Grilling peaches is easy and fun. First, pick ripe peaches. This ensures they are sweet and juicy. Halve and pit the peaches before grilling. Brush the cut sides with olive oil. This helps them grill better. Set your grill to medium-high heat. This is about 400-450°F (204-232°C). Place the peaches cut-side down on the grill. Grill for about 3-4 minutes. You want nice grill marks and slight softness. Avoid overcooking, as they can turn mushy. This salad pairs well with a variety of foods. Try serving it with grilled chicken or fish. The creamy burrata complements these flavors nicely. You can also add crusty bread for a more filling meal. For a beautiful presentation, use a large, shallow bowl. Start with a base of greens. Layer the grilled peaches and burrata on top. Sprinkle fresh basil and nuts for color and crunch. Drizzle balsamic reduction for a touch of sweetness. This makes your dish look and taste amazing. For more ideas, check out the Full Recipe for Grilled Peach Burrata Salad. {{image_2}} You can swap burrata cheese with other options. Try fresh mozzarella or goat cheese. Both give a creamy texture that complements the salad. If you want a dairy-free option, use cashew cheese or almond-based spreads. For greens, arugula is great, but you can use spinach or mixed baby greens. Each green brings a unique flavor. For nuts, substitute pine nuts or walnuts with almonds or pecans. Roasted or raw, they add a nice crunch. To boost flavors, add fruits like strawberries or figs. These fruits provide a sweet contrast to the savory cheese. You can also mix in herbs like mint or dill for extra freshness. Using flavored oils can elevate the dish. Try garlic-infused olive oil or chili oil for a kick. You can also drizzle with a fruity balsamic vinaigrette. This adds a twist to the classic balsamic reduction. For the full recipe, check the section above. To keep your grilled peach burrata salad fresh, follow these tips: - Cool the salad: Allow it to reach room temperature first. - Use airtight containers: Store leftovers in glass or plastic containers with tight lids. - Layer wisely: Keep the greens separate from the peaches and cheese to avoid sogginess. - Refrigerate promptly: Aim to store within two hours to keep it safe. This method helps maintain the salad's vibrant flavors and textures for up to three days. You might want to reheat the grilled peaches if they have been stored. Here’s how: - Only reheat peaches: Remove the burrata and greens before reheating. - Use a skillet: Heat a non-stick skillet over low heat. Add the peaches for about two minutes until warm. - Refresh flavors: Drizzle a bit of olive oil or balsamic reduction on top after reheating. This keeps the salad tasty and enjoyable! If you need the full recipe, check it out above. Can I make the salad ahead of time? Yes, you can prepare parts of the salad ahead. Grill the peaches and store them in the fridge. Keep the greens, burrata, and nuts separate. Assemble the salad just before serving for the best taste. What can I substitute for balsamic reduction? You can use regular balsamic vinegar for a tangy flavor. Honey or maple syrup works well, too. This will add sweetness without the thick texture of a reduction. How can I make this recipe vegan-friendly? To make this salad vegan, swap burrata with a plant-based cheese. You can use cashew cheese or tofu. Ensure your balsamic reduction is vegan, as some may contain animal products. Are peaches the only fruit I can use? No, you can use other fruits like nectarines, plums, or even grilled pineapple. Each fruit brings a unique taste, so feel free to experiment! How to tell if peaches are ripe for grilling? Choose peaches that are slightly soft when you squeeze them. They should have a sweet smell and a vibrant color. Avoid peaches that feel too firm or have blemishes. What dishes pair well with Grilled Peach Burrata Salad? This salad pairs nicely with grilled chicken or fish. It also goes well with crusty bread and a light white wine. For a complete meal, serve it with a pasta dish or a charcuterie board. This blog post showed you how to make a Grilled Peach Burrata Salad. We discussed the ingredients, steps to prepare, and tips for grilling. You can experiment with different greens and nuts, too. Storage tips help keep your salad fresh. This dish is perfect for gatherings or a light meal. Enjoy this salad and share it with friends! Let the flavors of grilled peaches and creamy burrata elevate your meals.

Grilled Peach Burrata Salad Flavorful and Fresh Meal

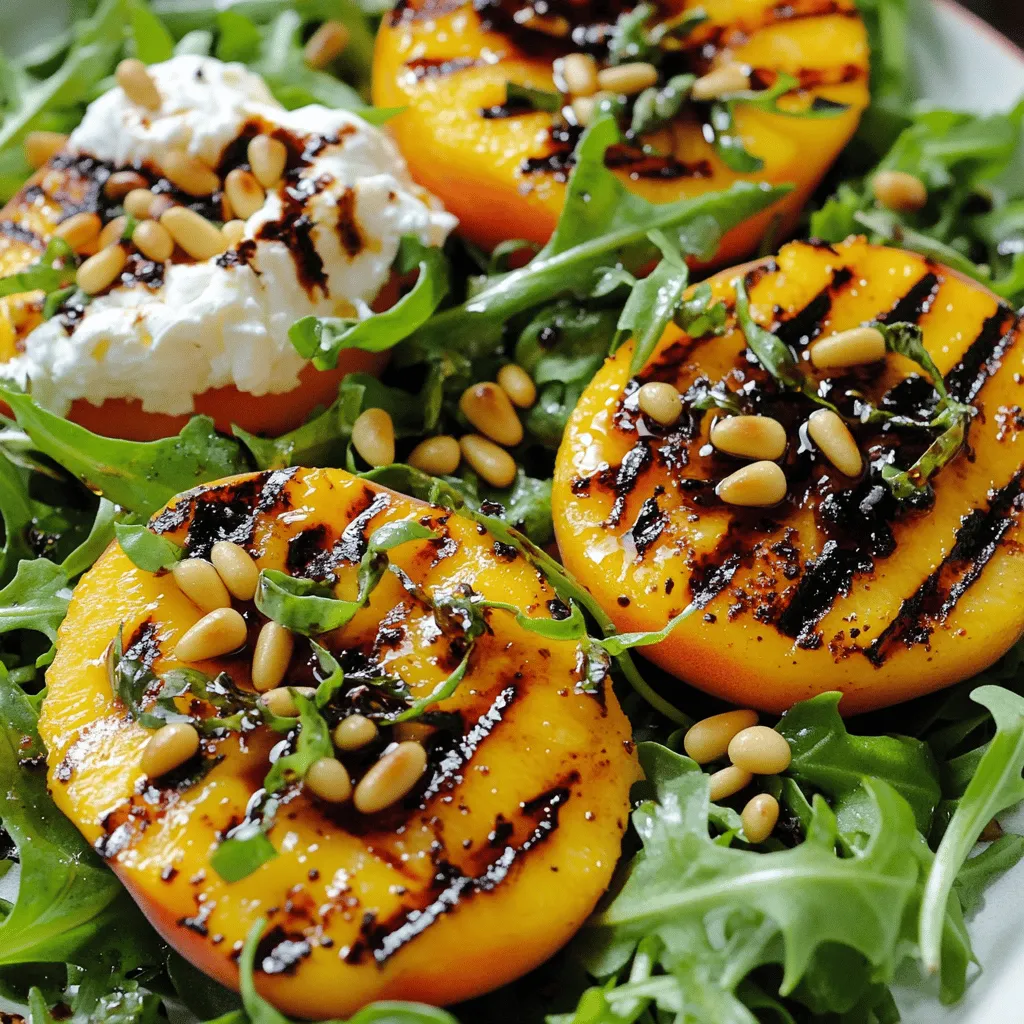
Looking for a bright and tasty meal? Try this Grilled Peach Burrata Salad! The juicy peaches, creamy burrata, and fresh

To make these tasty crispy Parmesan zucchini fries, gather these ingredients: - 2 medium zucchinis, cut into fries - 1 cup breadcrumbs (preferably panko for extra crunch) - ½ cup grated Parmesan cheese - 1 teaspoon garlic powder - ½ teaspoon onion powder - ½ teaspoon paprika - Salt and pepper to taste - 2 large eggs, beaten - Olive oil spray You will need some tools to make this recipe easier: - Baking sheet - Parchment paper - 2 shallow bowls - Knife and cutting board - Mixing spoon - Oven Each serving of crispy Parmesan zucchini fries has: - Calories: 210 - Protein: 10g - Carbohydrates: 25g - Fat: 9g - Fiber: 2g These fries are a healthier snack choice. They pack flavor without extra calories. Enjoy with your favorite dip for even more fun! For the complete recipe, check the Full Recipe section. To make crispy Parmesan zucchini fries, start with fresh zucchinis. Wash them well, then slice them into fry shapes. Aim for a uniform size for even cooking. Use two bowls for the next steps. In one bowl, mix breadcrumbs, Parmesan cheese, garlic powder, onion powder, paprika, salt, and pepper. This mix gives flavor and crunch. In the second bowl, beat two eggs until smooth. This helps the coating stick. Now, dip each zucchini fry into the beaten eggs first. Make sure it’s fully coated. Next, roll it in the breadcrumb mix. Press gently to make sure the crumbs stick well. Place all coated fries on a baking sheet lined with parchment paper. This keeps them from sticking. Spray the tops lightly with olive oil spray. This step helps them get golden and crispy. Bake in a preheated oven at 425°F (220°C) for 18 to 20 minutes. Flip the fries halfway through cooking. This ensures they brown evenly. For the best crispiness, don’t crowd the fries on the baking sheet. Give them space to breathe. If you have extra zucchini, bake in batches. Always keep an eye on them in the last few minutes. Oven times can vary, so check for a golden brown color. After baking, let them cool for a few minutes. This helps them firm up a bit more. Serve them warm with your favorite dipping sauce. For more details, refer to the Full Recipe. To get that perfect crunch, use panko breadcrumbs. They are light and airy, giving your fries a nice texture. Make sure to coat the zucchini well in the egg before rolling it in the breadcrumbs. This helps the crumbs stick better. Also, spray the tops with olive oil spray. It helps them crisp up nicely in the oven. One common mistake is overcrowding the baking sheet. If the fries are too close, they will steam instead of crisp. Another mistake is not flipping them halfway through cooking. Flipping ensures even cooking and color. Lastly, don’t skip the salt. It brings out the flavors in the zucchini. You can boost the flavor by adding spices. Try a pinch of cayenne for heat or Italian herbs for a classic touch. Fresh herbs like parsley can add brightness too. For a cheesy kick, sprinkle more Parmesan on top before serving. Dipping sauces like marinara or ranch make great pairings. Check the Full Recipe for more details on preparing these tasty fries! {{image_2}} You can change the coating for more fun. Instead of breadcrumbs, try crushed nuts. Almonds or pecans add a nice crunch. You can also use cornmeal for a different texture. If you like spice, add some cayenne pepper to the mix. This gives a kick to every bite. Enhance the flavor with spices and herbs. Try adding Italian seasoning for a classic touch. Basil, oregano, or thyme work great too. For a zesty twist, mix in some lemon zest. You can even sprinkle a little chili powder for heat. Be creative! The right blend makes every fry special. Serve your zucchini fries hot and crispy. They pair well with marinara or ranch dressing. For a fresh twist, try tzatziki sauce or aioli. You can add a sprinkle of fresh herbs on top to impress your guests. Serve them in a basket for a fun, casual feel. Check out the Full Recipe for more ideas! To keep your crispy zucchini fries fresh, store them in an airtight container. Place a paper towel at the bottom to absorb moisture. This helps maintain their crispiness. Store them in the fridge for up to three days. If you want to enjoy them later, freezing is a great option. When you're ready to eat your leftovers, reheating properly is key. Preheat your oven to 400°F (200°C). Place the fries on a baking sheet in a single layer. Bake for about 10 minutes until they are warm and crisp again. Avoid using the microwave, as it can make them soggy. To freeze your crispy zucchini fries, first let them cool completely. Arrange them in a single layer on a baking sheet and freeze for about one hour. After they are frozen solid, transfer them to a freezer-safe bag or container. They will stay fresh for up to three months. When ready to cook, bake from frozen, adding a few extra minutes to the cooking time. For the full recipe, check out the earlier section! Yes, you can! To make crispy Parmesan zucchini fries gluten-free, simply use gluten-free breadcrumbs. Many brands offer tasty options that work well. You can also crush gluten-free crackers or use ground almonds as a fun twist. To make these fries healthier, you can reduce the amount of cheese. Try using a lighter cheese or skip it altogether. You can also bake them without oil spray. Instead, use a light brush of olive oil for flavor. Pair them with fresh veggies or a salad on the side for a balanced meal. Some great dips include marinara sauce, ranch dressing, or tzatziki. You can also try a spicy sriracha mayo for a kick. Each dip adds a unique flavor, so feel free to mix and match to find your favorite! Here’s a quick look at the full recipe for crispy Parmesan zucchini fries: - Ingredients: 2 medium zucchinis, 1 cup breadcrumbs, ½ cup grated Parmesan cheese, 2 large eggs, and more. - Preparation: Preheat oven, mix coatings, dip zucchini fries, and bake. - Cooking Time: About 20 minutes for crispy perfection. This overview gives you all the key points to get started on this tasty snack! This post covered everything you need for Crispy Parmesan Zucchini Fries. We explored the key ingredients, tools, and nutritional facts, ensuring you're well-prepared. The step-by-step instructions made cooking simple, while the tips and tricks help you get that perfect crisp. We looked at fun variations and smart storage tips too. Remember, you can adapt this recipe to fit your tastes. Now, enjoy your delicious fries and impress your friends!

Crispy Parmesan Zucchini Fries Simple and Tasty Snack

Are you ready for a snack that’s easy to make and full of flavor? Crispy Parmesan Zucchini Fries are the

To make your Healthy Chocolate Banana Muffins, you will need some simple and wholesome ingredients. Here’s what you need: - 2 ripe bananas, mashed - 1/2 cup unsweetened applesauce - 1/4 cup honey or maple syrup - 1 teaspoon vanilla extract - 1 cup whole wheat flour - 1/2 cup cocoa powder (unsweetened) - 1 teaspoon baking soda - 1/2 teaspoon baking powder - 1/4 teaspoon salt - 1/2 cup dark chocolate chips (optional) - 1/4 cup walnuts or pecans, chopped (optional) These ingredients create a rich and moist muffin. The bananas add natural sweetness, while the applesauce keeps the muffins soft. Whole wheat flour gives a nice texture and extra nutrients. Cocoa powder brings the chocolate flavor without added sugar. You can customize your muffins. Add chocolate chips for extra sweetness or nuts for crunch. Each ingredient plays a role in making your muffins delicious and healthy. For the full recipe, check out the detailed instructions above. Enjoy baking! Start by preheating your oven to 350°F (175°C). This step is key for even baking. While the oven warms up, you can prepare your muffin tin. Grease it lightly or use muffin liners. Both methods work well. In a large bowl, mash two ripe bananas. Use a fork to make them smooth. Then, add 1/2 cup of unsweetened applesauce, 1/4 cup of honey or maple syrup, and 1 teaspoon of vanilla extract. Mix everything until it’s smooth and creamy. This blend gives your muffins moisture and natural sweetness. Take another bowl to mix the dry ingredients. Sift together 1 cup of whole wheat flour, 1/2 cup of unsweetened cocoa powder, 1 teaspoon of baking soda, 1/2 teaspoon of baking powder, and 1/4 teaspoon of salt. Sifting helps remove lumps and makes the muffins light. Now, pour the dry ingredients into the wet ingredients. Stir gently until just combined. Be careful not to overmix. A few lumps are okay. Overmixing can make your muffins dense, and we want them fluffy. Divide the batter evenly among the muffin cups. Fill each cup about 3/4 full. This gives them room to rise. Place the muffin tin in the oven and bake for 18-20 minutes. Check for doneness by inserting a toothpick in the center of a muffin. It should come out clean. Once baked, let the muffins cool in the pan for about 5 minutes. Then, transfer them to a wire rack to cool completely. For a great presentation, serve them warm on a wooden platter. You can even add a few chocolate chips on top. Enjoy your healthy chocolate banana muffins with a glass of almond milk! For the full recipe, refer to the earlier sections. To make your muffins fluffy, mix the wet and dry ingredients gently. Overmixing can make them dense. You want to just combine the two. Use ripe bananas; they add moisture and sweetness. This helps create a light texture. Also, use fresh baking soda and baking powder. They give the best rise. You can swap honey for maple syrup if you prefer. For a lower-calorie option, use a sugar substitute. Instead of whole wheat flour, almond flour works well too. You can also add Greek yogurt for extra protein. This keeps the muffins moist and boosts nutrition. If you want to skip the chocolate chips, try dried fruit instead. Bake your muffins at 350°F (175°C). This temperature cooks them evenly. Check for doneness at 18 minutes. Insert a toothpick into the center. If it comes out clean, they are ready. If you want them extra fluffy, let the batter rest for 10 minutes before baking. This helps the muffins rise better while baking. For the full recipe, check out Healthy Chocolate Banana Muffins. {{image_2}} To make vegan chocolate banana muffins, swap the honey for maple syrup. You can also use plant-based milk instead of applesauce. This keeps the muffins moist and adds a nice flavor. Replace the dark chocolate chips with vegan ones to keep it dairy-free. These muffins stay soft and delicious! If you need gluten-free muffins, use gluten-free flour instead of whole wheat flour. Almond flour or oat flour works well. Make sure your cocoa powder is gluten-free too. These changes keep the taste great while making the muffins safe for those with gluten issues. You can make these muffins even better by adding extra flavors. Some great ideas include: - A teaspoon of cinnamon for warmth. - A splash of almond extract for a nutty taste. - Chopped nuts like walnuts or pecans for crunch. - Dried fruits like cranberries or cherries for a sweet touch. These mix-ins add fun and variety to every bite. Feel free to be creative with your choices! For the full recipe, check out the details above. Store your healthy chocolate banana muffins in an airtight container. This keeps them fresh. Place them at room temperature for up to three days. If you want to keep them longer, refrigeration works too. Just remember to wrap them well to avoid drying out. Freezing is a great way to save muffins for later. First, let them cool completely. Then, wrap each muffin in plastic wrap. Place them in a freezer bag or container for extra protection. They can last up to three months in the freezer. When you want one, just grab it and eat! To enjoy your muffins warm, reheat them in the oven or microwave. For the oven, set it to 350°F (175°C). Heat for 5 to 10 minutes. If you use the microwave, heat for 15 to 20 seconds. Check that they are warm all the way through. Enjoy your delicious muffins from the Full Recipe! You can check if the muffins are ready by inserting a toothpick in the center. If it comes out clean, the muffins are done. This usually takes about 18 to 20 minutes at 350°F. Keep an eye on them towards the end of the baking time. If they start to brown too much, you can cover them with foil. Yes, overripe bananas are perfect for this recipe. They add more sweetness and moisture to the muffins. The darker the banana, the better the flavor. Just make sure they are not moldy or spoiled. If you don’t have applesauce, you can use mashed avocado or yogurt. Both will keep the muffins moist. You could also use pureed pumpkin for a fun flavor twist. Absolutely! These muffins are a great treat for kids. They are healthy, tasty, and easy to eat. Plus, the chocolate and banana flavors are a hit with most children. You can even get them involved in the baking process for a fun family activity. To boost the nutrition, you can add chia seeds or flaxseeds to the batter. These seeds add fiber and healthy fats. You might also consider using whole grain oats instead of some flour for added texture and nutrients. Another option is to add different fruits or nuts for extra flavor. Check out the Full Recipe for more ideas! You now have a simple guide to make healthy chocolate banana muffins. We covered ingredients, instructions, tips, and storage. Remember, using ripe bananas brings out the best flavor. You can also try different mix-ins for fun variations. These muffins are not only tasty but also good for you. Baking can be fun, and this recipe makes it easy. Enjoy your delicious muffins and share them with friends and family!

Healthy Chocolate Banana Muffins Easy and Delicious Treat

Are you ready to indulge in a sweet treat that’s good for you? My Healthy Chocolate Banana Muffins are an

- 1 cup coconut milk (chilled) - 1/2 cup dates, pitted and chopped - 1 ripe banana - 1 tablespoon almond butter - 1 teaspoon vanilla extract - 1/2 teaspoon ground cinnamon - Ice cubes (optional) - Fresh coconut flakes (for garnish) The Coconut Date Shake starts with simple, healthy ingredients. Each one brings flavor and nutrition. Coconut milk adds a creamy texture and tropical taste. It is dairy-free and rich in good fats. Dates offer natural sweetness. They also pack fiber and nutrients. A ripe banana gives the shake a smooth, thick feel. It adds potassium, which is great for your heart. Almond butter boosts the shake with protein and healthy fats. Vanilla extract enhances the flavor. It makes the shake smell amazing too. Ground cinnamon adds warmth and spice. It can help with blood sugar levels. If you like your shake colder, add ice cubes. Fresh coconut flakes on top give a nice crunch and look. - Calories per serving: Approximately 250 - Macronutrient breakdown: 10g protein, 35g carbs, 12g fat - Health benefits of key ingredients: - Coconut milk: Good for hydration and heart health. - Dates: High in fiber; helps with digestion. - Banana: Great for energy and muscle function. - Almond butter: Supports heart health and keeps you full. - Cinnamon: May lower blood sugar and reduce inflammation. This shake is not just tasty; it's also good for you! You can find the full recipe above. - Step 1: Blending the ingredients Start by gathering all your ingredients. In a blender, combine the coconut milk, chopped dates, ripe banana, almond butter, vanilla extract, and ground cinnamon. Blend on high speed until the mix is smooth and creamy. This step is key for a delightful texture. - Step 2: Adjusting the texture and sweetness After blending, taste the shake. If it needs sweetness, add more dates or a bit of honey. For a thicker shake, toss in a handful of ice cubes and blend again. This makes your drink cold and refreshing, perfect for a warm day. - Step 3: Serving the shake Pour the shake into tall glasses. Top with fresh coconut flakes for a lovely look and added flavor. Serve right away to enjoy the freshness. - Choosing ripe bananas Select bananas that are fully ripe. They should be yellow with some brown spots. Ripe bananas add natural sweetness and creaminess to your shake. - Importance of chilled coconut milk Use chilled coconut milk for the best taste. It keeps your shake cold and refreshing. If your coconut milk is not cold, put it in the fridge for a while before use. - Blending for optimal creaminess Blend your shake until it is fully smooth. This ensures a creamy texture. If needed, stop the blender and scrape down the sides to mix everything well. To serve your Coconut Date Shake, use tall glasses. The shake looks great in clear glass. You can enjoy it alone or with snacks. This shake pairs well with fresh fruit or granola bars. The sweet taste complements salty snacks too. Try some rice cakes or nuts on the side. If you want to prepare this shake ahead, store leftovers in the fridge. Use a sealed container to keep it fresh. You can also prepare your ingredients in advance. Chop the dates and banana, and store them in the fridge. This will save you time when you're ready to blend. For the best taste, drink the shake within two days. For the full recipe, check the earlier section. {{image_2}} You can make your Coconut Date Shake even better with a few simple changes. One fun option is to add cocoa powder for a chocolate twist. Just mix in one tablespoon of cocoa powder when blending. This gives your shake a rich, chocolate flavor that you will love. Another idea is to try different nut butters. You can swap almond butter for peanut or cashew butter. Each nut butter brings its own taste and creaminess. It’s a great way to switch things up! If you're looking for vegan options, this shake is already vegan-friendly! Just make sure to use a plant-based milk like coconut milk. For a low-sugar variety, use fewer dates or try a sugar substitute. You can also add more banana for natural sweetness. This keeps the shake tasty without too much sugar. With these variations, you can enjoy a Coconut Date Shake that fits your taste and diet! For the full recipe, check the main section. To keep your coconut date shake fresh, use a glass jar or a plastic container. Glass jars work best since they do not hold odors. Make sure the container has a tight lid. This helps keep air out. You can store your shake in the fridge for up to two days. After that, the flavor and texture may change. If you want to save the shake for later, freezing is a great option. Pour the shake into ice cube trays or freezer-safe bags. Leave space at the top of the bag for expansion. When you want to enjoy it, take out the cubes or bags. To thaw, place them in the fridge overnight. If you use a bag, run it under warm water for a few minutes. You can blend the thawed shake again for a smooth texture. Enjoy your coconut date shake anytime! Can I use regular milk instead of coconut milk? Yes, you can use regular milk. However, coconut milk gives a rich flavor. It also adds a nice creaminess. If you want a dairy-free option, stick with coconut milk. How can I make the shake more filling? To make your shake more filling, add more fruits or nuts. A scoop of protein powder can help too. You might try adding oats for extra fiber. Is this recipe suitable for kids? Yes, this shake is great for kids. It has natural sweetness from dates and banana. Plus, it packs in nutrients. Just be mindful of any nut allergies. Troubleshooting common issues If your shake is too thin, add more banana or dates. Blend it longer for a smoother texture. If it tastes too sweet, add a pinch of salt. This helps balance flavors. Substituting ingredients effectively You can swap almond butter for peanut butter if you want. If you don’t have dates, try using honey or maple syrup. Just adjust the amount based on your taste. Check out the Full Recipe for more ideas! This blog post shared a simple, tasty shake recipe using coconut milk and fruits. You learned about the ingredients, their health benefits, and the step-by-step preparation. We discussed tips for the best taste and how to store or freeze leftovers. You can even customize the shake to fit your taste. Experiment with flavors and find what you love. Make this shake a healthy go-to in your kitchen!

Coconut Date Shake Refreshing and Healthy Recipe

Looking for a delicious and healthy treat? The Coconut Date Shake is your answer! Packed with creamy coconut milk, sweet

- Fresh pineapple chunks - Fresh mint leaves - Honey or agave syrup - Coconut water - Lime juice - Sparkling water - Ice cubes - Extra mint leaves - Pineapple slice - Vitamin C from pineapple - Hydration from coconut water - Antioxidants from mint The key to a great Minty Pineapple Cooler lies in its fresh ingredients. You’ll need ripe, juicy pineapple chunks for a sweet base. Fresh mint leaves will add a refreshing burst that brightens the drink. Sweetness comes from honey or agave syrup, which you can adjust to your taste. Coconut water brings hydration and a light tropical flavor, while lime juice adds a zesty kick. Don’t forget the sparkling water! It gives the drink that bubbly finish. Ice cubes are a must to keep your cooler chilled and enjoyable. For garnishes, a few extra mint leaves and a slice of pineapple offer a lovely, vibrant touch. These little details enhance the drink's look and make it more fun to enjoy. Nutritionally, this drink is a powerhouse. Pineapple provides a good dose of vitamin C, which is great for your immune system. Coconut water keeps you hydrated, especially during hot summer days. Mint is rich in antioxidants, which may help with digestion and freshening your breath. This Minty Pineapple Cooler is not just a treat; it's a refreshing way to stay healthy and hydrated. For the complete recipe, check the Full Recipe section. To start, gather all your ingredients. In a blender, add the fresh pineapple chunks, mint leaves, honey, coconut water, and lime juice. Blend these ingredients until smooth. If you like your drink less pulpy, strain the mixture. Use a fine mesh sieve to pour it into a pitcher. This makes the drink silky and nice. Next, grab your favorite glasses. Fill each glass halfway with ice cubes. Now, pour the pineapple-mint mixture over the ice. Fill each glass about two-thirds full. To add some fizz, top off each drink with sparkling water. This makes it extra refreshing! To finish, stir each glass gently. This helps mix the flavors without losing the bubbles. For a lovely touch, add garnishes. Place extra mint leaves on top and maybe a slice of pineapple on the rim. These small details make your cooler look great. Enjoy your Minty Pineapple Cooler! For the full recipe, check the section above. To get the best texture in your Minty Pineapple Cooler, blend all the ingredients well. Start with fresh pineapple chunks and mint leaves. Blend until smooth, but if you like a smoother drink, you can strain it using a fine mesh sieve. This helps remove any pulp. When it comes to sweetness, you can adjust as needed. Honey works great, but you can also use agave syrup. Add a little, blend, and taste. If you want it sweeter, add more. Just remember, you can always add, but you can't take away! For the best presentation, choose tall glasses that show off the bright color of your cooler. Fill each glass halfway with ice cubes. Pour the mixture over the ice, then top it off with sparkling water. This gives a nice fizz and makes it refreshing. Pair your Minty Pineapple Cooler with light snacks. Think fresh fruit, veggie sticks, or even chips with a zesty dip. These snacks will balance the drink's sweetness and keep your guests happy. You can change the flavors in your Minty Pineapple Cooler easily. Try adding extra fruits like mango or berries for a fruity twist. This will make each sip unique. Another fun idea is to use flavored sparkling water. Look for options like lime or raspberry to add another layer of taste. This way, you can switch things up each time you make it! {{image_2}} You can give the Minty Pineapple Cooler a tropical twist by adding mango or passion fruit. Both fruits add a rich, sweet flavor. Simply blend in one cup of your chosen fruit along with the other ingredients. This change will make your drink even more fruity and fun. Mango brings a creamy texture, while passion fruit adds a tangy kick. You can mix and match to find your favorite flavor. For a fresh twist, try adding basil or cilantro to your cooler. These herbs can change the drink's flavor profile. Just a handful of leaves will do! Basil gives a sweet, slightly spicy note, while cilantro adds a bright, zesty touch. Blend these herbs with the mint for an herbal explosion. This version is perfect for those who love bold flavors and want to impress their guests. You can easily turn your Minty Pineapple Cooler into a fun cocktail. Adding rum or vodka makes it an adult beverage. Use about 2 ounces of your favorite spirit for each glass. Blend it with the other ingredients to create a refreshing drink. This option is great for summer parties or relaxing evenings. Just remember to drink responsibly and enjoy the delicious flavors! For the full recipe, check out the Minty Pineapple Cooler section. To keep your Minty Pineapple Cooler fresh, use airtight containers. Glass jars or plastic containers work well. Store the cooler in the refrigerator for up to three days. After this time, the flavors may fade, and the drink may separate. If you want to save the cooler for later, freezing is a great option. Pour the mixture into ice cube trays or freezer-safe containers. Leave some space at the top to allow for expansion. When you’re ready to enjoy it, take the cooler out of the freezer and thaw it in the fridge overnight. After refrigerating or freezing, stir the cooler well before serving. Pour it over fresh ice to keep it extra cold. If the mixture has settled, give it a good shake or stir. Add new mint leaves and a slice of pineapple for a fresh look! Yes, you can make this drink ahead of time. To prep, blend the pineapple, mint, honey, coconut water, and lime juice. Pour the mixture into a container and keep it in the fridge. This way, you save time when guests arrive. Just remember to add ice and sparkling water right before serving. This keeps it fresh and fizzy! If you don't have coconut water, use other liquids. Some good choices are: - Fresh orange juice - All-natural lemonade - Regular water with a pinch of salt These options still give a refreshing taste. You can mix and match to find your favorite! To cut the sweetness, here are some easy tricks: - Reduce the honey or agave syrup. - Add extra lime juice for a tangy kick. - Use less sweet coconut water or other liquids. These methods keep the flavor balanced without making it too sugary. You can enjoy the Minty Pineapple Cooler just the way you like it! You learned how to make a refreshing Minty Pineapple Cooler. We covered the ingredients and step-by-step instructions. I shared tips on blending, serving, and customization. You even discovered variations for tropical flavors and an alcoholic twist. Enjoy this drink as a tasty treat or healthy refreshment. With its vibrant flavors and easy preparation, you’ll impress your friends and family. Cheers to staying cool and hydrated!

Minty Pineapple Cooler Refreshing Summer Beverage

Looking for a drink that screams summer? The Minty Pineapple Cooler is your answer! This refreshing beverage combines sweet pineapple,

- 2 ripe peaches - 1 cup fresh raspberries - 1 frozen banana - Additional garnishes - 1 tablespoon chia seeds - 1 cup almond milk (or any milk of choice) - 1 tablespoon honey or maple syrup (optional) - Ice cubes When making the Peach Raspberry Chia Smoothie, fresh ingredients are key. Ripe peaches bring a sweet and juicy flavor. Fresh raspberries add a delightful tartness. The frozen banana gives the smoothie a creamy texture and natural sweetness. You can use other fruits if you like, but this combo shines. For garnish, you can add whole raspberries or peach slices on top. It makes your drink look fancy! For the essentials, chia seeds are a must. They add fiber and omega-3 fatty acids. Almond milk keeps it dairy-free, but any milk works. If you want a sweeter taste, add honey or maple syrup. Ice cubes make it cold and refreshing, perfect for hot days. This balanced mix of ingredients makes the Peach Raspberry Chia Smoothie not just tasty but also healthy. Check out the [Full Recipe] for more details on blending this delicious drink! Start by pitting your peaches. Cut them in half and remove the pit. Then chop the peaches into small pieces. This makes them easier to blend. Next, rinse your raspberries gently under cool water. Drain them well. If you use a frozen banana, take it out of the freezer. You can cut it into chunks for easier blending. Now it’s time to layer the ingredients in your blender. Add the chopped peaches first. Then add the fresh raspberries and banana chunks. Sprinkle in the chia seeds next. Pour in the almond milk slowly. If you want your smoothie sweet, this is when to add honey or maple syrup. Blend on high speed until the mixture is smooth. If it’s too thick, add more almond milk and blend again. Once blended, taste your smoothie. If you think it needs more sweetness, add a bit of honey or syrup. Blend again briefly to mix it in. Pour your smoothie into tall glasses. For a nice touch, garnish with whole raspberries and a peach slice on the rim. You can also sprinkle some chia seeds on top for extra flair. Enjoy this Peach Raspberry Chia Smoothie, perfect for a refreshing treat! To make your Peach Raspberry Chia Smoothie nice and creamy, use frozen fruits. Frozen bananas work best. They add a rich texture without needing ice. If you prefer, you can use fresh fruits too. Just add a handful of ice cubes to chill your drink. For the milk, try different types. Almond milk gives a light taste, while coconut milk adds a rich flavor. Oat milk offers a thick texture, perfect for a creamy blend. Choose your favorite based on what you like best. Adjust the sweetness to fit your taste. If you want it sweeter, add honey or maple syrup. Start with just a bit, then blend and taste. You can always add more if needed. Want to try something new? Add a splash of vanilla extract or a pinch of cinnamon. Both flavors mix well with peaches and raspberries. They can change your smoothie from good to great! Make your smoothie look as good as it tastes. Serve it in tall glasses for a fun touch. You can garnish with whole raspberries and a peach slice. This adds color and makes it more inviting. For added texture, sprinkle a few chia seeds on top before serving. This small step makes your drink look fancy and appealing. If you want to impress guests, these simple tricks will do the job! For the full recipe, check out the details. {{image_2}} You can switch up the fruits in your smoothie to make it exciting. Substituting other berries works great. Try strawberries or blueberries instead of raspberries. They add a new twist to the flavor. You can also mix in tropical fruits like mango. Mango adds a creamy texture and sweetness that pairs well with peaches. If you want a vegan version, simply use plant-based milk. Almond milk or oat milk keeps it tasty. For sweetness, you can use maple syrup or agave nectar instead of honey. These options make it dairy-free and still delicious. To enhance the nutrition, consider adding protein powder or spinach. Protein powder gives you energy and helps keep you full longer. Adding spinach is a sneaky way to get more vitamins without changing the taste. You can also think about flax seeds versus chia seeds. Flax seeds add omega-3s but need grinding to release their nutrients. Chia seeds, on the other hand, offer fiber and keep you feeling full. Each seed has its own benefits, so choose based on your needs. To keep your peach raspberry chia smoothie fresh, store it in a sealed jar. Use a glass jar if possible, as it helps keep the flavor. Place it in the fridge right after you make it. Drink the smoothie within 24 hours for the best taste. This smoothie may separate as it sits. Just give it a good shake before you drink it again. If you have leftover smoothie, you can freeze it. Pour the smoothie into ice cube trays or freezer-safe jars. Leave some space at the top, as liquids expand when they freeze. When you are ready to use it, take out what you need and let it thaw in the fridge. You can also blend it again for a thicker, colder treat. Chia seeds have a long shelf life. They can last for up to two years if stored in a cool, dry place. Nuts can last around six months to a year, depending on how they are stored. Fresh fruits, like peaches and raspberries, should be eaten within a few days of buying them. Store them in the fridge to keep them fresh longer. Yes, you can use frozen peaches. They will make your smoothie cold and thick. However, frozen peaches might change the flavor slightly. Fresh peaches have a sweet and bright taste. Frozen ones can be a bit less sweet. I suggest tasting the smoothie after blending. If it needs sweetness, add honey or maple syrup. Chia seeds are tiny but mighty! They add fiber, protein, and omega-3 fatty acids. When you blend them, they soak up liquid and swell. This gives the smoothie a creamier texture. Plus, they help keep you full longer. Just one tablespoon adds great nutrition without changing the taste much. You have many choices for milk. You can use oat milk, soy milk, or coconut milk. Each type has a unique flavor. Oat milk has a creamy taste, while soy milk is rich in protein. Coconut milk adds a tropical twist. Choose what you like best for your smoothie! For more ideas, check the full recipe. In this blog post, you learned how to make a delicious smoothie using fresh ingredients like peaches and raspberries. We covered essential steps, tips for texture, and fun variations to try. Remember to adjust sweetness and experiment with different fruits. Smoothies are great for quick snacks or breakfast. Enjoy making your perfect blend and have fun with it! You’ll love the burst of flavor in every sip.

Peach Raspberry Chia Smoothie Refreshing Healthy Blend

Summer is here, and it’s time to enjoy a refreshing treat! Let me introduce you to the delightful Peach Raspberry

- 1 cup oat milk - 1 shot espresso (or 1/2 cup strong brewed coffee) - 2 tablespoons pure maple syrup - 1/2 teaspoon ground cinnamon (plus extra for garnish) - 1/4 teaspoon vanilla extract - Pinch of salt - Optional: whipped coconut cream for topping When I make a Maple Cinnamon Oat Milk Latte, I focus on the ingredients first. Oat milk is creamy and dairy-free. It gives a nice base for the latte. I like using espresso for a rich taste, but you can use strong brewed coffee too. Pure maple syrup adds sweetness and a unique flavor. Ground cinnamon brings warmth and spice, making each sip cozy. A little vanilla extract enhances the taste, while a pinch of salt balances the sweetness. For a special touch, I often add whipped coconut cream on top. It makes the drink feel extra fancy. You can find all these ingredients in most stores. If you want to make this drink at home, check out the Full Recipe for more details. - Calories: About 200 per serving - Carbs: 35g - Protein: 3g - Fat: 7g - Sugar: 18g (from maple syrup) This latte is a treat, but it has some healthy perks too. The calories come mostly from oat milk and maple syrup. It has carbs for energy and protein, which helps keep you full. Using maple syrup is a better choice than refined sugar. It adds flavor and nutrients like antioxidants. These nutrients help your body fight off bad stuff. - Oat milk is rich in fiber, which aids digestion. - Cinnamon has antioxidants that may lower blood sugar. - Espresso gives you a quick energy boost. Oat milk is a great choice for many people. It’s good for digestion and is lower in fat than cow's milk. Plus, it’s often enriched with vitamins. Cinnamon is more than just a spice. It has health benefits too! It can help keep your blood sugar steady. That’s great for energy throughout the day. Finally, when you sip on espresso, you get a nice lift. It helps you feel awake and focused. This latte is a tasty way to enjoy these benefits. Ingredient temperature matters. Warm oat milk blends better with coffee. Start with oat milk right from the fridge. If it’s too cold, the drink won’t taste as good. You can choose between espresso or brewed coffee. Espresso gives a bold flavor. Strong brewed coffee is easier to make at home. You’ll need some tools. Grab a small saucepan for the oat milk. Use a whisk to mix everything well. A measuring cup helps with accurate ingredient amounts. First, heat the oat milk. Use medium-low heat. Keep whisking gently. Stop when it steams but don’t let it boil. Boiling can spoil the taste and texture. Next, mix the maple syrup and spices. In a small bowl, combine maple syrup, ground cinnamon, vanilla extract, and salt. Stir until it’s smooth. Now, add your coffee. Pour the espresso or brewed coffee into the syrup mixture. Mix well until it combines into a rich color. Slowly pour the warm oat milk into the coffee mixture. Continue whisking as you pour. This creates a frothy texture. It’s all about making it light and airy! Taste your latte. If you want it sweeter, add more maple syrup. Stir it in until it blends. Pour your latte into a coffee mug. For a special touch, top with whipped coconut cream. It adds richness and flavor. Finally, sprinkle some cinnamon on top for a lovely finish. It makes the drink look beautiful and smell great. Pair this latte with a pastry or a cookie. The flavors go well together and make for a cozy treat. For the full recipe, check out the details above. To make the best maple cinnamon oat milk latte, avoid these common mistakes: - Using cold ingredients: Warm your oat milk for better froth. - Skipping the whisk: Whisk as you pour for creamy texture. - Too much heat: Don’t boil the oat milk; it can ruin the taste. To achieve optimal frothiness, follow these tips: - Whisk while warming: Use a whisk or frother to create bubbles. - Use fresh oat milk: Freshness adds to the creaminess. - Pour slowly: Introduce warm milk gently into coffee to mix well. Adjust flavors to taste by: - Tasting before serving: Add more maple syrup if you like it sweeter. - Adding more cinnamon: Use a sprinkle on top for extra warmth. For dairy-free alternatives, try: - Almond milk: A nutty twist to your latte. - Soy milk: A creamier option with a rich flavor. - Coconut milk: Adds a tropical flair. Experiment with spices like: - Nutmeg: A warm touch that pairs well with cinnamon. - Cocoa powder: For a chocolatey flavor boost. Seasonal variations can include: - Pumpkin spice: Perfect for fall vibes. - Peppermint: Great for holiday cheer. Choose the right glassware or mugs: - Clear glass mugs: Show off your latte’s beautiful layers. - Ceramic mugs: Keep your drink warm longer. Pair your latte with these tasty snacks: - Croissants: Buttery and flaky for a perfect match. - Cookies: Sweet and satisfying alongside your drink. The best time of day to enjoy this latte is: - Morning: Kickstart your day. - Afternoon: A cozy pick-me-up. For the full recipe, check out the details above and enjoy crafting your perfect maple cinnamon oat milk latte! {{image_2}} You can mix up your Maple Cinnamon Oat Milk Latte in fun ways. Here are some ideas: - Maple Bourbon Oat Milk Latte: Add a splash of bourbon to your latte. It gives a warm, rich flavor. This drink is perfect for cozy nights. - Spiced Vanilla Oat Milk Latte: Add vanilla extract and a pinch of nutmeg. This mix makes your latte taste sweet and fragrant. It’s like a hug in a mug! - Mocha Maple Oat Milk Latte: Stir in some cocoa powder for a chocolate twist. This latte satisfies both coffee and chocolate lovers. It’s a delightful treat! When the weather warms up, try these cold versions of your latte: - Iced Maple Cinnamon Oat Milk Latte: Brew your coffee strong, then chill it. Pour over ice, and add oat milk and syrup. It’s refreshing and smooth! - Blended frozen version: Blend the latte with ice for a frosty drink. It’s like a coffee smoothie. Perfect for hot days! - Fun summer toppings: Top with whipped cream, cinnamon, or even sprinkles. Get creative with your toppings to make it special. You can change how you sweeten your latte. Here are some options: - Honey vs. maple syrup: Both are tasty, but honey adds a floral note. Maple syrup stays true to the latte’s flavor. Choose what you love! - Sugar-free sweeteners (stevia, agave): If you want fewer calories, try stevia or agave. They sweeten without sugar. Just remember, a little goes a long way! - Flavor-enhancing extracts: Almond or hazelnut extracts can add a new layer of flavor. A drop can change your drink completely! For the full recipe of the Maple Cinnamon Oat Milk Latte, check out the recipe section above. - Oat milk: Keep it in a sealed container in the fridge. It lasts about 5-7 days. - Maple syrup: Once opened, store it in the fridge. It stays fresh for about a year. - Espresso and coffee: Store in a cool, dark place. Keep coffee beans in an airtight container for best flavor. - Preparing components: You can make the oat milk and espresso ahead. Store them separately in the fridge. - Best practices for reheating: Heat oat milk gently on the stove or in the microwave. Avoid boiling it to keep the texture smooth. - Freezing options: You can freeze oat milk in ice cube trays. It’s perfect for quick use later. - Portable options: Use a travel mug for busy mornings. Look for one that keeps drinks hot for hours. - Best travel mugs: Stainless steel mugs are great for heat retention. Choose one with a spill-proof lid. - Pre-mixing ideas: Mix oat milk and maple syrup in a jar. Just add coffee when ready for a quick latte. If you want to make this drink, check out the Full Recipe for all the details! The best oat milk for lattes has a creamy texture and good flavor. I recommend brands like Oatly or Califia Farms. These brands froth well and taste great in coffee. If you prefer making your oat milk at home, blend one cup of rolled oats with four cups of water. Strain it through a nut milk bag or fine sieve. This gives you fresh oat milk without additives. Yes, you can use a coffee maker. Brew a strong cup of coffee for your latte. Aim for a ratio of one part coffee to two parts oat milk. To ensure your latte tastes rich, use a dark roast coffee. You can also adjust the coffee strength by changing the amount you brew. This recipe is already vegan, but always check your ingredients. Use pure maple syrup for sweetness. Ensure that your oat milk is dairy-free. If you want whipped cream, use whipped coconut cream. This adds a tasty, creamy touch without any dairy. Feel free to explore other plant-based toppings as well. In this article, we explored how to create a delicious Maple Cinnamon Oat Milk Latte. We discussed key ingredients like oat milk, espresso, and maple syrup. I shared step-by-step instructions for perfecting your latte and offered tips on customization. You learned about potential health benefits and easy variations. This drink can bring joy and warmth to your day. Experiment with flavors and enjoy your creation!

Maple Cinnamon Oat Milk Latte Smooth and Cozy Drink

Warm up your mornings with the comforting taste of a Maple Cinnamon Oat Milk Latte! This smooth and cozy drink

You need fresh strawberries for this latte. They bring a bright flavor. Choose ripe, juicy strawberries for the best taste. Rinse them well, hull, and slice them. Fresh fruit makes a big difference in your drink. Vanilla bean paste gives a rich flavor with tiny specks. It makes the latte feel fancy. If you don’t have it, vanilla extract works too. Use one teaspoon of vanilla extract if you go this route. Both options will add a lovely sweet note to your drink. You can use any milk you like. Whole milk makes the latte creamy and rich. Almond, oat, or soy milk are great non-dairy choices. Each type will change the taste a little. Try different milks to find your favorite. Sweeten your latte to taste. Honey adds a smooth, floral note. Maple syrup brings a warm, earthy flavor. Start with one tablespoon of your chosen sweetener. You can always add more if you like it sweeter. Remember, these ingredients come together to create something special. For the full recipe, check out the detailed instructions. Enjoy making your Strawberry Vanilla Bean Latte! First, take 1 cup of fresh strawberries. Hull and slice them. Place the strawberries in a small saucepan. Add 1-2 tablespoons of honey or maple syrup. Heat this mixture over medium heat. Cook for about 5-7 minutes. Stir it occasionally. The strawberries will soften and release their juices. Once done, remove it from the heat and let it cool slightly. In a separate saucepan, pour in 2 cups of milk. You can use dairy or a non-dairy option. Heat the milk over medium heat until it is hot. Do not let it boil. Add 2 tablespoons of vanilla bean paste. Whisk it well until fully mixed and slightly frothy. This will give your latte a rich vanilla flavor. While your milk is heating, brew your coffee. You can use a shot of espresso or 1/2 cup of strong brewed coffee. Pour it into a large mug. This will be the base for your latte. Now, strain the cooked strawberry mixture. Use a fine mesh sieve to pour it into your coffee. Discard the solids unless you want more texture. Slowly pour the vanilla-infused milk into the mug. Stir gently to mix everything. If you like, add whipped cream on top. Garnish with fresh strawberry slices for a lovely finish. Enjoy your homemade Strawberry Vanilla Bean Latte! For the full recipe, check the details above. To make your milk frothy, heat it slowly. Use medium heat and keep stirring. When it’s hot, whisk it well. You can also use a frother or blender for a nice foam. This adds a lovely touch to your latte. Sweetness is key in this drink. Start with one tablespoon of honey or maple syrup. Taste your mixture. If it needs more sweetness, add a bit more. This way, you can make your latte just how you like it. When straining, use a fine mesh sieve. Place it over a bowl or your mug. Pour the cooked strawberry mixture in slowly. Use a spoon to push the juice through. This keeps the solid bits out for a smooth drink. For a great look, serve your latte in clear glass mugs. You can see the layers of colors. Top it off with whipped cream and a fresh strawberry slice. A sprig of mint adds a nice touch too. This makes your drink even more inviting. {{image_2}} You can enjoy your Strawberry Vanilla Bean Latte hot or iced. For a hot drink, follow the full recipe. The warmth brings out the flavors of the strawberries and vanilla. If you prefer it iced, just let the drink cool after making it. Pour the latte over ice and enjoy a refreshing twist. This way, you can have a tasty drink year-round. You can change the sweetness in your latte. Instead of honey or maple syrup, try agave syrup or stevia. These options can add a unique taste. They also let you control the sweetness better. If you want a richer flavor, consider using brown sugar. Each sweetener can change the latte's flavor profile, so feel free to experiment. Flavored milks can add a fun twist to your latte. You could try almond milk with a hint of vanilla. Coconut milk gives a tropical touch. Oat milk offers a creamy texture that blends well. Each type of milk changes the drink’s taste, so find your favorite. Mixing flavors can lead to new and exciting combinations to enjoy. Store any leftover strawberry mixture in an airtight container. It should last about three days in the fridge. When you want to use it again, just give it a quick stir. You can even warm it up slightly if you prefer. This mixture is great for adding to yogurt or pancakes too! If you have extra vanilla-infused milk, store it in a jar or container. Keep it sealed in the fridge for up to two days. To reheat, pour it into a saucepan over low heat. Stir gently until it’s warm, but don’t let it boil. You can also microwave it in short bursts, stirring in between. To keep your Strawberry Vanilla Bean Latte fresh, drink it right after making it. If you need to store it, mix the components separately. Keep the coffee, milk, and strawberry mixture in their own containers. When you're ready to enjoy, combine them for the best taste. Yes, you can use frozen strawberries. Just thaw them first. They may have more water than fresh ones, so adjust the honey or maple syrup to avoid too much sweetness. Frozen strawberries work well and still taste great in your latte. To make more servings, simply multiply the ingredients. For four servings, use 2 cups of strawberries, 4 tablespoons of vanilla bean paste, and 4 cups of milk. You can also adjust the coffee quantity to match. This way, you keep the flavors balanced. Strawberries are high in vitamins and antioxidants. They help boost your immune system and improve heart health. Vanilla has calming effects and may help reduce stress. Together, they make a delicious drink that is not only tasty but also good for you. You can find a Strawberry Vanilla Bean Latte at many coffee shops. Look for places that offer seasonal drinks or specialty lattes. Some larger coffee chains may have it on their menu, especially in spring and summer. This blog post covered all the steps to make a delicious Strawberry Vanilla Bean Latte. You learned how to choose fresh ingredients, like strawberries and vanilla, and various milk options. I shared easy cooking steps and tips for frothy milk and adjusting sweetness. You can even try hot or iced versions. Now, enjoy experimenting with this drink. It’s easy to customize and make it your own. Drink it fresh for the best taste. Delight your taste buds with this simple recipe!

Strawberry Vanilla Bean Latte Tasty and Simple Recipe

Are you ready to enjoy a refreshing Strawberry Vanilla Bean Latte that’s simple to make? I’ll share an easy recipe

Older posts
Newer posts
← Previous Page1 … Page68 Page69 Page70 … Page86 Next →

dsad

© 2026 Cooking Wells • Built with GeneratePress

Our Policies

  • Copyright Policy
  • Cookie Policy
  • GDPR Policy
  • Privacy Policy
  • Disclaimer
  • Terms Of Use

More Information

  • Home
  • About
  • Contact
  • Appetizers
  • Dessert
  • Dinner
  • Drinks
©2026, Cooking Wells About Back To Top