Skip to content
DisclaimerTerms Of UseGDPR PolicyCookie Policy

Cooking Wells

  • Home
  • Drinks
  • Appetizers
  • Dinner
  • Dessert
  • About
  • Contact
  • Privacy Policy
DisclaimerTerms Of UseGDPR PolicyCookie Policy

NO-ING-IMG

- 1 tablespoon olive oil - 1 medium onion, finely chopped - 3 cloves garlic, minced - 1 cup Arborio rice - 4 cups chicken broth (low sodium) - 1 cup cooked chicken, shredded (rotisserie chicken works well) - 1 can (14 oz) artichoke hearts, drained and quartered - Zest and juice from 1 lemon - ½ cup grated Parmesan cheese - ¼ cup fresh parsley, chopped - Salt and pepper to taste - Lemon slices for serving This dish shines with its fresh, bright flavors. I use olive oil to start, which gives a rich base. The onion and garlic add warmth. They create a cozy aroma that fills the kitchen. Next, I add Arborio rice. This type of rice is key for risotto. It absorbs flavors well and becomes creamy. The chicken broth is next. I use low-sodium broth for better control of saltiness. Cooked chicken adds protein and heartiness. I often use rotisserie chicken. It saves time and adds great taste. The artichoke hearts bring a unique texture. They complement the creamy rice beautifully. For flavor, I rely on lemon zest and juice. It brightens the dish. Parmesan cheese adds richness and a salty kick. I finish with fresh parsley for color and freshness. A sprinkle of salt and pepper balances all the flavors. Lastly, I like to serve it with lemon slices. They make the dish look lovely and add a pop of flavor. 1. Sautéing onion and garlic: Start by heating one tablespoon of olive oil in a large pot. Add one finely chopped onion. Cook for about five minutes. You want it to turn translucent. Next, stir in three minced garlic cloves. Cook for one more minute. The smell will be amazing! 2. Toasting Arborio rice: Now, add one cup of Arborio rice to the pot. Stir well to coat the grains in oil. Toast the rice for about two minutes. This step adds a nice flavor to your risotto. 1. Incorporating chicken broth: Gradually add four cups of low-sodium chicken broth. Pour in one cup at a time. Stir constantly as you add each cup. Wait until most liquid is absorbed before adding more. This process takes about 20 to 25 minutes. 2. Achieving creamy, al dente texture: Keep stirring until the rice is creamy and al dente. It should have a slight bite to it. This is the key to perfect risotto. 1. Adding chicken, artichokes, and lemon: Now, mix in one cup of shredded cooked chicken and one can of quartered artichoke hearts. Zest and juice one lemon. Stir these into the risotto. This adds fresh brightness! 2. Stirring in Parmesan cheese: Finally, remove the pot from heat. Add half a cup of grated Parmesan cheese. Stir well to melt the cheese into the risotto. Season with salt and pepper to taste. Let it rest for two to three minutes before serving. Stirring constantly is key to making risotto creamy. It helps release the starch from the rice. This starch gives risotto that smooth texture you crave. Don't rush this step. Keep stirring as you add the broth slowly. To achieve the right consistency, look for a creamy, slightly thick texture. The rice should be al dente or firm to the bite. This means it is cooked but still has a slight chew. If it's too thick, add a bit more broth. If you want an alternative to chicken, try using shrimp or tofu. Both options add great flavor and protein. For artichokes, you can use frozen peas or mushrooms. These swaps keep the dish fresh and interesting. For a vegetarian option, skip the chicken entirely. Use vegetable broth instead of chicken broth. This keeps the taste rich while being meat-free. For storing leftovers, put the risotto in an airtight container. Keep it in the fridge for up to three days. When you're ready to eat it again, reheat it gently on the stove. You can add a splash of broth to help restore moisture. To avoid losing texture, don't microwave it. Microwaving can make it dry and gummy. Instead, stir it over low heat until heated through. This keeps the creaminess intact. {{image_2}} You can switch up the protein in this dish. Shrimp works great in risotto. Just add it when you mix in the chicken. It cooks fast and adds a nice flavor. Tofu is a fantastic alternative for a vegetarian dish. Use firm tofu and cook it until golden. You can also try different cuts of chicken. Thighs will give you a richer taste. Breasts are leaner but still delicious. Adding herbs can change the whole dish. Fresh thyme adds a lovely earthy note. Basil brings a sweet touch that brightens the flavors. You can also toss in other veggies. Spinach wilts down nicely and adds color. Peas are a fun addition too. They give a burst of sweetness in every bite. Serving this risotto with crusty bread is a must. A warm baguette soaks up the sauce well. A fresh salad on the side makes the meal lighter. You can also make it a one-pot meal. Just add a side of roasted veggies right in the pot. This way, you get a full and tasty dinner with less cleanup. To keep your risotto fresh, use airtight containers. This keeps out air and moisture. Store it in the fridge right after it cools. This way, it stays safe to eat. You can keep it for up to three days. For best results, eat it within two days for great taste. If you want to save risotto for later, freezing works well. First, let it cool completely. Then, spoon it into freezer-safe containers. Leave some space at the top for expansion. It can last up to three months in the freezer. When you are ready to eat, thaw it in the fridge overnight. Reheat it on the stove, adding a splash of broth or water to keep it creamy. Knowing how long your food lasts is important. Cooked risotto lasts about three days in the fridge. If you see any signs of spoilage, like an odd smell or mold, throw it away. Always trust your senses. Keeping food safe is key to enjoying your meals! Yes, you can make this risotto ahead of time. Cook the risotto as directed. After it cools, store it in an airtight container. Keep it in the fridge for up to three days. When you're ready to eat, reheat it on the stove. Add a splash of chicken broth to keep it creamy. Stir constantly until it’s hot. This risotto pairs well with several side dishes. Try a simple green salad with a light dressing. Roasted vegetables also make a great side. You can serve it with crusty bread, too. For a heartier meal, add grilled asparagus or a side of garlic bread. Check the risotto after about 20-25 minutes of cooking. It should be creamy and al dente. Take a spoonful and taste a grain. If it’s tender but still has a slight bite, it's ready. The risotto should not be mushy. If it needs more time, cook it a few more minutes, stirring often. This blog post covered all you need to make a great risotto. We talked about key ingredients like olive oil, chicken broth, and Parmesan cheese. You learned how to prepare the rice and achieve the perfect creamy texture. Don’t forget to try different proteins and veggies to mix it up. With a few tips on storage and reheating, you can enjoy leftovers too. Now it’s time to create your dish and make it your own. Happy cooking!

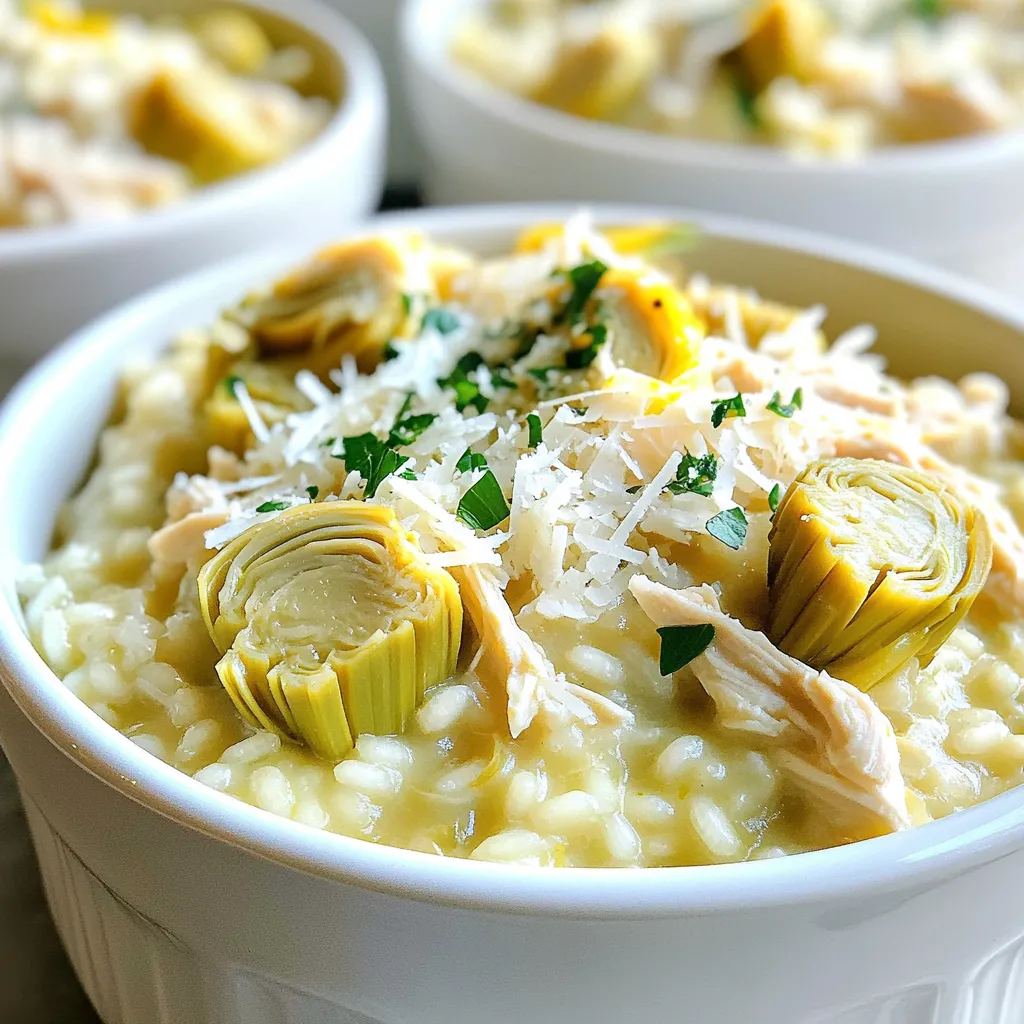
One-Pot Lemon Artichoke Chicken Risotto Delight

Welcome to the easy and delicious world of One-Pot Lemon Artichoke Chicken Risotto! If you want a simple meal that

- 1 ½ cups warm water - 1 packet active dry yeast - 1 tablespoon granulated sugar - 4 cups all-purpose flour - 1 teaspoon salt - 1 teaspoon baking soda - 1 cup sharp cheddar cheese, shredded - 2-3 jalapeños, finely chopped - 1 large egg (for egg wash) - Coarse sea salt (for sprinkling) To make Air Fryer Jalapeno Cheddar Pretzel Bites, gather your ingredients first. Fresh ingredients are key for great taste. You need warm water to activate the yeast. Aim for a temperature between 110°F and 115°F. The packet of active dry yeast helps your dough rise. The granulated sugar feeds the yeast, making it frothy. All-purpose flour forms the base of the dough. It gives the pretzel bites that perfect chewiness. Salt adds flavor. Baking soda is crucial for that classic pretzel taste. Sharp cheddar cheese gives a rich, cheesy flavor. Jalapeños add heat and flavor. Adjust the number based on your spice preference. You’ll also need an egg for the wash. This gives the pretzel bites a shiny finish. Finally, coarse sea salt adds a nice crunch on top. These ingredients come together to create a delightful snack that’s warm and cheesy. Start by combining 1 ½ cups of warm water (110°F to 115°F), 1 packet of active dry yeast, and 1 tablespoon of granulated sugar in a large bowl. Stir gently to mix. Let it sit for about 5 minutes. This step is key. You want the mixture to get frothy. This shows that the yeast is alive and ready to work. Once your yeast is activated, add 4 cups of all-purpose flour and 1 teaspoon of salt to the yeast mixture. Mix until a dough begins to form. Transfer the dough to a floured surface and knead it for about 5 minutes. You’re looking for a smooth and elastic texture. If it feels too sticky, add a bit more flour. Now, it’s time to make these bites special. Flatten the dough slightly. Add 1 cup of shredded sharp cheddar cheese and 2-3 finely chopped jalapeños. Knead the dough again until the cheese and jalapeños are evenly mixed throughout. This adds flavor and a little kick! Place the dough in a lightly oiled bowl. Cover it with a kitchen towel. Set it in a warm spot. Let it rise for about 1 hour or until it doubles in size. This rising time is crucial. It makes the pretzel bites light and fluffy. After the dough has risen, punch it down gently. Divide the dough into 12 equal pieces. Roll each piece into a rope about 6 inches long. Cut these ropes into bite-sized pieces. This is where you create the fun shapes for your pretzel bites. In a large pot, bring 10 cups of water to a boil. Add 1 teaspoon of baking soda to the water. This boiling process is important. It gives the pretzel bites that classic chewy texture and brown color. Preheat your air fryer to 375°F (190°C). Brush each pretzel bite with a beaten egg and sprinkle with coarse sea salt. Place the bites in a single layer in the air fryer basket. You may need to work in batches. Cook for about 8-10 minutes. Halfway through, shake the basket for even cooking. Enjoy the aroma as they cook! To get the right texture, knead your dough well. Kneading helps develop gluten. This makes the dough smooth and stretchy. Aim for about five minutes of kneading. You can tell it's ready when it feels soft and springs back. Proofing is just as key. Let the dough rise in a warm spot. A good place is near a sunny window. Cover it with a towel to keep it warm. Wait until it doubles in size. This can take about one hour. You can customize your pretzel bites easily. For more cheese flavor, add extra sharp cheddar. If you love spice, toss in more jalapeños. Start with one jalapeño and taste the dough. You can always add more if you want heat. If you prefer a milder taste, use fewer jalapeños. You can also mix in other cheeses. Pepper jack adds a nice kick. Mozzarella gives a creamy texture without heat. To cook your pretzel bites evenly, shake the air fryer basket halfway through. This helps every side get that golden brown color. Check for doneness by looking for a rich golden hue. If they look pale, they need more time. After cooking, let them cool for a few minutes. This makes them easier to handle and enhances the flavor. Enjoy with your favorite dip for a tasty treat! {{image_2}} You can switch up the cheese for fun flavors. Try using pepper jack for a spicy kick. Mozzarella adds a mild, creamy texture. Other cheeses like gouda or fontina also work well. Mix and match to find your favorite. Want more heat? Add spices like cayenne pepper or chili powder. You can also use different peppers, such as serrano or habanero. Adjust the amount based on your spice level. This way, each bite can be just how you like it. If you need a gluten-free choice, use gluten-free all-purpose flour. Brands like Bob's Red Mill or King Arthur Flour have good options. Make sure the baking soda is also gluten-free. This way, everyone can enjoy these tasty bites! To keep your pretzel bites fresh, let them cool first. Place leftovers in an airtight container. You can store them in the fridge for up to 3 days. For longer storage, place them in the freezer. Wrap each pretzel bite in plastic wrap before freezing. This helps prevent freezer burn. To reheat pretzel bites, use your air fryer. Preheat it to 350°F (175°C). Place the bites in the basket for about 5 minutes. You can also use the oven. Preheat to 350°F (175°C) and bake for 8-10 minutes. This makes them warm and slightly crispy again. When stored properly, pretzel bites last for 3 days in the fridge. In the freezer, they can last for up to 3 months. Just remember to wrap them well to keep them tasty. Enjoy your pretzel bites fresh or reheated! Yes, you can make the dough ahead. After kneading, place it in a bowl and cover it. Store it in the fridge for up to 24 hours. When ready to use, let it come to room temperature before shaping. Look for a rich golden color on the bites. They should feel puffy and firm to the touch. If they are still soft or pale, give them a few more minutes in the air fryer. Yes, you can use a regular oven. Preheat it to 425°F (220°C). Place the bites on a baking sheet lined with parchment paper. Bake for about 12-15 minutes, or until golden brown. These pretzel bites can be spicy, depending on the jalapeños you use. Adjust the amount of jalapeños to control the heat level. You can also remove the seeds for milder bites. Serve your pretzel bites with a variety of dips. Mustard, cheese sauce, or ranch dressing work great. For a twist, try spicy aioli or a tangy salsa. You now have a clear guide to making tasty cheese and jalapeño pretzel bites. I covered all the steps, from mixing the dough to air frying the bites. You have tips for perfect texture, flavor variations, and storage. Enjoy customizing this recipe to your taste. These bites will be a hit at any gathering. Prepare for the compliments! With practice, you can master this fun snack. Dive in and make your kitchen smell amazing!

Air Fryer Jalapeno Cheddar Pretzel Bites Delight

Get ready to satisfy your snack cravings with Air Fryer Jalapeno Cheddar Pretzel Bites! These tasty bites blend warm, cheesy

To make these salted caramel apple brownies, gather the following items: - 1 cup unsalted butter, melted - 1 cup brown sugar - ½ cup granulated sugar - 4 large eggs - 1 teaspoon vanilla extract - 1 cup all-purpose flour - ½ cup unsweetened cocoa powder - ½ teaspoon baking powder - ½ teaspoon salt - 2 medium apples, peeled and diced (preferably Granny Smith) - 1 cup salted caramel sauce (store-bought or homemade) - Sea salt flakes for garnish You can switch some ingredients if needed. - Use coconut oil instead of unsalted butter for a dairy-free option. - Brown sugar can be replaced with coconut sugar for a lower glycemic index. - If you don’t have eggs, try using flax eggs (1 tablespoon ground flaxseed mixed with 2.5 tablespoons water = 1 egg). - For gluten-free brownies, substitute all-purpose flour with a 1:1 gluten-free blend. When selecting apples, go for Granny Smith. They add a nice tartness. Their firm texture holds up well in baking. You can use other apples like Honeycrisp or Fuji for added sweetness. Make sure the apples are fresh and free from blemishes. Fresh apples give the best flavor in these brownies. First, preheat your oven to 350°F (175°C). Grease a 9x13 inch baking pan or line it with parchment paper. This helps with easy removal later. In a large bowl, mix 1 cup of melted butter, 1 cup of brown sugar, and ½ cup of granulated sugar. Whisk until it is smooth and creamy. Next, add 4 large eggs, one at a time. Whisk well after each egg. Then, stir in 1 teaspoon of vanilla extract. In a separate bowl, sift together 1 cup of all-purpose flour, ½ cup of cocoa powder, ½ teaspoon of baking powder, and ½ teaspoon of salt. Gradually mix this dry mixture into the wet ingredients. Stir until just combined. Gently fold in 2 diced apples, making sure they are evenly spread throughout the batter. Now, pour half of the brownie batter into the prepared pan. Spread it out evenly. Drizzle half of the salted caramel sauce over the top of the first layer. Carefully add the rest of the brownie batter on top. Finish by drizzling the remaining caramel sauce. Take a knife or skewer and swirl the caramel into the batter for a beautiful design. Bake the brownies in your preheated oven for 25-30 minutes. Test for doneness by inserting a toothpick into the center. It should come out with moist crumbs but not wet batter. This shows that your brownies are ready. Keep an eye on your brownies as they bake. The edges will look set while the center may seem a bit soft. If the toothpick has moist crumbs, they are perfect. If you find wet batter, bake for a few more minutes. Remember, you want them fudgy and rich, not dry. After baking, let the brownies cool in the pan for about 15 minutes. Then, transfer them to a wire rack to cool completely before cutting. This helps keep them moist and delicious. To make the best brownies, follow a few key steps. First, use fresh ingredients. Old eggs or expired flour can change the taste. Next, whisk the butter and sugars well. This helps to create a rich, smooth batter. When you add eggs, beat them in one at a time. This gives a nice texture. Don't overmix after adding the dry ingredients. Gently fold them in to keep the brownies soft. You can easily change the flavor of your brownies. Want more chocolate? Add chocolate chips or chunks to the batter. For a nutty crunch, toss in walnuts or pecans. If you like spices, try adding a dash of cinnamon or nutmeg. Each change can add unique flavor and texture. Remember to keep the balance so your brownies stay moist. How you serve the brownies matters. Cut them into squares and arrange them on a rustic wooden board. Drizzle extra salted caramel on top for a sweet touch. Add a slice of fresh apple on the side for color. A light sprinkle of sea salt flakes makes it look fancy. These small details create a delightful treat that looks as good as it tastes. {{image_2}} You can add nuts to your brownies for a nice crunch. Chopped walnuts or pecans work well. You might also try chocolate chips for extra sweetness. Just fold in about one cup of either into the batter. This will make your brownies even richer and more fun to eat. Not all caramel is the same. You can use different types to change the flavor. Try using dark caramel for a bolder taste. Or, use flavored caramel, like vanilla or bourbon. Each type will add its unique twist to your brownies. You can change the flavor with the seasons. In fall, add pumpkin spice to the batter for a warm, cozy taste. Just mix in one teaspoon of pumpkin spice along with the dry ingredients. This will give your brownies a festive vibe, perfect for gatherings. To keep your salted caramel apple brownies fresh, store them in an airtight container. This helps prevent them from drying out. Place a piece of parchment paper between layers to avoid sticking. You can keep them at room temperature for up to three days. If you want to store them longer, the fridge is a good option. Just remember to let them come back to room temperature before serving. Freezing brownies is simple and keeps them tasty. First, let the brownies cool completely. Then, cut them into squares. Wrap each square tightly in plastic wrap. For extra protection, place the wrapped brownies in a freezer bag. They can last up to three months in the freezer. When you're ready to enjoy, take them out and let them thaw in the fridge overnight. Reheating brownies can bring back their soft texture. You can use the microwave for quick warming. Place a brownie on a microwave-safe plate and cover it with a damp paper towel. Heat for about 10 to 15 seconds. Check to see if it's warm enough. If not, heat in small bursts. You can also reheat them in the oven. Set the oven to 350°F (175°C) and warm for about 10 minutes. Enjoy them warm with extra caramel on top! Yes, you can make these brownies gluten-free. Use a gluten-free flour blend. Make sure it is a 1:1 ratio blend for best results. This will keep the texture similar to regular brownies. To check if the brownies are done, use a toothpick. Insert it into the center of the brownies. If it comes out with moist crumbs, they are ready. If it has wet batter, bake them a little longer. If you don't have salted caramel sauce, you can use chocolate sauce. A mix of honey and a pinch of sea salt works too. Maple syrup also adds a sweet touch if you prefer that flavor. Salted caramel apple brownies last about three days at room temperature. If you store them in the fridge, they can last up to a week. Just make sure to keep them in an airtight container. We covered how to make salted caramel apple brownies. You learned about key ingredients, easy steps, and helpful tips. You can mix in nuts or try seasonal flavors, too. Proper storage keeps them fresh for longer. Now you can impress your friends with a tasty treat. Enjoy your baking, and remember to share your delicious results!

Salted Caramel Apple Brownies Delightful and Rich Treat

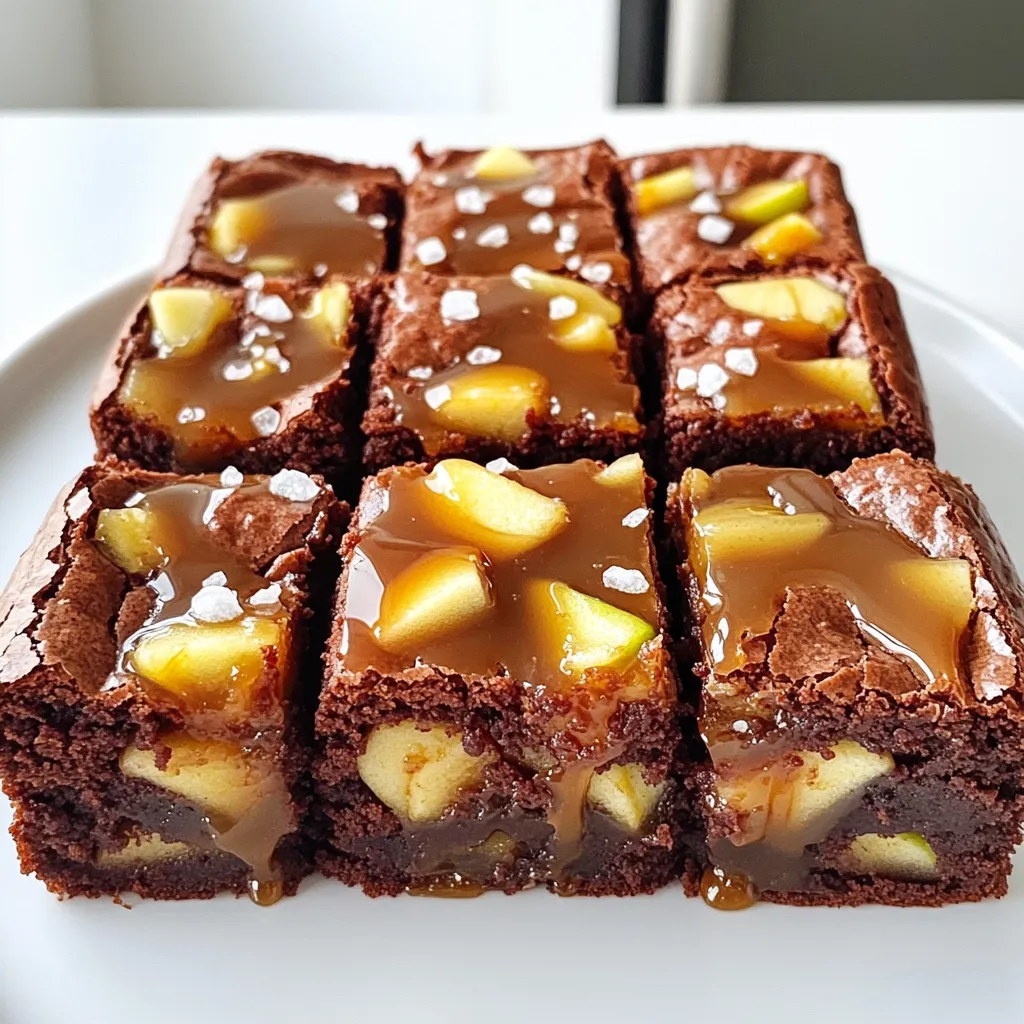
Are you ready to indulge in a treat that blends sweet and salty? Salted Caramel Apple Brownies are rich, decadent,

- All-purpose flour: 4 tablespoons - Granulated sugar: 2 tablespoons - Baking powder: 1/8 teaspoon - Baking soda: 1/8 teaspoon - Salt: 1/8 teaspoon - Ground cinnamon: 1 teaspoon + 1/2 teaspoon for topping - Pumpkin puree: 1 tablespoon - Milk (dairy or non-dairy): 3 tablespoons - Vegetable oil: 1 tablespoon - Vanilla extract: 1/4 teaspoon - Brown sugar: 1 tablespoon (for topping) Gathering these ingredients is simple. You likely have most at home. All-purpose flour forms the base. Granulated sugar adds sweetness. Baking powder and baking soda help the cake rise. A pinch of salt balances the flavors. Ground cinnamon brings in warmth and spice. Pumpkin puree adds moisture and flavor. You can use any milk you prefer, even non-dairy. Vegetable oil keeps the cake moist. A dash of vanilla extract gives a lovely aroma. Finally, brown sugar and cinnamon create a sweet topping that makes it special. Make sure to measure accurately for the best results. Each ingredient plays a key role in this tasty treat. Enjoy the process of gathering them together! First, grab a microwave-safe mug. In it, mix these dry ingredients: - 4 tablespoons all-purpose flour - 2 tablespoons granulated sugar - 1/8 teaspoon baking powder - 1/8 teaspoon baking soda - 1/8 teaspoon salt - 1 teaspoon ground cinnamon Stir them well until they blend together nicely. This step is key. A good mix ensures even baking. Now, it's time for the fun part! Add these wet ingredients to your dry mix: - 1 tablespoon pumpkin puree - 3 tablespoons milk (you can use dairy or non-dairy) - 1 tablespoon vegetable oil - 1/4 teaspoon vanilla extract Stir everything together until you have a smooth batter. Make sure there are no lumps. This will help the cake rise well while cooking. In a small bowl, mix together: - 1 tablespoon brown sugar - 1/2 teaspoon cinnamon This will be your delicious topping. Sprinkle it evenly over the cake batter in the mug. Now, place your mug in the microwave. Cook it on high for 1 minute and 30 seconds. Every microwave is a little different, so check it at 1 minute. The cake should puff up and look set in the middle. Let it cool for a minute before digging in. If you want, add a dollop of whipped cream or a scoop of ice cream on top. Enjoy your cozy treat! To get the best texture in your mug cake, make sure your batter is lump-free. This means mixing your dry ingredients very well. Use a fork or a whisk to break up any clumps. When you add the wet ingredients, mix until you see a smooth batter. This smoothness helps the cake rise evenly in the microwave. Microwaves can cook unevenly, so cooking times may change. Start with 1 minute and 30 seconds, then check your cake. If it's not set in the center, add 10 more seconds. Each microwave is different, so keep an eye on it. You want a puffed cake that is firm to the touch. For a special treat, top your mug cake with whipped cream or a scoop of ice cream. This adds a creamy texture and coolness that contrasts nicely with the warm cake. You can also sprinkle extra cinnamon on top for a little extra spice. Enjoy your mug cake while it’s warm for the best experience! {{image_2}} You can easily spice up your Pumpkin Spice Snickerdoodle Mug Cake. Try adding nutmeg or ginger for a warm twist. These spices bring out the cozy fall flavors even more. A dash of nutmeg can add a nice depth. Ginger offers a lovely zing that complements pumpkin perfectly. Experimenting with these flavors lets you create your own unique mug cake. If you need gluten-free options, swap the all-purpose flour with a gluten-free blend. Many brands offer a good mix that works well for baking. For those avoiding dairy, use non-dairy milk like almond or oat milk. The pumpkin puree is naturally dairy-free, so your cake stays rich and moist. These changes let everyone enjoy this treat without worry. For a richer mug cake, consider adding chocolate chips or nuts. A handful of chocolate chips will melt beautifully, creating gooey pockets of chocolate. Chopped nuts, like pecans or walnuts, can add a nice crunch. Both options enhance the texture and flavor, making your mug cake even more delightful. Personalizing your cake with these add-ins is fun and easy. I love this mug cake fresh from the microwave. The warm pumpkin spice flavor is so cozy. Enjoy it right away for the best taste and texture. If you have leftovers, they can last for a day or two. Just remember, it may dry out a bit when stored. Keep it in an airtight container. If you want to enjoy it later, make sure to store it in the fridge. If you have leftover mug cake, don't worry! You can reheat it easily. Place the mug in the microwave. Heat it for about 20 to 30 seconds. Check to see if it’s warm throughout. If it needs more time, heat in 10-second bursts. This helps keep it soft and tasty. If you want to add a bit of moisture, consider adding a small splash of milk before heating. Enjoy every bite! Yes, you can easily make more than one mug cake. To double the recipe, use: - 8 tablespoons all-purpose flour - 4 tablespoons granulated sugar - 1/4 teaspoon baking powder - 1/4 teaspoon baking soda - 1/4 teaspoon salt - 2 teaspoons ground cinnamon - 2 tablespoons pumpkin puree - 6 tablespoons milk - 2 tablespoons vegetable oil - 1/2 teaspoon vanilla extract - 2 tablespoons brown sugar (for topping) - 1 teaspoon cinnamon (for topping) You can mix everything in a larger bowl and divide the batter into two or three mugs. Adjust the microwave time to 1 minute and 30 seconds per mug, checking until set. If you don’t have a mug, don’t worry! You can use any microwave-safe container. Try a small bowl or ramekin. Just make sure it can hold the batter. The cooking time may change slightly, so keep an eye on it. To adjust the sweetness, you can play with the sugar amounts. If you like it sweeter, add an extra half tablespoon of granulated sugar. For a less sweet cake, cut back on the sugar by one tablespoon. You can also try using different sweeteners, like honey or maple syrup. Just remember to adjust the liquid in the recipe a bit if you do. This recipe is simple and fun. We’ve covered all the ingredients and steps needed to make a delicious mug cake. You can tweak flavors and adjust the sweetness for your taste. Remember to aim for a smooth batter for the best texture. Enjoy your treat fresh, or store it for later. With the right techniques, you can make it perfect every time. Now, it’s time to get creative and enjoy your cake!

Pumpkin Spice Snickerdoodle Mug Cake Delightful Treat

Craving a cozy fall treat? This Pumpkin Spice Snickerdoodle Mug Cake is the perfect solution! You can whip it up

- 1.5 pounds flank steak, trimmed - 2 tablespoons unsalted butter, melted - 4 cloves garlic, minced - 1 teaspoon smoked paprika - 1 teaspoon garlic powder - 1 teaspoon onion powder - Salt and pepper to taste - 1 bell pepper (red or yellow), sliced - 1 zucchini, sliced into half-moons - 1 cup cherry tomatoes, halved - 1 cup broccoli florets - 2 tablespoons olive oil - Fresh parsley, chopped for garnish Gathering the right ingredients is key to making this dish shine. Start with the flank steak. It’s flavorful and cooks nicely in the oven. Trim it well to remove excess fat. Next, you’ll need butter. Unsalted butter works best, as it lets you control the saltiness. Garlic is a must. Mince four cloves for a strong flavor. You also want smoked paprika, garlic powder, and onion powder. These spices add depth to the dish. Don’t forget to season with salt and pepper to taste. For the veggies, choose a bell pepper, zucchini, cherry tomatoes, and broccoli. These colorful vegetables not only taste great but also look beautiful on your plate. Finally, drizzle everything with olive oil for roasting. Finish with fresh parsley for a nice touch. This mix of ingredients makes the meal tasty and appealing. Enjoy the process of gathering your items, as each one plays a role in creating your delicious meal! Preheat your oven to 425°F (220°C). This heat makes everything nice and crisp. Line a large baking sheet with parchment paper. This helps with easy cleanup, so you can enjoy your meal without a mess. In a small bowl, melt 2 tablespoons of unsalted butter. Add 4 minced garlic cloves, 1 teaspoon of smoked paprika, 1 teaspoon of garlic powder, 1 teaspoon of onion powder, and some salt and pepper. Whisk it all together until it is mixed well. This garlic butter will add amazing flavor to your steak and veggies. Now, take 1.5 pounds of flank steak and place it on the baking sheet. Use a brush or spoon to coat the steak with the garlic butter mixture. Make sure to cover both sides. This step is key for great taste. For the best flavor, let the steak marinate for at least 15 minutes. If you have more time, let it sit longer. This allows the flavors to soak in, making each bite delicious! While the steak marinates, grab a bowl and toss together a sliced bell pepper, a sliced zucchini, halved cherry tomatoes, and broccoli florets. Use 2 tablespoons of olive oil, salt, and pepper to coat the veggies evenly. This will help them roast nicely. Arrange the veggies around the flank steak in a single layer. Avoid overcrowding the pan, as this helps everything cook evenly and get that nice roasted flavor. Place the baking sheet in the preheated oven. Roast for 15-20 minutes. For a medium-rare steak, aim for an internal temperature of 135°F. You can use a meat thermometer to check. After cooking, take the baking sheet out of the oven. Let the steak rest for about 5 minutes. This helps the juices stay in the meat. Then, slice the steak against the grain for the best texture. To serve, place the steak slices next to the roasted veggies. Drizzle any leftover garlic butter from the pan over everything. Finish with a sprinkle of fresh chopped parsley for color and extra flavor. Enjoy your meal! To get the best steak, knowing the right temperature is key. Here are the recommended temperatures for doneness: - Rare: 125°F - Medium-rare: 135°F - Medium: 145°F - Medium-well: 150°F - Well done: 160°F For a juicy steak, I suggest using a meat thermometer. It helps you avoid overcooking. When it’s time to slice your steak, always cut against the grain. This means slicing perpendicular to the muscle fibers. This method gives you tender bites. Different vegetables cook at different rates. For this dish, I suggest these timing tips: - Bell peppers: 15-20 minutes - Zucchini: 15 minutes - Cherry tomatoes: 15 minutes - Broccoli: 15-20 minutes To ensure even roasting, make sure your veggies are in a single layer. This gives them space to brown and crisp. Overcrowding leads to steaming, not roasting. Want to boost flavor? Try adding these seasonings: - Fresh herbs like rosemary or thyme - A splash of balsamic vinegar - A pinch of red pepper flakes for heat For sides or sauces, consider these pairings: - A light salad with lemon dressing - Creamy mashed potatoes - A tangy chimichurri sauce These additions can elevate your meal and create new flavor experiences. Enjoy experimenting! {{image_2}} You can swap flank steak for chicken or tofu. Chicken breast works well and cooks fast. If you choose tofu, use firm or extra-firm varieties. Here are the cooking times: - Chicken: Roast for 20-25 minutes until it reaches 165°F. - Tofu: Roast for about 15-20 minutes until golden brown. Feel free to use seasonal vegetables. Carrots, asparagus, and green beans add nice flavor. Adjust the spices if you change the vegetables. For example, root vegetables may need more time to cook. Always taste and tweak the seasonings to fit the veggies. You can add herbs or spices to change the flavor. Try rosemary for a fresh touch or chili flakes for heat. Marinades also work well. A soy sauce or teriyaki base can give an Asian twist. Just mix it into the garlic butter before coating the steak and veggies. To keep your leftovers fresh, store them in an airtight container. This helps prevent moisture loss and keeps flavors intact. Place the container in the fridge as soon as the food cools. For best taste, eat leftovers within three days. Beyond that, the quality may drop. When reheating, use the oven to keep the steak juicy. Preheat your oven to 350°F (175°C). Place the steak on a baking sheet and cover it with foil. Heat for about 10-15 minutes. For the veggies, spread them out on the sheet. Re-crisp them for about five minutes until warm. This method keeps the taste and texture nice. If you want to freeze your dish, let it cool first. Use a freezer-safe container or bag. Remove as much air as possible to prevent freezer burn. You can freeze the meal for up to three months. When ready to eat, thaw it in the fridge overnight. Reheat as mentioned above for the best results. Yes, you can use other cuts of steak. Ribeye, sirloin, or tenderloin work well. Each cut brings a different flavor and texture. Just adjust cooking times based on the thickness of the steak. Thicker cuts may need a few extra minutes in the oven. If you lack smoked paprika, try regular paprika. It won't have the same smoky flavor, but it still adds color and taste. You can also mix in a bit of cumin or chili powder for a different twist. To spice things up, add red pepper flakes or cayenne pepper to the garlic butter mix. You can also toss sliced jalapeños or serrano peppers with the veggies. This will give your dish a nice kick! Yes, you can prep ahead! Marinate the steak and chop the veggies a day early. Store them in the fridge until ready to cook. This makes dinner quick and easy on a busy night. This dish pairs well with fluffy rice or creamy mashed potatoes. A fresh salad with vinaigrette also makes a great side. You can even serve it with crusty bread to soak up the garlic butter! This blog post explored a delicious and simple sheet-pan garlic butter steak and veggies recipe. We covered the key ingredients, step-by-step instructions, and handy tips to perfect your dish. You can even adapt this recipe with different proteins or vegetables based on your taste. Remember, cooking is about experimenting and finding what you love. Now, grab your ingredients and start roasting for a tasty meal that everyone will enjoy!

Sheet-Pan Garlic Butter Steak and Veggies Delight

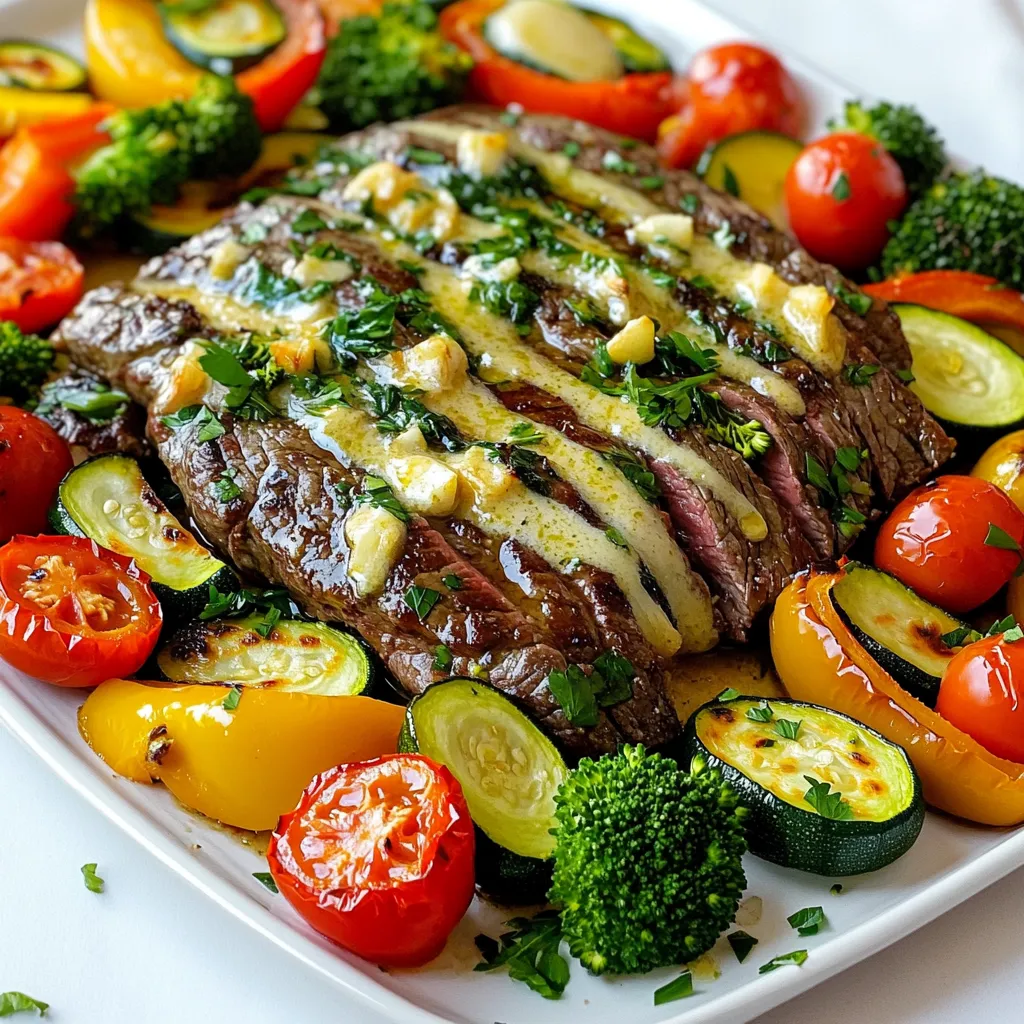
Get ready to savor a delicious meal with my Sheet-Pan Garlic Butter Steak and Veggies Delight! This one-pan recipe combines

- 4 bone-in chicken thighs, skin removed - 1/2 cup honey - 1/4 cup soy sauce (low sodium) The main ingredients are simple but essential. The chicken thighs give a rich flavor. Honey adds sweetness, and soy sauce brings a savory touch. - 4 cloves garlic, minced - 1 tablespoon fresh ginger, grated Garlic and ginger are the stars of this dish. Minced garlic brings aroma, while fresh ginger adds a zing. They work together to create depth in flavor. - 1 teaspoon sesame oil - 1/2 teaspoon black pepper - 1/4 teaspoon chili flakes (optional for heat) Sesame oil adds a nutty taste. Black pepper gives warmth, and chili flakes can bring heat if you like it spicy. These seasonings balance the sweetness of honey. To make the sauce, start by mixing the ingredients in a bowl. You need: - 1/2 cup honey - 1/4 cup low sodium soy sauce - 4 cloves garlic, minced - 1 tablespoon fresh ginger, grated - 1 teaspoon sesame oil - 1/2 teaspoon black pepper - 1/4 teaspoon chili flakes (optional) Stir these together until they blend well. The sauce will be sweet and savory, perfect for the chicken. Next, place the chicken thighs in the bottom of the slow cooker. Use four bone-in thighs, skin removed. Make sure they lay flat and do not overlap. This helps them cook evenly and soak up all the flavors. After arranging the chicken, pour the honey garlic sauce over the thighs. Cover the slow cooker with its lid. You can cook on low for 6 hours or high for 3 to 4 hours. The chicken should become tender and cooked through. Once cooked, mix 2 tablespoons of cornstarch with 2 tablespoons of water in a small bowl. Stir until smooth. Add this mixture to the sauce in the slow cooker. Switch to high heat and cover again. Cook for an extra 15 to 20 minutes until the sauce thickens. When ready, carefully take the chicken out and place it on a serving platter. Drizzle the thickened sauce over the chicken. For a pop of color, top with sliced green onions and a sprinkle of sesame seeds. Enjoy your meal! To make your honey garlic sauce shine, focus on thickeners and flavor enhancers. Cornstarch is your best friend here. Mix it with cold water to avoid lumps. After cooking, stir this mixture into the sauce. Cook it on high for 15 to 20 minutes. This will give your sauce a nice, thick texture. You can also add a splash of rice vinegar for a tangy twist. This will brighten the flavor and balance the sweetness of the honey. For juicy, tender chicken, use bone-in thighs. They stay moist during cooking. Trim the skin for less fat but keep the bones. This adds flavor. Make sure to coat the chicken well with the sauce. You want every inch covered. Cooking on low for six hours is ideal. This slow method breaks down the meat, making it fork-tender. If you’re short on time, high heat for three to four hours works too. Presentation is key to a great meal. Serve the chicken on a bed of steamed rice or alongside roasted veggies. Drizzle the thickened sauce over the top for added flavor. For a pop of color, garnish with sliced green onions and sesame seeds. This not only looks great but adds a nice crunch. You can also use a sprinkle of chili flakes for heat. The bright colors and textures will make your dish stand out! {{image_2}} You can switch up the flavors in your honey garlic chicken. Here are some easy swaps: - Sweeteners: If you want a lower-calorie option, use agave syrup or maple syrup instead of honey. Both work well and add a nice taste. - Soy Sauce: Use coconut aminos for a gluten-free option. It has a similar flavor and works great in this dish. These changes can give your dish a new twist while keeping the essence of the recipe. Adding more to your slow cooker can make it heartier. Here are ideas for extras: - Vegetables: Toss in chopped carrots, bell peppers, or broccoli. They soak up the sauce and add nutrition. - Sides: Serve the chicken over rice or with quinoa. This adds texture and makes it a full meal. Feel free to get creative with what you have on hand. Want to heat things up? You can easily adjust the spice level. - Chili Flakes: The recipe includes 1/4 teaspoon of chili flakes. Add more if you like extra heat. Start with a small amount and taste. - Hot Sauce: Drizzle some hot sauce into the sauce mix for a spicy kick. Customize your chicken to fit your taste. Enjoy experimenting! Store leftover Slow Cooker Honey Garlic Chicken Thighs in an airtight container. Make sure they cool down first. Place them in the fridge within two hours of cooking. Enjoy them within three to four days for the best taste. To freeze, place cooled chicken thighs in a freezer-safe bag. Remove as much air as possible before sealing. You can also freeze the sauce separately. When ready to eat, thaw in the fridge overnight. Reheat in a slow cooker or microwave until hot. The chicken stays fresh in the fridge for about four days. If frozen, it can last up to three months. Check for any off smells or discoloration before using. If it looks or smells strange, it’s best to throw it away. You can serve this dish with many sides. Here are some tasty ideas: - Steamed rice - Roasted vegetables - Mashed potatoes - Quinoa - Salad with a light dressing These sides blend well with the sweet and savory flavors. Choose one or mix a few for a great meal! Yes, you can use boneless chicken thighs. They cook faster than bone-in thighs. Here are some tips: - Reduce the cooking time to about 4 hours on low or 2-3 hours on high. - Check for doneness to avoid overcooking. - Boneless thighs might be juicier, so keep an eye on the sauce. This swap makes it easier if you prefer less prep work! To serve more people, you can scale the ingredients. Here’s how: - Double or triple the chicken and sauce ingredients. - Keep the slow cooker size in mind; don’t overfill it. - Adjust cooking time slightly if you add more chicken, but check for doneness. This way, everyone can enjoy the delicious honey garlic chicken! In this post, we explored how to make Slow Cooker Honey Garlic Chicken Thighs. We discussed essential ingredients like chicken, honey, and soy sauce. I shared step-by-step instructions to prepare and cook the dish. You learned tips to enhance sauce flavor and keep the chicken juicy. I also covered variations, storage, and FAQs to help you succeed. Try this recipe for a tasty meal. With simple steps and tips, you'll impress everyone. Enjoy your cooking adventure!

Slow Cooker Honey Garlic Chicken Thighs Simple Recipe

If you crave a meal that’s easy to make and bursting with flavor, you’ll love this Slow Cooker Honey Garlic

To make Minute Honey Garlic Tofu Stir-Fry, gather these simple ingredients: - 1 block (14 oz) firm tofu, drained and pressed - 3 tablespoons honey - 3 cloves garlic, minced - 1 tablespoon fresh ginger, grated - 2 tablespoons soy sauce - 1 tablespoon sesame oil - 1 red bell pepper, sliced - 1 cup broccoli florets - 1 cup snap peas - 2 green onions, sliced - 1 tablespoon sesame seeds (for garnish) - Cooked rice or quinoa (for serving) If you don’t have firm tofu, you can use extra-firm tofu for better texture. Maple syrup can replace honey for a vegan option. Use garlic powder if you lack fresh garlic. For soy sauce, tamari works well for gluten-free diets. If you want a different oil, try canola or peanut oil. When buying tofu, look for firm or extra-firm types. Check the package for a good date. Fresh tofu has a clean smell and a smooth texture. Avoid tofu with cracks or excessive water. If you can, buy organic tofu for better taste and health benefits. Start by cutting the pressed tofu into bite-sized cubes. This size helps the tofu cook evenly. Next, slice the red bell pepper into strips and chop the broccoli into small florets. Rinse the snap peas to clean them. Finally, slice the green onions thinly. You can use the green tops for color and flavor. In a small bowl, mix together three tablespoons of honey, three minced cloves of garlic, and one tablespoon of grated ginger. Add in two tablespoons of soy sauce and one tablespoon of sesame oil. Whisk this mix well to create a smooth sauce. This sauce adds a sweet and savory flavor to the dish. Heat a drizzle of oil in a large non-stick skillet or wok over medium-high heat. Once hot, add the tofu cubes and cook for 5-7 minutes. Turn them often until they turn golden brown. Pour the honey garlic sauce over the tofu and toss to coat. Cook for an extra two minutes to let the sauce caramelize slightly. Now, add the sliced bell pepper, broccoli, and snap peas to the skillet. Stir-fry for 3-4 minutes until the vegetables are bright and tender-crisp. Remove the skillet from heat. Top with sliced green onions and a sprinkle of sesame seeds. Serve it all over cooked rice or quinoa for a complete meal. Enjoy! Tofu can be tricky, but I have tips. Start with firm or extra-firm tofu. Drain it well and press it to remove water. This helps it soak up flavors. Cut it into small cubes for even cooking. Heat oil in a non-stick skillet over medium-high heat. Cook the tofu for about 5-7 minutes. Turn it often until it is golden brown. This gives it a nice texture. For extra flavor, add the honey garlic sauce at the end. You can serve this dish in many fun ways. I love it over fluffy rice or quinoa. It makes the meal hearty. Top it with sliced green onions and sesame seeds. This adds color and crunch. You can also pair it with a fresh salad on the side. A simple cucumber salad works great. Use chopsticks to eat for a fun twist! Getting the veggies just right is key. Cook the broccoli and snap peas for about 3-4 minutes. You want them tender but still crisp. This keeps their bright color and nutrients. Add the red bell pepper at the same time. It cooks quickly and adds sweetness. If you like softer veggies, you can cook them a bit longer, but watch closely. Overcooked veggies lose their charm. {{image_2}} If you want a vegetarian or vegan dish, this recipe works great! Simply swap honey with maple syrup or agave nectar to keep it plant-based. This small change keeps all the sweet, tasty goodness without using animal products. You can also add more tofu, or even use tempeh for a protein boost. Both options provide a chewy texture, making your stir-fry even more satisfying. Feel free to get creative with your veggies! You can add carrots, zucchini, or bell peppers. Each vegetable adds its own flavor and crunch. Try adding mushrooms for an earthy taste or baby corn for a fun twist. The more colorful your plate, the more appealing it looks. Aim for a mix of textures and colors to keep your meal exciting and healthy. The honey garlic sauce is super flexible. To change it up, you can add chili paste or crushed red pepper for heat. For a tangy kick, add lime juice or rice vinegar. If you want a nutty flavor, toss in some peanut butter. Mixing and matching these options lets you create a sauce that fits your taste perfectly. Don’t be afraid to experiment! To store leftovers, let the stir-fry cool down first. Then, place it in an airtight container. This keeps the flavors fresh. Store it in the fridge for up to three days. Make sure to keep the rice or quinoa separate to avoid sogginess. When you're ready to eat, you can reheat the stir-fry. Use a skillet over medium heat for best results. Add a splash of water or soy sauce to keep it moist. Stir until hot. You can also microwave it for about 2-3 minutes, stirring halfway through for even heating. If you want to freeze it, let the stir-fry cool completely. Then, portion it into freezer-safe bags. Remove as much air as possible to avoid freezer burn. It will last for up to three months in the freezer. When you're ready to eat, thaw it in the fridge overnight before reheating. Yes, you can use different types of tofu. Firm tofu is best for this dish. It holds its shape well during cooking. Soft or silken tofu may break apart. If you want a chewy texture, try extra-firm tofu. Just remember to press it well to remove excess water. This helps it absorb flavors better. Honey garlic tofu stir-fry pairs well with a few sides. Cooked rice or quinoa are great choices. Their flavors complement the sweet and savory sauce. You can also add a simple salad for freshness. Roasted vegetables or steamed greens make a nice addition too. If you want a crunch, serve with some crispy spring rolls. To add spice, you can include red pepper flakes. Start with a pinch and adjust to taste. Sriracha or chili sauce also works well. You can mix a bit into the honey garlic sauce. For fresh heat, try adding sliced jalapeños or Thai bird chilies. Just be careful; a little goes a long way! In this post, we explored honey garlic tofu stir-fry. We covered ingredient lists, quality tofu tips, and easy substitutions. Next, I shared clear steps for prepping, cooking, and making the honey garlic sauce. You learned tricks for perfect tofu cooking and great serving ideas. We also discussed veggie variations, storage methods, and answered some common questions. Enjoy this dish for its taste and healthy benefits. With practice, you will master it!

Minute Honey Garlic Tofu Stir-Fry Simple and Quick

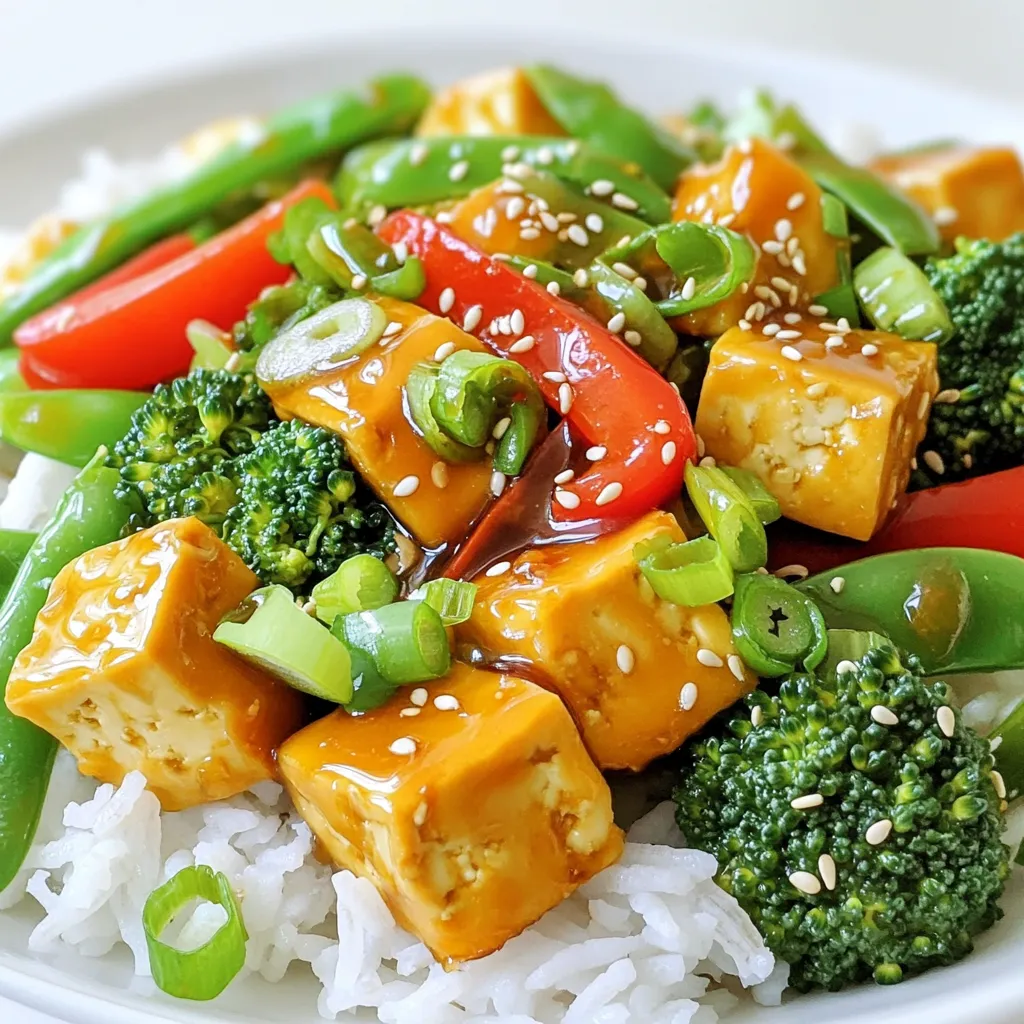
Looking for a quick and tasty meal? This Minute Honey Garlic Tofu Stir-Fry is here to save your day! In

- 2 tablespoons olive oil - 4 cloves garlic, minced - 1 medium onion, diced - 3 cups vegetable broth - 2 cups whole milk - 8 ounces cheese tortellini (fresh or frozen) - 1 cup baby spinach, chopped - 1 cup cherry tomatoes, halved - 1 teaspoon dried basil - 1 teaspoon dried oregano - Salt and pepper to taste - Grated Parmesan cheese for serving - Fresh basil leaves for garnish - Red pepper flakes for heat - A squeeze of lemon juice for brightness - Bacon or pancetta for a smoky touch - Fresh herbs like thyme or parsley for extra freshness - Large pot or Dutch oven for even heat - Wooden spoon for stirring - Measuring cups and spoons for accuracy - Knife and cutting board for prep - Ladle for serving soup Each ingredient adds its own touch to this creamy garlic tortellini soup. The olive oil brings richness, while the garlic and onion create a fragrant base. The vegetable broth and whole milk combine for a creamy texture. Tortellini gives heartiness, and spinach adds color. The cherry tomatoes contribute a burst of flavor. Don't skip the Parmesan; it elevates the soup! Using these tools helps make your cooking smooth. A large pot prevents spills and allows for easy stirring. Measuring tools ensure you get just the right amount. A good knife makes prep fast and safe. Enjoy the process, and let your kitchen fill with delightful aromas! Start by gathering all your ingredients. You need: - 2 tablespoons olive oil - 4 cloves garlic, minced - 1 medium onion, diced - 3 cups vegetable broth - 2 cups whole milk - 8 ounces cheese tortellini (fresh or frozen) - 1 cup baby spinach, chopped - 1 cup cherry tomatoes, halved - 1 teaspoon dried basil - 1 teaspoon dried oregano - Salt and pepper to taste - Grated Parmesan cheese for serving - Fresh basil leaves for garnish Chop the onion and mince the garlic. This step builds flavor in your soup. Heat the olive oil in a large pot over medium heat. Add the minced garlic and diced onion. Sauté them for about 3-4 minutes. You want the onion to be soft and clear. Next, pour in the vegetable broth and whole milk. Stir well. Increase the heat and wait for the mix to boil gently. Once boiling, add the cheese tortellini. Lower the heat to a simmer. Cook the tortellini for 5-7 minutes. Stir often to keep them from sticking. When the tortellini is tender, stir in the chopped spinach, halved cherry tomatoes, dried basil, and oregano. Cook for another 2-3 minutes. The spinach should wilt, and the tomatoes will soften. Finally, season the soup with salt and pepper to taste. Always stir well when adding new ingredients. This helps blend the flavors. If you want a thicker soup, let it simmer a bit longer. The liquid will reduce, making it creamier. For extra flavor, add more garlic or herbs. Fresh herbs can also brighten the soup. Don’t forget to top with grated Parmesan and fresh basil before serving. This adds a nice finish to your dish. Enjoy your creamy garlic tortellini soup! To achieve that rich, creamy texture, use whole milk. It gives the soup a nice body. Adding the milk slowly helps it blend well. Stir often to avoid lumps. You can also add a splash of cream for extra richness. If you want it thicker, mix a bit of cornstarch with cold water. Stir this mix into the soup until it thickens. Start with a pinch of salt and pepper. Taste as you go. If you want more heat, add a pinch of red pepper flakes. You can also use fresh ground black pepper for a stronger kick. Remember, you can always add more, but you can't take it out. Balance is key, so find what feels right for you. Always pick fresh tortellini for the best flavor. Check local markets for fresh options. Frozen tortellini works too, just make sure it’s good quality. Look for low-sodium vegetable broth to control salt levels. Fresh baby spinach adds color and nutrition. Buy ripe cherry tomatoes for the sweetest taste. Finally, choose a good Parmesan cheese; it makes a big difference. {{image_2}} You can easily make this soup vegetarian or vegan. For a vegetarian version, just use vegetable broth and keep the whole milk. To make it vegan, swap the whole milk for almond milk or coconut milk. You may want to add a bit of nutritional yeast for a cheesy flavor. For the tortellini, look for a vegan option made from spinach or other veggies. This way, you get all the taste without any animal products. Want to add more protein? You have options! Cooked chicken is a great choice. Just shred it and stir it in at the end. For a spicy kick, try adding Italian sausage. Brown the sausage in the pot before adding the garlic and onions. You can also use diced turkey or even shrimp for a seafood twist. These additions make the soup heartier and more filling. Using seasonal ingredients can really boost flavor. In spring, add fresh peas or asparagus. These add color and crunch. In summer, use zucchini or bell peppers for a fresh taste. In fall, swap in butternut squash for a sweet touch. Winter calls for kale or collard greens, which are hearty and nutritious. Always adjust your herbs too. Fresh herbs add a burst of flavor that dried ones cannot match. Store any leftover soup in an airtight container. Make sure to let it cool first. This keeps the soup fresh for up to three days in the fridge. If you want to keep it longer, consider freezing it. To reheat, pour soup into a pot over low heat. Stir gently to warm it up evenly. You can also use the microwave. Heat in short bursts, stirring in between. This helps keep the creamy texture intact. You can freeze this soup for up to three months. Use a freezer-safe container or bag. Leave some space at the top for the soup to expand. When ready to eat, thaw it in the fridge overnight. Reheat as described above for the best taste. Yes, you can use frozen tortellini in this soup. Just add them straight into the pot. They will cook well in the broth. Frozen tortellini usually takes 1-2 more minutes to cook. Watch them closely to ensure they're tender. To make the soup dairy-free, swap whole milk for a plant-based milk. Options like almond, oat, or coconut milk work well. You can also use dairy-free cheese tortellini for a full dairy-free dish. Just check the labels to be sure. Great sides for this soup include a simple green salad or crusty bread. Garlic bread is a favorite, too. You can also serve it with a light antipasto platter. These sides balance the creamy soup and add more flavor. In this blog post, we explored the best ingredients for a delicious tortellini soup. We discussed essential tools, step-by-step cooking, and tips for achieving a creamy texture. You learned about fun variations and clever ways to store leftovers. Remember, great soup starts with fresh ingredients and a little creativity. Adjust the flavors to match your taste. Enjoy making this dish for yourself and friends. It’s easy, tasty, and perfect for any occasion. Don’t forget to try the variations and share your own tips!

One-Pot Creamy Garlic Tortellini Soup Delight

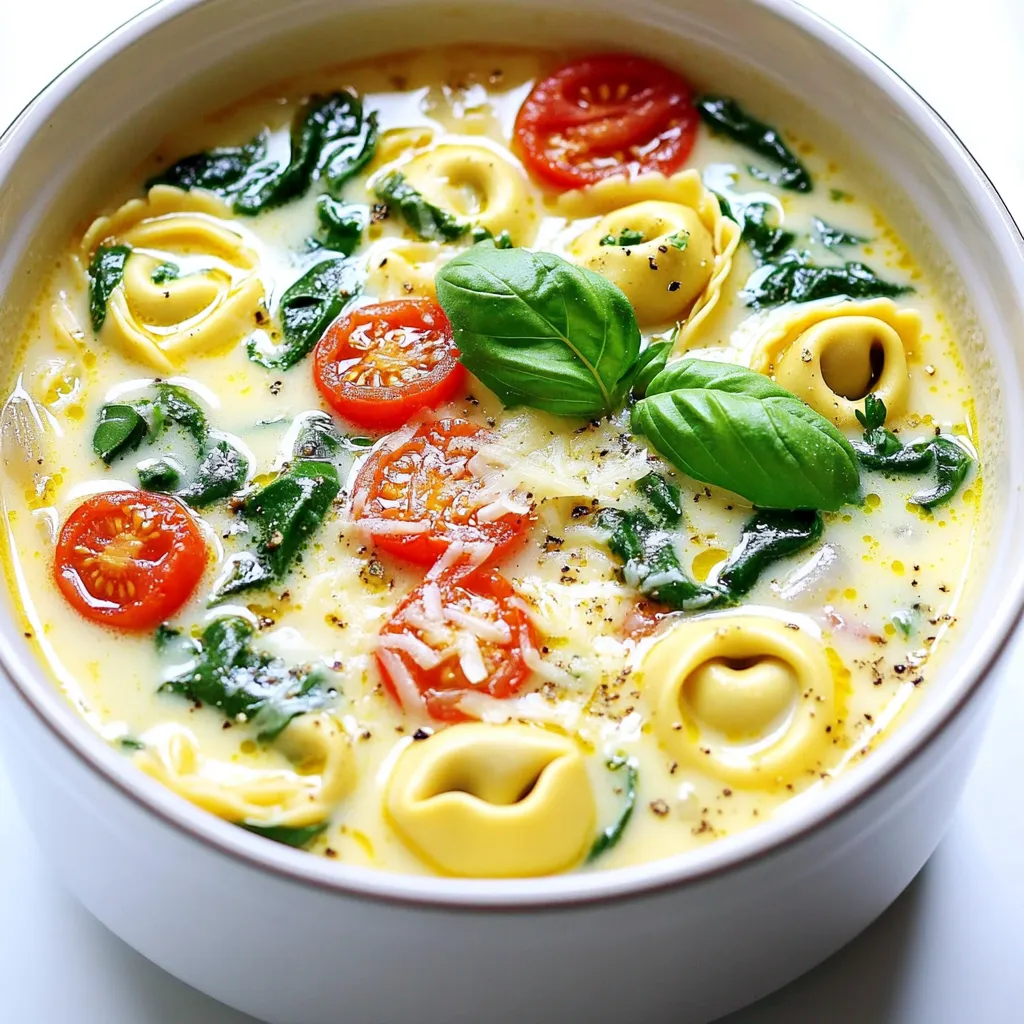
If you’re searching for a quick, tasty meal, look no further! My One-Pot Creamy Garlic Tortellini Soup is simple, comforting,

- 2 cups grated carrots - 1 cup all-purpose flour - 1 cup rolled oats - 1/2 cup brown sugar - 1/2 cup maple syrup - 1/3 cup vegetable oil - 2 large eggs To make these Maple Glazed Carrot Cake Bars, you need fresh grated carrots. Use about four medium carrots for two cups. The oats bring a nice texture, while brown sugar adds sweetness. Maple syrup not only sweetens but also gives that rich flavor. Vegetable oil keeps the bars moist, and eggs help bind everything. - 1/2 cup chopped walnuts or pecans - Spices: cinnamon, ginger, nutmeg You can add nuts for crunch. Walnuts or pecans work well. A mix of spices like cinnamon, ginger, and nutmeg adds warmth. These spices create a cozy flavor that enhances the sweetness. - 1 cup powdered sugar - 3 tablespoons maple syrup - 1-2 teaspoons milk The glaze is simple. Use powdered sugar as the base and mix in maple syrup. Add milk to reach your desired thickness. This glaze makes the bars shine and taste even better. - Preheat oven to 350°F (175°C). - Prepare the baking dish with parchment paper. Start by preheating your oven. This step is key to getting those bars just right. While the oven heats, take an 8x8 inch baking dish and line it with parchment paper. Leave some paper hanging over the edges. This makes it easy to lift the bars out later. - Combine grated carrots, oats, and nuts. - Whisk together dry and wet ingredients. In a large bowl, mix the grated carrots, oats, and nuts if you want that extra crunch. In another bowl, whisk the dry ingredients. This includes flour, brown sugar, baking powder, baking soda, cinnamon, ginger, nutmeg, and salt. Make sure everything blends well. Now, in a separate bowl, beat the eggs and mix in the maple syrup and vegetable oil until smooth. Next, combine the wet ingredients with the dry ones. Stir gently until just mixed. You do not want to overmix. Then, fold in the carrots and nuts. This ensures every bite is full of flavor. - Pour batter into prepared dish. - Bake for 25-30 minutes. Now, pour the batter into your prepared dish. Spread it evenly with a spatula. Bake in the preheated oven for 25 to 30 minutes. Check for doneness by inserting a toothpick into the center. If it comes out clean, your bars are ready! Let them cool in the pan for about 10 minutes. Then, lift them out using the parchment paper. Allow them to cool fully on a wire rack before glazing. - How to know when the bars are done You can check if the bars are done by inserting a toothpick. If it comes out clean, they are ready. This usually takes about 25-30 minutes. - Importance of not overmixing When you mix the batter, do it just until you see no dry flour. Overmixing can make the bars tough. You want them soft and moist. - Achieving the perfect glaze consistency The glaze should be smooth and pourable. Mix powdered sugar, maple syrup, and milk until it flows easily. If it’s too thick, add more milk, a little at a time. - Tips for drizzling glaze Use a spoon or a squeeze bottle to drizzle the glaze. Start from the center and move outwards for a nice look. You can even let it drip down the sides. - Serving suggestions for an appealing display Serve the bars on a rustic wooden platter. This adds charm. Place them in neat rows for a clean visual. - Garnishing techniques with walnuts and maple syrup Sprinkle some chopped walnuts on top for crunch. A light drizzle of extra maple syrup adds shine and sweetness. This will make your bars look even more tempting. {{image_2}} You can mix up the flavor of your maple glazed carrot cake bars. One way is by adding chocolate chips or dried fruit. Chocolate chips bring a rich taste and a fun surprise in each bite. Dried fruit, like raisins or cranberries, adds a chewy texture and a sweet burst. You can also switch up the spices. Try using cardamom for a warm twist or allspice for a cozy flavor. Each spice brings its own charm, so feel free to experiment! If you need gluten-free options, use gluten-free flour instead of all-purpose flour. Many brands offer good choices that work well in baking. You can also replace oats with gluten-free oats to keep the texture right. For vegan adaptations, swap the eggs with flax eggs. Mix one tablespoon of flaxseed meal with three tablespoons of water. Let it sit for five minutes to thicken. Use a plant-based oil in place of vegetable oil and maple syrup can be a great sweetener. Maple glazed carrot cake bars are great on their own, but you can make them even better. Pair them with a scoop of ice cream for a fun dessert. The cold creaminess balances the sweet, warm bars. You can also enjoy these bars as a breakfast treat. They are not too sweet and fill you up. Add a drizzle of maple syrup or a dollop of whipped cream for a special touch. Enjoy them with your morning coffee or tea! To keep your leftover maple glazed carrot cake bars fresh, store them in the fridge. Place the bars in an airtight container. This method keeps them moist and tasty for days. If you want to store them longer, freezing is a great option. Wrap each bar in plastic wrap, then place them in a freezer-safe bag. They can last up to three months in the freezer. When you’re ready to enjoy your bars again, reheating is key. The best way is to use the oven. Preheat it to 350°F (175°C). Place the bars on a baking sheet and heat for about 10 minutes. This helps keep them soft and warm. If you're in a hurry, the microwave works too. Heat them for 15-20 seconds. However, this method can make them a bit chewy. At room temperature, the bars last about three days. Keep them in a cool, dry place. After that, check for signs of spoilage. Look for a dry texture or an off smell. If you see any mold, it’s best to toss them out. Enjoy your maple glazed carrot cake bars fresh for the best taste! Can I use store-bought carrot cake mix? Yes, you can use store-bought carrot cake mix. Just follow the package instructions. Then, add the maple glaze for a sweet touch. This option saves time and still tastes great. How do I substitute maple syrup? You can replace maple syrup with honey or agave syrup. Both options add sweetness. If you use honey, it might change the flavor slightly. Adjust the amount as needed. What can I add to make them more moist? To make the bars more moist, add applesauce or crushed pineapple. Both options work well. They add moisture without changing the flavor too much. You can also use more grated carrots. Overview of calories per serving Each bar has about 150 calories. This is based on cutting the recipe into 16 bars. It makes a delicious treat without too many calories. Breakdown of key nutrients - Carbohydrates: 22 grams - Protein: 3 grams - Fat: 6 grams - Fiber: 2 grams These nutrients help keep you full and satisfied after eating. What others say about their experience Many people love these bars! They say the flavor is amazing and the glaze is a nice touch. Some enjoy them as a snack or dessert. Tips shared by readers for perfecting the recipe Readers suggest not overmixing the batter. This keeps the bars light and fluffy. Others recommend using fresh spices for the best taste. In this blog post, we explored a delicious recipe for maple-glazed carrot cake bars. You learned about key ingredients like carrots, oats, and optional add-ins for extra flavor. I shared clear steps for preparation, mixing, and baking. Helpful tips ensured your baking gets great results. We also looked at variations, storage options, and FAQs for your needs. I hope these insights inspire you to bake these tasty bars and enjoy every bite!

Maple Glazed Carrot Cake Bars Irresistible Delight

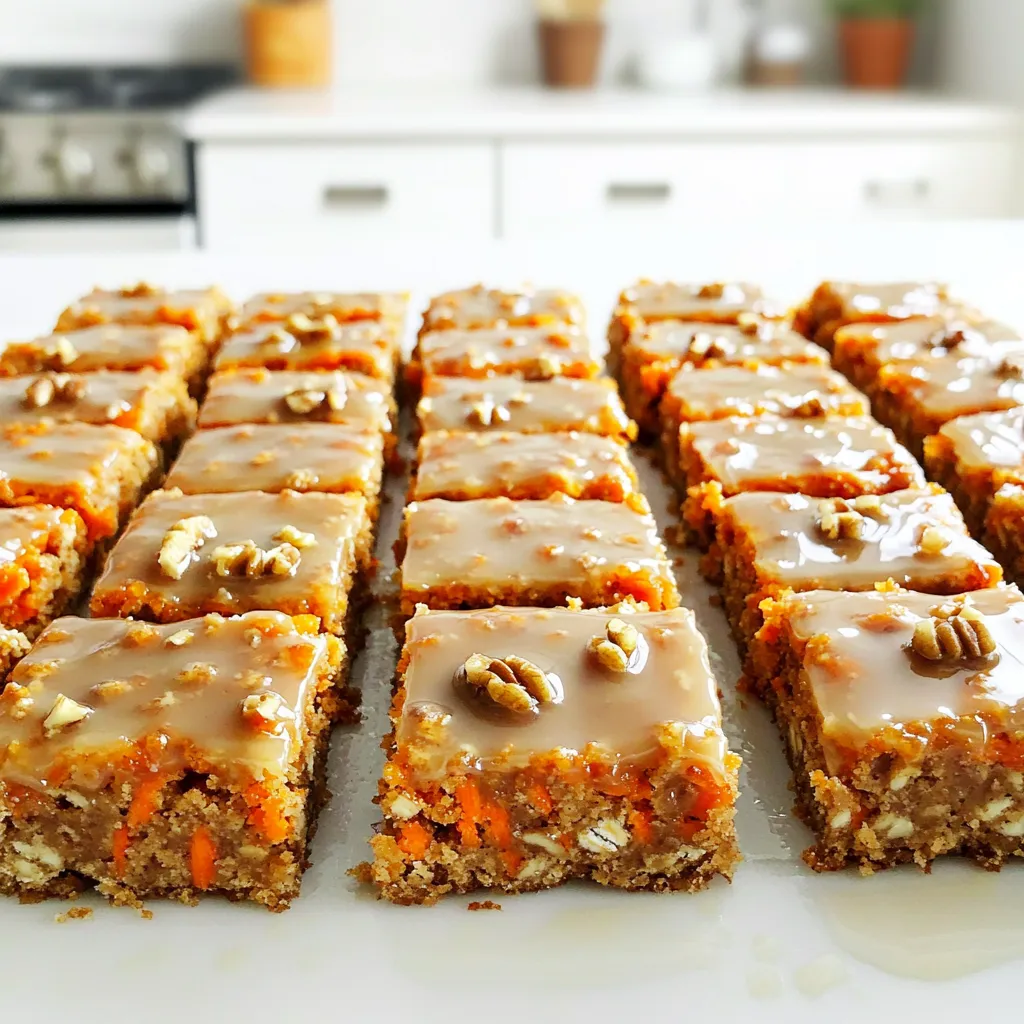
If you crave something sweet yet wholesome, you’re in for a treat! These Maple Glazed Carrot Cake Bars combine the

- 1 cup cream cheese, softened - 1 cup pumpkin puree - 1/2 cup powdered sugar - 1 teaspoon vanilla extract - 1 teaspoon pumpkin pie spice - 1/2 teaspoon ground cinnamon - 1/4 cup sour cream - A pinch of salt - Graham crackers, apple slices, or pretzels for dipping Each ingredient plays a role in the flavor. The cream cheese gives a smooth base. Pumpkin puree adds richness and a nice color. Powdered sugar sweetens the dip without adding graininess. Vanilla extract gives depth. Pumpkin pie spice and cinnamon bring the fall flavors we love. The sour cream adds tanginess, and salt enhances all the tastes. For a fun experience, use different dippers. Graham crackers add crunch and sweetness. Apple slices bring a fresh, fruity taste that pairs well. Pretzels give a salty contrast. You can even mix them up for a colorful platter. Each dipper adds its own twist to the creamy dip. Enjoy experimenting with your favorites! To create this pumpkin spice cheesecake dip, start with the right ingredients. Gather these items: - 1 cup cream cheese, softened - 1 cup pumpkin puree - 1/2 cup powdered sugar - 1 teaspoon vanilla extract - 1 teaspoon pumpkin pie spice - 1/2 teaspoon ground cinnamon - 1/4 cup sour cream - A pinch of salt - Graham crackers, apple slices, or pretzels for dipping First, I take a large mixing bowl and beat the softened cream cheese. I use an electric mixer to make it smooth and creamy. This step is key. A good base makes for a great dip. Next, I add the pumpkin puree to the cream cheese. I mix it well until it’s fully combined. Then, I sift in the powdered sugar. I do this slowly and mix until it blends in nicely. After that, I stir in the vanilla extract, pumpkin pie spice, ground cinnamon, and sour cream. Don’t forget the pinch of salt! Mixing these ingredients makes the dip fluffy and full of flavor. I always taste the dip at this stage. If I think it needs more sweetness or spice, I add a bit more powdered sugar or pumpkin pie spice. This is where you can make it your own. Once the dip is ready, I transfer it to a serving bowl. I smooth the top with a spatula to make it look nice. To enhance the presentation, I sprinkle a little extra pumpkin pie spice on top. For dipping, I arrange graham crackers, apple slices, and pretzels around the bowl. This adds color and makes it easy to serve. I find this dip is perfect for parties or cozy gatherings. To get a smooth dip, start with softened cream cheese. Beat it well until creamy. This step makes mixing easy. Add pumpkin puree next, and blend until smooth. Gradually sift in the powdered sugar. Mix until it is all combined. If the dip feels too thick, add a little sour cream. This will give it a creamier feel. To boost the flavor, use fresh spices. Fresh ground cinnamon and pumpkin pie spice add a warm taste. Don't skip the vanilla extract; it adds depth. Taste your dip as you mix. Adjust the sweetness or spice to your liking. If you want it sweeter, add more powdered sugar. For extra warmth, sprinkle in more pumpkin pie spice. For a fun display, choose a decorative bowl. Smooth the top of the dip for a polished look. Before serving, sprinkle a little pumpkin pie spice on top. Arrange graham crackers, apple slices, and pretzels around the bowl. This creates a lovely color contrast. It’s also an easy way for guests to dip. Enjoy making your pumpkin spice cheesecake dip a star at any party! {{image_2}} You can really change the taste of your dip. Here are some fun add-ins you might try: - Maple Syrup: Swap some sugar for maple syrup for a rich taste. - Nutmeg: Add a dash of nutmeg for a warm, spicy kick. - Chocolate Chips: Fold in mini chocolate chips for a sweet surprise. These changes can make your dip different and exciting for your guests! If you want a dairy-free or vegan dip, it’s easy to switch. Use these simple swaps: - Vegan Cream Cheese: Replace cream cheese with your favorite brand of vegan cream cheese. - Coconut Cream: Instead of sour cream, use thick coconut cream for a creamy texture. - Maple Syrup: Use maple syrup instead of powdered sugar for added sweetness. With these swaps, everyone can enjoy this tasty treat! You can celebrate each season with fun twists on this dip. Here are some ideas: - Holiday Cheer: For winter, add crushed peppermint for a festive flavor. - Spring Freshness: Mix in lemon zest and juice for a bright spring touch. - Summer Delight: Add fresh berries on top for a fruity summer version. These seasonal ideas can keep your dip fun and fresh all year long! Store your pumpkin spice cheesecake dip in an airtight container. This keeps it fresh and tasty. Always place the dip in the fridge. Make sure it is fully cooled before covering it. If you have leftovers, try to use a clean spoon each time. This helps prevent germs from getting in. When properly stored, the dip lasts about 3 to 5 days. Keep an eye on its smell and texture. If it smells off or changes, it's best to toss it out. For the best taste, enjoy it within the first few days. If you want to enjoy it warm, you can gently reheat it. Use a microwave-safe bowl. Heat it in short bursts of about 10 to 15 seconds. Stir between each burst to keep it smooth. You can also serve it cold. It tastes great either way! Yes, you can make this dip ahead of time. I often prepare it the night before. Just mix all the ingredients and store it in the fridge. Letting it chill overnight helps the flavors blend better. It’s ready when you need it! If you want a different base, you can use Greek yogurt. It gives a nice tang and a creamy texture. You can also try cashew cream for a dairy-free option. Just blend soaked cashews until smooth. Both choices work well in this dip. To reduce the sweetness, cut back on the powdered sugar. Start with less and taste as you mix. You can also add more pumpkin puree or sour cream. These ingredients add flavor without making it too sweet. Adjust until it fits your taste! In this post, we explored ingredients and steps to make a tasty dip. We covered measurements, mixing techniques, and helpful tips for perfect texture. You learned about fun variations, smart storage, and answered common questions. Remember, experimenting with flavors can lead to great new ideas. Keep these tips in mind for your next gathering so everyone enjoys your delicious creation. Happy dipping!

Pumpkin Spice Cheesecake Dip Irresistible Party Treat

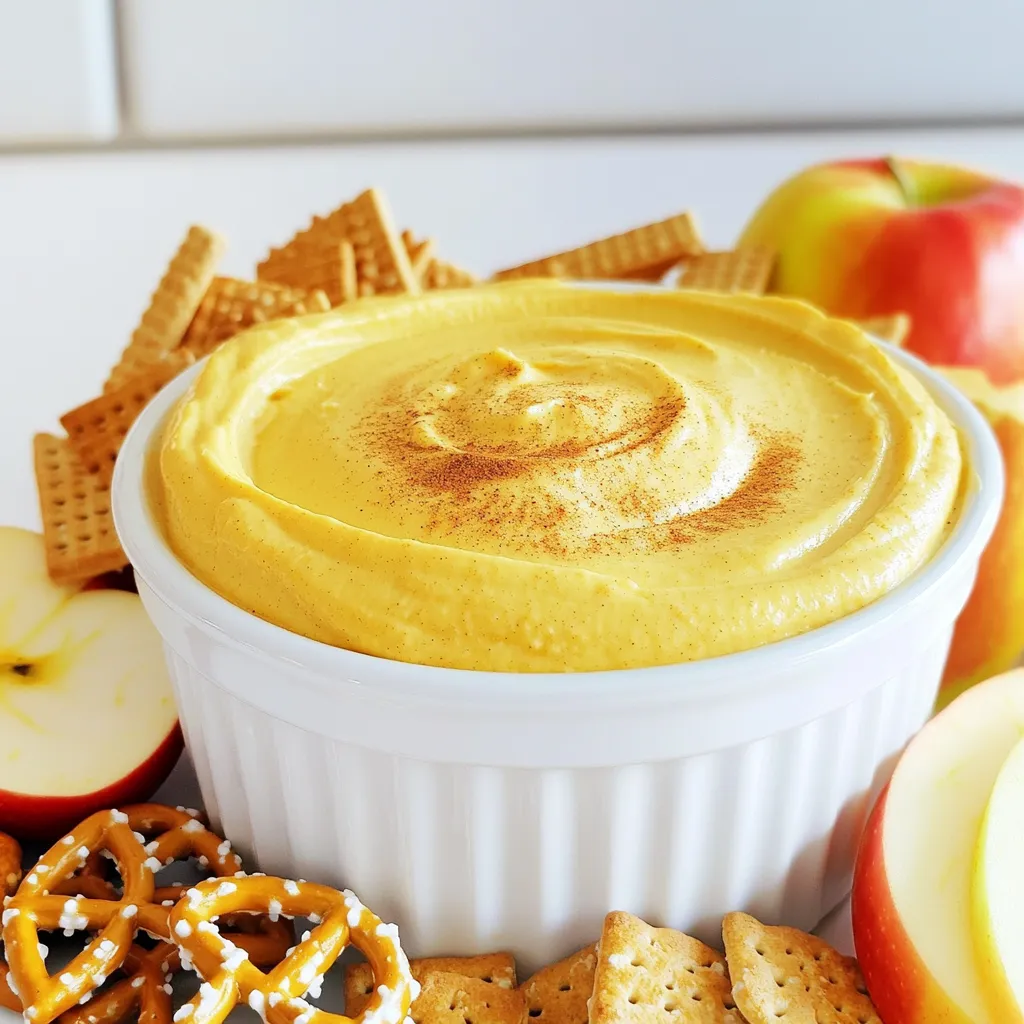
Fall is here, and that means it’s time for pumpkin spice everything! If you’re looking for an easy yet delicious

Older posts
Newer posts
← Previous Page1 … Page6 Page7 Page8 … Page86 Next →

dsad

© 2026 Cooking Wells • Built with GeneratePress

Our Policies

  • Copyright Policy
  • Cookie Policy
  • GDPR Policy
  • Privacy Policy
  • Disclaimer
  • Terms Of Use

More Information

  • Home
  • About
  • Contact
  • Appetizers
  • Dessert
  • Dinner
  • Drinks
©2026, Cooking Wells About Back To Top