Skip to content
DisclaimerTerms Of UseGDPR PolicyCookie Policy

Cooking Wells

  • Home
  • Drinks
  • Appetizers
  • Dinner
  • Dessert
  • About
  • Contact
  • Privacy Policy
DisclaimerTerms Of UseGDPR PolicyCookie Policy

NO-ING-IMG

- 4 ripe bananas, sliced and frozen - 1 tablespoon almond butter (or any nut/seed butter) - 1 teaspoon vanilla extract - 1/4 cup coconut milk (or any plant-based milk) - A pinch of salt To make vegan banana ice cream, you need ripe bananas. They should be yellow with brown spots. This means they are sweet and soft. The almond butter adds creaminess and rich flavor. Coconut milk gives a nice texture and sweetness, too. The vanilla extract enhances the taste. A pinch of salt makes the flavors pop. - Chopped nuts - Shredded coconut - Dark chocolate chips - Fresh berries Toppings make your ice cream fun! Chopped nuts give a crunchy bite. Shredded coconut adds a tropical touch. Dark chocolate chips are rich and delicious. Fresh berries bring a burst of flavor. You can mix and match these toppings for a special treat! For the full recipe, check out the detailed steps to create this creamy delight. To start, you need ripe bananas. They should have brown spots. This means they are sweet and perfect for ice cream. Freezing bananas: Peel the bananas and slice them into small pieces. Place the slices on a baking sheet lined with parchment paper. Make sure they do not touch each other. Freeze them for at least two hours or until they are solid. Slicing technique: Slice the bananas into about half-inch rounds. This size helps them freeze evenly. Even slices will blend better later. You will need a food processor for this step. A strong blender can also work, but a food processor gives the best results. Adding ingredients: Once your banana slices are frozen, take them out. Put the slices in the food processor. Add one tablespoon of almond butter, one teaspoon of vanilla extract, and a pinch of salt. These ingredients enhance the flavor of your ice cream. Blend the mixture until it starts to break down. Scrape down the sides of the bowl as needed. Soft-serve vs. firmer ice cream: If you want a soft-serve texture, you can serve it right away. If you want it firmer, transfer it to an airtight container. Freeze it for one to two more hours. Mixing in sweeteners if needed: Taste the mixture. If you want it sweeter, you can add maple syrup or agave syrup. Blend again to mix. This creamy vegan banana ice cream is a simple treat. Follow these steps, and you’ll enjoy a delicious dessert in no time. For the full recipe, check out Creamy Dreamy Vegan Banana Ice Cream. To make the best vegan banana ice cream, choose ripe bananas. The riper they are, the sweeter and creamier your ice cream will be. Look for bananas with lots of brown spots. These bananas are sweet and soft, perfect for blending. Chill your equipment before you start. Place your food processor bowl in the fridge for a bit. This helps keep your ice cream cold and creamy as you blend. You can switch out the almond butter for other nut butters. Peanut butter adds a nice kick. Sunflower seed butter works well too. These options give your ice cream a unique flavor and texture. For the milk, you can try different dairy-free options. Cashew milk adds creaminess. Oat milk gives a nice taste too. Each milk will change the flavor a bit, so feel free to experiment. When serving, scoop the ice cream into fun bowls or cones. This makes it look inviting. You can add toppings like chopped nuts or shredded coconut. Dark chocolate chips or fresh berries also make great choices for extra flavor. Try pairing your vegan banana ice cream with other desserts. It goes well with brownies or pie. You can also serve it with fresh fruit for a refreshing treat. {{image_2}} You can make a tasty chocolate banana ice cream by adding cocoa powder or chocolate chips. Start by mixing in two tablespoons of cocoa powder when you blend the base. This gives your ice cream a rich, chocolatey flavor. If you prefer, add dark chocolate chips after blending. This adds a fun crunch and bursts of chocolate in each bite. You can also infuse your banana ice cream with other fruits. Strawberry banana ice cream is easy and delicious. Just blend in one cup of fresh strawberries with the bananas. This adds a sweet and tangy twist. Another option is a mango and banana twist. Blend one cup of frozen mango with the bananas to create a tropical treat. Want to spice things up? Try adding nutmeg or cinnamon to your mix. Just a pinch will add warmth and depth to your ice cream. You can also fold in cookie crumbles for a fun texture. Use your favorite vegan cookies for a sweet surprise in every scoop. For the full recipe, be sure to check out the instructions above. Enjoy your creamy and delicious treat! To keep your vegan banana ice cream fresh, use airtight containers. This helps prevent ice crystals from forming. Fill the container, leaving some space at the top. The ice cream will expand as it freezes. After freezing, handle it carefully. When scooping, use a warm spoon for easier serving. For the best taste, consume the ice cream within two weeks. After that, the flavor may fade. Look for signs of freezer burn. If you see white spots or a dry texture, it's time to toss it. These signs mean the ice cream is no longer at its best. Can you refreeze melted ice cream? Yes, but it might lose some creaminess. To keep the flavor and texture, try to serve it right away. If you must refreeze, let it sit at room temperature for a few minutes before serving next time. This helps restore some of its original smoothness. Use very ripe bananas for this recipe. Ripe bananas have brown spots. They are sweeter and creamier. The sugar content rises as they ripen, giving a rich flavor. You want bananas that feel soft but not mushy. This is key for that smooth texture in your vegan banana ice cream. Yes, you can! If you don't have a food processor, try a blender. A high-powered blender works well too. You can also mash the bananas with a fork. It may take more time, but it is still doable. After mashing, mix in the other ingredients in a bowl. Blend or mix until you reach a creamy texture. To make this recipe sugar-free, skip any sweeteners. The ripe bananas give enough natural sweetness. You can also use sugar substitutes like stevia or monk fruit. Just be sure to adjust the amount based on the brand. Always taste the mixture to ensure it meets your sweetness preference. Yes, this recipe is great for meal prep! After making the ice cream, store it in an airtight container. It keeps well in the freezer. For best results, scoop and serve soon after freezing. If frozen too long, it may become hard. Just let it sit at room temperature for a few minutes before serving. Enjoy it anytime you crave a sweet treat! In this blog post, we covered how to make vegan banana ice cream. You learned about key ingredients, like ripe bananas and almond butter. We shared step-by-step instructions for preparation and blending. Tips for the best texture and fun variations added depth to your ice cream options. Lastly, we discussed storage and answers to common questions. Now, it’s time for you to make your creamy treat and enjoy it with your favorite toppings. This easy recipe makes delightful, healthy desserts for everyone.

Vegan Banana Ice Cream Creamy and Delicious Treat

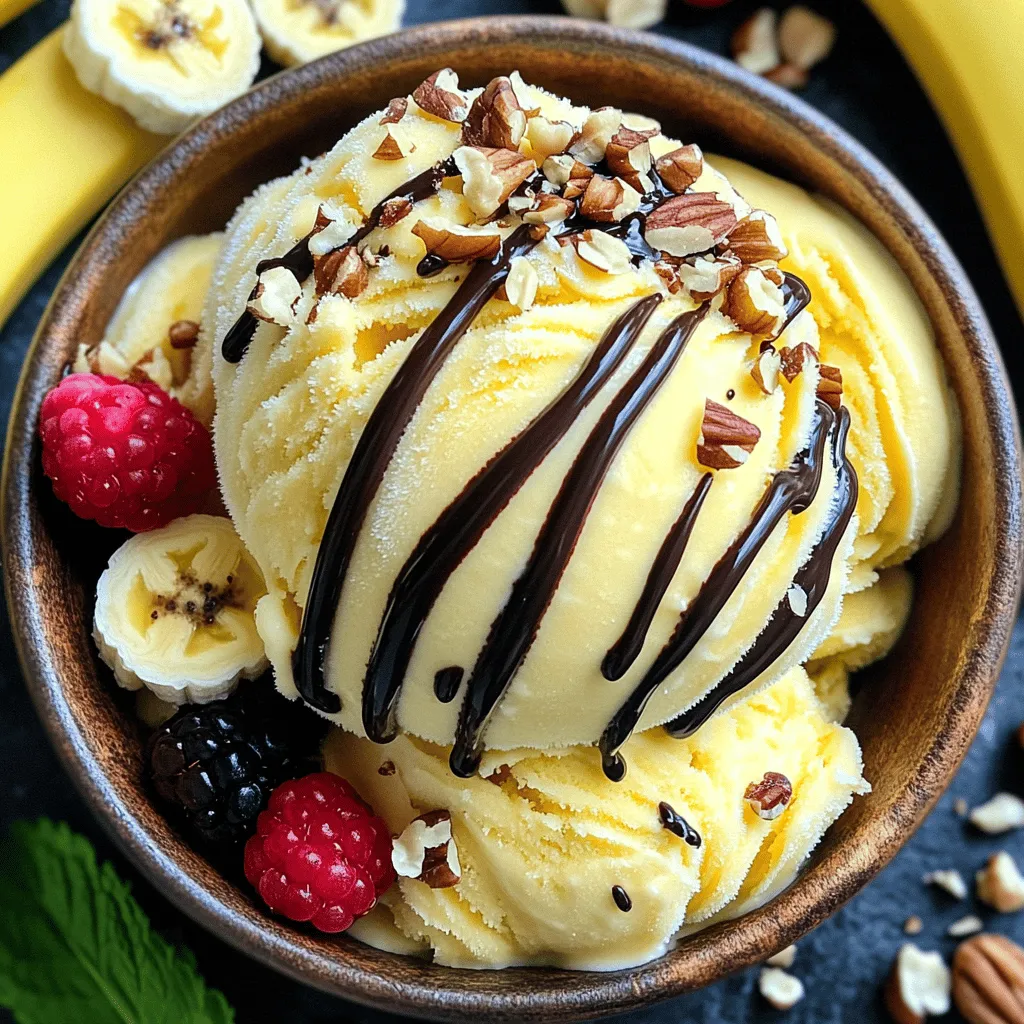
Are you ready to delight your taste buds with a creamy and delicious Vegan Banana Ice Cream? This simple recipe

- 2 cups cooked chicken, shredded - 1 cup cream cheese, softened - 1 cup shredded cheddar cheese - 12 small corn tortillas - 1 teaspoon garlic powder - 1 teaspoon onion powder - 1 teaspoon cumin - 1 teaspoon chili powder - 1/2 teaspoon salt - 1/4 teaspoon black pepper - Cooking spray or olive oil for brushing - Optional toppings: salsa, guacamole, or sour cream To make baked chicken taquitos, you need fresh and simple ingredients. Start with cooked chicken. I love using rotisserie chicken for its flavor. Then, cream cheese gives a nice, rich texture. Shredded cheddar cheese adds a cheesy kick that everyone loves. You also need corn tortillas. They hold all the goodness inside. For seasonings, garlic powder and onion powder add depth. Cumin and chili powder bring warmth and spice. Don’t forget the salt and black pepper for balance. If you want a crisp finish, brush the taquitos with cooking spray or olive oil. For fun, add toppings like salsa, guacamole, or sour cream. These make each bite even better! For the full recipe, check the section above. - Preheat the oven to 425°F (220°C). - Line the baking sheet with parchment paper. - In a large bowl, combine shredded chicken, cream cheese, cheddar cheese, garlic powder, onion powder, cumin, chili powder, salt, and black pepper. Mix until smooth. - Warm the corn tortillas in the microwave for about 30 seconds. This makes them soft and easy to roll. - Place about 2 tablespoons of the chicken mixture onto each tortilla. Roll each one tightly. - Place the rolled taquitos seam-side down on the baking sheet. - Lightly spray or brush the tops with oil for a crispy finish. - Bake for 15-20 minutes until the taquitos turn golden brown. These baked chicken taquitos are simple to make! For more details, check the Full Recipe. Enjoy your cooking adventure! - Ensure tortillas are warm for easy rolling. - Use a silicone brush for even oil application. Warming tortillas makes them soft and easy to roll. Place them in a damp paper towel and microwave for about 30 seconds. This prevents cracking as you roll. A silicone brush helps apply the oil evenly, giving your taquitos a nice golden finish. - Add diced jalapeños for extra heat. - Experiment with different cheese varieties. If you love spice, add diced jalapeños to the chicken mix. This adds a zesty kick. You can also switch up the cheese. Try pepper jack for more heat or a blend of cheeses for different flavors. - Serve with any of the optional toppings. - Pair with a side salad for a complete meal. Baked chicken taquitos shine with toppings like salsa, guacamole, or sour cream. These add freshness and creaminess. Pairing them with a side salad can round out your meal and add more nutrition. For the full recipe, check out the instructions above. {{image_2}} You can easily change the filling of your taquitos. Swap chicken for shredded beef or turkey. This keeps the dish fresh and exciting. If you prefer a lighter meal, use vegetables for a vegetarian option. Spinach, mushrooms, and zucchini work well together. If you need a gluten-free option, don’t worry! Just use gluten-free tortillas. They are available in most stores. Also, check that all seasonings are gluten-free. This way, everyone can enjoy your tasty taquitos. Cheese can change the flavor of your taquitos. Try pepper jack cheese for a spicier kick. It adds a nice heat that many love. You can also use a blend of Mexican cheeses for diversity. Mixing different cheeses can create a creamy and rich filling. For the full recipe and more tips, check out the [Full Recipe]. After enjoying your taquitos, let them cool down first. This step helps keep the texture nice. Once cool, place your taquitos in an airtight container. Store them in the refrigerator for up to three days. To reheat your taquitos, preheat your oven to 350°F (175°C). Place the taquitos on a baking sheet. Heat them in the oven until they are crispy again. This usually takes about 10-15 minutes. You can microwave them, but they may turn out softer. If you want that crispy bite, stick with the oven. Want to save some for later? You can freeze unbaked taquitos! Simply prepare the taquitos but do not bake them. Place them in a single layer on a baking sheet and freeze until firm. Then, transfer them to a freezer bag for easy storage. When you are ready to enjoy them, thaw them before following the baking instructions from the Full Recipe. To make the best Baked Chicken Taquitos, use high-quality ingredients. Fresh chicken and good cheese make a big difference. Mix the chicken with cream cheese and spices for rich flavor. Rolling the taquitos tightly is key. Warm the tortillas before filling to keep them soft. This helps avoid cracks. Place the seam-side down when baking. This keeps them from unrolling in the oven. Yes, you can prepare these taquitos ahead of time. Make the filling and roll the taquitos. Place them on a baking sheet. You can refrigerate or freeze them until you're ready to bake. When ready to eat, just pop them in the oven. No need to thaw if frozen, just add a few extra minutes to the baking time. You can serve Baked Chicken Taquitos with many tasty sides. Mexican rice is a classic choice. Refried beans add protein and flavor. A fresh salad also pairs nicely. Consider adding dips like salsa, guacamole, or sour cream for extra fun. These add flavor and moisture to each bite. Enjoy your meal! This post shared a simple recipe for baked chicken taquitos. It covered the main ingredients, seasonings, and extra tips. You learned steps to prepare, assemble, and bake them to perfection. Variations let you swap fillings and adjust for dietary needs, keeping the meal exciting. Store leftovers properly for later enjoyment. Enjoy your time in the kitchen, experimenting with flavors. Your taquitos will surely impress everyone around!

Baked Chicken Taquitos Flavorful and Easy Snack

Looking for a tasty snack that’s easy to make? Baked chicken taquitos are your answer! These crispy, cheesy rolls pack

For this tasty dish, gather these fresh ingredients: - 1 cup cherry tomatoes, halved - 1 medium zucchini, sliced - 1 bell pepper (any color), diced - 1 red onion, cut into wedges - 2 cups Brussels sprouts, halved - 4 cloves garlic, minced - 3 tablespoons olive oil - 1 teaspoon dried oregano - 1 teaspoon smoked paprika - Salt and pepper to taste - Fresh basil leaves for garnish Each ingredient plays a key role in flavor. The cherry tomatoes add sweetness. The zucchini and bell pepper bring crunch. Red onion adds a nice bite, while Brussels sprouts give a hearty taste. Minced garlic enhances the overall flavor. Olive oil helps the veggies roast nicely. Oregano and smoked paprika give a warm, earthy taste. Adjust salt and pepper to suit your liking. Always wash and cut your veggies before cooking. You can switch out some veggies if you like. Try using asparagus or carrots instead of Brussels sprouts. Sweet potatoes work well in place of zucchini. For herbs, thyme or rosemary can replace oregano. If you want spice, add cayenne pepper with the paprika. This dish is very flexible. Feel free to mix and match to find your favorite combo. For the full recipe, see the earlier section. Start by washing your vegetables well. Clean the cherry tomatoes and slice them in half. Next, take the zucchini and slice it into rounds. For the bell pepper, remove the seeds and dice it into small pieces. Cut the red onion into wedges. Lastly, halve the Brussels sprouts. Once all are prepared, gather them in a large mixing bowl. Preheat your oven to 425°F (220°C). Once ready, drizzle olive oil over the veggies in the bowl. Sprinkle dried oregano, smoked paprika, salt, and pepper on top. Toss everything well so every piece gets coated. Spread the veggies on a baking sheet in one layer. Make sure there is space between them. This helps them roast evenly. Roast in the oven for 20-25 minutes. Stir halfway through for best results. Look for a golden color and tender texture. Once the veggies are done, take them out of the oven. Let them cool for a few minutes. To serve, place them on a nice platter. Add fresh basil leaves on top for color and flavor. This makes the dish even more appealing. Enjoy your One Pan Roasted Veggies! For full details, check the Full Recipe. To boost the taste of your roasted veggies, try these tricks: - Use fresh herbs like rosemary or thyme for extra aroma. - Add a splash of balsamic vinegar before roasting for sweetness. - Sprinkle lemon juice after roasting for a fresh zing. - Mix in a pinch of chili flakes for some heat. These simple touches make a big difference. They bring out the natural sweetness and depth of your veggies. To ensure all your veggies roast evenly, follow these steps: - Cut vegetables into similar sizes. This helps them cook at the same rate. - Spread them out on the baking sheet. Leave space between pieces for hot air to circulate. - Stir halfway through roasting. This flips them and helps them brown nicely. These tips help you avoid undercooked or burnt spots. Here are some common mistakes to steer clear of: - Overcrowding the baking sheet. This leads to steaming instead of roasting. - Not preheating the oven. A hot oven helps veggies caramelize and get crispy. - Using too much oil. Too much oil makes veggies soggy rather than crisp. Avoiding these mistakes will make your One Pan Roasted Veggies shine. Enjoy the process and the tasty results! {{image_2}} You can change up the veggies based on the season. In spring, add asparagus or radishes. Summer brings great choices like eggplant or yellow squash. In fall, try root veggies like carrots and sweet potatoes. Winter lets you use hearty greens like kale or collard greens. Mixing seasonal veggies adds fun flavors to your dish. To make this dish a full meal, add protein or grains. Chickpeas are a great choice. They add protein and fiber. You can also toss in cooked quinoa or brown rice. For meat lovers, try adding diced chicken or sausage. These additions make your meal filling and hearty. Herbs and spices can change the taste of your veggies. Try rosemary or thyme for a fresh flavor. For a kick, add red pepper flakes. You can also experiment with cumin or curry powder for a warm taste. The right herbs and spices bring out the best in your roasted veggies. Explore different combinations to find your favorite. For the full recipe, check out the One Pan Roasted Veggies recipe above. After enjoying your one pan roasted veggies, it's key to store them right. Let the veggies cool before you put them away. Use an airtight container to keep them fresh. They will last in the fridge for about three to five days. If you want to keep them longer, freezing is a great option. To reheat your roasted veggies, use the oven or a skillet. The oven keeps them crisp. Preheat the oven to 350°F (175°C). Spread the veggies on a baking sheet and heat for about 10 minutes. You can also use a skillet on medium heat. Just add a splash of olive oil and stir until warm. Avoid the microwave if you want to keep that nice texture. Freezing is perfect for saving extra roasted veggies. Place the cooled veggies on a baking sheet first. Freeze them for about an hour. This step keeps them from sticking together. Once frozen, transfer them to a freezer bag. Label the bag with the date. They can stay good for up to three months. When you’re ready to eat, no need to thaw. Just toss them right into the oven or a skillet. Enjoy the flavors anytime! The best veggies for roasting are firm and hearty. I love using: - Cherry tomatoes - Zucchini - Bell peppers - Red onions - Brussels sprouts These vegetables cook well and get nice and tender. They also caramelize, giving you great flavor. You can mix and match based on your taste or what you have. Yes, you can! If you don’t want to roast, try sautéing. Sautéing cooks veggies quickly in a pan on the stove. You can also steam them for a softer texture. Grilling is another fun choice. It adds a nice smoky flavor. Each method gives a different taste and texture, so feel free to experiment. You can tell the veggies are done when they are soft and slightly golden. They should be tender when you poke them with a fork. Look for a little browning on the edges; this adds flavor. If you stir them halfway through roasting, it helps them cook evenly. Follow the steps in the Full Recipe for perfect timing! This blog post covered how to make tasty roasted veggies in one pan. We discussed the best ingredients, how to prepare and roast them, and tips for great flavor. I shared common mistakes to avoid and suggested fun variations. Plus, we went over storage tips for leftovers and answered key FAQs. Roasting veggies is easy and fun. You can mix it up with different veggies and flavors. Now, you have all the info you need to create a delicious dish. Enjoy your roasting adventure!

One Pan Roasted Veggies Flavorful and Easy Recipe

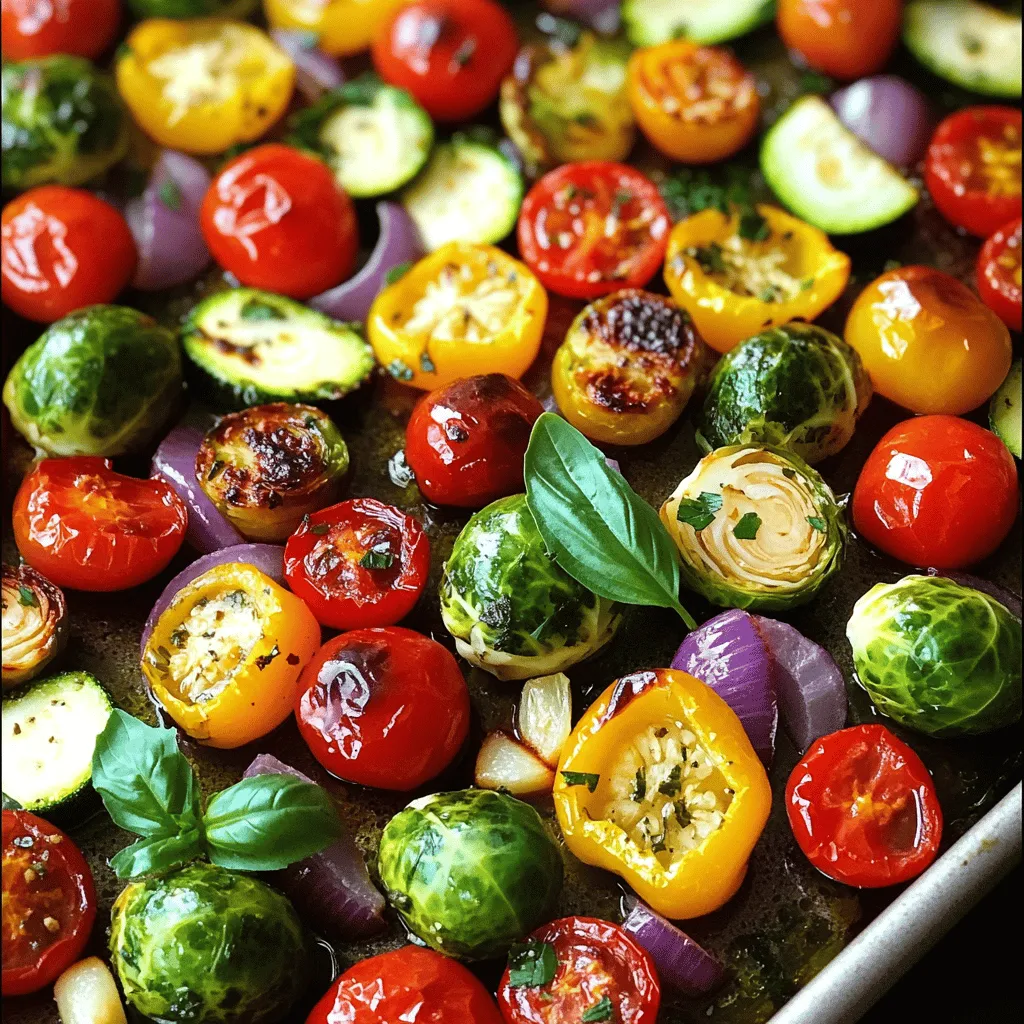
Are you ready to transform your weeknight dinners? My One Pan Roasted Veggies recipe is not only flavorful, but it’s

To make Cheesy Pull Apart Pizza Bread, gather these simple ingredients: - 1 loaf of rustic Italian bread - 1 cup shredded mozzarella cheese - 1/2 cup grated Parmesan cheese - 1/2 cup marinara sauce - 1 teaspoon Italian seasoning - 1/2 teaspoon garlic powder - 1/4 teaspoon red pepper flakes (optional) - 2 tablespoons olive oil - Fresh basil leaves for garnish Want to spice things up? Here are some tasty options: - Different cheese varieties, like cheddar or gouda - Additional pizza toppings, such as pepperoni, bell peppers, or olives These add-ins can change the flavor and make your bread even better. You can be creative and mix and match to suit your taste. For the full recipe, check out the details above. First, preheat your oven to 375°F (190°C). This step is key for even cooking. While the oven heats, prepare your baking sheet by lining it with aluminum foil. This helps with easy cleanup later. Next, take your loaf of rustic Italian bread. Place it on a cutting board. With a serrated knife, cut the bread into a grid pattern. Make diagonal cuts about an inch apart. Be careful not to slice all the way through the bottom. This keeps the bread intact for stuffing. Now, let’s make the cheese filling. In a mixing bowl, combine 1 cup of shredded mozzarella cheese and 1/2 cup of grated Parmesan cheese. Add 1 teaspoon of Italian seasoning, 1/2 teaspoon of garlic powder, and 1/4 teaspoon of red pepper flakes if you like heat. Stir until well mixed to blend the flavors. Take your knife and gently pry apart the cuts in the bread. Stuff the cheese mixture into each opening. Make sure to fill each space generously. This ensures every bite is cheesy and delicious. Once the bread is stuffed, drizzle 2 tablespoons of olive oil over the top. This adds flavor and helps the bread crisp up. Wrap the stuffed bread in aluminum foil, shiny side in, and place it on your baking sheet. Bake the bread for 15 minutes covered. After that, remove the foil and bake for an additional 10 minutes. This helps the cheese melt and the bread turn golden. To check doneness, look for melted cheese and a crispy crust. Enjoy the smell as it bakes! After removing it from the oven, let it cool for a few minutes. Then, gently pull apart to serve. Pair it with a small bowl of marinara sauce for dipping. You can find the full recipe details above. To get that perfect cheese pull, choose your cheese wisely. I recommend using mozzarella because it melts beautifully. Look for high-moisture mozzarella for the best results. It stretches nicely and gives that gooey texture we all love. Mixing in some Parmesan adds a sharp taste and depth. Next, the bread matters too. I love using rustic Italian bread. It's sturdy and has a great crust. This helps hold the cheese and toppings inside. You want a bread that can handle all that goodness without falling apart. To make your cheesy pull apart pizza bread even tastier, add herbs and spices. Italian seasoning adds a classic pizza flavor. For a kick, sprinkle in some red pepper flakes. You can also mix in garlic powder for extra flavor. If marinara sauce isn’t your thing, try other dips. Ranch or garlic butter work well too. You can even use pesto for a fresh twist. These alternatives add fun flavors and keep it exciting. Serving this dish is just as fun as making it. Pull apart the bread and place it on a nice platter. Add a small bowl of marinara or your chosen dip for guests to enjoy. For a fresh touch, garnish with basil leaves. They add a pop of color and flavor. You can also sprinkle some extra cheese on top before serving. This makes it look even more tempting. For the full recipe, check out the details above. Enjoy your cheesy creation! {{image_2}} You can make your Cheesy Pull Apart Pizza Bread more exciting. To create a spicy version, add crushed red pepper flakes to the cheese mix. This small change gives the dish a nice kick. You can also use pepper jack cheese instead of mozzarella for a spicy twist. If you want a healthier option, add fresh vegetables. Chopped bell peppers, spinach, or mushrooms work well. Mix these veggies into the cheese filling. This adds flavor and boosts nutrition. For those needing gluten-free options, you can use gluten-free bread. Many brands offer great choices, making it easy to enjoy this dish. Just ensure the bread has good texture to hold the filling. If you want a low-carb alternative, try using cauliflower bread. Cauliflower bread is easy to make and adds unique flavor. You can find many recipes online to guide you. You can also give your Cheesy Pull Apart Pizza Bread a cultural twist. Try a Mexican pizza inspiration by adding taco seasoning to the cheese mix. You might also include black beans, corn, or jalapeños for extra flavor. Top it off with avocado or cilantro after baking for a fresh touch. These variations keep the dish fun and interesting. Each version offers a new taste experience. Don’t hesitate to mix things up and try new ideas! To keep your cheesy pull apart pizza bread fresh, store it in an airtight container. This helps prevent the bread from drying out. You can also wrap the bread in plastic wrap before placing it in the container. Leftovers can last in the fridge for about 3 to 5 days. Make sure to cool the bread completely before storing. When you want to enjoy your cheesy pull apart pizza bread again, reheating it is key. The best method is using the oven. Preheat your oven to 350°F (175°C). Place the bread on a baking sheet and cover it with foil. Heat for about 10-15 minutes. This keeps the cheese melty and the bread soft. If you want to store it longer, you can freeze the leftovers. Wrap the bread tightly in plastic wrap and then in foil. It can last up to 3 months in the freezer. You can get creative with leftover cheesy pull apart pizza bread. Try cutting it into small pieces for a fun appetizer. You can also use the bread as a base for mini pizzas. Top it with extra marinara sauce, cheese, and your favorite toppings. Another idea is to toast it and serve it with soup or salad. Enjoy your leftovers in new ways! Yes, you can prep this dish ahead. To do so, cut the bread and fill it with cheese. Wrap it tightly in plastic wrap or foil. Store it in the fridge. Bake it when you're ready. This saves time and is great for parties. If you want a change, try different sauces. Ranch dressing adds a creamy taste. Pesto gives a fresh herby kick. You can also use garlic butter for a rich flavor. Experiment with your favorite dips for fun! To keep your bread crisp, avoid too much sauce. Use less marinara when stuffing. Make sure to bake it properly. Wrapping it in foil helps steam the bread but remove the foil for the last bake. This ensures a crispy crust. You can swap the rustic Italian bread. French bread works well for a crusty texture. Brioche adds a sweet touch. Just ensure the bread can hold the filling. With the right bread, your pull apart pizza will still be amazing. For the full recipe, check out the complete details on how to make it! You now have all the key steps to make Cheesy Pull Apart Pizza Bread. We've covered ingredients, preparation, baking, tips for great flavor, and variations. You can easily customize this dish to fit your taste. Whether you opt for gluten-free options or experiment with spices, this recipe is flexible. Don't forget to enjoy leftovers creatively! With practice, you can master this dish. So, gather your ingredients and start baking your delicious creation today.

Cheesy Pull Apart Pizza Bread Deliciously Easy Recipe

Get ready to dive into a cheesy delight with my Cheesy Pull Apart Pizza Bread recipe! This simple dish combines

To make delicious Spinach Feta Turkey Burgers, gather these main ingredients: - 1 lb ground turkey - 1 cup fresh spinach, chopped - 1/2 cup feta cheese, crumbled - 1/4 cup breadcrumbs - 1 clove garlic, minced - 1 small red onion, finely chopped - 1 egg, beaten - 1 teaspoon dried oregano - Salt and pepper to taste - Olive oil for grilling - Whole wheat burger buns These ingredients pack flavor and nutrition. Ground turkey keeps the burgers lean, while spinach adds vitamins. Feta cheese gives a tasty kick. The breadcrumbs help bind the mixture and keep it moist. You can elevate your burgers with simple toppings. Consider adding: - Sliced tomatoes - Crisp lettuce - Tzatziki sauce These toppings provide freshness and flavor. You can serve the burgers on whole wheat buns for a healthy touch. Feel free to get creative with your favorite toppings! Each burger is a healthy option. They are high in protein and low in fat. The spinach boosts your iron and vitamins. Feta cheese adds calcium but watch the portion for sodium. This meal is perfect for a balanced diet, making it a great choice for lunch or dinner. For the full recipe, check the details above. To start, grab a large mixing bowl. In this bowl, combine the ground turkey with fresh spinach, crumbled feta cheese, and breadcrumbs. Then, add minced garlic and finely chopped red onion. Next, pour in a beaten egg, sprinkle with dried oregano, and add salt and pepper to taste. Mix everything until just combined. It’s key not to overmix, as this helps keep the burgers tender and juicy. Once your mixture is ready, divide it into four equal portions. With your hands, shape each portion into a patty. Aim for a thickness of about one inch. Press down gently in the center of each patty. This helps them cook evenly and prevents puffing up while grilling. Preheat your grill or grill pan to medium heat. Brush it lightly with olive oil to prevent sticking. Place the patties on the grill and cook for about 5 to 7 minutes on each side. You want them to reach an internal temperature of 165°F (75°C). This ensures they are safe to eat and perfectly cooked. While grilling, you can toast whole wheat burger buns for 1 to 2 minutes until golden brown. Assemble your burgers by placing a patty on the bottom bun, adding toppings like sliced tomatoes or lettuce, and drizzle with tzatziki sauce if you like. Check out the Full Recipe for more details! To keep your spinach feta turkey burgers moist, avoid overmixing. When you blend the meat with other ingredients, mix just until combined. Overmixing can make the burgers tough. You can also add a little olive oil to the turkey mixture. This adds moisture and flavor. For extra flavor, try adding spices. A dash of paprika or cumin can boost taste. You can also mix in fresh herbs like basil or parsley. These add a fresh kick to every bite. Try adding a bit of lemon zest for brightness. It pairs well with feta cheese and spinach. You can cook these burgers on a grill or in a pan. Grilling gives a nice smoky flavor and those pretty grill marks. Make sure your grill is hot before placing the patties on it. If you pan-fry, use a non-stick skillet and a bit of olive oil. Both methods work well. Just cook until the burgers reach 165°F. This ensures they are safe to eat. For the best results, refer to the Full Recipe for detailed cooking tips. {{image_2}} If you want a meat-free option, you can make these burgers with black beans. Use one can of drained and rinsed black beans instead of ground turkey. Mash the beans in a bowl, then mix in the chopped spinach, crumbled feta, and breadcrumbs. Add the same spices and form patties. You can grill these just like regular burgers. This version is tasty and packed with fiber. Feta adds a salty zing to the burgers, but you can try other cheeses too. Goat cheese gives a creamy texture, while cheddar adds a rich flavor. Even mozzarella can work if you like it melty. Just remember to adjust the amount to your taste. Mixing cheese into your burgers can change the flavor in fun ways. Adding spices can change the game. Try paprika for a smoky flavor or cumin for warmth. Fresh herbs like parsley or dill can brighten the taste. You can also add a pinch of red pepper flakes for a kick. Spice and herb choices can make each batch of burgers unique. Get creative and find what you enjoy most! For the full recipe, check out the Spinach Feta Turkey Burgers. After making your spinach feta turkey burgers, you may have some leftovers. Store them in an airtight container. Place the burgers in the fridge. They will stay fresh for up to 3 days. If you want to keep them longer, freezing is a great option. To reheat your burgers, use a skillet or the oven. Heat a skillet over medium heat. Add a little olive oil for flavor. Cook for about 3-4 minutes on each side until warm. If using the oven, wrap the burgers in foil and heat at 350°F (175°C) for about 10-15 minutes. This keeps them moist and tasty. If you want to freeze the burgers, first let them cool completely. Wrap each burger in plastic wrap. Then, place them in a freezer bag. Squeeze out as much air as you can. The burgers can stay frozen for up to 3 months. When ready to eat, thaw them in the fridge overnight before reheating. This keeps the flavor and texture just right. You can find the full recipe for these delicious burgers to enjoy anytime! You can tell when turkey burgers are done by checking their temperature. Use a meat thermometer to find the internal temperature. It should read 165°F (75°C). This ensures the turkey is safe to eat. If you don’t have a thermometer, look for a golden brown color on the outside. The burgers should feel firm but not dry. Yes, you can make these burgers ahead of time. Prepare the patties and store them in the fridge for up to a day. This saves you time on busy days. You can also freeze the uncooked patties. Place parchment paper between each patty to prevent sticking. They will last in the freezer for about three months. Just thaw them in the fridge before cooking. Serve these burgers on whole wheat buns for a healthy twist. Add fresh toppings like sliced tomatoes and crisp lettuce. A dollop of tzatziki sauce brings great flavor. You can also pair the burgers with a side salad or sweet potato fries. For the full recipe, check out the instructions above. Enjoy your delicious meal! You now know how to make tasty spinach feta turkey burgers. We covered key ingredients, cooking steps, and tips for the best results. Remember the variations for vegetarian options and different cheeses. Storing and reheating leftovers is easy. In the end, these burgers are a great way to enjoy a healthy meal. Try them at your next cookout or family dinner. You'll impress your guests and feel good about what they eat. Enjoy your cooking!

Spinach Feta Turkey Burgers Healthy and Flavorful Meal

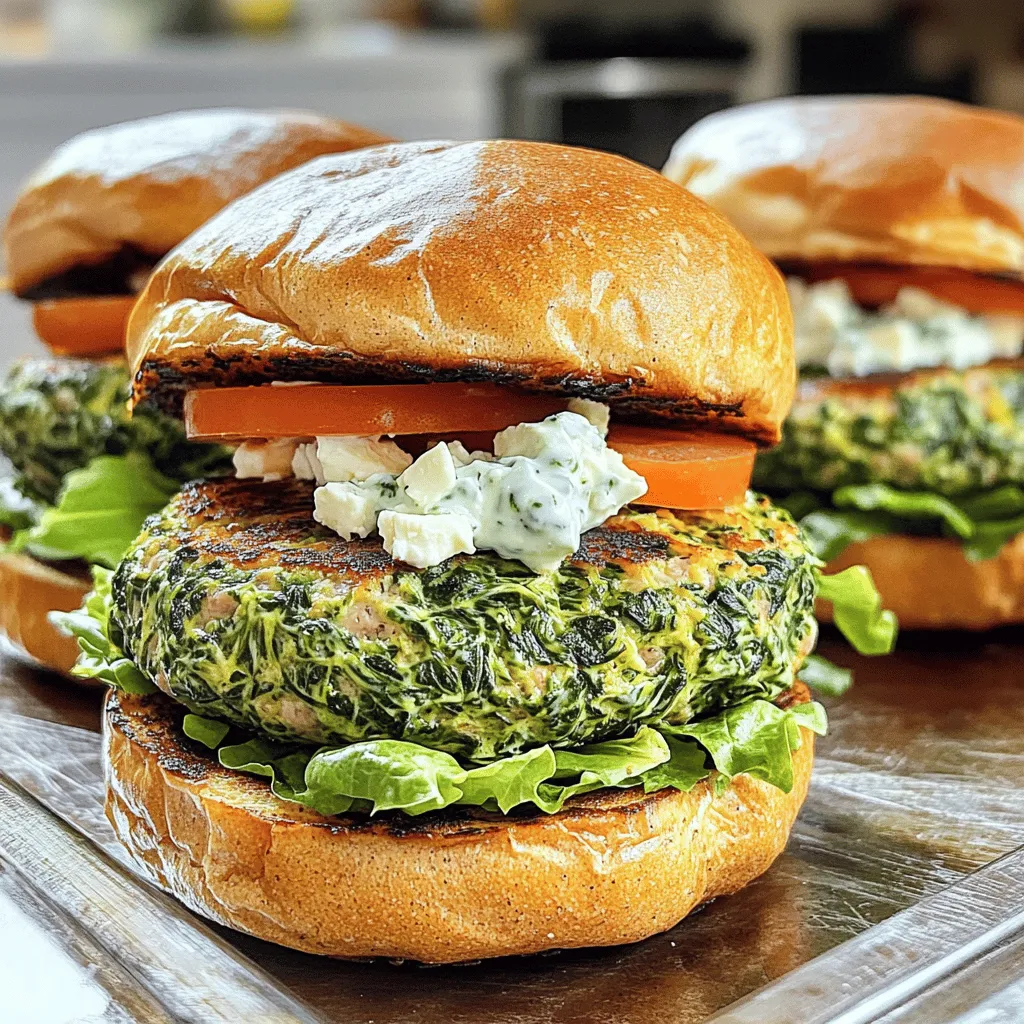
Are you looking for a healthy and tasty meal? Spinach feta turkey burgers offer the perfect blend of flavor and

- 2 ripe peaches - 1 banana (frozen) - 1 cup Greek yogurt (preferably vanilla) To make a Peach Pie Smoothie, you need fresh ingredients. Start with two ripe peaches. They should smell sweet and feel slightly soft. Next, grab a frozen banana. It adds creaminess and a nice chill. Finally, include one cup of Greek yogurt. I like using vanilla-flavored yogurt for extra sweetness. - Honey or maple syrup - Cinnamon and nutmeg - Rolled oats You can enhance your smoothie with a few optional ingredients. Honey or maple syrup gives it a sweet touch. A pinch of cinnamon and nutmeg adds warmth and spice. If you want more texture, consider adding rolled oats. They help make the smoothie filling and hearty. - Whipped cream - Crushed graham crackers When serving, consider some fun toppings. A dollop of whipped cream makes it feel like dessert. Crushed graham crackers can mimic that pie crust flavor. They add a nice crunch that pairs well with the smoothness of the drink. For the complete recipe, check the [Full Recipe]. 1. Start by washing the peaches under cold water. 2. Cut the peaches in half, remove the pit, and chop them into small pieces. 3. Grab a frozen banana from your freezer. If you don't have one, peel and slice a banana, then freeze it for later use. 1. In a blender, combine the chopped peaches, frozen banana, Greek yogurt, and almond milk. 2. Add in honey, cinnamon, nutmeg, rolled oats, and vanilla extract. 3. Blend on high speed until the mix is smooth. Check for any chunks. 4. If the smoothie is too thick, slowly add more almond milk until you reach your desired thickness. 1. Taste your smoothie. If it needs more sweetness, add a little more honey. Blend briefly. 2. Pour the smoothie into tall glasses. 3. For a fun touch, top each glass with whipped cream and a sprinkle of crushed graham crackers for that pie flavor. 4. Enjoy your tasty peach pie smoothie right away! For the full recipe, see the details above. Best types of peaches Use ripe, juicy peaches for the best flavor. Look for peaches that smell sweet and have a slight give when pressed. Freestone peaches are easier to prepare since the pit comes out easily. Using Greek yogurt vs. regular yogurt I recommend Greek yogurt for this smoothie. It adds creaminess and protein. Regular yogurt is fine too, but it may make the smoothie thinner. Choose vanilla-flavored Greek yogurt for added sweetness. How to adjust thickness If your smoothie is too thick, add more almond milk. Start with a little and blend. You want a nice, drinkable consistency. If you like it thicker, add more oats or yogurt. Tips for creaminess Frozen banana is key for a creamy texture. It blends well and adds natural sweetness. If you want extra creaminess, try adding a touch of avocado or a dollop of nut butter. Ideal glassware Serve your peach pie smoothie in tall glasses. This makes it look appealing and fun to drink. A mason jar works well too for a rustic touch. Pairing with snacks This smoothie pairs well with light snacks. Try it with whole-grain toast or a handful of nuts. You could also enjoy it with a simple fruit salad for a refreshing meal. For the full recipe, check out the Peach Pie Smoothie details above. {{image_2}} You can switch up the fruit in your peach pie smoothie. Try using ripe mangoes or sweet strawberries. These fruits can add new flavors and keep things exciting. You can also mix in berries like blueberries or raspberries. They pair well with peach and add a nice color. Just make sure the fruits are ripe for the best taste. If you want a dairy-free smoothie, you can swap Greek yogurt for plant-based yogurt. Look for options made from almond or coconut. They give a nice creaminess. For milk, you can use oat milk or soy milk instead of regular milk. These alternatives work great and keep the smoothie tasty. You can change how sweet your smoothie is. Use natural sweeteners like agave syrup or stevia instead of sugar. These options are often healthier and still sweet. You can also add spices like ginger or cardamom for more flavor. They can make your smoothie taste more complex and delicious. You can find the Full Recipe to make this tasty peach pie smoothie in the previous sections. To keep your Peach Pie Smoothie fresh, store leftovers in a sealed jar. This helps lock in the flavor. You can also pour the smoothie into an ice cube tray and freeze it for later. This is a smart way to enjoy a quick treat. When you want to enjoy your frozen smoothie, just take it out of the freezer. Let it sit in the fridge for a few hours to thaw. If it separates, just shake or stir it well before drinking. This will mix the ingredients back together. Peaches last about three to five days in the fridge. Bananas can spoil faster, so check them often. Signs your smoothie has gone bad include a sour smell or a change in color. If you notice these signs, it’s best to toss it out. The prep time for a Peach Pie Smoothie is about 10 minutes. This includes washing, chopping, and blending your ingredients. You can whip it up quickly, making it perfect for busy mornings or a refreshing snack. Yes, you can prepare this smoothie in advance. To do this, blend all the ingredients and store it in an airtight container. Keep it in the fridge for up to 24 hours. Just give it a quick stir before you drink. If you want to store it longer, pour the smoothie into ice cube trays and freeze. Then, blend the cubes with a bit of almond milk when you are ready to enjoy. To make the Peach Pie Smoothie vegan, swap Greek yogurt for plant-based yogurt. You can use almond, coconut, or soy yogurt. Also, replace honey with maple syrup or agave nectar for sweetness. These simple swaps keep all the flavor while making it dairy-free. This blog post showed you how to make a delicious Peach Pie Smoothie. You learned about the fresh ingredients and optional enhancements to boost flavor. I shared steps for blending and tips for the best texture. You can even explore tasty variations and storage tips. In the end, this smoothie is a fun and tasty way to enjoy fruit. Try it today and experiment with different ingredients!

Peach Pie Smoothie Flavorful and Refreshing Delight

Are you ready to enjoy a delicious treat that tastes like summer in a glass? My Peach Pie Smoothie is

- Zucchini and Apple Requirements - 1 medium zucchini, grated - 1 medium apple, peeled and grated (choose a sweet variety like Fuji or Gala) - Key Dry Ingredients - 2 cups all-purpose flour - 1 cup granulated sugar - 1/2 cup brown sugar, packed - 1/2 cup vegetable oil - 2 large eggs, beaten - 1 teaspoon vanilla extract - 1 teaspoon baking soda - 1/2 teaspoon baking powder - 1/2 teaspoon salt - 1 teaspoon ground cinnamon - 1/4 teaspoon ground nutmeg - Optional Add-ins - 1/2 cup chopped walnuts or pecans Gathering these ingredients will set you up for success. The combination of zucchini and apple gives this bread a moist texture and sweet flavor. Using a sweet apple like Fuji or Gala is key. The spices elevate the dish, adding warmth. If you want a crunch, add nuts. This blend creates a simple yet delicious treat. Check out the Full Recipe for step-by-step guidance. Preheating and Pan Preparation Start by preheating your oven to 350°F (175°C). This step is key. While it heats, grease a 9x5-inch loaf pan with butter or cooking spray. You can also line it with parchment paper. This helps in easy removal later. Preparing the Zucchini and Apple Next, take your medium zucchini and apple. Grate both using a box grater. You want them to blend well into the bread. If the grated mix looks too wet, squeeze out extra moisture with a clean cloth or paper towel. This will help keep the bread from being soggy. Combining Wet Ingredients In a large bowl, mix together your sugars and vegetable oil. Use a whisk to blend them until smooth. Then, add in the beaten eggs and vanilla extract. Make sure to mix well until everything is combined. Adding Dry Ingredients In another bowl, sift together the flour, baking soda, baking powder, salt, cinnamon, and nutmeg. Slowly add this dry mix to the wet ingredients. Stir gently until just combined. Be careful not to overmix; this keeps the bread nice and fluffy. Pouring the Batter into the Pan Now, fold in the grated zucchini and apple. If you like, add chopped walnuts or pecans at this stage. Pour the batter into the prepared loaf pan. Smooth the top with a spatula to ensure even baking. Checking for Doneness Place the pan in the preheated oven. Bake for 50 to 60 minutes. To check if it’s done, insert a toothpick into the center. If it comes out clean, your bread is ready. Let it cool in the pan for about 10 minutes, then transfer it to a wire rack. Enjoy the delightful aroma while it cools! Moisture Management Zucchini and apple bring moisture to your bread. This is great, but too much can make it soggy. To manage moisture, grate your zucchini and apple. Then, use a clean cloth to squeeze out excess liquid. This keeps your bread from being too wet. Avoiding Overmixing When mixing, do it gently. Overmixing can make the bread tough. Mix until you see no dry flour. Then fold in your zucchini and apple. This helps keep your bread light and fluffy. Spice Recommendations Spices can boost your bread's flavor. I love adding ground cinnamon and nutmeg. They give a warm, cozy taste. You can try adding a pinch of ginger or allspice for something new. Additions for Extra Flavor Consider adding chopped nuts or chocolate chips. Walnuts or pecans offer crunch and depth. You can swap them for chocolate chips if you want a sweeter treat. Dried fruit like raisins or cranberries also works well. Serving Suggestions Slice the Zucchini Apple Bread and serve it warm or at room temperature. It looks nice on a wooden board. Pair it with a cup of tea or coffee for a delightful snack. Toppings and Garnishes For extra flair, drizzle honey on top. A dollop of cream cheese spread adds richness. You can also sprinkle powdered sugar for a sweet touch. These garnishes make your bread look and taste even better. {{image_2}} You can customize your zucchini apple bread with fun flavors. Adding different nuts can bring a nice crunch. I love using walnuts or pecans. They add depth and texture to each bite. If you want a sweet twist, try incorporating chocolate chips. They melt into the bread and create a delicious treat. If you need a gluten-free version, swap the all-purpose flour for a gluten-free blend. This keeps the bread light and tasty. For vegan substitutions, you can replace the eggs with flaxseed meal or applesauce. Use a plant-based oil too, like coconut oil, for a rich flavor. You can make muffins instead of bread. Muffins bake faster and are great for snacks. Just adjust the baking time to about 20-25 minutes. Another fun idea is to use different bread sizes. Try mini loaf pans for smaller portions. They are perfect for sharing or gifting. For the full recipe, check out the complete guide to making zucchini apple bread. Room Temperature Storage Store your Zucchini Apple Bread at room temperature. Place it in a sealed container or cover it tightly with plastic wrap. This keeps the bread fresh and moist. It can stay good for up to three days. Refrigeration Recommendation If you want it to last longer, place the bread in the fridge. Wrap it well in plastic wrap or foil. This method can extend its freshness for about one week. Just remember that cold air can dry it out, so wrap it tightly. How to Freeze for Later To freeze your Zucchini Apple Bread, let it cool completely first. Then, slice it into pieces. Wrap each slice in plastic wrap and place them in a freezer-safe bag. You can also freeze the whole loaf. Just wrap it tightly to prevent freezer burn. It will stay fresh for up to three months. Reheating Tips When you're ready to enjoy your frozen bread, remove it from the freezer. Let it thaw in the fridge overnight. For a quick option, use the microwave. Heat a slice for about 15 seconds. This keeps it soft and tasty. Freshness Guidelines Zucchini Apple Bread tastes best when fresh. At room temperature, enjoy it within three days. In the fridge, it’s good for about one week. If frozen, use it within three months for the best flavor. Signs of Spoilage Check for any mold or an off smell. If the bread feels dry or hard, it’s time to toss it. Always trust your senses. They help you know when it's no longer good to eat. How to Tell When Zucchini Apple Bread is Done? You can check if your bread is done by using a toothpick. Insert it in the center of the loaf. If it comes out clean, the bread is ready. If it’s wet, give it more time. The top should be golden brown and spring back when touched. Can I Substitute Ingredients? Yes, you can substitute some ingredients. For example, use coconut oil instead of vegetable oil. You can swap granulated sugar for honey or maple syrup. If you want a gluten-free option, use a gluten-free flour blend. What to Do If the Bread is Too Dense? If your bread turns out dense, it might be due to overmixing. Mix only until the dry ingredients are combined. Also, make sure to measure the flour correctly. Too much flour can lead to dense bread. Can I Use a Different Pan Size? You can use a different pan size, but keep an eye on the baking time. A smaller pan may require longer baking, while a larger pan may cook faster. Always test for doneness with a toothpick. Calorie Count per Slice Each slice of Zucchini Apple Bread has about 150 calories. This can vary based on the added ingredients. If you add nuts, the calorie count will increase slightly. Nutritional Benefits of Ingredients Zucchini is low in calories and high in vitamins. It adds moisture without much fat. Apples provide fiber and natural sweetness. The nuts add healthy fats and protein. Together, these ingredients create a tasty and nutritious treat. In this article, we covered everything you need for making Zucchini Apple Bread. You learned about the key ingredients and how to mix and bake them properly. I shared tips for perfect texture, flavor boosts, and how to serve it best. You also found variations and storage tips to enjoy this bread longer. Remember, baking is a fun way to experiment. Don’t hesitate to try new flavors or ingredients. Enjoy the process and your delicious results!

Zucchini Apple Bread Easy and Tasty Recipe Guide

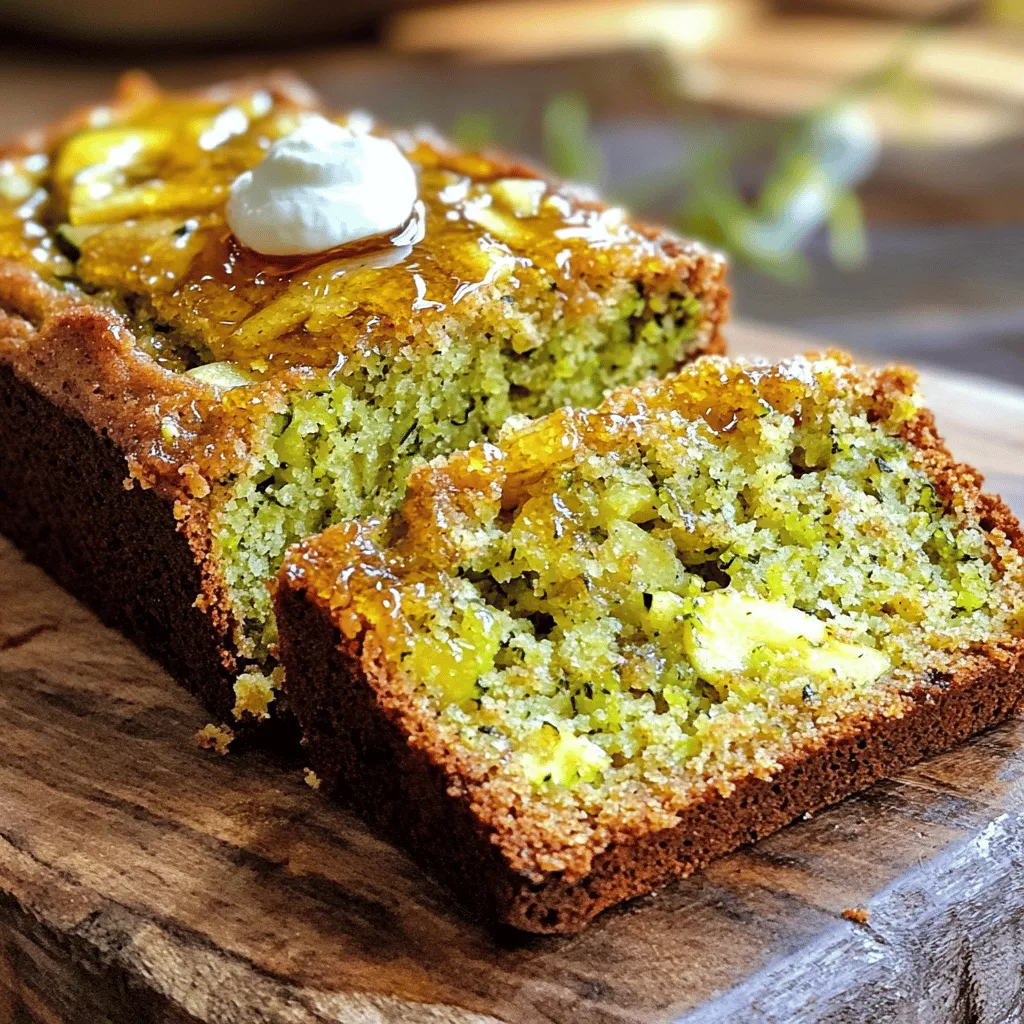
Are you ready to bake something delightful? Zucchini Apple Bread is a tasty treat that combines fresh zucchini and juicy

- 2 ripe peaches, peeled and sliced - 1 cup raspberries (fresh or frozen) - 2 tablespoons honey or maple syrup - 1 teaspoon vanilla extract - 1 cup Greek yogurt (plain or vanilla) - 1 cup granola - Mint leaves for garnish (optional) Gather these ingredients to create a tasty treat. The ripe peaches bring sweetness and a lovely color. Raspberries add a nice tartness that balances the dish. Honey or maple syrup sweetens without overpowering. The Greek yogurt gives creaminess and protein, making it healthy. Granola adds crunch and texture, while mint leaves make a lovely garnish. Each layer will not only taste great but also look beautiful. You can find the full recipe for Peach Melba Parfait in the earlier section. Enjoy the process of mixing flavors and creating your masterpiece! Step 1: Cooking the Peaches and Raspberries Start by washing the peaches and raspberries. Peel the peaches and slice them. Use a small saucepan and set it on medium heat. Add the sliced peaches and half of the raspberries to the pan. Pour in the honey or maple syrup. Cook this mixture until it bubbles and the peaches soften, which takes about 5 to 7 minutes. Once done, remove it from heat and let it cool. Step 2: Flavoring the Greek Yogurt Now, grab a bowl for the Greek yogurt. Add one cup of Greek yogurt to the bowl. Pour in the teaspoon of vanilla extract. This step gives the yogurt a sweet flavor. Mix it well until the yogurt is smooth and creamy. Step 3: Layering the Ingredients It's time to build your parfait! Take serving glasses or bowls and start with a spoonful of the flavored Greek yogurt at the bottom. Next, add a layer of the cooked peach and raspberry mix over the yogurt. Then, sprinkle a layer of granola on top. Repeat this layering until you fill the glasses. Finish with a layer of yogurt on top. For a nice touch, place a few fresh raspberries on the top layer and add a mint leaf if you like. That’s it! You now have a Peach Melba Parfait ready to enjoy. For more details, check out the Full Recipe. Tip 1: Choosing the Right Peaches Select ripe peaches for the best flavor. Look for peaches that yield slightly when you press them. They should have a sweet aroma. If you can't find ripe ones, let them sit at room temperature for a few days. Tip 2: Achieving the Ideal Layering Technique Layering makes your parfait look great and adds texture. Start with yogurt, then add the peach and raspberry mix. Follow with granola for crunch. Repeat until your glass is full. Make sure to finish with yogurt for a neat look. Tip 3: Customizing Sweetness Levels You can adjust the sweetness to fit your taste. If you like it sweeter, add more honey or maple syrup. If you prefer less sugar, use plain yogurt and skip the sweeteners. Taste as you go to find what you love best. For the full recipe, check out the Peach Melba Parfait section. Enjoy making this tasty treat! {{image_2}} Variation 1: Substituting Yogurt for Dairy-Free Options If you want a dairy-free parfait, use coconut or almond yogurt. Both have a creamy texture. They add a delicious flavor that pairs well with peaches and raspberries. This swap keeps the parfait just as tasty. Variation 2: Adding Different Fruits or Nuts You can mix and match fruits to your liking. Try adding bananas, strawberries, or blueberries. Each fruit brings its own unique taste. You may also add nuts like almonds or walnuts for crunch. They give extra texture and flavor. Variation 3: Incorporating Flavored Yogurts or Granola Using flavored yogurt can change the taste of your parfait. Vanilla or berry yogurts add extra sweetness and depth. You can also choose different granola flavors. This simple change makes each parfait unique and fun. For the complete recipe, check out the Full Recipe section. It provides steps to make your Peach Melba Parfait delicious and easy. Storage Method: Refrigeration Tips Keep your Peach Melba parfaits in the fridge. Use airtight containers to keep them fresh. If you have layered parfaits, store them as is. This method saves time and keeps flavors intact. Shelf Life: How Long They Last When stored properly, your parfaits last up to three days. After that, the fruit may lose its texture. You want to enjoy them while they are still fresh and tasty. Reassembling After Storage If you notice some separation after storage, don’t worry. Just stir the parfait gently to mix it. You can also add a fresh layer of yogurt or granola. This refreshes the taste and keeps it exciting. For more details, check the Full Recipe. Can I make Peach Melba Parfaits in advance? Yes, you can make these parfaits ahead of time. Just layer the ingredients in jars or cups. Cover them well and place them in the fridge. They taste great for up to two days. The layers may blend a little, but the flavor stays rich. What can I use instead of granola? If you want a swap for granola, try crushed nuts, seeds, or oats. You can also use crushed cookies for a sweet twist. Each option adds unique flavors and textures. Choose what you like best for your parfait. How can I make this recipe vegan? To make a vegan version, switch Greek yogurt for coconut yogurt. Use maple syrup instead of honey for sweetness. Replace granola with a vegan-friendly option. These simple swaps keep the taste delicious while fitting a vegan diet. Check the Full Recipe for more details! You can create a tasty Peach Melba Parfait at home. We covered the ingredients, steps, and tips needed to make this delicious treat. You learned how to layer peaches, raspberries, Greek yogurt, and granola. Plus, I shared ways to customize your parfait. Don’t forget to store leftovers properly for later enjoyment. Making this parfait is fun and easy, so get started today. Trust me, it will be a hit! Enjoy your delicious, healthy dessert.

Peach Melba Parfait Tasty and Healthy Delight

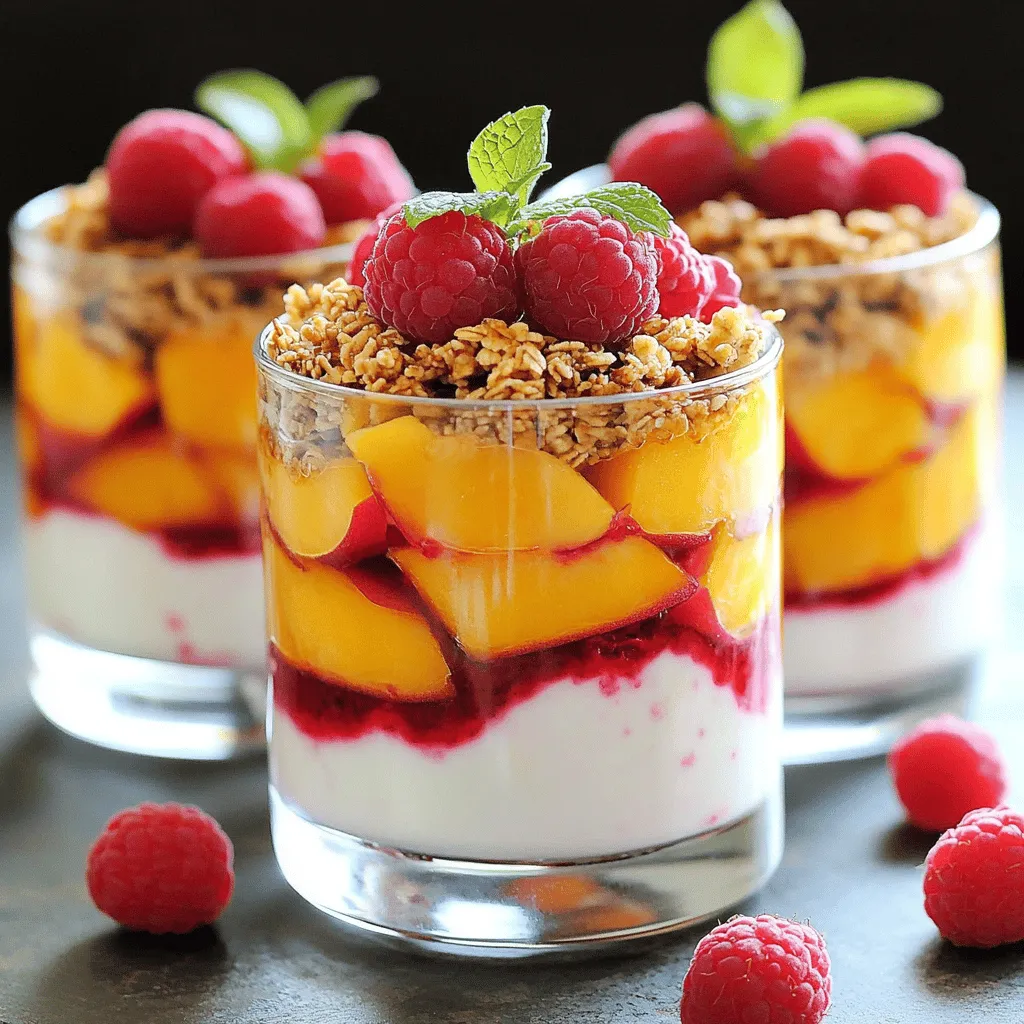
Craving a light, fruity treat that’s both tasty and healthy? Try my Peach Melba Parfait! This delicious dessert layers sweet

- 3 medium zucchinis, thinly sliced - 2 cups fresh spinach, packed - 15 oz ricotta cheese - 1 cup shredded mozzarella cheese - 1 cup grated Parmesan cheese - 1 large egg - 2 cups marinara sauce - 2 cloves garlic, minced - 1 teaspoon Italian seasoning - Salt and pepper to taste - Olive oil for cooking - Fresh basil leaves for garnish Zucchini and spinach make a great pair in this lasagna. You get the best of both worlds: a hearty dish that is also light and healthy. The zucchinis replace traditional pasta, which helps cut down on carbs. To start, gather your ingredients. Fresh zucchinis bring a crisp texture that holds up well in the oven. Spinach adds a vibrant green color and a healthy punch of nutrients. Ricotta cheese gives the dish creaminess. I love mixing it with an egg and some grated Parmesan. This blend helps bind the filling and adds depth. Marinara sauce brings a rich tomato flavor, while garlic and Italian seasoning enhance the taste even more. This recipe is easy to follow. You can find the Full Recipe in this article. Make sure to have all your ingredients ready before you start. Having everything prepped helps the cooking process go smoothly. Enjoy the colors and fresh scents as you prepare this tasty meal! - Preheat the oven to 375°F (190°C). - In a bowl, mix 15 oz of ricotta cheese, 1 large egg, and 1 cup of grated Parmesan cheese. Add 1 teaspoon of Italian seasoning, salt, and pepper to taste. Set this aside. - In a skillet, drizzle olive oil and heat over medium. Add 2 minced cloves of garlic and cook for about 1 minute until fragrant. - Toss in 2 cups of fresh spinach and cook until it wilts, about 2-3 minutes. Mix this into the ricotta mixture. - Start by spreading a thin layer of 2 cups of marinara sauce on the bottom of a baking dish. - Next, layer zucchini slices over the sauce. Use 3 medium zucchinis, thinly sliced. - Add half of the ricotta-spinach mixture on top of the zucchini. - Repeat with another layer of marinara sauce, more zucchini slices, and the rest of the ricotta-spinach mixture. - Finish with a final layer of zucchini, the remaining marinara sauce, and top it with 1 cup of shredded mozzarella cheese. - Cover the baking dish with aluminum foil and bake for 30 minutes. - Remove the foil and bake for an additional 15 minutes, or until the cheese bubbles and turns golden brown. - Let the lasagna cool for 10 minutes before slicing. This helps the layers set better. How to cut zucchini for optimal layering Cut zucchinis into thin slices. Aim for about 1/8 inch thick. This helps them cook well and blend in with the layers. You can use a sharp knife or a mandoline for even slices. Remember, even slices mean even cooking! Tips for seasoning the ricotta mixture Mix the ricotta cheese with one large egg and grated Parmesan. Add Italian seasoning, salt, and pepper. Taste it to adjust the flavor. If you want a kick, add a pinch of red pepper flakes. This step makes the ricotta rich and tasty. Best practices for sautéing spinach Heat olive oil in a skillet over medium heat. Add minced garlic and cook for about one minute. This makes your kitchen smell amazing! Then, add the fresh spinach. Cook until it wilts, about 2 to 3 minutes. Don't overcook—keep that vibrant green color! Recommended side dishes Serve your zucchini spinach lasagna with a fresh salad. A simple green salad with a light vinaigrette works great. Garlic bread also pairs well and adds a nice crunch. Best wines to pair with zucchini spinach lasagna A light red wine like Pinot Noir is perfect. If you prefer white, try a Chardonnay. Both wines enhance the flavors of the dish and make your meal feel special. Creative ways to use leftovers Leftover lasagna makes a quick lunch! You can also chop it up and mix it into a salad for a twist. Another idea is to bake it in a pie crust for a fun lunch option. For the full recipe, check out the [Full Recipe]. {{image_2}} If you want to change things up, you have great options. For the ricotta cheese, try cottage cheese or cream cheese. These swaps keep it creamy and delicious. You can also add different veggies. Consider mushrooms, bell peppers, or eggplant for added flavor. Mixing in these vegetables makes your lasagna colorful and fun. If you're gluten-free, use gluten-free lasagna noodles. You can also use thinly sliced zucchini as the noodle base. This keeps the dish light and healthy. To boost the taste, add spices like red pepper flakes or fresh herbs. Basil, oregano, or thyme can add depth to your dish. Just sprinkle them between the layers for extra flavor. You can use different cheeses for more richness. Try goat cheese or a sharp cheddar. Mixing cheeses creates a unique taste that you’ll love. Adjust your marinara sauce for more flavor. Add a splash of red wine or some chopped olives. This gives your sauce a special twist that makes it stand out. For the full recipe, check out the original instructions to see how all these ideas fit in. Store leftover zucchini spinach lasagna in an airtight container. Glass or plastic containers work well. Make sure to let it cool before sealing. The lasagna stays fresh in the fridge for up to three days. You can also freeze it. Wrap the lasagna tightly in plastic wrap and then in foil. It can last in the freezer for up to three months. When you're ready to eat it again, thaw it in the fridge overnight. To reheat lasagna, use an oven or microwave. Preheat the oven to 350°F (175°C). Cover the lasagna with foil to keep it moist. Heat for about 20 minutes or until warm. In the microwave, place a slice on a microwave-safe plate. Heat it for 2-3 minutes on high. Check to make sure it’s hot all the way through. This will help keep the texture and flavor intact. Enjoy your delicious zucchini spinach lasagna again! For a detailed guide, check the Full Recipe. Can I make zucchini spinach lasagna ahead of time? Yes, you can prepare the lasagna a day in advance. Assemble it, then cover it with foil. Store it in the fridge overnight. Bake it the next day. This helps the flavors blend well. What can I serve with this dish? I love to serve zucchini spinach lasagna with a fresh salad or garlic bread. A light Caesar salad pairs nicely. You can also try a crisp green salad with a lemon vinaigrette. Is this recipe suitable for meal prep? Absolutely! Zucchini spinach lasagna works great for meal prep. You can divide it into portions. Store leftovers in airtight containers. This makes it easy to grab a meal on busy days. How to prevent watery lasagna To avoid watery lasagna, salt the zucchini slices first. Let them sit for 15 minutes to draw out moisture. Pat them dry before layering. This keeps the dish from becoming soggy. Can I make this lasagna vegan? Yes, you can make a vegan version! Substitute ricotta with cashew cheese or tofu. Use a plant-based egg replacer for binding. Choose vegan mozzarella for topping. What if I don’t have fresh spinach? If you lack fresh spinach, you can use frozen spinach. Thaw and drain it well before mixing. Another option is to use kale or Swiss chard for a twist on flavor. This zucchini spinach lasagna recipe is a great way to enjoy healthy meals. You learned about the key ingredients, simple instructions, and helpful tips for perfecting flavor and texture. Don't forget the variations and storage tips to make the most of your dish. With this recipe, you'll impress family and friends while enjoying delicious meals all week. Cooking can be fun and rewarding, so dive in and make this lasagna your own!

Zucchini Spinach Lasagna Flavorful and Nutritious Dish

Looking for a tasty and healthy meal? This Zucchini Spinach Lasagna hits the spot! It’s easy to make and packed

To make the best peach raspberry scones, you need fresh, high-quality ingredients. Here’s what you will need: - 2 cups all-purpose flour - 1/2 cup granulated sugar - 1 tablespoon baking powder - 1/2 teaspoon salt - 1/2 cup unsalted butter, cold and cubed - 1 cup fresh peaches, diced - 1 cup fresh raspberries - 1/2 cup heavy cream - 1 large egg - 1 teaspoon vanilla extract - 1 tablespoon milk (for brushing) - Extra sugar for sprinkling These ingredients come together to create a delightful, flaky texture. The peaches add sweetness, while the raspberries give a tart burst of flavor. You can play with flavors by adding a few extra ingredients. Try these for a twist on the basic scone: - Zest from one lemon or orange - 1/2 teaspoon cinnamon - 1/2 teaspoon almond extract These extras can elevate the taste and give your scones a unique flair. If you run out of an ingredient, don’t worry! Here are some easy swaps: - Use whole wheat flour instead of all-purpose flour for a nuttier flavor. - Swap out heavy cream for buttermilk or Greek yogurt to cut calories. - Replace unsalted butter with coconut oil for a dairy-free option. These substitutions can help you make scones that fit your dietary needs without losing flavor. For the full recipe, check out the link provided. To start making your Peach Raspberry Scones, gather all your ingredients. You will need: - 2 cups all-purpose flour - 1/2 cup granulated sugar - 1 tablespoon baking powder - 1/2 teaspoon salt - 1/2 cup unsalted butter, cold and cubed - 1 cup fresh peaches, diced - 1 cup fresh raspberries - 1/2 cup heavy cream - 1 large egg - 1 teaspoon vanilla extract - 1 tablespoon milk (for brushing) - Extra sugar for sprinkling 1. Preheat your oven to 400°F (200°C). Line a baking sheet with parchment paper. 2. In a large bowl, whisk the flour, sugar, baking powder, and salt until mixed. 3. Add the cold butter. Use a pastry cutter or your hands to mix until it looks like coarse crumbs. 4. Gently fold in the diced peaches and raspberries. Be careful not to crush the berries. 5. In another bowl, whisk the cream, egg, and vanilla extract together. 6. Pour the wet mix into the dry mix. Stir until just combined. The dough should be a bit sticky. 7. Turn the dough onto a floured surface. Knead gently a few times to bring it together. 8. Pat the dough into a disc about 1-inch thick. Cut the disc into 8 equal wedges. 9. Place the wedges on the prepared baking sheet. Brush the tops with milk and sprinkle with extra sugar. 1. Bake the scones in the preheated oven for 15-18 minutes. They should turn golden brown. 2. Check for doneness by tapping the bottom. It should sound hollow. 3. Remove the scones from the oven and let them cool slightly on a wire rack. - Use cold butter to keep the scones flaky. - Don't overmix the dough. Stir just until combined. - For a softer scone, add a bit more cream if needed. - Let the scones cool on a rack for a few minutes before serving. For more details on preparation, check the Full Recipe. When making Peach Raspberry Scones, avoid overmixing the dough. Overmixing leads to tough scones. Handle the dough gently. Use cold butter for the best texture. If your butter is warm, your scones might spread too much. Also, watch your baking time. Scones can go from golden to burnt quickly. You can change the flavors in your scones! Try adding nuts like almonds or walnuts for crunch. You can also swap peaches and raspberries for other fruits. Blueberries or strawberries work well. For a zesty twist, add lemon or orange zest to the dough. This brightens the flavor and makes it unique. Mixing dough is key to great scones. Start by whisking dry ingredients in a bowl. This helps blend them evenly. When adding butter, use your fingers or a pastry cutter. Work until it looks like crumbs. Next, fold in your fruit gently. Make sure not to crush the raspberries; they should stay whole. Finally, add wet ingredients and mix until just combined. This keeps your scones light and fluffy. For the full recipe, check out the step-by-step guide. {{image_2}} You can change the fruits in these scones to fit your taste. Blueberries and peaches work well together. You could also use blackberries for a richer flavor. If you prefer a tropical twist, try adding diced pineapple. Mixing fruits brings new tastes to your scones. Want to make a savory version? Replace the peaches and raspberries with cheese and herbs. You could use sharp cheddar and fresh chives. This makes a great snack or appetizer. Serve them warm with your favorite dip. You can easily make these scones vegan. Swap the butter with coconut oil or vegan butter. Use almond milk instead of heavy cream. For gluten-free scones, replace all-purpose flour with a gluten-free blend. Just follow the Full Recipe for more details on making these swaps. To keep your leftover scones fresh, place them in an airtight container. This helps maintain their soft texture. You can store them at room temperature for up to two days. If you want to keep them longer, refrigeration is a good option. Just be aware that refrigeration may make them a bit dry. When you are ready to enjoy your scones again, reheating is simple. Preheat your oven to 350°F (175°C). Place the scones on a baking sheet. Heat them for about 5 to 10 minutes. This warms them up and brings back some crunch. You can also use a microwave, but be careful. Microwaving too long can make them tough. Heat for just 10 to 15 seconds at a time. Freezing is a great way to save scones for later. First, let the scones cool completely. Wrap each one tightly in plastic wrap. Then, place them in a freezer-safe bag. Label the bag with the date. You can freeze them for up to three months. When you're ready to eat them, thaw them in the fridge overnight. Reheat as mentioned above for the best results. For more details on preparation, check the Full Recipe. You can tell your scones are done when they turn a light golden brown. They should also feel firm to the touch. A toothpick inserted in the center should come out clean. If it comes out with wet dough, bake for a few more minutes. Keep an eye on them for the best results. Yes, you can make the dough ahead of time! Prepare the dough and wrap it in plastic wrap. Store it in the fridge for up to 24 hours. When you’re ready to bake, just cut the dough and follow the baking instructions. This makes it easy to enjoy fresh scones anytime! Peach Raspberry Scones pair well with clotted cream or whipped cream. You can also serve them with fresh fruit or a drizzle of honey. For a fun twist, add a flavored jam like peach or raspberry. These scones are great for brunch or a cozy afternoon tea. You can find the Full Recipe for all preparation details. In this post, we explored how to make delicious peach raspberry scones. We covered key and optional ingredients, along with substitutes for common items. You learned step-by-step instructions for perfect preparation and baking. Tips helped you avoid common mistakes and customize your scones. We also discussed variations, storage, and answered key FAQs. Enjoy baking these scones, and remember to check the full recipe for details. Happy baking!

Peach Raspberry Scones Fresh and Easy Recipe Guide

Welcome to my easy guide on making Peach Raspberry Scones! These scones are soft, sweet, and fruity. I’ll share simple

Older posts
Newer posts
← Previous Page1 … Page74 Page75 Page76 … Page86 Next →

dsad

© 2026 Cooking Wells • Built with GeneratePress

Our Policies

  • Copyright Policy
  • Cookie Policy
  • GDPR Policy
  • Privacy Policy
  • Disclaimer
  • Terms Of Use

More Information

  • Home
  • About
  • Contact
  • Appetizers
  • Dessert
  • Dinner
  • Drinks
©2026, Cooking Wells About Back To Top