![To make a No Bake Nutella Cheesecake, gather these ingredients: - 1 ½ cups graham cracker crumbs - 6 tablespoons unsalted butter, melted - 2 cups cream cheese, softened - 1 cup Nutella - ½ cup powdered sugar - 1 teaspoon vanilla extract - 1 cup heavy whipping cream - Chocolate shavings, for garnish - Chopped hazelnuts, for garnish I love using graham cracker crumbs for the crust. You can swap them with Oreo crumbs for a richer flavor. If you want a dairy-free option, use vegan cream cheese and coconut cream. This keeps the cheesecake creamy without the dairy. Melted coconut oil can replace butter if you're looking for a dairy-free crust. Garnishes add a nice touch to your cheesecake. I recommend chocolate shavings for extra sweetness. Chopped hazelnuts give a nice crunch and pair well with Nutella. You can also drizzle warm Nutella on top before serving. A sprig of mint can brighten your plate and make it look fancy. For the full recipe, check out the details. To start, grab a medium bowl. Mix 1 ½ cups of graham cracker crumbs with 6 tablespoons of melted unsalted butter. Stir until the crumbs look wet. Next, press this mixture into the bottom of a 9-inch springform pan. Use the back of a measuring cup to make it flat. Make sure the crust is tight and even. This crust will hold your cheesecake perfectly. In a fresh mixing bowl, beat 2 cups of softened cream cheese with an electric mixer. Mix for about 2 minutes until it’s smooth. Add 1 cup of Nutella, ½ cup of powdered sugar, and 1 teaspoon of vanilla extract. Blend until it’s creamy and well mixed. In another bowl, whip 1 cup of heavy cream until it forms soft peaks. Gently fold the whipped cream into the Nutella mix. Be careful; you want it light and airy. Now, pour the Nutella cheesecake filling over the crust. Use a spatula to smooth the top. Cover the cheesecake with plastic wrap and place it in the fridge. Let it chill for at least 4 hours, or overnight for the best results. When it’s set, carefully remove the springform pan. Top your cheesecake with chocolate shavings and chopped hazelnuts for a nice look. Serve it up and enjoy! For the full recipe, check out the details above. When you mix your cheesecake, always start with room temperature cream cheese. This helps the cream cheese blend smoothly. Use an electric mixer on medium speed. Beat it for about two minutes until it’s creamy. Next, when you add Nutella, powdered sugar, and vanilla, keep mixing until everything is well combined. Lastly, whip your heavy cream to soft peaks. Gently fold it into the Nutella mix. This keeps the mixture light and fluffy. One common mistake is over-mixing the whipped cream. If you mix too much, it can turn into butter. Just fold it in gently until you see no streaks. Also, make sure your crust is pressed firmly into the pan. This keeps the crust from crumbling when you slice the cheesecake. Lastly, let it chill long enough. Refrigerate for at least four hours. Overnight is best for great texture. When serving, slice the cheesecake into pieces with a sharp knife. To make it look fancy, drizzle some melted Nutella on top. You can also sprinkle chocolate shavings and chopped hazelnuts for some crunch. For an extra touch, add a sprig of mint on each plate. This makes the dessert pop and adds a fresh flavor. For the full recipe, check the details above. {{image_2}} You can twist this recipe by adding different flavors. For a fruity touch, mix in some raspberry or strawberry puree with the Nutella. This gives the cheesecake a fresh burst of taste. If you love coffee, try adding a shot of espresso to the mixture. It pairs well with Nutella and adds depth. You can also use white chocolate instead of Nutella. Just melt it, and mix it into the cream cheese for a rich flavor. These small changes can make a big difference! If you need a gluten-free option, it's easy! Swap the graham cracker crumbs for gluten-free cookies or almond flour. Both work well for the crust. You can also use gluten-free chocolate cookies for a unique flavor. Just make sure to check the labels to confirm they are gluten-free. The rest of the ingredients in this recipe are typically gluten-free, so you are mostly safe here! Serving your cheesecake in individual portions is fun and easy! Use small cups or jars to layer the crust and cheesecake filling. This makes it perfect for parties or gatherings. It also gives each guest their own little treat. You can even let them add their own toppings. This way, each person can customize their dessert. Plus, it looks great on a table! For the full experience, check the [Full Recipe]. To keep your no bake Nutella cheesecake fresh, store it in the fridge. Use an airtight container or cover it tightly with plastic wrap. This helps prevent it from absorbing other flavors in the fridge. Proper refrigeration also keeps it firm and tasty. Aim to eat it within three days for the best taste and texture. You can freeze the cheesecake if you want to keep it longer. First, let it set in the fridge for at least four hours. After that, remove it from the springform pan. Wrap it tightly in plastic wrap, then in aluminum foil. This extra layer protects it from freezer burn. When you're ready to eat, thaw it in the fridge overnight before serving. The no bake Nutella cheesecake can last up to one week in the fridge. Watch for any signs of spoilage, like off smells or changes in texture. If you see any, it's best to toss it out. For the best experience, enjoy it fresh or within a week. This cheesecake is a delight, and you want to savor it at its best! Yes, you can! If you want a twist, try dark or milk chocolate. Each type brings its own flavor. For a lighter taste, use white chocolate. Just melt it and mix it into the cream cheese. This will change the feel but keep it tasty. The cheesecake needs at least 4 hours to set. For the best texture, let it chill overnight. This helps it firm up and makes slicing easier. Be patient! The wait is worth it for that perfect slice. Absolutely! To make a vegan version, swap cream cheese for vegan cream cheese. Use coconut cream instead of heavy cream. For the crust, ensure your graham crackers are vegan. You can also use maple syrup in place of powdered sugar. This way, everyone can enjoy a slice! For the full recipe, check out the Nutella Dream No-Bake Cheesecake! You learned about the key ingredients and their measurements. We covered how to prepare, assemble, and present your cheesecake. You now have tips to avoid mistakes and variations to try. Remember to store your cheesecake properly to enjoy later. With these insights, you can bake a delicious cheesecake. Enjoy experimenting with flavors and sharing your results. Happy baking!](https://cookingwells.com/wp-content/uploads/2025/06/92a3ced6-0617-466f-920b-0db0fa213da4.webp)
No Bake Nutella Cheesecake Decadent and Easy Delight
Are you ready to indulge in a chocolate dream? This No Bake Nutella Cheesecake is an easy treat you can
Are you ready to indulge in a chocolate dream? This No Bake Nutella Cheesecake is an easy treat you can
![For a tasty classic spinach dip, you need: - 2 cups fresh spinach, chopped - 1 cup cream cheese, softened - ½ cup sour cream - ½ cup mayonnaise - 1 cup shredded mozzarella cheese - ¼ cup grated Parmesan cheese - 1 clove garlic, minced - 1 teaspoon onion powder - ½ teaspoon salt - ½ teaspoon black pepper - Optional: ½ teaspoon red pepper flakes for heat These ingredients come together to create a creamy, flavorful dip that everyone loves. Measuring ingredients correctly is key. I use dry measuring cups for solid items like cheese and cream cheese. For liquids, I prefer a liquid measuring cup. This helps me get the right amounts every time. - Spoon the cream cheese into the cup and pack it down. - Level off the top with a spatula. - For sour cream and mayonnaise, scoop and level the same way. This ensures the dip turns out smooth and creamy. You can switch out some ingredients if needed. For a lighter dip, use Greek yogurt instead of sour cream. You can also use low-fat cream cheese. If you don’t have mozzarella, try cheddar or a cheese blend. If you want a bit of spice, add chopped jalapeños instead of red pepper flakes. These swaps let you customize the dip to suit your taste! For the full recipe, you can check out the [Full Recipe]. Start by preheating your oven to 350°F (175°C). This step gets the oven ready for baking. In a medium bowl, mix the softened cream cheese, sour cream, and mayonnaise. Use a fork or spatula to blend until it’s smooth. This creates a creamy base for your dip. Next, fold in the chopped spinach and cheeses. Add the minced garlic, onion powder, salt, and black pepper. If you want heat, toss in red pepper flakes. Stir until everything is mixed well. Now, transfer the mix to a baking dish. Spread it evenly so it bakes correctly. Place the dish in the preheated oven. Bake for 25 to 30 minutes. You want it bubbling and golden on top. This step makes the dip warm and melty, which is perfect for dipping. After baking, take it out and let it cool a bit before serving. Serve the dip warm for the best taste. Arrange tortilla chips, sliced baguette, or fresh veggies around the dish. This makes it look nice and gives people options to dip. You can also use a small bowl to hold the dip. Enjoy with friends and family for a delicious snack! For the full recipe, check out the section above. You can prepare this spinach dip in advance. Mix all the ingredients as stated in the Full Recipe. Then, place the dip in a baking dish. Cover it with plastic wrap and store it in the fridge. You can keep it for one day. When you’re ready to bake, just remove the wrap. Preheat your oven and bake as directed. To reheat your spinach dip, you have a few options. You can use an oven or microwave. If using the oven, set it to 350°F (175°C). Place the dip in a baking dish and cover it with foil. Heat for about 15-20 minutes. If using a microwave, heat in short bursts. Stir in between to ensure even heat. Adding spices can elevate your spinach dip. I suggest using garlic and onion powder for depth. Salt and black pepper balance the flavors. For a little kick, consider red pepper flakes. If you want a twist, add a squeeze of lemon juice. This adds brightness and freshness to the dish. {{image_2}} You can make classic spinach dip healthier. Use Greek yogurt instead of sour cream. This swap adds protein and cuts fat. Try low-fat cream cheese for a lighter option. You can also add more spinach, which increases nutrients without many calories. Fresh herbs like dill or parsley can boost flavor without extra calories. Mixing flavors can take your dip to the next level. Add artichokes for a tangy twist. Chopped sun-dried tomatoes can bring a sweet tang. If you like spice, mix in jalapeños or hot sauce. You can also try different cheeses, like feta or cheddar, for unique tastes. Each combination creates a new experience. You can make a vegan version of spinach dip. Use cashew cream or tofu instead of cream cheese. For the sour cream, try coconut yogurt. Nutritional yeast adds a cheesy flavor without dairy. Some people use almond milk or oat milk for creaminess. This way, everyone can enjoy delicious spinach dip! For the full recipe, check out the details above. Once you make the classic spinach dip, let it cool. Cover it tightly with plastic wrap or put it in an airtight container. Store it in the fridge. This dip stays fresh for about 3 to 5 days. Always check for any off smells or changes in texture before eating. You can freeze spinach dip, but it may change texture. Place it in a freezer-safe container or bag. Squeeze out any extra air to prevent freezer burn. It can last up to 3 months in the freezer. When you're ready to eat it, thaw it in the fridge overnight. In the fridge, your spinach dip lasts 3 to 5 days. If frozen, it can last up to 3 months. After that, the taste and texture may not be as good. Always use your senses to check if it’s still good before serving. You can serve classic spinach dip with many tasty options. I love using: - Tortilla chips - Sliced baguette - Fresh veggies like carrots and bell peppers - Pita chips - Crackers These dippers all add flavor and crunch. You can arrange them nicely around the dip for a fun look. To keep spinach dip warm, use a slow cooker. Set it on low heat. Stir the dip often. You can also use a baking dish in a warm oven. Just cover it with foil to keep it warm. This way, guests can enjoy it hot throughout the party. Yes, you can make spinach dip without cream cheese. Use cottage cheese or Greek yogurt instead. Both options give the dip a creamy texture. You can also add more sour cream to keep it rich. This way, you can enjoy a tasty dip that fits your needs. For the full recipe, check it out. This blog post has covered all you need for making spinach dip. We explored key ingredients and how to measure them. You learned about substitutions in case you're missing something. We went through steps to prepare, bake, and serve your dip. I shared tips for making it ahead and keeping it fresh. Different variations let you customize flavor and health options. Lastly, I provided storage guidelines and answered common questions. Now you’re ready to impress with your spinach dip!](https://cookingwells.com/wp-content/uploads/2025/06/d31fc9bb-72a9-425c-93c9-b531527ff976.webp)
If you’re looking for a tasty and simple dip, you’ve come to the right place! My Classic Spinach Dip recipe
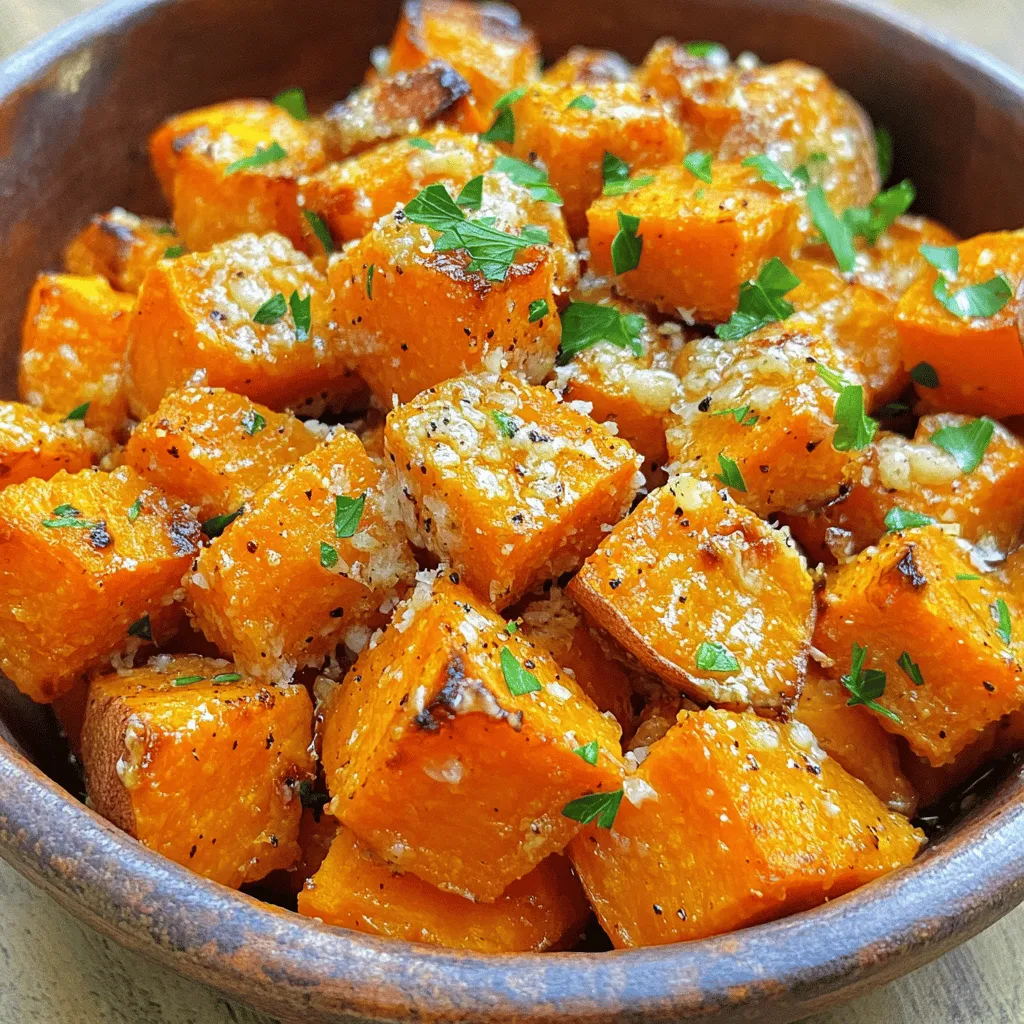
If you’re looking for a side dish that packs flavor and nutrition, look no further! Garlic Parmesan Roasted Sweet Potatoes

Are you ready to transform your breakfast routine? Spinach Feta Breakfast Quesadillas are easy to make and bursting with flavor!
![- Ground lamb or beef options - Quinoa or rice alternatives - Fresh herbs: oregano and mint For Greek stuffed peppers, you can choose ground lamb or beef. Both add great flavor. If you prefer a lighter option, quinoa works well. It gives a nice texture and adds nutrition. Rice is another classic choice that makes the dish hearty. I often add fresh herbs like oregano and mint. They bring a true taste of Greece to your meal. - Common seasonings: smoked paprika, garlic - Toppings: feta cheese, Kalamata olives - Vegetables: bell peppers in various colors Next, let’s talk about the extra ingredients. Smoked paprika adds a warm, rich flavor. Garlic gives a nice kick. For toppings, I love using crumbled feta cheese. It adds creaminess and saltiness. Kalamata olives give a briny taste that pairs well with the peppers. Finally, choose vibrant bell peppers. The colors not only look pretty but also add sweetness to the dish. For the full recipe, check out the Mediterranean Oasis Stuffed Peppers . Start by cutting the tops off the bell peppers. Use a sharp knife to slice just below the stem. This lets you create a nice opening. Remove the seeds and membranes inside. I find it helpful to use a spoon for this part. Once done, place the peppers upright in a baking dish. This keeps them stable as they cook. In a medium saucepan, add one cup of rinsed quinoa and two cups of vegetable broth. Turn the heat to high and bring it to a boil. Once boiling, reduce the heat to low. Cover the pan and let it simmer for about 15 minutes. The quinoa should be fluffy and the liquid absorbed. If you're using rice, follow the same steps. Just check the cook time on the package for perfect results. In a large bowl, mix the cooked quinoa with cherry tomatoes, feta cheese, Kalamata olives, and red onion. Add minced garlic, dried oregano, smoked paprika, and a drizzle of olive oil. Season with salt and pepper to taste. I like to use my hands to mix it all together. This helps ensure every bite is packed with flavor. Evenly spoon the filling into each bell pepper. Press down lightly to pack it in. This helps the mixture stay put while baking. Drizzle a little olive oil on top of the stuffed peppers. Cover the dish with foil to keep moisture in. Bake in your preheated oven for 25 minutes. After that, remove the foil and bake for another 10 to 15 minutes. The peppers should be tender and have a nice char. Enjoy your Greek Stuffed Peppers! Check the Full Recipe for more details. To check if your peppers are done, look for a tender texture. They should be slightly soft but still hold their shape. You can poke them with a fork to see if they yield easily. If they do, they are ready to serve. To enhance the flavor, drizzle a bit of olive oil over the peppers before baking. You can also add a sprinkle of salt and pepper on top to boost taste. For a touch of freshness, consider adding lemon zest before serving. If you have a busy schedule, prep the filling a day ahead. Store it in an airtight container in the fridge. You can also stuff the peppers and keep them in the fridge before baking. This makes your cooking easy and quick on a hectic day. When it's time to reheat, bake the stuffed peppers at 375°F (190°C). Cover with foil to keep them moist. Bake for about 20 minutes, or until heated through. For sides, pair your stuffed peppers with a light Greek salad or pita bread. These add freshness and balance to the meal. You can also serve a dollop of tzatziki sauce for extra flavor. When presenting, place the stuffed peppers on a colorful platter. Garnish with fresh parsley or chopped olives for a beautiful touch. This not only looks nice but also adds a pop of flavor. {{image_2}} You can easily make Greek stuffed peppers vegetarian. Instead of meat, use beans or lentils. Chickpeas work great too! They add protein and texture. You can also mix in veggies like zucchini or mushrooms. These give a nice flavor and crunch. Try creative vegetable fillings as well. Grated carrots and spinach can add color. Adding corn gives a sweet touch. With so many choices, you can create a unique dish every time. If you need gluten-free options, choose quinoa or rice. These grains work well and taste great. For cheese, look for gluten-free feta or goat cheese. Both add a nice creaminess without gluten. If you want to cut carbs, try cauliflower rice. It’s light and still fills you up. You can also skip the cheese or use a low-carb cheese. Your stuffed peppers will still be tasty and satisfying. Want to add some heat? Toss in jalapeños or a splash of hot sauce. The spice can wake up the flavors. Just make sure to balance it with the other ingredients. You can also play with cheese types. Goat cheese gives a tangy flavor, while mozzarella is creamy. Both choices can change the taste of your dish. Experiment and find what you love! For the full recipe, click here: [Full Recipe]. After enjoying your Greek stuffed peppers, store any leftovers in a container. I recommend using airtight glass or plastic containers. This keeps them fresh and tasty. In the fridge, they last up to 3 days. Be sure to let them cool before sealing. This helps avoid condensation and sogginess. To freeze Greek stuffed peppers, place them in a single layer in a freezer-safe container. You can also wrap each pepper in plastic wrap and then place them in a freezer bag. This method prevents freezer burn. They can stay good for about 3 months. When you're ready to eat, simply take them out. Thaw them overnight in the fridge for best results. To reheat, pop them in the oven at 350°F (175°C) for about 20-25 minutes. This makes them warm and delicious again. For an extra touch, add a sprinkle of fresh herbs before serving. Yes, you can easily swap out the meat. Ground chicken or pork works great. Both add a different taste and texture. Just cook them well before mixing with the other ingredients. This keeps the dish flavorful and safe to eat. If you want a leaner option, ground turkey is a good choice too. To add some heat, try using red pepper flakes or diced jalapeños. Mix these into the filling before stuffing the peppers. You can also use a spicier cheese, like pepper jack, instead of feta. For a fiery kick, drizzle some hot sauce on top before serving. Absolutely! You can prep the filling a day ahead. Just store it in the fridge until you are ready to stuff the peppers. You can also stuff the peppers and keep them in the fridge for a day. Bake them when you are ready to eat. This makes meal prep easy and efficient. Yes, Greek Stuffed Peppers are perfect for meal prep. You can make a batch and store them in containers. They last for about 3-4 days in the fridge. For longer storage, freeze them. Just thaw and reheat when you want to enjoy them. This way, you have healthy meals ready to go. Greek stuffed peppers are a tasty and fun dish to make. They use ground meat, quinoa, and fresh herbs for a great flavor. You learned how to prepare the peppers, cook the filling, and bake them to perfection. Remember, you can also switch up the ingredients or make them vegetarian. These tips help you wow your guests or enjoy a hearty meal yourself. Give this recipe a try, and enjoy the goodness!](https://cookingwells.com/wp-content/uploads/2025/06/3554defb-47c9-44c1-afda-c18fb51584f8.webp)
Are you ready to elevate your meal prep with a tasty twist? Greek Stuffed Peppers are a delightful mix of
![To make a delicious Moroccan Chickpea Tagine, gather these fresh ingredients: - 2 tablespoons olive oil - 1 large onion, finely chopped - 3 cloves garlic, minced - 1-inch piece of ginger, grated - 1 teaspoon ground cumin - 1 teaspoon ground coriander - 1 teaspoon ground cinnamon - 1 teaspoon smoked paprika - 1 can (15 oz) chickpeas, drained and rinsed - 1 large carrot, diced - 1 red bell pepper, chopped - 1 zucchini, chopped - 1 can (14 oz) diced tomatoes - 1 cup vegetable broth - 1/2 cup dried apricots, chopped - Salt and pepper to taste - Fresh cilantro or parsley for garnish - Lemon wedges for serving Each ingredient plays a key role. Olive oil adds richness. The onion, garlic, and ginger create a fragrant base. Spices like cumin and coriander give warmth. Chickpeas provide protein and texture. Carrots and bell peppers bring color and crunch, while zucchini adds moisture. Diced tomatoes and vegetable broth create a savory sauce. Dried apricots add sweetness to balance the spices. Don't forget to season with salt and pepper. Fresh herbs, like cilantro or parsley, add a burst of flavor. Lemon wedges brighten each bite. For the full recipe, check out the [Full Recipe]. With these ingredients, you'll craft a hearty and flavorful tagine that warms the soul. To start, I heat olive oil in a large tagine or Dutch oven over medium heat. I add the finely chopped onion. Sauté it until it becomes soft and translucent, about 5 minutes. Next, I stir in minced garlic and grated ginger. This mixture cooks for another minute, filling your kitchen with an amazing aroma. Then, it’s time to add the spices. I toss in ground cumin, ground coriander, ground cinnamon, and smoked paprika. I stir well to coat the onions with these spices. This step helps release their rich flavors. Now, I add the chickpeas, diced carrot, chopped red bell pepper, and zucchini. I mix all the ingredients together, ensuring even distribution. After that, I pour in the diced tomatoes and vegetable broth. I give everything a good stir and bring the mixture to a gentle simmer. Lastly, I add the chopped dried apricots. I cover the tagine or pot with a lid, reduce the heat to low, and let it simmer for about 25-30 minutes. This allows the vegetables to become tender and the flavors to meld beautifully. The order of spices is crucial for flavor. I always add spices after the onions are soft. This step brings out their best taste. I also watch the heat levels. If the tagine bubbles too much, I lower the heat. Slow cooking helps develop rich, deep flavors. For garnishing, I like to use fresh cilantro or parsley. This adds a pop of color and freshness. When I serve the tagine, I place it in the cooking vessel. This keeps it warm and looks great on the table. It's best enjoyed with warm couscous or crusty bread for dipping. A squeeze of lemon brightens the dish and enhances the flavors. For the full recipe, don’t forget to check the link provided earlier. To make your Moroccan Chickpea Tagine shine, consider adding or swapping vegetables. Try sweet potatoes or eggplant for a new twist. You can also add greens like spinach or kale for extra nutrients. Spices can take your dish to the next level. While cumin, coriander, and cinnamon are great, adding turmeric or cardamom can give it more depth. A pinch of cayenne can add a nice kick if you love heat. Choosing the right cookware is key. A tagine pot is traditional and helps blend flavors. A Dutch oven works well too, giving you the same great taste. Both options trap heat and moisture, making your meal tender. For easier prep, use a sharp knife and a sturdy cutting board. A good peeler is helpful for your vegetables. Also, have measuring spoons and cups ready for your spices. This will save you time and keep your kitchen organized. For the full recipe, refer to the earlier sections. {{image_2}} You can easily make this Moroccan Chickpea Tagine vegan and gluten-free. The ingredients are already plant-based. Just check that your vegetable broth is gluten-free. For a protein boost, try adding tofu or tempeh. Both options soak up the flavors well. Simply cube the tofu or tempeh and add it with the chickpeas. This change makes your meal more filling and satisfying. Different regions offer unique twists on this dish. For example, in some areas, people add sweet potatoes or squash. These ingredients add a nice sweetness and texture. You can also explore local spices or herbs. For instance, adding harissa gives it a spicy kick. Alternatively, use fresh mint or dill for a fresh taste. Each region’s twist makes this dish fun and exciting to make. To keep your Moroccan Chickpea Tagine fresh, store it in the fridge. Use an airtight container. This helps keep the flavors and moisture intact. You can also divide it into smaller portions. This way, it’s easy to grab a quick meal later. - Best practices for storing tagine: - Let the tagine cool to room temperature before storing. - Avoid leaving it out for more than two hours. - Container recommendations: - Use glass or BPA-free plastic containers for easy storage. - Consider using freezer bags for portion control. When it comes to reheating, your goal is to keep the flavor and texture. Use low heat on the stove or a microwave. Stir occasionally to ensure even heating. - Safely reheating for best flavor and texture: - If using a microwave, cover the container loosely. This helps steam the food. - Heat until it reaches 165°F (74°C) to ensure it’s safe to eat. - Tips for freezing portions: - Freeze the tagine in single servings for quick meals. - Lay the bags flat in the freezer. This saves space and helps them freeze faster. By following these tips, you can enjoy your Moroccan Chickpea Tagine long after cooking it. Check out the Full Recipe for more details on preparation! What is a tagine and how is it different from a stew? A tagine is a dish and also a cooking pot. It has a conical lid and is made of clay. The shape keeps steam inside. This helps the food to cook slowly and stay moist. A stew can be made in many pots and does not need a special shape. Tagine uses spices and can have fruits, like apricots, for sweetness. Can I make Moroccan Chickpea Tagine in advance? Yes, you can make it ahead of time. The flavors will blend well if you store it in the fridge. Just let it cool and put it in an airtight container. It tastes even better the next day! You can reheat it on the stove or in the microwave. How can I adjust the spice levels for my family? You can change the spices to fit your taste. If you want it milder, use less cumin and paprika. You can also skip the spices altogether. Add them in small amounts to find the right flavor for your family. What are the cultural significance and origins of this dish? Moroccan tagine has roots in North Africa. It reflects the land's rich history and many cultures. Spices like cumin and cinnamon show the mix of flavors. Tagine is often shared among family and friends. It represents togetherness and warmth in Moroccan culture. Suggestions for side dishes that pair well with the tagine Serve your tagine with warm couscous or crusty bread. You can also add a fresh salad with cucumber and tomatoes. A side of yogurt with herbs creates a nice balance, too. Each adds a different texture and taste to your meal. Enjoy mixing and matching! This blog post covered how to make a delicious Moroccan Chickpea Tagine. We looked at key ingredients, step-by-step instructions, and tips for better flavor. I shared variations to suit different diets and storage tips for leftovers. You can now enjoy a warming meal that’s both easy to prepare and full of nutrients. Remember, cooking should be fun and creative. Explore your tastes and share this dish with friends. Your tagine experience awaits!](https://cookingwells.com/wp-content/uploads/2025/06/7d7718ce-34b2-4d5a-9cb9-8e672e58597c.webp)
Are you ready to enjoy a dish that bursts with flavor? My Moroccan Chickpea Tagine recipe is both vibrant and

Welcome to my kitchen! Today, we’re whipping up a delightful dish: Teriyaki Salmon with Sesame Broccoli. This meal is packed
![Here are the ingredients you need for the Cinnamon Apple Oatmeal Bake: - 2 cups rolled oats - 1 teaspoon baking powder - 1 teaspoon ground cinnamon - 1/2 teaspoon salt - 2 cups unsweetened almond milk (or milk of choice) - 1/4 cup maple syrup or honey - 2 large eggs - 1 teaspoon vanilla extract - 2 cups apples, peeled and diced (about 2-3 medium apples) - 1/2 cup chopped walnuts or pecans (optional) - 1/4 cup raisins or dried cranberries (optional) This dish is simple to prepare and packed with flavor. Each ingredient plays an important role. The rolled oats provide a hearty base, while the apples add sweetness and moisture. Cinnamon gives it that warm, cozy taste. When choosing apples, go for a mix of tart and sweet. This balance really enhances the flavor of the bake. I often use Granny Smith and Honeycrisp for the best results. The nuts and dried fruits are optional but add great texture and flavor. You can mix and match your favorites. For a healthier twist, use unsweetened almond milk or any milk you prefer. Maple syrup or honey adds just the right amount of sweetness without being overpowering. For the full recipe, follow the steps to create this delightful dish. Enjoy the warm, comforting flavors of Cinnamon Apple Oatmeal Bake! - Preheat oven to 350°F (175°C). - Grease a 9x9 inch baking dish. Start by preheating your oven. This step makes sure the bake cooks evenly. Greasing the dish helps the oatmeal bake come out clean. - Combine rolled oats, baking powder, ground cinnamon, and salt. In a large bowl, mix the dry ingredients. This includes rolled oats, baking powder, ground cinnamon, and salt. Stir them well until they blend together. This step adds great flavor and texture. - Whisk together almond milk, maple syrup (or honey), eggs, and vanilla extract. Next, take another bowl and whisk the wet ingredients. Use almond milk, maple syrup or honey, eggs, and vanilla extract. Whisk until they are fully combined. This mixture will add moisture and sweetness to your bake. - Mix wet ingredients into dry ingredients and add apples, nuts, and dried fruits. Now, pour the wet mix into the dry mix. Stir gently until just combined. Fold in the diced apples and any nuts or dried fruits. This gives your oatmeal bake a tasty twist. - Pour into baking dish and bake for 35-40 minutes. Pour the entire mixture into your greased dish. Spread it out evenly. Bake it in the preheated oven for 35-40 minutes. You want the top to be golden brown and set at the edges. - Allow to cool before slicing. Once baked, let the dish cool for a few minutes. This makes slicing easier. Now, your Cinnamon Apple Oatmeal Bake is ready to enjoy! For the full recipe, check the detailed instructions provided. To make your Cinnamon Apple Oatmeal Bake just right, consider the sweetness. You can adjust it by adding more or less maple syrup or honey. Taste your mixture before baking to find the perfect level for you. Even apple distribution is key. Cut your apples into similar sizes. This way, every bite has a nice apple flavor. Mix them in gently with the oats to ensure they spread evenly. Serving this bake warm is a must. Drizzle it with maple syrup for a sweet touch or add a scoop of yogurt for creaminess. Both options enhance the taste and make it more enjoyable. A sprinkle of cinnamon on top adds flavor and makes your dish look nice. It brings out the warmth of the cinnamon already in the bake. Pair your oatmeal bake with coffee or tea for breakfast. The warm drinks balance the sweetness of the dish. Fresh fruit sides work well too. Think berries or banana slices, adding color and extra nutrients to your meal. Explore the [Full Recipe] for more details on making this delightful dish! {{image_2}} You can change the milk in this recipe. Use coconut milk for a creamy twist. Oat milk adds a subtle flavor that blends well. If you want less sugar, try agave or stevia as sweeteners. These options keep the dish tasty and healthy. To kick up the flavor, add a pinch of nutmeg or ginger. These spices add warmth and depth to your bake. You can also use different fruits. Pears add a nice sweetness, while berries bring tartness. Mix and match fruits to fit your taste. If you want a vegan version, swap the eggs for flaxseed meal. Use 1 tablespoon of flaxseed mixed with 2.5 tablespoons of water for each egg. This creates a great binder. For gluten-free options, use certified gluten-free oats. This ensures everyone can enjoy this dish. To store leftovers, let the Cinnamon Apple Oatmeal Bake cool first. Once cool, cut it into squares. Place the squares in an airtight container. This keeps the dish fresh and prevents it from drying out. If you have a large batch, use a glass baking dish with a lid. These containers help maintain flavor and texture. If you want to freeze the bake, cool it completely. Wrap each square tightly in plastic wrap. Then, place them in a freezer-safe bag or container. This prevents freezer burn. When you're ready to eat, take out a square. Let it thaw in the fridge overnight. Reheat in the oven at 350°F (175°C) for about 15 minutes. You can also microwave it for a quick warm-up, about 1-2 minutes. In the fridge, the bake lasts about 4-5 days. You’ll know it’s still good if it smells sweet and apple-like. If you see mold or it smells sour, throw it away. Trust your senses; they are your best guide! Yes, you can prep this dish in advance. To do this, mix the dry ingredients and wet ingredients separately. Store them in the fridge. Combine them just before baking. This helps save time on busy mornings. You can also bake it the night before. Just reheat it in the morning for a warm breakfast. Absolutely! You can replace the eggs with flaxseed meal. Mix 1 tablespoon of flaxseed meal with 2.5 tablespoons of water. Let it sit for 5-10 minutes until it thickens. This works great in baking, giving you a nice texture. The oatmeal bake should be moist but not watery. The top should be golden brown, and the edges should be firm. When you cut into it, you want it to hold together. It should feel creamy inside with soft apple chunks. Yes, you can easily double this recipe. Just use a larger baking dish. You may need to adjust baking time. Keep an eye on it. Check for doneness by inserting a toothpick. It should come out clean when it’s ready. Reheat leftovers in the oven or microwave. For the oven, set it to 350°F (175°C). Heat for about 10-15 minutes. If using the microwave, warm it for 1-2 minutes. Add a splash of almond milk to keep it moist. Yes! You can adjust this recipe to your taste. Try adding different fruits like bananas or berries. Use nuts like almonds or hazelnuts for crunch. You can also change the spices. Add nutmeg or ginger for a fun twist. This blog post covers a delicious baked oatmeal recipe. We went through the ingredients, step-by-step instructions, and helpful tips. You can mix and match to fit your taste and diet. Whether you're looking for a cozy breakfast or a snack, this recipe is a winner. Remember to store leftovers properly to enjoy them later. With so many variations, there's a way to make this your own. Try it out, and let this dish bring warmth to your table!](https://cookingwells.com/wp-content/uploads/2025/06/9c9a4a79-759e-4f0b-9d37-bbc3622fb7a8.webp)
Are you looking for a warm, tasty dish that’s also good for you? My Cinnamon Apple Oatmeal Bake fits the

Are you ready to spice up your meals? Spicy Korean Tofu Bowls mix heat and health in one tasty dish.

If you’re craving an easy yet gourmet treat, the Caramelized Onion and Goat Cheese Tart is perfect for you. This
