Skip to content
DisclaimerTerms Of UseGDPR PolicyCookie Policy

Cooking Wells

  • Home
  • Drinks
  • Appetizers
  • Dinner
  • Dessert
  • About
  • Contact
  • Privacy Policy
DisclaimerTerms Of UseGDPR PolicyCookie Policy

NO-ING-IMG

- Baby carrots or regular carrots - Unsalted butter - Garlic The main ingredients for garlic butter roasted carrots are simple yet flavorful. Baby carrots or regular carrots work well. If you use regular carrots, just peel and cut them into sticks. Next, you need unsalted butter to create that rich, buttery flavor. The garlic is what adds a punch of taste that makes this dish shine. - Fresh thyme - Honey (optional) - Salt and pepper For seasoning, fresh thyme adds an aromatic touch. You can also use honey if you want a hint of sweetness. Don’t forget salt and pepper to enhance all the flavors. These seasonings bring the whole dish together and elevate the carrots. - Fresh parsley When you serve garlic butter roasted carrots, sprinkle fresh parsley on top. It gives a bright color and fresh taste. This simple garnish makes the dish look pretty and adds a nice touch. For the full recipe, check out the detailed steps and cooking instructions. - Preheat your oven to 425°F (220°C). This high heat helps the carrots caramelize. - In a large mixing bowl, combine 4 tablespoons of melted unsalted butter and 4 minced garlic cloves. Add 1 teaspoon of fresh thyme leaves, 1 teaspoon of honey if you want sweetness, and salt and pepper to taste. Whisk until everything mixes well. - Add 1 pound of baby carrots to the garlic butter mixture. Toss them well so every carrot gets coated. You can also use regular carrots, just peel and cut them into sticks. - Spread the carrots in a single layer on a baking sheet lined with parchment paper. This makes for easy cleanup and helps them roast evenly. - Roast the carrots for about 25-30 minutes. Toss them halfway through to ensure even cooking. - After 25 minutes, check if the carrots are tender. They should be soft but still hold their shape. Taste and adjust seasoning if needed. If you want, garnish with chopped fresh parsley for color and freshness. This simple method gives you a tasty dish. For the full recipe, be sure to check the details above! When picking carrots, I prefer baby carrots for their sweetness and ease. They roast quickly and need little prep. If you choose regular carrots, look for firm, bright ones. Peel them and cut them into sticks about the same size. This helps them cook evenly. To make your carrots pop, try adding citrus zest. A little lemon or orange zest gives a fresh note. You can also use herbs like rosemary or dill. These herbs bring new flavors to the dish. Don't shy away from spices like paprika or cumin either. They can really elevate the taste. One big mistake is overcrowding the baking sheet. When carrots are too close, they steam instead of roast. This keeps them from getting crispy. Make sure to spread them out in a single layer. Also, remember to toss them halfway through cooking. This helps them brown evenly. {{image_2}} You can switch butter for olive oil. This keeps the dish light and healthy. Olive oil adds a nice flavor too. You can also try using herbs like rosemary or dill. Both add unique tastes that change the dish. Just chop them finely and mix. Don’t be afraid to experiment! Garlic butter roasted carrots pair well with many proteins. Serve them with chicken, fish, or steak for a tasty meal. You can also chop them and add them to salads or grain bowls. This makes your meal colorful and adds great flavor. They fit perfectly in a veggie bowl with quinoa or rice. Adjust your roasted carrots for different holidays. In fall, add spices like cinnamon for a cozy feel. For spring, pair them with fresh peas or radishes. You can also use seasonal vegetables along with carrots. Try beets or sweet potatoes for extra color and taste. Mixing veggies keeps your meals exciting and fresh! After you enjoy your garlic butter roasted carrots, store any leftovers in the fridge. Place them in an airtight container to keep them fresh. They will last for about 3 to 5 days in the fridge. Make sure to let them cool down before sealing the container. This helps prevent moisture buildup. When you're ready to eat the leftovers, reheating them is simple. The best way is to use the oven. Preheat your oven to 350°F (175°C). Spread the carrots on a baking sheet and heat for about 10 to 15 minutes. This method keeps the flavor and texture just right. You can also use a microwave if you're in a hurry. Just heat them in short bursts, stirring in between to avoid sogginess. If you want to save garlic butter roasted carrots for another time, freezing is a great option. First, let the cooked carrots cool completely. Then, place them in a freezer-safe bag or container. Squeeze out as much air as possible before sealing. They can be frozen for up to 3 months. When you want to use them, thaw the carrots in the fridge overnight. To reheat, use the oven for best results. This keeps them tasty and looking great. Yes, you can prepare garlic butter roasted carrots ahead of time. To do this, follow these tips: - Prep the carrots: Cut them and toss with the garlic butter mix. - Store: Place them in an airtight container. - Chill: Keep them in the fridge for up to 24 hours. - Roast later: When ready, simply roast them as directed in the Full Recipe. This way, you save time on busy days. Garlic butter roasted carrots pair well with many dishes. Here are some tasty ideas: - Grilled chicken: The flavors balance nicely. - Steak: Roasted carrots add a sweet touch to rich meat. - Fish: They complement the lightness of fish dishes. - Quinoa or rice: They make for a hearty grain side. These pairings make for a well-rounded meal. To make garlic butter roasted carrots vegan, swap out the butter. Here’s how: - Use olive oil: It gives a nice flavor and is plant-based. - Add vegan butter: This keeps the taste close to the original. These simple changes keep your dish tasty and plant-friendly. For the best roasting results, cut carrots into uniform pieces. Here’s how: - Baby carrots: Leave them whole for easy prep. - Regular carrots: Cut them into sticks about 1-inch long. - Uniform size: This helps them cook evenly. Cutting them well ensures each bite is tender and flavorful. In this blog post, I shared how to make delicious garlic butter roasted carrots. We covered the simple ingredients, from baby carrots to unsalted butter. You learned step-by-step instructions to prepare and roast them just right. I also shared tips for enhancing flavor and avoiding common mistakes. In conclusion, roasting carrots is easy and tasty. You can personalize your dish with different herbs or serve it in many ways. Enjoy your cooking and have fun experimenting!

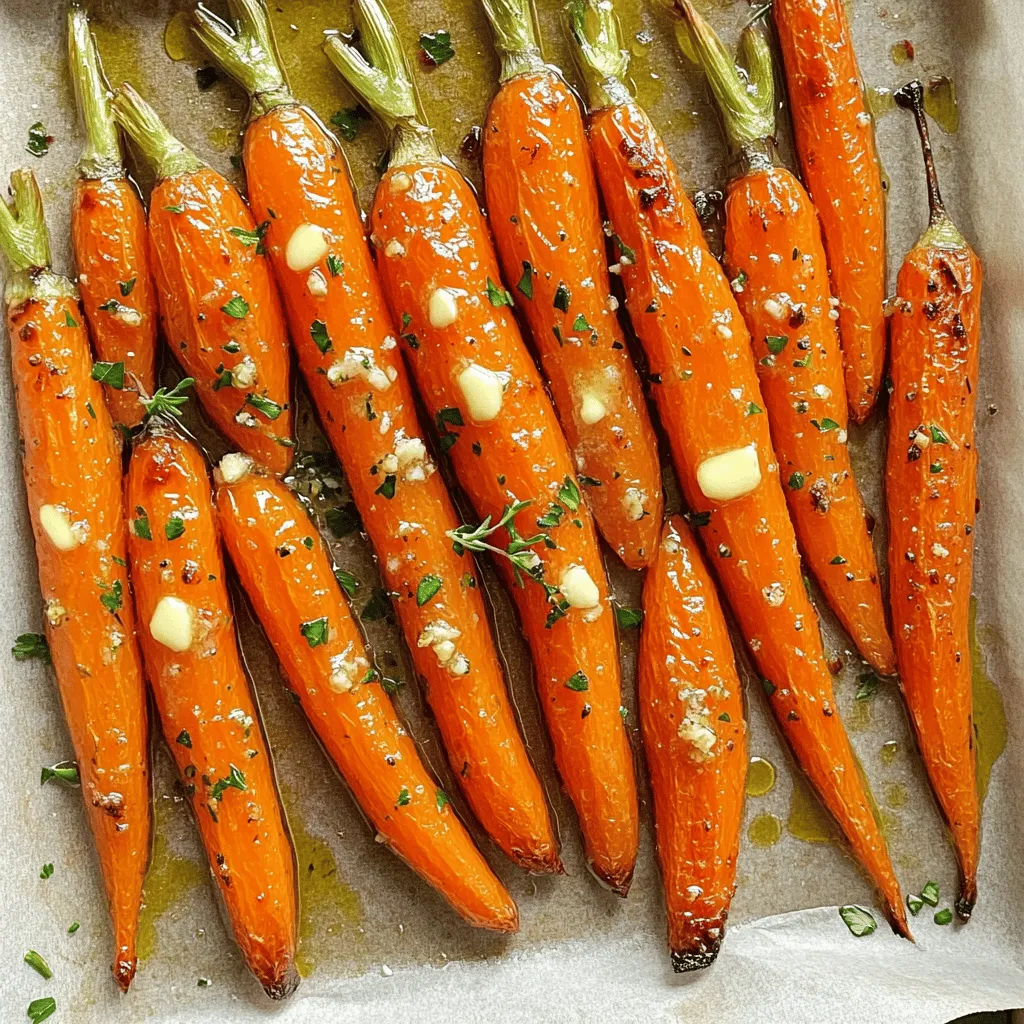
Garlic Butter Roasted Carrots Simple and Tasty Dish

Are you ready to elevate your dinner game? Garlic butter roasted carrots are simple to make and bursting with flavor.

To make this tasty dish, gather these main ingredients: - 2 cups cooked rotisserie chicken, shredded - 1 cup cooked penne pasta - 2 cups marinara sauce - 1 cup ricotta cheese - 1 cup shredded mozzarella cheese - ½ cup grated Parmesan cheese - 1 teaspoon dried oregano - 1 teaspoon garlic powder - ½ teaspoon salt - ½ teaspoon black pepper - Fresh basil for garnish These simple ingredients come together to create a rich and filling meal. The rotisserie chicken adds flavor while saving time. The penne pasta holds the sauce well, and the cheeses make it creamy and delicious. You can make this casserole your own by adding some fun extras. Here are a few ideas: - Sliced mushrooms for earthiness - Spinach for extra greens - Red pepper flakes for heat - Olives for a salty twist - Zucchini for added veggies Feel free to mix and match! These add-ins let you play with flavors and textures. You can make this dish unique to your taste or use what you have on hand. If you need to swap some ingredients, here are a few easy options: - Use cooked chicken breast instead of rotisserie chicken. - Swap penne pasta for any pasta shape you like. - Try cottage cheese if you don’t have ricotta. - Use any marinara or tomato sauce you prefer. - Substitute mozzarella with provolone or cheddar cheese. These swaps still give you a yummy casserole. It’s all about using what you have available in your kitchen. Before you cook, gather all your ingredients. This will save you time. Shred the chicken from a rotisserie. Use cooked penne pasta for ease. Measure your marinara sauce and cheeses. It helps to have everything ready. Preheat your oven to 375°F (190°C) to get it hot while you mix. Start by mixing the shredded chicken, penne pasta, and marinara sauce in a large bowl. Stir until every piece is coated. In another bowl, mix the ricotta cheese, oregano, garlic powder, salt, and black pepper. This adds great flavor. Grease a 9x13 inch casserole dish. Layer half of your chicken mixture at the bottom. Spread half of the ricotta mixture over it. Next, add half of the mozzarella cheese. Repeat these layers with the rest of the chicken and pasta mix, ricotta, and top with the remaining mozzarella and Parmesan. Cover the dish with foil. Bake for 25 minutes, then remove the foil and bake for another 15 minutes. You want the cheese to be bubbly and golden. Layering is key to a great casserole. It ensures every bite has flavor. The first layer gives a base that holds the dish together. Each layer builds flavor and texture. The top layer of cheese creates a nice crust. It adds a crispy finish. Layering also helps the dish heat evenly. This makes every piece delicious and satisfying. To get the best cheese melt, use fresh mozzarella. It melts beautifully and adds great texture. Make sure to layer the cheeses properly. Place the mozzarella on top of the casserole. This helps create a gooey, bubbly surface. Bake until the cheese is golden brown. This indicates a perfect melt. Store leftovers in airtight containers. This keeps the casserole fresh. You can refrigerate it for up to four days. If you want to freeze it, wrap it well in plastic wrap. Then place it in a freezer-safe bag. This way, it can last for up to three months. When ready to eat, thaw it overnight in the fridge. Use rotisserie chicken to save time. It’s already cooked and packed with flavor. Cook your pasta while the oven preheats. This cuts down on prep time. Prepare the casserole in advance. You can assemble it and refrigerate it. Just bake it when you’re ready to eat. For a quick meal, serve it with a side salad. This adds crunch and freshness. Feel free to check the Full Recipe for detailed steps! {{image_2}} You can easily add spinach and artichokes for a tasty twist. Mix in one cup of fresh spinach and half a cup of artichoke hearts. This adds color and boosts nutrition. It gives your casserole a creamy and rich flavor. The spinach brings in vitamins, while artichokes add a nice touch. This is a great way to enjoy more veggies. If you need a gluten-free option, swap the penne pasta. Use gluten-free pasta or quinoa instead. Check the marinara sauce to ensure it’s gluten-free. You can also use gluten-free breadcrumbs for a crispy topping. This way, you can enjoy the same great taste without gluten. For a vegetarian version, omit the chicken. Replace it with roasted vegetables like zucchini, mushrooms, or bell peppers. You can also add some beans for protein. This keeps your casserole hearty and filling. Using veggies not only makes it colorful but also adds unique flavors. To keep your Chicken Parmesan Casserole fresh, let it cool first. Use an airtight container for storage. This method prevents moisture loss and keeps flavors intact. You can store it in the fridge for three to four days. If you want to enjoy it later, freezing is your best bet. Freezing is easy and saves time. First, let the casserole cool completely. Then, cut it into single portions. Wrap each piece tightly in plastic wrap. Place the wrapped portions in a freezer-safe bag. This way, you can pull out just what you need. The casserole will stay good for up to three months in the freezer. When you reheat, keep the taste and texture in mind. For the best results, use the oven. Preheat to 350°F (175°C). Place the casserole in a baking dish. Cover it with foil to keep it moist. Heat for about 20 minutes or until warm. You can also use the microwave if you're in a hurry. Just use a microwave-safe dish and cover it. Heat in short bursts, stirring in between. Enjoy your flavorful meal! You can make Chicken Parmesan Casserole with simple steps. Start with cooked rotisserie chicken. Shred it into bite-sized pieces. Cook penne pasta until al dente. Mix the chicken, pasta, and marinara sauce in a bowl. Then, blend ricotta cheese with oregano, garlic powder, salt, and black pepper. Layer half of the chicken mix in a greased dish, then add half of the ricotta and mozzarella. Repeat the layers. Bake at 375°F for 40 minutes. This method gives you a flavorful, hearty meal. For the full recipe, check below. Yes, you can prepare this casserole ahead of time. Assemble it in the dish but do not bake. Cover it tightly with foil and store it in the fridge. This way, you save time on busy days. When ready to cook, just bake it straight from the fridge. You might need to add a few extra minutes to the cooking time. Pair your Chicken Parmesan Casserole with a fresh salad. A simple green salad with vinaigrette works well. Garlic bread is also a great side. It soaks up the sauce nicely. You can even add some roasted vegetables for extra color and nutrients. The cooking time is about 40 minutes. Bake the casserole covered for 25 minutes, then uncover for 15 minutes. This method helps the cheese to melt and brown nicely. Always check for bubbly cheese to know it's done! You learned how to make Chicken Parmesan Casserole step by step. We covered key ingredients, cooking techniques, and tips for the perfect melt. You can even customize this dish with fun add-ins or variations. Remember to store leftovers well and consider making extras for later. I hope you feel ready to create a dish everyone will love. Enjoy your cooking adventure!

Chicken Parmesan Casserole Delightful and Simple Meal

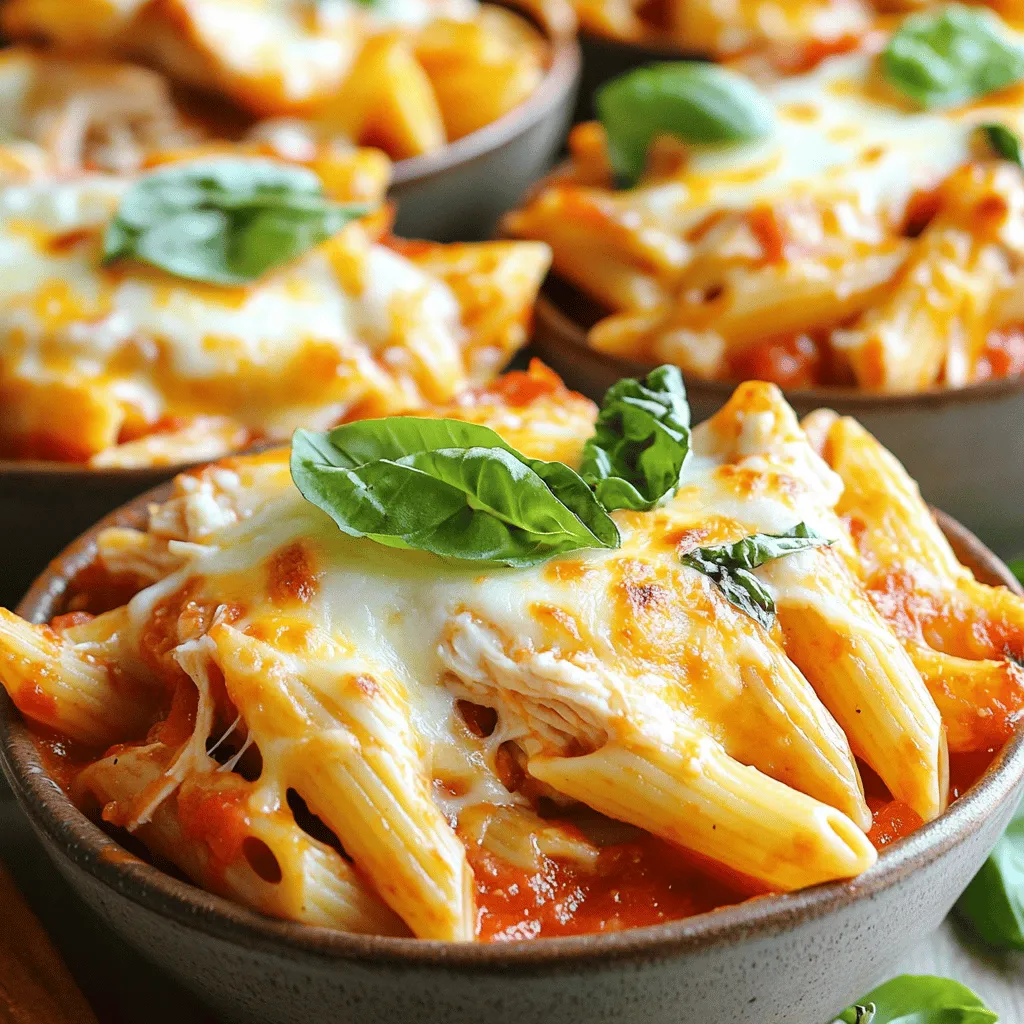
Looking for a tasty meal that’s easy to make? Try my Chicken Parmesan Casserole! This dish combines tender chicken, rich

To make crispy air fryer mozzarella sticks, you will need: - 12 mozzarella string cheese sticks - 1 cup all-purpose flour - 2 large eggs, beaten - 1 cup breadcrumbs (preferably panko for extra crunch) - 1 teaspoon garlic powder - 1 teaspoon Italian seasoning - ½ teaspoon salt - ½ teaspoon black pepper - Cooking spray These ingredients create the perfect blend for tasty, crispy bites of cheese. You can add a few extra ingredients to boost the taste: - Fresh herbs like parsley or basil - Crushed red pepper for heat - Parmesan cheese for added richness These options let you customize the flavor to your liking. If you don’t have an ingredient, don’t worry. Here are some simple swaps: - Use gluten-free flour for a gluten-free option. - Swap eggs with flaxseed meal mixed with water for a vegan alternative. - Try using whole wheat breadcrumbs for a healthier twist. These substitutions keep your recipe flexible and fun. For the full recipe, check the earlier section. To start, grab your mozzarella string cheese sticks. Cut each stick in half. This gives you 24 shorter mozzarella sticks. Shorter sticks cook better and are easier to dip. Now, let’s set up your breading station. You need three shallow dishes. In the first dish, add 1 cup of all-purpose flour. In the second dish, pour in 2 large beaten eggs. In the last dish, mix 1 cup of breadcrumbs with 1 teaspoon of garlic powder, 1 teaspoon of Italian seasoning, ½ teaspoon of salt, and ½ teaspoon of black pepper. This mix gives great flavor! Time to bread those cheese sticks! Take one mozzarella stick and dip it into the flour, covering it fully. Next, dip it into the beaten eggs. Let any extra egg drip off. Finally, roll it in the breadcrumb mixture. Press lightly to help the crumbs stick well. Repeat this for all 24 mozzarella sticks. Once breaded, place the mozzarella sticks on a plate lined with parchment paper. Put them in the freezer for at least 30 minutes. Chilling helps them hold their shape while cooking. Now, it’s time to air fry! Preheat your air fryer to 375°F (190°C) for about 5 minutes. Lightly spray the air fryer basket with cooking spray. Place the frozen mozzarella sticks in a single layer, making sure they don’t touch. Give the tops a quick spray of cooking spray too. Cook for 6-8 minutes until they turn golden brown and crispy. Shake the basket halfway through for even cooking. Enjoy these crispy delights with marinara sauce! You can find the full recipe above. To get the best crispy texture, follow a few key steps. First, use panko breadcrumbs. They create a light and crunchy crust. Make sure to coat the mozzarella sticks well. This ensures every bite is crispy. Freezing the sticks before cooking is important too. It helps them hold their shape and stay crispy. When it comes to cooking spray versus oil, I prefer cooking spray. It gives an even layer without making the sticks too greasy. Oil can sometimes lead to soggy results. A light spray on the mozzarella sticks helps them crisp up nicely in the air fryer. Avoid some common mistakes for the best results. First, don’t skip the chilling step. It helps the cheese stay inside the stick. Also, don’t overcrowd the air fryer basket. Leave space between each stick for proper air flow. Lastly, don’t rush the cooking time. Monitor them closely to avoid burning. For the full recipe, check out the Crispy Air Fryer Mozzarella Sticks instructions. {{image_2}} You can add spinach to your mozzarella sticks for a tasty twist. Start with fresh spinach. Sauté it briefly in a pan until wilted. Then, chop it finely. Mix this chopped spinach into the breadcrumb mixture. It adds flavor and some color to your dish. These cheesy spinach and mozzarella sticks give a nice, healthy touch. For those who love heat, try adding jalapeños. Finely chop fresh jalapeños and mix them into the breadcrumbs. You can adjust the amount based on how spicy you want. This variation gives your mozzarella sticks a fun kick. It pairs great with a cooling dip like ranch or sour cream. Dipping sauces can really elevate your mozzarella sticks. Classic marinara sauce is a must. You can also try ranch dressing or a spicy sriracha mayo. For a fun twist, mix cream cheese with herbs for a rich dip. Each sauce brings out different flavors and makes your snack even better. Explore various sauces to find your favorite! To store leftover mozzarella sticks, let them cool first. Place them in an airtight container. Keep them in the fridge for up to three days. If you want to keep them longer, consider freezing them. This way, you can enjoy them later without losing their taste. To reheat mozzarella sticks, use the air fryer for the best results. Preheat the air fryer to 350°F (175°C). Place the sticks in a single layer. Heat them for about 4-5 minutes until they are warm and crispy. You can also use an oven if you prefer. Set it to 375°F (190°C) and bake for 8-10 minutes. This method helps keep them crunchy. You can freeze uncooked mozzarella sticks for later use. After breading, lay them on a baking sheet lined with parchment paper. Make sure they don’t touch each other. Freeze them for about 1-2 hours until solid. Then, transfer them to a freezer bag or container. They will stay fresh for up to three months. You can cook them directly from frozen when you're ready to eat. Just add a few extra minutes to the cooking time. You can tell when mozzarella sticks are done by their color. Look for a golden-brown crust. You can also check the texture. They should feel crispy on the outside. A great way to check is to take one out and cut it. If the cheese is gooey and melty, they are perfect! Just make sure to keep an eye on them while they cook. You don’t want them to overcook and become hard. Yes, you can make these ahead of time! Prepare the mozzarella sticks and bread them as directed. Then, freeze them on a plate for about 30 minutes. After they are firm, transfer them to a zip-top bag. Store them in the freezer for up to three months. When you're ready to cook, just air fry them straight from the freezer. No need to thaw! You have many options for dipping sauces! Marinara sauce is a classic choice. It adds a nice tang and flavor. You can also try ranch dressing for a creamy dip. If you prefer something spicy, buffalo sauce is great too. For a twist, consider honey mustard or even a garlic aioli. Choose what sounds best to you! If your mozzarella sticks leak cheese, it might be due to two reasons. First, they may not have been chilled long enough before cooking. Freezing them helps keep the cheese inside. Second, they might be overcooked. Keep an eye on the cooking time. If you notice them leaking, try cooking them for a shorter time next time. Follow the Full Recipe for best results! Crispy air fryer mozzarella sticks are easy to make with the right ingredients and steps. We explored required and optional ingredients, along with smart substitutions for flavor. I shared step-by-step instructions that ensure a perfect breading and chilling process. Key tips help you avoid common mistakes for the best results. Don’t forget the fun variations to spice things up and tasty dipping sauces to enjoy. Proper storage and reheating can keep your leftovers crispy. You can now enjoy delicious mozzarella sticks any time!

Crispy Air Fryer Mozzarella Sticks Delightful Snack

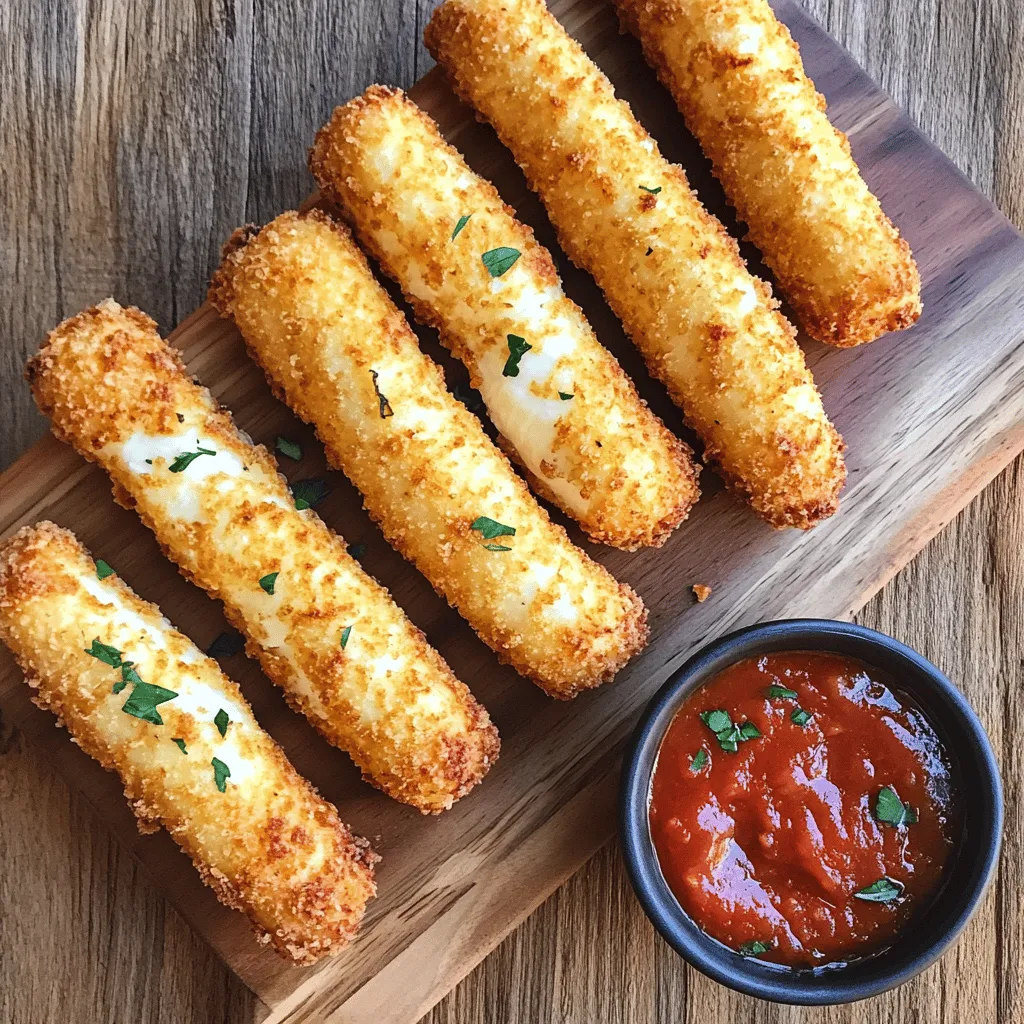
Are you ready to enjoy a snack that’s both cheesy and crispy? My Crispy Air Fryer Mozzarella Sticks are your

When you make chicken tortilla soup, you need fresh and simple ingredients. Here's what you'll need for this quick and tasty dish: - 2 tablespoons olive oil - 1 medium onion, chopped - 2 cloves garlic, minced - 1 bell pepper, chopped (any color) - 4 cups chicken broth - 1 can (14.5 oz) diced tomatoes, undrained - 1 can (15 oz) black beans, drained and rinsed - 1 teaspoon ground cumin - 1 teaspoon chili powder - ½ teaspoon smoked paprika - 2 cups cooked chicken, shredded - 1 cup corn (frozen or canned) - Salt and pepper to taste - Tortilla chips, for serving - Avocado slices, fresh cilantro, lime wedges, and shredded cheese for garnish Each ingredient adds its own flavor. Olive oil gives richness, while onion and garlic add depth. The bell pepper brings sweetness. Chicken broth creates a warm base. Diced tomatoes add tang, and black beans lend creaminess. Cumin and chili powder spice things up. Smoked paprika gives a nice smoky taste, while corn adds sweetness. The shredded chicken makes it hearty. Finally, the garnishes make every bowl special. For a detailed step-by-step guide to making this soup, check out the Full Recipe. 1. In a large pot, heat 2 tablespoons of olive oil over medium heat. 2. Add 1 chopped onion and sauté for about 3 minutes until it turns soft and clear. 3. Stir in 2 minced garlic cloves and 1 chopped bell pepper. Cook for another 2-3 minutes until the bell pepper is tender. 1. Pour in 4 cups of chicken broth and 1 can of diced tomatoes. Mix well to combine. 2. Add 1 can of drained black beans, 1 teaspoon of ground cumin, 1 teaspoon of chili powder, ½ teaspoon of smoked paprika, 1 cup of corn, and 2 cups of shredded chicken. Stir everything together and bring the soup to a gentle boil. 1. Lower the heat and let the soup simmer for 15-20 minutes. This lets all the flavors blend well. 2. Taste the soup and add salt and pepper as needed to enhance the flavor. 3. Serve hot in bowls, topped with crushed tortilla chips, avocado slices, fresh cilantro, lime wedges, and shredded cheese if you like. This simple process makes a warm, delicious meal. For the full recipe, check out the detailed steps above. For great flavor, I use the right seasonings and spices. Ground cumin adds warmth. Chili powder gives a nice kick. Smoked paprika gives a hint of smoke. If you want more heat, add cayenne pepper or jalapeños. Taste as you go. Adjust the spices to fit your taste. Think about how to serve your soup. Top it with crushed tortilla chips for crunch. You can add fresh avocado slices for creaminess. Fresh cilantro adds a bright touch. Lime wedges give a zesty flavor. Shredded cheese brings richness. Pair the soup with a simple salad or some cornbread for a full meal. Fresh herbs can boost the taste. I love adding cilantro or parsley right before serving. Always choose quality chicken. Opt for free-range or organic chicken if you can. This makes your soup tastier and healthier. Fresh ingredients make a big difference in flavor and nutrition. Enjoy the freshness in every bite! {{image_2}} To make a vegetarian version of chicken tortilla soup, start by substituting chicken with hearty plant-based options. You can use soy protein or chickpeas as a great swap. Adding more legumes enhances the dish. Black beans work well, but you can also add kidney beans or lentils. They give texture and protein, making the soup filling. You can easily adjust the spice level of your soup. For mild soup, use less chili powder and cumin. You can also skip the smoked paprika. If you like heat, add more chili powder or even diced jalapeños. Try different spices, too! Consider adding cayenne pepper for extra kick or even some taco seasoning for a unique twist. Using different types of broth can change the flavor. Try vegetable broth for a lighter taste or even coconut broth for a creamy touch. You can also get creative with vegetables. Add zucchini, carrots, or spinach for extra nutrition. These swaps not only change the taste but also boost the soup's health benefits. For more ideas, check out the Full Recipe. To keep chicken tortilla soup fresh, store it in the fridge. Use airtight containers for best results. Let the soup cool down before sealing. This helps prevent moisture build-up. It’s best to eat the leftovers within three to four days. You can freeze chicken tortilla soup for later. To freeze, use freezer-safe containers or bags. Leave some space at the top for expansion. For best taste, eat it within three months. To thaw, move the soup to the fridge overnight. Reheat it on the stove over low heat. Stir often to warm it evenly. Chicken tortilla soup lasts about four days in the fridge. In the freezer, it can last up to three months. Always check for signs of spoilage. If the soup has an off smell or changes color, it’s time to toss it. Enjoy your soup fresh or save it for later! For the full recipe, check the main article. You can make chicken tortilla soup in a slow cooker with ease. Start by heating the olive oil in a pan. Sauté the onion, garlic, and bell pepper until soft. Then, transfer them to your slow cooker. Add chicken broth, diced tomatoes, black beans, and spices. Add shredded chicken and corn next. Set your slow cooker on low for about 6-8 hours or high for 3-4 hours. Enjoy the rich flavors! Yes, you can use dried beans. Soak them overnight to soften. Cook them until tender before adding to the soup. This step may take longer, but the flavor is worth it. Use about 1 cup of dried beans to replace 1 can. Remember to adjust the cooking time accordingly. Toppings make your soup shine. Here are some favorites: - Crushed tortilla chips - Sliced avocado - Fresh cilantro - Lime wedges - Shredded cheese Feel free to mix and match these toppings for extra flavor and crunch. Yes, you can easily make this soup dairy-free. Just skip the cheese or use a dairy-free alternative. You can also add more avocado for creaminess. This way, you can enjoy the soup without any dairy. To thicken your soup, try these methods: - Add more corn or beans. - Blend a portion of the soup and mix it back in. - Use a cornstarch slurry. Mix 1 tablespoon of cornstarch with 2 tablespoons of water. Stir it in and let it cook for a few minutes. These methods will help create a heartier texture. In this blog post, we explored how to make a delicious chicken tortilla soup. We detailed the ingredients, from olive oil to tortilla chips. Step-by-step instructions guided you through preparing the base, combining flavors, and final cooking steps. I shared tips on perfecting the taste and suggested fun serving ideas. Lastly, we discussed variations, storage, and answered common questions. This soup is versatile and easy to make. Enjoy experimenting with flavors and ingredients to suit your taste!

Easy Chicken Tortilla Soup Quick and Flavorful Meal

Looking for a quick and easy meal that bursts with flavor? My Easy Chicken Tortilla Soup is just what you

To make honey garlic roasted sweet potatoes, gather these main items: - 4 medium sweet potatoes - 3 tablespoons olive oil - 4 tablespoons honey - 4 cloves garlic These ingredients form the base of your dish. Sweet potatoes are sweet and creamy. Olive oil helps them roast nicely. Honey adds a touch of sweetness. Garlic gives a bold flavor. Next, you need some seasonings: - 1 teaspoon smoked paprika - Salt and pepper to taste - Fresh parsley for garnish Smoked paprika adds a warm, smoky taste. Salt and pepper enhance all the flavors. Fresh parsley brightens up the dish and adds color. If you want to mix it up, consider these optional items: - Other spices or herbs for variation - Lemon juice for added acidity Feel free to experiment with spices like cinnamon or cayenne. A splash of lemon juice can add a nice zing. These changes can make the dish your own. For the full recipe, check out [Full Recipe]. Start with the sweet potatoes. Peel them first to remove the skin. Then, cut the potatoes into 1-inch cubes. This size helps them cook evenly. Next, let's make the honey garlic marinade. In a large bowl, mix 3 tablespoons of olive oil, 4 tablespoons of honey, and 4 minced garlic cloves. Add 1 teaspoon of smoked paprika, salt, and pepper to taste. Whisk everything together until it's well blended. Now, preheat your oven to 400°F (200°C). This step is important for even cooking. While the oven heats, toss the sweet potato cubes in the honey garlic marinade. Make sure each piece gets coated well. This will give you those sweet and savory flavors you want. Spread the coated sweet potatoes on a baking sheet. Use parchment paper for easy cleanup. Make sure the potatoes are in a single layer. This way, they roast nicely. Roast them in the oven for 25–30 minutes. Remember to stir halfway through the cooking time. This helps them caramelize. They are done when they are tender and golden on the edges. Once they are out of the oven, let them cool for a few minutes. Transfer the sweet potatoes to a serving dish and garnish with fresh parsley. This adds a bright touch. For the full recipe, check the section above. To get sweet potatoes just right, aim for a tender inside with crispy edges. The key is to cut them into 1-inch cubes. This size helps them cook evenly. I recommend tossing them in the honey garlic mixture well. Make sure every piece is coated. When you roast, use a single layer on the baking sheet. This helps them caramelize nicely. Stir them halfway through roasting for even cooking. You can boost the taste with extra spices. Try adding a pinch of cinnamon for warmth, or some cayenne for heat. You can also use fresh herbs like thyme or rosemary. Always choose high-quality honey and olive oil. These ingredients make a big difference. They bring out the flavors of the sweet potatoes. Fresh garlic adds a nice kick too. For a beautiful dish, garnish with fresh parsley. It adds color and freshness. You can serve the sweet potatoes warm, drizzled with any leftover honey mixture. This extra touch enhances the look and taste. For a fun twist, pair them with roasted meats or a colorful salad. Serve on a bright plate for added appeal. Check out the Full Recipe for more details. {{image_2}} You can switch up the taste of your honey garlic roasted sweet potatoes. Try adding spices! A dash of cinnamon brings warmth. A pinch of cayenne adds heat. Both spices work well with the sweet flavor. You can also use different sweeteners if you like. Maple syrup is a great choice. It adds a rich, deep taste to the dish. If sweet potatoes are not your thing, use butternut squash instead. It has a similar texture and works well with the honey garlic sauce. If you want a vegan option for honey, try agave syrup. It has a similar sweetness and flavor profile. These roasted sweet potatoes pair well with proteins. Serve them alongside chicken or pork for a balanced meal. They also shine as a side dish for holiday meals. Their bright color and sweet flavor make any table pop. When you serve these, your guests will be impressed! For the full recipe, check back to create this delightful dish. To keep your honey garlic roasted sweet potatoes fresh, place them in an airtight container. Store the container in the refrigerator. They will stay good for about 3 to 5 days. If you notice any signs of spoilage, like an off smell, it is best to discard them. They are still tasty and nutritious within this time. You can reheat the sweet potatoes in two ways: the oven or the microwave. For the oven, preheat it to 350°F (175°C). Spread the sweet potatoes on a baking sheet. Heat them for about 10-15 minutes until warm. This method keeps them crisp. If you use the microwave, place them in a bowl. Heat in short bursts of 30 seconds, stirring in between. This method is quicker but may result in softer potatoes. To freeze roasted sweet potatoes, let them cool completely first. Spread them in a single layer on a baking sheet. Freeze them for about 1-2 hours until solid. Once frozen, transfer the sweet potatoes to a freezer bag. Remove as much air as you can. They can last up to 3 months in the freezer. To thaw, place them in the fridge overnight. Reheat them in the oven to restore their texture. Enjoy your sweet potatoes later with the same great flavor! To make honey garlic roasted sweet potatoes, start by preheating your oven to 400°F (200°C). Next, mix olive oil, honey, minced garlic, smoked paprika, salt, and pepper in a bowl. Then, add the sweet potato cubes and toss them in the honey garlic mixture. Spread the cubes on a baking sheet lined with parchment paper. Roast them for 25 to 30 minutes, stirring halfway through. They are done when they are tender and caramelized. For the full recipe, check out the above section. Yes, you can prep these sweet potatoes ahead of time. Peel and cut the sweet potatoes a day before. Keep them in water to avoid browning. Store the honey garlic mixture in a separate container. Combine them on the day you plan to roast. This makes it easy to enjoy a delicious meal without much hassle. These sweet potatoes pair well with many dishes. You can serve them with grilled chicken or pork. They also go great with a fresh salad for a light meal. For a vegetarian option, try them with quinoa or lentils. The sweet and savory flavors work well with diverse meals. Yes, this recipe is quite healthy. Sweet potatoes are rich in vitamins and fiber. They provide antioxidants that help your body. The honey adds sweetness but in moderation. Using olive oil offers healthy fats. Overall, this dish is a nutritious addition to any meal. This blog post covered making honey garlic roasted sweet potatoes in easy steps. You learned about the ingredients, from sweet potatoes to honey, and how to prepare them. I shared tips to enhance flavor and texture while roasting. You also discovered serving ideas and storage methods. Use these insights to create a delicious and healthy dish with confidence. With simple variations, you can make it your own. Enjoy your cooking adventure!

Honey Garlic Roasted Sweet Potatoes Simple Delight

Are you ready to transform your dinner tonight? Honey Garlic Roasted Sweet Potatoes are your new go-to dish! With a

To make a tasty Classic BLT Pasta Salad, you will need: - 8 ounces fusilli or rotini pasta - 4 slices of crispy turkey bacon, chopped - 1 cup cherry tomatoes, halved - 1 cup Romaine lettuce, chopped - 1/2 cup mayonnaise - 1 tablespoon Dijon mustard - 1 tablespoon apple cider vinegar - 1/4 cup green onions, sliced - Salt and pepper to taste - 1/4 teaspoon smoked paprika (optional) - Fresh basil leaves for garnish (optional) This recipe serves six people. If you need to serve more, simply double the ingredients. You can also swap out the pasta for a gluten-free option. If you prefer, use regular bacon in place of turkey bacon. For a lighter version, use Greek yogurt instead of mayonnaise. Fresh ingredients make a big difference in flavor. Using ripe cherry tomatoes adds sweetness. Crisp Romaine lettuce provides crunch. Fresh basil gives a bright taste. Always choose high-quality ingredients. They will elevate your pasta salad. When you use fresh items, you create a dish that shines. For the complete recipe, check the Full Recipe. Start by boiling a large pot of salted water. Add 8 ounces of fusilli or rotini pasta. Cook it according to the package instructions. Aim for al dente, which means the pasta should still have a slight bite. This typically takes about 8 to 10 minutes. Once cooked, drain the pasta and rinse it with cold water. This stops the cooking and cools it down. Set the pasta aside to cool completely. Next, grab 4 slices of turkey bacon. Cut them into small pieces. Heat a skillet over medium heat and add the bacon. Cook it until it is crispy. This usually takes about 5 to 7 minutes. Once crispy, remove the bacon and place it on paper towels. This helps to soak up any extra grease. This step ensures you get that nice crunch in your salad. For the dressing, you need a small bowl. Add 1/2 cup of mayonnaise, 1 tablespoon of Dijon mustard, and 1 tablespoon of apple cider vinegar. If you want a hint of smokiness, add 1/4 teaspoon of smoked paprika. Sprinkle in some salt and pepper to taste. Whisk all these ingredients together until smooth. Taste the dressing and adjust seasoning if needed. This creamy dressing ties all the flavors together and makes the salad shine. For the full recipe, check out the earlier section. Enjoy making this fresh and flavorful Classic BLT Pasta Salad! To keep pasta from sticking, drain it well after cooking. Rinse it with cold water. This stops the cooking process. Toss the pasta in a little olive oil. This adds flavor and helps prevent sticking. If you're using a gluten-free pasta, follow the same steps. Gluten-free pasta often sticks more, so rinsing is key. Seasoning can make a big difference in your salad. Use salt and pepper to taste. I also like adding smoked paprika for a hint of smokiness. Fresh herbs like basil brighten the dish. You can also try a squeeze of lemon juice for added zest. Always taste as you go. Adjust the flavors until you are happy. Chilling the salad allows the flavors to blend. After mixing all the ingredients, cover the bowl with plastic wrap. Refrigerate for at least 30 minutes. This also makes the salad refreshing on a hot day. If you want to chill it longer, that’s fine too. Just remember to stir it before serving. This helps mix the dressing again. For the full recipe, check out the details above. {{image_2}} You can boost the taste of your BLT pasta salad by adding cheese. Cheese adds creaminess and a rich flavor. Try cubed cheddar or crumbled feta. Both work well with the salad's fresh tastes. You can also mix in mozzarella balls for a fun twist. Cheese makes each bite more satisfying. Don’t be afraid to add or swap out veggies. If you want a different crunch, use bell peppers or cucumbers. Both add a fresh and crisp taste. You can also try adding avocado for creaminess. Spinach can replace Romaine lettuce for a nutrient boost. Get creative with what you like! If you need gluten-free options, there are many pastas available. Look for brown rice or chickpea pasta. Both types hold up well in salads. They also add their own unique flavor. Cooking time may vary, so check the package. Enjoy your pasta salad without worrying about gluten! For the full recipe, refer to the Classic BLT Pasta Salad. Store leftover Classic BLT Pasta Salad in an airtight container. This keeps the salad fresh. Make sure to chill it in the fridge right away. It’s best to eat leftovers within three days for the best taste. To keep your ingredients fresh, store the pasta and dressing separately. This helps prevent sogginess. If you have leftover tomatoes or bacon, store them in their own containers. Always check for any signs of spoilage before using. You should not reheat the pasta salad. It’s best enjoyed cold. If you prefer a warm dish, reheat only the pasta and mix it with fresh ingredients. However, this alters the classic flavor of the salad. Enjoy it as is for the best experience! You can make Classic BLT Pasta Salad a day early. Prepare the salad, but don't add the dressing yet. Store it in the fridge. When ready to serve, mix in the dressing. This keeps everything fresh. The flavors will blend well overnight. Just remember to toss it gently before serving. Yes, you can use regular bacon. It adds a rich flavor. Cook the bacon until crispy and then chop it. Keep in mind that regular bacon has more fat. You may want to adjust the dressing to balance the taste. Either choice will make a tasty salad. You can add many different ingredients to the salad. Here are some ideas: - Avocado: Adds creaminess and healthy fats. - Cucumber: Gives a nice crunch and freshness. - Peppers: Adds color and sweetness. - Cheese: Feta or cheddar can enhance flavor. Feel free to mix and match based on what you like. Experimenting is part of the fun! For the full recipe, check the earlier section. In this post, we explored making a Classic BLT Pasta Salad. We covered the key ingredients and their importance. The step-by-step guide helps you cook pasta, prepare bacon, and make creamy dressing. I shared tips to enhance flavor and keep the pasta fresh. You can also try fun variations, like adding cheese or using gluten-free pasta. Lastly, I outlined best practices for storage and answered common questions. Enjoy creating this tasty dish and make it your own!

Classic BLT Pasta Salad Fresh and Flavorful Delight

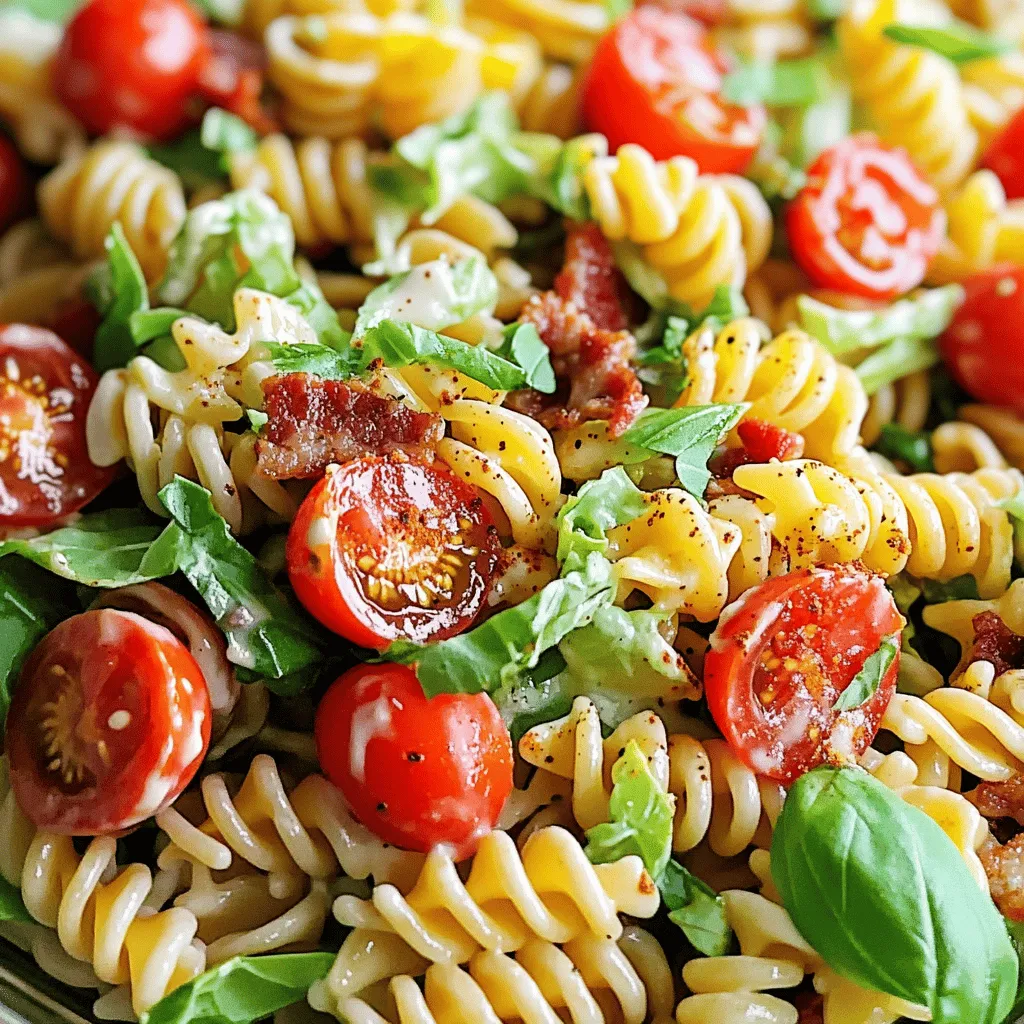
Are you ready to elevate your summer potluck game? My Classic BLT Pasta Salad is a fresh and flavorful delight

To make One Pan Sausage and Peppers, you will need: - 4 Italian sausages (mild or spicy, your choice) - 2 tablespoons olive oil - 1 large onion, sliced - 2 bell peppers (one red, one yellow), sliced - 2 cloves garlic, minced - 1 teaspoon dried oregano - 1 teaspoon paprika - Salt and pepper to taste - Fresh parsley, chopped (for garnish) - Crusty bread (for serving, optional) Using fresh ingredients makes a big difference in taste. Fresh vegetables add color and crunch. They keep the meal vibrant and full of flavor. Fresh herbs, like parsley, elevate the dish. They bring brightness and aroma that dried herbs can't match. When you use quality ingredients, your meal shines. This simple choice can turn a good dish into a great one. If you have allergies, you can still enjoy this recipe. Here are some easy swaps: - Sausages: Try turkey or chicken sausages if you prefer leaner meat. - Olive Oil: Use canola oil or avocado oil if you need a different oil. - Onion: If you cannot eat onions, skip them or use leeks instead. - Bell Peppers: Substitute with zucchini or mushrooms for a different taste. - Garlic: If garlic is a concern, use garlic powder for flavor without the allergen. These swaps help you enjoy the dish while staying safe. To start, gather all your ingredients. This helps you stay organized. You will need: - 4 Italian sausages (mild or spicy, your choice) - 2 tablespoons olive oil - 1 large onion, sliced - 2 bell peppers (one red, one yellow), sliced - 2 cloves garlic, minced - 1 teaspoon dried oregano - 1 teaspoon paprika - Salt and pepper to taste - Fresh parsley, chopped (for garnish) - Crusty bread (for serving, optional) Once you have everything, slice the onion and bell peppers. Mince the garlic. Having these prepped makes cooking easy and fast. Now let's cook! Heat the olive oil in a large skillet over medium heat. I like to use a sturdy pan to ensure even cooking. Add the Italian sausages first. Brown them on all sides, which takes about 5-7 minutes. This step adds flavor. Once browned, remove the sausages and place them on a plate. In the same skillet, toss in the sliced onion and bell peppers. Sauté for 5-6 minutes until they soften. Stir in the minced garlic, oregano, paprika, salt, and pepper. Cook for an additional 1-2 minutes until you smell the spices. This is where the magic happens! Next, slice the sausages into thick pieces. Return them to the skillet and mix everything together. Cover the skillet and let it simmer for about 10-12 minutes. This allows the flavors to meld. Timing is key for perfect sausage. Make sure to check them after simmering. They should be cooked through and juicy. If you're unsure, cut one open to check. Adjust seasoning if needed, then garnish with fresh parsley. Serve hot right from the skillet for a cozy, rustic feel. For the full recipe, check out the [Full Recipe]. To get the best taste, use high-quality Italian sausages. If you like spice, choose spicy sausages. Fresh bell peppers add a sweet crunch. Try using a mix of red and yellow for color. Don't rush the cooking process. Let the onions and peppers soften slowly. This helps build a rich flavor. Always taste your dish before serving. Adjust the salt and pepper as needed. One common mistake is cooking sausage on high heat. This can lead to burnt outsides and raw insides. Always cook on medium heat instead. Another mistake is not letting the dish simmer long enough. This step allows flavors to blend well. Don't forget to slice the sausages before returning them to the skillet. This helps distribute the flavor evenly. Sausage and peppers pair well with crusty bread. The bread soaks up the tasty juices. You can also serve it over rice or pasta for a filling meal. For a fresh touch, add a simple green salad on the side. A glass of red wine complements this dish nicely, enhancing its rich flavors. {{image_2}} You can switch up the sausages to change the taste. Try chicken or turkey sausages for a lighter meal. For a smoky flavor, use chorizo or andouille sausages. You can also swap the bell peppers. Use green, orange, or even poblano peppers for new tastes. Experiment with different herbs and spices too. A bit of thyme or basil can add a fresh twist. For a vegan or vegetarian version, replace the sausages with plant-based options. Use lentils, chickpeas, or tofu to keep it hearty. You can also add portobello mushrooms for a meaty texture. Instead of olive oil, use vegetable broth to sauté the veggies. This keeps the dish light and full of flavor without meat. Want to take this dish up a notch? Add some olives, capers, or sun-dried tomatoes for a burst of flavor. You can also toss in some spinach or kale for extra nutrients. If you like a kick, add red pepper flakes or hot sauce. For a creamy touch, mix in some cream or cheese right before serving. These additions make the meal more exciting and delicious. For the full recipe, check out the One Pan Sausage and Peppers Delight. To keep your One Pan Sausage and Peppers fresh, let it cool first. Place the leftovers in an airtight container. This helps prevent moisture loss and keeps the flavors intact. Store it in the fridge for up to three days. If you have a lot left, consider using smaller containers for easy access. When you're ready to enjoy leftovers, reheat them on the stove. Place the sausage and peppers in a skillet over medium heat. Add a splash of water or broth. This keeps the dish moist. Stir occasionally until heated through, about 5 to 7 minutes. You can also microwave it, but be careful not to overheat. You can freeze One Pan Sausage and Peppers for longer storage. Let it cool completely before freezing. Place the dish in a freezer-safe container. It can last up to three months in the freezer. To reheat, thaw it overnight in the fridge. Then, follow the reheating instructions. This way, you enjoy a hearty meal anytime! For the full recipe, check out the One Pan Sausage and Peppers Delight! It takes about 5-7 minutes to brown the sausages in a pan. You want them to get a nice, golden color. After that, simmer them with the veggies for 10-12 minutes. This ensures they cook through and soak up all the flavors. Yes, you can use other meats. Chicken or turkey work well. You can also try pork or beef. Just ensure they are cut into similar sizes so they cook evenly. Keep in mind that cooking times may vary based on the meat you choose. Several sides go great with this dish. Crusty bread is perfect for soaking up the juices. A fresh salad adds a nice crunch. Roasted potatoes or rice can round out the meal, too. Each side brings its own flavor and texture to the table. This article explored the key ingredients for a tasty sausage and peppers dish. Fresh ingredients elevate flavor, and I shared substitutions for allergies. You learned step-by-step cooking tips to ensure perfect timing. I highlighted common mistakes to avoid and offered pairing suggestions. In the end, mastering this dish means understanding its basics and experimenting with flavors. With the tips in this post, you can create a meal that everyone will love. Enjoy your cooking journey!

One Pan Sausage and Peppers Hearty Meal Made Easy

Are you looking for a simple yet tasty dinner idea? One Pan Sausage and Peppers is the answer! This hearty

- 2 cups cooked jasmine rice (preferably day-old) - 1 cup chicken breast, diced - 1 cup mixed vegetables (carrots, peas, and corn) - 3 green onions, sliced - 2 eggs, lightly beaten - 3 tablespoons soy sauce (low sodium) - 1 tablespoon sesame oil - 1 tablespoon vegetable oil - 1 teaspoon garlic powder - 1 teaspoon ginger powder - Salt and pepper to taste Using day-old rice is key. Fresh rice can be too moist. It will clump together. Day-old rice is drier and breaks apart nicely. This makes for a better texture. You can vary the vegetables based on what you like. Try bell peppers, broccoli, or snap peas. Each adds a unique taste and color. A large non-stick skillet or a wok works best. These help cook the rice evenly. A non-stick surface prevents sticking. This ensures easy mixing and cleanup. To start, you need to cook the chicken. Heat a large non-stick skillet or wok over medium-high heat. Add vegetable oil and let it warm up. Once hot, toss in the diced chicken breast. Season the chicken with salt, pepper, garlic powder, and ginger powder. Cook the chicken for about 5 to 7 minutes. You want it golden brown and cooked through. When done, remove the chicken from the skillet and set it aside. This step adds flavor to your fried rice. Next, it's time for the vegetables. In the same skillet, add your mixed vegetables. These can be carrots, peas, and corn. Cook them for about 3 to 4 minutes. You want them tender but still crisp. To keep them crisp, avoid overcooking. Stir occasionally, but don’t let them sit too long. This step adds color and nutrition to your dish. Now we mix everything together. Push the cooked vegetables to one side of the skillet. Pour the beaten eggs on the other side. Scramble the eggs until fully cooked. Then, mix the eggs with the vegetables. Next, add the cooked jasmine rice to the skillet. Follow this with the cooked chicken. Pour in the soy sauce and sesame oil. Mix everything thoroughly, cooking for another 2 to 3 minutes. This ensures all the flavors blend well. Finally, toss in the sliced green onions and stir again. You can adjust the seasoning with salt and pepper. Serve hot and enjoy your savory chicken fried rice! For more details, check out the Full Recipe. To make the best chicken fried rice, use cold rice. Cold rice works better than warm rice. It keeps the grains separate and firm. This prevents mushy fried rice. Day-old rice is ideal since it dries out a bit in the fridge. If you don't have day-old rice, spread freshly cooked rice on a tray. Let it cool for 30 minutes. This helps remove some moisture. One big mistake is overcrowding the pan. When you add too many ingredients, the heat drops. This leads to steaming instead of frying. Steamed rice does not have that nice, crispy texture. Cook in batches if needed. This keeps everything hot and helps achieve that golden color on your chicken and veggies. Serving matters. A great presentation makes any dish more appealing. Serve chicken fried rice in bowls. Top each bowl with green onions and sesame seeds. This adds color and texture. You can also drizzle some soy sauce on top. For a fun touch, add a lime wedge on the side. This adds a splash of freshness to every bite. Enjoy your delicious and beautiful dish! {{image_2}} You can easily make chicken fried rice vegetarian. Swap chicken for tofu or tempeh. Use firm tofu for the best texture. Press it to remove excess water, then cube it. Sauté the tofu until golden brown. Follow the same cooking steps in the recipe. You can also try using chickpeas or edamame for added protein. Want to add more flavor? Try different sauces and spices. A splash of oyster sauce adds umami. You can also use chili paste for heat. For a touch of sweetness, add a bit of hoisin sauce. Consider sprinkling sesame seeds or chopped cilantro on top for a fresh taste. Keep experimenting to find your favorite mix! Not a fan of jasmine rice? You can use different grains. Brown rice adds a nutty flavor and more fiber. Quinoa is a great gluten-free option, too. Just remember to cook them before adding to the pan. Cauliflower rice is another healthy choice. It’s low-carb and cooks quickly. Choose what you like best for a tasty meal! Homemade chicken fried rice lasts about 3 to 4 days in the fridge. Make sure to cool it down before putting it in the fridge. Store it in a tight container to keep it fresh. Always check for any off smells or changes in color before eating. To freeze chicken fried rice, first cool it completely. Then, place it in a freezer-safe container or a zip-top bag. Remove as much air as possible to prevent freezer burn. It can last up to 3 months in the freezer. To reheat, thaw it in the fridge overnight. Then, warm it on the stove or in the microwave until hot. I recommend using glass or BPA-free plastic containers. These keep the flavors in and prevent spills. If you use bags, make sure they are heavy-duty and designed for freezing. Label your containers or bags with the date to keep track of how long they have been stored. For chicken fried rice, I like using jasmine rice. It has a nice, fluffy texture. Day-old rice is best because it is drier. This helps it fry better. You can also use basmati rice. It has a lovely aroma and flavor. Yes, using leftover chicken is great! It saves time and adds flavor. Just chop it into small pieces. You can use any cooked chicken, like rotisserie chicken. This makes your meal quick and easy. If you want to skip soy sauce, try using coconut aminos. It’s a tasty, soy-free option. You can also use teriyaki sauce or fish sauce. For a lighter flavor, add lemon juice. These options keep your dish flavorful. Yes, homemade chicken fried rice is usually healthier. You control the ingredients. You can choose fresh veggies and lean chicken. This means less salt and fat. You can also add more nutrients. Making it at home is a tasty way to eat better. This blog post covered the essential ingredients, steps, and tips for making chicken fried rice. We discussed using day-old rice, cooking techniques, and equipment needed for the best results. I shared ways to adapt the recipe, such as vegetarian options and flavor boosters. In closing, homemade chicken fried rice not only tastes better than takeout, but you also control the ingredients. With these tips and steps, you can make a quick meal that everyone will enjoy. Enjoy your cooking and make it your own!

Homemade Chicken Fried Rice Savory and Simple Recipe

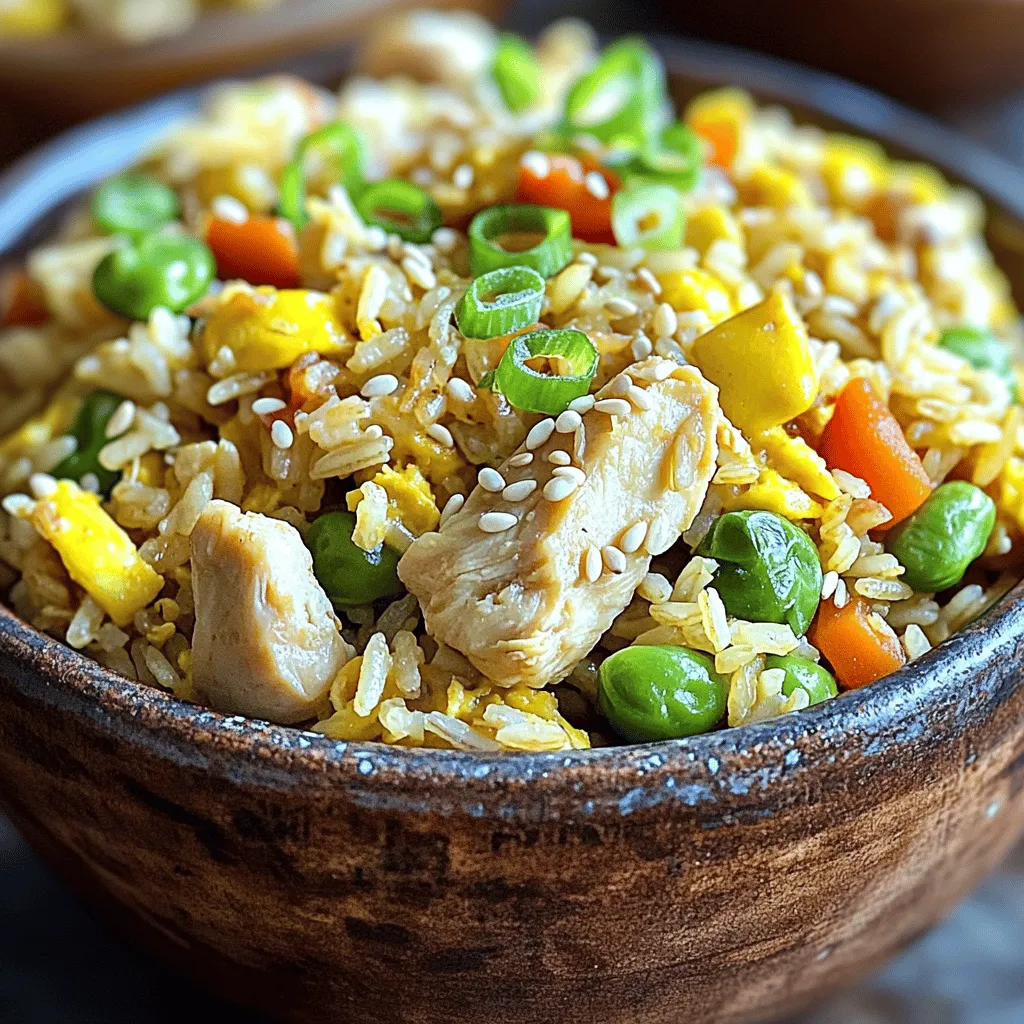
Craving a delicious meal that’s quick and easy? Let’s dive into making homemade chicken fried rice. This savory dish is

- 1 medium head of cauliflower, cut into florets - 4 tablespoons olive oil - 4 cloves garlic, minced - 1 teaspoon salt - 1/2 teaspoon black pepper - 1 teaspoon smoked paprika - 1/2 cup grated Parmesan cheese - 2 tablespoons fresh parsley, chopped (for garnish) - Lemon wedges (for serving) To make Garlic Parmesan Roasted Cauliflower, gather these simple ingredients. The key to this dish is the fresh garlic and rich Parmesan. The cauliflower brings a nice crunch. Olive oil helps the flavors blend well. - Calories per serving: About 150 - Macronutrient breakdown: - Carbohydrates: 8g - Protein: 5g - Fat: 12g This dish is not just tasty; it also packs a good amount of nutrients. The cauliflower is low in calories and high in vitamins. The Parmesan adds flavor and some protein. Each serving gives you a nice balance of healthy macronutrients. For the full recipe, check out the link provided. Enjoy creating this flavorful dish! - Preheat your oven to 425°F (220°C). - In a large bowl, toss the cauliflower florets with olive oil. Add minced garlic, salt, black pepper, and smoked paprika. Mix well until each floret gets coated. - Spread the cauliflower in a single layer on a baking sheet. Roast it for 20 minutes. This step helps to soften and brown the florets. - After 20 minutes, take out the baking sheet. Sprinkle the grated Parmesan cheese over the cauliflower. Return it to the oven for another 5–10 minutes. You want the cheese to melt and turn golden brown. - Let the cauliflower cool for a few minutes after roasting. - Garnish it with chopped parsley. Serve with lemon wedges on the side. The lemon adds a nice zing to the dish. For more details, check the Full Recipe. To get the best roast, you want even cooking. Start by cutting your cauliflower into uniform florets. This step helps them cook at the same rate. Use a spacious baking sheet. Crowding the florets will steam them instead of roasting. Set your oven to 425°F (220°C). This high heat is key to getting that nice golden color. Place your baking sheet in the middle of the oven. It allows hot air to circulate evenly around the cauliflower. Want to spice things up? Try adding a pinch of cayenne for some heat. You can also mix in dried herbs like thyme or oregano. If you don’t have Parmesan cheese, use Pecorino Romano. It gives a salty kick that pairs well with garlic. Make your dish look fancy! Use a large white platter for serving. Arrange the roasted cauliflower in a circular pattern. Drizzle a little olive oil on top for shine. Finish with fresh parsley for a pop of color. Serve lemon wedges on the side. They add a zesty touch that brightens the dish. These tips will help you create a Garlic Parmesan Roasted Cauliflower that looks and tastes amazing. For the complete Garlic Parmesan Roasted Cauliflower recipe, check out the Full Recipe link. {{image_2}} You can switch up the cheese in this recipe. Try using cheddar or feta for a twist. Each cheese brings its own flavor and texture. You might also mix in some mozzarella for a gooey bite. Adding more veggies can make this dish even better. Think about bell peppers, carrots, or broccoli. Chop them into small pieces and toss them with the cauliflower. This adds color and nutrition to your meal. For a vegan option, skip the Parmesan cheese. You can use nutritional yeast instead. It gives a cheesy flavor without dairy. You might also try vegan cheese shreds. They melt well and add richness. If you need low-carb or gluten-free options, this dish is perfect as is. Cauliflower is naturally low in carbs and gluten-free. Just be sure to check any added seasonings or cheese for hidden carbs. If you like heat, consider a spicy garlic version. Add crushed red pepper flakes to the oil mix. This will give your cauliflower a kick! You can also throw in some cayenne pepper for an extra boost. For a fresh twist, use herbs. Mix in dried thyme or oregano with the oil. This will add a lovely aroma and flavor. You can even toss in fresh herbs after roasting for a bright finish. Try these variations to make Garlic Parmesan Roasted Cauliflower your own. You can find the full recipe above to get started! To store your Garlic Parmesan Roasted Cauliflower, let it cool first. Then, place it in an airtight container. This will keep it fresh. In the fridge, it can last for about 3 to 5 days. Just make sure the container is sealed well to avoid any odors. When you’re ready to enjoy leftovers, reheating is key. For the best taste, use the oven. Preheat it to 350°F (175°C). Spread the cauliflower on a baking sheet and heat for about 10 minutes. This keeps it crispy. You can also use the microwave. Heat it in short bursts to avoid sogginess. You can freeze Garlic Parmesan Roasted Cauliflower! First, let it cool completely. Place it in a freezer-safe bag or container. It can stay good for about 1 to 2 months. When ready to eat, thaw it in the fridge overnight. Reheat it in the oven to keep the texture nice. Enjoy your delicious dish anytime! For the full recipe, check out the details above. You can prepare Garlic Parmesan Roasted Cauliflower in advance. First, wash and cut the cauliflower into florets. Then, mix it with olive oil, garlic, salt, pepper, and smoked paprika. Store this mixture in an airtight container in the fridge for up to 24 hours. When you're ready to cook, spread it on a baking sheet and roast as directed in the Full Recipe. This method keeps the flavors fresh. Yes, you can use frozen cauliflower. Just remember to thaw it first. Drain the excess water to prevent sogginess. Toss the thawed cauliflower with the same olive oil and spices from the recipe. This will help maintain the flavor and texture. For best results, roast it a bit longer to achieve that crispy bite. Garlic Parmesan Roasted Cauliflower pairs well with many dishes. You can serve it alongside grilled chicken or fish for a tasty meal. It also works great with pasta or quinoa dishes. For sides, consider a fresh salad or some roasted potatoes. This dish adds a nice touch to any meal! This blog post outlined a tasty Garlic Parmesan Roasted Cauliflower recipe. We covered ingredients, cooking steps, and creative serving ideas. You learned about nutritional info and storage tips. Remember, small changes can boost flavor or suit dietary needs. Enjoy experimenting with variations, like adding spices or different cheeses. This dish can shine at any meal. Use these tips to make the best roasted cauliflower ever. Have fun cooking and sharing with others!

Garlic Parmesan Roasted Cauliflower Simple and Tasty

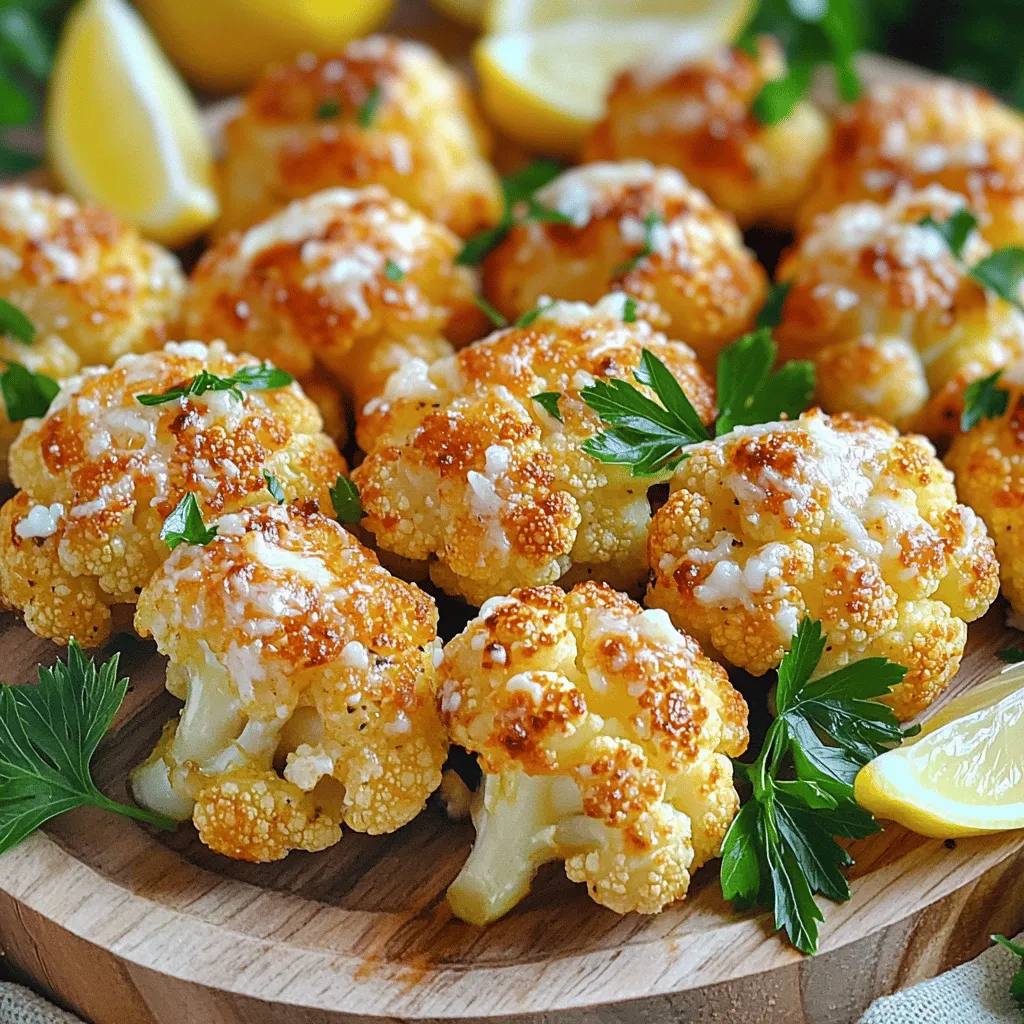
If you’re looking for a simple and tasty dish, Garlic Parmesan Roasted Cauliflower is perfect for you! This recipe brings

- 1 pound large shrimp, peeled and deveined - 4 cloves garlic, minced - 1/4 cup fresh lemon juice - Zest of 1 lemon - 1/4 cup olive oil - 1 teaspoon red chili flakes (optional) - 1/2 teaspoon salt - 1/4 teaspoon black pepper - 2 tablespoons fresh parsley, chopped - Lemon slices for garnish To make Zesty Lemon Garlic Shrimp, start with fresh shrimp. You want shrimp that is large and firm. Peel and devein them before cooking. The garlic adds a nice punch. Mince four cloves for the best flavor. Fresh lemon juice gives a bright taste. You will need 1/4 cup of it. Next, the seasonings make this dish pop. Zest one lemon to add a burst of citrus flavor. Olive oil helps to cook the shrimp and adds richness. Use 1/4 cup. If you like heat, add red chili flakes. One teaspoon is perfect. Salt and black pepper are key for taste. You need 1/2 teaspoon of salt and 1/4 teaspoon of black pepper. Fresh parsley gives a nice touch. Use 2 tablespoons, chopped. Finally, lemon slices are great for garnish. They brighten the dish and add flair. Ready to cook? You can find the full recipe above. To start, grab a medium bowl. In it, combine: - 1/4 cup olive oil - 4 cloves garlic, minced - 1/4 cup fresh lemon juice - Zest of 1 lemon - 1 teaspoon red chili flakes (optional for spice) - 1/2 teaspoon salt - 1/4 teaspoon black pepper Whisk these ingredients well. This marinade packs a punch of flavor that will infuse the shrimp. Now, take 1 pound of large shrimp, peeled and deveined. Add them to your marinade. Toss gently to coat each shrimp evenly. Let them sit at room temperature for 15-20 minutes. This time allows the shrimp to soak up the zesty flavors. Next, preheat a large skillet over medium-high heat. Once hot, add the marinated shrimp in a single layer. Make sure not to crowd the skillet. Cook the shrimp for 2-3 minutes on one side. They should turn pink and slightly char. Flip each shrimp and cook for another 1-2 minutes until fully cooked. Remove them from the heat. Sprinkle 2 tablespoons of fresh parsley on top for a burst of color and flavor. You can serve this dish right away, garnished with lemon slices. For the full recipe, check out the [Full Recipe]. To make your Zesty Lemon Garlic Shrimp shine, use fresh ingredients. Fresh shrimp, garlic, and lemons pack great flavor. Always choose the best you can find. You can also adjust heat levels with red chili flakes. If you want more spice, add more flakes. For less heat, skip them altogether. Avoid overcrowding the skillet when cooking shrimp. If you add too many, they will steam instead of sear. This can make them tough and chewy. Cook shrimp in batches if needed. Make sure the shrimp cook properly. They should turn pink and opaque, which shows they are done. Pair your shrimp with sides for a complete meal. Rice, pasta, or a fresh salad work well. They balance the strong lemon and garlic flavors. For presentation, add lemon slices and parsley. These bright colors make your dish pop and look inviting. {{image_2}} You can add vegetables to the Zesty Lemon Garlic Shrimp for extra flavor and nutrition. Here are some great choices: - Cherry tomatoes - Bell peppers - Zucchini - Spinach - Broccoli Just chop veggies into bite-sized pieces. Toss them into the marinade with the shrimp. This adds color and crunch. Cooking times may vary. Just make sure veggies are tender but not mushy. If you don’t want to use shrimp, try chicken or tofu. For chicken, use boneless breasts or thighs. Cut them into cubes. Marinate them the same way. Cook the chicken for about 5-7 minutes, until golden. For a plant-based option, use firm tofu. Press it to remove water, then cut into cubes. Marinate like the shrimp. Sauté for 4-6 minutes until golden and crispy on the outside. You can play with herbs and spices to enhance the dish. Here are some options to consider: - Fresh basil - Thyme - Oregano - Cilantro Add these to the marinade or sprinkle them on the shrimp before serving. They will bring new flavors to the dish. Experiment and find your favorite combinations! For the full recipe, check out the [Full Recipe]. After you enjoy your Zesty Lemon Garlic Shrimp, store any leftovers right away. Place the shrimp in an airtight container. This keeps them fresh and safe. You can refrigerate cooked shrimp for up to three days. If you wait too long, they may spoil. When it's time to enjoy leftovers, be careful not to overcook them. The best way is to heat shrimp gently. You can use a skillet on medium heat. Add a little olive oil to keep them moist. Stir often for 2-3 minutes. You can also use a microwave. Heat in short bursts, checking to avoid rubbery shrimp. Yes, you can freeze cooked shrimp! To do this, let them cool first. Place shrimp in a freezer-safe bag. Press out the air and seal it tight. Cooked shrimp can last for up to three months in the freezer. When ready, thaw shrimp in the fridge overnight. This keeps them safe and tasty. Shrimp cook fast. They usually take 3 to 5 minutes. Look for these signs: - Color Change: Raw shrimp are gray. Cooked shrimp turn pink. - Shape: They curl into a C shape when done. - Texture: Cooked shrimp feel firm, not mushy. If you see these signs, your shrimp are ready! Yes, you can use frozen shrimp. Here’s how to thaw them: - Refrigerator Method: Place shrimp in the fridge overnight. - Cold Water Method: Seal shrimp in a bag. Soak in cold water for 15-20 minutes. Make sure to pat them dry before cooking. This helps the shrimp sear better. Pair shrimp with tasty sides for a complete meal. Here are my top picks: - Rice: White or brown rice adds a nice base. - Pasta: Toss shrimp with spaghetti for a delightful dish. - Salad: A fresh green salad balances the meal. - Bread: Serve with crusty bread to soak up the sauce. Yes! Zesty Lemon Garlic Shrimp is a healthy choice. Here’s why: - Low in Calories: Shrimp are low in calories but high in protein. - Rich in Nutrients: They contain omega-3 fatty acids, which are great for heart health. - Fresh Ingredients: Using garlic and lemon adds flavor and nutrition without extra fat. Enjoy this dish guilt-free! For the full recipe, check the earlier section. In this article, we explored how to make Zesty Lemon Garlic Shrimp. We covered the main ingredients, detailed steps, and tips for the best flavor. Fresh ingredients and proper cooking make a big difference. You can also try adding veggies or swapping shrimp with chicken or tofu for variety. Storing leftovers properly ensures they last. This dish is not only tasty but healthy, too. Enjoy your cooking adventure with this simple yet flavorful recipe!

Zesty Lemon Garlic Shrimp Simple and Quick Recipe

Craving a quick and tasty meal? Look no further! My Zesty Lemon Garlic Shrimp recipe is simple yet bursting with

Older posts
Newer posts
← Previous Page1 … Page78 Page79 Page80 … Page86 Next →

dsad

© 2026 Cooking Wells • Built with GeneratePress

Our Policies

  • Copyright Policy
  • Cookie Policy
  • GDPR Policy
  • Privacy Policy
  • Disclaimer
  • Terms Of Use

More Information

  • Home
  • About
  • Contact
  • Appetizers
  • Dessert
  • Dinner
  • Drinks
©2026, Cooking Wells About Back To Top