Skip to content
DisclaimerTerms Of UseGDPR PolicyCookie Policy

Cooking Wells

  • Home
  • Drinks
  • Appetizers
  • Dinner
  • Dessert
  • About
  • Contact
  • Privacy Policy
DisclaimerTerms Of UseGDPR PolicyCookie Policy

NO-ING-IMG

- 1 pound large shrimp, peeled and deveined - 8 ounces smoked sausage, sliced - 1 red bell pepper, diced - 1 green bell pepper, diced - 1 medium onion, chopped - 3 cloves garlic, minced - 2 cups cherry tomatoes, halved - 2 tablespoons Cajun seasoning - 1 teaspoon paprika - 1 cup chicken broth - 2 tablespoons olive oil - 1 tablespoon fresh parsley, chopped (for garnish) - Salt and pepper to taste You can change a few ingredients if needed. If you don’t have large shrimp, use medium shrimp. Chicken sausage works well if you want a lighter option. Red and green bell peppers add color, but you can use yellow or orange if that’s what you have. For a twist, try using diced zucchini or mushrooms. If you are short on Cajun seasoning, make your own with paprika, cayenne, and dried herbs. When measuring, use dry measuring cups for solids. For liquids, use a clear measuring cup with markings. Always level off dry ingredients with a knife for accuracy. If you need garlic, use fresh for the best taste. Minced garlic adds a stronger flavor, so one clove is often enough. For chopped items like onion and peppers, try to keep the pieces even. This helps them cook at the same rate. Start by heating 2 tablespoons of olive oil in a large skillet over medium heat. Once hot, add 8 ounces of sliced smoked sausage. Cook for about 5 minutes until the sausage is browned. This step adds great flavor. Next, add 1 chopped onion, 1 diced red bell pepper, and 1 diced green bell pepper. Cook these for another 5 minutes until they are soft. This mix gives your dish a nice crunch and color. Now, it's time to add the shrimp. First, stir in 3 minced garlic cloves and cook for 1 minute until you smell that great aroma. Then, sprinkle 2 tablespoons of Cajun seasoning and 1 teaspoon of paprika over the mixture. Stir well to coat everything in spice. Add 2 cups of halved cherry tomatoes and pour in 1 cup of chicken broth. Bring this mix to a simmer. Let it cook for about 5 minutes, so the sauce thickens. After that, add 1 pound of peeled and deveined shrimp to the skillet. Cook for about 3 to 4 minutes. The shrimp should turn pink and be fully cooked. Keep an eye on them so they don't overcook. Once the shrimp is done, taste and adjust with salt and pepper. This step is key for bringing out all the flavors. Remove the skillet from the heat. Finally, garnish your dish with 1 tablespoon of chopped fresh parsley. This not only adds a pop of color but also a fresh taste. Serve hot and enjoy your flavorful Cajun shrimp and sausage skillet! When picking shrimp, look for clear shells. Fresh shrimp should smell like the ocean, not fishy. Their color should be bright and not dull. If the shrimp feel firm and springy, they are good. Avoid shrimp with black spots or a slimy feel. One common mistake is overcooking the shrimp. Shrimp cook fast; they turn pink in just a few minutes. If you leave them too long, they can become tough. Another mistake is using too much salt. Cajun seasoning adds flavor, so use it wisely. Lastly, don’t skip the fresh parsley. It adds a nice touch at the end. Want more heat? Add a pinch of cayenne pepper or red pepper flakes. If you prefer less spice, use less Cajun seasoning. You can also add some cream to cool it down. Mixing in a little sour cream can balance the heat well. Always taste as you go to find your perfect flavor. {{image_2}} You can make this dish heartier by adding rice. Cook one cup of rice in a pot. While the rice cooks, follow the main recipe for the Cajun shrimp and sausage. Once the shrimp and sausage are ready, stir in the cooked rice. This makes a one-pan meal that is filling and tasty. If you want a keto version, swap the sausage for a low-carb option. Use zucchini or cauliflower rice instead of regular rice. They add great texture and cut carbs. You can also increase the shrimp to boost protein. This meal will keep you satisfied while staying low in carbs. For a vegetarian or vegan take, skip the shrimp and sausage. Use mushrooms or jackfruit as the main protein source. They soak up flavors well and give a nice texture. Replace chicken broth with vegetable broth. You still get a tasty dish packed with veggies. Store any leftover Cajun shrimp and sausage skillet in an airtight container. Let the dish cool to room temperature first. This way, you keep all the flavors and freshness. Refrigerate the leftovers for up to three days. If you want to enjoy it later, you can freeze it. To reheat, use a skillet over medium heat. Add a splash of chicken broth to prevent sticking. Stir often until heated through. You can also use a microwave. Place the food in a microwave-safe bowl. Heat in short bursts, stirring in between, until hot. If you want to freeze this dish, do it as soon as possible. Store it in a freezer-safe container. It can last up to two months in the freezer. When ready to eat, thaw it overnight in the fridge. Then, reheat it as mentioned above. Avoid refreezing once it's thawed. This keeps the shrimp tender and flavorful. Yes, you can use frozen shrimp. Just thaw them first. Place them in cold water for about 15 minutes. This helps the shrimp cook evenly. I prefer fresh shrimp for taste, but frozen works well too. Smoked sausage is the best choice. It adds great flavor and richness. I like andouille sausage for a classic Cajun taste, but any smoked sausage will do. Just pick a type you enjoy. To spice it up, add more Cajun seasoning. You can also mix in some hot sauce. If you want extra heat, chop up a fresh jalapeño. This will make each bite fiery and delicious. Adjust the spice to fit your taste! This blog covered everything you need for a great shrimp and sausage dish. We discussed ingredients, cooking steps, and how to store leftovers. I shared tips to adjust spice levels and suggested fun variations, too. Remember, cooking is about experimenting and enjoying the process. You can make this dish your own, so try different flavors. Happy cooking, and enjoy your meal!

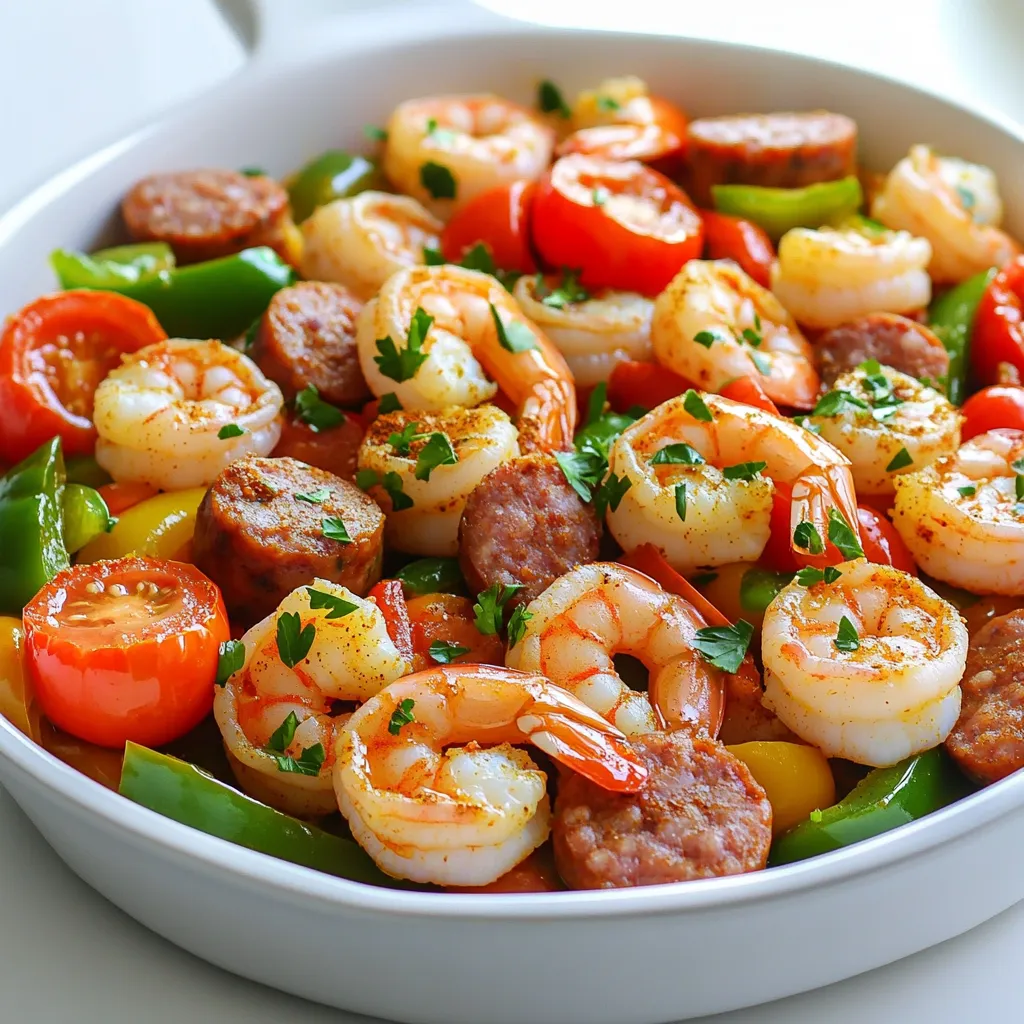
Cajun Shrimp & Sausage Skillet Flavorful Dinner Dish

If you crave bold flavors and easy meals, you’ll love my Cajun Shrimp & Sausage Skillet. This dish bursts with

To make your Air Fryer Crispy Tortilla Pizza, gather these main items: - 2 large flour tortillas - 1 cup marinara sauce - 1 ½ cups shredded mozzarella cheese - ½ cup sliced bell peppers (red and green) - ½ cup sliced black olives - ½ teaspoon dried oregano - ½ teaspoon garlic powder - ½ teaspoon red pepper flakes (optional for heat) - Fresh basil leaves for garnish - Olive oil spray These ingredients create a tasty base for your pizza. The tortillas will give you that perfect crispy crust. You can customize your tortilla pizza with these fun toppings: - Fresh spinach - Sliced mushrooms - Cooked chicken or pepperoni - Pineapple chunks - Feta cheese Feel free to mix and match to suit your taste. Add these to make your pizza truly yours! To make this recipe easy, use these tools: - Air fryer - Tongs - Cooking spray bottle - Cutting board - Sharp knife - Mixing bowl Having the right tools makes cooking smooth. With these, you can whip up your pizza in no time! Start by gathering all your ingredients. You need: - 2 large flour tortillas - 1 cup marinara sauce - 1 ½ cups shredded mozzarella cheese - ½ cup sliced bell peppers (red and green) - ½ cup sliced black olives - ½ teaspoon dried oregano - ½ teaspoon garlic powder - ½ teaspoon red pepper flakes (optional for heat) - Fresh basil leaves for garnish - Olive oil spray Preheat your air fryer to 400°F (200°C). This step takes about 5 minutes. While it heats, spray one side of each tortilla with olive oil. This helps make them crispy. Now, place the tortillas in the air fryer basket with the oiled side down. Next, spread ½ cup of marinara sauce on each tortilla. Be sure to leave a small border around the edges. Sprinkle ¾ cup of shredded mozzarella cheese on each sauced tortilla. Then, add the sliced bell peppers and black olives on top. Finish by adding the remaining mozzarella cheese. Season your pizzas with dried oregano, garlic powder, and optional red pepper flakes. These spices add great flavor. Cook the pizzas in the air fryer for 6-8 minutes. Watch for the cheese to bubble and the edges to turn golden brown. Once done, carefully remove the pizzas using tongs. Slice the pizzas into wedges. Serve them on a colorful platter for a fun look. You can drizzle balsamic glaze over the top or sprinkle fresh herbs for extra flair. Enjoy your crispy tortilla pizza straight from the air fryer! To get that perfect crispy bite, keep a few things in mind. First, spray the tortillas with olive oil. This adds flavor and helps them crisp up. Use just enough oil to coat one side lightly. Next, don’t overload the toppings. Too many toppings can make the tortilla soggy. Aim for a nice balance. Set your air fryer to 400°F (200°C). Preheating for five minutes is key. This ensures your tortillas start cooking right away. Cook the pizzas for 6-8 minutes. Check them at the 6-minute mark. Look for bubbly cheese and golden edges. This means they are ready to enjoy. One common mistake is not preheating the air fryer. This can lead to uneven cooking. Also, avoid using too much sauce. Spreading just enough marinara keeps the tortilla crisp. Lastly, don’t forget to check the cooking time. Every air fryer is different, so adjust as needed. These tips will help you create a delicious and crispy tortilla pizza that everyone will love! {{image_2}} You can make this tortilla pizza a veggie delight. Use fresh veggies like spinach, mushrooms, or zucchini. You could also add artichoke hearts or sun-dried tomatoes for a twist. Try different cheese, like goat cheese or feta, for extra flavor. For a heartier meal, add proteins. Cooked chicken, turkey, or pepperoni works great. Chop the meat into small pieces before adding it. You can even use leftover rotisserie chicken for ease. Just sprinkle it on top of the cheese before cooking. If you need gluten-free options, use corn tortillas. They crisp up nicely in the air fryer. You can also find gluten-free flour tortillas at stores. Just check the labels to ensure they fit your needs. Enjoy all the toppings just like with regular tortillas! To store leftovers, let the tortilla pizza cool down first. Then, place it in an airtight container. You can keep it in the fridge for up to three days. If you want to avoid sogginess, try to separate the slices with parchment paper. To reheat your pizza, use the air fryer for the best results. Set it to 350°F (175°C) for about 3-5 minutes. This will keep the crust crispy and warm the cheese nicely. You can also use a microwave, but it might make the crust soft. If you want to freeze your pizza, wrap each slice in plastic wrap. Then, place them in a freezer bag. This way, they can stay fresh for up to a month. When ready to eat, reheat from frozen in the air fryer. This keeps the pizza tasty and crispy. Yes, you can use corn tortillas for this recipe. Corn tortillas add a different taste and texture. They tend to be a bit crunchier. Just ensure they are sturdy enough to hold toppings. If they are too thin, they might break. Check for a bubbly cheese and crispy edges. The cooking time is about 6-8 minutes. If the cheese is melted and golden, it is ready. Keep an eye on it to avoid burning. The best toppings include: - Pepperoni - Mushrooms - Spinach - Onions - Sausage Feel free to mix and match your favorites. You can also try different cheeses like cheddar or feta. Yes, you can use a conventional oven. Preheat it to 400°F (200°C). Place the tortilla pizzas on a baking sheet. Bake for about 10-12 minutes. Keep an eye on them to get the cheese nice and bubbly. In this blog post, we explored how to make a delicious tortilla pizza. We covered key ingredients and optional toppings. You learned valuable cooking steps and helpful tips for a crispy crust. We also discussed tasty variations and proper storage methods. Tortilla pizza is easy to customize and great for meals. Enjoy your cooking and let your creativity shine in the kitchen!

Air Fryer Crispy Tortilla Pizza Flavorful and Easy Meal

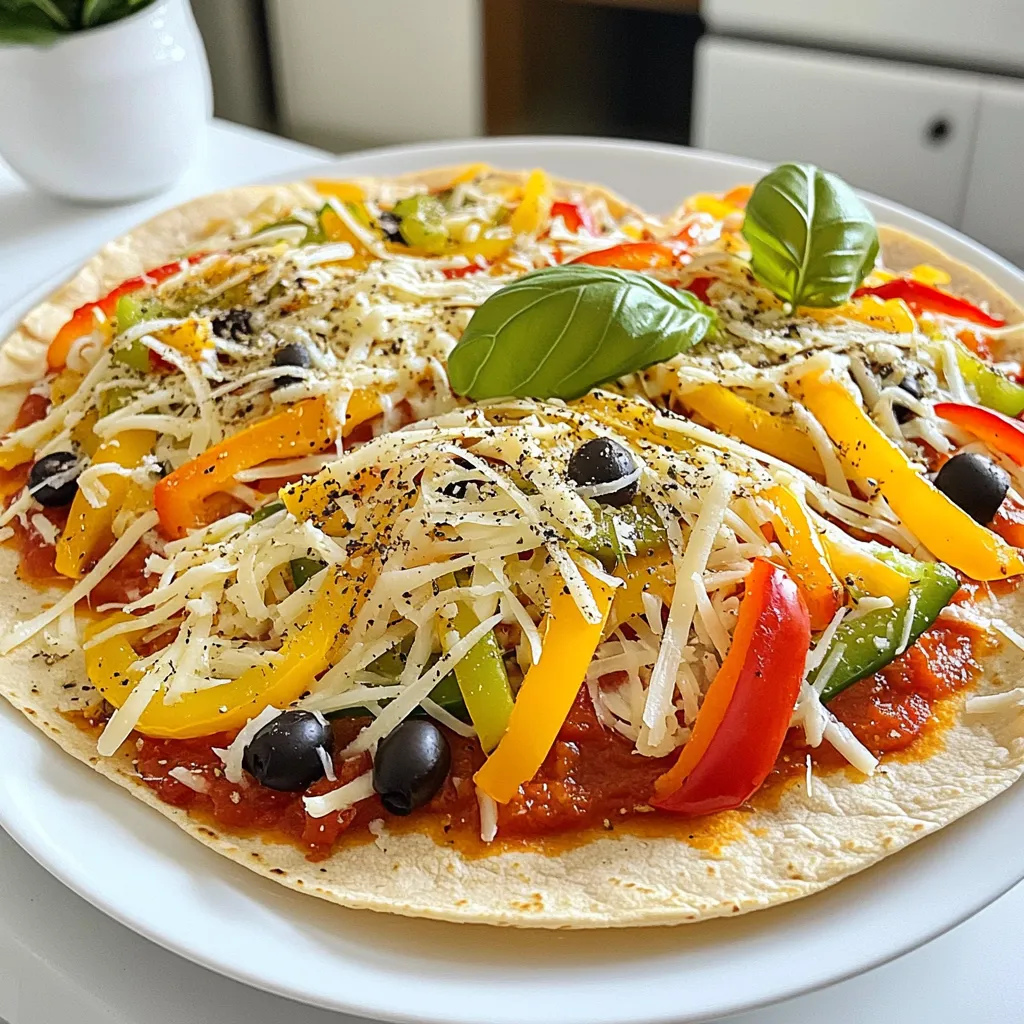
Do you love quick meals that pack a punch? You’re in for a treat! This Air Fryer Crispy Tortilla Pizza

- 4 haddock fillets (about 6 ounces each) - 3 tablespoons olive oil - 3 cloves garlic, minced - Zest of 1 lemon - Juice of 1 lemon - 1 teaspoon dried oregano - 1 teaspoon paprika - Salt and pepper, to taste - 1 cup cherry tomatoes, halved - 1 cup asparagus, trimmed and cut into 2-inch pieces - Fresh parsley, chopped, for garnish To make this dish, you need fresh haddock fillets. They should weigh about six ounces each. Look for fillets that smell clean and have a firm texture. You will also need olive oil and garlic. The olive oil helps to keep the fish moist. Garlic adds a lovely flavor. Use three cloves of garlic, minced finely for the best taste. Next, we have the lemon. You will use both the zest and juice. The zest gives a bright flavor, while the juice adds acidity. This helps balance the dish. Herbs and spices play a big role here. You need one teaspoon of dried oregano and one teaspoon of paprika. These add warmth and depth. Don’t forget the salt and pepper to taste. For vegetables, you’ll use cherry tomatoes and asparagus. The tomatoes should be halved, and the asparagus needs to be cut into two-inch pieces. These will roast perfectly alongside the fish. Lastly, fresh parsley will be your garnish. It adds a pop of color and a fresh taste. Together, these ingredients create a meal that is not only tasty but also colorful and healthy. Preheating your oven to 400°F (200°C) is key for this dish. A hot oven cooks the haddock perfectly. It helps seal in moisture and keeps the fish tender. While the oven heats, prepare your baking sheet. Line it with parchment paper. This step makes cleanup quick and easy. A lined sheet pan helps the fish and veggies not stick. In a small bowl, add 3 tablespoons of olive oil. Then, add 3 cloves of minced garlic. Next, zest one lemon and squeeze its juice into the bowl. Add 1 teaspoon of dried oregano and 1 teaspoon of paprika. Season with salt and pepper to taste. Whisk all the ingredients together until they combine well. This mixture brings bright flavors to your dish. Now, place the haddock fillets in the center of the lined baking sheet. Ensure they have space around them. Drizzle half of the lemon garlic mixture over the fillets. Make sure to coat them evenly. On one side of the fillets, add 1 cup of halved cherry tomatoes and 1 cup of asparagus pieces. Drizzle the remaining mixture over the vegetables. This step ensures that every bite is full of flavor. Roast everything in the preheated oven for 12-15 minutes. The haddock is done when it turns opaque and flakes easily with a fork. The veggies should be tender but not mushy. Keep an eye on the time to avoid overcooking. Once ready, take the sheet pan out of the oven. Use a spatula to serve the haddock and vegetables on plates. Enjoy your flavorful dinner delight! Preventing overcooking To keep your haddock juicy, watch the time. Cook it for just 12-15 minutes. Check the fish when it starts to look opaque. Use a fork; it should flake easily. If it is still translucent, give it a few extra minutes. Keeping an eye on it prevents dryness. Choosing fresh haddock Fresh haddock is key for great flavor. Look for fillets that smell like the sea, not fishy. The flesh should be firm and shiny, with no brown spots. If you can, ask your fishmonger when it was caught. Freshness makes a big difference in your dish. Garnishes and additional seasonings Garnish your dish with fresh parsley for color and taste. You can also add a sprinkle of lemon zest for a bright kick. If you like heat, try a pinch of red pepper flakes. This adds a nice contrast to the garlic and lemon. Pairing with sides For a complete meal, pair this dish with a side salad or rice. Quinoa is also a great choice, as it absorbs flavors well. Roasted potatoes can add heartiness. Choose sides that complement the lightness of the haddock. This balance makes your meal more enjoyable. {{image_2}} You can swap haddock for other fish. Salmon, tilapia, or cod work well. Each fish has its own taste and texture. Salmon offers a rich flavor. Tilapia is mild and easy to cook. Cod has a firm, flaky texture. For a vegan or vegetarian twist, try tofu or tempeh. Both absorb flavors well. Use the same lemon garlic mix to marinate them. Roast them just like the fish. This keeps the meal tasty and satisfying. Adding veggies can change the meal's taste. Seasonal veggies are great choices. Try zucchini, bell peppers, or broccoli. Each adds color and nutrients. Remember, different veggies need different cooking times. For example, carrots may take longer than asparagus. Cut veggies to similar sizes for even cooking. Adjust the cooking time as needed. This way, all your veggies will be perfectly tender. To store leftovers, let the haddock cool first. Place it in an airtight container. This keeps the fish fresh and tasty. You can also add the veggies in the same container. Cooked haddock lasts about three days in the fridge. Make sure to eat it before the three days are up for the best flavor. To reheat without drying out, use the oven. Preheat it to 350°F (175°C). Place the haddock and veggies on a baking sheet. Cover with foil to keep moisture in. Heat for about 10 minutes. Check if it’s warm all the way through. You can also use a microwave. But be careful; it can dry out the fish. Heat in short bursts and check often. Enjoy your meal again! Cooking haddock typically takes about 12 to 15 minutes in the oven. Set your oven to 400°F (200°C) for best results. You want the fish to be opaque and flake easily with a fork. This quick cook time helps keep the fish moist and tender. Yes, you can use frozen haddock. If using frozen fillets, do not thaw them before cooking. Just add a few extra minutes to the cooking time. This way, you still get a juicy and flaky fish. Keep an eye on it as it cooks, though, to avoid overcooking. You can serve many tasty sides with this dish. Here are some ideas: - Garlic bread for a crunchy texture - Rice or quinoa for a filling option - A fresh green salad for a crisp complement - Roasted potatoes for a comforting side These pairings make the meal more complete and enjoyable! This blog post covered important steps to cook delicious sheet-pan lemon garlic haddock. We explored key ingredients, easy instructions, and tips to boost flavor. I shared variations you can try, whether you want to swap fish or add more veggies. Remember, proper storage will keep your leftovers great. Enjoy this meal with your favorite sides for a well-rounded dish. Cooking does not have to be hard. Trust these simple methods to impress your family or friends. Enjoy your cooking journey!

Sheet-Pan Lemon Garlic Haddock Flavorful Dinner Delight

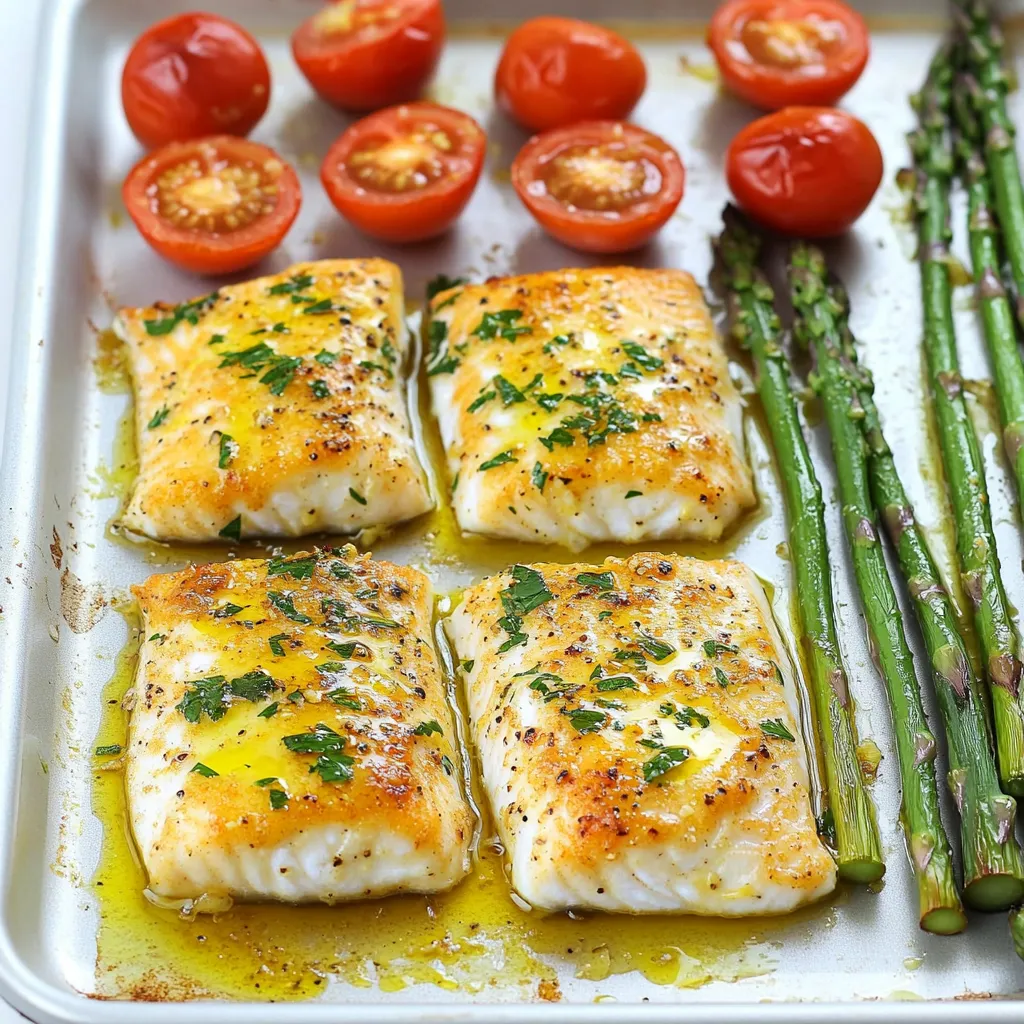
Looking for a quick, tasty dinner? Try my Sheet-Pan Lemon Garlic Haddock, a dish packed with flavor and easy to

To make Strawberry Shortcake Overnight Oats, gather these simple items: - 1 cup rolled oats - 1 cup almond milk (or any milk of choice) - 1 cup Greek yogurt (vanilla or plain) - 1 tablespoon honey or maple syrup - 1 teaspoon vanilla extract - 1 cup fresh strawberries, hulled and sliced - 1/4 cup crushed graham crackers - A pinch of salt - Fresh mint leaves for garnish (optional) You can swap some ingredients for your needs: - Use coconut milk instead of almond milk for a rich flavor. - Try dairy-free yogurt to make it vegan. - Maple syrup works well if you want a vegan sweetener. - You can add any berry if you do not have strawberries. - Instead of graham crackers, try crushed cookies for a twist. Fresh strawberries make this dish shine. Here’s how to choose the best ones: - Look for bright red berries with no white spots. - Choose firm, plump strawberries without bruises. - Smell the berries; they should have a sweet scent. - Check the green tops; they should be fresh and green. - If possible, buy local strawberries for the best flavor. To make your Strawberry Shortcake Overnight Oats, start with a medium bowl. Add 1 cup of rolled oats, 1 cup of almond milk, and 1 cup of Greek yogurt. You can use vanilla or plain yogurt. Then, mix in 1 tablespoon of honey or maple syrup. Next, add 1 teaspoon of vanilla extract and a pinch of salt. Stir everything well to combine. Now, add half of the sliced strawberries to the oat mixture. Gently fold them in so the flavor spreads. Once mixed, divide the mixture into two jars or containers. Make sure they have lids. Layer the oats with the rest of the sliced strawberries on top of each jar. Sprinkle 1/4 cup of crushed graham crackers over the top for that classic shortcake taste. Seal the jars tightly and put them in the fridge. Let them chill overnight or at least for 4 hours. This helps the oats soak and soften. In the morning, take out your jars. Stir the oats well before eating. If you want a creamier texture, add a splash of almond milk. Layering makes the dish look pretty and tasty! Start with a layer of oats, then add strawberries. This way, the strawberries stay on top and look fresh. Use a spoon to gently press down the layers. This keeps everything in place. You can also add some crushed graham crackers between layers. This adds more crunch and flavor. Just remember to leave some for the top. Serve your oats in the jars for a fun look. Add fresh mint leaves and extra strawberry slices on top. This makes it more colorful and fresh. If you want, you can also drizzle a little more honey or maple syrup on top for extra sweetness. Enjoy your delicious Strawberry Shortcake Overnight Oats! To get creamy overnight oats, use rolled oats. They soak up the milk well. Combine oats with Greek yogurt for added creaminess. The almond milk gives a nice flavor. Stir the mixture well to blend all ingredients. Let it chill overnight to soften the oats. If you want it creamier, add more milk in the morning. Avoid using instant oats. They become too mushy and lose texture. Don’t skip the Greek yogurt; it adds richness and protein. Use fresh, ripe strawberries for the best taste. If you add too many strawberries, the mixture can become too watery. Always seal your jars tightly to keep them fresh. Layer your jars for a fun look. Start with oats, then add fruit, and finish with graham crackers. This keeps everything fresh and tasty. Make sure to store your oats in the fridge. They can last up to five days. Experiment with flavors by adding spices like cinnamon or nutmeg. Enjoy your oats cold or warmed up, as you prefer! {{image_2}} You can mix and match fruits in your overnight oats. Try blueberries, raspberries, or bananas. Each fruit adds its own taste. For a tropical twist, add diced mango or pineapple. You can even use frozen fruits. Just thaw them before mixing. This keeps everything fresh and fun! Nut butters add creaminess and flavor. You can use almond, peanut, or cashew butter. Just stir in one tablespoon into your oat mix. It gives a nice nutty taste. If you want a sweeter option, try chocolate hazelnut spread. It pairs well with strawberries and makes breakfast feel like dessert. To make this recipe vegan, swap the Greek yogurt for coconut yogurt. Use maple syrup instead of honey. Almond milk is a great choice for the liquid. This keeps the dish plant-based and creamy. You still get all the tasty flavors without any dairy! To store your overnight oats, place them in jars or airtight containers. This keeps them fresh. Make sure to seal them tightly. You can store them in the fridge. It’s best to eat them within a few days. The oats can soak up the liquid and get thicker over time. If they seem too thick, just add a splash of milk before eating. I recommend using glass jars or BPA-free plastic containers. Glass jars help you see the oats and look nice on your table. Plastic containers are lightweight and easy to carry. Choose containers that have tight-fitting lids. This helps keep your oats fresh and prevents spills. Your Strawberry Shortcake Overnight Oats last about 3 to 5 days in the fridge. If you plan to eat them later, don’t add the toppings right away. Keep the graham crackers and strawberries separate until you are ready to serve. To reheat, you can use a microwave. Heat in short bursts, stirring in between. Add a splash of milk for creaminess. Enjoy your tasty treat! Yes, you can use instant oats. However, the texture will change. Instant oats soak up liquid faster than rolled oats. This means your overnight oats may turn out mushy. I recommend sticking to rolled oats for a chewier bite. They give a nice texture that complements the strawberries and yogurt well. You can store overnight oats in the fridge for up to five days. This makes them great for meal prep. Just make sure to keep them in airtight containers. The longer they sit, the softer they become. If you like a firmer texture, eat them within two to three days. Strawberry Shortcake Overnight Oats are quite nutritious. Each serving has about 300 calories. You get healthy carbs from oats, protein from Greek yogurt, and vitamins from strawberries. Here’s a quick breakdown: - Rolled oats: Good source of fiber and energy. - Greek yogurt: High in protein and calcium. - Almond milk: Low in calories and dairy-free. - Strawberries: Full of vitamins and antioxidants. This recipe also offers a touch of sweetness from honey or maple syrup, making it a balanced breakfast choice. You now know how to make delicious Strawberry Shortcake Overnight Oats. We covered the key ingredients, helpful tips, and tasty variations. Remember to choose fresh strawberries and layer well for the best taste. Use the right storage containers to keep your oats fresh. With these simple steps, you can enjoy a healthy treat anytime. I hope this guide makes your breakfast fun and easy! Now, grab your oats and start creating.

Strawberry Shortcake Overnight Oats Simple Recipe

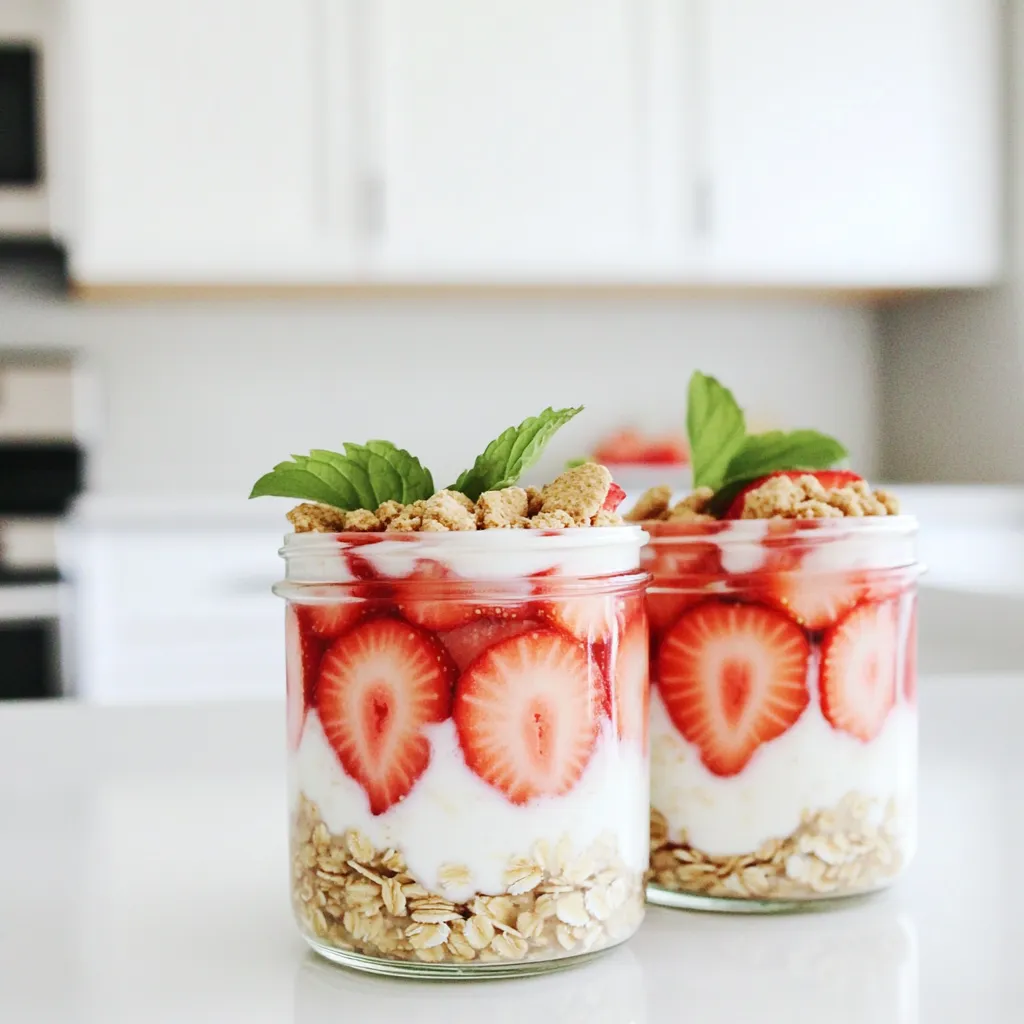
Looking for a quick and tasty breakfast? Let’s make Strawberry Shortcake Overnight Oats! This simple recipe brings the joy of

- 2 cups grated zucchini (about 1 medium zucchini) - 1 cup all-purpose flour - 1 cup whole wheat flour - 1/2 cup unsweetened cocoa powder - 3/4 cup brown sugar, packed - 1/4 cup granulated sugar - 2 large eggs The main star of this recipe is the zucchini. It adds moisture and a subtle flavor. The flour blend gives the bread a nice structure. I use both all-purpose and whole wheat flour for a balanced taste. The cocoa powder gives a rich chocolate flavor. Brown sugar adds depth, while granulated sugar sweetens without overpowering the other flavors. Finally, the eggs bind everything together, making the bread rise beautifully. - 1 cup semi-sweet chocolate chips - 1/2 cup chopped walnuts (optional) For a chocolatey experience, I love to toss in chocolate chips. They melt and create pockets of gooey goodness. Walnuts add a nice crunch and earthy flavor. You can skip the walnuts if you prefer a smoother texture. - 1 teaspoon baking powder - 1 teaspoon baking soda - 1/2 teaspoon salt - 1 teaspoon ground cinnamon - 1/2 cup vegetable oil Baking powder and baking soda help the bread rise. I always check their freshness before using. Salt enhances all the flavors in the bread. Ground cinnamon adds warmth, making each bite cozy. Lastly, vegetable oil keeps the bread moist and tender. It’s a key player in achieving that bakery-style texture. First, I preheat my oven to 350°F (175°C). This step is key for even baking. Next, I grease a 9x5-inch loaf pan with butter or oil. I can also line it with parchment paper for easy removal later. In a medium bowl, I combine 2 cups of grated zucchini with 2 large eggs. Then, I add 1/2 cup of vegetable oil and 1 tablespoon of vanilla extract. I whisk everything together until it looks nice and smooth. In another large bowl, I mix 1 cup of all-purpose flour and 1 cup of whole wheat flour. I also add 1 teaspoon of baking powder, 1 teaspoon of baking soda, 1/2 teaspoon of salt, 1 teaspoon of ground cinnamon, and 1/2 cup of cocoa powder. I stir these dry ingredients well until they are combined. Now, I pour the wet mixture into the dry ingredients. I gently fold them together with a spatula. It's important not to overmix; some lumps are fine. Next, I fold in 1 cup of semi-sweet chocolate chips and 1/2 cup of chopped walnuts if I want some extra crunch. I pour the batter into my prepared loaf pan and smooth the top. I like to sprinkle a few chocolate chips on top for a nice touch. Then, I bake it in my preheated oven for 55-65 minutes. I check if it's done by inserting a toothpick in the center; it should come out clean. Once baked, I let the bread cool in the pan for about 10 minutes. After that, I carefully transfer it to a wire rack. This helps it cool completely before slicing. The smell is amazing, and I can’t wait to enjoy a slice! To get that perfect bakery-style texture, mixing matters. Keep these tips in mind: - Mix wet ingredients: Start by whisking together zucchini, eggs, oil, and vanilla until smooth. - Combine dry ingredients: In a separate bowl, blend flours, baking powder, baking soda, salt, cinnamon, and cocoa well. - Folding: Gently fold the wet mix into the dry mix. This keeps air in the batter. Avoid overmixing; lumps are fine. Ingredient temperature is crucial. Use room temperature eggs and oil. This helps create a better rise and texture. Cold ingredients can lead to dense bread. To boost flavor, consider adding spices or extracts. Try these ideas: - Spices: Along with cinnamon, add nutmeg or allspice for warmth. - Extracts: A splash of almond or orange extract can add depth. For chocolate chips, quality matters. Choose semi-sweet or dark chocolate for a richer taste. You can mix in milk or white chocolate chips for variety. Presentation makes a difference. Here are some tips for slicing and serving: - Slicing: Use a sharp knife for clean cuts. Slice when the bread is cool. - Serving: Serve warm with butter on top for a delightful touch. Garnish ideas can elevate your dish. Sprinkle cocoa powder or add fresh mint leaves on top for color and flavor. Enjoy your bakery-style zucchini bread! {{image_2}} You can make this bread even better! Add nuts like walnuts or pecans for crunch. Dried fruits like raisins or cranberries add sweetness. You can also swap the all-purpose flour for almond or oat flour. Each choice brings a new taste and texture to the bread. To make it lighter, reduce the sugar. Try using half the brown sugar. You can also use applesauce or yogurt instead of some oil. This change keeps the bread moist while cutting fat and calories. If you need gluten-free bread, use a blend of gluten-free flours. Look for blends that include rice flour and tapioca flour. When using these flours, check your baking time. Gluten-free bread may need a bit longer to bake. Always test with a toothpick to ensure it’s done. To store unbaked batter, refrigerate it in an airtight container. This keeps the batter fresh for up to 24 hours. If you want to keep it longer, you can freeze it. Pour the batter into a freezer-safe container. Leave some space at the top, as it will expand. You can freeze it for up to three months. Once baked, let the bread cool completely. Store it at room temperature in a bread box or a plastic bag. This will keep it fresh for about three days. If you need to store it longer, freeze the slices. Wrap each slice in plastic wrap and place them in a freezer bag. This way, they last for up to three months. To reheat slices, use the microwave or the oven. For the microwave, heat one slice for 20 to 30 seconds. For the oven, preheat it to 350°F (175°C) and warm the slices for about 10 minutes. You can serve reheated slices with a pat of butter. They taste great warm, and you can add a sprinkle of cocoa powder for a nice touch. To keep your zucchini bread moist, use fresh zucchini. Grate it and squeeze out excess water. Also, include oil in your recipe. This adds moisture. Don’t overmix your batter; it can make bread dense. Bake until just done to avoid dryness. Yes, you can use dark chocolate or milk chocolate instead. Feel free to mix chocolate types for a unique taste. You can even try white chocolate for a sweeter option. Just keep the same amount of chocolate chips in your recipe. If you need an egg substitute, try unsweetened applesauce. Use 1/4 cup of it for each egg. You can also use mashed bananas or a flaxseed meal mix. For the flaxseed mix, combine 1 tablespoon of ground flaxseed with 2.5 tablespoons of water. Check your bread with a toothpick. Insert it into the center after 55 minutes of baking. If it comes out clean, your bread is done. If not, bake for another 5-10 minutes. The top should look firm and slightly golden. Yes, yellow squash works well as a substitute. The taste is similar, and it can add a fun color to your bread. Just make sure to grate it as you would zucchini. The baking time will stay the same, so you’re all set! In this blog post, we covered how to make delicious zucchini bread. We discussed the key ingredients, step-by-step instructions, and helpful tips. You learned about flavor variations and ways to store your bread. Baking can be fun and rewarding. With fresh flavors and easy methods, you can impress everyone. Enjoy your baking journey!

Chocolate Chip Zucchini Bread Bakery-Style Delight

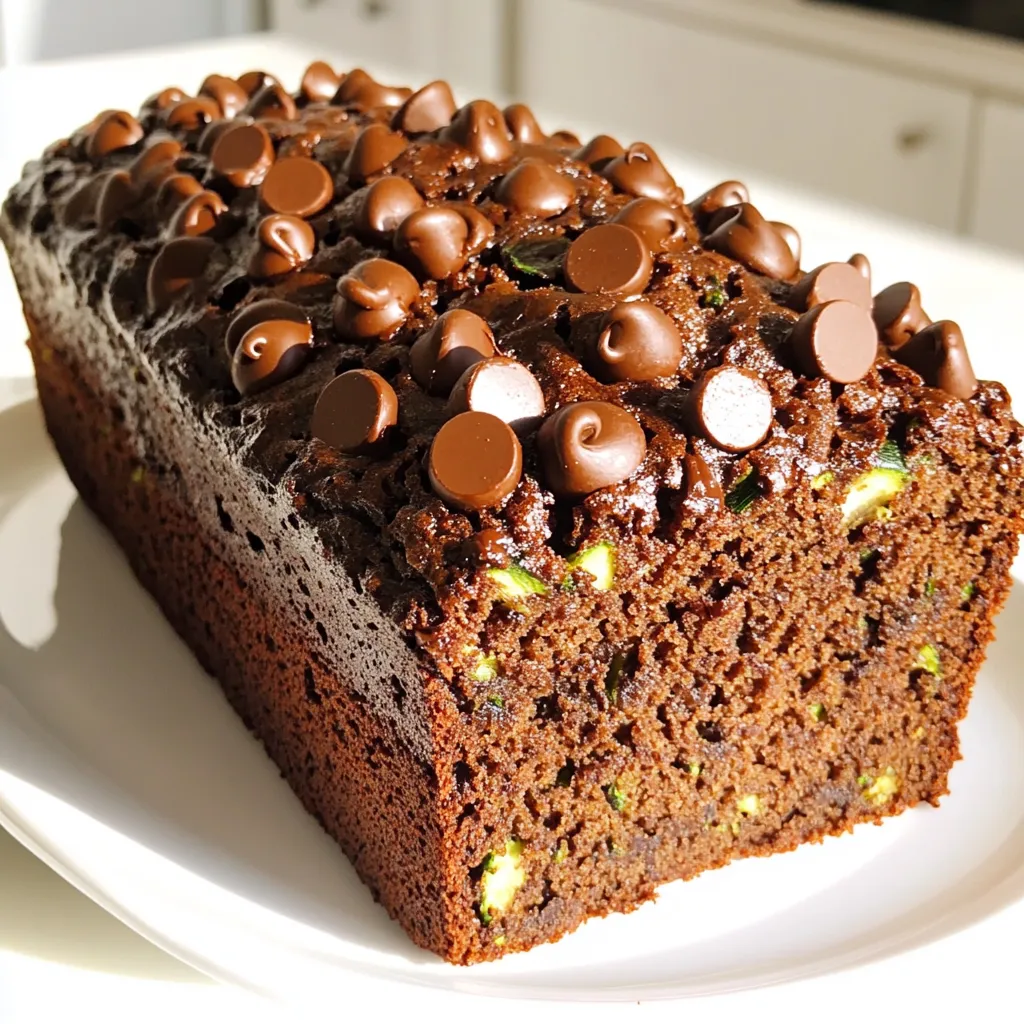
If you’ve ever craved a sweet treat that balances indulgence with a healthy twist, you’re in the right place! Our

To make no-bake snickerdoodle energy balls, gather these simple ingredients: - 1 cup rolled oats - 1/2 cup almond butter - 1/3 cup honey or maple syrup - 1 teaspoon vanilla extract - 1 teaspoon cinnamon - 1/4 teaspoon nutmeg - 1/4 cup mini chocolate chips (optional) - Pinch of salt - 2 tablespoons chia seeds (optional) These ingredients blend together to create a tasty and healthy snack. You can swap some ingredients if needed. Here are a few ideas: - Use peanut butter if you prefer a different nut flavor. - Maple syrup works well in place of honey for a vegan option. - Any nut butter can replace almond butter. Just be sure to check for allergies. These swaps help you customize the recipe to fit your taste or diet. Want to make your energy balls even better? Try these optional ingredients: - Add a handful of dried fruit like raisins or cranberries for extra sweetness. - Toss in a scoop of protein powder for a protein boost. - A sprinkle of coconut flakes can add texture and flavor. These additions can make your energy balls unique and even more delicious! Start with a large mixing bowl. Add 1 cup of rolled oats, 1/2 cup of almond butter, and 1/3 cup of honey or maple syrup. Don't forget 1 teaspoon of vanilla extract. Mix everything well until it’s smooth and sticky. Next, add 1 teaspoon of cinnamon, 1/4 teaspoon of nutmeg, and a pinch of salt. Stir until all the spices blend in nicely. If you want, fold in 1/4 cup of mini chocolate chips and 2 tablespoons of chia seeds. This makes the energy balls even tastier. Now comes the fun part! Use your hands to scoop out small amounts of the mixture, about 1 tablespoon each. Roll them into small balls. Place them on a parchment-lined baking sheet. Once you’ve formed all the balls, refrigerate them for at least 30 minutes. This helps them set up nicely. Store them in an airtight container in the fridge for up to a week. Enjoy your healthy snacks! To get the best texture for your energy balls, balance is key. You want them to hold together well but still be soft. Start with the right amount of almond butter. If the mix feels too dry, add more almond butter or a little honey. If it’s too sticky, add more oats. The chia seeds help bind the mix, so use them if you can. Keep your energy balls in an airtight container. This keeps them fresh for about a week. Store them in the fridge to maintain their yummy taste and texture. If you want to take them on the go, pack them in a small cooler or insulated bag. They make a great snack anytime! You can easily adjust the recipe to fit your needs. For a vegan version, swap honey for maple syrup. For gluten-free options, ensure you use certified gluten-free oats. Want to add some fun flavors? Try adding dried fruit or nuts. These small changes can make a big difference! {{image_2}} To make these energy balls vegan, simply swap out the honey for maple syrup. Maple syrup adds sweetness without any animal products. Use almond butter or any nut butter you like. Check that your nut butter has no added sugars. This keeps the recipe pure and healthy. You can still enjoy the same great taste! These energy balls are naturally gluten-free if you use certified rolled oats. If you want a nut-free option, try sunflower seed butter instead of almond butter. Make sure your oats are gluten-free, as some may be processed with gluten. This way, those with gluten sensitivities can enjoy them too! Get creative with flavors! You can mix in different spices like ginger or cardamom for a twist. Try adding dried fruits like raisins or cranberries for extra sweetness. For a fun crunch, add chopped nuts or seeds. If you love chocolate, add more mini chocolate chips. There are endless ways to make this recipe your own! To keep your no-bake snickerdoodle energy balls fresh, store them in an airtight container. This prevents air from drying them out. You can use a glass or plastic container with a tight lid. Make sure to keep them in the refrigerator. This helps maintain their texture and flavor. No-bake snickerdoodle energy balls can last up to a week in the fridge. After that, they may lose their freshness. It’s best to enjoy them within this time frame for the best taste and texture. Yes, you can freeze energy balls. To do this, place them in a single layer on a baking sheet. Freeze them for about an hour. Then, transfer the frozen balls to an airtight container. They can last up to three months in the freezer. Just remember to thaw them in the fridge before you enjoy them! Yes, you can use peanut butter instead of almond butter. Both add creaminess and flavor. Peanut butter will give a different taste, but it still works well. If you like peanuts, this swap is a great choice. You can use maple syrup instead of honey. Maple syrup has a similar sweetness and keeps the balls soft. Agave nectar is another option if you want a vegan choice. Both will work just fine and taste amazing. I suggest serving 2 to 3 energy balls per person. They are filling, so a few go a long way. You can always offer more if your guests want more snacks. Just keep in mind that they are rich in flavor. Yes, no-bake energy balls are healthy. They contain oats, nut butter, and seeds, which provide energy and nutrients. They are great for a quick snack or a boost before exercise. Plus, they have no added sugars beyond what you use. Absolutely! Kids can help mix the ingredients and roll the balls. It’s a fun activity that teaches them about cooking. Just make sure to supervise them, especially when using utensils. They will love making and eating these treats! You now have a clear path to making delicious no-bake energy balls. We explored the key ingredients, showed you how to mix, and added tips for the best texture. Customization lets you adjust flavors to your liking. Proper storage keeps them fresh longer. Remember, these tasty treats can be healthy and fun to make. Enjoy preparing these energy balls for yourself and your family! Your kitchen adventures start now!

No-Bake Snickerdoodle Energy Balls Tasty and Simple

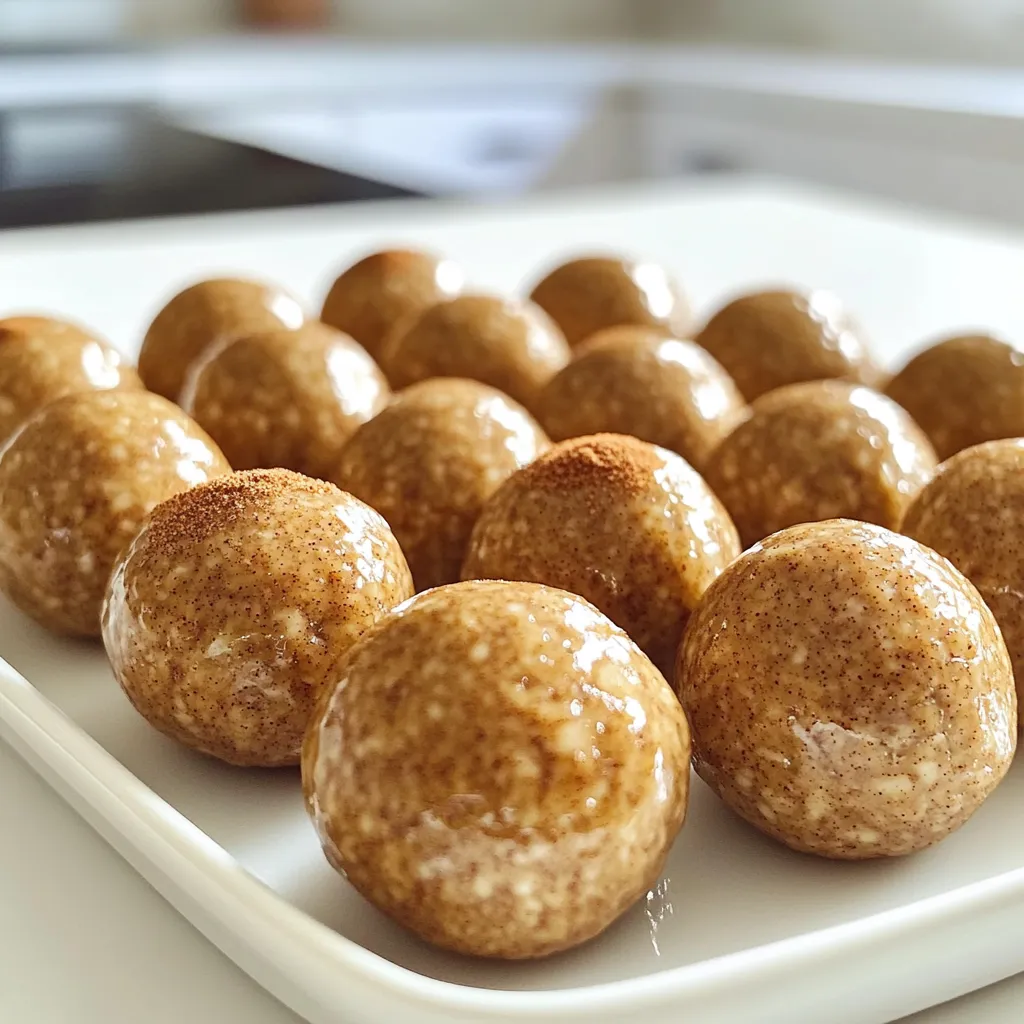
Looking for a quick and tasty snack? You’ll love these No-Bake Snickerdoodle Energy Balls! They combine sweet cinnamon flavor with

- 1 cup orzo pasta - 4 cups vegetable broth - 1 cup heavy cream - 1 medium onion, finely chopped - 2 cloves garlic, minced - 1 medium carrot, diced - 1 medium stalk of celery, diced - Zest and juice from 1 lemon - 1 tablespoon olive oil - Salt and pepper to taste - Fresh parsley, chopped for garnish In this recipe, you need orzo pasta as the star. It cooks quickly and adds a nice bite. The vegetable broth forms the soup's base, while the heavy cream makes it rich and creamy. For aromatics, we use onion, garlic, carrot, and celery. These vegetables create a strong flavor base. They add depth and sweetness to the soup. The lemon zest and juice brighten the dish and balance the creaminess. Olive oil gives a nice finish, while salt and pepper enhance the taste. Finally, fresh parsley adds color and freshness when you serve the soup. Each ingredient plays a key role in making this lemon orzo soup both quick and tasty. Start by heating the olive oil in a large pot over medium heat. Add the finely chopped onion, diced carrot, and diced celery. Sauté these vegetables for about 5 to 7 minutes until they soften. This step builds a tasty base. Next, stir in the minced garlic. Cook for one more minute until the garlic smells amazing. Now, pour in the vegetable broth. Bring it to a gentle boil. Once boiling, add the orzo pasta. Stir it well and let it cook for 8 to 10 minutes. The orzo should be tender but not mushy. Stir occasionally to keep it from sticking to the pot. When the orzo is cooked, reduce the heat to low. Now, stir in the heavy cream, lemon zest, and lemon juice. Mix everything until it’s well combined and heated through. Season with salt and pepper to taste. If you like it tangy, you can add more lemon juice. Let it sit for 2 to 3 minutes off the heat. This will help the soup thicken a bit. Serve hot, garnished with fresh chopped parsley on top. To get that rich, creamy feel in your soup, heavy cream is key. It adds a rich taste that makes every bowl comforting. When you add the cream, keep the heat low. This helps to prevent the cream from breaking. If the soup gets too hot, it can curdle. Stir gently to mix everything smoothly. Lemon zest and juice bring bright flavors to the soup. Use both for a balanced taste. The zest packs a punch, while the juice adds a fresh zing. Start with a bit of zest and juice, then taste the soup. If you want more tartness, add a little more juice until it’s just right. Garnishing can make your soup look special. I love using fresh parsley on top. It adds a pop of color and freshness. Serve the soup in bright bowls to enhance the look. You can also offer crusty bread on the side. This makes the meal feel more complete and inviting. {{image_2}} You can change the herbs for a new taste. Try fresh thyme or dill. These add a nice twist. You can also use dried herbs if fresh is not available. Swap out vegetables to fit your taste. Spinach or kale adds color and nutrients. You can even toss in peas for sweetness. For a lighter soup, use lower fat cream. Light cream or milk works well and still tastes good. You can also use whole grain orzo instead of regular. Whole grain adds fiber and a nutty flavor. Both changes keep the dish tasty while being better for you. Boost your soup with protein. Adding cooked chicken or shrimp makes it hearty. You can also mix in spices for heat. Red pepper flakes can bring warmth. A dash of smoked paprika adds depth. Each change lets you customize your soup for your taste. To keep your creamy lemon orzo soup fresh, store it in the fridge. Use an airtight container to avoid spills and keep out air. The soup stays good for about three days. If you want to save it longer, freeze it. Soup freezes well for up to three months. Use freezer-safe containers or bags. Leave some space at the top for expansion. When you want to enjoy your soup again, reheat it gently. Use a pot on low heat. Stir it often to avoid sticking. You can also use the microwave in short bursts. Heat it in 30-second intervals, stirring in between. This way, it warms evenly. If it seems too thick, add a splash of broth or water for a nice texture. Your creamy lemon orzo soup lasts up to three days in the fridge. Check for signs of spoilage before eating. If you see mold or smell something off, it’s best to throw it out. When frozen, the soup stays good for three months. After that, the taste may change. Always trust your senses when checking for freshness. Yes, you can make this soup vegan with a few easy swaps. Instead of heavy cream, use coconut cream or a cashew cream. For the broth, choose vegetable broth or a homemade vegan broth. Both options keep the soup rich and tasty. If you want a thicker soup, several easy options exist. You can add a slurry made from cornstarch and water. Mix one tablespoon of cornstarch with two tablespoons of cold water. Stir it in while simmering the soup until it thickens. Another option is to blend a portion of the soup and mix it back in. This soup pairs well with many sides. A fresh green salad adds crunch and color. You can also serve it with warm bread or crusty rolls for dipping. Try adding a side of roasted vegetables for a balanced meal. This blog post covered how to make a delicious lemon orzo soup. We explored the key ingredients like orzo, broth, and cream. We also discussed helpful tips for texture and flavor. Lastly, we looked at variations to customize your soup and how to store leftovers properly. Enjoy making this soup and feel free to get creative with your ingredients. Happy cooking!

Minute Creamy Lemon Orzo Soup Quick and Tasty Recipe

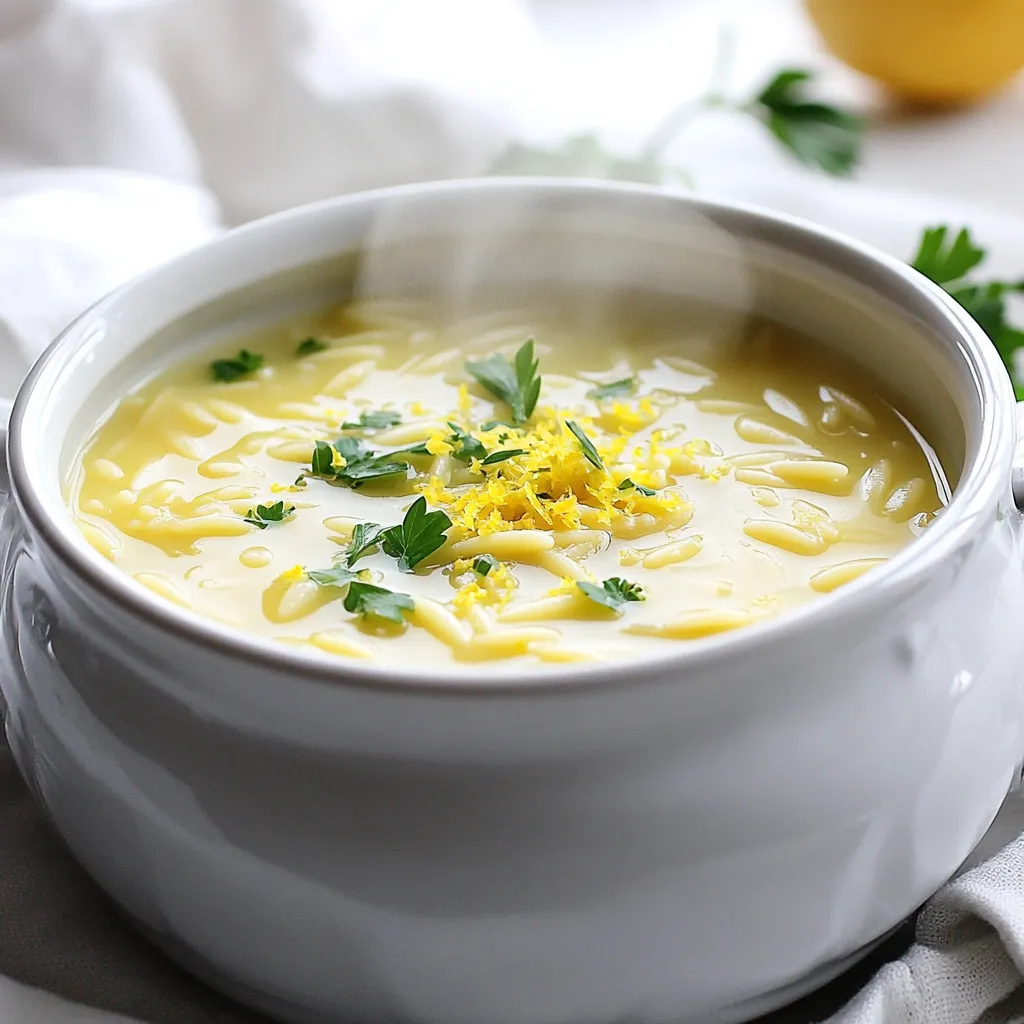
This Minute Creamy Lemon Orzo Soup is a game-changer. It’s quick, tasty, and packed with vibrant flavors. You’ll love how

You need fresh salmon for this dish. I recommend using: - 4 salmon fillets (6 oz each) - 2 tablespoons Dijon mustard - 3 tablespoons pure maple syrup - 2 tablespoons olive oil These main ingredients create a tasty base. The salmon offers healthy fats. The maple syrup adds sweetness, while the Dijon gives a nice tang. For great color and flavor, include these veggies: - 2 cups Brussels sprouts, halved - 1 bell pepper, sliced (any color) - 1 medium red onion, cut into wedges - 1 cup cherry tomatoes These vegetables provide crunch and a pop of color. Brussels sprouts are rich in vitamins. Bell peppers add sweetness, and tomatoes bring juiciness. To boost the taste, you’ll need: - 1 teaspoon garlic powder - 1 teaspoon onion powder - 1 teaspoon smoked paprika - Salt and pepper to taste These seasonings add depth to the dish. Garlic powder and onion powder enhance the savory notes. Smoked paprika gives a subtle smoky flavor, making each bite exciting. First, set your oven to 400°F (200°C). This heat helps the salmon and veggies cook well together. Next, line a sheet pan with parchment paper. This makes cleanup easy and keeps food from sticking. In a small bowl, combine the following ingredients: - 2 tablespoons Dijon mustard - 3 tablespoons pure maple syrup - 2 tablespoons olive oil - 1 teaspoon garlic powder - 1 teaspoon onion powder - 1 teaspoon smoked paprika - Salt and pepper to taste Whisk these together until they blend nicely. This mixture adds a sweet, tangy flavor to your salmon and veggies. On one side of the sheet pan, place the four salmon fillets. Brush half of the maple Dijon mixture over them. This coats the salmon and adds flavor. On the other side, spread out the halved Brussels sprouts, sliced bell pepper, and onion wedges. Drizzle the rest of the maple Dijon mixture on top. Toss the veggies well to ensure they are coated evenly. Now, scatter the cherry tomatoes around the veggies. They add color and sweetness to the dish. Place the sheet pan in the oven and roast for 15-20 minutes. The salmon is done when it flakes easily with a fork. The veggies should be tender and slightly caramelized. After roasting, take the pan out and let it rest for 5 minutes. This helps the flavors settle. Enjoy your delicious meal! To get the best salmon, start with fresh fillets. Look for bright, shiny skin. The flesh should feel firm to the touch. Before cooking, let the salmon sit at room temperature for 15 minutes. This helps it cook evenly. When you brush on the maple Dijon mixture, don’t hold back! Coat it well for great flavor. Bake until it flakes easily with a fork, about 15-20 minutes. This means it is cooked just right. Prep your veggies right before cooking. Cut Brussels sprouts in half for even cooking. Slice the bell pepper into nice thin strips. This helps them roast well. The red onion should be in wedges for a sweet taste. Toss all veggies in the remaining maple Dijon mix. This adds great flavor and helps them caramelize. Spread them out on the pan. Crowding them can lead to steaming instead of roasting. Cleaning up after cooking can be a breeze. Use parchment paper to line your sheet pan. It makes for easy cleanup. Once you finish cooking, let the pan cool before washing. Soak any stuck-on bits in warm, soapy water for a few minutes. For stubborn stains, a gentle scrub with a sponge works well. Keeping your cookware in good shape means it lasts longer. Plus, it makes your next meal prep easier! {{image_2}} You can switch up the veggies you use. Try using asparagus for a fresh crunch. Zucchini slices also work well. Carrots add a sweet flavor and vibrant color. Get creative with seasonal veggies like cauliflower or green beans. Just keep the cooking time in mind, as some veggies cook faster than others. The maple Dijon marinade is great, but you can explore other flavors. Try using soy sauce for a salty kick. Honey can replace maple syrup if you like it sweeter. For a tangy twist, add lemon juice or balsamic vinegar. You can mix in fresh herbs like dill or thyme for added taste. If you love some spice, there are easy ways to add heat. Mix in red pepper flakes for a mild kick. You can also add sriracha or your favorite hot sauce to the marinade. Another option is to use a spicy mustard instead of Dijon. This gives a nice zing to the salmon and veggies. To keep your leftovers fresh, place them in an airtight container. This helps lock in moisture and flavor. Store the salmon and veggies together or separate them based on your preference. If stored correctly, they will last in the fridge for up to three days. Make sure to let the food cool to room temperature before sealing it. When you are ready to enjoy your leftovers, reheating is simple. Preheat your oven to 350°F (175°C). Place the salmon and veggies on a baking sheet. Cover them with foil to keep them moist. Heat for about 10-15 minutes or until warmed through. You can also use a microwave, but be careful not to overcook the salmon. Heat in short intervals, checking often. If you want to freeze this meal, it is best to freeze the uncooked ingredients. Prepare the salmon and veggies, then place them in a freezer-safe bag or container. Remove as much air as possible. This method will keep your meal fresh for up to three months. If you freeze cooked salmon and veggies, they can last about two months. Just remember to thaw them in the fridge overnight before reheating. It takes about 15 to 20 minutes to cook salmon on a sheet pan. The key is to preheat your oven to 400°F (200°C). Check the salmon at 15 minutes. It should flake easily with a fork when done. If it needs more time, keep checking every few minutes. Yes, you can use frozen salmon for this recipe. Just make sure to thaw it first. Thaw it in the fridge overnight or use the quick method. Place it in a sealed bag and run it under cold water for about 30 minutes. After thawing, pat it dry and follow the same steps for seasoning. You can get creative with seasonings! Try adding fresh herbs like dill or thyme for extra flavor. Lemon zest can brighten the dish, too. If you want more heat, add red pepper flakes or a dash of cayenne. Use your favorite spices to make it your own! Yes, this recipe is great for meal prep! Cook a batch and divide it into containers. It stays fresh in the fridge for up to four days. You can reheat it easily in the microwave or oven. This makes it a quick and healthy option for busy days. This post covered how to make delicious sheet-pan salmon meals. You learned about key ingredients, step-by-step cooking tips, and variations to try. Proper storage and reheating methods ensure nothing goes to waste. Remember, you can adjust flavors and veggies to fit your taste. Experiment with spices or veggies to keep it fun and fresh. Enjoy your healthy meals and happy cooking!

Sheet-Pan Maple Dijon Salmon and Veggies Delight

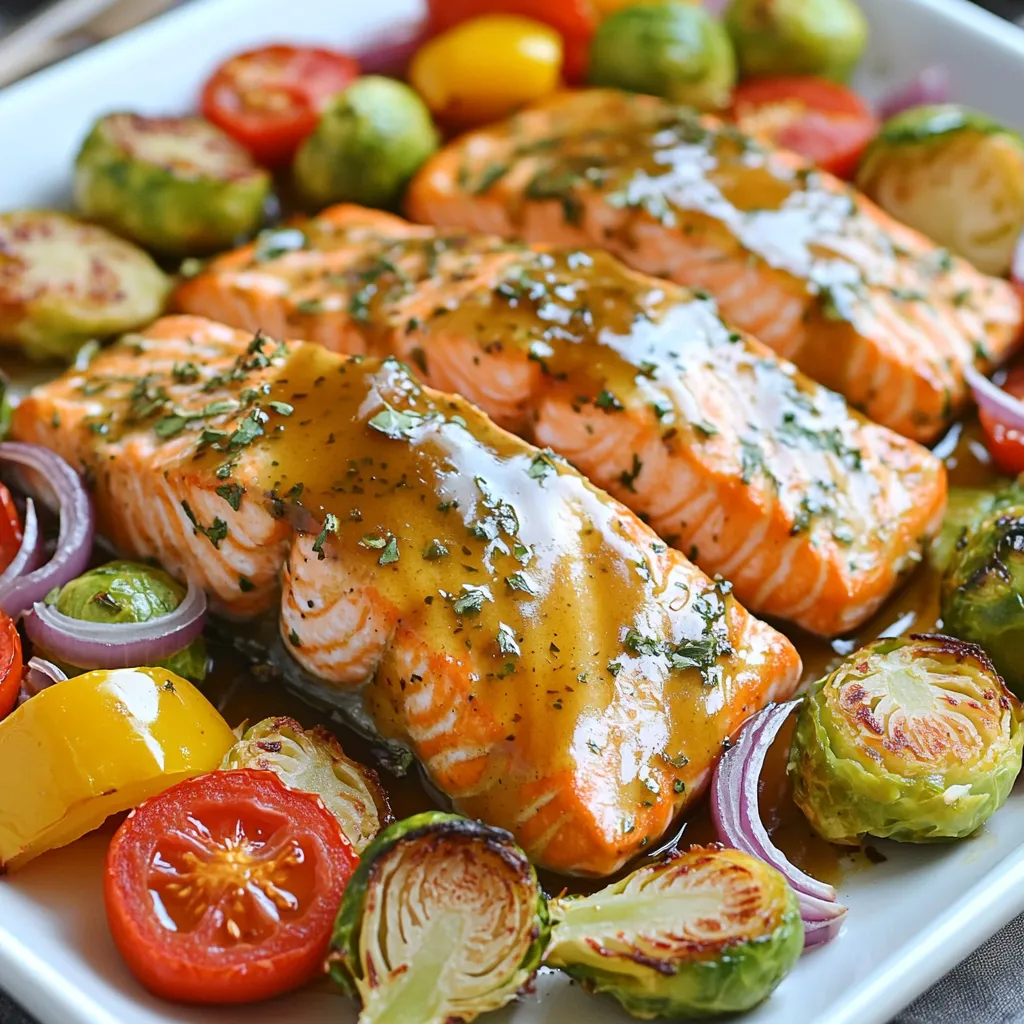
Welcome to Sheet-Pan Maple Dijon Salmon and Veggies Delight! If you’re looking for a quick, tasty, and healthy meal, this

- 1 pound large shrimp, peeled and deveined - 1 cup all-purpose flour - 2 large eggs, beaten - 1 cup unsweetened shredded coconut - 1 cup panko breadcrumbs - 1 teaspoon garlic powder - 1 teaspoon onion powder - 1 teaspoon paprika - Salt and pepper to taste - Air fryer - Shallow bowls for coating - Cooking spray Gather these ingredients and tools before you start. The shrimp should be large and fresh for the best taste. The flour adds a nice base for the coating. Eggs help the coconut and breadcrumbs stick to the shrimp. I like to use unsweetened coconut for a natural taste. Panko breadcrumbs give that extra crunch you want. The seasonings are key to flavor. Garlic powder and onion powder add depth. Paprika gives a slight kick and color. Don’t forget to add salt and pepper to bring out all the flavors. You will need a good air fryer for cooking. It makes the shrimp crispy without a lot of oil. Shallow bowls help with the coating process. Finally, a cooking spray is essential to prevent sticking and to ensure a crisp finish. - Preheat air fryer to 400°F (200°C). - In a shallow bowl, mix flour, garlic powder, onion powder, paprika, salt, and pepper. - Beat the eggs in a second shallow bowl until well combined. - Dip each shrimp into the flour mixture, coating all sides. - Next, coat the floured shrimp in the beaten eggs. - Roll the shrimp in the coconut and panko mixture, pressing lightly to stick. - Arrange the shrimp in a single layer in the air fryer basket. - Lightly spray with cooking spray to enhance crispiness. - Cook at 400°F (200°C) for 8-10 minutes, flipping halfway through. This method gives you crispy, golden shrimp with a tasty coconut crunch. Enjoy! - Use a light coating of flour and panko. - Make sure to spray cooking spray liberally. To get that perfect crunch, the amount of flour and panko matters. When you coat the shrimp, do it lightly. Too much can weigh them down. The spray helps create a crispy layer. It also prevents sticking in the air fryer. - Watch cooking times closely for your desired doneness. - Know how your air fryer cooks. Every air fryer can be a little different. I often check my shrimp at the 8-minute mark. If they look golden brown, they are likely ready. If not, give them a minute or two more. This step is key to avoid overcooking. - Pair the crispy shrimp with sweet chili sauce. - Garnish with fresh lime wedges and cilantro. A nice touch is to serve the shrimp on a platter. The sweet chili sauce gives a nice dip. Lime wedges add a burst of flavor. Cilantro brings a fresh look and taste. These little details make your dish shine! {{image_2}} You can easily change the flavor of your coconut shrimp. Try adding shredded cheese to the coconut mix. It gives a nice twist. You can also spice things up! Adding cayenne or curry powder gives a warm kick. Just a pinch can change the whole dish. If you need a gluten-free option, use gluten-free flour instead of regular flour. This keeps the breading crispy. You can also switch shrimp for chicken tenders or tofu. These options work well and taste great. For more crunch, try double breading your shrimp. First, coat the shrimp in flour, then in eggs, and back to flour before the final coconut mix. This makes a thicker layer. Adjust the cooking time by a couple of minutes if the coating is thicker. You want that perfect crunch! Cool your shrimp completely before storing. This keeps them fresh longer. Use an airtight container. It helps prevent moisture and keeps them crispy. The best way to reheat shrimp is in the air fryer. Set it to 350°F (175°C) for about 3-5 minutes. This method keeps the shrimp crispy. You can also use the oven. Preheat it to 350°F (175°C) and bake for 5-7 minutes. If you use a microwave, the shrimp may lose their crunch. Heat for 30 seconds, then check. You can freeze both uncooked and cooked shrimp. For uncooked, place them in a single layer on a baking sheet. Once frozen, transfer to a freezer bag. For cooked shrimp, let them cool, then pack them in a freezer bag. Always label your bags with the date. To thaw, place them in the fridge overnight. You can also use cold water if you need them faster. Just seal them in a bag and submerge. Yes, you can use frozen shrimp! First, you need to thaw them. Place the shrimp in a bowl of cold water for about 15-20 minutes. Change the water halfway through to speed up the thawing. Once thawed, pat them dry with paper towels. This helps remove excess moisture and ensures a crispy finish. After that, follow the recipe as usual. Several common mistakes can lead to soggy shrimp. First, if the shrimp are too wet, the coating won't stick well. Always dry the shrimp before coating. Also, using too much or too little cooking spray can affect crispiness. Make sure to spray lightly but evenly. Lastly, overcrowding the air fryer basket can trap steam, which makes them soggy. Cook in small batches for the best results. Sweet chili sauce is a classic choice! It adds a nice balance of sweet and spicy. You could also try a tangy mango salsa for a fresh twist. For something rich, a creamy coconut or lime aioli works great, too. Feel free to experiment and find your favorite sauce to pair with the crispy coconut shrimp! This guide shows you how to make tasty coconut shrimp in an air fryer. We covered the key ingredients, easy steps, tips for crispiness, and serving ideas. Cooking at home can be fun and rewarding. Whether you’re impressing guests or enjoying a snack, this recipe is a winner. Don’t forget to try the variations to keep it interesting. With these tips, you can enjoy delicious shrimp any time. Dive into your kitchen and get started!

Air Fryer Crispy Coconut Shrimp Tasty and Quick Recipe

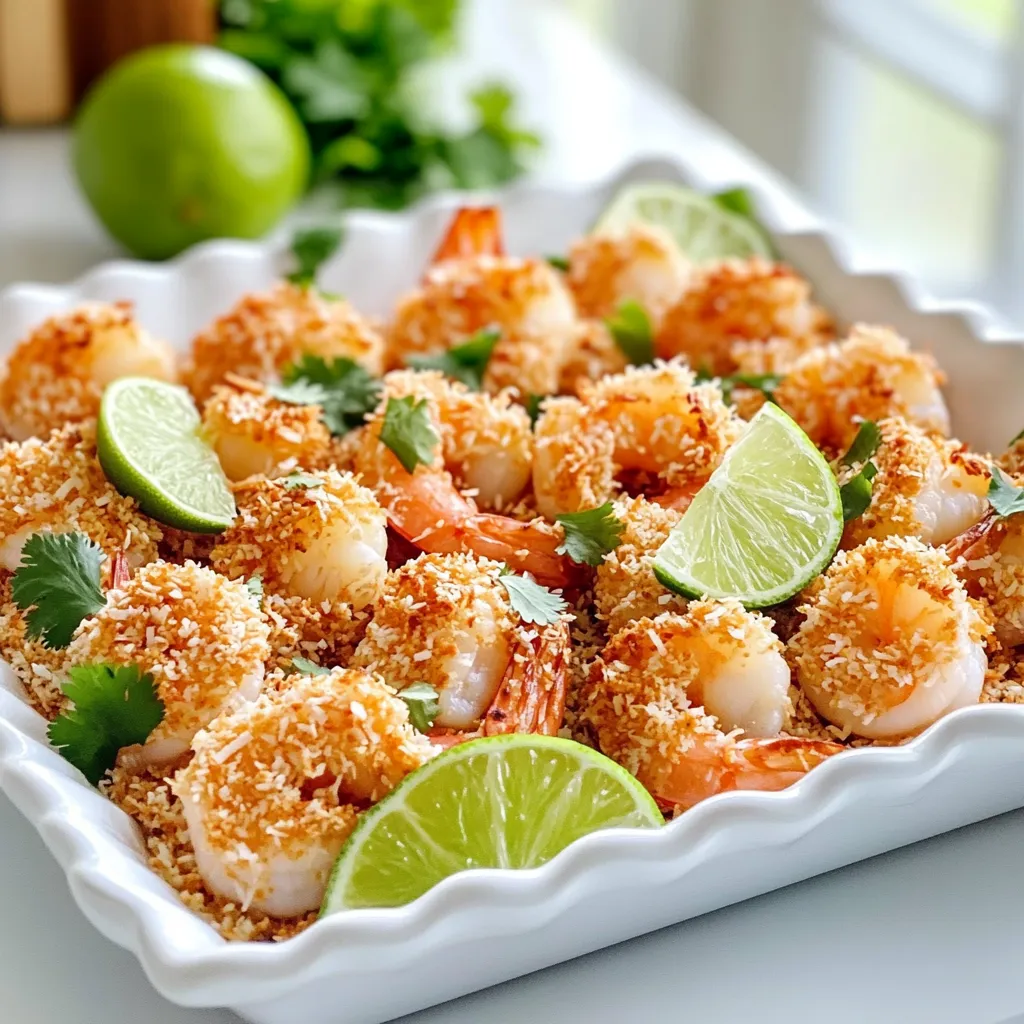
Craving a delicious seafood dish that’s both tasty and quick to make? Look no further than my Air Fryer Crispy

To make One-Pot Creamy Tomato Spinach Tortellini Soup, gather these simple ingredients: - 2 tablespoons olive oil - 1 medium onion, diced - 2 cloves garlic, minced - 1 can (14 oz) diced tomatoes - 4 cups vegetable broth - 1 teaspoon dried basil - 1 teaspoon dried oregano - 1/2 teaspoon red pepper flakes (optional) - 9 oz fresh or frozen cheese tortellini - 2 cups fresh spinach, roughly chopped - 1 cup heavy cream or coconut milk (for a dairy-free option) - Salt and pepper to taste - Grated Parmesan cheese (for serving, optional) - Fresh basil leaves for garnish (optional) Each ingredient plays a role in creating a rich, creamy soup. The olive oil gives flavor and helps cook the onion and garlic. The onion adds a sweet note, while the garlic brings depth. The diced tomatoes add acidity and texture. Vegetable broth serves as a base, making the soup hearty. Herbs like basil and oregano infuse warmth. Red pepper flakes can add a little heat if you like a kick. Cheese tortellini brings a delightful chewiness. Spinach adds color and nutrients. Heavy cream or coconut milk gives that creamy texture we love. Lastly, salt and pepper enhance all the flavors. Feel free to customize your soup with optional garnishes. Parmesan cheese and fresh basil make great toppings, adding flavor and a fresh touch. Enjoy gathering these ingredients for a delicious meal! 1. Sauté onion and garlic Start by heating the olive oil in a large pot over medium heat. Add the diced onion. Sauté it for about 5 minutes. Wait until it turns translucent. Then, add the minced garlic. Cook it for 1 more minute. You will smell a nice aroma! 2. Add tomatoes and broth Next, stir in the can of diced tomatoes along with their juices. Then pour in the vegetable broth. Add the dried basil, dried oregano, and red pepper flakes if you want some heat. Bring this mix to a boil. 3. Incorporate tortellini and cook Once it boils, lower the heat to a simmer. Add the cheese tortellini. Cook according to the package instructions. This usually takes about 3 to 5 minutes. Keep an eye on them until they are tender. 4. Stir in spinach and cream Now, add the chopped spinach and the heavy cream or coconut milk. Cook for another 2 to 3 minutes. You want the spinach to wilt and the soup to warm through. - Adjust seasoning for taste Always taste your soup before serving. Add salt and pepper as needed. This step is key to making your soup flavorful. - Monitor cooking times for tortellini Do not overcook the tortellini. Check them a minute before the time is up. They should be soft but not mushy. To make this soup shine, use fresh ingredients. Fresh herbs and veggies give great taste. If you like spice, add red pepper flakes. Just a pinch adds warmth without being too hot. You can adjust it to your taste. Pair your soup with crusty bread or a fresh salad. Bread soaks up the creamy broth, while salad adds a crunchy texture. For a lovely touch, serve the soup in a nice bowl. Top with grated Parmesan and fresh basil leaves. This makes the dish look as good as it tastes! {{image_2}} You can easily change this soup to fit your needs. If you want a dairy-free option, swap heavy cream for coconut milk. It adds a rich, creamy texture without any dairy. This keeps the soup smooth and flavorful. For those who need gluten-free meals, look for gluten-free tortellini. Many brands offer great options. Just make sure to check the labels. With these swaps, anyone can enjoy this delicious soup. Want to make your soup even better? You can add other vegetables. Carrots and bell peppers work great. Just chop them up and toss them in with the onions. They add color and taste. You can also boost the protein in your soup. Cooked chicken or beans add a nice touch. If you use beans, try chickpeas or white beans. They mix well with the tomato and spinach flavors. These changes keep your soup exciting and nutritious. To keep your One-Pot Creamy Tomato Spinach Tortellini Soup fresh, use a few simple steps. First, let the soup cool to room temperature. Then, transfer it to an airtight container. Store it in the fridge for up to three days. If you want to keep it longer, freeze it. Pour the soup into freezer-safe containers, leaving some space at the top. This allows for expansion as it freezes. You can freeze it for up to three months. When it’s time to enjoy your soup again, reheating properly is key. The best method is to use a pot on the stove. Pour the soup into the pot and heat over medium heat. Stir it often to keep it smooth. If you notice it’s too thick, add a splash of broth or water. You can also use the microwave if you prefer. Just place the soup in a microwave-safe bowl. Heat it in short bursts, stirring in between, until it’s hot. Avoid boiling it, as that can change the texture. Can I use frozen tortellini? Yes, you can use frozen tortellini. Just add it to the pot directly. It cooks fast and will thaw in the soup. Follow the package instructions for timing. This makes cooking easy and quick. How can I make this soup vegetarian? To make this soup vegetarian, use vegetable broth instead of chicken broth. All other ingredients are already plant-based. This keeps the flavors rich while staying meat-free. You can also add more veggies for added nutrition. What can I substitute for heavy cream? For a lighter option, use coconut milk. It gives a creamy texture without dairy. Almond milk or cashew cream are great choices too. Just pick what you like best. This soup has about 300 calories per serving. It contains 15 grams of fat and 10 grams of protein. - Calories: 300 - Fat: 15g - Protein: 10g The ingredients provide many health benefits. Spinach is rich in iron and vitamins. Tomatoes add antioxidants, which are great for your skin. Tortellini gives you energy with carbs. Overall, this soup is tasty and healthy! This blog post covered a delicious tortellini soup recipe. We looked at key ingredients, step-by-step prep, and cooking tips. You learned how to customize the soup with flavors and dietary needs. I shared storage methods to keep your leftovers fresh and easy reheating tips. Enjoy making this warm soup with your own twist! Simple ingredients can turn into a tasty dish that everyone will love. Dive in, get cooking, and share your yummy results!

One-Pot Creamy Tomato Spinach Tortellini Soup Delight

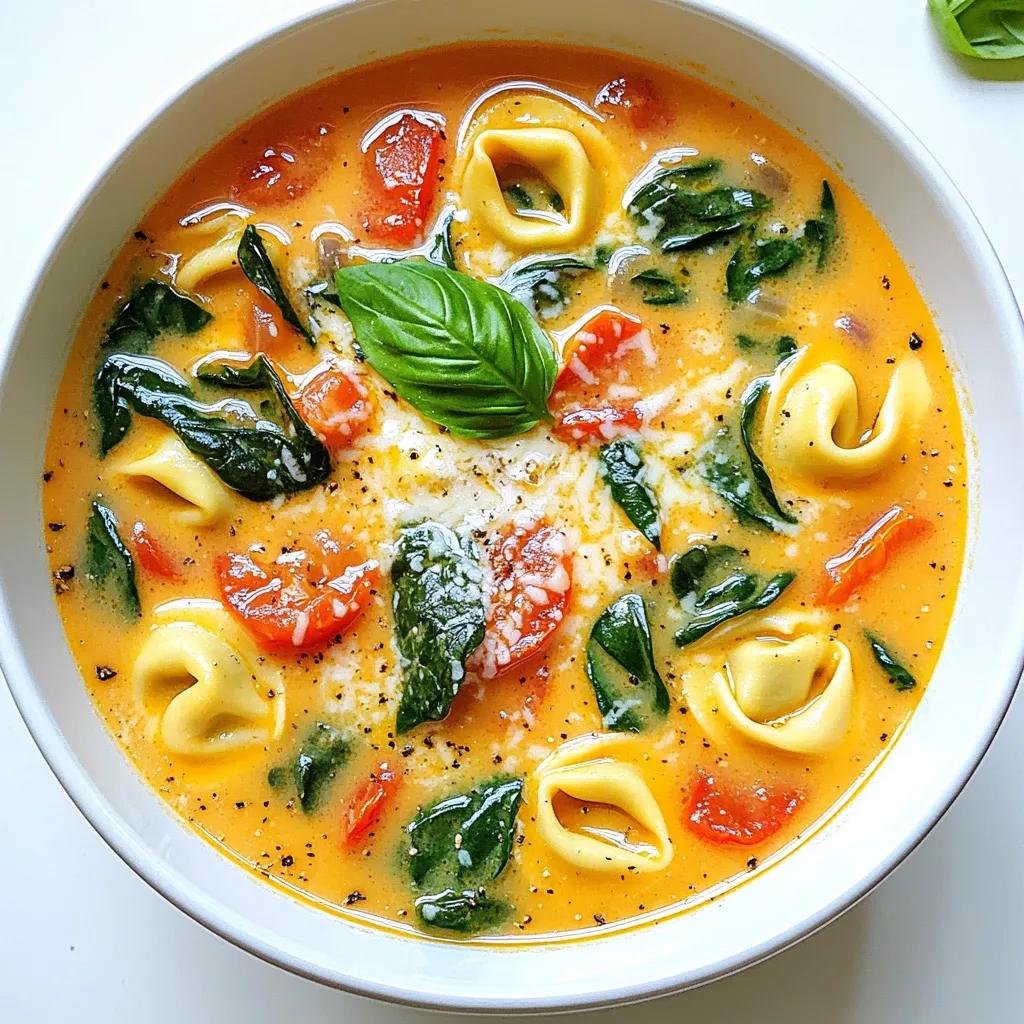
Looking for a cozy meal that’s quick and easy? Our One-Pot Creamy Tomato Spinach Tortellini Soup Delight is here to

Older posts
Newer posts
← Previous Page1 … Page7 Page8 Page9 … Page86 Next →

dsad

© 2026 Cooking Wells • Built with GeneratePress

Our Policies

  • Copyright Policy
  • Cookie Policy
  • GDPR Policy
  • Privacy Policy
  • Disclaimer
  • Terms Of Use

More Information

  • Home
  • About
  • Contact
  • Appetizers
  • Dessert
  • Dinner
  • Drinks
©2026, Cooking Wells About Back To Top