Skip to content
DisclaimerTerms Of UseGDPR PolicyCookie Policy

Cooking Wells

  • Home
  • Drinks
  • Appetizers
  • Dinner
  • Dessert
  • About
  • Contact
  • Privacy Policy
DisclaimerTerms Of UseGDPR PolicyCookie Policy

Mia

To make delicious sweet potato fries, gather these main ingredients: - 2 large sweet potatoes, peeled and cut into fries - 2 tablespoons olive oil - 1 teaspoon smoked paprika - 1 teaspoon garlic powder - Salt and pepper to taste These ingredients create the perfect blend of flavors and textures for your fries. The sweet potatoes provide natural sweetness, while smoked paprika adds depth. For the chipotle aioli, you will need: - 1 cup mayonnaise - 1-2 chipotle peppers in adobo sauce, finely minced - 1 tablespoon lime juice - 1 teaspoon cumin This aioli is creamy with a smoky kick. The chipotle peppers give it a spicy depth, making it a perfect dip for the fries. You can elevate your dish with these optional garnishes and spices: - Fresh cilantro, chopped (for garnish) Adding fresh cilantro brightens the dish and adds a pop of color. You can also sprinkle extra smoked paprika or lime zest for more flavor. For the full recipe, check out the [Full Recipe]. Start by peeling your sweet potatoes. Then, cut them into thin fries. Aim for uniform size so they cook evenly. Place the fries in a large bowl. Add 2 tablespoons of olive oil, 1 teaspoon of smoked paprika, and 1 teaspoon of garlic powder. Sprinkle salt and pepper to taste. Toss everything together until the fries are well coated. This step is key for flavor. Now, preheat your oven to 425°F (220°C). Line a baking sheet with parchment paper. Spread the sweet potato fries in a single layer on the sheet. Make sure they don’t touch to get crispy. Bake for about 25-30 minutes. Flip the fries halfway through for even cooking. They should turn golden and crispy. While the fries bake, prepare the chipotle aioli. In a mixing bowl, combine 1 cup of mayonnaise. Add 1 to 2 minced chipotle peppers in adobo sauce for heat. Squeeze in 1 tablespoon of lime juice and add 1 teaspoon of cumin. Mix well until smooth. Taste and adjust the heat by adding more chipotle if needed. This dip will take your fries to the next level. Once the fries are done, let them cool slightly. This helps them stay crispy. Serve your sweet potato fries hot with the chipotle aioli on the side. Garnish with chopped fresh cilantro for a nice touch. Enjoy this tasty treat! For the full recipe, check the details above. To make your sweet potato fries extra crispy, cut them evenly. Aim for a uniform thickness, around 1/4 inch. This helps them cook at the same rate. Toss them in olive oil and seasonings, then spread them out on a baking sheet. Avoid crowding the fries. This allows hot air to circulate and crisp them up. You can also soak the cut fries in water for 30 minutes before baking. This removes excess starch, which helps them get crispy. To save time, you can prep the sweet potatoes a day ahead. Cut them into fries and store them in a bowl of water in the fridge. This keeps them fresh and ready for cooking. You can also mix the aioli ingredients earlier. Just store it in an airtight container. This way, you can whip up this dish quickly when you’re ready to serve. A few tools can make your cooking journey smoother. Start with a good knife for cutting the sweet potatoes. A cutting board and a large bowl help with mixing. You’ll need a baking sheet lined with parchment paper for easy cleanup. A whisk or fork works well for mixing the aioli. Finally, having a spatula on hand helps you flip the fries halfway through baking. These tools ensure a fun and simple cooking experience. For the complete recipe, check out the Full Recipe. {{image_2}} You can change the flavor of your sweet potato fries with different seasonings. For a spicy kick, try adding cayenne pepper. If you like a hint of sweetness, mix in some cinnamon with your olive oil. You can also use Italian herbs like oregano or thyme for a fresh taste. Another option is to sprinkle some nutritional yeast for a cheesy flavor without dairy. These alternatives keep your fries exciting and tasty. The chipotle aioli is fantastic, but you can explore other flavors too. For a classic twist, use roasted garlic instead of chipotle. You could also mix in fresh herbs like basil or dill for a bright touch. If you enjoy a tangy flavor, add some Dijon mustard or a splash of vinegar. Each aioli flavor brings a new experience, making every dip special. Sweet potato fries with aioli are perfect for sharing. Set them out in a big bowl at your next party. You can also make a dipping station with different aioli flavors to please all guests. Consider pairing your fries with a fresh salad or a platter of veggies. This combo makes for a colorful and yummy spread. For a fun twist, serve the fries in small cones for a cute presentation. Remember, the key is to make it fun and inviting for everyone. Check out the Full Recipe for more ideas. If you have leftover sweet potato fries, store them in an airtight container. Let them cool before sealing to keep moisture out. They stay fresh for about 2-3 days in the fridge. If you want to enjoy them later, consider freezing them. Place fries in a single layer on a baking sheet. Once frozen, transfer them to a freezer bag. They can last up to 3 months! To bring back that crispy texture, reheat your fries in the oven. Preheat to 400°F (200°C). Spread the fries on a baking sheet in a single layer. Bake for about 10-15 minutes, flipping halfway through. This method helps avoid soggy fries. You can also use an air fryer for extra crunch! Set it to 350°F (175°C) and cook for about 5-7 minutes. Store leftover chipotle aioli in a sealed container in the fridge. It keeps well for about 1 week. If you want to add some depth, stir in a splash of lime juice before serving. This will keep the flavor fresh and bright. If you make a larger batch, consider freezing it in ice cube trays. Once frozen, transfer to a freezer bag. This way, you can use just what you need later. For the full recipe, check out the details above! Yes, you can use regular potatoes. Russet or Yukon Gold work well. They have a great texture and flavor. However, sweet potatoes add a unique sweetness. This sweetness pairs nicely with the smoky aioli. If you choose regular potatoes, adjust cooking time. Watch for golden color and crispiness. To make the aioli spicier, add more chipotle peppers. You can also mix in cayenne pepper or hot sauce. Start with a little. Taste as you go to find your perfect heat level. This way, you can control the spice. A little goes a long way, so be careful! Yes, you can easily make this recipe vegan. Swap mayonnaise for a plant-based version. There are many tasty options available. Use vegan mayo to keep the creamy texture. The rest of the recipe stays the same. You’ll still enjoy all the flavors and crunch! The best way to cut sweet potatoes is to slice them evenly. Aim for about 1/4 inch thick. This size helps them cook evenly. Start by cutting off the ends. Then, slice the potato lengthwise. Make long strips, then cut those into fries. Uniform size ensures perfect cooking every time. This blog post shared how to make tasty sweet potato fries and chipotle aioli. You learned the key ingredients and step-by-step instructions to create them. I offered tips for crispiness and ideas for variations to keep things fun. Storing leftovers was also covered, so you can enjoy them later. In the end, cooking these fries and aioli can bring joy to any meal. Use your creativity to explore flavors and enjoy every bite!

Sweet Potato Fries with Chipotle Aioli Delight

Are you ready to elevate your snacking game? In this post, I’ll show you how to whip up mouthwatering sweet

To make creamy spinach tortellini, gather these simple ingredients: - Cheese Tortellini (12 ounces) - Fresh Spinach (2 cups, chopped) - Olive Oil (1 tablespoon) - Garlic (3 cloves, minced) - Heavy Cream (1 cup) - Parmesan Cheese (1 cup, grated) - Nutmeg (1/2 teaspoon, freshly grated if possible) - Salt and Pepper to taste - Optional Ingredients (Crushed red pepper flakes, Fresh basil for garnish) Each ingredient plays a key role in creating a rich and satisfying dish. The cheese tortellini serves as a hearty base. Spinach adds color and nutrition. Olive oil brings richness, while garlic adds depth. Heavy cream creates that luscious texture. Parmesan cheese adds umami and saltiness. Nutmeg gives a warm, aromatic hint. Don't forget salt, pepper, and optional spices to elevate your dish! For the full recipe, check out the complete cooking instructions. - Prepare tortellini according to package instructions. - Ensure tortellini is al dente before draining. This gives it a nice bite. - Heat olive oil in a skillet over medium heat. This will add flavor. - Add minced garlic and sauté until fragrant. This takes about a minute. - Stir in chopped spinach and cook until wilted. It should take 2-3 minutes. - Lower heat and add heavy cream, simmer gently. This builds the sauce. - Gradually mix in parmesan cheese until melted. This adds creaminess. - Season with nutmeg, salt, pepper, and optional red pepper flakes. This brings out flavor. - Gently fold cooked tortellini into the creamy sauce. Make sure every piece is coated. - Allow to thicken slightly before serving. This helps the sauce cling to the pasta. For the complete process, check out the Full Recipe. To make your sauce creamy, use heavy cream. It adds richness and smoothness. When you pour the cream into the pan, keep the heat low. This helps prevent curdling. Stir the sauce often as it simmers. If you see any lumps, lower the heat more. To boost flavor, try adding crushed garlic or a pinch of cayenne. Fresh herbs like basil or parsley can brighten the dish. You can also swap Parmesan for other cheeses. Try using mozzarella for a milder taste or Gruyère for a nutty flavor. Pair creamy spinach tortellini with a fresh salad or garlic bread. A light, crunchy salad balances the rich sauce. For plating, use a wide bowl to show off the dish. Add a sprinkle of cheese and a basil leaf on top for color. This makes your meal look as good as it tastes. {{image_2}} You can add protein to your creamy spinach tortellini for extra flavor. Chicken, shrimp, or sausage work great. If you choose chicken, cook it in the skillet before adding garlic. For shrimp, add it when the spinach wilts. Sausage can be crumbled and browned first. Adjust cooking times to ensure each protein is cooked through. You can also mix in other veggies. Try bell peppers, zucchini, or mushrooms. These add texture and flavor. For a fresh twist, use seasonal produce. In spring, add peas or asparagus. In fall, consider butternut squash. Just make sure to sauté them well with the spinach. You can make this dish fit your diet. Look for gluten-free tortellini if you need it. Many brands offer this option. For a vegan version, swap heavy cream for coconut cream and use nutritional yeast instead of cheese. These changes keep the dish rich and tasty while meeting your dietary needs. To keep your creamy spinach tortellini fresh, use airtight containers. Glass or plastic containers work well. Make sure the tortellini is cool before sealing. This helps prevent steam buildup. Store in the fridge for up to three days. You can reheat creamy spinach tortellini in two ways: microwave or stovetop. For the microwave, place it in a bowl and cover it. Heat in short bursts, stirring often. For stovetop, use a non-stick pan on low heat. Add a splash of cream to keep it creamy. Stir gently until heated through. To freeze creamy spinach tortellini, let it cool first. Portion it into freezer-safe bags or containers. Remove as much air as possible. Label the containers with the date. It will last for up to three months. When ready to eat, thaw it overnight in the fridge. Reheat as mentioned above. Enjoy it just like fresh! For the full recipe, check out the link provided above. Yes, you can use frozen tortellini. Frozen tortellini saves time and is easy to find. Pros of frozen tortellini: - Convenient and quick to cook. - Longer shelf life than fresh tortellini. Cons of frozen tortellini: - May have a different texture than fresh. - Might take slightly longer to cook. To make creamy spinach tortellini lighter, you can swap some ingredients. - Use half-and-half instead of heavy cream. - Try low-fat cheese or less cheese overall. - Add more vegetables like zucchini or bell peppers. - Use less oil or a cooking spray for sautéing. This dish goes well with many sides. - A simple green salad with vinaigrette is great. - Roasted vegetables add flavor and color. - Garlic bread complements the creamy sauce nicely. - Light soups, like a tomato basil, work well too. For detailed cooking instructions, check the [Full Recipe](#). This blog post shared a simple and tasty way to make creamy spinach tortellini. You learned about the ingredients, cooking steps, and ways to enhance flavor. We also explored options for protein and veggies. Finally, I covered storage tips and answered common questions. Now you can make this dish deliciously your own. Enjoy cooking and share this meal with friends or family. Simple recipes like this can create joy at the table.

Creamy Spinach Tortellini Easy and Flavorful Recipe

If you’re craving a dish that’s both easy and packed with flavor, Creamy Spinach Tortellini is the answer! This delightful

To make the double chocolate zucchini muffins, you need the following: - 1 cup grated zucchini (about 1 medium zucchini) - 1 cup all-purpose flour - 1/2 cup unsweetened cocoa powder - 1 teaspoon baking soda - 1/2 teaspoon baking powder - 1/4 teaspoon salt - 1/2 cup granulated sugar - 1/2 cup brown sugar, packed - 1/2 cup vegetable oil (or melted coconut oil) - 2 large eggs - 1 teaspoon vanilla extract - 1/2 cup semi-sweet chocolate chips - 1/4 cup chopped walnuts or pecans (optional) If you lack any of these ingredients, don’t worry! Here are some easy swaps: - Flour: You can use whole wheat flour for added fiber. - Cocoa Powder: Try carob powder for a different flavor. - Sugar: Substitute with coconut sugar or honey. - Oil: Applesauce works well as a low-fat option. - Eggs: Use flax eggs (1 tablespoon flaxseed meal + 2.5 tablespoons water) as a binder. These swaps can change the taste slightly, but they keep the muffins tasty and moist. When picking zucchini, look for these tips: - Color: Choose dark green zucchini. Avoid those with yellow spots. - Size: Opt for medium-sized zucchini. Smaller ones have better flavor. - Texture: The skin should be smooth and firm. Avoid soft or wrinkled ones. - Weight: Select zucchini that feels heavy for its size. This means more moisture inside. Using fresh zucchini makes your muffins rich and moist. It enhances the flavor too! For the full recipe, check here. To start, gather all your ingredients. You need one cup of grated zucchini. This is about one medium zucchini. You will also need flour, cocoa powder, baking soda, and salt. Ensure you have both granulated and brown sugar. Grab two large eggs and some oil too. Don't forget the vanilla extract and chocolate chips. Optional nuts can add a nice crunch. 1. First, preheat your oven to 350°F (175°C). Line a muffin tin with paper liners or grease it lightly. 2. In a medium bowl, mix the grated zucchini with one tablespoon of flour. This helps absorb moisture. Set this bowl aside. 3. Now, take a large bowl. Whisk together the flour, cocoa powder, baking soda, baking powder, and salt. Mix until it's nice and even. 4. In another bowl, blend the granulated sugar, brown sugar, and oil until smooth. Add one egg at a time, mixing well after each. Stir in the vanilla extract. 5. Gradually add the dry mix to the wet mix. Stir until just combined. Be careful not to overmix. 6. Gently fold in the zucchini, chocolate chips, and nuts if you’re using them. Make sure they’re evenly spread. 7. Divide the batter into the muffin cups. Fill each cup about three-quarters full. 8. Bake in the preheated oven for 18-22 minutes. A toothpick should come out clean when inserted in the center. 9. Once baked, remove them from the oven. Let the muffins cool in the pan for about five minutes. Then, move them to a wire rack to cool completely. Baking these double chocolate zucchini muffins is a fun way to enjoy a sweet treat. The zucchini keeps them moist and rich. For the full recipe, refer to the ingredients section above. Overmixing can ruin your muffins. It makes them tough and chewy. Mix just until the batter comes together. Use a spatula for gentle folds. This keeps your muffins soft and fluffy. Remember, lumps are okay! They will bake out. Zucchini adds moisture to your muffins. Grate it finely for the best result. Squeeze out excess water using a clean towel. A little flour on the grated zucchini helps absorb extra moisture. This step helps keep your muffins rich and moist. Texture is key to a great muffin. Use high-quality cocoa powder for a deep chocolate flavor. Don’t skip the chocolate chips; they add a nice melt. Bake until a toothpick comes out clean. This ensures a tender crumb. For extra crunch, consider adding nuts. They add texture and flavor contrast. These tips will help you bake the perfect double chocolate zucchini muffins. Check out the Full Recipe for detailed steps! {{image_2}} You can add fun flavors to your muffins. Try using different mix-ins to make them unique. Here are some great ideas: - Chocolate chunks: They melt and create pockets of gooey chocolate. - Dried fruit: Raisins or cranberries add a nice sweetness. - Coconut flakes: This gives a tropical twist to your muffins. - Peanut butter chips: They add a nutty flavor that pairs well with chocolate. These mix-ins can change the taste and texture. Feel free to experiment! You can make these muffins a bit healthier without losing the taste. Here are some simple swaps: - Use whole wheat flour: This adds fiber and nutrients. - Reduce sugar: Try cutting the sugar in half or using honey instead. - Swap oil for applesauce: This keeps muffins moist and cuts fat. - Add flaxseeds: They boost nutrition and add a nice crunch. These changes keep the muffins tasty while making them a bit lighter. If you need gluten-free muffins, I have you covered. Here’s how to make them gluten-free: - Use gluten-free flour blend: Look for a blend that includes xanthan gum. - Try almond flour: This gives a rich flavor and is naturally gluten-free. - Check your chocolate chips: Ensure they are gluten-free, as some brands may contain gluten. With these adjustments, you can enjoy delicious muffins that fit your diet. Don't forget to check out the Full Recipe for all the details! To keep your double chocolate zucchini muffins fresh, store them in an airtight container. Place a paper towel inside to absorb moisture and keep them from getting soggy. You can store them at room temperature for up to three days. If you want to keep them longer, consider refrigeration. Freezing is a great way to save muffins for later. First, let the muffins cool completely. Then, wrap each muffin tightly in plastic wrap. Place the wrapped muffins in a freezer bag or container. They can last up to three months in the freezer. When you are ready to enjoy them, just thaw them at room temperature. To reheat your muffins, you can use the microwave or the oven. If using the microwave, heat them for about 15-20 seconds. For the oven, preheat it to 350°F (175°C) and heat muffins for about 5-10 minutes. This will help restore their warm, moist texture. Enjoy your muffins fresh, just like when they came out of the oven! Yes, you can use frozen zucchini. Just remember to thaw it first. Squeeze out excess water after thawing. This keeps your muffins from becoming too wet. Frozen zucchini works great in these double chocolate zucchini muffins. To make these muffins vegan, swap the eggs for flax eggs. Mix one tablespoon of ground flaxseed with three tablespoons of water for each egg. Let it sit until it thickens. Use a plant-based oil instead of vegetable oil. Replace chocolate chips with dairy-free ones. The best way to test muffins is to use a toothpick. Insert it into the center of a muffin. If it comes out clean or with a few crumbs, they are ready. Bake them for 18-22 minutes. Keep an eye on them as they bake! We explored everything you need to know to make delicious zucchini muffins. We covered the key ingredients, substitutions, and tips for choosing fresh zucchini. Next, we shared step-by-step instructions for baking, along with tips to keep muffins moist and texture perfect. You learned about variations, storage methods, and how to handle common questions. I hope this guide helps you enjoy zucchini muffins at home. Remember, experimenting with ingredients can lead to great results! Happy baking!

Double Chocolate Zucchini Muffins Rich and Moist Delight

Craving a sweet treat that packs a hidden veggie punch? You’re in the right place! These Double Chocolate Zucchini Muffins

To make pesto mozzarella stuffed chicken, you need the following items: - 4 boneless, skinless chicken breasts - 1 cup fresh basil pesto - 8 oz mozzarella cheese, sliced - 1/2 cup sun-dried tomatoes, chopped - 1/4 cup grated Parmesan cheese - 1 teaspoon garlic powder - 1 teaspoon paprika - Salt and pepper to taste - 2 tablespoons olive oil - Fresh basil leaves for garnish Using fresh ingredients makes a big difference. Fresh basil pesto brings bright flavors. It enhances the taste in your chicken. Dried versions may lack the same depth. Fresh mozzarella adds creaminess that you can't beat. When possible, choose fresh over dried for the best meal. You can customize this dish easily! Here are some ideas: - Add spinach for extra greens. - Use feta cheese for a tangy twist. - Mix in artichokes for a unique flavor. - Try different herbs like thyme or oregano. These options let you make the dish your own. Don't be afraid to experiment! For the full recipe, check the instructions provided earlier. Start by prepping your chicken breasts. You need four boneless, skinless chicken breasts for this dish. Using a sharp knife, carefully cut a pocket into each breast. Make sure not to cut all the way through. This pocket will hold all the tasty fillings. Next, mix garlic powder, paprika, salt, and pepper in a small bowl. Rub this mix over the outside of each chicken breast. This step adds great flavor to the chicken. Now, it’s time to stuff the chicken. Spoon about 1/4 cup of fresh basil pesto into each pocket. Then, add two slices of mozzarella cheese. Don't forget to sprinkle some chopped sun-dried tomatoes in there too. For extra flavor, add a little grated Parmesan cheese inside the pocket as well. Searing is key to locking in moisture and flavor. Heat two tablespoons of olive oil in a large oven-safe skillet over medium heat. Once the oil is hot, carefully place the stuffed chicken breasts in the skillet. Sear the chicken for about 3 to 4 minutes on each side. Look for a nice golden brown color. This step builds a rich flavor and a tasty crust. After searing, it’s time to bake the chicken. Preheat your oven to 375°F (190°C) before you start. Once the chicken is seared, transfer the skillet to the preheated oven. Bake for about 20 minutes. You want the chicken to reach an internal temperature of 165°F (75°C). This ensures the chicken is fully cooked and safe to eat. After baking, remove the skillet from the oven and let the chicken rest for 5 minutes before slicing. This resting time helps the juices redistribute, making your chicken juicy and tender. Drizzle any remaining pesto over the top and garnish with fresh basil leaves for a beautiful finish. Enjoy your Pesto Mozzarella Stuffed Chicken as a delicious meal! You can find the full recipe above. When you stuff chicken, you want to create a pocket without cutting all the way through. This way, your filling stays inside. Use a sharp knife to cut gently along the side of each breast. Make the pocket big enough for your tasty fillings, but be careful not to break through. Stuff it with pesto, mozzarella, and sun-dried tomatoes. This mix keeps the chicken flavorful and moist. To keep chicken juicy, seasoning is key. Use a mix of salt, pepper, garlic powder, and paprika. Rub this mix all over the chicken before cooking. This adds flavor and helps lock in juices. Searing the chicken in olive oil also helps. Cook it for just a few minutes on each side until golden brown. Then, bake it in the oven until it reaches 165°F (75°C). Let it rest for five minutes before slicing. This resting time allows the juices to settle. One common mistake is overcooking the chicken. Use a meat thermometer to check the temperature. Another mistake is stuffing too much filling. If the pocket is too full, the filling can spill out. Lastly, don’t skip the resting time after cooking. This step is crucial for juicy chicken. Follow these tips for a perfect Pesto Mozzarella Stuffed Chicken experience. For the complete recipe, check out the Full Recipe section. {{image_2}} If you want to mix things up, try using red pepper or sun-dried tomato for your pesto. Red pepper pesto adds a sweet and smoky taste. It pairs well with the chicken and offers a vibrant color, too. Sun-dried tomato pesto brings a rich and tangy flavor that elevates the dish. Both options work great in the pocket of your chicken, making each bite unique. You can also switch out the mozzarella for feta or goat cheese. Feta cheese adds a salty kick and crumbly texture. It pairs well with the pesto and adds a Mediterranean twist. Goat cheese, on the other hand, brings a creamy richness and a slight tang. Both choices give this dish a new character and enhance the overall flavor profile. When it comes to serving, think about sides that complement the chicken. A fresh garden salad adds a crisp and light touch. Steamed vegetables like broccoli or green beans offer a healthy balance. You can also serve it with garlic bread for a comforting touch. For a twist, try pairing it with quinoa or couscous. These sides round out your meal and make it even more enjoyable. For the full recipe, you can check the earlier section. To keep your Pesto Mozzarella Stuffed Chicken fresh, store it in an airtight container. Let the chicken cool to room temperature before placing it in the fridge. Make sure to use it within 3 to 4 days for the best taste. If you have leftover pesto, store it in a separate container to keep flavors fresh. When you reheat the chicken, the goal is to keep it juicy. Preheat your oven to 350°F (175°C). Place the chicken in a baking dish and cover it with foil. Heat for about 15 to 20 minutes, or until warmed through. If you want, drizzle a little extra pesto on top for added flavor. Avoid the microwave, as it can make the chicken dry. If you want to save Pesto Mozzarella Stuffed Chicken for later, freezing is a great option. Wrap each chicken breast tightly in plastic wrap, then place them in a freezer-safe bag. You can freeze them for up to 3 months. When you’re ready to eat, thaw them in the fridge overnight before reheating. This helps maintain the chicken's juicy texture. For the full recipe, check the details above. To check if the chicken is done, use a meat thermometer. The chicken's internal temperature should be 165°F (75°C). Insert the thermometer into the thickest part of the chicken. If it reads 165°F, the chicken is safe to eat. If not, return it to the oven for a few more minutes. Always let it rest for about five minutes after cooking. This helps the juices settle, keeping the chicken juicy. Yes, you can prepare this dish ahead of time. Stuff the chicken breasts and store them in the fridge. You can do this up to a day in advance. When you're ready to cook, just sear and bake them as directed. This makes it easier for busy weeknights or meal prep. Just remember, if you freeze them, thaw them fully before cooking. This dish pairs well with many sides. Here are a few ideas: - Steamed vegetables like broccoli or green beans - A fresh garden salad with light dressing - Roasted potatoes for a hearty touch - Quinoa or rice for a healthy grain option These sides complement the rich flavors of the pesto and mozzarella in your chicken. For the full recipe, check out the earlier section! This blog post covered how to make Pesto Mozzarella Stuffed Chicken. We explored fresh versus dried ingredients and how you can customize your dish. I shared step-by-step instructions, tips, and common mistakes to avoid. You also learned about tasty variations and how to store leftovers. Cooking is fun, and with these steps, you can make a great meal. Enjoy the process and share your results!

Pesto Mozzarella Stuffed Chicken Juicy and Delicious Meal

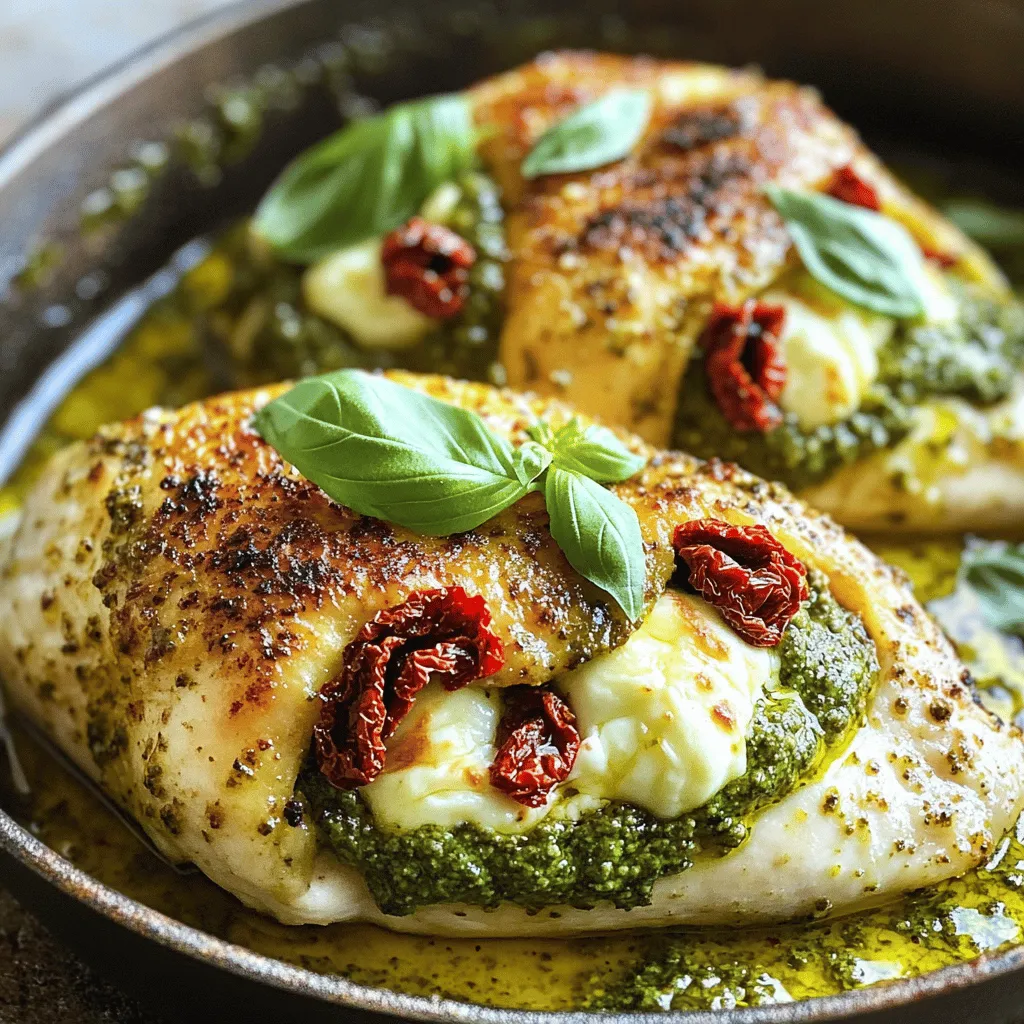
If you’re craving a meal that’s both juicy and full of flavor, look no further! Pesto Mozzarella Stuffed Chicken is

- 2 large apples (such as Granny Smith or Honeycrisp) - 2 tablespoons granulated sugar - 1 tablespoon ground cinnamon - 1 teaspoon lemon juice - A pinch of sea salt These ingredients are simple and easy to find. I love using Granny Smith apples because they are tart and crisp. Honeycrisp apples also work well, offering a sweet flavor. You need sugar and cinnamon for that classic taste. Lemon juice helps keep the apples fresh and bright. A pinch of sea salt enhances all the flavors. - Other spices (e.g., nutmeg, ginger) - Sweetener alternatives (e.g., honey, agave) - Toppings or dips (e.g., yogurt, caramel sauce) You can get creative with optional ingredients. Try adding nutmeg or ginger for a new twist. If you want a healthier option, use honey or agave instead of sugar. For a fun serving idea, pair your chips with yogurt or drizzle caramel sauce on top. These enhancements can take your apple chips to the next level! For the full recipe, check out the details above. Enjoy making these tasty snacks! - Preheat your oven to 225°F (107°C). - Wash and slice the apples into thin rounds. Start by getting your oven ready. This low heat helps dry the apples. Next, wash the apples well. I like to use a mandoline slicer for even rounds. Aim for slices about 1/8 inch thick. This thickness ensures they bake nicely and get crisp. Don’t forget to remove the seeds as you slice! - Combine sugar and cinnamon in a small bowl. - Drizzle apple slices with lemon juice and toss. In a small bowl, mix the sugar and ground cinnamon. This blend adds a sweet touch. Now take the apple slices and place them in a large bowl. Drizzle them with lemon juice. This helps the sugar stick and adds a nice flavor. Gently toss the apple slices to coat them evenly in the juice. - Arrange slices on prepared baking sheets. - Bake and monitor for crispness. Lay the apple slices in a single layer on baking sheets. Make sure they do not overlap. This allows the heat to reach all sides of the slices. Bake them for about 1-2 hours. Flip the slices halfway through for even crisping. Keep an eye on them as they bake. They should turn golden and crisp but not burn. Once they cool, they will be even crunchier. For the full recipe, check the earlier section. When making cinnamon sugar apple chips, uniform thickness is key. Even slices bake evenly, so you get the best crunch. Aim for slices about 1/8 inch thick. This size allows the apple to crisp up without burning. For tools, I suggest using a mandoline slicer. It gives you a consistent thickness quickly. If you don’t have one, a sharp knife works too. Just be careful while slicing to keep your fingers safe. Baking time can change based on the type of apple you use. Tart apples, like Granny Smith, can take longer to bake compared to sweeter apples. Watch closely as they bake. You want to flip them halfway through for even crispness. Monitor them for how chewy or crisp you want them. If you prefer chewiness, take them out a bit sooner. For extra crunch, leave them in longer. There are many fun ways to serve apple chips. You can stack them in a rustic bowl or lay them on a wooden platter. A light dusting of cinnamon sugar on top adds flair. Pair these chips with yogurt for a healthy snack or use them as a topping on desserts. They also go well with caramel sauce for a sweet treat. Enjoy these chips anytime you crave a snack! {{image_2}} You can change the flavor of your apple chips easily. Try adding spices like nutmeg or ginger for a warm twist. You can also mix in extracts like vanilla or almond for a unique taste. Another fun idea is to use citrus zest. Just grate some lemon or orange peel and sprinkle it on your apple slices. This adds a bright and fresh flavor that blends well with cinnamon. The type of apple you use matters. Sweet apples like Honeycrisp make tasty chips. Tart apples like Granny Smith add a nice bite. You can mix different kinds for a fun flavor profile. If you want to change the sugar, try using honey or agave instead. These substitutes can make the chips fit your dietary needs while still being delicious. You don’t have to stick to the oven for making apple chips. An air fryer works great for quicker results. It crisps them up in less time and uses less energy. Just set it to about 160°F (70°C) and keep an eye on them. If you want a different texture, consider using a dehydrator. This method takes longer but gives you a chewy and crunchy snack. For the full recipe, make sure to check the detailed section above. To keep your cinnamon sugar apple chips fresh, store them in an airtight container. This helps keep moisture out and crunch in. Choose a container that fits your chips snugly but not too tight. Make sure to seal it well after each use. For the best pantry conditions, keep the container in a cool, dry place. Avoid areas with heat or humidity, as these can make the chips soft. Homemade apple chips can last for about one to two weeks when stored properly. After that, they may start to lose their crispness. Signs that your apple chips are no longer good include a change in smell, color, or texture. If they feel soft or chewy, it's best to toss them. If your apple chips become soft, don’t worry! You can easily revive them. Place the chips on a baking sheet and pop them in a preheated oven at 200°F (93°C) for about 10-15 minutes. This will help them regain their crunch. To avoid moisture buildup, always ensure the chips are cool before sealing them in a container. Store them with a small packet of silica gel or uncooked rice to absorb excess moisture. You can make apple chips without sugar by simply slicing apples and baking them. Use a mandoline or a knife to cut thin rounds. After slicing, sprinkle some lemon juice on top to enhance the flavor. Bake them at 225°F (107°C) until they are crisp. This method keeps them healthy and still tasty. Apple chips offer many health benefits. They contain fiber, which aids digestion. Apples also have vitamins like C and A. Eating apple chips can satisfy your sweet cravings without added sugars. They are a low-calorie snack option, making them great for weight management. You can find pre-made cinnamon sugar apple chips at health food stores or online. Many grocery stores carry them in the snack aisle. Look for brands that use natural ingredients for a quality product. Local farmers' markets may also offer fresh options. Freezing cinnamon sugar apple chips is not the best option. They may lose their crispness after thawing. If you have leftovers, store them in an airtight container at room temperature. This keeps them crispy longer. Consider making smaller batches to avoid waste. The best apples for chips are Granny Smith and Honeycrisp. Granny Smith apples are tart, which balances the sweetness of sugar well. Honeycrisp apples have a nice crunch and natural sweetness. You can also try Fuji or Pink Lady for a different flavor twist. You now have all the steps to make delicious apple chips. Start with fresh apples and simple ingredients. The baking process brings out their natural sweetness. You can customize flavors and enhance your snacks with spices and toppings. Remember, uniform slices ensure even baking and great texture. Store your chips properly to keep them fresh. Enjoy your healthy snack and experiment with different tastes! This fun process teaches you about flavor and creativity in cooking. Happy baking!

Cinnamon Sugar Apple Chips Simple and Delicious Snack

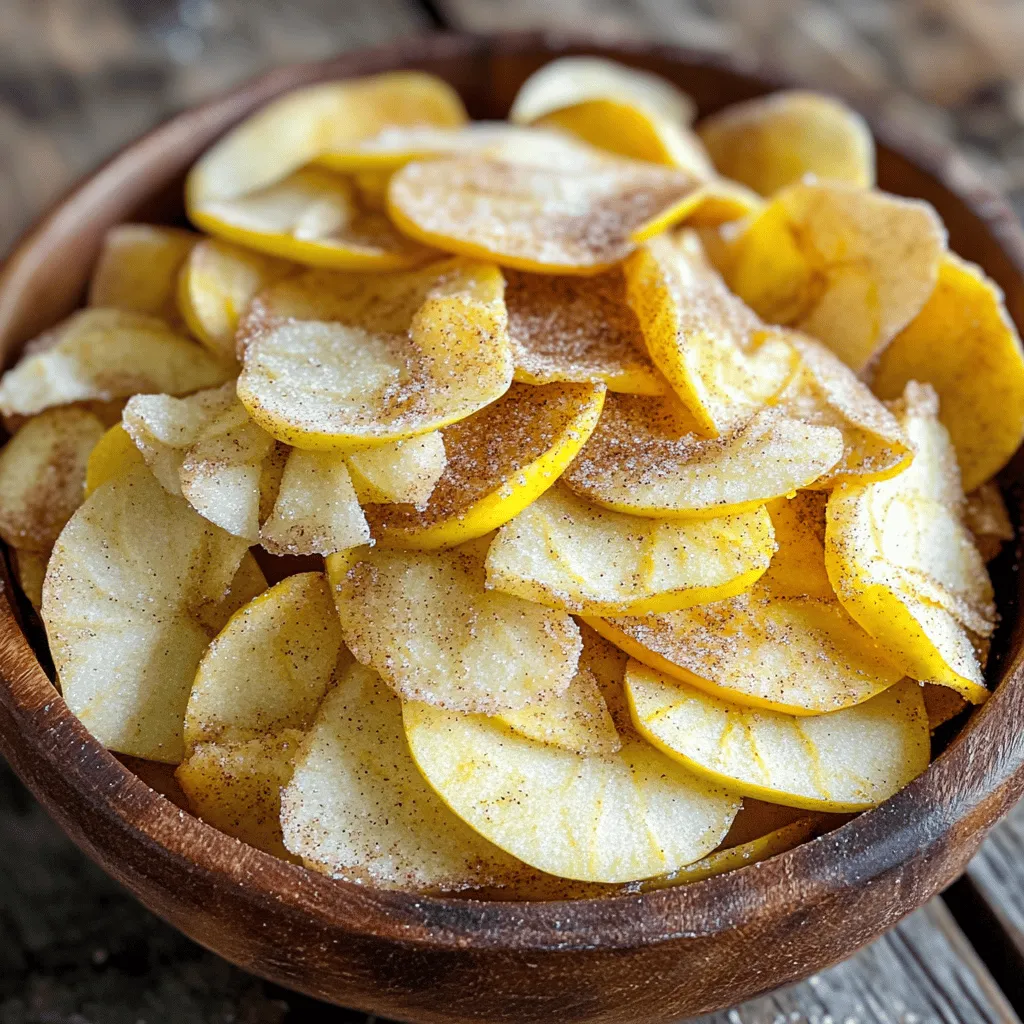
Craving a sweet yet healthy snack? Let’s make Cinnamon Sugar Apple Chips! With just a few simple ingredients, these crispy

When making Baked Garlic Parmesan Chicken Tenders, you need a few key items. Here’s what you should gather: - 1 lb chicken breast tenders - 1 cup breadcrumbs (preferably panko) - ½ cup grated Parmesan cheese - 2 teaspoons garlic powder - 1 teaspoon onion powder - 1 teaspoon dried Italian herbs (oregano, basil, thyme) - ½ teaspoon salt - ½ teaspoon black pepper - 2 large eggs - 2 tablespoons olive oil - Fresh parsley, chopped (for garnish) Each ingredient plays a role in building flavor and texture. The chicken breast tenders offer a juicy base. Panko breadcrumbs give a light, crispy coating that is hard to beat. Grated Parmesan cheese adds a rich, savory note that pairs perfectly with garlic. Using garlic powder and onion powder brings a strong aroma and taste. The dried Italian herbs add depth and freshness to the dish. Salt and black pepper enhance all the flavors. The eggs help bind the coating, ensuring it sticks well to the chicken. Olive oil adds moisture and a hint of fruitiness. Finally, fresh parsley not only brightens the dish but also adds a pop of color when you serve it. For the full recipe, check out the instructions above. 1. Preheat your oven to 400°F (200°C). This helps the chicken cook evenly. 2. Line a baking sheet with parchment paper. This makes cleanup easy. 3. In a large bowl, mix together the breadcrumbs, Parmesan, garlic powder, onion powder, Italian herbs, salt, and pepper. Make sure everything blends well. 4. In another bowl, whisk the eggs and add the olive oil. Mix until smooth. 1. Take each chicken tender and dip it into the egg mixture. Make sure it gets fully coated. 2. Next, roll the tender in the breadcrumb mix. Press down gently so the crumbs stick well. 1. Place the coated chicken tenders on the lined baking sheet. Leave some space between them. 2. Bake in the oven for 20-25 minutes. Check that the chicken is cooked through and the coating is golden. Flip them halfway for even browning. For the full recipe, you can refer back to the ingredients and steps above. Get ready to enjoy a tasty dish! To get that perfect crunch, always use Panko breadcrumbs. Panko is lighter and airier than regular breadcrumbs. It makes your chicken tenders extra crispy. When coating the tenders, dip them in the egg mixture first. This step helps the breadcrumbs stick better. Press the chicken gently into the breadcrumbs. Make sure every inch is covered well. You can add spices to the breadcrumb mix for more flavor. Try paprika or cayenne for some heat. A pinch of garlic powder can also enhance the taste. Fresh herbs are great, but dried herbs work too. If you use fresh herbs, chop them finely. This way, they mix well with the breadcrumbs. Dried herbs are easy to use and still give great flavor. Pair your chicken tenders with dips like marinara or ranch. These dips add fun flavors to each bite. For a gourmet look, serve the tenders on a nice platter. You can sprinkle extra Parmesan on top for a fancy touch. Add some chopped parsley for a pop of color. This makes your dish look even more appetizing. For the full recipe, check the details above! {{image_2}} You can make these tenders spicy! Just add cayenne pepper or chili flakes to the breadcrumb mix. Start with a half teaspoon. Taste the mixture, then adjust to your heat level. This gives your tenders a nice kick. It's a fun way to spice up your meal. Using different herbs can change the flavor. Try rosemary or thyme instead of Italian herbs. These herbs bring a fresh taste to the chicken. Just add a teaspoon of your chosen herb to the breadcrumb mixture. You’ll enjoy a new twist on the classic recipe. If you need a gluten-free option, swap the traditional breadcrumbs. Use gluten-free breadcrumbs instead. They work just as well for a crispy texture. You can find them in most grocery stores. This way, everyone can enjoy your tasty chicken tenders! For the full recipe, check out the Baked Garlic Parmesan Chicken Tenders section! To keep your chicken tenders fresh, place them in an airtight container. Make sure they cool down before sealing. Store the container in the fridge. They stay good for about 3 days. If you want to enjoy them later, consider freezing. When you’re ready to enjoy leftovers, use the oven for best results. Preheat it to 350°F (175°C). Place the chicken tenders on a baking sheet. Heat them for about 10-15 minutes. This keeps the outside crispy and the inside juicy. You can also use an air fryer. It gives a nice crunch in less time. For long-term storage, freeze the chicken tenders. First, let them cool completely. Then, wrap each tender in plastic wrap. Place them in a freezer bag. Squeeze out as much air as you can before sealing. They can stay frozen for up to 3 months. To thaw, move them to the fridge overnight before reheating. Enjoying homemade chicken tenders later is easy with this method! For the full recipe, check out the complete guide above. Yes, you can use frozen chicken tenders. Just make sure to adjust the cooking time. Bake them for 30 to 35 minutes at 400°F (200°C). Check that they reach an internal temperature of 165°F (74°C). This ensures they are safe to eat. Baking chicken tenders usually takes 20 to 25 minutes. The key is to check for a crispy, golden coating. For best results, flip them halfway through cooking. This helps achieve even browning. If you lack Parmesan cheese, no worries! You can use Pecorino Romano or Grana Padano instead. Both will give a nice, salty flavor. You can also use a blend of nutritional yeast and breadcrumbs for a dairy-free option. This post covered how to make delicious chicken tenders. We explored the ingredients, from tender chicken to tasty spices. The step-by-step guide showed easy preparation, coating, and baking tips. You learned how to achieve the perfect crunch with Panko breadcrumbs. Plus, I shared variations, storage tips, and a FAQs section to help you succeed. Now, you can enjoy crispy, flavorful chicken tenders anytime. Enjoy your cooking and impress everyone with your tasty meal!

Baked Garlic Parmesan Chicken Tenders Flavorful Delight

Are you ready to make a dish that everyone will love? These Baked Garlic Parmesan Chicken Tenders are not just

The Peanut Butter Banana Smoothie Bowl is a tasty and easy dish. It blends sweet bananas and creamy peanut butter. You can enjoy it for breakfast or as a snack. This bowl is a mix of flavors and textures. It is also packed with nutrients. Follow this recipe for a quick and healthy meal. - 2 ripe bananas - 1/2 cup creamy peanut butter - 1 cup almond milk (or alternative) - 1 tablespoon honey or maple syrup (optional) - 1/2 teaspoon vanilla extract - 1/4 cup rolled oats - Suggested toppings: sliced banana, granola, chia seeds, crushed nuts, honey drizzle Each ingredient adds unique taste and health benefits. Bananas provide energy and sweetness. Peanut butter adds protein and healthy fats. Almond milk makes it creamy without dairy. Honey or maple syrup gives a touch of sweetness. Rolled oats bring fiber and help keep you full. Toppings like granola and nuts add crunch and taste. This bowl is not just good; it’s also good for you! - Step 1: Blend ingredients together Start by placing one ripe banana, peanut butter, almond milk, honey, vanilla extract, and rolled oats into a blender. Blend on high until the mixture is smooth and creamy. This is where the magic begins! - Step 2: Adjust almond milk for desired thickness If you want a thicker smoothie, add less almond milk. For a thinner consistency, pour in a bit more almond milk. You control the texture of your bowl. - Step 3: Pour into a bowl Once blended, carefully pour the smoothie into your favorite bowl. Look at that creamy goodness! It’s already looking tasty. - Step 4: Add banana slices and toppings Take the second banana and slice it into rounds. Arrange those slices on top of your smoothie bowl. Add your favorite toppings, like granola, chia seeds, and crushed nuts. A drizzle of honey adds the final touch of sweetness. For the full scoop on making this delightful dish, check out the Full Recipe. Enjoy your creation! To get the best peanut butter banana smoothie bowl, start with your blender. I recommend using a high-speed blender for a creamy texture. Make sure to add your liquid first. This helps the blades spin freely and mix well. If your smoothie is too thick, add more almond milk. Start with a little and blend again. You can also add ice cubes for a colder drink. If it's too thin, throw in some rolled oats or more banana. This thickens the mix nicely. Next, let's talk about layers. After pouring the smoothie into your bowl, add the toppings in style. First, place banana slices neatly. Then, sprinkle granola, chia seeds, and crushed nuts. This makes your bowl look great and adds fun textures. A drizzle of honey on top adds a sweet touch. For the best look, use a variety of colors. Bright fruits like berries or kiwi can make your bowl pop. Experiment with different toppings to find your favorite. Each bowl can be a new creation. Enjoy your healthy delight! {{image_2}} You can easily switch up the nut butter in this recipe. Instead of peanut butter, try almond or cashew butter. Both will add a nice twist to the flavor. If you want a creamier base, use coconut milk or oat milk instead of almond milk. Milk choices allow for more taste options. For sweetness, you can skip honey or maple syrup. Use agave syrup or stevia instead. These alternatives can help cut calories while keeping the taste. Toppings can make or break your smoothie bowl! Fresh fruit adds color and taste. Try using berries, kiwi, or mango for a fruity flair. Each fruit brings its own unique flavor and health benefits. Crunchy toppings add texture. You can sprinkle on nuts, seeds, or granola. Each adds a delightful crunch. For an extra flavor boost, consider coconut flakes or cocoa nibs. These small additions can enhance the taste and visual appeal of your bowl. The right toppings make the dish more fun and satisfying. For the full recipe, check out the Peanut Butter Banana Bliss Smoothie Bowl. To keep your peanut butter banana smoothie bowl fresh, follow these tips: - Storing leftover smoothie mixture: If you have extra smoothie left, pour it into an airtight container. Seal it well and keep it in the fridge. Use it within 24 hours for the best taste. - Correct storage of cut fruits for toppings: Slice your fruits just before serving. If you have leftovers, store them in a sealed bag or container. Keep them in the fridge to prevent browning. Use within a day for best flavor and texture. - Recommended timeframes for freshness: Smoothie mixtures taste best fresh. However, if stored right, you can keep them for a day. Toppings like bananas and nuts are best eaten within a few hours for peak crunch and freshness. By following these storage tips, you can enjoy your peanut butter banana smoothie bowl at its best. For the full recipe, check back to the main recipe section. Can I make this smoothie bowl vegan? Yes, you can make this smoothie bowl vegan. Just use plant-based milk like almond or oat milk. Also, skip honey and use maple syrup instead. How can I adjust the recipe for more servings? To adjust for more servings, just multiply the ingredients. For two bowls, use four bananas and one cup of peanut butter. This way, everyone can enjoy it! What are the nutritional benefits of this smoothie bowl? This smoothie bowl is packed with nutrients. Bananas give you potassium, while peanut butter adds protein and healthy fats. Oats provide fiber, which helps with digestion. It’s a great start to your day! Can I freeze bananas for this recipe? Yes, you can freeze bananas! Just peel and slice them before freezing. Frozen bananas make the smoothie bowl extra creamy and cold. It's a fun trick for a refreshing treat. For the full recipe, check out the details above. This blog post showed you how to make a tasty peanut butter banana smoothie bowl. Remember, you need ripe bananas, creamy peanut butter, almond milk, and oats. I shared step-by-step instructions to help you blend the perfect mix. Use my tips to adjust thickness and layer toppings nicely. You can also try different nut butters or toppings for variety. Enjoy this delicious bowl as a healthy option anytime. It’s easy to make, fun to customize, and a great way to eat well!

Peanut Butter Banana Smoothie Bowl Healthy Delight

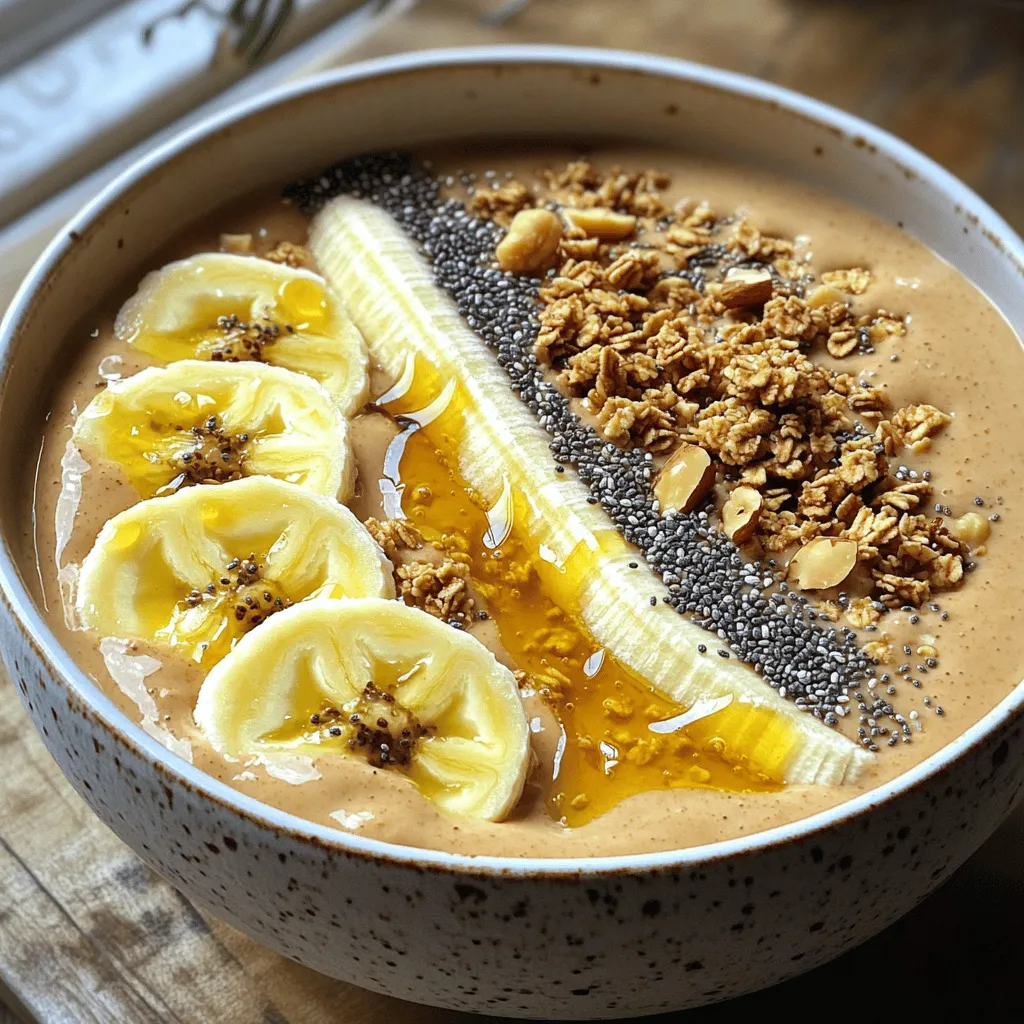
Fuel your day with a Peanut Butter Banana Smoothie Bowl! This tasty treat is packed with nutrients and flavor to

To make teriyaki chicken meatballs, gather these key ingredients: - 1 lb ground chicken - 1/4 cup breadcrumbs - 1/4 cup green onions, finely chopped - 1 clove garlic, minced - 1 tablespoon ginger, grated - 2 tablespoons soy sauce - 1 tablespoon sesame oil - 1 tablespoon honey - 1 egg, beaten - Salt and pepper, to taste These ingredients create a tasty and moist meatball. The ground chicken gives it a light texture. The breadcrumbs help bind the meatballs. Garlic and ginger add a lovely warmth, while soy sauce offers that classic umami flavor. For an extra flavor boost, consider these optional ingredients: - 1 tablespoon cornstarch (for crispiness) Adding cornstarch can help the meatballs turn out crispier. If you like a bit more heat, you can also mix in a dash of red pepper flakes. This will give your meatballs a little kick. Once your meatballs are ready, don’t forget these garnishes: - Sesame seeds - Fresh cilantro or additional green onions Garnishing with sesame seeds adds crunch and visual appeal. Fresh herbs like cilantro or extra green onions brighten the dish and add freshness. They make your meatballs not just tasty but also beautiful! For the full recipe, follow the instructions to create this delicious dish. To start, gather all your ingredients. You need ground chicken, breadcrumbs, and chopped green onions. Add minced garlic and grated ginger for a nice kick. Next, pour in soy sauce, sesame oil, and honey. Crack in a beaten egg and sprinkle salt and pepper. If you want extra crispiness, add cornstarch. Now, mix everything with your hands until it’s all combined. Preheat your oven to 400°F (200°C). Line a baking sheet with parchment paper. This makes cleanup easy! Now, take the meatball mixture and roll it into small balls. Aim for about 1 inch in size. Place the meatballs on the baking sheet, making sure they are spaced out. Bake them for 18-20 minutes. Turn them halfway through. You want them golden brown and cooked through. While the meatballs bake, let’s make the teriyaki sauce. Grab a small saucepan and mix more soy sauce, honey, and sesame oil. Heat it on medium until it starts to simmer. Let it cook for a few minutes until it thickens slightly. Once the meatballs are done, toss them gently in the warm sauce to coat. This dish is simple and fun to make. For the full recipe, check the recipe section above. Enjoy your tasty teriyaki chicken meatballs! To get the best results, make your meatballs the same size. I like to use a small ice cream scoop. This helps them cook evenly. Preheat your oven well. An oven at 400°F (200°C) works great. Halfway through cooking, turn the meatballs. This step makes sure every side gets nice and brown. If you have leftovers, cool the meatballs first. Place them in an airtight container. These will last in the fridge for up to four days. To freeze, put them in a freezer bag. They stay good for three months. When ready to eat, reheat in the oven or microwave. You can add a little teriyaki sauce for extra flavor. To change the flavor, try adding spices. A dash of chili powder gives heat. For a sweeter taste, add more honey. Want a crunchier texture? Mix in some cornstarch with the meat. You can also use panko breadcrumbs instead of regular ones for extra crispiness. Don’t forget to taste as you go! Adjust to your liking for the perfect meatball. You can find the Full Recipe in this article for more details! {{image_2}} You can easily make teriyaki chicken meatballs healthier. Instead of ground chicken, try using ground turkey or lean beef. These options can cut down on fat. For breadcrumbs, you can use whole wheat or almond flour. You can also replace honey with maple syrup or a sugar substitute. Using low-sodium soy sauce will help reduce the salt content too. You can serve teriyaki chicken meatballs in many fun ways. For a casual meal, place them in a bowl with rice. You can also make them into sliders by placing them in mini buns. Another option is to skewer the meatballs on sticks for a party. This makes them easy to grab and eat. You can top them with extra teriyaki sauce for added flavor. Teriyaki chicken meatballs pair well with several side dishes. Steamed broccoli or green beans are great options. You can also serve them with a fresh salad for a light meal. Fried rice or quinoa adds a nice touch too. For a special treat, try pairing them with crispy wontons or spring rolls. These sides will make your meal even more enjoyable. Each serving of Teriyaki Chicken Meatballs has about 250 calories. You get around 20 grams of protein, which is great for muscle health. The dish also has about 12 grams of fat, mainly from the sesame oil. It contains 18 grams of carbs, making it a balanced meal. Each serving gives you a good dose of vitamins and minerals, thanks to the green onions and garlic. - Ground Chicken: This lean meat is low in fat and high in protein. It helps keep you full and is easy to digest. - Green Onions: These add flavor and are rich in vitamins A and K. They also help boost your immune system. - Garlic: Garlic is known for its health benefits. It can help lower blood pressure and improve heart health. - Ginger: This spice aids digestion and can reduce nausea. It also has anti-inflammatory properties. - Soy Sauce: While it adds flavor, it also provides some essential amino acids. Just watch the sodium level if you’re watching your salt intake. When you enjoy these meatballs, keep in mind the serving size. If you eat more than one serving, the calories will add up. Pairing them with veggies or a salad can help balance your meal. You can also adjust the recipe to lower calories. Use less honey or choose a low-sodium soy sauce. For a lower-calorie option, serve the meatballs with cauliflower rice instead of regular rice. Yes, you can use ground turkey. It offers a lean option. The flavor may change slightly. Turkey is still juicy and tasty. I recommend using dark meat turkey for more flavor. To make this dish gluten-free, swap regular soy sauce for tamari. Tamari is a gluten-free soy sauce. Use gluten-free breadcrumbs as well. These changes keep the dish safe for gluten-free diets. The best way to reheat them is in the oven. Set your oven to 350°F (175°C). Place the meatballs on a baking sheet. Heat for about 10-15 minutes until warm. You can also microwave them, but they may lose some texture. Yes, you can freeze these meatballs. Let them cool completely first. Place them in an airtight container or freezer bag. They can last up to three months in the freezer. Thaw them in the fridge before reheating. These meatballs pair well with rice or noodles. You can also serve them with steamed veggies. A fresh salad is a great side too. They are versatile and fit many meals. Cooked meatballs can last up to four days in the fridge. Store them in an airtight container. Make sure they are cool before sealing. This keeps them fresh for your next meal. This blog post covered how to make Teriyaki chicken meatballs. You learned about key ingredients and optional flavor boosters. I shared step-by-step instructions for preparation and cooking. You now have tips for even cooking and storing leftovers. We also explored variations and discussed nutritional value. Keep these ideas in mind for tasty meals. Enjoy making these meatballs again and again!

Teriyaki Chicken Meatballs Flavorful and Easy Recipe

Looking for a tasty dinner that’s easy to make? You’ve found it! My Teriyaki Chicken Meatballs recipe is packed with

- 1 large baguette or ciabatta loaf: This is the base of your garlic bread. It should be fresh and crusty. I recommend using a French baguette or a good quality ciabatta for the best texture. - 1/2 cup unsalted butter, softened: Butter adds richness and moisture. Softened butter spreads easily, blending well with garlic. Look for high-quality European-style butter for a creamier taste. - 4 cloves garlic, minced: Fresh garlic gives a bold flavor. You can use more or less, depending on your love for garlic. Organic garlic often has a stronger taste. - 1 cup fresh mozzarella cheese, diced: Mozzarella melts beautifully and provides a gooey texture. Aim for fresh mozzarella from the deli section for the best flavor. - 1 cup cherry tomatoes, halved: These add sweetness and freshness. Use ripe, firm tomatoes. Organic varieties usually taste better. - 1/4 cup fresh basil leaves, chopped: Basil gives a fragrant aroma and bright flavor. Look for vibrant green leaves with no browning. - 2 tablespoons balsamic glaze (for drizzling): This adds a sweet tang. You can find good balsamic glaze at most grocery stores or make your own for a fresher taste. - Salt and pepper to taste: These are essential for enhancing all the flavors. Use sea salt for a more complex taste. Using fresh ingredients makes a big difference in flavor. Fresh garlic, tomatoes, and herbs have a brightness that dried ones lack. They also add better texture and color to the dish. When choosing fresh ingredients, look for: - Vibrant colors: Choose tomatoes that are bright and firm. - Aromas: Smell your herbs. Fresh basil should have a strong, sweet scent. - Condition: Avoid any browning or wilting in your herbs and vegetables. These tips help ensure that your Caprese Garlic Bread shines with flavor and looks appealing. Fresh ingredients do not just taste better; they also elevate the whole dish. For the complete recipe, refer to the Full Recipe section above. To make Caprese Garlic Bread, start with the ingredients. Here’s what you need: - 1 large baguette or ciabatta loaf - 1/2 cup unsalted butter, softened - 4 cloves garlic, minced - 1 cup fresh mozzarella cheese, diced - 1 cup cherry tomatoes, halved - 1/4 cup fresh basil leaves, chopped - 2 tablespoons balsamic glaze (for drizzling) - Salt and pepper to taste Slice the baguette or ciabatta in half lengthwise. Make sure you cut straight down the middle. This creates two long pieces of bread perfect for garlic goodness. In a bowl, mix the softened butter and minced garlic. Use a fork or spoon to blend them well. You want a smooth mix. Spread this garlic butter on the cut sides of the bread. Don't hold back! Cover it all for the best flavor. Next, prepare the topping. In a separate bowl, combine the diced mozzarella, halved cherry tomatoes, and chopped basil leaves. Sprinkle in some salt and pepper. This mix adds a fresh burst of flavor to your bread. Now it’s time to bake! Preheat your oven to 375°F (190°C). Place the buttered bread on a baking sheet, cut side up. Bake it for about 10-12 minutes. Look for golden edges. This means the bread is getting crispy. After that, take the bread out of the oven. Spread the cheese and tomato mix evenly over the garlic bread. Return it to the oven for another 5-7 minutes. The cheese should melt and bubble, creating a perfect topping. Once it’s ready, remove the bread from the oven. Drizzle balsamic glaze over the top for added flavor. Let it cool for a minute before cutting it into pieces. Serve warm and enjoy your Caprese Garlic Bread! To make your Caprese garlic bread shine, use fresh ingredients. Fresh garlic gives a strong flavor. I recommend using garlic that is firm and has a strong smell. Fresh herbs, like basil, add a bright touch. You can also try adding a pinch of oregano for depth. For a crispy crust, consider these tips: - Broil at the end: After baking, switch to broil for a minute. This gives you a golden top. - Use a baking stone: It helps heat evenly and gets the bread nice and crispy. One common mistake is not measuring the butter and garlic right. Too much butter can make it greasy, while too little makes it dry. Stick to the recipe for best results. Also, watch your baking time. If you pull the bread out too soon, the cheese won’t melt. If you leave it too long, it can burn. Look for golden edges and bubbly cheese as signs it’s ready. For more tips and the full recipe, check out the complete guide to Caprese garlic bread. {{image_2}} You can switch the cheese in this recipe. Feta cheese adds a salty kick. Goat cheese gives a tangy flavor. Both work well with the fresh tomatoes and basil. For added texture, think about adding veggies. Sliced bell peppers or spinach boosts flavor and color. You can even add olives for a briny taste. These swaps keep the dish fresh and exciting. Caprese Garlic Bread pairs well with many sides. A light salad with vinaigrette balances the rich flavors. Roasted vegetables also make a great side. They add a healthy touch to your meal. You can turn this dish into a main course easily. Pair it with a hearty soup, like tomato basil. This combo makes a filling lunch or dinner. You can also serve it with grilled chicken or shrimp for protein. Enjoy experimenting with different sides and main dishes! To keep your Caprese garlic bread fresh, wrap it tightly in plastic wrap or foil. You can also place it in an airtight container. This method keeps the bread moist and tasty. If you want to freeze it, cut the bread into pieces first. Store the pieces in a freezer bag. You can keep it in the fridge for about 3 days. If frozen, it stays good for up to 3 months. When reheating, use the oven for the best results. Preheat your oven to 350°F (175°C). Place the bread on a baking sheet and cover it with foil. This helps to keep the bread from getting too hard. Bake for about 10 minutes or until warm. Avoid using the microwave. It can make the bread chewy and lose its crispiness. Yes, you can prepare Caprese Garlic Bread in advance. I suggest making the garlic butter and mixing the toppings a day ahead. Store the garlic butter in the fridge. Keep the tomato and cheese mix in a sealed container. When you're ready, spread the butter on the bread and add the topping. Bake it fresh for the best taste. Absolutely! You can use sourdough or whole wheat. Each type gives a unique taste. A crusty bread adds more crunch. A softer bread, like brioche, offers a fluffier bite. Choose what you like best for your Caprese Garlic Bread! Caprese Garlic Bread pairs well with many dishes. Serve it alongside a fresh salad for a light meal. It also goes great with soups, like tomato basil. For drinks, try a light white wine or sparkling water. These options enhance the flavors of your bread. This blog post covered key aspects for making Caprese Garlic Bread. We explored the best ingredients and brands, ensuring fresh choices improve taste. Detailed steps helped you prepare and bake it perfectly, avoiding common mistakes. We also shared tips for variations and perfect storage methods. Now, you have all the tools needed for a delicious garlic bread. Enjoy your cooking and impress everyone with your skills. Happy baking!

Caprese Garlic Bread Savory and Flavorful Treat

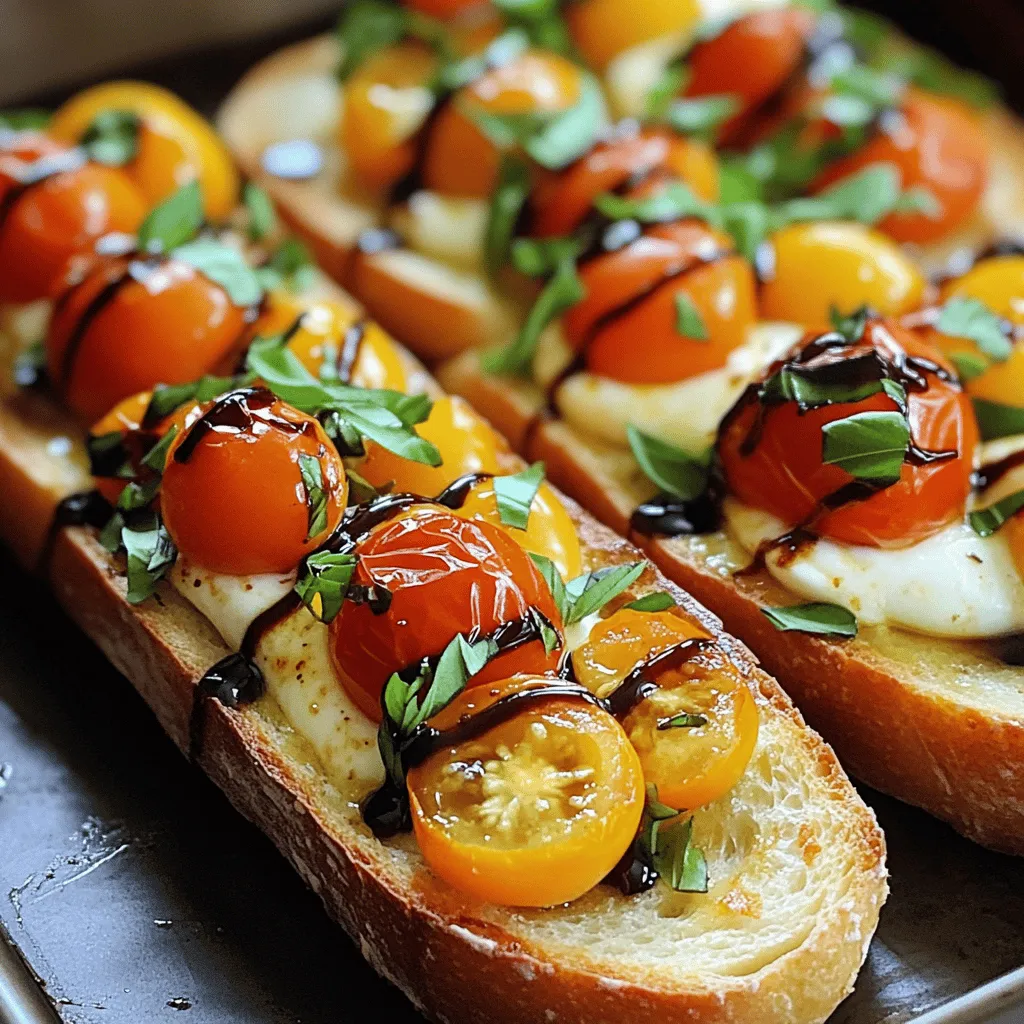
Are you ready to take your garlic bread to the next level? My Caprese Garlic Bread is not just any

For this tasty dish, you will need: - 1 pound sirloin steak, cut into bite-sized cubes - 4 tablespoons unsalted butter - 4 cloves garlic, minced - 1 tablespoon fresh parsley, chopped - Salt and black pepper to taste - 1 teaspoon olive oil - ½ teaspoon red pepper flakes (optional) These ingredients blend perfectly to create a rich and savory flavor. The sirloin steak gives a nice texture, while the garlic and butter add depth. You can enhance your steak bites with these extras: - Fresh herbs like thyme or rosemary - A squeeze of lemon juice for brightness - Worcestershire sauce for a tangy kick Using these options can elevate your dish. They allow you to play with flavors and make the recipe your own. To make Garlic Butter Steak Bites, gather these tools: - A large skillet for cooking - A sharp knife for cutting steak - A cutting board to prep ingredients - A spatula or tongs for flipping steak Having the right tools makes cooking easier. It helps you work quickly and safely. For the full recipe, check the details above. First, take your sirloin steak and cut it into bite-sized cubes. The pieces should be about one inch thick. This size helps them cook evenly. Next, season the steak cubes with salt and black pepper. Make sure each piece is coated well. This simple step brings out the meat's natural flavor. Heat a large skillet over medium-high heat. Add a teaspoon of olive oil and let it warm for about a minute. Once hot, add the steak bites in a single layer. Do not overcrowd the pan; this keeps the meat from steaming. Cook the steak for about 2-3 minutes on each side. You want them browned and cooked to your liking. If you prefer medium-rare, aim for an internal temp of about 130°F. Once done, remove the steak bites and set them aside. In the same skillet, lower the heat to medium and add 4 tablespoons of unsalted butter. Let it melt slowly. After the butter melts, add 4 minced garlic cloves and red pepper flakes if you want a bit of heat. Sauté for 1-2 minutes. Keep an eye on the garlic; you want it fragrant but not brown. Now, return the steak bites to the skillet and toss them in the garlic butter. Cook for another 1-2 minutes to heat everything through. Finally, sprinkle fresh parsley for color and flavor. Enjoy your garlic butter steak bites, perfect for sharing! For the full recipe, check the earlier sections. To get the perfect steak doneness, use a meat thermometer. For medium-rare, aim for 130°F. Insert the thermometer into the thickest part of the meat. If you don’t have one, check the steak by touch. A medium-rare steak feels like the fleshy part of your thumb when your hand is relaxed. Cook the steak bites for 2-3 minutes per side for a good sear. Don't rush this step; browning adds flavor. Seasoning is key to great flavor. Use salt and black pepper generously. Coat each steak bite evenly for the best taste. I recommend seasoning just before cooking. This helps the salt stick better. If you have time, let the seasoned steak rest for 15 minutes. This allows the flavors to soak in. Want to kick it up a notch? Add red pepper flakes for some heat. Just a half teaspoon is enough for a nice kick without overpowering the dish. Fresh herbs can elevate your steak bites even more. Try adding rosemary or thyme when cooking. You can also sprinkle chopped parsley before serving for a fresh touch. These enhancements make each bite even more delicious. For a full recipe, you can find it [here](Full Recipe). {{image_2}} You can use many cuts for steak bites. Sirloin is great but try ribeye for more flavor. Flank steak offers a nice chew and cooks fast. Tenderloin is fancy and melts in your mouth. Always cut against the grain for the best texture. For a meat-free option, use mushrooms. Portobello caps work well when cut into bite-sized pieces. You can also try tofu. Marinate it in soy sauce and garlic for extra taste. Cauliflower bites are another fun choice. They soak up flavors nicely and offer a hearty texture. Switch up the flavors with herbs and spices. Rosemary and thyme add a fresh taste. For heat, add more red pepper flakes or use cayenne. You might also try a bit of smoked paprika for a smoky kick. Lemon zest can brighten the dish. Mix and match to find your favorite combo! To store leftover Garlic Butter Steak Bites, place them in an airtight container. Make sure they cool down before sealing the container. Store in the fridge for up to three days. If you plan to eat them later, it is best to store them right away. This keeps them fresh and tasty. When reheating steak bites, use a skillet. Heat it on medium heat and add a little butter or oil. Place the steak bites in the skillet. Cook for about 2-3 minutes, stirring gently. This method helps keep the meat juicy and flavorful. Avoid using the microwave, as it can make the steak tough. If you want to freeze Garlic Butter Steak Bites, start by cooling them completely. Then, place them in a freezer-safe bag or container. Squeeze out as much air as possible. You can freeze them for up to three months. When ready to eat, thaw them in the fridge overnight before reheating. This way, they taste fresh like the first time you made them. For the full recipe, check out the earlier section. The best steak cut for steak bites is sirloin. It has good flavor and tenderness. Ribeye is also a great choice if you want more fat. Tenderloin works well too but can be pricier. Aim for cuts that cook quickly and are easy to chew. To make this recipe keto-friendly, focus on low-carb ingredients. Use sirloin steak, as it is low in carbs. Skip any starchy sides. Pair the steak bites with non-starchy veggies like broccoli or zucchini. You can also add more butter for healthy fats. Yes, you can use garlic powder instead of fresh garlic. Use about 1 teaspoon of garlic powder for each clove. Fresh garlic gives a stronger flavor, but powder is more convenient. Just remember, it won’t have the same fresh taste as minced garlic. Some great side dishes include: - Roasted vegetables - Mashed cauliflower - Salad with a light dressing - Garlic bread - Creamy spinach These sides balance the rich flavor of the steak bites. They also add freshness to your meal. You can find more ideas in the Full Recipe. Garlic Butter Steak Bites offer a tasty way to enjoy steak with simple steps. We covered the main and optional ingredients, tools, and detailed cooking instructions. You now have tips for perfect doneness and seasoning. Plus, explore fun variations and find out how to store leftovers. With these insights, you can create a delicious meal and impress everyone. Enjoy your cooking adventure!

Garlic Butter Steak Bites Flavorful and Easy Recipe

If you crave a quick, tasty meal, you’ve found the right recipe! Garlic Butter Steak Bites are flavorful, easy to

Older posts
Newer posts
← Previous Page1 Page2 Page3 … Page76 Next →

dsad

© 2025 Cooking Wells • Built with GeneratePress

Our Policies

  • Copyright Policy
  • Cookie Policy
  • GDPR Policy
  • Privacy Policy
  • Disclaimer
  • Terms Of Use

More Information

  • Home
  • About
  • Contact
  • Appetizers
  • Dessert
  • Dinner
  • Drinks
©2025, Cooking Wells About Back To Top