Skip to content
DisclaimerTerms Of UseGDPR PolicyCookie Policy

Cooking Wells

  • Home
  • Drinks
  • Appetizers
  • Dinner
  • Dessert
  • About
  • Contact
  • Privacy Policy
DisclaimerTerms Of UseGDPR PolicyCookie Policy

Mia

- 1 lb chicken breast, cut into bite-sized pieces - 1/4 cup honey - 1/4 cup soy sauce (low sodium preferred) - 4 cloves garlic, minced - 1 tablespoon fresh ginger, grated - 1 tablespoon cornstarch - 2 tablespoons vegetable oil - Salt and pepper to taste The main star of this dish is chicken breast. It cooks fast and stays juicy. Honey adds a sweet touch, while soy sauce brings depth. Garlic and ginger add a punch of flavor. Together, these ingredients create a tasty bite. - Sesame seeds - Sliced green onions - Extra honey for drizzling Garnishes make your dish pop. Sesame seeds add crunch. Sliced green onions bring fresh flavor. A drizzle of extra honey gives a sweet finish. These tiny touches make a big difference in presentation and flavor. For the full recipe, check out the Honey Garlic Chicken Bites . Start by grabbing a mixing bowl. Add 1/4 cup of honey, 1/4 cup of soy sauce, 4 minced garlic cloves, and 1 tablespoon of grated ginger. Whisk these ingredients together until they blend well. This will create a sweet and savory marinade. It's important to reserve 2 tablespoons of this marinade for later use. This reserved portion will add extra flavor at the end. Next, take your chicken breast, cut into bite-sized pieces. In another bowl, toss the chicken with 1 tablespoon of cornstarch, salt, and pepper. This step is key for a crispy texture. Make sure each piece is evenly coated. An even coating helps the chicken cook properly and keeps it juicy inside. Now, heat 2 tablespoons of vegetable oil in a large skillet over medium-high heat. Once the oil is hot, add the chicken bites in a single layer. If your skillet is small, you may need to cook in batches. Cook the chicken for about 5 to 6 minutes. Turn the pieces occasionally until they are golden brown and cooked through. This browning adds flavor and a nice crunch. After the chicken is cooked, reduce the heat to medium. Pour the remaining marinade over the chicken. Stir well to coat each piece. Cook for an additional 2 to 3 minutes until the sauce thickens slightly. This will create a sticky glaze on the chicken. Remove from heat and drizzle the reserved marinade over the bites for added flavor. Finally, garnish with sesame seeds and sliced green onions before serving. For the full recipe, check out the previous section. Enjoy your cooking! To get the best flavor and texture, start with dry chicken. Pat the chicken pieces with paper towels. This step helps the coating stick well. If the chicken is wet, it will not brown nicely. Another mistake is overcrowding the pan. If you add too many pieces at once, they will steam instead of fry. Cook in batches for crispy chicken bites. To boost the taste, consider adding spices like paprika or chili powder. These spices can give a nice kick. You can also experiment with herbs, like basil or thyme, for a fresh twist. If you want more sweetness, add a little more honey. For saltiness, add a splash more soy sauce. Always taste as you go to find your perfect balance. Honey garlic chicken bites pair well with rice or noodles. You can serve them with a side salad for freshness. For a fun touch, use toothpicks for easy snacking. To make your dish look great, drizzle some extra honey on top. A sprinkle of sesame seeds and sliced green onions adds color and crunch. Enjoy these bites as a tasty snack or a meal! {{image_2}} You can switch chicken for shrimp or tofu. Shrimp cooks quickly and gets a nice texture. Tofu soaks up flavors well and is great for a plant-based option. For shrimp, use about 1 pound of large shrimp. Peel and devein them first. For tofu, choose firm tofu and cut it into bite-sized pieces. Both options still work great with the honey garlic sauce. Try different sauces for new tastes. Teriyaki sauce gives a sweet and savory kick. If you like heat, add some chili sauce. You can also mix in vegetables for more flavor and nutrition. Bell peppers, broccoli, or snap peas add color and crunch. Just toss them in with the chicken for a tasty twist. You can bake the chicken for a healthier option. Preheat your oven to 400°F. Place the coated chicken bites on a lined baking sheet. Bake for about 20 minutes, flipping halfway through. They’ll be crispy and delicious! Alternatively, use a slow cooker for ease. Just mix the chicken and sauce in the cooker. Set it on low for 4 hours or high for 2 hours. This method keeps the chicken juicy and full of flavor. For the full recipe, check back to ensure you have all the steps. To keep your honey garlic chicken bites fresh, store them in an airtight container. This method locks in flavors and moisture. Place the container in the fridge right after the meal. They will stay good for about 3 to 4 days. If you want to enjoy them later, make sure they cool down before sealing. You can freeze these chicken bites for longer storage. First, let them cool completely. Then, place them in a freezer-safe bag. Squeeze out as much air as you can before sealing. They can last up to 3 months in the freezer. When you're ready to eat, thaw them in the fridge overnight. To reheat, use the oven for the best results. Preheat your oven to 350°F (175°C). Spread the chicken bites on a baking sheet and cover with foil. Heat for about 15-20 minutes, or until hot throughout. You can also use a microwave, but they might lose some crispness. Enjoy your meal! For the full recipe, check out Honey Garlic Chicken Bites. You can serve honey garlic chicken bites with many tasty sides. Here are some great ideas: - Steamed rice or fried rice - Crispy vegetables like carrots or broccoli - Fresh salad with a light dressing - Dipping sauces such as sweet chili or ranch - Corn on the cob for a fun touch These sides will balance the sweet and savory flavors of the chicken. Yes, you can prepare this recipe ahead of time! Here are some tips: - Marinate the chicken bites in the sauce the night before. This makes them extra flavorful. - Cook the chicken and store it in the fridge for up to three days. - Reheat the chicken bites in a pan over low heat or in the microwave. This makes dinner easy on busy nights. To add heat to the sauce, try these options: - Add red pepper flakes for a little kick. - Mix in sriracha or chili sauce for a spicy twist. - Use fresh chopped jalapeños for a fresh heat. These simple changes will make your honey garlic chicken bites more exciting! For the full recipe, check out the section above. In this blog post, we explored how to make delicious honey garlic chicken bites. We discussed key ingredients like chicken, honey, soy sauce, garlic, and ginger. You learned the step-by-step process for marinating, cooking, and enhancing flavors. We also provided tips for avoiding common mistakes and suggested variations for protein and cooking methods. Remember, experimenting is key to making this dish your own. Enjoy your cooking adventure!

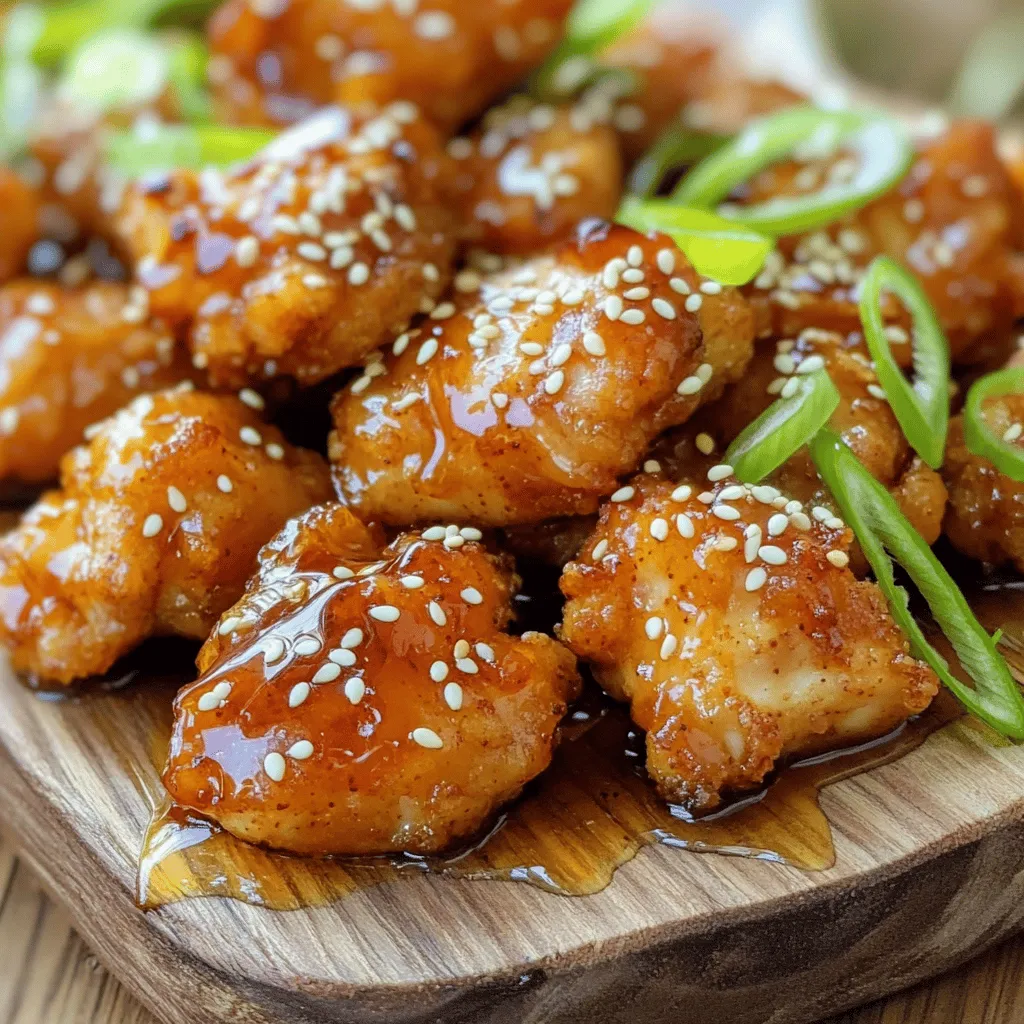
Honey Garlic Chicken Bites Tasty and Simple Recipe

Ready to spice up your dinner routine? Let’s dive into my tasty and simple Honey Garlic Chicken Bites recipe! It’s

To make egg salad avocado boats, gather the following ingredients: - 4 large eggs - 2 ripe avocados - 2 tablespoons Greek yogurt - 1 tablespoon Dijon mustard - 1 celery stalk, finely chopped - 2 green onions, thinly sliced - Salt and pepper to taste - Fresh dill, for garnish (optional) - Paprika, for garnish (optional) These ingredients blend to create a tasty and healthy dish. The eggs provide protein, while the avocados add healthy fats. Greek yogurt gives a creamy texture without too many calories. Celery and green onions add crunch and freshness. You can play with the spices to make it your own. If you want the full recipe, check the Egg Salad Avocado Boats section above. Each ingredient plays a key role in the dish, so choose fresh ones for the best flavor. - Boil the eggs: Place 4 large eggs in a pot. Cover them with water. Bring the water to a boil over medium heat. Once it boils, cover the pot and take it off the heat. Let the eggs sit for 12 minutes. - Cool the eggs in an ice bath: After 12 minutes, move the eggs to an ice bath. This helps them cool quickly and makes peeling easier. - Halve and pit the avocados: Take 2 ripe avocados and slice them in half. Remove the pit carefully to avoid injury. - Create a well for the egg salad: Use a spoon to scoop out a little of the avocado flesh. This creates a well for your egg salad, so it fits nicely. - Chop and mix the ingredients: Once the eggs cool, peel off the shells. Chop the eggs into small pieces. In a mixing bowl, combine the chopped eggs with 2 tablespoons of Greek yogurt, 1 tablespoon of Dijon mustard, 1 finely chopped celery stalk, and 2 thinly sliced green onions. Mix gently until all ingredients blend well. - Season the mixture: Add salt and pepper to taste. This step enhances the flavor of the salad. - Fill the avocado halves with egg salad: Generously scoop the egg salad into each avocado half. Each bite will be creamy and delicious. Now, you have a tasty treat ready to enjoy! For the complete recipe, check out the Full Recipe section. To make the best egg salad, start with fresh eggs. Fresh eggs give a better taste and texture. Look for eggs that are free-range or organic when possible. These eggs often have richer flavor and vibrant yolks. Next, balance your flavors with seasonings. Greek yogurt adds creaminess without excess fat. Dijon mustard gives a nice tang. I like to chop celery and green onions for crunch. Don’t forget to season with salt and pepper. Taste as you mix to find the perfect blend. Serving your egg salad avocado boats well is key. Use a nice platter to display them. You can arrange them in a circle or a line. Each avocado half should sit flat on the plate. Garnishing adds visual appeal. Sprinkle paprika over the top for a pop of color. Fresh dill is a great choice for an extra touch of flavor. These small details make your dish look gourmet and inviting. For the full recipe, check the section above. {{image_2}} You can switch up the Greek yogurt in egg salad. If you want a creamier taste, try sour cream or even cottage cheese. These options keep the dish tasty and rich. You can also use avocado instead of yogurt for extra creaminess. Adding different vegetables or herbs can change the flavor. Chopped bell peppers can add a nice crunch. Fresh parsley or cilantro can bring a bright taste. You can even toss in some diced pickles for a tangy twist. To make it vegan or vegetarian, swap the eggs and yogurt. Use chickpeas instead of eggs. Mash them up and mix with vegan mayo or tahini. This gives you a similar texture while keeping it plant-based. For low-carb options, skip the avocados and serve the egg salad in lettuce wraps. This keeps the meal light and fresh. You can also reduce the amount of yogurt to cut down on carbs while still enjoying the dish. For the full recipe, check out the details above. To store your egg salad avocado boats, use an airtight container. Keep the egg salad separate from the avocado halves. This helps the avocado stay fresh. You can store the egg salad in the fridge for up to three days. The avocados will brown quickly, so try to eat them within a day. If you have leftover avocado, sprinkle lemon juice on it to slow browning. Reheating egg salad is not common since it tastes best fresh. If you need to warm it up, gently heat it in the microwave for a few seconds. Cover the bowl to keep moisture in. To prevent your avocados from browning, store them with the pit inside. This simple trick can help maintain their color. Also, you can brush them with lemon juice. This adds flavor and keeps them looking fresh longer. For the full recipe, check out the Egg Salad Avocado Boats section. You can use Greek yogurt instead of mayonnaise. It adds creaminess and tang. Other options include mashed avocado or hummus. Each choice adds a unique flavor. You can mix and match these ingredients to find your favorite. Yes, you can prep the egg salad ahead. Make the egg salad and store it in the fridge. Keep it in an airtight container. Cut the avocados just before serving. This keeps them fresh and green. These boats pair well with many sides. Try whole-grain toast for a crunchy contrast. A light salad adds freshness. You can also serve with fresh fruit for a sweet touch. For a complete meal, include soup or chips. You now have a clear guide to making egg salad avocado boats. This recipe combines flavorful ingredients like eggs and ripe avocados. I shared simple steps for preparation and serving. You learned tips for the perfect salad, including ingredient swaps and storage ideas. Enjoy experimenting with flavors and presentations. These avocado boats are not just tasty; they are healthy too. Try them for lunch or a snack. Your friends and family will love them!

Egg Salad Avocado Boats Perfect and Tasty Delight

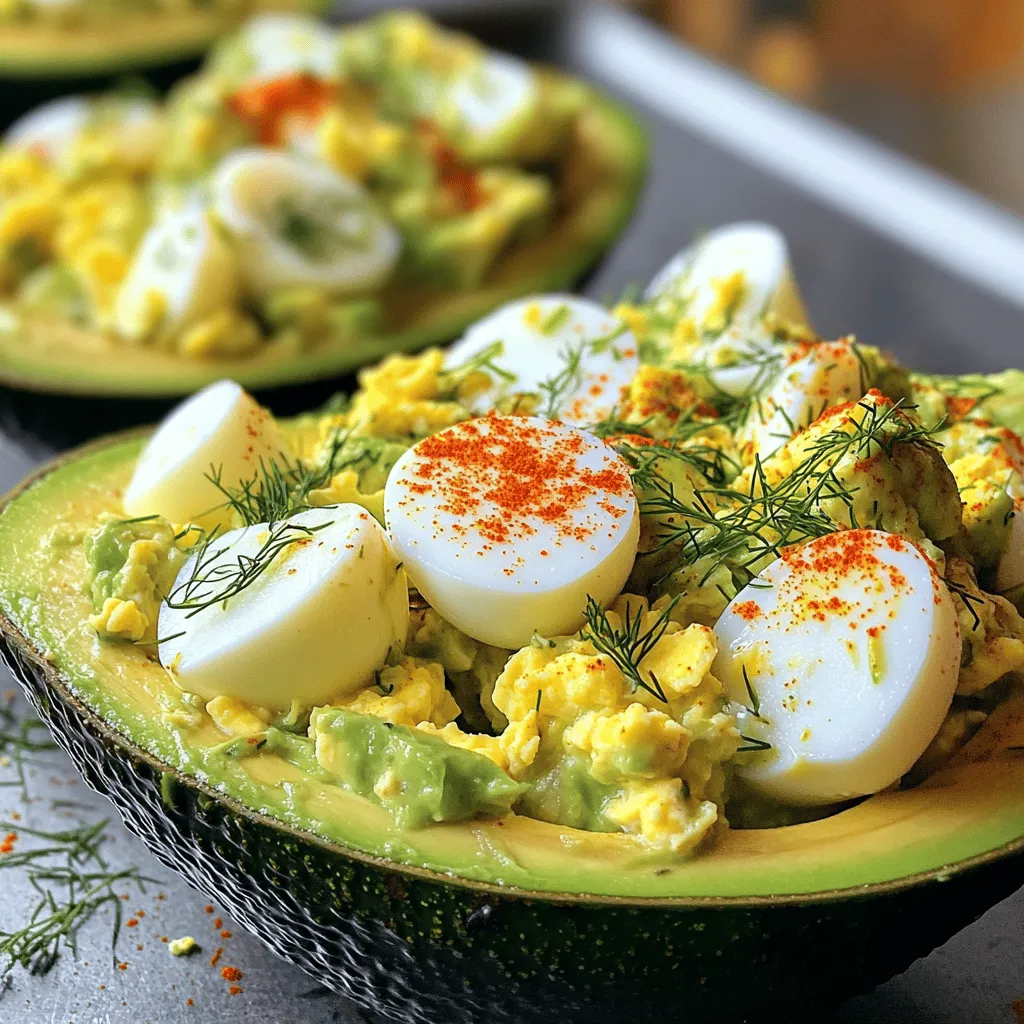
Looking for a fun and healthy meal idea? Try Egg Salad Avocado Boats! This dish combines creamy, nutritious avocados and

- 2 ripe bananas, frozen - 2 tablespoons smooth peanut butter - 1 cup almond milk (or milk of choice) - 1 tablespoon honey or maple syrup (optional) - 1/2 teaspoon vanilla extract - 1/4 teaspoon ground cinnamon - 1/4 cup Greek yogurt (for added creaminess) - Ice cubes (optional, for thickness) I love making this smoothie because it is quick and easy. You only need a few simple items. The key ingredient is ripe, frozen bananas. They give the smoothie a sweet and creamy base. Make sure to peel and slice them before freezing for easy blending. Smooth peanut butter adds richness. It pairs well with bananas. You can use any nut butter if you like. Just keep the ratio the same. I often choose almond milk for a lighter feel, but you can use any milk you prefer. If you want extra sweetness, add honey or maple syrup. This is optional, so taste first. Vanilla extract and ground cinnamon add nice flavor notes. They make the smoothie feel special and cozy. Greek yogurt makes the treat creamy and boosts protein. You can skip it for a vegan option. Finally, ice cubes can thicken it up if you like a colder drink. Mix all these ingredients, and you have a delicious smoothie. Check out the Full Recipe for detailed steps on how to blend everything together. - Step 1: Prepare the Bananas Start with two ripe bananas. Peel them and break them into chunks. Frozen bananas work best. They make the smoothie thick and cold. - Step 2: Add Ingredients to Blender Place the banana chunks in a blender. Next, add two tablespoons of smooth peanut butter. Then, include a quarter cup of Greek yogurt. This will make your smoothie creamy. - Step 3: Blend Until Smooth Pour in one cup of almond milk. If you like it sweet, add one tablespoon of honey or maple syrup. Don’t forget half a teaspoon of vanilla extract and a quarter teaspoon of ground cinnamon. Now, blend everything on high speed until it is smooth and creamy. - Step 4: Adjust Consistency and Taste Check the thickness of your smoothie. If you want it thicker, add ice cubes and blend again. Taste the smoothie and adjust sweetness if needed. Add more honey or syrup if you like it sweeter. Now you have a delicious Peanut Butter Banana Smoothie ready to enjoy! For the complete recipe details, check the Full Recipe section. - Achieving the Perfect Consistency To make a smooth smoothie, blend on high speed. Start with frozen bananas for a thick base. If it's too thick, add more almond milk. Blend again until you reach your desired texture. - Making it Creamier with Yogurt Adding Greek yogurt makes your smoothie creamier. It gives a rich flavor and adds protein. Use 1/4 cup as suggested in the recipe. This simple step creates a more satisfying drink. - Flavor Boosters and Sweetness Adjustments If you want a sweeter taste, add honey or maple syrup. You can also try other sweeteners like agave or stevia. Taste as you blend and adjust to your liking. - Beautifying Your Smoothie Presentation matters! Pour your smoothie into clear glasses. This lets the vibrant color shine through. Sprinkle ground cinnamon on top for a nice look. Add banana slices or a drizzle of peanut butter for extra flair. - Serving Suggestions Serve your smoothie chilled for the best taste. You can also garnish with nuts or seeds. This adds crunch and makes it more appealing. Enjoy it as a quick breakfast or a refreshing snack. {{image_2}} Vegan Peanut Butter Banana Smoothie If you're vegan, you can still enjoy this smoothie. Just swap almond milk for any plant-based milk. Use maple syrup for sweetness. This change keeps the flavors rich without dairy. High-Protein Options Want more protein? Add a scoop of your favorite protein powder to the mix. You can also use Greek yogurt, which adds creaminess and protein. This makes the smoothie a great post-workout snack. Nut-Free Alternatives If you need a nut-free option, use sunflower seed butter instead of peanut butter. It gives a similar flavor and is just as delicious. You can still use almond milk or switch to oat milk for a nut-free choice. Adding Greens (Spinach or Kale) Want to sneak in some veggies? Toss in a handful of spinach or kale. These greens blend well and add nutrients without changing the taste much. It’s a great way to boost your smoothie's health factor. Enhancing with Other Fruits Feel free to mix in other fruits. Berries like strawberries or blueberries pair well with bananas. You can also try mango or pineapple for a tropical twist. This adds flavor and makes your smoothie even more fun! Try these variations next time you whip up your Peanut Butter Banana Smoothie. For the full recipe, check out the details above! If you have leftover smoothie, refrigeration is best for short-term storage. Pour the smoothie into a jar or a glass. Seal it tightly with a lid. Store it in the fridge for up to 24 hours. The smoothie may separate after sitting. Just shake it well before drinking. For longer storage, freezing is an option. Pour the smoothie into ice cube trays or freezer bags. This way, you can save portions for future use. Smoothies can last in the freezer for about 2 to 3 months. When ready to enjoy, let it thaw in the fridge overnight or blend it frozen for a thick treat. Choose containers that seal well to keep the smoothie fresh. Glass jars are great. They do not absorb flavors. They also do not stain. Plastic containers with tight lids work well too. If you're freezing, use freezer-safe bags or trays. These are easy to store and take up less space. Can I use fresh bananas instead of frozen? Yes, you can use fresh bananas. But frozen bananas make the smoothie colder and creamier. If you use fresh, add some ice cubes for thickness. How to make a lower-calorie version? To cut calories, use unsweetened almond milk and skip the honey or syrup. You can also use less peanut butter or low-calorie peanut butter. What is the nutritional information for this smoothie? This smoothie has about 300 calories per serving. It includes protein, healthy fats, and fiber from bananas and peanut butter. The Greek yogurt adds extra protein and creaminess. How can I make this smoothie more filling? Add a scoop of protein powder or some oats. Both options will boost the fiber and protein content, making the smoothie more satisfying. Is it okay to use flavored peanut butter? Yes, flavored peanut butter adds a nice twist. Try chocolate or cinnamon flavors for a fun change. Just be aware that these may increase sugar content. How long does the smoothie last in the fridge? The smoothie is best when fresh. However, it can last up to 24 hours in the fridge. Just give it a good shake or stir before drinking. This blog post detailed how to make a Peanut Butter Banana Smoothie. You learned about key ingredients, easy steps for making it, and creative variations. These tips help you create a tasty drink. You can adjust flavors and make it fit your diet. Remember, storing leftovers properly ensures freshness. Now, you’re ready to blend your smoothie with confidence and enjoy a delicious treat!

Peanut Butter Banana Smoothie Quick and Tasty Treat

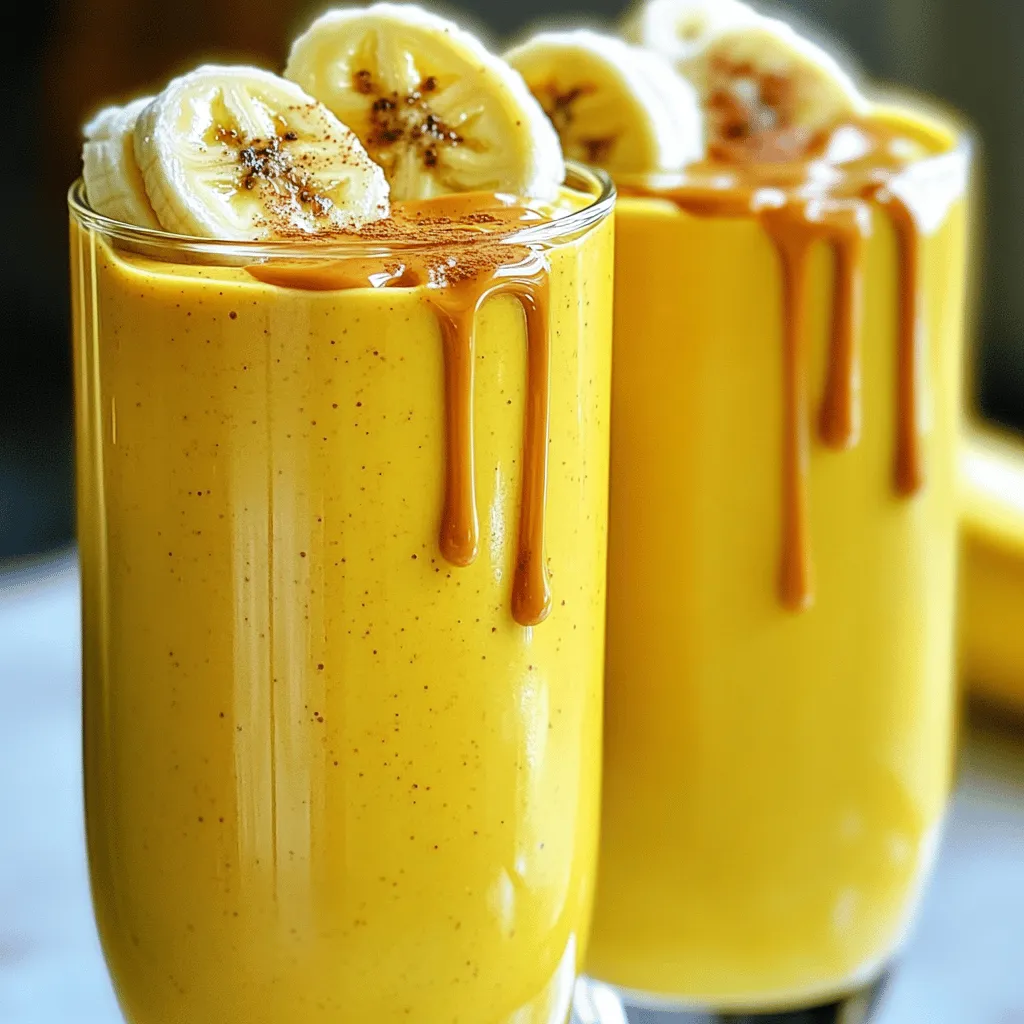
Looking for a quick, tasty treat? This Peanut Butter Banana Smoothie is your answer! With just a few simple ingredients,

- 2 boneless, skinless chicken breasts - 1 tablespoon olive oil - 1 teaspoon chili powder - 1 teaspoon cumin - 1 teaspoon garlic powder - 1 teaspoon onion powder - Salt and pepper to taste The chicken is the star of our salad. The marinade makes it juicy and tasty. Seasoning helps bring out the best flavors. Use enough spices to coat the chicken well. This step is key for a delicious meal. - 4 cups romaine lettuce, chopped - 1 cup cherry tomatoes, halved - 1 cup black beans, rinsed and drained - 1 cup corn (fresh, frozen, or canned) - 1 avocado, diced - ½ cup shredded cheese (cheddar, Monterey Jack, or Mexican blend) - ½ cup salsa - ¼ cup sour cream or Greek yogurt - Fresh cilantro, chopped (for garnish) - Tortilla chips (for crunch) Fresh veggies add texture and color. Romaine lettuce forms the base. Cherry tomatoes give a sweet burst. Black beans and corn add protein and fiber. Avocado brings creaminess. You can top it with cheese and salsa for extra flavor. For more fun, try adding extra toppings like jalapeños, olives, or lime juice. You can also serve this with a side of rice or tortilla chips. These extras can make the meal even more enjoyable. To make the chicken flavorful, start with the marinade. In a bowl, mix together 1 tablespoon of olive oil, 1 teaspoon of chili powder, 1 teaspoon of cumin, 1 teaspoon of garlic powder, 1 teaspoon of onion powder, salt, and pepper. This mix gives the chicken a zesty kick. Coat the chicken breasts well with this mixture. Let them sit for about 15 minutes. This short time allows the flavors to soak in without being too long. You can grill or pan-sear the chicken. If you grill, preheat your grill or grill pan to medium-high heat. Cook the chicken for about 6-7 minutes on each side. You want the internal temperature to reach 165°F (75°C). This ensures the chicken is safe to eat. If you do not have a meat thermometer, slice the chicken open. The meat should be white and no longer pink. After cooking, remove it from heat and let it cool slightly. Dice it into bite-sized pieces for the salad. Now, it’s time to build your salad bowl! Start by layering the chopped romaine lettuce at the bottom. This gives a nice base and adds crunch. Next, add the halved cherry tomatoes, black beans, corn, diced avocado, and the grilled chicken. Layering your salad not only looks great but also mixes flavors well. Fresh ingredients make a big difference in taste. The more colorful your bowl, the better it looks and tastes! Finish with salsa, sour cream or Greek yogurt, cheese, and crushed tortilla chips. Enjoy your tasty Chicken Taco Salad Bowl! For more details, check out the Full Recipe. To boost the taste of your chicken taco salad, adjust the spices. - Add cayenne pepper for heat. - Use smoked paprika for depth. Fresh herbs can also make a big difference. - Cilantro brightens the dish. - Try green onions for a mild bite. Meal prep makes life easier. You can prepare components in advance. - Cook the chicken and store it in the fridge. - Chop veggies and keep them in separate containers. This will help maintain freshness. Make your salad bowl fun and appealing. - Layer ingredients in a clear bowl for a colorful look. - Serve with crispy tortilla chips on the side. For parties, consider a taco salad bar. - Let guests build their own bowls with toppings. This keeps it interactive and fun! For the full recipe, check the link above. {{image_2}} For a tasty vegetarian version, you can swap the chicken for grilled vegetables or beans. Try using: - Grilled zucchini - Bell peppers - Sliced mushrooms - Chickpeas These options add great texture and flavor. Use spices like cumin and chili powder to keep the taste bold. You can also add roasted corn for a sweet touch. Fresh herbs like cilantro or parsley brighten up the dish. If you're looking for low-carb options, use lettuce wraps instead of tortilla chips. For gluten-free, check your salsa and toppings. Make sure they are certified gluten-free. For dairy-free variations, replace cheese with avocado or use nutritional yeast for a cheesy flavor. You can also skip sour cream and use a dairy-free yogurt or guacamole instead. To mix things up, try adding different cuisines to your salad. You could: - Incorporate Mediterranean flavors with feta cheese and olives. - Use Asian-inspired ingredients like sesame dressing and edamame. - Add Mexican flair with jalapeños and pico de gallo. Unique ingredients can take your salad to new heights. Try adding roasted nuts or seeds for crunch. You can also mix in fruits like mango or pineapple for a sweet twist. For the full recipe, check out the Zesty Chicken Taco Salad Bowls. To keep your Chicken Taco Salad Bowls fresh, use airtight containers. Store any leftovers in the fridge. The salad will stay good for up to three days. Keep the dressing separate to avoid soggy greens. This way, your salad stays crisp and tasty. If you have leftover chicken, reheat it gently. Use a microwave or stovetop. Heat the chicken just until warm. This keeps the meat tender and juicy. Avoid overheating to prevent dryness. Always store your dressing separately. This keeps your salad fresh longer. You can freeze some salad components. Chicken and black beans freeze well. Store them in freezer-safe bags. Remove as much air as possible for longer shelf life. Avoid freezing lettuce and tomatoes; they don't thaw well. Prepare your salad fresh for the best flavor and texture. To make Chicken Taco Salad Bowls, follow these key steps: 1. Marinate the chicken with olive oil, chili powder, cumin, garlic and onion powders, plus salt and pepper. 2. Grill or pan-cook the chicken until it reaches 165°F (75°C). 3. Chop romaine lettuce and place it at the bottom of your bowl. 4. Add toppings like tomatoes, black beans, corn, avocado, and the cooked chicken. 5. Drizzle salsa and add sour cream or Greek yogurt on top. 6. Finish with shredded cheese and crushed tortilla chips. This [Full Recipe] makes a colorful, tasty meal. Yes, you can use leftover chicken. Just ensure it is stored properly. Here are some best practices: - Shred or chop the chicken into small pieces. - Reheat it gently to avoid drying it out. - Mix it with a little salsa or dressing for added moisture. Using leftover chicken saves time and still brings great flavor. You can add many toppings to boost the flavor of your salad. Here are some popular choices: - Sliced jalapeños for heat - Chopped green onions for freshness - Black olives for a briny taste - Diced bell peppers for crunch - Fresh cilantro for a burst of flavor These toppings add nutrition, too. For example, jalapeños contain vitamin C, while black beans provide fiber. To give your salad a spicy kick, try these tips: - Add sliced jalapeños or diced serrano peppers. - Use spicy salsa or hot sauce as a dressing. - Mix in some crushed red pepper flakes. These spicy ingredients can elevate the taste and add excitement to your meal. This blog post showed you how to make a tasty chicken salad bowl. We covered ingredients like chicken, fresh veggies, and fun toppings. You learned step-by-step marinating and cooking tips to ensure flavor. I shared ways to customize your meal for different diets and cuisines. Now, you can enjoy a fresh salad that's easy to make and mix! Try the tips for meal prep and storage to keep your meals great all week. Your salad bowl creation can wow family and friends. Enjoy your cooking journey!

Chicken Taco Salad Bowls Flavorful and Healthy Meal

Craving a meal that’s both tasty and healthy? Chicken taco salad bowls are your perfect answer! Packed with fresh veggies,

The Avocado BLT Salad bursts with color and flavor. To make this salad, gather these simple ingredients: - 4 cups mixed salad greens (e.g., arugula, spinach, romaine) - 1 ripe avocado, diced - 6 slices of cooked turkey bacon, chopped - 1 cup cherry tomatoes, halved - ½ cup cucumber, diced - ¼ cup red onion, thinly sliced - 3 tablespoons olive oil - 2 tablespoons apple cider vinegar - 1 teaspoon Dijon mustard - Salt and pepper to taste - Fresh chives or parsley for garnish This mix creates a delightful, crunchy texture and a burst of flavors. The creamy avocado pairs well with the crispy turkey bacon. Each bite offers a sweet note from the cherry tomatoes and a refreshing crunch from the cucumber. The red onion adds a sharp kick, making it even tastier. When you gather these ingredients, look for ripe avocados. They should yield slightly when you squeeze them gently. Fresh greens are key, too. Choose vibrant, crisp leaves for the best taste. You can find the full recipe online to guide you through the cooking process, making it easy to whip up this fresh salad. Enjoy the mix of flavors and textures that this Avocado BLT Salad offers! Start by washing and drying the mixed salad greens. Use your favorite greens, like arugula, spinach, or romaine. Next, take one ripe avocado and cut it into small cubes. This adds creaminess to the salad. Then, chop six slices of cooked turkey bacon into bite-sized pieces. This gives a nice, smoky flavor. Halve one cup of cherry tomatoes for a burst of sweetness. Dice half a cup of cucumber for crunch. Finally, thinly slice a quarter cup of red onion to add a sharp taste. In a small bowl, combine three tablespoons of olive oil. Add two tablespoons of apple cider vinegar for tang. Mix in one teaspoon of Dijon mustard to enhance flavor. Season with salt and pepper to taste. Whisk these ingredients together until smooth. This dressing will bring all the salad components together. In a large bowl, combine the prepared salad ingredients. Pour the dressing over the top. Gently toss everything until it’s well coated. Taste the salad and add more salt or pepper if needed. Let it sit for five minutes. This helps the flavors blend. Before serving, sprinkle fresh chives or parsley on top for a pop of color. You can find the full recipe for this delicious salad [Full Recipe]. Enjoy your fresh and flavor-packed Avocado BLT Salad! When selecting an avocado, look for one that feels slightly soft. You want a ripe avocado, but not too mushy. The skin should be dark green to black, depending on the type. Gently press the avocado; it should yield to light pressure. If it's too firm, it needs more time to ripen. You can speed this up by placing it in a paper bag. For the bacon in your Avocado BLT Salad, I recommend using turkey bacon. It has less fat than pork bacon but still packs a savory punch. Cook it until crisp for the best texture. You can also try plant-based bacon if you want a vegetarian option. It gives a unique flavor while keeping the dish light. Adding fresh herbs can really boost your salad's taste. Chives and parsley are great choices. They add brightness and freshness. Just chop them finely and sprinkle them on top before serving. You can also try adding basil or cilantro for a twist. Experiment with flavors to find your favorite mix. For the full recipe, check out the provided link. {{image_2}} You can add proteins to the Avocado BLT Salad for extra flavor. Grilled chicken works well. Just slice it up and mix it in. Cooked shrimp is another tasty choice. It adds a nice touch. You can also use tofu for a meat-free option. Protein boosts keep you full longer. If you want a vegan salad, swap turkey bacon for crispy chickpeas. They add crunch and protein. Replace the dressing with a vegan option made from tahini and lemon juice. This keeps the salad fresh and tasty. For a vegetarian twist, try using regular bacon or tempeh bacon. Both add great flavor and texture. You can easily swap ingredients to fit your diet. For gluten-free needs, ensure your dressing is gluten-free. You can use quinoa or lentils instead of bacon. They add protein and fiber. If you're low on carbs, skip the bacon altogether. Use more veggies or some nuts. Almonds or walnuts add a nice crunch without carbs. For the full recipe, check the [Full Recipe]. If you have leftover salad, store it in an airtight container. Keep it in the fridge for up to two days. The longer it sits, the soggier it gets. So, try to eat it soon for the best taste. To keep your salad fresh, store the dressing separately. When ready to eat, pour it on the salad. This helps keep the greens crisp. You can also wrap the avocado with lemon juice. This slows down browning. If you want warm turkey bacon, reheat it in the microwave. Use a plate and cover it with a paper towel. Heat for 20 to 30 seconds. You can also re-crisp it in a skillet for extra crunch. Enjoy your salad while everything is fresh! For the full recipe, check out the details above. Yes, you can make the Avocado BLT Salad in advance. However, I suggest you keep the avocado and dressing separate. This keeps everything fresh. You can mix the salad just before serving. It will taste better this way. You can use regular bacon if you prefer. Another option is plant-based bacon for a vegan spin. Crispy pancetta also works well. Each option gives a different taste, so choose what you like best. To keep avocado from browning, use lemon juice or lime juice. Just squeeze a little over the diced avocado. This helps slow down the browning process. You can also mix the avocado in right before serving. That way, it stays fresh and green. This blog post showed you how to make a tasty Avocado BLT Salad. We covered the needed ingredients, step-by-step instructions, and tips for the best flavors. You learned how to customize the recipe for your diet and store any leftovers. Cooking can be fun and easy. With this salad, you have a fresh meal packed with good stuff. Enjoy making it your own!

Avocado BLT Salad Fresh and Flavorful Delight

Are you ready to experience a fresh and flavorful delight? My Avocado BLT Salad combines crisp greens, creamy avocado, and

- Orzo pasta: This small pasta looks like rice. It cooks fast and absorbs flavors well. - Vegetables and herbs: Use fresh cherry tomatoes, crisp cucumbers, and red onions. Add a touch of parsley for a fresh taste. - Dressings and seasonings: A mix of olive oil, lemon juice, and oregano gives this salad a sunny flavor. Salt and pepper bring everything together. - Protein options: You can add grilled chicken, shrimp, or chickpeas for extra protein. - Nuts and seeds: Toss in some toasted pine nuts or sunflower seeds for a nice crunch. - Additional cheeses: Try using goat cheese or grated Parmesan for a different flavor. For the full recipe, check out the Mediterranean Orzo Delight. To start, bring two cups of vegetable broth to boil in a medium pot. This adds great flavor to the orzo. Once boiling, add one cup of orzo pasta. Cook it for about eight to ten minutes. You want it to be al dente, which means it should be firm but cooked through. Tips for achieving the perfect al dente texture: - Stir the orzo occasionally to avoid sticking. - Taste it a minute or two before the time is up. This helps you catch the perfect texture. - Once cooked, drain the orzo in a colander. Rinse it under cold water. This stops the cooking and cools it down quickly. Now, let’s make the salad. In a large mixing bowl, combine the cooled orzo, one cup of halved cherry tomatoes, one diced cucumber, half a finely chopped red onion, and one cup of halved Kalamata olives. Next, add one cup of crumbled feta cheese and a quarter cup of chopped fresh parsley. These ingredients create a colorful and tasty mix. For the dressing, take a small bowl. Whisk together a quarter cup of olive oil, two tablespoons of lemon juice, one teaspoon of dried oregano, and a pinch of salt and pepper. Pour the dressing over your salad mix. Gently toss all the ingredients together until well combined. This helps each bite be full of flavor. Taste your salad and adjust the seasoning with extra salt or pepper if needed. Let the salad sit for about 15 minutes at room temperature. This helps all the flavors meld together beautifully. For the full recipe, check out the Mediterranean Orzo Delight. Enjoy making your Greek Orzo Salad! One common mistake is overcooking the orzo. You want it al dente, which means firm. Follow the package instructions closely. Once cooked, drain it right away and rinse it under cold water. This stops the cooking process and keeps it from getting mushy. Another mistake is forgetting to let the flavors meld. After tossing your salad, let it sit for about 15 minutes. This time allows the dressing and ingredients to blend. You’ll be surprised how much better it tastes! To enhance flavor, adjust the seasoning to your liking. Start with the salt and pepper. Taste your salad after mixing. If it’s too bland, add a pinch more salt or pepper. Fresh herbs can make a big difference too. I love using parsley, basil, or mint. They add a burst of freshness. Try mixing in a bit of each for a unique twist! Presentation matters. Serve the salad in a large, colorful bowl. This makes it more inviting. For garnishing, add extra parsley or whole olives on top. It not only looks pretty but also adds flavor. Choosing the right serving dish can elevate your salad. A shallow bowl or platter works best. This way, everyone can see the beautiful colors and textures. Enjoy your meal! {{image_2}} To make your Greek Orzo Salad unique, try adding Mediterranean ingredients. You can toss in roasted red peppers or artichoke hearts. They add great texture and flavor. Fresh herbs like dill or mint can brighten the dish, too. Seasonal vegetable swaps also work well. In summer, add ripe zucchini or bell peppers. In fall, think about using roasted butternut squash. These swaps keep the salad fresh and exciting all year. If you need gluten-free options, use rice or quinoa instead of orzo. Both grains bring a great taste and varied texture. You can find gluten-free orzo in some stores as well. For vegan adaptations, skip the feta and use avocado or a nut-based cheese. You can also add chickpeas for protein. They taste amazing and add extra nutrition. To make a full meal, pair your salad with grilled chicken or fish. These proteins complement the fresh flavors well. You could also serve it alongside pita bread or hummus for a fun twist. For a light lunch, enjoy the Greek Orzo Salad with a cup of soup. A lemony lentil soup goes perfectly with it. For the full recipe of Mediterranean Orzo Delight, be sure to check out the complete instructions. It will guide you to create this flavorful dish with ease. After enjoying your Greek Orzo Salad, store any leftovers right away. Use an airtight container to keep it fresh. This will help lock in the flavors and moisture. Place the salad in the fridge within two hours of serving. The cool air will slow down spoilage. To keep the salad fresh, avoid adding the dressing until you're ready to eat. The dressing can make the orzo soggy. Store it separately in a small container. When you're ready to enjoy it again, simply mix in the dressing. If you have more salad than you can eat, you can freeze it. However, freezing can change the texture of some ingredients. It’s best to freeze only the orzo and vegetables. Avoid freezing feta cheese and olives, as they do not thaw well. To freeze, place the salad in a freezer-safe container. Leave some space at the top for expansion. To thaw, take it out of the freezer and move it to the fridge overnight. Once thawed, give it a good stir. You can add fresh dressing before serving. In the fridge, your Greek Orzo Salad will last for about 3 to 5 days. Keep an eye on the smell and look for any signs of spoilage. If it smells off or looks slimy, it’s best to toss it out. If you freeze the salad, it can last for 2 to 3 months. After this time, it may lose flavor and quality. Always check for signs of spoilage before eating. If it looks or smells bad, do not eat it. Orzo is a type of pasta shaped like rice. It is typically made from semolina flour or whole wheat. One serving of orzo gives you about 200 calories, 7 grams of protein, and 42 grams of carbs. It also has some fiber and iron. This makes orzo a filling and tasty base for salads. Yes, you can make Greek Orzo Salad ahead of time. To prep, cook the orzo and cool it down. Chop your veggies and store them in the fridge. Mix the dressing in a separate container. Combine everything for the best taste just before serving. This keeps the salad fresh and crunchy. If you need a feta cheese substitute, try using goat cheese or ricotta. For a dairy-free option, use tofu or a nut-based cheese. These options still give a nice creaminess to your salad while meeting different dietary needs. For the full recipe, check out Mediterranean Orzo Delight. Greek Orzo Salad is a simple dish that packs flavor. We covered the main ingredients like orzo, fresh veggies, and dressings. You learned how to cook orzo perfectly and mix the salad. Avoid common mistakes and try my tips to enhance the taste. Explore variations to make it your own, and don’t forget to store your leftovers properly. This salad is not just tasty; it fits many diets. Enjoy making this dish again and again!

Greek Orzo Salad Flavorful and Fresh Mealtime Dish

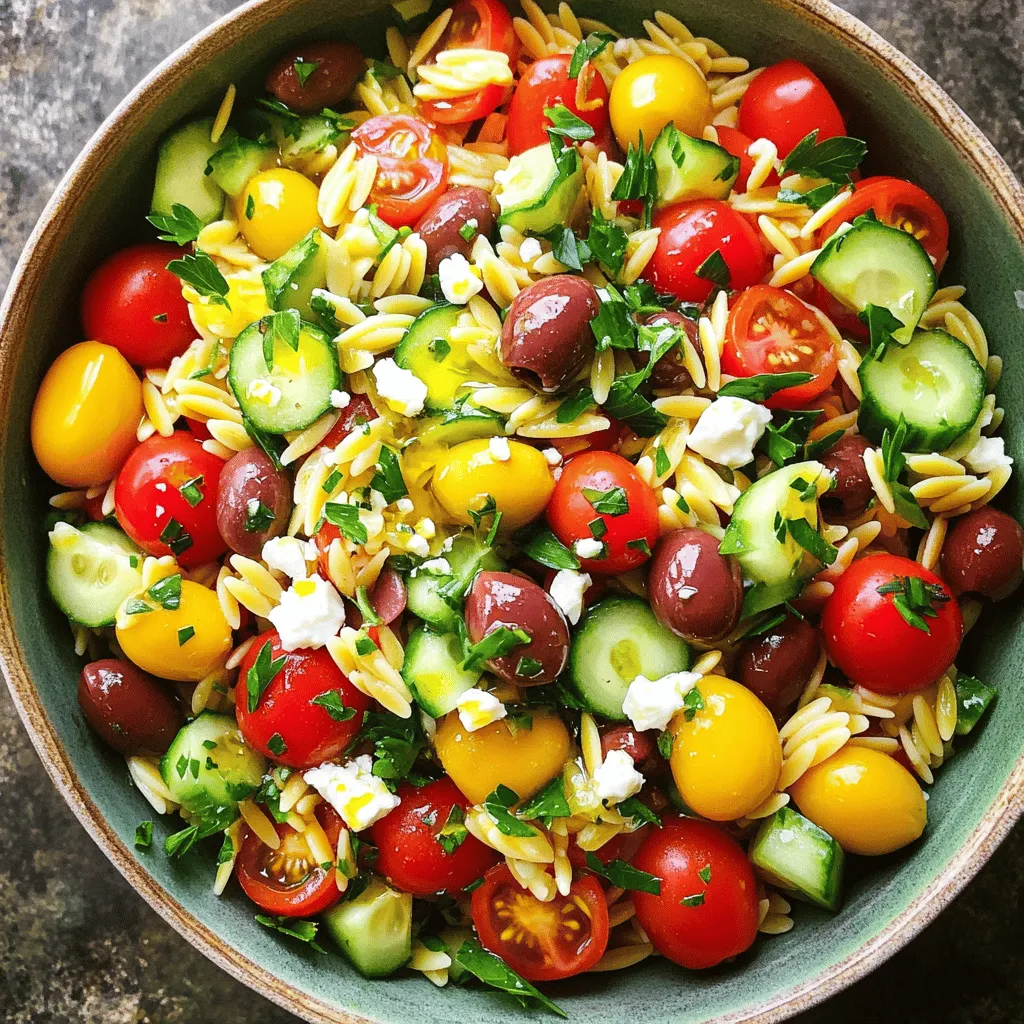
Are you craving a fresh and vibrant dish that bursts with flavor? Look no further than Greek Orzo Salad! This

To make delicious zucchini corn fritters, you need fresh and simple ingredients. Here’s the list: - Grated zucchinis - Corn kernels - All-purpose flour - Cornmeal - Baking powder - Garlic powder - Onion powder - Smoked paprika - Salt and black pepper - Eggs - Fresh cilantro (optional) - Olive oil These ingredients come together to create a tasty treat. I love using fresh zucchinis and corn because they add great flavor and texture. The herbs and spices enhance the taste, making the fritters special. You can find the full recipe if you want to dive deeper into making these fritters. Remember, the key is to squeeze out excess moisture from the zucchinis. This step keeps the fritters crispy. Enjoy cooking! First, grab a large mixing bowl. In this bowl, combine the grated zucchinis and corn kernels. Make sure the zucchinis are dry. Excess moisture can make the fritters soggy. Next, add the dry ingredients: all-purpose flour, cornmeal, baking powder, garlic powder, onion powder, smoked paprika, salt, and black pepper. Stir them together until they mix well. Now, it’s time to incorporate the eggs and chopped cilantro. Fold them in gently until the mixture feels cohesive. If it seems too wet, add a bit more flour. Heat a non-stick skillet over medium heat. Add a thin layer of olive oil to coat the bottom. Once the oil is hot, drop spoonfuls of the fritter mixture into the skillet. Flatten them slightly with the back of your spoon. Cook each fritter for about 3-4 minutes on each side. Look for a golden brown color and a crispy texture. When done, remove the fritters from the skillet. Place them on a paper towel-lined plate to soak up any extra oil. Repeat this frying step with the remaining batter. Add more oil as needed to keep the skillet well-coated. You can find the full recipe above to help you follow along! Enjoy the process of making these tasty zucchini corn fritters! To make great zucchini corn fritters, start by avoiding sogginess. Squeeze out as much water from the grated zucchini as you can. This step is key. If your mixture is too wet, your fritters will be soft and mushy. You can also add a bit more flour to help absorb moisture. Next, think about flavor enhancements. Try mixing in fresh herbs like parsley or dill. You can also add some spicy pepper flakes for a kick. Different spices can elevate your fritters. Experiment with different flavors that you enjoy. When serving your fritters, think about accompaniments. A dollop of sour cream or yogurt works well. You can also serve them with fresh salsa for added zest. Both options add a nice touch and contrast to the fritters. For presentation tips, stack the fritters on a nice plate. Drizzle with some yogurt or sour cream. Sprinkle with fresh cilantro for a pop of color. This not only looks great but makes your dish more appetizing. Serve warm for the best taste experience. {{image_2}} You can easily adapt this recipe to fit your needs. Here are some options: - Gluten-free options: Substitute the all-purpose flour with gluten-free flour. This works well and keeps the fritters light. - Dairy-free versions: Instead of eggs, use flaxseed meal mixed with water. This will help bind the mixture without dairy. Adding unique flavors can make your fritters stand out. Try these ideas: - Spicy twists: Add chopped jalapeños or a pinch of cayenne pepper to the batter for a kick. - Herb combinations: Mix in fresh herbs like dill, basil, or parsley. These add freshness and depth to the taste. Explore these variations to make the dish your own. For a complete guide, check out the Full Recipe. To store leftover zucchini corn fritters, first let them cool. Place them in an airtight container. Make sure they are not stacked too high to avoid sogginess. They will stay fresh in the fridge for up to three days. When you want to reheat them, use a skillet over medium heat. This method keeps the fritters crispy. Heat them for about 2-3 minutes on each side until they are warm. If you want to freeze the fritters, it's best to freeze them before frying. Place the uncooked fritter mixture on a baking sheet. Form them into patties and freeze for about 2 hours. After they are firm, transfer them to a freezer bag. They can last up to three months in the freezer. When you’re ready to cook, thaw them in the fridge overnight. Reheat them in a skillet over medium heat for about 4-5 minutes on each side. This way, they will taste just as fresh as the day you made them. Don't forget to check the [Full Recipe] for the right cooking steps! Zucchini corn fritters are tasty bites made from fresh zucchini and corn. They are mixed with flour, spices, and eggs. Then, they are fried until golden brown. These fritters are crispy on the outside and soft on the inside. They make a great snack or side dish. To make your fritters crispy, follow these tips: - Squeeze out excess moisture from the grated zucchini. - Use a hot skillet with enough olive oil. - Don't overcrowd the pan; fry in small batches. - Cook until golden brown on each side. These steps help keep your fritters light and crisp. Yes, you can use frozen corn. Just thaw it and drain any excess water. Frozen corn works well in the recipe. It saves time and still gives a nice flavor. Many dips go well with zucchini corn fritters. Here are some great options: - Sour cream - Greek yogurt - Avocado sauce - Spicy salsa These dips add extra flavor and make your fritters even more enjoyable. To make vegan zucchini corn fritters, replace the eggs with flax eggs. Mix one tablespoon of ground flaxseed with three tablespoons of water for each egg. Let it sit until it thickens. You can also use a dairy-free milk substitute for extra moisture if needed. You’ve learned how to make tasty zucchini corn fritters step by step. From the right ingredients to cooking tips, you now have the tools for success. Remember to experiment with flavors and variations. Adjust the recipe based on your diet or preferences. Store leftovers properly for future snacks. Overall, these fritters are versatile and fun. Enjoy creating them for friends and family! Your kitchen is ready for delicious moments.

Zucchini Corn Fritters Tasty and Easy to Make

Are you ready to treat your taste buds? These Zucchini Corn Fritters are both tasty and easy to make! You’ll

- 2 pounds ripe tomatoes - 1 medium onion - 4 cloves garlic - 2 tablespoons olive oil The stars of this soup are ripe tomatoes, onion, and garlic. I love using juicy, red tomatoes. They give the soup a rich flavor. The onion adds sweetness, while the garlic gives depth. Olive oil helps to roast the veggies to perfection. - 1 teaspoon dried basil - 1 teaspoon dried oregano - Salt and pepper to taste Herbs bring the soup to life. Dried basil and oregano give it a classic taste. Salt and pepper are key for balance. You can adjust these to fit your own taste. - 2 cups vegetable broth - 1 tablespoon balsamic vinegar - Fresh basil leaves for garnish - Optional toppings like crème fraîche or yogurt Vegetable broth adds body and richness to the soup. Balsamic vinegar gives a hint of sweetness. For serving, fresh basil leaves add a pop of color and flavor. Crème fraîche or yogurt can make it creamy, but they are optional. You can find the Full Recipe in the article for more details. First, preheat your oven to 400°F (200°C). This step is key for roasting. While the oven heats up, prepare your tomatoes, onion, and garlic. You will need 2 pounds of ripe tomatoes, cut in half. Use 1 medium onion, quartered. Don’t forget 4 cloves of peeled garlic. This mix gives the soup great flavor. Next, arrange the halved tomatoes, quartered onion, and garlic on a baking sheet. Drizzle them with 2 tablespoons of olive oil. Sprinkle 1 teaspoon of dried basil, 1 teaspoon of dried oregano, and add salt and pepper to taste. Mix it all up a bit. Roast the vegetables for 30 to 35 minutes. Look for a nice caramelization on the tomatoes. They should be slightly charred. This adds depth to your soup. After roasting, take the baking sheet out of the oven. Let the veggies cool for a few minutes. Transfer them to a large pot. Pour in 2 cups of vegetable broth and add 1 tablespoon of balsamic vinegar. Now, blend the mixture until it’s smooth. You can use an immersion blender for this. If you don’t have one, blend in batches using a countertop blender. Heat the blended soup over medium heat for about 5 to 10 minutes. This time allows the flavors to mix well. Taste and adjust the seasoning if needed. Serve hot, and enjoy the rich flavors of your easy roasted tomato soup! For the full recipe, check the earlier section. Using fresh herbs can add a bright taste. They bring life to your soup. However, dried herbs work well too. They are easy to keep on hand. If you use fresh herbs, add them at the end. This keeps their flavor strong. Dried herbs should go in with the tomatoes. They need time to release their taste. Adjusting the seasoning is key. Taste your soup before serving. If it feels bland, add salt. A touch of acid can brighten the soup. You can use lemon juice or balsamic vinegar. Both will lift the flavors. To caramelize tomatoes, cut them in half. This allows the heat to reach the inside. Spread them evenly on the baking sheet. Give them space so they roast well. Overcrowding can lead to steaming instead. The key is to let them brown without burning. For the right texture, aim for a little char. You want the edges to crisp up. This adds depth to the soup. Keep an eye on the oven. Roasting for 30-35 minutes is usually perfect. Presentation matters. Serve the soup in rustic bowls to add charm. A drizzle of olive oil on top looks great. You can also add croutons for crunch. They make the soup more fun to eat. Pair your soup with fresh bread. A crusty loaf is perfect for dipping. You can also add a side salad for a nice balance. Fresh basil leaves on top add a pop of color too. {{image_2}} You can change the flavor and texture of your soup by swapping ingredients. - Using different types of tomatoes: Try using cherry or heirloom tomatoes. Each variety brings its own taste. Cherry tomatoes are sweet, while heirloom tomatoes have a rich flavor. - Adding vegetables like bell peppers or carrots: Chopped bell peppers add sweetness. Carrots bring a nice earthiness to the dish. Roast them with the tomatoes for a deeper flavor. If you want a dairy-free or vegan soup, there are easy swaps to make. - Suggested substitutes for crème fraîche: Instead of crème fraîche, use cashew cream or coconut yogurt. Both options add creaminess without dairy. - Ensuring the recipe remains plant-based: Use vegetable broth and skip any animal products. This keeps your soup tasty and plant-based. Enhance your soup with some extra flavor. - Adding spices like cumin or smoked paprika: A pinch of cumin adds warmth. Smoked paprika gives a lovely, smoky depth. - Infusing the soup with a hint of heat: If you like spice, add a dash of red pepper flakes. This will give your soup a nice kick without overpowering the flavors. Explore these variations to make your Easy Roasted Tomato Soup even more exciting. For the full recipe, check out the details above! To keep your soup fresh, store it in an airtight container. Before putting it in the fridge, let the soup cool down. This way, it stays tasty. Your roasted tomato soup will last about 3 to 5 days in the fridge. If you notice any change in color or smell, throw it away. Freezing is a great option if you want to save some soup for later. Pour the cooled soup into freezer-safe containers. Leave some space at the top for the soup to expand. You can freeze it for up to 3 months. When you are ready to eat, take the soup out and place it in the fridge overnight to thaw. When reheating, do it slowly to keep the flavors. You can use a stove or microwave. If using the stove, heat it on low, stirring often. This helps avoid separation. If you use a microwave, heat in short bursts, stirring in between. This keeps the texture nice and smooth. If the soup seems too thick, add a splash of broth or water to adjust it. Yes, you can use canned tomatoes. Choose whole or diced tomatoes in juice. Drain excess liquid to avoid a watery soup. Canned tomatoes are a great option when fresh ones aren’t available. They still give a nice flavor, but the soup may lack the roasted taste. To enhance flavor, add a bit of smoked paprika or additional herbs. Look for a few key signs. The tomatoes should be soft and slightly charred on the edges. You want them to look caramelized. This browning brings out their sweetness. The onions should also be tender and browned. If they are still firm, give them more time in the oven. Pair your soup with crusty bread or grilled cheese. Both add a nice crunch and texture. You can also serve it with a side salad for freshness. For a fancy touch, add croutons on top. They give a delightful crunch. For more ideas, check the Full Recipe for tips on great pairings! This blog post covered how to make easy roasted tomato soup. We looked at the main ingredients, like ripe tomatoes and garlic. I shared step-by-step instructions for prepping, roasting, and blending. You learned tips to enhance flavor and texture. We also explored variations for different tastes and storage methods to keep leftovers fresh. In conclusion, this soup is tasty and simple. Give it a try, and enjoy each bowl!

Easy Roasted Tomato Soup Flavorful Comfort Bowl

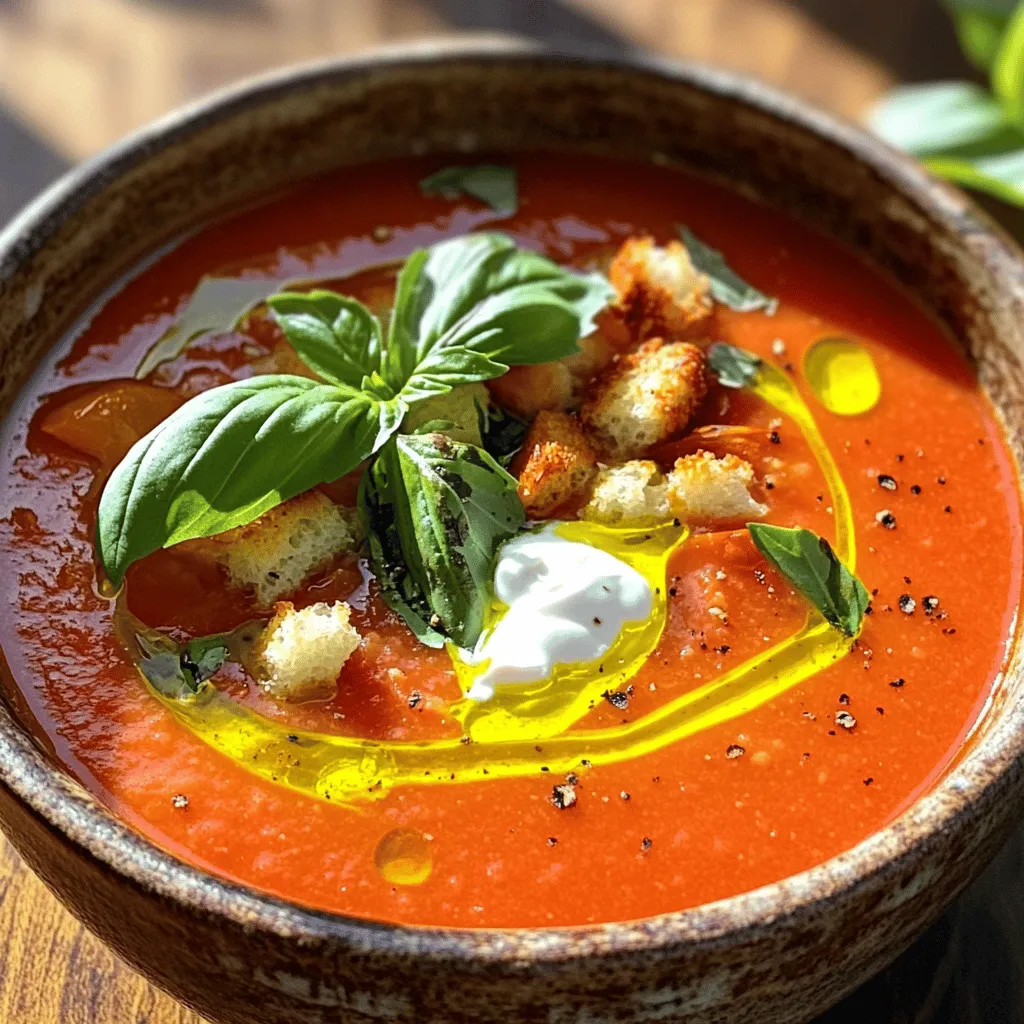
Craving a bowl of warm comfort? This easy roasted tomato soup recipe will hit the spot! With just a few

- Chicken and Vegetables - 1 pound boneless, skinless chicken breast, cut into 1-inch cubes - 1 cup pineapple chunks (fresh or canned) - 1 red bell pepper, cut into 1-inch pieces - 1 yellow bell pepper, cut into 1-inch pieces - 1 medium red onion, cut into wedges - Marinade Components - 1/3 cup BBQ sauce (your favorite brand) - 2 tablespoons soy sauce - 1 tablespoon honey - 1 teaspoon garlic powder - 1 teaspoon smoked paprika - 1/2 teaspoon black pepper - Skewer Options - Wooden or metal skewers For the best flavor, use fresh ingredients. The chicken shines with the sweet and smoky notes from the marinade. Pineapple adds a lovely contrast. The bell peppers and onion bring color and crunch. I prefer wooden skewers for their rustic look, but metal skewers are easy to reuse. If you use wooden skewers, soak them in water first. This step helps prevent burning. You can find the Full Recipe for more detailed steps and tips. Combining Ingredients To start, gather your marinade ingredients. You need BBQ sauce, soy sauce, honey, garlic powder, smoked paprika, and black pepper. In a bowl, mix these well. This creates a tasty blend that adds flavor to the chicken. Marinating the Chicken Next, add the cubed chicken to the marinade. Make sure every piece gets covered. Cover the bowl with plastic wrap and place it in the fridge. Let it sit for at least 30 minutes, or up to 2 hours. This soaking time makes the chicken juicy and flavorful. Soaking Wooden Skewers If you use wooden skewers, soak them in water for about 30 minutes. This step stops them from burning on the grill. If you use metal skewers, you can skip this step. Threading Chicken and Vegetables Once the chicken is marinated, it’s time to thread the skewers. Take a skewer and add chicken, pineapple chunks, and pieces of red and yellow bell pepper. You can also add red onion wedges. Alternate the ingredients for a colorful and tasty skewer. Preheating the Grill Before grilling, preheat your grill to medium-high heat. This step is key for getting nice grill marks and cooking the chicken evenly. Cooking Time and Techniques Place the skewers on the grill. Cook for about 10 to 15 minutes. Turn them often to cook all sides evenly. The chicken should reach an internal temperature of 165°F. This step ensures it’s safe to eat. Applying Additional Sauce During the last few minutes, brush more BBQ sauce on the skewers. This adds extra flavor and makes them shine. Enjoy these delicious grilled BBQ chicken skewers, perfect for summer nights! For the full recipe, check out the details above. To get juicy chicken, check the internal temperature. The chicken should reach 165°F. Use a meat thermometer for best results. Always remove the skewers from the grill once they hit this temperature. This ensures safe eating and great taste. Next, avoid overcrowding on the skewers. Leave some space between pieces. This helps the heat circulate. It also allows for even cooking. If the skewers are too packed, the chicken may steam instead of grill. For great flavor, use just a few pieces of chicken and mix in veggies. Using different BBQ sauces can change the flavor of your skewers. Try a spicy sauce for a kick or a sweet sauce for a treat. You can mix sauces too. This gives you even more flavor options. Adding spices can make a big difference. Use garlic powder, smoked paprika, or even a pinch of cayenne pepper. These spices add depth and warmth to the dish. Experiment with your favorites to create your perfect skewers. For serving, choose a nice platter. Lay the skewers out neatly. Add a side of fresh cilantro or parsley for color. This adds a pop of green and looks great. For garnishing, consider a drizzle of extra BBQ sauce over the skewers. A small bowl of sauce for dipping is a fun touch. It invites everyone to dig in. You can also add lemon wedges for a fresh burst of flavor. For the full recipe, check out the Tropical Grilled BBQ Chicken Skewers. {{image_2}} You can easily swap out chicken for other proteins. Shrimp is a great choice. It cooks fast and takes on flavors well. Just marinate it like the chicken. Beef is another option. Choose tender cuts like sirloin or flank steak. Cut it into cubes and marinate. Both proteins add a nice twist to your barbecue. For vegetarian options, consider tofu or tempeh. They soak up flavors beautifully. Cut them into cubes, just like the chicken. You can also use mushrooms or zucchini. These veggies grill well and taste great. Mixing up the marinade keeps things fun. For an Asian-inspired twist, use soy sauce, ginger, and sesame oil. This gives a rich flavor. You can add honey for sweetness and garlic for depth. If you want a Mexican flair, try lime juice, cumin, and chili powder. This adds a zesty kick. You can even throw in some chipotle for heat. Each marinade brings a unique taste to your skewers. Don’t forget about fresh vegetables! Use what’s in season for the best flavors. Bell peppers, zucchini, and cherry tomatoes are great choices. These veggies add color and crunch. You can also adapt to what you find at the market. Try asparagus or corn in summer. In spring, snap peas and radishes shine. Using seasonal produce makes your dish fresh and vibrant. It also helps you support local farmers. To keep your grilled BBQ chicken skewers fresh, store them properly. First, let the skewers cool down. Place them in an airtight container. Make sure to use them within three to four days. Store the skewers in the fridge. They should stay good for up to four days. Make sure the temperature is below 40°F (4°C). To prevent drying, cover them tightly. If you want to save them longer, freezing is a great choice. Wrap each skewer in plastic wrap. Then, place them in a freezer bag. They can last for up to three months in the freezer. Reheating skewers can be tricky, but it’s easy. You want to keep them juicy and flavorful. The best way to reheat skewers is in the oven. Preheat your oven to 350°F (175°C). Place the skewers on a baking sheet. Heat them for about 10-15 minutes. You can also use a grill to reheat. Just warm them over medium heat, turning often. To keep the chicken juicy, add a splash of BBQ sauce before reheating. This will help to lock in moisture. You can also cover the skewers with foil while reheating. This traps steam and keeps them tender. Now you’re ready to enjoy those delicious grilled BBQ chicken skewers again! For the full recipe, check out the Tropical Grilled BBQ Chicken Skewers section. You should marinate the chicken for at least 30 minutes. For best results, aim for 2 hours. This time allows the chicken to absorb all the tasty flavors from the marinade. If you have time, longer marination will give your chicken an even richer taste. Yes, you can use either wooden or metal skewers. If you choose wooden skewers, soak them in water for 30 minutes before grilling. This step helps prevent burning. Metal skewers do not need soaking and can go straight on the grill. Both options work well for holding your delicious ingredients. BBQ chicken skewers go well with many sides. Consider serving them with: - Fresh coleslaw - Grilled corn on the cob - Potato salad - Rice or quinoa - A light salad with vinaigrette These choices balance the flavors and complete your meal nicely. To check if chicken is done, use a meat thermometer. The internal temperature should reach 165°F. You can also cut into a piece of chicken. If the juices run clear and the meat is no longer pink, it is fully cooked. This ensures your chicken is safe to eat. Yes, you can prepare the skewers ahead of time. Assemble them and store them in the fridge. Try to grill them within 24 hours for the best taste. This method saves you time and allows you to enjoy your summer nights with friends and family. For the full recipe, check [Full Recipe]. To sum it up, this guide helps you make tasty chicken skewers. You learned about the best ingredients, marinade, and preparation steps. I shared tricks for cooking perfectly and gave ideas for serving. You also discovered fun variations and how to store leftovers. Enjoy grilling delicious skewers with your favorite flavors. Happy cooking!

Grilled BBQ Chicken Skewers Perfect for Summer Nights

Summer nights call for delicious grilled BBQ chicken skewers! These tasty treats are easy to make and perfect for gatherings.

To make Veggie Quesadilla Stacks, you need fresh and tasty ingredients. Here's what you'll need: - 4 large whole wheat tortillas - 1 cup shredded cheese (cheddar or Mexican blend) - 1 small zucchini, diced - 1 bell pepper (any color), diced - 1 small red onion, thinly sliced - 1 cup corn kernels (fresh or frozen) - 1 cup black beans, rinsed and drained - 1 teaspoon chili powder - 1 teaspoon cumin - Salt and pepper to taste - 2 tablespoons olive oil - Fresh cilantro, chopped (for garnish) - Sour cream or Greek yogurt (for serving) These ingredients blend well to create a rich flavor. The tortillas hold everything together and give a nice crunch. The cheese melts beautifully, making each bite creamy. Zucchini and bell pepper add a fresh taste and a pop of color. Corn and black beans bring in some sweetness and protein. Spices like chili powder and cumin enhance the taste, while salt and pepper balance it. Olive oil helps cook the veggies just right. Finally, cilantro adds a fresh touch, and sour cream or yogurt gives a creamy finish. For the full recipe, check out the detailed instructions. Start by heating the olive oil in a large skillet over medium heat. Once the oil is warm, add the diced zucchini, bell pepper, and red onion. Sauté these vegetables for 5 to 7 minutes. You want them to become tender but not mushy. Next, stir in the corn and black beans. Add the chili powder, cumin, salt, and pepper. Cook everything together for another 3 to 4 minutes. This step brings all the flavors together. Remove the skillet from heat. Now it's time to build your quesadilla stacks. On a clean surface, lay one tortilla flat. Spread a generous portion of the vegetable mixture on top. Sprinkle some shredded cheese over the veggies. Place another tortilla on top and press down gently. Repeat this process for the remaining tortillas and filling. You should have a nice stack of tortillas filled with flavorful veggies and cheese. Wipe the skillet clean and return it to medium heat. Carefully transfer your stacked quesadillas to the skillet. Cook them for about 3 to 4 minutes on each side. You want the tortillas to turn golden brown and crispy. Make sure the cheese melts inside. If your stack is too tall, slice it in half to fit better in the skillet. Once they are cooked, remove the quesadilla stacks from the skillet. Let them cool slightly, then cut them into wedges. Serve hot, garnished with fresh cilantro and a dollop of sour cream or Greek yogurt. For the full recipe, check out the details above. Enjoy this tasty and simple meal! Choosing the right tortilla matters. I recommend using whole wheat tortillas. They add a nice nutty flavor. You can also try corn tortillas for a gluten-free option. Make sure they are large enough to hold the filling. Thin tortillas work best for crispiness. If you're feeling adventurous, you can find flavored tortillas, like spinach or tomato. For the best melt, use shredded cheese. Shredded cheese mixes better than blocks. Cheddar and Mexican blends are my favorites. Make sure your pan is hot enough. This helps the cheese melt evenly. If the cheese is not melting, cover the quesadilla briefly. This traps heat and helps it melt faster. Sautéing vegetables is key to great flavor. Heat olive oil in the pan first. Add vegetables like zucchini, bell pepper, and onion. Cook them until they are soft but not mushy. This takes about 5-7 minutes. Stir them often to avoid burning. Season with salt and pepper for extra taste. Remember, the goal is to keep their colors vibrant and flavors fresh. {{image_2}} You can easily make this dish vegan. Use a plant-based cheese instead of dairy cheese. There are many tasty options available. You can also swap sour cream for a dairy-free yogurt. This keeps the dish creamy and flavorful. Want to mix it up? You can add more veggies! Try using spinach, mushrooms, or diced tomatoes. Broccoli or kale can also work well. Just chop them into small pieces to fit in the stacks. The more colors, the more fun your quesadilla stacks will be! If you enjoy heat, add some spice! You can mix in jalapeños or a dash of hot sauce. For a milder taste, reduce the chili powder. Each person can adjust it to their liking. Cooking should be about your taste! After enjoying your Veggie Quesadilla Stacks, you may want to save some for later. Allow the stacks to cool completely before storing. Place them in an airtight container. They can stay fresh in the fridge for up to three days. If you have extra filling, store it separately. This keeps everything fresh and tasty. When you're ready to enjoy your leftovers, you can reheat them easily. The best way is to use a skillet. Heat the skillet over medium heat. Cook the quesadilla stacks for about 3-4 minutes on each side. This makes them crispy again. You can also use a microwave, but it may make them a bit soggy. If you use the microwave, heat them in short bursts of 30 seconds. If you want to store them for a longer time, freezing is a great option. Wrap each quesadilla stack tightly in plastic wrap. Then, place them in a freezer bag. Make sure to remove as much air as possible. You can freeze them for up to two months. When ready to eat, thaw them in the fridge overnight. Then, reheat as described above. Enjoy a quick meal any time! You can serve veggie quesadilla stacks with many tasty sides. A simple green salad pairs well. You might also enjoy a side of guacamole or fresh salsa. If you love dips, try serving sour cream or Greek yogurt on the side. These add creaminess and flavor. You can also serve it with rice or quinoa for a fuller meal. Yes, you can use different beans in your quesadilla stacks. Pinto beans, kidney beans, or even chickpeas work well. Just make sure to rinse and drain them before adding. Each type of bean gives a unique flavor and texture. Feel free to experiment with what you have on hand. This makes your meal even more fun and personalized. To make veggie quesadilla stacks gluten-free, simply swap the whole wheat tortillas for gluten-free ones. Many brands offer tasty options made from corn or brown rice. Always check labels to ensure they are certified gluten-free. These small changes keep your meal safe and delicious. Enjoy gourmet flavors without worry. For the full recipe, check back to the main section. This blog post shared a great recipe for veggie quesadilla stacks. We covered tasty ingredients like whole wheat tortillas, veggies, and spices. You learned step-by-step instructions on preparing, layering, and cooking the stacks. We also shared tips on the best tortillas and cheese melting. For variations, you can explore vegan options and spice adjustments. We discussed how to store leftovers and answered common questions. These stacks are a fun and healthy meal for all. Enjoy creating your own version!

Veggie Quesadilla Stacks Flavorful and Simple Meal

If you’re looking for a quick and tasty meal, veggie quesadilla stacks are perfect! With fresh veggies and melted cheese,

Older posts
Newer posts
← Previous Page1 … Page9 Page10 Page11 … Page66 Next →

dsad

© 2025 Cooking Wells • Built with GeneratePress

Our Policies

  • Copyright Policy
  • Cookie Policy
  • GDPR Policy
  • Privacy Policy
  • Disclaimer
  • Terms Of Use

More Information

  • Home
  • About
  • Contact
  • Appetizers
  • Dessert
  • Dinner
  • Drinks
©2025, Cooking Wells About Back To Top